

Page 1
KTC12
KTC96
English 3
Simplified Chinese
8
TRADESMAN SERIES
®
Page 2
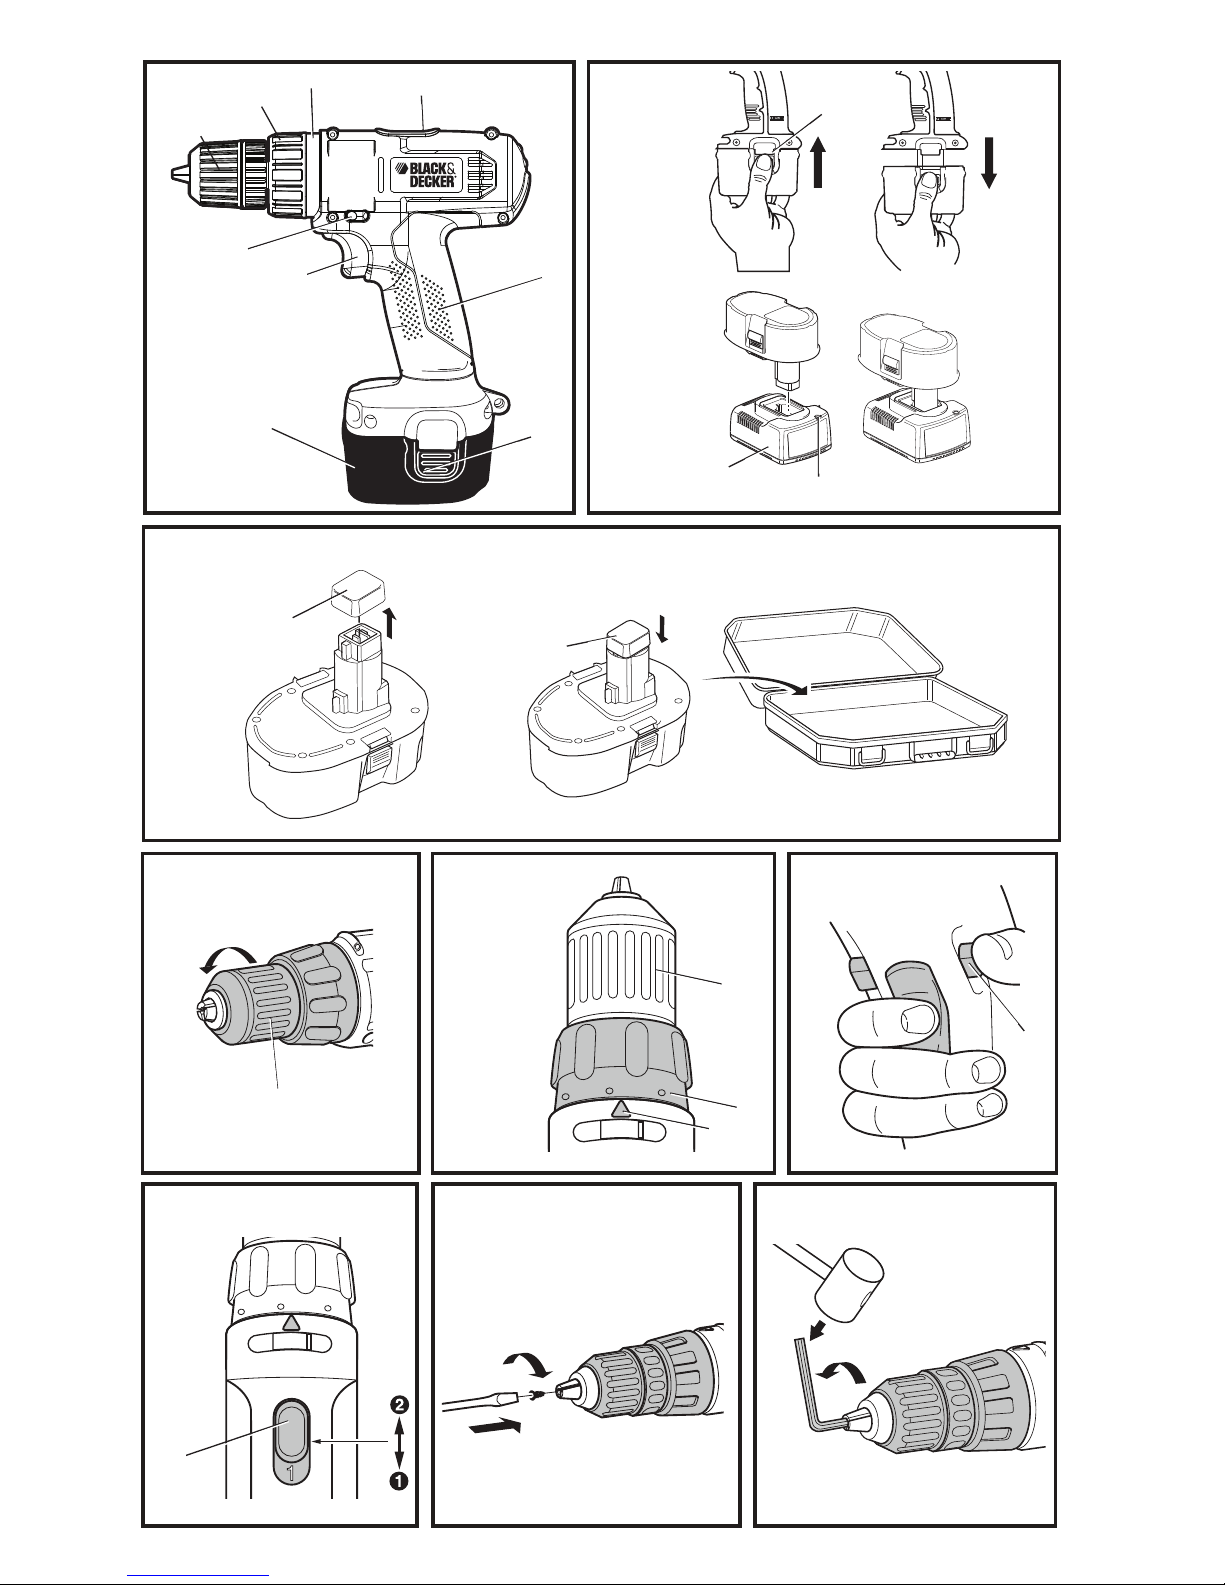
Figure 1
Figure 5Figure 4
p
Figure 2
Figure 3
k
l
A
o
B
o
e
q
p
b
f
Figure 8 Figure 9Figure 7
j
h
j
i
a
b
c
d
e
f
Figure 6
Page 3

3
ENGLISH
––––––––––––––––––––––––––––––––––––––––––––––––––––––
––––––––––––––––––––––––––––––––––––––––––––––––––––––
KTC12/KTC96
10MM CORDLESS DRILL/ DRIVER
INTENDED USE
Your Black & Decker cordless drill/driver has been
designed for all drlling & screw driving applications.
GENERAL SAFETY RULES
Warning! Read all instructions. Failure to follow all
instructions listed below may result in electric shock, fire
and/or serious injury. The term “power tool” in all of the
warnings listed below refers to your mains operated
(corded) power tool or battery operated (cordless) power
tool.
SAVE THESE INSTRUCTIONS.
1. Work area safety
a. Keep work area clean and well lit. Cluttered or
dark areas invite accidents.
b. Do not operate power tools in explosive
atmospheres, such as in the presence of
flammable liquids, gases or dust. Power tools
create sparks which may ignite the dust or fumes.
c. Keep children and bystanders away while
operating a power tool. Distractions cancause you
to lose control.
2. Electrical safety
a. Power tool plugs must match the outlet. Never
modify the plug in any way. Do not use any
adapter plugs with earthed (grounded) power tools.
Unmodified plugs and matching outlets will reduce
risk of electric shock.
b. Avoid body contact with earthed or grounded
surfaces, such as pipes, radiators, ranges and
refrigerators. There is an increased risk of electric
shock if your body is earthed or grounded.
c. Do not expose power tools to rain or wet
conditions. Water entering a power tool will
increase the risk of electric shock.
d. Do not abuse the cord. Never use the cord for
carrying, pulling or unplugging the power tool.
Keep cord away from heat, oil, sharp edges or
moving parts. Damaged or entangled cords
increase the risk of electric shock.
e. When operating a power tool outdoors, use an
extension cord suitable for outdoor use. Use of
a cord suitable for outdoor use reduces the risk of
electric shock.
f. If operating a power tool in a damp location is
unavoidable, use a residual current device
(RCD) protected supply. Use of an RCD reduces
the risk of electric shock.
3 Personal safety
a. Stay alert, watch what you are doing and use
common sense when operating a power tool.
Do not use a power tool while you are tired or
under the influence of drugs, alcohol or
medication. A moment of inattention while
operating power tools may result in serious personal
injury.
b. Use personal protective equipment. Always
wear eye protection. Protective equipment such
as dust mask, non-skid safety shoes, hard hat, or
hearing protection used for appropriate conditions
will reduce personal injuries.
c. Prevent unintentional starting. Ensure the
switch is in the off-position before connecting
to power source and/or battery pack, picking
up or carrying the tool. Carrying power tools with
your finger on the switch or energising power tools
that have the switch on invites accidents.
d. Remove any adjusting key or wrench before
turning the power tool on. A wrench or a key left
attached to a rotating part of the power tool may
result in personal injury.
e. Do not overreach. Keep proper footing and
balance at all times. This enables better control of
the power tool in unexpected situations.
f. Dress properly. Do not wear loose clothing or
jewellery. Keep your hair, clothing and gloves
away from moving parts. Loose clothes, jewellery
or long hair can be caught in moving parts.
g. If devices are provided for the connection of
dust extraction and collection facilities, ensure
these are connected and properly used. Use of
dust collection can reduce dust-related hazards.
4. Power tool use and care
a. Do not force the power tool. Use the correct-
power tool for your application. The correct
power tool will do the job better and safer at the rate
for which it was designed.
TECHNICAL DATA
Cordless Drill/ Driver
Voltage
No Load Speed
Max. Torque
Drilling Capacity
– Wood/Steel
– Chunck Capacity
Weight
Battery
Voltage
Capacity
Weight
Charger
Approx. Charging Time
Weight
KTC12
12
0-350/ 0-1,200
21
25/10
1.0-10
1.1
12
1.2
0.5
1
1.1
KTC96
9.6
0-300/ 0-1,000
20
22/10
1.0-10
1.1
9.6
1.2
0.46
1
1.1
V
rpm
Nm
mm
mm
kg
V
Ah
g
Hour
kg
Page 4

4
ENGLISH
b. Do not use the power tool if the switch does
not turn it on and off. Any power tool that cannot
be controlled with the switch is dangerous and must
be repaired.
c. Disconnect the plug from the power source
and/or the battery pack from the power tool
before making any adjustments, changing
accessories, or storing power tools. Such
preventive safety measures reduce the risk of
starting the power tool accidentally.
d. Store idle power tools out of the reach of
children and do not allow persons unfamiliar
with the power tool or these instructions to
operate the power tool. Power tools are
dangerous in the hands of untrained users.
e. Maintain power tools. Check for misalignment
or binding of moving parts, breakage of parts
and any other condition that may affect the
power tool’s operation. If damaged, have the
power tool repaired before use. Many accidents
are caused by poorly maintained power tools.
f. Keep cutting tools sharp and clean. Properly
maintained cutting tools with sharp cutting edges are
less likely to bind and are easier to control.
g. Use the power tool, accessories and tool bits
etc. in accordance with these instructions,
taking into account the working conditions
and the work to be performed. Use of the power
tool for operations different from those intended
could result in a hazardous situation.
5. Battery tool use and care
a. Ensure the switch is in the off position before
inserting battery pack. Inserting the battery pack
into power tools that have the switch on invites
accidents.
b. Recharge only with the charger specified by
the manufacturer. A charger that is suitable for
one type of battery pack may create a risk of fire
when used with another battery pack.
c. Use power tools only with specifically
designated battery packs. Use of any other
battery packs may create a risk of injury and fire.
d. When battery pack is not in use, keep it away
from other metal objects like paper clips,
coins, keys, nails, screws, or other small
metal objects that can make a connection from
one terminal to another. Shorting the battery
terminals together may cause burns or a fire.
e. Under abusive conditions, liquid may be
ejected from the battery; avoid contact. If
contact accidentally occurs, flush with water.
If liquid contacts eyes, additionally seek
medical help. Liquid ejected from the battery may
cause irritation or burns.
6. Service
a. Have your power tool serviced by a qualified
repair person using only identical replacement
parts. This will ensure that the safety of the power
tool is maintained.
Additional Power Tool Safety
Warnings
Warning! Additional safety warnings for drills and
impact drills
Wear ear protectors with impact drills.
Exposure to noise can cause hearing loss.
Use auxiliary handles supplied with the tool.
Loss of control can cause personal injury.
Hold power tool by insulated gripping surfaces
when performing an operation where the
cutting accessory may contact hidden wiring
or its own cord. Cutting accessory contacting a
"live" wire may make exposed metal parts of the
power tool "live" and shock the operator.
Additional Safety Instructions for
for Batteries and Chargers
Batteries
Never attempt to open for any reason.
Do not expose the battery to water.
We recommend taking battery off the charger when fully
Charged.
Do not store in locations where the temperature may
exceed 40ºC.
Charge only at ambient temperatures between 4ºC and 40ºC.
Charge only using the charger provided with the tool.
When disposing of batteries, follow the instructions
given in the section “Protecting the environment”.
Leaks from battery cells can occur under
extreme conditions. The battery fluid, a 25-30%
solution of potassium hydroxide, can be harmful. In
case of skin contact: (a) wash quickly with soap and
water; or (b) neutralize with a mild acid such as
lemon juice or vinegar. If the liquid gets into the
eyes, flush them immediately with clean water for a
minimum of 10 minutes. Seek medical attention.
Do not incinerate the battery.
Do not charge damaged battery packs.
Fire hazard! Avoid short-circulating the contacts of
a detached battery.
Chargers
Use your Black & Decker charger only to charge the
battery in the tool with which it was supplied. Other
batteries could burst, causing personal injury and
damage.
Charger may need approximately 15 minutes to
re-set after finishing charge to charging the 2nd
battery.
Never attempt to charge non-rechargeable batteries.
Have defective cords replaced immediately.
Do not expose to water.
Do not open the charger.
•
•
•
•
•
•
•
•
•
•
•
•
•
•
•
•
•
Page 5
5
ENGLISH
Do not probe the charger.
Labels on the charger
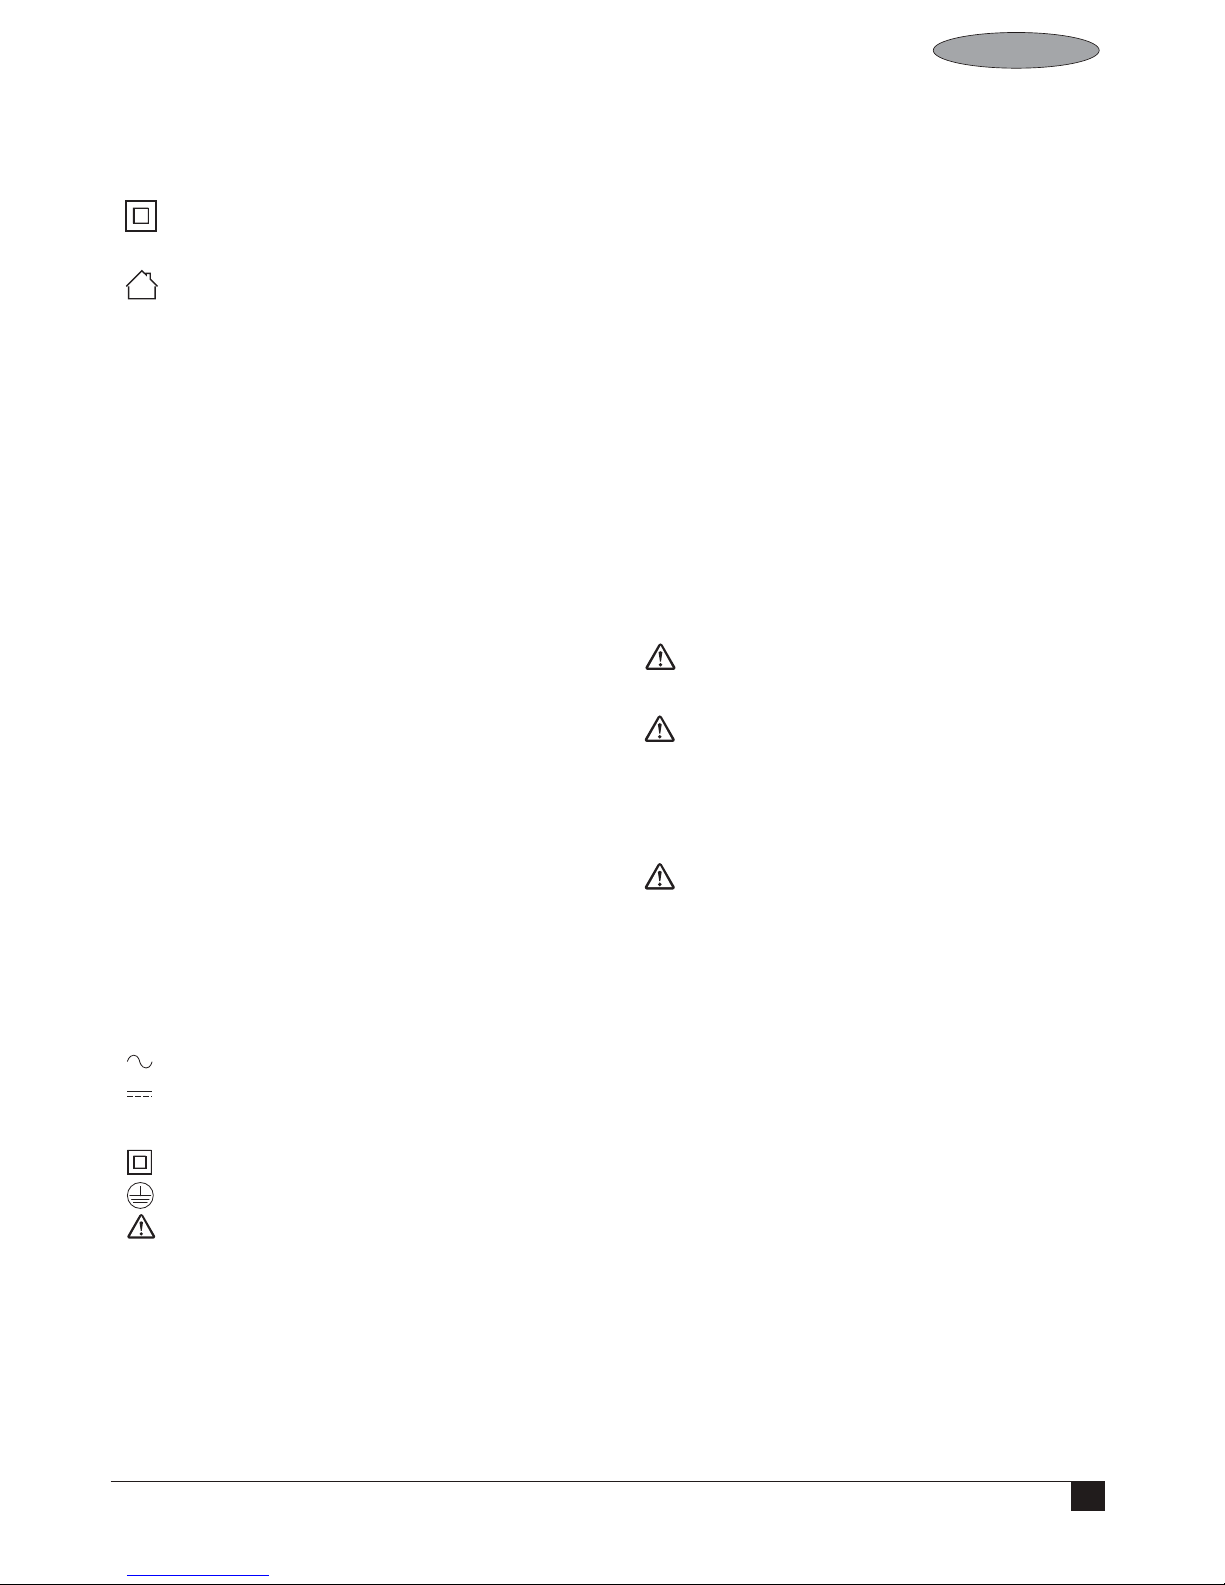
The following symbols are found on your charger:
Your charging base is double insulated; therefore no
earth wire is required. Always check that the power
supply corresponds to the voltage on the rating plate.
The charging base is intended for indoor use only.
Specific Safety Rules
Hold tool by insulated gripping surfaces when
performing an operation where the tool may
contact hidden wiring or its own cord. Contact
with a “live” wire will also make exposed metal parts
of the tool “live” and shock the operator.
When working on a ladder or on scaffolding be
sure to lay the tool down on its side when not in
use. Some tools with large battery packs will stand
upright but may be easily knocked over.
Avoid touching the tip of a drill bit just after drilling,
as it may be hot.
When fitting and changing accessories, always use
the instructions supplied with the accessory.
Should your tool develop a fault, do not try to fix it
yourself, but take it to one of our authorized repair
agents.
Symbols
The label on your tool may include the following symbols:
V volts
A Amperes
Hz Hertz
W Watts
min. Minutes
Alternating current
Direct current
no No load speed
Class II Construction
Earthing terminal
Safety alert symbol
…/min Revolutions or reciprocation per minute
…/bpm Beats per minute
Using an Extension Cable
An extension cable should not be used unless absolutely
necessary. Use of an improper extension cable could
result in a risk of fire and electric shock. If an extension
cable must be used, use only those that are approved by
the country's Electrical Authority. Make sure that
extension cord is in good condition before using. Always
use the cord that is suitable for the power input of your
tool (see technical dataon name plate). The minimum
conductor size is 1mm
2
; the maximum length is 30m.
When using a cable reel, always unwind the cable
completely.
Features (Fig. A)
a. Variable speed switch
b. Forward/reverse slider
c. Keyless chuck
d. Mode selector/torque adjustment collar
e. Collar settings
f. Two gear selector
h. Grip
i. Battery pack
j. Release buttons
k. Charger
l. Charging indicator
Assembly and Adjustment
WARNING: Prior to assembly and adjustment,
always remove the battery pack. Always switch off the
tool before inserting or removing the battery pack.
WARNING: Use only Black &Decker battery packs
and chargers.
Inserting and Removing the Battery
Pack from the Tool (fi g. 2)
WARNING: To reduce the risk of serious
personal injury, turn tool off and disconnect
battery pack making any adjustments or
removing/installing attachments or accessories.
An accidental start-up can cause injury.
TO INSTALL THE BATTERY PACK INTO THE TOOL
HANDLE
1. Align the base of the tool with the notch inside the
tool’s handle (fig. 2).
2. Slide the battery pack firmly into the handle until you
hear the lock snap into place.
TO REMOVE THE BATTERY PACK FROM THE TOOL
1. Press the release buttons (j) and firmly pull the battery
pack out of the tool handle.
2. Insert battery pack into the charger as described in the
charger section of this manual.
INSERTING AND REMOVING BITS (FIG. 1, 4)
1. Open the chuck by turning the sleeve (p) counter-
clockwise and insert the bit shank.
2. Place the bit in the chuck as far as it will go and lift
slightly before tightening.
3. Tighten firmly by turning the sleeve clockwise.
•
•
•
•
•
•
Page 6
6
ENGLISH
4. To remove the bit, proceed in reverse order.
SELECTING THE OPERATING MODE OR ADJUSTING
THE TORQUE (FIG. 5)
The collar of this tool has 15 positions for the adjustment of
the torque to suit the size of the screw and the workpiece
material. For torque adjustment, refer to
Screwdriving.Select the drilling mode or torque by aligning
the symbol or number on the collar (e) with the indicator (q)
on the housing.
FORWARD/REVERSE SLIDER (FIG. 6)
To select forward or reverse rotation, use the forward/
reverse slider (b) as shown (see arrows on tool).
WARNING: To reduce the risk of personal injury,
always wait until the motor has come to a complete
standstill before changing the direction of rotation.
WARNING: To reduce the risk of personal injury,
always wait until the motor has come to a complete
standstill before changing the direction of rotation.
TWO-GEAR SELECTOR (FIG. 7)
Your tool is fitted with a two-gear selector (f) to vary the
speed/torque ratio.
1. low speed/high torque (drilling large holes, driving
2. screws) high speed/low torque (drilling smaller holes)
For speed rates, refer to the technical data.
WARNING: To reduce the risk of personal injury:
Always push the two gear selector completely forward
or backward.
Do not change gears at full speed or during use.
Removing and Fitting the Chuck(fi g. 8, 9)
1. Open the chuck jaws as far as possible.
2. Insert a screwdriver into the chuck and remove the
chuck retaining screw by turning clockwise as shown
in figure 8.
3. Tighten an hex key into the chuck and strike it with a
hammer as shown in figure 9. This will loosen the
chuck so that it can be unscrewed by hand.
4. To refit the chuck, proceed in reverse order.
OPERATION
Instructions for Use
WARNING: To reduce the risk of personal injury:
Always observe the safety instructions and applicable
regulations.
Be aware of the location of pipework and wiring.
Apply only a gentle pressure to the tool. Excessive
force does not speed up drilling but decreases tool
To minimize break-through, progressively reduce the
drill point pressure towards the end of the operation.
Keep the motor running when pulling the bit back out
of a drilled hole. This will help prevent jamming.
PRIOR TO OPERATION:
1. Make sure your battery pack is (fully) charged.
2. Insert the appropriate bit.
3. Mark the spot where the hole is to be drilled.
4. Select forward or reverse rotation.
SWITCHING ON AND OFF (FIG. 1, 6)
1. To run the tool, press the variable speed switch (a).
The pressure exerted on the variable speed switch
determines the tool speed.
2. To stop the tool, release the switch.
3. To lock the tool in the off position, move the
forward/reverse slider (b) to the central position.
WARNING: To reduce the risk of personal injury the
drill is equipped with a brake to stop the tool as soon as the
variable speed switch is fully released.
Drill Operation
1. Select the desired speed/torque range using the gear
shifter to match the speed and torque to the planned
operation.
2. For WOOD, use twist bits, spade bits, power auger bits
or hole saws. For METAL, use high-speed steel twist
drill bits or hole saws. Use a cutting lubricant when
drilling metals. The exceptions are cast iron and brass
which should be drilled dry.
3. Always apply pressure in a straight line with the bit. Use
enough pressure to keep the drill bit biting, but do not
push hard enough to stall the motor or deflect the bit.
4. Hold tool firmly with both hands to control the twisting
action of the drill.
5. IF DRILL STALLS, it is usually because it is being
overloaded. RELEASE TRIGGER IMMEDIATELY, remove
drill bit from work, and determine cause of stalling. DO
NOT CLICK TRIGGER OFF AND ON IN AN ATTEMPT TO
START A STALLED DRILL – THIS CAN DAMAGE THE
DRILL.
6. Keep the motor running when pulling the bit back out
of a drilled hole. This will help prevent jamming.
SCREWDRIVING (FIG. 1)
1. Select forward or reverse rotation using the slider (b).
Match the speed and torque to the planned operation.
Insert the desired fastener accessory into the chuck as
you would any drill bit.
2. Set the collar (d) to position 1 and begin screwdriving
(low torque). Make a few practice runs in scrap or
unseen areas to determine the proper position of the
clutch collar.
•
•
•
•
•
•
•
Page 7
7
ENGLISH
3. If the clutch ratchets too soon, adjust the collar to
increase the torque as required.
Maintenance
Your Black & Decker power tool has been designed to
operate over a long period of time with a minimum of
maintenance. Continuous satisfactory operation depends
upon proper tool care and regular cleaning.
Warning! Before performing any maintenance on
the tool, remove the battery from the tool. Unplug the
charger before cleaning it.
Regularly clean the ventilation slots in your tool using
a soft brush or dry cloth.
Regularly clean the motor housing using a damp
cloth. Do not use any abrasive or solvent-based
cleaner.
Regularly open the chuck and tap it to remove any
dust from the interior.
This tool is not user-serviceable. Take it to an authorized
Black & Decker repair agent for service.
Your charger does not require any maintenance apart
from regular cleaning.
Important
To ensure product SAFETY and RELIABILITY, repairs,
maintenance and adjustment (other than those listed in
this manual) should be performed by authorized service
centers or other qualified organizations, always-using
identical replacement parts. Unit contains no user
serviceable parts inside.
Cleaning
WARNING: Blow dirt and dust out of the main
housing with dry air as often as dirt is seen collecting in
and around the air vents. Wear approved eye protection
and approved dust mask when performing this
procedure.
WARNING: Never use solvents or other harsh
chemicals for cleaning the non-metallic parts of the tool.
These chemicals may weaken the materials used in
these parts. Use a cloth dampened only with water and
mild soap. Never let any liquid get inside the tool; never
immerse any part of the tool into a liquid.
CHARGER CLEANING INSTRUCTIONS
WARNING: Shock hazard. Disconnect the charger
from the AC outlet before cleaning. Dirt and grease may
be removed from the exterior of the charger using a cloth
or soft non-metallic brush. Do not use water or any
cleaning solutions.
Accessories
The performance of any power tool is dependent upon
the accessory used. Black & Decker accessories are
engineered to high quality standards and are designed to
enhance the performance of power tool.
Black & Decker offers a large selection of accessories
available at our local dealer or autho-rized service center
at extr a cost.
CAUTION: The use of any other accessory not
recommended for use with this tool could be
hazardous.
Protecting The Environent
Separate collection. This product must not be
disposed of with normal household waste.
Should you find one day that your Black & Decker
product needs replacement, or if it is of no further use to
you, do not dispose of it with household waste. Make this
product available for separate collection.
Separate collection of used products and packaging
allows materials to be recycled and used again.
Re-use of recycled materials helps prevent environmental pollution and reduces the demand for raw materials.
If necessary, contact your local municipality for proper
disposal instructions in your city/town.
Batteries
Black & Decker batteries can be recharged many times.
At the end of their useful life, discard batteries with due
care for our environment:
Run the battery down completely, and then remove it
from the tool.
NiCd and NiMH batteries are recyclable. Take them to a
local recycling station.
Service Information
Black & Decker offers a full network of company-owned
and authorized service locations throughout Asia. All
Black & Decker Service Centers are staffed with trained
personnel to provide customers with efficient and reliable
power tool service.Whether you need technical advice,
repair, or genuine factory replacement parts, contact the
Black & Decker location nearest to you.
Notes
Black & Decker's policy is one of continuous
improvement to our products and, as such, we
reserve the right tochange product specifications
without prior notice.
Standard equipment and accessories may vary by
country.
Product specifications may differ by country.
Complete product range may not be available in all
countries. Contact your local Black & Decker dealers
for range availability.
•
•
•
•
•
•
•
Page 8
Page 9

9
中文
电池及充电器的附加安全守则
电池
• 任何情况下,均不得试图打开电池。
• 不得触水。
• 电池充满电后,建议从充电器上取下。
• 不得存放于温度可能超过40℃的地方。
• 仅在4℃至40℃的室温下充电。
• 仅使用工具的原装充电器充电。
• 弃置电池时,请遵守“保护环境”部分的规定。
• 在极端条件下,电池会发生泄露。电池的电解
液为25~30%的氢氧化钾溶液,可能会造成
伤害。如与之有皮肤接触:(a)请立即用肥
皂和清水冲洗;或(b)用柠檬汁或醋等弱酸
中和。如果不慎进入眼睛,请立即用清水冲洗
至少10分钟,然后就医。切勿焚烧电池。
已损坏的电池不得充电。
火灾危险!请避免电池电极短路。
充电器
• 仅可使用百得充电器给工具的原装电池充电。
其它电池可能爆炸,造成人身伤害或物品损
坏。
• 在充电完成后给第二块电池充电之前,充电器
可能需要大约15分钟复位。
• 切勿试图给非充电电池充电。
• 电线一旦损坏,请立即更换。
• 不得触水。
• 不得打开充电器。
• 不得刺戳充电器。
充电器上的标志
充电器上有如下标志:
本充电座为双重绝缘,因此无须接地线。使用
前,切记检查并确保电源电压与铭牌上的使用
电压相符。
本充电座仅限室内使用。
3. 在进行任何调节、更换附件或贮存电动工具
之前,必须从电源上拔掉插头和/或将电池
盒脱开电源。这种防护性措施将减少电动工
具突然起动的危险。
4. 将闲置电动工具贮存在儿童所及范围之外,
并且不要让不熟悉电动工具或对这些说明不
了解的人操作电动工具。电动工具在未经训
练的用户手中是危险的。
5. 保养电动工具。检查运动部件的安装偏差或
卡住、零件破损情况和影响电动工具运行的
其它条件。如有损坏,电动工具必须在使用
前修理好。许多事故由维护不良的电动工具
引发。
6. 保持切削刀具锋利和清洁。保养良好的有锋
利切削刃的刀具不易卡住而且容易控制。
7. 按照使用说明书以及打算使用的电动工具的
特殊类型要求的方式,考虑作业条件和进行
的作业来使用电动工具、附件和工具的刀头
等。电动工具用作那些与要求不符的操作可
能会导致危险情况。
e)维修
1. 将你的电动工具送交专业维修人员,必须使
用同样的备件进行更换。这样确保所维修的
电动工具的安全性。
电动工具的附加安全守则
注意!请遵守电钻和冲击钻的附加安全
守则
• 使用冲击钻时,请佩戴听力保护器。暴露在
噪音中会损伤听力。
• 请使用随工具提供的辅助手柄。工具失控会
导致人身伤害。
• 请拿著工具的绝缘表面,因机具可能会接触
到隐藏的电源线或自身电线。接触带电的电
线,可使工具的金属露部件也带电,并电击
操作者。
Page 10
10
中文
部件(图A)
a) 变速开关
b) 正转/倒转滑动拨杆
c) 无键夹头
d) 模式开关/扭矩调节环
e) 调节环设定
f) 两档选择开关
h) 把手
i) 电池组
j) 释放按钮
k) 充电器
l) 充电状态指示灯
组装和调整
警告:组装和调整前,请先取下电池组。在
插入或取下电池组之前,切记关闭工具开关。
警告:仅可使用百得电池组和充电器。
电池组安装与拆卸(图2)
警告:为降低严重人身伤害的风险,在进行
任何调整或安装/拆卸附件与配件前,请关闭开关
并取下电池组。工具意外启动会导致人身伤害。
将电池组安装到工具手柄中
1. 把工具底座与工具手柄内的缺口对正(图2)。
2. 把电池组用力滑入手柄,直至听到咬合到位
的声音。
从工具上取下电池组
1. 按下释放按钮(j),把电池组用力从工具手
柄中拉出。
2. 按照本手册充电器部分的说明,将电池组插
入充电器。
钻头安装与拆卸(图1、4)
1. 逆时针旋转轴套(p),打开夹头并插入钻柄。
2. 把钻柄尽可能插入夹头,在紧固前稍微抬起钻头。
特殊安全守则
• 使用电动工具时,应拿著其绝缘表面,因机
具可能会接触到隐藏的电源线或自身电线。
接触带电的电线,可使工具的金属露部件也
带电,并电击操作者。
• 在爬梯或脚手架上工作时,请确保在不用时
侧放工具。一些带大电池的工具可以竖直放
置,但很容易倾倒。
• 刚钻完时,钻头可能很烫,应避免接触。
• 安装或更换配件时,切记遵守配件上的使用
指南。
• 工具故障时,切勿试图自行修理。请把工具
送往我们的授权维修点维修。
标志
工具上的铭牌可能包含以下标志:
......伏特
......安培
......赫兹
......瓦特
......分钟
......交流电
......直流电
......空载速度
......II级 双重绝缘
......接地端子
......安全警示标志
.../min.. 每分钟的旋转或往复次数
.../bpm..每分钟的击打次数
使用延长线
如非必要,请勿使用延长线。使用不正确的延长线
会引致火灾或电击的危险。如果非要使用不可,请
用当地电力机构认可的延长线。使用前先确定延长
线的性能良好,并且符合工具的电源输入(见铭牌
上的技术数据)。延长线的电线导体部分尺寸应不
小于1平方毫米,最大电线长度为30米。使用电缆
卷轴架时,请始终完全松开电缆。
V
A
Hz
W
min
n
0
Page 11
11
中文
警告:为了降低人身伤害的风险:
• 请遵守安全指示及相关条例。
• 清楚管道和电线的位置。
• 对工具轻缓用力。用力过大,钻进速度不增反
降。
• 为尽量避免钻过头,在将近结束时逐步降低钻点
压力。
• 钻孔后抽出钻头时,应保持马达旋转。这有助于
防止卡钻。
操作前:
1. 确保电池组充(满)电。
2. 安装适用的钻头。
3. 标出钻孔的位置。
4. 选择正转或反转。
开关(图1、6)
1. 要启动工具,按压变速开关(a)。工具的转速
取决于按压变速开关的程度。
2. 要止动工具,释放开关。
3. 要把工具锁定到关闭位置,把正转/倒转滑动拨
杆(b)移动到中央位置。
警告:为了降低人身伤害的风险,本工具配
有制动器,一旦变速开关被完全释放,制动器会使
工具停止。
钻孔作业
1. 使用档位选择器,选择所需速度/扭矩范围,与
作业要求相匹配。
2. 钻木材时,应使用麻花钻头、扁钻头、机械螺旋
钻头或孔锯。钻金属时,使用高速钢麻花钻头或
孔锯。钻金属时,使用切削润滑剂;但铸铁和黄
铜出外,必须干钻。
3. 用力方向始终与钻头成一直线。请施加足够大的
压力,保证钻进所需;但不要大到马达失速或钻
头倾斜。
4. 请双手紧握电钻,控制电钻的扭转效应。
5. 如果电钻失速,常常是由于过载。请立即松开触
发开关,从工件上退出钻头,查找失速的原因。
3. 顺时针拧牢轴套。
4. 要拆卸钻头,反向进行上述操作。
选择操作模式或调整扭矩(图5)
本工具的调整环有15个扭矩调整点,以适应不同尺
寸的螺丝和工件材料。扭矩调整方法可参考拧螺丝
部分。要选择钻进模式或扭矩,只需将环(e)上
的符号或数字对准外壳上的指针(q)即可。
正转/倒转滑动拨杆(图6)
要选择正转或倒转,请使用如图所示的正转/倒转
滑动拨杆(b)(见工具上的箭头)。
警告:为了降低人身伤害的风险,请切记等
马达完全停止后,再改变旋转方向。
警告:为了降低人身伤害的风险,请切记等
马达完全停止后,再改变旋转方向。
两档选择开关(图7)
本工具配有两档选择开关(f),用来改变速率/扭
矩比。
1. 低速/高扭矩(钻大孔、拧螺丝时)。
2. 高速/低扭矩(钻较小孔时)。
对于额定速度,可参考技术参数。
警告:为了降低人身伤害的风险:
• 切记将两档选择开关完全向前或向后推到位。
• 不得在全速或使用过程中换档。
夹头的拆卸与安装(图8、9)
1. 将夹头爪尽可能打开。
2. 把一螺丝刀插入夹头并顺时针旋转,取下夹头
固定螺钉,如图8所示。
3. 把内六角扳手紧固到夹头内,并锤击扳手,如
图9所示。这会松开夹头,然后用手旋下夹头。
4. 要安装夹头,反向进行上述操作。
操作
使用指南
Page 12
12
中文
和灰尘。进行这一步骤时,请佩戴经认可的护目装
备和认可的面罩。
警告:切勿使用溶剂或其它刺激性化学品来
清洁工具的非金属部件。这些化学品可能削弱零件
中使用的材料。只能使用抹布蘸中性肥皂水进行清
洁。勿使任何液体进入工具;勿使工具的任何部分
浸入液体中。
充电器清洁说明
警告:触电危险。清洁之前,请把充电器与
交流电插座断开。可使用布或软的非金属刷,清除
充电器内部的粉尘和油脂。不得使用水或任何清洁
溶液。
配件
所有电动工具的性能都是依赖使用得当的配件的,
百得的配件都是经精心设计,并以最佳物料制造、
再经无数次严谨的测试合格才推出市场的;故其质
量一等一,务求与电动工具相辅相成。购买百得配
件会令您的百得电动工具如虎添翼。
百得有一系列的配件,可以在当地的经销商及维修
中心选购。
注意:本电动工具使用任何未经推荐的配
件,均可能导致危险。
保护环境
分类回收。此类产品不得和普通家庭垃圾一
起处理。
如果某一天您的百得产品需要更换或不再使用,请
不要把它和家庭垃圾一起处理。把该产品单独分类
回收。
旧产品和旧包装的分类回收使材料能够得以
再循环和再利用。再循环材料的重新利用有助于防
止环境污染和减少原料需求。
必要时,请与本市/镇市政联系,以咨询相关的处
理信息。
切勿试图通过按下—-松开触发开关来启动失速
的电钻—这会损坏电钻。
6. 从成孔中拉出钻头时,请保持马达运转。这有
助于防止卡死。
拧螺丝(图1)
1. 使用滑动拨杆(b)选择正转或倒转,与与作业
要求的速度和扭矩相匹配。把所需紧固配件插
入夹头,与安装钻头的程序一样。
2. 把调节环(d)设定到位置1,开始拧螺丝(低
扭矩)。在废料或不可见区域尝试几次,确定
离合器环的正确位置。
3. 如果离合器松开太快,调整环的位置,根据需
要增加扭矩。
维护
您的百得电动工具设计精良,可以长期使用,仅需
极少维护。要连续获得令人满意的工作效果,需要
您做合适的保养和定期的清洁。
警告!维护工具前,必须取下电池;清洁充
电器前,请拔下插头。
• 定期使用软刷或干布清洁工具的通风槽。
• 定期使用湿布清洁马达外壳,但不得使用任何
研磨性或溶剂型清洁剂。
• 定期打开并轻拍夹头,清除内部灰尘。
本工具不可由用户进行维修。请将工具交给授权的
百得修理机构。
除了定期清洁外,充电器不须其它维护。
重要说明
为确保产品的安全性和可靠性,应由授权的维修中
心或其它合格组织修理、维护和调整(非本手册所
列项目)机器,并始终使用相同的备件。装置内不
含有用户可维修部件。
清洁
警告:一旦通风口及其周围积聚可见的粉
尘,请即用干燥的压缩空气吹走主机外壳内的粉尘
Page 13

13
中文
电池
百得电池可以多次充电使用。在其使用寿命结束
时,请务必小心处理,以保护环境:
将电完全用尽,从工具上取下电池。
NiCd和NiMH电池是可以回收的。把它们送往本地
的回收站。
维修信息
百得为您提供我们在全亚洲公司所有的和公司授
权的维修点网络。所有的百得维修中心均配备训
练有素的人员,可为客户提供高效可靠的电动工
具维修。无论您需要的是技术建议、修理还是原
厂备件,均可联系最近的百得维修点为您服务。
注意事项
• 百得实行的是对我们的产品持续改进的政策;
因此,我们保留不另行通知即可更改产品规格
的权利。
• 标准装置和配件因国家而异。
• 产品规格会按国家而有所不同。
• 完整的产品系列不一定在所有的国家均可用。
请联系您当地的百得经销商,咨询产品系列的
可用性。
90551457
 Loading...