


TM
6-IN-1 KITCHEN SYSTEM
SISTEMA DE COCINA 6 EN 1
APPAREIL CULINAIRE 6 EN 1
HB5500

2
Should you have any questions or concerns with your new product,
please call our Customer Service Line at 1-800-231-9786 (US and
Canada). Please do not return to the store.
Si usted tiene alguna inquietud o pregunta con su producto, por
favor llame a nuestra línea de servicio al cliente una atención
inmediata 1-800-231-9786 (EE.UU/Canadá) 01-800-714-2503
(México). No devuela a la tienda.
Si vous avez des questions ou des préoccupations à propos de
votre nouveau produit, veuillez communiquer avec notre Service à
la clientèle au 1 800 231-9786 (États-Unis et Canada). Veuillez ne
pas rapporter le produit au magasin.
Thank you for your purchase!
Gracias por su compra!
Merci de votre achat!

3
• Read and save all instructions.
• To protect against risk of electrical shock, do not
immerse base, motor, cord or plug in water or other
liquid. Do not use the appliance in the bathroom,
near water, or outdoors.
• This appliance should not be used by children and
close supervision is necessary when used by or near
children.
• Unplug cord from outlet when not in use, before
putting on or taking off parts, and before cleaning.
• Do not operate any appliance with a damaged
cord or plug or after the appliance malfunctions,
or is dropped or damaged in any manner. Call the
appropriate toll-free number in this manual.
• The use of attachments not recommended or sold
by the appliance manufacturer may cause fire,
electric shock or injury; do not use attachments for
anything other than intended use.
• This appliance is not intended for commercial,
professional or industrial use. It is designed and built
exclusively for household use.
• Do not place on or near a hot gas or electric burner
or in a heated oven.
• Do not let the cord hang over edge of table or
counter, or touch hot surfaces.
• Do not use outdoors.
• Do not use the appliance other than for intended use.
• Do not touch moving parts, disks or blades. The
blades are sharp; handle carefully and store out of
reach of children.
• When mixing liquids, especially hot liquids, use a
tall container or make small quantities at a time to
reduce spillage.
• Keep hands and utensils away from moving blades
or discs while processing food to reduce the risk
of severe injury to persons or damage to the food
processor. A scraper may be used but must be used
only when the food processor is not running.
• Always ensure processing bowl lid is locked into
place before use.
• Do not process hot or boiling liquids in food
processor bowl – allow liquids to cool before placing
into the food processor bowl.
• Do not leave the appliance unattended when in use.
• Do not use the blender with wet hands.
• Do not push food into the feed chute with your fingers
or other utensils. Always use the food pusher provided.
• Always operate motor base with attachment and/or
lid locked securely in place.
• Do not attempt to override the lid interlock
mechanism.
• Never blend hot oil or fat.
• Never add ingredients to the container while the
immersion blender is operating.
• Do not operate the appliance continuously for more
than 2 minutes. Allow the motor to rest for 1 minute
between each use.
• Never mix dry, thick or heavy mixtures for more
than 30 seconds. Stop the operation and stir the
ingredients before continuing. Allow the motor to
rest for 1 minute between each use.
• When using heavy loads, the appliance should not
be operated for more than 15 seconds.
• Do not remove the motor with attachment from
ingredients during operation. Ensure the appliance
is off and has stopped before removing to avoid
contact with moving blades or whisk.
• Keep fingers, hands, knives and other utensils away
from moving blade and disks.
• The maximum rating is based on the Food processor
attachment. The power input of the others
accessories is less than the allowable deviation
• This appliance is not intended for use by persons
(including children) with reduced physical, sensory
or mental capabilities, or lack of experience and
knowledge, unless they have been given supervision
or instruction concerning use of the appliance by a
person responsible for their safety.
• Children should be supervised to ensure that they
do not play with the appliance.
Please Read and Save this Use and Care Book.
IMPORTANT SAFEGUARDS.
When using electrical appliances, basic safety precautions should always be followed to
reduce the risk of fire, electric shock, and/or injury, including the following:
SAVE THESE INSTRUCTIONS.
This product is for household use only.
4
1
3
2
5
6
7
8
9
10 11
14
13
12
18
22
23
24
26
28
25
19
15
21
17
20
POLARIZED PLUG (120V models only)
This appliance has a polarized plug (one
blade is wider than the other). To reduce
the risk of electric shock, this plug is
intended to fit into a polarized outlet only
one way. If the plug does not fit fully into
the outlet, reverse the plug. If it still does
not fit, contact a qualified electrician. Do
not attempt to modify the plug in any way.
TAMPER-RESISTANT SCREW
Warning: This appliance is equipped
with a tamper-resistant screw to prevent
removal of the outer cover. To reduce
the risk of fire or electric shock, do not
attempt to remove the outer cover. There
are no user-serviceable parts inside.
Repair should be done only by authorized
service personnel.
ELECTRICAL CORD
1. A short power-supply cord is provided
to reduce the risk resulting from becoming
entangled in or tripping over a longer cord.
2. Extension cords may be used if care is
exercised in their use.
3. If a long detachable extension cord is used:
a) The marked electrical rating of the
power cord or extension cord should
be at least as great as the electrical
rating of the appliance.
b) If the appliance is of the grounded
type, the extension cord should be a
grounding-type 3-wire cord.
c) The cord should be arranged so that
it will not drape over the countertop
or tabletop where it can be pulled on
by children or tripped over.
Note: If the power cord is damaged,
please contact the warranty department
listed in these instructions.

5
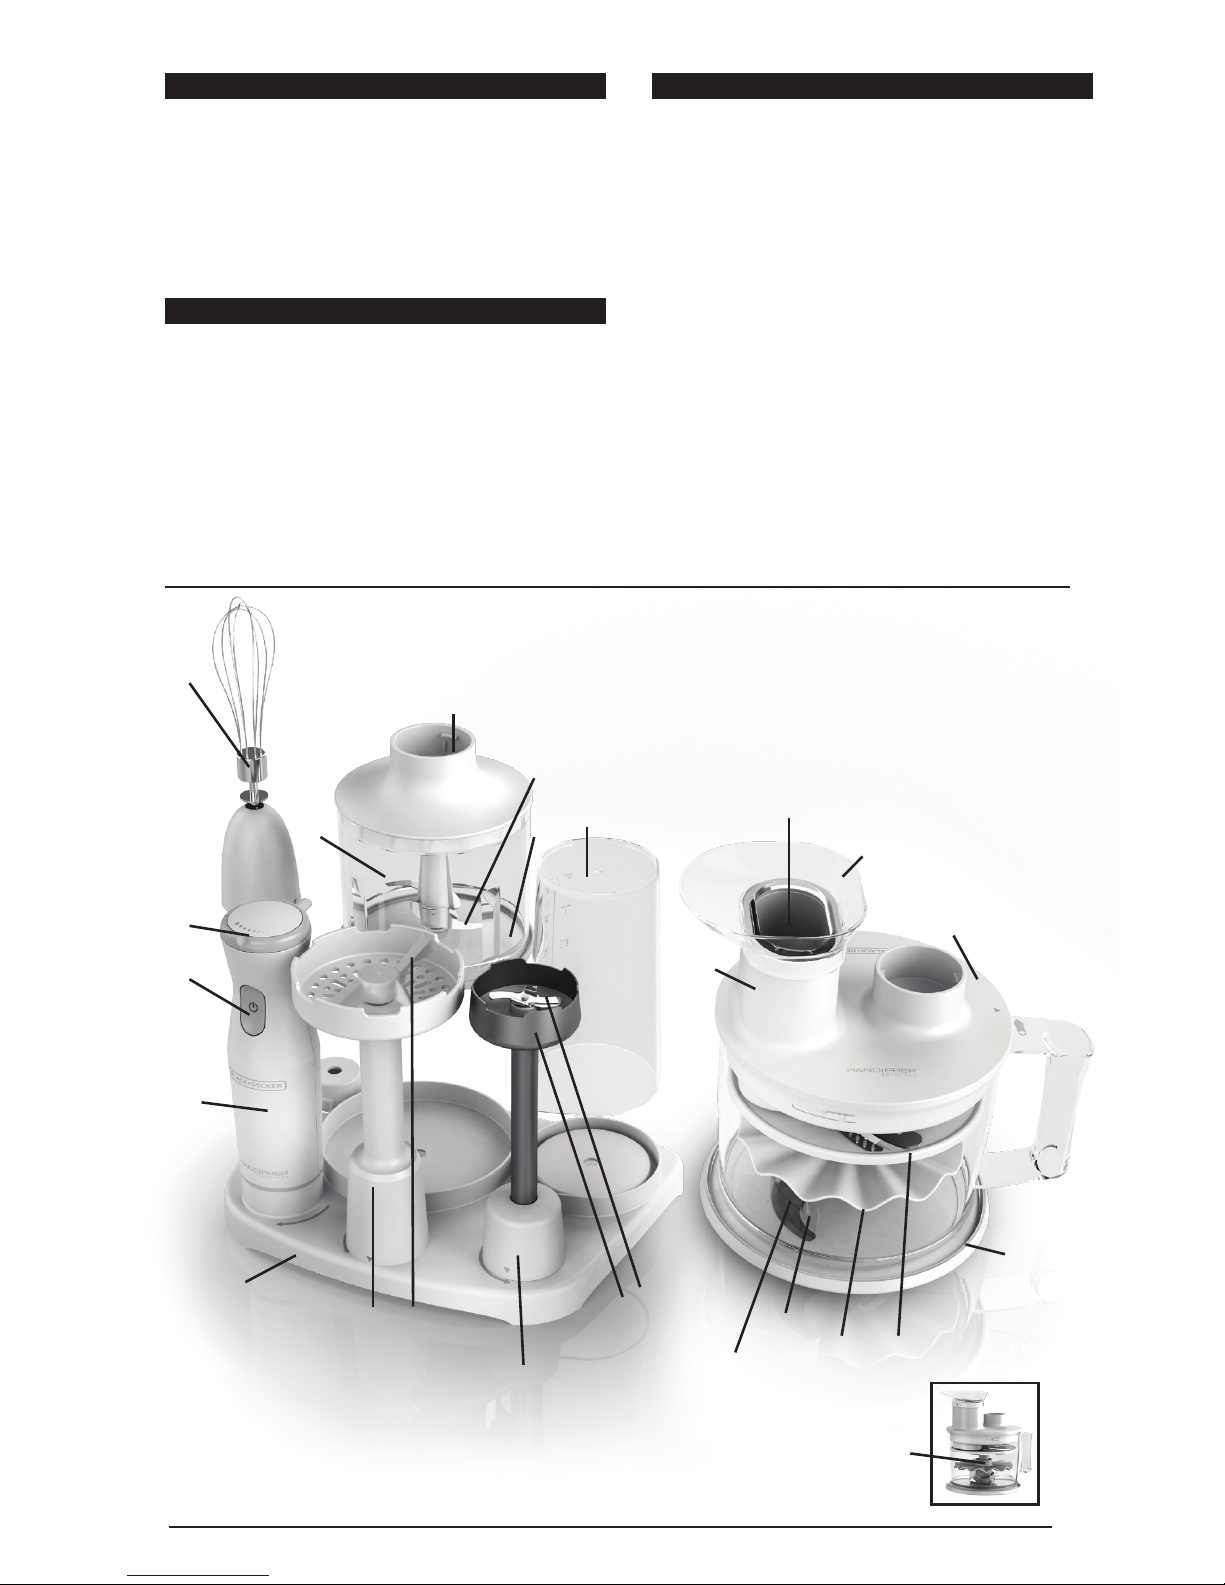
GETTING TO KNOW YOUR
HANDIPREP EXPRESS
MOTOR BASE
1. Speed Control Dial
2. On/Off Button
3. Motor body
4. Power cord (not pictured)
HAND BLENDER
ATTACHMENTS
5. Immersion blender shaft
(Part # HB5500-01)
6. Stainless Steel Blade
7. Protective guard
8. Whisk Attachment
(Part # HB5500-02)
9. Measuring Jar
(Part # HB5500-03)
10. Potato Masher
(Part # HB5500-04)
11. Potato Masher Blade
(Part # HB5500-05)
MINI CHOPPER
12. Plastic storage lid
(Part # HB5500-06)
13. Chopper bowl
(Part # HB5500-07)
14. Chopper Lid
(Part # HB5500-08)
15. Chopper Blade
(Part # HB5500-09)
16. Chopper Blade protective cover
(not pictured) (Part # HB5500-10)
FOOD PROCESSOR
17. Processor Bowl Lid
(Part # HB5500-11)
18. 5 cup processing bowl with non slip base (Part # HB5500-12)
19. Food Pusher
(Part # HB5500-13)
20. Feed Chute
21. Funnel (Part # HB5500-14)
22. S Blade
(Part # HB5500-15)
23. S Blade Cover
24. Emulsifying Disk
(Part # HB5500-16)
25. Shredding and slicing disk
(Part # HB5500-17)
26. Spindle
(Part # HB5500-18)
27. Spindle Base
(Part # HB5500-19)
STORAGE BASE
28. Storage Base
(Part # HB5500-20)
Congratulations on your purchase of the Black + Decker HandiPrep Express! This
ultimate multi-purpose kitchen tool combines six appliances, giving you all the tools
you need to master your kitchen in one compact system.

6
HOW TO USE
The HandiPrep Express is a versatile appliance with many different attachments.
The motor base operates with the following attachments:
OPERATING THE MOTOR BASE
ON|OFF BUTTON
Plug in the motor base and press and hold the ON|OFF button located on the
motor base to start the motor. Release the button to stop the motor. To pulse,
press and release the ON|OFF button continuously.
IMPORTANT: Never turn the motor on unless attachments are securely attached.
INSTALLING THE ATTACHMENTS
1. Make sure the appliance is unplugged before connecting attachments.
2. Hold the attachment firmly in one hand.
3. Align the top of the attachment with the bottom of the motor base. Turn the
attachment counterclockwise to lock it into place.
4. To remove, first unplug the appliance. Holding the motor base in one hand, turn the
attachment clockwise to unlock.
ATTACHMENT USE
Immersion Blender
Blends liquids such as sauce and smoothies
Mixes batters
Purees fruits and vegetables
Potato Masher
Mash cooked vegetables such as potatoes and
cauliflower
Whisk
Beat eggs
Make Meringue
Whip cream
Food Processor
Chop, mix, blend
Shred and slice fruits, vegetables and cheeses
Emulsifying Disk
Emulsify dressings and mayonnaise
Chopper
Chop nuts, vegetables, bread, crackers (small quantities)
GETTING STARTED
This product is for household use only.
• Remove all packing material, any stickers, and the plastic band around the
power plug.
• Remove and save literature.
• Please visit www.prodprotect.com/applica to register your warranty.
• Wash all removable parts as instructed in the CARE AND CLEANING section of
this manual. Handle blades carefully, they are very sharp. Ensure all parts are dried
thoroughly to avoid any water running into the motor body when reattached.

7
ATTACHMENT SPEED
MAX. OPERATING
TIME BEFORE
RESTING
RESTING
TIME
USES
Immersion
blender
Low to
high
30 seconds 10
seconds
Soups
Smoothies
Sauces
Milk shakes
Whisk Start low,
increase
speed as
needed
2 minutes 3 minutes Whipping
cream
Egg whites for
meringues
Gravy
Chopper Low for
coarse
chop,
High for
fine chop
30 seconds 30
seconds
Nuts
Bread crumbs
Vegetables
S Blade High 30 seconds 10
seconds
Mixing and
chopping
vegetables
Nuts
Mix spreads
and dips
Emulsifying
Disk
Low to
medium
90 seconds 90
seconds
Mayonnaise
Salad
dressings
Slicing Disk Low to
medium
15 seconds 15
seconds
Potatoes
Cabbage
Shredding
Disk
Low to
medium
15 seconds 15
seconds
Carrots
Zucchini
Cheese
Potato Masher Low to
medium
60 seconds 60
seconds
Cooked
vegetables
Potatoes
Fruit for jam
NOTE: Always ensure attachment and motor handle are dry before attaching
SPEED CONTROL
The motor base has a variable speed dial. Turn the speed control to the speed
you would like to use.

8
USING THE IMMERSION BLENDER
Ensure the immersion blender shaft is assembled to the motor base as detailed in
the INSTALLING THE ATTACHMENTS section.
1. Place food to be processed in a mixing bowl or the provided measuring jar. The
container should only be ½ full or less when blending liquids or when making a puree
of fruit and/or vegetables to prevent food from overflowing.
Important: Always ensure motor base and immersion blender shaft are properly
assembled and that the power cord is not damaged before use.
2. Plug in and start processing at low speed and increasing to high by turning the
speed control dial at the top of the motor base.
Note: If selecting a higher speed, it is recommended that you start on low speed
and then increase to high speed to avoid splattering and over processing.
3. Immerse the blender as deeply as possible into the jar or bowl and press the ON|OFF
button to turn the immersion blender on.
4. Blend the ingredients by moving the appliance up and down and in a circular motion.
5. After you have completed blending, release the ON|OFF button to stop the motor
and unplug the appliance.
Important: The continuous operating time must be less than 30 seconds. Never
blend hot oil, fat or meat.
6. Ensure the motor has completely stopped before lifting the immersion blender out
of the jar. If the blades get blocked, first stop and unplug before clearing.
7. After processing, unplug and disassemble the immersion blender from the motor
base by turning the motor base counterclockwise and clean the attachment.
TIPS & TRICKS FOR USING THE IMMERSION BLENDER
• The immersion blender blends foods and liquids rapidly, therefore it is easy to
over process. Stop the motor and check food throughout the operation to avoid
over processing.
• When pureeing and blending, cut food into uniform sizes. This will ensure
smooth and consistent results.
• Allow hot food to cool slightly before blending.
• Ensure the body of the appliance and power cord are kept away from any
heat source.

9
USING THE POTATO MASHER
Note: Attach the potato masher to the motor base as detailed in the INSTALLING
THE ATTACHMENTS section above. The masher is properly locked in the motor
base when the markings on the masher and motor base are aligned.
1. Place food to be mashed into a jar or large mixing bowl/container.
Note: Only use masher with well cooked vegetables or fruits.
2. Plug in the appliance and select the desired speed setting using the dial on top of the
motor base.
3. Immerse the masher completely in the ingredients, press and hold the ON|OFF
button and mash by moving it slowly up and down and in circles until desired texture
is achieved, adding liquids gradually if needed.
Tip: Use the masher at low to medium speed in bursts of 1 or 2 seconds at a time
with a break of at least 1 second between bursts and do not run continuously for
more than one minute. Let rest before running again.
4. Turn off the motor by releasing the ON|OFF button and lift the masher out of the
bowl. Unplug the appliance. Turn the motor base counter clockwise to detach the
masher from the motor base.
Important: Do not operate continuously for more than 60 seconds.
5. If the masher gets blocked, stop and unplug before clearing.
6. Remove the masher blade from the masher by turning clockwise. Carefully remove
the blade when washing and reattach the blade by turning counterclockwise.
Important: Make sure the masher blade has completely stopped before
removing from masher.
USING THE WHISK
Ensure the whisk is assembled to the motor base as detailed under INSTALLING
THE ATTACHMENTS.
1. Place ingredients to be whisked into a mixing bowl or the provided measuring jar.
Note: to incorporate air into the ingredients when whisking, use a deep and
wide container and move whisk in a gentle up and down motion.
2. Immerse the whisk completely in the ingredients, to the bottom of the container and
select low speed on the speed control dial to prevent splattering.
3. Push and hold the ON|OFF button to turn the motor on. Whisk ingredients by
moving the appliance slowly up and down and in circles. Use low speed to start and
increase speed to high.
4. When completed, release the ON|OFF button and remove whisk from the bowl.
Important: Always ensure the whisk has completely stopped turning before
removing
Important: The continuous operating time must be less than 2 minutes.
Never whisk hot oil, fat or meat.
5. If your whisk gets blocked, first stop and unplug before clearing.

10
Note: Do not fill jar above the 500ML mark. The jar can also be used as a
measuring cup.
6. Unplug the appliance, disassemble the whisk from the motor base and
clean appliance.
WHISK TIPS
• For whipping cream, always use fresh chilled cream
• For egg whites, whisk fresh, room temperature eggs in a glass bowl to
achieve greater and more stable volume.
• It is recommended to use the highest speed when whisking egg whites
and cream.
USING THE FOOD PROCESSOR BOWL
1. Determine whether you will be using the S Blade, Slicing and Shredding Disk, or
Emulsifying Disk and refer to the appropriate instructions before proceeding.
Note: Always place the blade or disk into the food processor prior to
placing the food into the food processor. See instructions for each blade/
disk in the following steps.
2. Place ingredients directly into the bowl. If you do not put the ingredients into the
bowl before attaching the lid, you can feed ingredients through the funnel after
finishing assembly. Do not exceed the maximum (MAX) marking.
3. If adding ingredients through the funnel, always use the pusher to push ingredients
down, never your hands.
4. Place the processing bowl lid into position and ensure that it is correctly aligned.
Twist the lid counter-clockwise to lock into place.
5. Place the funnel into the feed chute and insert the pusher into the funnel.
6. Insert the motor base into the lid of the food processor and turn clockwise to lock.
7. Plug in the unit and select the processing speed on the speed control dial.
8. Press and hold the ON|OFF button to turn the appliance on and start the processing
action.
9. Slowly add ingredients to the funnel using the pusher as a guide, if using the funnel.
10. When processing has finished, release the ON|OFF button to turn the motor off.
Unplug the appliance.
11. Always precut large chunks of food to fit the funnel opening.
12. If the blade or disks get blocked, stop and unplug the appliance before clearing.
13. Detach the motor base from the food processor lid by turning counter clockwise
and remove the lid from the bowl by twisting clockwise. Carefully remove the disk
or S Blade and use a spatula to remove any excess food from the disks or blades
and to remove processed food from the bowl.
Note: Always switch off and unplug before cleaning.
Important: the continuous operating time must be less than 30 seconds.

11
USING THE S BLADE
1. The S blade is used for mixing and chopping a variety of
foods.
2. Remove protective cover from S blade and place the S
blade on a flat surface. Hold the plastic center tightly in
place and very carefully align the tabs of the spindle with
the S Blade and insert spindle into top of blade (A). Push
down to secure (B).
3. Place S Blade and spindle assembly on center post of
processing bowl, pushing down to lock.
Warning: Blades are sharp; Caution should be taken when
handling the blades.
4. Place food to be processed in the food processor bowl
around the blade. Assemble the food processor lid and
attach motor base to lid as directed in USING THE FOOD PROCESSOR BOWL.
5. Press and hold the ON|OFF button or pulse ON|OFF to process.
6. Once finished processing, unplug the appliance, detach the motor base and
remove the lid from the bowl.
7. To remove the blade from the spindle, place assembly on a flat surface. Hold
the center of the blade tightly against the surface and pull up on the spindle.
USING THE SLICING AND SHREDDING DISK
1. Place the spindle on the center post in the food processing bowl, pushing down
to lock.
Note: Make sure the S Blade is removed from the spindle before using the disk.
2. There is a side for shredding and a side for slicing on the slicing and shredding
disk. Place the side desired for food prep UP. Align the hole in the center of the
disk with the top of the spindle and ensure that it is pushed down firmly in place.
3. Assemble the food processor lid and attach motor base to lid as directed in
USING THE FOOD PROCESSOR BOWL. Press and hold the ON|OFF button to
turn the appliance on. Slowly add ingredients to the feed chute or funnel.
4. To disassemble, lift the disk off the spindle.
USING THE EMULSIFYING DISK
1. Hold the emulsifying disk in one hand and the spindle in the other hand. Align
the tabs of the spindle with the tabs of the disk and push down to attach.
2. Place the spindle on the center post in the food processing bowl, pushing down
to lock.
3. Add ingredients to the bowl and attach the lid and motor base to begin
emulsifying.
4. Slowly add oil through the funnel.
5. To disassemble, hold the disk in one hand and pull the spindle out of the disk.

12
TIPS WHEN USING THE FOOD PROCESSOR
• The bottom of the processing bowl features an anti-slip rubber lid. This keeps the
processing bowl stable, however it is recommended during processing to hold
the motor base with one hand and the processing bowl and lid with the other.
• Do not operate the motor base when the processing bowl is empty.
• When processing, cut food into uniform sizes to ensure quicker, even and more
consistent results.
• DO NOT process hard foods such as ice, coffee, or chocolate in squares in the
processing bowl as damage to the blades may result.
• DO NOT process boiling or hot foods in the processing bowl.
• NEVER remove the blades from the bowl before processing is completed.
USING THE MINI CHOPPER
1. Remove the protective cover from the blade of the chopper.
2. Place the chopper blade on the center post of the chopper bowl.
Important: Handle carefully; blades are sharp.
3. Place food to be chopped in mini chopper and attach lid.
Important: Do not chop raw meat. Do not process hard foods including
anything you can’t cut easily with a kitchen knife.
Note: Maximum operating time is 30 seconds. Resting time 30 seconds
4. Attach motor base to lid by turning motor base clockwise to lock it in place.
5. Press and release the ON|OFF button to pulse chop food or hold ON|OFF for
mixing. Release the button to turn off the motor. Unplug the appliance when
finished chopping.
6. If your chopper gets blocked, first stop and unplug before cleaning.
7. After use, unplug and dismantle the motor base and the lid unit in sequence, then
remove the blade from the bowl by pulling the plastic shaft up. Empty food from bowl.
STORAGE
1. Place storage base on a dry level surface.
2. Position each attachment over a circle in the base and turn each attachment
counterclockwise to lock it onto the base.
3. Place the motor base in the circular cutout and twist clockwise to lock into base.
4. Plug the motor base cord into the storage base for convenient cord
management.

13
CARE AND CLEANING
1. Unplug the appliance and detach any attachments from the motor base.
Caution: Take care when cleaning the blades and disks as they are
extremely sharp.
2. Wipe motor base and lid with a soft damp cloth. Do not use abrasive cleaners or steel
wool. Never immerse motor base in water or any other liquid. Do not place motor base or
immersion blender in dishwasher.
3. Hand wash all other parts in hot soapy water. Rinse and dry thoroughly
4. You may wash accessory parts and bowls in a dishwasher; top shelf only. If you use a
dishwasher, the harsher environment inside the dishwasher may affect the surface finishes
over time.
5. Quick Wash for accessories: Attach accessory part to motor base and insert into jar
of water. Press on for 5 seconds to remove any food on the blade and continue any
additional processing.
6. When dry, reattach blade covers and store all accessories on the storage base.
TROUBLESHOOTING
PROBLEM SOLUTION
Blades don’t turn
when processing
May be too much food in bowl; reduce quantity.
Pieces of food may be too large, cut to smaller
size.
Ensure the appliance is assembled properly and
locked into place.
Unable to lock lid
into place
Spindle may be out of position. Remove lid,
straighten spindle and ensure centered on metal
post. Reattach lid.
Food may be stuck underneath any blades
preventing the lid from locking into place. Turn
off the appliance, unplug, and remove the food
with a spatula or utensil and continue.
Shredding disk slows
down when in use
Shredded food has exceeded Max level. Empty
bowl and continue to shred.
Too much force is being used when shredding.
Reduce force when pushing.
Motor sounds like it
is not able to process
load
Speed may not be correct. Refer to processing
guide for correct speeds.
Quantity of food may be too much.
If additional assistance is needed, please contact our consumer service team at
1-800-231-9786.

14
RECIPES
FRESH TOMATO SALSA
6 Roma tomatoes, seeded and cut into
quarters
1
⁄2 of a medium red onion, cut into 1- inch
pieces
3 garlic cloves
2 jalapeno peppers, seeded, cut into 1-inch
pieces
1 cup loosely packed fresh cilantro leaves
2 Tbsp. fresh lime juice
2 tsp. sugar
2 tsp. salt
1 tsp. ground black pepper
PLACE all ingredients in food processor bowl with S blade.
PULSE CHOP to desired consistency.
Makes: 2 1⁄2 cups
TIP: Substitute Habanero or Serrano peppers for Jalapenos
BASIC MAYONNAISE
4 egg yolks
2 tsp. dry mustard
2 tsp. lemon juice
2 tsp. white wine vinegar
1 Tbsp. granulated sugar
1 tsp. salt
1 1/2 c. canola oil or safflower oil
PLACE emulsifying disk in food processor bowl. Add first 6 ingredients and process
30 seconds or until egg mixture is light yellow and creamy but not thick.
ADD oil gradually in a steady stream through feed chute with the processor running;
process 1 minute until all oil is incorporated into egg mixture and sticks to the side of
the bowl.
REMOVE disk and transfer mayonnaise into storage container. Keep Refrigerated.
Makes 1 1⁄2 cups
WHIPPED CREAM
2 cups heavy cream, chilled
1
⁄4 cup sugar
2 tsp. vanilla
POUR cream, sugar and vanilla in a large glass or
stainless mixing bowl.
WHISK cream starting on low speed to avoid cream from splashing.
BLEND cream 1-2 minutes increasing speed as cream thickens and forms soft peaks.
Makes: 3 1⁄2 cups
MASHED POTATOES
6 medium potatoes, peeled and quartered
3 Tbsp. butter, softened
1
⁄2 tsp. salt
1
⁄4 tsp. pepper
1 Tbsp. milk or cream
PLACE potatoes in a medium saucepan and cover with water. Bring to a boil. Reduce
heat; cover and cook 15 minutes or until tender. Drain.
PLACE cooked potatoes, butter and cream in medium bowl. Add salt and pepper.
Mash with the potato masher attachment until potatoes are smooth, adding
additional milk if necessary. Do not over mash or potatoes will become “gluey”.
Makes 6 (1⁄2 cup) servings.

15
BASIC VINAIGRETTE
To create your own signature vinaigrette, mix and match your choice of vinegar, mustard and
oil using the chart below.
PLACE vinegar and mustard in the Mini Chopper bowl. Process a few seconds to
combine.
ADD oil; process until blended.
STORE in refrigerator up to 4 days.
Makes: 1 cup
RECIPES
BASIC PIZZA CRUST FOR FOOD PROCESSOR
1 pkg. active dry yeast
1 tsp. sugar
2
⁄3 cup warm water
1
2
⁄3 cups all-purpose flour
1 tsp. salt
12 tsp. vegetable oil
STIR yeast and sugar into warm water; let stand until foamy, about 10 min.
ADD flour and salt to food processor and with processor running, pour yeast mixture
through feed tube and process 45 seconds or until dough pulls away from sides of
bowl. Add oil through feed tube and run an additional minute.
Note: If dough sticks to sides of bowl, add more flour 1 Tbsp. at a time and process 10
seconds after each addition.
ROLL dough out onto a floured surface to make one (14 inch) or two (9 inch) circles.
Rotate and turn dough often and use enough flour so dough does not stick.
OIL baking pans and sprinkle with cornmeal. Loosely fold pizza dough in half and then
half again to transfer to pizza pan placing the point of the dough in the center of the pan.
Unfold dough and press from the center outward folding edges under to create a rim.
TOP crust with sauce, cheese and your choice of meat and vegetables.
PIE CRUST
1 cup flour
1
⁄2 tsp. salt
2-3 Tbsp. ice water
4 Tbsp. (
1
⁄2 stick) cold butter, cut in pieces
PLACE flour, salt and butter into food processor with S Blade.
PULSE 10-20 seconds or until mixture forms pea size crumbs. With food processor running,
add water, 1 Tbsp. at a time through the feed chute until dough starts to form a ball.
REMOVE dough from bowl and form into a ball, then press into a disk shape.
WRAP in plastic wrap; chill at least 1 hour before rolling.
BANANA & PINEAPPLE SMOOTHIE
1
⁄4 cup orange juice
1
⁄2 banana, cut into 1 inch pieces
1
⁄2 cup fresh pineapple chunks
1
⁄4 cup nonfat plain Greek yogurt
PLACE all ingredients in mixing container. Insert immersion blender making sure the
protective guard is submerged. Blend, using up and down motions 30-35 seconds or
until ingredients are well mixed.
Vinegar (1⁄4 cup) Mustard (2 tsp) Oil (2⁄3 cup)
Red wine vinegar Dijon mustard Olive oil
White wine vinegar Honey dijon mustard Grapeseed oil
Balsamic vinegar Coarse grain mustard Safflower oil
Apple cider vinegar

16
WARRANTY AND CUSTOMER
SERVICE INFORMATION
For service, repair or any questions regarding your appliance, call the
appropriate 800 number listed within this section. Please DO NOT return the
product to the place of purchase. Also, please DO NOT mail product back to
manufacturer, nor bring it to a service center. You may also want to consult
the website listed on the cover of this manual.
Two-Year Limited Warranty
(Applies only in the United States and Canada)
What does it cover?
• Any defect in material or workmanship provided; however, Spectrum Brands,
Inc.’s liability will not exceed the purchase price of product.
For how long?
• Two years from the date of original purchase with proof of purchase.
What will we do to help you?
• Provide you with a reasonably similar replacement product that is either new or
factory refurbished.
How do you get service?
• Save your receipt as proof of date of sale.
• Visit the online service website at www.prodprotect.com/applica, or call toll-free
1-800-231-9786, for general warranty service.
• If you need parts or accessories, please call 1-800-738-0245.
What does your warranty not cover?
• Damage from commercial use
• Damage from misuse, abuse or neglect
• Products that have been modified in any way
• Products used or serviced outside the country of purchase
• Glass parts and other accessory items that are packed with the unit
• Shipping and handling costs associated with the replacement of the unit
• Consequential or incidental damages (Please note, however, that some states do
not allow the exclusion or limitation of consequential or incidental damages, so
this limitation may not apply to you.)
How does state law relate to this warranty?
• This warranty gives you specific legal rights. You may also have other rights that
vary from state to state or province to province.

17
• Lea y conserve todas las instrucciones.
• A fin de protegerse contra el riesgo de una
descarga eléctrica, no sumerja la base, el cable ni
el enchufe en agua ni en ningún otro líquido. No
utilice el aparato en el baño, cerca del agua o a la
intemperie.
• Todo aparato eléctrico utilizado cerca de la
presencia de los niños o por ellos mismos, requiere
la supervisión de un adulto.
• Desenchufe el aparato del tomacorriente cuando no
esté en uso, antes de instalarle o retirarle piezas y
antes de limpiarlo.
• No utilice ningún aparato eléctrico que tenga
el cable o el enchufe averiado, que presente un
problema de funcionamiento o que esté dañado.
Llame al número de servicio para el cliente que
aparece en este manual.
• El uso de accesorios no recomendados o vendidos
por el fabricante puede ocasionar incendio,
descarga eléctrica o lesiones. No utilice ningún
accesorio para otro fin que no sea para el que ha
sido diseñado.
• Este aparato no es para uso comercial, profesional o
industrial. Está diseñado y fabricado exclusivamente
para uso doméstico.
• No lo coloque sobre ni cerca de una hornilla de gas
o eléctrica que esté caliente ni adentro de un horno
caliente.
• No permita que el cable cuelgue del borde de la
mesa o del mostrador ni que toque superficies
calientes.
• No utilice el aparato a la intemperie.
• No utilice el aparato para otro fin que no sea para el
que ha sido diseñado.
• No toque las piezas móviles, ni los discos ni las
cuchillas. Las cuchillas están afiladas; manéjelas
con cuidado y almacenelas fuera del alcance de los
niños.
• Cuando mezcle líquidos, especialmente líquidos
calientes, utilice un recipiente alto o mezcle
cantidades pequeñas cada vez para reducir las
salpicaduras.
• Mantenga la manos y los utensilios alejados de las
cuchillas o discos móviles mientras se procesan
los alimentos para reducir el riesgo de ocasionar
daño severo a las personas o daño al procesador
de alimentos. Una espátula de goma puede ser
utilizada, pero solo se debe utilizar cuando el
aparato no está en funcionamiento.
• Siempre asegúrese de que la tapa del recipiente de
procesamiento esté asegurada en su lugar antes de
utilizar.
• No procese ni líquidos calientes ni que estén
hirviendo en el recipiente del procesador de
alimentos--permita que los líquidos se enfríen antes
de colocarlos en el recipiente.
• No deje el aparato desatendido cuando esté en uso.
• No utilice la licuadora con las manos mojadas.
• No empuje los alimentos dentro del tubo de
alimentación ni con los dedos ni con otros utensilios.
Siempre utilice el empujador de alimentos provisto.
• Siempre opere la base del motor con el accesorio
y/o la tapa cerrada con seguridad en su lugar.
• No trate de anular el mecanismo de entrecierre
de la tapa.
• Nunca mezcle ni aceite caliente ni grasa.
• Nunca añada ingredientes en el recipientes mientras
la batidora de inmersión esté funcionando.
• No opere el aparato continuamente por más de 2
minutos. Deje que el motor descanse por 1 minuto
entre cada uso.
• Nunca mezcle las mezclas secas, espesas y
pesadas por más de 30 segundos. Detenga el
funcionamiento y revuelva los ingredientes antes de
continuar. Deje que el motor descanse por 1 minuto
entre cada uso.
• Cuando utilice cargas de ingredientes pesados, el
aparato no debe funcionar por más de 15 segundos.
• La clasificación máxima es basada en el accesorio del
procesador de alimentos. La entrada de energía de los
otros accesorios es menos que la desviación permitida.
• No retire el motor con el accesorio de los
ingredientes durante el funcionamiento. Asegúrese
de que el aparato esté apagado y que haya parado
antes de retirarlo para evitar el contacto con las
cuchillas móviles o el batidor.
• Mantenga los dedos, las manos, los cuchillos y otros
utensilios lejos de las cuchillas y los discos que
están en movimiento.
Por favor lea este instructivo antes de usar el producto.
INSTRUCCIONES IMPORTANTES
DE SEGURIDAD
Al utilizar cualquier aparato eléctrico siempre deben tomarse precauciones básicas de
seguridad, incluyendo las siguientes:
CONSERVE ESTAS INSTRUCCIONES.
Este aparato eléctrico es para uso doméstico solamente.

18
ENCHUFE POLARIZADO (Solamente
para los modelos de 120V)
Este aparato cuenta con un enchufe polarizado (un
contacto es más ancho que el otro). A fin de reducir
el riesgo de un choque eléctrico, este enchufe
encaja en un tomacorriente polarizada en un solo
sentido. Si el enchufe no entra en el tomacorriente,
inviértalo y si aun así no encaja, consulte con
un electricista. Por favor no trate de alterar esta
medida de seguridad.
TORNILLO DE SEGURIDAD
Advertencia: Este aparato cuenta con un tornillo
de seguridad para evitar la remoción de la cubierta
exterior del mismo. A fin de reducir el riesgo de
incendio o de choque eléctrico, por favor no trate
de remover la cubierta exterior. Este producto no
contiene piezas reparables por el consumidor. Toda
reparación se debe llevar a cabo únicamente por
personal de servicio autorizado.
CABLE ÉLECTRICO
1. El producto se debe de proporcionar con un
cable eléctrico corto, a fin de reducir el riesgo de
tropezar o de enredarse en un cable más largo.
2. Si se utiliza un cable separable o de extensión,
a) El régimen nominal del cable separable o del
cable de extensión debe ser, como mínimo, igual
al del régimen nominal del aparato.
b) Si el aparato es de conexión a tierra, el cable de
extensión debe ser un cable de tres alambres de
conexión a tierra.
c) Uno debe de acomodar el cable más largo de
manera que no cuelgue del mostrador o de la
mesa, para evitar que un niño tire del mismo o
que alguien se tropiece.
Nota: Si el cordón de alimentación es dañado,
en América Latina debe sustituirse por personal
calificado o por el centro de servicio autorizado.
1
3
2
5
6
7
8
9
10 11
14
13
12
18
22
23
24
26
28
25
19
15
21
17
20

19
CONOZCA SU
HANDIPREP EXPRESS
BASE DEL MOTOR
1. Dial de control de velocidad
2. Botón de encendido/apagado
(On/Off )
3. Cuerpo del motor
4. Cable de alimentación (no ilustrada)
ACCESORIOS DE LA
BATIDORA DE MANO
5. Eje de la batidora de inmersión
(Pieza N° HB5500-01)
6. Cuchilla de acero inoxidable
7. Cubierta protectora de la cuchilla
8. Batidor de huevos
(Pieza N° HB5500-02)
9. Jarra medidora
(Pieza N° HB5500-03)
10. Aplastador de papas
(Pieza N° HB5500-04)
11. Cuchilla para aplastador de papas
(Pieza N°HB5500-05)
MINI PICADOR
12. Tapa de almacenamiento plástica
(Pieza N° HB5500-06)
13. Recipiente del picador
(Pieza N° HB5500-07)
14. Tapa del picador
(Pieza N° HB5500-08)
15. Cuchilla del picador
(Pieza N° HB5500-09)
16. Cubierta protectora de la cuchilla
del picador (no ilustrada)
(Pieza N°HB5500-10)
PROCESADOR DE
ALIMENTOS
17. Tapa del recipiente del procesador
(Pieza N° HB5500-11)
18. Recipiente para procesar de 5 tazas
con base antideslizante
(Pieza N° HB5500-12)
19. Empujador de alimentos
(Pieza N° HB5500-13)
20. Tubo de alimentación
21. Embudo (Pieza N°HB5500-14)
22. Cuchilla S
(Pieza N° HB5500-15)
23. Tapa de cuchilla S
24. Disco emulsionante
(Pieza N°HB5500-16)
25. Disco para rebanar/rallar
(Pieza N° HB5500-17)
26. Eje (Pieza N° HB5500-18)
27. Base de Eje (Pieza N° HB5500-19)
BASE DE
ALMACENAMIENTO
28. Base de almacenamiento
(Pieza N° HB5500-20)
¡Felicidades por la compra de su Black+Decker sistema de cocina 6 en 1! El dispositivo
de cocina de mayor versatilidad, combina seis productos en un sistema compacto para
brindarle todas las herramientas necesarias para adueñarse de su cocina.

20
CÓMO USAR
El Sistema Práctico para Preparación de Alimentos Rápida es un producto
versátil con muchos accesorios diferentes. La base del motor funciona con los
siguientes accesorios:
CÓMO OPERAR LA BASE DEL MOTOR
BOTÓN DE ENCENDIDO/APAGADO (ON/OFF)
Enchufe la base del motor y presione y sostenga el botón de encendido/apagado
(On/Off) localizado en la base del motor para activar el motor. Suelte el botón para
detener el motor. Para pulsar, presione y suelte el botón de encendido/apagado
(On/Off) continuamente.
IMPORTANTE: Nunca encienda el motor sin que los accesorios estén
conectados con seguridad.
INSTALACIÓN DE
LOS ACCESORIOS
1. Asegúrese de que el aparato esté desenchufado antes de conectar los accesorios.
2. Sujete el accesorio firmemente en una mano.
3. Empuje el extremo de la base del motor dentro del accesorio y gire en dirección a
las manecillas del reloj para asegurar en su lugar. El accesorio está asegurado en su
lugar cuando las marcas en la base del motor y el eje del accesorio están alineados.
4. Para retirar, desenchufe y luego gire la base del motor en dirección contraria a las
manecillas del reloj y tire lejos del eje del accesorio.
ACCESORIO USO
Batidora de Inmersión
Mezcla líquidos como salsa y batidos
Mezcla masas
Hace puré de frutas y vegetales
Aplastador de papa
Aplasta vegetales cocinadas como papas y coliflor
Batidor de huevos
Bate huevos
Hace merengue
Bate crema
Procesador de
alimentos
Pica, mezcla, licúa
Ralla y rebana frutas, vegetales y quesos
Disco emulsionante
Emulsiona aderezo y mayonesa
Picador
Pica nueces, vegetales, pan, galletas (pequeña
cantidades)
PRIMEROS PASOS
Este producto es para uso doméstico solamente.
• Retire todo material de empaque y cualquier etiqueta adherida al producto.
• Retire y conserve la literatura.
• Por favor, visite www.prodprotect.com/applica para registrar su garantía.
• Lave todas las piezas removibles como se indica en la sección CUIDADO Y
LIMPIEZA de este manual. Maneje las cuchillas con ciudado, éstas están muy
afiladas. Asegúrese de que todas las piezas estén completamente secas para
evitar que agua caiga dentro del cuerpo del motor cuando esté reconectado.

21
ACCESORIO VELOCIDAD
TIEMPO MÁXIMO
DE FUNCIONAMIENTO
ANTES DE DESCANSAR
TIEMPO DE
DESCANSO
USOS
Batidora
de inmersión
Alta a Baja 30 segundos 10
segundos
Sopas
Batidos
Salsas
Batidos de
leche
Batidor de
huevos
Comience
despacio,
aumente la
velocidad
según sea
necesario
2 minutos 3 minutos Crema para
batir
Huevo
Claras para
merengue
Salsa para
carnes
Picador Baja para
picar grueso,
Alta para
picar fino
30 segundos 30
segundos
Nueces
Migajas de
pan
Vegetales
Cuchilla S Alta 30 segundos 10
segundos
Para mezclar
y picar
vegetales
y nueces.
Mezclar
pastas para
untar y dips.
Disco
emulsionante
Baja a
Mediana
90 segundos 90
segundos
Mayonesa
Aderezos
para
ensaladas
Disco para
rebanar
Baja a
Mediana
15 segundos 15 segundos Papas
Col
Zanahorias
Pepinos
Disco para
rallar
Baja a
Mediana
15 segundos 15 segundos Zanahorias
Calabacín
verde
Queso
Aplastador Baja a
Mediana
60 segundos 60
segundos
Vegetales
cocinados
Papas
Frutas para
mermelada
NOTA: Siempre asegúrese de que el accesorio y el asa del motor estén secos antes
de conectarlos.
CONTROL DE VELOCIDAD
La base del motor cuenta con un dial de velocidad variable. Gire el control a la
velocidad que desee utilizar.

22
CÓMO UTILIZAR LA BATIDORA DE INMERSIÓN
Asegúrese de que el eje de la batidora de inmersión esté ensamblado en la base
del motor como es detallado en la sección INSTALACIÓN DE LOS ACCESORIOS.
1. Coloque los alimentos para procesar en la jarra medidora provista, el recipiente para
mezclar o una olla. Para evitar desbordamientos, el recipiente solo debe llenarse a la
mitad o menos cuando mezcle líquidos o cuando haga puré de frutas y/o vegetales.
Importante: Siempre asegúrese de que la base del motor y que el eje de la
batidora de inmersión estén ensamblados correctamente y que el cable no
esté dañado antes de utilizar.
2. Comience procesando a una velocidad baja y gradualmente incremente a una
velocidad alta, girando el dial de control de temperatura localizado en la parte
superior del cuerpo del motor.
Nota: Si selecciona una velocidad alta, se recomienda comenzar a una
velocidad baja e incrementar a una velocidad alta para evitar salpicamientos
y procesar en exceso.
3. Sumerja la batidora lo más profundo posible dentro de la jarra o recipiente y
presione el botón de encendido/apagado (On/Off) para activar la batidora.
4. Mezcle los ingredientes moviendo el aparato hacia arriba y hacia abajo utilizando un
movimiento circular.
5. Una vez que haya terminado de mezclar, suelte el botón de encendido/apagado
(On/Off) para detener el motor y desenchufe el aparato.
Importante: El tiempo de funcionamiento continuo debe de ser menos de 30
segundos. Nunca mezcle aceite caliente, grasa o carne.
6. Asegúrese de que el motor haya parado por completo antes de alzar la batidora
de inmersión fuera de la jarra. Si las cuchillas están obstruidas, primero pare y
desenchufe el aparato antes de eliminar la obstrucción.
7. Después de procesar, desenchufe y desmonte la batidora de immersión de la base
del motor girando la base del motor en dirección contraria a las manecillas del reloj y
limpie el accesorio.
CONSEJOS Y TRUCOS PARA UTILIZAR LA BATIDORA DE INMERSIÓN
• La batidora de inmersión mezcla alimentos y líquidos rápidamente, por lo tanto
es fácil procesar los alimentos en exceso. Pare el motor y supervise los alimentos
a través del funcionamiento para evitar procesarlos en exceso.
• Cuando esté haciendo puré y licuando, corte los alimentos en tamaños
uniformes. Esto asegurará resultados suaves y consistentes.
• Permita que los alimentos se enfríen ligeramente antes de licuarlos.
• Asegúrese de que el cuerpo de la olla y el cable se mantengan lejos de cualquier
fuente de calor.

23
CÓMO UTILIZAR EL APLASTADOR DE PAPAS
Nota: Conecte el aplastador de papas a la base del motor como es indicado en
la sección INSTALACIÓN DE LOS ACCESORIOS. El aplastador está asegurado
correctamente en la base del motor cuando las marcas en el aplastador están
alineadas con las marcas del motor.
1. Coloque los alimentos para aplastar en una jarra o recipiente/vasija para mezclar
grande.
Nota: solo utilice el aplastador con vegetales o frutas que estén bien
cocinadas.
2. Enchufe el aparato y seleccione el adjuste de la velocidad deseada, utilizando el dial
en la parte superior de la base del motor.
3. Sumerja el aplastador completamente en los ingredientes, presione y sostenga
el botón de encendido/apagado (On/Off) y aplaste los ingredientes moviendolo
lentamente hacia arriba y hacia abajo y en círculos hasta alcazar la textura deseada,
añadiendo líquidos gradualmente, si es necesario.
Consejo: Utilice el aplastador en velocidad baja a alta en intervalos de 1
ó 2 segundos a la vez con un descanso de por lo menos 1 segundo entre
intervalos y no lo haga funcionar continuamente por más de 1 minuto. Deje
reposar antes de hacer funcionar de nuevo.
4. Apague el motor soltando el botón de encendido/apagado (On/Off) y alzando el
aplastador fuera del recipiente. Desenchufe el aparato. Gire la base del motor en
dirección contraria a las manecillas del reloj para desconectar el aplastador de la
base del motor.
Importante: No opere continuamente por más de 60 segundos.
5. Si el aplastador está obstruido, pare y desenchufe el aparato antes de eliminar la
obstrucción.
6. Retire la cuchilla del aplastador girandola en dirección a las manecillas
del reloj. Retire la cuchilla cuidadosamente para lavarla y conecte la cuchilla
girandola en dirección contraria a las manecillas del reloj.
Importante: Asegúrese de que la cuchilla del aplastador haya parado por
completo antes de retirarla del aplastador.
CÓMO UTILIZAR EL BATIDOR DE HUEVOS
Asegúrese de que el batidor de huevos está ensamblado en la base del motor
como es detallado en la sección INSTALACIÓN DE LOS ACCESORIOS.
1. Coloque los ingredientes para batir adentro de la jarra medidora o un recipiente para
mezclar limpio y seco.
Nota: Para incorporar aire en los ingredientes cuando los bate, utilice un
recipiente profundo y ancho y mueva el batidor de huevos suavemente
hacia arriba y hacia abajo.
2. Sumerja el batidor de huevos completamente en los ingredientes, hacia el fondo del
recipiente y seleccione la velocidad baja para evitar salpicamientos.
3. Presione y sostenga el botó de encendido/apagado (On/Off) para encener el motor.

24
Bata los ingredientes moviendo el aparato lentamente hacia arriba y hacia abajo y en
círculos. Utilice la velocidad baja para comenzar y luego aumente a la velocidad alta.
4. Cuando haya terminado, suelte el botón de encendido/apagado (On/Off) y retire el
batidor de huevos del recipiente.
Importante: Siempre asegúrese de que el batidor de huevos haya parado de
girar completamente antes de removerlo.
Importante: El tiempo de funcionamiento continuo debe ser menos de 2
minutos. Nunca bata aceite caliente, grasa o carne.
5. Si su batidor de huevos está obstruido, primero pare y desenchufe el aparato antes
de eliminar la obstrucción.
Nota: No llene la jarra medidora pasado de la marca de 500ML. La jarra
también puede ser utilizada como taza de medir.
6. Desenchufe el aparato, desensamble el batidor de huevos de la base del motor y
límpie el aparato.
CONSEJO PARA USAR EL BATIDOR DE HUEVOS:
• Para batir crema, siempre use crema enfriada, fresca.
• Para las claras de huevos, bata huevos frescos a temperatura ambiente, en
un recipiente de vidrio para lograr un volumen mejor y más estable.
• Es recomendado usar la velocidad más alta cuando se baten huevos y crema.
CÓMO UTILIZAR EL RECIPIENTE DEL
PROCESADOR DE ALIMENTOS
1. Determine si va a utilizar la cuchilla S, el disco para rebanar y rallar o el disco
emulsionante y consulte las instrucciones apropiadas antes de proceder.
Nota: Siempre coloque la cuchilla o el disco en el procesador de alimentos
antes de colocar los alimentos en el procesador de alimentos. Consulte las
instrucciones para cada cuchilla/disco en los siguientes pasos.
2. Coloque los ingredientes directamente en el recipiente. Si no coloca los ingredientes
en el recipiente antes de conectar la tapa, puede pasar los ingredientes a través del
embudo después que termine de ensamblar. No exceda la marcade máximo (MAX).
3. Si añade los ingredientes a través del embudo, siempre utilice el empujador de
alimentos para empujar los ingredientes hacia abajo, nunca sus manos.
4. Coloque la tapa del recipiente para procesar en posición y asegúrese de que esté
alineada correctamente. Gire la tapa en dirección contraria a las manecillas del reloj
para asegurarla en posición.
5. Coloque el embudo dentro del tubo de alimentación e inserte el empujador de
alimentos en el embudo.
6. Inserte la base del motor en la tapa de procesador de alimentos y gírela en dirección
a las manecillas del reloj para cerrarla.
7. Enchufe la unidad y seleccione la velocidad de procesamiento marcada en el dial de
control de velocidad.

25
CÓMO UTILIZAR LA CUCHILLA S
1. La cuchilla S se utiliza para mezclar y picar una variedad de
ailmentos.
2. Retire la cubierta protectora de la cuchilla S y coloque la
cuchilla S sobre una superficie plana. Mantenga el centro
del plástico firmemente en su lugar y con mucho ciudado
alinee las lengüetas en el eje con la cuchilla S e inserte el eje
en la parte superior de la cuchilla. Empuje hacia abajo para
asegurar.
3. Coloque la cuchilla S en el montaje del eje en el poste
central del recipiente para procesar, empujando hacia abajo
para asegurarlo.
Advertencia: Las cuchillas están afiladas. Se debe tomar
precaución cuando se maneje las cuchillas.
4. Coloque los ailmentos que se vayan a picar en el recipiente del procesador de
alimentos alrededor de la cuchilla. Ensamble la tapa del procesador de ailmentos
y conecte la base del motor a la tapa según las instrucciones en CÓMO
UTILIZAR EL RECIPIENTE DEL PROCESADOR DE ALIMENTOS.
5. Presione y sostenga el botón de encendido/apagado (On/Off) o pulse el botón
de encendido/apagado (On/Off) para procesar.
6. Una vez terminado el procesamiento,desenchufe el aparato, desmonte la base
del motor y retire la tapa del recipiente.
7. Para retirar la tapa del eje, coloque la cubierta protectora en la cuchilla y
coloque el conjunto de chuchillas sobre una superficie plana. Mantenga el centro
de la cuchilla firmemente contra la superficie y tire del eje.
8. Presione y sostenga el botón de encendido/apagado (On/Off) para activar la
unidad y comenzar la acción de procesamiento.
9. Lentamente añada ingredientes al embudo, utilizando el empujador de alimentos
como una guía, si utliza el embudo.
10. Cuando el procesamiento haya terminado, suelte el botón de encendido/apagado
(On/Off) para apagar el motor. Desenchufe el aparato.
11. Siempre corte con anterioridad trozos grandes de alimentos para acomodar la
abertura del embudo.
12. Si la cuchilla o los discos están obstruidos, pare y desenchufe el aparato antes de
eliminar la obstrucción.
13. Desconecte la base del motor de la tapa del procesador de alimentos girandola en
dirección contraria a las manecillas del reloj y retire la tapa del recipiente girandola
en dirección a las manecillas del reloj. Remueva con ciudado el disco o la cuchilla S
y utilice una espátula para remover cualquier exceso de alimento en los discos o las
cuchillas y para remover alimentos procesados del recipiente.
Nota: Siempre apague y desenchufe el aparato antes de limpiarlo.
Importante: El tiempo de funcionamiento continuo debe ser menos de 30
segundos.

26
CÓMO UTILIZAR EL DISCO PARA REBANAR Y
RALLAR
1. Coloque el eje en el poste central en el recipiente del procesador de alimentos,
empujando hacia abajo para cerrarlo.
Nota: Asegúrese de que la cuchilla S esté removida del eje antes usar el disco.
2. El disco tiene un lado para rallar y un lado para rebanar. Coloque el lado deseado
para preparar los alimentos mirando hacia arriba.. Alinee el agujero en el centro
del disco con la parte superior del eje y asegúrese de que está empujado hacia
abajo firmemente en su lugar.
3. Ensamble la tapa del procesador de alimentos y conecte la base del motor a la
tapa según las instrucciones en la sección CÓMO UTILIZAR EL RECIPIENTE DEL
PROCESADOR DE ALIMENTOS. Presione y sostenga el botón de encendido/
apagado para activar el aparato. Añada lentamente los ingredientes al tubo de
alimentación o al embudo.
4. Para desensamblar, alce el disco fuera del eje.
CÓMO UTILIZAR EL DISCO EMULSIONANTE
1. Sostenga el disco emulsionante en una mano y el eje en la otra mano. Alinee
las lengüetas en el eje con las lengüetas del disco y empuje hacia abajo para
conectar.
2. Coloque el eje en el poste central en el recipiente del procesador de alimentos,
empujando hacia abajo para asegurarlo.
3. Añada los ingredientes en el recipiente y conecte la tapa a la base del motor
para comenzar el proceso de emulsión.
4. Lentamente añada aceite a través del embudo.
5. Para desensamblar, sostenga el disco en una mano y tire del eje fuera del disco.
CONSEJOS PARA UTILIZAR EL PROCESADOR DE ALIMENTOS
• La parte inferior del recipiente para procesar cuenta con una tapa de goma
antideslizante alrededor de la parte inferior del recipiente. Esto mantiene el
recipiente estable, sin embargo, es recomendado durante el procesamiento,
sostener la base del motor con una mano y el recipiente para procesar con la otra.
• No haga funcionar la base del motor cuando el recipiente para procesar esté
vacio.
• Cuando vaya a procesar, corte los alimentos en tamaños uniformes para asegurar
resultados consistentes, uniformes y más rápidos.
• NO procese ailmentos duros como hielo, café o chocolate en cuadrados en el
recipiente para procesar ya que puede resultar en un daño.
• NO procese alimentos calientes o que estén hirviendo en el recipiente para
procesar.
• NUNCA remueva las cuchillas del recipiente antes que haya terminado el
procesamiento.

27
ALMACENAMIENTO
1. Coloque la base de almacenamiento sobre una superficie seca y nivelada.
2. Posicione cada accesorio sobre un círculo en la base y gire cada accesorio
en dirección contraria a las manecillas del reloj para asegurarla en la base.
3. Coloque la base del motor en la abertura circular y gire en dirección a las
manecillas del reloj para asegurar en la base.
4. Enchufe el cable de la base del motor en la base de almacenamiento para
mantener control del cable.
CUIDADO Y LIMPIEZA
1. Desenchufe el aparato y desconecte los accesorios de la base del motor.
Precaución: Proceda con cuidado cuando limpie las cuchillas y los discos ya
que están sumamente afilados.
2. Limpie la base del motor y la tapa con un paño suave húmedo. No utilice limpiadores
abrasivos ni lana de acero. Nunca sumerja la base del motor en agua ni en ningún otro
líquido. No coloque la base del motor ni la batidora de inmersión en la máquina lavaplatos.
3. Lave a mano todas las otras piezas con agua caliente jabonosa. Enjuague y seque bien.
4. Usted puede lavar las piezas de los accesorios y los recipientes en una máquina lavaplatos,
rejilla superior solamente. Si utiliza una máquina lavaplatos, el ambiente riguroso que existe
adentro de la máquina, puede afectar el acabado de la superficies con el tiempo.
5. Limpieza rápida para los accesorios: Conecte la pieza del accesorio a la base del
motor e inserte en la jarra con agua. Presione el botón de encendido (On) por 5
segundos para eliminar cualquier alimento pegado en la cuchilla y continue cualquier
procesamiento adicional.
6. Cuando esté seco, reconecte la cubierta de la cuchilla y almacene todos los accesorios en
la base de almacenamiento.
CÓMO UTILIZAR EL MINI PICADOR
1. Retire la cubierta protectora de la cuchilla del picador.
2. Coloque la cuchilla del picador en el poste central del recipiente del picador.
Importante: maneje con cuidado; las chuchillas tienen filo.
3. Coloque los alimentos para picar en el mini picador y conecte la tapa.
Importante: No pique carne cruda. No procese alimentos duros--cualquier
alimento que no pueda cortar fácilmente con un cuchilla de cocina.
Nota: Tiempo de funcionamienito máximo es 30 segundos. Tiempo de
descanso es 30 segundos.
4. Conecte la base del motor a la tapa girando la base del motor en dirección a las
manecillas del reloj para asegurarlo en su lugar.
5. Presione y suelte el botón de encendido/apagado (On/Off) para usar la función de pulso
para picar alimentos o sostenga el botón de encendido/apagado (On/Off) para mezclar.
Suelte el botón para apagar el motor. Desenchufe el aparato cuando termine de picar.
6. Si su picador está obstruido, primero pare y desenchufe el aparato antes de tratar
de eliminar la obstrucción.
7. Después de usar, desenchufe y desarme la base del motor y la tapa en sequencia,
luego retire la cuchilla del recipiente tirando del eje plástico hacia arriba. Vacie el
recipiente de alimentos.

28
RESOLUCIÓN DE PROBLEMAS/FALLAS
PROBLEMA SOLUCIÓN
Las cuchilla no giran
cuando estan procesando los alimentos.
Puede ser que el recipiente contenga demasiada
cantidad de aliementos; reduzca la cantidad.
Tal vez los pedazos de alimentos sean demasiado
grandes, corte en pedazos más pequenos.
Asegúrese de que el aparato esté ensamblado
correctamente y asegurado en su lugar.
No es posible cerrar la
tapa en su lugar.
El eje puede estar fuera de posicion. Retire la
tapa, enderece el eje y asegure de que esté
centrado en el poste de metal. Reconecte la tapa.
Puede haber alimentos pegados debajo de
cualquiera de las cuchillas, impidiendo que la
tapa se cierre en posición. Apague el aparato,
desenchufe y remueva los alimentos con una
espátula o utensilo y continue.
El disco para rallar
reduce la velocidad
cuando está en uso.
La cantidad de alimentos rallados ha excedido
el nivel Max (máximo). Vacie el recipiente y
continue rallando los alimentos.
Se está utilizando demasiada fuerza para rallar.
Reduzca la fuerza cuando empuje los alimentos.
El motor suena como
si no fuera capaz de
procesar la cantidad
de alimentos seleccionados.
La velocidad seleccionada no debe ser la correcta.
Consulte la guía de procesamiento para la
velocidad correcta a seleccionar.
Puede haber demasiada cantidad de alimentos
para procesar.
Si necesita asistencia adicional, favor the ponerse en contacto con nuestro equipo
de servicio al consumidor llamando al número
1-800-231-9786.

29
RECETAS
SALSA DE TOMATE FRESCA
6 tomates Roma, sin semillas y cortados
en cuartos
1
⁄2 de una cebolla roja mediana, cortada
en pedazos de 1 pulgada
3 dientes de ajo
2 pimientos jalapeños sin semillas, cortados
en pedazos de 1 pulgada
1 taza de hojas sueltas de cilantro, frescas
2 cucharadas de jugo de lima, fresco
2 cucharaditas de azúcar
2 cucharaditas de pimienta
1 cucharadita de pimienta negra molida
COLOQUE todos los ingredientes en el recipiente del procesador de alimentos con la
cuchilla S.
PULSE PARA PICAR hasta alcanzar la consistencia deseada.
Rinde: 2 1⁄2 tazas
Consejo: Sustituya los jalapeños con pimiento Serrano o Habanero.
MAYONESA BÁSICA
4 yemas de huevo
2 cucharaditas de mostaza seca
2 cucharaditas de jugo de limón
2 cucharaditas de vinagre de vino blanco
1 cucharada de azúcar granulada
1 cucharadita de sal
1½ cucharada de aceite canola o aceite de
cártamo
COLOQUE el disco emulsionante en el recipiente del procesador de alimentos. Añada
los primeros seis ingredientes y procese 30 segundos o hasta que la mezcla de huevo
tenga un color amarillo claro y cremosa pero no espesa.
AÑADA aceite gradualmente con un chorro constante a través del tubo de
alimentación con el procesador funcionando; procese por 1 minuto hasta que todo el
aceite esté incorporado en la mezcla de huevo y se pegue a los lados del recipiente.
RETIRE el disco y transfiera la mayonesa a un recipiente para almacenar. Mantenga en
el refrigerador.
Rinde 1 1⁄2 tazas
CREMA BATIDA
2 tazas de crema de leche, enfriada
1
⁄4 taza de azúcar
2 cucharaditas de vainilla
VIERTA la crema, la azúcar y la vainilla en un recipiente grande para mezclar de vidrio
o de acero inoxidable.
BATA la crema comenzando en la velocidad baja para evitar que salpique.
BLEND la crema por 1 a 2 minutos aumentando la velocidad mientras la crema se va
espesando y forma unas puntas suaves.
Rinde: 3 1⁄2 tazas
PURÉ DE PAPAS
6 papas medianas, peladas y
cortadas en cuartos
3 cucharadas de mantequilla, suavisada
1
⁄2 cucharadita de sal
1
⁄4 cucharadita de pimienta
1 cucharada de leche o crema
COLOQUE las papas en una olla mediana y cubra con agua. Deje que hiervan.
Reduzca el calor; cubra y cocine 15 minutos o hasta que estén blandas.
COLOQUE las papas cocinadas, la mantequilla y la crema en un recipiente mediano.
Añada sal y pimienta. Aplaste con el accesorio aplastador de papas hasta que las
papas estén suaves, añadiendo más leche si es necesario. No aplaste en exceso o las
papas se pondran pegajosas.
Rinde 6 porciones (de 1⁄2 taza)

30
VINAGRETA BÁSICA
Para crear su propia especialidad de vinagreta, mezcle y combine su vinagre, mostaza y aceite
preferido, usando la tabla a continuación.
COLOQUE vinagre y mostaza en el recipiente del mini picador. Procese por varios
segundos para combinar.
AÑADA
aceite; procese hasta que esté bien mezclado.
ALMACENE en el refrigerador por hasta 4 días.
Rinde 1 taza.
CORTEZA DE PIZZA BÁSICA PARA PROCESADOR DE ALIMENTOS
1 paquete de levadura seca activa
1 cucharadita de azúcar
2
⁄3 taza de agua tibia
1
2
⁄3 tapas de harina común
1 cucharadita de sal
12 cucharadita de aceite vegetal
REVUELVA la levadura y la azúcar en agua tibia; deje reposar hasta que se ponga
espumosa, aproximadamente 10 minutos.
AÑADA la harina y la sal al procesador de alimentos y con el procesador funcionando,
vierta la mezcla de levadura a través del tubo de alimentación y procese 45 segundos o
hasta que la masa se despegue de los lados del recipiente. Añada aceite a través del tubo
de alimentación y haga funcionar por 1 minuto más.
Nota: Si la masa se pega a los lados del recipiente, añada más harina, 1 cucharada cada
vez y procese 10 segundos después de cada adición.
ENROLLE la masa hacia afuera y coloque sobre una superficie con harina para hacer
uno (14 pulgadas) o dos (9 pulgadas) cículos. Rote y gire la masa con frecuencia y
utilice suficiente harina para que la masa no se pegue.
ÚNTELE ACEITE a las bandejas y esparza harina de maíz. Doble la masa de pizza
holgadamente y luego vuelva a doblar a la mitad para transferir a la bandeja de pizza,
colocando la punta de la masa en el centro de la bandeja. Desdoble la masa y presione
desde el centro hacia afuera doblando los borders por debajo para crear una orilla.
CUBRA con la salsa, queso y su carnes y vegetales preferidos.
CORTEZA DE PASTEL
1 taza de harina
1
⁄2 cucharadita de sal
2 a 3 cucharadas de agua helada
4 cucharadas (
1
⁄2 barra) de mantequilla fría,
cortada en pedazos
COLOQUE la harina, sal y mantequilla en el procesador de alimentos con la cuchilla S.
PULSE 10 a 20 segundos o hasta que la mezcla forme migas del tamaño de un chícharo. Con
el procesador de alimentos en funcionamiento, añada el agua, 1 cucharada a la vez a través del
tubo de alimentación hasta que la masa comience a formar una pelota.
REMUEVA la masa del recipiente y dele la forma de una pelota, luego presione para darle
forma de disco.
ENVUELVA en una envoltura plástica; enfríe por lo menos 1 hora antes de extenderla con un rodillo.
BATIDO DE PLÁTANO Y PIÑA
1
⁄4 taza de jugo de naranja
1
⁄2 platano, cortado en pedazos de 1 pulgada
1
⁄2 taza de trozos de piña fresca
1
⁄4 taza de yogur griego sin grasa, natural
COLOQUE todos los ingredientes en el recipiente para licuar. Introduzca la batidora
asegurandose de que la cubierta protectora esta sumergida. Mezcle, usando un movimiento
hacia arriba y hacia abajo 30 a 35 segundos o hasta que los ingredientes estén bien mezclados.
Vinagre (1⁄4 taza) Mostaza (2 cucharaditas) Aceite (2/3 taza)
Vinagre de vino into Mostaza Dijon Aceite oliva
Vinagre de vino blanco Mostaza Dijon con miel Aceite de semilla de uva
Vinagre balsámico Mostaza de grano grueso Aceite de cártamo
Vinagre de sidra de manzana

31
INFORMACIÓN DE GARANTÍA Y
SERVICIO AL CLIENTE
Para servicio, reparaciones o preguntas relacionadas al producto, por favor
llame al número del centro de servicio que se indica para el país donde
usted compró su producto. NO devuélva el producto al fabricante. Llame o
lleve el producto a un centro de servicio autorizado.
Dos Años de Garantía Limitada
(No aplica en México, Estados Unidos y Canada)
¿Qué cubre la garantía?
• La garantía cubre cualquier defecto de materiales o de mano de obra que no haya
sido generado por el uso incorrecto del producto.
¿Por cuánto tiempo es válida la garantía?
• Por dos años a partir de la fecha original de compra mientras que tenga una
prueba de la compra.
¿Cómo se obtiene el servicio necesario?
• Conserve el recibo original como comprobante de la fecha de compra,
comuníquese con el centro de servicio de su país y haga efectiva su garantía si
cumple lo indicado en el manual de instrucciones.
¿Cómo se puede obtener servicio?
• Conserve el recibo original de compra.
• Para servicio al cliente y para registrar su garantía, visite www.prodprotect.com/
applica, o llame al número 1-800-231-9786, para servicio al cliente
• Por favor llame al número del centro de servicio autorizado. 1-800-738-0245.
¿Qué aspectos no cubre esta garantía?
• Los productos que han sido utilizados en condiciones distintas a las normales.
• Los daños ocasionados por el mal uso, el abuso o negligencia.
• Los productos que han sido alterados de alguna manera.
• Los daños ocasionados por el uso comercial del producto.
• Los productos utilizados o reparados fuera del país original de compra.
• Las piezas de vidrio y demás accesorios empacados con el aparato.
• Los gastos de tramitación y embarque asociados al reemplazo del producto.
• Los daños y perjuicios indirectos o incidentales.
¿Qué relación tiene la ley estatal con esta garantía?
• Esta garantía le otorga derechos legales específicos y el consumidor podría
tener otros derechos que varían de una región a otra.

32
• Lire et conserver toutes les instructions.
• Afin d’éviter les risques de choc électrique, ne pas
immerger la base, le moteur, le cordon ou la fiche
dans l’eau ou dans d’autres liquides. Ne pas utiliser
cet appareil dans une salle de bain, près de l’eau ou
à l’extérieur.
• Cet appareil ne doit pas être utilisé par les enfants, et
exercer une étroite surveillance lorsque l’appareil est
utilisé à proximité d’un enfant ou que ce dernier s’en sert.
• Débrancher l’appareil de la prise de courant lorsqu’il
n’est pas utilisé, avant d’installer ou de retirer des
pièces et avant de le nettoyer.
• Ne pas utiliser un appareil dont la fiche ou le
cordon sont abîmés, qui présente un problème
de fonctionnement, qui a été échappé ou qui
est endommagé de quelque façon que ce soit.
Composer le numéro sans frais approprié qui figure
dans le présent guide.
• L’utilisation d’accessoires non recommandés
ou vendus par le fabricant présente des risques
d’incendie, de choc électrique ou de blessures; ne
pas utiliser les accessoires à d’autres fins que pour
lesquelles ils ont été conçus.
• Cet appareil n’est pas conçu pour un usage
commercial, professionnel ou industriel. Il est conçu
et fabriqué pour un usage domestique seulement.
• Ne pas placer l’appareil sur un brûleur au gaz ou
électrique, ou à proximité, ni dans un four chaud.
• Ne pas laisser le cordon pendre du rebord d’une table
ou d’un comptoir, ou toucher une surface chaude.
• Ne pas utiliser l’appareil à l’extérieur.
• N’utiliser cet appareil que pour les fonctions
auxquelles il est destiné.
• Ne pas toucher les pièces mobiles, les disques ou
les lames. Les lames sont tranchantes; les manipuler
avec soin et les ranger hors de la portée des enfants.
• Pour mélanger des liquides, surtout des liquides
chauds, utiliser un grand récipient ou préparer
de petites quantités à la fois pour réduire les
déversements.
• Garder les mains et les ustensiles éloignés des lames
ou des disques mobiles pendant le fonctionnement
de l’appareil pour réduire les risques de blessures
graves ou de dommages au robot culinaire. Une
spatule en caoutchouc peut être utilisée, mais
seulement lorsque l’appareil est arrêté.
• Toujours s’assurer que le couvercle du récipient est
verrouillé en place avant l’utilisation.
• Ne pas mélanger de liquides chauds ou bouillants
dans le récipient du robot culinaire - permettre
aux liquides de refroidir avant de les verser dans le
récipient du robot culinaire.
• Ne pas laisser l’appareil sans surveillance pendant
qu’il fonctionne.
• Ne pas utiliser le mélangeur avec les mains
mouillées.
• Ne pas pousser les aliments dans la trémie avec
vos doigts ou autres ustensiles. Utiliser toujours le
poussoir d’aliments fourni.
• Ne faire fonctionner la base du moteur qu’avec un
accessoire ou lorsque le couvercle est verrouillé en
place.
• Ne pas tenter de contourner le dispositif de
verrouillage du couvercle.
• Ne jamais mélanger d’huile ou de graisse chaude.
• Ne jamais ajouter d’aliments dans le récipient
pendant le fonctionnement du mélangeur à
immersion.
• Ne pas utiliser l’appareil de façon continue pendant
plus de 2 minutes. Permettre au moteur de refroidir 1
minute entre chaque utilisation.
• Ne jamais mélanger des préparations sèches,
épaisses ou lourdes pendant plus de 30 secondes.
Cesser l’utilisation et agiter les ingrédients avant de
continuer. Permettre au moteur de refroidir 1 minute
entre chaque utilisation.
• Lorsque les préparations sont lourdes, l’appareil ne
doit pas fonctionner pendant plus de 15 secondes.
• La calificación máxima se basa en la fijación Robot
de cocina. La entrada de energía de los otros
accesorios es menor que la desviación permisible
• Ne pas retirer des aliments l’accessoire utilisé
pendant le fonctionnement de l’appareil. S’assurer
que l’appareil est arrêté et que les pièces sont
immobiles avant de retirer les accessoires afin d’éviter
tout contact avec les lames et les fouets mobiles.
• Tenir les doigts, les mains, les couteaux et autres
ustensiles éloignés des lames et des disques mobiles.
CONSERVER CES INSTRUCTIONS.
L’appareil est conçu pour une utilisation domestique seulement.
Veuillez lire et conserver ce guide d’entretien et d’utilisation.
MISES EN GARDE IMPORTANTES.
Lorsqu’on utilise des appareils électriques, il faut toujours respecter certaines règles de
sécurité fondamentales, notamment les suivantes :

33
FICHE MISE À LA TERRE (Modèles de
120 V seulement)
Par mesure de sécurité, le produit comporte
une fiche mise à la terre qui n’entre que dans
une prise à trois trous. Il ne faut pas neutraliser
ce dispositif de sécurité. La mauvaise connexion
du conducteur de terre présente des risques de
secousses électriques. Communiquer avec un
électricien certifié lorsqu’on se demande si la
prise est bien mise à la terre.
VIS INDESSERRABLE
AVERTISSEMENT : L’appareil est doté d’une
vis indesserrable empêchant l’enlèvement du
couvercle extérieur. Pour réduire les risques
d’incendie ou de secousses électriques, ne
pas tenter de retirer le couvercle extérieur.
L’utilisateur ne peut pas remplacer les pièces de
l’appareil. En confier la réparation seulement au
personnel des centres de service autorisés.
CORDON
1. Le cordon d’alimentation de l’appareil
est court afin de minimiser les risques
d’enchevêtrement ou de trébuchement.
2. Lorsqu’on utilise un cordon d’alimentation
amovible ou de rallonge plus long, il faut
s’assurer que :
a.) la tension nominale du cordon
d’alimentation amovible ou de rallonge soit
au moins égale à celle de l’appareil, et que;
b.) lorsque l’appareil est de type mis à la terre,
il faut utiliser un cordon de rallonge mis à la
terre à trois broches, et;
c.) le cordon plus long soit placé de sorte
qu’il ne soit pas étalé sur le comptoir ou
la table d’où des enfants pourraient le
tirer, ni placé de manière à provoquer un
trébuchement.
Note: Lorsque le cordon d’alimentation est
endommagé, il faut le faire remplacer par
du personnel qualifié ou, en Amérique
latine, par le personnel d’un centre de
service autorisé.
1
3
2
5
6
7
8
9
10 11
14
13
12
18
22
23
24
26
28
25
19
15
21
17
20

34
FAMILIARISATION AVEC LA
HANDIPREP EXPRESS
BASE DU MOTEUR
1. Cadran de réglage de la vitesse
2. Bouton MARCHE/ARRÊT
3. Boîtier du moteur
4. Cordon d’alimentation (non illustré)
ACCESSOIRES DU
MÉLANGEUR À MAIN
5. Tige (amovible) du mélangeur à
immersion (pièce n° HB5500-01)
6. Lame en acier inoxydable
7. Protège-lame
8. Contenant à mesurer
(pièce n° HB5500-02)
9. Pilon à pommes de terre (amovible)
(pièce n° HB5500-03)
10. Pilon à pommes de terre (amovible)
(pièce n° HB5500-04)
11. Lame du pilon à pommes de terre
(pièce n°HB5500-05)
MINI HACHOIR
12. Couvercle de rangement en
plastique (pièce n° HB5500-06)
13. Bol du hachoir
(pièce n° HB5500-07)
14. Couvercle du hachoir
(pièce n° HB5500-08)
15. Lame du hachoir
(pièce n° HB5500-09)
16. Protège-lame du hachoir
(non illustré) (pièce n° HB5500-10)
ROBOT CULINAIRE
17. Couvercle du robot culinaire
(pièce n° HB5500-11)
18. Récipient de 1,18 l (5 tasses) à base
antidérapante
(pièce n° HB5500-12)
19. Poussoir d’aliments
(pièce n° HB5500-13)
20. Trémie
21. Entonnoir (pièce n° HB5500-14)
22. Lame en S
(pièce n° HB5500-15)
23. Protège-lame
24. Disque émulsifiant
(pièce n° HB5500-16)
25. Disque déchiqueteur/éminceur
(pièce n° HB5500-17)
26. Arbre d’entraînement
(pièce n° HB5500-18)
27. Base de arbre d’entraînement
(pièce n° HB5500-19)
BASE DE RANGEMENT
28. Base de rangement
(pièce n° HB5500-20)
Félicitations pour l’achat de la Appareil culinaire 6 en 1 de BLACK+DECKER!L’appareil
de cuisine le plus polyvalent combine six appareils, vous apportant en un seul
système compact tous les outils dont vous avez besoin pour cuisiner comme un
maître.

35
UTILISATION
Le HandiPrep Express est un appareil polyvalent pouvant accueillir plusieurs accessoires
différents. La base du moteur peut fonctionner avec les accessoires suivants :
UTILISATION DE LA BASE DU MOTEUR
BOUTON MARCHE/ARRÊT
Brancher la base du moteur et maintenir enfoncé le bouton MARCHE/ARRÊT situé sur la
base pour démarrer le moteur. Relâcher le bouton pour arrêter le moteur. Pour utiliser le
mode impulsion, presser et relâcher le bouton MARCHE/ARRÊT continuellement.
IMPORTANT : Ne jamais mettre le moteur en marche avant que les accessoires
soient bien en place.
INSTALLATION DES ACCESSOIRES
1. S’assurer que l’appareil est débranché avant de fixer les accessoires.
2. Tenir l’accessoire fermement d’une main.
3. Pousser l’extrémité de la base du moteur sur l’accessoire et tourner dans le sens horaire
pour le verrouiller en place. L’accessoire est correctement en place lorsque les marques
sur la base du moteur sont alignées sur la tige de l’accessoire.
4. Pour retirer l’accessoire, tourner la base du moteur dans le sens antihoraire et détacher
l’accessoire de la tige.
ACCESSOIRE UTILISATION
Mélangeur à
immersion
Mélanger des liquides comme des sauces et des
frappés aux fruits
Mélanger de la pâte
Réduire en purée des fruits et des légumes
Pilon à pommes de
terre
Piler des légumes cuits comme des pommes de
terre et du chou-fleur
Fouet
Battre des œufs
Préparer de la meringue
Fouetter de la crème
Robot culinaire
Hacher, mixer, mélanger. Broyer et trancher des fruits,
des légumes et du fromage
Disque émulsifiant
Émulsifier des vinaigrettes et de la mayonnaise
Hachoir
Hacher des noix, des légumes, du pain, des biscottes
(petites quantités)
POUR COMMENCER
Cet appareil est conçu pour un usage domestique seulement.
• Retirer tous les matériaux d’emballage et les autocollants sur le produit.
• Retirer et conserver la documentation.
• Visiter le www.prodprotect.com/applica pour enregistrer la garantie.
• Laver toutes les pièces amovibles en suivant les directives de la section
ENTRETIEN ET NETTOYAGE du présent guide. Manipuler les lames avec
précaution; elles sont très tranchantes. S’assurer que toutes les pièces
ont bien séché pour éviter que de l’eau pénètre dans le boîtier du moteur
lorsqu’elles sont remises en place.

36
ACCESSOIRE VITESSE
DURÉE
D’UTILISATION
MAXIMALE
AVANT UNE
PAUSE
DURÉE
DE LA
PAUSE
UTILISATION
Mélangeur à
immersion
Élevée à
basse
30 secondes 10
secondes
Soupes
Frappés aux
fruits
Sauces
Lait frappé
Fouet Commencer
à basse
vitesse, puis
augmenter
au besoin
2 minutes 3 minutes Fouetter de la
crème
Blancs d’œufs
pour la
meringue
Sauce
Hachoir Basse pour
un hachage
grossier,
élevée pour un
hachage fin
30 secondes 30
secondes
Noix
Chapelure
Légumes
Lame en S Élevée 30 secondes 10
secondes
Mélanger et
broyer des
légumes, des
noix.
Mélanger des
tartinades et
des trempettes.
Disque
émulsifiant
Basse à
moyenne
90 secondes 90
secondes
Mayonnaise
Vinaigrettes
Disque
éminceur
Basse à
moyenne
15 secondes 15
secondes
Pommes de
terre
Chou
Carottes
Concombres
Disque
déchiqueteur
Basse à
moyenne
15 secondes 15
secondes
Carottes
Zucchini
Fromage
Pilon Basse à
moyenne
60 secondes 60
secondes
Légumes cuits
Pommes de
terre
Fruits pour
confitures
REMARQUE: Toujours s’assurer que l’accessoire et la poignée du moteur sont
secs avant de les fixer.
RÉGLAGE DE LA VITESSE
La base du moteur comporte un cadran de vitesse variable. Tourner le cadran de
réglage à la vitesse désirée.

37
UTILISATION DU MÉLANGEUR À IMMERSION
S’assurer que la tige du mélangeur à immersion est assemblée à la base du moteur
selon les instructions de la section « INSTALLATION DES ACCESSOIRES ».
1. Déposer les aliments à mélanger dans le contenant à mesurer, le bol ou la casserole
fournie. Le récipient doit être à moitié plein ou moins pour mélanger des liquides ou
pour faire une purée de fruits et/ou légumes, afin d’éviter tout déversement d’aliments.
Important : Toujours s’assurer que la base du moteur et la tige du mélangeur
à immersion sont bien assemblées, et que le cordon d’alimentation n’est pas
endommagé avant l’utilisation.
2. Commencer à basse vitesse et augmenter à vitesse élevée en tournant le cadran de
réglage au haut du boîtier du moteur.
Remarque : Avant de sélectionner des vitesses élevées, il est recommandé
de commencer à basse vitesse et d’augmenter à vitesse élevée pour éviter
les éclaboussures et un mixage excessif.
3. Plonger le mélangeur le plus profondément possible dans le contenant ou le bol, et
appuyer sur le bouton MARCHE/ARRÊT pour mettre le mélangeur en marche.
4. Mélanger les ingrédients en déplaçant l’appareil de bas en haut et en mouvement
circulaire.
5. Une fois le mélange terminé, relâcher le bouton MARCHE/ARRÊT pour arrêter le
moteur, puis débrancher l’appareil.
Important : La durée de fonctionnement continu doit être inférieure à 30
secondes. Ne jamais mélanger d’huile chaude, de graisse ou de viande.
6. S’assurer que le moteur est complètement arrêté avant de retirer le mélangeur à
immersion du contenant. En cas de blocage des lames, arrêter d’abord le moteur et
débrancher l’appareil avant de dégager les lames.
7. Après le mixage, débrancher et démonter le mélangeur à immersion de la base du
moteur en tournant cette dernière dans le sens antihoraire, puis nettoyer l’accessoire.
CONSEILS ET ASTUCES POUR L’UTILISATION DU MÉLANGEUR
À IMMERSION
• Le mélangeur à immersion permet de mixer des aliments et des liquides
rapidement; par conséquent, un mixage excessif est à prévoir. Arrêter le moteur
et vérifier les aliments pendant l’opération pour éviter le mixage excessif.
• Pour la mise en purée et le mixage, découper les aliments en morceaux de même
dimension. Cette précaution assurera des résultats lisses et uniformes.
• Permettre aux aliments de refroidir légèrement avant le mixage.
• S’assurer de tenir le corps de l’appareil et le cordon d’alimentation éloignés de la
source de chaleur.

38
UTILISATION DU PILON À POMMES DE TERRE
REMARQUE : Fixer le pilon à pommes de terre à la base du moteur selon les
instructions de la section « Installation des accessoires » ci-dessus. Le pilon est
correctement fixé à la base du moteur lorsque les marques sur le pilon sont
alignées sur celles de la base.
1. Déposer les aliments à piler dans un récipient ou un grand bol/contenant à mélanger.
Remarque : N’utiliser le pilon que pour des légumes ou des fruits bien cuits.
2. Brancher l’appareil et sélectionner la vitesse désirée à l’aide du cadran situé au haut
de la base.
3. Plonger entièrement le pilon dans les ingrédients, puis presser et maintenir le bouton
MARCHE/ARRÊT en déplaçant le pilon lentement de haut en bas et en mouvement
circulaire jusqu’à la texture désirée, en ajoutant les liquides graduellement au besoin.
Conseil : Utiliser le pilon à vitesse basse à moyenne par rafales de 1 ou 2
secondes chacune en accordant un délai de 1 seconde entre chaque rafale;
ne pas faire fonctionner l’appareil de façon continue pendant plus d’une
minute. Faire une pause avant de poursuivre le pilage.
4. Arrêter le moteur en relâchant le bouton MARCHE/ARRÊT et retirer le pilon du
bol. Débrancher l’appareil. Tourner la base du moteur dans le sens antihoraire pour
détacher le pilon de la base.
Important : Ne pas utiliser l’appareil de façon continue pendant plus de 60
minutes.
5. En cas de blocage du pilon, arrêter d’abord le moteur et débrancher l’appareil avant
de dégager le pilon.
6. Retirer la lame du pilon en tournant dans le sens horaire. Retirer délicatement la lame
pour la nettoyer et remettre la lame en place en tournant dans le sens antihoraire.
Important : S’assurer que la lame du pilon s’est immobilisée complètement
avant de la retirer du pilon.
UTILISATION DU FOUET
S’assurer que le fouet est assemblé à la base du moteur selon les instructions de
la section « Installation des accessoires » ci-dessus.
1. Déposer les ingrédients à fouetter dans un contenant à mesurer ou un bol à
mélanger propre et sec.
Remarque : Pour laisser l’air pénétrer dans les ingrédients pendant le
fouettage, utiliser un récipient profond et large, puis déplacer le fouet
délicatement de haut en bas.
2. Plonger le fouet entièrement dans les ingrédients et sélectionner la basse vitesse au
cadran de réglage pour éviter les éclaboussures.
3. Presser et maintenir enfoncé le bouton MARCHE/ARRÊT pour mettre le moteur en
marche. Fouetter les ingrédients en déplaçant l’appareil lentement de bas en haut et
en mouvement circulaire. Commencer à basse vitesse et augmenter à vitesse élevée.
4. Lorsque le fouettage est terminé, relâcher le bouton MARCHE/ARRÊT et retirer le
fouet du bol.

39
Important : Toujours s’assurer que le fouet s’est immobilisé complètement
avant de le retirer.
Important : La durée de fonctionnement continu doit être inférieure à 2
minutes. Ne jamais fouetter d’huile chaude, de graisse ou de viande.
5. En cas de blocage du fouet, arrêter d’abord le moteur et débrancher l’appareil avant
de dégager le fouet.
Remarque : Ne jamais remplir le récipient au-dessus de la marque de 500 ml
(2 tasses). Le récipient peut aussi être utilisé comme tasse à mesurer.
6. Débrancher l’appareil, détacher le fouet de la base du moteur et nettoyer l’accessoire.
CONSEILS POUR LE FOUETTAGE :
• Pour fouetter de la crème, toujours utiliser de la crème à fouetter fraîche.
• Dans le cas de blancs d’œufs, fouetter des œufs frais conservés à
température ambiante pour obtenir un volume plus élevé et plus stable.
• Il est recommandé d’utiliser la vitesse la plus élevée pour fouetter des
blancs d’œufs et de la crème.
UTILISATION DU BOL DU ROBOT CULINAIRE
1. Sélectionner la lame à utiliser - lame en S, disque éminceur/déchiqueteur ou disque
émulsifiant - et consulter les instructions appropriées avant de continuer.
Remarque : Toujours placer la lame ou le disque dans le robot culinaire avant
d’y incorporer les aliments. Consulter les instructions appropriées à chaque
lame/disque aux étapes suivantes.
2. Déposer les ingrédients directement dans le bol. Si vous ne voulez pas placer les
ingrédients dans le bol avant de mettre le couvercle, vous pouvez utiliser l’entonnoir
après l’assemblage. Ne pas excéder la ligne de remplissage maximal (MAX).
3. Pour ajouter des ingrédients dans l’entonnoir, toujours utiliser le poussoir pour faire
pénétrer les ingrédients, jamais les mains.
4. Mettre le couvercle du bol en place et s’assurer qu’il est bien aligné. Tourner le
couvercle dans le sens antihoraire pour le verrouiller.
5. Placer l’entonnoir dans la trémie et insérer le poussoir d’aliments dans l’entonnoir.
6. Insérer la base du moteur dans le couvercle du robot culinaire et tourner dans le sens
horaire pour verrouiller.
7. Brancher l’appareil et sélectionner la vitesse à l’aide du cadran de réglage.
8. Presser et maintenir enfoncé le bouton MARCHE/ARRÊT pour mettre l’appareil en
marche et commencer le traitement.
9. Si l’entonnoir est utilisé, ajouter lentement les ingrédients dans l’entonnoir à l’aide du
poussoir comme guide.
10. Lorsque le traitement est terminé, relâcher le bouton MARCHE/ARRÊT pour arrêter
le moteur. Débrancher l’appareil.
11. Toujours découper préalablement les aliments pour qu’ils puissent entrer dans
l’entonnoir.
12. En cas de blocage des lames ou des disques, arrêter et débrancher l’appareil avant
de les dégager.

40
UTILISATION DE LA LAME EN S
1. La lame en S sert à mixer et à hacher divers aliments.
2. Retirer le protège-lame et déposer la lame en S sur une
surface plate. Maintenir le centre en plastique fermement
en place et aligner très délicatement les pattes de l’arbre
sur la lame en S, puis insérer l’arbre d’entraînement dans le
haut de la lame. Enfoncer pour le fixer en place.
3. Placer le montage de la lame en S et de l’arbre sur l’axe
d’entraînement du bol, en poussant vers le bas pour
verrouiller.
Avertissement : Les lames sont tranchantes; manipuler les
lames avec prudence.
4. Déposer les aliments à hacher dans le bol du robot
culinaire, autour de la lame. Mettre le couvercle du robot
culinaire et fixer la base du moteur au couvercle comme
indiqué à la section UTILISATION DU BOL DU ROBOT CULINAIRE.
5. Presser et maintenir enfoncé le bouton MARCHE/ARRÊT ou le bouton MARCHE/
ARRÊT du mode d’impulsion pour commencer le traitement.
6. Une fois le traitement terminé, débrancher l’appareil, détacher la base du moteur
et retirer le couvercle du bol.
7. Pour retirer la lame de l’arbre d’entraînement, placer le protège-lame sur la lame
et déposer l’assemblage sur une surface plate. Maintenir le centre de la lame
fermement en place sur la surface et tirer l’arbre d’entraînement vers le haut.
UTILISATION DU DISQUE ÉMINCEUR/DÉCHIQUETEUR
1. Placer l’arbre sur l’axe d’entraînement dans le bol, en poussant vers le bas pour
verrouiller.
Remarque : S’assurer de retirer la lame en S de l’arbre d’entraînement avant
d’utiliser le disque.
2. Le disque éminceur/déchiqueteur comporte un côté pour déchiqueter et un
côté pour émincer. Placer le côté désiré vers le HAUT. Aligner le trou au centre
du disque sur le haut de l’arbre d’entraînement et s’assurer que le disque est
fermement en place en poussant vers le bas.
3. Assembler le couvercle du robot culinaire et fixer la base du moteur au couvercle
comme indiqué à la section UTILISATION DU BOL DU ROBOT CULINAIRE. Presser
et maintenir enfoncée la touche MARCHE/ARRÊT pour mettre l’appareil en
marche. Ajouter lentement les ingrédients dans la trémie ou l’entonnoir.
4. Pour démonter, retirer le disque de l’arbre d’entraînement.
13. Détacher la base du moteur du couvercle du robot culinaire en tournant dans le
sens antihoraire, puis retirer le couvercle du bol en tournant dans le sens horaire.
Retirer délicatement le disque ou la lame en S et utiliser une spatule pour enlever
tout excédent d’aliments du disque ou de la lame, et pour retirer les aliments du bol.
Remarque : Toujours arrêter et débrancher l’appareil avant le nettoyage.
Important : La durée de fonctionnement continu doit être inférieure à 30
secondes.

41
CONSEILS POUR L’UTILISATION DU ROBOT CULINAIRE
• La base du bol comporte un couvercle antidérapant en caoutchouc entourant le
bol. Cette caractéristique assure la stabilité du bol; toutefois, il est recommandé,
pendant le traitement, de tenir la base du moteur d’une main et le bol/couvercle
de l’autre.
• Ne pas faire fonctionner la base du moteur lorsque le bol est vide.
• Pour le traitement, découper les aliments en morceaux de même dimension pour
obtenir des résultats plus rapides et plus uniformes.
• NE PAS traiter d’aliments solides comme de la glace, du café ou des quartiers de
chocolat dans le bol, car ils risquent d’endommager la lame.
• NE PAS traiter d’aliments bouillants ou chauds dans le bol.
• Ne JAMAIS retirer les lames du bol avant que le traitement soit terminé.
UTILISATION DU MINI HACHOIR
1. Retirer le protège-lame de la lame du hachoir.
2. Placer la lame du hachoir sur l’axe d’entraînement du bol.
3. Important : Manipuler avec précaution; les lames sont tranchantes.
4. Déposer les aliments à hacher dans le mini hachoir et fixer le couvercle.
Important : Ne pas hacher de viande crue. Ne pas hacher d’aliments solides -
tout aliment que vous ne pouvez pas découper avec un couteau de cuisine.
Remarque : La durée maximale de fonctionnement est de 30 secondes. La
durée de la pause est de 30 secondes.
5. Fixer la base du moteur au couvercle en tournant la base dans le sens horaire pour
la verrouiller.
6. Presser et relâcher le bouton MARCHE/ARRÊT pour utiliser le mode impulsion, ou
presser et maintenir enfoncé le bouton MARCHE/ARRÊT pour mélanger. Relâcher le
bouton pour arrêter le moteur. Débrancher l’appareil lorsque le hachage est terminé.
7. En cas de blocage du hachoir, arrêter d’abord le moteur et débrancher l’appareil
avant de dégager le hachoir.
8. Après l’utilisation, débrancher et démonter la base du moteur et le couvercle dans
l’ordre, puis retirer la lame du bol en tirant la tige en plastique vers le haut. Retirer les
aliments du bol.
UTILISATION DU DISQUE ÉMULSIFIANT
1. Tenir le disque émulsifiant d’une main et l’arbre d’entraînement de l’autre. Aligner
les pattes de l’arbre sur les pattes du disque, et pousser vers le bas pour fixer.
2. Placer l’arbre sur l’axe d’entraînement dans le bol, en poussant vers le bas pour
verrouiller.
3. Ajouter les ingrédients dans le bol et fixer le couvercle ainsi que la base du
moteur pour commencer le traitement.
4. Ajouter lentement de l’huile dans l’entonnoir.
5. Pour démonter, tenir le disque d’une main et retirer l’arbre d’entraînement
du disque.

42
RANGEMENT
1. Placer la base de rangement sur une surface sèche et de niveau.
2. Placer chaque accessoire en cercle dans la base et tourner chaque
accessoire dans le sens antihoraire pour le fixer à la base.
3. Placer la base du moteur dans la découpe circulaire et tourner dans le sens
horaire pour verrouiller.
4. Brancher le cordon de la base du moteur dans la base de rangement pour
ranger le cordon de façon pratique.
ENTRETIEN ET NETTOYAGE
1. Débrancher l’appareil et détacher les accessoires de la base du moteur.
Mise en garde : Nettoyer les lames et les disques avec prudence, car ils sont
extrêmement tranchants.
2. Essuyer la base du moteur et le couvercle à l’aide d’un linge doux et humide. Ne pas
utiliser de nettoyants abrasifs ou de laine d’acier. Ne pas immerger la base du moteur
dans l’eau ou dans un autre liquide. Ne pas mettre la base du moteur ou le mélangeur à
immersion au lave-vaisselle.
3. Laver à la main toutes les autres pièces dans de l’eau chaude savonneuse. Rincer et
bien assécher.
4. Vous pouvez laver les accessoires et les bols au lave-vaisselle, dans le panier supérieur
seulement. Si vous utilisez le lave-vaisselle, le traitement intensif à l’intérieur du lavevaisselle peut endommager les surfaces avec le temps.
5. Nettoyage rapide des accessoires : Fixer l’accessoire à la base du moteur et plonger
l’accessoire dans un contenant d’eau. Presser le bouton MARCHE/ARRÊT pendant 5
secondes pour enlever tout résidu d’aliment sur la lame et poursuivre l’utilisation au besoin.
6. Lorsque les pièces sont sèches, remettre les protège-lames en place et ranger tous les
accessoires dans la base de rangement.

43
DÉPANNAGE
PROBLÈME SOLUTION
Les lames ne tournent
pas
Quantité d’aliments excessive dans le bol; réduire
la quantité.
Morceaux d’aliments trop gros; découper en
morceaux plus petits.
S’assurer que l’appareil est assemblé
correctement et que les accessoires sont bien
fixés.
Le couvercle ne se
verrouille pas
L’arbre d’entraînement n’est pas bien
installé. Retirer le couvercle, redresser l’arbre
d’entraînement et s’assurer qu’il est bien centré
sur la tige métallique. Remettre le couvercle en
place.
Des aliments sont coincés sous les lames, ce qui
empêche le verrouillage du couvercle. Arrêter
l’appareil, le débrancher et retirer les aliments
à l’aide d’une spatule ou d’un ustensile, et
continuer.
Le disque déchiqueteur ralentit en cours
d’utilisation
Les aliments déchiquetés ont excédé le
niveau maximal. Vider le bol et poursuivre le
déchiquetage.
Une pression trop est exercée pour le
déchiquetage. Réduire la pression d’insertion.
Le moteur semble
incapable de traiter le
volume d'aliments
La vitesse n’est pas appropriée. Consulter le guide
des vitesses appropriées au traitement.
Trop grande quantité d’aliments.
Si une aide supplémentaire est nécessaire, s’il vous plaît contacter notre
équipe de service à la clientèle au
1-800-231-9786.

44
RECETTES
SALSA DE TOMATES FRAÎCHES
6 tomates italiennes épépinées et coupées
en quartiers
Un demi-oignon rouge moyen, coupé
en morceaux de 2,5 cm (1 po)
3 gousses d’ail
2 piments jalapenos épépinés, coupés
en morceaux de 2,5 cm (1 po)
250 ml (1 tasse) de feuilles de coriandre
fraîches peu compactées
30 ml (2 c. à table) de jus de lime frais
10 ml (2 c. à thé) de sucre
10 ml (2 c. à thé) de sel
5 ml (1 c. à thé) de poivre noir
fraîchement moulu
PLACER tous les ingrédients dans le bol équipé de la lame en S.
HACHER PAR IMPULSION jusqu’à l’obtention de la consistance désirée.
Donne 625 ml (2
1
⁄2 tasses)
CONSEIL :
Remplacer les piments jalapenos par des habaneros ou des piments Serrano
MAYONNAISE
4 blancs d’œufs
10 ml (2 c. à thé) de moutarde sèche
10 ml (2 c. à thé) de jus de citron
10 ml (2 c. à thé) de vinaigre de vin blanc
15 ml (1 c. à table) de sucre granulé
5 ml (1 c. à thé) de sel
375 ml (1
1
⁄2 tasse) d’huile de canola ou de
carthame
PLACER le disque émulsifiant dans le bol du robot culinaire. Ajouter les 6 premiers
ingrédients et mixer 30 secondes ou jusqu’à ce que le mélange d’œufs devienne jaune
clair et crémeux, sans être épais.
AJOUTER l’huile graduellement et uniformément dans la trémie pendant que le
robot culinaire fonctionne; mélanger 1 minute jusqu’à ce que l’huile soit entièrement
incorporée et que le mélange adhère aux bords du bol.
RETIRER le disque et verser la mayonnaise dans un récipient. Garder réfrigéré.
Donne 375 ml (1 1/2 tasse).
CRÈME FOUETTÉE
500 ml (2 tasses) de crème épaisse, réfrigérée
65 ml (1/4 tasse) de sucre
10 ml (2 c. à thé) de vanille
VERSER la crème, le sucre et la vanille dans un grand verre ou un bol en acier
inoxydable.
FOUETTER la crème en commençant à basse vitesse pour éviter les éclaboussures.
MÉLANGER la crème de 1 à 2 minutes en augmentant la vitesse à mesure que la crème
épaissit et forme des pointes molles.
Donne 875 ml (3 1/2 tasses)
PURÉE DE POMMES DE TERRE
6 pommes de terre moyennes, pelées et en
quartiers
15 ml (3 c. à table) de beurre, ramolli
3 ml (1⁄2 c. à thé) de sel
1,25 ml (
1
⁄4 c. à thé) de poivre
15 ml (1 c. à table) de lait ou de crème
DÉPOSER les pommes de terre dans une casserole moyenne et couvrir d’eau. Amener
à ébullition. Réduire le feu; couvrir et cuire 15 minutes, ou jusqu’à ce que les pommes
de terre soient tendres. Égoutter.
PLACER les pommes de terre cuites, le beurre et la crème dans un bol moyen. Ajouter le
sel et le poivre. Piler avec le pilon à pommes de terre jusqu’à ce que la purée soit lisse, en
ajoutant du lait au besoin. Ne pas trop piler; autrement, la purée deviendra collante.
Donne 6 portions (80 ml).

45
VINAIGRETTE SIMPLE
Pour créer votre propre vinaigrette, combinez vos vinaigres, moutardes et huiles préférés en vous
servant du tableau ci-dessous.
PLACER le vinaigre et la moutarde dans le bol du mini hachoir. Hacher quelques secondes pour
combiner les ingrédients.
AJOUTER l’huile; hacher jusqu’à ce que les ingrédients soient mélangés.
CONSERVER au réfrigérateur jusqu’à 4 jours.
Donne 250 ml (1 tasse).
PÂTE À PIZZA POUR ROBOT CULINAIRE
1 emballage de levure sèche active
5 ml (1 c. à thé) de sucre
170 ml (
2
⁄3 tasse) d’eau tiède
420 ml (1
2
⁄3 tasse) de farine tout usage
5 ml (1 c. à thé) de sel
60 ml (12 c. à thé) d’huile végétale
REMUER la levure et le sucre dans l’eau tiède; laisser reposer jusqu’à ce que le mélange
mousse, environ 10 minutes.
AJOUTER la farine et le sel dans le robot culinaire et, pendant que le robot culinaire
fonctionne, verser le mélange de levure dans la trémie et mélanger pendant 45
secondes ou jusqu’à ce que la pâte se détache des bords du bol. Ajouter l’huile dans la
trémie et mélanger pendant 1 minute additionnelle.
Remarque : Si la pâte adhère aux bords du bol, ajouter de la farine, 15 ml (1 c. à table) à
la fois, et mélanger 10 secondes après chaque ajout.
ROULER la pâte sur une surface farinée pour créer un (35 cm (14 po)) ou deux (23 cm (9
po)) cercles. Tourner et retourner la pâte plusieurs fois et utiliser suffisamment de farine
pour que la pâte ne colle pas.
HUILER des moules à pain et saupoudrer de semoule de maïs. Plier la pâte à pizza en
deux, puis encore en deux, pour la transférer sur une plaque à pizza, en plaçant la pointe
de la pâte au centre de la plaque. Déplier la pâte et l’abaisser à partir du centre vers
l’extérieur, en pliant le contour pour créer un rebord.
GARNIR la croûte de sauce, de fromage et de viande et de légumes, au choix.
CROÛTE DE TARTE
1 250 ml (1 tasse) de farine
3 ml (
1
⁄2 c. à thé) de sel
30-45 ml (2-3 c. à table) d’eau glacée
60 ml (4 c. à table) de beurre froid, en petits
morceaux
PLACER la farine, le sel et le beurre dans le robot culinaire équipé de la lame en S.
APPLIQUER LE MODE À IMPULSION de 10 à 20 secondes ou jusqu’à ce que le mélange
forme des miettes de la taille d’un pois. Pendant que le robot culinaire fonctionne,
ajouter l’eau, 15 ml (1 c. à table) à la fois, dans la trémie jusqu’à ce que la pâte commence
à former une boule.
RETIRER la pâte du bol et former une boule; puis, abaisser la pâte en forme de disque.
ENROBER la pâte dans une pellicule plastique; réfrigérer au moins 1 heure avant de rouler.
FRAPPÉ AUX BANANES ET AUX ANANAS
65 ml (1⁄4 tasse) de jus d’orange
Une demi-banane, coupée en morceaux
de 2,5 cm (1 po)
125 ml (1/2 tasse) de morceaux
d’ananas fraîchement coupés
65 ml (1/4 tasse) de yogourt grec nature
sans gras
PLACER tous les ingrédients dans le récipient. Insérer le mélangeur en s’assurant que
le protecteur est submergé. Mélanger en appliquant des mouvements de haut en bas
pendant 30-45 secondes ou jusqu’à ce que tous les ingrédients soient bien mélangés.
Vinaigre (65 ml (1/4 tasse)) Moutarde (10 ml (2 c. à thé)) Huile (170 ml (2/3 tasse)
Vinaigre de vin rouge Moutarde de Dijon Huile d’olive
Vinaigre de vin blanc Moutarde de Dijon au miel Huile de pépins de raisin
Vinaigre balsamique Moutarde à gros grains Huile de carthame
Vinaigre de cidre de pomme

46
RENSEIGNEMENTS DE GARANTIE ET
SERVICE À LA CLIENTÈLE
Pour communiquer avec les services d’entretien ou de réparation, ou pour
adresser toute question relative au produit, composer le numéro sans frais
approprié indiqué sur la page couverture. Ne pas retourner le produit où il a
été acheté. Ne pas poster le produit au fabricant ni le porter dans un centre
de service. On peut également consulter le site web indiqué sur la page
couverture.
Garantie Limitée De Deux Ans
(Valable seulement aux États-Unis et au Canada)
Quelle est la couverture?
• Tout défaut de main-d’oeuvre ou de matériau; toutefois, la responsabilité de la
société. Applica se limite au prix d’achat du produit.
Quelle est la durée?
• Deux année(s) à compter de la date d’achat initiale, avec une preuve d’achat.
Quelle aide offrons nous?
• Remplacement par un produit raisonnablement semblable nouveau ou réusiné.
Comment se prévaut-on du service?
• Conserver son reçu de caisse comme preuve de la date d’achat.
• Visiter notre site web au www.prodprotect.com/applica, ou composer sans frais le
1-800 231-9786, pour obtenir des renseignements généraux relatifs à la garantie.
• On peut également communiquer avec le service des pièces et des accessoires au
1-800 738-0245.
Qu’est-ce que la garantie ne couvre pas?
• Des dommages dus à une utilisation commerciale.
• Des dommages causés par une mauvaise utilisation ou de la négligence.
• Des produits qui ont été modifiés.
• Des produits utilisés ou entretenus hors du pays où ils ont été achetés.
• Des pièces en verre et tout autre accessoire emballés avec le produit.
• Les frais de transport et de manutention reliés au remplacement du produit.
• Des dommages indirects (il faut toutefois prendre note que certains états ne
permettent pas l’exclusion ni la limitation des dommages indirects).
Quelles lois régissent la garantie?
• Les modalités de la présente garantie donnent des droits légaux spécifiques.
L’utilisateur peut également se prévaloir d’autres droits selon l’état ou la province
qu’il habite.

47
PÓLIZA DE GARANTÍA
(Válida sólo para México)
DURACIÓN
Rayovac de México SA de CV garantiza este producto por 2 años a partir de
la fecha original de compra.
¿Qué cubre esta garantía?
• Esta Garantía cubre cualquier defecto que presenten las piezas,
componentes y la mano de obra contenidas en este producto.
• Requisitos para hacer válida la garantía
• Para reclamar su Garantía deberá presentar al Centro de Servicio Autorizado
la póliza sellada por el establecimiento en donde adquirió el producto. Si no
la tiene, podrá presentar el comprobante de compra original.
¿Donde hago válida la garantía?
• Llame sin costo al teléfono 01 800 714 2503, para ubicar el Centro de
Servicio Autorizado más cercano a su domicilio en donde usted podrá
encontrar partes, componentes, consumibles y accesorios.
Procedimiento para hacer válida la garantía
Acuda al Centro de Servicio Autorizado con el producto con la póliza de
Garantía sellada o el comprobante de compra original, ahí se reemplazará
cualquier pieza o componente defectuoso sin cargo alguno para el usuario
final. Esta Garantía incluye los gastos de transportación que se deriven de su
cumplimiento.
Excepciones
Esta Garantía no será válida cuando el producto:
A) Se hubiese utilizado en condiciones distintas a las normales.
B) No hubiese sido operado de acuerdo con el instructivo de uso
que le acompaña.
C) Cuando el producto hubiese sido alterado o reparado por personas
no autorizadas por Rayovac de México SA de CV.
Nota: Usted podra encontrar partes, componentes, consumibles y
accesorios en los centros de servicios autorizados. Esta garantía incluyen los
gastos de transportación que se deriven de sus cumplimiento dentro de sus
red de servicio.

48

49

50
Por favor llame al número correspondiente que aparece en la lista a continuación para solicitar
que se haga efectiva la garantía y donde Ud. puede solicitar servicio, reparaciones o partes en
el país donde el producto fué comprado.
Argentina
Servicio Técnico
Monroe 3351
CABA Argentina
Tel: 0800 – 444 - 7296
servicios@rayovac.com.ar
Chile
SERVICIO DE MAQUINAS Y HERRAMIENTAS
LTDA .
Portugal Nº 644
Santiago – Chile
Fonos: 02-6355208 / 02-6341169
Email: servicio@spectrumbrands.cl
Call center: 800-171-051
Colombia
Rayovac Varta S.A
Carrera 17 Número 89-40
Línea gratuita nacional
Tel. 018000510012
Costa Rica
Aplicaciones Electromecanicas, S.A.
Calle 26 Bis y Ave. 3
San Jose, Costa Rica
Tel. (506) 257-5716 / 223-0136
administracion@masterecuador.com
Ecuador
SERVICIO MASTER ECUADOR
ALMERIA N50-71 Y DE LOS ALAMOS
Tel. (593) 2281-3882 / 2240-9870
El Salvador
Calle San Antonio Abad 2936
San Salvador, El Salvador
Tel. (503) 2284-8374
Guatemala
MacPartes SA
3ª Calle 414 Zona 9
Frente a Tecun
Tel. (502) 2331-5020 / 2332-2101
Honduras
ServiTotal
Contigua a Telecentro
Tegucigalpa, Honduras,
Tel. (504) 235-6271
México
Articulo 123 # 95 Local 109 y 112
Col. Centro, Cuauhtemoc,
México, D. F.
Tel. 01 800 714 2503
Nicaragua
ServiTotal
De semáforo de portezuelo
500 metros al sur.
Managua, Nicaragua,
Tel. (505) 248-7001
Panamá
Servicios Técnicos CAPRI
Tumbamuerto Boulevard
El Dorado Panamá
500 metros al sur.
Tel. 3020-480-800 sin costo
(507) 2360-236 / 159
Perú
Servicio Central Fast Service
Av. Angamos Este 2431
San Borja, Lima Perú
Tel. (511) 2251 388
Puerto Rico
Buckeye Service
Jesús P. Piñero #1013
Puerto Nuevo, SJ PR 00920
Tel.: (787) 782-6175
Republica Dominicana
Prolongación Av. Rómulo Betancourt
Zona Industrial de Herrera
Santo Domingo, República Dominicana
Tel.: (809) 530-5409
Venezuela
Inversiones BDR CA
Av. Casanova C.C.
City Market Nivel Plaza Local 153
Diagonal Hotel Melia,
Caracas.
Tel. (582) 324-0969
www.applicaservice.com
servicio@applicamail.com

51
Comercializado por:
Rayovac de México S.A de C.V
Autopista México Querétaro
No 3069-C Oficina 004
Colonia San Andrés Atenco, Tlalnepantla
Estado de México, C.P. 54040
Mexico.
Tel: (55) 5831 – 7070
Servicio y Reparación
Art. 123 No. 95
Col. Centro, C.P. 06050
Deleg. Cuauhtemoc
Servicio al Consumidor,
Venta de Refacciones y Accesorios
01 800 714 2503
Importado por / Imported by:
RAYOVAC ARGENTINA S.R.L.
Humboldt 2495 Piso# 3
(C1425FUG) C.A.B.A. Argentina.
C.U.I.T No. 30-70706168-1
Importado por / Imported by:
Rayovac de México S.A de C.V
Autopista México Querétaro
No 3069-C Oficina 004
Colonia San Andrés Atenco, Tlalnepantla
Estado de México, C.P. 54040
Mexico.
Tel: (55) 5831-7070
Para atención de garantía marque:
01 (800) 714 2503
HB5500 - 300 W 120 V ~ 60 Hz
Sello del Distribuidor:
Fecha de compra:
Modelo:
Código de fecha / Date Code / Le code de date:

2014/7/24/125
T22-5001425
© 2014 The Black & Decker Corporation
and Spectrum Brands, Inc.,
Middleton, WI 53562
Made in People’s Republic of China
Fabricado en la República Popular de China
Fabriqué en République populaire de Chine
BLACK+DECKER and the BLACK+DECKER logo are trademarks of The Black & Decker
Corporation and are used under license. All rights reserved.
BLACK+DECKER y el logo tipo BLACK+DECKER son marcas registradas de The
Black&Decker Corporation y son utilizados bajo licencia. Todos los derechos reservados.
BLACK + DECKER et le logo BLACK &+DECKER sont des marques de commerce de The
Black & Decker Corporation, et sont utilisés sous licence. Tous droits réservés.
www.BlackAndDeckerAppliances.com
 Loading...