

Page 1
FX1200 Food Processor
First Use Safety Recommendation
Please read through this booklet for safe and efficient use of the appliance.
We urge you read and follow all instructions, even if you are familiar with a
similar appliance.
Keep this guide handy for future reference.
English Page 02
Farsi Page 08
Arabic Page 14
FX1200
Page 2
English
3
5
1
6
7
4
2
Figure A
23
22
21
20
19
18
17
25
16
24
8
15
11
9
10
14
31
35
30
32
29
12
13
26
28
34
32
33
27
-2-
Page 3

English
Intended use
Your Black & Decker Food Processor has been
designed for processing ingredients as listed in this
manual.
This appliance is intended for indoor consumer use
only.
Safety Instructions
• Warning! When using mains-powered appliances,
basic safety precautions, including the following,
should always be followed to reduce the risk of
fire, electric shock, personal injury and material
damage.
• Read all of this manual carefully before using the
appliance.
• The intended use is described in this manual. The
use of any accessory or attachment or the
performance of any operation with this appliance
other than those recommended in this instruction
manual may present a risk of personal injury.
• Retain this manual for future reference.
• Always route the cord carefully to avoid a tripping
hazard.
• Never operate an appliance directly below the
socket-outlet it is connected to.
Using your appliance
• Make sure that the appliance is switched off
before connecting to or disconnecting from the
power supply.
• Always take care when using the appliance.
• Do not use the appliance outdoors.
• Never pull the power supply cord to disconnect
the plug from the socket. Keep the power supply
cord away from heat, oil and sharp edges.
• Disconnect the appliance from the power supply
when not in use, before fitting or removing parts,
maintenance and before cleaning.
• Surfaces may be hot during use and during the
cool down period
• Do not operate or place any part of this appliance
on or near any hot surface, such as a gas or
electric burner or in a heated oven.
• When using an extension cord with your
appliance, make sure the extension cord is
correctly wired & rated for its use.
Safety of others
• Do not allow children or any person unfamiliar
with these instructions to use the appliance.
• Do not allow children or animals to come near
the work area or to touch the appliance or power
supply cord. Close supervision is necessary
when the appliance is used near children.
• Never leave an appliance unattended when in
use
• Do not allow the cord set to hang over bench
tops
After use
• Switch off and remove the plug from the socket
before leaving the appliance unattended and
before changing, cleaning or inspecting any parts
of the appliance.
• When not in use, the appliance should be stored
in a dry place. Children should not have access
to stored appliances.
Inspection and repairs
• Before use, check the appliance for damaged or
defective parts. Check for breakage of parts,
damage to switches and any other conditions
that may affect its operation.
• Do not use the appliance if any part is damaged
or defective.
• Have any damaged or defective parts repaired or
replaced by an authorised repair agent.
• Before use, check the power supply cord for
signs of damage, ageing and wear.
• Do not use the appliance if the power supply cord
or mains plug is damaged or defective.
• If the power supply cord or mains plug is
damaged or defective it must be repaired by the
manufacturer or its service agent or a similarly
qualified person in order to avoid a hazard. Do
not cut the power supply cord and do not
attempt to repair it yourself.
• Never attempt to remove or replace any parts
other than those specified in this manual.
• Do not attempt to repair the appliance. Take it to
your nearest Black & Decker-owned or
authorised Service Centre for repair.
Double insulation
This appliance is double insulated; therefore
no earth wire is required. Always check that
the power supply corresponds to the voltage
on the rating plate.
Additional safety instructions for Food
Processors
• Do not immerse the appliance, cord set or plug in
liquids
• Always leave sufficient space around the
appliance for ventilation
• Keep loose clothing, hair, jewellery, etc. away
from moving parts.
• Do not use the unit if you have wet hands or bare
feet.
• Care is needed when handling cutting blades,
especially when removing the blades from the
bowl, emptying the bowl and during cleaning.
• “Switch off the appliance before changing
accessories or approaching parts which move in
use”.
-3-
Page 4

English
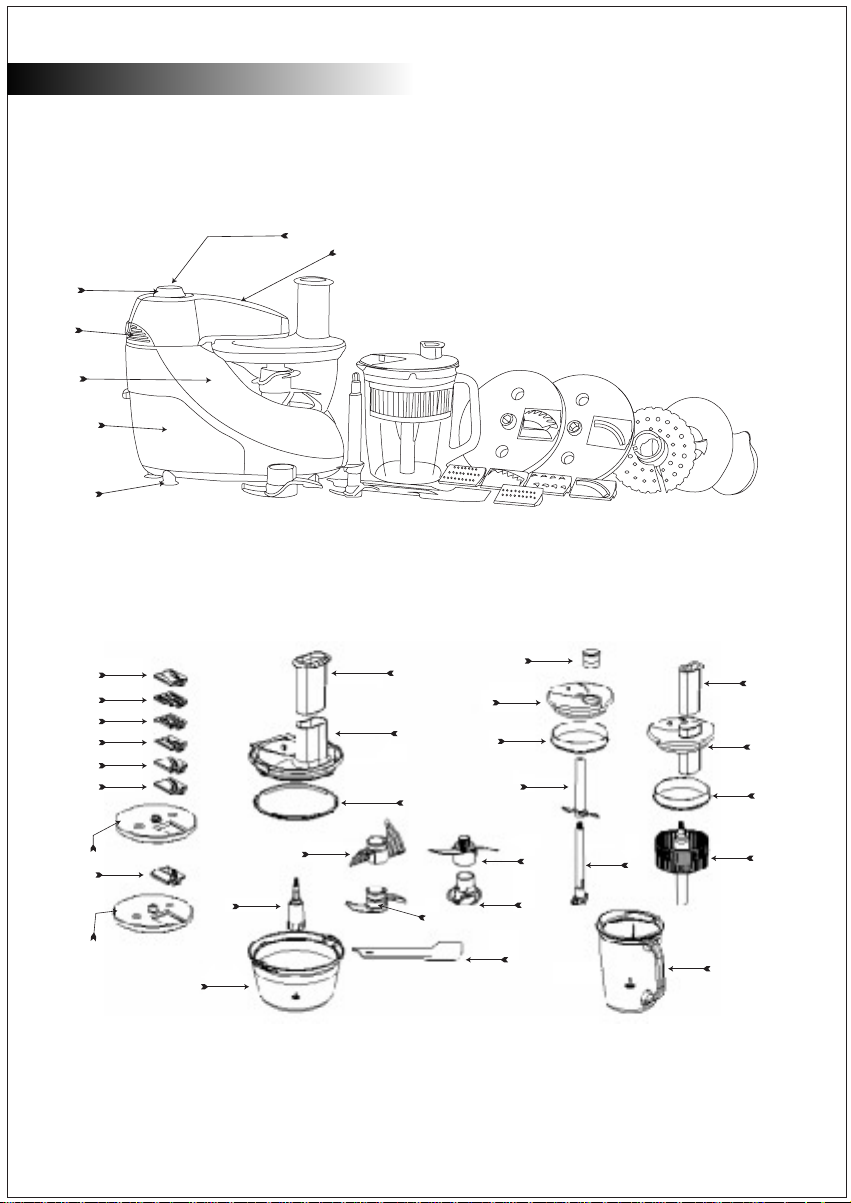
Features
This appliance includes some or all of the following
features (fig. A).
1. Motor housing
2. Swivel head
3. On/Off switch & speed control
4. Pulse control
5. Swivel head release button
6. Blade storage
7. Foot
8. Bowl
9. Bowl lid
10. Lid seal
11. Bowl pusher
12. Upper chopping blade
13. Lower chopping blade
14. Dough blade
15. Whisk
16. Chopping blade spindle
17. Blade carrier
18. Thin slicing blade
19. Thick slicing blade
20. Thin shredding blade
21. Thick shredding blade
22. Parmesan blade
23. French fries blade – small
24. French fries blade carrier
25. French fries blade – large
26. Spatula
27. Jug
28. Lower jug blade
29. Upper jug blade
30. Jug lid
31. Jug lid cap
32. Jug seal
33. Juice extractor
34. Juice extractor lid
35. Juice extractor pusher
Assembly
This appliance requires some assembly to complete
the required task. Please refer to the relevant
section for particular assembly details.
All parts should be cleaned before use. See
“Cleaning” for details.
Use
As a Food Processor
• Carefully fit the lower chopping blade (13) over
the chopping blade spindle (16) then fit the upper
chopping blade (12) onto the lower blade,
rotating the blades in a clockwise direction so
they lock together and onto the spindle.
Note: The blades should be at right-angles to
each other,forming an X-shape.
• Remove the bowl lid (9), fit the spindle & blades
onto the metal pin in the centre of the bowl then
re-fit the bowl lid, making sure the lid seal (10) is
in place.
• Ingredients can be added to the bowl while the lid
is off, or through the chute in the lid using the
bowl pusher (11) provided.
• Fit the bowl pusher (11) into the inlet chute in the
lid. This should be left in place during use to
prevent spills.
• Press the swivel head release button (5), guiding
the swivel head (2) as it lifts.
Note: The swivel head cannot be raised if the
speed selector (3) is in any position other than
“OFF”.
• Place the assembled bowl in the recess in the
motor housing (1).
• Rotate the swivel head back towards the motor
housing & push it down until it latches in place.
• Connect the appliance to a suitable electrical
supply.
• Rotate the speed control (3) to the desired speed
until the ingredients are chopped as required then
rotate the control back to 0 to turn the appliance
off.
• The pulse button (4) can be used instead of the
speed control.
• Press the swivel head release button (5), guiding
the swivel head (2) as it lifts.
• Lift the bowl from the appliance.
• Remove the bowl lid then carefully remove the
spindle & blades & transfer the ingredients to a
suitable container.
• The blades can be removed from the spindle
individually,rotatingthem in an anti-clockwise
direction.
-4-
Page 5

English
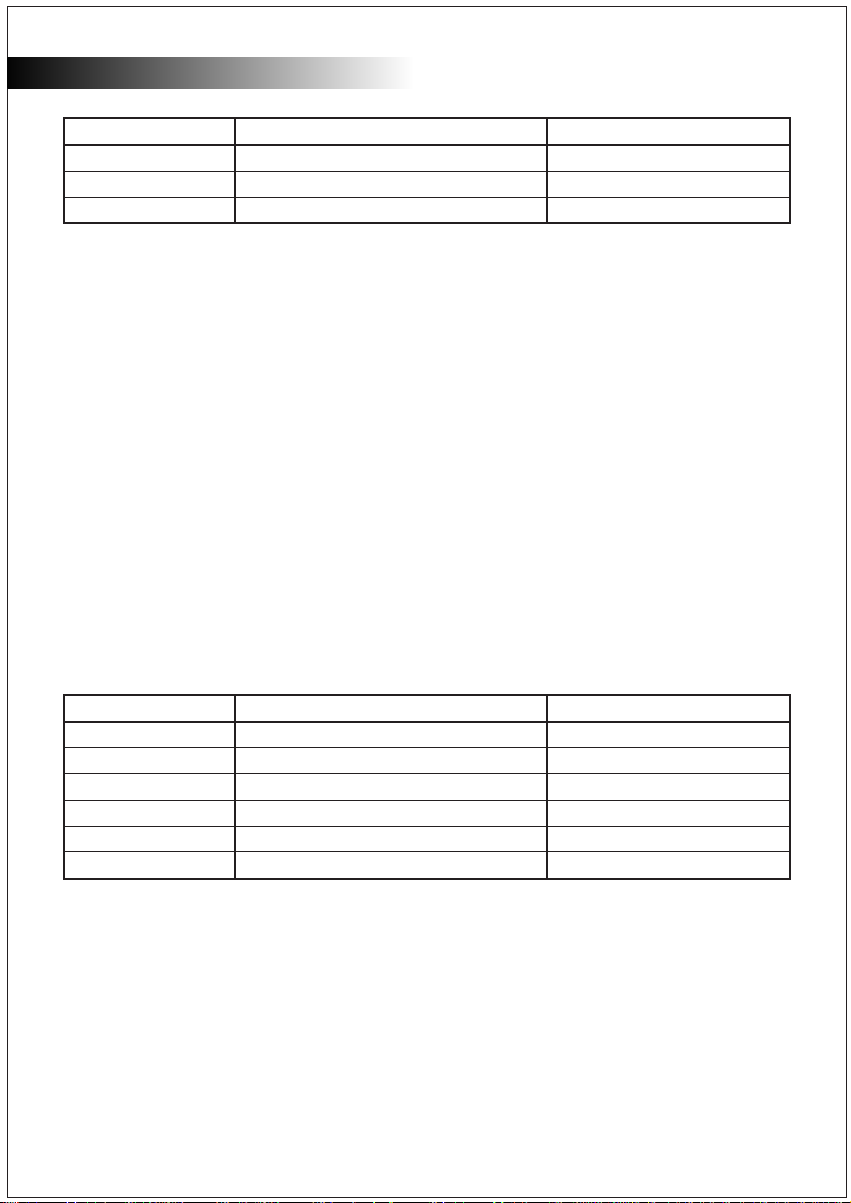
Processing Guide
Ingredients Quantity Speed Setting Time (seconds)
Meat 1,000g Max 10 to 20
Onions 700g 5 - Max 10 to 20
Nuts 600g Max 10 to 20
Fish 700g Pulse - Max 10 to 20
Cheese 700g Pulse – Max 10 to 20
Carrots 700g Pulse – Max 20
Apples 700g 5 – Max 10 to 20
Mayonnaise 4 eggs / 1 litre oil 8 - Max 20
As a Dough Mixer
Fit the dough blade (14) over the chopping blade
spindle (16), rotating the blade in a clockwise
direction so it locks onto the spindle.
Remove the bowl lid (9), fit the spindle & blades
onto the metal pin in the centre of the bowl. Place
the ingredients in the bowl, & re-fit the lid, making
sure the lid seal (10) is in place.
Liquid ingredients can be added to the bowl through
the chute in the lid.
Fit the bowl pusher (11) into the inlet chute in the lid.
This should be left in place during use to prevent
spills.
Press the swivel head release button (5), guiding the
swivel head (2) as it lifts.
Note: The swivel head cannot be raised if the speed
selector (3) is in any position other than “OFF”.
Place the assembled bowl in the recess in the motor
housing (1).
Rotate the swivel head back towards the motor
housing & push it down until it latches in place.
Connect the appliance to a suitable electrical
supply.
Rotate the speed control (3) to the desired speed
until the ingredients are mixed as required then
rotate the control back to 0 to turn the appliance off.
Press the swivel head release button (5), guiding the
swivel head (2) as it lifts.
Lift the bowl from the appliance.
Remove the bowl lid, spindle & dough blade, &
transfer the ingredients to a suitable container.
The blades can be removed from the spindle by
rotating it in an anti-clockwise direction.
Note: Never use the whisk (15) to knead dough.
Note: When preparing dough, do not operate the
appliance for longer than 20 seconds. After 20
seconds use, wait at least 2 minutes before
operating the appliance again.
Note: The maximum capacity of this appliance is
800g of dough (500g of flour and 300g of water).
As a Whisk
Fit the whisk (15) over the chopping blade spindle
(16), rotating the whisk in a clockwise direction so it
locks onto the spindle.
Remove the bowl lid (9) then fit the spindle & blades
onto the metal pin in the centre of the bowl. Place
the ingredients in the bowl, & re-fit the lid, making
sure the lid seal (10) is in place.
Liquid ingredients can be added to the bowl through
the chute in the lid.
Fit the bowl pusher (11) into the inlet chute in the lid.
This should be left in place during use to prevent
spills.
Press the swivel head release button (5), guiding the
swivel head (2) as it lifts.
Note: The swivel head cannot be raised if the speed
selector (3) is in any position other than “OFF”.
Place the assembled bowl in the recess in the motor
housing (1).
Rotate the swivel head back towards the motor
housing & push it down until it latches in place.
Connect the appliance to a suitable electrical
supply.
Rotate the speed control (3) to the desired speed
until the ingredients are mixed as required then
rotate the control back to 0 to turn the appliance off.
The pulse button (4) can be used instead of the
speed control.
Press the swivel head release button (5), guiding the
swivel head (2) as it lifts.
Lift the bowl from the appliance.
Remove the bowl lid, spindle & whisk, & transfer the
ingredients to a suitable container.
The whisk can be removed from the spindle by
rotating it in an anti-clockwise direction.
-5-
Page 6
English
Whisking Guide
Ingredients Quantity Speed Setting
Eggs 4 1 – Max
Cake mix 800g 8 – Max
Cream 500g 8 - Max
As a Slicer / Shredder
Carefully fit the required blade (18, 19, 20, 21, 22 or
23) to the blade carrier (17) so that the cutting
edges are in line with the smooth face of the blade
carrier.
Place the chopping blade spindle (16) onto the
metal pin in the centre of the bowl then place the
holder & blade over the hexagonal portion of the
spindle.
Re-fit the bowl lid, making sure the lid seal (10) is in
place and place the bowl pusher (11) into the inlet
chute in the bowl lid (9).
The bowl pusher should be left in place during use
to prevent spills.
Place the assembled bowl in the recess in the
motor housing (1).
Rotate the swivel head back towards the motor
housing & push it down until it latches in place.
Connect the appliance to a suitable electrical
supply.
Rotate the speed control (3) to the desired speed.
Remove the pusher from the inlet chute & add the
ingredients through the inlet chute, using the pusher
to gently press them onto the cutting blade.
Note: Never insert fingers or allow loose clothing,
jewellery,hair, etc. to enter into the inlet chute.
Add ingredients until the bowl is full or sufficient
ingredients have been processed then rotate the
control back to 0 to turn the appliance off.
Press the swivel head release button (5), guiding the
swivel head (2) as it lifts.
Lift the bowl from the appliance.
Remove the lid then take the blade carrier & spindle
from the bowl before transferring the ingredients to
a suitable container.
The blades can be removed from the carrier by
carefully pushing it in the opposite direction of
assembly.
Note: The large French fry blade (25) has a unique
carrier (23). This cannot be used for any other
blade. The large French fry blade & carrier are used
in the same way as the other carrier & blades.
Slicing / Shredding Guide
Ingredients Quantity Speed Setting
Carrots 500g 1 - 3
Radish 500g 1 – 3
Squash 1,000g 1 – 3
Cucumber 1,000g 1 – 3
Cheese 500g 1– Max
Potato 500g 1 – 3
As a Blender
Carefully fit the upper jug blade (29) over the lower
jug blade (28) rotating the blades in a clockwise
direction so they lock together.
Note: The blades should be at right-angles to each
other, forming an X-shape.
Remove the jug lid (30) and fit the blades onto the
metal pin in the centre of the bowl before replacing
the lid, making sure the seal (32) is in place.
Ingredients can be added to the jug while the lid is
off, or by inserting them through the hole left when
the jug lid cap (31) is removed.
Note: Never insert fingers or allow loose clothing,
jewellery,hair, etc. to enter into the inlet.
Press the swivel head release button (5), guiding the
swivel head (2) as it lifts.
Note: The swivel head cannot be raised if the speed
selector (3) is in any position other than “OFF”.
Place the assembled jug in the recess in the motor
housing (1).
Rotate the swivel head back towards the motor
housing & push it down until it latches in place.
Connect the appliance to a suitable electrical
supply.
-6-
Page 7

English
Rotate the speed control (3) to the desired speed
until the ingredients are blended as required then
rotate the control back to 0 to turn the appliance off.
The pulse button (4) can be used instead of the
speed control.
Press the swivel head release button (5), guiding the
swivel head (2) as it lifts.
Lift the bowl from the appliance.
Remove the jug lid then carefully remove the spindle
& blades & transfer the ingredients to a suitable
container.
The blades can be removed from the spindle
individually,rotatingthem in an anti-clockwise
direction.
As a Juice Extractor
Place the juice extractor (33) over the metal pin in
the centre of the jug (27) & fit the juice extractor lid
(34), making sure the seal (32) is in place.
Place the juice extractor pusher (35) into the inlet
chute in the juice extractor lid (34).
The pusher should be left in place during use to
prevent spills.
Place the assembled juicer in the recess in the motor
housing (1).
Rotate the swivel head back towards the motor
housing & push it down until it latches in place.
Connect the appliance to a suitable electrical supply.
Rotate the speed control (3) to the Maximum speed.
Remove the pusher from the inlet chute & add the
ingredients through the inlet chute, using the pusher
to gently press them into the juicer.
Note: Never insert fingers or allow loose clothing,
jewellery,hair, etc. to enter into the inlet chute. If
ingredients jam in the juicer, use the pusher.
Note: If it is not possible to clear a blockage using
the pusher,switch off & disconnect the appliance
from the electrical supply, then raise the swivel head
& open the jug to clear the blockage manually.
Add ingredients until the jug is full or sufficient
ingredients have been processed then rotate the
control back to 0 to turn the appliance off.
Press the swivel head release button (5), guiding the
swivel head (2) as it lifts.
Lift the bowl from the appliance.
Remove the lid & juicer before transferring the
ingredients to a suitable container.
Maintenance
Your Black & Decker tool has been designed to
operate over a long period of time with a minimum of
maintenance. Continuous satisfactory operation
depends upon proper tool care and regular cleaning.
Warning! Before performing any maintenance or
cleaning of the tool, disconnect the appliance from
the power supply.
Ventilation slots should be cleaned occasionally with
a clean, dry paint brush.
Cleaning
The motor housing (1) should be cleaned with a
clean damp cloth only.
The stainless steel blades can be cleaned in a
dishwasher.
Alternatively, they can be washed in warm soapy
water. Rinse with clean water and dry thoroughly with
a dry soft cloth.
All other parts should be washed in warm soapy
water. Rinse with clean water and dry thoroughly with
a dry soft cloth.
Note: Do not use abrasives or chemical cleaners on
any part of this appliance.
Technical data FX1200
Voltage V 220-240
Power input W 1,000
Cable length m 1.0
Container size l Processor Bowl 2.2lt
Blender Bowl 1.5lt
Weight kg 9.92Kg
Protecting the environment
Separate collection. This product must not be
disposed of with normal household waste.
Should you find one day that your Black & Decker
product needs replacement, or if it is of no further use to
you, do not dispose it off with other household waste.
Make this product available for separate collection.
Separate collection of used products and
packaging allows materials to be recycled and
used again. Use of recycled materials helps
prevent environmental pollution and reduces the
demand for raw materials.
Local regulations may provide for separate collection of
electrical products from the household, at municipal
waste sites or by the retailer when you purchase a new
product.
Black & Decker provides a facility for the collection and
recycling of Black & Decker products once they have
reached the end of their working life. To take advantage
of this service please return your product to any
authorised repair agent who will collect them on our
behalf. You can check the location of your nearest
authorised repair agent by contacting your local Black &
Decker office at the address indicated in this manual. A
list of authorised Black & Decker repair agents and full
details of our after-sales service and contact are
available on the Internet at: www.2helpU.com
-7-
Page 8

English
BLACK & DECKER HOME APPLIANCE 2 YEAR WARRANTY
Black & Decker providesa2YearWarranty for this product from the date of purchase against defects due
to defective materials or workmanship. Motor/element burn-outs due to voltage fluctuations are not
covered under warranty. If the product should become defective within the warranty period, Black &
Decker will repair or (at Black & Decker's discretion) replace it free of charge.
The warranty provisions do not cover failure due to accident, misuse, abuse, negligence or non
observation of local regulations on the part of the user. Equally, the warranty provisions do not apply
where the appliance has been serviced by a person not authorized by Black & Decker or serviced with
non-approved parts and this has contributed to the fault of the product. Superseded models without a
replacement equivalent will either be repaired or (at Black & Decker's discretion) replaced with another
product of similar retail value.
UPON PURCHASE
Fill in the Warranty Registration Card with the original Authorized Dealer's stamp (indicating date of
purchase) and attach your purchase receipt to it. Retain in case of claims in the future.
MAKING A CLAIM
Take your defective product together with the Warranty Registration Card & purchase receipt to your local
service Centre. You can either do this in person or send it freight prepaid. If mailing or shipping your
appliance, ensure that it is packed carefully in a sturdy carton with enough packing material to prevent
damage. Include a note describing the problem to the service Centre and be sure to give your return
address.
DESIGNED FOR DOMESTIC PURPOSES ONLY.
Page 9

Page 10

Page 11

Page 12

Page 13

Page 14

Page 15

Page 16

Page 17

Page 18

Page 19

Page 20

Names & Addresses for Black & Decker Service Concessionaries
Afghanistan: Ishan National Co., Opp. Ministry of Justice, Kabul. Tel.: +93-2-2101727. Algeria: SARL Outillage Corporation, 04
Route De Dely Brahim Cheraga, Alger. Tel.: +213-21-364363/508, Fax: +213-21-369667. Bahrain: Fawaz Al Zayani, P.O.Box
26563, Adliya, Manama. Tel.: +973-17-715252/712756, Fax: +973-17-713789. Bangladesh: Ultra Corporation, 8, Kushol Centre,
Uttara, Dhaka 1230. Tel.: +880-2-8919272/9756 Ext.28, Fax: +880-2-9887167. Egypt: Anasia Egypt for Trading S. A. E., P.O.Box
2443, 110 Mostafa Refaat Street, Sheraton Heliopolis 11361, Cairo. Tel.: +20-2-2684159, Fax: +20-2-2684169. Ethiopia: Tewfik
Sherif & Co. Ltd., P.O.Box 5583, Debre Zeit Road, Addis Ababa. Tel.: +251-1-651700/601, Fax: +251-1-650570. India: Gryphon
Impex Pvt. Ltd., D-6/4, Okhla Industrial Area, Phase-I, New Delhi-110020. Tel.: +91-11-26372602-4, Fax: +91-11-26372601. Iran:
Tehran - Service Centre of Iran, No 510, South Karger Ave, Below Pasteur Sq. Tehran. Tel.: +98-21-6490608/0656/6407672. Kish
Island: Cayhan Electric Co., No. 69, Paradise Shopping Centre, Kish Island. Tel.: +98-76444-22894. Jordan: Bashiti Hardware,
P.O.Box 1564, TLA Ali, Amman. Tel.: +962-6-5350009/4770741, Fax: +962-6-5350012/4789783. Kenya: Zylog Enterprises, IPS
Building, Kuanda Street, P.O.Box 40877, Nairobi. Tel.: +254-2-338188/199, Fax: +254-2-330642. Kuwait: Al Omar Technical Co.,
P.O.Box 4062, 13041 Safat, Kuwait. Tel.: +965-4848595/0039, Fax: +965-4845652. Lebanon: Est. F.A. Kettaneh SA, P.O.Box
110242, Dora Highway, Kettaneh Building, Beirut. Tel.: +961-1-255860/6, Fax: +961-1-255891. Libya: El Ghoul Brothers, P.O.Box
348, Islamic Call Bldg.,Office 201-202, Benghazi. Tel.: +218-61-9097681/4183, Fax: +218-61-9094123. Madagascar: Group Tana
Confort S. A. R. L., B. P. 1770, Antananarivo. Tel.: +261-20-2264505, Fax: +261-20-2264244. Malta: John G. Cassar Ltd., 36
Victory Str, Qormi QRM 06, Malta. Tel.: +356-21-493251, Fax: +356-21-483231. Mauritius: Happy World Marketing Ltd., Block 2,
Industrial Estate, Coromandel, P.O.Box 429, Port Louis. Tel.: +230-2076700, Fax: +230-2337330/7400. Nepal: Universal Trading
Centre, P.O.Box 1947, Tripureswor, Kathmandu. Tel.: +977-1-262192/260587/785, Fax: 261154. Nigeria: Amin Bros. Eng. Co. Ltd.,
30A (Plot 1291), Akin Adesola Street, Victoria Island, Lagos. Tel.: +234-1-3201778, Fax: +234-1-2613667. Oman: Oman Mktg. &
Service Co., P.O.Box 2734, Ruwi, Muscat. Tel.: +968-560232, Fax: +968-560255. Pakistan: Karachi - Ammar Service & Spares, 60,
Bank Arcade, Serai Road, Karachi. Tel.: +92-21-2426905, Fax: 2427214/5243. Pakistan: Lahore - Electronics Inn, 212-G Raja
Centre, Main Market, Gulberg, Lahore. Tel.: +92-42-5756750. Philippines: Modern House International Enterprises, 213 Rizal Ave.
Extension, between 2nd and 3rd Ave. Kalookan City. Tel.: +632 366-4487, Fax: +632 366-4489. Qatar: Al Muftah Trading & Cont.,
P.O.Box 875, Doha. Tel.: +974-4650880/4446868, Fax: +974-4441415. Saudi Arabia: Dammam - Ebrahim Fawaz Al Zayani,
P.O.Box 76026, Al Raka, Dammam. Tel.: +966-3-8140914, Fax: +966-3-8140824. Jeddah: Anasia - P.O.Box 50959, Jeddah -
21477. Tel.: +966-2-6710014, Fax: +966-2-6725929. EAC (Al Yousuf) - P.O. Box 30377, Jeddah - 21477. Tel.: +966-2-6519912,
Fax: +966-2-6511153. Madina: Garziz Trdg. for Bldg. Mat.&Decor., P.O.Box 3364, Madina. Tel.: +966-4-8261490/8227636, Fax:
+966-4-8265741. Riyadh: Anasia, P.O.Box 18689, Riyadh - 11425. Tel.: +966-1-2693751, Fax: +966-1-4501178. Yanbu: Bin Afif,
P.O.Box 530 Yanbu, Al Bahr. Tel.: +966-4-3222626/8867, Fax: +966-4-3222210. Sri Lanka: Delmege Gen. Equip. Pvt. Ltd., No.
428/1AT. B., Jaya Mawatha (Darley Road), Colombo-10. Tel.: +94-11-2665914, Fax: +94-11-2665915. Sudan: United Distribution
Company, P.O.Box 325, Sayed Abdul Rehman Street, Khartoum. Tel.: +249-11-772612/777296, Fax: +249-11-770919. Tanzania:
General Motors Investment, P.O Box 16541, 14 Vingunguti Nyerere Road, Dar Es Salaam. Tel.: +255-22-2862661/5022, Fax: +25522-2862667/5412/3. Tunisia: STE Tunisienne De Quincaillerie Stq., Nvelle Z.I 2013, Ben Arous, Tunis, Tunisia, Tel: +216 71386102,
Fax: +216 71380412. UAE: Abu Dhabi - Light House Electric., P.O.Box 120, Abu Dhabi. Tel.: +971-2-6726131, Fax: +971-2-
6720667. Dubai - Black & Decker (O) A.G., P.O.Box 5420, Dubai. Tel.: +971-4-7028234/233, Fax: +971-4-2822765. Ideal Mach. &
Equipt. R. W/shop P.O.Box 37116, Al Quoz, Dubai. Tel.: +971-4-3474160, Fax: +971-4-3474157. Sharjah - McCoy Middle East
LLC, P.O.Box 20228, Sharjah. Tel.: +971-6-5336321, Fax: +971-6-5336320. Uganda: The Building Centre, Kitgum House, 52
Station Road, P.O.Box 7436, Kampala. Tel.: +256-41-234567, Fax: +256-41-236413. Yemen: Aden - Middle East Trad. Co. Ltd.,
Mulla Dakka, Aden. Tel.: +967-2-240950, Fax: +967-2-240952. Sana'a: Middle East Trad. Co. Ltd., P.O.Box 12363, Hayel Street,
Sana'a. Tel.: +967-1-204201, Fax: +967-1-204204. Taiz: Middle East Trad. Co. Ltd., Campa area near Al-Kair mosque, Taiz. Tel.:
+967-4-231610/232033, Fax: +967-4-219869. Zimbabwe: J.D.Distributors, P.O.Box 226, 17 Bessemer Road, Graniteside, Harare.
Tel.: +263-4-753913-7, Fax: 753918. Cyprus: G. Kyprianou Trading Co Ltd., 51 Prodromou AVE. Strovolos, 1681, P.O. Box 23318
Nicosia Cyprus. Tel.: 00357 22 468170/1, Fax: 00357 22 468186, Email gktltd@spidernet.com.cy
WARRANTY REGISTRATION CARD
 Loading...