

Page 1

INSTRUCTION MANUAL
CHAIN SAW
Thank you for choosing BLACK+DECKER!
PLEASE READ BEFORE RETURNING THIS PRODUCT FOR
ANY REASON.
If you have a question or experience a problem with your BLACK+DECKER
purchase, go to http://www.blackanddecker.com/instantanswers
If you can’t find the answer or do not have access to the Internet, call
1-800-544-6986 from 8 a.m. to 5 p.m. EST Mon. - Fri. to speak with an agent.
Please have the catalog number available when you call.
SAVE THIS MANUAL FOR FUTURE REFERENCE.
VEA EL ESPANOL EN LA CONTRAPORTADA.
INSTRUCTIVO DE OPERACIÓN, CENTROS DE SERVICIO Y PÓLIZA DE GARANTÍA.
ADVERTENCIA: LÉASE ESTE INSTRUCTIVO ANTES DE USAR EL PRODUCTO.
CATALOG NUMBER
CS1518
To register your new product, visit
www.BlackandDecker.com/NewOwner
KEY INFORMATION YOU SHOULD KNOW:
DO NOT OVER-TENSION CHAIN. Refer to “ADJUSTING CHAIN TENSION”
for proper method of tensioning chain.
Retighten chain frequently during first two hours of use.
Page 2

2
GENERAL POWER TOOL
SAFETY RULES
WARNING: Read all safety
warnings and all instructions. Failure to
follow the warnings and instructions may result
in electric shock, fire and/or serious injury.
SAVE ALL WARNINGS AND
INSTRUCTIONS FOR FUTURE
REFERENCE
The term “power tool” in the warnings refers
to your mains-operated (corded) power tool
or battery-operated (cordless) power tool.
1) WORK AREA SAFETY
a) Keep work area clean and well lit.
Cluttered or dark areas invite accidents.
b) Do not operate power tools in
explosive atmospheres, such as in the
presence of flammable liquids, gases
or dust. Power tools create sparks which
may ignite the dust or fumes.
c) Keep children and bystanders
away while operating a power tool.
Distractions can cause you to lose control.
2) ELECTRICAL SAFETY
a) Power tool plugs must match the
outlet. Never modify the plug in
any way. Do not use any adapter
plugs with earthed (grounded)
power tools. Unmodified plugs and
matching outlets will reduce risk of
electric shock.
b) Avoid body contact with earthed or
grounded surfaces such as pipes,
radiators, ranges and refrigerators.
There is an increased risk of electric
shock if your body is earthed or grounded.
c) Do not expose power tools to rain
or wet conditions. Water entering
a power tool will increase the risk of
electric shock.
d) Do not abuse the cord. Never use
the cord for carrying, pulling or
unplugging the power tool. Keep
cord away from heat, oil, sharp
edges or moving parts. Damaged or
entangled cords increase the risk of
electric shock.
e)
When operating a power tool
outdoors, use an extension cord
suitable for outdoor use. Use of a
cord suitable for outdoor use reduces
the risk of electric shock.
f) If operating a power tool in a damp
location is unavoidable, use a
ground fault circuit interrupter
(GFCI) protected supply. Use of a
GFCI reduces the risk of electric shock.
3) PERSONAL SAFETY
a) Stay alert, watch what you are
doing and use common sense
when operating a power tool. Do
not use a power tool while you
are tired or under the influence of
drugs, alcohol or medication. A
moment of inattention while operating
power tools may result in serious
personal injury.
b) Use personal protective equipment.
Always wear eye protection. Protective
equipment such as dust mask, nonskid
safety shoes, hard hat, or hearing
protection used for appropriate conditions
will reduce personal injuries.
c) Prevent unintentional starting.
Ensure the switch is in the off
position before connecting to power
source and/ or battery pack, picking
up or carrying the tool. Carrying
power tools with your finger on the
switch or energizing power tools that
have the switch on invites accidents.
d) Remove any adjusting key or wrench
before turning the power tool on. A
wrench or a key left attached to a rotating
part of the power tool may result in
personal injury.
e) Do not overreach. Keep proper
footing and balance at all times. This
enables better control of the power tool
in unexpected situations.
f) Dress properly. Do not wear loose
clothing or jewelry. Keep your hair,
clothing and gloves away from
moving parts. Loose clothes, jewelry or
long hair can be caught in moving parts.
g) If devices are provided for the
connection of dust extraction and
collection facilities, ensure these
SAFETY GUIDELINES - DEFINITIONS
It is important for you to read and understand this manual. The information it contains
relates to protecting YOUR SAFETY and PREVENTING PROBLEMS. The symbols
below are used to help you recognize this information.
DANGER: Indicates an imminently hazardous situation which, if not avoided, will
result in death or serious injury.
WARNING: Indicates a potentially hazardous situation which, if not avoided,
could result in death or serious injury.
CAUTION: Indicates a potentially haz ard ous situation which, if not avoided,
may result in minor or mod er ate injury.
NOTICE: Used without the safety alert symbol indicates potentially hazardous
situation which, if not avoided, may result in property damage.
Page 3

3
are connected and properly used.
Use of dust collection can reduce dustrelated hazards.
4) POWER TOOL USE AND CARE
a)
Do not force the power tool. Use
the correct power tool for your
application. The correct power tool will
do the job better and safer at the rate
for which it was designed.
b) Do not use the power tool if the
switch does not turn it on and
off. Any power tool that cannot
be controlled with the switch is
dangerous and must be repaired.
c) Disconnect the plug from the power
source and/or the battery pack from
the power tool before making any
adjustments, changing accessories,
or storing power tools. Such preventive
safety measures reduce the risk of
starting the power tool accidentally.
d) Store idle power tools out of
the reach of children and do not
allow persons unfamiliar with the
power tool or these instructions
to operate the power tool. Power
tools are dangerous in the hands of
untrained users.
e) Maintain power tools. Check for
misalignment or binding of moving
parts, breakage of parts and any
other condition that may affect the
power tool’s operation. If damaged,
have the power tool repaired before
use. Many accidents are caused by
poorly maintained power tools.
f) Keep cutting tools sharp and clean.
Properly maintained cutting tools with
sharp cutting edges are less likely to
bind and are easier to control.
g) Use the power tool, accessories
and tool bits, etc. in accordance
with these instructions, taking into
account the working conditions
and the work to be performed.
Use of the power tool for operations
different from those intended could
result in a hazardous situation.
5) SERVICE
a)
Have your power tool serviced by a
qualified repair person using only
identical replacement parts. This will
ensure that the safety of the power
tool is maintained.
READ ALL INSTRUCTIONS
CHAIN SAW SAFETY WARNINGS:
• Keep all parts of the body away from
the saw chain when the chain saw is
operating. Before you start the chain
saw, make sure the saw chain is not
contacting anything. A moment of
inattention while operating chain saws
may cause entanglement of your clothing
or body with the saw chain.
• Always hold the chain saw with your
right hand on the rear handle and
your left hand on the front handle.
Holding the chain saw with a reversed
hand configuration increases the risk of
personal injury and should never be done.
• Hold the power tool by insulated
gripping surfaces only, because the
saw chain may contact hidden wiring
or its own cord. Saw chains contacting
a ″live″ wire may make exposed metal
parts of the power tool ″live″ and could
give the operator an electric shock.
• Wear safety glasses and hearing
protection. Further protective
equipment for head, hands, legs
and feet is recommended. Adequate
protective clothing will reduce personal
injury by flying debris or accidental
contact with the saw chain.
• Do not operate a chain saw in a tree.
Operation of a chain saw while up in a
tree may result in personal injury.
• Always keep proper footing and
operate the chain saw only when
standing on fixed, secure and level
surface. Slippery or unstable surfaces
such as ladders may cause a loss of
balance or control of the chain saw.
• When cutting a limb that is under tension
be alert for spring back. When the tension
in the wood fibres is released the spring
loaded limb may strike the operator and/or
throw the chain saw out of control.
• Use extreme caution when cutting
brush and saplings. The slender material
may catch the saw chain and be whipped
toward you or pull you off balance.
• Carry the chain saw by the front handle
with the chain saw switched off and away
from your body. When transporting or
storing the chain saw always fit the guide
bar cover. Proper handling of the chain
saw will reduce the likelihood of accidental
contact with the moving saw chain.
• Follow instructions for lubricating,
chain tensioning and changing
accessories. Improperly tensioned or
lubricated chain may either break or
increase the chance for kickback.
• Keep handles dry, clean, and free from
oil and grease. Greasy, oily handles are
slippery causing loss of control.
• Cut wood only. Do not use chain
saw for purposes not intended. For
example: do not use chain saw for
cutting plastic, masonry or non-wood
building materials. Use of the chain
saw for operations different than intended
could result in a hazardous situation.
CAUSES AND OPERATOR PREVENTION
OF KICKBACK:
Kickback may occur when the nose or tip
of the guide bar touches an object, or when
Page 4

the wood closes in and pinches the saw
chain in the cut.
Tip contact in some cases may cause a
sudden reverse reaction, kicking the guide
bar up and back towards the operator.
Pinching the saw chain along the top of the
guide bar may push the guide bar rapidly
back towards the operator.
Either of these reactions may cause you
to lose control of the saw which could
result in serious personal injury. Do not
rely exclusively upon the safety devices
built into your saw. As a chain saw user,
you should take several steps to keep your
cutting jobs free from accident or injury.
Kickback is the result of tool misuse and/
or incorrect operating procedures or
conditions and can be avoided by taking
proper precautions as given below:
• Maintain a firm grip, with thumbs
and fingers encircling the chain saw
handles, with both hands on the saw
and position your body and arm to
allow you to resist kickback forces.
Kickback forces can be controlled by the
operator, if proper precautions are taken.
Do not let go of the chain saw.
• Do not overreach and do not cut
above shoulder height. This helps
prevent unintended tip contact and
enables better control of the chain saw in
unexpected situations.
• Only use replacement bars and chains
specified by the manufacturer. Incorrect
replacement bars and chains may cause
chain breakage and/or kickback.
• Follow the manufacturer’s sharpening
and maintenance instructions for the
saw chain. Decreasing the depth gauge
height can lead to increased kickback.
THE FOLLOWING PRECAUTIONS SHOULD
BE FOLLOWED TO MINIMIZE KICKBACK:
(1.) Grip Saw Firmly. Hold the chain saw firmly
with both hands when the motor is running.
Use a firm grip with thumbs and fingers
encircling the chain saw handles. Chain saw
will pull forward when cutting on the bottom
edge of the bar, and push backward when
cutting along the top edge of the bar.
(2.) Do not over reach.
(3.) Keep proper footing and balance at all times.
(4.) Don’t let the nose of the guide bar contact
a log, branch, ground or other obstruction.
(5.) Don’t cut above shoulder height.
(6.) Use devices such as low kickback
chain and reduced kickback guide bars that
reduce the risks associated with kickback.
(7.) Only use replacement bars and chains
specified by the manufacturer or the equivalent.
(8.) Never let the moving chain contact any
object at the tip of the guide bar.
(9.) Keep the working area free from
obstructions such as other trees, branches,
rocks, fences, stumps, etc. Eliminate or
avoid any obstruction that your saw chain
could hit while you are cutting through a
particular log or branch.
(10.) Keep your saw chain sharp and properly
tensioned. A loose or dull chain can increase
the chance of kickback. Check tension at
regular intervals with the motor stopped and
tool unpllugged, never with the motor running.
(11.) Begin and continue cutting only with
the chain moving at full speed. If the chain
is moving at a slower speed, there is a
greater chance for kickback to occur.
(12.) Cut one log at a time.
(13.) Use extreme caution when re-entering
a previous cut. Engage ribbed bumpers into
wood and allow chain to reach full speed
before proceeding with cut.
(14.) Do not attempt plunge cuts or bore cuts.
(15.) Watch for shifting logs or other forces that
could close a cut and pinch or fall into chain.
KICKBACK SAFETY FEATURES
WARNING: The following features are
included on your saw to help reduce the
hazard of kickback; however such features
will not totally eliminate this dangerous
reaction. As a chain saw user do not rely only
on safety devices. You must follow all safety
precautions, instructions, and maintenance in
this manual to help avoid kickback and other
forces which can result in serious injury.
•
Chain Brake, designed to immediately tun
the chain saw off if kickback is too great.
• Reduced-Kickback Guide Bar, designed
with a small radius tip which reduces the
size of the kickback danger zone on bar tip.
A reduced - kickback guide bar is one which
has been demonstrated to significantly
reduce the number and seriousness of
kickbacks when tested in accordance with
safety requirements for electric chain saws.
• Low-Kickback Chain, designed with a
contoured depth gauge and guard link
which deflect kickback force and allow
wood to gradually ride into the cutter. A
low-kickback chain is a chain which has
met kickback performance requirements
of ANSI B175.1-1991.
• Do not operate chain saw while in
a tree, on a ladder, on a scaffold, or
from any unstable surface.
• Hold tool by insulated gripping
surfaces when performing an
operation where the cutting tool may
contact hidden wiring. Contact with a
“live” wire will make exposed metal parts
of the tool “live” and shock the operator.
• Do not attempt operations beyond
your capacity or experience. Read
thoroughly and understand completely all
instructions in this manual.
• Before you start chain saw, make sure
saw chain is not contacting any object.
• Do not operate a chain saw with one
hand! Serious injury to the operator,
helpers, or bystanders may result
from one handed operation. A chain saw
4
Page 5

5
is intended for two-handed use only.
• Keep the handles dry, clean, and free
of oil or grease.
• Do not allow dirt, debris, or sawdust to
build up on the motor or outside air vents.
• Stop the chain saw before setting it down.
• Do not cut vines and/or small under brush.
• Use extreme caution when cutting small
size brush and saplings because slender
material may catch the saw chain and be
whipped toward you or pull you off balance.
WARNING: Some dust created by power
sanding, sawing, grinding, drilling, and other
construction activities contains chemicals
known to the State of California to cause
cancer, birth defects or other reproductive
harm. Some examples of these chemicals are:
• lead from lead-based paints,
• crystalline silica from bricks and
cement and other masonry products, and
• arsenic and chromium from
chemically-treated lumber.
Your risk from these exposures varies,
depending on how often you do this type
of work. To reduce your exposure to these
chemicals: work in a well ventilated area,
and work with approved safety equipment,
such as those dust masks that are specially
designed to filter out microscopic particles.
• Avoid prolonged contact with dust
from power sanding, sawing, grinding,
drilling, and other construction
activities. Wear protective clothing
and wash exposed areas with soap
and water. Allowing dust to get into
your mouth, eyes, or lay on the skin may
promote absorption of harmful chemicals.
WARNING: Use of this tool can
generate and/or disburse dust, which may
cause serious and permanent respiratory
or other injury. Always use NIOSH/OSHA
approved respiratory protection appropriate
for the dust exposure. Direct particles away
from face and body.
CHAIN SAW NAMES AND TERMS
• Bucking - The process of cross cutting a
felled tree or log into lengths.
• Motor Brake - A device used to stop the
saw chain when the trigger is released.
• Chain Saw Powerhead - A chain saw
without the saw chain and guide bar.
• Drive Sprocket or Sprocket - The
toothed part that drives the saw chain.
• Felling - The process of cutting down a tree.
• Felling Back Cut - The final cut in a tree
felling operation made on the opposite
side of the tree from the notching cut.
• Front Handle - The support handle located
at or toward the front of the chain saw.
• Front Hand Guard - A structural barrier
between the front handle of a chain saw
and the guide bar, typically located close
to the hand position on the front handle
and sometimes employed as an activating
lever for a chain brake.
• Guide Bar - A solid railed structure that
supports and guides the saw chain.
• Guide Bar Scabbard - Enclosure fitted
over guide bar to prevent tooth contact
when saw is not in use.
• Kickback - The backward or upward motion,
or both of the guide bar occurring when the
saw chain near the nose of the top area of
the guide bar contacts any object such as a
log or branch, or when the wood closes in
and pinches the saw chain in the cut.
• Kickback, Pinch - The rapid pushback of
the saw which can occur when the wood
closes in and pinches the moving saw chain
in the cut along the top of the guide bar.
• Kickback, Rotational - The rapid upward
and backward motion of the saw which can
occur when the moving saw chain near
the upper portion of the tip of the guide bar
contacts an object, such as a log or branch.
• Limbing - Removing the branches from a
fallen tree
• Low-Kickback Chain - A chain that
complies with the kickback
performance requirements of ANSI
B175.1-1991 (when tested on
a representative sample of chain saws.)
• Normal Cutting Position - Those
positions assumed in
performing the bucking and felling cuts.
• Notching Undercut - A notch cut in a tree
that directs the tree’s fall.
• Rear Handle - The support handle
located at or toward the rear of the saw.
• Reduced Kickback Guide Bar - A guide
bar which has been demonstrated to
reduce kickback significantly.
• Replacement Saw Chain - A chain that
complies with kickback performance
requirements of ANSI B175.1-2000 when
tested with specific chain saws. It may
not meet the ANSI performance
requirements when used with other saws.
• Saw Chain - A loop of chain having
cutting teeth, that cut the wood,and that is
driven by the motor and is supported by
the guide bar.
• Ribbed Bumper - The ribs used when
felling or bucking to pivot the saw and
maintain position while sawing.
• Switch - A device that when operated will
complete or interrupt an electrical power
circuit to the motor of the chain saw.
• Switch Linkage - The mechanism that
transmits motion from a trigger to the switch.
• Switch Lockout - A movable stop that
prevents the unintentional operation of
the switch until manually actuated.
INTENDED USE
Your BLACK+DECKER Chain Saw is ideal
for pruning applications and cutting small
logs up to 16 inches (406 mm) in diameter.
This tool is intended for consumer use only.
SAVE THESE INSTRUCTIONS
Page 6
6
SYMBOLS
The label on your tool may include the
following symbols. The symbols and their
definitions are as follows:
V ..................volts
A ..................amperes
Hz ................ hertz
W .................watts
min ..............minutes
or AC ...... alternating current
or DC ...direct current
n
o ................ no load speed
................Class I Construction
(grounded)
PREPARING YOUR CHAIN SAW
FOR USE
WARNING: Read and understand all
instructions. Failure to follow all instructions
listed below may result in electric shock, fire
and/or serious personal injury.
ASSEMBLY
INSTALLING THE GUIDE BAR AND SAW CHAIN
CAUTION: Sharp chain. Always wear
protective gloves when handling the
chain. The chain is sharp and can cut you
when it is not running.
WARNING: Sharp moving chain. To
prevent accidental operation, insure that
tool is unplugged before performing the
following operations. Failure to do this
could result in serious personal injury.
The saw chain (5) and guide bar (4) are
packed separately in the carton. The chain
has to be attached to the bar, and both must
be attached to the body of the tool.
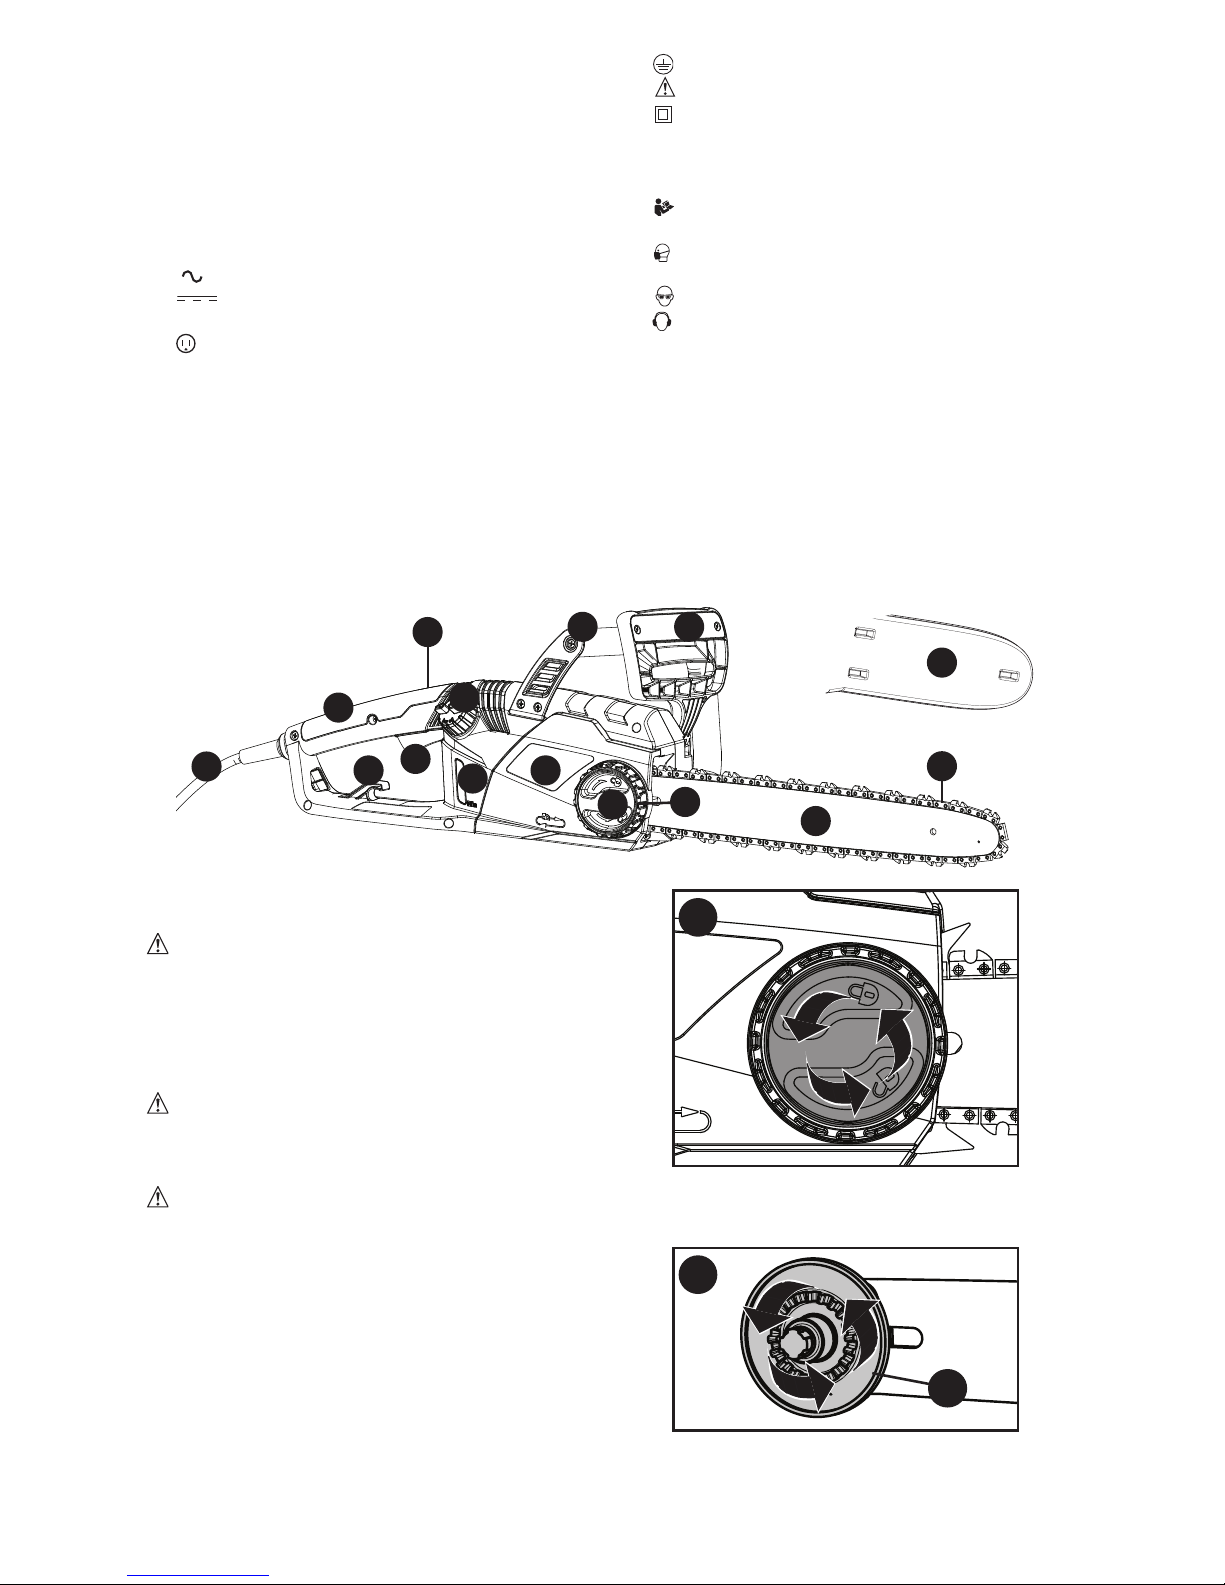
• Place the saw on a firm surface.
• Rotate the bar adjust locking knob (7)
counterclockwise as shown in figure A to
remove sprocket cover (6).
................earthing terminal
................safety alert symbol
................Class II Construction
(double insulated)
.../min or rpm...revolutions or
reciprocation per minute
...............Read instruction manual
before use
................ Use proper respiratory
protection
................ Use proper eye protection
................ Use proper hearing
protection
• Turn the tool-free tension assembly (16)
(attached to the bar) counterclockwise
until it stops as shown in figure B.
• Wearing protective gloves, grasp the saw
chain (5) and wrap it around the guide
bar (4), ensuring the teeth are facing the
correct direction (see figure F)
FUNCTIONAL DESCRIPTION
1. Trigger switch
2. Lock-off button (not shown)
3. Chain brake / front hand guard
4. Guide bar
5. Saw chain
6. Sprocket cover
7. Bar adjust locking knob
8. Chain tensioning wheel
9. Guide bar scabbard
10. Rear handle
11. Front handle
12. Cord
13. Extention cord retainer
14. Oil cap
15. Oil level indicator
A
1
3
6
7
4
2
5
9
11
10
12
13
14
8
15
B
16
Page 7
7
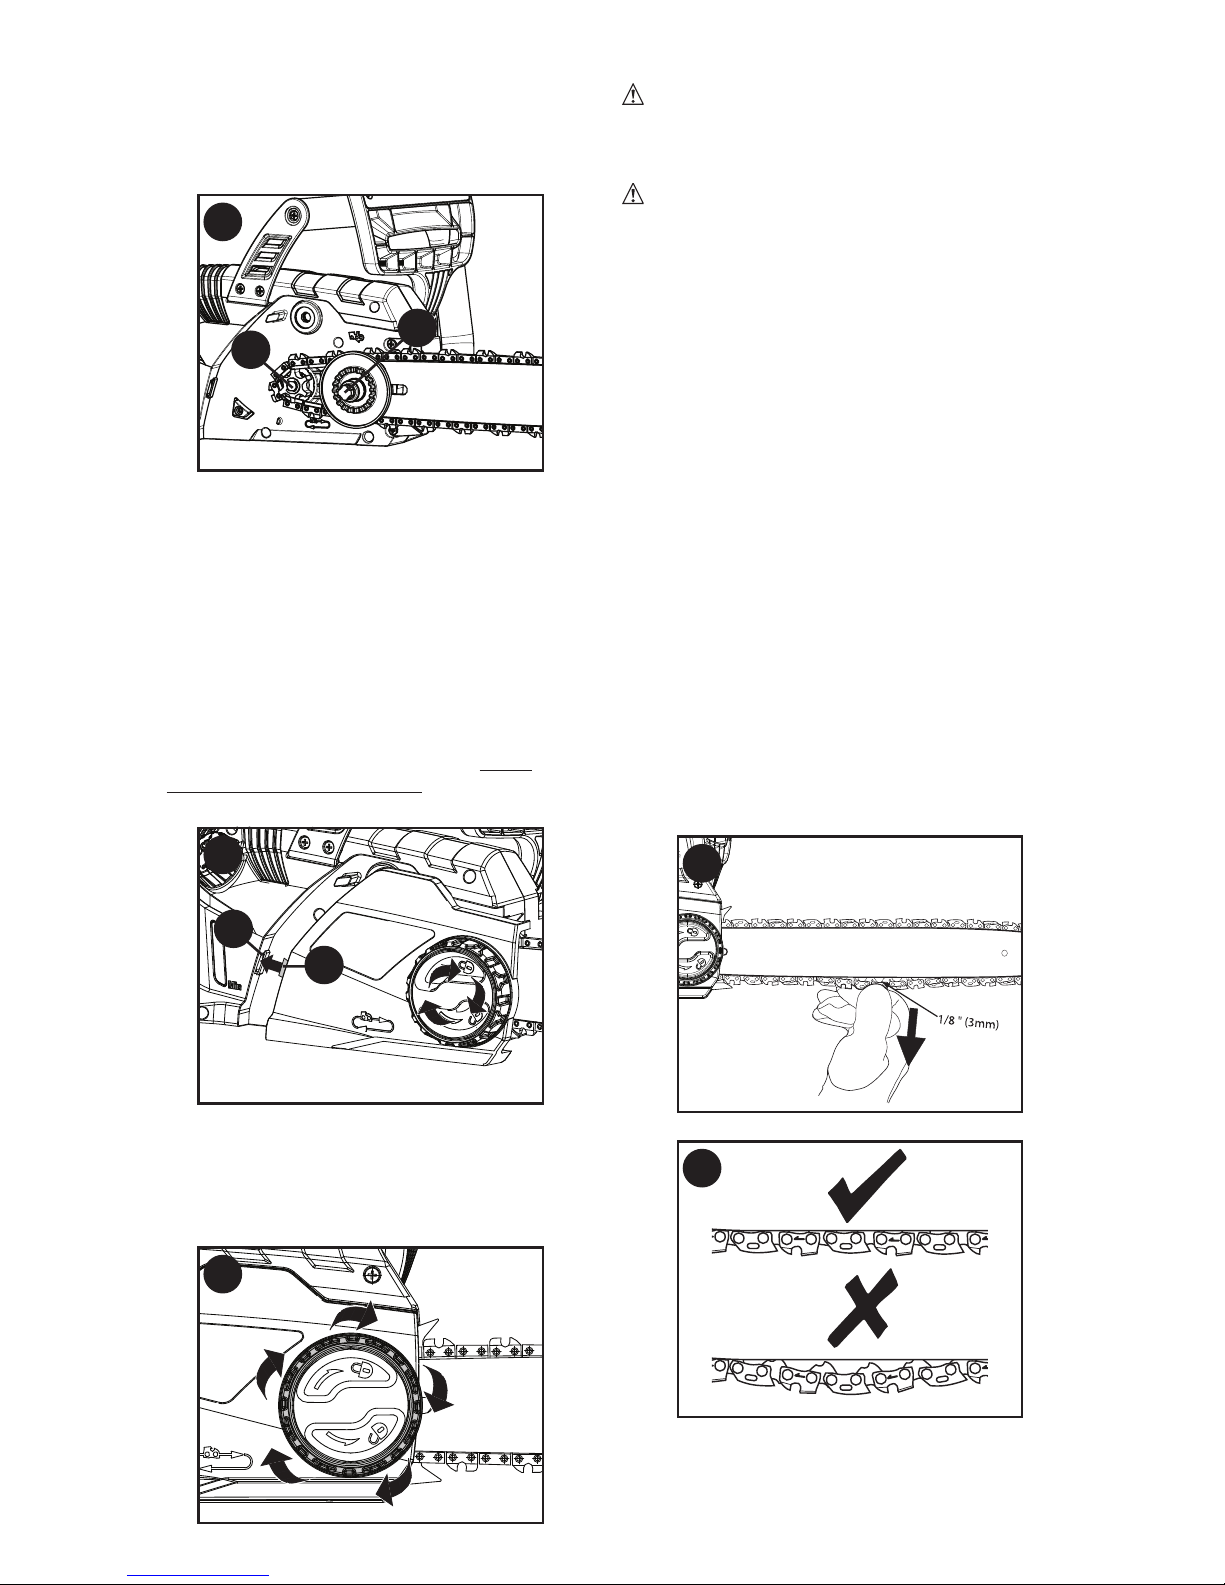
• Ensure the chain is properly set in the slot
around the entire guide bar.
• Place the saw chain around the sprocket
(17) while lining up the hole in the tool-free
tension assembly with the bolt (18) in the
base of the tool as shown in figure C.
• Rotate bar until it engages the two pins
underneath and no longer easily rotates
up and down.
• Once in place, turn the tool-free tension
assembly (16) clockwise by hand to
preliminarily tighten the assembly to hold
it in place.
• While holding the bar in still, replace
sprocket cover (6). Make sure the nub
(19) on the cover lines up with the slot
(20) in the main housing as shown in
figure D. Rotate the bar adjust locking
knob (7) clockwise until snug, then
loosen knob one full turn, so the saw
chain can be properly tensioned.
• While holding the bar adjust locking knob
(7), rotate the chain tensioning wheel (8)
clockwise to increase tension as shown
in figure E. Make sure the saw chain (5)
is snug around the guide bar (4).
ADJUSTING CHAIN TENSION
CAUTION: Sharp chain. Always wear
protective gloves when handling the
chain. The chain is sharp and can cut you
when it is not running.
WARNING: Sharp moving chain. To
prevent accidental operation, insure that
the tool is unplugged before performing
the following operations. Failure to do this
could result in serious personal injury.
• With the saw on a firm surface, check
the saw chain (5) tension. The tension is
correct when the chain snaps back after
being pulled 1/8 inch (3mm) away from
the guide bar (4) with light force from
the middle finger and thumb as shown
in figure F. There should be no “sag”
between the guide bar and the chain on
the underside as shown in figure G.
• To adjust saw chain tension, loosen
bar adjust locking knob (7) and follow
instructions for “Installing the Guide Bar
and Saw Chain.”
• Do not over-tension the chain as this will
lead to excessive wear and will reduce
the life of the bar and chain.
• Once chain tension is correct, tighten bar
adjust locking knob.
• When the chain is new, check the tension
frequently (after unplugging tool) during
the first 2 hours of use as a new chain
stretches slightly.
E
D
20
19
C
17
18
F
G
Page 8
8
AUTO OILING SYSTEM
This chain saw is equipped with an auto
oiling system that keeps the saw chain and
guide bar constantly lubricated.
The oil level indicator (15) shows the level
of the oil in the chain saw. If the oil level is
less than a quarter full, unplug the chain
saw and refill with the proper oil.
NOTE: Use a high quality bar and chain
oil for proper chain and bar lubrication. As
a temporary substitute, a non-detergent
SAE30 weight motor oil can be used.The
use of a vegetable based bar and chain oil is
recommended when pruning trees. Mineral
oil is not recommended because it may harm
trees. Never use waste oil or very thick oil.
These may damage your chain saw.
Filling the oil reservoir
• Remove the oil cap (14) and fill the
reservoir with the recommended chain oil
until the oil level has reached the top of
the oil level indicator (15).
• Refit the oil cap.
• Periodically switch the chain saw off and
check the oil level indicator to insure the
bar and chain are being properly oiled.
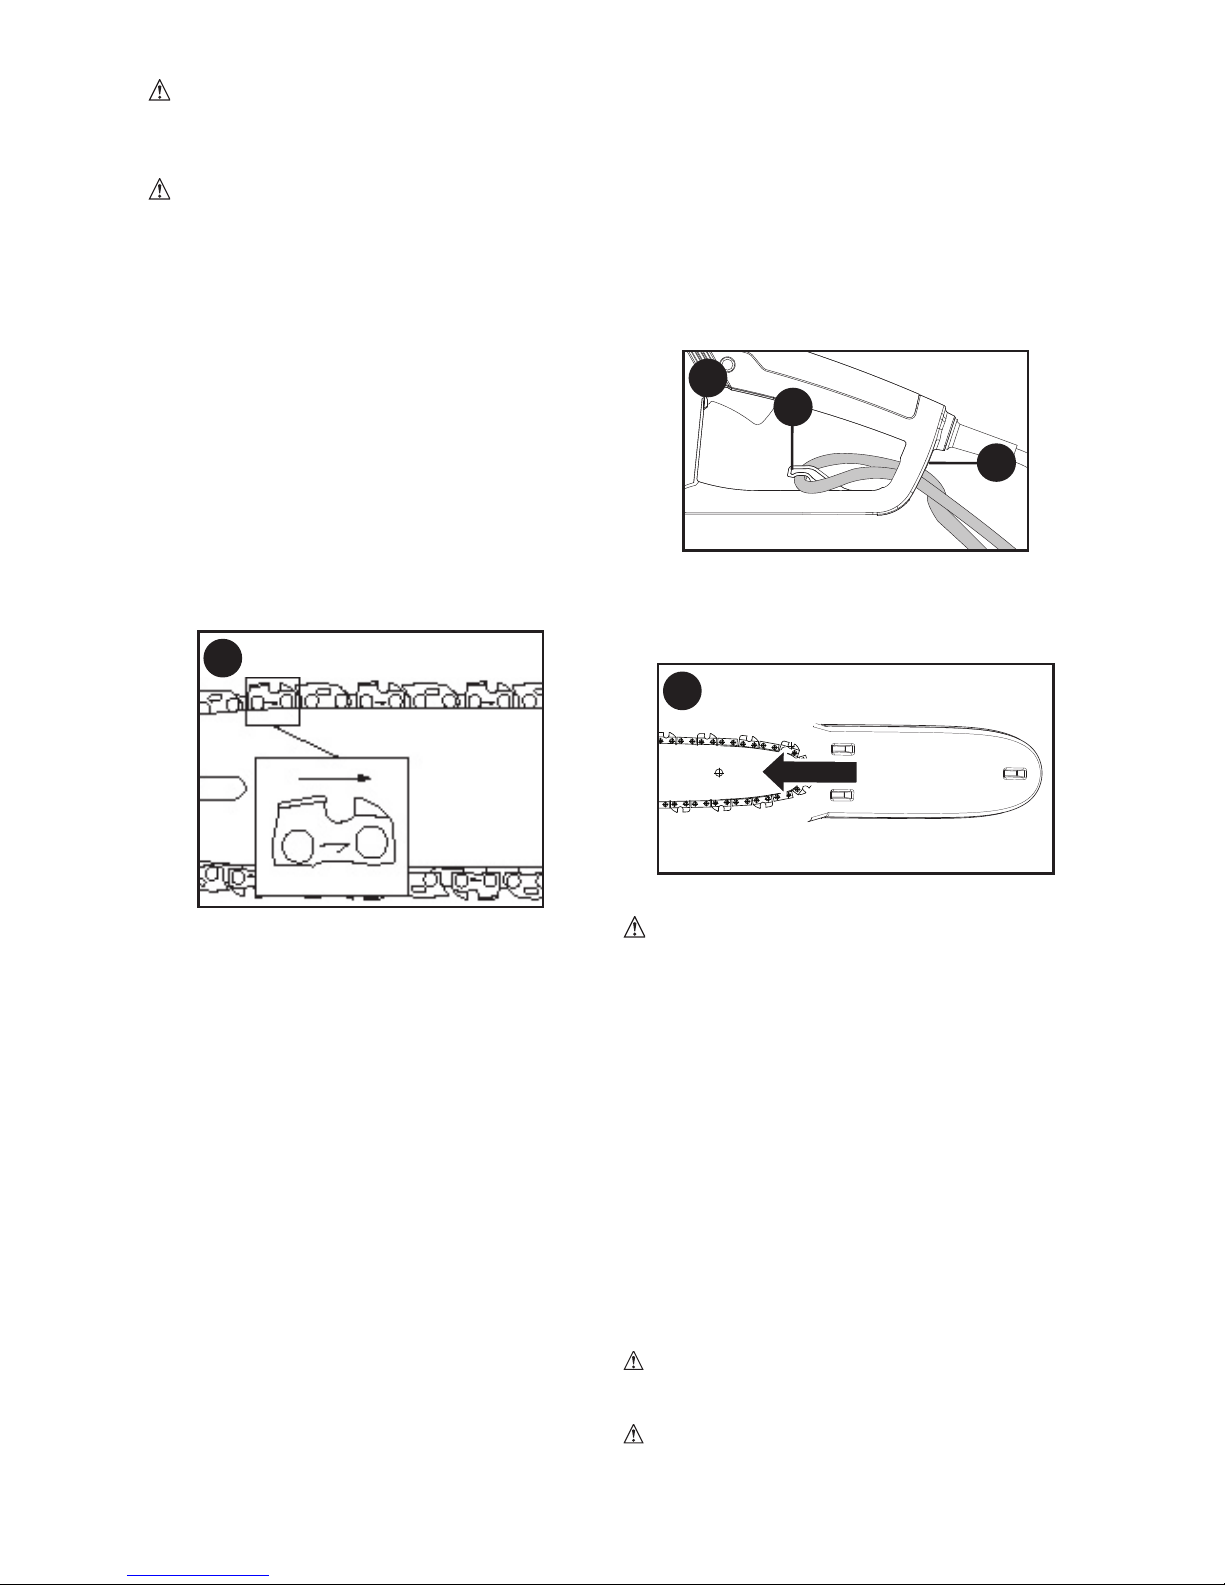
ATTACHING EXTENSION CORD
An extension cord retainer (13) is built into
the switch handle. It prevents the extention
cord from coming unplugged.
• Double the extension cord and insert it
into the slot (20) in the end of the handle
area as shown in figure I. Hook the loop
formed by doubling the cord over the
cord retainer (13). Gently tug on the cord
to insure that it is firmly retained in the
handle. Plug the receptacle end of the
extension cord into the power cord (12)
of the chain saw.
TRANSPORTING SAW
• Always cover the guide bar (4) with the
scabbard (9) (figure J) when transporting
the saw.
OPERATING THE CHAIN SAW
WARNING: Read and understand all
instructions. Failure to follow all instructions
listed below may result in electric shock, fire
and/or serious personal injury.
• Guard Against Kickback which can result
in severe injury or death. See Important
Safety Instructions “Guard Against
Kickback”, to avoid the risk of kickback.
• Do not overreach. Do not cut above
chest height. Make sure your footing is
firm. Keep feet apart. Divide your weight
evenly on both feet.
• Use a firm grip with your left hand on
the front handle (11) and your right
hand on the rear handle (10) so that
your body is to the left of the guide bar.
• Do not hold chain saw by front hand guard
(3). Keep elbow of left arm locked so that left
arm is straight to withstand a kickback.
WARNING: Never use a cross-handed
grip (left hand on the rear handle and right
hand on the front handle).
WARNING: Never allow any part of
your body to be in line with the guide bar
(4) when operating the chain saw.
• Never operate while in a tree, in any
awkward position or on a ladder or
J
I
20
13
REPLACING THE SAW CHAIN
CAUTION: Sharp chain. Always wear
protective gloves when handling the
chain. The chain is sharp and can cut you
when it is not running.
WARNING: Sharp moving chain. To
prevent accidental operation, insure that
the tool is unplugged before performing
the following operations. Failure to do this
could result in serious personal injury.
• Rotate the bar adjust locking knob (7)
counterclockwise to lessen chain tension.
• Remove sprocket cover (6) as described
in “Installing the Guide Bar and Saw
Chain” section.
• Lift the worn saw chain (5) out of the
groove in the guide bar (4).
• Place the new chain in the slot of the
guide bar, making sure the saw teeth are
facing the correct direction by matching
the arrow on the chain with the graphic on
the sprocket cover (6) shown in figure H.
• Follow instructions for “Installing the
Guide Bar and Saw Chain.”
H
Page 9
9
other unstable surface. You may lose
control of saw causing severe injury.
• Keep the chain saw running at full
speed the entire time you are cutting.
• Allow the chain to cut for you. Exert
only light pressure. Do not put pressure
on chain saw at end of cut.
ON / OFF
• Always be sure of your footing and grip the
chain saw firmly with both hands with the
thumb and fingers encircling both handles.
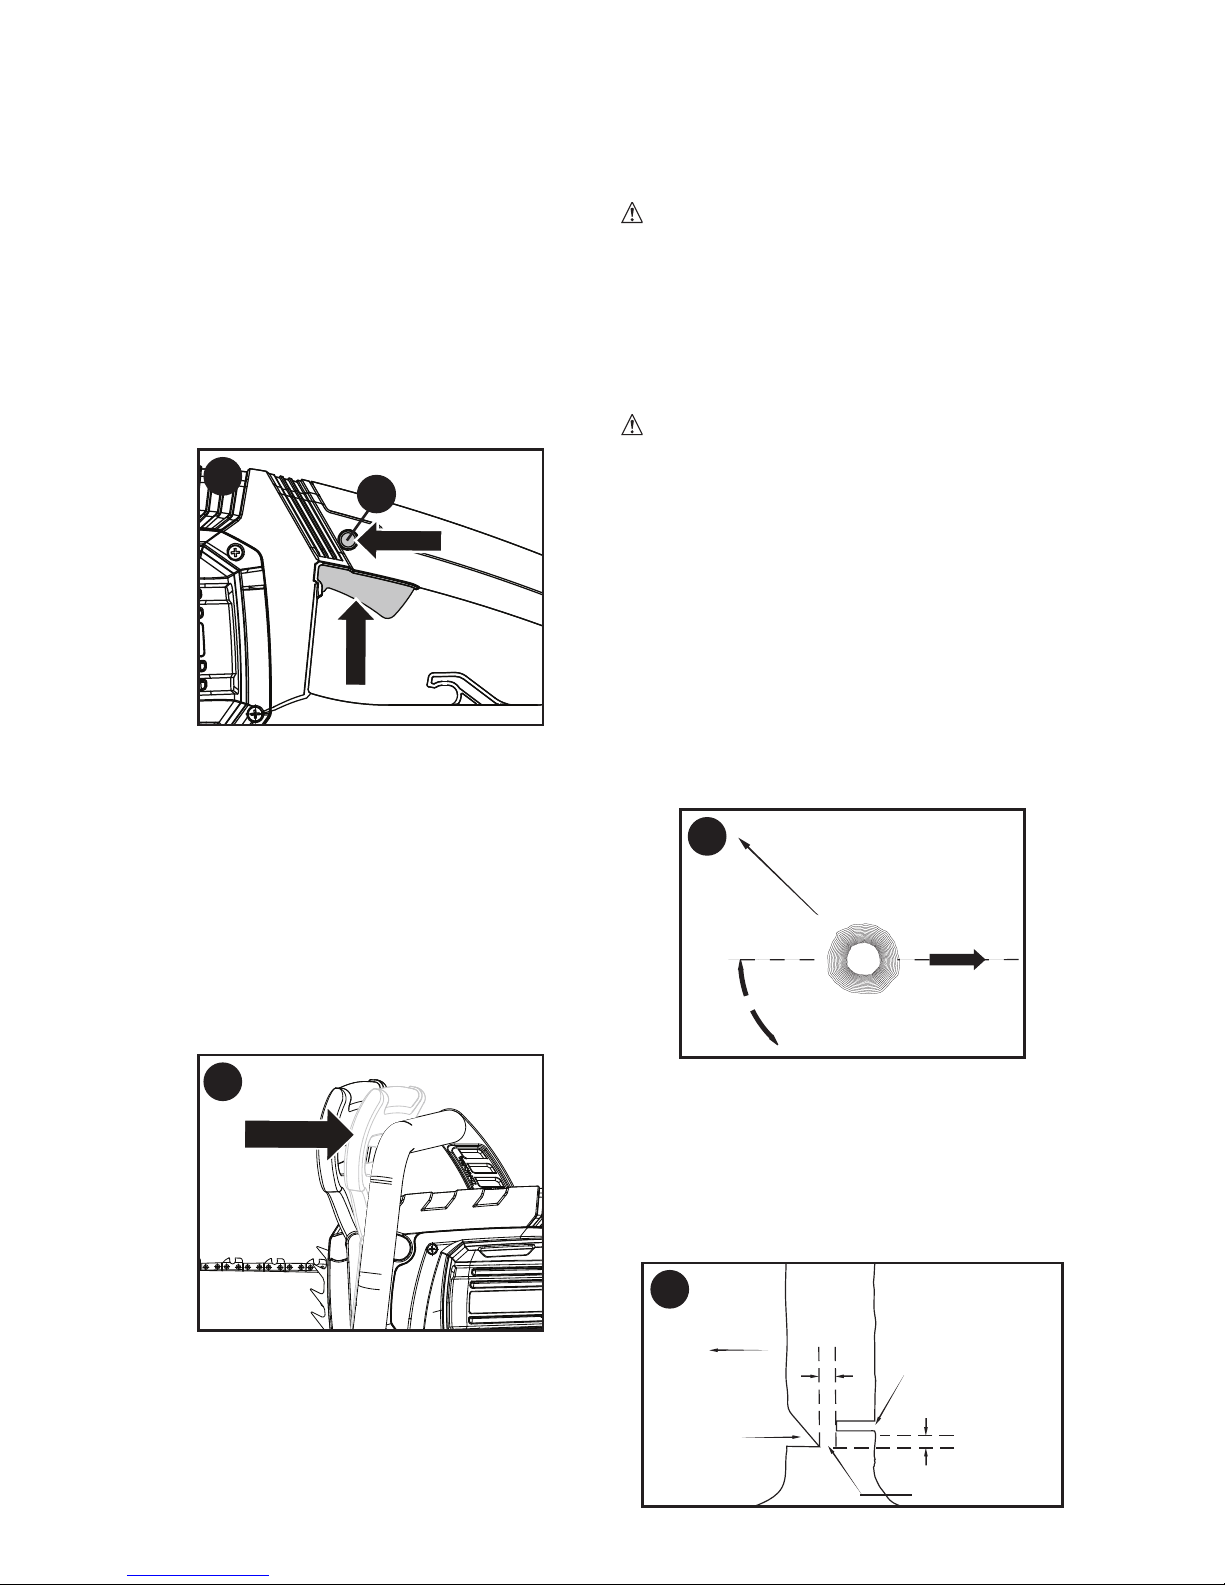
• To turn the tool ON, depress the lock off
button (2) and squeeze the trigger switch
(1) as shown in figure K. (Once the tool is
running you can release the lock off button.)
• To turn the tool OFF, release the trigger switch.
SETTING THE CHAIN BRAKE
Your chain saw is equipped with a motor
chain braking system which will stop the
chain quickly in case of kickback.
• Make sure the tool is unplugged.
• Pull the chain brake / front hand guard
(3) back into the “set” position as shown
in figure L.
• The tool is now ready to use.
NOTE: In the event of kickback, your left
hand will come in contact with the front
guard, pushing it forward, toward the
workpiece. This will stop the tool immediately.
TESTING THE CHAIN BRAKE
Test the chain brake before every use to
make sure it operates correctly.
• Place the tool on a firm surface. Make sure
the saw chain (5) is clear of the ground.
• Grip the tool firmly with both hands and
turn the chain saw on .
• Rotate your left hand forward around the
front handle so the back of your hand
comes in contact with the Chain brake /
front hand guard (3) and push it forward,
toward the workpiece. The saw chain
should stop immediately.
NOTE: If saw does not stop immediately,
stop use of tool and bring it to a service
center nearest you.
WARNING:
Make sure to set chain brake
before cutting.
COMMON CUTTING TECHNIQUES
Felling
Felling is the process of cutting down a tree.
Be sure battery is fully charged before felling
a tree so you can finish on a single charge.
Do not fell trees in high wind conditions.
WARNING: Felling can result in injury. It
should only be performed by a trained person.
• (Figure M) A retreat path should be
planned and cleared as necessary before
cuts are started. The retreat path should
extend back and diagonally to the rear of
the expected line of fall.
• Before felling is started, consider the
natural lean of the tree, the location of
larger branches and the wind direction to
judge which way the tree will fall. Have
wedges (wood, plastic or aluminum)
and a heavy mallet handy.
Remove dirt, stones, loose bark, nails,
staples, and wire from the tree where the
felling cuts are to be made.
• (Figure N) Notching Undercut - Make
the notch 1/3 of the diameter of the tree,
perpendicular to the direction of the fall.
Make the lower horizontal notching cut
first. This will help to avoid pinching of
either the saw chain or the guide bar
when the second notch is being made.
L
1
2
K
2
DIRECTION
OF
FALL
RETREAT
45°
TREE
M
2 (5cm)
INCHES
DIRECTION
OF FALL
2 (5cm)
INCHES
HINGE
NOTCH
FELLING BACK
CUT
N
Page 10
10
Limbing
Limbing is removing the branches from a
fallen tree. When limbing, leave larger lower
limbs to support the log off the ground.
Remove the small limbs in one cut. Branches
under tension should be cut from the bottom
up to avoid binding the chain saw as shown
in figure P. Trim limbs from opposite side
keeping tree stem between you and saw.
Never make cuts with saw between your legs
or straddle the limb to be cut.
P
Q
21
CUT FROM TOP
(OVERBUCK)
AVOID CUTTING EARTH
1
1
2
2nd CUT OVERBUCK
(2/3DIAMETER)
TO MEET 1st CUT
(TO AVOID PINCHING)
1st CUT UNDERBUCK
(1/3 DIAMETER)
AVOID SPLINTERING
R
1
2
S
2nd CUT UNDERBUCK
(2/3 DIAMETER)
TO MEET 1st CUT
(TO AVOID PINCHING)
1st CUT OVERBUCK
(1/3 DIAMETER)
TO AVOID SPLINTERING
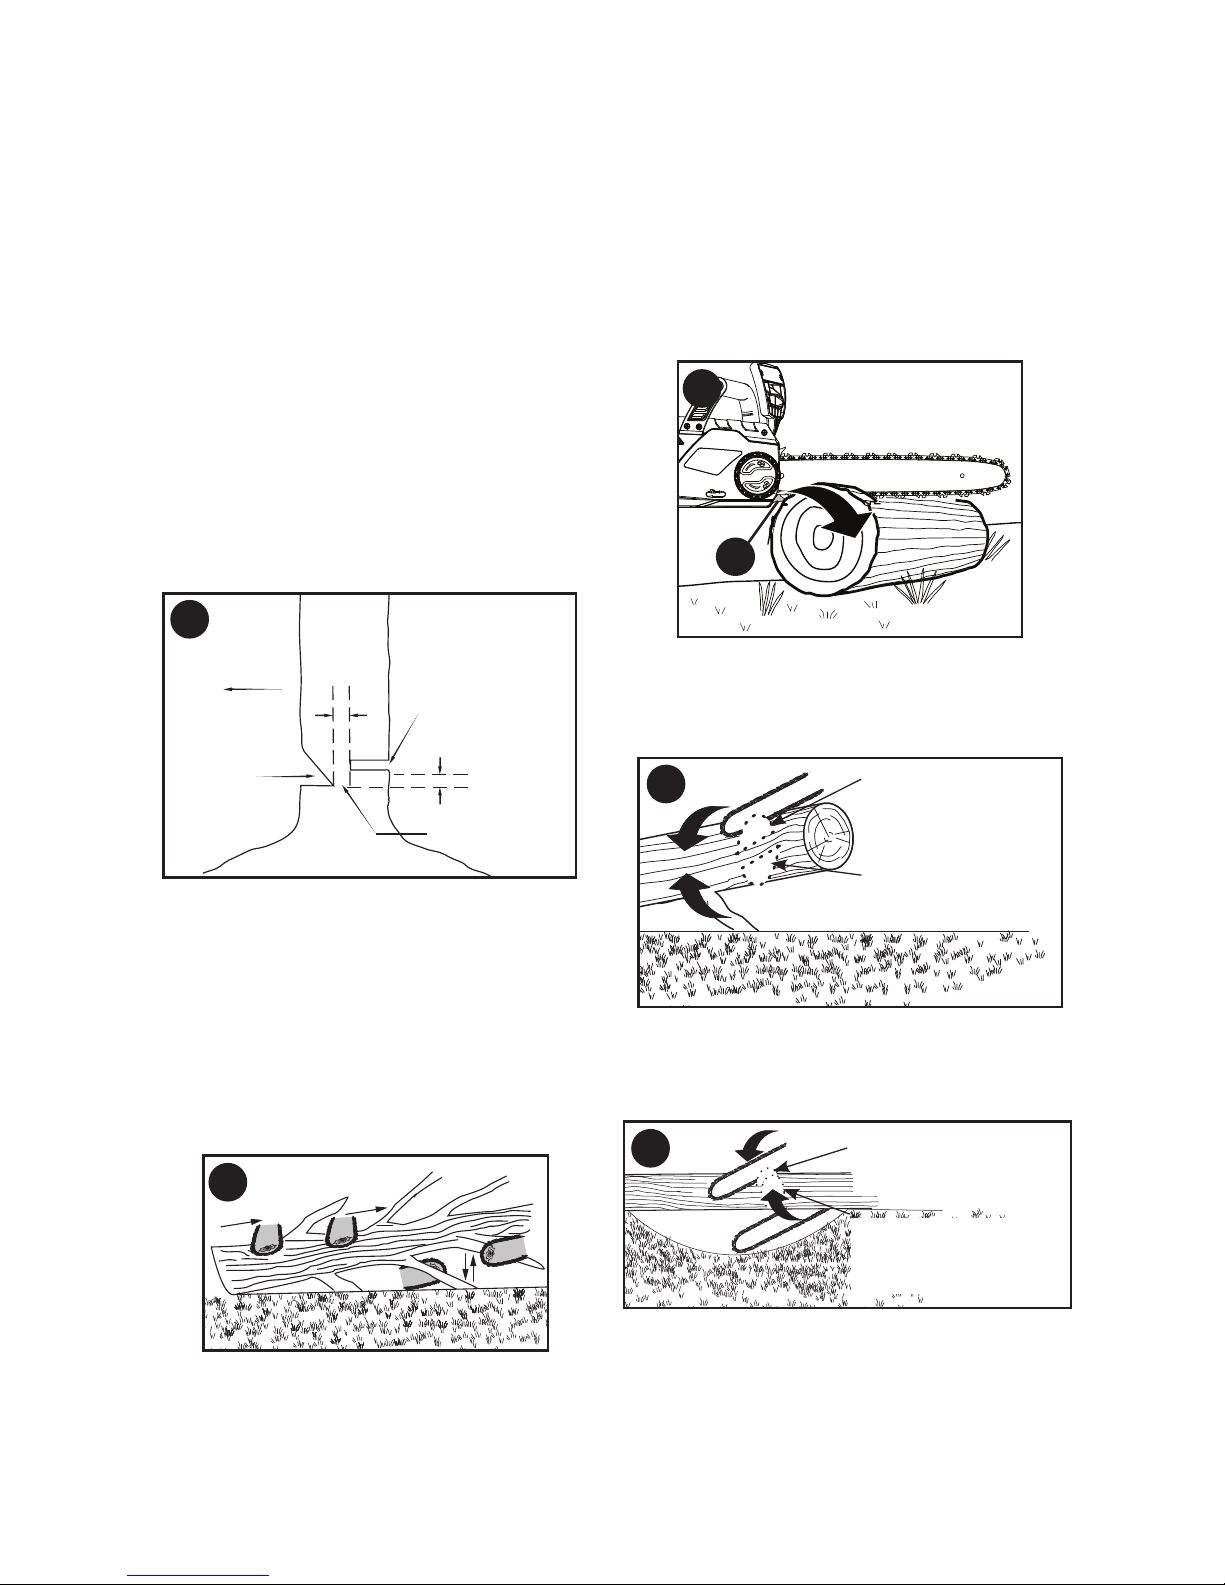
Bucking
Bucking is cutting a felled tree or log into
lengths. How you should cut depends on
how the log is supported. Use a saw horse
(figure U) whenever possible.
Always start a cut with the chain running at
full speed.
• Place the bottom spike (21) of the chain
saw behind the area of the initial cut as
shown in figure Q.
• Turn the chain saw on then rotate the chain
and bar down into the tree, using the spike
as a hinge.
•
Once the chain saw gets to a 45 degree
angle, level the chain saw again and
repeat steps until you cut fully through.
• When the tree is supported along its
entire length, make a cut from the top
(overbuck), but avoid cutting the earth as
this will dull your saw quickly.
• (Figure O) Felling Back Cut - Make the
felling back cut at least
2 inches (51mm) higher than the
horizontal notching cut. Keep the felling
back cut parallel to the horizontal
notching cut. Make the felling back cut
so enough wood is left to act as a hinge.
The hinge wood keeps the tree from
twisting and falling in the wrong direction.
Do not cut through the hinge.
• (Figure O) As the felling cut gets close to
the hinge the tree should begin to fall. If
there is any chance that the tree may not
fall in the desired direction or it may rock
back and bind the saw chain, stop cutting
before the felling cut is complete and use
wedges to open the cut and drop the
tree along the desired line of fall. When
the tree begins to fall remove the chain
saw from the cut, stop the motor, put the
chain saw down, then use the retreat
path planned. Be alert for overhead limbs
falling and watch your footing.
• (Figure R) When supported at one end
First, cut 1/3 the diameter from the underside
(underbuck). Then make the finished cut by
overbucking to meet the first cut.
• (Figure S) When supported at both ends
First, cut 1/3 down from the top overbuck.
Then make the finished cut by underbucking
the lower 2/3 to meet the first cut.
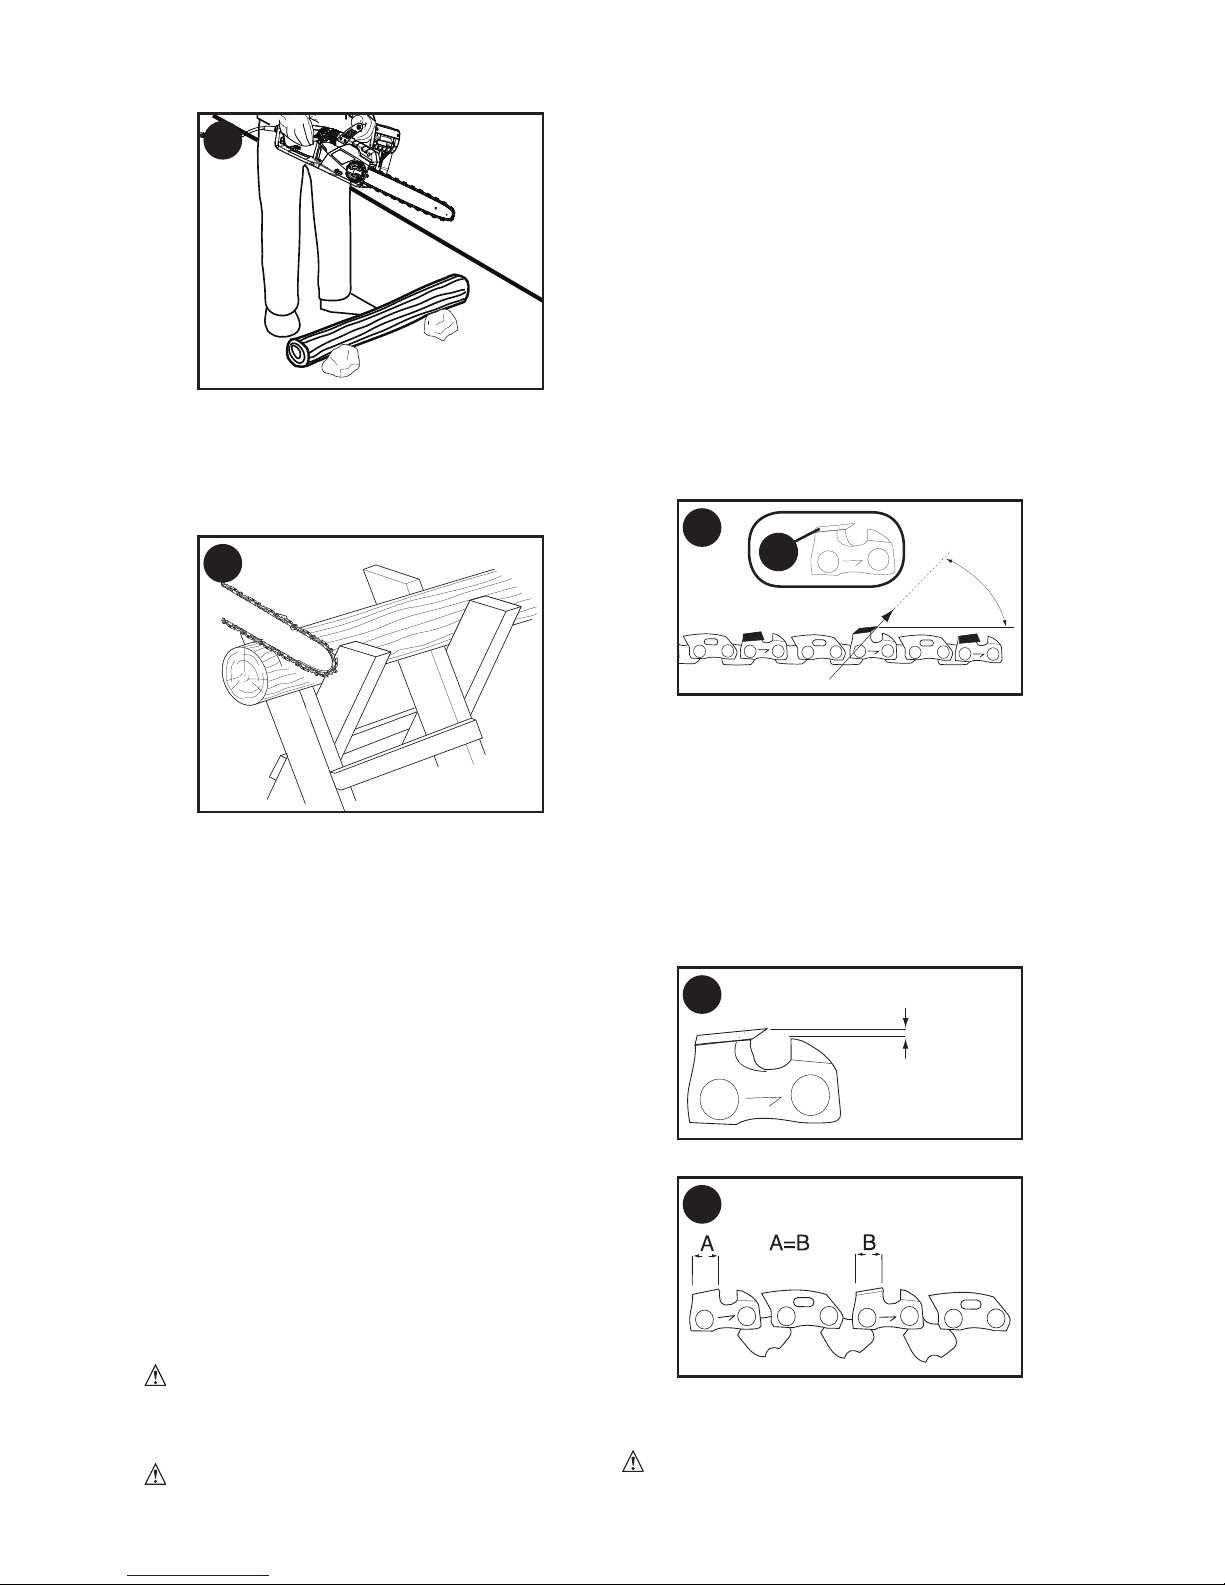
• (Figure T) When on a slope
Always stand on the uphill side of the
log. When “cutting through”, to maintain
complete control release the cutting
pressure near the end of the cut without
relaxing your grip on the chain saw
handles. Don’t let the chain contact the
ground. After completing the cut, wait for
the saw chain to stop before you move
2 (5cm)
INCHES
DIRECTION
OF FALL
2 (5cm)
INCHES
HINGE
NOTCH
FELLING BACK
CUT
O
Page 11
11
X
T
U
60°
V
22
W
.025 in.
.635mm
• (Figure U) When using a saw horse
This is strongly recommended whenever
possible. Position the log in a stable
position. Always cut on the outside of the
saw horse arms.
the chain saw. Always stop the motor
before moving from tree to tree.
CARE AND MAINTENANCE
Use only mild soap and damp cloth to clean
the tool. Do not use solvents to clean the
plastic housing of the saw. Never let any
liquid get inside the tool; never immerse any
part of the tool into a liquid.
IMPORTANT: To assure product SAFETY
and RELIABILITY, repairs, maintenance
and adjustment should be performed by
authorized service centers or other qualified
service organizations, always using identical
replacement parts.
Regular maintenance ensures a long
effective life for your chain saw. We
recommend you make the following checks
on a regular basis:
CHAIN AND BAR
After every few hours of use, remove the
guide bar and chain and
clean thoroughly.
SAW CHAIN SHARPENING
CAUTION: Sharp chain. Always wear
protective gloves when handling the
chain. The chain is sharp and can cut you
when it is not running.
WARNING: Sharp moving chain. To
prevent accidental operation, insure that
the tool is unplugged before performing
the following operations. Failure to do
this could result in serious personal injury.
NOTE: The cutters will dull immediately if
they touch the ground or a nail while cutting.
To get the best possible performance from
your chain saw it is important to keep the
teeth of the chain sharp. Follow these
helpful tips for proper saw chain sharpening:
1. For best results use a 4.5mm file and
a file holder or filing guide to sharpen
your chain. This will ensure you always
get the correct sharpening angles.
2. Place the file holder flat on the top
plate and depth gauge of the cutter.
3. (Figure V) Keep the correct top plate
(22) filing angle line of 30° on your file
guide parallel with your chain (file at
60° from chain viewed from above).
4. Sharpen cutters on one side of the
chain first. File from the inside of
each cutter to the outside. Then turn
your saw around and repeat the
processes (2,3,4) for cutters on the
other side of the chain.
NOTE: Use a flat file to file the tops of the
rakers (portion of chain link in front of the
cutter) so they are about .025 inch (.635
mm) below the tips of the cutters as shown
in Figure W.
5. (Figure X) Keep all cutter lengths equal.
6. If damage is present on the chrome
surface of the top plates or side plates,
file back until such damage is removed.
CAUTION: After filing, the cutter will be
sharp, use extra caution during this process.
NOTE: Each time the chain is sharpened,
Page 12

12
it loses some of the low kickback qualities
and extra caution should be used. It is
recommended that a chain be sharpened
no more than four times.
ACCESSORIES
WARNING: The use of accessories not
recommended in this manual may be hazardous.
Accessories are available from your local retailer
or nearest BLACK+DECKER service center.
•
This chain saw is compatible with the
BLACK+DECKER chain RC1800
• Replace bar with a corresponding 18-inch
Oregon low-kickback bar.
NOTE:
Ensure the new bar is equipped with
a tool-free tension assembly (16).
SERVICE INFORMATION
All BLACK+DECKER Service Centers
are staffed with trained personnel to
provide customers with efficient and
reliable power tool service. Whether you
need technical advice, repair, or genuine
factory replacement parts, contact the
BLACK+DECKER location nearest you. To
find your local service location, call:
1-800-544-6986, or visit
www.blackanddecker.com
FULL TWO-YEAR HOME USE
WARRANTY
BLACK+DECKER warrants this product for
two years against any defects in material or
workmanship. The defective product will be
replaced or repaired at no charge in either of
two ways.
The first, which will result in exchanges
only, is to return the product to the retailer
from whom it was purchased (provided
that the store is a participating retailer).
Returns should be made within the time
period of the retailer’s policy for exchanges
(usually 30 to 90 days after the sale). Proof
of purchase may be required. Please check
with the retailer for their specific return policy
regarding returns that are beyond the time
set for exchanges.
The second option is to take or send the
product (prepaid) to a BLACK+DECKER
owned or authorized Service Center for
repair or replacement at our option. Proof of
purchase may be required.
This warranty does not apply to accessories.
This warranty gives you specific legal rights
and you may have other rights which vary
from state to state or province to province.
Should you have any questions, contact the
manager of your nearest BLACK+DECKER
Service Center. This product is not intended
for commercial use.
FREE WARNING LABEL REPLACEMENT:
If your warning labels become illegible or
are missing, call 1-800-544-6986 for a free
replacement.
LATIN AMERICA: This warranty does not
apply to products sold in Latin America. For
products sold in Latin America, check country
specific warranty information contained in the
packaging, call the local company or see the
website for warranty information.
Page 13

13
TROUBLESHOOTING
Problem Possible Cause Possible Solution
• Chain saw will not start. • Cord not plugged in.
• Plug chain saw into a working outlet.
• Circuit fuse is blown. • Replace circuit fuse. (If the
product repeatedly causes the
circuit fuse to blow, discontinue use
immediately and have it serviced
at a BLACK+DECKER service center
or authorized servicer.)
• Circuit breaker is tripped.
• Reset circuit breaker. (If the product
repeatedly causes the circuit
breaker to trip, discontinue use
immediately and have it serviced
at a BLACK+DECKER service
center or authorized servicer.)
• Cord or switch is • Have cord or switch replaced at
damaged. BLACK+DECKER Service Center or
Authorized Servicer.
• Lock-off button not • Push lock off button and then
actuated. depress the trigger switch.
• Bar / chain overheated.
• Chain too tight. • Refer to “adjusting chain
tension” section.
• Lubrication needed.
• Refer to “filling the oil reservoir”
section.
• Chain is loose. • Chain tension set • Refer to “adjusting chain
incorrectly. tension” section.
• Poor cut quality. • Chain tension set • Refer to “adjusting chain
incorrectly. tension” section.
• Chain needs to be • Refer to “saw chain sharpening”
sharpened. section.
• Chain needs Note: Excessive tension leads to
replacement. excessive wear and reduction in
life of bar & chain. Ensure too is
always adequately filled with
proper oil.
Refer to “replacing the saw chain”
section.
• Unit runs but does • Chain installed • Refer to sections for installing
not cut. backwards. and removing chain.
For assistance with your product, visit our website www.blackanddecker.com for the location
of the service center nearest you or call the BLACK+DECKER help line at 1-800-544-6986.
Imported by
Black & Decker (U.S.) Inc.,
701 E. Joppa Rd.
Towson, MD 21286 U.S.A.
Page 14

14
MODE D’EMPLOI
SCIE À CHAÎNE
Merci d’avoir choisi BLACK+DECKER! Consulter le site Web
www.BlackandDecker.com/NewOwner pour enregistrer votre nouveau produit.
ÀLIRE AVANT DE RETOURNER CE PRODUIT POUR QUELQUE
RAISON QUE CE SOIT :
Si des questions ou des problèmes surgissent après l’achat d’un produit
BLACK+DECKER, consulter le site Web www.blackanddecker.com/instantanswers
pour obtenir des réponses instantanément 24 heures par jour. Si la réponse est
introuvable ou en l’absence d’accès à l’Internet, composer le 1 800 544-6986 de 8 h à
17 h HNE, du lundi au vendredi, pour parler avec un agent. Prière d’avoir le numéro de
catalogue sous la main lors de l’appel.
Pour l´achat d´un filtre de rechange composer le 1-888-678-7278
CONSERVER CE MODE D’EMPLOI POUR UN USAGE ULTÉRIEUR.
VOICI DES RENSEIGNEMENTS IMPORTANTS À CONNAÎTRE :
NE PAS EXERCER DE TENSION TROP FORTE SUR LA CHAÎNE. Se
reporter à la rubrique « RÉGLAGE DE LA TENSION DE LA CHAÎNE »
pour savoir comment tendre la chaîne correctement.
Retendre la chaîne fréquemment durant les deux premières heures
d’utilisation.
NUMERO DE CATALOGUE
CS1518
LIGNES DIRECTRICES EN MATIÈRE DE SÉCURITÉ - DÉFINITIONS
Il est important que vous lisiez et compreniez ce mode d’emploi. Les informations qu’il
contient concernent VOTRE SÉCURITÉ et visent à ÉVITER TOUT PROBLÈME. Les
symboles ci-dessous servent à vous aider à reconnaître cette information.
DANGER : Indique une situation dangereuse imminente qui, si elle n’est pas
évitée, causera la mort ou des graves blessures.
AVERTISSEMENT : Indique une situation potentiellement
dangereuse qui, si elle n’est pas évitée, pourrait causer la mort ou de graves blessures.
MISE EN GARDE : Indique une situation potentiellement dangereuse
qui, si elle n’est pas évitée, pourrait causer des blessures mineures ou modérées.
MISE EN GARDE : Utilisé sans le symbole d’alerte à la sécurité,
indique une situation potentiellement dangereuse qui, si elle n’est pas évitée, peut résulter
en des dommages à la propriété.
Page 15

15
Avertissements de sécurité
généraux pour les outils
électriques
AVERTISSEMENT : Lire tous les
avertissements de sécurité et
toutes les directives. Le non-respect
des avertissements et des directives
pourrait se solder par un choc
électrique, un incendie et/ou une
blessure grave.
Conserver tous les
avertissements et toutes les
directives pour un usage
ultérieur.
Le terme «outil électrique» cité dans
les avertissements se rapporte à votre
outil électrique à alimentation sur
secteur (avec fil) ou par piles (sans fil).
1) Sécurité du lieu de travail
a) Tenir la zone de travail propre et
bien éclairée. Les endroits sombres
sont souvent des causes d’accidents.
b) Ne pas faire fonctionner d’outils
électriques dans un milieu
déflagrant, soit en présence de
liquides inflammables, de gaz ou
de poussière. Les outils électriques
produisent des étincelles qui peuvent
enflammer la poussière ou les vapeurs.
c) Éloigner les enfants et les curieux
au moment d’utiliser un outil
électrique. Une distraction pourrait
vous en faire perdre la maîtrise.
2) Sécurité en matière d’électricité
a) Les fiches des outils électriques
doivent correspondre à la prise. Ne
jamais modifier la fiche en aucune
façon. Ne jamais utiliser de fiche
d’adaptation avec un outil électrique mis
à la terre. Le risque de choc électrique
sera réduit par l’utilisation de fiches non
modifiées correspondant à la prise.
b) Éviter tout contact physique
avec des surfaces mises à la
terre comme des tuyaux, des
radiateurs, des cuisinières et des
réfrigérateurs. Le risque de choc
électrique est plus élevé si votre corps
est mis à la terre.
c) Ne pas exposer les outils
électriques à la pluie ou à d’autres
conditions où il pourrait être
mouillé. La pénétration de l’eau dans
un outil électrique augmente le risque
de choc électrique.
d) Ne pas utiliser abusivement le cordon
d’alimentation. Ne jamais utiliser
le cordon pour transporter, tirer ou
débrancher un outil électrique. Tenir
le cordon éloigné de la chaleur, de
l’huile, des bords tranchants ou
des pièces mobiles. Les cordons
endommagés ou emmêlés augmentent
les risques de choc électrique.
e) Pour l’utilisation d’un outil
électrique à l’extérieur, se servir
d’une rallonge convenant à une telle
utilisation. L’utilisation d’une rallonge
conçue pour l’extérieur réduit les
risques de choc électrique.
f) S’il est impossible d’éviter
l’utilisation d’un outil électrique
dans un endroit humide, brancher
l’outil dans une prise ou sur un
circuit d’alimentation dotés d’un
disjoncteur de fuite à la terre (GFCI).
L’utilisation de ce type de disjoncteur
réduit les risques de choc électrique.
3) Sécurité personnelle
a) Ê
tre vigilant, surveiller le travail
effectué et faire preuve de jugement
lorsqu’un outil électrique est utilisé.
Ne pas utiliser d’outil électrique en
cas de fatigue ou sous l’influence de
drogues, d’alcool ou de médicaments.
Un simple moment d’inattention en
utilisant un outil électrique peut entraîner
des blessures corporelles graves.
b) Utiliser des équipements de
protection individuelle. Toujours
porter une protection oculaire.
L’utilisation d’équipements de protection
comme un masque antipoussière, des
chaussures antidérapantes, un casque
de sécurité ou des protecteurs auditifs
lorsque la situation le requiert réduira les
risques de blessures corporelles.
c) Empêcher les démarrages
intempestifs. S’assurer que
l’interrupteur se trouve à la position
d’arrêt avant de relier l’outil à une
source d’alimentation et/ou d’insérer
un bloc-piles, de ramasser ou de
transporter l’outil. Transporter un
outil électrique alors que le doigt
repose sur l’interrupteur ou brancher
un outil électrique dont l’interrupteur
est à la position de marche risque de
provoquer un accident.
d) Retirer toute clé de réglage ou
clé standard avant de démarrer
l’outil. Une clé standard ou une clé
de réglage attachée à une partie
pivotante peut causer des blessures.
e) Ne pas trop tendre les bras.
Conserver son équilibre en tout
temps. Cela permet de mieux
maîtriser l’outil électrique dans les
situations imprévues.
f) S’habiller de manière appropriée.
Ne pas porter de vêtements amples
ni de bijoux. Garder les cheveux,
les vêtements et les gants à l’écart
des pièces mobiles. Les vêtements
amples, les bijoux ou les cheveux
Page 16

16
longs risquent de rester coincés dans
les pièces mobiles.
g) Si des composants sont fournis
pour le raccordement de dispositifs
de dépoussiérage et de ramassage,
s’assurer que ceux-ci sont bien
raccordés et utilisés. L’utilisation
d’un dispositif de dépoussiérage peut
réduire les dangers
engendrés par les poussières.
4) Utilisation et entretien d’un outil
électrique
a) Ne pas forcer un outil électrique.
Utiliser l’outil électrique approprié
à l’application. L’outil électrique
approprié effectuera un meilleur travail,
de façon plus sûre et à la vitesse pour
laquelle il a été conçu.
b) Ne pas utiliser un outil électrique
dont l’interrupteur est défectueux.
Tout outil électrique dont l’interrupteur
est défectueux est dangereux et doit
être réparé.
c) Débrancher la fiche du secteur ou le
bloc-piles de l’outil électrique avant
de faire tout réglage ou changement
d’accessoire, ou avant de ranger
l’outil électrique. Ces mesures
préventives réduisent les risques de
démarrage accidentel de l’outil électrique.
d) Ranger les outils électriques
hors de la portée des enfants, et
ne permettre à aucune personne
n’étant pas familière avec un
outil électrique (ou son manuel
d’instruction) d’utiliser ce dernier.
Les outils électriques deviennent
dangereux entre les mains
d’utilisateurs inexpérimentés.
e) Entretenir les outils électriques.
Vérifier les pièces mobiles pour
s’assurer qu’elles sont bien
alignées et tournent librement,
qu’elles sont en bon état et ne
sont affectées par aucun trouble
susceptible de nuire au bon
fonctionnement de l’outil électrique.
En cas de dommage, faire réparer
l’outil électrique avant toute
nouvelle utilisation. Beaucoup
d’accidents sont causés par des outils
électriques mal entretenus.
f) S’assurer que les outils de coupe sont
aiguisés et propres. Les outils de coupe
bien entretenus et affûtés sont moins
susceptibles de se coincer et sont plus
faciles à contrôler.
g) Utiliser l’outil électrique, les
accessoires, les forets, etc.
conformément aux présentes
directives en tenant compte des
conditions de travail et du travail
à effectuer. L’utilisation d’un outil
électrique pour toute opération autre
que celle pour laquelle il a été conçu
est dangereuse.
5) Réparation
a) Faire réparer l’outil électrique
par un réparateur professionnel
en n’utilisant que des pièces de
rechange identiques. Cela permettra
de maintenir une utilisation sécuritaire
de l’outil électrique.
LIRE TOUTES CES DIRECTIVES.
CONSIGNES DE SÉCURITÉ ET
AVERTISSEMENTS POUR LES
SCIES Á CHAÍNE
• Éloigner toute partie du corps de
la chaîne de l’outil lorsque la scie
à chaîne est en marche. Avant de
démarrer la scie à chaîne, s’assurer
que la chaîne est dégagée, sans
aucun contact avec des objets. Un
moment d’inattention, durant l’utilisation
d’une scie à chaîne, peut résulter dans
l’enchevêtrement des vêtements ou d’une
partie du corps dans la chaîne.
• Toujours tenir la tronçonneuse avec
votre ISO sur la poignée arrière et la
main gauche sur la poignée avant. Tenir
la tronçonneuse avec une configuration
inversée main augmente le risque de
blessure et ne devrait jamais être fait.
• Tenir l’outil électrique par ses surfaces
de prise isolées seulement, car la
chaîne peut entrer en contact avec un
câblage caché ou le cordon de la scie.
Tout contact entre une chaîne de scie et
un fil « sous tension » risque de mettre
« sous tension » les pièces métalliques
exposées de l’outil et de donner un choc
électrique à l’opérateur.
• Porter des lunettes de sécurité et
une protection auditive. Le port
d’un équipement de protection
supplémentaire pour la tête, les
mains, les jambes et les pieds est
recommandé. Les vêtements de
protection appropriés réduisent les
blessures corporelles causées par les
débris projetés ou un contact accidentel
avec la chaîne de scie.
• Ne pas grimper dans un arbre pour
utiliser la scie à chaîne. L’utilisation d’une
scie à chaîne en hauteur dans un arbre peut
se solder par des blessures corporelles.
• Conserver toujours un pas sûr et
utiliser uniquement la scie à chaîne
debout sur une surface fixe, sécuritaire
et de niveau. Les surfaces glissantes ou
instables comme les échelles peuvent
entraîner une perte de l’équilibre ou du
contrôle de la scie à chaîne.
• Lors de la coupe d’une branche
maîtresse sous tension, prendre
Page 17

17
garde au redressement de la branche.
Lorsque la tension contenue dans les
fibres de bois se relâche, la branche
maîtresse pendant la détente risque
de frapper l’utilisateur et/ou de lui faire
perdre le contrôle de la scie à chaîne.
• Être extrêmement prudent lors de la
coupe de broussailles ou de jeunes
arbres. Les branches élancées peuvent
se coincer dans la chaîne et être projetées
vers vous ou vous déséquilibrer.
• Transporter la scie à chaîne par la
poignée avant avec l’outil hors tension
et à l’écart du corps. Toujours mettre
la gaine du guide-chaîne avant de
transporter ou d’entreposer la scie à
chaîne. La manipulation adéquate de la
scie à chaîne réduit le risque de contact
accidentel avec la chaîne en mouvement.
• Suivre les consignes de graissage, de
tension de la chaîne et de changement
d’accessoires. Une chaîne mal tendue
ou graissée risque de se briser ou accroît
la probabilité d’un effet de rebond.
• Maintenir les poignées sèches,
propres et exemptes d’huile et de
graisse. Des poignées pleines de graisse
sont glissantes et peuvent vous faire
perdre le contrôle de votre outil.
• Ne couper que le bois. Ne pas utiliser
la scie à chaîne pour des applications
pour lesquelles l’outil n’est pas
conçu, comme la coupe des matières
plastiques, de la maçonnerie ou des
matériaux de constructions qui ne
sont pas en bois. L’utilisation de la scie
à chaîne pour toutes opérations autres
que celles pour lesquelles elle a été
conçue est dangereuse.
Causes de l’effet de rebond et
prévention par l’opérateur :
L’effet de rebond se produit lorsque
l’extrémité ou la partie supérieure du guidechaîne frappe un objet ou lorsque la chaîne
se coince dans une entaille.
Le contact de l’extrémité pourrait provoquer
une réaction inverse soudaine qui
projetterait le guide-chaîne vers le haut et
l’arrière en direction de l’opérateur.
Un coincement de la chaîne de la scie
sur le dessus du guide-chaîne pourrait
repousser rapidement le guide-chaîne vers
l’arrière en direction de l’opérateur.
L’un ou l’autre de ces mouvements
brusques pourrait vous faire perdre la
maîtrise de la scie et se solder par une
grave blessure corporelle. Il ne faut pas
se fier exclusivement aux dispositifs de
sécurité intégrés à votre scie. L’utilisateur
de scie à chaîne doit prendre plusieurs
mesures pour éviter tout accident ou toute
blessure lors des travaux de coupe.
Un effet de rebond est le résultat
d’une mauvaise utilisation de l’outil et/
ou de procédures ou conditions de
fonctionnement incorrectes. Il peut
être évité en prenant les précautions
nécessaires telles que décrites ci-dessous :
• Saisir fermement la scie à chaîne
des deux mains, avec les pouces et
les doigts autour des poignées, et
positionner le corps et les bras de
sorte à résister à la force de l’effet de
rebond. Il est possible de maîtriser
les forces de l’effet de rebond avec de
telles mesures de précaution. Ne pas
lâcher la scie à chaîne.
• Ne pas trop tendre les bras et ne
pas couper au-dessus du niveau des
épaules. Cela aide à éviter un contact
accidentel de l’extrémité et permet de
mieux maîtriser la scie à chaîne dans les
situations imprévues.
• Utiliser uniquement les guide-chaînes
et les chaînes de remplacement
spécifiés par le fabricant. Les guide-
chaînes et les chaînes de remplacement
inadéquats peuvent entraîner un bris de
la chaîne et/ou un effet de rebond.
• Suivre les directives du fabricant pour
l’affûtage et l’entretien de la chaîne
de scie. Le fait de baisser le guide de
profondeur peut accroître l’effet de rebond.
Suivre les précautions qui suivent pour
réduire l’effet de rebond notamment :
(1.) Saisir fermement la scie à chaîne. Tenir
fermement la scie à chaîne avec les deux
mains lorsque le moteur est en marche.
Utiliser une prise ferme avec les pouces et
les doigts et encercler les poignées de la
scie à chaîne. La scie à chaîne imprimera
un mouvement avant lors de la coupe avec
la partie inférieure du guide-chaîne et un
mouvement arrière lors de coupe avec la
partie supérieure du guide-chaîne.
(2.) Ne pas trop se pencher.
(3.) Conserver son équilibre en tout temps.
(4.) Ne pas laisser l’extrémité du guidechaîne frapper un billot, une branche, le sol
ou tout autre obstruction.
(5.) Ne pas couper au-dessus de la hauteur
des épaules.
(6.) Utiliser des dispositifs comme des chaînes
à faible effet de rebond et des guides-chaîne à
faible effet de rebond pour réduire les risques
associés à l’effet de rebond.
(7.) Utiliser uniquement des guides-chaîne
et des chaînes de rechange précisés par le
fabricant ou son équivalent.
(8.) Ne pas mettre en contact la chaîne et tout
objet se trouvant à l’extrémité du guide-chaîne.
(9.) Tenir la zone de travail dégagée et
exempte d’obstructions comme d’autres
arbres, branches, roches, clôtures,
souches, etc. Éliminer ou éviter toute
obstruction que la scie à chaîne pourrait
Page 18

18
frapper lors d’une coupe d’un billot ou
d’une branche en particulier.
(10.) Maintenir la chaîne de la scie bien
affûtée et tendue correctement. Une chaîne
lâche ou émoussée peut augmenter le
risque d’effet de rebond. Vérifier la tension
à intervalles réguliers, avec le moteur hors
tension et sans le bloc-piles, jamais avec le
moteur en marche.
(11.) Commencer et poursuivre la coupe
uniquement lorsque la chaîne fonctionne
à plein régime. Si la chaîne tourne à un
régime plus lent, le risque d’un effet de
rebond est plus élevé.
(12.) Tronçonner un seul billot à la fois.
(13.) Faire très attention lorsque vous
recommencez à scier à partir d’une
entaille déjà entamée. Appuyer les butées
cannelées contre le tronc et laisser la
chaîne atteindre son plein régime avant de
poursuivre la coupe.
(14.) Ne pas essayer de coupes en
plongée ou le perçage de trous.
(15.) Prendre garde au déplacement des
billots ou à d’autres forces qui pourraient
faire refermer une entaille et pincer la
chaîne ou qui pourraient tomber sur celle-ci.
Directives de sécurité concernant l’effet
de rebond
AVERTISSEMENT : la scie à chaîne est
dotée des caractéristiques suivantes afin
d’aider à réduire les risques liés à l’effet de
rebond; toutefois, ces caractéristiques
n’élimineront pas totalement cette
dangereuse réaction. En tant qu’utilisateur
de scie à chaîne, ne pas se fier uniquement
aux dispositifs de sécurité. Vous devez
respecter toutes les précautions, directives
et consignes d’entretien et de sécurité
contenues dans ce manuel afin d’essayer
d’éviter l’effet de rebond et autres forces qui
pourraient entraîner de graves blessures.
• Frein de chaîne, conçu pour éteindre
immédiatement la scie à chaîne si le
rebond est trop grand.
• Guide-chaîne à faible effet de rebond,
conçu avec une extrémité de faible rayon
qui réduit la taille de la zone dangereuse
d’effet de rebond sur l’extrémité de la
barre. Un guide-chaîne à faible effet
de rebond est l’un des dispositifs qui
réduit de manière significative le nombre
et l’ampleur des effets de rebond
lors d’essais en conformité avec les
exigences de sécurité pour les scies à
chaîne électriques.
• Chaîne à effet de rebond réduit, conçue
avec un guide de profondeur profilé et un
lien de pare-main qui dévie la force de
l’effet de rebond et permet à la chaîne de
s’enfoncer progressivement dans le bois.
Une chaîne à faible effet de rebond est
une chaîne conforme aux exigences de
performance ANSI B175.1-1991.
• Ne pas utiliser la scie à chaîne lorsque
vous êtes dans un arbre, sur une
échelle ou un échafaudage ou sur
toute autre surface instable.
• Tenir l’outil par sa surface de prise
isolée dans une situation où l’outil de
coupe peut entrer en contact avec un
câblage dissimulé. Tout contact avec un
fil « sous tension » mettra « sous tension
» les pièces métalliques exposées de
l’outil et électrocutera l’opérateur.
• Ne pas effectuer d’opérations au-delà de
sa capacité ou de son expérience. Lire
attentivement et comprendre parfaitement
les directives de ce mode d’emploi.
• Avant de démarrer la scie à chaîne,
s’assurer que la chaîne est dégagée,
sans aucun contact avec des objets.
• Ne pas utiliser la scie à chaîne d’une
seule main! Une telle pratique risque
de blesser gravement l’opérateur,
les aides ou les curieux. Une scie à
chaîne est conçue uniquement pour une
utilisation à deux mains.
• Garder les poignées sèches, propres
et exemptes d’huile ou de graisse.
• Ne pas laisser la saleté, les débris ou
la sciure s’accumuler sur le moteur ou
les évents externes.
• Arrêter la scie à chaîne avant de la
déposer sur le sol.
• Ne pas couper de vignes, de petites
broussailles ou du sous-bois.
• Être extrêmement prudent lors de la
coupe de broussailles ou de jeunes
arbres, car les branches élancées
peuvent se coincer dans la chaîne et être
projetées vers vous ou vous déséquilibrer.
AVERTISSEMENT : certains outils
électriques, tels que les sableuses, les scies,
les meules, les perceuses ou certains autres
outils de construction, peuvent produire de
la poussière contenant des produits
chimiques reconnus par l’État de la
Californie comme étant susceptibles
d’entraîner le cancer, des malformations
congénitales ou pouvant être nocifs pour le
système reproductif. Parmi ces produits
chimiques, on retrouve :
• le plomb contenu dans les peintures à
base de plomb,
• la silice cristalline de la brique, du
ciment et d’autres
produits de maçonnerie, et
• l’arsenic et chrome provenant de bois
traité chimiquement
Les risques reliés à l’exposition à ces
poussières varient selon la fréquence à
laquelle l’utilisateur travaille avec ce type
de matériaux. Pour réduire l’exposition à
ces produits chimiques, travailler dans un
endroit bien ventilé et porter un équipement
Page 19

19
de sécurité approuvé comme un masque
antipoussières conçu spécialement pour
filtrer les particules microscopiques.
• Éviter le contact prolongé avec les
poussières produites par les activités
de ponçage, sciage, meulage, perçage
et autres activités de construction.
Porter des vêtements de protection et
laver les parties du corps exposées
avec une solution d’eau et de savon.
Laisser la poussière pénétrer dans
la bouche et les yeux ou la laisser
reposer sur la peau, pourrait promouvoir
l’absorption de produits chimiques nocifs.
AVERTISSEMENT : Utilisation de cet
outil peut générer ou débourser de
poussière, ce qui peut causer des
blessures graves et permanentes
respiratoires ou autres. Toujours utiliser
une protection respiratoire approuvé par
NIOSH/OSHA approprié pour l’exposition à
la poussière. Particules directs loin du
visage et du corps.
TERMINOLOGIE ET
NOMENCLATURE RELATIVES Á
SCIES Á CHAÍNE
• Tronçonnage - le processus de coupe
transversale d’un arbre abattu ou d’un
billot en morceaux.
• Frein moteur - un dispositif utilisé pour
immobiliser la chaîne de la scie dès
que la détente est relâchée.
• Tête motorisée de la scie à chaîne -
une scie sans chaîne et guide-chaîne.
• Pignon d’entraînement ou pignon -
la pièce dentée qui entraîne la chaîne
de l’outil.
• Abattage - le processus de coupe d’un arbre.
• Trait d’abattage - la dernière entaille
pratiquée au côté opposé à l’entaille
d’abattage sur le tronc d’un arbre.
• Poignée avant - la poignée d’appui
logée à l’avant ou vers l’avant de la
scie à chaîne.
• Protège-main avant - une barrière
physique entre la poignée avant de
la scie à chaîne et le guide-chaîne
normalement positionné près de la
main sur la poignée avant et parfois
utilisé comme levier d’actionnement du
frein de chaîne.
• Guide-chaîne - une solide structure
sur rail qui supporte et guide la chaîne
de l’outil.
• Fourreau du guide-chaîne - boîtier
qui s’adapte sur le guide-chaîne pour
prévenir le contact des dents lorsque la
scie n’est pas en utilisation.
• Effet de rebond - le mouvement
vertical ou arrière, ou les deux
simultanément, du guide-chaîne, se
produit lorsque la chaîne près de
l’extrémité supérieure du guide-chaîne
frappe un objet tel un billot ou une
branche ou lorsque la chaîne est prise
dans une entaille du tronc.
• Effet de rebond par pincement - le
refoulement rapide de la scie peut
se produire lorsque l’entaille dans le
tronc se referme et pince la chaîne
en mouvement et la bloque près de
l’extrémité du guide-chaîne.
• Effet de rebond par rotation - le
mouvement vertical ou arrière rapide de
la scie peut se produire lorsque la chaîne
en mouvement près de l’extrémité
supérieure du guide-chaîne frappe un
objet tel un billot ou une branche.
• Ébranchage - la coupe des branches
d’un arbre abattu
• Chaîne à faible effet de rebond - une
chaîne conforme aux exigences de
performance de rebond de la norme
ANSI B175.1-1991 (lors d’essais sur un
échantillon représentatif de scies à chaîne).
• Position normale de coupe - ces
positions sont utilisées lors du
tronçonnage et des entailles d’abattage.
• Entaille d’abattage - une entaille dans
le tronc qui dirige la chute de l’arbre.
• Poignée arrière - la poignée d’appui
logée à l’arrière ou vers l’arrière de la scie.
• Guide-chaîne à faible effet de rebond
- un guide-chaîne qui réduit de façon
significative et prouvée l’effet de rebond.
• Chaîne de rechange - une chaîne
conforme aux exigences de
performance d’effet de rebond de la
norme ANSI B175.1-1991 lors d’essais
avec des modèles spécifiques de
scies à chaîne. Il est possible que
cette chaîne ne soit pas conforme aux
exigences de performance ANSI si
utilisée sur d’autres modèles d’outils.
• Chaîne pour scies à chaîne - une
chaîne dentée en boucle, qui coupe le
bois, et qui est entraînée par le moteur
et supportée par le guide-chaîne.
• Butée cannelée - le point d’appui utilisé
en cours d’abattage ou de tronçonnage
pour faire pivoter la scie et maintenir la
position lors de la coupe.
• Interrupteur - un dispositif qui, lorsque
actionné, complètera ou interrompra un circuit
électrique du moteur de la scie à chaîne.
• Bielle - un mécanisme qui transmet le
mouvement d’une détente à l’interrupteur.
• Verrou d’interrupteur - une butée
qui se déplace pour empêcher le
fonctionnement non intentionnel
de l’interrupteur à moins d’un
actionnement manuel.
UTILISATION PRÉVUE
La scie à chaîne sans fil BLACK+DECKER
est parfaite pour l’élagage et le tronçonnage
de petits billots jusqu’à 406 mm (16 po) de
diamètre. Cet outil se destine uniquement à
être utilisé par les consommateurs.
Page 20

20
SYMBOLES
• L’étiquette apposée sur votre outil pourrait
comprendre les symboles suivants. Les
symboles et leurs définitions sont indiqués
ci-après :
V ................. volts
A ................. ampères
Hz ............... hertz
W ................ watts
min ..............minutes
ou AC ....courant alternatif
ou DC ..courant continu
n
o ...............sous vide
................ Construction de classe I
PRÉPARATION POUR L’UTILISATION DE
LA SCIE À CHAÎNE
AVERTISSEMENT : Lire et assimiler toutes
les directives. Le non-respect des directives
indiquées ci-dessous peut entraîner des
risques de choc électrique, d’incendie ou de
blessures corporelles graves.
ASSEMBLAGE
INSTALLATION DU GUIDE-CHAÎNE ET
DE LA CHAÎNE
MISE EN GARDE :
Chaîne affûtée.
Toujours porter des gants protecteurs lors
de la manipulation de la chaîne. La chaîne
est tranchante et peut vous couper même
lorsqu’elle est au repos.
AVERTISSEMENT :
Chaîne affûtée en
mouvement. Pour prévenir tout
fonctionnement accidentel, s’assurer de
débrancher l’outil avant d’effectuer les
opérations suivantes. Le non-respect de
cette directive risque d’entraîner des
blessures corporelles graves.
................borne de mise à la minute
(mis à la terre)
...............
Construction de classe II
.............. symbole d´avertissement
.../min ..........tours à la minute
.............. Lire le mode d’emploi avant
l’utilisation
............Utiliser une protection
respiratoire adéquate.
...........Utiliser une protection oculaire
adéquate.
............Utiliser une protection auditive
adéquate.
La chaîne (5) et le guide-chaîne (4) sont
emballés individuellement dans la boîte. La
chaîne doit être attachée au guide-chaîne,
et l’ensemble doit être monté sur le corps
de l’outil.
• Déposer la scie sur une surface ferme.
• Tourner le bouton de réglage du guide-
chaîne (7) dans le sens antihoraire
comme le montre la figure A pour
enlever le couvercle du pignon (6).
• Tourner le module de serrage sans
clé (16) (fixé au guide-chaîne) dans le
sens antihoraire jusqu’à ce qu’il s’arrête
DESCRIPTION FONCTIONNELLE
1. Détente
2. Bouton de verrouillage (non illustré)
3. Frein de chaîne/pare-main avant
4. Guide-chaîne
5. Chaîne de scie
6. Couvercle du pignon
7. Bouton de réglage du guide-chaîne
8. Roue tendeuse de chaîne
9. Fourreau du guide-chaîne
10. Poignée arrière
11. Poignée avant
12. Cordon
13. Dispositif de retenue de rallonge
14. Bouchon du réservoir d’huile
15. Indicateur de niveau d’huile
A
1
3
6
7
4
2
5
9
11
10
12
13
14
8
15
Page 21

21
comme le montre la figure B.
• Avec des gants de protection, saisir la
chaîne de scie (5) et l’enrouler autour du
guide-chaîne (4) en s’assurant que les
dents pointent dans la bonne direction
(voir la figure F)
• Vérifier que la chaîne est bien logée dans
la fente qui fait tout le tour du guide-chaîne.
• Placer la chaîne de scie autour du pignon
(17) tout en alignant le trou dans le
module de serrage sans clé sur le boulon
(18) à la base de l’outil comme le montre
la figure C.
• Faire tourner le guide-chaîne jusqu’à ce
qu’il s’engage sur les deux ergots en
dessous et cesse de pivoter facilement
vers le haut et le bas.
• Ceci fait, tourner le module de serrage
sans clé (16) en sens horaire à la main
pour effectuer un serrage préliminaire du
module et le maintenir en place.
• En tenant le guide-chaîne immobile,
remettre le couvercle du pignon (6).
S’assurer que la patte (19) du couvercle
s’aligne sur la fente (20) du boîtier
principal comme le montre la figure D.
Tourner le bouton de réglage du guidechaîne (7) dans le sens horaire jusqu’à
ce qu’il soit serré, puis desserrer le
bouton d’un tour complet pour permettre
le serrage adéquat de la chaîne de scie.
• En tenant le bouton de réglage du guide-
chaîne (7), tourner la roue tendeuse
de chaîne (8) en sens horaire pour
augmenter la tension comme le montre la
figure E. S’assurer que la chaîne de scie
(5) est serrée autour du guide-chaîne (4).
RÉGLAGE DE LA TENSION DE
LA CHAÎNE
MISE EN GARDE :
Chaîne affûtée.
Toujours porter des gants protecteurs
lors de la manipulation de la chaîne. La
chaîne est tranchante et peut vous couper
même lorsqu’elle est au repos.
AVERTISSEMENT :
Chaîne affûtée en
mouvement. Pour prévenir tout
fonctionnement accidentel, s’assurer de
débrancher l’outil avant d’effectuer les
opérations suivantes. Le non-respect de
cette directive risque d’entraîner des
blessures corporelles graves.
• La scie reposant sur une surface ferme,
vérifier la tension de la chaîne de scie (5).
La tension est correcte lorsque la chaîne
retourne en position d’un coup sec après
avoir été éloignée de 3 mm (1/8 po) du
guide-chaîne (4) avec une légère force du
majeur et du pouce comme le montre la
figure F. Observer la figure G. La chaîne
ne doit pas « pendre » sous la face
inférieure du guide-chaîne.
• Pour ajuster la tension de la chaîne de
scie, desserrer le bouton de réglage du
guide-chaîne (7) et suivre les instructions
de la section « Installation du guidechaîne et de la chaîne ».
• Ne pas trop tendre la chaîne, car une telle
pratique entraînera une usure excessive
et réduira la durée de vie du guide et de
la chaîne.
• Une fois la tension bien réglée, serrer le
bouton de réglage du guide-chaîne.
• Lorsque la chaîne est neuve, vérifier
fréquemment la tension (après avoir
débranché l’outil) au cours des deux
premières heures d’utilisation, car une
chaîne neuve s’étire légèrement.
E
D
20
19
B
16
C
17
18
Page 22

22
REMPLACEMENT DE LA CHAÎNE
MISE EN GARDE :
Chaîne affûtée.
Toujours porter des gants protecteurs lors
de la manipulation de la chaîne. La chaîne
est tranchante et peut vous couper même
lorsqu’elle est au repos.
AVERTISSEMENT :
Chaîne affûtée en
mouvement. Pour prévenir tout
fonctionnement accidentel, s’assurer de
débrancher l’outil avant d’effectuer les
opérations suivantes. Le non-respect de
cette directive risque d’entraîner des
blessures corporelles graves.
• Tourner le bouton de réglage du guide-
chaîne (7) dans le sens antihoraire pour
réduire la tension de la chaîne.
• Retirer le couvercle du pignon (6) comme
le décrit la section « Installation du guidechaîne et de la chaîne ».
• Soulever la chaîne usée (5) de la rainure
sur le guide-chaîne (4).
• Insérer la nouvelle chaîne dans la fente
du guide-chaîne et s’assurer que les
dents de la scie pointent dans la bonne
direction, de manière à ce que la flèche
de la chaîne corresponde à l’illustration
sur le couvercle du pignon (6) comme le
montre la figure H.
• Suivre les instructions de la section «
Installation du guide-chaîne et de la chaîne ».
SYSTÈME DE GRAISSAGE
AUTOMATIQUE
La scie à chaîne est munie d’un système
de graissage automatique qui lubrifie en
permanence la chaîne de scie et le guide-chaîne.
L’indicateur de niveau d’huile (15) montre le
niveau de lubrifiant dans la scie à chaîne.
S’il reste moins du quart du réservoir,
débrancher la scie à chaîne et remplir
d’huile appropriée.
REMARQUE : Utilisez une barre de haute
qualité et huile pour chaîne adéquate
et bar la lubrification de la chaîne.
Comme substitut temporaire, une huile
moteur sans détergent SAE30 peut
être utilisée.L’utilisation d’une barre de
base végétale et d’huile de chaîne est
recommandé lors de l’élagage des arbres.
Huile minérale n’est pas recommandé car
il peut endommager les arbres. N’utilisez
jamais d’huile usagée ou huile très épaisse.
Ceux-ci peuvent endommager votre scie à
chaîne.Remplissage du réservoir d’huile
• Enlever le bouchon du réservoir d’huile
(14) et remplir le réservoir avec l’huile
recommandée jusqu’à ce que le niveau
d’huile atteigne le haut de l’indicateur de
niveau d’huile (15).
• Remettre le bouchon du réservoir d’huile.
• Éteindre périodiquement la scie à chaîne
et consulter l’indicateur de niveau d’huile
pour s’assurer que le guide-chaîne et la
chaîne sont bien lubrifiés.
FIXATION DE LA RALLONGE
Un dispositif de retenue de rallonge (13)
est intégré dans la poignée. Il empêche le
débranchement de la rallonge.
• Replier la rallonge en deux, puis l’insérer
dans l’encoche (20) logée à l’extrémité de la
poignée comme le montre la figure I. Fixer
la boucle ainsi formée en repliant la rallonge
sur le dispositif de retenue du cordon (13).
Tirer délicatement sur la rallonge afin de
s’assurer que celle-ci est fermement retenue
par la poignée. Connecter la prise femelle
de la rallonge au cordon d’alimentation (12)
de la scie à chaîne.
TRANSPORT DE LA SCIE À CHAÎNE
• Toujours mettre le fourreau (9) sur le
guide-chaîne (4) (figure J) lors du transport
de la scie à chaîne.
F
G
I
20
13
H
Page 23

23
FONCTIONNEMENT DE LA SCIE
À CHAÎNE
AVERTISSEMENT : Lire et assimiler toutes
les directives. Le non-respect des directives
indiquées ci-dessous peut entraîner des
risques de choc électrique, d’incendie ou de
blessures corporelles graves.
• Se protéger contre l’effet de rebond
qui peut entraîner des blessures
graves ou un décès. Consulter les
importantes consignes de sécurité en
matière de « Protection contre l’effet de
rebond » pour éviter ce risque.
• Ne pas trop tendre les bras. Ne pas
couper au-dessus du niveau de la
poitrine. S’assurer de maintenir un bon
équilibre. Maintenir les pieds écartés. Diviser
également votre poids sur les deux pieds.
• Saisir fermement la poignée avant (11)
avec la main gauche et la poignée arrière
(10) avec la main droite de sorte que votre
corps soit à la gauche du guide-chaîne.
• Ne pas tenir la scie à chaîne par le pare-
main avant (3). Bloquer le coude du bras
gauche de sorte que le bras soit étendu et
droit pour résister à un effet de rebond.
AVERTISSEMENT :
Ne jamais utiliser
une prise à bras croisés (la main gauche
sur la poignée arrière et la main droite sur
la poignée avant).
AVERTISSEMENT :
Ne jamais aligner
une partie du corps avec le guide-chaîne
(4) lors de l’utilisation de la scie à chaîne.
• Ne jamais l’utiliser lorsque l’on se
trouve dans un arbre, dans une
position incommode, sur une échelle
ou toute autre surface instable. Il y a
risque de perte de maîtrise de la scie
à chaîne pouvant entraîner ainsi une
blessure grave.
• Maintenir la scie à chaîne à plein régime
en tout temps lors de tronçonnages.
• Laisser la chaîne exécuter son travail.
Exercer uniquement une légère pression.
Ne pas mettre de pression à la fin du
tronçonnage.
MARCHE/ARRÊT
• Toujours s’assurer d’avoir le pied sûr et
de saisir fermement la scie à chaîne des
deux mains avec les pouces et les doigts
encerclant les deux poignées.
• Pour mettre l’outil en marche, enfoncer le
bouton de verrouillage (2) et appuyer sur
la détente (1) comme le montre la figure
K. (Une fois l’outil en marche, relâcher le
bouton de verrouillage.)
• Pour éteindre l’outil, relâcher la détente.
ACTIVATION DU FREIN DE CHAÎNE
La scie à chaîne est dotée d’un système de
freinage moteur qui immobilise la chaîne
rapidement en cas de rebond.
• S’assurer que l’outil est débranché.
• Tirer pour remettre le frein de chaîne/le
pare-main avant (3) en position « activée
» comme le montre la figure L.
• L’outil est maintenant prêt à être utilisé.
REMARQUE : En cas de rebond, la main
gauche de l’utilisateur entre en contact avec
le pare-main avant, le poussant vers l’avant,
en direction de la pièce. L’outil s’arrête alors
sur-le-champ.
ESSAI DU FREIN DE CHAÎNE
Tester le frein de chaîne avant chaque
utilisation pour vérifier son bon fonctionnement.
• Placer l’outil sur une surface ferme.
S’assurer que la chaîne de scie (5) est à
bonne distance du sol.
• Saisir fermement l’outil des deux mains et
allumer la scie à chaîne.
• Faire pivoter la main gauche sur la
poignée avant, vers l’avant, de façon à
ce que le dos de la main entre en contact
avec le frein de chaîne/le pare-main avant
(3), puis pousser-le vers l’avant, c.-à-d.
vers la pièce. La chaîne de scie devrait
s’arrêter sur-le-champ.
REMARQUE : Si la scie ne cesse pas
immédiatement de fonctionner, ne pas
utiliser l’outil et le confier à un centre de
L
J
1
2
K
2
Page 24

24
réparation près de chez vous.
AVERTISSEMENT :
S’assurer que le frein
de chaîne est activé avant le tronçonnage.
TECHNIQUES DE COUPE LES
PLUS COMMUNES
Abattage
L’abattage est le processus de coupe d’un
arbre. S’assurer que le bloc-piles soit à pleine
charge avant d’abattre un arbre de sorte à
terminer le travail avec une seule charge. Ne
pas abattre d’arbres sous des vents forts.
AVERTISSEMENT :
L’abattage comporte
un risque de blessure. Il doit être exécuté
uniquement par une personne qualifiée.
• (Figure M) On se devrait de prévoir et de
dégager une voie de retrait avant le début
de l’abattage. La voie devrait s’étendre
vers l’arrière et en diagonale à la ligne de
chute prévue.
• Avant l’abattage, observer le penchant
naturel de l’arbre, l’emplacement de
grandes branches et la direction du vent
pour évaluer la ligne de chute de l’arbre.
Prévoir des coins (bois, plastique ou
aluminium) et un maillet à portée de main.
Retirer toute saleté, roches et morceaux
d’écorce détaché, clous, agrafes et fils
métalliques de l’arbre avant la coupe de
la première entaille.
• (Figure N) Entaille d’abattage : entailler
le tronc de 1/3 du diamètre de celui-ci,
perpendiculairement à la direction de la
chute. Exécuter l’encoche horizontale
d’abord. Cette technique évitera de
coincer la chaîne ou le guide-chaîne lors
de la coupe de la seconde encoche.
• (Figure O) Trait d’abattage : positionner
et exécuter le trait d’abattage au moins
51 mm (2 po) plus haut que l’encoche
horizontale de l’entaille d’abattage.
Exécuter le trait d’abattage parallèle
à l’encoche horizontale de l’entaille
d’abattage. Exécuter le trait d’abattage
de sorte qu’il y ait assez de bois pour
servir de charnière. Cette charnière
naturelle empêche l’arbre de se tordre et
de tomber dans la mauvaise direction. Ne
pas la découper de part en autre.
• (Figure O) Dès que le trait abattage se
rapproche de la charnière naturelle, l’arbre
devrait débuter sa chute. S’il existe la
possibilité que l’arbre ne tombe pas dans
la direction désirée ou qu’il se balance
et coince la scie à chaîne, arrêter la
coupe avant la fin du trait d’abattage et
utiliser les coins pour ouvrir le trait et faire
basculer l’arbre dans la ligne de chute
voulue. Lorsque l’arbre débute sa chute,
retirer la scie à chaîne du trait, en arrêter
le moteur et la déposer sur le sol puis
reculer dans la voie de retrait prévue.
Faire attention aux chutes de branches et
regarder où vous marchez.
Ébranchage
L’ébranchage est simplement la coupe
des branches d’un arbre abattu. Pour
ce faire, conserver intacte les branches
maîtresses inférieures pour supporter le
billot au-dessus du sol. Retirer les petites
branches d’un seul mouvement. Les
branches tendues devraient se couper du
bas vers le haut pour éviter de coincer la
scie à chaîne comme le montre la figure P.
Ébrancher du côté opposé en maintenant
la branche entre l’opérateur et la scie à
chaîne. Ne jamais couper avec la scie
à chaîne entre les jambes. Ne jamais
enjamber la branche maîtresse à couper.
N
5 CM
(2 po)
CHARNIÈRE
5 CM
(2 po)
DIRECTION
DE LA
CHUTE
ENTAILLE
TRAIT
D’ABATTAGE
O
5 CM
(2 po)
CHARNIÈRE
5 CM
(2 po)
DIRECTION
DE LA
CHUTE
ENTAILLE
TRAIT
D’ABATTAGE
45°
M
DIRECTION
DE LA
CHUTE
ARBRE
VOIE DE RETRAIT
P
Page 25

25
Tronçonnage
Le tronçonnage est une coupe transversale
d’un arbre abattu ou d’un billot en
morceaux. La méthode varie selon le type
de support du billot. Lorsque possible,
utiliser un chevalet de sciage (figure U).
Toujours commencer un tronçonnage avec
la chaîne à plein régime.
• Placer la griffe du bas (21) de la scie à
chaîne derrière la zone de coupe initiale
comme le montre la figure Q.
• Allumer la scie à chaîne, puis utiliser la griffe
comme pivot pour incliner la chaîne et le
guide-chaîne vers l’arbre et amorcer la coupe.
• Quand la scie à chaîne atteint un angle
de 45 degrés, relever la scie à chaîne
et répéter les étapes jusqu’à ce que le
tronçonnage soit accompli.
• Quand l’arbre est supporté sur toute
sa longueur, tronçonner par le dessus,
mais éviter de toucher le sol car cette
pratique émoussera la chaîne rapidement.
• (Figure R) Soutien à une extrémité
Tronçonner d’abord 1/3 du diamètre
par le dessous. puis terminer avec un
tronçonnage par le dessus pour rejoindre
le premier trait.
• (Figure S) Soutien aux deux extrémités
Tronçonner d’abord 1/3 du diamètre par le
dessus. Puis terminer par un tronçonnage
des 2/3 restants par le dessous pour
rejoindre le premier trait de coupe.
• (Figure T) Tronçonnage en pente
Toujours se tenir en aval du billot. Lors
du tronçonnage, maintenir la maîtrise
parfaite en relâchant la pression près
de la fin du tronçonnage sans toutefois
relâcher la prise sur les poignées de la
scie à chaîne. Ne pas laisser la chaîne
toucher le sol. Une fois la coupe terminée,
attendre l’immobilisation complète de la
chaîne avant de déplacer la scie à chaîne.
Toujours arrêter le moteur avant de se
déplacer à un autre arbre.
• (Figure W) Utilisation d’un chevalet de
sciage
L’utilisation d’un chevalet est fortement
recommandée lorsque possible.
Positionner le billot de façon stable.
Toujours scier sur l’extrémité à l’extérieur
du chevalet.
SOINS ET ENTRETIEN
N’utiliser qu’un détergent doux et un chiffon
humide pour nettoyer l’outil. Ne pas utiliser de
solvants pour nettoyer le boîtier en plastique
de la scie à chaîne. Ne jamais laisser de
liquide pénétrer dans l’outil et n’immerger
aucune partie de l’outil dans un liquide.
IMPORTANT : pour assurer la SÉCURITÉ
et la FIABILITÉ du produit, confier toute
réparation, entretien ou réglage à un centre
de réparation autorisé ou autres centres
qualifiés et toujours utiliser des pièces de
rechange identiques.
Un entretien régulier de la scie à chaîne
garantit une durée de vie utile prolongée.
Nous vous recommandons d’effectuer les
vérifications suivantes sur une base régulière :
Q
21
TRONÇONNER PAR LE
DESSUS POUR ÉVITER
DE COUPER LE SOL
1
1
2
R
2e TRONÇONNAGE
PAR LE DESSUS (2/3
DU DIAMÈTRE) POUR
REJOINDRE LE 1er
TRAIT DE SCIE (ÉVITER
LE PINCEMENT)
1er TRONÇONNAGE
PAR LE DESSOUS (1/3
DU DIAMÈTRE) POUR
ÉVITER LES ÉCLATS
1
2
S
1er TRONÇONNAGE
PAR LE DESSUS (1/3
DU DIAMÈTRE) POUR
ÉVITER LES ÉCLATS
2e TRONÇONNAGE
PAR LE DESSOUS (2/3
DU DIAMÈTRE) POUR
REJOINDRE LE 1er
TRAIT DE SCIE (ÉVITER
LE PINCEMENT)
T
U
Page 26

26
X
60°
V
22
W
.025 in.
.635mm
CHAÎNE ET GUIDE-CHAÎNE
Après quelques heures d’utilisation, retirer
le guide-chaîne et la chaîne et nettoyer
soigneusement.
AFFÛTAGE DE LA CHAÎNE
MISE EN GARDE : chaîne tranchante.
Toujours porter des gants protecteurs
lors de la manipulation de la chaîne. La
chaîne est tranchante et peut vous couper
même lorsqu’elle est au repos.
AVERTISSEMENT : chaîne tranchante
mobile. Pour prévenir tout
fonctionnement accidentel, s’assurer de
débrancher le bloc-piles de l’outil avant
d’effectuer les opérations suivantes. Le
non-respect de cette directive risque
d’entraîner des blessures corporelles graves.
REMARQUE : les couteaux seront
émoussera immédiatement si elles touchent
le sol ou un clou pendant la coupe.
Pour optimiser le rendement de la scie à chaîne,
il est primordial de tenir les dents affûtées.
Suivre les conseils pratiques ci-dessous pour un
affûtage correct de la chaîne :
1. Pour de meilleurs résultats, utiliser une
lime de 4,5 m et un porte-lime ou un
guide de lime pour affûter la chaîne.
Ces instruments garantissent un angle
d’affûtage correct.
2. Déposer le porte-lime à plat sur la plaque
supérieure et dans le guide de profondeur
de l’élément tranchant.
3. (Figure V) Maintenir le bon angle de
limage de 30° de la plaque supérieure (22)
sur votre porte-lime parallèle à la chaîne
(lime à 60° de la chaîne vue du dessus).
4. Affûter les dents d’un seul côté d’abord.
Affûter chaque dent de l’intérieur vers
l’extérieur. Puis retourner la scie à chaîne
et répéter le processus (2, 3, 4) pour
les dents traçantes de l’autre côté de la
chaîne.
REMARQUE : Utiliser une lime plate
pour limer la partie supérieure des dents
rabotantes (partie d’un maillon devant
une dent traçante) de sorte qu’elles soient
à environ 0,635 mm (0,025 po) sous les
extrémités des dents traçantes comme le
montre la figure W.
5. (Figure X) Maintenir toutes les dents de
la même longueur.
6. En présence de dommage à la surface
chromée des plaques supérieures ou latérales,
limer jusqu’à la disparition de la marque.
MISE EN GARDE : après le limage, les
dents seront très tranchantes. Être très
attentif lors de ce travail.
REMARQUE : à chaque affûtage, la chaîne
perd un peu de ses propriétés de faible
effet de rebond et l’opérateur se doit d’être
très prudent. Il est recommandé de ne pas
affûter une chaîne plus de quatre fois.
ACCESSOIRES
AVERTISSEMENT : l’utilisation de tout
accessoire non recommandé dans ce
manuel peut présenter un danger.
Les accessoires sont offerts chez le
détaillant BLACK+DECKER de votre région
ou au Centre de réparation le plus près.
• Cette tronçonneuse est compatible avec
la chaîne BLACK+DECKER RC1800
• Remplacer la barre avec une barre
de faible recul de Oregon 18 pouces
correspondante.
REMARQUE : Assurez-vous que le
nouveau bar est équipé d’un montage sans
outil de tension (16).
iNFORMATION SUR LES
REPARATIONS
Tous les centres de réparation
BLACK+DECKER sont dotés de personnel
qualifié en matière d’outillage électrique; ils
sont donc en mesure d’offrir à leur clientèle
un service efficace et fiable. Que ce soit pour
un avis technique, une réparation ou des
pièces de rechange authentiques installées
en usine, communiquer avec l’établissement
BLACK+DECKER le plus près de chez vous.
Pour trouver l’établissement de réparation de
votre région, composer le numéro suivant :
1-800-544-6986 ou consulter le site
www.blackanddecker.com
Page 27

27
GARANTIE COMPLÈTE DE DEUX
ANS POUR UNE UTILISATION
DOMESTIQUE
Black & Decker (É.-U.) Inc. garantit ce produit
pour une durée de deux ans contre tout défaut
de matériau ou de fabrication. Le produit
défectueux sera remplacé ou réparé sans
frais de l’une des deux façons suivantes :
La première façon consiste en un simple
échange chez le détaillant qui l’a vendu
(pourvu qu’il s’agisse d’un détaillant
participant). Tout retour doit se faire durant
la période correspondant à la politique
d’échange du détaillant (habituellement, de
30 à 90 jours après l’achat). Une preuve
d’achat peut être requise. Vérifier auprès
du détaillant pour connaître sa politique
concernant les retours hors de la période
définie pour les échanges.
La deuxième option est d’apporter ou
d’envoyer le produit (transport payé
d’avance) à un centre de réparation
autorisé ou à un centre de réparation de
BLACK+DECKER pour faire réparer ou
échanger le produit, à notre discrétion. Une
preuve d’achat peut être requise.
Cette garantie ne s’applique pas aux
accessoires. Cette garantie vous accorde
des droits légaux spécifiques et vous
pourriez avoir d’autres droits qui varient d’un
État ou d’une province à l’autre. Pour toute
question, communiquer avec le directeur du
centre de réparation BLACK+DECKER le
plus près de chez vous. Ce produit n’est pas
destiné à un usage commercial.
REMPLACEMENT GRATUIT DES
ÉTIQUETTES D’AVERTISSEMENT : si
les étiquettes d’avertissement deviennent
illisibles ou sont manquantes, composer
le 1-800-544-6986 pour en obtenir le
remplacement gratuit.
Page 28

28
DÉPANNAGE
Problème Cause possible Solution possible
• La scie à chaîne ne • Cordon d’alimentation • Brancher la scie à chaîne dans une
démarre pas. non branché. prise sous tension.
• Le fusible du circuit • Remplacer le fusible du circuit. (Si
le est grillé. Roduit fait griller
de façon répétée le fusible du circuit,
arrêter immédiatement d’utiliser le
produit et le faire réparer dans un
centre de réparation BLACK+DECKER
ou un centre de réparation autorisé.)
• Le disjoncteur s’est • Réarmer le disjoncteur. (Si le
déclenché. produit fait déclencher de façon
répétée le disjoncteur, arrêter
immédiatement d’utiliser le produit et
le faire réparer dans un centre de
réparation BLACK+DECKER ou un
centre de réparation autorisé.)
• Cordon d’alimentation ou • Faire remplacer le cordon ou
interrupteur endommagé. l’interrupteur au centre de réparation
BLACK+DECKER ou à un centre de
réparation autorisé.
• Bouton de verrouillage • Appuyer sur le bouton de
non activé. verrouillage, puis sur la détente.
• Surchauffe du guide-
• La chaîne est trop serrée.
• Se reporter à la section « Réglage
chaîne/de la chaîne. de la tension de la chaîne ».
• Lubrification requise. • Se reporter à la section «
Remplissage du réservoir d’huile ».
• La chaîne est trop • Mauvais réglage de la • Se reporter à la section « Réglage
lâche. tension de la chaîne. de la tension de la chaîne ».
• Mauvaise qualité de • Mauvais réglage de la • Se reporter à la section « Réglage
la coupe. tension de la chaîne. de la tension de la chaîne ».
• La chaîne a besoin • Se reporter à la section « Affûtage
d’être affûtée. de la chaîne ».
• La chaîne doit être Remarque : Une tension excessive
remplacée. entraîne une plus grande usure et
diminue la durée de vie du guide-
chaîne et de la chaîne. S’assurer
que le réservoir est toujours assez
rempli d’huile appropriée. Se
reporter à la section
« Remplacement de la chaîne ».
• L’appareil fonctionne, • La chaîne est installée • Se reporter aux sections
mais ne coupe pas. à l’envers. concernant l’installation et le retrait
de la chaîne.
Pour de l’aide avec l’outil, consulter notre site Web www.blackanddecker.com pour
l’emplacement du centre de réparation le plus près ou communiquer avec l’assistance
BLACK+DECKER au 1-800-544-6986.
Imported by / Importé par
Black & Decker Canada Inc.
100 Central Ave.
Brockville (Ontario) K6V 5W6
Page 29

29
MANUAL DE INSTRUCCIONES
LA SIERRA DE CADENA
Gracias por elegir BLACK+DECKER!
Visite www.BlackandDecker.com/NewOwner para registrar su nuevo producto.
LEA EL MANUAL ANTES DE DEVOLVER ESTE PRODUCTO POR
CUALQUIER MOTIVO:
Si tiene una consulta o algún inconveniente con su producto BLACK+DECKER,
visite http://www.blackanddecker.com/instantanswers
para obtener respuestas instantáneas las 24 horas del día.
Si no encuentra la respuesta o no tiene acceso a Internet, llame al 1-800-544-6986
de lunes a viernes de 8 a. m. a 5 p. m. hora del Este para hablar con un agente.
Cuando llame, tenga a mano el número de catálogo.
Para comprar un filtro de repuesto llame al 1-888-678-7278.
CONSERVE ESTE MANUAL PARA FUTURAS CONSULTAS.
SÓLO PARA USO DOMÉSTICO.
INFORMACIÓN CLAVE QUE USTED DEBE CONOCER:
NO SOBRETENSE LA CADENA. Consulte “AJUSTE DE TENSIÓN DE LA
CADENA” para conocer el método adecuado para tensar la cadena.
Vuelva a ajustar la cadena con frecuencia durante las dos primeras horas de uso.
CATÁLOGO N°
CS1518
PAUTAS DE SEGURIDAD/DEFINICIONES
Es importante que lea y comprenda este manual. La información que contiene se
relaciona con la protección de SU SEGURIDAD y la PREVENCIÓN DE PROBLEMAS.
Los símbolos que siguen se utilizan para ayudarlo a reconocer esta información.
PELIGRO: indica una situación de peligro inminente que, si no se evita,
provocará la muerte o lesiones graves.
ADVERTENCIA: indica una situación de peligro potencial que, si no se evita,
provocará la muerte o lesiones graves.
PRECAUCIÓN: indica una situación de peligro potencial que, si no se evita,
provocará lesiones leves o moderadas.
PRECAUCIÓN:
utilizado sin el símbolo de alerta de seguridad indica una situación de
peligro potencial que, si no se evita, puede provocar daños en la propiedad.
Page 30

30
Advertencias generales de
seguridad para herramientas
eléctricas
ADVERTENCIA: Lea todas las
advertencias de seguridad e
instrucciones El incumplimiento de las
advertencias e instrucciones puede
provocar descargas eléctricas, incendios
o lesiones graves.
CONSERVE TODAS LAS
ADVERTENCIAS E INSTRUCCIONES
PARA FUTURAS CONSULTAS.
El término “herramienta eléctrica” incluido
en las advertencias hace referencia a las
herramientas eléctricas operadas con
corriente (con cable eléctrico) o a las
herramientas eléctricas operadas con
baterías (inalámbricas).
1) Seguridad en el área de trabajo
a) Mantenga el área de trabajo limpia y
bien iluminada. Las áreas abarrotadas
y oscuras propician accidentes.
b) No opere herramientas eléctricas
en atmósferas explosivas, como
ambientes donde se encuentran
líquidos, gases o polvo inflamables.
Las herramientas eléctricas originan
chispas que pueden encender el polvo
o los vapores.
c) Mantenga a los niños y
espectadores alejados de la
herramienta eléctrica en
funcionamiento. Las distracciones
pueden provocar la pérdida de control.
2) Seguridad eléctrica
a) Los enchufes de la herramienta
eléctrica deben adaptarse al
tomacorriente. Nunca modifique
el enchufe de ninguna manera. No
utilice ningún enchufe adaptador
con herramientas eléctricas con
conexión a tierra. Los enchufes no
modificados y que se adaptan a los
tomacorrientes reducirán el riesgo de
descarga eléctrica.
b) Evite el contacto corporal con
superficies puestas a tierra, como
por ejemplo tuberías, radiadores,
rangos y refrigeradores. Existe
mayor riesgo de descarga eléctrica si
su cuerpo está puesto a tierra.
c) No exponga las herramientas
eléctricas a la lluvia o a condiciones
de humedad. Si ingresa agua a una
herramienta eléctrica, aumentará el
riesgo de descarga eléctrica.
d) No maltrate al cable. Nunca utilice
el cable para transportar, tirar
o desenchufar la herramienta
eléctrica. Mantenga el cable lejos
del calor, aceite, bordes afilados o
piezas móviles. Los cables dañados
o enredados aumentan el riesgo de
descarga eléctrica.
e) Al operar una herramienta eléctrica
en el exterior, utilice un cable
prolongador adecuado para tal uso.
Utilice un cable adecuado para uso
en exteriores a fin de reducir el riesgo
de descarga eléctrica.
f) Si el uso de una herramienta eléctrica
en un lugar húmedo es imposible de
evitar, utilice un suministro protegido
con un interruptor de circuito por
falla a tierra (GFCI). El uso de un GFCI
reduce el riesgo de descargas eléctricas.
3) Seguridad personal
a) Permanezca alerta, controle lo
que está haciendo y utilice el
sentido común cuando emplee una
herramienta eléctrica. No utilice una
herramienta eléctrica si está cansado
o bajo el efecto de drogas, alcohol
o medicamentos. Un momento de
descuido mientras se opera una
herramienta eléctrica puede provocar
lesiones personales graves.
b) Utilice equipos de protección
personal. Siempre utilice
protección para los ojos. En las
condiciones adecuadas, el uso
de equipos de protección, como
máscaras para polvo, calzado de
seguridad antideslizante, cascos
o protección auditiva, reducirá las
lesiones personales.
c) Evite el encendido por accidente.
Asegúrese de que el interruptor
esté en la posición de apagado
antes de conectarlo a la fuente
de energía o paquete de baterías,
o antes de levantar o transportar
la herramienta. Transportar
herramientas eléctricas con el dedo
apoyado en el interruptor o enchufar
herramientas eléctricas con el
interruptor en la posición de encendido
puede propiciar accidentes.
d) Retire las clavijas de ajuste o llaves
de tuercas antes de encender la
herramienta eléctrica. Una llave de
tuercas o una clavija de ajuste que se
deje conectada a una pieza giratoria
de la herramienta eléctrica pueden
provocar lesiones personales.
e) No se estire. Conserve el equilibrio
adecuado y manténgase parado
correctamente en todo momento. Esto
permite un mejor control de la herramienta
eléctrica en situaciones inesperadas.
f) Use la vestimenta adecuada. No
use ropas holgadas ni joyas.
Mantenga el cabello, la ropa y los
guantes alejados de las piezas en
movimiento. Las ropas holgadas, las
joyas o el cabello largo pueden quedar
Page 31

31
atrapados en las piezas en movimiento.
g) Si se suministran dispositivos
para la conexión de accesorios
con fines de recolección y
extracción de polvo, asegúrese
de que estén conectados y que
se utilicen correctamente. El uso
de dispositivos de recolección de
polvo puede reducir los peligros
relacionados con el polvo.
4) Uso y mantenimiento de la
herramienta eléctrica
a) No fuerce la herramienta eléctrica.
Utilice la herramienta eléctrica
correcta para el trabajo que realizará.
La herramienta eléctrica correcta hará
el trabajo mejor y más seguro a la
velocidad para la que fue diseñada.
b) No utilice la herramienta eléctrica
si no puede encenderla o apagarla
con el interruptor. Toda herramienta
eléctrica que no puede ser controlada
mediante el interruptor es peligrosa y
debe ser reparada.
c) Desconecte el enchufe de la fuente
de energía y/o el paquete de baterías
de la herramienta eléctrica antes de
realizar ajustes, cambiar accesorios
o almacenar herramientas eléctricas.
Estas medidas de seguridad
preventivas reducen el riesgo de
encender la herramienta eléctrica en
forma accidental.
d) Guarde las herramientas
eléctricas que no están en uso
fuera del alcance de los niños y
no permite que otras personas
no familiarizadas con ella o con
estas instrucciones operen la
herramienta. Las herramientas
eléctricas son peligrosas en las
manos de usuarios no entrenados.
e) Mantenimiento de las herramientas
eléctricas. Controle que no haya
piezas móviles mal alineadas
o trabadas, piezas rotas y
toda otra situación que pueda
afectar el funcionamiento de
las herramientas eléctricas.
Si encuentra daños, haga
reparar la herramienta eléctrica
antes de utilizarla. Se producen
muchos accidentes a causa de las
herramientas eléctricas que carecen
de un mantenimiento adecuado.
f) Mantenga las herramientas
de corte afiladas y limpias.
Las herramientas de corte con
mantenimiento adecuado, con los
bordes de corte afilados son menos
propensas a trabarse y son más
fáciles de controlar.
g) Utilice la herramienta eléctrica,
los accesorios y las brocas de la
herramienta, etc. de acuerdo con
estas instrucciones y teniendo en
cuenta las condiciones de trabajo
y el trabajo que debe realizarse. El
uso de la herramienta eléctrica para
operaciones diferentes de aquéllas
para las que fue diseñada podría
originar una situación peligrosa.
5) Mantenimiento
a) Haga que una persona de
reparaciones calificada realice el
mantenimiento de su herramienta
eléctrica y utilice piezas de
repuesto idénticas solamente.
Esto garantizará la seguridad de la
herramienta eléctrica.
LEA TODAS LAS INSTRUCCIONES.
INSTRUCCIONES DE
SEGURIDAD Y ADVERTENCIAS
PARA LAS SIERRAS DE CADENA
• Cuando la motosierra esté
funcionando, mantenga todas las
partes del cuerpo alejadas de la
cadena de la sierra. Antes de arrancar
la motosierra, asegúrese de que la
cadena de la sierra no esté en contacto
con nada. Un momento de descuido al
utilizar motosierras puede provocar que
su ropa o su cuerpo queden atrapados en
la cadena de la sierra.
• Siempre mantenga la motosierra con
su vareo sobre el mango trasero y la
mano izquierda en el mango delantero.
Sosteniendo la motosierra con una
configuración invertida mano aumenta el
riesgo de lesiones personales y nunca
debe hacerse.
• Sostenga la herramienta eléctrica
únicamente por las superficies de
agarre aisladas, debido a que la
cadena de la sierra puede entrar en
contacto con cables eléctricos ocultos
o su propio cable. El contacto de la
cadena de la sierra con un cable con
corriente eléctrica puede provocar que
las partes metálicas expuestas de la
herramienta eléctrica también conduzcan
la corriente y que el operador sufra una
descarga eléctrica.
• Use anteojos de seguridad y
protección para los oídos. Se
recomienda el uso de equipos de
protección adicionales para la cabeza,
las manos, las piernas y los pies. La
ropa de protección adecuada reducirá
las lesiones personales producidas por la
proyección de fragmentos o el contacto
accidental con la cadena de la sierra.
• No utilice una motosierra mientras se
encuentre en un árbol. El uso de una
motosierra al estar subido a un árbol
puede provocar lesiones personales.
Page 32

32
• Siempre mantenga una posición firme
y adecuada, y utilice la motosierra
únicamente cuando esté parado sobre
una superficie fija, firme y nivelada.
Las superficies resbalosas o inestables,
como las escaleras, pueden provocar
una pérdida del equilibrio o del control de
la motosierra.
• Al cortar una rama que esté bajo
tensión, manténgase alerta al efecto
de resorte. Cuando se libera la tensión
de las fibras de la madera, la rama
puede golpear al operador con el efecto
de resorte y/o hacer que se pierda el
control de la motosierra.
• Tenga extremo cuidado cuando corte
pequeñas malezas y árboles jóvenes.
El material largo y delgado puede quedar
atrapado en la cadena de la sierra y
azotarle o hacerle perder el equilibrio.
• Transporte la motosierra sosteniendo
el mango delantero con la herramienta
apagada y alejada de su cuerpo. Al
transportar o guardar la motosierra,
siempre coloque la cubierta de la
barra guía. El manejo apropiado de la
motosierra reducirá la probabilidad de un
contacto accidental con la cadena de la
sierra en movimiento.
• Siga las instrucciones para lubricar,
tensar la cadena y cambiar los
accesorios. Una cadena mal tensada
o mal lubricada puede romperse o
aumentar la posibilidad de retroceso.
• Mantenga los mangos secos, limpios
y libres de aceite y grasa. Los mangos
con grasa o aceite pueden resbalarse y
provocar la pérdida de control.
• Corte madera únicamente. No utilice
la motosierra para fines no previstos.
Por ejemplo, no utilice la motosierra
para cortar plástico, mampostería
o materiales de construcción que
no sean de madera. El uso de la
motosierra para aplicaciones distintas
de las previstas puede dar origen a una
situación peligrosa.
Causas del retroceso y su prevención
por parte del operador:
El retroceso puede producirse cuando la nariz
o la punta de la barra guía tocan un objeto
o cuando la madera se cierra y pellizca la
cadena de la sierra durante el corte.
En algunos casos, el contacto con la punta
puede provocar una repentina reacción
inversa, empujando la barra guía hacia
arriba y hacia atrás en dirección al operador.
El pellizco de la cadena de la sierra a lo
largo de la parte superior de la barra guía
puede empujar la barra guía rápidamente
hacia atrás en dirección al operador.
Cualquiera de estas reacciones puede
resultar en que usted pierda el control
de la sierra, lo cual puede resultar en
graves lesiones personales. No confíe
exclusivamente en los dispositivos de
seguridad incorporados en su sierra. En su
condición de usuario de una motosierra,
usted debe realizar varias acciones para
mantener sus trabajos de corte libres de
accidentes o lesiones.
El retroceso es el resultado del mal uso
de la herramienta y/o de procedimientos o
condiciones de funcionamiento incorrectos
y se puede evitar tomando las debidas
precauciones que se indican a continuación:
• Mantenga un agarre firme, con los
pulgares y los dedos rodeando los
mangos de la motosierra, con ambas
manos sobre la sierra y con su
cuerpo y brazo ubicados de manera
que le permitan resistir las fuerzas
de retroceso. Si se toman las debidas
precauciones, el operador puede
controlar las fuerzas de retroceso. No
suelte la motosierra.
• No se estire demasiado y no corte por
encima de la altura de los hombros.
Esto ayuda a evitar un contacto no
deseado con la punta y hace posible
un mejor control de la motosierra en
situaciones imprevistas.
• Utilice únicamente barras y cadenas de
repuesto especificadas por el fabricante.
El reemplazo incorrecto de las barras y
cadenas de repuesto puede provocar rotura
de la cadena y/o el retroceso.
• Siga las instrucciones de afilado y
mantenimiento del fabricante para la
cadena de la sierra. La reducción de la
altura del calibrador de profundidad puede
resultar en un incremento del retroceso.
Se deben tomar las siguientes
precauciones para disminuir el retroceso:
(1.) Sujete la sierra con firmeza. Sujete
la sierra de cadena con firmeza con
ambas manos cuando el motor esté en
funcionamiento. Sujete firmemente con los
pulgares y dedos los mangos de la sierra
de cadena. La sierra de cadena tirará hacia
adelante cuando corte sobre el borde inferior
de la barra y empujará hacia atrás cuando
corte a lo largo del borde superior de la
barra.
(2.) No se estire demasiado.
(3.) Conserve el equilibrio adecuado y
manténgase parado correctamente en todo
momento.
(4.) No permita que la boquilla de la barra
de guía entre en contacto con un tronco,
una rama, el piso u otra obstrucción.
(5.) No realice cortes por encima de la
altura del hombro.
(6.) Utilice dispositivos como cadena
de retroceso bajo y barras de guía de
retroceso reducido que disminuyen los
Page 33

33
riesgos relacionados con el retroceso.
(7.) Sólo utilice como reemplazo las barras
y cadenas que especificó el fabricante o el
equivalente.
(8.) Nunca permita que la cadena en
movimiento entre en contacto con ningún
objeto en la punta de la barra de guía.
(9.) Mantenga el área de trabajo libre de
obstrucciones como otros árboles, ramas,
rocas, cercos, troncos cortados, etc. Elimine
o evite cualquier obstrucción que su cadena
de sierra pueda golpear mientras está
cortando un tronco o rama en especial.
(10.) Mantenga la cadena de la sierra filosa
y tensionada correctamente. Una cadena
suelta o sin filo aumentará las posibilidades
de retroceso. Verifique la tensión en
intervalos regulares con el motor apagado
y sin la batería, nunca los haga con el
motor en funcionamiento.
(11.) Comience y continúe el corte sólo con
el movimiento de la cadena a la máxima
velocidad. Si la cadena se mueve a una
velocidad menor, es más probable que se
produzca un retroceso.
(12.) Corte los troncos de a uno.
(13.) Tenga mucha precaución al reanudar
un corte anterior. Trabe los parachoques
acanalados en la madera y deje que la
cadena alcance la velocidad máxima antes
de comenzar a cortar.
(14.) No intente realizar cortes de rebajado
o en diámetro.
(15.) Tenga cuidado con los troncos que
se desplazan u otras fuerzas que pueden
cerrar un corte y morder la cadena o caer
sobre ella.
CARACTERÍSTICAS DE SEGURIDAD
DURANTE EL RETROCESO
ADVERTENCIA: las siguientes
características se incluyen en su sierra
para ayudar a reducir el peligro durante el
retroceso; sin embargo, estas
características no eliminarán
completamente esta riesgosa reacción.
Como usuario de la sierra de cadena, no
confíe solamente en los dispositivos de
seguridad. Debe seguir todas las
precauciones de seguridad, las
instrucciones y el mantenimiento según se
describe en este manual para ayudar a
evitar el retroceso y otras fuerzas que
pueden provocar lesiones de gravedad.
• Freno de cadena diseñado para apagar
la motosierra de inmediato si el retroceso
es demasiado grande.
• Barra de guía de retroceso reducido,
diseñada con una pequeña punta de
empuje que reduce el tamaño de la zona
de retroceso en la punta de la barra. Una
barra de guía de retroceso reducido es una
que demostró reducir significativamente la
cantidad y la gravedad de los retrocesos
cuando se la pone a prueba según las
normas de seguridad para las sierras de
cadena eléctricas.
• Cadena de retroceso bajo, diseñada
con un calibre de profundidad
contorneado y un enlace de guarda que
desvía la fuerza de retroceso y permite
que la madera se deslice gradualmente
en la cortadora. Una cadena de retroceso
bajo es una cadena que cumple con los
requisitos de rendimiento de retroceso
ANSI B175.1-1991.
• No opere la sierra de cadena mientras
está en un árbol, en una escalera,
en un andamio o desde cualquier
superficie inestable.
• Sostenga la herramienta por las
superficies de agarre aisladas cuando
realice una operación en la que la
herramienta de corte pueda tocar
cables eléctricos ocultos. El contacto
con un cable con “corriente eléctrica”
hará que las partes metálicas expuestas
de la herramienta tengan “corriente
eléctrica” y el operador sufra una
descarga eléctrica.
• No intente realizar operaciones que
superan su habilidad o experiencia.
Lea atentamente y comprenda
completamente todas las instrucciones
de este manual.
• Antes de encender la sierra de cadena,
asegúrese de que la cadena de la sierra
no esté en contacto con ningún objeto.
• ¡No opere la sierra de cadena con
una sola mano! La operación con una
sola mano puede provocarle lesiones
graves al operador, asistente o
espectadores. La sierra de cadena está
diseña para su uso con las dos manos.
• Mantenga los mangos secos, limpios y
libres de aceite o grasa.
• No permita que se acumule suciedad,
desechos o aserrín en el motor o fuera
de los orificios de ventilación.
• Apague la sierra de cadena antes de
depositarla sobre una superficie.
• No corte enredaderas y/o malezas
pequeñas.
• Tenga extremo cuidado cuando corte
pequeñas malezas y árboles jóvenes
ya que el material delgado puede trabar
la cadena de la sierra, volverse hacia
usted y golpearlo o sacarlo de balance.
ADVERTENCIA: Parte del polvo
producido por las herramientas eléctricas al
lijar, aserrar, esmerilar, taladrar y realizar
otras actividades de la construcción,
contiene productos químicos reconocidos
por el Estado de California como causantes
de cáncer, defectos de nacimiento u otros
problemas reproductivos. Algunos de estos
Page 34

34
productos químicos son:
• el plomo de las pinturas de base plomo,
• la sílice cristalina de ladrillos,
el cemento y otros productos de
mampostería, y
• el arsénico y el cromo de la madera
con tratamiento químico.
El riesgo derivado de estas exposiciones
varía según la frecuencia con la que se
realice este tipo de trabajo. Para reducir
la exposición a estos productos químicos,
se recomienda trabajar en áreas bien
ventiladas y usar equipos de seguridad
aprobados, como las máscaras para polvo
especialmente diseñadas para filtrar las
partículas microscópicas.
• Evite el contacto prolongado con las
partículas de polvo originadas al lijar,
aserrar, esmerilar, taladrar y realizar
demás actividades de la construcción.
Use indumentaria protectora y lave
las áreas expuestas con agua y jabón.
Evite que el polvo entre en la boca y
en los ojos o se deposite en la piel,
para impedir la absorción de productos
químicos nocivos.
ADVERTENCIA: el uso de esta
herramienta puede generar o dispersar
partículas de polvo, que pueden causar
lesiones respiratorias permanentes y
graves u otras lesiones. Use siempre
protección respiratoria apropiada para la
exposición al polvo aprobada por el Instituto
Nacional de Salud y Seguridad Ocupacional
de EE.UU. y la Administración de Salud y
Seguridad Ocupacional de EE.UU. (NIOSH
y OSHA respectivamente, por sus siglas en
inglés). Aleje la cara y el cuerpo del
contacto con las partículas.
NOMBRES Y TÉRMINOS DE LAS
SIERRAS DE CADENA
• Aserrado: el proceso de realizar cortes
transversales en un árbol caído o
troncos en trozos.
• Freno del motor: un dispositivo que
se utiliza para detener la sierra de
cadena cuando se libera el disparador.
• Cabezal eléctrico de la sierra de
cadena: una sierra de cadena sin la
cadena de la sierra y la barra de guía.
• Rueda dentada de accionamiento o
rueda dentada: la pieza dentada que
acciona la cadena de la sierra.
• Tala: el proceso de destroncar un
árbol.
• Corte de destronque: el corte final
en una operación de tala de árboles
realizada en el lado opuesto del árbol del
corte de entallado.
• Mango delantero: el mango de apoyo
ubicado en o hacia el frente de la sierra
de cadena.
• Protector delantero de la mano: una
barrera estructural entre el mango
delantero de una sierra de cadena
y la barra de guía, habitualmente se
encuentra cerca de la posición de
la mano en el mango delantero y a
veces se utiliza como una palanca de
activación para un freno de cadena.
• Barra de guía: una estructura
resistente con rieles que soporta y guía
la cadena de la sierra.
• Funda de la barra de guía: cubierta
que se coloca en la barra de guía para
evitar el contacto con la pieza dentada
cuando no se utiliza la sierra.
• Retroceso: el movimiento hacia atrás
o adelante, o ambos, de la barra de
guía que se produce cuando la cadena
de la sierra cerca de la boquilla en el
área superior de ella entra en contacto
con un objeto como un tronco o una
rama, o cuando la madera se acerca y
muerde la cadena de la sierra durante
el corte.
• Retroceso, Pliegue: el rápido
movimiento hacia atrás de la sierra que
puede generarse cuando la madera se
acerca y muerde la cadena de la sierra
en movimiento durante el corte a lo
largo de la parte superior de la barra
de guía.
• Retroceso giratorio: el rápido
movimiento hacia arriba y abajo de la
sierra que puede generarse cuando
la cadena de la sierra en movimiento
cerca de la parte superior de la punta
de la barra de guía entra en contacto
con un objeto, como un tronco o una
rama.
• Escamonda: extracción de las ramas
de un árbol caído
• Cadena de retroceso bajo: una
cadena que cumple con los requisitos
de rendimiento de retroceso de ANSI
B175.1-1991 (al probarse en una
muestra representativa de sierras de
cadena).
• Posición de corte normal: las
posiciones adoptadas al realizar los
cortes de aserrado y tala.
• Muesca de entallado: un corte de
entallado en el árbol que dirige la caída
del mismo.
• Mango trasero: mango de apoyo
ubicado en o hacia la parte trasera de
la sierra de cadena.
• Barra de guía de retroceso
reducido: una barra de guía que ha
demostrado que reduce el retroceso
significativamente.
• Cadena de la sierra de repuesto: una
cadena que cumple con los requisitos
de rendimiento de ANSI B175.1-1991
al probarse con sierras de cadena
Page 35

35
específicas. Posiblemente no cumpla
con los requisitos de rendimiento ANSI
al utilizarse con otras sierras.
• Cadena de la sierra: un bucle de la
cadena que posee dientes de corte
para realizar cortes en madera y que
está accionado por el motor y apoyado
sobre la barra de guía.
• Parachoques acanalado: los canales
se utilizan durante la tala o aserrado
para girar la sierra y mantener la
posición mientras corta.
• Interruptor: un dispositivo que
durante el funcionamiento completará
o interrumpirá un circuito eléctrico al
motor de la sierra de cadena.
• Mecanismo del interruptor:
el mecanismo que transmite el
movimiento desde un disparador al
interruptor.
• Seguro del interruptor: un tope móvil
que evita el funcionamiento accidental
del interruptor hasta que se lo acciona
en forma manual.
USO PREVISTO
Su motosierra BLACK+DECKER es ideal
para aplicaciones de poda y para cortar
troncos pequeños de hasta 406 mm (16
pulg.) de diámetro. Esta herramienta está
diseñada solo para uso personal.
PREPARACIÓN DE LA
MOTOSIERRA PARA EL USO
ADVERTENCIA: Lea y comprenda todas
las instrucciones. El incumplimiento de
cualquiera de las instrucciones
enumeradas a continuación puede
provocar una descarga eléctrica, un
incendio y/o lesiones personales graves.
CONSERVE ESTAS INSTRUCCIONES
SÍMBOLOS
• La etiqueta de su herramienta puede
incluir los siguientes símbolos. Los símbolos
y sus definiciones son los siguientes:
V ................. voltios
A ................. amperios
Hz ............... hertz
W ................ vatios
min ..............minutos
o AC ......corriente alterna
o DC ....corriente directa
n
o ...............no velocidad sin carga
................ Construcción Clase I
................
terminal a tierra
(mis à la terre)
...............
Construcción de clase II
.............. simbolo de alerta
.../min ..........revoluciones o minuto
seguridad
....... Lea el manual de instrucciones
antes del uso
............Use protección adecuada para
las vías respiratorias
...........Use protección adecuada para
los ojos
............Use protección adecuada para
los oídos
ENSAMBLAJE
INSTALACIÓN DE LA BARRA GUÍA Y LA
CADENA DE LA MOTOSIERRA
PRECAUCIÓN: Cadena filosa. Siempre
use guantes de protección cuando manipule
la cadena. La cadena es filosa y puede
cortarle cuando no está funcionando.
ADVERTENCIA: Cadena móvil filosa. Para
DESCRIPCIÓN DE LA FUNCIONES
1. Interruptor de gatillo
2. Botón de bloqueo en apagado (no se
muestra)
3. Freno de cadena/protector delantero
para la mano
4. Barra guía
5. Cadena de la motosierra
6. Cubierta de la rueda dentada
7. Perilla de bloqueo de ajuste de la barra
8. Rueda tensora de la cadena
9. Funda de la barra guía
10. Mango trasero
11. Mango delantero
12. Cable
13. Sujetador para el cable prolongador
14. Tapa del aceite
15. Indicador del nivel de aceite
1
3
6
7
4
2
5
9
11
10
12
13
14
8
15
Page 36

36
evitar el funcionamiento accidental,
asegúrese de que la herramienta esté
desenchufada antes de realizar las siguientes
operaciones. El resultado de no hacerlo
pueden ser lesiones personales graves.
La cadena de la motosierra (5) y la barra
guía (4) vienen embaladas por separado
en la caja. La cadena debe instalarse en
la barra y ambas deben instalarse en el
cuerpo de la herramienta.
• Coloque la motosierra sobre una
superficie firme.
• Gire hacia la izquierda la perilla de
bloqueo de ajuste de la barra (7) como
se muestra en la Figura A para quitar la
cubierta de la rueda dentada (6).
• Gire hacia la izquierda el ensamblaje
tensor sin herramientas (16) (instalado
en la barra) hasta que se detenga como
se muestra en la Figura B.
• Usando guantes de protección, sujete
la cadena de la motosierra (5) y
colóquela alrededor de la barra guía
(4), asegurándose de que los dientes
apunten en la dirección correcta
(consulte la Figura F).
• Asegúrese de que la cadena esté bien
instalada en la ranura alrededor de toda
la barra guía.
• Coloque la cadena de la motosierra
alrededor de la rueda dentada (17) y
simultáneamente alinee el agujero del
ensamblaje tensor sin herramientas con
el perno (18) en la base de la herramienta
como se muestra en la Figura C.
• Gire la barra hasta que enganche con las
dos clavijas que se encuentran debajo
y ya no gire con facilidad hacia arriba y
hacia abajo.
• Una vez en su lugar, gire manualmente
hacia la derecha el ensamblaje tensor
sin herramientas (16) para ajustar
preliminarmente el ensamblaje para
sujetarlo en su lugar.
• Mientras sujeta la barra con firmeza,
vuelva a colocar la cubierta de la rueda
dentada (6). Asegúrese de que la
protuberancia (19) en la cubierta se alinee
con la ranura (20) en la carcasa principal
como se muestra en la Figura D. Gire la
perilla de bloqueo de ajuste de la barra (7)
hacia la derecha hasta que esté ajustada;
luego, afloje la perilla una vuelta completa,
de manera que la cadena de la motosierra
pueda tensarse debidamente.
• Mientras sujeta la perilla de bloqueo
de ajuste de la barra (7), gire hacia la
derecha la rueda tensora de la cadena
(8) para incrementar la tensión como se
muestra en la Figura E. Asegúrese de
que la cadena de la motosierra (5) esté
ajustada alrededor de la barra guía (4).
E
A
D
20
19
B
16
C
17
18
Page 37

AJUSTE DE TENSIÓN DE LA
CADENA
PRECAUCIÓN: Cadena filosa. Siempre
use guantes de protección cuando
manipule la cadena. La cadena es filosa y
puede cortarle cuando no está funcionando.
ADVERTENCIA: Cadena móvil filosa.
Para evitar el funcionamiento accidental,
asegúrese de que la herramienta esté
desenchufada antes de realizar las
siguientes operaciones. El resultado de
no hacerlo pueden ser lesiones
personales graves.
• Con la motosierra sobre una superficie
firme, verifique la tensión de la cadena
de la motosierra (5). La tensión es la
correcta cuando la cadena vuelve a
ajustarse en su lugar después de tirar
de ella separándola 3 mm (1/8 pulg.) de
la barra guía (4) con una leve fuerza del
dedo medio y el pulgar como se muestra
en la Figura F. No debe existir “pandeo”
entre la barra guía y la cadena que se
encuentra en la parte inferior como se
muestra en la Figura G.
• Para ajustar la tensión de la cadena de
la motosierra, afloje la perilla de bloqueo
de ajuste de la barra (7) y siga las
instrucciones para la “Instalación de la
barra guía y la cadena de la motosierra”.
.• No sobretense la cadena ya que esto
provocará un desgaste excesivo y reducirá
la vida útil de la barra y la cadena.
• Una vez que la tensión de la cadena sea
la correcta, apriete la perilla de bloqueo
de ajuste de la barra.
• Cuando la cadena sea nueva, verifique
la tensión con frecuencia (después de
desenchufar la herramienta) durante
las primeras 2 horas de uso ya que una
cadena nueva se estira levemente.
REEMPLAZO DE LA CADENA DE
LA MOTOSIERRA
PRECAUCIÓN: Cadena filosa. Siempre
use guantes de protección cuando
manipule la cadena. La cadena es filosa y
puede cortarle cuando no está funcionando.
ADVERTENCIA: Cadena móvil filosa.
Para evitar el funcionamiento accidental,
asegúrese de que la herramienta esté
desenchufada antes de realizar las
siguientes operaciones. El resultado de
no hacerlo pueden ser lesiones
personales graves.
• Gire hacia la izquierda la perilla de
bloqueo de ajuste de la barra (7) para
reducir la tensión de la cadena.
• Quite la cubierta de la rueda dentada
(6) como se describe en la sección
“Instalación de la barra guía y la cadena
de la motosierra”.
• Levante la cadena de la motosierra (5)
desgastada fuera de la ranura en la barra
guía (4).
• Coloque la cadena nueva en la ranura
de la barra guía, asegurándose de que
los dientes de la cadena apunten en la
dirección correcta haciendo coincidir la
flecha en la cadena con el gráfico en la
cubierta de la rueda dentada (6) como se
muestra en la Figura H.
• Siga las instrucciones para la “Instalación de
la barra guía y la cadena de la motosierra”.
SISTEMA DE AUTOLUBRICACIÓN
Esta motosierra está equipada con un
sistema de autolubricación que mantiene
la cadena de la motosierra y la barra guía
constantemente lubricadas.
El indicador del nivel de aceite (15)
muestra el nivel del aceite en la motosierra.
Si el nivel de aceite es inferior a un cuarto,
desenchufe la motosierra y llene con el
aceite adecuado.
NOTA: Use una barra de alta calidad y aceite
para cadena apropiada y lubricación de la
barra de cadena. Como un sustituto temporal,
puede utilizarse un detergente sin aceite de
motor SAE30.El uso de una barra de base
vegetal y aceite de cadena se recomienda
al podar árboles. Aceite mineral no se
recomienda porque puede dañar los árboles.
Nunca utilice aceite o aceite muy espeso.
Éstos pueden dañar su sierra de cadena.
37
F
G
H
Page 38

38
LLENADO DEL DEPÓSITO DE ACEITE
• Quite la tapa del aceite (14) y llene el
depósito con el aceite para cadena
recomendado hasta que el nivel de
aceite haya alcanzado la parte superior
del indicador del nivel de aceite (15).
• Vuelva a colocar la tapa del aceite.
• Periódicamente, apague la motosierra y
verifique el indicador del nivel de aceite
para asegurarse de que la barra y la
cadena se lubrican debidamente.
INSTALACIÓN DEL CABLE
PROLONGADOR
El mango del interruptor tiene incorporado
un sujetador para el cable prolongador
(13). Este evitar que el cable prolongador
se desenchufe.
• Doble el cable prolongador e insértelo en
la ranura (20) en el extremo del área del
mango como se muestra en la Figura I.
Enganche el lazo formado al doblar el
cable sobre el sujetador para el cable
(13). Tire suavemente del cable para
asegurarse de que quede firmemente
retenido en el mango. Enchufe el
extremo del receptáculo del cable
prolongador en el cable de alimentación
(12) de la motosierra.
TRANSPORTE DE LA MOTOSIERRA
• Siempre cubra la barra guía (4) con la funda
(9) (Figura J) cuando transporte la motosierra.
USO DE LA MOTOSIERRA
ADVERTENCIA: Lea y comprenda
todas las instrucciones. El
incumplimiento de cualquiera de las
instrucciones enumeradas a continuación
puede provocar una descarga eléctrica, un
incendio y/o lesiones personales graves.
• Protéjase del retroceso; este puede
provocar lesiones graves o la muerte.
Consulte “Protéjase contra el retroceso” en
las Instrucciones de seguridad importantes
, para evitar el riesgo del retroceso.
• No se estire. No corte por encima
de la altura del pecho. Asegúrese de
estar parado correctamente. Mantenga
sus pies separados. Distribuya su peso
en forma uniforme sobre ambos pies.
• Sujete firmemente el mango delantero
(11) con su mano izquierda y el mango
trasero (10) con su mano derecha de
modo que su cuerpo esté a la izquierda
de la barra guía.
• No sujete la motosierra por el
protector delantero para la mano (3).
Mantenga el codo del brazo izquierdo fijo
para que el brazo izquierdo esté derecho
a fin de resistir un retroceso.
ADVERTENCIA: Nunca sujete la
motosierra con las manos en posición
cruzada (mano izquierda en el mango trasero
y mano derecha en el mango delantero).
ADVERTENCIA: Nunca permita que
alguna parte del cuerpo esté en línea con
la barra guía (4) al utilizar la motosierra.
• Nunca la utilice mientras está en un
árbol, en alguna posición complicada
o en una escalera u otra superficie
inestable. Puede perder el control de la
motosierra, la que le provocará lesiones
graves.
• Mantenga la motosierra funcionando a
máxima velocidad todo el tiempo que
esté cortando.
• Permita que la cadena realice el
corte por usted. Solo aplique una leve
presión. No aplique presión sobre la
motosierra al final del corte.
ENCENDIDO/APAGADO
• Siempre asegúrese de estar parado
correctamente y sujete la motosierra
firmemente con ambas manos, con el pulgar
y los dedos alrededor de ambos mangos.
• Para encender la herramienta, oprima
el botón de bloqueo en apagado (2) y
apriete el interruptor de gatillo (1) como se
muestra en la Figura K. (Una vez que la
herramienta esté funcionando usted puede
soltar el botón de bloqueo en apagado).
• Para apagar la herramienta, suelte el
interruptor de gatillo.
J
I
20
13
1
2
K
2
Page 39

39
APLICACIÓN DEL FRENO DE
CADENA
Su motosierra está equipada con un
sistema motorizado para frenado de
la cadena que detendrá la cadena
rápidamente en caso de retroceso.
• Asegúrese de que la herramienta esté
desenchufada.
• Tire del freno de cadena/protector
delantero para la mano (3) de vuelta a la
posición de “ajuste” como se muestra en
la Figura L.
• Ahora la herramienta está lista para su uso.
NOTA: En caso de retroceso, su mano
izquierda entrará en contacto con el
protector delantero, empujándolo hacia
adelante, hacia la pieza de trabajo. Esto
detendrá la herramienta de inmediato.
PRUEBA DEL FRENO DE CADENA
Pruebe el freno de cadena antes de cada
uso para asegurarse de que funcione
correctamente.
• Coloque la herramienta sobre una
superficie firme. Asegúrese de que la
cadena de la motosierra (5) se encuentre
separada del suelo.
• Sujete la herramienta firmemente con
ambas manos y encienda la motosierra.
• Gire su mano izquierda hacia adelante
acercándola al mango delantero de
manera que el dorso de su mano entre
en contacto con el freno de cadena/
protector delantero para la mano (3) y
empújelo hacia adelante, hacia la pieza
de trabajo. La cadena de la motosierra
debe detenerse de inmediato.
NOTA: Si la motosierra no se detiene
de inmediato, suspenda el uso de
la herramienta y llévela al centro de
mantenimiento más cercano.
ADVERTENCIA:
Asegúrese de ajustar el
freno de cadena antes de cortar.
TÉCNICAS DE CORTE COMUNES
Tala
La tala es el proceso de cortar un árbol.
Asegúrese de que la batería esté totalmente
cargada antes de talar un árbol para que
pueda terminar en una sola carga. No tale
árboles cuando haya vientos fuertes.
ADVERTENCIA: La tala puede provocar
lesiones. Solo debe realizarla una persona
capacitada.
• (Figura M) Debe planificarse y
despejarse una vía de retirada según
sea necesario antes de iniciar los cortes.
La vía de retirada debe extenderse
hacia atrás y en diagonal con respecto
a la parte posterior de la línea de caída
prevista.
• Antes de iniciar la tala, tenga en cuenta
la inclinación natural del árbol, la
ubicación de las ramas más grandes y
la dirección del viento para juzgar hacia
dónde caerá el árbol. Tenga a mano
cuñas (de madera, plástico o aluminio) y
un mazo pesado.
Retire la suciedad, piedras, cortezas
sueltas, clavos, grapas y alambre del árbol
donde se realizarán los cortes de tala.
• (Figura P) Muesca de entallado: haga
una muesca de 1/3 del diámetro del
árbol, perpendicular a la dirección
de caída. Primero realice el corte de
entallado horizontal inferior. Esto ayudará
a evitar el pellizcamiento de la cadena
de la motosierra o de la barra guía al
realizar la segunda muesca.
• (Figura O) Corte auxiliar de tala: haga el
corte auxiliar de tala al menos 51 mm (2
pulg.) más alto que el corte de entallado
horizontal. Mantenga el corte auxiliar
de tala paralelo al corte de entallado
horizontal. Realice el corte auxiliar
de tala de manera que haya madera
suficiente para que funcione como una
bisagra. La madera de bisagra evita
que el árbol gire y caiga en la dirección
incorrecta. No corte la bisagra.
L
N
5 cm (2
PULG.)
DIRECCIÓN
DE
LA CAÍDA
5 cm (2
PULGADAS)
MUESCA
CORTE DE
DESTRONQUE
BISAGRA
45°
M
DIRECCIÓN
DE LA
CAÍDA
RETIRADA
ÁRBOL
Page 40

40
P
• (Figura O) A medida que se acerca el
corte de tala a la bisagra el árbol debería
comenzar a caerse. Si existe alguna
posibilidad de que el árbol no caiga en la
dirección deseada o se balancee hacia
atrás y trabe la cadena de la sierra,
detenga el corte antes de que el corte
de tala se complete y utilice cuñas para
abrir el corte y tirar el árbol hacia a línea
de caída deseada. Cuando el árbol
comience a caer retire la sierra de cadena
del corte, detenga el motor, deposite la
sierra de cadena en el piso y luego utilice
el trayecto de retirada planificado. Esté
atento a la caída de ramas y también mire
cuidadosamente donde camina.
Desramado
El desramado es la eliminación de las
ramas de un árbol caído. Cuando realice
un desramado, deje las ramas inferiores
más grandes para soportar el tronco
separado del piso. Elimine las ramas
pequeñas en un solo corte. Las ramas
bajo tensión deben cortarse desde abajo
hacia arriba para evitar que la motosierra
se trabe como se muestra en la Figura P.
Recorte las ramas desde el lado opuesto
manteniendo el tronco del árbol entre usted
y la motosierra. Nunca realice cortes con la
motosierra entre las piernas ni se monte a
horcajadas sobre la rama que cortará.
Aserrado
El aserrado es el corte de un árbol talado
o tronco en trozos. La forma del corte
depende de la manera en que se apoya
el tronco. Utilice un caballete (Figura U)
siempre que sea posible.
Siempre inicie un corte con la cadena
funcionando a velocidad máxima.
• Coloque la púa inferior (21) de la
motosierra detrás del área del corte
inicial como se muestra en la Figura Q.
• Encienda la motosierra y luego gire la
cadena y la barra hacia abajo en el árbol,
utilizando la púa como una bisagra.
• Una vez que la motosierra alcance un
ángulo de 45 grados, vuelva a nivelar
la motosierra y repita los pasos hasta
completar el corte.
• Cuando el árbol esté apoyado a todo
lo largo, realice un corte desde la parte
superior (aserrado superior), pero evite
cortar en la tierra ya que esto desafilará
su motosierra rápidamente.
• (Figura R) Cuando está apoyado sobre
un extremo
Primero, corte 1/3 del diámetro de la
parte inferior (underbuck). Luego, realice
el corte de acabado cortando hacia arriba
para llegar al primer corte.
• (Figura S) Cuando está apoyado sobre
ambos extremos
Primero, corte 1/3 hacia abajo desde la
parte superior Después, realice el corte
de acabado cortando hacia abajo los 2/3
inferiores para llegar al primer corte.
• (Figura T) Cuando está en una pendiente
Siempre párese cuesta arriba del tronco.
Cuando “corte” para mantener un control
total libere la presión de corte cerca del
final del corte sin relajar la sujeción de
los mangos de la sierra de cadena. No
O
5 cm (2
PULG.)
DIRECCIÓN
DE
LA CAÍDA
5 cm (2
PULGADAS)
MUESCA
CORTE DE
DESTRONQUE
BISAGRA
1
1
2
R
EL 2do CORTE DE LA
PARTE SUPERIOR DEL
TRONCO (OVERBUCK)
(2/3 DEL DIÁMETRO) A
FIN DE LLEGAR AL 1er
CORTE (PARA EVITAR
QUE LA MADERA
MUERDA LA CADENA)
EL 1er CORTE DE LA PARTE
INFERIOR DEL TRONCO
(1/3 DEL DIÁMETRO) PARA
EVITAR LAS ASTILLAS
Q
21
CORTE DE LA PARTE
SUPERIOR DEL TRONCO
(OVERBUCK) PERO EVITE
CORTAR LA TIERRA
1
2
S
EL 1er CORTE DE LA
PARTE SUPERIOR
DEL TRONCO (1/3 DEL
DIÁMETRO) PARA EVITAR
LAS ASTILLAS
EL 2do CORTE DE LA
PARTE INFERIOR DEL
TRONCO (UNDERBUCK)
(2/3 DEL DIÁMETRO) A
FIN DE LLEGAR AL 1er
CORTE (PARA EVITAR
QUE LA MADERA
MUERDA LA CADENA)
Page 41

41
T
U
permita que la sierra entre en contacto
con el piso. Después de finalizar el
corte, espere que la cadena de la sierra
se detenga antes de mover la sierra de
cadena. Siempre detenga el motor antes
de trasladarse de un árbol a otro.
• (Figura U) Cuando utilice un caballete
Esto es muy recomendable cuando
sea posible. Coloque el tronco en una
posición estable. Siempre corte del lado
exterior de los brazos del caballete.
4. Afile las cortadoras (23) primero del lado de
la cadena. Lime desde la cara interna de
cada cortadora hacia afuera. Después gire
la sierra y repita los procesos (2,3,4) para
las cortadoras del otro lado de la cadena.
NOTA: Utilice una lima plana para limar las
partes superiores de los rastrilladores (parte
del eslabón de la cadena delante del cortador)
de manera que estén a alrededor de 0,64 mm
(0,025 pulg.) por debajo de las puntas de los
cortadores como se muestra en la Figura W.
CUIDADO Y MANTENIMIENTO
Para limpiar la herramienta, sólo utilice
jabón suave y un paño húmedo. No utilice
solventes para limpiar la cubierta plástica
de la sierra. Nunca permita que penetre
líquido dentro de la herramienta ni sumerja
ninguna de las piezas en un líquido.
IMPORTANTE: para asegurar la
SEGURIDAD y la CONFIABILIDAD
del producto, las reparaciones, el
mantenimiento y los ajustes se deben
realizar en los centros de mantenimiento
autorizados o con otro personal de
mantenimiento calificado, utilizando
siempre piezas de repuesto idénticas.
El mantenimiento regular asegura una vida
larga y eficaz para su sierra de cadena. Le
recomendamos que realice las siguientes
verificaciones regularmente:
CADENA Y BARRA
Después de varias horas de uso, extraiga la
barra de guía y la cadena y límpielas a fondo.
AFILADO DE LA CADENA DE LA SIERRA
PRECAUCIÓN: cadena filosa. Siempre
utilice guantes de protección cuando
maneje la cadena. La cadena es filosa y puede
cortarlo cuando no está en funcionamiento.
ADVERTENCIA:cadena filosa en
movimiento. Para evitar el
funcionamiento accidental, asegúrese de
que la batería está desconectada de la
herramienta antes de realizar las
siguientes operaciones. El incumplimiento
de esta instrucción puede provocar graves
lesiones personales.
NOTA: las cuchillas te quitará
inmediatamente si tocan el suelo o un clavo
durante el corte.
Para obtener el mejor rendimiento posible
de la cadena de la sierra es importante
mantener los dientes de la cadena filosos.
Siga estos consejos útiles para el afilado de
la cadena de sierra apropiado:
1. Para obtener mejores resultados utilice
una lima de 4,5 mm y un sujetador de lima
o una guía de limado para afilar su cadena.
Esto seguramente hará que siempre
obtenga los ángulos de afilado correctos.
2. Coloque el sujetador de lima en forma
plana sobre la parte superior de la placa y
del calibre de profundidad de la cortadora.
3. (Figura V) Mantenga la línea del ángulo
de limado de la placa superior (22) de
30° de su guía de limado paralela a su
cadena (lima a 60° de la cadena vista
desde arriba).
60°
V
22
W
.025 in.
.635mm
Page 42

42
5. (Figura X) Mantenga todas las longitudes
de la cortadora iguales.
6. Si las superficies cromadas de las placas
superiores o laterales presentan daños,
lime otra vez hasta eliminar el daño.
PRECAUCIÓN: después del limado, la
cortadora estará filosa, tenga extremo
cuidado durante este proceso.
NOTA: cada vez que se afila la cadena,
pierde algo de las cualidades de bajo
retroceso y se debe tener extremo cuidado.
No se recomienda afilar la cadena más de
cuatro veces.
ACCESORIOS
ADVERTENCIA: el uso de accesorios no
recomendados en este manual puede ser
peligroso.
Los accesorios están disponibles en su
comercio minorista local o en el centro de
mantenimiento de BLACK+DECKER más
cercano.
• Esta motosierra es compatible con la
cadena BLACK+DECKER RC1800
• Reemplace la barra con una barra de bajo
contragolpe de Oregon de 18 pulgadas
correspondiente.
NOTA: Asegúrese de que el nuevo bar está
equipado con un conjunto de tensión sin
herramientas (16).
INFORMACIÓN DE MANTENIMIENTO
Todos los Centros de servicio de
BLACK+DECKER cuentan con personal
altamente capacitado dispuesto a
brindar a todos los clientes un servicio
eficiente y confiable en la reparación
de herramientas eléctricas. Si necesita
consejo técnico, reparaciones o piezas de
repuesto originales de fábrica, póngase
en contacto con el centro de servicio
de BLACK+DECKER más cercano a su
domicilio. Para ubicar su centro de servicio
local, llame al 1-800-544-6986 o visite
nuestro sitio www.blackanddecker.com.
GARANTÍA COMPLETA DE DOS
AÑOS PARA USO EN EL HOGAR
BLACK+DECKER ofrece una garantía de
dos años por cualquier defecto del material o
de fabricación de este producto. El producto
defectuoso se reparará o reemplazará sin
costo alguno de dos maneras.
La primera opción, el reemplazo, es
devolver el producto al comercio donde se
adquirió (siempre y cuando se trate de un
comercio participante). Las devoluciones
deben realizarse conforme a la política de
devolución del comercio (generalmente,
entre 30 y 90 días posteriores a la venta). Le
pueden solicitar comprobante de compra.
Consulte en el comercio acerca de la
política especial sobre devoluciones una vez
excedido el plazo establecido.
La segunda opción es llevar o enviar el
producto (con flete pago) a un Centro
de servicio propio o autorizado de
BLACK+DECKER para su reparación o
reemplazo según nuestro criterio. Le pueden
solicitar el comprobante de compra.
Esta garantía no se extiende a los
accesorios. Esta garantía le concede
derechos legales específicos; usted
puede tener otros derechos que pueden
variar según el estado o la provincia. Si
tiene alguna pregunta, comuníquese
con el gerente del Centro de servicio de
BLACK+DECKER de su zona. Este producto
no está diseñado para uso comercial.
AMÉRICA LATINA: esta garantía no se
aplica a los productos que se venden en
América Latina. Para los productos que se
venden en América Latina, debe consultar
la información de la garantía específica del
país que viene en el empaque, llamar a la
compañía local o visitar el sitio Web a fin de
obtener esa información.
X
Page 43

43
DETECCIÓN DE PROBLEMAS
Problema Causa posible Solución posible
• La motosierra no • El cable no está • Enchufe la motosierra en un
enciende. enchufado. tomacorriente que funcione.
• Se quemó el fusible del • Reemplace el fusible del circuito. (Si
circuito. el producto hace que el fusible
del circuito se queme repetidamente,
suspenda su uso de inmediato y haga
que le realicen mantenimiento en un
centro de mantenimiento
BLACK+DECKER o en un centro de
mantenimiento autorizado).
• Se dispara el interruptor • Reinicie el interruptor automático. (Si
automático. el producto hace que el interruptor
automático se dispare repetidamente,
suspenda su uso de inmediato y haga
que le realicen mantenimiento en un
centro de mantenimiento
BLACK+DECKER o en un centro de
mantenimiento autorizado).
• El cable o el interruptor • Haga que reemplacen el cable o el
están dañados. interruptor en un centro de
mantenimiento BLACK+DECKER o en
un centro de mantenimiento autorizado.
• No se accionó el botón • Oprima el botón de bloqueo en
de bloqueo en apagado. apagado y luego oprima el interruptor
de gatillo.
• Barra/cadena • La cadena está • Consulte la sección “Ajuste de
sobrecalentada. demasiado ajustada. tensión de la cadena”.
• Se necesita lubricación. • Consulte la sección “Llenado del
depósito de aceite”.
• La cadena está suelta. • Tensión de la cadena • Consulte la sección “Ajuste de
ajustada incorrectamente. tensión de la cadena”.
• Mala calidad de corte. • Tensión de la cadena • Consulte la sección “Ajuste de
ajustada incorrectamente. tensión de la cadena”.
• Es necesario afilar la • Consulte la sección “Afilado de la
cadena. cadena de la motosierra”.
• Es necesario reemplazar NOTA: La tensión excesiva produce un
la cadena. desgaste excesivo y una reducción en
la vida útil de la barra y la cadena.
Siempre asegúrese también de llenar
debidamente con el aceite adecuado.
Consulte la sección “Reemplazo de la
cadena de la motosierra”.
• La unidad funciona • La cadena está instalada • Consulte las secciones sobre cómo
pero no corta. al revés. instalar y quitar la cadena.
Solamente para Propósitos de México
Para conocer la ubicación del centro de servicio más cercano a fin de recibir ayuda con
su producto, visite nuestro sitio Web www.blackanddecker.com.mx o llame a la línea de
ayuda BLACK+DECKER al 01 800 847 2309/01 800 847 2312.
Page 44

44
Page 45

45
· GARANTÍA BLACK+DECKER · BLACK+DECKER WARRANTY
. SOLAMENTE PARA PROPOSITOS DE MEXICO
Distributor Name · Sello firma del distribuidor
Date of purchase · Fecha de compra Invoice No. · No. de factura
PRODUCT INFOMATION · IDENTIFICACIÓN DEL PRODUCTO
Cat. No. · Catalogo ó Modelo Serial Number · No. de serie
Name · Nombre Last Name · Apellido
Address · Dirección
City · Ciudad State · Estado
Postal Code · Código Postal Country · País
Telephone · No. Teléfono
2 AÑOS DE GARANTIA
Este producto cuenta con dos años de garantía a partir de la fecha de compra contra
cualquier defecto de su funcionamiento, así como cualquier falla debido a materiales
empleados para su fabricación ó mano de obra defectuosa.
Nuestra garantía incluye la reparación o reposición del producto y/o componentes sin
cargo alguno para el cliente incluyendo la mano de obra, esta incluye los gastos de
trasportación erogados para lograr cumplimiento de esta garantía en los domicilios
diversos señalados.
Para hacer efectiva esta garantía deberá presentar su herramienta y esta póliza sellada
por el establecimiento comercial donde se adquirió el producto.
Nos comprometemos a entregar el producto en un lapso no mayor a 30 días hábiles
contados a partir de la fecha de recepción del mismo en nuestros talleres de servicio
autorizados.
ESTA GARANTIA NO APLICA CUANDO:
El producto se hubiese utilizado en condiciones distintas a las normales.
El producto no hubiese sido operado de acuerdo con el instructivo de uso que se acompaña.
El producto hubiese sido alterado o reparado por personas no autorizadas por nosotros.
Importador: Black & Decker S.A. de .C.V
Bosque de Cidros Acceso Radiatas No.42
3ra.Seccion de Bosques de las lomas
C.P.05120, Mexico, D.F. Tel: (01 55) 5326 7100
Page 46

46
Page 47

47
Grupo Realsa en herramientas,
S.A. de C.V.
Súper Manzana 69 MZ.01 Lote 30
(Av. Torcasita)
Col. Puerto Juárez
Cancún, Quintana Roo
Tel. 01 998 884 72 27
Ferre Pat de Puebla, S.A. de C.V.
16 de Septiembre No. 6149
Col. El Cerrito
Puebla, Puebla
Tel. 01 222 264 12 12
Ferre Pat de Puebla, S.A. de C.V.
Ejército Mexicano No. 15
Col. Ejido 1ro. de Mayo
Boca del Rio, Veracruz
Tel. 01 229 167 89 89
Servicio de Fabrica BLACK+DECKER,
S.A. de C.V.
Lázaro Cardenas No. 18
Col. Obrera
Distrito Federal
Tel. 55 88 95 02
Representaciones Industriales Robles,
S.A. de C.V.
Tezozomoc No. 89
Col. La Preciosa
Distrito Federal
Tel. 55 61 86 82
Gpo. Comercial de Htas. y Refacciones
de Occidente, S.A. de C.V.
Av. La Paz No. 1779
Col. Americana, S. Juaréz
Guadalajara, Jalisco
Tel. 01 33 38 25 69 78
Herramientas y Equipos Profesionales
Av. Colón 2915 Ote.
Col. Francisco I. Madero
Monterrey, Nvo. León
Tel. 01 81 83 54 60 06
Htas. Portátiles de Chihuahua,
S.A. de C.V.
Av. Universidad No. 2903
Col. Fracc. Universidad
Chihuahua, Chihuahua
Tel. 01 614 413 64 04
Fernando González Armenta
Bolivia No. 605
Col. Felipe Carrillo Puerto
Cd. Madero, Tamaulipas
Tel. 01 833 221 34 50
Perfiles y Herramientas de Morelia
Gertrudis Bocanegra No. 898
Col. Ventura Puente
Morelia, Michoacán
Tel. 01 443 313 85 50
Enrique Robles
Av. de la Solidaridad No. 12713
Col. La Pradera
Irapuato, Guanajuato
Tel. 01 462 626 67 39
Hernández Martinez Jeanette
Prolongación Corregidora Nte. No. 1104
Col. Arboledas
Queretaro, Qro.
Tel. 01 442 245 25 80
SOLAMENTE PARA PROPOSITOS DE MEXICO
PARA OTRAS LOCALIDADES LLAME AL 01 800 847 2309 o 01 800 847 2312.
BLACK & DECKER S.A. DE C.V.
BOSQUES DE CIDROS ACCESO RADIATAS NO. 42
COL. BOSQUES DE LAS LOMAS.
05120 MÉXICO, D.F
TEL. (01 55) 5326 7100
01 800 847 2309/01 800 847 2312
Page 48

48
Cat No. CS1518 Form #90609996 April 2014
Copyright © 2014 BLACK+DECKER Printed in China
 Loading...