

Page 1

www.blackanddecker.ae
KC4815
Page 2
ENGLISH
21 3
4
5 6 7 8 9
10
A
B
2
Page 3

ENGLISH
3
Page 4

ENGLISH
Intended use
Your Black & Decker drill/screwdriver has been designed for
screwdriving applications and for drilling in wood, metal and
plastics. This tool is intended for consumer use only.
Safety instructions
General power tool safety warnings
Warning! Read all safety warnings and all
instructions. Failure to follow the warnings and
instructions listed below may result in electric
shock, fire and/or serious injury.
Save all warnings and instructions for future reference.
The term “power tool” in all of the warnings listed below
refers to your mains operated (corded) power tool or battery
operated (cordless) power tool.
1. Work area safety
a. Keep work area clean and well lit. Cluttered or dark
areas invite accidents.
b. Do not operate power tools in explosive
atmospheres, such as in the presence of flammable
liquids, gases or dust. Power tools create sparks which
may ignite the dust or fumes.
c. Keep children and bystanders away while operating
a power tool. Distractions can cause you to lose control.
2. Electrical safety
a. Power tool plugs must match the outlet. Never
modify the plug in any way. Do not use any adapter
plugs with earthed (grounded) power tools.
Unmodified plugs and matching outlets will reduce risk of
electric shock.
b. Avoid body contact with earthed or grounded
surfaces such as pipes, radiators, ranges and
refrigerators. There is an increased risk of electric
shock if your body is earthed or grounded.
c. Do not expose power tools to rain or wet conditions.
Water entering a power tool will increase the risk of
electric shock.
d. Do not abuse the cord. Never use the cord for
carrying, pulling or unplugging the power tool. Keep
cord away from heat, oil, sharp edges or moving
parts. Damaged or entangled cords increase the risk of
electric shock.
e. When operating a power tool outdoors, use an
extension cord suitable for outdoor use. Use of a
cord suitable for outdoor use reduces the risk of electric
shock.
f. If operating a power tool in a damp location is
unavoidable, use a residual current device (RCD)
protected supply. Use of an RCD reduces the risk of
electric shock.
3. Personal safety
a. Stay alert, watch what you are doing and use
common sense when operating a power tool. Do not
use a power tool while you are tired or under the
influence of drugs, alcohol or medication. A moment
of inattention while operating power tools may result in
serious personal injury.
b. Use personal protective equipment. Always wear eye
protection. Protective equipment such as dust mask,
non-skid safety shoes, hard hat, or hearing protection
used for appropriate conditions will reduce personal
injuries.
c. Prevent unintentional starting. Ensure the switch is in
the off-position before connecting to power source
and/or battery pack, picking up or carrying the tool.
Carrying power tools with your finger on the switch or
energising power tools that have the switch on invites
accidents.
d. Remove any adjusting key or wrench before turning
the power tool on. A wrench or a key left attached to a
rotating part of the power tool may result in personal
injury.
e. Do not overreach. Keep proper footing and balance at
all times. This enables better control of the power tool in
unexpected situations.
f. Dress properly. Do not wear loose clothing or
jewellery. Keep your hair, clothing and gloves away
from moving parts. Loose clothes, jewellery or long hair
can be caught in moving parts.
g. If devices are provided for the connection of dust
extraction and collection facilities, ensure these are
connected and properly used. Use of dust collection
can reduce dust-related hazards.
4. Power tool use and care
a. Do not force the power tool. Use the correct power
tool for your application. The correct power tool will do
the job better and safer at the rate for which it was
designed.
b. Do not use the power tool if the switch does not turn
it on and off. Any power tool that cannot be controlled
with the switch is dangerous and must be repaired.
4
Page 5

ENGLISH
c. Disconnect the plug from the power source and/or
the battery pack from the power tool before making
any adjustments, changing accessories, or storing
power tools. Such preventive safety measures reduce
the risk of starting the power tool accidentally.
d. Store idle power tools out of the reach of children
and do not allow persons unfamiliar with the power
tool or these instructions to operate the power tool.
Power tools are dangerous in the hands of untrained
users.
e. Maintain power tools. Check for misalignment or
binding of moving parts, breakage of parts and any
other condition that may affect the power tools
operation. If damaged, have the power tool repaired
before use. Many accidents are caused by poorly
maintained power tools.
f. Keep cutting tools sharp and clean. Properly
maintained cutting tools with sharp cutting edges are
less likely to bind and are easier to control.
g. Use the power tool, accessories and tool bits etc., in
accordance with these instructions, taking into
account the working conditions and the work to be
performed. Use of the power tool for operations different
from those intended could result in a hazardous
situation.
5. Battery tool use and care
a. Recharge only with the charger specified by the
manufacturer. A charger that is suitable for one type of
battery pack may create a risk of fire when used with
another battery pack.
b. Use power tools only with specifically designated
battery packs. Use of any other battery packs may
create a risk of injury and fire.
c. When battery pack is not in use, keep it away from
other metal objects, like paper clips, coins, keys,
nails, screws, or other small metal objects, that can
make a connection from one terminal to another.
Shorting the battery terminals together may cause burns
or a fire.
d. Under abusive conditions, liquid may be ejected
from the battery; avoid contact. If contact
accidentally occurs, flush with water. If liquid
contacts eyes, additionally seek medical help. Liquid
ejected from the battery may cause irritation or burns.
6. Service
a. Have your power tool serviced by a qualified repair
person using only identical replacement parts. This
will ensure that the safety of the power tool is maintained.
Special Safety Advice for Screwdriver
Hold power tool by insulated gripping surfaces, when
performing an operation where the fastener may contact
hidden wiring. Fasteners contacting a "live" wire may make
exposed metal parts of the power tool "live" and could give
the operator an electric shock.
Only plug the Battery Charger in 230V mains. Recharge the
Battery only with the provided charger. Before starting any
work on walls, floors or similar, make sure that all power lines
in the work area are switched off at the main switchboard.
Inspect the proposed drill hole location for any utility lines
(e.g. water, gas, power) before drilling. Use a suitable device
such as a metal or electricity line detecting device. If in doubt
contact a qualified electrician or your utility provider. Both
tools and work-pieces can heat up considerably during the
drilling operation. Allow a sufficient period of cooling before
handling. Wear appropriate gloves.
Safety Advice for Charger
Important! Danger! There are 4 pcs 1.2V Ni-cd battery in
screwdriver, Never short-circuit the battery or expose it to
moisture. Do not store it together with any metal parts which
could short-circuit the contacts. the machine could overheat,
start burning or explode.
Warning!
1. This appliance is not intended for use by persons
(including children) with reduced physical, sensory or
mental capabilities, or lack of experience and knowledge,
unless they have been given supervision or instruction
concerning use of the appliance by a person responsible
for their safety.
2. Do not recharge non-rechargeable batteries
Labels on tool
The following pictograms are shown on the tool:
Warning! To reduce the risk of injury, the user must
read the instruction manual.
5
Page 6

ENGLISH
The charger is intended for indoor use only.
Read this entire manual carefully before using the
appliance.
Electrical safety
Your charger is double insulated; therefore no
earth wire is required. Always check that the mains
voltage corresponds to the voltage on the rating
plate. Never attempt to replace the charger unit with a
regular mains plug.
• If the supply cord is damaged, it must be replaced by the
manufacturer or an authorised Black & Decker Service
Centre in order to avoid a hazard.
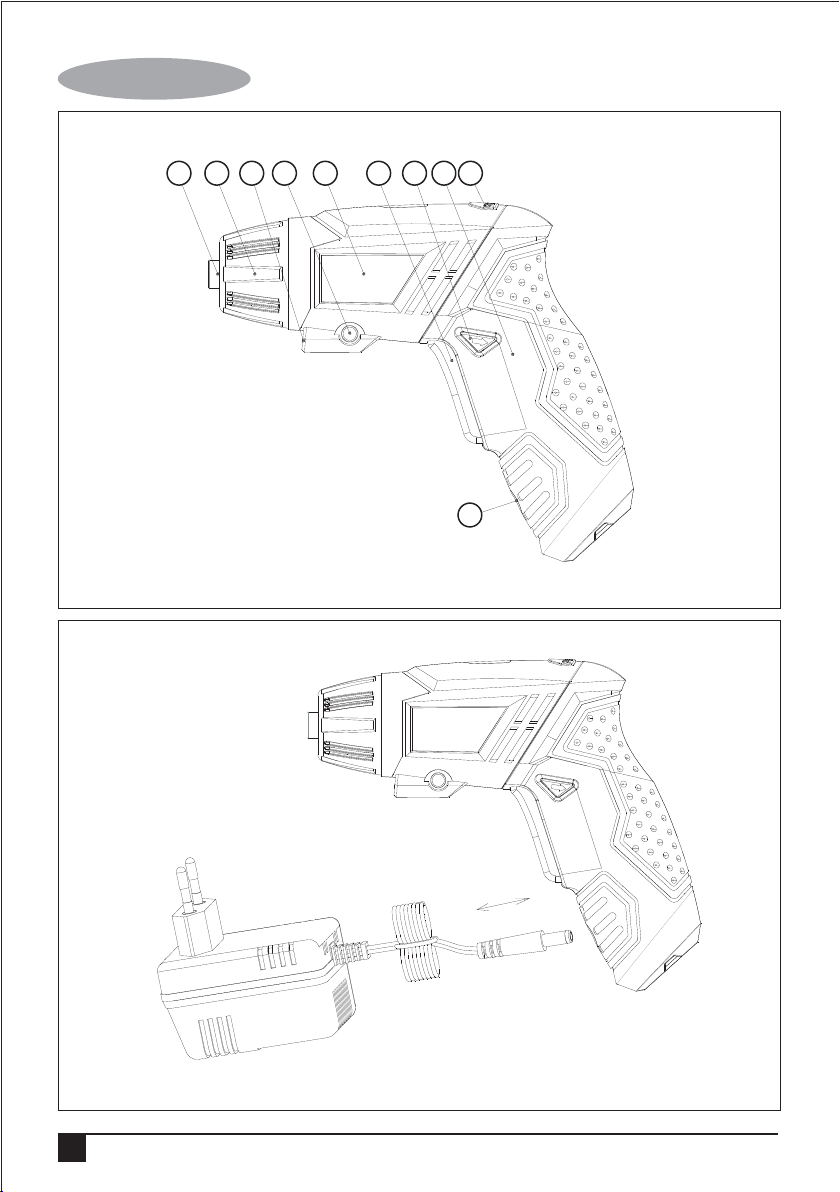
Product Features
1. Keyless chuck
2. Gear box
3. LED
4. LED switch
5. Housing
6. Switch
7. Reverse-rotation lever
8. Handle casing
9. Pivot release button
10. Charging hole
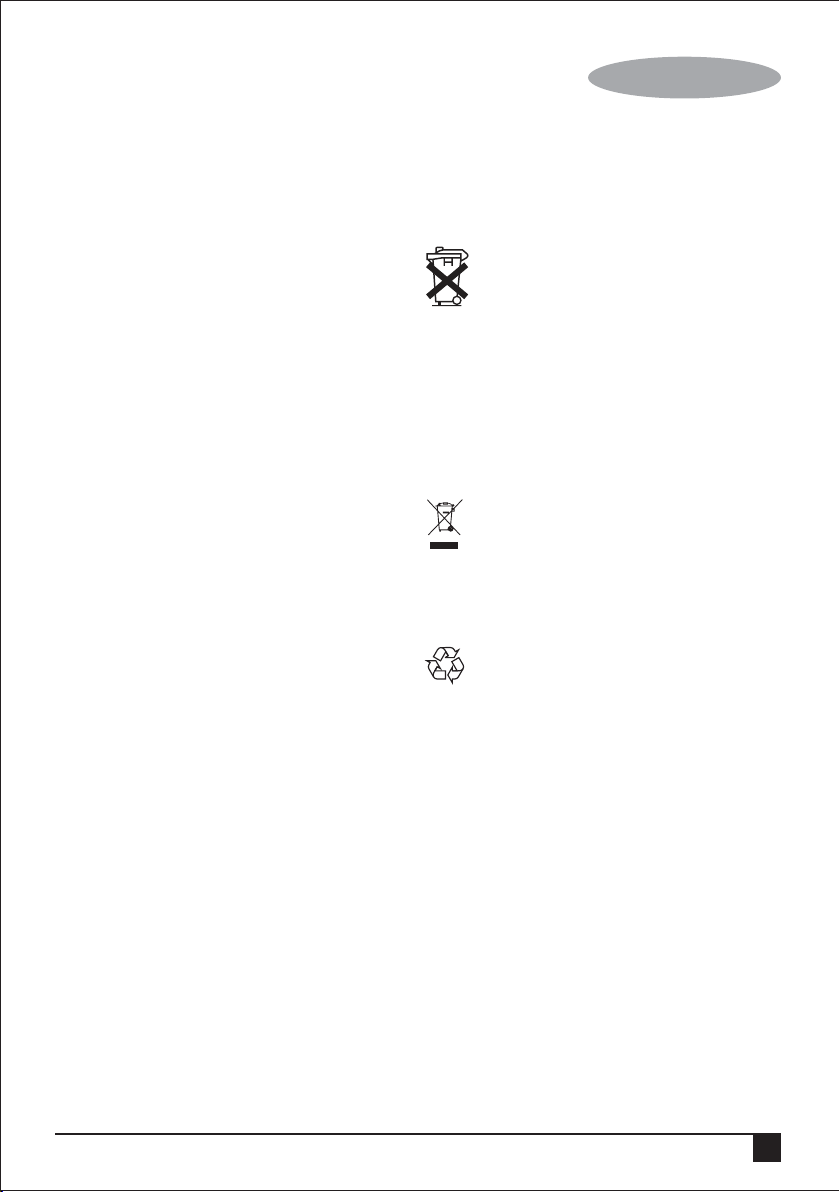
Charging the Battery
Charging as shown, Must turn off the screwdriver. Only Red
lights up on the power indicator when you charging.
Charging time: 3-5 Hours.
Power indicator light
Three different colors of light
(From Left : Green. Yellow. Red)
Charging State:
Only Red lights up when charging.
Operation State:
Green. Yellow and red light will light up at the same time,
With continued working, the battery voltage drops, and when
the Red light turns off, this implies that the battery is used up
and needs charging.
Inserting Tool Bits
Important! Always Turn off the machine before you change
the screw bit to avoid unintentional starting of the machine.
On/Off Trigger.
On/Off Trigger
Use the On/Off trigger to start the machine and keep holding
it for continuous operation.
Reverse-rotation Lever
Important! This is a can foldable cordless screwdriver. The
machine has to come to a complete stop before the reverse
rotation lever can be used, otherwise the machine may be
damaged.
Use the reverse-rotation lever to switch between clockwise
(normal) and anticlockwise rotation or vice-versa, With the
reverse-rotation lever in the central position the trigger switch
is locked and cannot be depressed. Put the reverse-rotation
lever in the central position before you put the machine down,
to avoid unintentional starting.
Torque adjustment
Torque setting 8 torque+1 drilling setting You can control the
maximum torque applied to the drill bit with the torque control
knob.
Attention! The torque control knob should only be operated
when the machine is not running; otherwise the machine may
be damaged.
To set the drill to the lowest available torque setting, twist the
torque control knob until the small arrow on the drill-housing
points to the “1” stamped on the torque control knob. In this
position the torque clutch will slip with light drilling resistance.
The higher the number the arrow points to on the torque
control knob, the larger the maximum torque that can be
applied before the torque clutch will slip. To set the machine
to maximum available torque twist the torque control knob
until the arrow points to the drill symbol.
6
Page 7
ENGLISH
In this position there is no slip in the torque clutch. Select a
lower torque for insertion/removal of screws to avoid
damage to the work-piece (in particular wooden
work-pieces) or to the screw. For drilling select a higher
torque setting. Do a test first on an item which is not your
final work-piece and adjust the desired torque accordingly
before you start the actual work.
Operation for working
1. Using the Screwdriver as a Screw-driver
Before using the machine check whether the screw-bit is
inserted correctly. Avoid over-tightening screws, otherwise
the screw head may be damaged or stripping of the threads
may occur.
2. Screw Insertion
Set the direction of rotation of the drill to the clockwise
direction. Insert the screw-bit into the slot in the head of the
screw. Hold the screw bit perpendicular to the head of the
screw, otherwise the screw or the screw head may be
damaged. Press the screw bit against the screw with a
constant pressure while driving in the screw.
When the screw is completely screwed in, hold the machine
firmly and release the On/Off trigger, otherwise the screw or
the screw head may be damaged. If the On/Off trigger is not
released immediately a high torque could also damage the
drill bit or the drill.
3. Screw Removal
Set the direction of rotation of the drill to the anticlockwise
direction. Insert the screw-bit into the slot in the head of the
screw. Hold the screw-bit perpendicular to the head of the
screw, otherwise the screw or the screw head may be
damaged. Press the screw bit against the screw with a
constant pressure while removing the screw.
Maintenance and Cleaning
Attention! Always remove the battery before carrying out
any work on the machine.
To clean, always use a dry or moist, but not wet, towel. Many
cleaning agents contain chemical substances which may
cause damage to the plastic parts of the machine. Therefore
do not use any strong or inflammable cleaners such as
petrol, paint thinner, turpentine or similar cleaning agents.
Always keep air ventilation holes free of dust deposits to
prevent overheating.
Servicing
For more information on KC4815 and other products, please
visit us
Batteries
Black & Decker batteries can be recharged many
times. At the end of their useful life, discard
batteries with due care for our environment:
• Run the battery down completely, then remove it from the
tool.
• NiCd, NiMH and Li-Ion batteries are recyclable. Take
them to any authorised repair agent or a local recycling
station.
Protecting the environment
Separate collection. This product must not be
disposed of with normal household waste.
Should you find one day that your Black & Decker product
needs replacement, or if it is of no further use to you, do not
dispose of it with household waste. Make this product
available for separate collection.
Separate collection of used products and
packaging allows materials to be recycled and used
again. Reuse of recycled materials helps prevent
environmental pollution and reduces the demand for raw
materials.
Local regulations may provide for separate collection of
electrical products from the household, at municipal waste
sites or by the retailer when you purchase a new product.
Black & Decker provides a facility for the collection and
recycling of Black & Decker products once they have
reached the end of their working life. To take advantage of
this service please return your product to any authorised
repair agent who will collect them on our behalf.
You can check the location of your nearest authorised repair
agent by contacting your local Black & Decker office at the
address indicated in this manual. Alternatively, a list of
authorised Black & Decker repair agents and full details of
our after-sales service and contacts are available on the
Internet at: www.2helpU.com.
7
Page 8

ENGLISH
Technical data
KC4815
Rated Voltage V 4.8
No load speed min-1 200rpm
Weight kg 0.4
Battery cell V 1.2v.Ni-cd.600mAh
Charger HY-06
Rated Voltage V 220-240
Output Voltage DC6V, 300 mA
Charging Time 3-5 hours
8
Page 9

Guarantee
Black & Decker is confident of the quality of its products and
offers an outstanding guarantee. This guarantee statement is
in addition to and in no way prejudices your statutory rights.
The guarantee is valid within the territories of the Member
States of the European Union and the European Free Trade
Area.
If a Black & Decker product becomes defective due to faulty
materials, workmanship or lack of conformity, within 24
months from the date of purchase, Black & Decker
guarantees to replace defective parts, repair products
subjected to fair wear and tear or replace such products to
make sure of the minimum inconvenience to the customer
unless:
• The product has been used for trade, professional or hire
purposes.
• The product has been subjected to misuse or neglect.
• The product has sustained damage through foreign
objects, substances or accidents.
• Repairs have been attempted by persons other than
authorised repair agents or Black & Decker service staff.
To claim on the guarantee, you will need to submit proof of
purchase to the seller or an authorised repair agent. You can
check the location of your nearest authorised repair agent by
contacting your local Black & Decker office at the address
indicated in this manual. Alternatively, a list of authorised
Black & Decker repair agents and full details of our aftersales
service and contacts are available on the Internet at:
www.2helpU.com
Please visit our website www.blackanddecker.co.uk to
register your new Black & Decker product and to be kept up
to date on new products and special offers. Further
information on the Black & Decker brand and our range of
products is available at www.blackanddecker.co.uk.
ENGLISH
9
Page 10

FRANÇAIS
21 3
4
5 6 7 8 9
10
A
10
B
Page 11

FRANÇAIS
11
Page 12

FRANÇAIS
Utilisation
Votre pistolet à air chaud Black & Decker est conçu pour
différentes applications de chaleur telles que le décapage de
la peinture. Ce produit est destiné à un usage privé et à
l’intérieur seulement.
Consignes de sécurité
Précautions générales pour les outils électriques
Attention! Lisez attentivement toutes les
consignes de sécurité et toutes les
instructions. Si vous ne respectez pas les
consignes de sécurité et les instructions
ci-dessous vous vous exposez à un risque de décharge
électrique, d’incendie et/ou de blessures graves.
Conservez toutes les consignes de sécurité et les
instructions pour vous y référer ultérieurement.
Dans toutes les consignes de sécurité mentionnées
ci-dessous le terme « outil électrique » signifie un outil
électrique branché sur une prise secteur (filaire) ou un outil
électrique à pile (sans fil).
1. Place de travail
a. Maintenir la zone de travail propre et bien éclairée.
Les endroits encombrés et sombres invitent les
accidents.
b. Ne pas utiliser les machines-outils dans un
environnement explosif, comme en présence de
liquides inflammables, de gaz ou de poussières. Les
machines-outils provoquent des étincelles qui peuvent
mettre le feu aux poussières ou aux vapeurs.
c. Ne permettez pas aux tierces personnes et aux
animaux de s’approcher de la machine lorsque vous
l’utilisez. Les distractions peuvent occasionner une
perte de contrôle.
2. Sécurité électrique
a. Les prises de branchement des machines-outils
doivent correspondre aux prises d’alimentation. Ne
jamais modifier la prise de quelque façon. Ne pas
utiliser d’adaptateurs avec des prises d’appareils
avec terre. Le branchement de prises non modifiées sur
des prises d’alimentation correspondantes évite tout
risque d’accident et de décharge électrique.
b. Eviter d’être en contact physique avec des surfaces
mises à la terre comme des tuyaux, des radiateurs,
des cuisinières et des réfrigérateurs. Le fait d’être mis
à la terre augmente le risque de décharge électrique.
c. Ne pas exposer les machines-outils à la pluie ou à un
environnement humide. La pénétration de l’eau à
l’intérieur d’une machine-outil accroît le risque de
décharge électrique.
d. Ne pas maltraiter le cordon. Ne jamais utiliser le
cordon pour porter la machine-outil, la tirer ou la
débrancher. Tenir le cordon à l’écart de la chaleur,
des graisses, des bords coupants ou des parties
mobiles. Les cordons endommagés ou emmêlés
augmentent le risque de décharge électrique.
e. En actionnant une machine-outil en extérieur, utiliser
une rallonge adéquate pour une utilisation en
extérieur. L’utilisation d’un cordon prévu pour un usage
en extérieur réduit le risque de décharge électrique.
f. Si l’outil doit être utilisé dans un endroit humide,
prenez les précautions nécessaires en utilisant un
dispositif à courant résiduel (RCD). L’utilisation d’un tel
dispositif réduit les risques d’électrocution.
3. Sécurité personnelle
a. Prêtez attention et regardez ce que vous êtes en train
de faire, utilisez votre bon sens quand vous
actionnez une machine-outil. N’utilisez pas une
machine-outil quand vous êtes fatigué ou sous
l’influence de drogues, d’alcool ou de médicaments.
Un moment d’inattention pendant l’opération d’une
machine-outil peut occasionner des blessures graves.
b. Utilisez des moyens de protection pour votre
sécurité. Portez impérativement des lunettes de
protection. D’autres possibilités comme un masque
contre la poussière, des bottes de sécurité
non-glissantes, un casque ou des protections auditives
dans des situations appropriées réduisent le risque de
blessures corporelles.
c. Pour empêcher un démarrage intempestif. Vérifiez
que l’interrupteur est sur la position arrêt avant de
brancher l’outil sur une prise électrique et/ou une
batterie, de le prendre ou de le transporter.
Transporter un outil électrique avec le doigt sur
l’interrupteur ou mettre sous tension un outil électrique
avec l’interrupteur allumé entraîne un risque d’accident.
d. Enlevez toute clé d’ajustement avant de mettre la
machine-outil en service. Une clé laissée en position
sur une partie mobile d’une machine-outil peut causer
des blessures corporelles.
e. N’essayez pas d’atteindre trop loin. Gardez votre
stabilité et votre équilibre à tout moment. Ainsi vous
gardez un meilleur contrôle de la machine-outil dans des
situations inattendues.
12
Page 13

FRANÇAIS
f. Habillez-vous en proportion. Ne portez pas de
vêtements amples ou des bijoux. Gardez vos
cheveux, vêtements et gants à l’écart de toutes
parties mobiles. Des vêtements lâches, des bijoux ou
de longs cheveux peuvent se trouver attrapés dans les
parties mobiles.
g. Si des accessoires sont fournis pour l’aspiration et
le stockage des poussières, assurez-vous qu’ils sont
correctement installés et utilisés. L’utilisation de ces
dispositifs peut réduire les risques dûs aux poussières.
4. Utilisation d’une machine-outil et soins d’entretien
a. Ne pas forcer la machine-outil. Utilisez la
machine-outil correspondant au travail à effectuer.
Une machine-outil adéquate réalisera un travail mieux
fait, plus sûr et dans un délai pour lequel elle a été
conçue.
b. Ne pas utiliser une machine-outil dont l'interrupteur
ne fonctionne pas. Une machine-outil qui ne peut pas
être activée par un interrupteur est potentiellement
dangereuse et doit être réparée.
c. Débranchez l’appareil avant de procéder à un
ajustement, un changement d’accessoire ou avant
de le ranger. De telles mesures préventives de sécurité
réduisent le risque de mettre des machines-outils en
service accidentellement.
d. Rangez les machines-outils hors de portée des
enfants et n’autorisez pas l’utilisation de
machines-outils par des personnes qui ne sont pas
familiarisées avec l’appareil ou avec ces
instructions. Les machines-outils sont dangereuses
entre les mains d’utilisateurs inexpérimentés.
e. Prendre soin des machines-outils. Vérifier la
déviation d’alignement, le serrage des vis, les pièces
cassées ou tout autre dommage qui pourrait affecter
le bon fonctionnement de la machine-outil. Si la
machine est endommagée, la faire réparer avant de
l’utiliser. Beaucoup d’accidents sont dûs à des
machines-outils en mauvaise condition.
f. Maintenir les outils de coupe aiguisés et propres.
Des outils de coupe correctement entretenus avec des
lames aiguisées risquent moins de se bloquer et sont
plus faciles à utiliser.
g. Utilisez une machine-outil, ses accessoires et ses
pièces selon ces instructions et de la façon prévue
pour ce type particulier d’appareils, en tenant
compte des conditions de travail et du travail à
effectuer. Une utilisation autre que celle prévue peut
entraîner une situation dangereuse.
5. Utilisation et précautions à prendre avec les outils à
batterie
a. Rechargez uniquement avec le chargeur spécifié par
le fabriquant. Un chargeur qui convient pour un type de
batterie peut poser un risque d’incendie quand il est
utilisé avec un autre type de batterie.
b. N’utilisez les outils électriques qu’avec les batteries
spécialement conçues pour ceux-ci. En utilisant
d’autres batteries vous pouvez causer des blessures et il
y a un risque d’incendie.
c. Quand la batterie n’est pas utilisée, il faut la garder
éloignée des objets métalliques, tels que trombones,
pièces, clés, clous, vis, ou autres petits objets
métalliques qui peuvent établir le contact d’une borne
à l'autre. Un court-circuit des bornes de la batterie peut
causer des brûlures ou un incendie.
d. Dans des conditions abusives, si du liquide est éjecté
de la batterie, évitez tout contact. S’il y a un contact
accidentel, rincez abondamment avec de l’eau. Si le
liquide entre en contact avec les yeux, consultez
immédiatement un médecin. Le liquide éjecté de la
batterie peut causer des irritations ou des brûlures.
6. Révision
a. Faites réviser votre outil électrique par un réparateur
qualifié qui n’utilise que des pièces de rechange
identiques. Cela assurera la sécurité de l’outil électrique.
Conseils de sécurité spéciaux pour la
visseuse
Tenez l’outil électrique par les surfaces de prise isolées
quand vous effectuez un travail où l’élément de fixation
risque d’entrer en contact avec des fils électriques
cachés. Si l’élément de fixation entre en contact avec un fil
électrique sous tension il peut « électrifier » les parties
métalliques exposées de l’outil et donner une décharge
électrique.
Branchez le chargeur de la batterie sur une prise secteur
230V. Rechargez la batterie uniquement avec le chargeur
fourni. Avant de commencer un travail sur un mur, un
plancher ou une autre surface similaire, assurez-vous que
toutes les lignes électriques de la zone sont disjonctées au
tableau de distribution principal. Avant de percer
assurez-vous qu’il n’y a pas de conduite de service à
l’emplacement du trou à percer (eau, gaz, électricité). Utilisez
un dispositif adéquat comme un appareil de détection de
métal ou de ligne électrique. Si vous avez des doutes
appelez un électricien qualifié ou votre fournisseur de
service. L’outil tout comme les pièces peuvent chauffer
considérablement pendant le perçage. Laissez refroidir
suffisamment longtemps avant de toucher. Portez des gants
appropriés.
Conseils de sécurité pour le chargeur
Important ! Danger ! Il y a 4 piles 1,2V Ni-cd dans la batterie
de la visseuse. Ne jamais court-circuiter la batterie ou
l’exposer à l’humidité. Ne la rangez pas avec des pièces
métalliques qui pourraient court-circuiter les points de
contact. La machine risquerait de chauffer, se mettre à brûler
ou exploser.
13
Page 14

FRANÇAIS
Attention !
1. Cet outil n’est pas prévu pour être utilisé par des
personnes (y compris les enfants) avec des capacités
physiques, sensorielles ou mentales réduites, ou un
manque d’expérience et de connaissances, sauf si elles
bénéficient, par l’intermédiaire d’une personne
responsable de leur sécurité, d’une supervision ou
d’instructions concernant l’utilisation de l’outil.
2. Ne pas recharger avec des batteries non rechargeables
Étiquettes sur l’outil
Les pictogrammes suivant apparaissent sur l’outil :
Attention ! Pour réduire les risques de blessures,
l’utilisateur doit lire le manuel d’instructions.
Le chargeur doit être utilisé uniquement à
l’intérieur.
Avant d’utiliser cette machine lisez attentivement la
totalité de ce manuel.
Sécurité électrique
Votre chargeur est doublement isolé; il n’y a donc
pas besoin de faire une mise à la terre. Vérifiez si
la tension de l’alimentation électrique est
compatible avec la tension indiquée sur la plaque
signalétique. N’essayez jamais de remplacer le chargeur par
une fiche électrique normale.
• Si le cordon d’alimentation est endommagé ou
défectueux il doit être réparé par le fabriquant ou un
réparateur Black & Decker agréé afin d’éviter tout risque
d’accident.
Description du produit
1. Porte-embouts
2. Bouton de contrôle du couple
3. LED
4. Bouton du LED
5. Boîtier du moteur
6. Témoin lumineux de mise sous tension
7. Déclencheur du pivot
8. Gâchette
9. Levier de rotation inversée
10. Boîtier de poignée rotative
11. Prise de chargement
Chargement de la batterie
Chargez comme indiqué, vous devez mettre la visseuse hors
tension. Seulement le témoin rouge s’allume sur l’indicateur
de mise sous tension quand vous mettez à charger. Temps
de chargement : 3 à 5 heures.
Témoins lumineux de mise sous tension
Trois couleurs différentes
(A partir de la gauche : Vert. Jaune. Rouge)
Chargement :
Seulement le témoin rouge s’allume quand la batterie est en
charge.
Fonctionnement :
Les témoins vert, jaune et rouge s’allument en même temps.
Au bout d’un fonctionnement continu, la tension de la batterie
baisse, et quand le témoin rouge s’éteint, cela implique que
la batterie est usée et doit être rechargée.
Insertion de embouts
Important ! Mettez toujours la machine hors tension quand
vous changez l’embout de vissage afin d’éviter un démarrage
intempestif de la machine. Gâchette Marche/Arrêt.
Gâchette Marche/Arrêt
Servez-vous de la gâchette Marche/Arrêt pour démarrer la
machine et appuyez continuellement dessus pendant la
durée de l’opération.
Levier de rotation inversée
Important ! Cet outil est une visseuse pliable à piles. La
machine doit être complètement à l’arrêt avant de pouvoir
utiliser le levier de rotation inversée, sinon la machine peut
être endommagée.
Servez-vous du levier de rotation inversée pour passer de la
rotation dans le sens horaire (normal) à la rotation dans le
sens antihoraire ou vice-versa. Quand le levier de rotation
inversée est sur la position centrale la gâchette est
verrouillée et ne peut pas être enfoncée. Mettez le levier de
rotation inversée sur la position centrale avant de poser la
machine, afin d’éviter un démarrage intempestif.
Réglage du couple
Réglage de couple 8 vitesses + 1 réglage de perçage. Vous
pouvez contrôler le couple maximum appliqué sur la mèche
de la perceuse avec le bouton de contrôle du couple.
Attention ! Le bouton de contrôle du couple ne peut être
tourné que lorsque la machine ne tourne pas ; sinon la
machine peut être endommagée.
14
Page 15

FRANÇAIS
Pour régler la perceuse sur le réglage de couple le plus
faible possible, tournez le bouton de contrôle du couple
jusqu’à ce que la petite flèche sur le boîtier de la perceuse
pointe sur le « 1 » estampé sur le bouton de contrôle du
couple. Dans cette position le couple d’embrayage patinera
si la résistance de perçage est légère. Plus le chiffre vers
lequel la flèche pointe sur le bouton de contrôle du couple
est élevé, plus le couple maximum appliqué pourra être
élevé avant que le couple
d’embrayage patine. Pour régler la machine sur la couple
maximum disponible tournez le bouton de contrôle du
couple jusqu’à ce que la flèche pointe sur le symbole de la
perceuse. Dans cette position le couple d’embrayage ne
patinera pas. Sélectionnez un couple faible pour
visser/dévisser des vis afin d’éviter d’endommager la pièce
sur laquelle vous travaillez (en particulier sur le bois) ou la
vis elle-même. Pour percer sélectionnez un réglage de
couple plus élevé. Faites d’abord un essai sur un objet qui
n’est pas la pièce finale et selon le résultat réglez au couple
désiré avant de commencer à travailler sur la pièce actuelle.
Fonctionnement
1. Utilisation de la visseuse comme tournevis
Avant de vous servir de la machine vérifiez si l’embout est
inséré correctement. Évitez de trop serrer la vis, sinon la tête
de vis peut être détruite ou le filetage peut être abîmé.
2. Vissage d’une vis
Réglez la direction de rotation de la perceuse dans la
direction horaire. Insérez l’embout dans la fente de la tête de
vis. Tenez l’embout perpendiculairement à la tête de vis,
sinon la vis ou la tête de vis risque d’être endommagée.
Appuyez l’embout contre la vis avec une pression constante
tout en enfonçant la vis. Quand la vis est complètement
vissée, tenez fermement la machine et relâchez la gâchette
Marche/Arrêt, sinon la vis ou la tête de vis risque d’être
endommagée. Si la gâchette Marche/Arrêt n’est pas
relâchée immédiatement un couple élevé risque
d’endommager l’embout de la perceuse ou la perceuse.
3. Dévissage d’une vis
Réglez la direction de rotation de la perceuse dans la
direction antihoraire. Insérez l’embout dans la fente de la
tête de vis. Tenez l’embout perpendiculairement à la tête de
vis, sinon la vis ou la tête de vis risque d’être endommagée.
Appuyez l’embout contre la vis avec une pression constante
tout en dévissant la vis.
Entretien et nettoyage
Attention ! Enlevez toujours la batterie avant de faire tout
travail d’entretien sur la machine.
Pour nettoyer, utilisez toujours un chiffon sec ou humide,
mais pas mouillé. De nombreux produits de nettoyage
contiennent des substances chimiques qui peuvent
détériorer les pièces de la machine qui sont en plastique. Il
ne faut donc pas utiliser des produits de nettoyage puissants
ou inflammables tels que le pétrole, le diluant de peinture, la
térébenthine ou des produits de nettoyage similaires.
Veillez à ce que les fentes de ventilation soient toujours
dégagées des dépôts de poussière pour éviter le
surchauffage.
Révision
Pour plus d’informations sur la KC4815 et d’autres produits,
visitez-nous sur
Batteries
Black & Decker batteries can be recharged many
times. At the end of their useful life, discard
batteries with due care for our environment:
• Run the battery down completely, then remove it from the
tool.
• NiCd, NiMH and Li-Ion batteries are recyclable. Take
them to any authorised repair agent or a local recycling
station.
Protection de l'environnement
Recyclage. Cet appareil ne doit pas être jeté avec
les déchets ménagers.
Si votre appareil Black & Decker doit être remplacé ou si
vous n'en avez plus l'usage, ne le jetez pas avec les ordures
ménagères. Songez à la protection de l'environnement et
recyclez-les.
La collecte séparée des produits et des emballages
usagés permet de recycler et de réutiliser des
matériaux. La réutilisation de matériaux recyclés
évite la pollution de l'environnement et réduit la demande de
matières premières.
Des réglementations locales peuvent stipuler la collecte
séparée des produits électriques et des produits ménagers,
dans des déchetteries municipales ou par le revendeur
lorsque vous achetez un nouveau produit.
Black & Decker offre une solution permettant de recycler les
produits Black & Decker lorsqu'ils ont atteint la fin de leur
cycle de vie. Pour pouvoir profiter de ce service, veuillez
retourner votre produit à un réparateur agréé qui se chargera
de le collecter pour nous.
Pour connaître l'adresse du réparateur agréé le plus proche
de chez vous, contactez le bureau Black & Decker à
l'adresse indiquée dans ce manuel. Vous pourrez aussi
trouver une liste de réparateurs agréés de Black & Decker et
de plus amples détails sur notre service après-vente sur le
site Internet à l'adresse suivante : www.2helpU.com.
15
Page 16

FRANÇAIS
Fiche technique
KC4815
Tension nominale V 4,8
Vitesse à vide min-1 200rpm
Poids kg 0,4
Élément de la batterie V 1,2v.Ni-cd.600mAh
Chargeur HY-06
Tension nominale V 220-240
Tension de sortie DC6V, 300 mA
Temps de chargement 3 à 5 heures
16
Page 17

Guarantee
Black & Decker is confident of the quality of its products and
offers an outstanding guarantee. This guarantee statement is
in addition to and in no way prejudices your statutory rights.
The guarantee is valid within the territories of the Member
States of the European Union and the European Free Trade
Area.
If a Black & Decker product becomes defective due to faulty
materials, workmanship or lack of conformity, within 24
months from the date of purchase, Black & Decker
guarantees to replace defective parts, repair products
subjected to fair wear and tear or replace such products to
make sure of the minimum inconvenience to the customer
unless:
• The product has been used for trade, professional or hire
purposes.
• The product has been subjected to misuse or neglect.
• The product has sustained damage through foreign
objects, substances or accidents.
• Repairs have been attempted by persons other than
authorised repair agents or Black & Decker service staff.
To claim on the guarantee, you will need to submit proof of
purchase to the seller or an authorised repair agent. You can
check the location of your nearest authorised repair agent by
contacting your local Black & Decker office at the address
indicated in this manual. Alternatively, a list of authorised
Black & Decker repair agents and full details of our aftersales
service and contacts are available on the Internet at:
www.2helpU.com
Please visit our website www.blackanddecker.co.uk to
register your new Black & Decker product and to be kept up
to date on new products and special offers. Further
information on the Black & Decker brand and our range of
products is available at www.blackanddecker.co.uk.
FRANÇAIS
17
Page 18

ARABIC
¿Éª°†dG
¿É«H ¿ƒµjh .kGõ«‡ kÉfɪ°V Ωó≤Jh É¡JÉéàæe IOƒéH ôµjO ófBG ∑ÓH ≥ãJ
¥ƒ≤◊ÉH ∫GƒMC’G øe ∫ÉM …CÉH πîj ’h áaÉ°VE’ÉH Gòg ¿Éª°†dG
OÉ–E’G ‘ AÉ°†YC’G ∫hódG º«∏bEG πNGO ¿Éª°†dG Gòg …öùjh .á«fƒfÉ≤dG
.á«HhQhC’G Iô◊G IQÉéàdG á≤£æeh »HQhC’G
áYÉæ°üdGh OGƒŸG ܃«Y ÖÑ°ùH kÉÑ«©e ôµjO ófBG ∑ÓH èàæe íÑ°UCG GPEG
ïjQÉJ øe kGô¡°T 12 ¿ƒ°†Z ‘ ôµjO ófBG ∑ÓH øª°†J ,á≤HÉ£ŸG ΩóYh
»∏СdG IЙYGфe ™e дЙйажŸG мУ°UEGh бС«©ŸG AGхLC’G ∫GуСа°SG AGцыdG
AУª©dG Й°VQ шe уcCЙа∏d дЙйажŸG √тg ∫GуСа°SG hCG …OЙ©dG ΩGуоа°S’ЙH
:⁄ Ée
.ÒLCÉà∏d hCG á«æ¡e hCG ájQÉŒ ¢VGôZC’ èàæŸG ΩGóîà°SG ” •
.èàæŸG ΩGóîà°SG IAÉ°SEG hCG ∫ɪgEG •
.çOGƒ◊G hCG á«HôZ ¢VGôZCG hCG OGƒe ÖÑ°ùH ∞∏àd èàæŸG ¢Vô©J •
øjôNB’G ¢UÉî°TC’G πÑb øe ìÓ°UE’G äÉ«∏ªY AGôLEG ádhÉfi •
∑ÓÑd ™HÉàdG áeóÿG ≥jôa hCG º¡H ìöüŸG ìÓ°UE’G AÓch ±ÓîH
.ôµjO ófBG
™«ÑdG π«ch hCG ™FÉÑ∏d AGöûdG äÉÑKEG Ëó≤J Öéj ,¿Éª°†dÉH áÑdÉ£ª∏d
Öàµe á©LGôà óªà©e ìÓ°UEG π«ch ÜôbCG ¿Éµe áaô©e ∂æµÁh .óªà©ŸG
ôaƒàJ ɪc .π«dódG ‘ ¬«dEG QÉ°ûŸG ¿Gƒæ©dG ‘ »∏ëŸG ôµjO ófBG ∑ÓH
äÉeóN äÉfÉ«Hh ôµjO ófBG ∑ÓH iód øjóªà©ŸG ìÓ°UE’G AÓcƒH áªFÉb
:ÊhεdE’G ™bƒŸG ≈∏Y ∫É°üJ’Gh ™«ÑdG ó©H Ée
.www.2helpU.com
18
ÊhεdE’G Éæ©bƒe á©LGôe ≈Lôj
∑ÓH øe ójó÷G ∂éàæe π«é°ùàd www.blackanddecker.co.uk
≈∏Y ∫ƒ°ьл∏dh .б°UЙяG ¢Vhф©dGh дЙйажŸG зуMCG бaф©Ÿh фµjO уfBG
≈Lôj ,ÉæJÉéàæeh ôµjO ófBG ∑ÓH áeÓY ∫ƒM äÉeƒ∏©ŸG øe ójõŸG
.www.blackanddecker.co.uk IQÉjR
Page 19

ARABIC
á«æØdG äÉfÉ«ÑdG
KC4815
4^8 §dƒa ≤ŸG »FÉHô¡µdG ó¡÷G
200 á≤«bódG ‘ IQhO πªM ¿hóH áYöùdG
0^4 ºéc ¿RƒdG
,§dƒa 1^2 Ωƒ«eOÉc πµ«f §dƒa ájQÉ£ÑdG á«∏N
áYÉ°ùdG ‘ ÒÑeCG »∏∏e 600
06-HY øMÉ°ûdG
240-220 §dƒa ≤ŸG »FÉHô¡µdG ó¡÷G
ÒÑeCG »∏∏e 300 ,ôªà°ùe QÉ«J §dƒa 6 êQÉÿG ó¡÷G
äÉYÉ°S 5 ¤EG 3 øë°ûdG øeR
áÄ«ÑdG ájɪM
.á«dõæŸG äÉØ∏îŸG ™e èàæŸG Gòg AÉ≤dEG ΩóY Öéj .π°üØæe ™«ªŒ
∂H ¢UÉÿG ôµjO ófBG ∑ÓH RÉ¡L πjóÑJ Öéj ¬fCÉH ΩÉjC’G óMCG ‘ ∂d ÚÑJ GPEG
ºbh .á«dõæŸG äÉØ∏îŸG ™e ¬æe ¢ü∏îàJ ’ .¬eGóîà°S’ áLÉëH ó©J ⁄ hCG
.π°üØæŸG ™«ªéà∏d èàæŸG Gòg ÒaƒàH
шe бeуоа°щŸG дGƒС©dGh дЙйажª∏d π°ьШжŸG ™«ªйаdG шµБ
IOÉYEG óYÉ°ùj PEG ,iôNCG Iôe É¡eGóîà°SGh OGƒŸG ôjhóJ IOÉYEG
≈∏Y Ö∏£dG ¢†ØNh »Ä«ÑdG çƒ∏àdG ™æe ≈∏Y ÉgôjhóJ OÉ©ŸG OGƒŸG ΩGóîà°SG
ΩÉÿG OGƒŸG
шY б«FЙHф¡µdG дЙйажª∏d π°ьШжe ™«ªŒ ≈∏Y б«∏лŸG дЙ©jцыаdG ¢ьжJ уb
AGöT óæY áFõéàdG ôLÉJ hCG ájó∏ÑdG äÉØ∏fl ™bGƒe ‘ á«dõæŸG äÉØ∏îŸG
.ójóL èàæe
фµjO уfBG ∑УH дЙйажe фjhуJ IOЙYEGh ™«ªйаd ICЙ°ыжe фµjO уfBG ∑УH фaƒJ
√тg шe IOЙШа°SУdh .™aЙжdG ЙgфªY бjЙ¡жd дЙйажŸG ∂∏J ∫ƒ°Uh ужY
Ωƒ≤«°S …òdG óªà©e ìÓ°UEG π«ch …CG ¤EG èàæŸG IOÉYEG ≈Lôj ,áeóÿG
.ЙжY бHЙ«f дЙйажŸG ™«ªйаH
ôµjO ófBG ∑ÓH Öàµe á©LGôà óªà©e ìÓ°UEG π«ch ÜôbCG ¿Éµe áaô©e ∂æµÁ
ìÓ°UE’G AÓcƒH áªFÉb ôaƒàJ ɪc .π«dódG ‘ ¬«dEG QÉ°ûŸG ¿Gƒæ©dG ‘ »∏ëŸG
≈∏Y ∫É°üJ’Gh ™«ÑdG ó©H Ée äÉeóN äÉfÉ«Hh ôµjO ófBG ∑ÓH iód øjóªà©ŸG
.www.2helpU.com :ÊhεdE’G ™bƒŸG
áeóÿG äÉeƒ∏©e
ácƒ∏ªŸGh Ióªà©ŸG áeóÿG õcGôe øe á∏eÉc áµÑ°T ôµjO ófBG ∑ÓH ôaƒJ
∑ÓÑd á©HÉàdG áeóÿG õcGôe ™«ªL ‘ πª©jh .É«°SBG AÉLQCG ™«ªL ‘ ácöû∏d
™«ª÷ á≤ãdÉH IôjóLh ádÉ©a áeóN Ëó≤J ≈∏Y ¿ƒ∏gDƒe OGôaCG ôµjO ófBG
IQƒ°ûe ≈∏Y ∫ƒ°ü◊G ‘ ÖZôJ âæc GPEÉa .AÓª©dG É°VQ ≥≤ëj Éà Iõ¡LC’G
iƒ°S ∂«∏Y Ée ,á«∏°UCG QÉ«Z ™£b ≈∏Y ∫ƒ°ü◊G hCG Iõ¡LC’G ìÓ°UEG hCG á«æa
.ôµjO ófBG ∑ÓÑd áeóN õcôe ÜôbCÉH ∫É°üJ’G
19
Page 20

ARABIC
§HQ AÉæKCG ôªà°ùŸG §¨°†dG ™e »ZÈdG ≈∏Y »ZGÈdG áª≤∏H §¨°VG .»ZÈdG
ìÉàØe QôMh kGó«L RÉ¡÷G ∂°ùeG ,kÉeÉ“ »ZÈdG §HQ ∫ɪàcG óæY .»ZÈdG
‘h .»ZÈdG ¢SCGQ ∞∏àJ hCG »ZÈdG ∞∏àj ó≤a ’EGh ,𫨰ûàdG ±É≤jEG / 𫨰ûàdG
Ωõ©dG …ODƒj ó≤a ,kGQƒa 𫨰ûàdG ±É≤jEG / 𫨰ûàdG ìÉàØe ôjô– ΩóY ádÉM
.ÜÉ≤ãŸG hCG »ZGÈdG áª≤d ∞∏J ¤EG ójó°ûdG
»ZGÈdG ∂a .3
.áYÉ°ùdG ÜQÉ≤Y √ÉŒG ¢ùµY ‘ ¿GQhódG ≈∏Y ÜÉ≤ãŸG ¿GQhO √ÉŒG OóM
»ZGÈdG áª≤d âÑK .»ZÈdG ¢SCGQ ‘ IOƒLƒŸG áëàØdG ‘ »ZGÈdG áª≤d πNOG
.»ZÈdG ¢SCGQ ∞∏àJ hCG »ZÈdG ∞∏àj ó≤a ’EGh »ZÈdG ¢SCGQ ≈∏Y …OƒªY πµ°ûH
.»ZÈdG ∂a AÉæKCG ôªà°ùŸG §¨°†dG ™e »ZÈdG ≈∏Y »ZGÈdG áª≤∏H §¨°VG
∞«¶æàdGh áfÉ«°üdG
.RÉ¡÷G ≈∏Y ∫ɪYCG …CG ò«ØæJ πÑb ájQÉ£ÑdG ∂ØH kɪFGO ºb !¬«ÑæJ
.á∏àÑe â°ù«d øµdh ,áÑWQ hCG áaÉL áØ°ûæe kɪFGO Ωóîà°SG ,RÉ¡÷G ∞«¶æàd
∞∏J ¤EG …ODƒJ ób »àdGh ájhɪ«c OGƒe ≈∏Y äÉضæŸG øe ójó©dG …ƒà–
äÉضæe …CG Ωóîà°ùJ ’ ºK øeh .RÉ¡÷ÉH IOƒLƒŸG ᫵«à°SÓÑdG AGõLC’G
hCG ÚàæHÎdG hCG (ÔãdG) ¿ÉgódG ∞Øfl hCG øjõæÑdG πãe ∫É©à°TÓd á∏HÉb hCG ájƒb
.iôNC’G äÉضæŸG
•ôa ™æŸ RÉ¡÷G ≈∏Y IOƒLƒŸG ájƒ¡àdG äÉëàa áaɶf ≈∏Y kɪFGO ßaÉM
.RÉ¡÷G IQGôM
áeóÿG
π°†ШJ ,iфNC’G дЙйажŸGh KC4815 RÉ¡L øY äÉeƒ∏©ŸG øe ójõŸ
.ÉæYhôa óMCG IQÉjõH
ÜQÉ≤Y √ÉŒG ‘ ¿GQhódG ÚH πjóÑà∏d »°ùµ©dG ¿GQhódG ´GQP ΩGóîà°SG
¢ùµ©dG hCG áYÉ°ùdG ÜQÉ≤Y √ÉŒG ¢ùµY ‘ ¿GQhódGh (…OÉ©dG ™°VƒdG) áYÉ°ùdG
ìÉàØe ÚeCÉJ ºàj ,∞°üàæŸG ‘ »°ùµ©dG ¿GQhódG ´GQP OƒLh ™eh .¢ùµ©dÉH
‘ »°ùµ©dG ¿GQhódG ´GQP ™°V .¬«∏Y §¨°†dG IOÉYEG øµÁ ’h 𫨰ûàdG
.Oƒ°ü≤ŸG ÒZ 𫨰ûàdG …OÉØàd ∑ój øe RÉ¡÷G ∑ôJ πÑb ∞°üàæŸG
Ωõ©dG iƒà°ùe πjó©J
ó◊G ‘ ºµëàdG ∂æµÁh .Ö≤ã∏d ™°Vh + Ωõ©∏d ´É°VhCG á«fɪK ¬H RÉ¡÷G
‘ ºµëàdG ¢†Ñ≤e ΩGóîà°SÉH Ö≤ãdG áª≤d ≈∏Y ¢VhôØŸG Ωõ©∏d ≈°übC’G
.Ωõ©dG
‘ RÉ¡÷G ¿Éc GPEG ’EG Ωõ©dG ‘ ºµëàdG ¢†Ñ≤e 𫨰ûJ ΩóY Öéj !¬«ÑæJ
.RÉ¡÷G ∞∏J ¤EG ∂dP …ODƒj ±ƒ°ùa ’EGh ,𫨰ûàdG ±É≤jEG ™°Vh
‘ ºµëàdG ¢†Ñ≤e ∞∏H ºb `,Ωõ©∏d ôaƒàe ™°Vh πbCG ≈∏Y ÜÉ≤ãŸG §Ñ°†d
™°VƒdG ¤EG ÜÉ≤ãŸG AÉ£Z ≈∏Y OƒLƒŸG Ò¨°üdG º¡°ùdG Ò°ûj ≈àM Ωõ©dG
≥dõæj ±ƒ°S ™°VƒdG Gòg ‘h .Ωõ©dG ‘ ºµëàdG ¢†Ñ≤e ≈∏Y ´ƒÑ£ŸG "1"
≈∏Y º¡°ùdG ¬«dEG Ò°ûj …òdG ºbôdG OGR ɪ∏ch .Ö≤K áehÉ≤e πbCÉH Ωõ©dG ¢†HÉb
¿CG πÑb ¬≤«Ñ£J øµÁ …òdG Ωõ©∏d ≈°übC’G ó◊G OGR ,Ωõ©dG ‘ ºµëàdG ¢†Ñ≤e
´GQP ∞∏H ºb ,ôaƒàe ΩõY ≈°übCG ≈∏Y RÉ¡÷G §Ñ°†dh .Ωõ©dG ¢†HÉb ≥dõæj
óLƒj ’ ,™°VƒdG Gòg ‘h .Ö≤ãdG õeQ ¤EG º¡°ùdG Ò°ûj ≈àM Ωõ©dG ‘ ºµëàdG
…OÉØàd »ZGÈdG ∂ah §Hôd πbCG ΩõY ™°Vh OóM .Ωõ©dG ¢†HÉb ‘ ¥’õfG
OóM Ö≤ã∏dh .»ZÈdG hCG (á«Ñ°ûÿG πª©dG ™£b kÉ°Uƒ°üNh)πª©dG á©£b ∞∏J
á©£b ±ÓîH á©£b …CG ≈∏Y k’hCG QÉÑàNG AGôLEÉH ºb .Ωõ©∏d ™°Vh ≈°übCG
πª©dG AóH πÑb ∂dòd kÉ≤ah ܃∏£ŸG Ωõ©dG πjó©àH ºbh ,á«FÉ¡ædG πª©dG
.»∏©ØdG
πª©dG πLCG øe 𫨰ûàdG
‘ .äGôe IóY É¡æë°T IOÉYEG øµÁ ôµjO ófBG ∑ÓH äÉjQÉ£H
IÉYGôe ™e äÉjQÉ£ÑdG øe ¢ü∏îJ ,»°VGÎa’G ÉgôªY ájÉ¡f
.ÉæàÄ«H ájɪ◊ áÑLGƒdG ájÉæ©dG
.RÉ¡÷G øe É¡Lôîà°SG ºK ,πeɵdÉH ájQÉ£ÑdG ábÉW óØæà°SG •
Êó©ŸG ójQó«¡dG πµ«fh "NiCd" Ωƒ«eOÉc πµ«ædG äÉjQÉ£H •
.ôjhóàdG IOÉYE’ á∏HÉb "Li-lon" ¿ƒjCG Ωƒ«ã«∏dGh "NiMH"
.á«∏fi ôjhóJ IOÉYEG á£fi hCG óªà©e ìÓ°UEG π«ch …C’ É¡ª∏°S
20
äÉjQÉ£ÑdG
»ZGôH ∂تc πª©dG ‘ »ZGÈdG ∂Øe ΩGóîà°SG .1
ÖæŒ .í«ë°U mπµ°ûH »ZGÈdG áª≤d Ö«côJ øe ≥≤– ,RÉ¡÷G ΩGóîà°SG πÑb
¿Éæ°SCG öùµæJ hCG »ZÈdG ¢SCGQ ∞∏àJ ó≤a ’EGh ,»ZGÈdG §HQ ‘ •GôaE’G
.Ödƒ∏dG
»ZÈdG §HQ .2
πNOCG .áYÉ°ùdG ÜQÉ≤Y √ÉŒG ‘ ¿GQhódG ≈∏Y ÜÉ≤ãŸG ¿GQhO √ÉŒG OóM
»ZGÈdG áª≤d âÑK .»ZÈdG ¢SCGQ ‘ IOƒLƒŸG áëàØdG ‘ »ZGÈdG áª≤d
¢SCGQ ∞∏àJ hCG »ZÈdG ∞∏àj ó≤a ’EGh »ZÈdG ¢SCGQ ≈∏Y …OƒªY πµ°ûH
Page 21

ARABIC
RɵJQ’G Qƒfi ôjô– QR .7
ìÉàØe .8
»°ùµ©dG ¿GQhódG ´GQP .9
QGhódG ¢†Ñ≤ŸG AÉ£Z .10
øë°ûdG áëàa .11
ájQÉ£ÑdG øë°T
øë°ûdG óæY .»ZGÈdG ∂Øe 𫨰ûJ ±É≤jEG Ú©àjh ,™°Vƒe ƒg ɪc øë°ûdÉH ºb
.äÉYÉ°S 5 ¤EG 3 :øë°ûdG øeR .AÉHô¡µdG öTDƒe ‘ §≤a AGôª◊G áѪ∏dG A»°†J
AÉHô¡µdG öTDƒe áÑŸ
äÉѪ∏dG øe áØ∏àfl ¿GƒdCG áKÓK ∑Éæg
(AGôªM –AGôØ°U – AGö†N :QÉ°ù«dG øe)
:øë°ûdG ádÉM
.øë°ûdG óæY §≤a AGôª◊G áѪ∏dG A»°†J
:𫨰ûàdG ádÉM
™eh ,âbƒdG ¢ùØf ‘ kÉ©e AGôª◊Gh AGôØ°üdGh AGö†ÿG äÉѪ∏dG A»°†J
áѪ∏dG ÅØ£æJ ÉeóæYh ,ájQÉ£ÑdG á«£dƒa ¢†ØîæJ RÉ¡÷G 𫨰ûJ QGôªà°SG
.øë°ûdG IOÉYEG ¤EG êÉà–h ájQÉ£ÑdG ∑Ó¡à°SG ” ¬fCG »æ©j Gò¡a ,AGôª◊G
RÉ¡÷G º≤d ∫ÉNOEG
»ZGÈdG º≤d Ò«¨J πÑb RÉ¡÷G 𫨰ûJ ±É≤jEÉH kɪFGO ºb !᪡e áXƒë∏e
.Oƒ°ü≤e ÒZ mπµ°ûH RÉ¡÷G 𫨰ûJ ±É≤jEG / 𫨰ûJ ìÉàØe 𫨰ûJ …OÉØàd
!ôjò–
¿ƒfÉ©j øjòdG ¢UÉî°TC’G πÑpb øe ΩGóîà°SÓd ¢ü°üfl ÒZ RÉ¡÷G Gòg .1
∂dP ‘ ÉÃ) á«∏≤©dG hCG á«°ù◊G hCG á«fóÑdG äGQó≤dG ‘ Qƒ°üb øe
â– GƒfÉc GPEG ’EG ,áaô©ŸGh IÈÿG ¤EG ¿hô≤àØj øjòdG hCG (∫ÉØWC’G
ΩGóîà°SG ¢Uƒ°üîH ¬æe äɪ«∏©àH hCG º¡àeÓ°S øY ∫hDƒ°ùŸG ±GöTEG
.RÉ¡÷G
.øë°û∏d á∏HÉ≤dG ÒZ äÉjQÉ£ÑdG øë°T IOÉYEÉH º≤J ’ .2
RÉ¡÷G ≈∏Y IOƒLƒŸG äÉ≤°ü∏ŸG
:á«dÉàdG á«ë«°VƒàdG Qƒ°üdG ≈∏Y RÉ¡÷G …ƒàëj
IAGôb Ωóîà°ùŸG ≈∏Y Ú©àj ,áHÉ°UE’G ôWÉfl π«∏≤àd
.§≤a »∏NGódG ΩGóîà°SÓd ¢ü°üfl øMÉ°ûdG
.RÉ¡÷G ΩGóîà°SG πÑb kGó«L πeɵdÉH π«dódG Gòg CGôbG
!ôjò–
.äɪ«∏©àdG π«dO
á«FÉHô¡µdG áeÓ°ùdG
¤EG áLÉM ∑Éæg â°ù«d ∂dòd ,kÉLhOõe k’õY ∫hõ©e øMÉ°ûdG
™e »FÉHô¡µdG QÉ«àdG ó¡L ≥aGƒJ øe ≥≤ëàdG ≈Lôoj .¢†jQCÉàdG
øMÉ°ûdG IóMh ∫GóÑà°SG kGóHCG ∫hÉ– ’ .Úæ≤àdG áMƒd ≈∏Y í°VƒŸG ó¡÷G
.…OÉ©dG »FÉHô¡µdG QÉ«àdG ¢ùÑ≤e Ö°SÉæJ IóMƒH
áeóÿG õcGôe óMCG ᣰSGƒH ¬dGóÑà°SG Öéj ,»FÉHô¡µdG ∂∏°ùdG ∞∏J óæY •
.ôWÉîª∏d ¢Vô©àdG …OÉØàd ,ôµjO ófBG ∑ÓH ácöûd á©HÉàdG Ióªà©ŸG
èàæŸG ¢üFÉ°üN
º≤∏dG πeÉM .1
𫨰ûàdG ±É≤jEG / 𫨰ûàdG ìÉàØe
‘ ôªà°SGh ,RÉ¡÷G 𫨰ûJ AóÑd 𫨰ûàdG ±É≤jEG / 𫨰ûàdG ìÉàØe Ωóîà°SG
.ôªà°ùŸG 𫨰ûà∏d ¬«∏Y §¨°†dG
»°ùµ©dG ¿GQhódG ´GQP
Öéj .»£∏d πHÉb »µ∏°S’ »ZGôH ∂Øe øY IQÉÑY RÉ¡÷G Gòg !᪡e áXƒë∏e
’EGh ,»°ùµ©dG ¿GQhódG ´GQP ΩGóîà°SG πÑb ácô◊G øY kÉeÉ“ RÉ¡÷G ∞bƒàj ¿CG
.RÉ¡÷G ∞∏àj ó≤a
¿GQhódG ΩõY ‘ ºµëàdG ¢†Ñ≤e .2
…O …EG ∫EG ìÉÑ°üe .3
…O …EG ∫EG ìÉÑ°üe ìÉàØe .4
∑ôëŸG AÉ£Z .5
AÉHô¡µdG öTDƒe áÑŸ .6
21
Page 22

ARABIC
kÉ°ü«°üN ᪪°üŸG äÉjQÉ£ÑdG ™e §≤a á«FÉHô¡µdG Iõ¡LC’G Ωóîà°SG .2
¤EG iôNCG äÉjQÉ£H ™e á«FÉHô¡µdG Iõ¡LC’G ΩGóîà°SG …ODƒj ób .É¡d
.≥jôM hCG äÉHÉ°UEG ´ƒbh ôWÉfl
á«fó©ŸG AÉ«°TC’G øY kGó«©H É¡¶ØMG ,ájQÉ£ÑdG ΩGóîà°SG ΩóY ádÉM ‘ .3
hCG í«JÉØŸG hCG á«fó©ŸG äÓª©dG hCG á«fó©ŸG ∂HÉ°ûŸG πãe iôNC’G
ób »àdGh ,iôNC’G IÒ¨°üdG á«fó©ŸG AÉ«°TC’G hCG »ZGÈdG hCG ÒeÉ°ùŸG
IôFGódG öüb …ODƒj ób .ôNBG ¤EG ±ôW øe ∫É°üJG çhóM ¤EG …ODƒJ
hCG ¥hôëH áHÉ°UE’G ôWÉfl ¤EG kÉ©e ájQÉ£ÑdG ±GôWC’ á«FÉHô¡µdG
.≥jô◊G ôWÉfl
á°ùeÓe ÖæŒ ,ájQÉ£ÑdG øe πFÉ°S êôîj ób ,á«Ø°ù©àdG ±hô¶dG ‘ .4
…òdG Aõ÷G ∞£°TG ,áaó°üdÉH πFÉ°ùdG Gòg á°ùeÓe ádÉM ‘ .πFÉ°ùdG Gòg
Ö∏WG ,Úæ«©∏d πFÉ°ùdG á°ùeÓe ádÉM ‘h .ôjõ¨dG AÉŸÉH πFÉ°ùdG ¢ùe’
¤EG ájQÉ£ÑdG øe ÜöùàŸG πFÉ°ùdG …ODƒj ób .kÉ°†jCG á«Ñ£dG IóYÉ°ùŸG
.¥hôM hCG äÉHÉ¡àdG çhóM
áeóÿG .6
∫ɪYCG ò«Øæàd πgDƒe ¢üî°T ∫ÓN øe »FÉHô¡µdG RÉ¡÷G áfÉ«°U Ωõ∏j .1
∂dP øª°†j ±ƒ°S .§≤a á≤HÉ£ŸG QÉ«¨dG ™£b ΩGóîà°SÉH áfÉ«°üdG
.»FÉHô¡µdG RÉ¡÷G áeÓ°S ≈∏Y ®ÉØ◊G
»ZGÈdG ∂Øe ΩGóîà°SG óæY áeÓ°ù∏d á°UÉN íFÉ°üf
¿CG øµÁ á«∏ªY …CG ò«ØæJ óæY ádhõ©ŸG í£°SC’G øe »FÉHô¡µdG RÉ¡L∫G ∂°ùeG
Ȉd
G §HôdG º≤∏d øµÁ .á«ØîŸG á«FÉHô¡µdG ∑Ó°SC’G ™e §HôdG áª≤d É¡«a ¢ùeÓàJ
AGõLC’G ¢†jô©J ¤EG …ODƒJ ¿CG "»FÉHô¡µdG QÉ«àdG ¬H …öùj" ∂∏°S ™e ¢ùeÓàJ
áeó°üd π¨°ûŸG ¢Vô©j ób ɇ ,AÉHô¡µdG QÉ«à∏d »FÉHô¡µdG RÉ¡é∏d á«fó©ŸG
.á«FÉHô¡c
óYCG .§≤a §dƒa 230 IQó≤H »FÉHô¡c òNCÉà ájQÉ£ÑdG øMÉ°T π«°UƒàH ºb
…CG CGóH πÑbh .RÉ¡÷G ™e OhõŸG øMÉ°ûdG ΩGóîà°SÉH §≤a ájQÉ£ÑdG øë°T
™«ªL π°üa øe ócCÉJ ,á∏KɪŸG í£°SC’G hCG äÉ«°VQC’G hCG ¿GQó÷G ≈∏Y ∫ɪYCG
™bƒe ¢üëaG .á«°ù«FôdG áMƒ∏dG øe πª©dG á≤£æe ‘ IOƒLƒŸG á«FÉHô¡µdG •ƒ£ÿG
(RɨdGh √É«ŸG πãe) ≥aGôe •ƒ£N …CG OƒLh ΩóY øe ≥≤ëà∏d áMÎ≤ŸG ÜÉ≤ãŸG IôØM
•ƒ£ÿG hCG ¿OÉ©ŸG øY ∞°ûµdG RÉ¡L πãe Ö°SÉæŸG RÉ¡÷G Ωóîà°SG .Ö≤ãdG πÑb
Ohõe hCG ¢ü°üîàe »æØH ∫É°üJ’G ≈Lôoj ,¢SÉÑàd’G ádÉM ‘ .á«FÉHô¡µdG
πµ°ûH πª©dG ™£bh Iõ¡LC’G IQGôM áLQO ™ØJôJ ób .∂H ¢UÉÿG áeóÿG
™e ,¬àdhÉæe πÑb OÈ«d á«aÉc IÎa RÉ¡÷G ∑ôJG .Ö≤ãdG á«∏ªY ∫ÓN ®ƒë∏e
.áÑ°SÉæŸG äGRÉØ≤dG AGóJQG
øMÉ°û∏d áeÓ°ùdG íFÉ°üf
äGƒa 1^2 Ωƒ«eOÉc πµ«f äÉjQÉ£H ™£b ™HQCG óLƒJ !ô£N !᪡e áXƒë∏e
É¡°†jô©J hCG ájQÉ£ÑdG ‘ IôFGódG öü≤H kGóHCG º≤J ’h ,»ZGÈdG ∂Øe ‘
öüb ¤EG …ODƒJ ób »àdGh á«fó©e AGõLCG …CG ™e ájQÉ£ÑdG ¿õîJ ’h .áHƒWô∏d
‘ CGóÑj hCG RÉ¡÷G IQGôM áLQO ™ØJôJ ób .π«°UƒàdG ±GôWCG ≈∏Y IôFGódG
.ôéØæj hCG ¥GÎM’G
22
“ ≈–« ØUÊ «∞πNU“ ±eËœ« °IDl ∞AHj «_¢d°W Ë¢πLOFNU,
¢QØb ±s √Ê ≥cÁ «∞IDl ±∏∂∑W ≠w «∞πNU“ °Dd¥IW ßKOLW.
«ß∑ªb«Â ≥cÁ «∞IDl ¥LJs √Ê ¥IKq «∞LªU©d «∞L∑BKW °U_¢d°W.
4 «ß∑ªb«Â «_§Ne… «∞∑w ¢FLq °U∞DUÆW Ë«∞FMU¥W °NU
√ ô ¢º∑ªb «∞πNU“ ≠w ¨Od «∞Gd÷ «∞cÍ ÅLr ∞t.
«ß∑ªb «∞πNU“ «∞LMUßV ∞KGd÷ «∞LMUßV. «∞πNU“
«∞LMUßV ¢∫Bq ´Kv ≤∑OπW √≠Cq Ë«ôß∑ªb«Â «ü±s «∞cÍ
ÅLLX ∞t.
» ô ¢º∑ªb «∞πNU“ «∞cÍ ¥FLq °U∞DUÆW ≈–« ∞r ¥Js “¸
¨KIt Ë¢AGOKt ¥FLq. √Í §NU“ ØNd°w ô ¥H∑` Ë¥GKo ±s «∞e¸
«∞LªBh ∞Nc« «∞Gd÷ ¥Fb îDd« Ë¥πV ≈Åö•t.
à «≤eŸ «∞LI∂f ±s ±ªdà «∞JNd°U¡ Æ∂q «∞IOU °QÍ
¢Fb¥ö‹ √Ë ¢GOOd «∞IDl √Ë «∞∑ªe¥s. ±∏q ≥cÁ «ù§d«¡«‹
«ô•∑OU©OW ¢∫b ±s ±ªU©d ¢AGOq «∞πNU“ œËÊ ÆBb.
œ ´Mb ´b «ß∑ªb«±NU, Ær °∑ªe¥s «_§Ne… «∞∑w ¢FLq
°U∞DUÆW °FOb« ´s «_©HU‰ Ëô ¢ºL` _Í ®ªh ¨Od
±F∑Uœ ´Kv «∞∑FU±q ±l «∞πNU“ Ë∞r ¥DKl ´Kv ≥cÁ
«ù¸®Uœ«‹ °UÊ ¥Iu °∑AGOq «∞πNU“. «_§Ne… «∞∑w ¢FLq
°U∞DUÆW ¢AJq îDd« ≈–« ¢dØX ≠w √¥bÍ ¨Od «∞Lb¸°Os.
Á Ær °BOU≤W «_§Ne… «∞∑w ¢FLq °U∞DUÆW. ¢QØb ±s √Ê
§LOl «∞IDl «∞L∑∫dØW ≠w Ë{FNU «∞B∫O` ˱∏∂∑W
§Ob«, ˸«§l «∞πNU“ °∫∏U ´s √Í §e¡ ±Jºu¸ ¥LJs √Ê
¥R£d ´Kv ´Lq «∞πNU“. ≈–« ˧b‹ ¢KHU, ¥πV ≈ÅöÕ
«∞πNU“ Æ∂q «ôß∑ªb«Â. Ø∏Od ±s «∞∫u«œÀ ¢Il °ºV ´bÂ
ÅOU≤W «_§Ne… «∞∑w ¢FLq °U∞DUÆW.
Ë •U≠k ´Kv «_§e«¡ «∞IU©FW •Uœ… Ë≤EOHW. «_§e«¡
«∞IU©FW –«‹ «∞AHd«‹ «∞∫Uœ… «∞∑w ¢∑r ÅOU≤∑NU ´Uœ… ô ¢M∏Mw
°ºNu∞W Ë¥ºNq «∞∑∫Jr ≠ONU.
“ «ß∑ªb«Â «∞πNU“ «∞cÍ ¥FLq °U∞DUÆW, ËÆDFt «∞LJLKW
Ë√§e«zt, «∞a °LU ¥∑Ho ±l ≥cÁ «ù¸®Uœ«‹ ˱l «∞Dd¥IW
«∞LªBBW ∞öß∑ªb«Â ∞Nc« «∞MuŸ ±s «_§Ne…, ±l
«_îc ≠w «ô´∑∂U¸ °OµW «∞FLq Ë≤uŸ «∞FLq «∞LDKu».
«ß∑ªb«Â «_§Ne… ≠w √¨d«÷ ¨Od «∞LªBBW ∞NU Æb ¥M∑Z ´Mt
±ªU©d.
¬H ájÉæ©dGh ájQÉ£ÑdÉH πª©j …òdG RÉ¡÷G ΩGóîà°SG .5
ácöûdG ÖfÉL øe OhõŸG øMÉ°ûdG ΩGóîà°SÉH §≤a RÉ¡÷G øë°TG .1
¤EG äÉjQÉ£ÑdG øe óMGh ´ƒæd Ö°SÉæŸG øMÉ°ûdG …ODƒj ób .á©æ°üŸG
.iôNCG ájQÉ£H ™e ¬eGóîà°SG óæY ≥jôM ´ƒbh ôWÉfl
Page 23

œîu‰ «∞LU¡ ≈∞v ≥cÁ «_§Ne… ¥d≠l ±s ±ªU©d «∞Bb±W
ìÉàØe Ωóîà°SG ,áÑWôdG AGƒLC’G ‘ »FÉHô¡µdG RÉ¡÷G 𫨰ûJ ÖæŒ Qò©J GPEG h
¢Vô©àdG ô£N øe π∏≤j ìÉàØŸG ∂dP ΩGóîà°SG ¿EG PEG ,∞∏îàŸG QÉ«àdG øe ájÉbƒ∏d
.á«FÉHô¡µdG äÉeó°ü∏d
πÑb RÉ¡÷G ≥∏Z øe ócCÉàdÉH ∂dPh »FÉHô¡µdG RÉ¡é∏d ÅLÉØŸG 𫨰ûàdG QòMG ê
…ODƒj .¬∏ªM hCG ¬©aQ πÑbh ,ájQÉ£ÑdG áeõM hCG/h »FÉHô¡µdG QÉ«àdÉH ¬∏«°UƒJ
π«°UƒJ hCG »FÉHô¡µdG RÉ¡÷G πªM AÉæKCG 𫨰ûàdG ìÉàØe ≈∏Y ∂©Ñ°UEG ™°Vh
.çOGƒ◊G ´ƒbh ¤EG 𫨰ûàdG ó«b ¿ƒµj ÉeóæY á«FÉHô¡µdG áµÑ°ûdÉH RÉ¡÷G
ARABIC
«∞∂Kq.
«∞JNd°OW.
§HQh ∂a äÉeGóîà°S’ ôµjO ófBG ∑ÓH øe »ZGÈdG ∂Øe / ÜÉ≤ãŸG RÉ¡L º«ª°üJ ”
ΩGóîà°S’ ¢ü°üfl RÉ¡÷G Gòg .∂«à°SÓÑdGh ¿OÉ©ŸGh Ö°ûÿG ‘ Ö≤ã∏dh »ZGÈdG
œ ô ¢ºw¡ «ß∑ªb«Â «∞ºKp. ô ¢∫Lq «∞πNU“ √Ë ¢πdÁ ±s
«∞ºKp , Ëô ¢πc» «∞ºKp ∞∑MeŸ «∞LI∂f ±s ±ªdÃ
«∞JNd°U¡. √°o «∞ºKp °FOb« ´s «∞∫d«¸… Ë«∞e¥u‹ Ë«∞∫u«·
«∞∫Uœ…. ¢Kn «∞ºKp √Ë ¢AU°Jt ¥e¥b ±s ±ªU©d «∞Bb±W «∞JNd°OW.
Á ´Mb «ß∑ªb«Â «∞πNU“ «∞FU±q °U∞DUÆW îU¸Ã «∞LMe‰,
ΩóY …ODƒj ób PEG ,áeÓ°ùdG äGOÉ°TQEGh äGôjò– áaÉc IAGôb Öéj !ôjò–
«ß∑ªb ßKp ≈©U∞W ±MUßV ∞öß∑ªb«Â îU¸Ã «∞LMe‰.
¢Vô©àdG ô£N ¤EG √ÉfOCG áæ«ÑŸG äɪ«∏©àdGh äGOÉ°TQE’ÉH ΩGõàd’G
ßKp «ù©U∞W «∞LMUßV ∞öß∑ªb«Â îU¸Ã «∞LMe‰ ¥∫b ±s ±ªU©d
«∞Bb±W «∞JNd°OW.
™«ªL ¤EG √ÉfOCG áæ«ÑŸG äGOÉ°TQE’G ‘ OQh ɪã«M "»FÉHô¡c RÉ¡L" í∏£°üe Ò°ûj
.(᫵∏°SÓdG) ájQÉ£ÑdÉH hCG (᫵∏°ùdG) AÉHô¡µdÉH πª©J »àdG á«FÉHô¡µdG Iõ¡LC’G
á«FÉHô¡µdG Iõ¡LC’G ΩGóîà°SG óæY áeÉ©dG áeÓ°ùdG äGôjò–
.IÒ£N äÉHÉ°UEG hCG/h á«FÉHô¡c äÉeó°üd
.kÓÑ≤à°ùe É¡«dEG ´ƒLô∏d áeÓ°ùdG äGOÉ°TQEGh äGôjò– ™«ªéH ßØàMG
3 «∞ºö±W «∞AªBOW
√ ¥πV √Ê ¢JuÊ ¥IEU ˱M∑∂NU ∞LU ¢HFKt Ë¥πV √Ê ¢∫ºs
¢LOOe «_±u¸ √£MU¡ «ß∑ªb«Â «_§Ne… «∞∑w ¢FLq °U∞DUÆW.
ô ¢º∑ªb ≥cÁ «_§Ne… Ë√≤X ±∑FV √Ë ¢∫X ¢Q£Od
«∞Lªb¸«‹ √Ë «∞J∫u‰ √Ë «∞FIUÆOd «∞D∂OW. ∞∫EW ±s ´bÂ
«ô≤∑∂UÁ √£MU¡ «ß∑ªb«Â §NU“ ØNd°w Æb ¢RœÍ ≈∞v ≈ÅU°U‹ îDOd….
» «ß∑ªb ±Fb«‹ «_±UÊ. «¸¢b Ë«ÆOU ∞KFOMOs œ«zLU. «ß∑ªb«Â
±Fb«‹ «_±UÊ ±∏q «∞IMUŸ «∞LCUœ ∞KG∂U¸, Ë•c«¡ «_±UÊ «∞LU≤l
∞K∑e•Ko, Ë«∞ªu–…, ˨DU¡ «_–Ê ¥∫b ±s ±ªU©d •bËÀ «ùÅU°U‹.
ΩGóîà°S’G øe ¢Vô¨dG
áeÓ°ùdG äGOÉ°TQEG
.§≤a Úµ∏¡à°ùŸG
1 •Oe «∞FLq
√ ¥πV √Ê ¥JuÊ •Oe «∞FLq ≤EOHU ˧Ob «ù{U¡…. «∞FLq ≠w
«_±UØs «∞Hu{u¥W Ë«∞LEKLW Æb ¥∑º∂V ≠w •u«œÀ.
» ô ¢º∑ªb «_§Ne… «∞∑w ¢FLq °U∞JNd°U¡ ≠w √§u«¡ ÆU°KW
∞ö®∑FU‰, ´Kv ß∂Oq «∞L∏U‰ ≠w ˧uœ ßu«zq √Ë ¨U“«‹
ßd¥FW «ô®∑FU‰ √Ë ¨∂U¸, _Ê «_§Ne… «∞∑w ¢FLq °U∞DUÆW
¢Bb¸ ®d«¸«‹ Æb ¢RœÍ ≈∞v ≈®FU‰ «_°ªd… √Ë «∞G∂U¸.
à «©KV ±s «_©HU‰ √Ë ±s ¥IHuÊ •u∞p «ô°∑FUœ √£MU¡
¢AGOq «ü∞W. ¢A∑X «ô≤∑∂UÁ Æb ¥RœÍ ≈∞v ≠Ib «∞∑∫Jr ≠w «ü∞W.
2 «∞ºö±W {b √îDU¸ «∞JNd°U¡
œ «≤eŸ √Í ±Hp √Ë ±H∑UÕ °d«¨w Æ∂q °b¡ ¢AGOq «∞πNU“
«∞cÍ ¥FLq °U∞DUÆW. ˧uœ ±H∑UÕ °d«¨w ≠w «∞πe¡ «∞bË«¸ ±s
«∞πNU“ ´Mb «∞∑AGOq Æb ¥∑º∂V ≠w ≈ÅU°U‹ ®ªBOW.
Á ô ¢Lb ÆU±∑p ∞∑Bq ≈∞v √±UØs √°Fb. √°o Æb±Op £U°∑∑Os
˧ºLp ±∑u«“≤U ≠w Øq «_ËÆU‹, ≥c« ¥e¥b ±s Æb¸¢p ´Kv
«∞∑∫Jr ≠w «∞πNU“ «∞cÍ ¥FLq °U∞DUÆW ´Mb •bËÀ ±uÆn ¨Od
±∑uÆl.
Ë «¸¢b ±ö°f ±MUß∂W. ô ¢K∂f ±ö°f Ë«ßFW √Ë ±πu≥d«‹.
«°o ®Fd„ ˱ö°ºp ËÆHU“«¢p °FOb… ´s «_§e«¡
«∞L∑∫dØW. «∞Lö°f «∞u«ßFW Ë«∞Lπu≥d«‹ Ë«∞AFd «∞Du¥q Æb
¢FKo ≠w «_§e«¡ «∞L∑∫dØW.
√ ¥πV √Ê ¥JuÊ •πr «∞LI∂f ±MUß∂U ∞∫πr ±ªdÃ
«∞JNd°U¡. ô ¢πdÍ √Í ¢Fb¥ö‹ ±s √Í ≤uŸ ´Kv «∞LI∂f.
ô ¢º∑ªb ËÅKW ±IU°f ±l «_§Ne… «∞∑w ¢FLq
°U∞DUÆW «∞L∑BKW °U_¸{w. ´b ¢Fb¥q «∞LIU°f Ë«ß∑ªb«Â
±ªdà ØNd°U¡ ±MUßV ¥∫b ±s ±ªU©d «∞Bb±U‹ «∞JNd°OW.
» ¢πMV √Ê ¥JuÊ §ºLp ±ö±ºU _Í ßD` ±∑Bq
°U_¸÷ ±∏q «∞Lu«ßOd Ë«∞LAFUŸ, Ë«∞LuÆb, Ë«∞∏ö§W. ¢eœ«œ
±ªU©d «∞Bb±W «∞JNd°UzOW ≈–« ØMX ±∑Bö °U_¸÷.
à ô ¢Fd÷ «_§Ne… «∞∑w ¢FLq °U∞DUÆW ≈∞v «∞LDd √Ë
23
Page 24

ARABIC
24
Page 25

ARABIC
21 3
4
5 6 7 8 9
10
A
B
25
Page 26

N a m e s & A dd re ss es f or B la ck & D ec ke r S er vi ce C on ce ss io na r i e s
ALGERIA: Sarl Outillage Corporation, 08 Rue Med Boudiaf - Cheraga - Algiers, Algeria. Tel: (213-21) 375130, Fax: (213-21) 369667. AZERBAIJAN:
Royalton Holdings Ltd. 41 Khagani St. Apt. 47 AZ 1001, Baku. Tel: (994-12) 4935544, Fax: (994-12) 5980378. BAHRAIN: Alfouz Services Co. WLL.,
P.O. Box 26562, Tubli, Manama. Tel: (973) 17783562, Fax: (973) 17783479. EGYPT: El-Farab S.A.E 15 - Nabil El Wakkad Street, Dokki, Giza. Tel:
(202) 37603946, Fax: 33352796. ETHIOPIA: Seif Tewfik Sherif, Arada Sub-City, Kebele 01/02, Global Insurance Building, 2nd Floor, Room 43,
P.O. Box 2525, Addis Ababa, Ethiopia. Tel: (251-11) 1563968/ 1563969, Fax: (251-11) 1558009. IRAQ: Al Sard Co. for General Trading Ltd.
Jbara Bldg. 3Flr, Al Rasheed St. Bagdad. Tel: (964) 18184102. Sakhar Group, Arrassat al-hindya Al Masbah, Bagdad. (964) 7400144446. JORDAN:
Palestine Bldg. Matl. (Bashiti Hardware), 93 King Abdullah 2nd Street, Opp. ELBA House, P.O. Box 3005, Amman 11953, Tel: (962-6) 5349098, Fax:
(962-6) 5330731. KENYA: Dextron Tools Ltd., P.O. Box 20121-00200, Shariff House, Kimathi Street, Nairobi. Tel: (254-20) 6905000/ 2358021, Fax:
(254-20) 6905111/ 6905112. KUWAIT: Al Omar Technical Co., P.O. Box 4062, 13041 Safat, Kuwait. Tel: (965) 24848595/ 24840039, Fax:
(965) 24845652. Fawaz Al Zayani Establishment, P.O. Box 42426, Shop No. 18, Al Humaizi Commercial Complex, Khalifa Al Jassim, Shuwaikh, Kuwait.
Tel: (965) 24828710, Fax: (965) 24828716. LEBANON: Est. Shaya & Azar S.A.R.L., Boulvard, Jdeideh, Mar Takla-Bouchrieh, P.O. Box 90545,
Jdeideh, Beirut. Tel: (961-1) 872305/ 872306, Fax: (961-1) 872303. LIBYA: (Benghazi) Sniydel st., Amr Ibn EL-Aas Rd. Tel: (+218) 92 5771120.
(Tripoli) Al Barniq Service Center, Mokhazin elsukar st., ElFallah. Tel: (+218) 21 4808019. (Misrata) Al Hilal Service Center, Tawergha st. Tel:
(+218) 51 2626743. MAURITIUS: Robert le Marie Limited, Old Moka Road, Bell Village, P.O. Box 161, Port Louis. Tel: (230) 2121865/ 2122847, Fax:
(230) 2080843. MOROCCO: Ets. Louis Guillaud & Cie, 31, Rue Pierre Parent, Casablanca-21000. Tel: (+212) 522 305971, Fax: (+212) 522 444518.
NIGERIA: Meridian Power Tools Ltd., Gr. Floor, #1 Alhaji Masha Road, Next to Teslim Balogun Stadium, Near National Stadium, Surulere, Lagos. Tel:
(234-1) 7740431/ 7740410, Fax: (234-1) 7913798. OMAN: Al Jizzi Company LLC, P.O. Box 1704, P.C. 112 Ruwi, Oman. Tel: (968) 24832618/
24835153, Fax: (968) 24831334. Al Hassan Technical & Construction Supplies Co. LLC., P.O. Box 1948, P.C. 112, Ruwi, Oman. Tel: (968) 24810575/
24837054, Fax: (968) 24810287/ 248333080. Khimji Ramdas, P.O. Box 19, Post Code 100, Ghala, Muscat, Oman. Tel: (968) 24595906/ 907, Fax:
(968) 24852752. Oman Hardware Co. LLC., P.O. Box 635, Ruwi-112. Tel: (968) 24815131, Fax: (968) 24816491. Oman Marketing & Service Co.
(Omasco), P.O. Box 2734, Behind Honda Showroom, Wattayah, Oman. Tel: (968) 24560232/ 24560255, Fax: (968) 24560993. Oman Marketing &
Service Co. (Omasco), Al Ohi, Sohar, Oman. Tel: (968) 26846379, Fax: (968) 26846379. Oman Marketing & Service Co. (Omasco), Sanaya, Salalah,
Oman. Tel: (968) 23212290, Fax: (968) 23210936. PAKISTAN: Ammar Service & Spares, 60-Bank Arcade, Serai Road, Karachi, Pakistan. Tel:
(92-21) 32426905, Fax: (92-21) 32427214. ZIT Co., Nasir & Bros., 2nd Floor, Qadri Center, Chowk Dalgran, Railway Road, Lahore. Tel:
(92-42) 37670839, Fax: (92-42) 37652989. QATAR: Al Muftah Service Centre, Al Wakrah Road, P.O. Box 875, Doha, Qatar. Tel: (974) 4650880/
4650110/ 4446868, Fax: (974) 4441415/ 4662599. Shaheen Electrical Works & Trading Co. WLL., Gate 34, St.44 Industriala Area, P.O. Box 9756,
Doha. Tel: (974) 4600230/ 4600525, Fax: (974) 4601338. Teyseer Industrial Supplies & Services Co. WLL., 55, Al Wakalat St. (Between St. 18 & 19)
Salwa Industrial Area, P.O. Box 40523, Doha, Qatar. Tel: (974) 4581536, Fax: (974) 4682024. SAUDI ARABIA: (Al Bahr) Mohamed Ahmed Bin Afif
Est., P.O. Box 530, Yanbu, Al Bahr. Tel: (966-4) 3222626/ 3228867, Fax: (966-4) 3222210. (Al Khobar) Fawaz Ebrahim Al Zayani Trading Est.,
P.O. Box 76026, Al Khobar # 31952, Tel: (966-3) 8140914, Fax: (966-3) 8140824. MSS (Al-Mojil Supply & Services) P.O. Box 450, Jubail 31951,
Opp. Gulf Bridge Library & Riyadh House. Tel: (966-3) 3612850/ 3624487/ 3621729, Fax: (966-3) 3623589/ 3620783. (Dammam) Al Bawardi Tools &
Hardware, P.O. Box 112, Dammam 31411. Tel: (966-3) 8330780/ 8348585 ext. 24, Fax: (966-3) 8336303. (Jeddah) Al Bawardi Tools & Hardware,
P.O. Box 16905, Jeddah-21474. Tel: (966-2) 6444547, Fax: (966-2) 6439024. EAC (Al Yousef Contg. & Trdg. Est.), P.O. Box 30377, Jeddah -21477, Tel:
(966-2) 6519912, Fax: (966-2) 6511153. (Madina) Garziz Trading for Bldg Mat & Decoration, P.O. Box 3364, Madina. Tel: (966-4) 8261490/ 8227636,
Fax: (966-4) 8265741. (Riyadh) Al Bawardi Tools & Hardware, P.O. Box 68, Riyadh 11411. Tel: (966-1) 4484999, Fax: (966-1) 4487877.
Industrial Material Organization (IMO), P.O. Box 623, Rail Street, Riyadh. Tel: (966-1) 4028010, Fax: (966-1) 4037970. Sulatn Garment factory (RSC),
P.O. Box 29912, Riyadh 11467. Tel: (966-1) 4055148/ 4042889, Fax: (966) 4055148. SOUTH AFRICA: Trevco Power Tool Service 14 Steenbok Street,
Koedoespoort, 0186, Pretoria, South Africa. Tel: (27-86) 1873826, Fax: (27-86) 5001771. TANZANIA: General Motors investment Ltd., P.O. Box 16541,
14 Nyerere Road, Vingunguti, Dar-es-Salaam. Tel: (255 22) 2862661/ 2865022, Fax: (255 22) 2862667. TUNISIA: Societe Tunisienne De Maintenance
(STM), Rue de la Physique. Nouvelle Zone Industrielle Ben Arous., 2013 Ben Arous, Tunisia. Tel: (+216) 71 389687, Fax: (+216) 71 385154. UAE:
(Abu Dhabi) Light House Electrical, P.O. Box 120, Abu Dhabi, Tel: (971-2) 6726131, Fax: (971-2) 6720667. (Ajman) Al Sukoon Gen. Trdg. Co. LLC,
P.O. Box 2975, Ajman. Tel: (971-6) 7435725/ 7438317, Fax: (971-6) 7437350. (Al Ain) Zillion Equipment and Spare Parts Trading LLC, P.O. Box 19740,
Opp. Bin Sadal/ Trimix Redymix Sanaiya, Al Ain. Tel: (971-3) 7216690, Fax: (971-3) 7216103. (Dubai) Alebrah Engineering Service, P.O. Box 78954,
Al Qusais, Dubai. Tel: (971-4) 2850044, Fax: (971-4) 2844802. Black & Decker (Overseas) GmbH, P.O. Box 5420, Dubai, Tel: (971-4) 8127400/
8127406, Fax: (971-4)2822765. Ideal Star Workshop Eqpt. trading LLC, P.O. Box 37110, Al Quoz, Dubai. Tel: (971-4) 3474160, Fax: (971-4) 3474157.
(Musaffah) Light House Electrical, P.O. Box 120, Abu Dhabi, Tel: (971-2) 5548315, Fax: (971-2) 5540461. (Sharjah) Mc Coy Middle East LLC,
P.O. Box 25793, Sharjah, Tel: (971-6) 5395931, Fax: (971-6) 5395932. Burj Al Madeena, Industrial Area No.1, Opp. Pakistani Masjid, P.O. Box 37635,
Sharjah. Tel: (971-6) 5337747, Fax: (971-6) 5337719. (Ras Al Khaimah) Mc Coy Middle East LLC, P.O. Box 10584, Ras Al Khaimah, Tel:
(971-7) 2277095, Fax: (971-7) 2277096. UGANDA: The Building Center (U) Ltd., 52 Station Road, Kitgum House, P.O. Box 7436, Kampala, Uganda.
Tel: (256-41) 4234567/ 4259754, Fax: (256-41) 4236413. YEMEN: (Aden) Middle East Trad. Co. Ltd. (METCO), Mualla Dakka, Aden, Yemen. Tel:
(967-2) 222670, Fax: (967-2) 222670. (Sana'a) Middle East Trad. Co. Ltd. (METCO), Hayel St., Sana'a, Yemen. Tel: (967-1) 204201, Fax:
(967-1) 204204. (Taiz) Middle East Trading Co. (METCO), P.O. Box 12363, 5th Flr, Hayel Saeed Anam Bldg, Al-Mugamma St. Taiz, Yemen. Tel:
(967-4) 213455, Fax: (967-4) 219869.
Page 27

Page 28

WARRANTY REGISTRATION CARD
YOUR NAME/
YOUR ADDRESS
POSTCODE
«ùßr
«∞FMu«Ê
«∞d±e «∞∂d¥bÍ
DATE OF PURCHASE
DEALER'S NAME & ADDRESS/
¢U¸¥a «∞Ad«¡
≈ßr Ë ´Mu«Ê «∞∂Uzl
PRO
DUCT MODEL NO.KC4815
 Loading...