

Page 1
AR PT FR EN
www.blackanddecker.ae
AF300
AF400
Page 2

4
ENGLISH
(Original instructions)
5 6
7
8
3
2
1
2
Page 3
(Original instructions)
ENGLISH
9
2
3
A B
1
3
C
3
Page 4

ENGLISH
(Original instructions)
Intended use
Your BLACK+DECKER AF300/AF400 Air Fryer has been
designed for preparing food using hot air.
This appliance is intended for indoor household use only.
This appliance is not intended to be used in:
• Staff kitchen areas in shops, offices and other working
environments;
• Farm houses;
• By clients in hotels, motels and other residential type
environments;
• Bed and breakfast type environments;
Thank you for choosing BLACK+DECKER. We hope that
you will enjoy using this product for many years.
Safety instructions
• Warning! When using mains- powered appliances, basic
safety precautions, including the following, should
always be followed to reduce the risk of fire, electric
shock and personal injury.
• Read all of this manual carefully before using the
appliance.
• In order to avoid a hazard due to inadvertent resetting of
the thermal cut-out, this appliance must not be supplied
through an external switching device, such as a timer, or
connected to a circuit that is regularly switched on and
off by the utility.
• The intended use is described in this manual. The use of
any accessory or attachment or the performance of any
operation with this appliance other than those
recommended in this instruction manual may present a
risk of personal injury.
• Retain this manual for future reference.
Using your appliance
• Always take care when using the appliance.
• Do not use outdoors.
• Do not operate the appliance if your hands are wet. Do
not operate the appliance if you are barefoot.
• Guide the power supply cord neatly so it does not hang
over the edge of a worktop and cannot be caught
accidentally or tripped over.
• Never pull the power supply cord to disconnect the plug
from the socket. Keep the power supply cord away from
heat, oil and sharp edges.
• If the supply cord is damaged, it must be replaced by the
manufacturer, its service agent or similarly qualified
persons in order to avoid a hazard.
• Disconnect the appliance from the power supply when
not in use and before cleaning.
• Do not fill the appliance above the maximum level.
• Overfilling the appliance could cause a hazard.
• Overfilling the appliance could cause water to spill.
Safety of others
• This appliance is not intended for use by persons
(including children) with reduced physical, sensory or
mental capabilities, or lack of experience and knowledge,
unless they have been given supervision or instruction
concerning use of the appliance by a person responsible
for their safety.
• Children should be supervised to ensure that they do not
play with the appliance.
After use
• Switch off, remove the plug from the socket and let the
appliance cool down before leaving it unattended and
before changing, cleaning or inspecting any parts of the
appliance.
• When not in use, the appliance should be stored in a dry
place. Children should not have access to stored
appliances.
Inspection and repairs
• Before use, check the appliance for damaged or
defective parts. Check for breakage of parts, damage to
switches and any other conditions that may affect its
operation.
• Do not use the appliance if any part is damaged or
defective.
• Have any damaged or defective parts repaired or
replaced by an authorised repair agent.
• Before use, check the power supply cord for signs of
damage, ageing and wear.
• Do not use the appliance if the power supply cord or
mains plug is damaged or defective.
• If the power supply cord or mains plug is damaged or u
Never attempt to remove or replace any parts other than
those specified in this manual.
Additional safety instructions for fryers
Warning! Do not place near a hot Gas or electric oven.
• Use the original components only.
Caution: Ensure that the appliance is switched off before
performing any maintenance or cleaning.
• Do not immerse the appliance, base, cord or plug in any
liquid.
• If an extension lead is used, it must be earthed.
• Ensure the door is correctly closed before use.
Caution: Hot air and steam may escape from the vents
during use.
Caution: Care must be taken when opening the door as hot
steam may escape.
4
Page 5
(Original instructions)
ENGLISH
• Use oven gloves when handling hot accessories.
• Only cook with the accessories provided.
• Always use the drip tray to protect the cavity base.
• Leave adequate space around the appliance for
ventilation.
• Disconnect the appliance from the electrical supply
before cleaning or carrying out any maintenance.
• Keep children and animals away from the appliance and
cord set.
• Close supervision is required when using the appliance
near children.
• This appliance is not intended to be operated by means
of an external timer or a separate remote control
system.
Note: The outer surface of the appliance may become hot in
use.
Electrical safety
Before use, check that the mains voltage corresponds to the
voltage on the rating plate.
This product must be earthed. Always
check that the mains voltage corresponds
to the voltage on the rating plate
• Appliance plugs must match the outlet. Never modify the
plug in any way.
• Do not use any adapter plugs with earthed (Class 1)
appliances. Unmodified plugs and matching outlets will
reduce the risk of electric shock.
• To avoid the risk of electric shock, do not immerse the
cord, plug or appliance in water or other liquid.
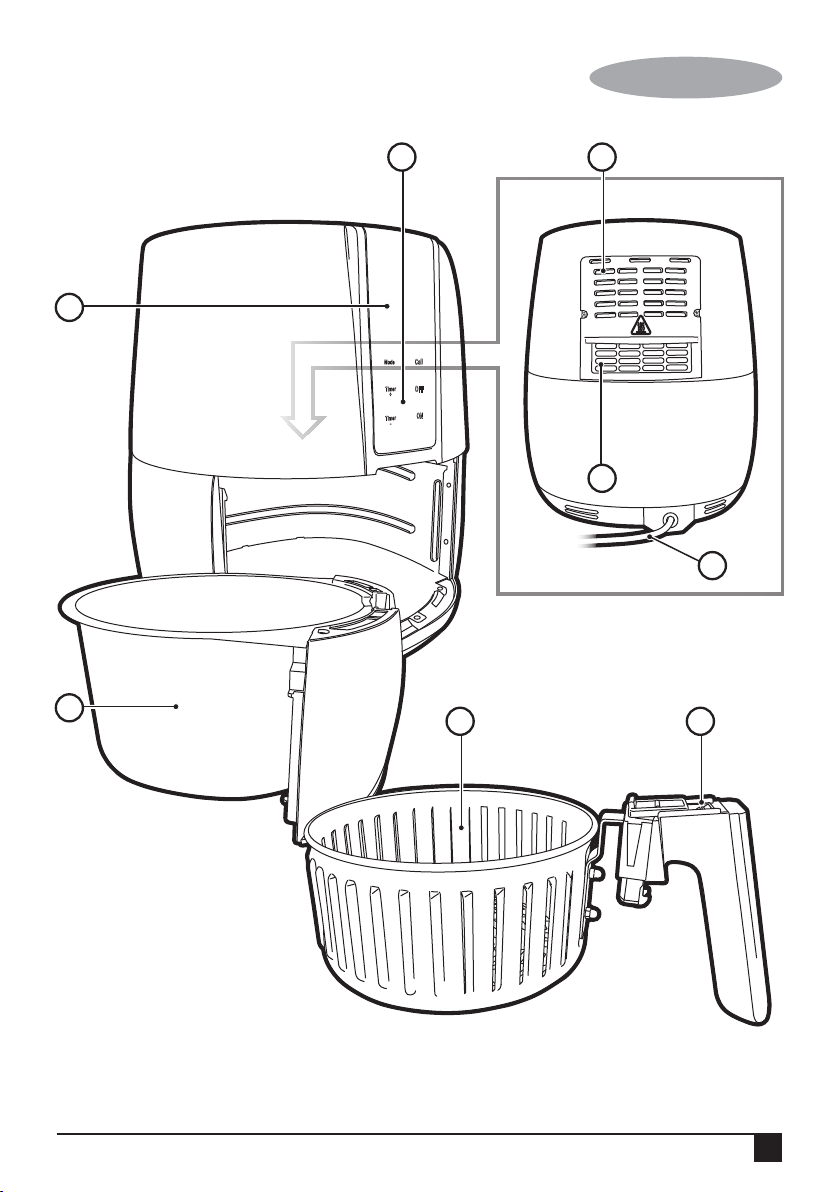
4. LED display (Only for AF400)
5. Control panel
6. Air inlet
7. Air outlet
8. mains cord
9. Basket release button cover
Use
Note: Before using for the first time, hand wash all the
removable parts.
• Initially, the element may smoke a little. This may smell a
bit, but it's nothing to worry about. Ensure the room is
well ventilated.
• Add oil to the food as a coating only.
Warning! Never pour oil into the basket (7).
• Sit the appliance on a stable, level, heat resistant
surface.
Note: the basket MUST be put into the appliance properly,
otherwise the appliance doesn’t work!
• Plug the mains cord and plug into the earthed wall
socket.
Warning! Do not fill the pan with oil or any other liquid.
Warning! Do not put anything on top of the appliance.
Warning! Do not put anything on the air-inlet on the rear of
the appliance, this disrupts the airflow and affects the cooking
result.
Using the appliance
The air fryer can prepare a large range of ingredients. Refer
to the section “settings” table.
Extension cables & class 1 product
• A 3 core cable must be used as your tool is earthed and
of class 1 construction.
• Up to 30m (100 ft) can be used without loss of power.
• If the supply cord is damaged, it must be replaced by the
manufacturer or an authorised BLACK+DECKER
Service Centre in order to avoid a hazard.
Labels onAppliance
The following pictograms along with the date code are
shown on the tool:
Warning! Hot surface.
Features
1. Basket
2. Basket release button
3. Pan
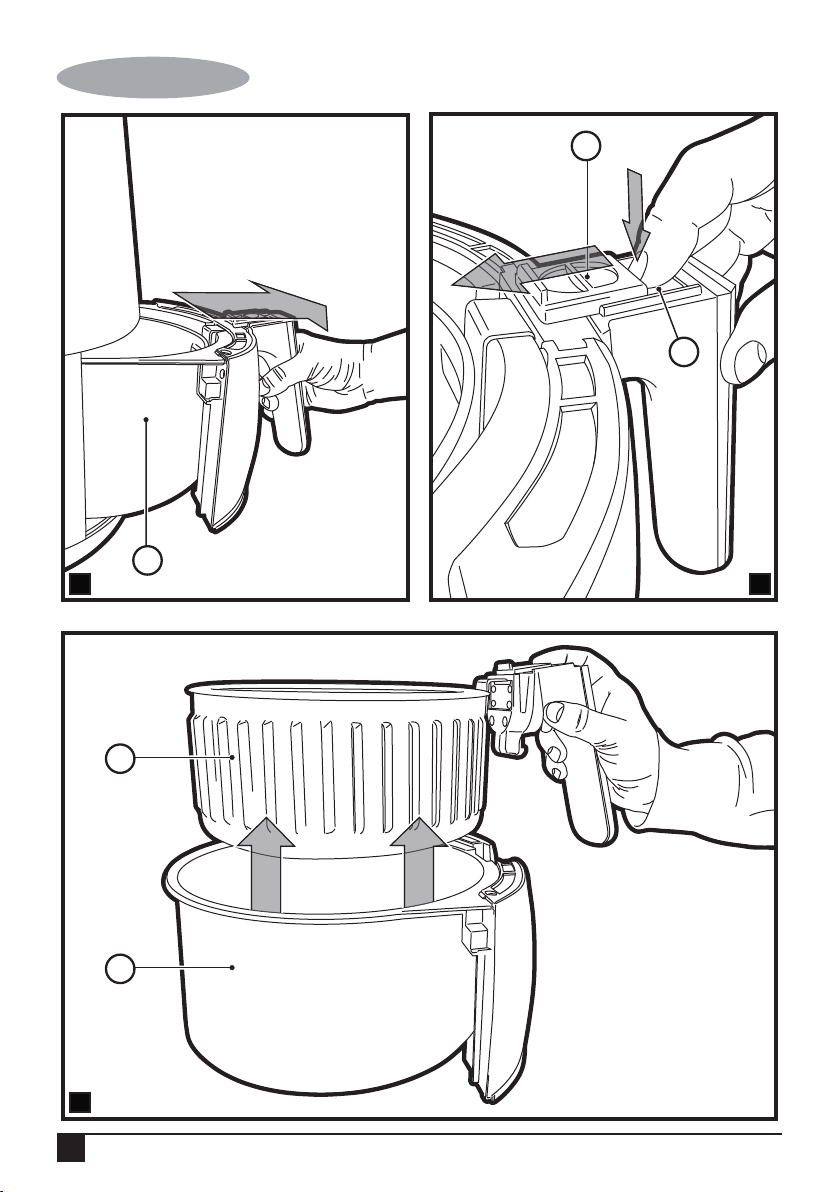
Hot air frying
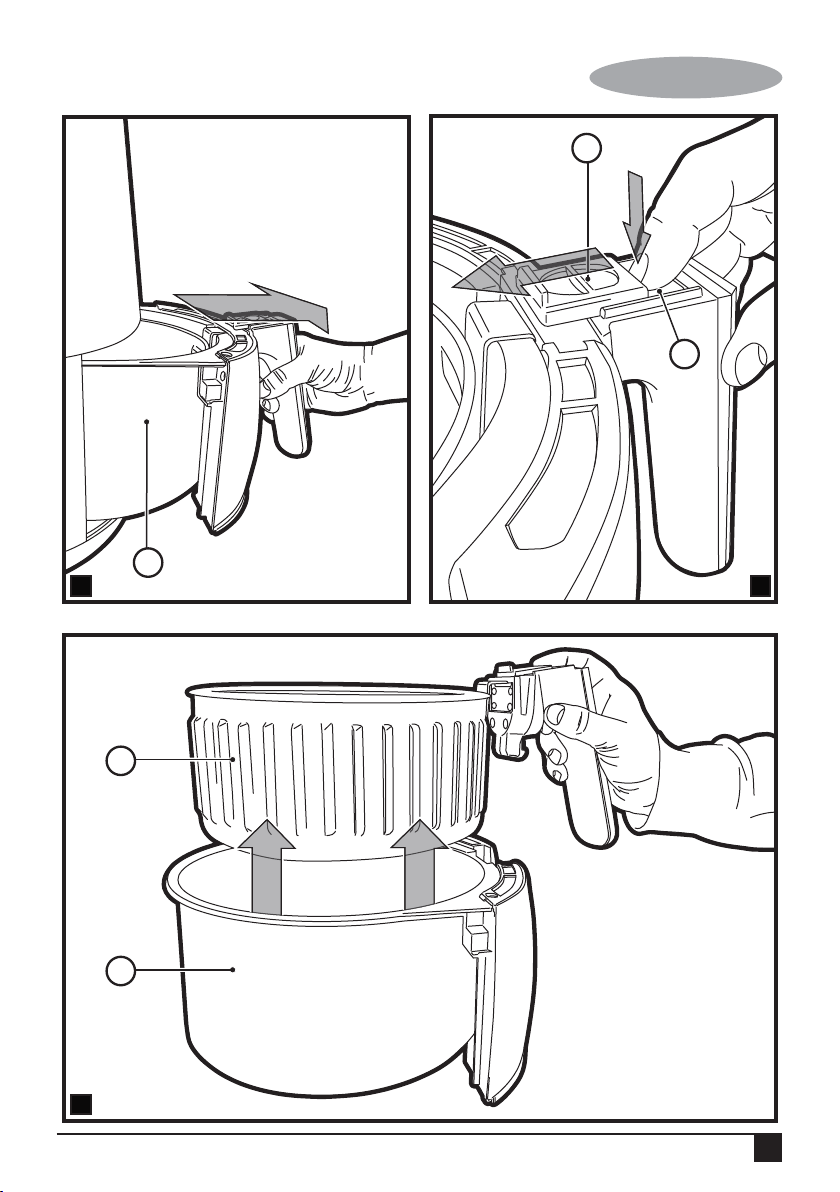
• Put the mains plug into an earthed wall socket.
• Carefully pull the pan (3) out of the air fryer (fig.A).
• Push the basket release button cover (9) forward and
depress the basket release cover (2) (fig.B).
• Lift the basket (1) from the pan (3) (fig.C)
• Put the ingredients in the basket (1).
Note: Never overfill the basket or exceed the recommended
amount ( see section ‘Settings’).
• Slide the pan back into the air fryer properly.
Note: Never use the pan without the basket in it. If the pan is
not fixed into the air fryer properly, the appliance won’t work.
Caution: Do not touch the pan during and for some time after
use, as it gets very hot. Only hold the pan by the handle.
• For AF300,to switch ON the unit, turn the timer knob and
to set the desired cooking temperature, use temperature
control knob.
• For AF400,Touch the MODE button to the required
temperature. See the section’ Settings’ to determine the
right temperature.
5
Page 6

ENGLISH
(Original instructions)
• Determine the required preparation time for the
ingredient see section ‘Settings.’ Adjust the timer setting
by using TIMER+ or TIMER- button.
• To switch on the appliance, touch the ON button, to
switch off the appliance, touch the OFF button or touch
the TIMER- to adjust the time to 00.
• The LED light will light up.
• The timer will begin to start counting down the set
preparation time.
• During the cooking process, the heating-up mode will
light on and off from time to time. This indicates that the
heating element is switching on and off to maintain the
selected temperature.
• Excess oil from the ingredients will be collected on the
bottom of the pan (3).
• Some ingredients require shaking halfway through the
preparation time see section ’Settings’. To shake the
ingredients, pull the pan out of the appliance by the
handle and shake it. Then slide the pan back into the air
fryer and continue to cook.
Caution: Do not press the basket release button on the
handle during shaking.
Tip: To reduce the weight, you can remove the basket (1)
from the pan (3) and shake the basket only. To do so, pull
the pan out of the appliance, place it on a heat-resistant
surface and press the basket release button on the handle.
Tip: If you set the timer to half the preparation time, you will
hear the timer bell when it is time to shake the ingredients.
However, this means that you have to set the timer again to
the remaining preparation time after shaking.
Tip: If you set the timer to full preparation time, there will be
no timer bell during cooking. Before finishing, you can pull
out the pan at any time to check the ingredients cooking
condition, the power will shut down automatically and
resume after you slide the pan back into the appliance(timer
still on).
• When you hear the timer bell, the set preparation time
has elapsed. Pull the pan out of the appliance and place
it on a heat-resistant surface.
Note: You can also switch off the appliance manually. To do
this, touch the OFF button (for AF400), or touch the TIMERbutton to 0, or pull out the pan directly.
• Check if the ingredients are ready. If the ingredients are
not ready yet, simply slide the pan back into the
appliance and set the timer to a few extra minutes.
• To remove small ingredients (e.g. fries), press the
basket release button and lift the basket out of the pan.
Warning! Do not turn the basket upside down with the pan
still attached to it, as any excess oil that has collected on the
bottom of the pan will leak onto the ingredients.
Warning! After hot air frying, the pan and the ingredients are
hot. Depending on the type of the ingredients in the air fryer,
steam may escape from the pan.
• Empty the basket into a bowl or onto a plate.
Tip: To remove large or fragile ingredients, use a pair of
tongs to lift the ingredients out of the basket.
• When a batch of ingredients is ready, the air fryer is
instantly ready for preparing another batch.
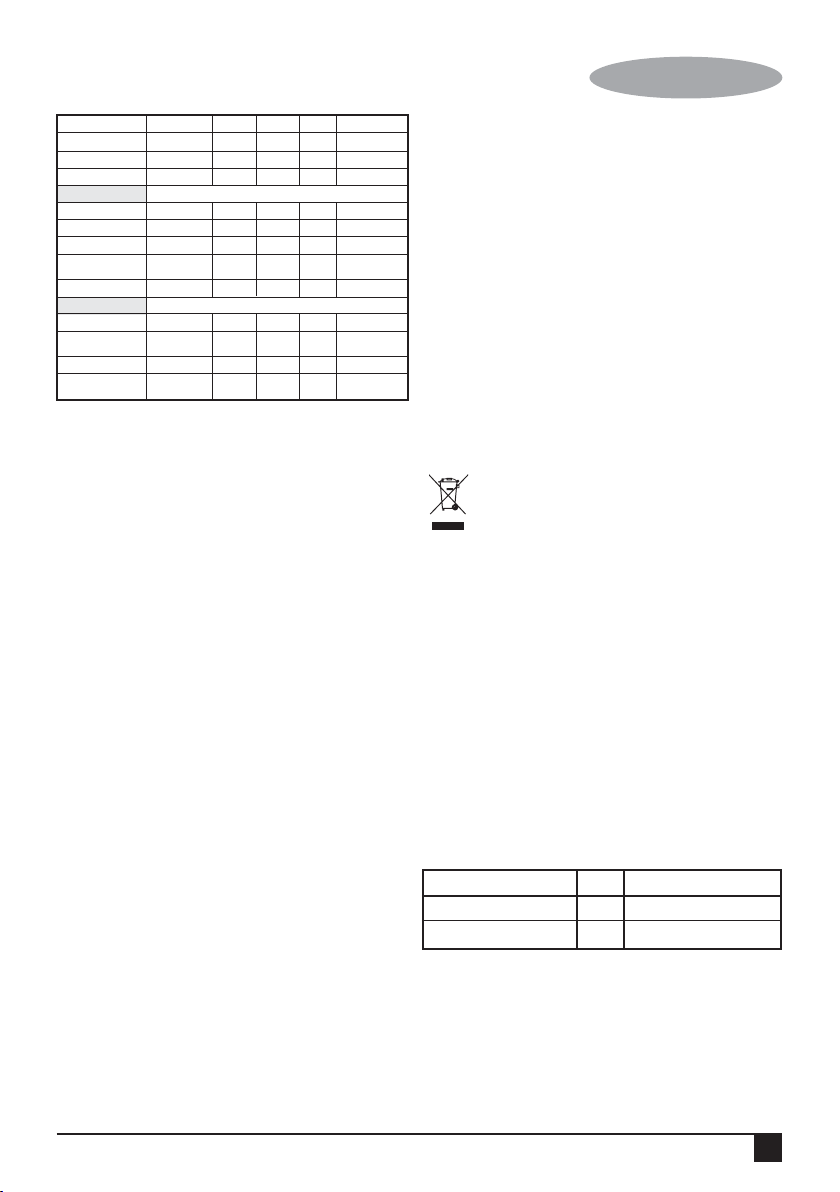
Settings
The table below helps you to select the basic settings for the
ingredients you want to prepare.
Note: Keep in mind that these settings are indications. As
ingredients differ in origin, size, shape as well as brand, we
cannot guarantee the best setting for your ingredients.
Note: Because the rapid hot air technology instantly reheats
the air inside the appliance, pulling the pan briefly out of the
appliance during hot air frying barely disturbs the process.
Tips
• A larger amount of ingredients only requires a slightly
longer preparation time, a smaller amount of ingredients
only requires a slightly shorter preparation time.
• Shaking smaller ingredients halfway through the
preparation time optimizes the end result and can help
prevent unevenly fried ingredients.
• Add some oil to fresh potatoes for a crispy result. Fry
your ingredients in the air fryer within a few minutes of
adding the oil for best results.
• Do not prepare extremely greasy ingredients such as
sausages in the air fryer.
• Snacks that can be prepared in a oven can also be
prepared in the air fryer.
• The optimal amount for preparing crispy fries is 500
grams.
• Use pre-made dough to prepare filled snacks quickly and
easily. Pre-made dough also requires a shorter
preparation time than home-made dough.
• Place a baking tin or oven dish in the air fryer basket if
you want to bake a cake or quiche or if you want to fry
fragile ingredients or filled ingredients.
• You can also use the air fryer to reheat ingredients. To
reheat ingredients, set the temperature to 150°C for up to
10 minutes.
Min-max
Potatoes & fries
Thin frozen fries 300-700 9-16 200 shake
Thick frozen fries 300-700 11.20 200 shake
Home-made fries (8×8mm) 300-800 16-10 200 shake Add 1/2 tbsp of oil
Home-made potato wedges 300-800 18-22 180 shake Add 1/2 tbsp of oil
Home-made potato cubes 300-750 12-18 180 shake Add 1/2 tbsp of oil
Rosti 250 15-18 180 shake
Potato gratin 500 15-18 200 shake
Meat & Poultry
Steak 100-500 8-12 180
Lamb chops 100-500 10-14 180
amount (g)
Time
(min.)
Temp (
o
C) Shake Extra information
6
Page 7
(Original instructions)
ENGLISH
Hamburger 100-500 7-14 180
Sausage roll 100-500 13-15 200
Drumsticks 100-500 18-22 180
Chicken breast 100-500 10-15 180
Snacks
Spring rolls 100-400 8-10 200 shake use oven-ready
Frozen chicken nuggets 100-500 6-10 200 shake use oven-ready
Frozen fish fingers 100-400 6-10 200 use oven-ready
Frozen breadcrumbed
cheese snacks
Stuffed vegetables 100-400 10 160
Baking
Cake 300 20-25 160 use baking tin
Quiche
Muffins
Sweet snacks 400 20 160
100-400 8-10 180 use oven-ready
400 20-22 180
300 15-18 200 use baking tin
use baking tin/
oven dish
use baking tin/
oven dish
Note: Add 3 minutes to the preparation time when you start
frying while the air fryer is still cold.
Making home-made fries
To make home-made fries, follow the steps below:
• Peel the potatoes and cut them into sticks.
• Wash the potato sticks thoroughly and dry them with
kitchen paper.
• Pour 1/2 tablespoon of olive oil in a bowl, put the sticks
on top and mix until the sticks are coated with oil.
• Remove the sticks from the bowl with your fingers or a
kitchen utensil so that excess oil stays behind in the
bowl. Put the sticks in the basket.
Note: Do not tilt the bowl to put all the sticks in the basket in
one go, to prevent excess oil from ending up on the bottom
of the pan.
• Fry the potato sticks according to the instructions in this
chapter.
Cleaning and maintenance
Warning! Before cleaning and maintenance, switch the
appliance off and remove the plug from the socket.
Warning! Allow the unit to thoroughly cool down before
attempting to clean it.
• Do not immerse the appliance into liquid.
• Never use dilutent or benzene, chemical wiping cloths,
plastic brush or metal brush.
• The basketand pan can be washed in hot soapy water.
Rinse & dry thoroughly after cleaning.
• Use a damp cloth to wipe the outside of the body (1) and
the internal cavity.
• Keep the power cord, control panel clean and dry,
otherwise it may cause problems.
Caution: NEVER immerse the appliance in water or any
liquids. Make sure the appliance is thoroughly dried before
use.
Mains plug replacement
If a new mains plug needs to be fitted:
• Safely dispose of the old plug.
• Connect the brown lead to the live terminal in the new
plug.
• Connect the blue lead to the neutral terminal.
• If the product is class I (earthed), connect the
green/yellow lead to the earth terminal
Note! If your product is class II double insulated (only 2 wires
in the cord set), no connection is to be made to the earth
terminal. Follow the fitting instructions supplied with good
quality plugs.
Any replacement fuse must be of the same rating as the
original fuse supplied with the product.
Warning! The above section on mains plug replacement is
for authorized service centre persons.
Protecting the environment
Separate collection. This product must not be
disposed of with normal household waste.
Should you find one day that your Black+Decker product
needs replacement, or if it is of no further use to you, do not
dispose of it with other household waste. Make this product
available for separate collection.
• Black+Decker provides a facility for recycling
Black+Decker products once they have reached the end
of their working life. This service is provided free of
charge. To take advantage of this service please return
your product to any authorised repair agent who will
collect them on our behalf.
• You can check the location of your nearest authorised
repair agent by contacting your local Black+Decker
office at the address indicated in this manual.
Alternatively, a list of authorized Black+Decker repair
agents and full details of our after-sales service and
contact are available on the Internet at:
www.2helpU.com.
Technical data
AF300 / AF400
Input voltage VAC 220 - 240
Power input W 1500
Warranty
Black+Decker is confident of the quality of its products and
offers an outstanding warranty.
This warranty statement is in addition to and in no way
prejudices your statutory rights.
The warranty is valid within the territories of the Member
States of the European Union and the European Free Trade
Area.
7
Page 8

ENGLISH
If a Black+Decker product becomes defective due to faulty
materials, workmanship or lack of conformity, within 24
months from the date of purchase, Black+Decker warranty
to replace defective parts, repair products subjected to fair
wear and tear or replace such products to ensure minimum
inconvenience to the customer unless:
The product has been used for trade, professional or
hire purposes;
The product has been subjected to misuse or neglect;
The product has sustained damage through foreign
objects, substances or accidents;
Repairs have been attempted by persons other than
authorised repair agents or Black+Decker service staff.
To claim on the warranty, you will need to submit proof of
purchase to the seller or an authorised repair agent. You can
check the location of your nearest authorised repair agent by
contacting your local Black+Decker office at the address
indicated in this manual.
Alternatively, a list of authorised Black+Decker repair
agents and full details of our after-sales service and contacts
are available on the Internet at: www.2helpU.com.
(Original instructions)
8
Page 9
(Traduction des instructions d'origine)
FRANÇAIS
5 6
4
7
8
3
1
2
9
Page 10
FRANÇAIS
(Traduction des instructions d'origine)
9
2
3
A B
1
3
C
10
Page 11

(Traduction des instructions d'origine)
FRANÇAIS
Usage prévu
Votre friteuse à air BLACK+DECKER AF300/AF400 a été
conçue pour préparer des aliments à l’aide d’air chaud.
Cet appareil est destiné à une utilisation domestique interne
uniquement. L’utilisation de cet appareil n’est pas prévue
dans les environnements suivants :
• dans les cuisines pour les employés de boutiques, de
bureaux et d’autres environnements professionnels ;
• les fermes ;
• par les clients d’hôtels, de motels et autres
environnements de type résidentiel ;
• au lit ou petit déjeuner ;
Merci d’avoir choisi BLACK+DECKER. Nous espérons que
vous profiterez de ce produit pendant de nombreuses
années.
Consignes de sécurité
• Avertissement ! L’utilisation d’appareils électriques
requiert le respect de consignes de sécurité de base,
notamment celles indiquées ci-après, afin de réduire les
risques d’incendie, d’électrocution et de blessure.
• Lisez attentivement ce manuel dans son intégralité
avant d’utiliser l’appareil.
• Pour éviter tout danger résultant de la réinitialisation par
inadvertance du coupe-circuit thermique, évitez
d’alimenter cet appareil au moyen d’un dispositif de
commutation externe tel qu’une minuterie, ou de le
connecter à un circuit régulièrement mis sous/hors
tension par le réseau public.
• L’usage prévu est décrit dans le présent manuel.
L’utilisation d’un accessoire ou d’une pièce jointe ou
l’exécution de toute opération avec cet appareil autre
que celles qui sont recommandées dans ce mode
d’emploi peut présenter un risque de blessure.
• Conservez ce manuel à titre de référence.
Utilisation de l’appareil
• Utilisez toujours l’appareil avec précaution.
• Ne l’utilisez pas à l’extérieur.
• N’utilisez pas l’appareil avec les mains mouillées.
N’utilisez pas l’appareil pieds nus.
• Positionnez correctement le cordon d’alimentation de
sorte qu’il ne pende pas du bord d’un plan de travail et
d’éviter tout accrochage et trébuchement accidentels.
• Ne tirez jamais sur le cordon d’alimentation pour
débrancher la fiche du secteur. Maintenez le cordon
d’alimentation à l’écart des sources de chaleur, de l’huile
et des bords tranchants.
• Si le cordon d’alimentation est abîmé, il doit être
remplacé par le fabricant, un agent de service agréé ou
d’autres personnes tout autant qualifiées afin d’éviter
tout danger.
• Débranchez l’appareil de l’alimentation électrique en cas
de non-utilisation et avant de le nettoyer.
• Ne remplissez pas l’appareil au-delà du niveau
maximum.
• Il peut être dangereux d’utiliser l’appareil s’il est trop
rempli.
• L’eau peut déborder de l’appareil s’il est trop rempli.
Sécurité d’autrui
• Cet appareil n’est pas prévu pour être utilisé par des
personnes (y compris les enfants) présentant des
capacités physiques, sensorielles ou mentales réduites,
ou manquant d’expérience et de connaissances, sans
surveillance ou sans avoir reçu d’instructions concernant
l’utilisation de l’appareil de la part d’une personne
responsable de leur sécurité.
• Les enfants doivent être surveillés pour s’assurer qu’ils
ne jouent pas avec l’appareil.
Après utilisation
• Éteignez, débranchez la fiche et laissez l’appareil
refroidir avant de le laisser sans surveillance et avant
d’en remplacer, nettoyer ou inspecter les pièces.
• Lorsqu’il n’est pas utilisé, l’appareil doit être rangé à un
endroit sec. L’appareil doit être rangé hors de portée des
enfants.
Inspection et réparations
• Avant d’utiliser l’appareil, vérifiez qu’aucune pièce n’est
endommagée ou défectueuse. Vérifiez si des pièces ne
sont pas cassées, si les interrupteurs ne sont pas
endommagés, et toutes les autres conditions qui peuvent
affecter son fonctionnement.
• N’utilisez pas l’appareil si une pièce est endommagée ou
défectueuse.
• Faites réparer ou remplacer les pièces endommagées ou
défectueuses par un agent de service agréé.
• Avant d’utiliser l’appareil, contrôlez l’absence de signes
d’endommagement, de vieillissement et d’usure au
niveau du cordon d’alimentation.
• N’utilisez pas l’appareil si la fiche ou le cordon
d’alimentation est endommagé ou défectueux.
• N’essayez jamais de retirer ou de remplacer des pièces
différentes de celles qui sont indiquées dans le présent
manuel.
Consignes de sécurité supplémentaires pour
les friteuses
Avertissement ! Ne placez pas l’appareil à proximité d’un
gaz chaud ou d’un four électrique.
• Utilisez uniquement des composants d’origine.
Attention : Assurez-vous que l’appareil est hors tension
avant de procéder à tout entretien ou nettoyage.
11
Page 12

FRANÇAIS
(Traduction des instructions d'origine)
• Ne plongez pas l’appareil, le socle, le cordon ou la fiche
dans un liquide.
• En cas d’utilisation d’une rallonge électrique, celle-ci doit
être reliée à la terre.
• Vérifiez que le couvercle est bien fermé avant d’utiliser
l’appareil.
Attention : De l’air et de la vapeur chauds risquent de
s’échapper des orifices d’aération pendant l’utilisation de
l’appareil.
Attention : Soyez prudent au moment d’ouvrir l’appareil, car
de la vapeur chaude risque de s’échapper.
• Utilisez des gants pour manipuler les accessoires
chauds.
• Cuisinez uniquement avec les accessoires fournis.
• Utilisez toujours un plateau d’égouttage pour protéger la
base de la cavité.
• Laissez suffisamment d’espace autour de l’appareil pour
la ventilation.
• Débranchez l’appareil de l’alimentation électrique avant
d’effectuer le nettoyage ou l’entretien.
• Tenez les enfants et les animaux à l’écart de l’appareil et
du cordon d’alimentation.
• Une surveillance étroite est indispensable lorsque vous
utilisez l’appareil près des enfants.
• Cet appareil n’a pas été conçu pour fonctionner au
moyen d’une minuterie externe ou d’un système de
télécommande séparé.
Remarque : la surface extérieure de l’appareil peut chauffer
pendant l’utilisation.
Sécurité électrique
Avant d’utiliser l’appareil, vérifiez que la tension secteur
correspond à celle de la plaque signalétique.
Cet appareil doit être relié à la terre.
Vérifiez toujours que la tension secteur
correspond à celle de la plaque
signalétique.
• La fiche de l’appareil doit correspondre à la prise
secteur. Ne modifiez jamais la fiche, de quelque manière
que ce soit.
• N’utilisez pas d’adaptateurs avec les fiches des
appareils reliés à la terre (classe 1). L’utilisation de
fiches non modifiées et de prises murales
correspondantes réduira le risque d’électrocution.
• Pour éviter le risque d’électrocution, ne plongez pas le
cordon, la fiche ou l’appareil dans de l’eau ou tout autre
liquide.
Rallonges électriques et produit de classe 1
• Vous devez utiliser un câble à 3 conducteurs car
l’appareil est doté d’une mise à la terre et est de
construction de classe 1.
• Une rallonge de 30 m (100 pieds) au plus peut être
utilisée sans perte de puissance.
• Si le cordon d’alimentation est abîmé, il doit être
remplacé par le fabricant ou un centre de service agréé
BLACK+DECKER afin d’éviter tout danger.
Étiquettes sur l’appareil
Les pictogrammes suivants ainsi que le code de date
apparaissent sur l’appareil :
Avertissement ! Surface chaude.
Caractéristiques
1. Panier
2. Bouton de déverrouillage du panier
3. Casserole
4. Affichage à LED (uniquement pour le modèle AF400)
5. Panneau de commande
6. Entrée d’air
7. Sortie d’air
8. Cordon d’alimentation secteur
9. Couvercle du bouton de déverrouillage du panier
Mode d’emploi
Remarque : Avant d’utiliser l’appareil pour la première fois,
lavez à la main toutes les pièces amovibles.
• Au début, de la fumée s’échappera de l’appareil. Il peut
dégager une légère odeur, ne vous inquiétez pas.
Assurez-vous que la pièce est bien aérée.
• Ajoutez de l’huile uniquement pour enrober les aliments.
Avertissement ! Ne versez jamais de l’huile dans le panier (7).
• Placez l’appareil sur une surface stable, plane et
résistante à la chaleur.
Remarque : le panier DOIT être mis dans l’appareil
correctement, sinon l’appareil ne fonctionne pas !
• Branchez la fiche du cordon d’alimentation dans la prise
murale.
Avertissement ! Ne remplissez pas la casserole d’huile ou
de tout autre liquide.
Avertissement ! Ne placez rien sur le dessus de l’appareil.
Avertissement ! Ne placez rien devant l’entrée d’air à
l’arrière de l’appareil car cela empêcherait une bonne
circulation d’air et affecterait le résultat de la cuisson.
Utilisation de l’appareil
La friteuse à air permet de préparer un large éventail
d’ingrédients. Référez-vous à la table de la section «
Réglages ».
12
Page 13

(Traduction des instructions d'origine)
FRANÇAIS
Friture à l’air chaud
• Branchez la fiche du cordon d’alimentation dans la prise
murale.
• Retirez délicatement la casserole (3) de la friteuse à air
(fig. A).
• Poussez le couvercle du bouton de déverrouillage du
panier (9) en avant et appuyez sur le couvercle de
déverrouillage du panier (2) (fig. B).
• Sortez le panier (1) de la casserole (3) (fig. C)
• Placez les ingrédients dans le panier (1).
Remarque : Ne remplissez jamais le panier ou ne dépassez
jamais la quantité recommandée (voir la section « Réglages »).
• Glissez correctement la casserole dans la friteuse à air.
Remarque : N’utilisez jamais la casserole sans le panier. Si
la casserole n’est pas insérée correctement dans la friteuse
à air, l’appareil ne fonctionnera pas.
Attention : Ne touchez pas la casserole pendant et après
son utilisation pendant un certain temps, car elle sera très
chaude. Tenez la casserole uniquement par la poignée.
• Pour le modèle AF300, allumez l’appareil en tournant le
bouton de la minuterie, puis réglez la température de
cuisson désirée en utilisant le bouton de réglage de la
température.
• Pour le modèle AF400, appuyez sur le bouton MODE
pour sélectionner la température requise. Consultez la
section « Réglages » pour déterminer la température à
utiliser.
• Pour déterminer le temps de cuisson requis pour un
ingrédient, consultez la section « Réglages ». Réglez la
minuterie en utilisant le bouton TIMER+ ou TIMER-.
• Pour allumer l’appareil, appuyez sur le bouton ON, pour
éteindre l’appareil, appuyez sur le bouton OFF ou
touchez le bouton TIMER- pour mettre la minuterie à 00.
• Le voyant s’allume.
• La minuterie commence alors un compte à rebours du
temps préparation défini.
• Durant la cuisson, le mode « chauffage » s’allume et
s’éteint de temps en temps. Cela indique que la fonction
de chauffage se met en marche puis s’arrête pour
maintenir la température sélectionnée.
• L’excédent d’huile des ingrédients est recueilli au fond
de la casserole (3).
• Certains ingrédients doivent être agités en milieu du
temps de préparation (voir la section « Réglages »).
Pour secouer les ingrédients, retirez la casserole de
l’appareil par la poignée et agitez. Glissez ensuite
correctement la casserole dans la friteuse à air et
continuez la cuisson.
Attention :
du panier sur la poignée lorsque vous secouez la casserole.
Conseil :
(1) de la casserole (3) et agiter uniquement le panier. Pour
ce faire, tirez la casserole hors de l’appareil, placez-la sur
N’appuyez pas sur le bouton de déverrouillage
Pour réduire le poids, vous pouvez sortir le panier
une surface résistante à la chaleur et appuyez sur le bouton
de déverrouillage du panier situé sur la poignée.
Conseil : Si vous réglez la minuterie sur la moitié du temps
de préparation, vous entendrez la minuterie sonner lorsqu’il il
est temps de secouer les ingrédients. Cependant, cela
signifie que vous devez régler la minuterie à nouveau pour le
reste du temps de préparation, après avoir secoué les
ingrédients.
Conseil : Si vous réglez la minuterie sur le temps de cuisson
complète, celle-ci ne sonnera pas durant la cuisson. Avant la
fin de la cuisson, vous pouvez retirer la casserole à tout
moment pour vérifier l’état de cuisson des ingrédients,
l’appareil s’éteint automatiquement et se rallume dès que la
casserole a été remise en place dans l’appareil (la minuterie
étant toujours en train de décompter le temps).
• Lorsque vous entendez la sonnerie de la minuterie, le
temps de préparation s’est écoulé. Tirez la casserole
hors de l’appareil et placez-la sur une surface résistante
à la chaleur.
Remarque : Vous pouvez également éteindre l’appareil
manuellement. Pour ce faire, appuyez sur le bouton (pour le
modèle AF400), ou appuyez sur le bouton TIMER- pour
régler le temps à 0, ou encore, retirer la casserole de
l’appareil.
• Vérifiez si les ingrédients sont suffisamment cuits. Si les
ingrédients ne sont toujours pas prêts, il vous suffit de
glisser la casserole dans l’appareil et de régler la
minuterie sur quelques minutes de plus.
• Pour retirer les petits ingrédients (p. ex. des frites),
appuyez sur le bouton de déverrouillage du panier et
sortez le panier à frire de la casserole.
Avertissement ! Ne tournez pas le panier à l’envers avec le
panier toujours dans la casserole, vu que l’excès d’huile
recueilli au fond de la casserole va se répandre sur les
ingrédients.
Avertissement ! Après la cuisson à l’air chaud, la casserole
et les ingrédients sont chauds. En fonction du type
d’ingrédient dans l’appareil, de la vapeur peut s’échapper de
la casserole.
• Videz le panier à frire dans un bol ou sur une assiette.
Conseil : Dans le cas d’ingrédients grands ou fragiles,
utilisez une paire de pinces pour les sortir du panier.
• Lorsqu’un panier d’ingrédients est prêt, l’appareil peut
être réutilisé immédiatement pour frire un autre panier
d’ingrédients.
Réglages
Le tableau ci-dessous vous permet de sélectionner les
réglages de base à utiliser pour les ingrédients que vous
voulez frire.
Remarque : Gardez à l’esprit que ces réglages ne sont
qu’indicatifs. Comme les ingrédients diffèrent par leur origine,
taille, forme et marque, nous ne pouvons garantir que ce sont
là les meilleurs réglages à utiliser pour vos ingrédients.
13
Page 14

FRANÇAIS
(Traduction des instructions d'origine)
Remarque : Comme la technique à l’air chaud réchauffe
instantanément l’air à l’intérieur de l’appareil, retirer la
casserole de l’appareil brièvement durant la cuisson ne
perturbe presque pas le processus.
Conseil :
• Une plus grande quantité d’ingrédients ne nécessite
qu’un peu plus de temps de préparation, une plus petite
quantité d’ingrédients ne nécessite qu’un peu moins de
temps de préparation.
• Agiter les petits aliments au milieu de la cuisson peut
améliorer le résultat final et peut permettre d’éviter une
cuisson non uniforme.
• Ajoutez un peu d’huile sur les pommes de terre fraîches
pour obtenir des frites croustillantes. Faites frire vos
ingrédients dans l’appareil au plus tard quelques
minutes après les avoir enrobés d’huile afin d’obtenir les
meilleurs résultats.
• Ne préparez pas d’ingrédients extrêmement gras
comme des saucisses dans l’appareil.
• Des en-cas qui peuvent être préparés dans un four
peuvent également être préparés dans l’appareil.
• Le poids optimal de pommes de terre pour obtenir des
frites croustillantes est de 500 grammes.
• Utilisez de la pâte prête à cuire pour préparer des
snacks fourrés rapidement et facilement. De plus, la
pâte prête à cuite nécessite un temps de préparation
plus court que la pâte faite maison.
• Placez un moule à cuire ou un plat à four dans le panier
de l’appareil si vous voulez cuire un gâteau ou une
quiche ou si vous souhaitez frire des ingrédients fragiles
ou fourrés.
• Vous pouvez également utiliser l’appareil pour
réchauffer des ingrédients. Pour réchauffer des
ingrédients, réglez la température à 150°C pendant
jusqu’à 10 minutes.
Min-max
Temps
Pommes de terre et frites
Frites congelées fines
Frites congelées épaisses
Frites faites maison (8×8 mm)
Morceaux de pommes frites
faits maison
Cubes de pommes frites
faits maison
Rösti 250 15-18 180 agiter
Gratin dauphinois 500 15-18 200 agiter
Viande et volaille
Steak 100-500 8-12 180
Côtelettes d'agneau 100-500 10-14 180
Hamburger 100-500 7-14 180
Roulé aux saucisses 100-500 13-15 200
Cuisses 100-500 18-22 180
Poitrine de poulet 100-500 10-15 180
quantité (g)
300-700 9-16 200 agiter
300-700 11.20 200 agiter
300-800 16-10 200 agiter
300-800 18-22 180 agiter
300-750 12-18 180 agiter
(min.)
Temp. (°C) Agiter
Informations
supplémentaires
Ajouter 1/2 c. à soupe
d’huile
Ajouter 1/2 c. à soupe
d’huile
Ajouter 1/2 c. à soupe
d’huile
En-cas
Rouleaux de printemps 100-400 8-10 200 agitar
Pépites de poulet congelées
Bâtonnets de poisson congelés
Snacks de fromage pané
surgelés
Légumes farcis 100-400 10 160
Pâtisserie
Gâteau 300 20-25 160 tiliser un moule
Quiche
Muffins
En-cas sucrés 400 20 160
100-500 6-10 200 agitar
100-400 6-10 200
100-400 8-10 180
400 20-22 180
300 15-18 200 utiliser un moule
utiliser des
« prêts pour le four »
utiliser des
« prêts pour le four »
utiliser des
« prêts pour le four »
utiliser des
« prêts pour le four »
utiliser un moule/
plat à four
utiliser un moule/
plat à four
Remarque : Ajouter 3 minutes au temps de préparation
lorsque vous démarrez la cuisson et que l’appareil est froid.
Faire des frites faites maison
Pour faire des frites faites maison, suivez les étapes
ci-dessous :
• Pelez les pommes de terre et coupez-les en bâtonnets.
• Lavez soigneusement les pommes de terre coupées et
séchez-les avec du papier de cuisine.
• Versez 1/2 cuillerée à soupe d’huile d’olive dans un bol
avec les bâtonnets et mélangez jusqu’à ce que les
bâtonnets sont enduits d’huile.
• Prenez les bâtonnets dans le bol avec les doigts ou un
ustensile de cuisine afin de laisser l’excédent d’huile
dans le bol. Placez les bâtonnets dans le panier.
Remarque : N’inclinez pas le bol pour mettre tous les
bâtonnets dans le panier d’un seul coup, afin d’éviter de
verser l’excès d’huile au fond de la casserole.
• Faites frire les bâtonnets de pommes de terre selon les
instructions de ce chapitre.
Nettoyage et entretien
Avertissement ! Avant le nettoyage et l’entretien, éteignez
l’appareil et débranchez la fiche du secteur.
Avertissement ! Laissez l’appareil refroidir complètement
avant de commencer le nettoyage.
• Ne plongez pas l’appareil dans un liquide.
• N’utilisez pas de diluant ou de benzène, ni de lingettes
pré-imbibées de produits chimiques, ni de brosses en
plastique ou en métal.
• Le panier et la casserole peuvent être lavés à l’eau
chaude savonneuse.
Rincez et séchez soigneusement après le
nettoyage.
• Utilisez un chiffon humide pour nettoyer la partie
extérieure du corps (1) et la cavité interne.
• Gardez le cordon d’alimentation et le panneau de
commande propres et secs pour éviter tout problème.
14
Page 15

(Traduction des instructions d'origine)
FRANÇAIS
Attention : Ne plongez JAMAIS l’appareil dans de l’eau ou
dans tout autre liquide. Assurez-vous que l’appareil est
totalement sec avant de l’utiliser.
Changement de la fiche
En cas de besoin de montage d’une nouvelle fiche :
• Mettez dûment l’ancienne fiche au rebut.
• Connectez le fil marron à la borne sous tension de la
nouvelle fiche.
• Connectez le fil bleu à la borne neutre.
• S’il s’agit d’un produit de classe I (relié à la terre),
connectez le fil vert/jaune à la borne de terre.
Remarque ! Si vous disposez d’un produit à double isolation
de classe II (2 fils uniquement dans le cordon), aucun
raccordement à la borne de terre n’est nécessaire. Suivez
les consignes d’installation fournies avec les fiches de
bonne qualité.
Tout fusible de rechange doit avoir les mêmes
caractéristiques nominales que le fusible d’origine fourni
avec le produit.
Avertissement ! La section ci-dessus concernant le
remplacement de la fiche électrique s’adresse au personnel
des centres de service agréés.
Protection de l'environnement
Collecte séparée. Ce produit ne doit pas être
jeté avec les déchets domestiques normaux.
Si vous décidez de remplacer ce produit Black+Decker, ou si
vous n'en avez plus l'utilité, ne le jetez pas avec vos déchets
domestiques Rendez-le disponible pour une collecte
séparée.
• Black+Decker fournit un dispositif permettant de
collecter et de recycler les produits Black+Decker
lorsqu'ils ont atteint la fin de leur cycle de vie. Pour
pouvoir profiter de ce service, veuillez retourner votre
produit à un réparateur agréé qui se chargera de le
collecter pour nous.
• Pour connaître l'adresse du réparateur agréé le plus
proche de chez vous, contactez le bureau Black+Decker
à l'adresse indiquée dans ce manuel. Vous pourrez
aussi trouvez un liste des réparateurs agréés de
Black+Decker et de plus amples détails sur notre
service après-vente sur le site Internet à l'adresse
suivante : www.2helpU.com
Garantie
Black+Decker est confiant dans la qualité de ses produits et
vous offre une garantie très étendue.
Ce certificat de garantie est un document supplémentaire et
ne peut en aucun cas se substituer à vos droits légaux.
La garantie est valable sur tout le territoire des Etats
Membres de l'Union Européenne et de la Zone de Libre
Echange Européenne.
Si un produit Black+Decker s'avère défectueux en raison de
matériaux en mauvaises conditions, d'une erreur humaine,
ou d'un manque de conformité dans les 24 mois suivant la
date d'achat, Black+Decker garantit le remplacement des
pièces défectueuses, la réparation des produits usés ou
cassés ou remplace ces produits à la convenance du client,
sauf dans les circonstances suivantes :
Le produit a été utilisé dans un but commercial,
professionnel, ou a été loué.
Le produit a été mal utilisé ou avec négligence.
Le produit a subi des dommages à cause d'objets
étrangers, de substances ou à cause d'accidents.
Des réparations ont été tentées par des techniciens ne
faisant pas partie du service technique de Black+Decker.
Pour avoir recours à la garantie, il est nécessaire de fournir
une preuve d'achat au vendeur ou à un réparateur agréé.
Pour connaître l'adresse du réparateur agréé le plus proche
de chez vous, contactez le bureau Black+Decker à l'adresse
indiquée dans ce manuel.
Vous pourrez aussi trouver une liste des réparateurs agréés
de Black+Decker et de plus amples détails sur notre service
après-vente sur le site Internet à l'adresse suivante :
www.2helpU.com
Caractéristiques techniques
AF300 / AF400
Tension d’entrée VCA 220 - 240
Alimentation électrique W 1500
15
Page 16

PORTUGUÊS
4
(Tradução das instruções originais)
5 6
7
8
3
16
1
2
Page 17

(Tradução das instruções originais)
PORTUGUÊS
9
2
3
A B
1
3
C
17
Page 18

PORTUGUÊS
(Tradução das instruções originais)
Uso previsto
A sua Air Fryer AF300/AF400 da BLACK+DECKER foi
concebida para preparar alimentos usando ar quente.
Este aparelho destina-se apenas à utilização doméstica no
interior. Este aparelho não se destina a ser utilizado em:
• Áreas do pessoal de cozinha em lojas, escritórios e
noutros ambientes de trabalho;
• Casas rurais;
• Por clientes em hotéis, motéis e outros ambientes de
tipo residencial;
• Ambientes do tipo alojamento e pequeno-almoço;
Obrigado por escolher a BLACK+DECKER. Esperamos que
aprecie a utilização deste produto durante muitos anos.
Instruções de segurança
• Aviso! Quando utilizar aparelhos elétricos, as
advertências básicas de segurança, incluindo estas
instruções, deverão ser sempre respeitadas para reduzir
o risco de incêndio, choque elétrico e lesões pessoais.
• Leia cuidadosamente este manual antes de utilizar o
aparelho.
• Para evitar perigos devidos a reinício inadvertido do
corte térmico, este aparelho não deve ser alimentado
por meio de um dispositivo de interruptor externo como
um temporizador ou ligado a um circuito que é
frequentemente ligado e desligado pela empresa de
eletricidade.
• O uso previsto está descrito neste manual. A utilização
de qualquer acessório ou a realização de qualquer
operação com este aparelho que não seja a
recomendada neste manual de instruções pode
representar um risco de ferimentos pessoais.
• Guarde este manual para referência futura.
Utilização do aparelho
• Tenha sempre cuidado enquanto estiver a utilizar o
aparelho.
• Não use em espaços ao ar livre.
• Não opere o aparelho se tiver as mãos molhadas. Não
opere o aparelho se estiver descalço.
• Guie o cabo de alimentação com cuidado de modo a
não ficar pendurado na extremidade da bancada e de
forma a não ficar preso acidentalmente ou fazer alguém
tropeçar.
• Nunca puxe o cabo de alimentação para desligar a ficha
da tomada. Mantenha o cabo de alimentação longe do
calor, óleo e objetos afiados.
• Se o cabo de alimentação estiver danificado, deverá ser
substituído pelo fabricante, o seu agente de serviço ou
pessoal devidamente qualificado, de modo a evitar um
perigo.
• Desligue o aparelho da corrente elétrica quando não o
estiver a utilizar e antes de o limpar.
• Não encha o aparelho acima do nível máximo.
• O enchimento em demasia da máquina pode resultar
num perigo.
• O enchimento em demasia da máquina pode provocar
salpicos de água.
Segurança de terceiros
• Este aparelho não pode ser utilizado por pessoas
(incluindo crianças) com capacidades físicas, sensoriais
ou psíquicas diminuídas ou com falta de experiência e
conhecimentos, a não ser que se encontrem sob
vigilância ou a utilização segura do aparelho lhes tenha
sido ensinada por uma pessoa responsável da sua
segurança.
• As crianças devem ser supervisionadas para garantir
que não brincam com o aparelho.
Após a utilização
• Desligue, retire a ficha da tomada e deixe o aparelho
arrefecer antes de o deixar sem vigilância e antes de
trocar, limpar ou inspecionar qualquer peça do aparelho.
• Quando não estiver a ser usado, deve armazenar o
aparelho num local seco. As crianças não devem ter
acesso a eletrodomésticos guardados.
Inspeção e reparações
• Antes de utilizar, verifique se o aparelho apresenta
quaisquer danos ou peças defeituosas. Verifique se tem
as peças quebradas, danos nas ligações e quaisquer
outras condições que possam afetar a operação.
• Não utilize o aparelho, se encontrar qualquer peça
danificada ou defeituosa.
• Quaisquer peças danificadas ou defeituosas devem ser
reparadas ou substituídas por um técnico autorizado.
• Antes da utilização, verifique se o cabo de alimentação
apresenta sinais de danos, desgaste e envelhecimento.
• Não utilize o aparelho se o cabo de alimentação ou a
ficha principal apresentar danos ou defeitos.
• Se o cabo de alimentação ou a ficha elétrica estiver
danificado, nunca tente remover ou substituir quaisquer
peças que não sejam aquelas impede as especificadas
neste manual.
Instruções adicionais de segurança para
fritadeiras
Aviso! Não coloque perto de um forno quente, elétrico ou a
gás.
• Utilize apenas os componentes originais.
Cuidado: Certifique-se de que o aparelho está desligado
antes de realizar qualquer manutenção ou limpeza.
• Não mergulhe o aparelho, base, cabo ou ficha em
nenhum líquido.
• Se for utilizada uma extensão, esta deve estar ligada à
terra.
18
Page 19

(Tradução das instruções originais)
PORTUGUÊS
• Certifique-se de que a porta está corretamente fechada
antes de utilizar.
Cuidado: Durante a utilização pode sair ar quente e vapor
dos ventiladores.
Cuidado: Deve ter cuidado quando abrir a porta uma vez
que pode sair vapor quente.
• Calce luvas de forno quando manusear acessórios
quentes.
• Cozinhe apenas com os acessórios fornecidos.
• Utilize sempre o tabuleiro de recolha de molho para
proteger a base da cavidade.
• Deixe espaço adequado à volta do aparelho para
ventilação.
• Desligue o aparelho da alimentação elétrica antes da
limpeza ou de realizar qualquer manutenção.
• Mantenha as crianças e os animais afastados do
aparelho e do conjunto do cabo.
• É necessária uma supervisão apertada quando utilizar o
aparelho perto de crianças.
• Este aparelho não se destina a ser operado através de
um temporizador externo ou sistema de controlo remoto
separado.
Nota: Durante a utilização, a superfície exterior do aparelho
pode ficar quente.
Segurança elétrica
Antes de usar, confirme que a tensão de rede corresponde à
tensão que figura na chapa de características.
Este produto deve estar ligado a uma
tomada com fio terra. Verifique sempre se
a tensão elétrica corresponde à tensão
que figura na chapa de características
• As fichas do aparelho devem corresponder à tomada.
Nunca, de forma alguma, modifique a ficha.
• Não utilize quaisquer adaptadores de tomadas com
ligação terra (Classe 1) em aparelhos. Tomadas não
modificadas e fichas adequadas irão reduzir o risco de
choques elétricos.
• Para evitar riscos de choque elétrico, não mergulhe o
cabo, ficha ou o aparelho em água ou outro líquido.
Cabos de extensão e produto classe 1
• Deve ser utilizado um cabo de 3 núcleos, pois a sua
ferramenta está ligada à terra e de construção classe 1.
• Até 30 m (100 pés) pode ser utilizado sem a perda de
potência.
• Se o cabo de alimentação estiver danificado, deverá ser
substituído pelo fabricante ou por um Centro de
Serviços da BLACK+DECKER autorizado, para evitar
possíveis riscos.
Etiquetas no aparelho
Os seguintes pictogramas juntamente com o código da data
são apresentados no aparelho:
Aviso! Superfície quente.
Componentes
1. Cesto
2. Botão de abertura do cesto
3. Panela
4. Visor Led (apenas para AF400)
5. Painel de controlo
6. Entrada de ar
7. Saída de ar
8. cabo de alimentação
9. Tampa do botão de libertação do cesto
Utilização
Nota: Antes da primeira utilização, lave à mão todas as
partes removíveis.
• No início, o elemento pode libertar um pouco de fumo.
Este pode cheirar um pouco, mas não se deve preocupar
com isso. Assegure-se que a cozinha é bem ventilada.
• Acrescente óleo ao alimento apenas como uma
proteção.
Aviso! Nunca verta óleo dentro do cesto (7).
• Coloque o aparelho numa superfície estável, nivelada e
resistente ao calor.
Nota: o cesto TEM que ser colocado no aparelho
corretamente, caso contrário o aparelho não funciona!
• Conecte o cabo de alimentação e conecte-o à tomada
elétrica de terra.
Aviso! Não encha a panela com óleo ou qualquer outro
líquido.
Aviso! Não coloque nada em cima do aparelho.
Aviso! Não coloque nada na entrada de ar na parte traseira
do aparelho, isto interrompe o fluxo de ar e afeta o resultado
da cocção.
Utilização do aparelho
A fritadeira por ar pode preparar uma grande variedade de
ingredientes. Consulte a secção da tabela “definições”.
Fritar através de ar quente
• Conecte a fica elétrica à tomada terra de parede.
• Puxe cuidadosamente a panela (3) para fora da fritadeira
por ar (fig. A).
• Empurre a tampa do botão de libertação do cesto (9)
para a frente e aperte a tampa de libertação do cesto (2)
(fig. B).
• Levante o cesto (1) da panela (3) (fig. C)
• Coloque os ingredientes no cesto (1).
19
Page 20

PORTUGUÊS
(Tradução das instruções originais)
Nota: Nunca encha em demasia o cesto nem exceda
quantidade recomendada (ver a secção “Definições”).
• Deslize a panela de volta para dentro da fritadeira de ar
corretamente.
Nota: Nunca utilize a panela sem o cesto na mesma. Se a
panela não estiver corretamente fixa à fritadeira de ar, o
aparelho não funcionará.
Cuidado: Não toque na panela durante e após algum tempo
após o uso, visto que fica muito quente. Segure a panela
apenas pela pega.
• Para AF300, para ligar o aparelho, rode o botão do
temporizador e defina a temperatura de cocção
desejada, use o botão de controlo da temperatura.
• Para AF400, toque no botão MODO até à temperatura
desejada. Consulte a secção “Definições” para
determinar a temperatura certa.
• Determinar o tempo de preparação necessário para o
ingrediente, consulte a secção “Definições”. Ajuste a
definição do temporizador, usando o botão TIMER+ ou
TIMER-.
• Para ligar o aparelho, toque no botão ON, para desligar
o aparelho, toque no botão OFF ou toque no TIMERpara ajustar o tempo para 00.
• A luz LED acender-se-á.
• O temporizador começará a iniciar a contagem
decrescente do tempo de preparação definido.
• Durante o processo de cocção, o modo de aquecimento
acende-se e apaga-se periodicamente. Isto indica que o
elemento de aquecimento está a ligar-se e desligar-se
para manter a temperatura selecionada.
• O excesso de óleo dos ingredientes será recolhido no
fundo da panela (3).
• Alguns ingredientes precisam ser mexidos a meio do
tempo de preparação, consulte a secção “Definições”.
Para mexer os ingredientes, puxe a panela para fora do
aparelho pela pega e agite-o. Em seguida, volte a
deslizar a panela na fritadeira de ar e continue a
cozinhar.
Cuidado: Não pressione o botão de libertação do cesto na
pega enquanto agita.
Sugestão: Para reduzir o peso, pode remover o cesto (1)
da panela (3) e agitar apenas o cesto. Para isso, puxe a
panela para fora do aparelho, coloque-a sobre uma
superfície resistente ao calor e pressione o botão de
libertação do cesto na pega.
Sugestão: Se tiver definido o temporizador para metade o
tempo de preparação, ouvirá a campainha do temporizador
quando estiver na hora de mexer os ingredientes. No
entanto, isto significa que tem que definir o temporizador
novamente para o restante tempo de preparação depois de
agitar.
Sugestão: Se tiver definido o temporizador para o tempo de
preparação completo, não haverá campainha do
temporizador durante a cocção. Antes de terminar, pode
retirar a panela a qualquer momento para verificar o estado
de cocção dos ingredientes, a corrente desligar-se-á
automaticamente e será retomada assim que deslizar a
panela de volta para o aparelho (temporizador ainda ligado).
• Quando ouvir a campainha do temporizador, é sinal que
já decorreu o tempo de preparação definido. Puxe a
panela para fora do aparelho e coloque-a sobre uma
superfície resistente ao calor.
Nota: Também pode desligar o aparelho manualmente. Para
isso, toque no botão OFF (para AF400) ou toque no botão
TIMER- para 0 ou retire a panela diretamente.
• Verifique se os ingredientes estão prontos. Se os
ingredientes ainda não estiverem prontos, basta deslizar
a panela de volta para o aparelho e ajustar o
temporizador para alguns minutos extras.
• Para remover pequenos ingredientes (por exemplo,
batatas fritas), pressione o botão de libertação do cesto e
levante o cesto para fora da panela.
Aviso! Não rode o cesto de cabeça para baixo com a panela
ainda presa, visto que qualquer excesso de óleo que tenha
sido recolhido no fundo da panela vai vazar sobre os
ingredientes.
Aviso! Após a fritura por ar quente, a panela e os
ingredientes estão quentes. Dependendo do tipo de
ingredientes dentro da fritadeira de ar, poderá haver fuga de
vapor da panela.
• Esvazie o cesto para uma tigela ou um prato.
Sugestão: Para remover ingredientes grandes ou frágeis,
use um par de tenazes para levantar os ingredientes para
fora do cesto.
• Quando um conjunto de ingredientes estiver pronto, a
fritadeira de ar fica instantaneamente pronta para
preparar um novo conjunto.
Definições
A tabela abaixo ajuda-o a selecionar as definições básicas
para os ingredientes que deseja preparar.
Nota: Tenha em mente que estas definições são indicações.
Visto que os ingredientes diferem na origem, tamanho,
forma, bem como marca, não podemos garantir a melhor
definição para os seus ingredientes.
Nota: Tendo em conta que a tecnologia de ar quente rápido
reaquece instantaneamente o ar no interior do aparelho,
puxar a panela brevemente para fora do aparelho durante a
fritura com ar quente perturba o processo.
Sugestões
• Uma maior quantidade de ingredientes apenas requer
um tempo de preparação um pouco mais longo, uma
menor quantidade de ingredientes apenas requer um
tempo de preparação ligeiramente mais curto.
• Mexer os ingredientes mais pequenos a meio do tempo
de preparação otimiza o resultado final e pode ajudar a
prevenir ingredientes fritos de forma desigual.
• Adicione um pouco de óleo a batatas frescas para um
resultado crocante. Frite os ingredientes na fritadeira de
ar no espaço de alguns minutos após adicionar o óleo
para obter melhores resultados.
20
Page 21

(Tradução das instruções originais)
PORTUGUÊS
• Não prepare ingredientes extremamente gordurosos
como salsichas na fritadeira de ar.
• Os petiscos que podem ser preparados num forno
também podem ser preparados na frigideira de ar.
• A quantidade ideal para preparar batatas fritas
crocantes é de 500 gramas.
• Use massa pré-feita para preparar petiscos com recheio
de forma rápida e fácil. A massa pré-feita também
requer um menor tempo de preparação do que a massa
caseira.
• Coloque uma assadeira ou travessa de forno no cesto
da fritadeira de ar caso deseje assar um bolo ou uma
quiche ou se quiser fritar ingredientes frágeis ou
ingredientes recheados.
• Também pode usar a fritadeira de ar para reaquecer os
ingredientes. Para reaquecer ingredientes, defina a
temperatura para 150°C durante até 10 minutos.
Mín-Máx
Tempo
Batatas e fritos
Batatas às rodelas congeladas
Batatas aos palitos congeladas
Batatas fritas caseiras (8×8mm)
Batatas aos gomos caseiras 300-800 18-22 180 agitar
Batatas aos cubos caseiras 300-750 12-18 180 agitar
Rosti 250 15-18 180 agitar
Batata gratinada 500 15-18 200 agitar
Carne e aves
Bife 100-500 8-12 180
Costeletas de Cordeiro 100-500 10-14 180
Hambúrgueres 100-500 7-14 180
Enrolado de salsicha 100-500 13-15 200
Coxinhas 100-500 18-22 180
Peito de frango 100-500 10-15 180
Lanches
Rolos primavera 100-400 8-10 200 agitar use o forno pronto
Nuggets de frango congelados
Douradinhos de peixe congelados
Petiscos de queijo
panados congelados
Legumes recheados 100-400 10 160
Pastelaria
Bolo 300 20-25 160 usar assadeira
Quiche
Queques
Lanches doces 400 20 160
quantidade
300-700 9-16 200 agitar
300-700 11.20 200 agitar
300-800 16-10 200 agitar
100-500 6-10 200 agitar
100-400 6-10 200
100-400 8-10 180
400 20-22 180
300 15-18 200 usar assadeira
Temp. (°C) Agitar Informação extra
(min.)
Adicione 1/2 colher
de sopa de óleo
Adicione 1/2 colher
de sopa de óleo
Adicione 1/2 colher
de sopa de óleo
use o forno pronto
use o forno pronto
use o forno pronto
usar assadeira/
travessa de forno
usar assadeira/
travessa de forno
Nota: Adicione 3 minutos ao tempo de preparação quando
começa a fritar com a fritadeira de ar ainda fria.
• Verta 1/2 colher de sopa de azeite numa tigela, coloque
os palitos em cima e misture até os mesmos estarem
revestidos com óleo.
• Retire os palitos da tigela com os seus dedos ou com um
utensílio de cozinha para que o excesso de óleo fique na
tigela. Coloque os palitos na no cesto.
Nota: Não incline a tigela para colocar todos os palitos no
cesto de uma só vez, para evitar que o óleo em excesso
termine no fundo da panela.
• Frite as batatas aos palitos de acordo com as instruções
neste capítulo.
Limpeza e manutenção
Aviso! Antes da limpeza e manutenção, desligue o aparelho
e retire a ficha da tomada.
Aviso! Antes de limpar a unidade, deixe-a arrefecer
completamente.
• Não mergulhe a unidade em líquidos.
• Não utilize diluente ou benzeno, panos com produtos
químicos, escova de plástica ou escova de metal.
• O cesto e a panela podem ser lavados em água quente
com sabão. Após a lavagem, enxague e seque
completamente.
• Limpe a parte exterior da estrutura (1) e a cavidade
interna com um pano húmido.
• Mantenha o cabo de alimentação e o painel de controlo
limpos e secos, caso contrário pode provocar problemas.
Cuidado: NUNCA mergulhe o aparelho em água ou
quaisquer outros líquidos. Antes da utilização, certifique-se
de que o aparelho está completamente seco.
Substituição da ficha principal
Se alguma ficha principal necessitar ser substituída:
• Elimine de forma segura a ficha antiga.
• Una o fio castanho ao terminal positivo da nova ficha.
• Una o fio azul ao terminal neutro.
• Se o produto for da classe I (ligação à terra), una o fio
verde/amarelo ao terminal de terra
Nota! Se o seu aparelho for da classe II com isolamento
duplo (apenas 2 fios no conjunto de cabos), não se faz a
ligação à terra. Siga as instruções de montagem de fichas de
boa qualidade.
Qualquer fusível de substituição deve ser da mesma
classificação que o fusível original fornecido com o produto.
Aviso! A secção acima sobre substituição de ficha elétrica
destina-se apenas ao pessoal de centros de serviços
autorizados.
Fazer batatas fritas caseiras
Para fazer batatas fritas caseiras, siga os passos abaixo:
• Descasque as batatas e corte-as aos palitos.
• Lave os palitos de batata muito bem e seque-os com
papel de cozinha.
21
Page 22

PORTUGUÊS
(Tradução das instruções originais)
Proteção do ambiente
Recolha separada. Este produto não deve ser
eliminado com o lixo doméstico.
Se considerar que o seu produto da Black+Decker necessita
ser substituído ou se já não lhe for útil, não o elimine com
outros lixos domésticos. Leve-o para ser reciclado.
• A Black+Decker proporciona um local para reciclar
produtos Black+Decker quando atingirem o final da sua
vida útil. Este serviço é gratuito. Para aproveitar este
serviço, devolva o produto a qualquer agente de
reparação autorizado que o reciclará por nós.
• Informe-se sobre a localização do agente de reparação
autorizado mais próximo a si entrando em contacto com
uma filial da Black+Decker na morada indicada neste
manual. De forma alternativa, uma lista de agentes de
reparação autorizados da Black+Decker e os
pormenores completos do nosso serviço de
atendimento pós-venda estão disponíveis na Internet
em: www.2helpU.com.
Dados técnicos
AF300 / AF400
Tensão de entrada VCA 220 - 240
Potência de entrada W 1500
Garantia
A Black+Decker acredita na qualidade dos seus produtos e
oferece uma garantia excelente.
Esta declaração de garantia é um complemento aos seus
direitos estatutários e não os compromete em caso algum.
A garantia é válida nos territórios dos Estados Membros da
União Europeia e na Associação Europeia de Comércio
Livre.
Se um produto Black+Decker se avariar devido a materiais
com defeito, problemas de fabrico ou faltas de conformidade
no período de 24 meses a partir da data de compra, a
Black+Decker garante a substituição das peças avariadas,
a reparação de produtos sujeitos a desgaste normal ou a
substituição de tais produtos, no sentido de de minimizar o
inconveniente causado ao cliente, salvo se:
O produto for utilizado para fins comerciais,
profissionais ou de aluguer;
O produto for sujeito a má utilização ou negligência;
O produto tiver sido danificado por objetos, substâncias
ou acidentes estranhos;
Forem tentadas reparações por pessoas que não os
agentes reparadores autorizados ou o pessoal da
assistência técnica da Black+Decker .
Para reclamar a garantia, terá de apresentar o comprovativo
da compra ao vendedor ou agente reparador autorizado.
Pode verificar a localização do agente reparador mais
próximo, contactando os escritórios locais Black+Decker
através do endereço indicado neste manual.
Como alternativa, está disponível na Internet uma lista de
agentes reparadores Black+Decker, dados completos do
serviço de pós-venda e contactos em:at: www.2helpU.com.
22
Page 23

(ﺔﻴﺴﻴﺋﺮﻟﺍ ﺕﺎﻤﻴﻠﻌﺘﻟﺍ)
ﺔـﻴـﺑﺮـﻌـﻟﺍ
πH ,iôNC’G á«dõæŸG áeɪ≤dG ™e ¬æe ¢ü∏îàJ Óa ,¬eóîà°ùJ ó©J ⁄ GPEG
.π°üØæŸG ™ªé∏d èàæŸG Gòg áMÉJEG øe ócCÉJ
уfBG ∑УH дЙйажe фjhуJ IOЙYE’ ≥aфe фµjO уfBG ∑УH бcцT фaƒJ •
.πª©∏d É¡à«MÓ°U ΩóYh ÉgôªY ájÉ¡f ¤EG É¡dƒ°Uh Oôéà ôµjO
≈Lôj ,áeóÿG √òg øe IOÉØà°SÓd .ÉkfÉ› áeóÿG √òg Ëó≤J ºàjh
√QhóH ¤ƒàj ±ƒ°S …òdGh óªà©e áfÉ«°U π«ch …CG ¤EG èàæŸG IOÉYEG
.ЙжY бHЙ«f дЙйажŸG ™ªL
∫ÓN øe óªà©e áfÉ«°U π«ch ÜôbCG ™bƒe ≈∏Y ±ô©àdG ∂æµÁ •
‘ í°VƒŸG ¿Gƒæ©dG ‘ »∏ëŸG ôµjO ófBG ∑ÓH Öàµe ≈∏Y ∫É°üJ’G
øjóªà©ŸG áfÉ«°üdG AÓcƒH áªFÉb óLƒJ ,∂dP øe k’óHh .π«dódG Gòg
ó©H Ée äÉeóÿ á∏eɵdG π«°UÉØàdGh ôµjO ófBG ∑ÓH ácöûd Ú©HÉàdG
™bƒŸG ≈∏Y âfÎfE’G ≈∏Y ÉæH á°UÉÿG ∫É°üJ’G πFÉ°Shh ™«ÑdG
.www.2helpU.com :ÊhεdE’G
á«æØdG äÉfÉ«ÑdG
AF300 / AF400
240 - 220 OOÎe QÉ«J âdƒa πNódG á«àdƒa
1500 äGh ábÉ£dG πNO
¿Éª°†dG
.πLC’G πjƒW Ékfɪ°V ¢Vô©Jh É¡JÉéàæe IOƒL ‘ ôµjO ófBG ∑ÓH ≥ãJ
’h ¿ƒfÉ≤dG É¡ëæÁ »àdG ∂bƒ≤M ¤EG áaÉ°VE’ÉH ¿ƒµj Gòg ¿Éª°†dG ¿É«H
.∫GƒMC’G øe ∫ÉM …CÉH É¡H πîj
á≤£æeh »HhQhC’G OÉ–’G ‘ AÉ°†YC’G ∫hódG º«dÉbCG ‘ ¿Éª°†dG …öùj
.á«HhQhC’G Iô◊G IQÉéàdG
hCG OGƒŸG ‘ Ö«Y ÖÑ°ùH ôµjO ófBG ∑ÓH èàæe ‘ π∏N OƒLh ádÉM ‘
,AGöûdG ïjQÉJ øe Gkô¡°T 24 ∫ÓN ,ÒjÉ©ŸG ™e ≥aGƒàdG ΩóY hCG áYÉæ°üdG
™e дЙйажŸG мУ°UEGh бС«©ŸG AGхLC’G ∫GуСа°SG фµjO уfBG ∑УH шª°†J
πbCG ¿Йª°†d дЙйажŸG √тg ∫GуСа°SG hCG »©«С£dG ≈∏СdGh πcBЙаdG IЙYGфe
:⁄ Ée 𫪩∏d êÉYREG
;ÒLCÉJ ¢VGôZCG hCG á«æ¡e hCG ájQÉŒ ¢VGôZCG ‘ èàæŸG ΩGóîà°SG ºàj
;∫ɪgE’G hCG ΩGóîà°S’G Aƒ°ùd èàæŸG ¢Vô©àj
;çOGƒM hCG áÑjôZ OGƒe hCG AÉ«°TCG áé«àf ∞∏à∏d èàæŸG ¢Vô©àj
áfÉ«°üdG AÓch ÒZ ¢UÉî°TCG ᣰSGƒH èàæŸG ìÓ°UEG ádhÉfi ºàj
.ôµjO ófBG ∑ÓH ácöûd ™HÉàdG áfÉ«°üdG ≥jôa hCG øjóªà©ŸG
AGöûdG π«dO Ëó≤J ¤EG êÉà– ±ƒ°S ,¿Éª°†dG ÖLƒÃ áÑdÉ£e Ëó≤àd
π«ch ÜôbCG ™bƒe ≈∏Y ±ô©àdG ∂æµÁh .óªà©ŸG áfÉ«°üdG π«ch hCG ™FÉÑ∏d
‘ »∏ëŸG ôµjO ófBG ∑ÓH Öàµe ≈∏Y ∫É°üJ’G ∫ÓN øe óªà©e áfÉ«°U
.π«dódG Gòg ‘ í°VƒŸG ¿Gƒæ©dG
ácöûd Ú©HÉàdG øjóªà©ŸG áfÉ«°üdG AÓcƒH áªFÉb óLƒJ ,∂dP øe k’óHh
πFÉ°Shh ™«ÑdG ó©H Ée äÉeóÿ á∏eɵdG π«°UÉØàdGh ôµjO ófBG ∑ÓH
:ÊhεdE’G ™bƒŸG ≈∏Y âfÎfE’G ≈∏Y ÉæH á°UÉÿG ∫É°üJ’G
.www.2helpU.com
.™HÉ°UCG ¤EG É¡©
.ïÑ£ŸG πjOÉæà ɡØ
™HÉ°UCG ™°V ºK ,AÉYh ‘ ¿ƒàjõdG âjR øe á≤∏©e 2/1 ™°V •
.âjõdÉH ™HÉ°UC’G ≈n£¨oJ ≈àM ɪ¡Ñ
äGhOCG ióMEÉH hCG ,∑ó«H AÉYƒdG øe ¢ùWÉ£ÑdG ™HÉ°UCG êôNCG •
™HÉ°UCG ™°V .AÉYƒdG ‘ óFGõdG âjõdG Ö°SÎj å«ëH ;ïÑ£ŸG
‘ ¢ùWÉ£H ™HÉ°UCG øe ¬H Ée πc ÆpôØoàd AÉYƒdG π
.»∏≤dG AÉYh ô©b ‘ óFGõdG âjõdG Ö°SôJ ™æŸ ;kIóMGh ká©aO IÉØ°üŸG
‘ IOQGƒdG äɪ«∏©à∏d Ék≤ah ¢ùWÉ£ÑdG ™HÉ°UCG »∏b ≈∏Y ¢UôMG •
ØLh ,Gkó«L ¢ùWÉ£ÑdG ™HÉ°UCG π°ùZG •
p
q
£bh ,¢ùWÉ£ÑdG
q
p
∏bh ¬bƒa ¢ùWÉ£ÑdG
q
p
.IÉØ°üŸG ‘ ¢ùWÉ£ÑdG
öûb •
“ ’ :á¶MÓe
p
o
.π°üØdG Gòg
p
q
áfÉ«°üdGh ∞«¶æàdG
øe ¢ùHÉ≤dG ∫RCGh RÉ¡÷G 𫨰ûJ ∞bhCG ,áfÉ«°üdGh ∞«¶æàdG πÑb !ôjò–
.É¡Ø«¶æJ ádhÉfi πÑb ÉkeÉ“ OÈJ IóMƒdG ∑ôJG !ôjò–
.πFÉ°S …CG ‘ RÉ¡÷G ¢ùª¨J ’ •
∞«¶жаdG IЙ°Tфa hCG шjхжСdG hCG дЙШШоŸG ∫Йª©а°SЙH Йk≤∏£e º≤J ’ •
.á«fó©ŸG IÉ°TôØdG hCG »FÉ«ª«µdG í°ùŸG ™£bh ᫵«à°SÓÑdG
∞£°TG .¿ƒHÉ°Uh øNÉ°S AÉà »∏≤dG AÉYhh IÉØ°üŸG π°ùZ øµÁh •
.∞«¶æàdG ó©H Gkó«L ∞éj ¿CG ¤EG RÉ¡÷G
¢Tɪb á©£≤H á«∏NGódG ¬FGõLCGh RÉ¡÷G øe »LQÉÿG í£°ùdG í°ùeG •
ºµëàdG áMƒdh á«FÉHô¡µdG ábÉ£dG πHÉc ¿ƒµj ¿CG ≈∏Y ¢UôMG •
.äÓµ°ûe çhóM ‘ ÖÑ°ùàJ ¿CG øµª«a ’EGh ,áaÉLh áØ«¶f
¿CG øe ócCÉJ .ôNBG πFÉ°S …CG ‘ hCG AÉŸG ‘ RÉ¡÷G ¢ùªZ ô¶ëj :¬«ÑæJ
.¬dɪ©à°SG πÑb ÉkeÉ“ ±ÉL RÉ¡÷G
.¢ùÑ≤ŸG
.(1) á∏∏Ñe
AÉHô¡µdG ¢ùÑ≤e ∫GóÑà°SG
:ójóL »FÉHô¡c QÉ«J ¢ùHÉb Ö«cÎd IQhö†dG âYO GPEG
.áæeBG á≤jô£H Ëó≤dG ¢ùHÉ≤dG øe ¢ü∏îJ •
.ójó÷G ¢ùHÉ≤dG ‘ »◊G ±ô£∏d »æÑdG ∂∏°ùdG π«°UƒàH ºb •
.ójÉëŸG ±ô£dÉH ¥QRC’G π«°UƒàdG ∂∏°S π°UhCG •
/ö†NC’G ∂∏°ùdG π«°UƒàH ºb ,( kÉ°VQDƒe) 1 áÄØdG èàæŸG ¿Éc GPEG •
’ ) ÚàdRÉY Úà≤Ñ£H kGOhõe á«fÉãdG áLQódG øe RÉ¡÷G ¿Éc GP !á¶MÓe
ɪ¡æe …CG π«°UƒJ ºàj ’ ,(§≤a ¿ÉæKG ¿ÉaôW ’EG πHɵdG πNGO óLƒj
IOƒ÷G äGP ¢ùHGƒ≤dÉH á≤aôŸG Ö«cÎdG äɪ«∏©J ™ÑJG .»°VQC’G ±ô£dÉH
»∏°UC’G ô¡°üŸG ∞«æ°üJ ¢ùØf ≈∏Y ∫óÑà°ùŸG ô¡°üŸG ¿ƒµj ¿CG Öéj
»FÉHô¡µdG QÉ«àdG ¢ùHÉb ∫GóÑà°SG ¢Uƒ°üîH á≤HÉ°ùdG äɪ«∏©àdG !ôjò–
.§≤a óªà©ŸG áeóÿG õcôe »ØXƒÃ á°UÉN
.»°VQC’G ±ô£dÉH ôØ°UC’G
.á«dÉ©dG
.èàæŸG ™e ≥aôŸG
áÄ«ÑdG ájɪM
™e èàæŸG Gòg øe ¢ü∏îàdG ΩóY Ωõ∏j .π°üØæŸG ™ª÷G
.ájOÉ©dG á«dõæŸG áeɪ≤dG
hCG ,∂H ¢UÉÿG ôµjO ófBG ∑ÓH èàæe ∫GóÑà°SG ΩÉjC’G øe Ωƒj ‘ Ωõd GPEG
23
Page 24

ﺔـﻴـﺑﺮـﻌـﻟﺍ
(ﺔﻴﺴﻴﺋﺮﻟﺍ ﺕﺎﻤﻴﻠﻌﺘﻟﺍ)
º©W ≈∏Y ∫ƒ°üë∏d áLRÉ£dG ¢ùWÉ£ÑdG ¤EG âjõdG ¢†©H ∞°VCG •
‘ øNÉ°ùdG AGƒ¡dG IÓ≤e ‘ äÉfƒµŸG »∏b ≈∏Y ¢UôMGh .¢ûeô≤e
π°†aCG ≈∏Y ∫ƒ°üë∏d âjõdG áaÉ°VEG øe IOhó©e ≥FÉbO ¿ƒ°†Z
.èFÉàædG
AGƒ¡dG IÓ≤e ‘ ≥oéo°ùdÉc ¿ƒgódÉH á©Ñ°ûŸG äÉfƒµŸG
ö†o– ’ •
p
q
.øNÉ°ùdG
‘ ÉgÒ°†– ¿ôØdÉH ÉgOGóYEG …ôéj »àdG á©jöùdG äÉÑLƒ∏d øµÁ •
.øNÉ°ùdG AGƒ¡dG IÓ≤e
.ΩGôL 500 á°ûeô≤ŸG ¢ùWÉ£ÑdG Ò°†ëàd πãeC’G QGó≤ŸG ≠∏Ñj •
áØ«ØÿG äÉÑLƒdG OGóYE’ Ò°†ëàdG á≤Ñ°ùŸG áæ«é©dG Ωóîà°SG •
á≤Ñ°ùŸG áæ«é©dG Ö∏£àJ ɪc .π¡°Sh ™jöS ƒëf ≈∏Y á«°ûëŸG
ÉgÒ°†– iôL »àdG áæ«é©dG øe πbCG Ò°†– âbh Ék°†jCG Ò°†ëàdG
.∫õæŸG ‘
GPEG ,øNÉ°ùdG AGƒ¡dG IÓ≤e IÉØ°üe ‘ ¿ôa ≥ÑW hCG õÑN AÉfEG ™°V •
»∏b ‘ ÖZôJ âæc GPEG hCG ,IÒ£a hCG ∂«c õÑN ‘ ÖZôJ âæc
.á«°ûfi äÉfƒµe hCG âàØàdG á∏¡°S äÉfƒµe
Úî°ùJ IOÉYE’ øNÉ°ùdG AGƒ¡dG IÓ≤e ΩGóîà°SG Ék°†jCG ∂d ≈æ°ùàj •
≈∏Y IQGô◊G áLQO §Ñ°VG ,äÉfƒµŸG Úî°ùJ IOÉYEÓa .äÉfƒµŸG
.≥FÉbO 10 ¤EG π°üJ IóŸ ájƒÄe áLQO 150
(á≤«bO) âbƒdG
١٦-٩
١١٫٢٠
١٠-١٦
٢٢-١٨
١٨-١٢
١٨-١٥
١٨-١٥
١٢-٨
١٤-١٠
١٤-٧
١٥-١٣
٢٢-١٨
١٥-١٠
١٠-٨
١٠-٦
١٠-٦
١٠-٨
١٠
٢٥-٢٠
٢٢-٢٠
١٨-١٥
٢٠
≈°übC’G ó◊G - ≈fOC’G ó◊G
(ºL) ᫪µdG
٧٠٠-٣٠٠
٧٠٠-٣٠٠
(·8×8) ∫õæŸG ‘ Ió©oe Iôªfi ¢ùWÉ£H
٨٠٠-٣٠٠
٨٠٠-٣٠٠
∫õæŸG ‘ Iqó©oe ¢ùWÉ£H äÉÑ©µe
٧٥٠-٣٠٠
٢٥٠
٥٠٠
٥٠٠-١٠٠
٥٠٠-١٠٠
٥٠٠-١٠٠
٥٠٠-١٠٠
٥٠٠-١٠٠
٥٠٠-١٠٠
٤٠٠-١٠٠
٥٠٠-١٠٠
٤٠٠-١٠٠
٤٠٠-١٠٠
٤٠٠-١٠٠
٣٠٠
٤٠٠
٣٠٠
٤٠٠
IôªëŸG ¢ùWÉ£ÑdG
á©«aQ Ióª› ¢ùWÉ£Hõ¡dG
ᵫª°S Ióª› ¢ùWÉ£H
∫õæŸG ‘ Iqó©oe ¢ùWÉ£H íFGöT
»à°ShQ
á°ûeô≤e ¢ùWÉ£H
Qƒ«Wh º◊
∂«à°S
±hôN º◊ ™£b
ôLôH
±ƒØ∏e ≥é°S
πÑW OGƒYCG
êÉLO Qhó°U
áØ«ØN äÉÑLh
™«HôdG ±ƒØ∏e
IóªéŸG ñGôØdG ¢UGôbCG
IóªéŸG ∑ɪ°SC’G ™HÉ°UCG
IóªéŸG •Éª°ù≤ÑdG äÉÑLh
Í÷ÉH á©jöùdG
Iƒ°ûfi äGhö†N
õÑÿG
∂«c
IÒ£a
∂©c
Iƒ∏M áØ«ØN äÉÑLh
õ¡dG
âjõdG øe á≤∏©e 2/1 ∞°VCG
âjõdG øe á≤∏©e 2/1 ∞°VCG
âjõdG øe á≤∏©e 2/1 ∞°VCG
¿ôØdG ‘ qó©oŸG ´ƒædG Ωóîà°SG
¿ôØdG ‘ qó©oŸG ´ƒædG Ωóîà°SG
¿ôØdG ‘ qó©oŸG ´ƒædG Ωóîà°SG
¿ôØdG ‘ qó©oŸG ´ƒædG Ωóîà°SG
õÑN AÉYh Ωóîà°SG
¿ôØdG ≥ÑW/õÑN AÉYh Ωóîà°SG
õÑN AÉYh Ωóîà°SG
¿ôØdG ≥ÑW /õÑN AÉYh Ωóîà°SG
õ¡dG
õ¡dG
õ¡dG
õ¡dG
õ¡dG
õ¡dG
õ¡dG
õ¡dGá«aÉ°VEG äÉeƒ∏©e
IQGô◊G áLQO
(ájƒÄe áLQO)
٢٠٠
٢٠٠
٢٠٠
١٨٠
١٨٠
١٨٠
٢٠٠
١٨٠
١٨٠
١٨٠
٢٠٠
١٨٠
١٨٠
٢٠٠
٢٠٠
٢٠٠
١٨٠
١٦٠
١٦٠
١٨٠
٢٠٠
١٦٠
»∏≤dG á«∏ªY ‘ CGóÑJ ÉeóæY Ò°†ëàdG âbh ¤EG ≥FÉbO 3 ∞°VCG :á¶MÓe
.IOQÉH ∫GõJ ’ øNÉ°ùdG AGƒ¡dG IÓ≤e ¿ƒµJ ɪæ«H
∫õæŸG ‘ Iqó©oŸG IôªëŸG ¢ùWÉ£ÑdG Ò°†–
:á«dÉàdG äGƒ£ÿG ™ÑJG ,∫õæŸG ‘ Iqó©oŸG IôªëŸG ¢ùWÉ£ÑdG Ò°†ëàd
õgh ,(3) »∏≤dG AÉYh øe (1) IÉØ°üŸG ádGREG ∂æµÁ ,¿RƒdG π«∏≤àd :í«ª∏J
≈∏Y ¬©°Vh ,RÉ¡÷G øe »∏≤dG AÉYh êôNCG ,∂dòH ΩÉ«≤∏dh .§≤a IÉØ°üŸG
.¢†Ñ≤ŸÉH IÉØ°üŸG ôjô– QR ≈∏Y §¨°VG ºK ,IQGôë∏d ΩhÉ≤e í£°S
¬Ñæe Qó°ü«°S ,Ò°†ëàdG âbh ∞°üf ≈∏Y âbDƒŸG â£Ñ°V GPCG :í«ª∏J
»æ©j ,∂dP ™eh .äÉfƒµŸG õg âbh Úëj ÉeóæY Ék«¡«ÑæJ ÉkJƒ°U âbDƒŸG
Ò°†ëàdG âbh ≈∏Y iôNCG Iôe âbDƒŸG §Ñ°V ∂«∏Y Ú©àj ¬fCG Gòg
.äÉfƒµŸG õg ó©H »≤ÑàŸG
Qó°üj ø∏a ,πeɵdÉH Ò°†ëàdG âbh ≈∏Y âbDƒŸG â£Ñ°V GPEG :í«ª∏J
≈æ°ùàj ,AÉ¡àf’G πÑbh .»¡£dG á«∏ªY AÉæKCG Ék«¡«ÑæJ ÉkJƒ°U âbDƒŸG ¬Ñæe
,äÉfƒµŸG »¡W iƒà°ùe áaô©Ÿ âbh …CG ‘ »∏≤dG AÉYh êGôNEG ∂d
AÉYh ™°†J Éeó©H πª©dG ∞fCÉà°ùjh Ék«FÉ≤∏J ábÉ£dG 𫨰ûJ ∞bƒà«°Sh
.(𫨰ûàdG ó«b âbDƒŸG ∫Gõj ’) RÉ¡÷G ‘ »∏≤dG
Ò°†ëàdG âbh AÉ°†≤fG óæY Ék«¡«ÑæJ ÉkJƒ°U âbDƒŸG ¬Ñæe Qó°üj •
ΩhÉ≤e í£°S ≈∏Y ¬©°V ºK ,RÉ¡÷G øe »∏≤dG AÉYh êôNCÉa .Ú©ŸG
.IQGôë∏d
¢ùŸG ,∂dòH ΩÉ«≤∏dh .Ékjhój RÉ¡÷G 𫨰ûJ ±É≤jEG Ék°†jCG ∂æµÁ :á¶MÓe
êôNCG hCG ,0 ≈∏Y -TIMER QR §Ñ°VG hCG ,(AF400 RGô£H) OFF QR
.kIöTÉÑe »∏≤dG AÉYh
»¡£dG iƒà°ùe ¤EG É¡dƒ°Uh øe ócCÉà∏d äÉfƒµŸG ¢üëaG •
,ó©H ܃ZôŸG »¡£dG iƒà°ùe ¤EG äÉfƒµŸG π°üJ ⁄ ¿EGh .܃ZôŸG
§Ñ°Vh ,iôNCG Iôe RÉ¡÷G ‘ »¡£dG AÉYh ™°Vh ƒg ∂«∏Y Ée πµa
.á«aÉ°VEG ≥FÉbO ™°†H ≈∏Y âbDƒŸG
§¨°VG ,(IôªëŸG ¢ùWÉ£ÑdÉc) IÒ¨°üdG äÉfƒµŸG ¢†©H ádGRE’ •
.»∏≤dG AÉYh øe É¡LôNCGh ,IÉØ°üŸG ôjô– QR ≈∏Y
âjR …CG ¿CG PEG ;»∏≤dG AÉYh ‘ É¡Ñ«côJ AÉæKCG IÉØ°üŸG Ö∏≤J ’ !ôjò–
.äÉfƒµŸG ≈∏Y Öµ°ùæ«°S AÉYƒdG πØ°SCG ‘ ™ªéàe óFGR
AGƒ¡dÉH »∏≤dG ó©H ÚæNÉ°S äÉfƒµŸGh »∏≤dG AÉYh ¿ƒµj !ôjò–
äÉfƒµŸG ´ƒf Ö°ùëH ∂dPh ,»∏≤dG AÉYh øe QÉîÑdG å©Ñæj ób .øNÉ°ùdG
.øNÉ°ùdG AGƒ¡dG IÓ≤e ‘
.≥ÑW ≈∏Y hCG AÉYh ‘ IÉØ°üŸG Æ
ôa •
p
q
ácƒ°T Ωóîà°SG ,âàØàdG á∏¡°ùdG hCG ºé◊G IÒѵdG äÉfƒµŸG ádGRE’ :í«ª∏J
.IÉØ°üŸG øe É¡LGôNE’
íÑ°üJ ¿CG åÑ∏J ’ ,äÉfƒµŸG øe ᫪c »∏b øe AÉ¡àf’G óæY •
.iôNCG ᫪c Ò°†ëàd IõgÉL IÓ≤ŸG
äGOGóYE’G
»àdG äÉfƒµª∏d á«°SÉ°SC’G äGOGóYE’G ójó– ≈∏Y ‹ÉàdG ∫hó÷G ∑óYÉ°ùj
.ÉgÒ°†– ‘ ÖZôJ
±ÓàN’ Gkô¶f .ájôjó≤J äGOGóYE’G √òg ¿CG ∑QÉÑàYG ‘ ™°V :á¶MÓe
Ée áªK óLƒj Óa ,É¡Yƒfh ¬∏µ°Th É¡ªéMh ÉgCÉ°ûæe å«M øe äÉfƒµŸG
.É¡æe
πµd πãeC’G OGóYE’G øª°†j
q
m
»∏≤dG AÉæKCG äɶë∏d RÉ¡÷G øe »¡£dG AÉYh êGôNEG Oɵj ’ :á¶MÓe
øNÉ°ùdG AGƒ¡dG á«æ≤J ¿CG GPEG ;»∏≤dG á«∏ªY ≈∏Y ôKDƒj øNÉ°ùdG AGƒ¡dÉH
.∫É◊G ‘ RÉ¡÷G πNGO AGƒ¡dG Úî°ùJ ó«©J á©jöùdG
äÉ뫪∏J
âbh §Ñ°V ¤EG äÉfƒµŸG øe ÉkªéM ÈcC’G äÉ«ªµdG êÉà– •
πbCG Ò°†– âbh §Ñ°V Ú©àj ÚM ‘ ,kÓ«∏b ∫ƒWCG Ò°†–
.ÉkªéM ô¨°UC’G äÉfƒµŸG äÉ«ªµd áØ«ØW áLQóH
≈∏Y Ò°†ëàdG âbh AÉæKCG ÉkªéM ô¨°UC’G äÉfƒµŸG õg πª©j •
…ƒà°ùe ±ÓàNG ÖæŒ ≈∏Y óYÉ°ùj ɇ ;á«FÉ¡ædG áé«àædG Ú°ù–
.äÉfƒµª∏d »∏≤dG
24
Page 25

(ﺔﻴﺴﻴﺋﺮﻟﺍ ﺕﺎﻤﻴﻠﻌﺘﻟﺍ)
ﺔـﻴـﺑﺮـﻌـﻟﺍ
.§≤a á«£¨J á≤Ñ£c ΩÉ©£dG ¤EG âjõdG ∞°VCG •
.(7) IÉØ°üŸG ‘ âjõdG øe ¢ü∏îàdÉH Ék≤∏£e º≤J ’ !ôjò–
.IQGôë∏d áehÉ≤eh áàHÉKh ájƒà°ùe á«°VQCG ≈∏Y RÉ¡÷G ™°V •
.πª©j ød RÉ¡÷Éa ’EGh ,Gkó«L RÉ¡÷G ‘ IÉØ°üŸG â«ÑãJ Öéj :á¶MÓe
.¢VQDƒŸG QGó÷G ¢ùÑ≤e ‘ »FÉHô¡µdG QÉ«àdG ∂∏°S π
.ôNBG πFÉ°S …CG hCG âjõdÉH IÓ≤ŸG Aπe ô¶ëoj !ôjò–
.RÉ¡÷G ¥ƒa A»°T …CG ™°†J ’ !ôjò–
;RÉ¡÷G øe »Ø∏ÿG Aõ÷ÉH AGƒ¡dG πNóe ≈∏Y A»°T …CG ™°†J ’ !ôjò–
.»¡£dG áé«àf ≈∏Y ÒKCÉàdGh ,AGƒ¡dG ≥aóJ ábÉYEG ¬fCÉ°T øe Gò¡a
°Uh •
p
q
RÉ¡÷G ΩGóîà°SG
™LGQ .äÉfƒµŸG øe IÒÑc áYƒª› OGóYEG á«fɵeEÉH AGƒ¡dG IÓ≤e ≈¶–
."äGOGóYE’G" ∫hóL º°ùb
øNÉ°ùdG AGƒ¡dÉH »∏≤dG
.¢VQDƒe QGóL ¢ùÑ≤à »FÉHô¡µdG QÉ«àdG ¢ùHÉb π
.(A ôµ°ûdG) øNÉ°ùdG AGƒ¡dG IÓ≤e øe (3) »∏≤dG AÉYh Öë°SG •
(2) ¬«∏Y §¨°VG ºK ,ΩÉeC’G ¤EG (9) IÉØ°üŸG ôjô– QR AÉ£Z ™aOG •
(C πµ°ûdG) (3) IÓ≤ŸG øe (1) IÉØ°üŸG ™aQG •
.(1) IÉØ°üŸG ‘ äÉfƒµŸG ™°V •
ô¶fG) ¬H ≈°UƒŸG QGó≤ŸG RhÉéàJ hCG ,IÉØ°üŸG Aπe ‘ •pôØoJ ’ :á¶MÓe
.í«ë°U ƒëf ≈∏Y øNÉ°ùdG AGƒ¡dG IÓ≤e ‘ »∏≤dG AÉYh Ö«côJ óYCG •
ødh .¬«a IÉØ°üŸG ™°Vh ¿hO »∏≤dG AÉYh ΩGóîà°SG Ék≤∏£e ô¶ëoj :á¶MÓe
.É¡«a ÉkàÑãe »∏≤dG AÉYh øµj ⁄ GPEG ,¿Éî°ùdG AGƒ¡dG IÓ≤e πª©J
¿ƒµj ¬fCG PEG ;¬eGóîà°SG Qƒah ΩGóîà°S’G AÉæKCG »∏≤dG AÉYh ¢ùª∏J ’ :¬«ÑæJ
Ωóîà°SGh ,âbDƒŸG ¢†Ñ≤e QpOCG ,AF300 RGôW øe RÉ¡÷G 𫨰ûàd •
IQGô◊G áLQO ójóëàd "äGOGóYE’G" º°ùb ô¶fGh .áHƒZôŸG IQGô◊G
."äGOGóYE’G" º°ùb ô¶fG ,ΩÉ©£dG Ò°†ëàd ܃∏£ŸG âbƒdG ójóëàd •
.-TIMER hCG +TIMER QR ΩGóîà°SÉH âbDƒŸG OGóYEG §Ñ°VGh
¢ùŸG hCG ,¬aÉ≤jE’ OFF QR ¢ùŸG hCG ,ON QR ¢ùŸG ,RÉ¡÷G 𫨰ûàd •
á«∏ªY AÉæKCG ôNB’ ÚM øe A»Ø£æjh Úî°ùàdG ™°Vh öTDƒe A»°†«°S •
πØ°SCG ‘ äÉfƒµŸG øe ¬à«Ø°üJ äôL …òdG óFGõdG âjõdG ™
âbh ∫ÓN »∏≤dG á«∏ªY AÉæKCG Égõg ¤EG äÉfƒµŸG ¢†©H êÉà– •
»∏≤dG AÉYh Öë°SG ,äÉfƒµŸG õ¡d ."äGOGóYE’G" º°ùb ô¶fG ;Ò°†ëàdG
IÓ≤e ‘ »∏≤dG AÉYh Ö«côJ óYCG ºK .√
.§≤a ¢†Ñ≤ŸG øe ¬cÉ°ùeEG ≈∏Y ¢UôMÉa .áfƒî°ùdG ójó°T
»¡£dG IQGôM áLQO §Ñ°†d IQGô◊G áLQO ‘ ºµëàdG ¢†Ñ≤e
áLQO Ú«©àd MODE QR ¢ùŸG ,AF400 RGô£H ≥∏©àj ɪ«a •
.00 ≈∏Y âbDƒŸG §Ñ°†d -TIMER QR
.GkAƒ°V LED ìÉÑ°üe Qó°ü«°S •
.Ú©ŸG Ò°†ëàdG âbƒd ‹RÉæàdG ó©dG ‘ âbDƒŸG CGóÑ«°S •
¬aÉ≤jEGh Úî°ùàdG öüæY 𫨰ûJ ¤EG AGôLE’G Gòg Ò°ûjh .»¡£dG
.õ¡dG AGôLEG AÉæKCG ¢†Ñ≤ŸÉH IÉØ°üŸG ôjô– QR ≈∏Y §¨°†J ’ :¬«ÑæJ
.IOóëŸG IQGô◊G áLQóH ®ÉØàMÓd
õgh ,¢†Ñ≤ŸG øe RÉ¡÷G øe
p
q
.»¡£dG ™HÉJh ,øNÉ°ùdG AGƒ¡dG
°Uh •
p
q
.(B πµ°ûdG)
.("äGOGóYE’G" º°ùb
.áHƒZôŸG
.áÑ°SÉæŸG
ªéo«°S •
n
q
.(3) »∏≤dG AÉYh
AÉæKCG RÉ¡é∏d »LQÉÿG í£°ùdG IQGôM áLQO ™ØJôJ ób :á¶MÓe
.ΩGóîà°S’G
á«FÉHô¡µdG áeÓ°ùdG
»FÉHô¡µdG QÉ«àdG Qó°üe ó¡L ≥aGƒJ øe ócCÉàdG ΩGóîà°S’G πÑb »¨Ñæj
.äÉØ°UGƒŸG áMƒd ≈∏Y í°VƒŸG ó¡÷G ™e
kɪFGO ≥≤–h .Ék°VQDƒe èàæŸG GP ¿ƒµj ¿CG Öéj
í°VƒŸG ó¡÷G ™e »°ù«FôdG QÉ«àdG ó¡L ≥aGƒJ øe
Úæ≤àdG áMƒd ≈∏Y
ô¶ëoj .»FÉHô¡µdG QÉ«àdG Qó°üe ™e RÉ¡÷G ¢ùHGƒb ≥aGƒJ Ωõ∏j •
.á≤jôW …CÉH ¢ùHÉ≤dG πjó©J
á°VQDƒŸG á«FÉHô¡µdG Iõ¡LC’G ™e ÅjÉ¡e ¢ùHGƒb …CG Ωóîà°ùJ ’ •
É¡àÑ°SÉæeh ádó©ŸG ÒZh á«∏°UC’G ¢ùHGƒ≤dG ΩGóîà°SG .(1 áÄØdG)
.á«FÉHô¡c áeó°üd ¢Vô©àdG ôWÉfl øe π∏≤j AÉHô¡µdG òØæŸ
¢ùHÉ≤dG hCG ∂∏°ùdG ôª¨J ’ ,á«FÉHô¡c áeó°üd ¢Vô©àdG ô£N Öæéàd •
.ôNBG πFÉ°S …CG hCG AÉŸG ‘ RÉ¡÷G hCG
"1" áÄØdG èàæeh OGóàe’G äÓHÉc
øeh á°VQDƒe IGOC’G âfÉc GPEG ܃∏≤dG »KÓK πHÉc ΩGóîà°SG Öéj •
.1 áÄØdG
(Ωób 100) kGÎe 30 ¤EG ¬dƒW π°üj ójó“ πÑc ΩGóîà°SG øµÁ •
.ábÉ£∏d ¿Gó≤a …CG çhóM ¿hO
hCG ™æ°üoŸG πÑb øe ¬dGóÑà°SG Öéj ,AÉHô¡µdG ∂∏°S ∞∏J ádÉM ‘ •
Öæéàd BLACK+DECKER øe óªà©e áeóN õcôe …CG
.ôWÉîŸG
RÉ¡÷G ≈∏Y IOƒLƒŸG äÉ≤°ü∏ŸG
:IGOC’G ≈∏Y ïjQÉàdG Oƒc ™e á«dÉàdG Iô¨°üŸG Qƒ°üdG óLƒJ
.øNÉ°S í£°S !ôjò–
¢UGƒÿG
IÉØ°üŸG .1
IÉØ°üŸG ôjô– QR .2
IÓ≤ŸG .3
(§≤a AF400 RGôW ‘ Iôaƒàe) LED ¢VôY á°TÉ°T .4
ºµëàdG áMƒd .5
AGƒ¡dG πNóe .6
AGƒg êôfl .7
»FÉHô¡µdG QÉ«àdG ∂∏°S .8
IÉØ°üŸG ôjô– QR AÉ£Z .9
ΩGóîà°S’G
AGõLC’G πc π°ù¨H Ékjhój ºb ,¤hC’G Iôª∏d ΩGóîà°S’G πÑb :á¶MÓe
.∂Ø∏d á∏HÉ≤dG
º°ûJ ¿CG øµÁh .¿ÉNódG ¢†©H Aõ÷G Qó°üj ¿CG øµÁ ájGóÑdG ‘ •
áaô¨dG ¿CG øe ≥≤– .≥∏≤∏d m´GO ∑Éæg ¢ù«d øµd ,kÓ«∏b ¬àëFGQ
.ájƒ¡àdG Ió«L
25
Page 26

ﺔـﻴـﺑﺮـﻌـﻟﺍ
(ﺔﻴﺴﻴﺋﺮﻟﺍ ﺕﺎﻤﻴﻠﻌﺘﻟﺍ)
áaô©ŸGh IÈÿGh áæjóàŸG á«∏≤©dGh á«°ù◊Gh á«ægòdGh ájó°ù÷G
hCG º¡«∏Y ±GöTE’G πX ‘ ’EG ,(∫ÉØWC’G ∂dP ‘ ÉÃ) Úà∏«∏≤dG
¢üî°ûdG πÑb øe RÉ¡÷G ΩGóîà°SÉH á≤∏©àŸG äɪ«∏©àdG º¡FÉ£YEG
.º¡àeÓ°S øY ∫hDƒ°ùŸG
.RÉ¡÷ÉH º¡ãÑY ΩóY ¿Éª°†d ∫ÉØWC’G ≈∏Y ±GöTE’G Öéj •
ΩGóîà°S’G ó©H
∑ôJGh AÉHô¡µdG òNCÉe øe ¢ùHÉ≤dG ´õfGh RÉ¡÷G 𫨰ûJ ±É≤jEÉH ºb •
RÉ¡÷G AGõLCG øe …CG Ò«¨J πÑbh áÑbGôe ¿hO ¬côJ πÑb OÈj RÉ¡÷G
.É¡°üëa hCG É¡Ø«¶æJ hCG
Öéj .±ÉL ¿Éµe ‘ ¬æjõîJ Öéj ,RÉ¡÷G ΩGóîà°SG ΩóY ádÉM ‘ •
.∫ÉØWC’G ∫hÉæàe øY Gkó«©H áfqõîŸG Iõ¡LC’G ™«ªL ßØM
ìÓ°UE’Gh ¢üëØdG
hCG áØdÉJ AGõLCG ájCG øY ∞°ûµ∏d RÉ¡÷G ¢üëaG ,ΩGóîà°S’G πÑb •
,QGQRC’G ‘ ∞∏J hCG ,AGõLC’G ‘ Qƒ°ùc OƒLh ΩóY øe ≥≤– .áÑ«©e
.RÉ¡÷G 𫨰ûJ ≈∏Y ôKDƒJ ób ádÉM …CG hCG
.Ö«Y hCG ∞∏J ¬H AõL …CG OƒLh ádÉM ‘ RÉ¡÷G Ωóîà°ùJ ’ •
.áØdÉàdG hCG IQƒ°ùµŸG AGõLC’G ìÓ°UEÉH á°üNôe á¡L Ωƒ≤J ¿CG Öéj •
hCG AGÎgG hCG ∞∏J äÉeÓY OƒLh ΩóY øe ≥≤– ,ΩGóîà°S’G πÑb •
.»FÉHô¡µdG QÉ«àdG ∂∏°S ‘ πcBÉJ
∂∏°ùdG hCG ¢ùHÉ≤dG ‘ ∞∏J hCG Ö«Y OƒLh ádÉM ‘ RÉ¡÷G Ωóîà°ùJ ’ •
.»FÉHô¡µdG
∫hÉ– ’ ,AÉHô¡µdG ¢ùHÉb hCG »FÉHô¡µdG QÉ«àdG ∂∏°S ∞∏J ádÉM ‘ •
hCG π«dódG Gòg ‘ IOóëŸG AGõLC’G ±ÓîH AGõLCG …CG ádGREG Ék≤∏£e
.É¡dóÑà°SG
‹É≤ª∏d á«aÉ°VEG áeÓ°S ÒHGóJ
hCG RɨdÉH πª©j ¿Éc AGƒ°S øNÉ°S óbƒe øe Üô≤dÉH RÉ¡÷G ™°†J ’ !ôjò–
.AÉHô¡µdÉH
.á«∏°UC’G äÉfƒµŸG ’EG Ωóîà°ùJ ’ •
äGAGôLEG øe AGôLEG …CG IöTÉÑe πÑb RÉ¡÷G 𫨰ûJ ±É≤jEG øe ócCÉJ :ôjò–
.∞«¶æàdG hCG áfÉ«°üdG
.πFÉ°S …CG ‘ ¢ùHÉ≤dG hCG ¬£jöT hCG ¬JóYÉb hCG RÉ¡÷G ôª¨H º≤J ’ •
.¬°†jQCÉJ ºàj ¿CG Öé«a ,ádÉWEG πHÉc ΩGóîà°SG ” Ée GPEG •
.¬eGóîà°SG πÑb í«ë°U πµ°ûH ≥∏¨e ÜÉÑdG ¿CG øe ≥≤– •
AÉæKCG ájƒ¡àdG AÉ£Z äÉëàa øe øNÉ°ùdG QÉîÑdGh AGƒ¡dG Üöùàj ób :¬«ÑæJ
.ΩGóîà°S’G
QÉîH É¡æe Üöùàj ó≤a ;IÓ≤ŸG íàa óæY Qò◊G »NƒJ »¨Ñæj :¬«ÑæJ
.øNÉ°S
.áæNÉ°S äÉ«dɪc ™e πeÉ©àdG óæY ¿ôØdG äGRÉØb Ωóîà°SG •
.IOQƒŸG äÉ«dɪµdG ΩGóîà°SÉH »¡£dÉH ºb §≤a •
ájɪ◊ á£bÉ°ùàŸG äGô£≤dG á«æ«°U ΩGóîà°SG ≈∏Y ÉkªFGO ¢UôMG •
.IóYÉ≤dG
.ájƒ¡à∏d RÉ¡÷G ∫ƒM á«aÉc áMÉ°ùe ∑ôJ Ωõ∏j •
hCG ∞«¶æàdG ∫ɪYCG AGôLEG πÑb »FÉHô¡µdG QÉ«àdG øY RÉ¡÷G π°üØH ºb •
.áfÉ«°üdG
.∑Ó°SC’G áYƒª› h RÉ¡÷G øY äÉfGƒ«◊G h ∫ÉØWC’G ó©HCG •
.∫ÉØWC’G øe Üô≤dÉH RÉ¡÷G ∫ɪ©à°SG óæY áHƒ∏£e Üôb øY áÑbGôŸG •
hCG »LQÉÿG âbDƒŸG πFÉ°Sh ᣰSGƒH 𫨰ûà∏d ºª°üe ÒZ RÉ¡÷G Gòg •
.π°üØæŸG ó©H øY ºµëàdG Ωɶf
ΩGóîà°S’G øe ¢Vô¨dG
BLACK+DECKERá«FGƒ¡dG IÓ≤ŸG º«ª°üJ ”
.øNÉ°ùdG AGƒ¡dG ΩGóîà°SÉH ΩÉ©£dG OGóYE’ AF400/AF300
¢ü°üfl ÒZ RÉ¡÷G Gòg .§≤a ‹õæŸG ΩGóîà°SÓd RÉ¡÷G Gòg º
πª©dG äÉÄ«Hh ÖJɵŸGh ôLÉàŸG ‘ ∫ɪ©dG ïHÉ£e ≥WÉæe •
,ÚMÓØdG 䃫H •
áeÉbE’G øcÉeCGh IÒ¨°üdG ¥OÉæØdGh ¥OÉæØdG ‘ AÓª©dG πÑpb øe •
,QÉ£aE’Gh ΩƒædG øcÉeCG •
™àªà°ùJ ¿CG ∂d ≈æªàfh .BLACK+DECKER èàæe ∑QÉ«àN’ kGôµ°T
.IóY äGƒæ°ùd èàæŸG Gòg ΩGóîà°SÉH
ªo°U
p
q
:‘ ΩGóîà°SÓd
;iôNC’G
;iôNC’G
áeÓ°ùdG äɪ«∏©J
,á«FÉHô¡c π«°UƒJ ∑Ó°SCÉH IOhõŸG Iõ¡LC’G ΩGóîà°SG óæY !ôjò– •
äɪ«∏©àdG ∂dP ‘ Éà ,á«°SÉ°SC’G áeÓ°ùdG ÒHGóJ ´ÉÑJG Öéj
á«FÉHô¡µdG äÉeó°üdG hCG ≥jô◊G ôWÉîŸ ¢Vô©àdG øe óë∏d á«dÉàdG
.RÉ¡÷G 𫨰ûJ πÑb ájÉæ©H πeɵdÉH π«dódG Gòg CGôbG •
πµ°ûH …QGô◊G ™£≤dG §Ñ°V IOÉYEG øY áŒÉf ôWÉfl ´ƒbƒd ÉkÑæŒ •
QÉ«àdÉH √OGóeEG ºàj ¿CG Öéj ’ RÉ¡÷G Gòg ¿EÉa Ö°SÉæe ÒZ
hCG âbDƒŸG πãe ,»LQÉN π«°UƒJ RÉ¡L ∫ÓN øe »FÉHô¡µdG
.᪶àæe áØ°üH É¡FÉØWEGh É¡∏«¨°ûJ ºàj iôNCG IôFGóH ¬∏«°UƒJ
…CG ∫ɪ©à°SG ¿EG .π«dódG Gòg ‘ í°Vƒe ΩGóîà°S’G øe ¢Vô¨dG ¿EG •
»àdG ÒZ RÉ¡÷G Gò¡H á«∏ªY ájCG AGôLEG hCG äÉ≤aôe hCG äÉ≤ë∏e
.á«°üî°ûdG áHÉ°UE’G ô£N ÖÑ°ùj ób π«dódG Gòg ‘ É¡H ≈°Uƒoj
.áLÉ◊G óæY ¬«dEG ´ƒLô∏d π«dódG Gò¡H ßØàMG •
.ájó°ù÷G äÉHÉ°UE’G hCG
∂H ¢UÉÿG RÉ¡÷G ΩGóîà°SG
.RG èdG ΩGóîà°SG óæY ÉkªFGO Qò◊G nñƒJ •
.∫õæŸG êQÉN IÓ≤ŸG Ωóîà°ùJ ’ •
RÉ¡÷G π¨°ûJ ’ .¿Éà∏àÑe ∑Gój ¿ƒµJ ÉeóæY RÉ¡÷G π¨°ûJ ’ •
í£°S ±GƒM ¥ƒa ≥∏©àj ’ å«ëH ábóH »FÉHô¡µdG QÉ«àdG ∂∏°S OôaG •
.ó°üb ¿hO ¬H Ì©àdG hCG ≥∏©àdG ºàj ’ å«ëHh πª©dG
øY ¢ùHÉ≤dG π°üØd »FÉHô¡µdG QÉ«àdG ∂∏°S ó°T kÉ≤∏£e ∫hÉ– ’ •
IQGô◊G øY kGó«©H AÉHô¡µdG ∂∏°S ™°Vh ≈∏Y ¢UôMGh .¢ùÑ≤ŸG
™æ°üà áfÉ©à°S’G ≈Lôj ,»FÉHô¡µdG QÉ«àdG ∂∏°S ∞∏J ádÉM ‘ •
áLQO ¢ùØf ≈∏Y »æa …CG hCG óªà©ŸG áeóÿG π«ch hCG RÉ¡÷G
.á∏ªàfi ôWÉfl …CG Öæéàd ∂dPh ∞dÉàdG ∂∏°ùdG ∫GóÑà°S’ π«gCÉàdG
ΩóY ádÉM ‘ »FÉHô¡µdG QÉ«àdG Qó°üe øY RÉ¡÷G π°üaG •
.≈°übC’G ó◊G iƒà°ùe ¥ƒØj Ée ¤EG RÉ¡÷G CÓ“ ’ •
.QÉ£NCG ´ƒbh ‘ ÖÑ°ùàj ¿CG øµÁ RÉ¡÷G Aπe •GôaEG •
.AÉŸG Üɵ°ùfG ‘ ÖÑ°ùàj ¿CG øµÁ RÉ¡÷G Aπe •GôaEG •
.Úeó≤dG ‘ÉM ¿ƒµJ ÉeóæY
.IOÉ◊G ±Gƒ◊Gh âjõdGh
.∞«¶æàdG πÑbh ΩGóîà°S’G
øjôNB’G áeÓ°S
äGQó≤dG hhP ¢UÉî°TC’G ¬eóîà°ù«d ºª°üe ÒZ RÉ¡÷G Gòg •
26
Page 27

(ﺔﻴﺴﻴﺋﺮﻟﺍ ﺕﺎﻤﻴﻠﻌﺘﻟﺍ)
ﺔـﻴـﺑﺮـﻌـﻟﺍ
٥ ٦
٤
٧
٨
٣
١
٢
27
Page 28

ﺔـﻴـﺑﺮـﻌـﻟﺍ
(ﺔﻴﺴﻴﺋﺮﻟﺍ ﺕﺎﻤﻴﻠﻌﺘﻟﺍ)
٩
٢
٣
A B
١
٣
C
28
Page 29

N a m e s & A dd re ss es f or B la ck & D e c k e r S e r v i ce C o nc es si on ar ie s
ALGERIA: Sarl Outillage Corporation, DW, B&D Pet, HHD, 08, Rue Med Boudiaf (ex TELLA Achen) Cheraga, Alger, Tel:
00213-0-2 1375 13 0/ 00213-0-2 1375 13 1, Fax: 0 0213 -0-2 13 69667, E ma il: hakim.me rdja di @outillag e-dz .com ;
nefissa.merdjadi@outillage-dz.com; sidahmed.merdjadi@outillage-dz.com. AZERBAIJAN: Kontakt - NN LLC, HHD, M.Qashqay 43, Baku
Azerbaijan Az1000, Tel: 00994 12 408 20 50, Mob: +994503442204, Fax: 00994 12 411 70 90, eganjaly@hotmail.com. BAHRAIN: Alfouz
Services Co. WLL, Tubli, DW, B&D PET, HHD, P.O. Box 26562, Tubli, Manama, Tel: +973-17783562/ 17879987, Fax: 17783479, Email:
alfouz@batelco.com.bh. EGYPT: Anasia Egypt for Trading S.A.E. (Mentrade), HHD, P.O. Box 2443, 9, Mostafa Refaat Street, Sheraton
Heliopolis 11361, Cairo, Tel: 00202 22684159, Fax: 00202 22684169, Email: wael.salah@anasia.com; nevien.elbeshbishy@anasia.com.
ETHIOPIA: Seif Tewfik Sherif, DW, B&D PET, HHD, Arada Sub City, Kebele 01/02, Global Insurance Bldg, 2nd Flr, Room 43, P.O. Box
2525, Addis Ababa, Tel: 00-251-11-1563968/ 1563969, Fax: 00-251-11-1558009, Email: seif@ethionet.et; nawanag@ethionet.et;
seifudint@hotmail.com. IRAQ: Financial Links, B&D PET, HHD, Kazzaz Building Arasat Al-Hindia, Block No: 629, Street: 31, Building No:
1, Baghdad, Iraq, Tel: 00964-(0)780-195-2223/ +964-(0)781-3763044, Email: info@financiallinks-truevalue.com. JORDAN: Bashiti
Hardware (Palestine), B&D pet, HHD, "93 King Abdullah, 2nd St., Opp ELBA House, P.O. Box 3005, Amman 11953, Tel:
00962-6-5349098, ext.11, Fax: 00962-6-5330731, Email: manal@bashitihardware.com; info@bashitihardware.com;
rami@bashitihardware.com. KENYA: Zylog Enterprises Ltd. (T/A Leading Concepts), HHD, IPS Building,Kaunda Street, P.O. Box
40877-00100, Nairobi, Tel: 00254-20-6905000, Fax: 00254-20-6905111, Email: admin@alibhaishariff.co.ke;
leading@alibhaishariff.co.ke; info@alibhaishariff.co.ke. LEBANON: Aces Service Centre (Est. F.A.Ketaneh SA), HHD, P.O. Box 90-102,
Nahr El Mot, Seaside Highway, Pharaon Building, Beirut, Tel: 00961-1-898989/ + 961-(1)-262626, Fax: 0096-1-1245880, Email:
Nissrine.hajj@aces.com.lb; Nassim.aziz@Aces.com.lb; Johnny.sailian@Aces.com.lb; Paul.tahan@aces.com.lb. LIBYA: North Africa
Trading (El Ghoul Brothers), DW, B&D Pet, HHD, P.O. Box 348, 7 October Street 11, Benghazi, Tel: 00218-061-3383994, Fax:
00218-092-7640688, Email: nagte.ly@gmail.com; CC: nagte.dpt@gmail.com; elghol@technpower.com. North Africa Trading ( El Ghoul
Brothers), DW, B&D Pet, HHD, AlBarniq Dewalt Center, Mokhazin-elsukar St., ElFallah, Tripoli, Tel: 00218-021-3606430, Fax:
00218-092-6514813, Email: nagte.ly@gmail.com; cc: (nagte.dpt@gmail.com; elghol@technpower.com. Homeworld Co., HHD, Senidal St.
Amr Ibn Elaas Road, Benghazi, Libya, P.O. Box 18182, Salmany, Tel: 00218-61-9094183, ext. 103, Fax: 00218.61.9094123, ext. 108,
Email: nagte.ly@gmail.com. MAURITIUS: J.M. Goupille & Co.Ltd. The Brandhouse Ltd., HHD, Rogers Industrial Park 1, Riche Terre,
Mauritius, Tel: 00230-2069450/ +230-207-1700, Fax: 00230-2483188/ 00230-2069474, Email: claims(service.centre@goupille.mu;
stephanie.bijou@gmail.com; beatrice.li@gmail.com; sharon.laprovidence.jmg@gmail.com, tim.moszuti@goupille.mu; Cc.
Jfrancois.dromart@goupille.mu; mario.catherine@goupille.mu; gerard.gouges@goupille.mu. MOROCCO: UATS, HHD, "No. 37,
Lotissement KADIRIA, km 10 Route, Eljadida, LISASSFA, Casablanca, Morocco, Tel: 00212-522652602, Fax: 00212-522652603, Email:
farah1406@yahoo.fr; noureddine.uats@gmail.com. OMAN: Oman Marketing & Service Co.(Omasco), Wattayah/ Muscat, HHD, B&D
PET, P.O. Box 2734, Behind Honda Showroom, Wattayah, Oman, Tel: +968 24560232/ 24560255, Fax: 24560993, Email:
npservice@omasco.com.om; Cc. ashok.balan@omasco.com.om, damodaran.pillai@omasco.com.om; unnikrishnan@omasco.com.om.
Oman Marketing & Service Co.(Omasco), Sohar, HHD, B&D PET, Al Ohi, Sohar, Oman, Tel: +968 26846379, Fax: 26846379, Email:
sooraj.neeran@omasco.com.om. Oman Marketing & Service Co.(Omasco), Salalah, HHD, B&D PET, Sanaya, Salalah, Oman, Tel: +968
23212290, Fax: 23210936, Email: rajagopal.pr@omasco.com.om. Omar Mohammed Ali Bawain Trading Co., Salalah, Al-Awqadain, PC
217, P.O.Box 112, Salalah, Sultanate of Oman, Tel: +968 23214874, Fax: 23214874/ 23211878, Email: jithin@omartrad.com. PAKISTAN:
Ammar Service & Spares, B&D PET, HHD, Office No 6068, 6th Floor Central Plaza, Behind Gul Plaza Marston Road, Karachi, Tel:
0092-21-32426905/ 021-32775252, Fax: 0092-21-32427214, Email: babji93@yahoo.com. QATAR: Al Muftah Service Centre, Doha,
HHD, B&D PET, Al Wakrah, Road, P.O. Box 875, Doha, Qatar, Tel: +974 44650880/ 44650110/ 44446868, Fax: 44441415/ 44662599,
Email: service@almuftah.com; almuftah@almuftah.com. SAUDI ARABIA: Fawaz Ebrahim Al Zayani Trading Est., Dammam, DW, B&D
PET, HHD, P.O. Box 76026, Al Raka: 31952, Tel: +966-3-8140914, Fax: 8140824, Email: dewaltdammam@hotmail.com;
(vinoderakatyil@yahoo.com); Website: www.fawazalzayanigroup.com. Fawaz Ebrahim Al Zayani Trading Est., Makkah, DW, B&D PET,
HHD, 4753-Wali Alahed, Makkah, 9130-24353 Tel: +966-12-8140914/ 581121778, Fax: 128140914, Email: meraj2515@gmail.com.
Banaja Trading Co. Ltd., Riyadh, HHD, P.O. Box 566, Riyadh-11421, Tel: +966-1-4124444, Fax: 4033378, Email: jijophilip@hotmail.com.
Banaja Trading Co. Ltd, Jeddah, HHD P.O. Box 366, Jeddah-21411, Tel: +966-2-6511111, Fax: 6503668, Email: afouad@banaja.com;
jijophilip@hotmail.com. SOUTH AFRICA: Benray Tool Wholesalers C.C., B&D PET, HHD, 460 Koeberg Road, Cape Town, South Africa,
Tel: 021-551-7244, Fax: 021-552-6395, Email: dewaltct@benray.co.za. Stanley Black & Decker-RSA, BED, PET, HHD, 199 Winze Drive
Stormill Ext 9 Roodepoort Tel: (2711) 472-0454, Fax: (2711) 472-0482, Email: service@sbdinc.co.za; vincent.roets@sbdinc.co.za;
jacquesvincent.roets@sbdinc.com. SRI LANKA: Delmege Forsyth & Co. Ltd, DW, B&D Pet, HHD, Delmege Forsyth & Co. Ltd, Lifestyle
Cluster, 101, Vinayalankara Mawatha, Colombo 10, Sri Lanka, Tel: +94-11-2688462/ +94-11-2, Email: dgeservice@delmege.com;
Samith.lifestyle@delmege.com cc: Jayantha.lifestyle@delmege.com. TUNISIA: Societe Tunisienne De Maintenance (STM), B&D Pet,
HHD, Rue De La Physique. Nouvelle Zone Industrielle Ben Arous.2013 Ben Arous, TUNISIA. Tel: +216-79-389687, Fax: +216-71-385154,
Email: importa@stqu.com. UAE: (Abu Dhabi) Galaxy Equipment Trading, Abu Dhabi, DW, B&D PET, HHD, Madinath Zayed (Baada
Zaid), Abu Dhabi P.C. 58910, Tel: +971-2-8844279, Fax: 8844297, Email: galaxyeq@eim.ae; galaxyeq@emirates.net.ae. Light House
Electrical, Abu Dhabi, DW, B&D PET, HHD, P.O. Box 120, Abu Dhabi, Tel: +971-2-6726131, Fax: 6720667, Email:
dewalt_lhe@hotmail.com. Light House Electrical, Musaffah, DW, B&D PET, HHD, P.O. Box 120, Abu Dhabi, Tel: +971-2-5548315, Fax:
5540461, Email: dewalt_lhe@hotmail.com. (Al Ain) Zillion Equipment and Spare Parts Trading LLC. Al Ain, DW, B&D PET, HHD, P.O. Box
19740, Opp. Bin Sadal/ Trimix Redymix Sanaiya, Al Ain Tel: +971-3-7216690, Fax: 7216103, Email: zilliontrdg@gmail.com. (Dubai)
BLACK & DECKER (OVERSEAS) GmbH, Dubai, DW, B&D PET, HHD, P.O. Box 5420, Dubai, Tel: +971-4-8127400/ 8127406, Fax:
2822765, Email: service.mea@sbdinc.com. (Ras Al Khaimah) Mc Coy Middle East LLC, Ras Al Khaimah, DW, B&D PET, HHD, P.O. Box
10584, Ras Al Khaimah, Tel: +971-7-2277095, Fax: 2277096, Email: mccoyrak@gmail.com. (Sharjah) Mc Coy Middle East LLC, Sharjah,
DW, B&D PET, HHD, P.O. Box 25793, Sharjah, Tel: +971-6-5395931, Fax: 5395932, Email: mccoy@emirates.net.ae;
mccoydewalt@gmail.com. UGANDA: Anisuma Investment & Service Ltd. (Jacky's Electronics), HHD, J.R Comples, Ware house No.5,
Plot No.101. 3rd Industrial Area, Jinja Rd, Kampala, Tel: 00256-414237106, Mob: 00256 779429501, Email:
ha.service.uganda@anisuma.com. YEMEN: Middle East Trading Co. (METCO) DW, B&D Pet, HHD, 5th Flr. Hayel Saeed Anam Bldg.
Al-Mugamma St. Taiz, Yemen, Tel: +00967-4-213455, Fax: 00967-4-219869, Email: metco@metcotrading.com; sami@metcotrading.com.
Middle East Trading Co. (METCO) DW, B&D Pet, HHD, Mualla Dakka, Aden, Tel: 00967-2-222670, Fax: 00967-2-222670,
metco@metcotrading.com; sami@metcotrading.com. Middle East Trading Co. (METCO), DW, B&D Pet, HHD, Hayel st., Sana'a, Yemen,
Tel: 00967-1-204201, Fax: 00967-1-204204, Email: metco@metcotrading.com; sami@metcotrading.com.
Page 30

Page 31

WARRANTY REGISTRATION CARD
YOUR NAME/
YOUR ADDRESS
POSTCODE
DATE OF PURCHASE
DEALER'S NAME & ADDRESS/
«ùßr
«∞FMu«Ê
«∞d±e «∞∂d¥bÍ
¢U¸¥a «∞Ad«¡
≈ßr Ë ´Mu«Ê «∞∂Uzl
PRODUCT MODEL NO.
AF300, AF400
Page 32

 Loading...