

Page 1
Page 2

2
4
2
1
5
3
A
B
C
6
7
Page 3
3
D
E
F
Page 4
4
A7073
6V ALKALINE SCREWDRIVER SET
TECHNICAL DATA
ENGLISH
GENERAL SAFETY RULES
Abide by the local safety rules so as
to reduce risks of fire, electric shock
and personal injury when using the
power tools. Carefully read and
understand this user manual before
operating the product. Please keep
this manual properly for future
reference.
The following symbols will be used in
this user manual:
Indicating that fail to abide by
the instructions of the manual may
result in personal injury and death
and damage of the tool.
Indicating dangers related to
battery jar.
Indicating the risk of fire.
WORK AREA SAFETY
•
Keep work area clean and well lit.
Cluttered or dark areas invite
accidents.
•
Do not operate power tools in
explosive atmospheres, such as
in the presence of flammable
liquids, gases or dust. Power
tools create sparks which may
ignite the dust or fumes.
•
Keep children and bystanders
away while operating a power
tool. Distractions can cause you
to lose control.
ELECTRICAL SAFETY
•
Do not abuse the cord. Never
use the cord for carrying, pulling
or unplugging the power tool.
Keep cord away from heat, oil,
sharp edges or moving parts.
Replace any damaged cord
immediately; Damaged or
entangled cords increase the risk
of electric shock.
•
For the tools powered by
combination battery or separate
battery component, only use the
exclusive charger of the relevant
batteries for charging. Fire may
be caused if the charger for
certain battery is used for another
battery.
•
When using the battery powered
tools, only use the specified
battery components, otherwise,
fire may occur.
PERSONAL SAFETY
•
Stay alert, watch what you are
doing and use common sense
when operating a power tool. Do
not use a power tool while you
are tired or under the influence of
drugs, alcohol or medication. A
moment of inattention while
operating power tools may result
in serious personal injury.
•
Dress Properly. Do not wear loose
clothing or jewelries. Tie up your
long hair and keep the hair,
clothes or gloves away from the
moving tools. Loose clothes,
jewellery or long hair can be
caught in moving tools.
•
Prevent unintentional starting.
Ensure that the switch is in the
off-position before fitting the
battery into the tools. Do not hold
the switch position when carrying
the tools. Carrying power tools
with your finger on the switch or
energising power tools that have
the switch on invites accidents.
•
Remove any adjusting key or
wrench before turning the power
tool on. A wrench or a key left
attached to a rotating part of the
power tool may result in personal
injury.
Screwdriver
Voltage
No-load speed
Max. Torque
Net weight
AS600
6(alkaline battery only)
130
2.9
0.24
V
/min
Nm
kg
Page 5

5
•
Do not overreach. Keep proper
footing and balance at all times.
This enables better control of the
power tool in unpredictable
situations.
•
Use personal protective
equipment. Always wear eye
protection. The glasses for daily
use only have the anti-fall lens.
They are not the protection
glasses. Protective equipment
such as dust mask, non-skid
safety shoes, hard hat, or hearing
protection must be used for
appropriate conditions.
POWER TOOL USE AND
CARE
•
Fix the tools with clamping fixture
or other effective method on a
solid platform. It is unreliable to
control the tools with hands or
body.
•
Do not force the power tool. Use
the correct power tool for your
application. The correct power
tool will do the job better and
safer at the rate for which it was
designed.
•
Do not use the power tool if the
switch does not turn it on and off.
Any power tool that cannot be
controlled with the switch is
dangerous and must be repaired.
•
Disconnect the plug from the
power source and/or the battery
pack from the power tool before
making any adjustments,
changing accessories, or storing
power tools. Such preventive
safety measures reduce the risk
of starting the power tool
accidentally.
•
Store idle power tools out of the
reach of children and do not
allow persons unfamiliar with the
power tool or these instructions
to operate the power tool. Power
tools are dangerous in the hands
of untrained users.
•
Keep the battery components far
away from the metal objects
(e.g., clips, coins, keys, nails,
screws or other metal items)
when they are not in use,
because such objects may cause
the conduction of the two
terminals of the battery. Sparks,
combustion or fire may be caused
if the two terminals of the battery
are conducted.
•
Keep cutting tools sharp and
clean. Properly maintained
cutting tools with sharp cutting
edges are less likely to bind and
are easier to control.
•
Maintain power tools. Check for
misalignment or binding of
moving parts, breakage of parts
and any other condition that may
affect the power tool’s operation.
If damaged, have the power tool
repaired before use. Many
accidents are caused by poorly
maintained power tools.
•
Use the accessories
recommended by Black & Decker
only. Danger may be resulted in if
the accessory for certain tool is
used on other tools.
REPAIR
•
Have your power tool serviced by
a qualified repair person. Danger
may be caused if repair or
maintenance is carried out by
unqualified personnel.
•
Use only identical replacement
parts when repairing the tools.
Comply with the instructions in
“maintenance” section of this
manual. Using unauthorized parts
or failing to comply with the
maintenance instruction may
result in the equipment damage
or personal injury.
ADDITIONAL POWER
TOOL SAFETY
WARNINGS
Hold power tool by insulated
gripping surfaces when performing an
operation where the cutting
accessory may contact hidden wiring.
Cutting accessory contacting a "live"
wire may make exposed metal parts
of the power tool "live" and could
give the operator an electric shock.
ENGLISH
Page 6
6
한국어
THE TOOL LABEL MAY
HAVE THE FOLLOWING
SYMBOLS:
V volts
A Amperes
Hz Hertz
W Watts
min. Minutes
AC power
Direct current
n
0
No-load speed
Secondary construction
Grounding terminal
Safety alert symbol
PARTS INTRODUCTION
(FIG. A, B AND C)
1. Switch (forward)
2. Switch (reverse)
3. Sleeve
4. Main shaft locking ring
5. Battery box
6. Battery box release button
7. Battery direction indication
ASSEMBLY AND
ADJUSTMENT
Remove the battery before assembly
and adjustment.
When fitting or removing the
battery, keep the fingers away from
any switch to avoid the unexpected
startup of the tools.
BATTERIES
This tool uses four AA alkaline
batteries (R6).
FITTING AND REMOVING
THE BATTERY (FIG. B)
Press the two release buttons (6) of
the battery box, and pull out the
battery box from the tool, as shown in
the figure. Install batteries into the
box according to the battery direction
indication (7) of the battery box
(positive and negative poles indicated
with + and − respectively), and
then recover the battery box. Note:
Some batteries are printed with
positive symbol (+) only, the other
end without the symbol is the
negative pole (−). The battery box is
designed to insert into the tool from a
single direction. If it cannot be fully
inserted, do not force it, instead, you
shall rotate the box for 180 and try
again, until you hear a "click”.
Important: Improper installation of
battery will reduce the efficiency of
the tool or make it unusable. If the
battery is new, but the tool is
powerless or unable to operate,
please check if the battery is properly
installed into the battery box with
correct direction. If the battery is
properly installed, press the two
release buttons and pull out the
battery box, and then you can remove
the battery.
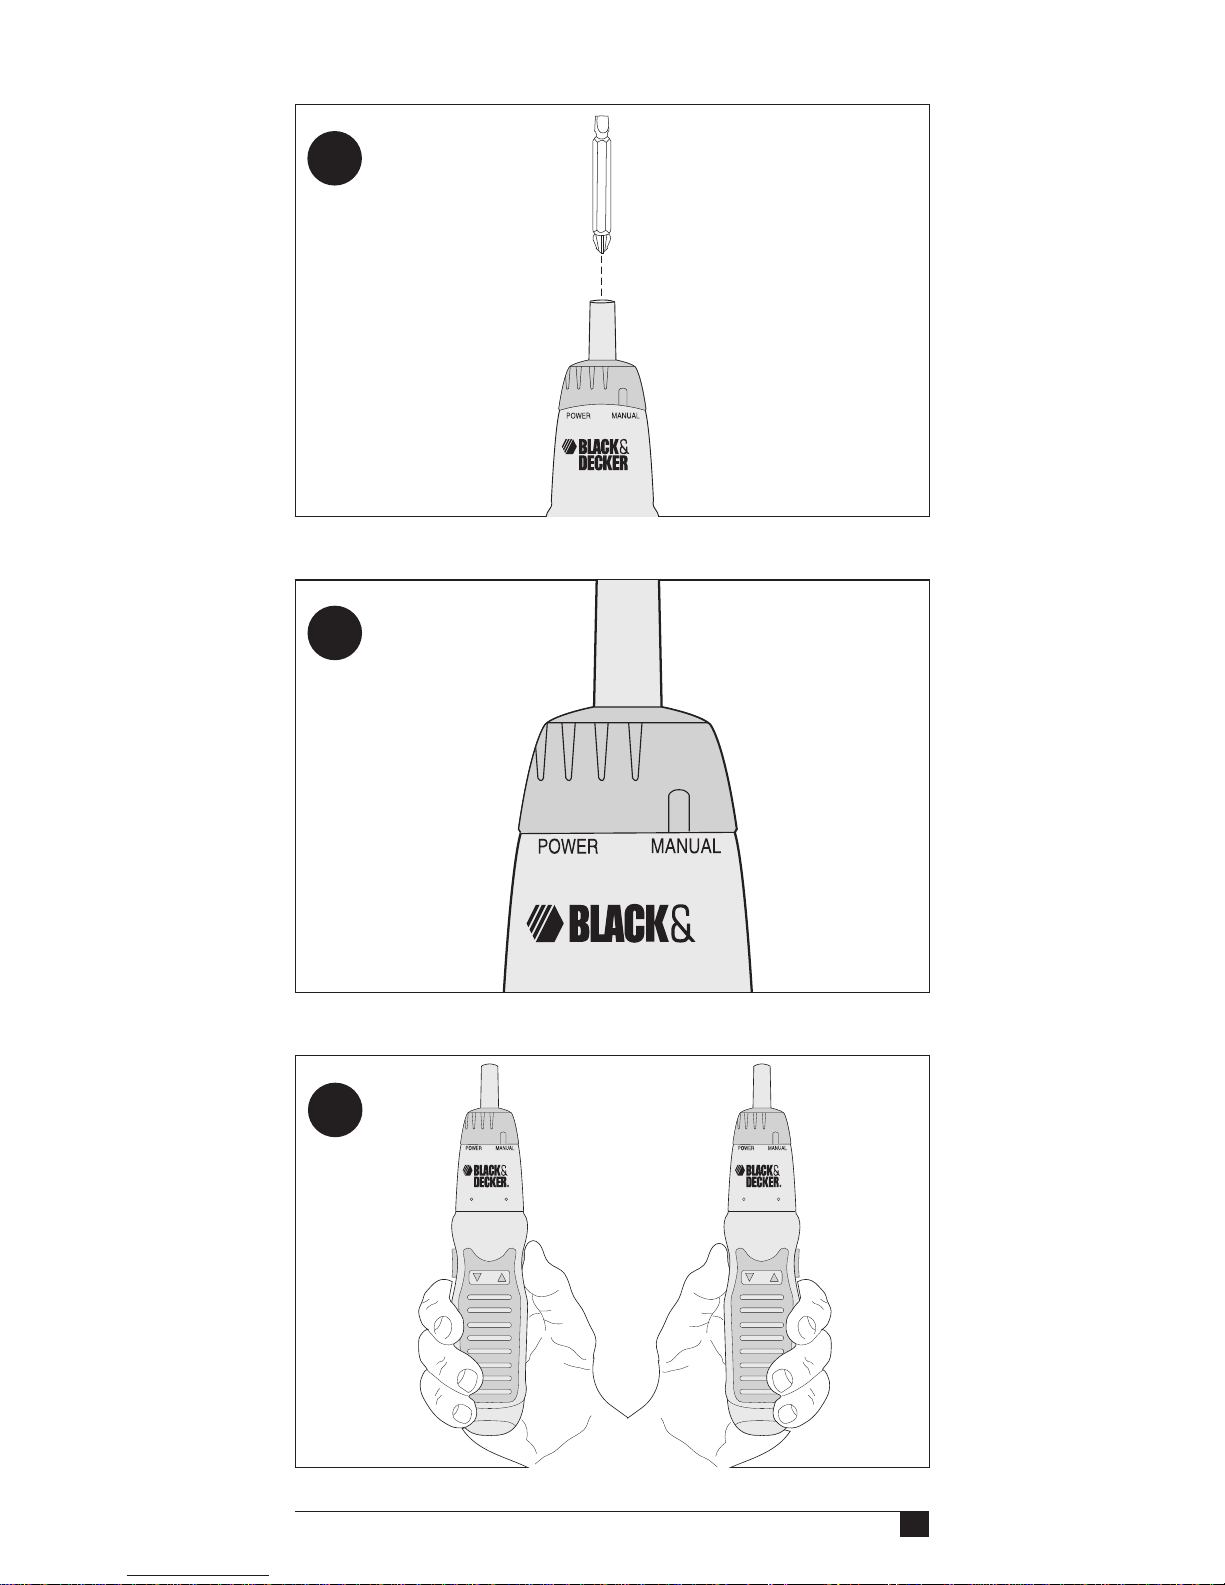
Fitting and removing
screwdriver bit (fig. C)
•
To install the screwdriver bit,
insert the screwdriver into the
main shaft sleeve (3) until it is in
place.
•
To remove the screwdriver bit,
pull it out of the sleeve.
•
If the screwdriver bit cannot
insert into the sleeve, rotate it
and try again.
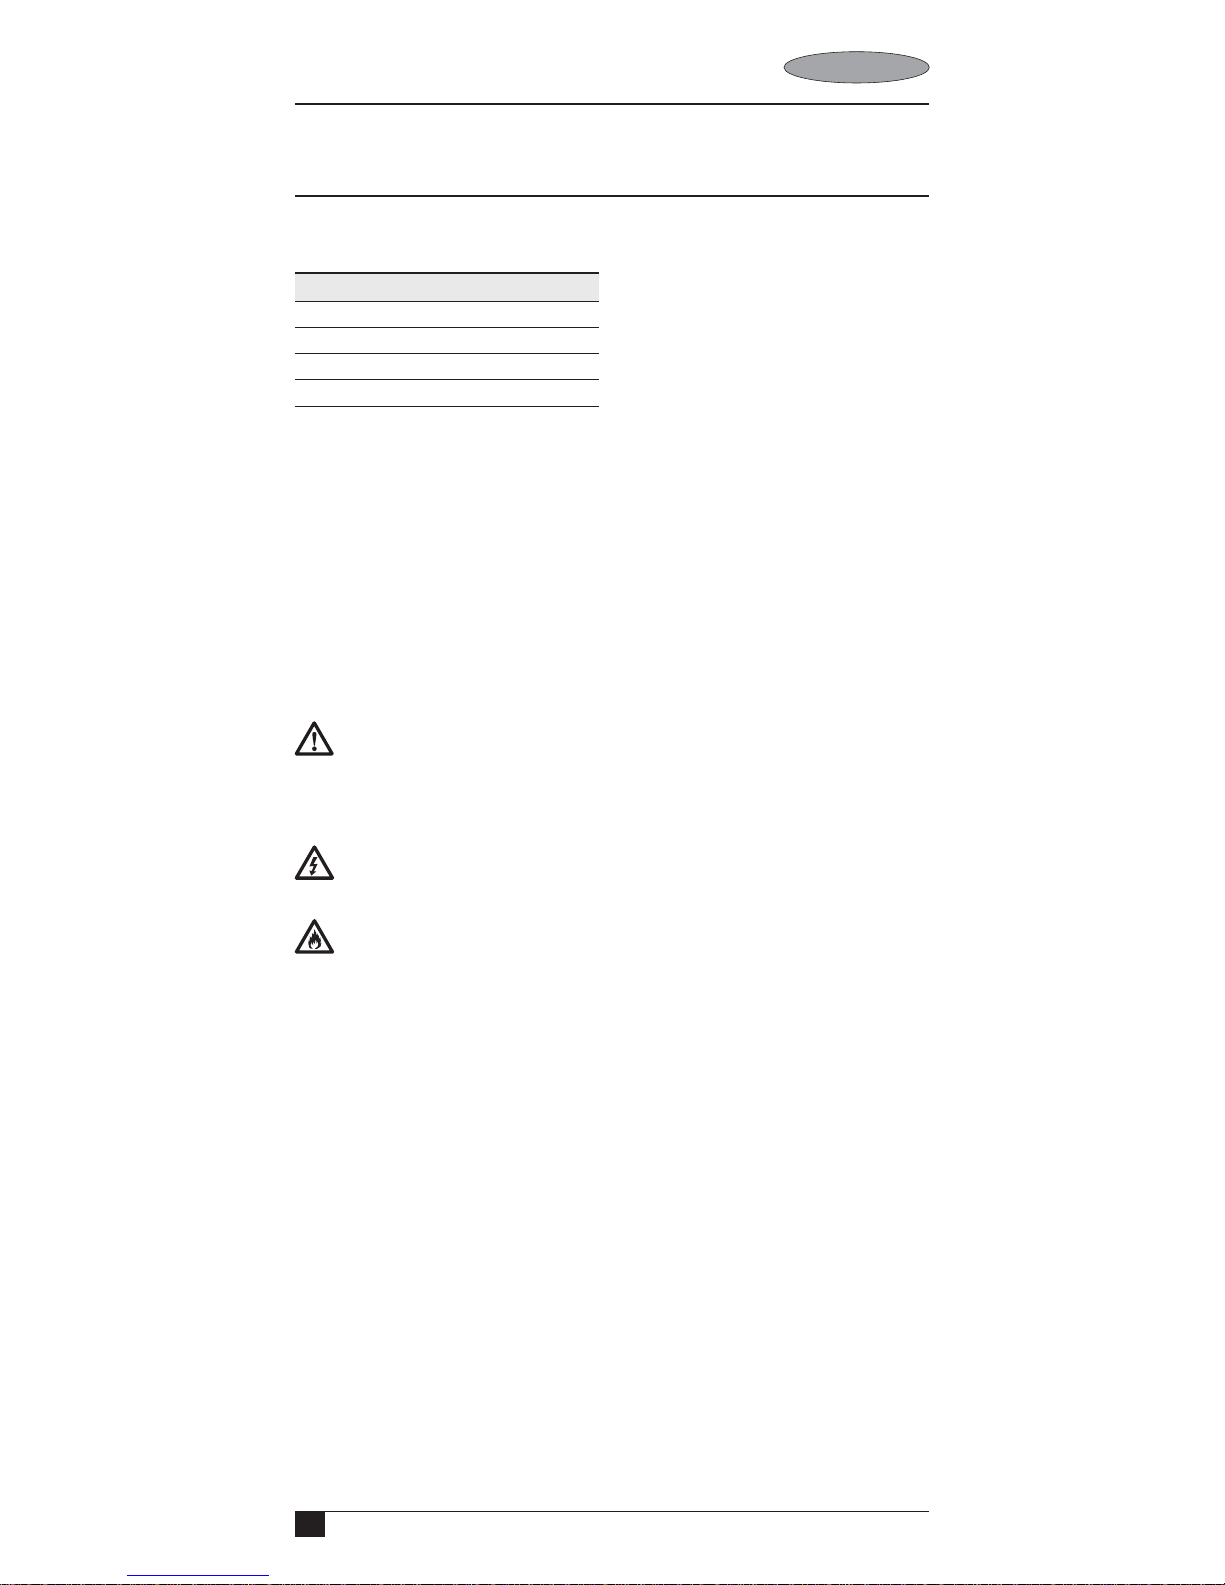
FORWARD/REVERSE
SWITCHES (FIG. D AND E)
•
Rotate the main shaft locking ring
(4) to the position with or
“power” characters.
•
Press the forward switch (1)
marked with , the tool will
rotate in forward direction.
Release the forward switch, the
tool will stop.
•
To make the tool rotate in reverse
direction, first rotate the main
shaft locking ring (4) to the
position with or “power”
characters. Press the reverse
switch (2) marked with , the
tool will rotate in reverse
direction. Release the reverse
switch, the tool will stop.
MAIN SHAFT LOCK (FIG. D)
•
To manually operate the tool,
Page 7

7
ENGLISH
rotate the main shaft locking ring
(4) to the position with or
“MANUAL” characters.
•
Operate the tool like the common
screwdrivers.
•
When the main shaft locking ring
is at or “MANUAL” position,
neither the forward switch nor
the reverse switch can be
enabled.
When the main shaft lock is
locked, do not start the tool,
otherwise, it will be damaged.
STORAGE
Ensure that the switch will not be
pressed by any object during the
storage, otherwise the tool will start
up and the battery will be exhausted.
If the tool will be idle for a long time,
remove the battery before the
storage.
MAINTENANCE
Continuous satisfactory operation
depends upon proper tool care and
regular cleaning. Use a cloth
dampened only with water and mild
soap. Never let any liquid get inside
the tool; never immerse any part of
the tool into a liquid.
Important: To ensure product SAFETY
and RELIABILITY, repairs,
maintenance and adjustment should
be performed by authorized service
centers or other qualified
organizations, always-using identical
replacement parts. Unit contains no
user serviceable parts inside.
ACCESSORIES
The performance of any power tool is
dependent upon the accessory used.
Black & Decker accessories are
engineered to high quality standards
and are designed to enhance the
performance of power tool. By using
these accessories you will get the
very best from your tool. Black &
Decker offers a large selection of
accessories available at our local
dealer or authorized service center at
extra cost.
CAUTION: The use of any other
accessory not recommended for use
with this tool could be hazardous.
PROTECTING THE
ENVIRONENT
Should you find one day that your
Black & Decker product needs
replacement, or if it is of no further
use to you, please remember to
protect the environment when you
dispose of the tool. Please contact the
local municipality for proper disposal
instructions.
Note: You have the responsibility of
disposing of or recalling the battery
and tool.
SERVICE INFORMATION
Black & Decker offers a full network
of company-owned and authorized
service locations throughout Asia. All
Black & Decker Service Centers are
staffed with trained personnel to
provide customers with efficient and
reliable power tool service.
Whether you need technical advice,
repair, or genuine factory
replacement parts, contact the Black
& Decker location nearest to you.
NOTES
•
Black & Decker's policy is one of
continuous improvement to our
products and, as such, we
reserve the right to change
product specifications without
prior notice.
•
Standard equipment and
accessories may vary by country.
•
Product specifications may differ
by country.
•
Complete product range may not
be available in all countries.
Contact your local Black & Decker
dealers for range availability.
Page 8

8
A7073
6V
알카라인 배터리 드라이버
기술 데이터
일반 안전 규정
전동 공구를 사용할 때 화재, 전기
충격 및 신체 부상의 위험을 줄일 수
있도록 지역 안전 규정을 따르십시오.
제품을 작동하기 전에 본 사용자
설명서를 주의 깊게 읽고 숙지하시기
바랍니다. 향후 참고할 수 있도록 본
설명서를 잘 보관해두십시오.
본 사용자 설명서에서 아래 기호는
다음과 같이 사용될 것입니다.
설명서의 지시 사항을 준수하지
않을 경우 부상, 사망과 공구 손상을
초래할 수 있음을 표시.
배터리 통에 관련된 위험 표시.
화재 위험 표시.
작업 안전 영역
•
작업 영역을 청결하게 그리고
조명을 밝게 유지하십시오.
혼잡하거나 어두운 작업
영역에서는 사고가 발생하기
쉽습니다.
•
가연성 액체, 가스 또는 먼지 등이
있는 폭발성 대기에서 전동
공구를 사용하지 마십시오. 전동
공구에 먼지나 연기를 발화시킬
수 있는 불꽃이 튈 수 있습니다.
•
전동 공구로 작업하는 동안에는
어린이와 주변 사람들이 작업
영역에 가까이 들어오지 못하도록
하십시오. 주변이 산만해져
통제력을 잃을 수 있습니다.
전기 안전
•
코드를 함부로 다루지 마십시오.
코드를 사용하여 전동 공구를
운반하거나 잡아당기거나
플러그를 빼지 마십시오. 열,
오일, 날카로운 모서리 또는
움직이는 부품에서 멀리 떨어진
장소에 코드를 보관하십시오.
손상된 코드는 즉시
교체하십시오. 코드가
손상되거나 뒤얽혀 있으면 감전
위험이 높아집니다.
•
배터리 조합 또는 별도의 배터리
구성으로 전원을 공급하는 공구의
경우, 충전 시 관련 배터리의 전용
충전기만 사용하십시오. 특정
배터리용 충전기를 다른 배터리에
사용할 경우 화재가 발생할 수
있습니다.
•
배터리 전원 공급 공구를 사용할
때, 지정된 배터리 구성만
사용하십시오. 그렇지 않을 경우
화재가 발생할 수 있습니다.
신체 안전 사항
•
전동 공구로 작업할 때는 방심하지
말고 작업에 주의하면서 상식에
따르십시오. 피곤한 상태이거나
약물, 술, 치료제를 복용한
상태에서는 전동 공구를 사용하지
마십시오. 전동 공구를 사용하는
중에 주의력을 잃어 순간적으로
부상을 당할 수 있습니다.
•
적절한 의복을 착용합니다. 헐렁한
옷이나 장신구를 착용하지
마십시오. 긴 머리는 묶고
머리카락, 옷 또는 장갑이
움직이는 공구에 닿지 않도록
유의하십시오. 헐렁한 옷, 장신구
또는 긴 머리가 움직이는 도구에
낄 수 있습니다.
•
의도하지 않은 장비 가동 방지.
배터리를 공구에 장착하기 전에
스위치가 꺼짐 위치에 있는지
확인하십시오. 공구를 운반할 때
스위치 위치를 잡지 마십시오.
스위치가 켜짐 위치에 있는
상태에서 스위치에 손가락이 닿은
상태로 전동 공구를 운반하거나
전동 공구에 전원을 공급하면
사고가 발생합니다.
드라이버
전압
무부하 속도
최대 토크
중량(배터리 제외)
AS600
6
(알카라인 배터리만 해당)
130
2.9
0.24
V
/min
Nm
kg
한국어
Page 9

9
한국어
•
전동 공구를 켜기 전에 모든 조정
키 또는 렌치를 제거하십시오.
전동 공구의 회전 부품에 렌치나
키가 부착되어 있으면 부상을
당할 수 있습니다.
•
무리하게 팔을 뻗지 마십시오.
항상 올바른 자세로 서서 균형을
유지하십시오. 그러면 예측할 수
없는 상황에서 전동 공구에 대한
제어력이 향상됩니다.
•
신체 보호 장비를 착용하십시오.
항상 보안경을 착용하십시오.
일회용 안경에만 박락 방지
렌즈가 있습니다. 이것은 보호
유리가 아닙니다. 해당 상황에
맞게 적합한 상황에서 방진
마스크, 미끄럼 방지 안전화,
안전모 또는 청력 보호 기구 등의
보호 장비를 사용해야 합니다.
전동 공구 사용 및 관리
•
단단한 작업대에서 클램프
고정물이나 기타 효과적인
방법으로 공구를 고정하십시오.
손이나 몸으로 공구를 제어할 수
없습니다.
•
전동 공구에 무리한 힘을 가하지
마십시오. 해당 용도에 맞는
올바른 전동 공구를
사용하십시오. 올바른 전동
공구를 사용해야 설계된 속도로
작업을 더욱 안전하고 정확하게
수행할 수 있습니다.
•
스위치를 켜거나 끌 수 없는 전동
공구는 사용하지 마십시오.
스위치로 제어되지 않는 전동
공구는 위험하며 수리해야
합니다.
•
전동 공구를 조정하거나
액세서리를 변경하거나 보관하기
전에 전원 및/또는 배터리 팩에서
플러그를 빼십시오. 이러한
예방적 안전 조치를 따라야 전동
공구가 갑자기 작동할 위험이
줄어듭니다.
•
사용하지 않는 전동 공구는
어린이의 손이 닿지 않는 곳에
보관하고, 전동 공구나 본 지시
사항에 익숙하지 않은 사람이
전동 공구를 절대 사용하지
못하게 하십시오. 전동 공구는
훈련을 받지 않은 사용자가
다루면 위험합니다.
•
사용하지 않을 때는 배터리팩을
금속 물체(예, 클립, 동전, 열쇠,
못, 나사 또는 기타 금속 품목)
가까이에 두지 마십시오. 그러한
물체는 배터리 두 개의 단자에
전도를 일으킬 수 있습니다. 두
개의 배터리 단자가 전도되면
불꽃, 연소 또는 화재가 유발될 수
있습니다.
•
절삭 공구를 예리하고 깨끗한
상태로 유지하십시오. 유지
보수를 올바로 수행하여 절삭
가장자리가 예리한 절삭 공구를
사용하면 바인딩이 적고 다루기가
용이합니다.
•
전동 공구 유지 보수. 움직이는
부품의 잘못된 정렬이나 바인딩,
부품 파손 및 기타 전동 공구의
작동에 영향을 미칠 수 있는
상태가 있는지 확인하십시오.
손상된 부분이 있는 경우
사용하기 전에 전동 공구를
수리하십시오. 많은 사고는 전동
공구를 제대로 유지 보수하지
않아 발생합니다.
•
Black & Decker에서 권장하는
액세서리만 사용하십시오. 특정
도구용 액세서리를 다른 도구에
사용하면 위험을 초래할 수
있습니다.
수리
•
자격을 갖춘 기술자에게 전동
공구를 정비하십시오. 자격이
없는 직원에게 수리나 유지
보수를 받을 경우 위험할 수
있습니다.
•
공구를 수리할 때 동일한 교체
부품만 사용하십시오. 이
설명서의 “유지 보수” 섹션에
나와 있는 지시 사항을
따르십시오. 무단 부품을
사용하거나 유지 보수 지시사항을
준수하지 않을 경우 장비
손상이나 부상을 입을 수
있습니다.
전동 공구에 관한 추가
안전 경고
절삭 액세서리가 숨겨진 배선에
접촉할 수 있는 작업을 수행할 때는
Page 10

10
절연된 그립핑 표면이 닿도록 하여
전동 공구를 잡으십시오. "전류가
흐르는" 전선에 접촉된 절삭
액세서리는 전동 공구의 노출된 금속
부품을 "전류가 흐르는" 상태로 만들어
작업자를 감전시킬 수 있습니다.
공구에 부착된 라벨에
다음 기호가 사용될 수
있습니다.
V 볼트
A 암페어
Hz 주파수
W 와트
Min. 분
AC 전원
직류
n
0
무부하 속도
2차 구조
접지 단자
안전 경고 기호
부품 소개((그림 A B 및 C)
1. 스위치(전진)
2. 스위치(후진)
3. 슬리브
4. 메인 샤프트 잠금 고리
5. 배터리 박스
6. 배터리 박스 해제 버튼
7. 배터리 방향 표시
조립 및 조정
조립 및 조정하기 전에 배터리를
제거하십시오.
배터리를 장착하거나 분리할 때,
예기치 않은 공구 시동을 피하려면
손가락을 스위치에서 멀리 두십시오.
배터리
본 공구는 네 개의 AA 알카라인
배터리(R6)를 사용합니다.
배터리 장착 및 분리(그림 B)
배터리 박스의 두 개의 해제
버튼(6)을 누르고 그림에서 보이는
것처럼 공구에서 배터리 박스를
빼냅니다. 배터리 박스의 배터리 방향
표시(7)에 따라 배터리를 박스에 끼운
다음(각각 + 및 –로 표시된 양극 및
음극) 배터리 박스를 다시 덮습니다.
참고: 일부 배터리는 양극 기호(+)만
표시되어 있고, 기호가 없는 다른 쪽
끝은 음극(-)입니다. 배터리 박스는 한
방향에서 공구에 삽입되도록
설계되었습니다. 완전하게 들어가지
않는 경우, 무리한 힘을 가하지 말고
대신 배터리 박스를 180도 돌리고
"찰깍"하는 소리가 들릴 때까지 다시
시도해 보십시오. 중요: 배터리를
잘못 설치하면 공구의 효율성이
줄어들거나 불안정할 수 있습니다.
배터리가 새 것인데, 공구에 전원이
없거나 작동할 수 없을 경우, 배터리가
배터리 박스에 정확한 방향으로
올바르게 설치되었는지 확인하십시오.
배터리를 올바르게 설치하려면, 두
개의 해제 버튼을 누르고 배터리
박스를 빼낸 다음 배터리를 제거할 수
있습니다.
드라이버 장착 및
분리(그림 C)
•
드라이버 비트를 설치하려면
드라이버가 제자리에 있을 때까지
메인 샤프트 슬리브(3)에
삽입합니다.
•
드라이버 비트를 분리하려면
슬리브에서 당겨 빼냅니다.
•
드라이버 비트를 슬리브에 끼울 수
없을 경우, 돌려서 다시
끼워보십시오.
전진/후진 스위치(그림 D
및 E)
•
메인 샤프트 잠금 고리(4)를
또는 “전원” 글자가 있는
위치로 돌립니다.
•
로 표시된 전진 스위치를
누르면, 공구가 전진 방향으로
돌아갑니다. 전진 스위치를
놓으면 공구가 정지합니다.
•
후진 방향으로 공구가 회전하도록
만들려면, 먼저 메인 샤프트 잠금
고리(4)를 또는 “전원”
표시가 있는 위치까지 돌립니다.
로 표시된 후진 스위치(2)를
누르면, 공구가 후진 방향으로
돌아갑니다. 후진 스위치를
놓으면 공구가 정지합니다.
한국어
Page 11

11
한국어
메인 샤프트 잠금
장치(그림 D)
•
공구를 수동으로 작동하려면, 메인
샤프트 잠금 고리(4)를 또는
“MANUAL” 글자가 있는
위치로 돌립니다.
•
일반 드라이버와 같이 공구를
사용합니다.
•
메인 샤프트 잠금 고리가 또는
“MANUAL” 위치에 있을 때,
전진 스위치 또는 후진 스위치
모두 사용할 수 없습니다.
메인 샤프트 잠금 장치가 잠겨
있을 때는 공구 사용을 시작하지
마십시오. 그렇지 않으면 손상될 수
있습니다.
보관
보관하는 동안 다른 물건에 의해
스위치가 눌리지 않도록 하십시오.
그렇지 않을 경우 공구가 작동되어
배터리가 소모됩니다. 장기간 공구를
사용하지 않을 경우에는, 보관하기
전에 배터리를 빼놓으십시오.
유지 보수
오랜 시간 만족스러운 성능으로
공구를 사용하려면 적합한 공구
관리와 정기적인 청소가 중요합니다.
헝겊에 물과 연한 비누를 적셔
닦아주십시오. 공구 내부에 액체를
넣거나 공구 부품을 액체에 담그는
행동은 절대 금물입니다.
중요: 제품 안전과 신뢰성을 보장하기
위해 수리, 유지 보수 및 조정 작업은
공인 서비스 센터 또는 자격을 갖춘
다른 수리점에서 항상 동일한 교체
부품을 사용하여 수행해야 합니다. 본
기기 내부에는 사용자가 수리할 수
있는 부품이 없습니다.
액세서리
전동 공구의 성능은 사용한
액세서리에 따라 결정됩니다. Black
& Decker 액세서리는 높은 품질
기준을 만족하도록 제조되었으며,
전동 공구의 성능을 향상시키도록
설계되었습니다. 이러한 액세서리를
사용함으로써 공구에서 최상의 결과를
얻을 것입니다. Black & Decker
에서 제공하는 다양한 액세서리는
해당 지역에 있는 판매점이나 공인
서비스 센터를 통해 구입할 수
있습니다.
주의: 본 공구와 함께
사용하도록 권장되지 않는 다른
액세서리를 사용할 경우 위험할 수
있습니다.
환경 보호
어느 날 Black & Decker 제품이
교체가 필요하다는 것을 알았거나 더
이상 사용하지 않을 경우, 공구를
폐기할 때 환경을 보호하는 것에 대해
잊지 마십시오. 올바른 처리 지침은
관할 당국에 문의하십시오.
참고: 귀하는 배터리 및 공구 폐기
또는 리콜에 대한 책임이 있습니다.
서비스 정보
Black & Decker는 아시아 전역에
영업소를 자체 운영하거나 공인
서비스 센터를 두고 있습니다. 모든
Black & Decker 서비스 센터에는
교육을 이수한 전문 직원이 배치되어
있어 고객에게 효과적이고 믿을 수
있는 전동 공구 서비스를 제공하고
있습니다.
기술 지원, 수리 또는 순정 교체
부품이 필요한 모든 경우에 가까운
Black & Decker로 연락하십시오.
참고사항
•
Black & Decker는 제품을
지속적으로 개선시키기 때문에
사전 통지 없이 제품 사양이
변경될 수 있습니다.
•
기본 장비 및 액세서리 구성은
나라에 따라 다를 수 있습니다.
•
제품 사양은 나라에 따라 다를 수
있습니다.
•
나라에 따라 판매하지 않는 제품도
있을 수 있습니다. 제품 판매
여부는 해당 지역에 있는 Black
& Decker 판매점으로
문의하십시오.
Page 12

12
A7073
6V 鹼性電池起子機
技術資料
繁体中文
安全指引
當使用電動工具時,必須遵
循當地安全規則以減少導致
火災、觸電和人為傷害的危
險。請在操作本產品前閱讀
並理解本操作手冊,並把本
手冊妥善保存!
下列標誌會在本使用手冊內
使用:
表示如不依本使用手冊
指示操作,會有人身傷亡、
機具損壞的危險。
表示會有電瓶的危險。
表示會有火災的危險。
工廠安全
• 請保持工廠清潔和有良
好的照明。工作台凌亂
及工廠黑暗,容易引起
意外事故。
• 切勿在易燃易燒的環境
(如在含有可燃物體、
氣體或粉塵的空氣)中
操作電動工具。電動工
具產生的火花,會燃點
該等粉塵或氣體。
• 操作電動工具時,勿讓
旁觀者、小孩及參觀者
靠近。注意力不集中,
會使操作失控。
電氣安全
• 切勿濫用電線。切勿使
用電線搬運工具。勿讓
電線接近電源、油脂、
銳利的邊角或移動機具。
電線損壞後,應立即更
換,因為使用損壞的電
線,容易導致火災。
• 採用組合電池或一個獨
立的電池組件發動的工
具,只可使用該等電池
專用的充電器併行充電。
適用於某一電池的充電
器,在用於另一電池時,
可能會導致火災。
• 使用電池驅動工具時,
只可使用其專門指定的
電池組件。使用其他電
池,可能會導致火災。
人身安全
• 操作電動工具時,應保
持警覺,密切留意操作
過程,並運用判斷力。
在疲勞或受麻醉藥、酒
精或藥物影響時,勿使
用工具。操作電動工具,
一時的疏忽,可能會導
致嚴重的人身傷害。
• 穿著適當的衣物。切勿
穿著寬鬆的衣服或配戴
首飾。長髮應束紮起來,
勿令頭髮、衣物或手套
接近移動機具。寬鬆的
衣服、首飾或長髮,會
被捲入移動機具中。
• 避免工具意外啟動。把
充電池插入工具前,要
確保開關已在“關”的
位置。提攜工具時,手
起子機
電壓
空載轉速
最大扭力
淨重(不包含電池)
AS600
6(只限鹼性電池)
130
2.9
0.24
伏特
每分鐘轉數
牛頓米
千克
Page 13

13
指不放在開關位置;勿
在開關開著時接通電源,
這會導致意外發生。
• 啟動機具前,應卸除調
整鎖匙或扳手。倘若調
整鎖匙或扳手留在移動
的機具上,可能會導致
人身傷害。
• 切勿伸展過遠操作。步
履要穩健,並時刻保持
身體平衡。
• 在難以預計的情況下,
穩健的步履和平衡的身
體可令用戶更好地操控
工具。
• 使用安全設備,配起護
眼裝備。日常所戴的眼
鏡,只有防摔鏡片,不
是防護眼鏡,在適當的
情況下,必須使用防護
面罩、防滑安全鞋、安
全帽或護耳設備。
工具的使用及維護
• 使用夾具或其他有效方
法,將工具固定,並支
撐在穩固的平台上。用
手或身體控制工具,皆
不穩固,容易失控。
• 不得強行使用工具,應
選用適當的工具使用。
工具使用得正確,便可
按設計的速度,更好、
更安全地工作。
• 切勿使用開關失靈的機
器。不能用開關操控的
工具,操作時非常危險,
必須進行修理。
• 在調整工具、更換附件
或貯藏工具之前,應拿
開工具上的電池組件,
或將開關設置到鎖定或
“關”的位置上。預防
性安全措施,可減少工
具意外啟動的危險。
• 工具閒置時,須存放在
小孩或未經培訓人員觸
摸不到的地方。未經培
訓的人員使用工具,非
常危險。
• 電池組件在不使用時,
應遠離其他金屬物件,
如紙夾、硬幣、鑰匙、
釘子、螺絲或其他小金
屬物件,因為該等物件
會將電池的兩個端子導
通。而電池的兩端如果
導通,則可能引起火花、
燃燒或火災。
• 小心維護機具,切割工
具應保持銳利和清潔。
帶有銳利切割過的工具,
如維護得當,不容易被
卡住,操控更容易。
• 檢查機具的移動部位是
否位置準確,部位有否
損壞,以及其他可能影
響機具操作的情況。如
有損壞,使用前應把機
具修好。許多事故皆是
因為機具維護不當造成
的。
•
只使用百得推薦的配件。
適用於某種工具的配件,
如用於另一種工具上,
可能會構成危險。
維修
• 只有合格的維修人員,
方可維修工具。由非合
格人員進行維修或維護,
可能會構成危險。
• 維修工具時,只可使用
相同的替代零件。同時,
應遵守本手冊中的“維
護”章節中的說明。使
用未經許可的零件,或
未遵守保養維修說明,
均可能導致電器或人員
傷害。
繁体中文
Page 14

14
繁体中文
特別安全守則
使用電動工具時,應拿
著其絕緣表面,因機具可能
會接觸到隱藏的電源或自身
電線,接觸帶電的電線,可
使機具的金屬物部件也帶電,
並電到操作者。
工具上的標籤可能會有
下列符號:
V 伏特
A 安培
Hz 赫茲
W 瓦
Min. 分鐘
交流電
直接電流
n
0
空載轉速
二級建造
接地終端
安全警告符號響
部件介紹(圖A\B及C)
1. 開關(正轉方向)
2. 開關(逆轉方向)
3. 套筒
4. 主軸鎖環
5. 電池盒
6. 電池盒釋放鍵
7. 電池方向指示
組裝和調整
組裝和調整前,先要卸下電
池。
插入或卸下電池時,手
指勿按在任何一個開關上以
避免意外啟動。
電池
本機使用四顆5號(AA)鹼
性電池(R6)。
插入並卸下電池(圖B)
按壓電池盒的兩釋放鍵(6),
如圖把電池盒由機具拉出,
依電池內盒的電池方向指示
(7)把電池裝上內盒(正負
極是分別以+及-號代替),
蓋上電池盒。注意:某些電
池只印有正極(+)符號,
無印符號的另一端便是負極
(-)。電池盒的設計只能
單方向插入機身內,如它不
能完全插入,切勿使用盡力,
應把電池盒旋轉180°再試至
其“咯搭”到位。重要提示:
不正確地裝上電池會減低機
具的效能或使它完全不能操
作,若電池是簇新的,但機
具乏力或不能運作。請再查
看電池是否正負極(+或-
號)正確的裝在電池盒內。
如果電池安裝正確,按壓兩
個釋放鍵並把電池盒拉出,
便可卸下電池。
裝卸起子頭(圖C)
•
要裝上起子頭,只要把
起子插入主軸套筒(3)
直至其到位。
•
要卸下起子頭,只要把
它由套筒拉出便可。
•
若起子頭不能插入套筒,
旋轉起子頭再嘗試插入。
正逆轉開關(圖D及E)
•
旋轉主軸鎖環(4)至有
或“POWER”字樣的
位置。
•
按壓標有▲的正轉開關
(1),機具便會正轉。
釋放正轉開關,機具便
會止動。
•
要機具逆轉,先旋轉主
軸鎖環(4)至標有 或
“POWER”字樣的位置。
按壓環有▼的逆轉開關
(2),機具便會逆轉。
Page 15

15
繁体中文
釋放逆轉開關,機具便
會止動。
主軸鎖(圖D)
•
本機具亦可手動操作,
旋轉主軸鎖環(4)至
標有 或“MANUAL”
字樣的位置。
•
如普通螺絲起子一般操
作。
•
當主軸鎖環在 或
“MANUAL”位置的時候,
正逆轉開關都不能啟動。
當已鎖定主軸鎖,切勿
啟動機具,否則機具會損
壞。
貯藏
貯藏機具時要小心開關勿讓
任何物件壓著,這會令機具
啟動,而電池亦會很快耗盡。
若長時間內不會使用本機具,
請在貯藏機具前先把電池卸
下。
維護
要使工具有滿意的性能,需
要長久正確的對機具維護及
清潔。使用溫和的清潔劑及
濕布清潔機具,切勿讓任何
液體進入機內,切勿把機具
浸入水中。
重要說明:為了確保本機具
安全可靠,只能由授權的維
修中心或其他專業維修組織
進行維修,保養及調整;同
時亦必須使用相同的更換部
件。本機具內並無用戶可自
行更換的零件。
配件
任何電動工具的性能是依賴
使用得當的配件,百得的配
件都是經過精心設計,並以
最佳物料製造,再經過數次
嚴謹的測試合格才推出市場
的;故其質地優良。購買百
得配件會令您的電動工作如
虎添翼,百得推薦的配件,
在當地的經銷商或授權的維
修中心有售。
警告:本電動工具使用
任何未推薦的配件,均可能
導致危險。
環境保護
若某天您想更新工具或工具
對您已無用處,請考慮要保
護環境。請與當地有關政府
部門聯絡,索取正確處置廢
棄物的資料。
注意:您應肩負放置或回收
電池組及工具的責任。
維修資料
百得在亞洲各地均設有直屬
或授權的維修中心網絡。所
有百得維修中心的專業人員
均訓練有素,可以提供顧客
高效、可靠的維修服務。
無論您需要技術建議、維修
還是更換原廠配件,請與就
近的百得維修中心聯繫。
注意事項:
•
由於百得對產品不斷作
出改良,因此我們保留
更改產品或規格的權利,
而無需作出任何事前通
知。
•
標準設備和備用配件在
各國可能有所不同。
•
產品規格在各國可能有
所不同。
•
百得不一定對所有的國
家都供應整套系列的產
品。關於供貨範圍情況
請與當地經銷商洽談。
Page 16

AS600
Page 17

Page 18

Page 19

Page 20

90602185 08/2013
 Loading...