

Page 1
Universal Flat Pack Cabinet
The economical 42U cabinet that’s easy
to transport and assemble on-site.
RMT3200A-R2
Customer
Support
Information
Order toll-free in the U.S.: Call 877-877-BBOX (outside U.S. call 724-746-5500)
FREE technical support 24 hours a day, 7 days a week: Call 724-746-5500 or fax 724-746-0746
Mailing address: Black Box Corporation, 1000 Park Drive, Lawrence, PA 15055-1018
Web site: www.blackbox.com • E-mail: info@blackbox.com
Page 2

Universal Flat Pack Cabinet Manual
Trademarks Used in this Manual
Black Box and the Double Diamond logo are registered trademarks of BB Technologies, Inc.
UL is a registered trademark of Underwriters Laboratories Inc.
Any other trademarks mentioned in this manual are acknowledged to be the property of the trademark owners.
1. Specifications
Technical Specifications
Approvals UL® recognized
Construction 18 AWG steel;
Front door: Tempered glass
Mounting Rails 19" M6 rails
Dimensions Exterior Height: 80" (202 cm);
Interior Height: 73.5" (42U) (186.7 cm);
Exterior Width: 24" (60 cm);
Interior Width: 21" (53.5 cm);
Exterior Depth: 38" (97 cm);
Interior Depth: 35" (80 cm)
Weight Weight Capacity: 1320 lb. (600 kg);
Weight of Cabinet: 265 lb. (120 kg)
2. Overview
RMT3200A-R2 provides a simple, stable, and effective cabling platform for equipment within the rack frame. Extra space is
provided to further enhance the front and rear cable management.
This cabinet is carefully engineered to provide flexibility and reconfigurability while maximizing your investment protection in both
your technology and your valuable data storage.
RMT3200A-R2 has been tested through sequential loading to ensure that it provides a safe working environment. For easy
installation and transport, the cabinet has medium-duty bracket casters and a weight capacity of up to 265 lb. (600 kg).
This economical 42U cabinet ships unassembled for easy transport.
Page 2
724-746-5500 | blackbox.com
Page 3
Universal Flat Pack Cabinet Manual
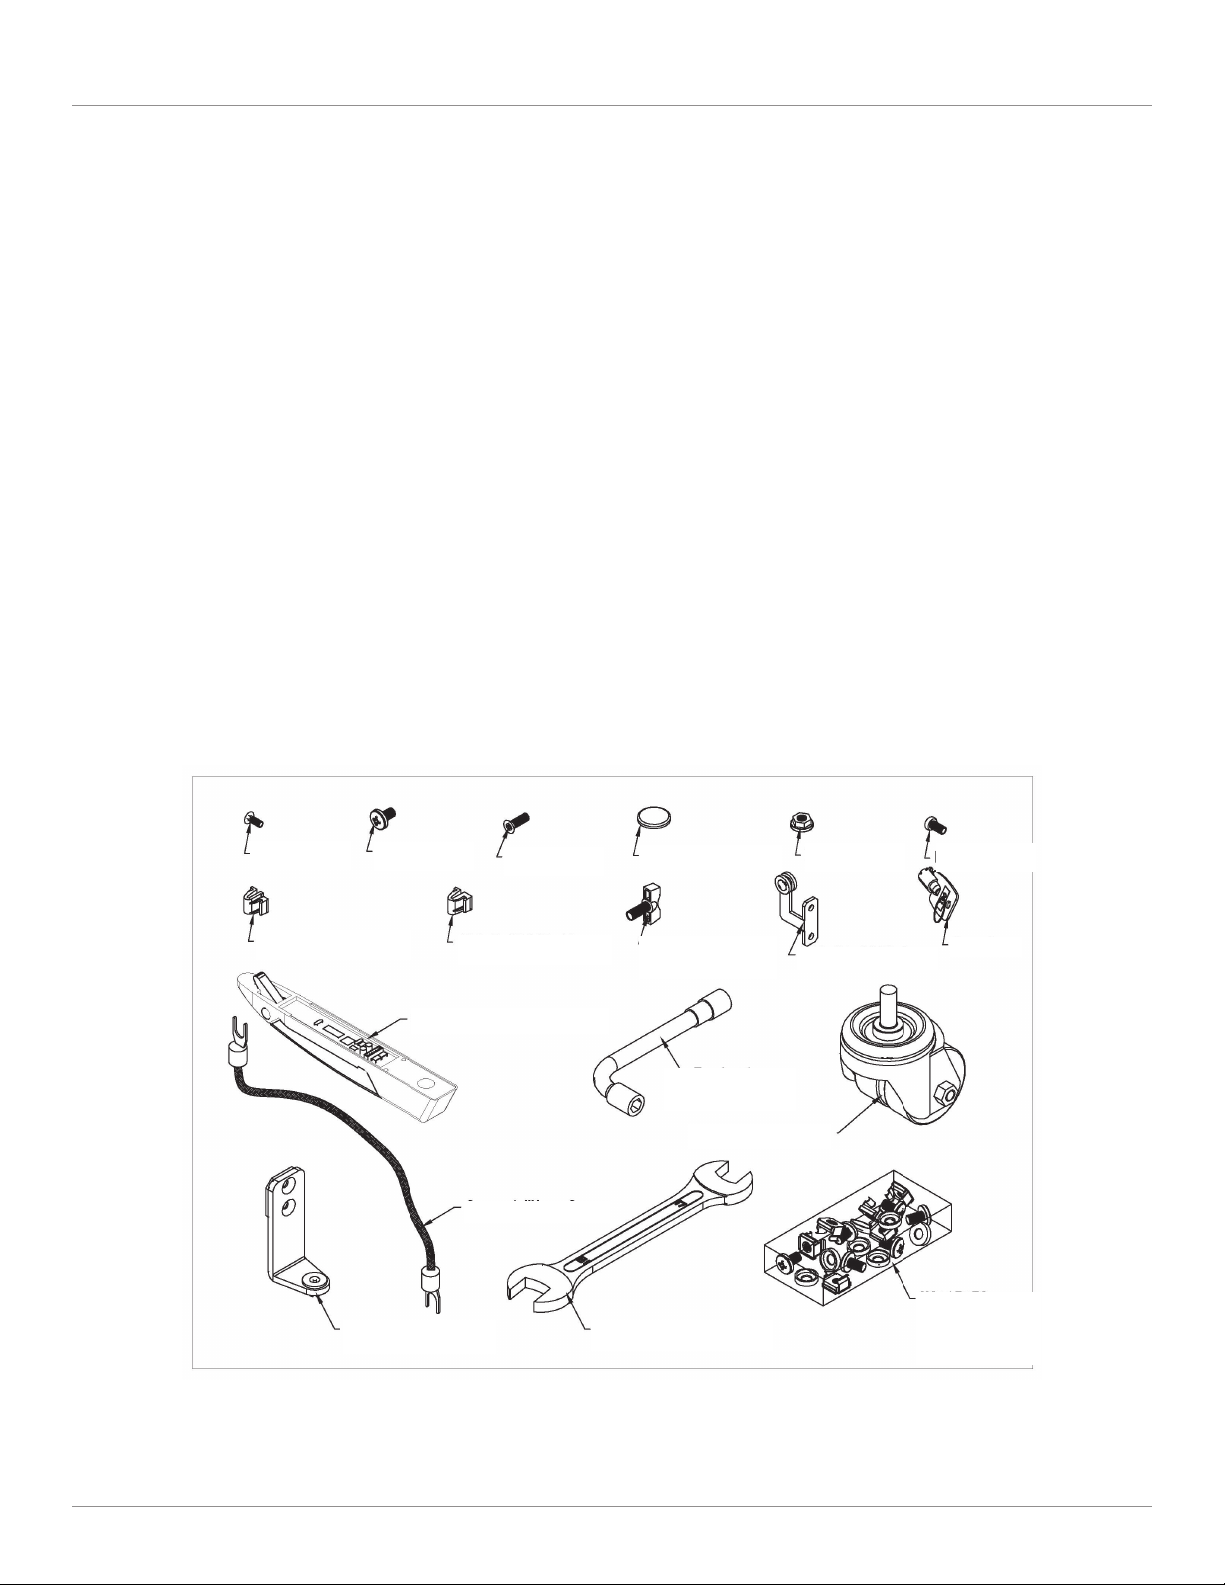
What's Included
Your package should contain the following items. If anything is missing or damaged, please contact Black Box at 724-746-5500 or
info@blackbox.com.
Box A:
• (1) Top Panel
• (1) Bottom Panel with Casters and Leveling Feet
• (2) Frames
• (4) Mounting Rails
• (6) Horizontal Supports: (2) bottom, (4) middle/top
• (1) Accessories Box (see below)
• (1) This User's Manual (in Accessories Box)
Box B:
• (1) Front Glass Door
• (1) Rear Vented Door
• (2) Side Panels with Lock and Latch
Accessories Box:
(4) 10-mm M4
screws
(12) blue clips
(4) 10-mm M6
screws
(2) door handles
(8) 15-mm M5
screws
(12) yellow clips
(2) ground wires
(2) rubber pads
(24) 12-mm M6
screws and fasteners
(1) 10 -mm
socket wrench
(44 ) M6 nuts (6) 12-mm M5
(2) “L” brackets
(4) casters
screws
(2) keys
(4) hinged
brackets
(1) 19- /17- mm
open end wrench
(50) 15-mm M6 nuts
(50) M6 square bolts
(50) M6 round bolts
Page 3
Page 4

Universal Flat Pack Cabinet Manual
3. Assembly Instructions
STEP 1: Connect two frames to the top and bottom panels, then use M6 nuts to secure them in place.
(16) M6 nuts
STEP 2: As shown in the diagram below, align the tabs of the horizontal supports to the slots in the vertical frame members and
drop into place. Install the (2) bottom horizontal supports first. They are larger than the top/middle horizontal supports and must
be installed in the bottom positions to allow the vertical rails to be installed. Use the blue and yellow plastic clips to attach the
horizontal rails to the vertical frame.
Front of Cabinet
Blue rail
(12) blue clips
Yellow rail
Yellow rail
(8) yellow clips
Blue rail
NOTE: Use the blue clips on the “blue rails” and the yellow clips on the “yellow rails.” When you look directly at the front and rear
of the cabinet (as shown in the diagram above), the left rail would use blue clips and the right rail would use yellow clips.
Page 4
724-746-5500 | blackbox.com
Page 5

Universal Flat Pack Cabinet Manual
STEP 3: Attach the lock bases and hinge bases with M5 screws. Attach the screws at the outer end of the mounting rails.
(4) mounting tabs
(8) 15-mm M5
screws
STEP 4: Put the two rubber pads on the corners of the front door. Then attach the front door with three latches. Repeat this
procedure to attach the rear door.
(1) rubber pad
(4) latches
(1) rubber pad
Page 5
Page 6

Universal Flat Pack Cabinet Manual
STEP 5: Attach the two side panels to the cabinet.
STEP 6: Attach the four grounding wires with M6 nuts.
(1) Lab el
(2) grounding wires
(4) M6 nuts
Page 6
724-746-5500 | blackbox.com
Page 7

STEP 7: Cabinet assembly is now complete.
Universal Flat Pack Cabinet Manual
Front
Back
Page 7
Page 8

Black Box Tech Support: FREE! Live. 24/7.
Tech support the
way it should be.
Great tech support is just 60 seconds away at 724-746-5500 or blackbox.com.
About Black Box
Black Box provides an extensive range of networking and infrastructure products. You’ll find everything from cabinets and racks
and power and surge protection products to media converters and Ethernet switches all supported by free, live 24/7 Tech support
available in 60 seconds or less.
© Copyright 2013. Black Box Corporation. All rights reserved. Black Box® and the Double Diamond logo are registered trademarks of BB Technologies, Inc.
Any third-party trademarks appearing in this manual are acknowledged to be the property of their respective owners.
RMT320 0A-R 2, version 2
724-746-5500 | blackbox.com
 Loading...