

Page 1
Model: 4075B, 4076B, 4077B, 4078B, 4079B, 4080B
Arbitrary/Function Waveform Generator
USER MANUAL
Page 2

Safety Summary
The following safety precautions apply to both operating and maintenance personnel and must be
followed during all phases of operation, service, and repair of this instrument.
Before applying power to this instrument:
Read and understand the safety and operational information in this manual.
Apply all the listed safety precautions.
Verify that the voltage selector at the line power cord input is set to the correct line voltage.
Operating the instrument at an incorrect line voltage will void the warranty.
Make all connections to the instrument before applying power.
Do not operate the instrument in ways not specified by this manual or by B&K Precision.
Failure to comply with these precautions or with warnings elsewhere in this manual violates the
safety standards of design, manufacture, and intended use of the instrument. B&K Precision assumes
no liability for a customer’s failure to comply with these requirements.
Category rating
The IEC 61010 standard defines safety category ratings that specify the amount of electrical energy
available and the voltage impulses that may occur on electrical conductors associated with these
category ratings. The category rating is a Roman numeral of I, II, III, or IV. This rating is also
accompanied by a maximum voltage of the circuit to be tested, which defines the voltage impulses
expected and required insulation clearances. These categories are:
Category I (CAT I): Measurement instruments whose measurement inputs are not intended to be
connected to the mains supply. The voltages in the environment are typically derived from a limitedenergy transformer or a battery.
Category II (CAT II): Measurement instruments whose measurement inputs are meant to be
connected to the mains supply at a standard wall outlet or similar sources. Example measurement
environments are portable tools and household appliances.
Category III (CAT III): Measurement instruments whose measurement inputs are meant to be
connected to the mains installation of a building. Examples are measurements inside a building's
circuit breaker panel or the wiring of permanently-installed motors.
Category IV (CAT IV): Measurement instruments whose measurement inputs are meant to be
connected to the primary power entering a building or other outdoor wiring.
i
Page 3

Do not use this instrument in an electrical environment with a higher category rating than what is
specified in this manual for this instrument.
You must ensure that each accessory you use with this instrument has a category rating equal to or
higher than the instrument's category rating to maintain the instrument's category rating. Failure to
do so will lower the category rating of the measuring system.
Electrical Power
This instrument is intended to be powered from a CATEGORY II mains power environment. The mains
power should be 120 V RMS or 240 V RMS. Use only the power cord supplied with the instrument and
ensure it is appropriate for your country of use.
Ground the Instrument
To minimize shock hazard, the instrument chassis and cabinet must be connected to an electrical
safety ground. This instrument is grounded through the ground conductor of the supplied, threeconductor AC line power cable. The power cable must be plugged into an approved three-conductor
electrical outlet. The power jack and mating plug of the power cable meet IEC safety standards.
Do not alter or defeat the ground connection. Without the safety ground connection, all accessible
conductive parts (including control knobs) may provide an electric shock. Failure to use a properlygrounded approved outlet and the recommended three-conductor AC line power cable may result in
injury or death.
Unless otherwise stated, a ground connection on the instrument's front or rear panel is for a
reference of potential only and is not to be used as a safety ground.
Do not operate in an explosive or flammable atmosphere
Do not operate the instrument in the presence of flammable gases or vapors, fumes, or finely-divided
ii
Page 4

particulates.
The instrument is designed to be used in office-type indoor environments. Do not operate the
instrument
In the presence of noxious, corrosive, or flammable fumes, gases, vapors, chemicals, or finely-
divided particulates.
In relative humidity conditions outside the instrument's specifications.
In environments where there is a danger of any liquid being spilled on the instrument or
where any liquid can condense on the instrument.
In air temperatures exceeding the specified operating temperatures.
In atmospheric pressures outside the specified altitude limits or where the surrounding gas is
not air.
In environments with restricted cooling air flow, even if the air temperatures are within
specifications.
In direct sunlight.
This instrument is intended to be used in an indoor pollution degree 2 environment. The operating
temperature range is 0 °C to 50 °C and the operating humidity is ≤ 95 % relative humidity at < 30 °C,
with no condensation allowed.
Measurements made by this instrument may be outside specifications if the instrument is used in
non-office-type environments. Such environments may include rapid temperature or humidity
changes, sunlight, vibration and/or mechanical shocks, acoustic noise, electrical noise, strong electric
fields, or strong magnetic fields.
Do not operate instrument if damaged
If the instrument is damaged, appears to be damaged, or if any liquid, chemical, or other material gets
on or inside the instrument, remove the instrument's power cord, remove the instrument from
service, label it as not to be operated, and return the instrument to B&K Precision for repair. Notify
B&K Precision of the nature of any contamination of the instrument.
Clean the instrument only as instructed
iii
Page 5

Do not clean the instrument, its switches, or its terminals with contact cleaners, abrasives, lubricants,
solvents, acids/bases, or other such chemicals. Clean the instrument only with a clean dry lint-free
cloth or as instructed in this manual.
Not for critical applications
This instrument is not authorized for use in contact with the human body or for use as a component
in a life-support device or system.
Do not touch live circuits
Instrument covers must not be removed by operating personnel. Component replacement and
internal adjustments must be made by qualified service-trained maintenance personnel who are
aware of the hazards involved when the instrument's covers and shields are removed. Under certain
conditions, even with the power cord removed, dangerous voltages may exist when the covers are
removed. To avoid injuries, always disconnect the power cord from the instrument, disconnect all
other connections (for example, test leads, computer interface cables, etc.), discharge all circuits, and
verify there are no hazardous voltages present on any conductors by measurements with a properlyoperating voltage-sensing device before touching any internal parts. Verify the voltage-sensing device
is working properly before and after making the measurements by testing with known-operating
voltage sources and test for both DC and AC voltages. Do not attempt any service or adjustment unless
another person capable of rendering first aid and resuscitation is present.
Do not insert any object into an instrument's ventilation openings or other openings.
Hazardous voltages may be present in unexpected locations in circuitry being tested when a fault
condition in the circuit exists.
Fuse replacement
Fuse replacement must be done by qualified service-trained maintenance personnel who are aware
of the instrument's fuse requirements and safe replacement procedures. Disconnect the instrument
from the power line before replacing fuses. Replace fuses only with new fuses of the fuse types,
voltage ratings, and current ratings specified in this manual or on the back of the instrument. Failure
to do so may damage the instrument, lead to a safety hazard, or cause a fire. Failure to use the
iv
Page 6

specified fuses will void the warranty.
Servicing
Do not substitute parts that are not approved by B&K Precision or modify this instrument. Return the
instrument to B&K Precision for service and repair to ensure that safety and performance features are
maintained.
Cooling fans
This instrument contains one or more cooling fans. For continued safe operation of the instrument,
the air inlet and exhaust openings for these fans must not be blocked nor must accumulated dust or
other debris be allowed to reduce air flow. Maintain at least 25 mm clearance around the sides of the
instrument that contain air inlet and exhaust ports. If mounted in a rack, position power devices in
the rack above the instrument to minimize instrument heating while rack mounted. Do not continue
to operate the instrument if you cannot verify the fan is operating (note some fans may have
intermittent duty cycles). Do not insert any object into the fan's inlet or outlet.
For continued safe use of the instrument
Do not place heavy objects on the instrument.
Do not obstruct cooling air flow to the instrument.
Do not place a hot soldering iron on the instrument.
Do not pull the instrument with the power cord, connected probe, or connected test lead.
Do not move the instrument when a probe is connected to a circuit being tested.
v
Page 7

Compliance Statements
This product is subject to Directive 2002/96/EC of the European
Parliament and the Council of the European Union on waste electrical
and electronic equipment (WEEE), and in jurisdictions adopting that
Directive, is marked as being put on the market after August 13, 2005,
and should not be disposed of as unsorted municipal waste. Please
utilize your local WEEE collection facilities in the disposition of this
product and otherwise observe all applicable requirements.
Disposal of Old Electrical & Electronic Equipment (Applicable in the European
Union and other European countries with separate collection systems)
vi
Page 8

CE Declaration of Conformity
This instrument meets the requirements of 2006/95/EC Low Voltage Directive and 2004/108/EC
Electromagnetic Compatibility Directive with the following standards.
Low Voltage Directive
- EN61010-1: 2001
EMC Directive
- EN 61000-3-2: 2006
- EN 61000-3-3: 1995+A1: 2001+A2: 2005
- EN 61000-4-2 / -3 / -4 / -5 / -6 / -11
- EN 61326-1: 2006
vii
Page 9
Safety Symbols
Refer to the user manual for warning information
to avoid hazard or personal injury and prevent
damage to instrument.
Electric Shock hazard
Alternating current (AC)
Chassis (earth ground) symbol.
Ground terminal
On (Power). This is the In position of the power
switch when instrument is ON.
Off (Power). This is the Out position of the power
switch when instrument is OFF.
Power Switch (On/Off). This is the power switch
located in front of the instrument.
CAUTION indicates a hazardous situation which, if
not avoided, will result in minor or moderate injury
WARNING indicates a hazardous situation which, if
not avoided, could result in death or serious injury
DANGER indicates a hazardous situation which, if
not avoided, will result in death or serious injury.
viii
Page 10

Contents
Safety Summary .............................................................................................. i
Compliance Statements ........................................................................................................ vi
Safety Symbols .................................................................................................................... viii
1 General Information ........................................................................... 1
1.1 Product Overview ......................................................................................................... 1
1.2 Package Contents ......................................................................................................... 1
1.3 Front Panel Overview ................................................................................................... 2
Front Panel Description ................................................................................................ 2
1.4 Rear Panel Overview .................................................................................................... 3
Rear Panel Description ................................................................................................. 3
1.5 Display Overview .......................................................................................................... 4
Display Description ....................................................................................................... 4
2 Getting Started ................................................................................... 4
2.1 Input Power Requirements .......................................................................................... 5
Input Power .................................................................................................................. 5
2.2 Output Connections ..................................................................................................... 5
Impedance Matching.................................................................................................... 6
2.3 Preliminary Check ......................................................................................................... 6
Output Check ................................................................................................................ 6
3 Operating Instructions ........................................................................ 7
3.1 Menu Keys .................................................................................................................... 7
Menu Tree..................................................................................................................... 7
PARAMETER Key ......................................................................................................... 10
WAVEFORM Key .......................................................................................................... 12
PULSE Menu ............................................................................................................... 18
MODE Key ................................................................................................................... 18
SWEEP Key .................................................................................................................. 20
MODULATION Key ...................................................................................................... 21
SETUPS Key ................................................................................................................. 23
UTILITY Key ................................................................................................................. 25
3.2 ON Key ........................................................................................................................ 26
ix
Page 11

3.3 Cursor Movement Keys .............................................................................................. 26
3.4 Rotary Input Knob ...................................................................................................... 26
3.5 Power-On Settings ...................................................................................................... 26
3.6 Memory ...................................................................................................................... 27
3.7 Displaying Errors ......................................................................................................... 28
3.8 Creating an Arbitrary Waveform ................................................................................ 29
Entering Individual Data Points .................................................................................. 29
Creating a Complex Arbitrary Waveform ................................................................... 30
Setting the Frequency ................................................................................................. 32
Setting the Amplitude ................................................................................................. 33
Loading an Arbitrary Waveform ................................................................................. 33
3.9 Remote Interface ........................................................................................................ 33
USB Interface .............................................................................................................. 33
GPIB Interface ............................................................................................................. 34
4 Programming .................................................................................... 35
4.1 Overview .................................................................................................................... 35
GPIB ............................................................................................................................ 35
4.2 Device State ................................................................................................................ 35
Local State (LOCS) ....................................................................................................... 35
Local With Lockout State (LWLS) ................................................................................ 35
Remote State (REMS) ................................................................................................. 35
Remote With Lockout State (RWLS) ........................................................................... 35
4.3 Interface Function Subsets ......................................................................................... 35
4.4 Device Address ........................................................................................................... 35
4.5 Message Exchange Protocol ....................................................................................... 36
The Input Buffer .......................................................................................................... 36
The Output Queue ...................................................................................................... 36
Response Messages .................................................................................................... 36
Coupled Commands .................................................................................................... 36
4.6 Block Data ................................................................................................................... 37
4.7 Instrument Identification ........................................................................................... 38
4.8 Instrument Reset ........................................................................................................ 38
4.9 Self-test ...................................................................................................................... 38
4.10 Command Syntax ........................................................................................................ 38
x
Page 12

General Command Structure ...................................................................................... 38
SCPI Command Structure ........................................................................................... 41
4.11 Status Reporting ......................................................................................................... 43
The Status Byte ........................................................................................................... 43
Service Request Enabling ............................................................................................ 43
Standard Event Status Register .................................................................................. 43
The Error Queue ......................................................................................................... 44
Error Codes ................................................................................................................. 44
4.12 Common Commands .................................................................................................. 48
System Data Commands............................................................................................. 48
Internal Operation Commands ................................................................................... 48
Synchronization Commands ....................................................................................... 49
Status and Event Commands ...................................................................................... 49
Device Trigger Commands .......................................................................................... 51
Stored Settings Commands ........................................................................................ 51
4.13 Instrument Control Commands .................................................................................. 52
SOURce Subsystem ..................................................................................................... 52
OUTPut Subsystem ..................................................................................................... 68
Trigger Subsystem ...................................................................................................... 69
Arbitrary Subsystem ................................................................................................... 71
Status Subsystem ........................................................................................................ 80
System Subsystem ...................................................................................................... 84
4.14 IEEE 488.1 Interface Messages ................................................................................... 87
GET - Group Execute Trigger ....................................................................................... 87
DCL - Device Clear ....................................................................................................... 87
SDC - Selected Device Clear ........................................................................................ 87
LLO - Local Lockout ..................................................................................................... 87
4.15 SCPI Command Tree ................................................................................................... 88
Root Node ................................................................................................................... 88
:SOURce Subsystem .................................................................................................... 88
:OUTPut Subsystem .................................................................................................... 88
:TRIGger Subsystem .................................................................................................... 89
:ARBitrary Subsystem ................................................................................................. 89
:STATus Subsystem ...................................................................................................... 90
xi
Page 13

:SYSTem Subsystem ..................................................................................................... 90
4.16 Block Transfer (GPIB only) .......................................................................................... 92
4.17 GPIB Communication Protocol ................................................................................... 94
General ....................................................................................................................... 94
Responses to IEEE-488.1 Interface Messages ............................................................ 94
IEEE 488.2 Interface Function Subsets ........................................................................ 97
5 Troubleshooting Guide ...................................................................... 98
6 Specifications .................................................................................... 99
SERVICE INFORMATION ............................................................................. 103
LIMITED THREE-YEAR WARRANTY .............................................................. 104
xii
Page 14

1 General Information
1.1 Product Overview
The B&K Precision 4075B series are versatile high performance arbitrary/function waveform
generators capable of generating arbitrary waveforms with 14-bit resolution and length up to
16,000,000 points. In addition to the large waveform memory, these generators offer AM, FM, and FSK
modulation along with sweep, burst, and flexible triggering capabilities. The instrument can be
remotely operated via the USBTMC or GPIB (IEEE-488.2) interface supporting SCPI commands. Users
can create arbitrary waveforms directly from the front panel using the generator’s built-in waveform
editing functions or load arbitrary waveforms via the instrument’s remote interfaces.
Features:
14-bit, 200 MSa/s, and up to 16M points arbitrary waveform generator
Generate Sine waveforms up to 80 MHz, Square waveforms up to 60 MHz
Color LCD display
AM, FM, and FSK modulation functions
Fully programmable markers
Store/recall up to 49 different instrument setups
Standard USBTMC and GPIB (50 MHz/80 MHz models only) interfaces
SCPI-compliant command set
1.2 Package Contents
Please inspect the instrument mechanically and electrically upon receiving it. Unpack all items from the
shipping carton, and check for any obvious signs of physical damage that may have occurred during
transportation. Report any damage to the shipping agent immediately. Save the original packing carton
for possible future reshipment. Every instrument is shipped with the following contents:
1 x 4075B, 4076B, 4077B, 4078B, 4079B, or 4080B waveform generator
1 x Full instruction manual on CD
1 x AC power cord
1 x USB type A to type B cable
1 x Certificate of calibration
1 x Test report
Verify that all items above are included in the shipping container. If anything is missing, please contact
B&K Precision.
1
Page 15
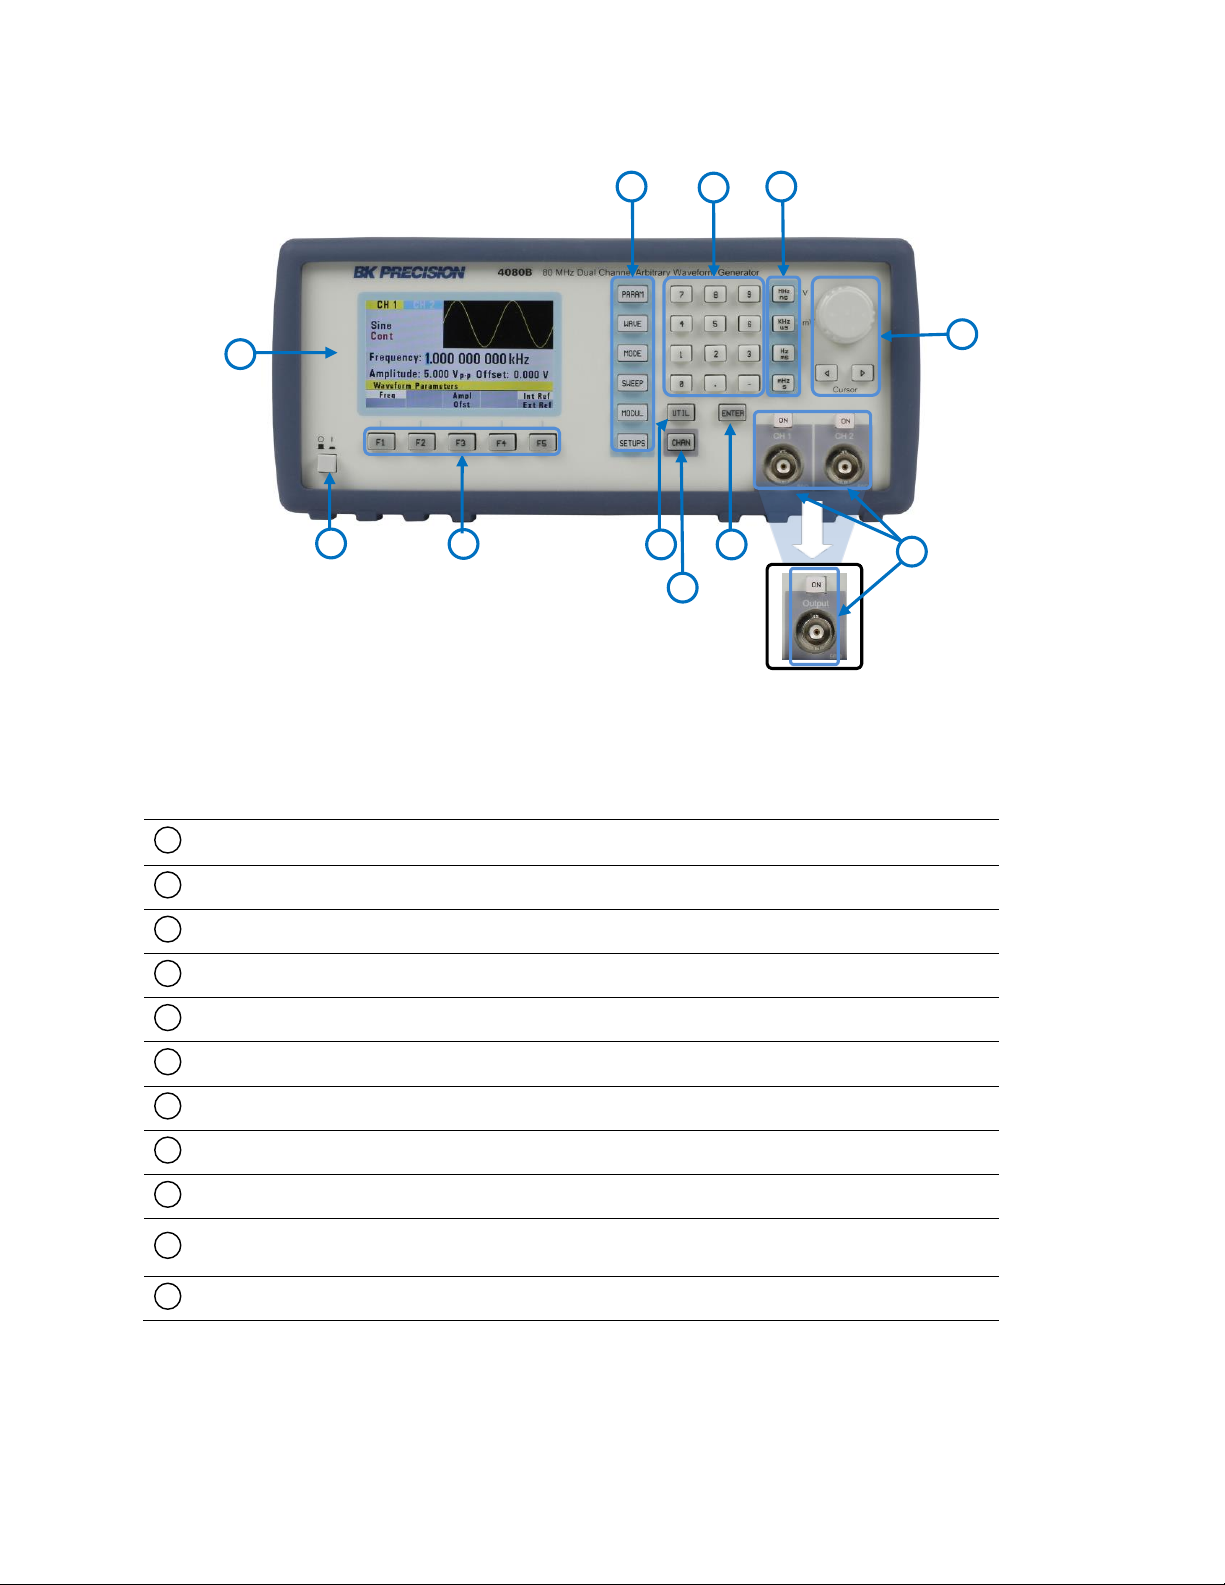
Power On/Off Switch
Function Keys (F1-F5)
UTILITY Key
CHANNEL Key (4078B, 4079B, and 4080B only)
ENTER Key
Channel Output BNC (50 Ω) and Enable
Rotary Knob and Cursor Keys
Unit Setting Keys
Numeric Keypad
Menu Option Keys
Color LCD Display Window
1
2 3 4 5 6
7 8 9
10
11
(For Models
and 4077B)
1
2
3 4 5
7
8
9
11
10
6
1.3 Front Panel Overview
4075B, 4076B,
Front Panel Description
Figure 1.1 – Front Panel Overview
2
Page 16
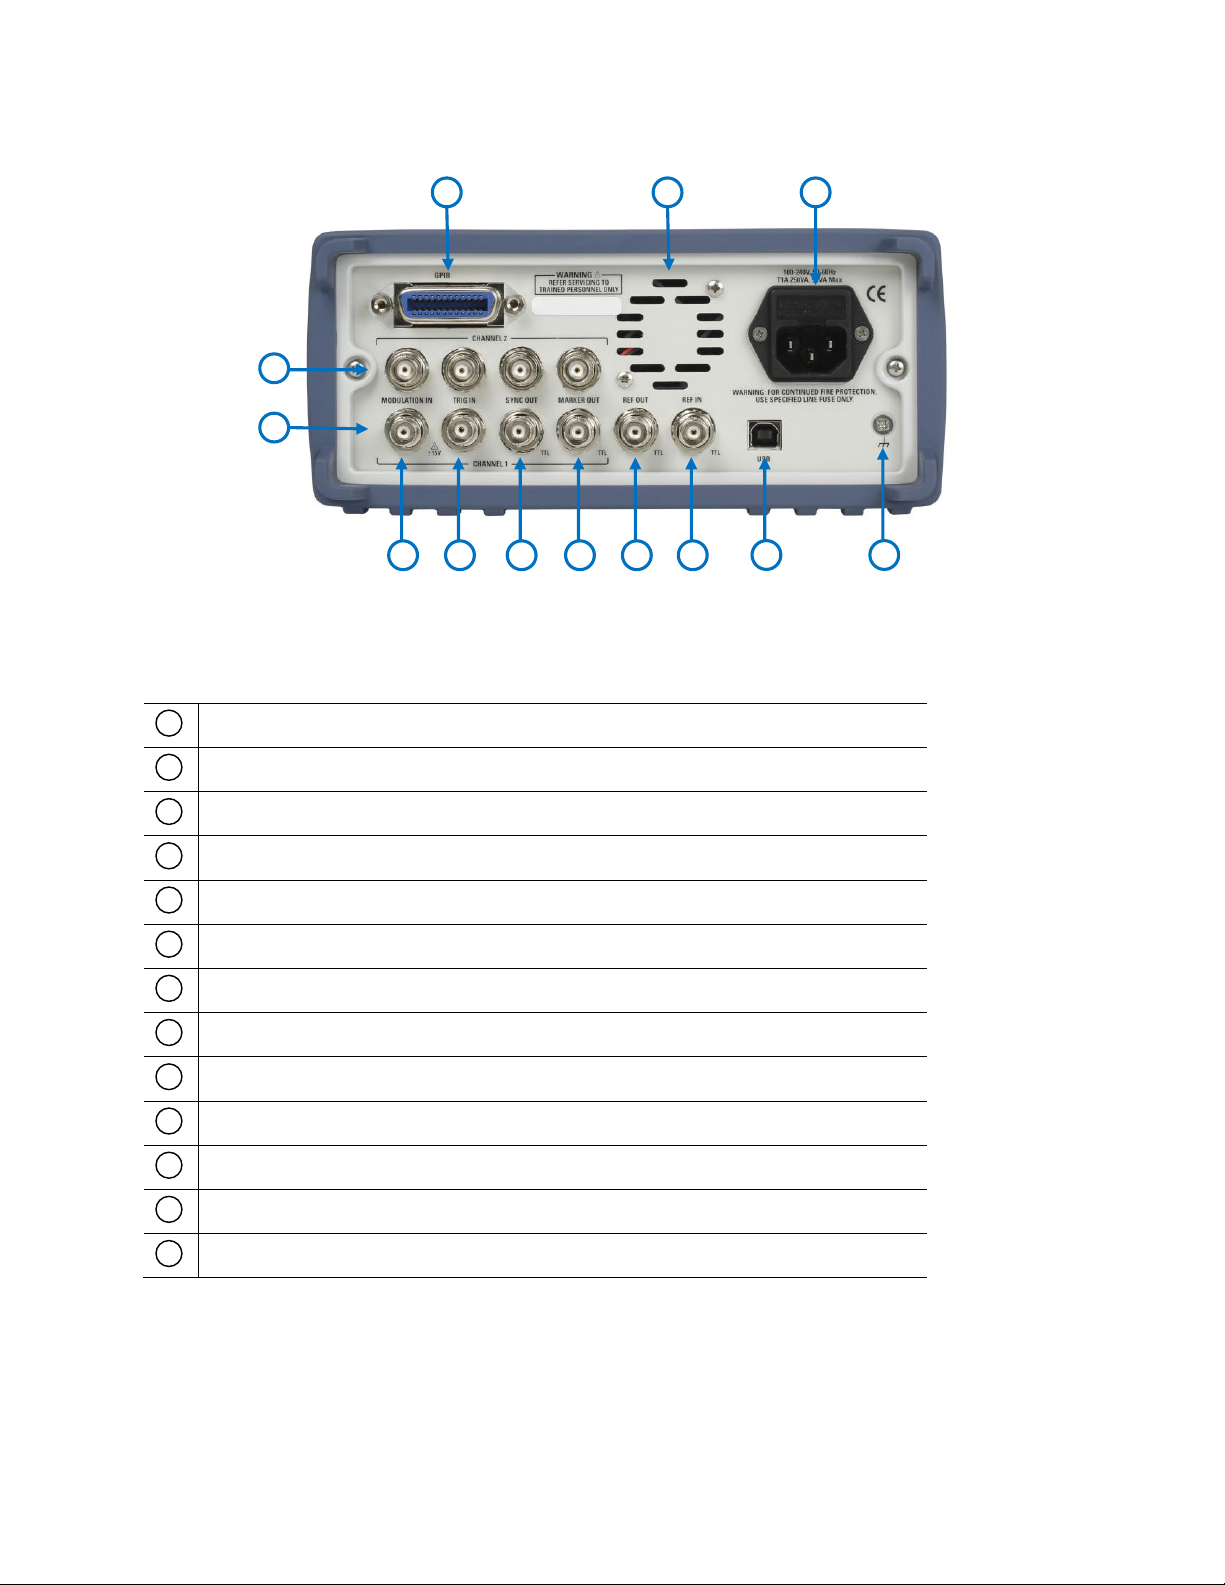
Modulation Input BNC
External Trigger Input BNC
Sync Output BNC
Marker Output BNC
10 MHz Reference Output BNC
10 MHz Reference Input BNC
USBTMC interface
Earth Ground
AC Power Connector and Fuse Box
Rear Cooling Fan
GPIB Port (4076B, 4077B, 4079B, and 4080B only)
Channel 2 I/O (4078B, 4079B, and 4080B only)
Channel 1 I/O
1 2 3
4
5 6 7 8 9
10
11
12
13
1 2 3
4
9
11
5 6 7
8
10
13
12
1.4 Rear Panel Overview
Rear Panel Description
Figure 1.2 – Rear Panel Overview
3
Page 17
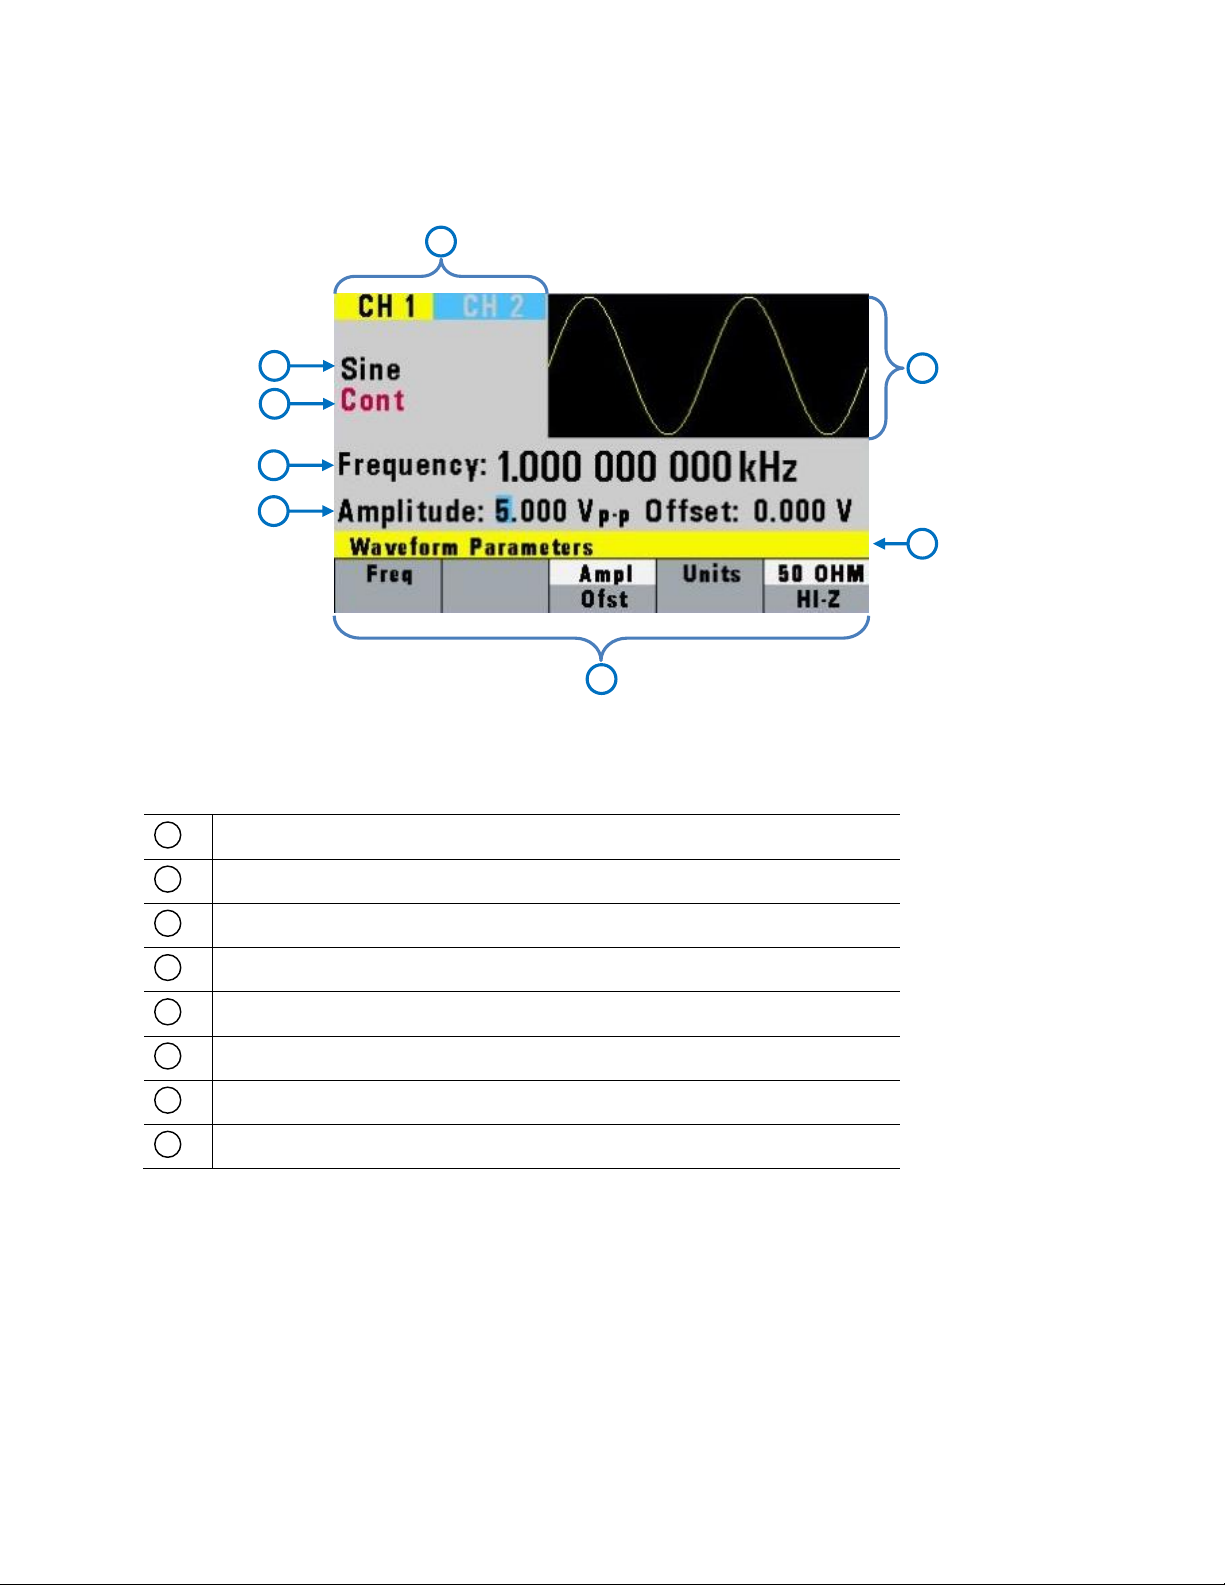
Wave Type
Trigger Mode
Frequency
Menu Parameters Values
Menu Options
Menu Title
General Waveform Display
Channel Selection Indicator
1
2 3 4 5 6
7
8
5
4
8 2 1 3 7
6
1.5 Display Overview
Display Description
2 Getting Started
Figure 1.3 – Display Overview
Before connecting and powering up the instrument, please review and go through the instructions in
this chapter.
4
Page 18

The included AC power cord is safety certified for this
instrument operating in rated range. To change a
cable or add an extension cable, be sure that it can
meet the required power ratings for this instrument.
Any misuse with wrong or unsafe cables will void the
warranty.
2.1 Input Power Requirements
Input Power
The instrument has a universal AC input that accepts line voltage and frequency input within:
100 – 240 V (+/- 10%), 50 – 60 Hz (+/- 5%)
Before connecting to an AC outlet or external power source, be sure that the power switch is in the OFF
position and verify that the AC power cord, including the extension line, is compatible with the rated
voltage/current and that there is sufficient circuit capacity for the power supply. Once verified, connect
the cable firmly.
2.2 Output Connections
The waveform generator output circuits are protected against short circuit or nominal accidental
voltages applied to the main output connector. The output circuits operate as a 50 Ω voltage source
working into a 50 Ω load. At higher frequencies, a non-terminated or improperly terminated output
may cause aberrations on the output waveform. In addition, loads with an impedance less than 50 Ω
will reduce the waveform amplitude, while loads with an impedance greater than 50 Ω will increase
waveform amplitude.
Excessive distortion or aberrations caused by improper termination are less noticeable at lower
frequencies, especially with sine and triangle waveforms. To ensure waveform integrity, follow these
precautions:
1. Use good quality 50 Ω coaxial cable and connectors.
2. Make all connections tight and as short as possible.
3. Use good quality attenuators, if it is necessary to reduce waveform amplitudes applied to sensitive
circuits.
4. Use termination or impedance-matching devices to avoid reflections.
5. Ensure that attenuators and terminations have adequate power handling capabilities.
If there is a DC voltage across the output load, use a coupling capacitor in series with the load. The
time constant of the coupling capacitor and load must be long enough to maintain pulse flatness.
5
Page 19

Impedance Matching
If the waveform generator is driving a high impedance, such as a 1 MΩ input impedance (paralleled by
a stated capacitance) of an oscilloscope vertical input, connect the transmission line to a 50 Ω
attenuator, a 50 Ω termination and to the oscilloscope input. The attenuator isolates the input
capacitance of the device and terminates the waveform generator properly.
2.3 Preliminary Check
Complete the following steps to verify that the generator is ready for use.
1. Verify AC Input Voltage
Verify and check to make sure proper AC voltages are available to power the instrument. The AC
voltage range must meet the acceptable specification as explained in section 2.1.
2. Connect Power
Connect AC power cord to the AC receptacle in the rear panel and press the power switch to the
ON position to turn ON the instrument. The instrument will have a boot screen while loading, after
which the main screen will be displayed.
3. Self Adjust
At power-on, the waveform generator performs a diagnostic self-test procedure to check itself for
errors. If it finds an error, an error code and text will appear in the display window. Other error
codes appear when you enter an invalid front-panel setting. For more information on error codes,
see the Displaying Errors section 3.7. When the waveform generator finishes the diagnostic selftest routine, it enters the local state (LOCS) and assumes power-on default settings.
Output Check
Follow the steps below to do a quick check of the settings and waveform output.
1. Turn on the instrument and set the instrument to default settings. To set to default, press Setups,
press Recall, and select 0 Default Setup. The instrument will set both channels with the following
parameters:
Waveform Shape: Sine
Frequency: 1.000000000 kHz
Amplitude: 5 .000 Vpp
Offset: 0.000 Vdc
Phase: 0.0 °
Output Impedance: 50 OHM
2. Connect the BNC output of CH1 into an oscilloscope.
3. Press the On button on top of CH1 output BNC to turn on the output and observe a sine wave with
the parameters above.
4. Press the Freq option in the menu and use the rotary knob or the numeric keypad to change
frequency. Observe the changes on the oscilloscope display.
6
Page 20

5. Press the Ampl option in the menu and use the rotary knob or the numeric keypad to change the
amplitude. Observe the changes on the oscilloscope display.
6. Press the Offset option in the menu and use the rotary knob or the numeric keypad to change the
DC offset. With the oscilloscope set for DC coupling, observe the changes on the display.
7. Now, connect the BNC output of CH2 into an oscilloscope and follow steps 3 to 6 to check its
output.
3 Operating Instructions
3.1 Menu Keys
These keys select the main menus for displaying or changing a parameter, function or mode. Below is
the hierarchy and selections of the menu tree.
Menu Tree
- PARAM
o FREQ | RATE (Arb Mode Only)
o AMPL| OFST
o UNITS (Only when AMPL is selected, press to toggle display in Vp-p, Vrms, dBm)
o 50 OHM | HI-Z
o INTCLK | EXTCLK
- WAVE
o SINE
o SQR (Duty Cycle)
o TRI (Symmetry)
o PULSE
FREQ | PERIOD
WIDTH
EQUAL EDGE
LEAD | TRAIL
PREV
o ARB
START
LENGTH
MARK
ADDR
LENGTH
ON | OFF
PREV
EDIT
POINT
7
Page 21

o ADRS
o DATA
o PREV
LINE
o FROM
o TO
o EXEC
NO
YES
PREV
o PREV
PREDEF
o TYPE (Predefined Waveform Type)
o FROM | DATA
o LENG
o SCALE (In %)
o EXEC
NO
YES
PREV
o EXEC (When NOISE is selected as TYPE)
ADD
NEW
EXEC
NO
YES
PREV
PREV
MORE
o COPY
FROM
LENG
TO
EXEC
NO
YES
PREV
PREV
o CLEAR
FROM
TO
ALL
EXEC
NO
YES
8
Page 22

PREV
o PROT
FROM
TO
ALL
ON | OFF
PREV
o SHOW WAVE
o PREV
PREV
PREV
- MODE
o CONT
o TRIG
MAN (Manual Trigger)
INT (Internal Trigger Rate)
EXT (External Trigger)
PREV
o GATE
MAN (Manual Gate Trigger)
INT (Internal Gate Trigger Rate)
EXT (External Gate Trigger)
PREV
o BURST
MAN (Manual Burst)
INT (Internal Burst Rate)
EXT (Burst External)
NBRST (Number of Bursts)
PREV
o PHASE (Not available in ARB mode)
PHASE (Set Phase Degree)
SET-ZERO (Set Phase to 0)
SYNC Both Ch
PREV
o SYNC Both Ch (ARB mode only)
- SWEEP ( Not Available in PULSE and ARB mode)
o ON | OFF
o START (Sweep Start Frequency)
o STOP (Sweep Stop Frequency)
o RATE (Sweep Rate)
o LIN | LOG | UP-DOWN (Linear or Logarithmic)
- MODUL
o AM
ON | OFF
% (% of Modulation)
PREV
9
Page 23

- SETUPS
- UTIL
SHAPE (AM Modulation Shape)
MOD FREQ (AM Modulation Frequency)
EXT | INT (External or Internal Modulation)
o FM (Not available in PULSE and ARB mode)
ON | OFF
DEV (FM Deviation Frequency)
SHAPE (FM Modulation Shape)
MOD FREQ (FM Modulation Frequency)
EXT | INT (External or Internal Modulation)
o FSK (Not available in PULSE and ARB mode)
ON | OFF
F-LO (FSK Low Frequency)
F-HI (FSK High Frequency)
RATE (FSK Rate)
EXT | INT (External or Internal modulation)
o RECALL (Recall Setup from Memory)
o LOAD ARB (Loads arbitrary waveform. Available only in ARB mode)
o STORE (Store Setup from Memory)
o SAVE ARB (Saves current arbitrary waveform into memory. Available only in ARB mode)
o GPIB (ACTIVE) (GPIB Address)
o USB (ACTIVE)
o POWER (Power On Setup)
o SN (Serial number information)
PARAMETER Key
This key selects and displays the waveform frequency, amplitude, offset and external reference, and
allows you to adjust the parameters. When Arbitrary Waveform is selected, the display also shows the
point rate.
Figure 3.1 - Frequency Menu
F1: Freq/Rate - (Frequency) Selects and displays the frequency. Change the frequency setting using
the cursor keys and rotary knob or numerical keypad. If a certain wavelength can't
produce the waveform at the desired frequency, the waveform generator displays an
“Out of Range” error message.
10
Page 24

Front Panel
Amplitude Setting
Data Point
Value
Relative Output
Amplitude Voltage
5 Vp-p
8191
+2.5 V
5 Vp-p
4095
+1.25 V
5 Vp-p
0
0V (offset voltage)
- (Rate) Selects and displays the Point Rate (for Arbitrary Waveform only). The Rate
parameter governs the rate at which waveform points are executed, and thus the
frequency of the waveform output. When you set this parameter, the waveform
generator will keep that execution rate for all waveform lengths until it is changed.
F3: Ampl/Ofst - Selects the Amplitude or the Offset parameters.
- (Offset) Change the offset by using the cursor keys, rotary dial or numerical keypad. If
a certain setting cannot be produced, the waveform generator will display a “Setting
Conflict” message.
In Arbitrary mode, this setting defines the maximum peak-to-peak amplitude of a fullscale waveform. If the waveform does not use the full scale of data (-8191 to +8191),
then its actual amplitude will be smaller.
Figure 3.2 - Amplitude Menu
Setting the Amplitude
The following equation represents the relative output amplitude voltage relationship
between the front-panel amplitude peak-to-peak setting and the data point values in
waveform memory:
𝐴𝑚𝑝𝑙𝑖𝑡𝑢𝑑𝑒 (𝑃𝑒𝑎𝑘 𝑡𝑜 𝑃𝑒𝑎𝑘 𝑠𝑒𝑡𝑡𝑖𝑛𝑔)× 𝑑𝑎𝑡𝑎 𝑝𝑜𝑖𝑛𝑡𝑠 𝑣𝑎𝑙𝑢𝑒
𝑂𝑢𝑡𝑝𝑢𝑡 𝑉𝑜𝑙𝑡𝑎𝑔𝑒 =
+ 𝑜𝑓𝑓𝑠𝑒𝑡
16382
Where 16382 is the total data point value range in waveform memory.
Examples
Table 3.1 - Output Voltage Examples
11
Page 25
9 Vp-p
-4095
-4.5 V
4 Vp-p
-8191
-2 V
F4: Units - Selects the amplitude units: peak-to-peak, RMS or dBm (sine waves only).
Note: This option is shown when Ampl is selected.
F5: 50 OHM/HI-Z - Selects the amplitude voltage value based on the two different impedance
termination (i.e. if connected to oscilloscope with 1MΩ input impedance,
generator will display the correct amplitude value for 1MΩ termination when HIZ is selected).
Note: This option is shown when Ampl/Ofst is selected.
F5: Int Ref/Ext Ref - Selects internal or external reference source (the external reference must be
connected to the rear panel Ref In connector).
Note: This option is shown when Freq is selected.
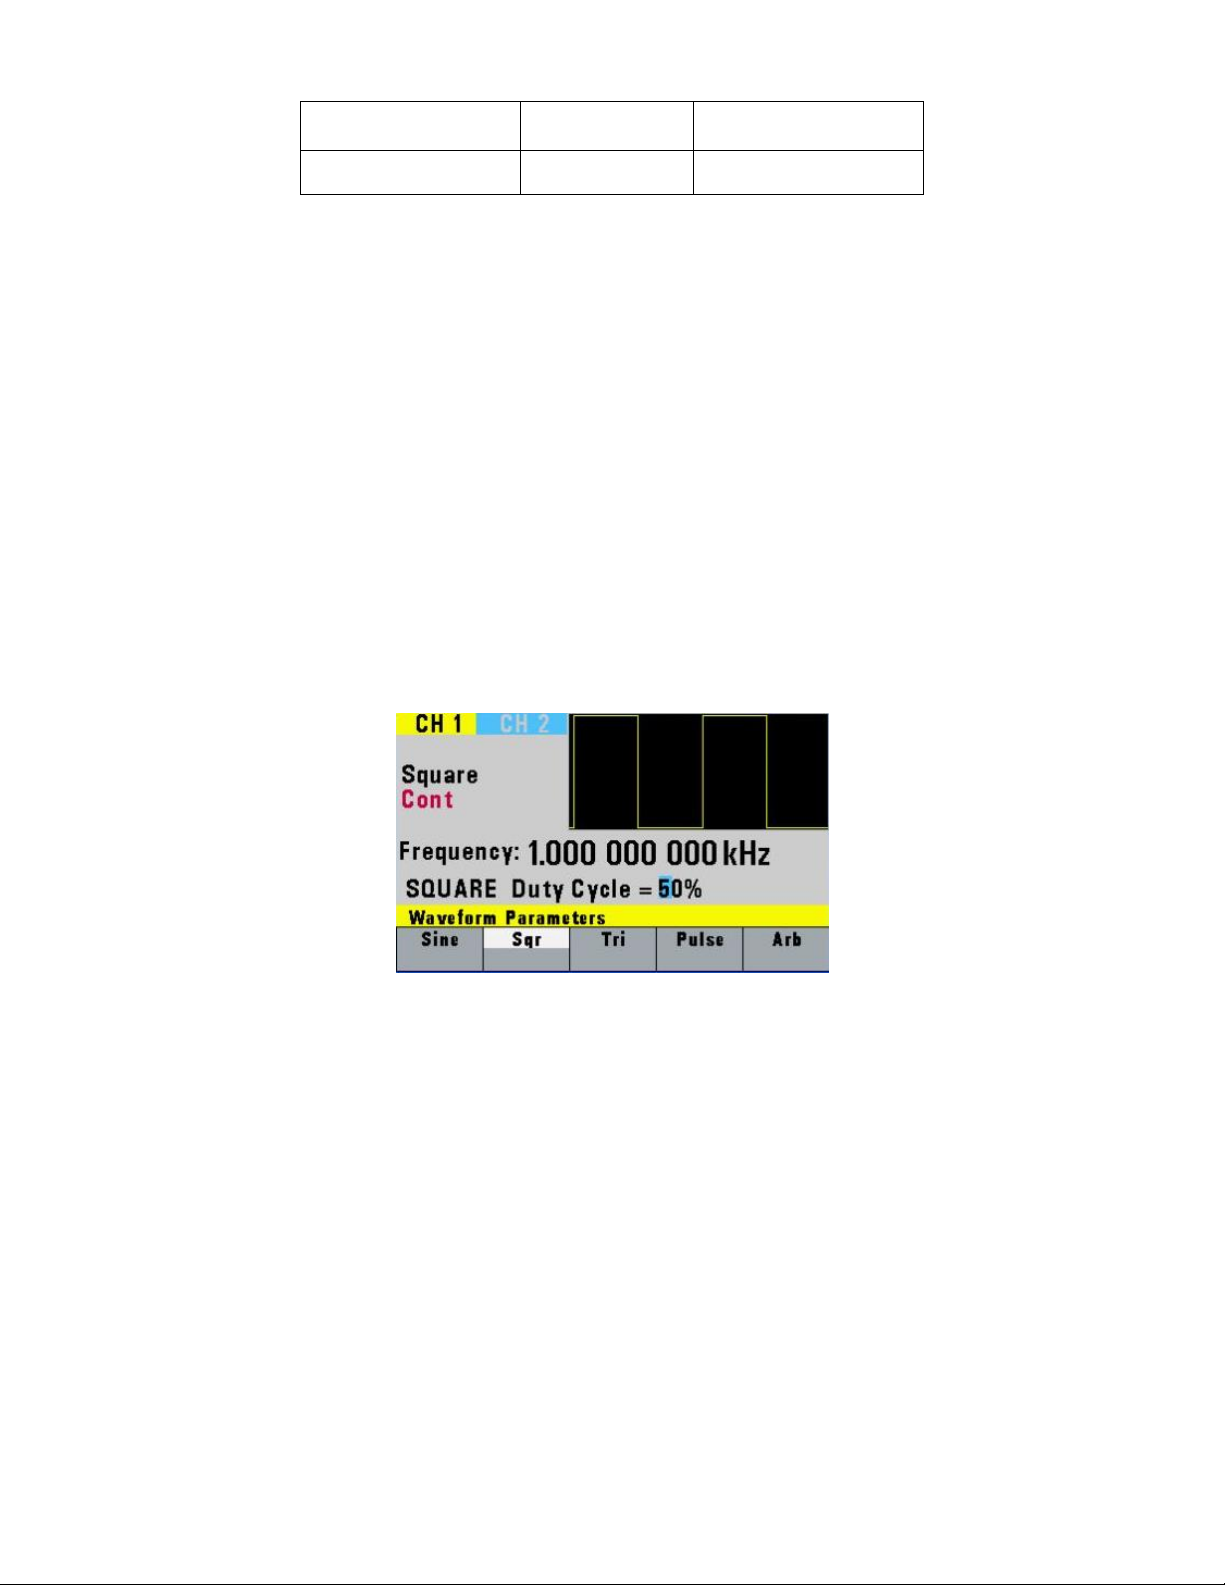
WAVEFORM Key
Displays the waveforms available:
Figure 3.3 - Waveform Menu
F1: Sine - Selects the sine waveform.
F2: Sqr - Selects the square waveform and displays the waveform duty cycle that can be
changed from 20% to 80% up to 10 MHz, 40% to 60% up to 30 MHz.
F3: Tri - Selects the triangle waveform and displays the waveform duty cycle that can be
changed from 0% to 100% up to 500 kHz, 10% to 90% up to 2 MHz, and 50% up to the
max frequency. The triangle maximum frequency is 5 MHz.
F4: Pulse - Selects the Pulse waveform and then displays the pulse menu. Refer to the PULSE
Menu section for details.
F5: ARB - Selects the arbitrary waveform and then displays the Arbitrary menu:
12
Page 26
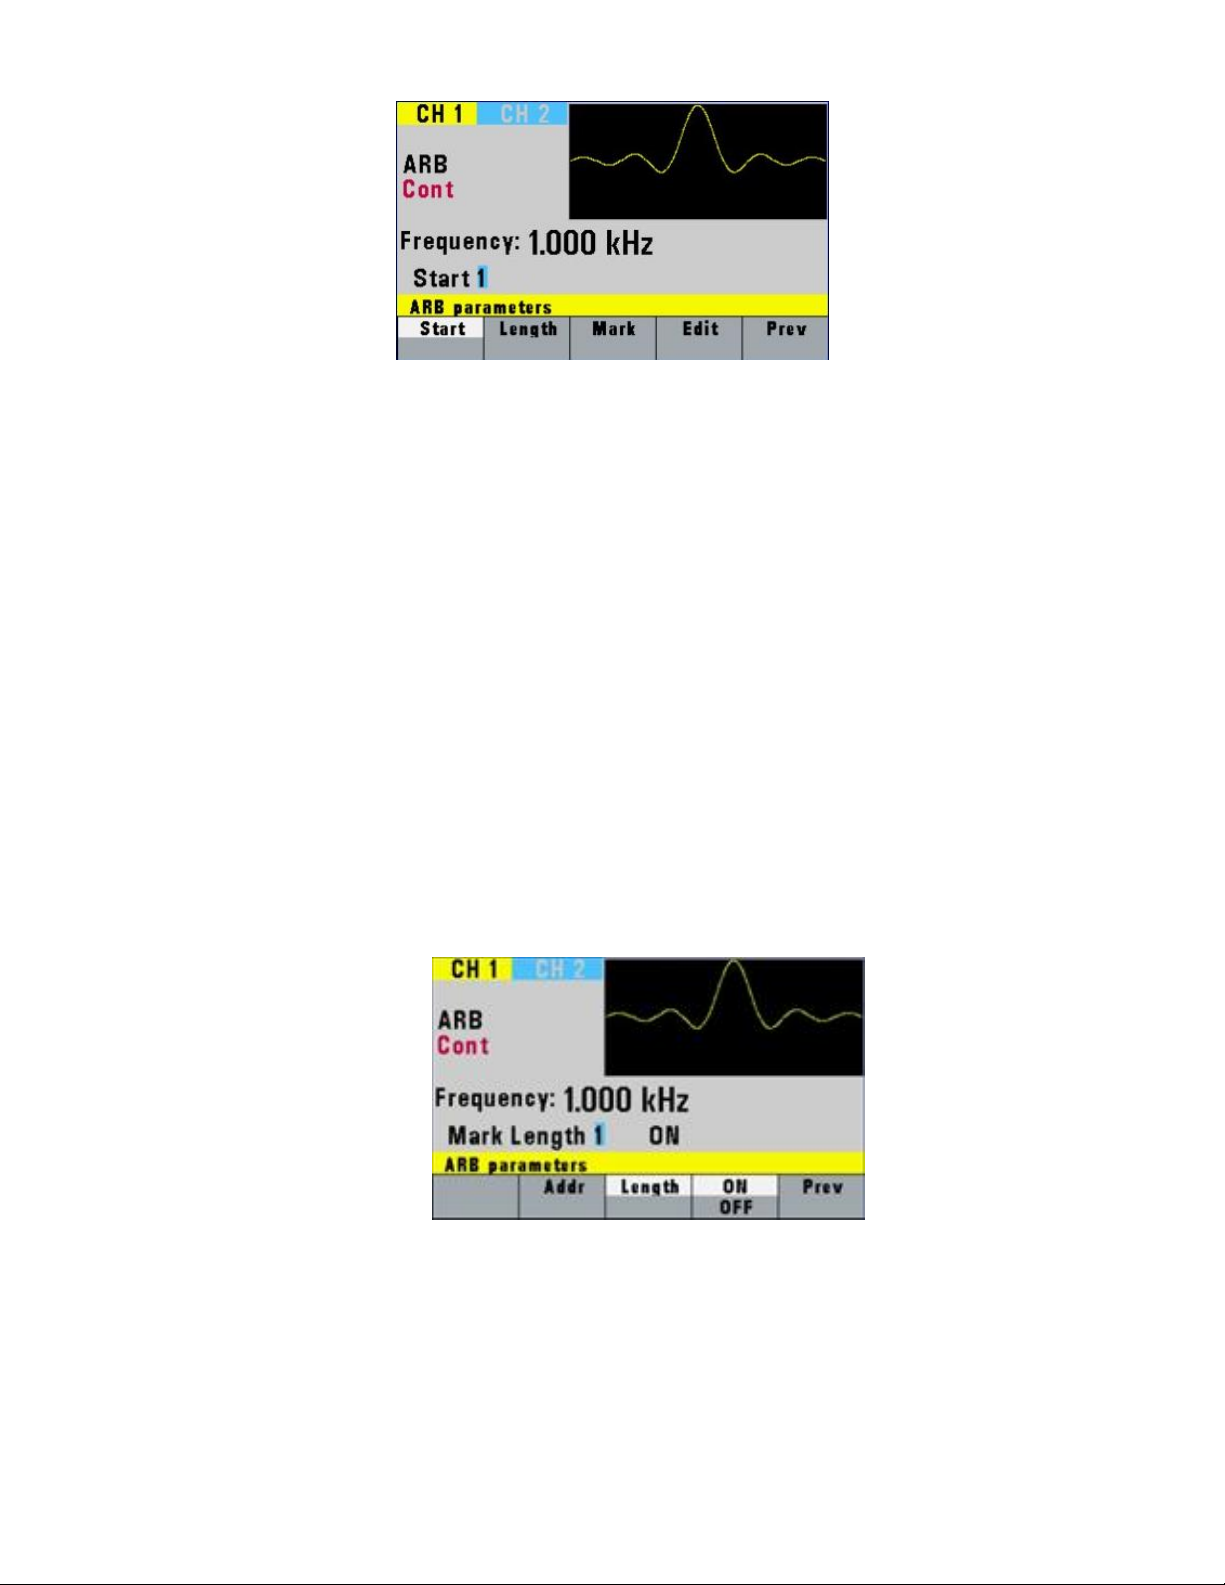
Figure 3.4 - Arbitrary Menu
F1: Start - Selects the starting address of the arbitrary waveform.
F2: Length - Selects the length of the arbitrary waveform. Use the START and LENGTH
menu selection to mark a selection of the waveform memory that will be
executed.
Note: The maximum Length allowed depends on model.
F3: Mark - (Marker Output) Selects the marker output address of the signal to be
available at the Marker Out connector. The F2: ADDR, F3: LENGTH or F4:
ON/OFF can be selected and the Marker output signal can be available at
every 4th location address between the start and stop addresses of the
executed waveform, starting from address 1 (i.e. 1, 5, 9, 13, etc.). This
marker output feature will allow you to generate a positive TTL level
output signal at the points specified by address and length.
Note: The maximum Length allowed to be set for marker is 4000. Marker
Length can be set at every 4th location address starting from 4 (i.e. 4, 8,
12, etc.)
Figure 3.5 - Marker Menu
Below is an illustration of how the marker function works:
13
Page 27
Start Address
Length
Markers
0
5 V
Arbitrary waveform
channel output
5 V TTL signal output
from front panel
from rear Marker Out
connector
F4: Edit - Refer to the Arbitrary EDIT Menu section below for details.
F5: Prev - Back to previous menu.
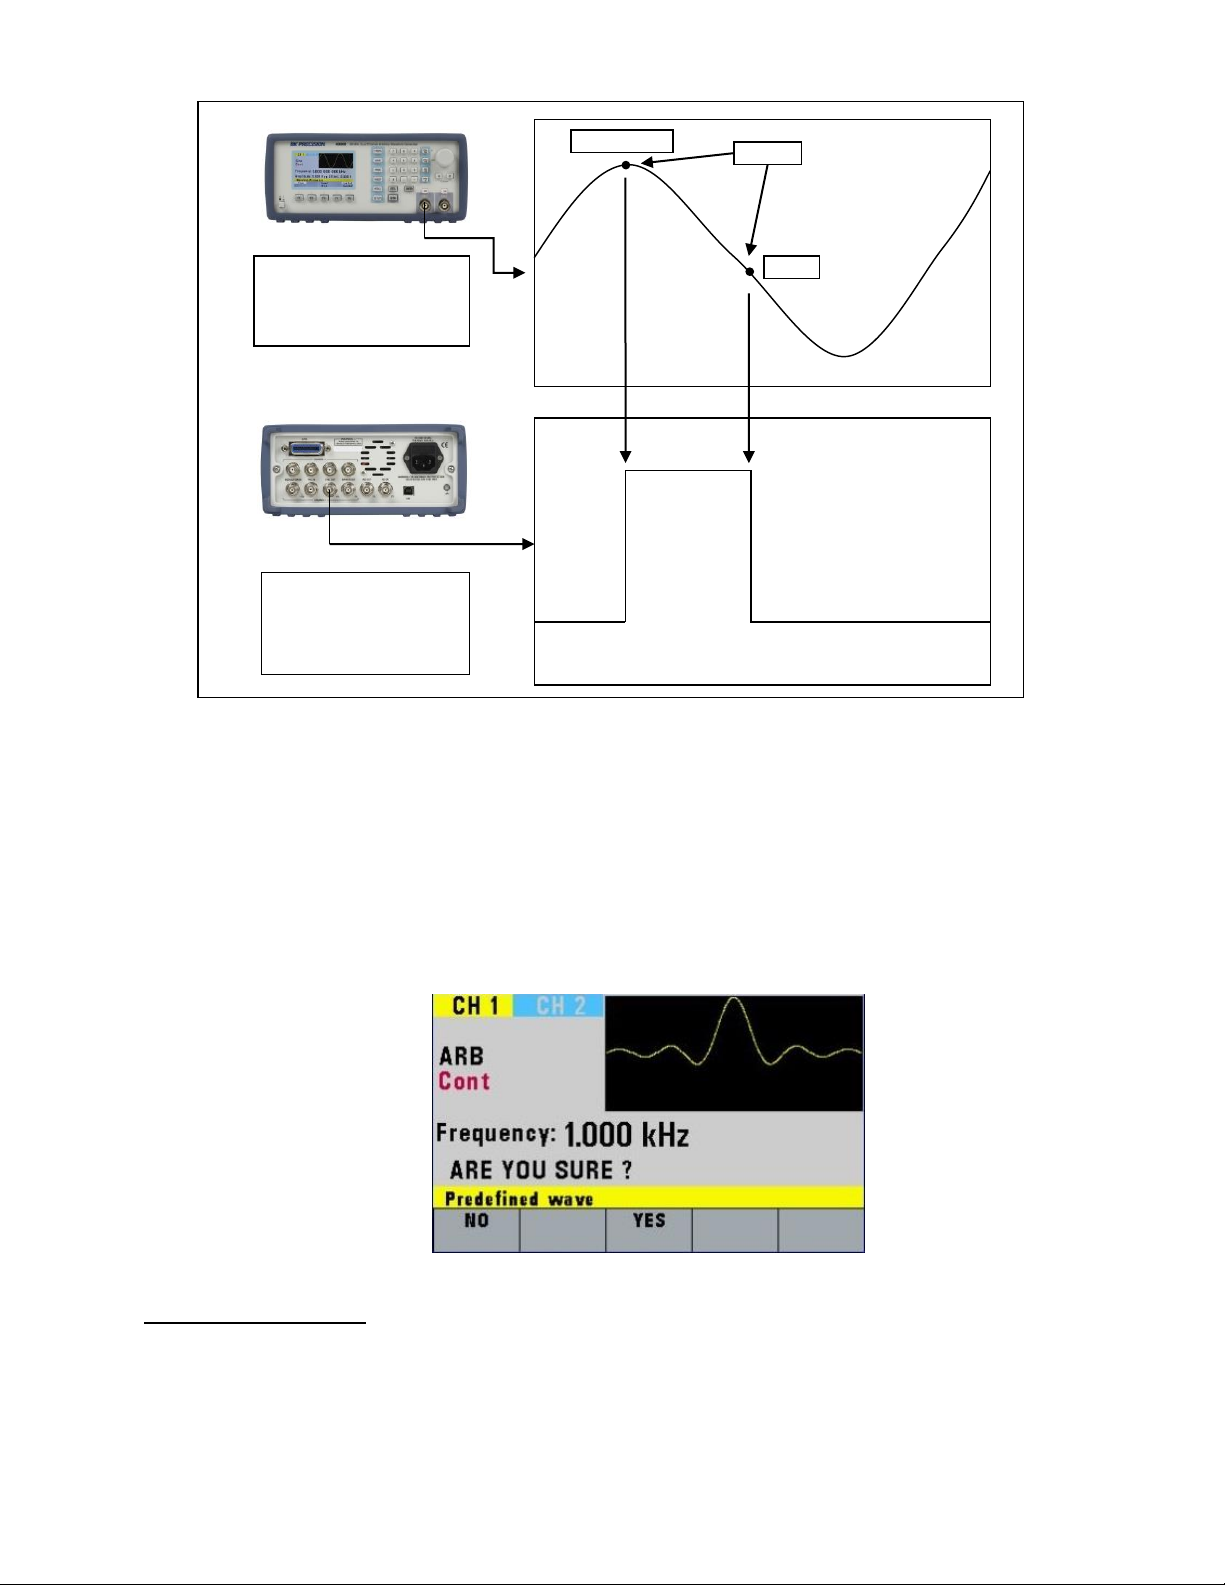
Note: Changing one of the arbitrary parameters as start and length causes an update of the output
waveform to the new parameters. When exiting the Arbitrary Menu by selecting a different waveform,
a message to save the Arbitrary wave will be displayed. Select YES or NO to save the new waveform.
This save functions the same as the SAVE ARB function.
Figure 3.6 - Arb Saving Menu
Arbitrary EDIT Menu
Enters data for creating arbitrary waveforms. You can enter data one point at a time, as a value at an
address, draw a line from one point (a value at an address) to another point, create a predefined
waveform, or combine these to create complex waveforms. The valid data values range is -8191 to
8191. The valid waveform memory addresses range from 1 to maximum memory length of instrument.
14
Page 28
The data value governs the output amplitude of that point of the waveform, scaled to the instrument
output amplitude. Therefore, a value of 8191 corresponds to positive peak amplitude, 0 corresponds to
the waveform offset, and -8191 corresponds to the negative peak amplitude. The following menu
displayed:
Figure 3.7 - Edit Menu
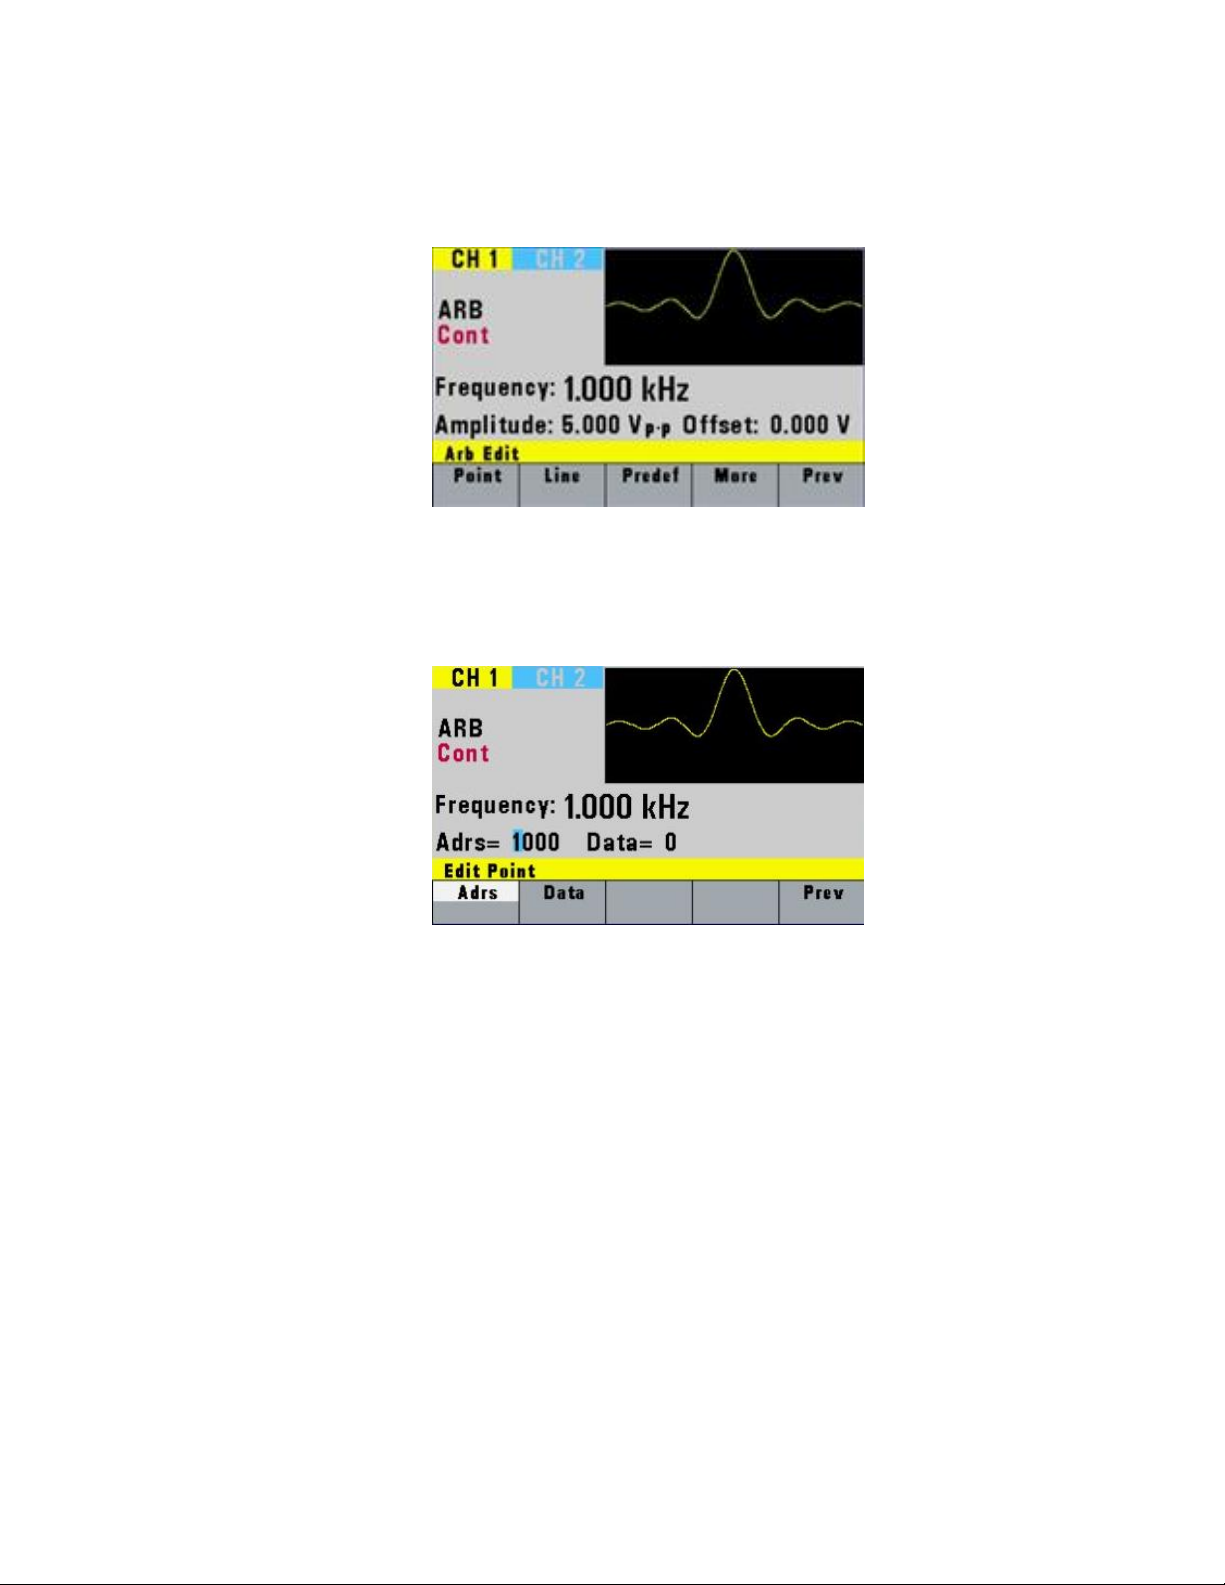
F1: Point - This menu allows point by point waveform editing. When selected, the following
menu is displayed:
Figure 3.8 - Point Editing Menu
F1: Adrs - Select the current address in the arbitrary waveform memory.
F2: Data - Selects the data point value at the current address. You can change the
point value from -8191 to 8191.
F5: Prev - Returns to the previous menu (Edit menu).
F2: Line - This menu allows a line drawing between two selected points. When selected, the
following menu is displayed:
F1: From - Selects the starting point address.
F2: To - Selects the ending point address.
F4: Prev - Displays the Confirmation menu, F1: NO and F3: YES.
F5: Prev - Returns to the previous menu (Edit menu).
F3: Predef - (Predefined Waveforms) Selects one of the predefined waveforms.
15
Page 29

Wave
Minimum
Length
Divisible by
Sine
16
4
Triangle
16
4
Square
2
2
Noise
16
1
Figure 3.9 - Predefine Waveform Menu
F1: Type - Selects the waveform Sine, Triangle, Square, Noise, Ramp up, Ramp
down, exponential up, exponential down, Sin(x)/x, and Gaussian distribution. If Noise
function is selected, a submenu is displayed when F5: EXEC is pressed to allow adding
the noise to an available waveform or to generate it as a new noise waveform.
F2: From/Data - Selects the starting point of the generated waveform and its data
value.
F3: Leng - Selects the length of the predefined waveform (number of points for a
full wave). The length value must be a number that is divisible by 4 or by
2 in some instances. If not, a pop up message will say “Must divide by 4”
or “Must divide by 2” and entered values will change back to its original.
Different waveforms have different limitations on the length. Refer to
Table 3-2 below.
Table 3.2 - Waveform Length Limits for Predefined Waveforms
F4: Scale - Selects the scale of the waveform. If scale is too high, a message will
display “Scale too high.” 100% means that the waveform spans the full
scale of -8191 to 8191. Scale factors are limited by the point data value of
the starting point and automatically calculated by the unit.
16
Page 30

Figure 3.10 - Scale Menu
F5: Exec - Prompts you to confirm whether to execute the selected predefined
waveform. Press NO to abort executing the predefined waveform; press
YES to execute the predefined waveform. On the NOISE function a menu
of ADD and NEW is prompted to select a new noise waveform or to add
noise to the existing waveform.
F4: More - Displays the following Menu:
F1: Copy - Displays the Copy menu (see the Copy Function later in this section).
F2: Clear - Displays the Clear menu (see the Clear Function later in this section).
F3: Prot - Displays the Protect menu (see the Protect Function later in this
section).
F4: Show Wave - Display the Arbitrary waveform in full screen mode on LCD display.
This is only an approximated display for quick viewing. It does not represent the exact
waveform being generated. To return back to the MENU selection, press any button.
F5: Prev - Returns to the previous menu.
Copy Function - Copies an area of waveform memory to another area of waveform memory.
F1: From - Selects the address of the first point to copy.
F2: Leng - Selects the length (number of points) of the waveform to copy.
F3: To - Selects the destination address where the first point is copied.
F4: Exec - Prompts to confirm to copy data. Press NO to abort copying, YES to copy.
F5: Prev - Returns to previous menu.
Clear Function - Clears (sets the data values to zero) either a section of or all of waveform memory.
F1: From - Selects the address of the first point to clear.
F2: To - Selects the address of the last point to clear.
F3: All - Clears the whole waveform memory.
F4: Exec - Prompts to confirm to clear data. Press NO to abort clearing, YES to
clear.
F5: Prev - Returns to previous menu.
17
Page 31

Protect Function - Protects (makes read-only) a section of waveform memory.
Note: Only one segment of waveform memory can be protected at a time.
F1: From - Selects the address of the first point to protect.
F2: To - Selects the address of the last point to protect.
F3: All - Clears the whole waveform memory.
F4: On/Off - Selects the unprotect mode and resets memory protection so that the
whole waveform memory can be written into.
F5: Prev - Returns to previous menu.
PULSE Menu
From the WAVE menu, select F4: Pulse.
Figure 3.11 - Pulse Menu
F1: Freq/Period - Selects the parameter definition of the Pulse repetition period.
F2: Width - Selects the Width of the generated pulse.
F3: Equal Edge - Selects equal Rise (Leading edge) and Fall (Trailing edge) times of the pulse.
F4: Lead/Trail - Selects different Rise and Fall times of the Pulse.
F5: Prev - Returns to previous menu.
MODE Key
Selects the output mode: Cont (Continuous), Trig (Triggered), Gated (Gated), and Burst (Burst).
To select the output mode, press MODE, then press the function key that corresponds to the desired
Mode menu option, as shown:
18
Page 32

Figure 3.12 - Mode Menu
F1: Cont - (Continuous) - Selects continuous output.
F2: Trig - (Triggered) - Triggers one output cycle of the selected waveform for each trigger
event.
F3: Gate - (Gate) - Triggers output cycles as long as the trigger source asserts the gate signal.
F4: Burst - (Burst) - Triggers output N output cycles for each trigger event, where N ranges from
2 to 999999.
F5: Phase - Selects the start phase of the signal in non-continuous modes. The range is from -
180˚ to +180˚, with a 0.1˚ resolution.
When Phase Menu is selected the following screen is displayed:
Figure 3.13 - Phase Menu
F1: Phase - Sets the phase.
F2: SET-Zero - Sets the phase reference to zero.
F3: SYNC Both Ch. - For Dual Channel models, pushing this key synchronizes both
channels in between with a phase shift as in the Phase parameter
entered (or 0 after pushing SET-Zero).
After selecting the TRIG, GATE or BURST menu, the trigger source menu is available:
19
Page 33

Figure 3.14 - Trigger Menu
F1: Man - Selects manual as the trigger source. To trigger the waveform generator, press this
MAN TRIG again.
F2: Int - (Internal) Selects the internal trigger generator as the trigger source. Change the
internal trigger rate displayed with the rotary input knob.
F3: Ext - (External) Selects the external trigger signal as the trigger source. The trigger source
is supplied through the TRIG IN connector.
F4: Nbrst - In BURST mode, the F4 displays Nbrst, the number of burst pulses to be output with
each trigger. The N can be changed from 1 to 999,999.
F5: Prev - (Previous) Returns to the previous Menu selection.
SWEEP Key
Selects the Sweep Mode and allows the entering of sweep parameters: Sweep Start, Sweep Stop, and
Sweep Rate.
To select the sweep mode, press SWEEP and then press the function key that corresponds to the
desired Sweep menu option as shown below.
Figure 3.15 - Sweep Menu
F1: ON/OFF - Operates the sweep function, selecting between Sweep On or Off.
20
Page 34

F2: Start - Defines the Sweep Start frequency.
F3: Stop - Defines the Sweep Stop frequency.
F4: Rate - Defines the Sweep Rate.
F5: Lin/Log - Selects Linear or Logarithmic Sweep.
How to Set up Sweep in Different Modes
By default, turning ON the sweep function will automatically set to a continuous (Cont) sweep. In order
to change to other modes of sweep, do the following:
1. Set sweep to On by pressing F1.
2. Press the MODE button on the front panel.
3. Select between triggered (Trig), burst (Burst) or gated (Gate) mode.
Note: If this is done before turning on sweep, sweep On selection will automatically reset to
default (continuous mode).
MODULATION Key
Selects the modulation mode AM, FM, or FSK.
To select the modulation mode, press MODUL key and then press the function key that corresponds to
the desired menu option.
Figure 3.16 - Modulation Menu
F1: AM - If AM is selected, the following menu is available:
21
Page 35

Figure 3.17 - AM Menu
F1: ON/OFF - Turns the modulation ON or OFF.
F2: % - Defines the AM modulation depth.
F3: Shape - Defines the modulation shape between Sine, Triangle or Square.
F4: Mod/Freq - Selects the modulation frequency, from 0.01 Hz to 20.00 KHz.
F5: Ext/Int - Selects and enables the external modulation by an external signal
applied to the Modulation In connector.
F2: FM - If FM is selected, the following menu is available:
Figure 3.18 - FM Menu
F1: ON/OFF - Turns the modulation ON or OFF.
F2: Dev - Defines the FM deviation frequency.
Note: The deviation is < the frequency. Frequency + deviation is limited to
the unit maximum frequency.
F3: Shape - Defines the modulation shape between Sine, Triangle or Square.
F4: Mod/Freq - Selects the modulation frequency, from 0.01 Hz to 20.00 KHz.
F5: Ext/Int - Selects and enables the external modulation by an external signal
applied to the Modulation In connector.
F3: FSK - If FSK is selected, the following menu is available:
22
Page 36

SINE
SQUARE
TRIANGLE
PULSE
ARBITRARY
AM
Yes
Yes
Yes
Yes
Yes
FM
Yes
Yes
Yes
No
No
FSK
Yes
Yes
Yes
No
No
Figure 3.19 - FSK Menu
F1: ON/OFF - Turns the modulation ON or OFF.
F2: F-LO - Defines the low frequency of the FSK.
F3: F-HI - Defines the high frequency of the FSK.
F4: Rate - Selects the rate of the alternating between the low and high
frequencies.
F5: Ext/Int - Selects and enables the external FSK when the unit frequency is
alternating between the low and high frequencies by an external signal
applied to the Trig In connector.
Modulation Combinations
SETUPS Key
The waveform generator can store the current front-panel settings, called a setup, into one of 50
storage locations. When you recall a setup, the waveform generator restores the front-panel settings to
those that you stored in the selected storage location. All waveform data except for the waveform
memory data is stored in the setup.
Figure 3.20 - Setups Menu
23
Page 37

Stored
Parameters
FREQUENCY
RATE(ARB)
AMPLITUDE
FUNCTION
OFFSET
REPETITION
MODE
N-BURST
START ADRS
WAVELENGTH
TRIG SOURCE
OUTPUT
SWEEP
MODULATION
F1: Recall - Recalls a previously stored front-panel setup from the selected storage location.
Change the storage location number by using the rotary input knob. Valid storage
location numbers are from 0 to 49. Location 0 is a read-only buffer that contains the
power-on settings listed in Table 3.3.
F3: Store - Stores the current front-panel setup to the specified storage location. Change the
storage location number by using the numeric keypad or the rotary input knob. Valid
storage location numbers range from 1 to 49. Below is a list of parameters that can be
stored in each storage location.
Table 3.3 - List of Stored Parameters
When the ARB waveform is selected, the setup menu is as shown:
Figure 3.21 - Setups Menu (with Arbitrary waveform selected)
F2: Load ARB - Selecting this will load the selected Arbitrary waveform data points.
F4: Save ARB - Selecting this will save the current Arbitrary waveform data points so that it can be
recalled when revisiting the ARB menu later on or when power cycling the instrument.
24
Page 38

8 full-length waveforms can be saved per channel. The saving is performed only on the
waveform segment that is defined by the Start and Length parameters defined in the
ARB menu.
Note: Storing a waveform generator setup does not store waveform memory data.
The STORE and RECALL function can be used as a tool to store and locate many arbitrary waveforms.
See Memory section for more information on segmenting arbitrary waveforms.
UTILITY Key
Figure 3.22 - Utility Menu
F1: Gpib - Selects the GPIB remote mode of operation. After selection, the GPIB address can be
set to any value from 1 to 31 using the rotary knob. The value is kept in nonvolatile
memory and used at power-on. The factory default address is 9. Setting the address to
31 puts the device in the off-bus state (it will not respond to messages on the GPIB
bus).
Note: GPIB is only for models 4076B, 4077B, 4079B, and 4080B.
F2: USB - Selects the USB remote mode of operation. If selected, the ACTIVE message is
displayed.
F4: Power - (Power-On default) Selects the power-on default setting. Select a value using the
numeric keypad or the rotary input knob. The selection is effective after a 10 s timeout period. Select zero (0) to have the waveform generator power on with the factory
default settings. Select 50 to have the waveform generator power-on with the settings
it had at the last power-off. Select any other value in the range from 1 to 49 to have
the waveform generator power-on with the settings that you have saved with STORE
(see SETUPS Key section) in the range of 1 to 49.
F5: SN - Selecting this will display the serial number information of the unit.
25
Page 39

Key Functions
Values
Description
FREQUENCY
1.000000000 Hz
Wave frequency
RATE(ARB)
1 µs
Sample time per point
AMPLITUDE
5.00 V
Peak to peak output amplitude
FUNCTION
SINE
Output waveform
OFFSET
0.00 V
Zero offset
REPETITION
10 ms
Internal trigger rate
Figure 3.23 - Serial Number Information
3.2 ON Key
Use this key to control the main output signal. When the output is active, the On button is illuminated
by the built-in LED.
3.3 Cursor Movement Keys
Use these keys to move the cursor (when visible) either left or right. They are used in conjunction with
the rotary input knob to set the step size of the rotary input knob.
3.4 Rotary Input Knob
Use this knob to increase and decrease numeric values or to scroll through a list. The cursor indicates
the low-order position of the displayed value which changes when you rotate the knob (for straight
numeric entries only). For other types of data, the whole value changes when you rotate the knob.
3.5 Power-On Settings
At power-on, the waveform generator performs a diagnostic self-test procedure to check itself for
errors. If it finds an error, an error code and text will appear in the display window. Other error codes
appear when you enter an invalid front-panel setting. For more information on error codes, see the
Displaying Errors section 3.7.
When the waveform generator finishes the diagnostic self-test routine, it enters the local state and
assumes power-on default settings. Table 3.4 below lists the factory default settings. You can also
program the waveform generator for any settings you want at power-on.
Table 3.4 - Power-On Default Settings
26
Page 40

MODE
CONT
Waveform mode
N-BURST
2
Waves per burst
START ADRS
1
Start memory address
WAVELENGTH
1000
Number of points per waveform
TRIG SOURCE
EXT
External trigger source
OUTPUT
OFF
Output disabled
SWEEP
OFF
Sweep execution
MODULATION
OFF
Modulation execution
4075B
4078B
4076B
4079B
4077B
4080B
Channels 1 2 1 2 1 2
Waveform
Memory
Length
2 points to 1,048,576 points
2 points to 4,194,304 points
2 points to 16,777,216 points
3.6 Memory
The waveform generator has two types of memory that can be stored and recalled:
- Waveform Memory (8 waveforms per channel)
- Setup Memory (0-49 buffer storage locations)
Up to 8 full waveforms can be stored, each with up to the maximum waveform memory points
available per channel.
The user can edit arbitrary waveforms in waveform memory and specify any data value in the range
from -8191 to 8191 for any point in waveform memory (14-bit depth). Due to the large memory bank,
users have greater freedom in selecting the size and number of waveforms they desire to generate. The
STORE and RECALL functions can be used to save the starting address and length of up to 49 different
waveforms as reference point setups for quick recall.
Note: The 49 different setups are shared between all 8 arbitrary waveform memory banks. For
instance, if Setup 1 is saved from address 1 to 1000 for ARB Wave 1, then ARB Wave 2 is selected and
Setup 1 is recalled, address 1 to 1000 will be the recalled reference points.
Waveform Memory setup example:
4080B users could segment one 16,777,216-point arbitrary waveform bank to create a waveform with 1
Mpts, another waveform with 5 Mpts, a third waveform with 4 Mpts, and a fourth waveform with 6
Mpts as shown in figure below.
27
Page 41

1. First, create or load 16,777,216 waveform data points into arbitrary waveform memory. For more
information, please see the Creating an Arbitrary Waveform section.
2. Save all 16,777,216 points into ARB Wave 1 using the “Save ARB” key in the SETUPS menu.
3. Reference each waveform in the memory bank according to their starting point and length. Using
the “Store” key in the SETUPS menu, save the parameters for each waveform to separate Setup
memory locations as follows:
Setup 1 ARB parameters: Start address = 1; Length = 1,000,000 points
Setup 2 ARB parameters: Start address = 1,000,001; Length = 5,000,000 points
Setup 3 ARB parameters: Start address = 6,000,002; Length = 4,000,000 points
Setup 4 ARB parameters: Start address = 10,000,003; Length = 6,000,000 points
To save edited arbitrary waveforms into Waveform Memory, the instrument will display a message
"SAVE DATA" after each modification of the arbitrary waveform in the EDIT menu. Please note that any
subsequent saving of data will rewrite the entire arbitrary waveform memory bank. Therefore, in order
to properly segment the entire range of points in Waveform Memory for Setup recall, the full length of
data points should be saved to Waveform Memory first.
Note: Since it is impossible to guarantee 100% of the time against loss of stored data, you should
maintain a record of the data stored in memory so that you can manually restore such data, if
necessary.
3.7 Displaying Errors
At power-on, the waveform generator performs a diagnostic routine to check itself for problems. If the
diagnostic routine finds an error, an error message is displayed. The waveform generator also displays
error messages when front-panel settings are either invalid or may produce unexpected results.
Message Text Cause
Out of range Attempt to set variable out of instrument limits.
Setting conflict Can't have this parameter set with some other.
28
Page 42

Trig rate short Internal trigger rate too short for wave/burst.
Empty location Attempt to restore nonexistent setting.
SCALE too high Attempt to set scale too high for current dot value
Protected RAM Attempt to write to protected RAM range.
RAM error Error in testing RAM.
Save RAM New firmware installed.
Must divide by 4 Predefined wave length must be divisible by 4.
Must divide by 2 Predefined wave length must be divisible by 2.
3.8 Creating an Arbitrary Waveform
You can create an arbitrary waveform using the following methods:
Enter individual data points
Draw lines between data points
Create a predefined waveform
Export a waveform from software
Create data points using SCPI commands
The waveform’s frequency and amplitude are influenced by the number of data points and their value
in the waveform. For further information on how the number of data points influence the frequency
and amplitude of a waveform in execution memory, see Setting the Frequency section (on page 32) and
Setting the Amplitude section (on page 33), respectively.
Entering Individual Data Points
The most basic way to program an arbitrary waveform is to enter data points for the waveform, one
data point at a time. While this can become tedious, the auto-increment function helps this process.
To enter individual data points into waveform memory, follow these steps:
1. Press WAVE main key to display the selection menu.
2. Press F5: ARB to display the arbitrary menu.
3. Press F4: EDIT to display the Edit menu.
4. Press F1: POINT to select the point-by-point programming mode.
5. Press F1: ADRS.
6. Use the rotary knob or the numerical keypad to enter the address.
7. Press F2: DATA.
8. Use the rotary knob or the numerical keypad to enter the value for the data point. Valid
entries range from –8191 to 8191.
9. Repeat steps 5 through 8 for additional points until you finish creating your arbitrary
waveform.
29
Page 43

ACTION
KEYSTROKES
Loads the first 1000 points of waveform
memory.
WAVE
F5: ARB
F1: START
1
F2: LENGTH
1000
F5: PREV
MODE
F1: CONT
OUTPUT ON
ACTION
KEYSTROKES
Step 1: Load a 1000-point, 50% scaled,
predefined sine wave into waveform memory
starting at address 1.
WAVE
F5: ARB
F4: EDIT
F3: PREDEF
F1: TYPE (rotate knob for selection)
SINE
F2:FROM/DATA
1
F3: LENG
1000
F4: SCAL
50
F5: EXEC
Creating a Complex Arbitrary Waveform
To create a complex arbitrary waveform:
Load a predefined sine waveform
Load a scaled sine waveform at the positive peak of the first sine wave
Draw a straight line between two data points in the waveform
Add a pulse/glitch to the waveform
Add a noise signal at the negative peak of the first sine wave
To see the waveform as you build it, connect the waveform generator to an oscilloscope and perform
the following steps:
Note: The user must press ENTER to confirm any input data value (Start address, Length, etc.) when
performing the following steps.
The following steps set up the waveform shown in Figure 3.24.
30
Page 44

F3: YES
Step 2: Load a 5% scaled, 100-point predefined
waveform into waveform memory starting at
address 200.
F3: PREDEF
F1: TYPE
SINE
F2: FROM
200
F3: LENG
100
F4: SCAL
5
F5: EXEC
F3: YES
Step 3: Draw a line between address 251 (the
highest point of the sine wave) and address 501
(where the sine wave crosses the origin).
F2: LINE
F1: FROM
251
F2: TO
501
F4: EXEC
F3: YES
Step 4: Add a negative pulse/glitch (data value -
8191) at addresses 600 through 606.
F1: POINT
F1: ADRS
600
F2: DATA
-8191
(repeat -8191 and ENTER
for addresses 601-606)
F5: PREV
Step 5: Add a 5% noise signal to addresses 700
through 800.
F3:PREDEF
F2:FROM
700
F3:LENG
100
F4:SCAL
5
F1:TYPE
NOISE
F5:EXEC
F1:ADD
F4:EXEC
F3-YES
31
Page 45

ACTION
KEYSTROKES
Step 1. Set the output rate to 1 µs (equivalent to
1000 Hz output frequency)
PARAM
F1: RATE
1
KHz/us
Figure 3.24 - Steps to set up an Arbitrary Waveform
Setting the Frequency
The arbitrary waveform frequency is a function of the number of data points used to run the waveform
(the length parameter in the ARB menu) and the waveform execution point rate. The waveform
execution point rate is the execution time between each point in the waveform. The total time taken to
run one period of the waveform is given by:
𝑇𝑜𝑡𝑎𝑙 𝑡𝑖𝑚𝑒 = # 𝑜𝑓 𝑝𝑜𝑖𝑛𝑡𝑠 ∙ 𝑟𝑎𝑡𝑒
Because the output frequency is a function of the rate and the number of points being executed, the
output frequency is calculated as:
𝑓𝑟𝑒𝑞𝑢𝑒𝑛𝑐𝑦 =
# 𝑜𝑓 𝑝𝑜𝑖𝑛𝑡𝑠 ∙ 𝑟𝑎𝑡𝑒
For example, to set the output frequency to 1000 Hz, given the number of data points used for the
waveform output is 1000, the rate is calculated as:
1
𝑟𝑎𝑡𝑒 =
1000 𝑝𝑡𝑠 ∙ 1000 𝐻𝑧
EXAMPLE: Setting the Output Frequency
To set the output frequency of a 1000-point waveform to 1000 Hz, set the rate to 1 µs:
1
= 1 𝜇𝑠
32
Page 46

Front Panel
Amplitude Setting
Data Point Value
Relative Output
Amplitude Voltage
5 V p-p
8191
2.5 V positive peak
5 V p-p
0
0 V (offset voltage)
10 V p-p
-8191
5 V positive peak
Setting the Amplitude
The following equation represents the relative output amplitude voltage relationship between the
front-panel amplitude peak-to-peak setting and the data point values in waveform memory:
𝑜𝑢𝑡𝑝𝑢𝑡 𝑣𝑜𝑙𝑡𝑎𝑔𝑒 =
Where 16382 is the total data point value range in waveform memory.
Table 3.5 - Relative Amplitude for Waveform Output (Examples)
𝐴𝑚𝑝𝑙𝑖𝑡𝑢𝑑𝑒 𝑝 − 𝑝 𝑠𝑒𝑡𝑡𝑖𝑛𝑔 ∙ 𝑑𝑎𝑡𝑎 𝑝𝑜𝑖𝑛𝑡 𝑣𝑎𝑙𝑢𝑒
+ 𝑜𝑓𝑓𝑠𝑒𝑡
16382
Loading an Arbitrary Waveform
To load a section of arbitrary waveform memory, specify its start address and length in the ARB menu:
1. Select the channel to ON.
2. Press WAVE and select the F5: ARB function.
3. Press F1: START to display the start address and use the rotary input knob or the numerical
keys to enter the address.
4. Press F2: LENGTH to display the length of the waveform and use the rotary input knob or the
numerical keys to enter the length.
Note: The starting address must be an odd number. If an even number is entered, the instrument will
automatically decrement one value to an odd number. For example, if you set start address to 2000
and press ENTER, it will display 1999. The length value must always be an even number. If you input an
odd number length, a message will pop up and say “Even wave length” and then decrement one value
to an even number. For example, if you entered 1001 as the length, the message will pop up for one
second and change the value automatically to 1000.
3.9 Remote Interface
USB Interface
The instrument has a USB interface (USBTMC) on the rear panel for remote communication. From the
UTIL menu, press USB to select the USB interface.
33
Page 47

To communicate with the unit, you must install the USB driver. For Windows® 7 and 8 users, this may
install automatically. For other users, visit www.bkprecision.com to download the driver.
Note: Users who have LabVIEW™ or NI-VISA installed will automatically have this driver in their system.
In this case, driver download is not required.
GPIB Interface
GPIB Address
The instrument has an optional GPIB interface on the rear panel for remote communication. The
optional GPIB interface is shipped with the address set to decimal 9. The address can be changed from
the front panel by using the UTIL menu (refer to UTILITY Key section on page 25).
GPIB Connection
The rear panel GPIB connector connects to a standard IEEE-488 bus cable connector. The GPIB line
screens are not isolated from chassis and signal ground.
Figure 3.25 – Standard GPIB connector
34
Page 48

4 Programming
4.1 Overview
GPIB
This section provides detailed information on programming the 4075B Series generators via IEEE-488
GPIB interface. The command syntax as defined by the IEEE 488.2 and SCPI standards are explained in
this chapter.
4.2 Device State
The device may be in one of the four possible states described below. The transition between states is
defined by IEEE 488.1.
Local State (LOCS)
In LOCS, the device may be operated from the front panel only. Its settings may be queried over the
GPIB, but not changed. Commands that do not affect the signal being output by the instrument are
accepted.
Local With Lockout State (LWLS)
In LWLS, the device may be operated from the front panel only. Its settings may be queried over the
GPIB, but not changed. Commands that do not affect the signal being output by the instrument are
accepted. The difference between the LOCS and the LWLS is that from the LWLS the device may enter
the Remote With Lockout State.
Remote State (REMS)
In REMS, the device may be operated from the GPIB. Actuating any front panel key will cause the
device state to revert to the LOCS.
Remote With Lockout State (RWLS)
In the RWLS the device is operable only from the GPIB. Front panel operation may be returned by
either sending an appropriate IEEE 488.1 command, or by cycling the device power.
4.3 Interface Function Subsets
The following interface function subsets are implemented in the 4075B series:
SH1, AH1, T6, L4, SR1, RL1, PP0, DC1, DT1, E2, C0
4.4 Device Address
The GPIB address of the device may be set to any value from 0 to 31. The address may be changed from
the front panel, using the numeric keypad or the rotary encoder, or via the GPIB itself using the
35
Page 49

command:
:SYSTem:COMMunicate:GPIB:ADDRess
Setting the device to address 31 puts it in the 'off-bus' state. In this state it will not respond to
messages on the GPIB. If the device is in the REMS when set to address 31, an internal 'return-to-local'
command will be given, setting the device to the LOCS. If the device is in the RWLS, the 'return-to-local'
command is ignored, and the device remains in the RWLS. The only way to then re-establish
communication with the device over the GPIB is to cycle the power, and to then change the address to
that required from the front panel.
4.5 Message Exchange Protocol
The device decodes messages using the Message Exchange Protocol (MEP) defined in IEEE 488.2. The
following functions implemented in the MEP must be considered:
The Input Buffer
The device has a 256-byte long cyclic input buffer. Decoding of remote messages begins as soon as the
input buffer is not empty, that is, as soon as the controller has sent at least one byte to the device.
Should the input buffer be filled up by the controller faster than the device can remove the bytes and
decode them, the bus handshake is not completed until room has been made for more bytes in the
buffer. This prevents a fast controller from overrunning the device with data.
If the user has sent part of a Program Message, but not the Program Message Terminator, and he
wishes to abort the message decoding and execution, the Device Clear command may be sent, or front
panel operation resumed (in REMS only).
The Output Queue
The device has a 100-byte long output queue in which it stores response messages for the controller to
read. If at the time a response message is formatted the queue contains previously formatted response
messages, such that there are not enough places in the queue for the new message, the device will put
off putting the message in the queue until there is place for it.
The Status Byte MAV bit, when set, indicates that part or all of a response message is ready to be read.
Response Messages
The device sends a Response Message in response to a valid query. All queries return a single Response
Message Unit. In only one case is the Response Message generated when the response is read (as
opposed to when the response is parsed), and this is when querying Arbitrary Waveform data. All other
queries generate the Response Message when they are parsed.
Coupled Commands
Coupled Commands are either commands whose execution validity depends on the value of other
parameters, or commands whose execution changes the value of another parameter. The execution of
commands designated as being coupled is deferred until all other commands in the same Program
36
Page 50

Message have been executed. The coupled commands are then grouped together according to their
functionality, and executed as a group. These groups of coupled commands are defined in the 4075B
series:
a) The commands to set the amplitude, the offset, and to switch the output on. The output being
switched on is included here in order to prevent possible damage to the equipment being
driven as a result of the amplitude and offset not being executed as intended by the user, due
to an execution error.
b) The commands to set the function, frequency, the point rate, the wavelength, and the
waveform start address. In ARB function, setting the frequency or the point rate causes the
other to change, keeping the wavelength constant (if it, too, is not specified in the same
program message). If the wavelength is specified as well, the frequency or point rate must
change in accordance with the new value. The validity of the start address is a function of the
wavelength. Please refer to the individual commands for more detail.
The maximum frequency is also dependent upon the waveform, so that changing the waveform
may render the current frequency out of range.
c) The commands to set modulation, modulation source and the function are inter-related. FM
and FSK are not available for ARB function. External source of modulation can be active for
either FM or AM but not both. FSK and FM cannot be active at the same time.
d) Sweep start and sweep stop frequencies must be distanced more than the minimum allowed
for sweep to function correctly.
4.6 Block Data
Arbitrary waveform values may be sent to the device in one of three formats:
a) ASCII values
b) Definite form arbitrary data
c) Indefinite form arbitrary data
Essentially we would like to check the execution validity of all the data of a command before
execution. When downloading a long arbitrary waveform, however, it is not possible to check
all the data sent before execution, since this would require excessive amounts of memory. The
following compromise has therefore been reached:
An arbitrary waveform is limited in length only by the amount of waveform memory. Each point
is checked and then written to memory. If an invalid value is detected all subsequent values are
discarded, and an execution error is flagged.
Querying arbitrary waveform data will result in a Response Message containing only as many
points as the user requested.
37
Page 51

4.7 Instrument Identification
The *IDN? common query is used to read the instrument's identification string. The string returned is
something similar to the following:
B&K Precision, 4080B, 0, V1.00
4.8 Instrument Reset
The *RST common command effects an instrument reset to the factory default power up state.
4.9 Self-test
The *TST common query causes the device to perform a self-test. This self-test consists of checking the
functionality of the arbitrary waveform memory.
4.10 Command Syntax
General Command Structure
The device commands are generally defined by the SCPI standard, with the exception of those
instrument functions for which SCPI commands do not as yet exist. The Common Commands and
Queries are defined by IEEE 488.2. The command syntax, i.e. how a command is structured, is defined
by IEEE 488.2.
A Program Message is defined as a string containing one or more Program Message Units, each of
which is an instrument command or query. Program Message Units are separated from each other by
the Program Message Unit Separator. The Program Message is terminated by the Program Message
Terminator.
The Program Message Unit Separator consists of a semicolon (';'), optionally preceded and/or followed
by whitespace characters. A whitespace character is defined as the ASCII characters in the ranges 00H09H, and 0BH-20H. This range includes the ASCII control characters and the space, but excludes the
Linefeed character.
The Program Message Terminator consists of optional whitespace characters, followed by one of three
options:
a) The Linefeed (LF) character (ASCII 0A)
b) The GPIB EOI bus line being set true on the last byte of the message
c) LF being sent with EOI true
The Program Message Unit can be divided into three sections as follows:
a) Program Header
The Program Header represents the operation to be performed, and consists of ASCII character
mnemonics. Two types of Program Headers are used in the 4075B series: Instrument-control headers
and Common Command and Query headers. A Program Header may consist of more than one
38
Page 52

mnemonic, in which case the mnemonics are separated from each other by the colon (':'). For
instrument control commands, the mnemonics are specified by the SCPI standard, and indicate the tree
structure of the command set. The first mnemonic indicates the subsystem being controlled. Common
Command and Query Program Headers consist of a single mnemonic prefixed by an asterisk ('*').
The mnemonics consist of upper - or lower-case alpha characters. Mnemonics may be written in either
the long form, in which the entire mnemonic is written out, or the short form, in which only a specified
portion of the mnemonic is written out. Some mnemonics have only one form due to their short
length. Where a command is described, the portion appearing in upper case is the short form. Only the
short form or the long form may be used.
Example: The command to set the frequency to 1 kHz may be written in the following ways:
SOURCE:FREQUENCY 1KHZ
SOUR:FREQ 1KHZ
SOURCE:FREQ 1KHZ
Some mnemonics in a specified Program Header may be optional. This is indicated in the command
description by the mnemonic being enclosed in square brackets ([...]). This means it is not necessary to
write the mnemonic into the Program Header: it is a default condition. The 'SOURCE' mnemonic, for
example, is optional. Not specifying it will cause the device to search for the mnemonics in the Program
Header under the Source Subsystem. For example, the frequency may be set by the commands
FREQ:CW 1KHz
FREQ 1KHz
since the 'CW' mnemonic is also optional.
b) Program Header Separator
The Program Header Separator is used to separate the program header from the program data. It
consists of one or more whitespace characters, denoted as <ws>. Typically, it is a space.
c) Program Data
The Program Data represent the values of the parameters being set, for example, the '1KHZ' in the
above examples. Different forms of program data are accepted, depending on the command. The
Program Data types used in the instrument are:
i. Character program data
This form of data is comprised of a mnemonic made up of lower - or upper-case alpha characters. As
with Program Header mnemonics, some Character Data mnemonics have short and long forms. Only
the short or the long form may be used.
ii. Boolean data
39
Page 53

Boolean data indicate that the parameter can take one of two states, ON or OFF. The parameter may be
character type ON or OFF or numeric. A numeric value is rounded to an integer. A non-zero result is
interpreted as 1 (ON), and a zero result as 0 (OFF). Queries return the values 0 or 1.
iii. NRf
This is a decimal numeric data type, where
NR1 indicates an integer number,
NR2 indicates a fixed point real number, and
NR3 indicates a floating point real number.
iv. Expression data
An expression is contained in parentheses (...). This data type is used only with the
STATus:QUEue:ENABle command.
v. Numeric value program data
This data type defines numeric values, as well as special cases of Character Data. Numeric values may
be specified in any of Integer, Fixed Point or Floating Point format. All parameters which have
associated units accept a suffix, which may be specified using upper or lower-case characters. When
the suffix is not specified, the numeric value is accepted in the default units, which are Hertz for
frequency, Seconds for time, and Volts for voltage. To set the frequency to 1 KHz we can send one of
the following commands:
FREQ 1000
FREQ 1E3
The special forms of character data accepted as numbers are
MAXimum: sets the parameter to its maximum value.
MINimum: sets the parameter to its minimum value.
For example, to set the frequency to its maximum value we can send the command
FREQ MAX
vi. Arbitrary Block Data
The Arbitrary block data type is used to send arbitrary waveform data to the instrument. In this data
type, the waveform points are specified in binary format, and each point consists of two bytes. Two
types of arbitrary block data are defined (by IEEE 488.2):
Definite Form
40
Page 54

The Definite Form has the structure
-#-Byte Count Length - Byte Count - 8-bit byte
The Byte Count Length consists of a single ASCII digit from 1 to 9. It tells the parser how many digits are
in the Byte Count.
The Byte Count is a decimal integer made up of the number of digits specified in the Byte Count Length.
It tells the parser how many 8-bit bytes are being sent.
Indefinite Form
The Indefinite Form has the structure
- # - 0 – 8-bit byte – LF^EOI
Some Program Message Units either require, or can accept, more than one data element. Program data
elements are separated from each other by the Program Data Separator. It is defined as optional
whitespace characters followed by a comma (','), which in turn is followed by optional whitespace
characters.
There are two types of Program Message Units: Command Message Units and Query Message Units. A
Query differs from a Command in that the Program Header is terminated with a question mark ('?'). For
example, the frequency might be queried with the following query:
FREQ?
Some Query Message Units accept data, giving the device more specific information about what is
being queried. In many cases the Query Message Unit may optionally be supplied with the MIN or MAX
mnemonics as data. This tells the device to return the minimum or maximum value to which the
parameter may currently be set. For example,
FREQ? MAX
will return the maximum value to which the frequency may currently be set.
Not all Program Message units have query forms (for example, STATUS:PRESET), and some Program
Message Units might have only the query form (for example SYSTEM:VERSION?).
The instrument puts the response to the query into the output queue, from where it may be read by
the controller. The Status Byte MAV bit is set to indicate to the controller that a response is ready to be
read.
SCPI Command Structure
SCPI commands are based on a hierarchical structure. This allows the same instrument-control header
41
Page 55

to be used several times for different purposes, providing that the mnemonic occurs in a unique
position in the hierarchy. Each level in the hierarchy is defined as a node. Mnemonics in the different
levels are separated from each other by a colon (':'). The first Program Message Unit, or command, in a
Program Message is always referenced to the root node. Subsequent commands are referenced to the
same level as the previous command. A Program Message Unit having a colon as its first character
causes the reference to return to the root. This process is defined by IEEE 488.1, section A.1.1. Consider
the following examples:
a) The following command may be used to set the amplitude and the offset of the signal.
SOURCE:VOLTAGE:AMPLITUDE 5V;OFFSET 2V
Note that the offset command is referenced to the command preceding it: the OFFSET mnemonic
resides at the same node as the AMPLITUDE command.
b) This command set the frequency and the amplitude.
SOURCE:FREQUENCY 2KHZ;VOLTAGE:AMPLITUDE 4V
The FREQUENCY and VOLTAGE mnemonics are at the same level.
c) When Program Message Units describe different subsystems, a colon prefix must be used to reset
the command reference to the root. Here the frequency and the output state are set.
SOURCE:FREQUENCY 3KHZ;:OUTPUT:STATE ON
Common Commands may be inserted in the Program Message without affecting the instrument-control
command reference. For example,
SOURCE:VOLTAGE:AMPLITUDE 4V;*ESE 255;OFFSET 2V
In an instrument with multiple channels, the selection of which channel to use is achieved through the
use of a numeric suffix indicating the channel, attached to the root level mnemonic. Four root level
mnemonics are channel - dependent, and these are SOURce, TRIGger, OUTPut and ARBitrary. When the
channel is not specified, channel 1 is assumed. Program message units that are referred back to a
specific root level mnemonic operate on the channel specified in that mnemonic.
Examples:
a) SOUR:FREQ 5KHZ;VOLT:AMPL 3V
Sets the frequency and amplitude of the first channel (default).
b) SOUR2:FREQ 5KHZ;VOLT:AMPL 3V
Sets the frequency and amplitude of channel 2.
c) ARB2:START 100;LENGTH 50
Sets the start address and length of the waveform being output on channel 2.
42
Page 56

4.11 Status Reporting
The instrument is capable of reporting status events and errors to the controller, using the IEEE 488.1
Service Request function and the IEEE 488.2 Status Reporting structure.
The Status Byte
Status summary information is communicated from the device to the controller using the Status Byte
(STB). The STB is composed of single-bit summary-messages, each summary message summarizing an
overlying Status Data Structure. By examining the content of the STB, the controller gains some
information concerning the instrument's status.
The STB bits are defined as follows:
Bit 0: Unused
Bit 1: Unused
Bit 2: Error/event queue summary message (EVQ). This bit is set if the queue is not empty.
Bit 3: Questionable Status summary message.
Bit 4: Message Available (MAV) summary message. This bit is set whenever all or part of a
message is available for the controller to read. The controller may be ready to read the
response message before it is available, in which case it can either wait until this bit is
set, or it can start to read. In the second case, the controller timeout must be set so that
the read action will not be aborted before the message has been read.
Bit 5: Event Status Bit (ESB) summary message. This bit is set to indicate that one or more of
the enabled standard events have occurred.
Bit 6: Request Service (RQS). This bit is set when the device is actively requesting service.
Bit 7: Operation Status summary message. No Operation Status events are defined in the
instrument, and so this bit is never set.
The STB is read by the controller during a serial poll. If the RQS bit was set, it is then cleared. The STB
may also be read by the *STB? common query.
Service Request Enabling
Service request enabling allows the user to select which Status Byte summary messages may cause the
device to actively request service. This is achieved using the Service Request Enable Register, which is
an 8-bit register whose bits correspond to those of the STB. The RQS bit in the STB is set when a bit in
the STB is set, and its corresponding bit in the service request enable register is set.
The service request enable register is set using the *SRE common command, and read using the *SRE?
common query.
Standard Event Status Register
The Standard Event Status Register (SESR) is defined by IEEE 488.2. It is implemented in the instrument
as a byte, whose bits have the following definitions:
43
Page 57

Bit 0: Operation Complete (OPC). This bit is set in response to the *OPC common command
being executed.
Bit 1: Request Control (RQC). Not implemented.
Bit 2: Query Error (QYE). This bit is set when either the controller is attempting to read data
from the device when none is available, or when data prepared for the controller to read
has been lost.
Bit 3: Device-Specific Error (DDE). This bit is set to indicate that a device operation did not
execute due to some device condition. For example, trying to recall an uninitialized
device stored setting.
Bit 4: Execution Error (EXE). This bit is set when the device could not execute a command, due
to the command being outside of it's capabilities. For example, a parameter being out of
range.
Bit 5: Command Error (CME). This bit is set to indicate an error in the command syntax.
Bit 6: User Request (URQ). This bit is not used.
Bit 7: Power On (PON). This bit is set when the device is powered on.
The SESR is queried using the *ESR? common query.
The SESR is paired with an enable register, the Standard Event Status Enable Register (SESER). This
register enables one or more events in the SESR to be reflected in the Status Byte ESB summary
message bit. The bits of the SESER correspond to those of the SESR. Setting a bit in the SESER enables
the corresponding event to set the ESB bit when it occurs. The SESER is set with the *ESE common
command and queried with the *ESE? command query.
The Error Queue
The error queue is used to store codes of errors detected in the device. It is implemented as a cyclic
buffer of length 10. When the error queue is not empty, bit EVQ in the Status Byte is set. The error
queue is read with either one of the following two queries:
:SYSTEM:ERROR?
:STATUS:QUEUE:NEXT?
The first error in the queue is returned, and the queue is advanced.
Error Codes
The negative error codes are defined by SCPI. Positive codes are specific to the instrument. The error
message is returned in the form:
<error number>,"<error description>"
A table of error numbers and their descriptions is presented here.
No error reported
0 No error
44
Page 58

Command Errors
A command error is in the range -199 to -100, and indicates that a syntax error was detected. This
includes the case of an unrecognized header. The occurrence of a command error causes the CME bit
(bit 5) of the Standard Event Status Register to be set.
-100 Command Error
-101 Invalid character
-102 Syntax error
-103 Invalid separator
-104 Data type error
-105 GET not allowed
-108 Parameter not allowed
More parameters than allowed were received
-109 Missing parameter
Fewer parameters than necessary were received
-110 Command header error
-111 Header separator error
-112 Program mnemonic too long
The mnemonic must contain no more than 12 characters.
-114 Header suffix out of range; Only suffix of 1 or 2 is valid, indicating the
channel being operated.
-113 Undefined header
-120 Numeric data error
-121 Invalid character in number
-123 Exponent too large
IEEE 488.2 specifies maximum of 32000
-124 Too many digits
IEEE 488.2 specifies maximum of 255 digits in mantissa.
-128 Numeric data not allowed
A different data type was expected
-131 Invalid suffix
-134 Suffix too long
A maximum of 12 characters are allowed in a suffix.
-138 Suffix not allowed
-140 Character data error.
-141 Invalid character data.
Incorrect character data were received.
-144 Character data too long
Character data may contain no more than 12 characters.
-148 Character data not allowed
-158 String data not allowed
-161 Invalid block data
An error was found in the block data
-168 Block data not allowed
45
Page 59

-170 Expression error
Only 6 error ranges may be specified.
-171 Invalid expression
An error was found in the expression.
-178 Expression data not allowed
Execution Errors
An execution error indicates that the device could not execute a syntactically correct command, either
since the data were out of the instrument's range, or due to a device condition. The EXE bit (bit 4) of
the Standard Event Status Register is set on occurrence of an execution error.
-200 Execution error
An attempt was made to RECALL the contents of an uninitialized stored
setting buffer.
-201 Invalid while in local.
-211 Trigger ignored.
The GET or *TRG common command was ignored due to the device not
being in the correct state to execute the trigger.
-220 Parameter error.
A parameter is in the correct range, but conflicts with other parameters.
-221 Settings conflict.
The parameter is out of range due to the current instrument state.
-222 Data out of range.
-223 Too much data.
The arbitrary waveform memory limit has been exceeded.
-224 Illegal parameter value.
The parameter value must be selected from a finite list of possibilities.
-241 Hardware missing; A command was sent to operate a non-existent
channel.
-258 Media protected.
An attempt was made to write to protected arbitrary waveform memory.
Device-Specific Errors
An error specific to the device occurred. The DDE bit (bit 3) of the Standard Event Status Register is set.
-315 Configuration memory lost.
Device memory has been lost.
-330 Self-test failed.
-350 Queue overflow.
Error codes have been lost due to more than 10 errors being reported
without being read.
Query Errors
46
Page 60

A query error indicates that the output queue control has detected a problem. This could occur if
either an attempt was made to read data from the instrument if none was available, or when data
were lost. Data could be lost when a query causes data to be formatted for the controller to be read,
and the controller sends more commands without reading the data.
-410 Query INTERRUPTED.
Data were sent before the entire response of a previous query was read.
-420 Query UNTERMINATED.
-430 Query DEADLOCKED.
-440 Query UNTERMINATED after indefinite response.
System Events
System events have positive valued codes. They are not defined by SCPI, but are specific to the
instrument. Sending the :STATus:PRESet command will disable these events from being reported.
401 Power on
402 Operation complete
The *OPC command has been executed.
Warnings
The execution of some commands might cause an undesirable instrument state. The commands are
executed, but a warning is issued. Sending the :STATus:PRESet command disables reporting of
warnings. The existence of these conditions causes a bit in the Status Questionable Condition register
to be set (refer to section Questionable Condition).
500 Trigger rate short on channel 1
501 Trigger rate short on channel 2
510 Output overload on channel 1
511 Output overload on channel 2
"Trigger rate short" means that the period of the waveform is larger than the value of the internal
trigger rate. Thus not every trigger will generate a cycle (or burst) of the waveform.
An attempt was made to read a response before the complete program
message meant to generate that response was sent.
The input buffer and output queue are full, and the controller is
attempting to send more data. In this case the output queue and input
buffers will be cleared. Parsing will resume after the END message is
detected.
A query was received in the same program message after a query
requiring an indefinite response was formatted. Essentially this means
that the *IDN? common query and the :ARB:DATA? query should not be
followed by more query messages in the same program message.
47
Page 61

4.12 Common Commands
The following section describes the common commands according to the IEEE 488.2 specifications.
These commands are applicable for both GPIB and USB interface.
System Data Commands
a) *IDN? - Identification query
The identification query enables unique identification of the device. This query should always
be the last in a program message. It returns a string with four fields:
Manufacturer name
Model name
Serial number (0 if not relevant)
Version number
Command
Type: Common Query
Syntax: *IDN?
Response: B&K Precision, MODEL 4080B,0,V0.82
b) *OPT? - Option identification query
The Option Identification Query is used to identify device options over the system interface.
This query should always be the last in a program message.
Command
Type: Common Query
Syntax: *OPT?
Response: No option available.
Internal Operation Commands
a) *RST - Reset command
The Reset command performs a device reset. It causes the device to return to the factory
default power up state.
Type: Common Command
Syntax: *RST
b) *TST? - Self-test query
The self-test query causes an internal self-test to be performed. This test consists of checking
the integrity of the arbitrary waveform memory.
Type: Common Query
Syntax: *TST?
Response: ASCII 0 if test passes
ASCII 1 if test fails
48
Page 62

Synchronization Commands
a) *OPC - Operation complete command
The operation complete command causes the device to generate the operation complete
message in the Standard Event Status Register, on completion of the selected device operation.
Type: Common Command
Syntax: *OPC
Examples: FREQ 5KHZ;*OPC
The *OPC command (and the *OPC? query described below) find use mainly when commands
having relatively long execution times are executed, for example the programming of long
predefined waveforms.
b) *OPC? - Operation complete query
The operation complete query places an ASCII character 1 in the output queue on completion
of the selected device operation.
Type: Common Query
Syntax: *OPC?
Response: ASCII character 1
Example FREQ 1KHz;*OPC?
c) *WAI - Wait-to-continue command
This command is intended for use with overlapped commands. No commands in the instrument
are overlapped, and so this command has no effect.
Type: Common Command
Syntax: *WAI
Status and Event Commands
a) *CLS - Clear status
b) *ESE - Standard event status enable
The clear status command clears the SESR and Error Queue status data structures.
Type: Common Command
Syntax: *CLS
This command is used to set the value of the Standard Event Status Enable Register.
Arguments
Type: NRf
Range: 0 to 255. Non integer arguments are rounded before execution.
49
Page 63

c) *ESR? - Standard event status register query
d) *PSC - Power on status clear command
e) *SRE - Service request enable command
Type: Common Command or Query
Syntax: *ESE<ws><NRf>
Examples: *ESE 48 (Enables the CME and EXE bits)
*ESE 255 (Enables all standard events)
Query
Syntax: *ESE?
Response: <NR1>
This query is used to read the value of the Standard Event Status Register. Reading the register
clears it.
Type: Common Query
Syntax: *ESR?
Response: <NR1>
This command is used to control the automatic power-on clearing of certain status functions.
Arguments
Type: Boolean
Type: Common Command or Query
Command
Syntax: *PSC<ws><Boolean>
Examples: *PSC ON or *PSC 1
*PSC OFF or *PSC 0
Query
Syntax: *PSC?
Response: ASCII 0 for OFF
ASCII 1 for ON
When set to ON (1), the Service Request Enable Register and the Standard Event Status Enable
Register are cleared on power-on.
This command sets the Service Request Enable Register bits.
Arguments
Type: NRf
Range: 0 to 255. Non integer arguments are rounded before execution.
The value of bit 6 is ignored, and is set always to zero.
Type: Common Command or Query
Syntax: *SRE<ws><NRf>
Examples: *SRE 48 (Enables reporting of ESB and MAV events)
Query
50
Page 64

f) *STB? - Status byte query
Device Trigger Commands
a) *TRG - Trigger command
Syntax: *SRE?
Response: <NR1>
This query is used to read the value of the Status Byte.
Type: Common Query
Syntax: *STB?
Response: <NR1>
The value of the Status Byte read with the *STB? query may differ from that read with the Serial
Poll. Bit 6 of the STB will be set as long as a reason for requesting service exists, while bit 6 of
the STB as read by the Serial Poll is cleared by the Serial Poll.
This command is analogous to the IEEE 488.1 Group Execute Trigger interface message, and has
the same effect. It is used to trigger the device to output a wave, and is accepted only when the
trigger mode is set to Trigger, Gate or Burst, and the trigger source is set to BUS.
Type: Common Command
Syntax: *TRG
Stored Settings Commands
a) *RCL - Recall instrument state
b) *SAV - Save instrument state
This command is used to restore the state of the device to that stored in the specified memory
location.
Arguments
Type <NRf>
Range 0 to 49. Non integer values are rounded before execution
Type: Common Command
Syntax: *RCL<ws><NRf>
Example: *RCL 0 (Recall default state)
*RCL 49
Stored setting location 49 stores the last instrument setting before power down.
This command is used to store the current instrument state in the specified memory location.
51
Page 65

Arguments
Type: NRf
Range: 1 to 49. Non integer values are rounded before execution
Type: Common Command or Query
Syntax: *SAV<ws><NRf>
Examples: *SAV 25
4.13 Instrument Control Commands
Instrument control commands are grouped into logical subsystems according to the SCPI instrument
model. The commands are comprised of mnemonics indicating the subsystem to which the command
belongs, and the hierarchy within that subsystem. When the command is to be referred to the Root
node, it should be prefixed with a colon (:). Mnemonics appearing in square brackets [...] are optional.
The '|' character is used to denote a choice of specifications. The '<ws>' is used to denote a white space
character.
All commands except those in the STATus and SYSTem subsystems, and commands specifically
indicated, are channel-dependent. Commands are referenced to channel 1 by default. The numeric
suffix '2' must be appended to the subsystem mnemonic to refer a command to channel 2. (See SCPI
Command Structure)
SOURce Subsystem
The Source Subsystem controls the frequency, voltage, amplitude modulation and clock source. The
command structure is as follows:
:SOURce
:FREQuency
[:CW|:FIXed] <numeric value>
:FUNCtion
[:SHAPe] SINusoid|SQUare|TRIangle||ARBitrary||PULSe
: DCYCle ] <numeric value>
:VOLTage
[:AC]
[:LEVel]
[:IMMediate]
[:AMPLitude] <numeric value>
:OFFSet <numeric value>
:REFerence
INTernal |EXTernal
:ROSCillator
[:SOURCE] INTernal |EXTernal
:AM
52
Page 66

[:STATe] <Boolean>
:DEPTh <numeric value>
:SHAPe SINusoid|SQUare|TRIangle
:FREQuency <numeric value>
:SOURce INTernal |EXTernal
:FM
[:STATe] <Boolean>
:DEViation <numeric value>
:SHAPe SINusoid|SQUare|TRIangle
:FREQuency <numeric value>
:SOURce INTernal |EXTernal
:FSK
[:STATe] <Boolean>
:LOWFrequency <numeric value>
:HIFrequency <numeric value>
:RATE <numeric value>
:SOURce INTernal |EXTernal
:SWEep
STATe <Boolean>
:SPACing <LIN|LOG>
:TIME <numeric value>
:STARt <numeric value>
:STOP <numeric value>
:PHAse
[:ADjust] <numeric value >
SYNChronize
:PULSe
:PERiod <numeric value >
:WIDth <numeric value >
:EDGe <numeric value >
:RISe <numeric value >
:FALl <numeric value >
Frequency
:SOURce:FREQuency <frequency>
The frequency command controls the frequency of the output waveform.
Arguments
Type: Numeric.
Units: MHz, KHz, Hz (default)
Range: Dependent on the Point Rate and Wavelength.
Fmax = 1/(5 ns * Wavelength)
53
Page 67

Fmin = 1/(100 S * Wavelength)
Rounding: The value is rounded to 4 digits.
Command Type: Setting or Query
Setting
Syntax: [:SOURce]:FREQuency[:CW]<ws><frequency>[units]
[:SOURce]:FREQuency<ws>MINimum|MAXimum
Examples: :FREQ 5KHZ
:FREQ 5E3
:FREQ MAXIMUM
:FREQ MIN
Query
Syntax: [:SOURce]:FREQuency[:CW]?[<ws>MAXimum|MINimum]
Examples: :FREQ?
:FREQ? MAX
Response: NR3
Considerations:
1) The MIN | MAX arguments should be used only in a Program Message that does NOT
contain Program Message Units specifying Arbitrary Point Rate or Wavelength, since the
MAXimum or MINimum value is calculated at the time the command is parsed.
2) The MIN and MAX arguments refer to currently settable minimum or maximum.
3) FIXed is alias for CW.
Amplitude
:SOURce:VOLTage[:AMPLitude] <p-p amplitude>
The amplitude command is used to set the peak-to-peak amplitude of the output waveform. Note that
the amplitude and the offset are limited by the relation
Peak Amplitude + |Offset| ≤ 5V
Arguments
Type: Numeric
Units: V, mV, VPP, mVPP
Range: 10mV to 10V
Rounding: 1mV from 10mV to 999mV. 10mV from 1V to 10V.
Command Type: Setting or Query
Setting
Syntax: [:SOURce]:VOLTage:AMPLitude<ws><amplitude>[units]
[:SOURce]:VOLTage:AMPLitude<ws>MINimum|MAXimum
Examples: :VOLT:AMPL 2.5
:VOLT:AMPL 2.5V
:VOLT:AMPL MAX
Query
Syntax: [:SOURce]:VOLTage:AMPLitude?
54
Page 68

[<ws>MINimum|MAXimum]
Examples: :VOLT:AMPL?
:VOLT:AMPL? MAX
Response: NR2
Considerations:
1) The MAXimum amplitude is dependent on the offset.
2) The MAX and MIN arguments should not be used in a program message containing an
OFFSet command, since these values are evaluated during parsing, based on the current
value of the offset.
Offset
:SOURce:VOLTage:OFFSet <offset>
The offset command is used to set the DC offset of the output waveform. Note that the amplitude and
the offset are limited by the relation
Peak Amplitude + |Offset| ≤ 5V
Arguments
Type: Numeric
Units: V, mV
Range: 10mV to 4.99V
Rounding: to 10mV
Command Type: Setting or Query
Setting
Syntax: [:SOURce]:VOLTage:OFFSet<ws><offset>[units]
[:SOURce]:VOLTage:OFFSet<ws>MINimum|MAXimum
Examples: :VOLT:OFFS 2.5
:VOLT:OFFS 2.5V
:VOLT:OFFS MAX
Query
Syntax: [:SOURce]:VOLTage:OFFSet?[<ws>MINimum|MAXimum]
Examples: :VOLT:OFFS?
:VOLT:OFFS? MAX
Response: NR2
Considerations:
1) The MAXimum offset is dependent on the amplitude.
2) The MAX and MIN arguments should not be used in a program message containing an
AMPLitude command, since these values are evaluated during parsing, based on the current
value of the amplitude.
55
Page 69

Clock Reference Source
:SOURce:REFerence:SOURce <clock source>
This command is used to select the source of the arbitrary waveform clock. This clock sets the arbitrary
waveform point rate.
Arguments
Type: Character
Options: INTernal, EXTernal
Command Type: Setting or Query
Setting
Syntax: [:SOURce]: REFerence
:SOURce<ws><option>
Examples: :REF:SOUR INT
:REF:SOUR EXT
Query
Syntax: [:SOURce]: REFerence :SOURce?
Response: INT|EXT
Function
:SOURce:FUNCtion [:SHAPe]
The function command is used to set the type of waveform to be generated by the instrument.
Command Type: Setting or Query
Setting
Syntax: [:SOURce]:FUNCtion[:SHAPe]<WS><OPTION>
Examples: :FUNC SIN
:FUNC ARB
Query
Syntax: [:SOURce]:FUNCtion[:SHAPe]?
Examples: :FUNC?
Response: SIN|TRI|SQU|ARB|PUL
Considerations:
The following functions are available:
SINusoid, SQUare, TRIangle, ARBitrary, PULse
56
Page 70

AM modulation
The following sections control the AM modulation:
AM STATe
This command activates or deactivates AM modulation:
Arguments
Type: Boolean
Command Type: Setting or Query
Setting
Syntax: [: SOURce:]AM [:STATe]<ws>ON|1|OFF|0
Examples: :SOURce:AM :STAT ON
AM OFF
Query
Syntax: [:SOURce:]AM[:STATe]?
Response: 0|1
AM DEPTh
This command sets the AM modulation depth in %
Arguments
Type: Numeric
Units: none (implied %)
Range: 0 to 100
Rounding: to integer
Command Type: Setting or Query
Setting
Syntax: :SOURce:AM:DEPTh<ws><percent depth>
:SOURce:AM:DEPTh<ws>MINimum|MAXimum
Examples: AM:DEPTh 50
Query
Syntax: AM:DEPTh?[<ws>MINimum|MAXimum]
Response: NR3
AM SHAPe
This command selects the AM modulating waveform shape
Arguments
Type: Character
Options: SINusoid, TRIangle, SQUare
Command Type: Setting or Query
Setting
Syntax: [:SOURce:]AM:SHAPe<ws><SIN|TRI|SQU>
Examples: [:SOURce:]AM:SHAP SIN
AM:SHAPE TRI
57
Page 71

Query
Syntax: [:SOURce:]AM:SHAPe?
Response: SIN|TRI|SQU
AM FREQuency
This command sets the AM modulating waveform frequency
Arguments
Type: Numeric.
Units: MHz, KHz, Hz (default)
Range: Fmax = 20 KHz
Fmin = 0.01 Hz
Rounding: The value is rounded to 4 digits.
Command Type: Setting or Query
Setting
Syntax: [:SOURce:]AM:FREQuency<ws><frequency>[units]
[:SOURce:]AM:FREQuency<ws>MINimum|MAXimum
Examples: AM:FREQ 5KHZ
AM:FREQ 5E3
AM:FREQ MAXIMUM
AM:FREQ MIN
Query
Syntax: [:SOURce:]AM:FREQuency?[<ws>MAXimum|MINimum]
Examples: AM:FREQ?
AM:FREQ? MAX
Response: NR3
AM SOURce
This command selects the AM modulation source as either internal (then the above settings are
effective) or external (and then the external waveform determines depth, shape and frequency of
modulation).
Arguments
Type: Character
Options: INTernal, EXTernal
Command Type: Setting or Query
Setting
Syntax: [:SOURce:] AM:SOURce<ws><INT|EXT>
Examples: AM:SOUR INT
AM:SOUR EXT
Query
Syntax: [:SOURce]:AM:SOURce?
Response: INT|EXT
58
Page 72

FM modulation
The following commands control the FM modulation:
FM STATe
This command activates or deactivates FM modulation:
Arguments
Type: Boolean
Command Type: Setting or Query
Setting
Syntax: [:SOURce:]FM[:STATe]<ws>ON|1|OFF|0
Examples: FM:STAT ON
FM OFF
Query
Syntax: [:SOURce:]FM[:STATe]?
Response: 0|1
FM DEViation
This command sets the FM modulation deviation
Arguments
Type: Numeric.
Units: MHz, KHz, Hz (default)
Range: Dependent on the carrier frequency.
Fmax = carrier frequency
Fmin = 10 uHz
Rounding: The value is rounded to 4 digits.
Command Type: Setting or Query
Setting
Syntax: [:SOURce]:FM:DEViation<ws><frequency>[units]
[:SOURce]:FM:DEViation<ws>MINimum|MAXimum
Examples: FM:DEV 5KHZ
FM:DEV 5E3
FM:DEV MAXIMUM
FM:DEV MIN
Query
Syntax: [:SOURce]:FM:DEViation?[<ws>MAXimum|MINimum]
Examples: FM:DEV?
FM:DEV? MAX
Response: NR3
Note: The carrier frequency and deviation cannot exceed the maximum frequency limited by the
instrument.
FM SHAPe
This command selects the FM modulating waveform shape
59
Page 73

Arguments
Type: Character
Options: SINusoid, TRIangle, SQUare
Command Type: Setting or Query
Setting
Syntax: [:SOURce:]FM:SHAPe<ws><SIN|TRI|SQU>
Examples: [:SOURce:]FM:SHPE SIN
FM:SHAPE TRI
Query
Syntax: [:SOURce:]FM:SHAPe?
Response: SIN|TRI|SQU
FM FREQuency
This command sets the FM modulating waveform frequency
Arguments
Type: Numeric.
Units: MHz, KHz, Hz (default)
Range: Fmax = 20 KHz
Fmin = 0.01 Hz
Rounding: The value is rounded to 4 digits.
Command Type: Setting or Query
Setting
Syntax: [:SOURce:]FM:FREQuency<ws><frequency>[units]
[:SOURce:]FM:FREQuency<ws>MINimum|MAXimum
Examples: FM:FREQ 5KHZ
FM:FREQ 5E3
FM:FREQ MAXIMUM
FM:FREQ MIN
Query
Syntax: [:SOURce:]FM:FREQuency?[<ws>MAXimum|MINimum]
Examples: FM:FREQ?
FM:FREQ? MAX
Response: NR3
FM SOURce
This command selects the FM modulation source as either internal (then the above settings are
effective) or external (and then the external waveform determines deviation, shape and frequency of
modulation).
Arguments
Type: Character
Options: INTernal, EXTernal
Command Type: Setting or Query
Setting
60
Page 74

Syntax: [:SOURce:] FM:SOURce<ws><option>
Examples: FM:SOUR INT
FM:SOUR EXT
Query
Syntax: [:SOURce]:FM:SOURce?
Response: INT|EXT
FSK modulation
The following commands control the FSK modulation:
FSK STATe
This command activates or deactivates FSK modulation:
Arguments
Type: Boolean
Command Type: Setting or Query
Setting
Syntax: [:SOURce:]FSK[:STATe]<ws>ON|1|OFF|0
Examples: FSK:STAT ON
FM OFF
Query
Syntax: [:SOURce:]FSK[:STATe]?
Response: 0|1
FSK LOWFrequency
This command sets the lower of the two frequencies used in FSK modulation.
Arguments
Type: Numeric.
Units: MHz, KHz, Hz (default)
Range: The whole frequency range of the current function.
Rounding: The value is rounded to 4 digits.
Command Type: Setting or Query
Setting
Syntax: [:SOURce:]FSK:LOWFrequency<ws><frequency>[units]
[:SOURce:]FSK:LOWFrequency<ws>MINimum|MAXimum
Examples: FSK:LOWFrequency 5KHZ
FSK:LOWF 5E3
FSK:LOWF MAXIMUM
FSK:LOWF MIN
Query
Syntax: [:SOURce:]FSK:LOWFrequency?[<ws>MAXimum|MINimum]
Examples: FSK:LOWF?
FSK:LOWF? MAX
Response: NR3
61
Page 75

FSK HIFrequency
This command sets the higher of the two frequencies used in FSK modulation.
Arguments
Type: Numeric.
Units: MHz, KHz, Hz (default)
Range: The whole frequency range of the current function.
Rounding: The value is rounded to 4 digits.
Command Type: Setting or Query
Setting
Syntax: [:SOURce:]FSK:HIFrequency<ws><frequency>[units]
[:SOURce:]FSK:HIFrequency<ws>MINimum|MAXimum
Examples: FSK:HIFrequency 5KHZ
FSK:HIF 5E3
FSK:HIF MAXIMUM
FSK:HIF MIN
Query
Syntax: [:SOURce:]FSK:HIFrequency?[<ws>MAXimum|MINimum]
Examples: FSK:HIF?
FSK:HIF? MAX
Response: NR3
FSK RATE
This command sets the rate of switching between the two frequencies of the modulation.
Arguments
Type: Numeric.
Units: MHz, KHz, Hz (default)
Range: Fmax = 1MHz
Fmin = 0.01Hz
Rounding: The value is rounded to 4 digits.
Command Type: Setting or Query
Setting
Syntax: [:SOURce:]:FSK:RATE<ws><frequency>[units]
[:SOURce:]:FSK:RATE <ws>MINimum|MAXimum
Examples: FSK:RATE 5KHZ
FSK:RATE 5E3
FSK:RATE MAXIMUM
FSK:RATE MIN
Query
Syntax: [:SOURce]:FSK:RATE ?[<ws>MAXimum|MINimum]
Examples: FSK:RATE ?
FSK:RATE ? MAX
Response: NR3
62
Page 76

FSK SOURce
This command selects the FSK modulation source as either internal (then the above settings are
effective) or external (and then the external waveform determines the frequency of modulation).
Arguments
Type: Character
Options: INTernal, EXTernal
Command Type: Setting or Query
Setting
Syntax: [:SOURce:] FSK:SOURce<ws><INT|EXT>
Examples: FSK:SOUR INT
FSK:SOUR EXT
Query
Syntax: [:SOURce]:FSK:SOURce?
Response: INT|EXT
Sweep control
The following commands control the sweep functionality:
Sweep STATe
This command activates or deactivates sweep:
Arguments
Type: Boolean
Command Type: Setting or Query
Setting
Syntax: [:SOURce:]SWEEP[:STATe]<ws>ON|1|OFF|0
Examples: SWEEP:STAT ON
SWEEP OFF
Query
Syntax: [:SOURce:]SWEEP[:STATe]?
Response: 0|1
Sweep SPACing
This command sets the sweep spacing as either LINear or LOGarithmic:
Arguments
Type: Character
Options: LINear, LOGarithmic
Command Type: Setting or Query
Setting
Syntax: [:SOURce:] SWEEP:SPACing<ws><LIN|LOG>
Examples: [:SOURce:] SWEEP:SPACing LIN
SWEEP:SPAC LOG
63
Page 77

Query
Syntax: [:SOURce:] SWEEP:SPACing ?
Response: LIN|LOG
Sweep TIME
This command sets the time for one complete sweep:
Arguments
Type: Numeric
Units: S, mS, uS, nS
Range: 10mS to 500S
Rounding: to 4 digits
Command Type: Setting or Query
Setting
Syntax: [:SOURce:]SWEEP:TIME<ws><time>[units]
[:SOURce:]SWEEP:TIME<ws>MINimum|MAXimum
Examples: SWEEP:TIME 50MS
Query
Syntax: [:SOURce:]SWEEP:TIME?[<ws>MINimum|MAXimum]
Response: NR3
Sweep STARt
This command sets the start frequency of the sweep:
Arguments
Type: Numeric.
Units: MHz, KHz, Hz (default)
Range: Dependent on the frequency range of the current function.
Rounding: The value is rounded to 4 digits.
Command Type: Setting or Query
Setting
Syntax: [:SOURce:]SWEEP:STARt<ws><frequency>[units]
[:SOURce:]SWEEP:STARt<ws>MINimum|MAXimum
Examples: SWEEP:STARt 5KHZ
SWEEP:STARt 5E3
SWEEP:STARt MAXIMUM
SWEEP:STARt MIN
Query
Syntax: [:SOURce:]SWEEP:STARt?[<ws>MAXimum|MINimum]
Examples: SWEEP:STARt ?
SWEEP:STARt ? MAX
Response: NR3
Sweep STOP
This command sets the stop frequency of the sweep:
64
Page 78

Arguments
Type: Numeric.
Units: MHz, KHz, Hz (default)
Range: Dependent on the frequency range of the current function.
Rounding: The value is rounded to 4 digits.
Command Type: Setting or Query
Setting
Syntax: [:SOURce:]SWEEP:STOP<ws><frequency>[units]
[:SOURce:]SWEEP:STOP<ws>MINimum|MAXimum
Examples: SWEEP:STOP 5KHZ
SWEEP:STOP 5E3
SWEEP:STOP MAXIMUM
SWEEP:STOP MIN
Query
Syntax: [:SOURce:]SWEEP:STOP?[<ws>MAXimum|MINimum]
Examples: SWEEP:STOP ?
SWEEP:STOP ? MAX
Response: NR3
Phase Adjust
[:SOURce:]PHASe<ws><phase>
This command controls the phase adjustment
Arguments
Type: Numeric
Units: one (degrees implied)
Range: -180 to +180 (other values converted to this range)
Rounding: to integer
Command Type: Setting or Query
Setting
Syntax: [:SOURce:]PHASe<ws><phase>
[:SOURce:]PHASe<ws>MINimum|MAXimum
Examples: [:SOURce:]PHASe 500
Query
Syntax: [:SOURce:]PHASe?[<ws>MINimum|MAXimum]
Response: NR3
Pulse Setting
The following commands control the pulse function:
Note that width + 0.6 x (rise + fall) < period in order to have valid values.
PULSe PERiod
This command sets the pulse period to the specified value.
Note: This also sets the pulse frequency.
65
Page 79

Arguments
Type: Numeric
Units: S, mS, uS, nS
Range: 40nS-2000S
Rounding: 4 digits
Command Type: Setting or Query
Setting
Syntax: [:SOURce:] PULse: PERiod <ws><value>
[:SOURce:] PULse: PERiod <ws>MINimum|MAXimum
Examples: [:SOURce:] PULse: PERiod 500NS
Query
Syntax: [:SOURce:] PULse: PERiod?[<ws>MINimum|MAXimum]
Response: NR3
PULse WIDth
This command pulse width to the specified value.
Arguments
Type: Numeric
Units: S, mS, uS, nS
Range: 20 nS minimum; maximum defined by period and transition (see note above)
Rounding: 4 digits
Command Type: Setting or Query
Setting
Syntax: [:SOURce:]PULse:WIDth<ws>< value >
[:SOURce:] PULse:WIDth <ws>MINimum|MAXimum
Examples: [:SOURce:] PULse:WIDth 500NS
Query
Syntax: [:SOURce:] PULse: WIDth?[<ws>MINimum|MAXimum]
Response: NR3
PULse EDGe
This command sets both rising and falling edge of the pulse to the specified value.
Arguments
Type: Numeric
Units: S, mS, uS, nS
Range: 100 nS minimum; maximum defined by period and width (see note above)
Rounding: 4 digits
Command Type: Setting or Query
Setting
Syntax: [:SOURce:] PULse:EDGe <ws>< value >
[:SOURce:] PULse:EDGe <ws>MINimum|MAXimum
Examples: [:SOURce:] PULse:EDGe 500NS
Query
66
Page 80

Syntax: [:SOURce:] PULse:EDGe?[<ws>MINimum|MAXimum]
Response: NR3
PULse RISe
This command sets rising edge of the pulse to the specified value.
Arguments
Type: Numeric
Units: S, mS, uS, nS
Range: 100 nS minimum; maximum defined by period and width (see note above)
Rounding: 4 digits
Command Type: Setting or Query
Setting
Syntax: [:SOURce:] PULse:RISe <ws><phase>
[:SOURce:] PULse:RISe <ws>MINimum|MAXimum
Examples: [:SOURce:] PULse:RISe 500NS
Query
Syntax: [:SOURce:] PULse:RISe?[<ws>MINimum|MAXimum]
Response: NR3
PULse FALl
This command sets falling edge of the pulse to the specified value.
Arguments
Type: Numeric
Units: S, mS, uS, nS
Range: 100 nS minimum; maximum defined by period and width (see note above)
Rounding: 4 digits
Command Type: Setting or Query
Setting
Syntax: [:SOURce:] PULse:FALl <ws><phase>
[:SOURce:] PULse:FALl <ws>MINimum|MAXimum
Examples: [:SOURce:] PULse:FALl 500NS
Query
Syntax: [:SOURce:] PULse:FALl?[<ws>MINimum|MAXimum]
Response: NR3
Duty Cycle
:SOURce:DCYCle <duty cycle value>
This command is used to set the duty-cycle of the square wave or the symmetry of triangular wave. The
value is given in percent and the maximum and minimum are frequency dependent.
67
Page 81

Arguments
Type: Numeric
Units: None (percent implied)
Range: 1 to 100%, depending on the Waveform and Frequency
Rounding: to integer
Command Type: Setting or Query
Setting
Syntax: :SOURce:DCYCle <ws><duty cycle value>
:SOURce:DCYCle <ws>MINimum|MAXimum
Query
Syntax: :SOURce:DCYCle?[<ws>MINimum|MAXimum]
Response: NR3
OUTPut Subsystem
The Output Subsystem controls characteristics of the source's output. Included in this subsystem are
the State and Summing commands. The command structure is as follows:
:OUTPut
[:STATe] <Boolean>
:TERminator <Boolean>
Output State
:OUTPut [:STATe] <state 0,1>
This command controls whether the output is ON or OFF.
Arguments
Type: Boolean
Command Type: Setting or Query
Setting
Syntax: :OUTPut[:STATe]<ws>ON|1|OFF|0
Examples: :OUTP:STAT ON
:OUTP OFF
Query
Syntax: :OUTPut[:STATe]?
Response: 0|1
Output Impedance
:OUTPut :TERM <state 0,1>
This command controls whether the 50Ohm terminator is ON or OFF.
68
Page 82

Arguments
Type: Boolean
Command Type: Setting or Query
Setting
Syntax: :OUTPut:TERM<ws>ON|1|OFF|0
Examples: :OUTP: TERM ON
:OUTP: TERM OFF
Query
Syntax: :OUTPut:TERM?
Response: 0|1
Trigger Subsystem
The Trigger Subsystem is used to control the waveform triggering. The command structure is as follows:
:TRIGger
:MODE CONTinuous|TRIGger|GATE|BURSt
:BURSt <numeric value>
:SOURce <MANual|INTernal|EXTernal|BUS
:TIMer <numeric value>
Trigger Mode
:TRIGger:MODE <trigger mode>
This command is used to set the trigger mode. It is not a standard SCPI command.
Arguments
Type: Character
Options: CONTinuous
TRIGger
GATE
BURSt
Command Type: Setting or Query
Setting
Syntax: :TRIGger:MODE<ws><option>
Examples: :TRIG:MODE CONT
:TRIG:MODE BURS
Query
Syntax: :TRIGger:MODE?
Response: CONT|TRIG|GATE|BURS
Trigger Source
:TRIGger:SOURce <trigger source>
69
Page 83

This command is used to select the trigger source, for use in the Trigger, Gate and Burst trigger modes.
Arguments
Type: Character
Options: MANual - Front panel MAN key
BUS - GPIB trigger (GET or *TRG)
INTernal - Internal trigger
EXTernal - External trigger
Command Type: Setting or Query
Setting
Syntax: :TRIGger:SOURce<ws><option>
Examples: :TRIG:SOUR BUS
:TRIG:SOUR INT
Query
Syntax: :TRIGger:SOURce?
Response: MAN|BUS|INT|EXT
Burst Count
:TRIGger:BURSt <burst count>
Used to set the number of cycles to be output in the BURST mode. It is not a standard SCPI command.
Arguments
Type: Numeric
Range: 2 to 999999
Rounding: To integer value
Command Type: Setting or Query
Setting
Syntax :TRIGger:BURSt<ws><value>
Examples :TRIG:BURS 100
:TRIG:BURS MAXIMUM
Query
Syntax: :TRIGger:BURSt?[<ws>MAXimum|MINimum]
Response: NR1
Examples: :TRIG:BURST?
:TRIG:BURS? MAX
Internal Trigger Rate
:TRIGger:TIMer <trigger rate>
Sets the rate of the internal trigger.
Arguments
70
Page 84

Type: Numeric
Units: S, mS, uS, nS
Range: 1E-6S to 100S
Rounding: to 4 digits
Command Type: Setting or Query
Setting
Syntax: :TRIGger:TIMer<ws><value>[units]
:TRIGger:TIMer<ws>MINimum|MAXimum
Examples: :TRIG:TIM 10E-6
:TRIG:TIM MIN
Query
Syntax: :TRIGger:TIMer?[<ws>MINimum|MAXimum]
Response: NR3
Examples: :TRIG:TIM?
:TRIG:TIM? MIN
Arbitrary Subsystem
The Arbitrary subsystem is not part of the SCPI standard. It was developed to suit the needs of the
instrument. Within this subsystem are commands to:
1) Control the point rate, start address, wavelength, marker address, and synchronization
pulse address
2) Set values of the arbitrary waveform, either discretely or using predefined, copy or draw
functions
3) Protect an area of waveform memory
4) Set the state of the automatic update and increment features
5) Update the waveform
Note: There are 16,777,216 addressable memory points for models 4077B and 4080B, 4,194,304 points
for models 4076B and 4079B, and 1,048,576 points for models 4075B and 4078B.
The following shows the structure of the ARBitrary subsystem:
:ARBitrary
:PRATe <numeric value>
:ADDRess <numeric value>
:DATA <numeric value>|<arbitrary block>
:DRAW <numeric value>,<numeric value>
:CLEar <numeric value>,<numeric value>
:COPY <NRf>,<NRf>,<NRf>
:PROTect
[:RANGe] <numeric value>,<numeric value>
:STATe <Boolean>
:PREDefined <shape>,<start address>,<length>,<scale>
71
Page 85

:STARt <numeric value>
:LENGth <numeric value>
:MARKer
[:ADDRess] <numeric value>
:STATe <Boolean>
:LENGth <numeric value>
:SAVe <numeric value>
:LOAD <numeric value>
Point Rate
ARBitrary:PRATe <point rate>
This command is used to set the point rate. It is coupled with the frequency of the waveform by the
relation:
𝐹𝑟𝑒𝑞𝑢𝑒𝑛𝑐𝑦 =
(𝑃𝑜𝑖𝑛𝑡 𝑅𝑎𝑡𝑒 × 𝑊𝑎𝑣𝑒𝑙𝑒𝑛𝑔𝑡ℎ)
Thus changing the point rate will result in a change in frequency.
Arguments
Type: Numeric
Units: S, mS, uS, nS
Range: 5nS to 100S
Rounding: to 4 digits
Command Type: Setting or Query
Setting
Syntax: :ARBitrary:PRATe<ws><point rate>[units]
:ARBitrary:PRATe<ws>MINimum|MAXimum
Examples: :ARB:PRAT 100NS
Query
Syntax: :ARBitrary:PRATe?[<ws>MINimum|MAXimum]
Response: NR3
1
Address
:ARBitrary:ADDRess <address>
This command sets the current address of the waveform. It is used to determine to where arbitrary
data are to be written.
Arguments
Type: Numeric
Range: 1 to 16,777,216
Rounding: to integer value
72
Page 86

Command Type: Setting or Query
Setting
Syntax: :ARBitrary:ADDRess<ws><address>
:ARBitrary:ADDRess<ws>MINimum|MAXimum
Examples: :ARB:ADDR 100
Query
Syntax: :ARBitrary:ADDRess?[<ws>MINimum|MAXimum]
Response: NR1
Data
:ARBitrary:DATA <data>
This command is used to set the values of the waveform.
Arguments
Type: Numeric. Definite form arbitrary block. Indefinite form arbitrary block
Numeric Range: -8191 to 8191 ASCII
Rounding: to integer value
Binary Range: 001H to 3FFFH BINARY
Command Type: Setting or Query
Setting Syntax
Numeric: :ARBitrary:DATA<ws><numeric>{[,<numeric]}
Example :ARB:DATA 100,200,1000,2000,-2000
Arbitrary Block: :ARBitrary:DATA<ws>#<arb block data>
See section 4.16
Examples
Definite Form: :ARB:DATA #14\x8\x64\x8\xC8
'\x' indicates that the values are Hexadecimal.
Indefinite: :ARB:DATA #0\x8\x64\x8\xc8\xa^EOI
Query
Syntax: :ARBitrary:DATA?<ws><number of points>, BINary|ASCii
Response: Using the BINary option, data are returned in the Indefinite arbitrary block form.
Using the ASCii option, data are returned in the decimal numeric form.
Considerations:
NOTE:
Reading waveform data:
USB: The maximum buffer size of the instrument is 32K bytes when communicating over USB.
Therefore, when reading arbitrary waveform data in ASCII, it is recommended that data be read in
chunks not exceeding 6000 points at a time. If read in Binary, it is recommended that data be read in
chunks not exceeding 10,000 points at a time.
GPIB: The maximum buffer size is approximately 200K bytes when communicating over GPIB. For
Data cannot be written to protected memory.
In binary form, each data point consists of two bytes.
The high byte must precede the low byte. (big-endian order)
73
Page 87

ASCII, it is recommended that data be read in chunks not exceed 10,000 points at a time. For Binary,
it is recommended that data be read in chunks not exceeding 100,000 points at a time.
Writing waveform data:
It is recommended that waveform data be sent in chunks not exceeding 10,000 points at a time when
writing data into the instrument’s arbitrary memory.
Line Draw
:ARBitrary:DRAW <start address>,<end address>
This command is used to generate a straight line between two points in the arbitrary waveform
memory.
Arguments
Type: Numeric.
Range: 1 to 16,777,216
Rounding: to integer value
Command Type: Setting only
Setting
Syntax: :ARBitrary:DRAW<ws><start address>, <end address>
Example: :ARB:DRAW 1,1000
Considerations:
1) The value of the data at the start and end points must first be set by the user, using the
:ARB:DATA command.
2) The range of the straight line cannot overlap with protected memory.
3) The end address must be greater than the start address.
Clear
:ARBitrary:CLEar <start address>,<end address>
This command is used to clear all or a portion of waveform memory. The memory is the set to the value
zero.
Arguments
Type: Numeric.
Numeric Range: 1 to 16,777,216
Rounding: to integer value
Command Type: Setting only
Setting
Syntax: :ARBitrary:CLEar<ws><start address>, <end address>
Examples: :ARB:CLE 1,1000
Considerations:
74
Page 88

1) The clear range cannot overlap with protected memory.
2) The end address must be greater than the start address.
Copy
:ARBitrary:COPY <start address>,<length>,<destination address>
This command is used to copy a section of the waveform to a different location in waveform memory.
Arguments
Type: NRf
Range: 1 to 16,777,216
Rounding: to integer value
Command Type: Setting only
Setting
Syntax: :ARBitrary:COPY<ws><start>,<length>,<destination>
Example: :ARB:COPY 1,1000,1001
Considerations:
1) The destination range cannot overlap with protected memory.
2) The destination range cannot overlap with the source range.
3) The destination end address may not exceed the maximum address:
Start address + Length - 1 <= 16,777,216
Destination address + Length - 1 <= 16,777,216
Memory Protection Range
:ARBitrary:PROTect [:RANGe] <start address>,<end address>
This command is used to define a range of arbitrary waveform memory to be write-protected. The
protection is effective only if the PROTect:STATe is ON.
Arguments
Type: Numeric.
Numeric Range: 1 to 16,777,216
Rounding: to integer value
Command Type: Setting or Query
Setting
Syntax: :ARBitrary:PROTect[:RANGe]<ws><start>,<end>
Examples: :ARB:PROT 1,1E3
Query
Syntax: :ARBitrary:PROTect[:RANGe]?
Response: <protect start>,<protect end> in NR1 format.
75
Page 89

Memory Protection State
:ARBitrary:PROTect:STATe <Boolean>
This command is used to enable or disable arbitrary waveform write-protection.
Arguments
Type: Boolean
Command Type: Setting or Query
Setting
Syntax: :ARBitrary:PROTect:STATe<ws>ON|1|OFF|0
Example: :ARB:PROT:STAT ON
Query
Syntax: :ARBitrary:PROTect:STATe?
Response: 0|1
Predefined waveforms
:ARB:PRED <shape>,<start address>,<length>,<scale>
This command is used to load the waveform memory with a specific type of waveform.
Arguments
Shape
Type: Character
Options: SINusoid
SQUare
TRIangle
NOISe (Pseudo-Random Noise)
ANOise (Noise added to the current waveform)
URAMp (Ramp up)
DRAMp (Ramp down)
SINXx (Sin[x]/x)
EXPUp (Exponent up)
EXPDn (Exponent down)
GAUS
Start Address
Type: Numeric. The MIN and MAX forms both set the address to 1
Range: 1 to 16,777,216
Rounding: to integer value
Length
Type: Numeric.
Range
SIN: 16 to 65,536; divisible by 4
SQU: 2 to 65,536; divisible by 2
TRI: 16 to 65,536; divisible by 4
URAM: 16 to 65,536
76
Page 90

DRAM: 16 to 65,536
NOIS: 16 to 65,536
ANO: 16 to 65,536
SINX: 16 to 65,536
EXPU: 16 to 65,536
EXPD: 16 to 65,536
GAUS: 16 to 65,536
Rounding: to integer value
Scale
Type: Numeric. MIN sets the scale to 1; MAX sets the scale to 100
Range: 1 to 100 (See considerations)
Rounding; to integer value
Command Type: Setting only
Setting
Syntax: :ARBitrary:PREDefined<ws> <shape>, <start>, <length>,<scale>
Examples: :ARB:PRED SIN,1,1e3,100
:ARB:PRED URAM,1001,1e3,50
Considerations:
1) The start address and the length must meet the specification that. Start address + Length - 1
<= 16,777,216
2) The 'scale' refers to the scaling of the waveform as a percentage of full scale. A scale of
100% will, under the correct conditions, generate a waveform whose data values range
from -8191 to +8191. These 'correct conditions' are set by the 'offset' value. This offset is
the value of the data at the start address, and determines the maximum scale settable. The
following table shows the data values required in order to achieve maximum scale.
SHAPE DATA
SIN 0
SQU 0
TRI 0
NOIS 0
URAM -8191
DRAM +8191
SINX 0
EXPU -8191
EXPD +8191
GAUS 0
Start Address
:ARBitrary:STARt <start address>
This command sets the start address of the waveform to be run.
77
Page 91

Arguments
Type: Numeric
Range: 1 to 16,777,215
Rounding: to integer value
Command Type: Setting or Query
Setting
Syntax: :ARBitrary:STARt<ws><start address>
:ARBitrary:STARt<ws>MINimum|MAXimum
Example: :ARB:STAR 100
Query
Syntax: :ARBitrary:STARt?[<ws>MINimum|MAXimum]
Examples: :ARB:START?
:ARB:STAR? MIN
Response: NR1
Considerations: The start address and length must meet the condition:
Start Address + Length - 1 <= 16,777,216
Wavelength
:ARBitrary:LENGth <length>
This command sets the length of the waveform being run.
Arguments
Type: Numeric
Range: 2 to 16,777,216
Rounding: to integer value
Command Type: Setting or Query
Setting
Syntax: :ARBitrary:LENGth<ws><length>
:ARBitrary:LENGth<ws>MINimum|MAXimum
Example: :ARB:LENG 1E3
Query
Syntax: :ARBitrary:LENGth?[<ws>MINimum|MAXimum]
Example: :ARB:LENG?
Response: NR1
Considerations:
1) Changing the wavelength will change either the frequency.
2) The minimum wavelength is 2.
Marker Address
:ARBitrary:MARKer [:ADDRess] <marker address>
This command is used to set the address of the marker.
78
Page 92

Arguments
Type: Numeric.
Range: 1 to 16,777,216
Rounding: to integer values
Setting
Syntax: :ARBitrary:MARKer[:ADDRess]<ws><marker address>
Examples: :ARB:MARK 45
Query
Syntax: :ARBitrary:MARKer[:ADDRess]?
Example: :ARB:MARK?
Response: Marker address in NR1 format
Considerations:
The marker is only output if its address is within the range of addresses currently
being run.
Marker Length
:ARBitrary:MARKer:LENGth <numeric value>
This command is used to set the marker length. The marker length is specified by appending a numeric
value, to the MARKer keyword.
Arguments
Type: Numeric
Range: 1 to 4,000
Command Type: Setting or Query
Setting
Syntax: :ARBitrary:MARKer:LENGth<ws><length>
Example: :ARB:MARK:LENG 5
Query
Syntax: :ARBitrary:MARKer:LENGth?
Response: NR1
Marker State
:ARBitrary:MARKer:STATe <Boolean>
This command is used to enable or disable the marker.
Arguments
Type: Boolean
Command Type: Setting or Query
Setting
Syntax: :ARBitrary:MARKer:STATe<ws>ON|1|OFF|0
79
Page 93

Query
Syntax: :ARBitrary:MARKer:STATe?
Response: 0/1
Save
:ARBitrary:SAVe
This command is used to save all unsaved arbitrary waveform data into one of the non-volatile memory
locations.
Arguments
Type: Numeric
Range: 1 to 8
Command Type: Setting only
Setting
Syntax: :ARBitrary:SAVe <location>
Load
:ARBitrary:LOAD
This command is used to load all arbitrary waveform data from one of the non-volatile memory
locations.
Arguments
Type: Numeric
Range: 1 to 8
Command Type: Setting only
Setting
Syntax: :ARBitrary:LOAD <location>
Status Subsystem
This subsystem controls the SCPI-defined status reporting structures, which are the QUEStionable and
OPERation status registers, and the error/event queue. The OPERation status registers are mandated by
SCPI, and so are implemented, but are not used by the hardware. No status is ever reported through
them, and they are not detailed in this manual. The following shows the STATus structure used:
:STATus
:PRESet
:QUEue
[:NEXT]?
:ENABle
80
Page 94

:QUEStionable
:CONDition?
:PTRansition <NRf>
:NTRansition <NRf>
:EVENt?
:ENABle <NRf>
Status Preset
:STATus:PRESet
This command is used to set certain status values to defined values.
a) The OPERation and QUEstionable enable registers are cleared.
b) The Positive transition filters are set to 32767.
c) The Negative transition filters are set to 0.
d) Only errors in the range (-440:-100) are enabled to be reported in the event queue.
Command Type: Setting only
Setting
Syntax: :STATus:PRESet
Error Queue Read
:STATus:QUEue?
This query returns the first entry in the error queue, and removes that entry from the queue. Its
function is identical to that of the :SYSTem:ERRor? query.
Command Type: Query only
Query
Syntax: :STATus:QUEue[:NEXT]?
Response: <Error number>, "<error description>"
Error Queue Enable
:STATus:QUEue:ENABle
This command is used to enable individual errors to be placed in the queue when they occur. Those
errors not specified in the :ENABle command are disabled from being reported in the error queue.
Errors and events enabled to be reported at power on depends on the Power on Status Clear status (set
with the *PSC common command). If PSC is set, the status is cleared on power on, and the range of
errors enabled is as set by the STATus:PRESet command, ie -440 to -100. If PSC is cleared, the status is
not cleared on power on, and the errors and events enabled are those that were enabled before the
last power down.
81
Page 95

Type: Expression
The expression data takes the form
(NRf|<event range>[{,NRf|<event range>}])
where NRf represents an error number. Entries are rounded to integer values.
An <event range> is defined as
NRf:NRf
The first number in a range MUST be less than the second.
Up to 6 ranges may be specified using one :ENABle command, representing the 6 ranges of
errors/events. The ranges are then separated from each other by Program Data Separators (comma).
The entire expression must be enclosed in parentheses(...).
Command Type: Setting or Query
Setting
Syntax: :STATus:QUEue:ENABle<ws><expression>
Example: :STAT:QUE:ENAB (-440:-410,-258:-220,402,-110)
Query
Syntax: :STATus:QUEue:ENABle?
Response: (NRf|<event range>[{,[NRf|event range>]})
Questionable Status
The Questionable status data structure is used to alert the user to instrument conditions that affect the
signal quality. Two types of conditions are defined in the AWG, and these are:
1) Frequency - Trigger rate conflict, and
2) Output overload condition.
Each condition is reported separately for each channel. Thus, a total of four conditions may be
reported.
The data structure is comprised of five 16-Bit registers. Each bit represents a different status condition.
In the AWG, bits 9 and 11 are used as follows:
Bit 9: Frequency - trigger rate conflict.
Bit 11: Output overload.
The existence of these conditions is indicated in the CONDition register. Bit 3 of the status byte is used
to indicate the occurrence of a questionable status condition. The conditions cause this bit to be set
depending on the values of the other four registers.
82
Page 96

The positive transition filter enables a bit in the event register to be set when a condition changes from
false to true. The negative transition register enables a bit in the event register to be set when a
condition changes from true to false. In order for the bit in the event register to be set, the
corresponding bit in the transition register must be set.
Bit 3 in the status byte will be set if a bit in the event register is set while the corresponding bit in the
enable register is set.
Questionable Condition
:STATus:QUEstionable:CONDition?
This query is used to read the condition register.
Command Type: Query only
Query
Syntax: :STATus:QUES:COND?
Response: NR1
Positive Transition Filter
:STAT:QUES:PTR
This command is used to set and query the value of the positive transition filter.
Arguments
Type: NRf
Range: 0 to 131,072. Non integer arguments are rounded before execution.
Command Type: Setting or Query
Setting
Syntax: :STAT:QUES:PTR<ws><NRf>
Examples: :STAT:QUES:PTR 2048
Query
Syntax: :STAT:QUES:PTR?
Response: NR1
Negative Transition Filter
:STAT:QUES:NTR
This command is used to set and query the value of the negative transition filter.
Arguments
Type: NRf
Range: 0 to 131,072. Non integer arguments are rounded before execution
83
Page 97

Command Type: Setting or Query
Setting
Syntax: :STAT:QUES:NTR<ws><NRf>
Examples: :STAT:QUES:NTR 2048
Query
Syntax: :STAT:QUES:NTR?
Response: NR1
Event Register
:STAT:QUES:EVENt?
This query is used to read the event register. Reading the register clears it.
Command Type: Query only
Query
Syntax: :STATus:QUES:EVEN?
Response: NR1
Event Enable Register
:STAT:QUES:ENABle
This command is used to set and query the value of the enable register.
Arguments
Type: NRf
Range: 0 to 131,072. Non integer arguments are rounded before execution.
Command Type: Setting or Query
Setting
Syntax: :STAT:QUES:ENAB<ws><NRf>
Examples: :STAT:QUES:ENAB 2048
Query
Syntax: :STAT:QUES:ENAB?
Response: NR1
System Subsystem
The SYSTem subsystem collects the functions that are not related to instrument performance. The
functions implemented in the AWG are security, GPIB address changing, error queue reading, SCPI
version reading, and power-on buffer setting (not SCPI-defined). The command structure is as follows:
:SYSTem
:COMMunicate
84
Page 98

:GPIB
:ADDRess <numeric value>
:ERRor?
:VERSion?
:SECurity
[:STATe] <Boolean>
:POBuffer <numeric value>
GPIB Address Change
:SYSTem:COMMunicate:GPIB:ADDRess
This command is used to set the GPIB address.
Arguments
Type: Numeric
Range: 0 to 31
Rounding: to integer value
Command Type: Setting or Query
Setting
Syntax: :SYSTem:COMMunicate:GPIB:ADDRess<ws><address>|MINimum|MAXimum
Example: :SYST:COMM:GPIB:ADDR 20
Query
Syntax: :SYSTem:COMMunicate:GPIB:ADDRess?[<ws>MINimum|MAXimum]
Response: <address> in NR1 format
Considerations:
1) Setting the address to 31 puts the instrument in the off-bus state.
2) Using the MAX option sets the address to 30, not 31.
Default Power-on is address 9.
Error Queue Reading
:SYSTem:ERRor?
This query returns the first entry in the error queue, and removes that entry from the queue. It's
function is identical to that of the :STATus:QUEue:NEXT? query.
Command Type: Query only
Query
Syntax: :SYSTem:ERRor?
Response: <Error number>, "<error description>"
SCPI Version
:SYSTem:VERSion?
85
Page 99

This query is used to read the SCPI version to which the instrument complies.
Command Type: Query only
Query
Syntax; :SYSTem:VERSion?
Response: 1992.0 (NR2 format)
Security
:SYSTem:SECurity[:STATe] <Boolean>
This command enables the instrument memory to be cleared. The stored settings and the arbitrary
waveform memory are cleared when the Security state is changed from ON to OFF. The instrument
state is returned to the factory power-on default.
Arguments
Type: Boolean
Command Type: Setting or Query
Setting
Syntax: :SYSTem:SECurity[:STATe]<ws>ON|1|OFF|0
Examples: :SYST:SEC ON
:SYST:SEC OFF
Query
Syntax: :SYSTem:SECurity[:STATe]?
Response: 0|1
Power-on Buffer
:SYSTem:POBuffer <buffer number>
This command is used to set the Power On Buffer setting. The instrument will power-on with the
setting stored in that buffer.
Arguments
Type: Numeric
Range: 0 to 49
Rounding: to integer value
Command Type: Setting or Query
Setting
Syntax: :SYSTem:POBuffer<ws><buffer>|MINimum|MAXimum
Example: :SYST:POB 49
Query
Syntax: :SYSTem:POBuffer?[<ws>MINimum|MAXimum]
Response: Power-on buffer in NR1 format
86
Page 100

4.14 IEEE 488.1 Interface Messages
GET - Group Execute Trigger
The GET is used by the AWG as a trigger when it is in either the TRIGGER, GATE or BURST modes, with
the trigger source set to BUS. It has the same effect as the *TRG common command.
DCL - Device Clear
In response to the DCL, the AWG does the following:
a) Clears the input buffer and the output queue.
b) Resets the Message Processing Functions.
SDC - Selected Device Clear
The response is as for the DCL message, when device is addressed to listen.
LLO - Local Lockout
Sending LLO when device is addressed to listen and controller is asserting the REN line will put the
device into "Remote with Lock out" state, locking out the front panel.
87
 Loading...