

Page 1

K-Class Flex KF II Retail scales, cash
register (POS), information terminal
Operating instructions
as from program version 2.80 (with CD)
61989850142 en-US
Page 2

© 04 / 2016
Alle Rechte vorbehalten
All rights reserved
Tous droits réservés
Reservados todos los derechos
Tutti i diritti riservati
Bizerba GmbH & Co. KG,
Bizerba Service
www.bizerba.com
72336 Balingen
Postfach 10 01 64
72301 Balingen, Germany
Telephone (+49 7433) 12-0, Fax (+49 7433) 12-2696
E-mail: [email protected]
Internet: www.bizerba.com
Translation of original instructions 61989850142 en-US
Page 3

Operating instructions K-Class Flex KF II Table of Contents
Table of Contents
1 About these instructions ........................................................................................... 7
1.1 Safe-keeping.................................................................................................. 7
1.2 Target group .................................................................................................. 7
1.3 Symbols used ................................................................................................ 7
1.4 Warnings........................................................................................................ 8
2 About the device....................................................................................................... 10
2.1 Overview of single components ................................................................... 10
2.2 Accessories.................................................................................................. 11
2.3 Intended use ................................................................................................ 11
2.4 Identification plates ...................................................................................... 11
2.4.1 Identification plate on load receptor KF II .................................................... 12
2.4.2 Identification plate on load receptor type 18 A............................................. 13
2.4.3 Data plate on VSC 280 KF........................................................................... 15
2.4.4 Connecting load receptor at a later point of time ......................................... 15
2.5 Verification information ................................................................................ 16
2.5.1 Software ID, logbook update........................................................................ 17
2.6 Standards and directives ............................................................................. 18
2.7 Operating conditions .................................................................................... 18
2.7.1 Power supply ............................................................................................... 19
2.7.2 Wireless LAN device network ...................................................................... 20
2.8 Warranty ...................................................................................................... 20
2.9 Virus protection ............................................................................................ 21
2.10 Software modules ........................................................................................ 21
2.11 Disposal of devices/environmental protection ............................................. 21
2.12 Third-party software ..................................................................................... 22
2.13 Connecting a UPOS conform printer ........................................................... 22
3 Safety instructions ................................................................................................... 23
3.1 Requirements for operating personnel......................................................... 23
3.2 Plates on the device..................................................................................... 23
3.3 System-related sources of hazards ............................................................. 23
4 Installation................................................................................................................. 24
4.1 Transport and storage.................................................................................. 24
4.2 Installation and assembly............................................................................. 24
4.3 Mains supply ................................................................................................ 24
4.4 VESA mounting system 500 mm ................................................................. 24
4.5 Setting adjusting force of holder .................................................................. 25
4.6 Connection cable ......................................................................................... 25
4.6.1 Plug systems................................................................................................ 27
4.7 Central unit................................................................................................... 27
3 / 15561989850142 en-US
Page 4

Table of Contents Operating instructions K-Class Flex KF II
4.7.1 Open central unit.......................................................................................... 28
4.7.2 Cable connections of central unit................................................................. 29
4.7.3 Strain relief for connecting cable.................................................................. 30
4.7.4 Vertical mounting of central unit................................................................... 30
4.8 12.1" operator display with touch screen ..................................................... 31
4.9 Customer display 7" ..................................................................................... 32
4.10 Customer display 12.1" ................................................................................ 32
4.11 Mouse, PC keyboard ................................................................................... 33
4.12 Printer .......................................................................................................... 33
4.12.1 Installation as table version.......................................................................... 33
4.12.2 Mounting to swivel arm at VESA mounting system 500 mm (option) .......... 33
4.12.3 Cable connections ....................................................................................... 34
4.13 KScalePad ................................................................................................... 34
4.14 Load receptor of VSC 280 Flex.................................................................... 35
4.15 Load receptor of GSP H Flex....................................................................... 36
4.16 Leveling load receptor.................................................................................. 37
4.16.1 Load receptor KF ......................................................................................... 38
4.16.2 Load receptor of type 18 A........................................................................... 38
5 Device and operating controls ................................................................................ 40
5.1 Power pushbutton ........................................................................................ 40
5.2 Operator display........................................................................................... 40
5.3 Customer display ......................................................................................... 41
5.4 Standard keyboard for assisted sales.......................................................... 42
5.4.1 Customer-specific keyboard ........................................................................ 43
5.4.2 Key functions ............................................................................................... 43
5.5 Printer .......................................................................................................... 52
5.5.1 Thermal paper.............................................................................................. 52
5.5.2 Side cover .................................................................................................... 54
5.5.3 Side cover (optional swivel-mounted door).................................................. 54
5.5.4 Thermal print head....................................................................................... 56
5.5.5 Tear-off edge ............................................................................................... 57
5.5.6 Paper feed ................................................................................................... 58
5.5.7 Message in the event of End of paper ......................................................... 59
5.5.8 Label printers ............................................................................................... 60
5.5.9 Set paper width ............................................................................................ 61
5.5.10 Reverse mode.............................................................................................. 62
5.5.11 Ticket and Linerless printer.......................................................................... 62
5.5.12 Dual printer tickets and labels...................................................................... 64
5.5.13 Dual printer ticket and Linerless................................................................... 65
5.5.14 2" L compact ................................................................................................ 66
6 Operating PowerScale ............................................................................................. 69
6.1 Switching device on ..................................................................................... 69
6.2 Shut down device, switch device off ............................................................ 70
6.3 Correction options........................................................................................ 70
6.4 Zerosetting the weight value display............................................................ 71
4 / 155 61989850142 en-US
Page 5

Operating instructions K-Class Flex KF II Table of Contents
6.5 HTML help ................................................................................................... 72
6.6 Calling up PLUs ........................................................................................... 73
6.6.1 PLU key ....................................................................................................... 74
6.6.2 Enter article no............................................................................................. 74
6.6.3 Call up a PLU from a different department .................................................. 75
6.6.4 Search article ............................................................................................... 75
6.6.5 Select PLU by product group ....................................................................... 76
6.6.6 PLU selection by order groups..................................................................... 77
6.7 Register article ............................................................................................. 77
6.8 Display Quick info ........................................................................................ 78
6.8.1 Full screen article information ...................................................................... 80
6.9 Operator info texts ....................................................................................... 80
6.10 Overwrite unit price ...................................................................................... 81
6.10.1 PLU with price per piece .............................................................................. 82
6.11 Enter weight value ....................................................................................... 82
6.12 Overwrite quantity ........................................................................................ 83
6.12.1 Sell article with number of pieces 0.5 .......................................................... 84
6.13 Input of a unit price weighed ........................................................................ 84
6.14 Input of a price per piece ............................................................................. 85
6.15 Input of a minus amount .............................................................................. 85
6.16 Check of registered items, Scrolling function............................................... 86
6.17 Item cancellation .......................................................................................... 87
6.17.1 Cancellation permission of operator ............................................................ 87
6.17.2 Without cancellation permission of operator ................................................ 88
6.18 Constant....................................................................................................... 89
6.19 Subtotals ...................................................................................................... 90
6.19.1 Displaying subtotal....................................................................................... 90
6.19.2 Subtotal with printout ................................................................................... 91
6.19.3 Subtotal difference ....................................................................................... 91
6.20 Total ............................................................................................................. 92
6.21 Tare.............................................................................................................. 93
6.21.1 Unknown tare............................................................................................... 93
6.21.2 Known tare................................................................................................... 95
6.21.3 Operator tare................................................................................................ 97
6.21.4 Deleting tare ................................................................................................ 98
7 Troubleshooting ....................................................................................................... 99
7.1 Malfunctions................................................................................................. 99
7.2 Fault descriptions......................................................................................... 99
7.3 Text messages........................................................................................... 100
8 Maintenance............................................................................................................ 109
8.1 Cleaning device ......................................................................................... 109
8.2 Cleaning touch screen ............................................................................... 109
8.2.1 Remove stuck labels.................................................................................. 110
5 / 15561989850142 en-US
Page 6

Table of Contents Operating instructions K-Class Flex KF II
8.3 Cleaning the printer.................................................................................... 110
8.3.1 Tear-off edge ............................................................................................. 110
8.3.2 Cleaning thermal print head....................................................................... 111
8.3.3 Thermal printhead cleaner ......................................................................... 111
8.3.4 Clean label printer...................................................................................... 112
8.3.5 Cleaning ticket and Linerless printer.......................................................... 113
8.3.6 Label remover ............................................................................................ 113
8.4 Cleaning KscalePad................................................................................... 114
9 Technical data......................................................................................................... 116
9.1 Dimensions (mm):...................................................................................... 116
9.2 Power supply ............................................................................................. 119
9.3 Ambient conditions..................................................................................... 119
9.4 Touch screen: Chemical resistance........................................................... 120
9.5 Ticket and label dimensions....................................................................... 120
9.5.1 Dimensions of label rolls ............................................................................ 120
9.5.2 Ticket rolls for label printer......................................................................... 121
9.5.3 Dimensions of ticket and Linerless rolls..................................................... 122
Subject index .......................................................................................................... 123
10 Annexe..................................................................................................................... 126
Declaration of conformity K scales............................................................. 127
EU declaration of conformity KH II............................................................. 128
Declaration of conformity on KScalePad ................................................... 129
10.1 WLAN_BWLC2 .......................................................................................... 130
10.2 Sparklan_WUBR-508N .............................................................................. 134
10.3 GNU General Public Licence ..................................................................... 135
10.4 GNU Lesser General Public Licence ......................................................... 140
10.5 License Agreement for Python................................................................... 146
10.6 LICENSE ISSUES ..................................................................................... 152
6 / 155 61989850142 en-US
Page 7

Operating instructions K-Class Flex KF II About these instructions
1
1 About these instructions
Read the operating instructions carefully before connecting and switching on the device so
that you can make most of the device's quality and possible applications.
These operating instructions explain how to operate and set the device.
The standard device version includes the most suitable Bizerba PowerScale software. The
device may optionally contain software from another manufacturer. In this case, Bizerba's
RIK software (RIK = Retail Integrators Kit) is installed.
It also includes functions that are only required by Bizerba Service. Contact your Bizerba
specialist if necessary.
Bizerba products undergo continuous further development and are subject to different country-specific regulations. Examples of pictures and graphics included in these instructions may
vary from the version you have received.
1.1 Safe-keeping
These operating instructions are an integral part of the device and must be kept next to it,
easily accessible for all personnel.
When selling this device, these operating instructions have to be attached in their entirety.
1.2 Target group
The device must be operated by trained personnel only. This means that the operator has to
be familiar with the contents of these operating instructions.
Installation, maintenance and repairs must be performed by Bizerba authorized specialists
only.
1.3 Symbols used
Various symbols are used in these instructions.
Icon Description
Text with arrow prompts you to carry out an action.
A key symbol prompts you to press this key.
<Key> Text within <> refers to a key.
<Key> + <Key> Key combination. Press and hold first key, press second key.
"Display" Text within "" shows the display text.
Item number in figure.
Information
Additional information for better understanding.
61989850142 en-US 7 / 155
Page 8
About these instructions Operating instructions K-Class Flex KF II
Instructions
These instructions must be strictly observed.
Menu settings
Menu settings required for a function are marked in grey.
Menu setting
- Setting of the menu.
Select 2 2 1: Key sequence for selection of menu. Starting point is the main menu.
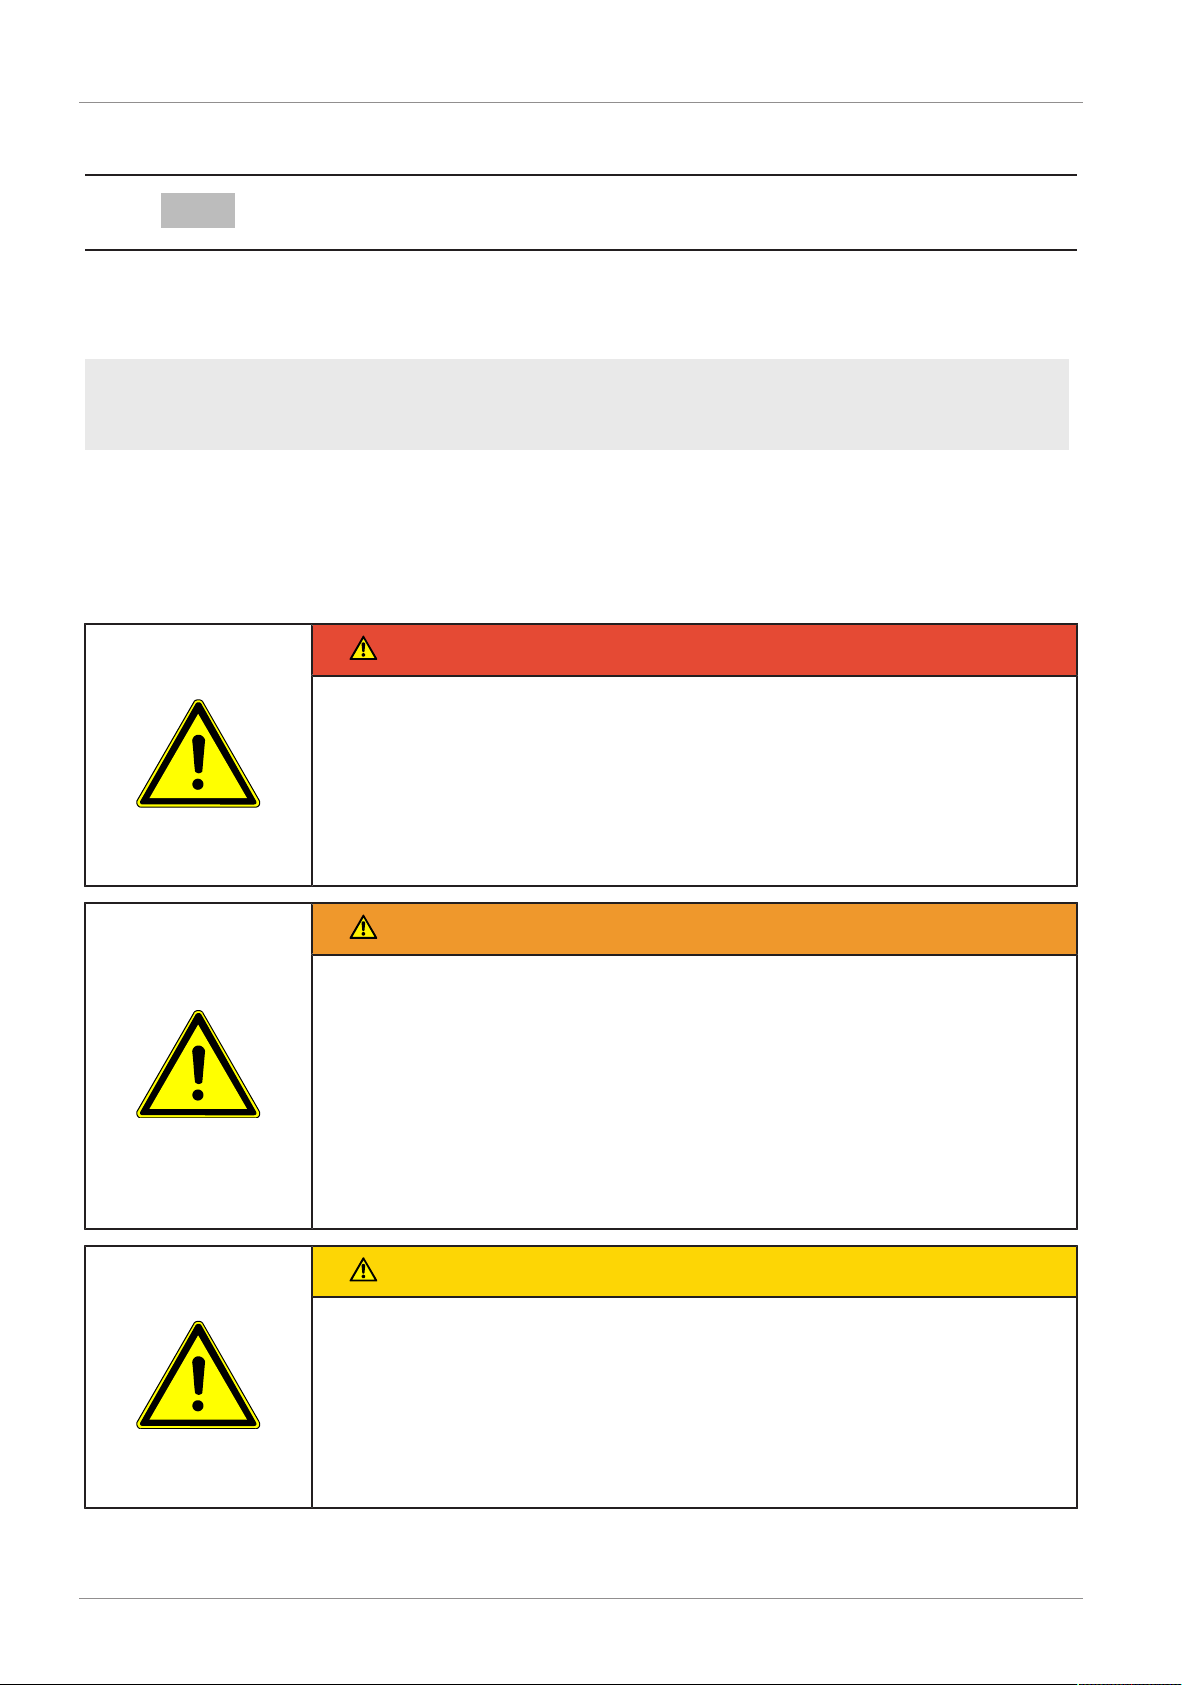
1.4 Warnings
Warnings are divided into danger levels by the signal word above the warning symbol.
Structure of warnings and meaning of signal words are described in these instructions as follows.
DANGER
Source of danger with high risk of imminent danger to persons!
The consequences are:
life threatening injuries,
serious health damage
– Measurements for prevention of danger are specified.
WARNING
Source of danger with medium risk of possible danger to persons!
The consequences can be:
serious injuries,
damage to health,
serious damage to property
– Measurements for prevention of danger are specified.
CAUTION
Source of danger with low risk of possible danger to persons!
The consequences can be:
injuries,
damage to property.
– Measurements for prevention of danger are specified.
8 / 155 61989850142 en-US
Page 9

Operating instructions K-Class Flex KF II About these instructions
NOTICE
Source of danger, improper use!
Damage to property can result.
– Measurements for prevention of danger are specified.
61989850142 en-US 9 / 155
Page 10

About the device Operating instructions K-Class Flex KF II
1
2
3
4
5
6
7
8
9
10
11
2 About the device
2.1 Overview of single components
Illustration1: Component overview
Displ.holder counter 180/200mm
Central unit
12.1" operator display with touch screen
Customer display 7" or 12.1"
VESA mounting system 500 mm with holder for customer display and swivel arm with
holder for operator display
Optional: Swivel arm for printer
Printer
– Ticket
– Label
– Linerless
– Ticket and label
– Ticket and Linerless
VSC 280 KF (slicer with scale)
GSP H Flex (slicer with scale)
Compact printer 2" L compact
– Ticket and Linerless printer
– Connecting cable = P-USB
– Easy Load function for easy paper roll change
Epson TM-T70
3" ticket printer
KScalePad
Scale to be integrated in counter
10 / 155 61989850142 en-US
Page 11
Operating instructions K-Class Flex KF II About the device
12
13
14
1
2
3
4
5
6
7
8
Load receptor KF
Load receptor of type 18 A
Cash register drawer
2.2 Accessories
Bizerba offers a wide range of accessories for this device. For further information, please
contact your Bizerba specialist.
2.3 Intended use
The K-Class Flex scales are modular, system-capable devices. They can be configured individually for different applications.
The main applications are:
– Assisted sales as retail scale. Optional with cash register function.
– Assisted sales for POS terminal for counter sales. Optional with scale
– Information terminal. Optional with printer.
– Price labeling
Only use the device in accordance with intended use.
2.4 Identification plates
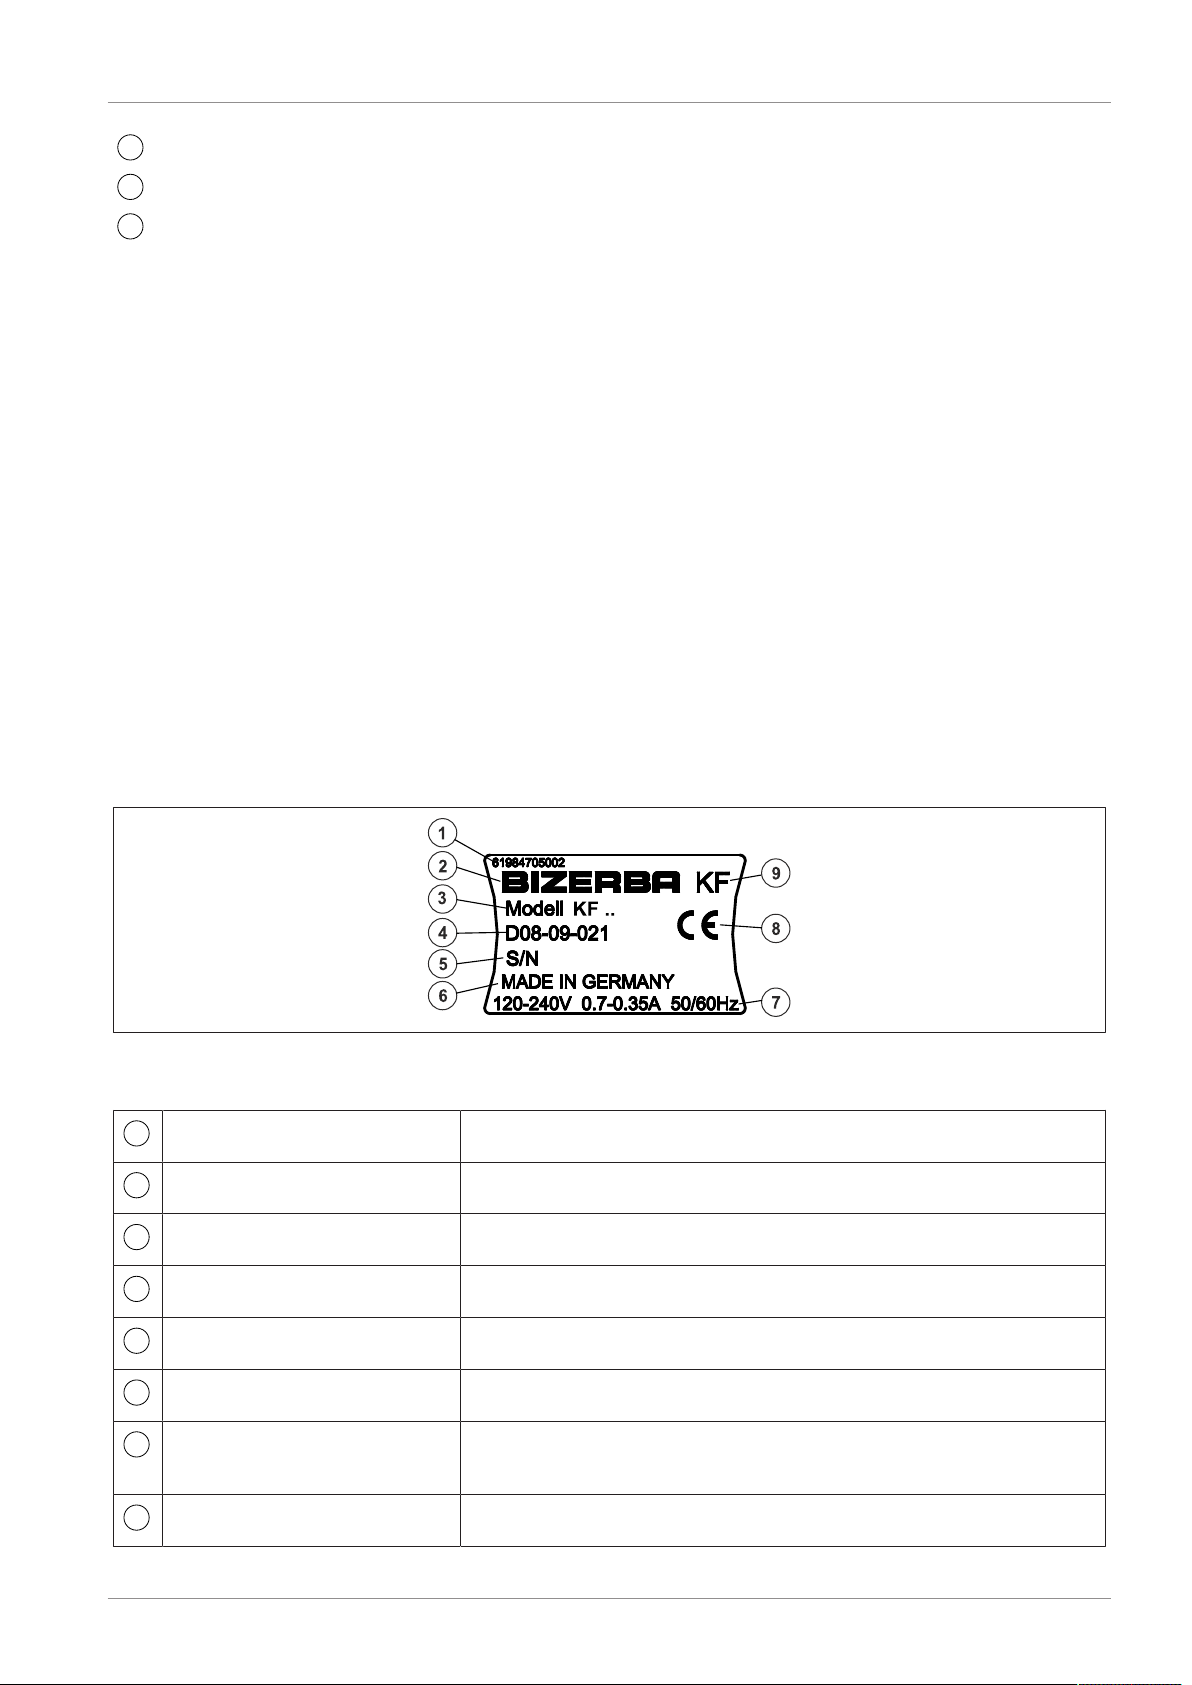
Identification plate at central unit
Illustration2: Example (Germany)
Explanation of individual inscriptions:
61984705002 Identification plate no.
Bizerba Manufacturer
Model Type Designation
D08-09-021 No. of EC type approval
S/N Device number
Made in Germany Country of manufacture
120-240 V 0.7-0.35 A
Electrical data
50/60 Hz
CE CE marking
61989850142 en-US 11 / 155
Page 12
About the device Operating instructions K-Class Flex KF II
9
1
2
3
4
5
6
1
2
3
4
KF Device type
Identification plate at single components
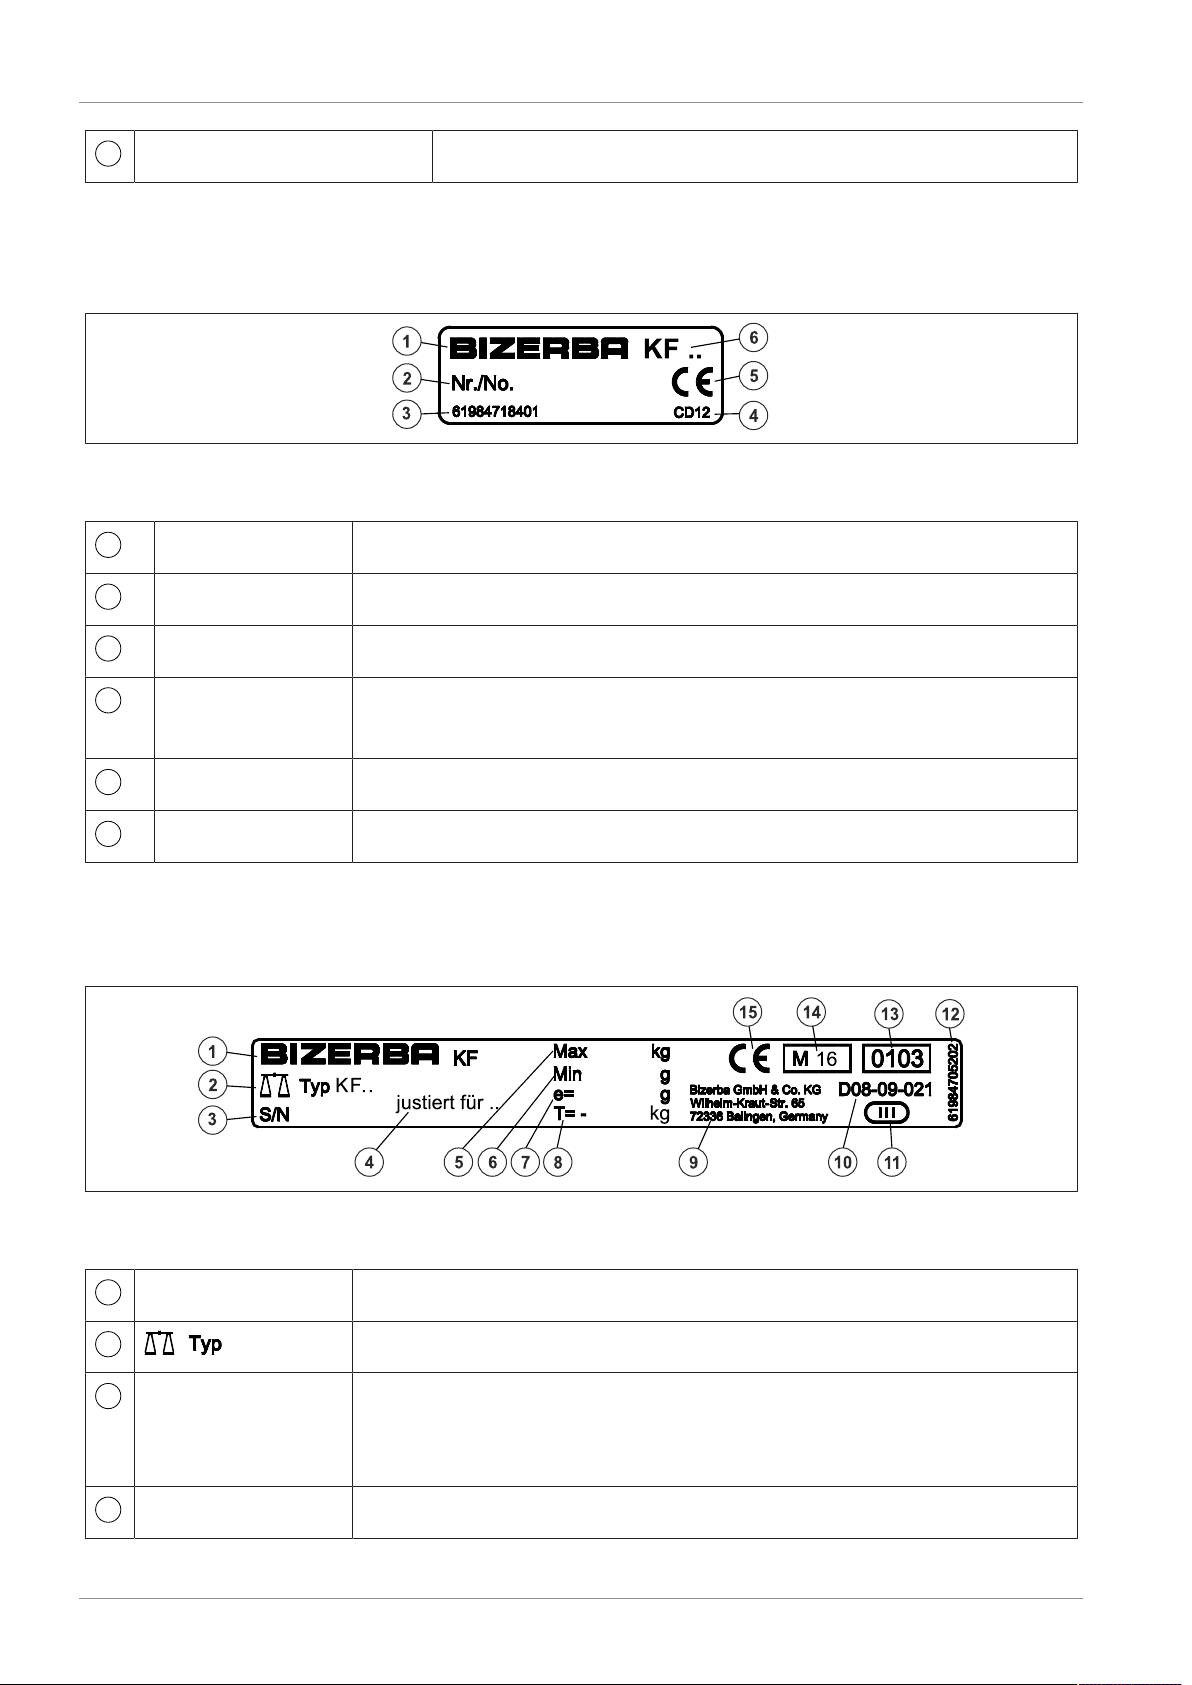
The following identification plate has been attached to the operator display, customer display
and printer.
Illustration3: Example (Germany)
Explanation of individual inscriptions:
Bizerba Manufacturer
Nr./No. Device number
61984718401 Identification plate no.
OD12, CD12 OD = Operator display, CD = customer display,
12 = Display size 12”
CE CE marking
KF .. Type description (basic type).
2.4.1 Identification plate on load receptor KF II
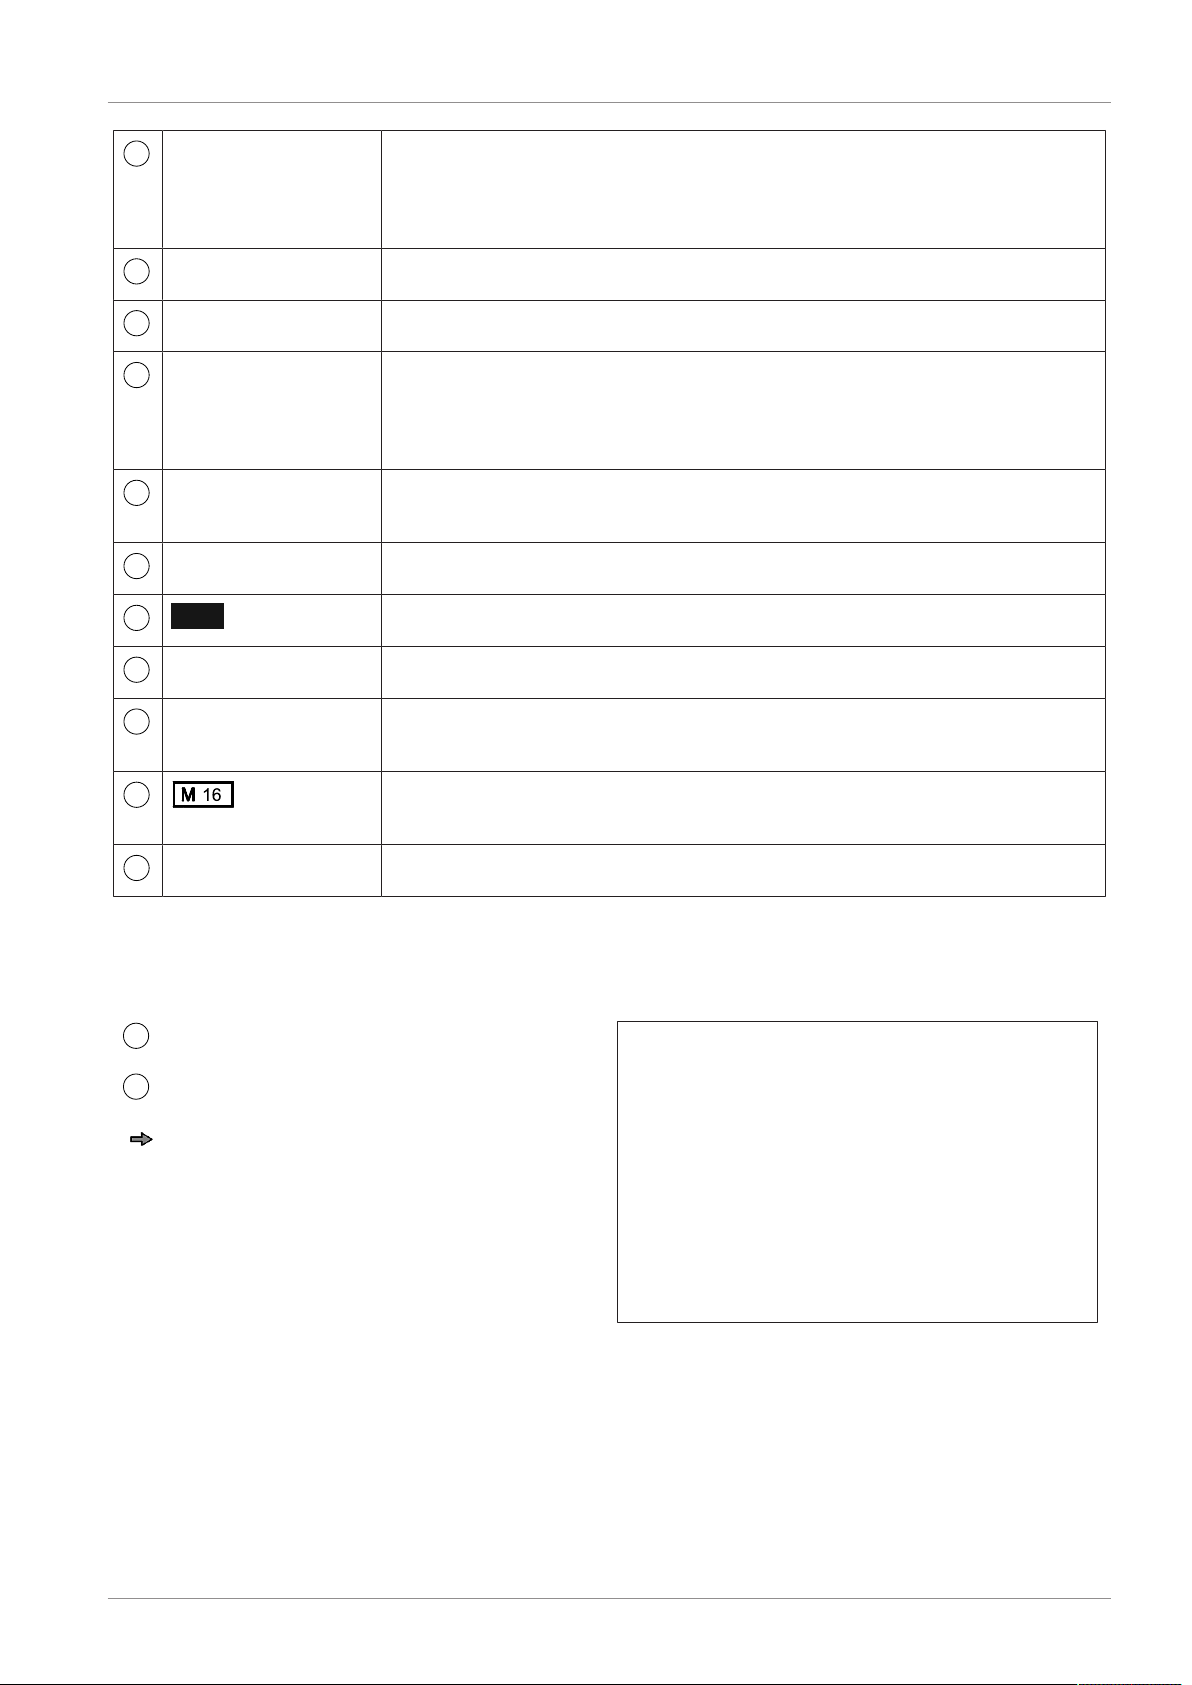
Identification plate at verified load receptor in combination with POS terminal (EC type approval).
Illustration4: Example (Germany)
Explanations of the individual labels:
BIZERBA Manufacturer
Scale type
S/N Device number
The device no. must be identical with the device no. of the central
unit or a load receptor was subsequently connected [}15].
adjusted for Stating verification zone
12 / 155 61989850142 en-US
Page 13
Operating instructions K-Class Flex KF II About the device
5
6
7
8
9
10
11
12
13
14
15
1
2
Max 6/15 kg Maximum load
0-6 kg first interval range
6-15 kg second interval range
Min 40 g Minimum load 40 g
e = 2/5 g Verification value e, 0-6 kg = 2 g / 6-15 kg = 5 g
T= -6/15 kg Subtractive maximum tare load
0-6 kg for preset tare value
0-15 kg for tare weighing
Bizerba GmbH &
Manufacturer's address
Co. KG
D08-09-021 No. of EC type approval
Scale accuracy class III
61984705202 Identification plate no.
0103 Identification number of the appointed body "Verification Manage-
ment - Stuttgart".
Metrology mark with the last two digits of the year when the CE
marking was attached
CE CE marking
Remove load platter
Position of identification plate
Load platter
Identification plate
Remove load platter.
Illustration5: Remove load platter
2.4.2 Identification plate on load receptor type 18 A
Identification plate at verified load receptor in combination with POS terminal (EC type approval).
61989850142 en-US 13 / 155
Page 14
About the device Operating instructions K-Class Flex KF II
1
2
3
4
5
6
7
8
9
10
11
12
13
14
15
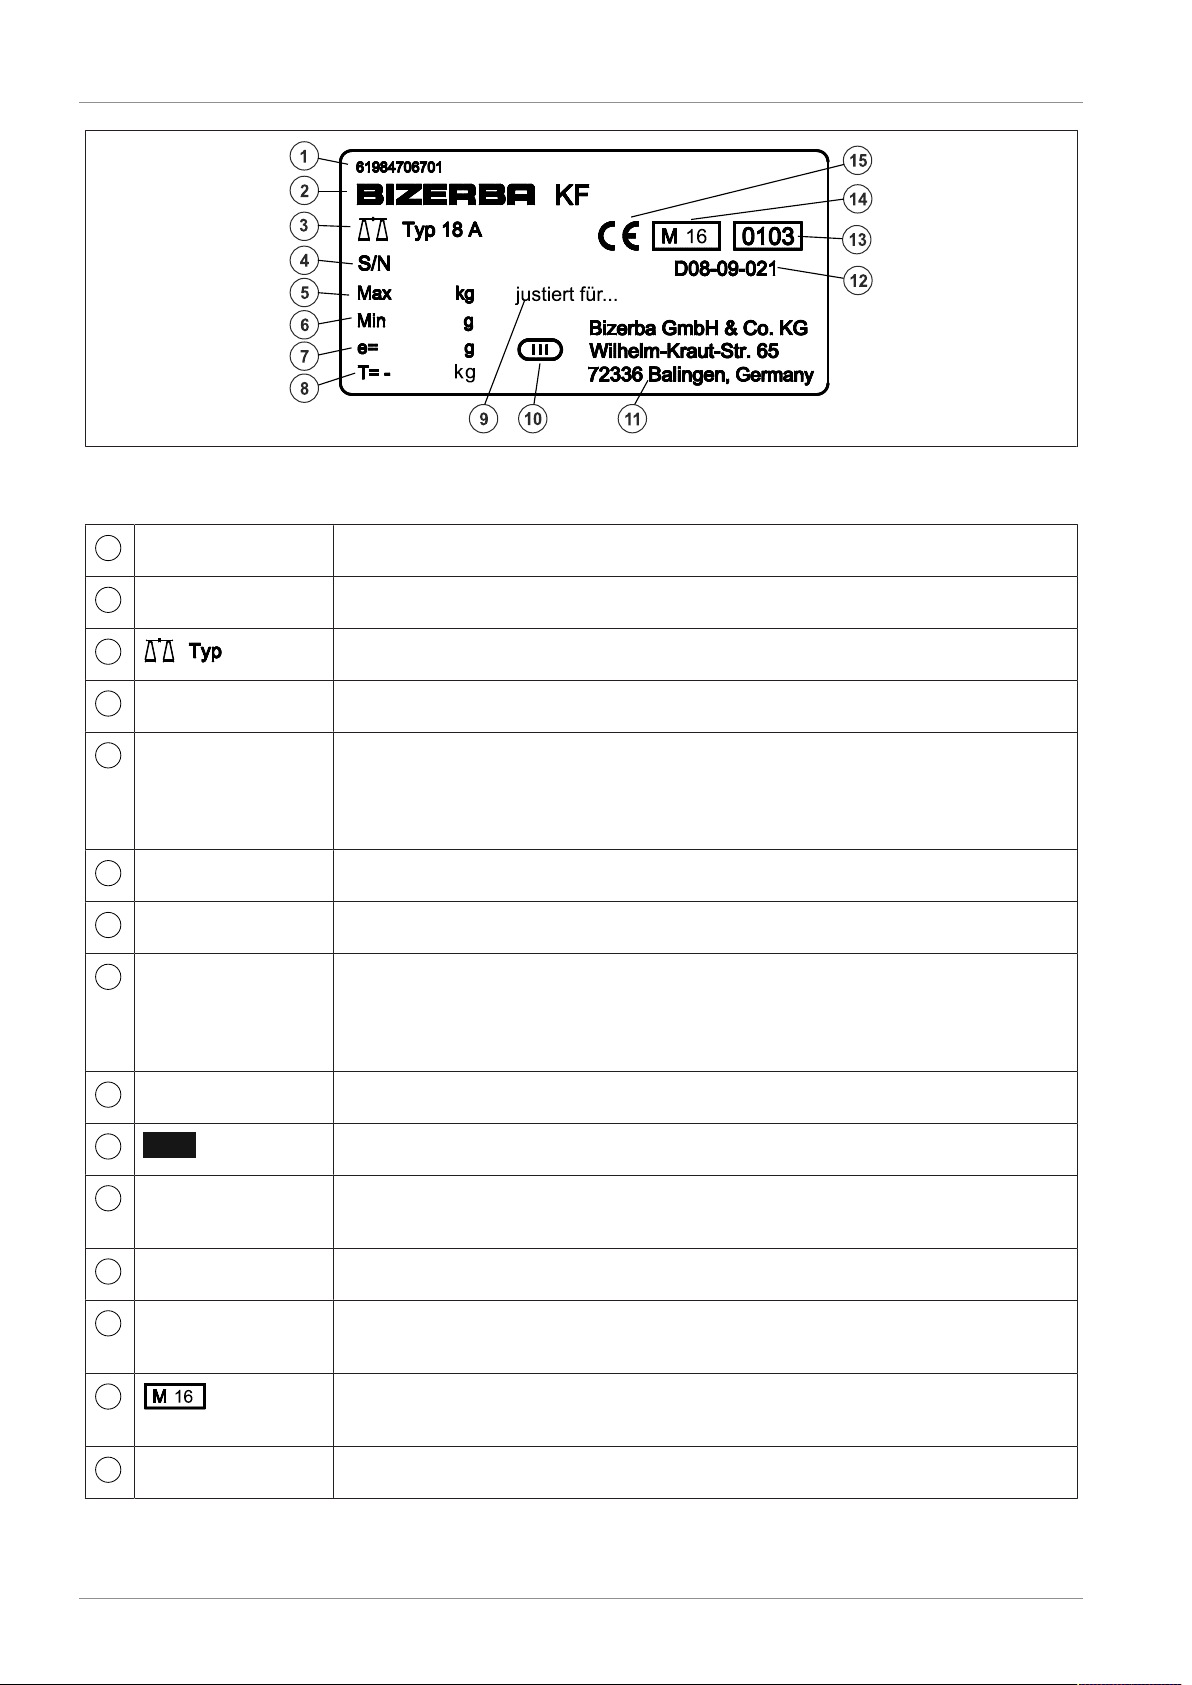
Illustration6: Example (Germany)
Explanations of the individual labels:
61984706701 Identification plate no.
Bizerba Manufacturer
Scale type
S/N Device number
Max 6/15 kg Maximum load
0-6 kg first interval range
6-15 kg second interval range
Min 40 g Minimum load 40 g
e = 2/5 g Verification value e, 0-6 kg = 2 g / 6-15 kg = 5 g
T= -6/15 kg Subtractive maximum tare load
0-6 kg for preset tare value
0-15 kg for tare weighing
verified for... Stating verification zone
Scale accuracy class III
Bizerba GmbH &
Manufacturer's address
Co. KG
D08-09-021 No. of EC type approval
0103 Identification number of the appointed body "Verification Manage-
ment - Stuttgart".
Metrology mark with the last two digits of the year when the CE
marking was attached
CE CE marking
14 / 155 61989850142 en-US
Page 15
Operating instructions K-Class Flex KF II About the device
1
2
3
4
5
6
7
8
9
10
11
12
13
14
2.4.3 Data plate on VSC 280 KF
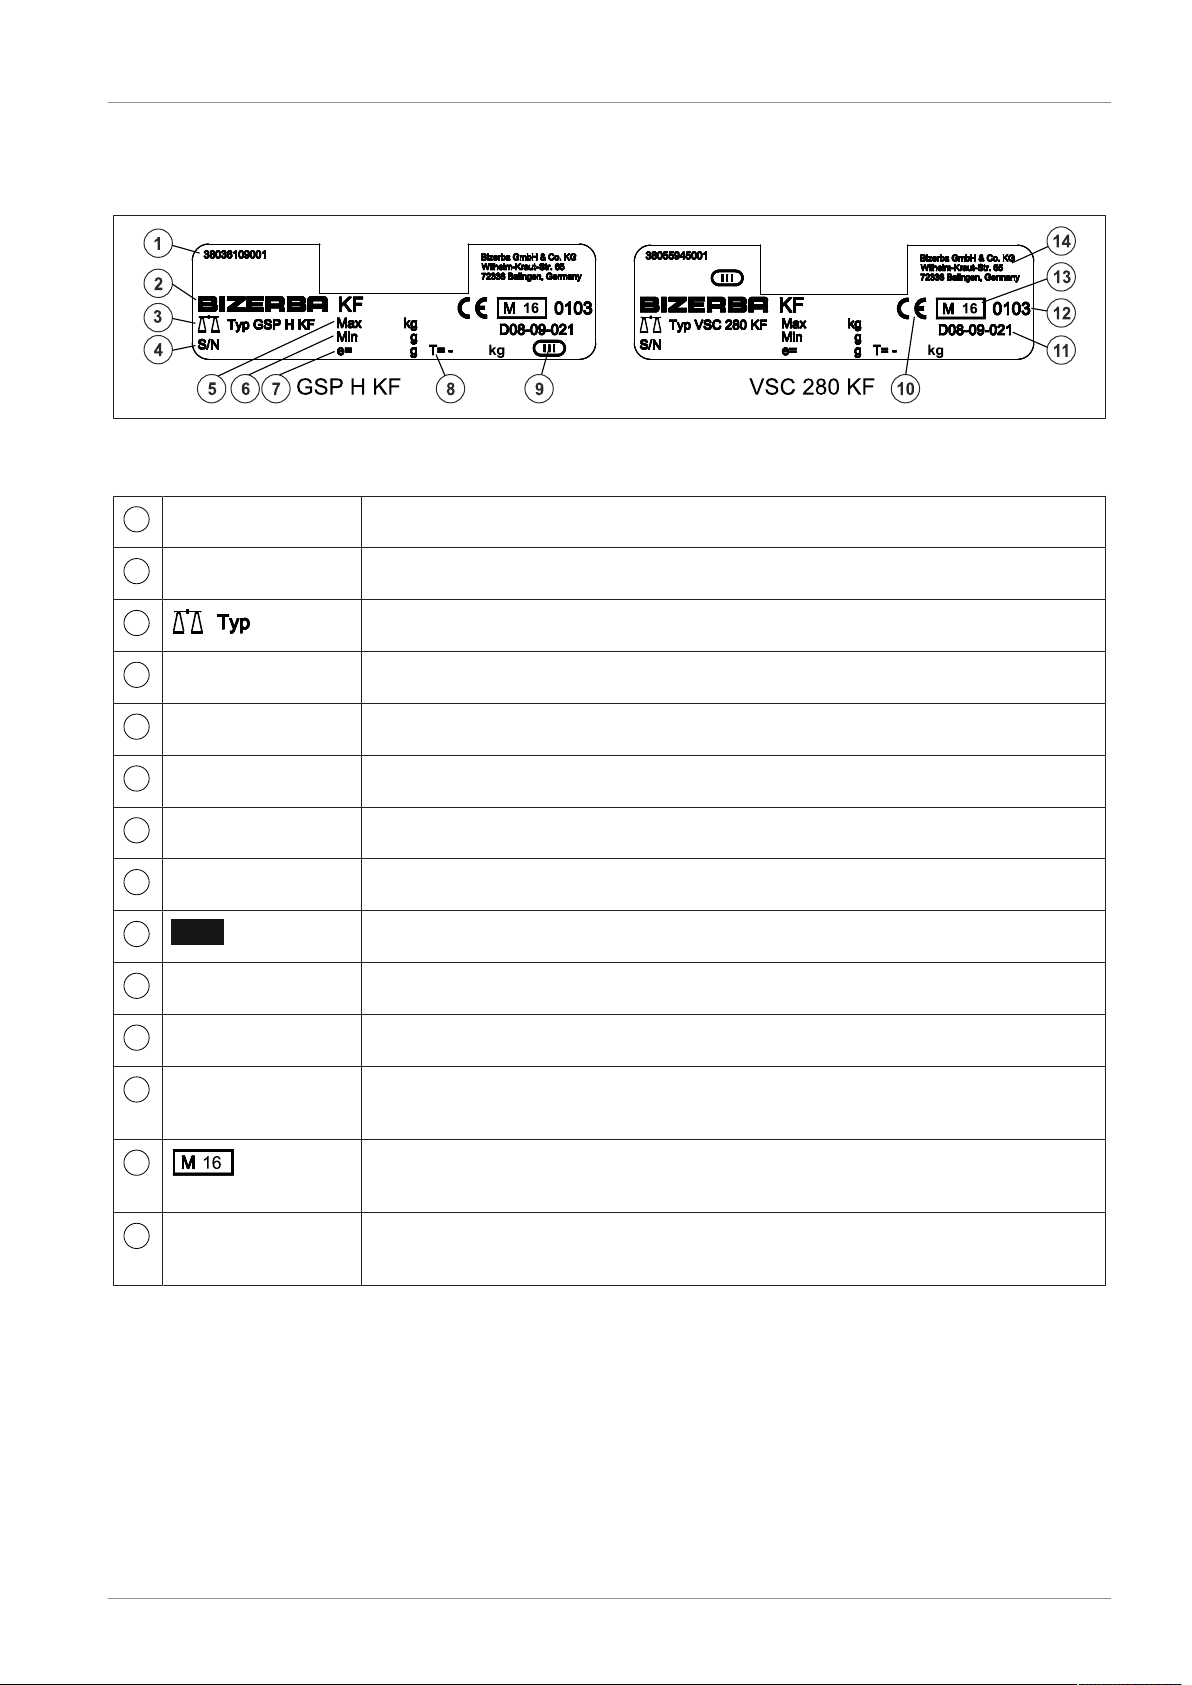
Data plate attached to verified load receptor of slicer VSC 280 KF (EC type approval).
Illustration7: Example
Explanations of the individual labels:
38036109001 Identification plate no.
BIZERBA Manufacturer
Scale type
S/N Device number
Max kg Maximum load
Min 40 g Minimum load 40 g
e = g Verification scale interval, (e.g. e= 2g)
T=kg Subtractive maximum tare load
Scale accuracy class III
CE CE marking
D08-09-021 No. of EC type approval
0103 Identification number of the appointed body "Verification Manage-
ment - Stuttgart".
Metrology mark with the last two digits of the year when the CE
marking was attached
Bizerba GmbH &
Manufacturer's address
Co. KG
2.4.4 Connecting load receptor at a later point of time
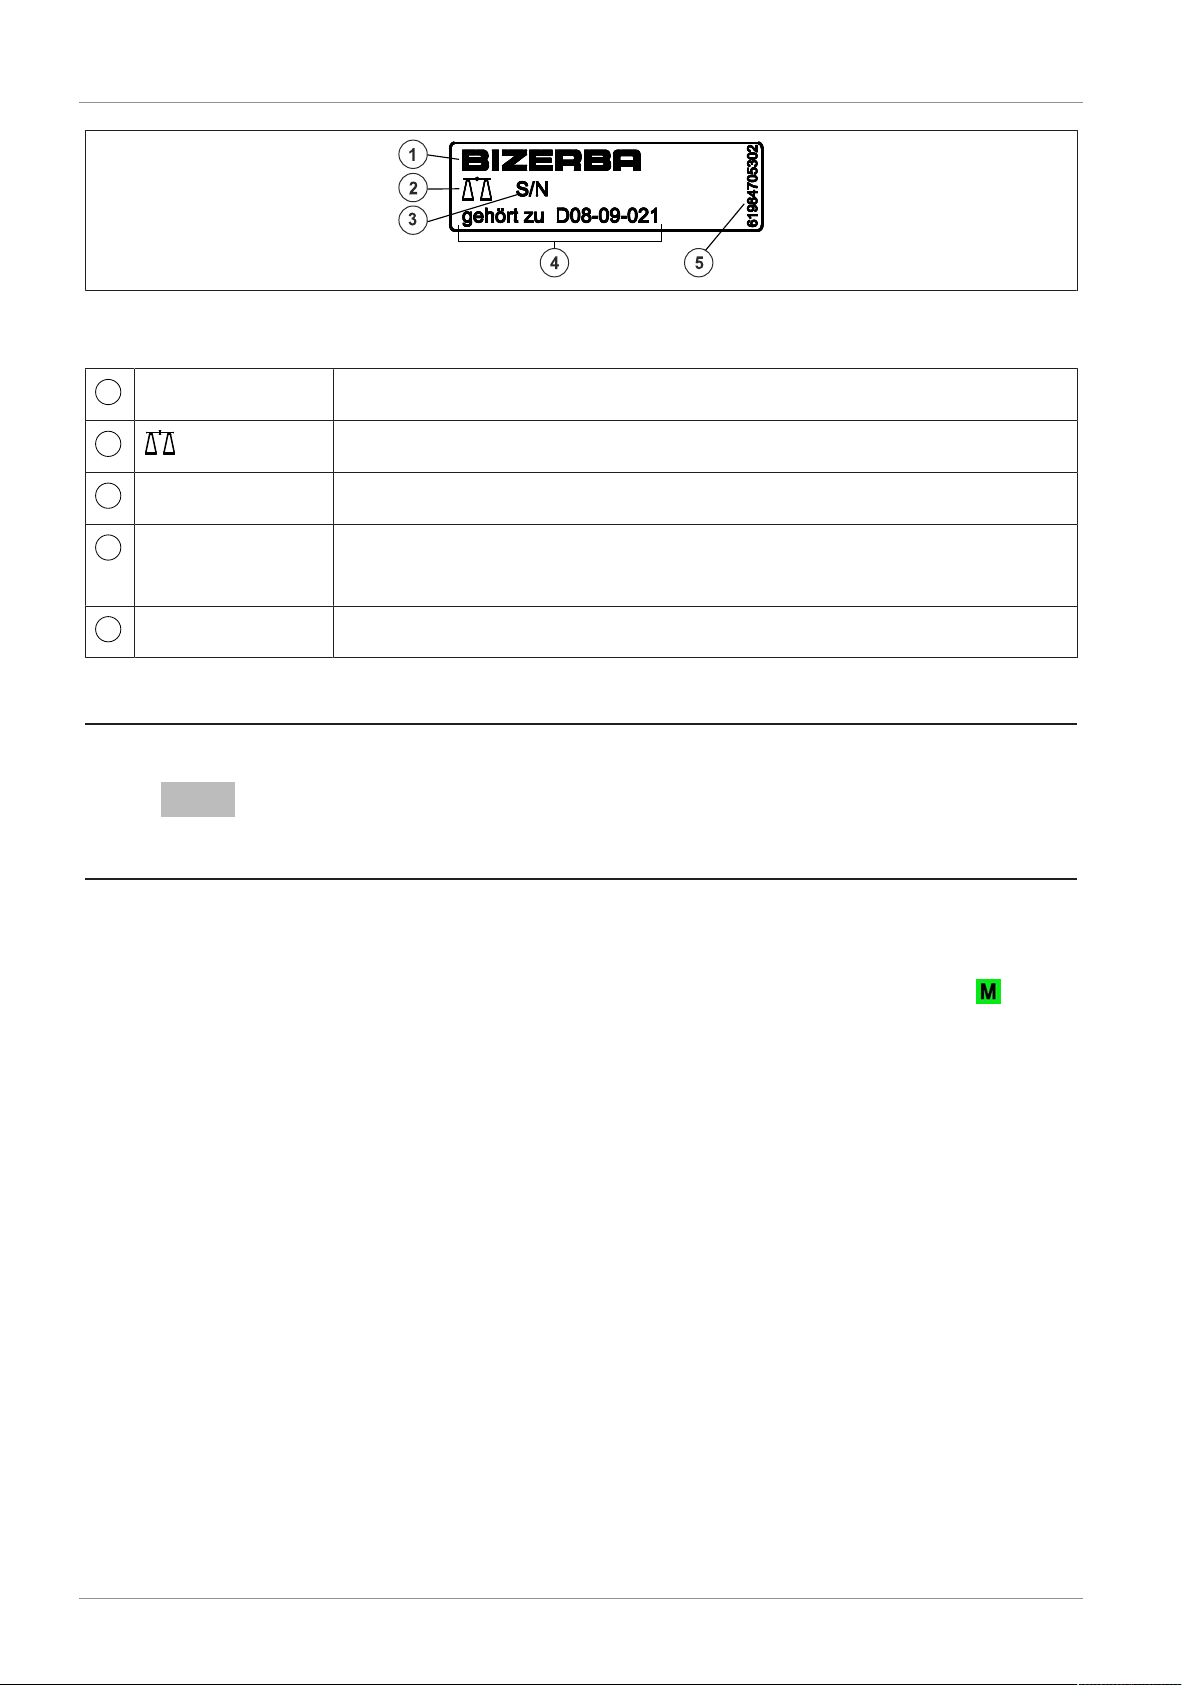
If the load receptor is connected later, the following identification plate must be affixed to the
front of the central unit beside the push button and type plate.
The load receptor comes with the identification plate.
61989850142 en-US 15 / 155
Page 16
About the device Operating instructions K-Class Flex KF II
1
2
3
4
5
Illustration8: Example (Germany)
Explanations of the individual labels:
Bizerba Manufacturer
Scale symbol
S/N Device number
belongs to
D08-09-021
belongs to
No. of EC type approval
61984705302 Identification plate no.
2.5 Verification information
Note related to scales being used in Germany.
If new or refurbished devices [...] are used, they need to be registered at the notified authority according to state law, at latest six
weeks after setting into operation.
Metrological notes for EU countries
The identification plate of the scale has a CE mark followed by the metrology mark (M + year
two-digital; framed) and the number of the notified body. Until 04/19/2016 the green
used as part of the metrology marking. Such a scale can be started up and operated on-site
provided that it is not connected to an auxiliary device which is subject to metrological approval.
Scales which are connected on site to an auxiliary device which is subject to metrological approval must undergo a conformity assessment or metrological approval. Only then, legal for
trade use is permissible.
was
Scales without metrology mark or control marks may not be used in legal for trade applications.
Scales calibrated for a certain gravity zone (specified on the scale) must not be used in other
zones.
As per legal requirements, the scale user must ensure that the scale is used for its intended
purpose. This includes the observance of legal requirements, especially in case of changes,
amendments and extensions.
16 / 155 61989850142 en-US
Page 17

Operating instructions K-Class Flex KF II About the device
1
2
3
4
Information on verification (early re-verification)
The verification of a scale is executed according to the respective statutory country regulations. The verification validity period for non-automatic scales (up to 3 tons), for example, is
generally 2 years in Germany. The verification validity starts as soon as the device is put on
the market.
When conformity assessment is carried out by Bizerba the scale is
sealed by means of control marks with marking "Gesichert
BIZERBA" on the control marking locations. Verifications must be
carried out by the operator of the scale according to the legal requirements.
Verification information for non-EU countries
The statutory regulations of the specific countries must be observed.
Customer ticket can be deactivated
The device offers the option of suppressing printout of the customer ticket. According to EC
regulation 2009/23/EC for scales, the customer is entitled to a receipt in order to check the
sales transactions in accordance with Appendix 1, No.14. Suppression of the customer ticket
should therefore only be activated if you are sure that there is no customer requirement for
printout of a customer ticket.
2.5.1 Software ID, logbook update
Software ID and update logbook are checked during verification by the approval official.
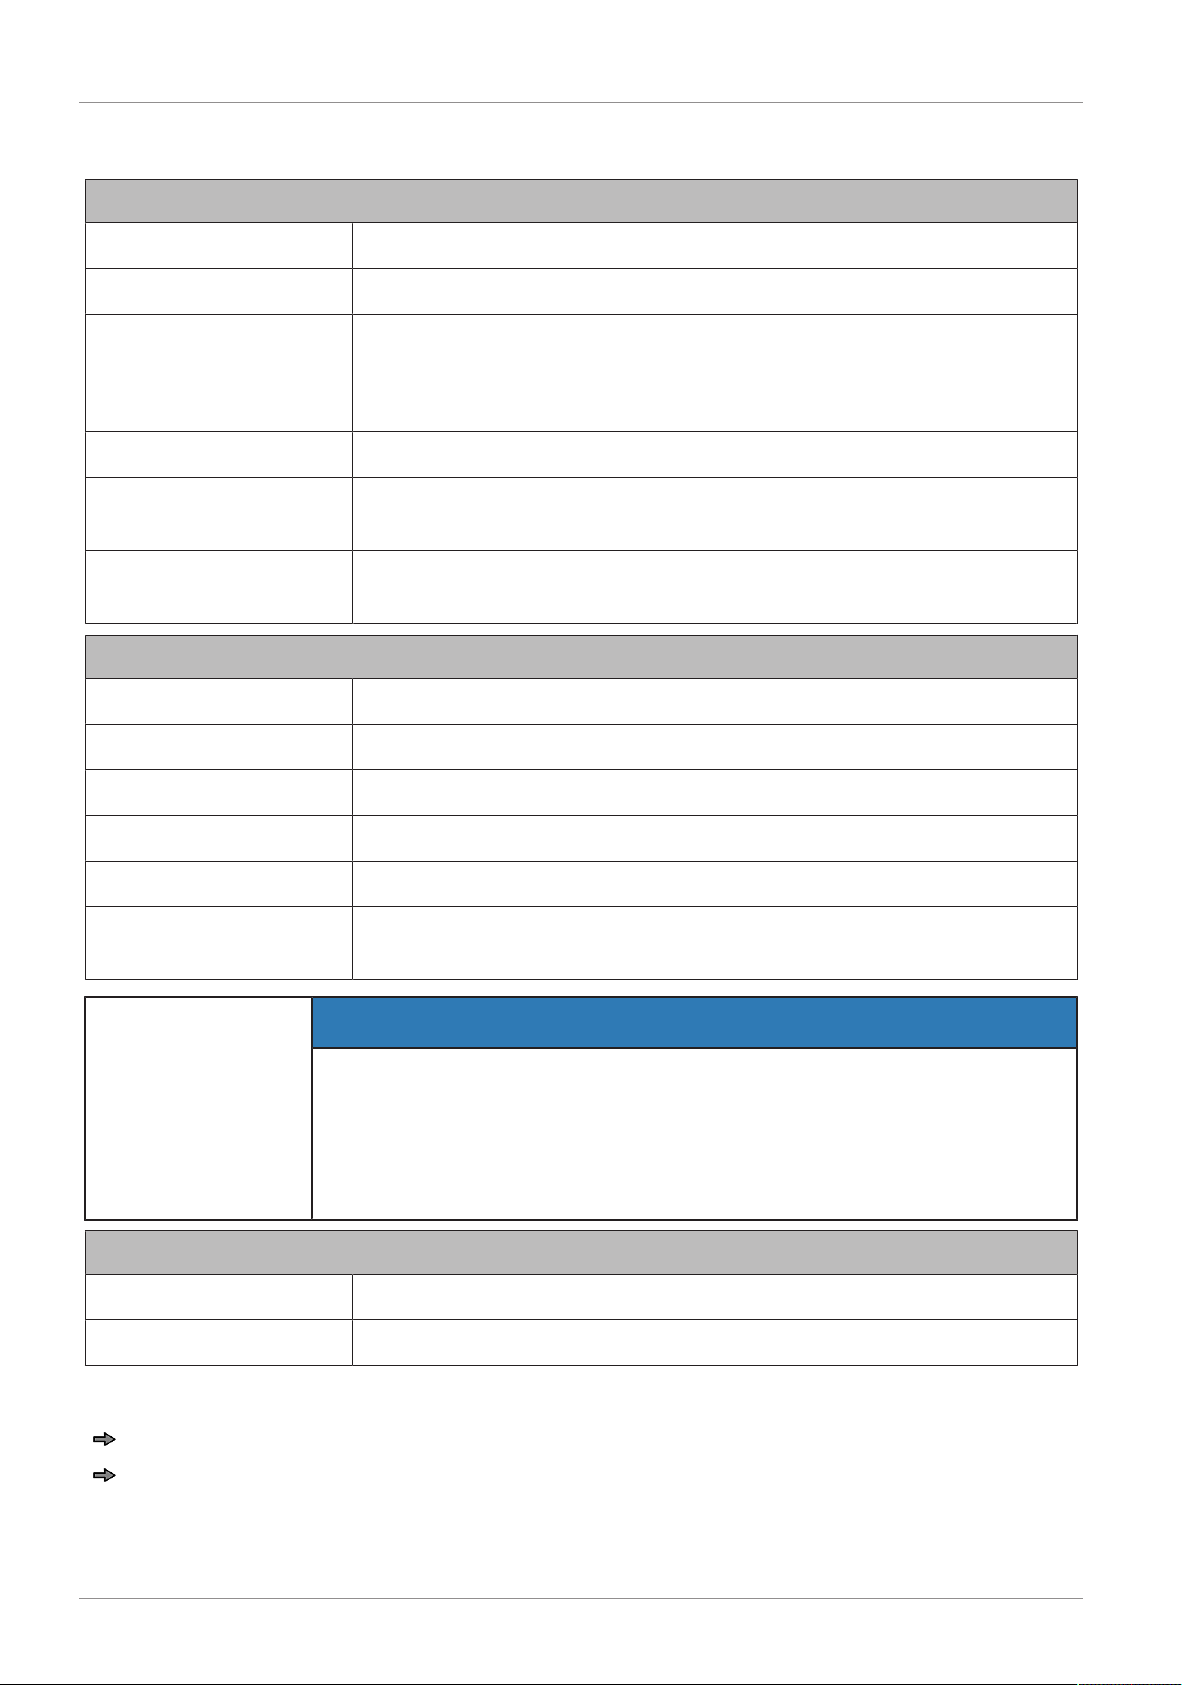
The software ID for the part of the software that requires verification is to be found in the current EC type approval.
Operating procedure
Keep the <Verification field> operating element held for at least 5 seconds.
Release operating element <Verification field>.
Certified software setup is displayed.
Example
The software ID is displayed
The content of the update logbook is displayed
.
Scroll through the update
logbook
,
.
.
Exit the update logbook
.
Illustration9: Example
61989850142 en-US 17 / 155
Page 18
About the device Operating instructions K-Class Flex KF II
2.6 Standards and directives
Measuring technology
2014/31/EC Scale directive "non-automatic scales"
EN 45501 Metrological aspects of non-automatic scales
OIML R76-1 OIML- recommendation for non-automatic scales
Organisation internationale de métrologie légale
Nonautomatic weighing instruments
WELMEC 2.3 Guideline for software testing
Handbook 44 Specifications, tolerances and other technical requirements for
weighing and measuring devices (USA)
Publication 14 Weighing devices, Checklist, Test procedures (USA) Weights and
Measures Act (Canada)
Electromagnetic compatibility
2014/30/EC EMC Directive
EN 61000-6-2 Immunity to interference for industrial areas
EN 55022 Interference emission for information technology equipment
EN 61000-3-2 Harmonic currents
EN 61000-3-3 Voltage fluctuations and flickers
GB 9254-1998 Information Technology Equipment - Radio Disturbance Charac-
teristics - Limits and Methods of Measurement
NOTICE
This is a set-up for class A.
This device can cause wireless interference in living areas.
– In this case, the operator can be demanded to take suitable mea-
sures.
Electrical safety
2014/35/EC Low voltage directive
EN60950-1 Information Technology Equipment - Safety
2.7 Operating conditions
Please note the operating conditions prior to start-up and during operation.
If you are in doubt concerning the practical application of these conditions, please contact
Bizerba or the responsible customer service.
18 / 155 61989850142 en-US
Page 19

Operating instructions K-Class Flex KF II About the device
For other manufacturers' equipment included in our scope of supply, the respective manufacturer's regulations take preference if they deviate from our conditions.
– Temperature and air humidity
The permitted values and protection type can be found on the identification plate on the
device and in the chapter Technical data.
– Installation surface
Make sure to install the device on a level surface in a dry place free of vibration and oscillation and protected from drafts.
Vibrations can affect measurements made by the scale.
– Aligning horizontally
To ensure the precision of the sale, it is of absolute necessity that the device is aligned
horizontally.
– Draft
Air drafts can affect the measurements made by the scale.
– Air convection
In order to prevent unacceptable heating, there must be free air convection around the device.
– supply voltage
The permitted values can be found on the designation plate on the device and in the
chapter on technical data.
– Trained personnel
Only trained personnel can maximize the performance of the device and avoid risks.
– Written consent for modifications
Changes to the devices require prior written consent of Bizerba. External data dialog between Bizerba equipment and third-party equipment, required hardware and software as
well as test and modification work must be clarified with Bizerba in writing.
2.7.1 Power supply
The installation of the power supply for connecting to Bizerba devices must be carried out in
accordance with the international specifications and the regulations derived from them.
These essentially include the recommendations of at least one of the following commissions:
– NEC (UL)
– International Electro-technical Commission (IEC)
– European Committee for Electro-technical Standardization (CENELEC)
– German Association for Electrical, Electronic and Information Technologies (VDE)
Bizerba devices must be connected to a protective conductor.
Interference suppression
If the mains power supply is subject to electric interference, interference suppression measures must be taken on site, e.g.:
– provision of separate mains line to our devices.
– In case of problems, insertion of capacitively decoupled isolating transformers or other
suppressors into the mains supply lines to Bizerba device.
61989850142 en-US 19 / 155
Page 20

About the device Operating instructions K-Class Flex KF II
2.7.2 Wireless LAN device network
Wireless LAN is a wireless network solution, that enables electronic devices to be networked
together without wiring.
The rules on the respective general allocation of frequencies must be observed.
The following instructions must be absolutely observed!
– When wireless networks are deployed, (including those supplied
by Bizerba and those not supplied by Bizerba), the required
transmission power set and frequency channels at Federal state
level must be strictly observed.
– Only wireless hardware is permitted in wireless networks that has
been released for use by the manufacturer in the country in which
it is to be deployed.
– If third parties access the network or wireless network, or if the
network is combined with foreign hardware, Bizerba is not liable
for any damages that result.
2.8 Warranty
Installation, start-up and initial training are carried out by trained staff of the Bizerba sales offices, customer service locations or by companies commissioned by Bizerba.
Bizerba is not responsible for damages caused by:
– non-observance of operating conditions and operating instructions.
– defective electrical installation by the customer.
– structural changes to the devices.
– removal of verification seals and safety stamp marks.
– incorrect programming and operation.
– natural wear and tear.
The warranty will lapse, if:
– defects/damages occur as a result of interventions by persons not authorized by Bizerba.
– any spare parts or operating material other than original Bizerba ones are used.
– any thermal ticket rolls and labels other than original Bizerba ones are used.
– Labels and thermal ticket rolls are used, which have not been manufactured to Bizerba
specification or approved by Bizerba.
If you reset or program devices, check the new setting with a test run and test printout. This
helps to avoid incorrect results.
Only trained staff may operate the devices.
Check that Bizerba products are handled correctly and repeat training if necessary.
Bizerba products undergo continuous further development and are subject to different country-specific regulations. Examples of pictures and graphics contained in these operating instructions may vary from the version which you received.
20 / 155 61989850142 en-US
Page 21
Operating instructions K-Class Flex KF II About the device
2.9 Virus protection
The supplied device provides the option of installing software. As with any computer, there is
therefore a fundamental risk of attack by computer viruses or other malicious software.
For your own safety your computer should therefore be regularly checked for computer
viruses and other malicious software with an up-to-date anti-virus program, particularly after
installing software.
2.10 Software modules
The device is equipped with basic software. The device is also equipped with the purchased
software modules.
Demo license
The device is enabled with all software modules included in the program version for a specific
period of time allowing customers to use all software modules without restrictions for a predefined time.
This gives the customer the opportunity to test software modules that he has not purchased.
The customer can purchase these additional software modules at any time.
Software modules that are purchased subsequently require special activation.
If the additional software modules are not released, you can no longer use them once a specific time period has expired.
The additional software modules are provided exclusively for demonstration purposes. There
is no entitlement to free provision after expiry of the set time period.
Please contact your technical consultant or the Bizerba customer service at any time for further information.
2.11 Disposal of devices/environmental protection
Only valid for Germany!
The application of the disposal regulations is based on legal
regulations of the respective country.
This device contains batteries which fall under the Batteries Act for the return and disposal of
used batteries and accumulators.
This ordinance requires you, as the end user, to return the device to the manufacturer or
dealer, at the end of its proper use, for the purposes of recycling and correct disposal.
Bizerba and its dealers are naturally willing to take back these defunct old devices.
Please contact your specialist in these cases.
If your device contains a rechargeable battery, you are required by the Battery Ordinance to
return the used battery to the dealer or the public return points provided for this purpose.
Naturally, Bizerba and its dealers will also take back the used batteries.
CAUTION
Risk of explosion if batteries are not replaced properly.
Please follow the manufacturer's instructions when disposing
of used batteries.
61989850142 en-US 21 / 155
Page 22

About the device Operating instructions K-Class Flex KF II
2.12 Third-party software
The software provided by Bizerba may also include further software and software components (third-party software) which are subject to special license conditions. This can be especially software from Open-Source-Communities. The third-party software may only be used in
accordance with the respective license conditions listed. The license conditions by Bizerba
do not apply to third-party software insofar as they contradict the respective valid license conditions of third-party software.
If the special license conditions of the third-party software, especially GNU General Public License and the GNU Lesser Public License authorize the license holder to maintain the
source code of the third-party software and if this source code is not included in the software
supported by Bizerba, the following applies:
The machine-readable source code of this third software needs to be purchased by Bizerba
GmbH & CO. KG, Wilhelm-Kraut-str. 65, 72336 Balingen, Germany for the duration of at
least (3) years upon delivery of third software at a primary cost of € 10.00 + respective valid
VAT and delivery costs. The source code will be transmitted according to the respective license conditions of the third-party software. The source code is supplied on a standard data
carrier by Bizerba GmbH & CO. KG.
The license texts of the GNU General Public Licence (GPL) version 2 and the GNU Lesser
General Public Licence (LGPL) Version 2.1 are printed in the annex.
2.13 Connecting a UPOS conform printer
An application software that supports the UPOS conform printer
must be installed on the device.
It is possible to connect a UPOS conform printer that was checked and approved by Bizerba.
Please contact your technical consultant or Bizerba at any time for further information.
22 / 155 61989850142 en-US
Page 23
Operating instructions K-Class Flex KF II Safety instructions
3 Safety instructions
The safety instructions must be observed throughout the installation, operation, cleaning and
maintenance procedures.
3.1 Requirements for operating personnel
The device must only be operated by personnel trained in the operation of this equipment.
The operating personnel must read and understand the safety instructions in these operating
instructions.
Please pay special attention to and memorize all safety and hazard information! Carry out
regular training!
Operators (purchasers) as well as supervisory and operating staff must carry out programming and data protection on Bizerba systems and devices exclusively in accordance with the
Bizerba operating and programming instructions.
Only use equipment for its intended purpose.
3.2 Plates on the device
Plate Description
Pull power plug before moving the machine.
Warning: Cut injuries on finger.
Beware of hazardous electric charge.
3.3 System-related sources of hazards
Shut down equipment immediately in the event of recurring faults,
damage of any type, and suspicion of risk of injury.
Inform Bizerba Service.
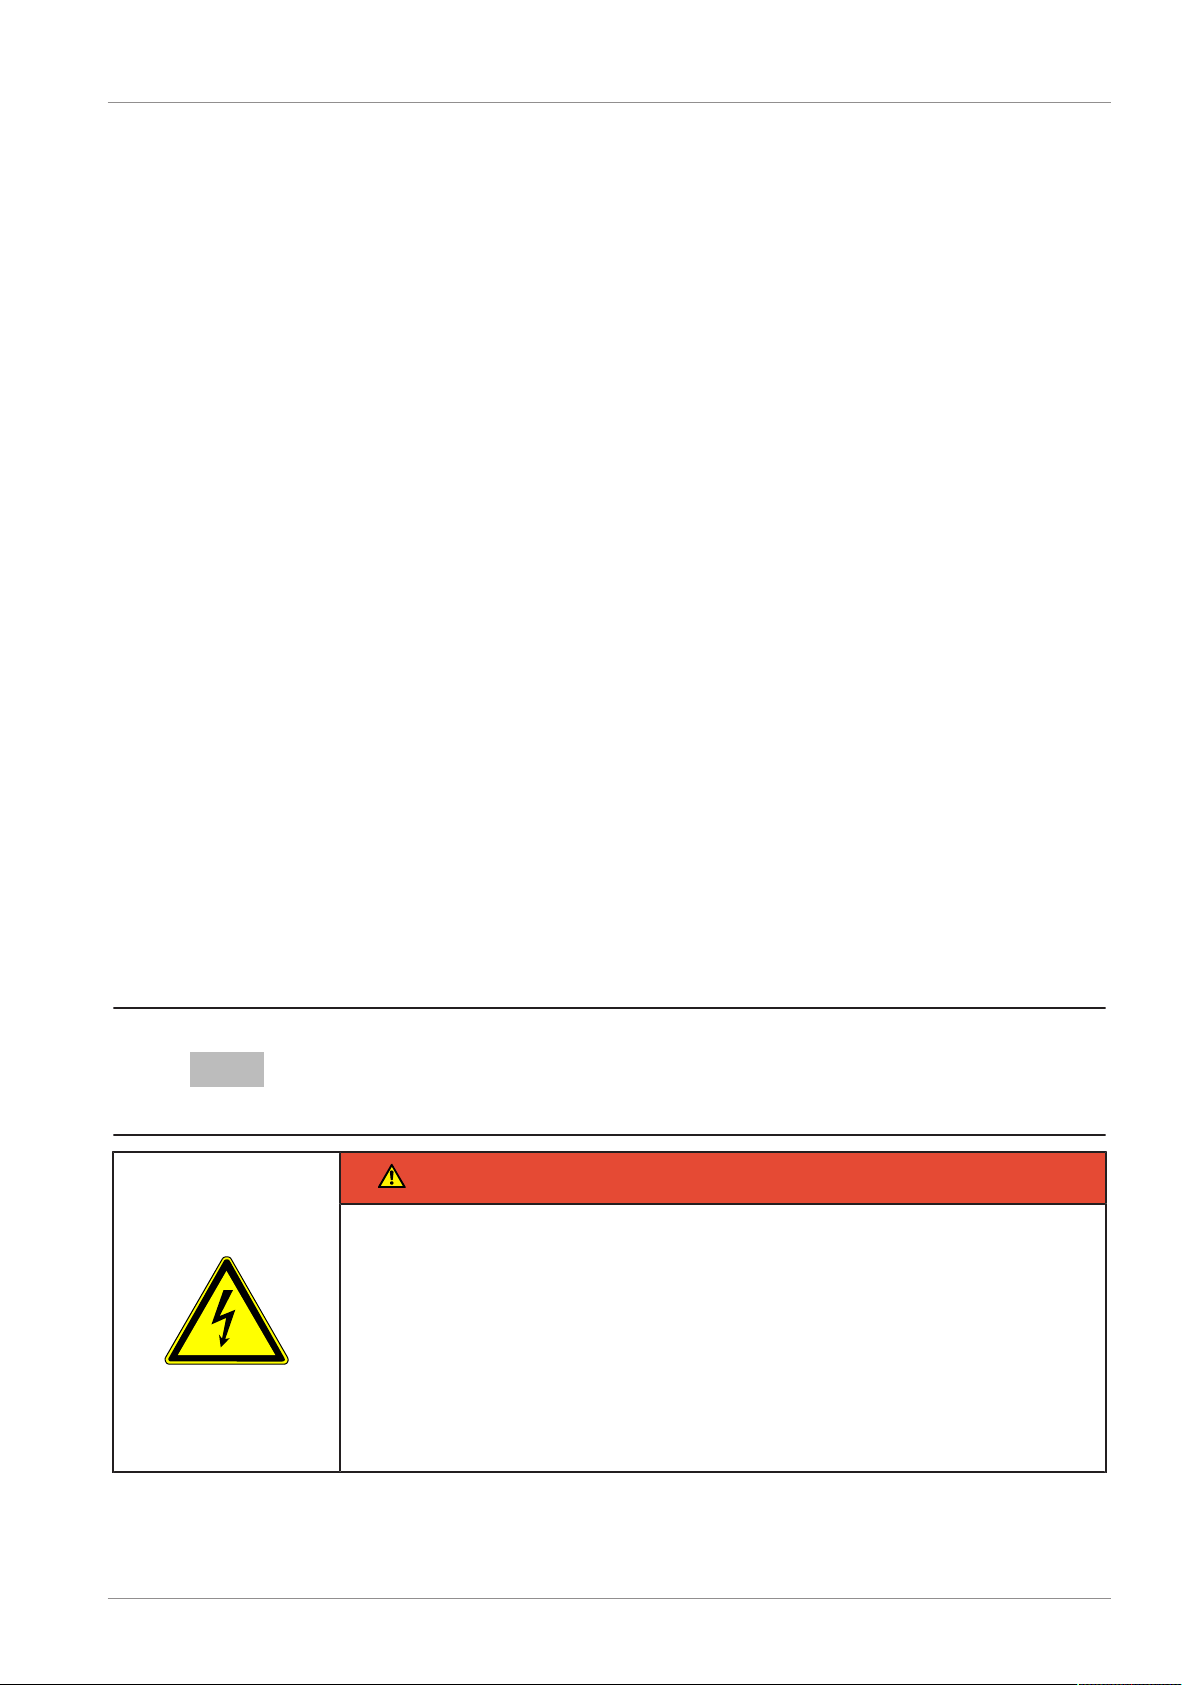
DANGER
Supply voltage present when device is open, even if main
switch is switched off!
The consequences can be:
Danger of death from electric shock due to touching live components.
– Pull out power plug.
– Only qualified personnel may open the device.
61989850142 en-US 23 / 155
Page 24
Installation Operating instructions K-Class Flex KF II
4 Installation
4.1 Transport and storage
Always transport and store the device in its original packaging.
4.2 Installation and assembly
The ambient temperature of the device must not exceed 40 °C / 104
°F. Make sure that there is sufficient ventilation.
Operating conditions [}18]
4.3 Mains supply
The mains plug must be accessible at any time.
WARNING
Incorrect supply voltage!
The consequences can be:
Destruction of electric components.
Fire hazard
– Compare the data of the supply voltage with the specifications on
the device identification plate.
– Do not connect the device to the electric mains if the data of the
supply voltage do not match the connection values of the device.
– Inform Bizerba Customer Service
NOTICE
Interference resistance
– To avoid interference, all components (CPU box, 15" monitor,
EPSON printer) have to be connected to the same socket.
– If you require more sockets, a Y splitter cable can be ordered
from the Service department.
4.4 VESA mounting system 500 mm
When routing the connecting cable make sure that no crushing and
shearing points occur when moving the single components.
24 / 155 61989850142 en-US
Page 25
Operating instructions K-Class Flex KF II Installation
1
1
The VESA mounting system 500 mm is designed for mounting operator display, customer
display and printer in the counter and cash register area.
The VESA mounting system 500 mm can be equipped with different swivel arms for fastening
single components.
The mounting system comes with fastening screws for the single components and a template
for drilling holes.
Drill the holes by means of the template.
Fasten the mounting system using 4
screws
, washers 2 and nuts 3 M6.
Illustration10: VESA mounting system,
drilling holes
Example
4.5 Setting adjusting force of holder
The adjusting force for tilting the holders can be set by loosing or tightening the adjustment
screws.
Perfect torque for adjustment screws: 5 Nm
Example
Adjusting screws
Illustration12: Adjusting screws
4.6 Connection cable
Only use original connection cables by Bizerba.
61989850142 en-US 25 / 155
Page 26
Installation Operating instructions K-Class Flex KF II
1
NOTICE
Do not kink connection cable!
The consequences can be:
Defective connection cable
– Lay connection cable without kinks.
– Defective connection cables have to be replaced immediately.
NOTICE
Do not insert or remove the connection cable when the device
is switched on!
The consequences can be:
Interface or peripheral device defect or malfunctioning.
– Switch off the device and separate from mains before the con-
nection cables are inserted or removed.
Marking connecting cable
Mark the following connecting cables with clips:
– HDMI cable for operator display with 1
– RJ45 cable for operator display with 1
– HDMI cable for customer display with 2
– RJ45 cable for customer display with 2
– Network RJ45, WLAN: modas BWLC module for operator display with 3. For connection
to central unit [}29].
The clips are included in the accessories kit of the central unit.
Example
Cable marking clip with 1
Illustration13: RJ45 cable for operator display
26 / 155 61989850142 en-US
Page 27

Operating instructions K-Class Flex KF II Installation
4.6.1 Plug systems
RJ12 connector
Locked when plugged in.
Open by pressing clip.
IEEE 1394 connector, Firewire
No locking when plugged in.
HDMI connector
No locking when plugged in.
RJ45 connector
Locked when plugged in.
Open by pressing clip.
Mate-N-Lock connector (P-USB)
Locked when plugged in.
Open by pressing clip.
Jack plug 3.5 mm
No locking when plugged in.
9-pole SUB-D connector
Locking and unlocking through knurled screws.
USB-A connector
No locking when plugged in.
Rubber connector
No locking when plugged in.
4.7 Central unit
The ambient temperature of the device must not exceed 40 °C / 104
°F. Make sure that there is sufficient ventilation.
61989850142 en-US 27 / 155
Page 28
Installation Operating instructions K-Class Flex KF II
1
2
4.7.1 Open central unit
WARNING
Supply voltage present when device is open, even if main
switch is switched off!
The consequences can be:
Danger of death from electric shock due to touching live components.
– Only qualified personnel may open the device.
– The device contains dangerous voltage which is not completely
protected.
Remove the cover of the central unit to have a better access to the cable connections.
Example
Vault-type latch
Cover
Push both vault-type latches 1 to stop
plate on rear side.
The Cover is unlocked.
At the same time lift cover 2 upwards.
Remove cover.
Illustration14: Open central unit
Illustration15: Open central unit
28 / 155 61989850142 en-US
Page 29

Operating instructions K-Class Flex KF II Installation
1
2
3
4
5
6
7
8
9
10
4.7.2 Cable connections of central unit
Illustration16: Cable connections
Reserve
Scale, 1 x IEEE 1394 Firewire. Only connect Bizerba components!
– Load receptor of type 18 A
– Scale of VSC 280 KF
– Scale of GSP-H Flex
Operator display
– HDMI cable for display Only connect Bizerba components!
– RJ45 connector cable
Customer display
– HDMI cable for display Only connect Bizerba components!
– RJ45 connector cable
Printer, 1 x Mate-N-Lock, 8-pin
Do not connect a headset!
COM2, 1 x DSUB 9 pin
– Scanner
– optional VGA for external screen
2 x USB 2.0 Highspeed
– WLAN
– UPOS conform printer
– Mouse
– PC keyboard
61989850142 en-US 29 / 155
Page 30

Installation Operating instructions K-Class Flex KF II
11
12
13
1
1
2
3
2 x USB 3.0 Superspeed
– WLAN: USB stick
– Mouse
– PC keyboard
– Scanner
or
– electronic cash terminal
Network, 1 x RJ45
– LAN, Ethernet 10/100
or
– WLAN: modas BWLC2 module
4.7.3 Strain relief for connecting cable
Fasten all connection cables without locking mechanism to the central unit housing using a
cable tie.
The cable tie can be found in the accessories of the central unit.
Example
Holder for cable tie
Put cable ties around connection cables
and fasten them to holder.
Illustration17: Strain relief for cable
4.7.4 Vertical mounting of central unit
The wall mount is designed for vertical mounting of the central unit.
The wall mount has to be ordered separately.
Example
Wall mounting
Fasten wall mount with screws through
drill holes
. Use suitable M4 screws.
Engage two adjusting feet of central unit
into grooves
.
Illustration18: Central unit wall mount
30 / 155 61989850142 en-US
Page 31
Operating instructions K-Class Flex KF II Installation
1
2
3
1
2
3
The screws need to carry a weight of 6 kg. Use M4 screws.
The length of the screws depends on the material of the surface to
which the device is attached. Use suitable dowels when mounting
unit to stone or concrete walls.
4.8 12.1" operator display with touch screen
The operator display is a 12.1" SVGA display combined with a touch screen. It is fastened to
the mounting system. The screws are attached to the supplied mounting system.
Touch screen functions [}42].
Bind HDMI cable and RJ45 connector cable for display together with
cable tie.
Example
HDMI cable for display
RJ45 connector cable
1 x USB Type B, 2.0 Highspeed
WLAN
Example
Network, RJ45
HDMI cable for display
RJ45 connector cable
Illustration19: Cable connections of operator
display
Illustration20: Cable connections of operator
display
NOTICE
Do not mix up RJ45 cables for display and network RJ45!
The consequences can be:
Defective assemblies
– Mark connecting cable with cable marking clips [}25].
– Insert connection cables into correct connectors.
61989850142 en-US 31 / 155
Page 32
Installation Operating instructions K-Class Flex KF II
1
2
4.9 Customer display 7"
The customer display 7'' is a WVGA display. It is fastened to the mounting system. The
screws are attached to the supplied mounting system.
Bind HDMI cable and RJ45 connector cable for display together with
cable tie.
NOTICE
Mounting to long mounting system. Do not turn display by
360°!
The consequences can be:
Defective connecting cable, plug-in connections.
– Do not turn display by 360°.
Please observe the notes on [}25]!
Example
HDMI cable for display
RJ45 connector cable
Illustration21: Connections of customer display 7"
4.10 Customer display 12.1"
The customer display 12.1" is a SVGA display. It is fastened to the mounting system. The
screws are included in the accessories of the mounting system.
Bind HDMI cable and RJ45 connector cable for display together with
cable tie.
Please observe the notes on [}25]!
32 / 155 61989850142 en-US
Page 33

Operating instructions K-Class Flex KF II Installation
1
2
1
Example
HDMI cable
RJ45 cable
Illustration22: Connections of customer display 12"
4.11 Mouse, PC keyboard
Mouse and PC keyboard can only be used when working on the interface of the operating
system.
4.12 Printer
4.12.1 Installation as table version
When installing as table version four bump rubbers need to be affixed to the printer. The
bump rubbers are included in the accessories.
Example
Bumb rubbers
Affix bump rubbers to bottom of printer.
Illustration23: Printer, table version
4.12.2 Mounting to swivel arm at VESA mounting system 500 mm (option)
When mounting to the swivel arm four screws need to be turned in. The screws are attached
to the supplied mounting system.
61989850142 en-US 33 / 155
Page 34
Installation Operating instructions K-Class Flex KF II
1
1
2
Example
Drillholes for screws
Illustration24: Bore holes
4.12.3 Cable connections
Please observe the notes on [}25]!
Example
Printer, 1 x Mate-N-Lock, 8-pin
Illustration25: Printer cable connections
4.13 KScalePad
KscalePad is a scale which is integrated in the counter so that it is only slightly higher than
the counter surface.
Installation
Install the load plate 1 and the scale
in the counter 3.
The installation must be performed by
qualified personnel only.
Illustration26: KScalePad installation
34 / 155 61989850142 en-US
Page 35

Operating instructions K-Class Flex KF II Installation
1
1
2
Installed KScalePad
Cable connection
IEEE 1394 Firewire
Illustration27: Installed KScalePad
4.14 Load receptor of VSC 280 Flex
Slicer VSC 280 KF
Scale
For the dimensions of the VSC 280 Flex see
the instruction manual of the slicer.
Illustration29: VSC 280 Flex
Illustration28: Cable for central control unit
61989850142 en-US 35 / 155
Page 36

Installation Operating instructions K-Class Flex KF II
1
2
1
2
3
1
2
Cable connection
Scale electronics
Connector IEEE 1394, FireWire
The scale of slicer VSC 280 Flex is connected to the FireWire interface of the K Flex.
Illustration30: Cable for central control unit
Leveling of VSC 280 Flex
In order to compensate for any small irregularities in the floor space, the scale of the
VSC 280 Flex can be leveled with the help of
the spirit level and by using the foot screws.
Slicer VSC 280 Flex
Spirit level
Scale
4.15 Load receptor of GSP H Flex
Slicer GSP H Flex
Scale
For the dimensions of the GSP H Flex see
the instruction manual of the slicer.
Illustration31: Spirit level
Illustration32: GSP H Flex
36 / 155 61989850142 en-US
Page 37

Operating instructions K-Class Flex KF II Installation
1
2
1
2
3
Cable connection
Scale electronics
Connector IEEE 1394, FireWire
The scale of slicer GSP H Flex is connected
to the FireWire interface of the K Flex.
Illustration33: Cable for central control unit
Leveling of GSP H Flex
In order to compensate for any small irregularities in the floor space, the scale of the
GSP H Flex can be leveled with the help of
the spirit level and by using the foot screws.
Slicer GSP H Flex
Spirit level
Scale
4.16 Leveling load receptor
Re-level the load receptor after any change in location.
Illustration34: Spirit level at GSP H Flex
61989850142 en-US 37 / 155
Page 38
Installation Operating instructions K-Class Flex KF II
1
2
3
2
1
2
3
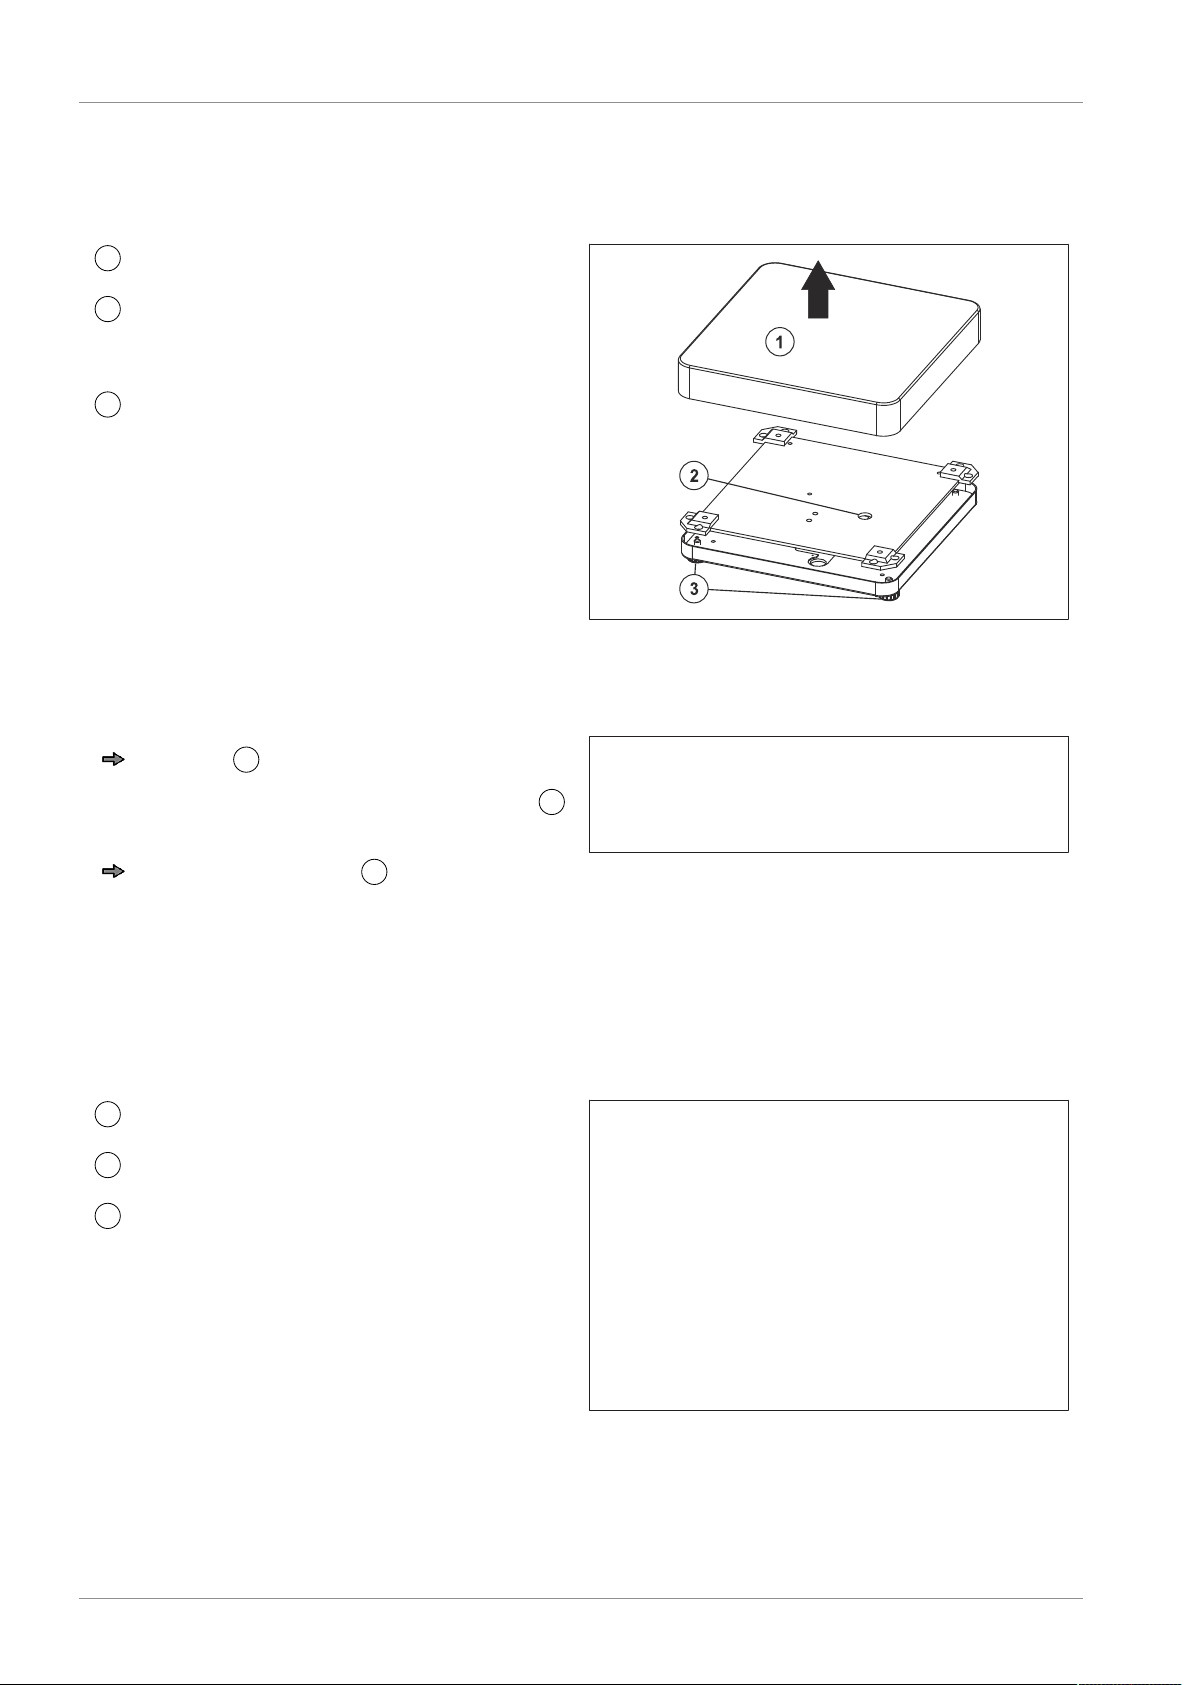
4.16.1 Load receptor KF
Position of spirit level
Load platter
Hole
Spirit level visible through drilled hole.
Foot screws
Illustration35: Load receptor KF
Leveling
Remove 1 load platter.
Spirit level visible through drilled hole
.
Turn the foot screws 3 until the air bubble is located in the center of the spirit
level.
4.16.2 Load receptor of type 18 A
Position of spirit level
Load platter
Spirit level
Foot screws
Illustration36: Device is leveled correctly
Illustration37: Load receptor of type 18 A
38 / 155 61989850142 en-US
Page 39

Operating instructions K-Class Flex KF II Installation
2
Leveling
Turn the foot screws 3 until the air bubble is located in the center of the spirit
level
.
61989850142 en-US 39 / 155
Page 40

Device and operating controls Operating instructions K-Class Flex KF II
1
1
2
3
4
5
5 Device and operating controls
5.1 Power pushbutton
Power key at central unit
Switch on device.
Illustration38: Power pushbutton
5.2 Operator display
The operator display is a 12.1'' SVGA touch screen.
Illustration39: Example of a view of the operator display
The operator display is divided into different display fields.
Department name
Verification field. Changing display of verifiable data. Maximum load, minimum load,
scale interval
Tare value
– – Weight, for weighed article.
– – Quantity, for PLU with price per piece.
Operator name, customer number
40 / 155 61989850142 en-US
Page 41

Operating instructions K-Class Flex KF II Device and operating controls
6
7
8
9
10
11
12
13
14
15
1
2
3
4
5
6
7
Consecutive ticket number
Item list. PLUs previously registered by the operator.
Number of items.
Subtotal
Status information
Displays status of different optional functions.
Unit price of the called up product.
Selling price of the called up product.
Information: Auto start, delivery note, price groups, date, time.
Text messages, status reports. Input field, e.g. PLU number, customer number.
PLU text
5.3 Customer display
The customer display is a 7" display. It is divided into different display fields:
Illustration40: Display example (Germany)
Display field for permanent advertising.
Selling price of the called up product.
Unit price of the called up product.
– Weight, for weighed article.
– Quantity, for PLU with price per piece.
Tare value
Verification field. Changing display of verifiable data. Maximum load, minimum load,
scale interval.
PLU text
61989850142 en-US 41 / 155
Page 42

Device and operating controls Operating instructions K-Class Flex KF II
1
2
3
4
5
6
7
8
9
In all display fields with text
Over-long texts are automatically shortened and marked with ... .
5.4 Standard keyboard for assisted sales
The device is delivered with the standard keyboard for assisted sales activated.
The keyboard is a touch screen.
The operating elements on the touch screen react when the relevant areas are touched.
Illustration41: Keyboard example
Functions
Operating element: <Department selection>
Operating element: <Verification field>
Operating element: <Tare>
Operating element: <Weight value> Only available if weight PLU is called up.
or
Operating element: <Quantity> Only available when the price per piece article is called
up.
Operating element: <Item list>
Operating element: <Total functions> Only available if total amount is displayed.
Key blocks with different functions.
Operating element: <Unit price weighed>
Operating element: <Unit price piece> Only available when the price per piece article is
called up.
42 / 155 61989850142 en-US
Page 43
Operating instructions K-Class Flex KF II Device and operating controls
10
11
12
1
2
3
4
5
6
Operating element: Switch off <Scanning & Recording>. Only displayed if Scanning &
Recording are switched on.
Operating element: <Message> Only available for overwriteable data.
Operating element: <Quick info> (PLU text)
5.4.1 Customer-specific keyboard
Customer-specific keyboards are created using the RetailVision PC program.
You can obtain information on the functions of your customized keyboard from your competent Bizerba technical consultant.
5.4.2 Key functions
<Search article>
Open keyboard for alphabetic product search.
<PLU key>
<Article selection>
Open keyboard for selection by product range.
<Constant>
Fix PLU and/or tare.
<Fixed tare keys>
Display fixed tare keys instead of product keys.
<Operator keys>
Display operator keys instead of product keys.
Display keys for operator functions.
<Escape>
Reset display values, back to initial display.
Cancel input.
<Manual> Manual input
Enter unit price for a price per piece product.
61989850142 en-US 43 / 155
Page 44
Device and operating controls Operating instructions K-Class Flex KF II
7
8
9
10
11
12
12
13
14
<Minus> Minus input
Enter negative unit price for a price per piece product.
<Enter> Confirm input
<Total>
Conclude sales transaction per operator. Print ticket.
<Clear> Clear input
Numeric keypad, numeric inputs
-
<forward> PLU keys 9 - 16
<backward> PLU keys 1 - 8
<Sales functions>
Display keys for sales functions instead of product keys.
<Additional functions>
Display keys for additional functions instead of product keys.
44 / 155 61989850142 en-US
Page 45
Operating instructions K-Class Flex KF II Device and operating controls
15
16
17
1
2
3
4
5
6
<Print functions>
Display keys for print functions instead of product keys.
<Ticket functions>
Display keys for ticket functions instead of product keys.
<PLU functions>
Display keys for PLU functions instead of product keys.
<Operator keys 1-n>
<Home>
Back to article keys.
<Time recording>
Call up time recording, per operator
<Operator log on/off>
Time recording
<Save operator tare>
Save a tare value, per operator.
<Call up operator tare>
Call up a previously saved operator tare.
61989850142 en-US 45 / 155
Page 46
Device and operating controls Operating instructions K-Class Flex KF II
1
2
3
4
5
6
7
1
2
3
<Paper feed>
Printer 1
<Paper feed>
Printer 2
<Print PLU on sec. pr.>
Print out product on printer 2.
<Print extra text>
Print out an extra text.
<Print customer ticket on/off>
Switch printer off. Switch printer on.
<Subtotal with printout>
Subtotal is printed on ticket.
<Repeat receipt>
Print out last ticket again, per operator.
<Call up last ticket total>
Display last total, per operator.
<Ticket re-opening>
Re-open concluded ticket with <Total>.
<Receipt cancel>
An active ticket is canceled, per operator.
46 / 155 61989850142 en-US
Page 47
Operating instructions K-Class Flex KF II Device and operating controls
4
5
6
7
8
9
10
11
12
13
<Input ticket number>
Floating sales mode with receipt number (receipt include).
<Customer number>
Through-operation with customer/operator link.
<Cancel customer link>
Through-operation with customer/operator link.
<Price group 3>
Activate/deactivate price group 3.
<Price group 2>
Activate/deactivate price group 2.
<Price group 1>
Activate/deactivate price group 1.
<Goods return>
Create a goods return.
<Delivery note>
Issue a delivery note.
<Enter partial ticket customer No.>
Through-operation with customer/operator link and partial ticket index.
<Partial ticket>
Print a partial ticket.
Through-operation with customer/operator link.
61989850142 en-US 47 / 155
Page 48
Device and operating controls Operating instructions K-Class Flex KF II
14
15
1
2
3
4
5
6
7
8
<Print customer ticket on/off>
Switch printer off. Switch printer on.
<Repeat receipt>
Print out last ticket again, per operator.
<Cash invoice>
Create a cash invoice.
<Paid invoice>
Record amount of a ticket concluded with credit disbursement type.
<No sale>
Open cash drawer without sales transaction.
<Markup/Discount>
Displays for markup/discount keys.
<Toggle automatic start>
Activate, deactivate automatic start.
<Fixed amount key 1>
Number of pieces stored 0.5. Only for article with price per piece.
<Scanning & Recording>
Switch off Scanning & Recording.
<Enter phone No.>
Loyalty points: Call up customer data with phone number.
48 / 155 61989850142 en-US
Page 49
Operating instructions K-Class Flex KF II Device and operating controls
9
10
1
2
3
4
5
6
7
8
<Foreign currency key 2>
Currency conversion
<Foreign currency key 1>
Currency conversion
<Returns>
Return of sold products.
<Product group code>
Register amount to product group.
<Single ticket>
Print out a product on an individual ticket.
<VAT>
Overwrite barcode per product.
<Date 3>
Overwrite use-by date per PLU.
<Date 2>
Overwrite sell-by date per PLU.
<Do not register>
The article called up next is not recorded.
<Date 1>
Overwrite packaging date per PLU.
61989850142 en-US 49 / 155
Page 50
Device and operating controls Operating instructions K-Class Flex KF II
9
10
1
2
3
4
5
6
7
8
<Calculate check digit>
Calculate check digit of barcode or customer number.
<Manual barcode input>
Manual input of a barcode.
<Bizerba Service>
Call up keyboard with contacts at Bizerba.
<Macro>
Open the macros keyboard.
<Menu>
Call up menu.
<Inventory>
Call up inventory mode.
<Order>
Call up order mode.
Call up HTML help from the device.
<RetailVisionScale>
Change keyboard layout for PLU keys, fixed tare keys, markup/discount keys, operator keys, product group keys and department keys.
<RetailApps>
Call up RetailApp manager.
50 / 155 61989850142 en-US
Page 51
Operating instructions K-Class Flex KF II Device and operating controls
9
10
11
1
2
3
4
5
6
7
<Shrink re-weigh>
Call up shrink re-weigh mode.
<Licensing>
Call up program BSP License Manager.
<Cleaning touch screen>
Call up screen for cleaning.
Operating element <Total functions>
Display keys for total functions instead of product keys.
<Subtotal>
Display subtotal on customer display.
<Subtotal difference>
Printout on ticket.
<Subtotal with printout>
Printout on ticket.
<Markup/Discount>
Displays for markup/discount keys.
<Foreign currency key 2>
Currency conversion
<Foreign currency key 1>
Currency conversion
61989850142 en-US 51 / 155
Page 52
Device and operating controls Operating instructions K-Class Flex KF II
8
1
2.3
4
5
6
7
<Partial ticket>
Print a partial ticket.
Through-operation with customer/operator link.
Operating element <Item list>
Display the item list and keys for further operating functions
<Input ticket number>
Floating sales mode with receipt number (receipt include).
<Enter partial ticket customer No.>
Through-operation with customer/operator link and partial ticket index.
<Cancel customer link>
Through-operation with customer/operator link.
<Receipt cancel>
An active ticket is canceled, per operator.
<Cancellation>
The item marked in the items list is canceled.
5.5 Printer
The devices are equipped with a ticket printer, label printer or Linerless printer.
Label printers
Do not print any lists or reports on labels.
Remove label paper from printer and insert ticket paper in order to
print lists or reports, e.g. PLU lists.
5.5.1 Thermal paper
The printers operate according to the thermal printing principle. The thermal paper is coated
on the outer side. The paper can only be printed on coated side.
52 / 155 61989850142 en-US
Page 53

Operating instructions K-Class Flex KF II Device and operating controls
Storage
Store unprinted thermal paper without direct light exposure to light (original packaging) in
closed box or similar, if possible. It keeps its printability for up to 5 years if stored at max. 60°
C and at a max. of 65% relative air humidity.
Printed thermal paper is readable for up to 10 years if not exposed to direct sunlight and if
kept at temperatures up to a maximum of 30°C and at a maximum of 65% relative air humidity.
To avoid any defects on the device, only ticket, label or Linerless rolls that have been
checked and approved by Bizerba are to be used. They are marked with a respective number.
Bizerba will not be liable for any damages/defects caused by ticket, label and Linerless rolls
that were not checked and approved.
Therefore, please order ticket, labels and Linerless rolls only at a Bizerba sales agent near
you:
Bizerba Labels & Consumables GmbH
Harpener Hellweg 31
44805 Bochum 1
Germany
Phone: +49 234 / 9557-0
Fax: +49 234 / 5070247
61989850142 en-US 53 / 155
Page 54

Device and operating controls Operating instructions K-Class Flex KF II
2
5.5.2 Side cover
Open side cover
The side cover is fastened with a magnet.
Hold side cover at1 recessed handle
.
Open it to the front.
Close side cover
Close side cover in backwards direction
Illustration42: Side cover
5.5.3 Side cover (optional swivel-mounted door)
Not included in standard scope of delivery. Optionally available.
54 / 155 61989850142 en-US
Page 55

Operating instructions K-Class Flex KF II Device and operating controls
Open side cover (optional swivel-mounted door)
Hold handle and pull side cover out as
far as possible.
Illustration43: Remove swivel-mounted door
61989850142 en-US 55 / 155
Page 56
Device and operating controls Operating instructions K-Class Flex KF II
2
2
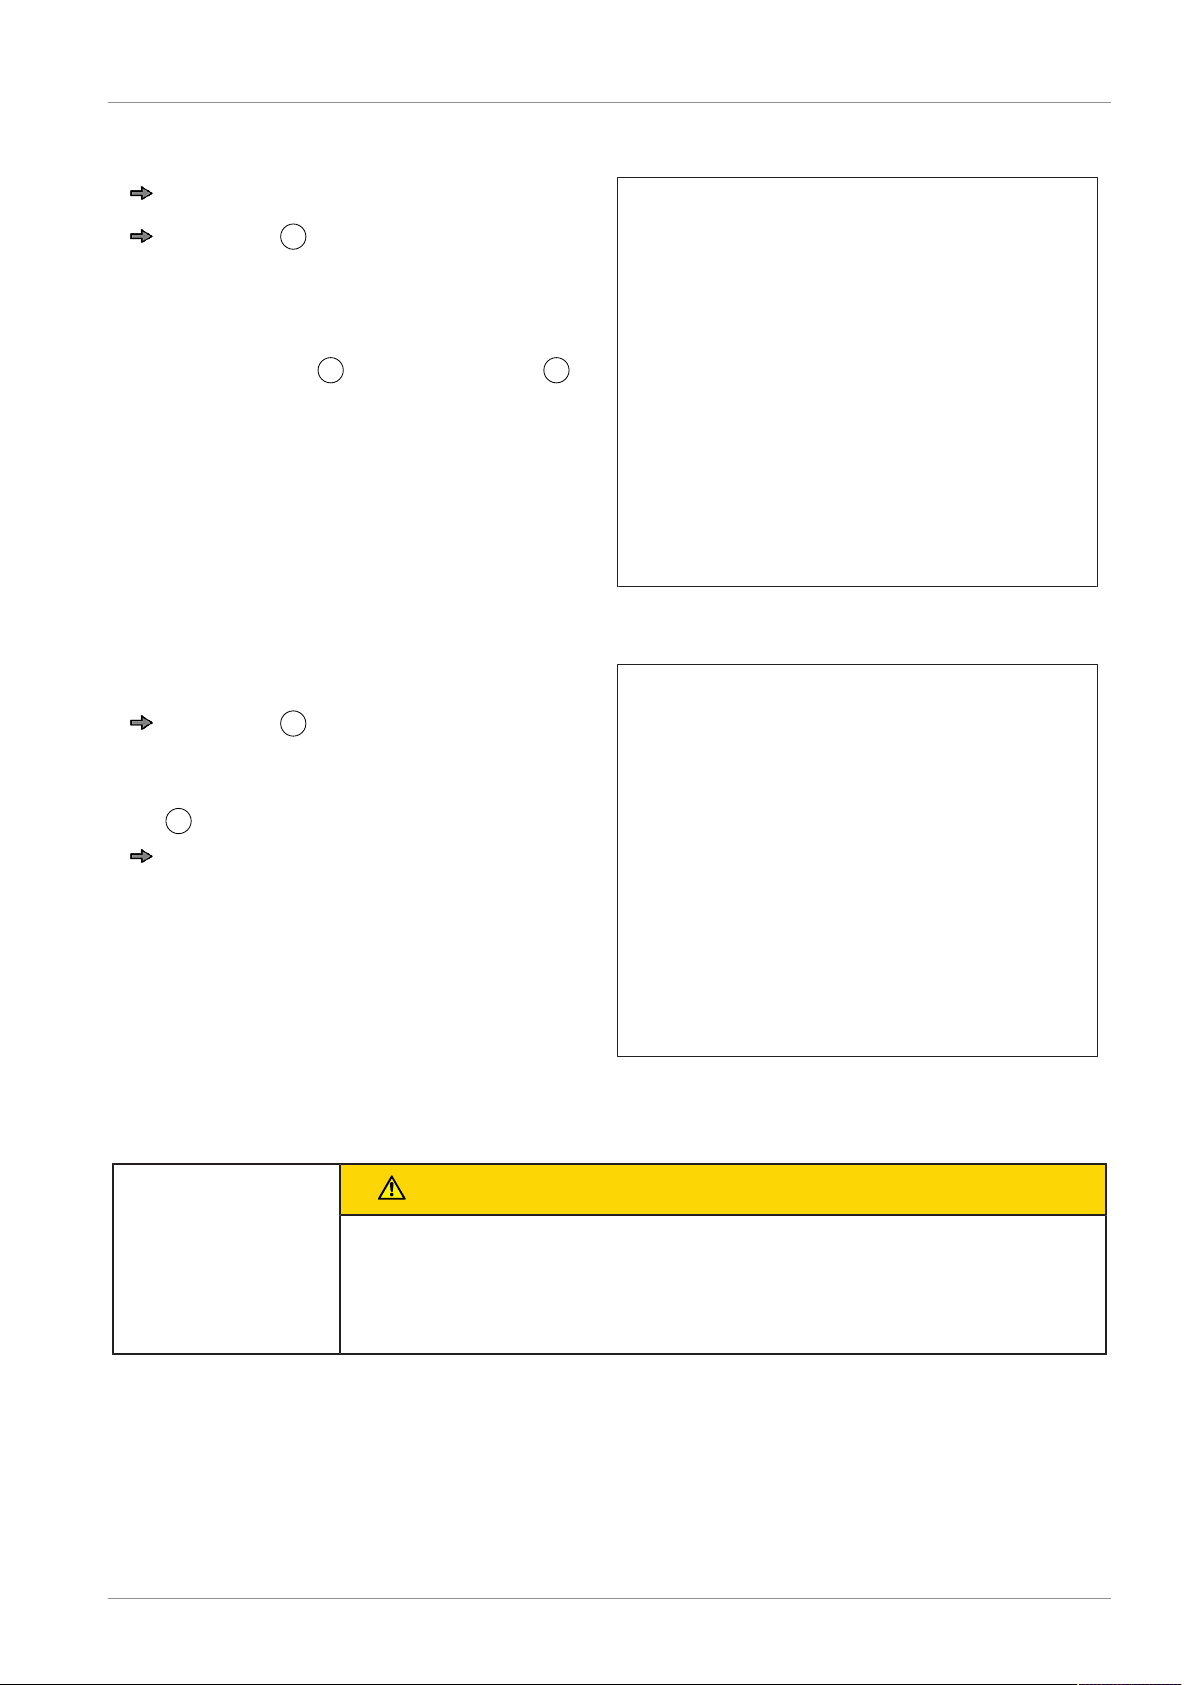
Rotate pulled out side cover clockwise
by approx. 180° until printer door engages.
Illustration44: Swivel printer door
When open, the interior of the printer is easily accessible.
Illustration45: Swivel-mounted door open
Close side cover (optional swivel-mounted door)
Proceed in reverse order (see optional swivel-mounted printer door: open side cover).
5.5.4 Thermal print head
Opening the thermal print head
Open side cover.
Move lock bar 1 to the right.
The thermal print head
folds down.
Closing the thermal print head
Move lock bar 1 to the left and hook
pin.
The thermal print head moves upwards and
is engaged.
is disengaged and
56 / 155 61989850142 en-US
Page 57
Operating instructions K-Class Flex KF II Device and operating controls
2
3
2
Thermal print head receipt and linerless printer
Open side cover.
Turn lever 1 downwards.
The thermal print head is disengaged
and folds up.
If the lever is in parallel position to the
displayed line
, the locking pin is
free.
Illustration46: Opening the thermal print
head
Closing the thermal print head
Turn lever 1 upwards.
The thermal print head folds down. The
lever must be engaged in the locking pin
.
Close side cover.
5.5.5 Tear-off edge
CAUTION
Sharp-edged tear-off edge!
Illustration47: Close thermal print head.
Cut-injuries at finger.
– Do not touch tear-off edge.
61989850142 en-US 57 / 155
Page 58

Device and operating controls Operating instructions K-Class Flex KF II
1
Tear-off edge
Illustration48: Tear-off edge
5.5.6 Paper feed
A paper feed can be triggered with the <Paper feed> keys for printer 1 and printer 2.
Operating procedure
Press key <Print functions>.
Press key <Paper feed> for printer 1.
Press key <Paper feed> for printer 2.
The printer reacts with a feed.
58 / 155 61989850142 en-US
Page 59

Operating instructions K-Class Flex KF II Device and operating controls
1
2
3
4
5
5
5.5.7 Message in the event of End of paper
Example (Germany)
Print types are displayed.
Operating element <Print mode>
"Continue with label print"
Operating element <Print mode>
"Continue with ticket print"
Operating element <Print mode>
"Continue with label print on ticket"
Operating element <Print mode>
"Continue with ticket on ticket linerless"
Operating element <Print mode>
"Continue with label on linerless"
Operating element <Print mode>
"Continue with black mark bottom"
Key <Arrow up>
Key <Arrow down>
Key <Enter>.
Close message "End of paper".
Press <Escape> key four times.
Operating procedure
Illustration49: Message End of paper
Select print.mode.
,
Confirm selection.
61989850142 en-US 59 / 155
Page 60
Device and operating controls Operating instructions K-Class Flex KF II
1
4
5
5.5.8 Label printers
CAUTION
Sharp-edged tear-off edge!
Cut-injuries at finger.
– Do not touch tear-off edge.
Insert label roll
Open side cover.
Open thermal print head.
Remove empty core of label roll.
Pull red peel-off unit 2 outwards.
Remove backing paper roll from take-up
arbor
.
New label roll: peel off labels from backing paper on a length of approx. 30cm.
Push new label roll on spool arbor 3.
Insert backing paper in direction of paper
feed
must pass the light barrier
of paper feed. Backing paper
.
Press red peel-off unit 2 inwards.
Place backing paper under clamp 6.
Close thermal print head.
Close side cover.
Confirm message "End of paper" by
pressing<Print mode> "Continue with label print".
An automatic paper infeed for two labels is
activated.
A canceled print job is repeated.
Illustration50: Insert label roll KH 800 E
60 / 155 61989850142 en-US
Page 61
Operating instructions K-Class Flex KF II Device and operating controls
1
Insert ticket roll
Open side cover.
Open thermal print head.
Remove empty core of ticket roll.
Push new ticket roll on spool arbor 3.
Insert ticket paper in direction 2 of paper feed. Ticket paper must pass the
light barrier
.
Close thermal print head.
Close side cover.
Confirm message "End of paper" by
pressing<Print mode>"Continue with
ticket print".
An automatic paper infeed is activated.
A canceled print job is repeated.
Illustration51: Inserting ticket roll 800 E
5.5.9 Set paper width
100 E, 200 E, 400 E
Open thermal print head.
Move the paper guides 1. Adjust them
to paper width.
Close thermal print head.
Illustration52: Set paper width
61989850142 en-US 61 / 155
Page 62

Device and operating controls Operating instructions K-Class Flex KF II
1
1
2
3
4
800 E
Paper guides
Illustration53: Set paper width 800 E
5.5.10 Reverse mode
Reverse mode means that when printing starts the label is fed until the beginning of the label.
Reversing is only possible with freely programmable labels. The reverse mode can be activated with the program BLD- Bizerba Label Designer when creating a freely programmable
label.
5.5.11 Ticket and Linerless printer
The ticket linerless printer can be operated with 2" and 3" ticket rolls as well as with linerless
rolls.
Illustration54: Ticket and Linerless printer
Pusher for setting paper width.
Take-up for ticket roll.
Take-up for linerless roll.
Lever for opening the printhead.
62 / 155 61989850142 en-US
Page 63
Operating instructions K-Class Flex KF II Device and operating controls
5
2
3
4
Locking pin
Inserting paper
Open side cover.
Turn lever 1 downwards.
The thermal print head is disengaged
and folds up.
If the lever is in parallel position to the
displayed line
free.
Move ticket roll on the respective takeup.
Insert paper in direction of paper travel.
, the locking pin is
Set paper width
Paper pusher
Set paper guide to 2" paper
Move paper pusher inwards.
Set paper guide to 3" paper
Move paper pusher outwards.
Illustration55: Open print head
Illustration56: Paper width
61989850142 en-US 63 / 155
Page 64
Device and operating controls Operating instructions K-Class Flex KF II
2
Closing the thermal print head
Turn lever 1 upwards.
The thermal print head folds down. The
lever must be engaged in the locking pin
.
Close side cover.
Illustration57: Close thermal print head.
5.5.12 Dual printer tickets and labels
CAUTION
Sharp-edged tear-off edge!
Cut-injuries at finger.
– Do not touch tear-off edge.
Insert ticket roll
800 TE
Open side cover.
Open thermal print head.
Remove empty core of ticket roll.
Push new ticket roll on spool arbor 1.
Insert ticket paper in direction 2 of paper feed.
Close thermal print head.
Close side cover.
Confirm message "Paper end" using the
<Enter> key.
A canceled print job is repeated.
Illustration58: Inserting ticket roll KH 800 TE
64 / 155 61989850142 en-US
Page 65
Operating instructions K-Class Flex KF II Device and operating controls
1
5
Insert label roll
Open side cover.
Open thermal print head.
Remove empty core of label roll.
Pull red peel-off unit 2 outwards.
Remove backing paper roll from take-up
arbor
New label roll: peel off labels from backing paper on a length of approx. 30cm.
Push new label roll on spool arbor 3.
Insert backing paper in direction 4of
paper feed. Backing paper must pass
the light barrier
Press red peel-off unit 2 inwards.
.
.
Place backing paper under clamp 6.
Close thermal print head.
Close side cover.
Confirm message "End of paper" by
pressing <Print mode> "Continue with label print" .
An automatic paper infeed for two labels is
activated.
A canceled print job is repeated.
Illustration59: Insert label roll
5.5.13 Dual printer ticket and Linerless
CAUTION
Sharp-edged tear-off edge!
Cut-injuries at finger.
– Do not touch tear-off edge.
61989850142 en-US 65 / 155
Page 66
Device and operating controls Operating instructions K-Class Flex KF II
3
1
Insert ticket roll
Vertical installation
Open side cover.
Open thermal print head.
Remove empty core of ticket roll.
Push new ticket roll on spool arbor 1.
Insert ticket paper in direction 2 of paper feed.
Close thermal print head.
Close side cover.
A canceled print job is repeated.
Insert Linerless roll
Message "End of paper" .
Vertical installation
Open side cover.
Open thermal print head.
Remove empty core of the Linerless roll.
Push new Linerless roll on spool arbor
.
Insert Linerless paper in direction 2of
paper travel. Linerless paper must pass
the light barrier
.
Close thermal print head.
Close side cover.
Confirm message "End of paper" by
pressing <print mode>"Continue with receipt print" or "Continue with label print
on ticket".
An automatic paper infeed is activated.
A canceled print job is repeated.
5.5.14 2" L compact
Ticket and linerless printer in compact design with Easy Load for easy paper roll change. The
printer can be installed next to a KF II or be mounted on a VESA mounting system.
The printer is connected to the central control unit of the K class Flex via a Mate N-Lock connector (P-USB). Power supply and data only with one cable.
66 / 155 61989850142 en-US
Page 67
Operating instructions K-Class Flex KF II Device and operating controls
2
1
CAUTION
Sharp-edged tear-off edge!
Cut-injuries at finger.
– Do not touch tear-off edge.
Insert paper rolls
Open the printer
Press unlocking device 1.
The printer cover opens.
Swivel printer cover upwards.
Insert paper roll from the top.
Place ticket paper with printable side on
thermal bar
.
Insert Linerless paper with adhesive side
facing up
.
Illustration60: Unlock and open cover
Illustration61: Insert paper roll
61989850142 en-US 67 / 155
Page 68

Device and operating controls Operating instructions K-Class Flex KF II
2
Pull paper towards front and push cover
downwards.
Cover must snap into place. The paper
is automatically fed via two guides
.
Illustration62: Close cover
68 / 155 61989850142 en-US
Page 69

Operating instructions K-Class Flex KF II Operating PowerScale
1
2
6 Operating PowerScale
This chapter describes available standard functions of the Bizerba PowerScale software
when the device is delivered ex factory.
The device can be adjusted to meet a wide range of requirements. Please contact your
Bizerba trade consultant for details.
In the following descriptions, a simplified version of the display is
shown!
Assisted sales without continuous operation
– Several operators can register parallel items with their <Operator> key.
– The items are saved per operator.
– The saved items can be canceled.
– A total is calculated per operator.
– The sales transaction for a customer is ended with the keys <Total>, <Operator> key.
– a ticket is printed.
6.1 Switching device on
Relieve the load plate before switching on. Remove objects from the
load plate. The load plate must be completely free.
Illustration63: K FLex
Power key at central unit
Load platter
Self-service devices are equipped with a cover to fit over the power
key. The power switch has to be pressed using a pen or pencil.
61989850142 en-US 69 / 155
Page 70
Operating PowerScale Operating instructions K-Class Flex KF II
Press power pushbutton.
After switch-on, the device runs through a start procedure.
Example
The device is ready for operation when the
initial display appears.
Illustration64: Example initial display PowerScale
Eliminating error messages [}99].
6.2 Shut down device, switch device off
NOTICE
Switching devices off/on in the system network!
Incomplete data
– Do not switch devices off/on that operate in the system network
during data transfer.
Press power pushbutton.
The device runs through a switch-off procedure.
The device is shut down when the display goes out.
Pull out power plug.
The device is now disconnected.
6.3 Correction options
Canceling function
A function called by mistake can be canceled.
Press <Escape> key.
The device returns to the empty initial
display.
70 / 155 61989850142 en-US
Illustration65: Example of initial display
Page 71
Operating instructions K-Class Flex KF II Operating PowerScale
1
Delete incorrect input
Incorrect inputs in an input field can be deleted.
Press <Clear> key. Values in the input field are deleted.
6.4 Zerosetting the weight value display
When the scale is switched on the weight
value display is automatically set to zero
(0.000 kg) with the scale unloaded.
If the load platter / tray / pan has not been
applied, underload is indicated on the dis-
play after the scale has been started.
Character for underload
Apply load platter / tray / pan.
Illustration66: Underload indication
The weight display shows zero.
Illustration67: Weight value is zero
Automatic zerosetting device
The scale has an automatic zerosetting device. Minor zero point changes are compensa-ted
automatically.
The automatic reset device is non-operational when the scale is tared.
Manual zerosetting
Zerosetting occurs only within the permitted verifiable zerosetting
ranges. The resetting ranges are country-dependent.
Operating procedure
Weight value does not display zero.
Illustration68: Weight value above zero
61989850142 en-US 71 / 155
Page 72

Operating PowerScale Operating instructions K-Class Flex KF II
Press operating element <Weight
value> for more than 3 sec.
Illustration69: Weight value below zero
The weight value display is set to zero.
Zerosetting can be repeated a number of
times within the permitted zerosetting range.
Illustration70: Weight display zero
6.5 HTML help
This help tool is available as from program version 2.50 as HTML page on the device.
It can also be called up via a PC browser. For this purpose, please enter the following path in
the browser:
http://"Geräteadresse"/bizerba/manuals/current/index.html
Help on the device
Accessing Help
Press <Add. functions> key.
Press help key 1.
Illustration71: Help key
72 / 155 61989850142 en-US
Page 73

Operating instructions K-Class Flex KF II Operating PowerScale
3
4
5
6
7
The first help page is displayed.
With the scroll bar 2 move displayed
page to the top or bottom.
Press <Escape> 1 to exit Help.
Illustration72: Scroll bar
Navigate
Jump back and forth one page or to Table of contents.
Press Link and directly go to the
link target.
Jump to the first page of the help.
The first page also includes the table of
content.
Changing between already displayed
pages: forward
Changing between already displayed
pages: Back
Illustration73: Navigate
6.6 Calling up PLUs
The articles saved in the device are also called PLU. PLU is the abbreviation of price look up.
Article is displayed with price, text etc.
The PLU no. is a short number with maximum 6 digits, which is used to call the data of a article.
PLUs can be called in the following ways:
– with PLU key[}74]
– Enter PLU no[}74]
– Call up PLU from another department[}75]
– Search PLU by text[}75]
– Select PLU by product group[}76]
– PLU selection by order group[}77]
61989850142 en-US 73 / 155
Page 74
Operating PowerScale Operating instructions K-Class Flex KF II
1
6.6.1 PLU key
The article key has a permanently assigned article.
Menu setting
- In menu "PLU maintenance" / "1 Change key assignment" assign articles to PLU keys.
Select 161
or
- Assign articles to PLU keys using RetailVision.
Operating procedure
Press <PLU key>.
Article data is displayed.
Illustration74: Articles
6.6.2 Enter article no.
Call up article by entering the article no. (PLU no.).
Menu setting
- In menu "Configuration" / "PLU No. basic settings" enter the "PLU input digits".
Select 5363
Operating procedure
Enter PLU number.
The input field for PLU num-
ber opens
.
Confirm entry.
Illustration75: Enter article number
or
Fill in all digits of the input
field for PLU number, e.g.
012.
Data of article is displayed.
Illustration76: Article selected
74 / 155 61989850142 en-US
Page 75
Operating instructions K-Class Flex KF II Operating PowerScale
1
1
2
3
6.6.3 Call up a PLU from a different department
The department can be changed to call up a PLU.
Operating procedure
Press operating element
<Department>
The department keys 1 - 10
are displayed
.
Press <Department> key,
e.g. 1.
In operating element "Department" the department
description is displayed.
Enter article no. (PLU no.).
-
Confirm entry.
Data of article is displayed.
After registration, the department set in the menu is reset.
6.6.4 Search article
Illustration77: Operating element department
Illustration78: Department display
Illustration79: Article display
The PLU can be searched by article text.
Menu setting
- Set the search options in menu "PLU maintenance" / "Options PLU search".
Select 196
Press <Search PLU>.
The keyboard for article search is opened.
Article keys with search results
Input field
Input keyboard
Key Function
Scroll through search results.
,
61989850142 en-US 75 / 155
Page 76

Operating PowerScale Operating instructions K-Class Flex KF II
1
2
Delete characters.
Cancel search function using the <Escape> key.
Operating procedure
Enter product text.
–
Article keys are displayed with search results.
Press <PLU> key, e.g. 8.
Article search is exited.
Data of article is displayed.
6.6.5 Select PLU by product group
The PLU can be chosen from a selection, which is sorted by product groups.
Menu setting
- In menu "Configuration" / "Profiles" select menu items "Project [Unitouch]" and "Applica-
tion [Standard]". Select variation in which the term prodgroup is used.
Select 5 3 1 2
Press operating element <PLU selection>.
The keyboard for PLU selection by product groups is opened.
<Product group> key to product group selection.
PLU keys of product group, sorted alphabetically by PLU text.
Menu setting
- In menu "Data maintenance" / "Product groups" define the data for product groups.
Select 2 1 1
- In menu "PLU maintenance" / "Miscellaneous" enter the "Product group".
Select 1 1 2 / Dept.No. / PLU no. / 4
Key Function
Cancel PLU selection using the <Escape> key.
Scroll through product group keys.
,
Scroll sideways through the PLU keys.
,
Operating procedure
Press <Product group> key.
PLU keys of product group are displayed.
76 / 155 61989850142 en-US
Page 77

Operating instructions K-Class Flex KF II Operating PowerScale
1
2
3
Press <PLU> key, e.g. 1.
PLU selection is exited.
Data of article is displayed.
6.6.6 PLU selection by order groups
The PLU can be chosen from a selection, which is sorted by order groups.
Menu setting
- In menu "Configuration" / "Profiles" select menu items "Project [Unitouch]" and "Applica-
tion [Standard]". Select variation in which the term ordergroup is used.
Select 5 3 1 2
Press operating element <PLU selection>.
The keyboard for product selection by order groups is opened.
Order group selection keys.
Selected order group.
PLU keys of order group, sorted alphabetically by PLU text.
Menu setting
- In menu "Data maintenance" / "Order groups" define the data for order groups.
Select 2 9 8
- In menu "PLU maintenance" / "Miscellaneous" enter the "Order group".
Select 1 1 2 / Dept.No. / PLU no. / 4
Key Function
Cancel PLU selection using the <Escape> key.
Scroll through the order group selection keys.
,
Scroll sideways through the PLU keys.
,
Back one level in the order groups.
Operating procedure
Press <Order group selection> key.
PLU keys of the order group are displayed.
Press <PLU> key, e.g. 15.
PLU selection is exited.
Data of article is displayed.
6.7 Register article
A PLU is called up and registered by an operator.
61989850142 en-US 77 / 155
Page 78
Operating PowerScale Operating instructions K-Class Flex KF II
Weighed PLU
PLU with PLU type "Weighed".
Operating procedure
Place article on load platter.
Call up PLU.
Recording with <Operator key>, e.g.
1.
The product with its determined values is added to the operator's item
list.
The called product fades out.
Remove PLU from load plate.
PLU with price per piece
Illustration80: Articles
PLU with PLU type "Manual", "Minus", "By count".
Operating procedure
Call up PLU.
Recording with <Operator key>, e.g.
1.
The product with its determined values is added to the operator's item
list.
The called product fades out.
Illustration81: PLU with price per piece
6.8 Display Quick info
Display additional information about the PLU.
Display the extra texts assigned to the PLU and the shelf life.
The information that is displayed depends on the selected keyboard
layout.
78 / 155 61989850142 en-US
Page 79

Operating instructions K-Class Flex KF II Operating PowerScale
2
1
2
1
Menu setting
- Create general texts in menu "Data maintenance" / "General texts".
Select 2 2 2
- In menu "PLU maintenance" / "Texts" enter the text numbers for "Extra text 1", "Extra text
2", "Extra text 3" and "Extra text 4".
Select 1 1 2 / Dept.No. / PLU no. / 2
- In menu "Miscellaneous" enter "Shelf-life 1" and "Shelf-life 2".
Select 1 1 2 / Dept.No. / PLU no. / 4
- In menu "Field 6 Extra text" enter the text number.
Select 1 1 2 / Dept.No. / PLU no. / 5 1
- In menu "Configuration" / "Profiles" select a "Variation".
Select 5 3 1 2
- In menu "Scrolling message/Promotion" select menu item "Promotion with [image files]".
Select 5 3 6 5
Operating procedure
Call up PLU.
Quickinfo is displayed
or
Call up PLU.
Press operating element
<Quickinfo>
Quickinfo is displayed
Quickinfo on full screen
Call up article information on full
screen
.
or
Quit Quickinfo 2.
.
.
.
Illustration82: Call up Quickinfo
Illustration83: Full screen display
61989850142 en-US 79 / 155
Page 80
Operating PowerScale Operating instructions K-Class Flex KF II
2
3
1
6.8.1 Full screen article information
Display the extra texts assigned to the PLU
on full screen
.
Call up Extra text, e.g. origin, application and calories
.
Call up Extra text e.g. vitamins, minerals
.
Call up recipe 4.
Print recipe 5.
Quit full screen 6.
Illustration84: Texts on full screen
6.9 Operator info texts
After calling up an article, the operator is to receive additional information regarding the article called up.
The keys need to be created using .RetailVision.
This product information can be displayed or printed.
Menu setting
- Create general texts in menu "Data maintenance" / "General texts".
Select 2 2 2
- In menu "PLU maintenance" / in the text field assignment assign text numbers to the
fields.
Select 1 1 2 / Dept.No. / PLU no. / 5 1
- In menu "Configuration" in "Oper.basic settings" enter the operator info text No.
Select 5 3 6 3 /Sales/Product information/ Operator info text No.
Operating procedure
Call up article.
The article is displayed. The article
stores product information, if a "?"
proceeds the PLU text.
Press <Print text> 2.
Product information is printed immediately.
Illustration85: Product info keys
80 / 155 61989850142 en-US
Page 81

Operating instructions K-Class Flex KF II Operating PowerScale
4
Press <Show text> 3.
The product info is displayed
.
Illustration86: Display product information
6.10 Overwrite unit price
Call up an article and overwrite the saved unit price.
Only supported with price type "Normal price".
Menu setting
- In menu "Configuration" / "Oper.basic settings" select menu item "Price overwrite".
Select 5 3 6 3
- In menu "PLU maintenance" / "Prices" activate menu item "Price overwrite".
Select 1 1 2 / Dept.No. / PLU no. / 1
- In menu "Data maintenance" / "Operator data" select menu item "Price overwrite".
Select 2 3 / Operator No.
Weighed PLU
PLU with PLU type "Weighed".
Operating procedure
61989850142 en-US 81 / 155
Page 82
Operating PowerScale Operating instructions K-Class Flex KF II
1
1
2
Place article on load platter.
Call up PLU.
Press <Unit price weighed>
operating element.
The unit price input field is
Illustration87: Articles
opened
Enter unit price, e.g. 2.20
EUR.
Confirm input
New selling price is calculated.
Illustration88: Unit price input field
Recording with <Operator
key>, e.g. 1.
Illustration89: Unit price input field
6.10.1 PLU with price per piece
PLU with PLU type "Manual", "Minus", "By count".
Operating procedure
Call up PLU.
Press operating element <Unit price piece>
.
The unit price input field is
opened
.
Enter unit price, e.g. 0.30
EUR.
Confirm entry.
Recording with <Operator
key>, e.g. 1.
Illustration90: Manual article
Illustration91: New price
6.11 Enter weight value
Call up an article and enter the weight value.
82 / 155 61989850142 en-US
Page 83
Operating instructions K-Class Flex KF II Operating PowerScale
1
2
The function is country-dependent.
Only for PLU with PLU type "Weighed".
Operating procedure
Load platter is unloaded.
Call up PLU.
Press operating element <Weight
value>
.
The input field for quantity is
opened
.
Enter weight value, e.g. 1.200 kg.
Illustration92: Manual weight input
Confirm input.
The entered weight value is marked
with the text "Man.".
The selling price is calculated with the
newly entered weight value.
Illustration93: Weight value
Recording with <Operator key>, e.g. 1.
6.12 Overwrite quantity
Call up an article and overwrite the quantity. The unit of quantity used depends on the PLU
type.
Article type Unit of quantity
"Manual", "Man.weighed", Quantity
"Minus" Quantity
"By count" Quantity
"Length" Meter (1 m, 0.1 m)
"Area" Square meter
"Volume" Liter (1 l, 0.1 l)
Operating procedure
Call up article, e.g. PLU type "Manual".
61989850142 en-US 83 / 155
Page 84

Operating PowerScale Operating instructions K-Class Flex KF II
1
2
Press operating element <Quantity>
.
The input field for quantity is opened
.
Enter quantity, e.g. 10pieces.
Illustration94: Unit
Confirm input.
The selling price is calculated
with the newly entered quantity.
Recording with <Operator key>,
Illustration95: Selling price
e.g. 1.
6.12.1 Sell article with number of pieces 0.5
An article is to be sold with number of pieces 0.5.
Example: Sale of half a loaf of bread.
Operating procedure
Call up article with price per piece.
Press <Sales functions> key.
Press <Fixed amount> key.
The product is displayed with quantity 0.5
and calculated selling price.
Recording with <Operator key>, e.g. 1.
6.13 Input of a unit price weighed
No PLU saved in the device is used.
Operating procedure
Place article on load platter.
Press <Unit price weighed> operating element.
The input field for unit price is opened.
Enter unit price, e.g. 2.59 EUR.
Recording with <Operator key>, e.g. 1.
or
84 / 155 61989850142 en-US
Page 85

Operating instructions K-Class Flex KF II Operating PowerScale
Confirm entry.
Unit price can be overwritten.
Weight value can be overwritten.
Illustration96: Unit price input
Recording with <Operator key>, e.g. 1.
6.14 Input of a price per piece
No PLU saved in the device is used.
Operating procedure
Press key <Manual>.
The input field for unit price
input is opened.
Enter piece price, e.g. 2.50
or
EUR.
Recording with <Operator
key>, e.g. 1.
Confirm entry.
Quantity can be overwritten.
Unit price can be overwritten.
Recording with <Operator
key>, e.g. 1.
6.15 Input of a minus amount
No PLU saved in the device is used.
Operating procedure
Press <Minus> key.
The input field for unit price input is
opened.
Enter amount, e.g. -0.20 EUR.
Recording with <Operator key>, e.g.
1.
or
61989850142 en-US 85 / 155
Page 86

Operating PowerScale Operating instructions K-Class Flex KF II
1
2
Confirm entry.
The amount is applied as a negative
amount.
Quantity can be overwritten.
Unit price can be overwritten.
Recording with <Operator key>, e.g.
1.
6.16 Check of registered items, Scrolling function
Check the registered items in the item list.
Operating procedure
Register a number of PLUs using <Operator> key, e.g. 1.
Press operating element <Item list>.
The item list is opened.
Scroll through item list:
Scroll using the <arrow up>, <arrow down> keys.
or
brush your finger up or down over the area 1.
or
move the scroll bar 2 up or down.
Press <Enter> key.
Go to last item in the item list.
Press the <Escape> key.
Exit the item list.
Example:
Brush up or down. Your finger must be
placed on the touch screen within this
area.
Scroll bar
Not displayed until after six items
86 / 155 61989850142 en-US
Page 87

Operating instructions K-Class Flex KF II Operating PowerScale
1
2
Discount displayed on virtual ticket
Article discount is displayed with % in
the status column.
Total discount is displayed with % behind the total.
Illustration97: Discount marking
6.17 Item cancellation
Cancel one or more registered items in the item list.
If a PLU is canceled, the sales data in the reports are corrected.
Cancelling is only possible before the final total.
Menu setting
- In menu "Data maintenance" / "Operator data" enter the "Password" and select menu
item "Cancellation".
Select 2 3 / Operator No.
- In menu "Configuration" / "General"activate or deactivate menu item "Print cancellation".
Select 5 3 2 1
6.17.1 Cancellation permission of operator
Operating procedure
Register a number of PLUs using <Operator> key, e.g. 1.
Press operating element <Item list>
The item list is opened.
Mark the items you want to cancel. Tap displayed item(s) in the items list.
or
61989850142 en-US 87 / 155
Page 88

Operating PowerScale Operating instructions K-Class Flex KF II
2
1
Press <Arrow up> and <Arrow
,
down> keys.
Press <Cancellation> key.
The canceled item is marked
with the character "S"
.
The item is added to the operator's item list with negative values and marked with character
"X"
.
Cancel additional items.
Illustration98: Item list (Germany)
or
Exit item list.
Press <Escape> key.
6.17.2 Without cancellation permission of operator
Define operators without cancellation permission, e.g. operator 1.
Define operator with cancellation permission and password, e.g. operator 4.
Operating procedure
Register a number of PLUs using <Operator> key, e.g. 1.
Press operating element <Item list>
The item list is opened.
Mark the items you want to cancel. Tap displayed item(s) in the items list.
or
Press <Arrow up> and <Arrow down> keys.
,
Press <Cancellation> key.
Keyboard for operator selection is opened.
If the operator does not have any cancellation rights, a different operator with
cancellation permission must carry out the cancellation, e.g. operator 4.
Press <Operator> key, e.g. 4.
The name of the operator is displayed. The keyboard for password entry is
opened.
Enter password of operator 4.
Confirm entry.
The product is added to the operator's item list with negative values and
marked with the character "X".
The canceled item is marked with the character 'S'.
88 / 155 61989850142 en-US
Page 89
Operating instructions K-Class Flex KF II Operating PowerScale
Cancel additional items.
or
Exit item list.
Press <Escape> key.
6.18 Constant
For weighed articles: The article is still called up after registration and unloading of the load
plate. In case of taring, the tare is also still called up.
For PLU with price per piece: The PLU is still called up after registration. If the number of
pieces is changed, the number of pieces is also still called up.
Operating procedure weighed article
Activate constant
Press <Constant> key.
The message "FIX" appears.
Constant function is activated.
Call up PLU.
Place article on load plate.
Recording with <Operator key>, e.g. 1.
Unload load plate.
The article is still called up.
Place article on load plate.
Recording with <Operator key>, e.g. 1.
Unload load plate.
The article is still called up.
Repeat weighing process, if needed.
Deactivate constant
Illustration99: Constant
Illustration100: Articles
Illustration101: Articles
Press key <Constant>.
Message "FIX" disappears.
The called up article disappears.
Function constant is disabled.
61989850142 en-US 89 / 155
Page 90

Operating PowerScale Operating instructions K-Class Flex KF II
Operating procedure PLU with price per piece
Activate constant
Press <Constant> key.
The message "FIX" appears.
Constant function is activated.
Call up PLU.
Recording with <Operator key>, e.g. 1.
The product is still called up after registration.
Illustration102: Constant
Recording with <Operator key>, e.g. 1.
The product is still called up after registration.
Repeat, if needed.
Deactivate constant
Press <Constant> key.
The message "FIX" disappears.
The called product fades out.
Constant function is deactivated.
The number of pieces may be changed.
Press operating element < quantity>.
Enter number of pieces.
–
The changed number of pieces is retained after registration.
Illustration103: Constant price per piece
6.19 Subtotals
6.19.1 Displaying subtotal
Displaying of subtotal with item list on the customer display for approx. 10 seconds.
Subtotal is only possible before the final total.
90 / 155 61989850142 en-US
Page 91

Operating instructions K-Class Flex KF II Operating PowerScale
Operating procedure
Register several PLUs. Example
Press operating element <Total
functions>
Press <Subtotal> key.
The message "Enter operator" appears.
Press <Operator> key, e.g. 1.
The subtotal with item list is displayed
on the customer display.
6.19.2 Subtotal with printout
After registration of one or more PLUs, the subtotal can be registered. After total completion
the subtotal and total are printed ..
Operating procedure
Register several PLUs.
Press operating element <Total functions>
or
Press key <Print functions>.
Press key<Subtotal with print>.
The message "Enter operator" appears.
Press <Operator> key, e.g. 1.
The subtotal is registered.
The subtotal with item list is displayed on the customer display.
Register further PLUs.
Press the <Total> key.
The message "Enter operator" appears.
Press <Operator> key, e.g. 1.
The ticket is printed.
6.19.3 Subtotal difference
If a customer makes purchases for several customers, the difference between the subtotals
can be printed out on the ticket.
61989850142 en-US 91 / 155
Page 92

Operating PowerScale Operating instructions K-Class Flex KF II
– The total of an included ticket is taken into account in the subtotal
difference.
– For partial tickets, the subtotal difference is only formed by the
current partial ticket. The previous partial tickets are not taken
into account.
– A POS ticket should only be included for cancellation. After inclu-
sion, no subtotal difference should be carried out for a POS
ticket.
Operating procedure
Register several PLUs to Operator 1 for Customer A.
Press operating element <Total functions>
Press key<Subtotal difference>.
The message "Enter operator" appears.
Press <Operator> key, e.g. 1.
The subtotal difference for Customer A is displayed and registered.
Register several articles to Operator 1 for Customer B.
Press operating element <Total functions>
Press key<Subtotal difference>.
The message "Enter operator" appears.
Press <Operator> key, e.g. 1.
The subtotal difference for Customer B is displayed and registered.
Press the <Total> key.
The message "Enter operator" appears.
Press <Operator> key, e.g. 1.
The ticket with the subtotal difference for Customer A, Customer B and total is printed.
6.20 Total
Close the sales transaction for a customer. Add all PLUs registered by an operator and print
out on a ticket.
92 / 155 61989850142 en-US
Page 93

Operating instructions K-Class Flex KF II Operating PowerScale
Operating procedure
Press the <Total> key.
The message "Enter the operator" appears.
Press <Operator> key, e.g. 1
The total is displayed on the operator
and customer display.
The ticket is printed.
Display total again
Display last total again per operator.
Operating procedure
Press <Ticket functions> key.
Press <Call for last ticket total> key.
Press <Operator> key, e.g. 1.
The last total for the respective operator is displayed on the operator and customer
display.
Example:
6.21 Tare
The tare is the difference between the gross weight and the net weight of a PLU. The tare
value is the weight of a PLU's packaging, e.g. paper, film, empty container or empties.
Taring is the process for determining the tare value.
– The total weighing range can be tared (country-dependent).
– The tared value is subtracted from the total weighing range.
6.21.1 Unknown tare
– An unknown tare (empties) is a non article-related tare. The un-
known tare must be weighed and tared.
– The tare command is only directly executed when the weight dis-
play is stationary.
Overwrite unknown tare
– An unknown tare cannot be overwritten by a known tare.
61989850142 en-US 93 / 155
Page 94

Operating PowerScale Operating instructions K-Class Flex KF II
Tare empties
Weigh article as an empty with unknown weight.
Operating procedure
Place empty container on the load plate.
Press operating element <Tare>
Tare value is displayed.
Weight value is zero and is
marked with "NET".
Fill empty with PLU.
Weight value is displayed as net weight.
Batch tare
The function is country-dependent.
Batch tare means repeated taring of an unknown tare during a weighing process. For example, when mixing ingredients as per recipe, the tare values are accumulated to one tare
value.
Weigh empties
Operating procedure
Place empty container on the load plate.
Press operating element <Tare>
Tare value is displayed.
Weight value is zero and is
marked with "NET".
Fill empty with PLU.
Weight value is displayed as net weight.
Press operating element <Tare>
Increased tare value is displayed.
Weight value is zero and is
marked with "NET".
Fill empty with PLU.
Weight value is displayed as net weight.
Repeat, if needed.
94 / 155 61989850142 en-US
Page 95
Operating instructions K-Class Flex KF II Operating PowerScale
6.21.2 Known tare
– When weighing a packaged article, the tare value must be known
(packaging/article-related tare).
– For multi-interval scales, the known tare must always be located
within the lower scale interval.
– The known tare is marked with "PT".
– The known tare can be used in three ways:
Manual tare, enter the tare value.
Fixed tare, <Fixed tare key> with saved tare value.
PLU tare, PLU with saved tare value.
Overwrite known tare
Known tare overwrite with possible
Manual tare Fixed tare yes
Manual tare PLU tare No
Fixed tare Manual tare No
Fixed tare PLU tare No
PLU tare Manual tare No
PLU tare Fixed tare yes
Rounding rules for known tare
After input and confirmation of the tare value, automatic rounding occurs in the lowest value
display position.
Scale with 2 g scale interval
Input of an odd tare value is rounded up to an even tare value.
Scale with 5 g scale interval
The tare value input is rounded up or down in the lowest value display position.
Input 1 or 2 Rounding off to 0
Input 3 or 4 Rounding off to 5
Input 6 or 7 Rounding off to 5
Input 8 or 9 Rounding off to 10
Manual tare
This function is country-dependent.
Manual tare means input of a known tare value.
61989850142 en-US 95 / 155
Page 96

Operating PowerScale Operating instructions K-Class Flex KF II
A known tare cannot be overwritten with an unknown tare.
Operating procedure
Scale is not loaded.
Weight value is zero (0.000 kg).
Press operating element
<Tare>
The input field for tare is
opened.
Enter known tare value, e.g.
900 g.
Confirm entry.
Tare value is displayed.
Weight value is negative and
marked with "NET".
Fixed tare
Fixed tare means taring with a tare value saved on a fixed tare key.
A known tare cannot be overwritten with an unknown tare.
Operating procedure
Scale is not loaded.
Weight value is zero (0.000 kg).
Press <Fixed tare> keys.
Display fixed tare keys instead
of article keys 1-9.
Press <Fixed tare key>, e.g.1.
The tare value saved on the
fixed tare key is tared, e.g. 0.002
kg.
PLU tare
PLU tare means taring with a tare value saved in the PLU data.
A known tare cannot be overwritten with an unknown tare.
Operating procedure
96 / 155 61989850142 en-US
Page 97

Operating instructions K-Class Flex KF II Operating PowerScale
Scale is not loaded.
Weight value is zero (0.000 kg).
Call up PLU.
The data of the assigned product are
displayed.
The tare value saved in the PLU data is
tared, e.g.0.010kg.
6.21.3 Operator tare
The operator can save a tare value and call it up again at a later time.
The operator tare is saved until another new tare value is saved.
Menu setting
- In menu "2 Data maintenance" / "3 Operator data" enter the operators.
Select 2 3
Save unknown tare for operator.
Operating procedure
Scale is not loaded.
Place empty container on load platter.
Press <Operator 1-n> keys.
Press <Save operator tare> key.
Press <Operator key>, e.g. 1.
Tare value is displayed and saved for the operator.
Save known tare for operator.
Operating procedure
Scale is not loaded. Scale is untared.
Press <Operator 1-n> keys.
Press <Save operator tare> key.
Press <Operator key>, e.g. 1.
The input field for tare is opened.
Enter tare value, e.g. 0.010 kg.
61989850142 en-US 97 / 155
Page 98

Operating PowerScale Operating instructions K-Class Flex KF II
Confirm entry.
Tare value is displayed and saved for the operator.
Call saved operator tare.
The tare can be called on any device in the system.
According to the Weight and Measures Act, calling a saved operator
tare is the same as a known tare.
Operating procedure
Scale is not loaded. Scale is untared.
Press <Operator 1-n> keys.
Press <Operator tare> key.
Press <Operator key>, e.g. 1.
The scale tares the value which was previously saved for Operator 1.
6.21.4 Deleting tare
Clear tare automatically
Clearing of a known or unknown tare occurs automatically after registration of the PLU and
unloading of the scale.
Clear tare manually
The function is country-dependent.
Delete a known or unknown tare.
Operating procedure
Unload scale
Tare value and negative weight value
must be identical, e.g. tare 0.016 kg,
weight value -0.016 kg.
Press operating element <TARE>.
Tare value is deleted. Weight value
is zero.
98 / 155 61989850142 en-US
Page 99
Operating instructions K-Class Flex KF II Troubleshooting
7 Troubleshooting
7.1 Malfunctions
Shut down equipment immediately in the event of recurring faults,
damage of any type, and suspicion of risk of injury.
Inform Bizerba Service.
DANGER
Supply voltage present when device is open, even if main
switch is switched off!
The consequences can be:
Danger of death from electric shock due to touching live components.
– Pull out power plug.
– Only qualified personnel may open the device.
The following table lists the most common problems along with their solutions and assists
you to solve problems you may encounter by trying the suggested remedies.
In the case of faults which you cannot eliminate yourself and which are not described in this
Operating Manual, please call your Bizerba customer service point.
Please provide your Bizerba Service with the following details:
– Device type (see identification plate)
– Device no. (see identification plate)
– Error description
7.2 Fault descriptions
Fault Cause Elimination
Scale in underload range below zero point.
Fit load platter / tray / pan correctly.
Remove objects positioned against
the load platter.
Remove objects from beneath load
platter / tray / pan.
Set scale to zero.
Scale in overload range above
maximum load.
Display does not illuminate.
61989850142 en-US 99 / 155
No supply voltage. Check and insert power cable.
Remove objects from load platter /
tray / pan.
Level scale.
Switch device on/off
Press power key.
Page 100

Troubleshooting Operating instructions K-Class Flex KF II
Fault Cause Elimination
Printer does not
print.
Weight value
changes.
Scale does not indicate weight
value, unit price,
selling price.
Thermal print head open. Close thermal print head correctly.
Ticket paper inserted incorrectly.
Load platter is incorrectly positioned or objects are touching
the load platter / tray / pan.
Soiling on or beneath the load
Insert ticket paper correctly.
Note coated side.
Clean load platter / tray / pan, position correctly and remove objects.
Level scale.
Switch device on/off.
platter / tray / pan.
Change the location of the scale.
Scale not leveled.
Unstable environment due to
drafts or vibrations.
Appears, if e.g. the item list is
hidden with the weight value in
Unload load platter / tray / pan.
Fit load platter / tray / pan correctly.
case of a loaded scale. Quit
the item list and call up a PLU.
Remove objects positioned against
the load platter / tray / pan.
Message "Weighing mode disabled" appears.
Remove objects from beneath load
platter / tray / pan.
Set scale to zero.
7.3 Text messages
The text messages are listed in the following table including cause and possible error elimination.
Message Cause Elimination
Attention!!
Scales switched
off, please
switch on!
Action not possible
Article not found Appears during sales. Enter correct article number.
Appears when the "Reports" menu
is selected. One or more devices
are not switched on.
Appears when order is selected.
The selected operator has not released an open ticket yet.
Switch on all devices.
Check cabling.
Close open ticket from operator.
<Total>, <Operator key>
Note department organization. Select correct department.
Check selected product in the PLU
maintenance.
Check menu items "PLU access
via department" and "EAN/UPC access via dept.".
Select 5 3 5
100 / 155 61989850142 en-US
 Loading...