

JETSCRUB PET
2526, 2529, 2527 SERIES
Go online for a comprehensive walkthrough
of your new purchase!
This guide features everything you need to get ready for first use,
including setting up, using and maintaining your machine, but join
us online for a comprehensive walkthrough. Our online support
includes tips and troubleshooting, videos, product registration,
parts, and more. Go to BISSELL.com/support.
BISSELL.com 1
IMPORTANT SAFETY INSTRUCTIONS
READ ALL INSTRUCTIONS BEFORE USING YOUR APPLIANCE.
When using an electrical appliance, basic precautions should be observed, including the following:
TO REDUCE THE RISK OF FIRE, ELECTRIC SHOCK
WARNING
OR INJURY:
» Connect to a p roperly grounded ou tlet only. See
grounding i nstructions . Do not modify the 3- prong
grounded plug.
» Do not leave app liance when it is plugge d in. Unplug
from outlet wh en not in use and before ser vicing.
» Use indoors only.
» Do not allow to be us ed as a toy. Close attention is
necessa ry when used by or nea r children.
» Do not use for a ny purpose other than d escribed
in this user gui de. Use only manufa cturer’s
recommended attachments.
» Do not use with d amaged cord or plug. If a ppliance
is not working a s it should, or has bee n dropped,
damaged , left outdoors , or dropped into water, have
it repaired at a n authorized service ce nter.
» Do not pull or c arry by cord, use cord as a han dle,
close a doo r on cord, or pull cord around s harp
edges or cor ners. Do not run ap pliance over cord.
Keep cord away from he ated surfaces.
» Do not unplu g by pulling on cord. To unplug , grasp
the plug, n ot the cord.
» Do not handl e plug or appliance with wet h ands.
» Do not put any o bject into openings . Do not use with
any opening b locked; keep openings f ree of dust,
lint, hair, and any thing that may reduce air f low.
» Keep hair, loose cl othing, fingers , and all parts of
body away from op enings and moving pa rts.
» Turn OFF all control s before plugging or unp lugging
appliance.
» Use extra c are when cleaning on st airs.
» Do not use to pick u p flammable or combu stible
materials (lig hter fluid, gasoline, ke rosene, etc.) or
use in areas wh ere they may be present.
» Do not use app liance in an enclosed s pace filled with
vapors give n off by oil-based pai nt, paint thinner,
some moth-proofing substances, flammable dust,
or other expl osive or toxic vapors.
» Do not use to pick u p toxic material (chlorine blea ch,
ammonia, drain cleaner, etc.).
» Do not pick up a nything that is burnin g or smoking,
such as cigaret tes, matches, or ho t ashes.
» Use only BIS SELL® cleaning produc ts intended for use
with this appl iance to prevent internal compo nent
damage. See the Cleaning Formula section of this
guide.
» Do not immer se. Use only on sur faces moistened by
the cleanin g process.
» Keep applian ce on a level surface.
» Do not carr y the appliance while in u se.
» Always instal l float before any wet pick-up
operation.
SAVE THESE INSTRUCTIONS
THIS MODEL IS FOR HOUSEHOLD USE ONLY. COMMERCIAL USE OF THIS UNIT VOIDS THE MANUFACTURER’S WARRANTY.
WARNING
Improper connection of the equipment-grounding conductor can result in a risk
of electri cal shock. Check w ith a qualified elec trician or servi ce person if you aren’t
sure if the out let is properly groun ded. DO NOT MODIF Y THE PLUG. If i t will not fit
the outlet, h ave a proper outlet inst alled by a qualified ele ctrician. Thi s appliance
is designe d for use on a nominal 120 -volt circuit, and ha s a grounding atta chment
plug that loo ks like the plug in the il lustration. Make ce rtain that the app liance
is connec ted to an outlet having the s ame configuration a s the plug. No plug
adapter should be used with this appliance.
GROUNDING INSTRUCTIONS
This appliance must be connected to a grounded
wiring syste m. If it should malf unction or break
down, groun ding provides a safe pa th of least
resistance for electrical current, reducing the risk
of electri cal shock. The cor d for this appliance
has an equipment-grounding conductor and a
grounding p lug. It must only b e plugged into an outl et that is properly inst alled
and grounded in accordance with all local codes and ordinances.
Grounded
Outlets
Grounding Pin
Troubleshooting
For a comprehensive walkthrough of your product and support tips visit BISSELL.com/support.
Problem Possible Cause Remedies
Loss of suction
power
Reduced spray OR
no spray
Other maintenance or service not included in the manual should be performed by an authorized service representative.
Dirty Water Tank has picked up maximum
amount of dirty water and has reached full
line.
Brush Roll Nozzle is not latched in place. Turn Power OFF / Unplug machine and re-install Brush Roll Nozzle.
Tanks may not be seated properly. Turn Power OFF / Remove both tanks and reseat them so they fit
Clean Water Tank is empty. Refill tank.
Clean Water Tank isn’t seated completely. Turn power OFF / Remove and re seat tank.
System isn’t completely primed. Hold Spray Trigger for 10 to 15 seconds to make sure the solution has
Brush Roll Nozzle isn’t latched in place. Turn power OFF / Unplug machine and re-install Brush Roll Nozzle.
Not holding trigger to spray solution. Hold trigger continuously while using the machine.
Empty Dirty Water Tank .
properly on the machine.
flowed to the spray tips .
Warranty
3-Year limited warranty, may vary by state. Visit BISSELL.com/support or call 1-844-383-2630
for complete warranty information.
2 BISSELL.com
We’re so happy you chose the JetScrub Pet. We put this guide
together to help you set up, use and maintain your JetScrub Pet.
We’ve also included some tips we think will come in handy when you
first start using your JetScrub Pet, so let’s get started!
For a comprehensive walkthrough of your product
go to BISSELL.com/support.
Warranty ...............................................................................2
What’s in the Box? .........................................................4
Getting to Know Your Carpet Washer ............. 4
Assembly .............................................................................. 4
Cleaning Formulas ......................................................... 5
Filling the Clean Water Tank....................................6
Cleaning Carpets and Area Rugs ........................7
Cleaning Your Stairs ......................................................8
Using CleanShot ..............................................................8
Emptying the Dirty Water Tank ............................9
Cleaning & Replacing the Brush Roll and
Chamber .............................................................................10
Using the Storage Tray ................................................11
Storing Your Machine ...................................................11
BISSELL.com 3
What’s in the Box?
Standard accessories may vary by model.To identify what should be included with your purchase,
please refer to the “Carton Contents” list located on the carton top flap. Additional accessories
may be purchased at BISSELL.com.
Body Handle
Storage Tray
(select models
only)
Carpet Brush Roll
& Nozzle
Hard Floor Brush
Roll & Nozzle
(select models only)
Nozzle Clean Out
Too l
Getting to Know Your Carpet Washer
For additional support videos and information about your product, visit BISSELL.com/support.
1
3
2
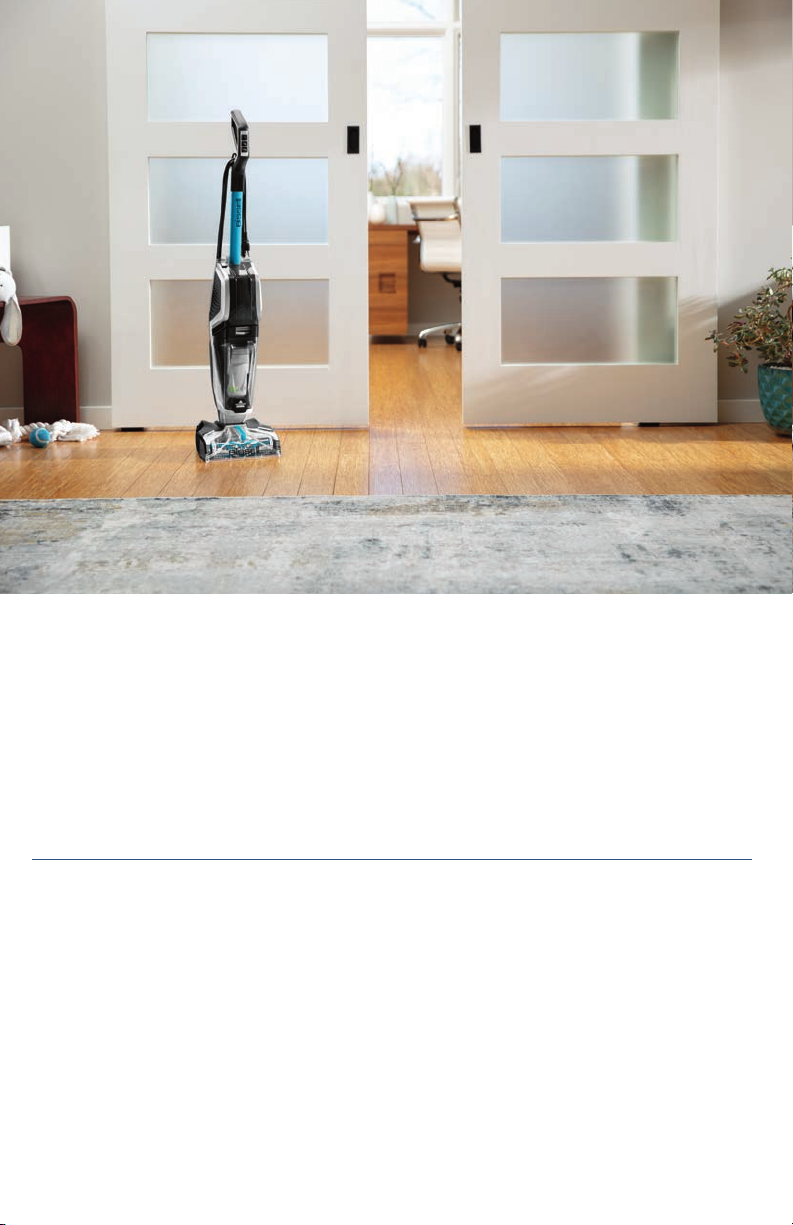
Product View
4
1. Upper Handle
2. SmartClean® Fingertip Controls
3. Solution Spray Trigger
4. Quick Release™ Cord Wrap
5. Clean Water Tank
5
6. Dirty Water Tank
7. Float Stack
8. Lower Cord Wrap
9. Removable Brush Roll & Nozzle
10. Cleanshot®
11. Foot
6
9
8
7
10
11
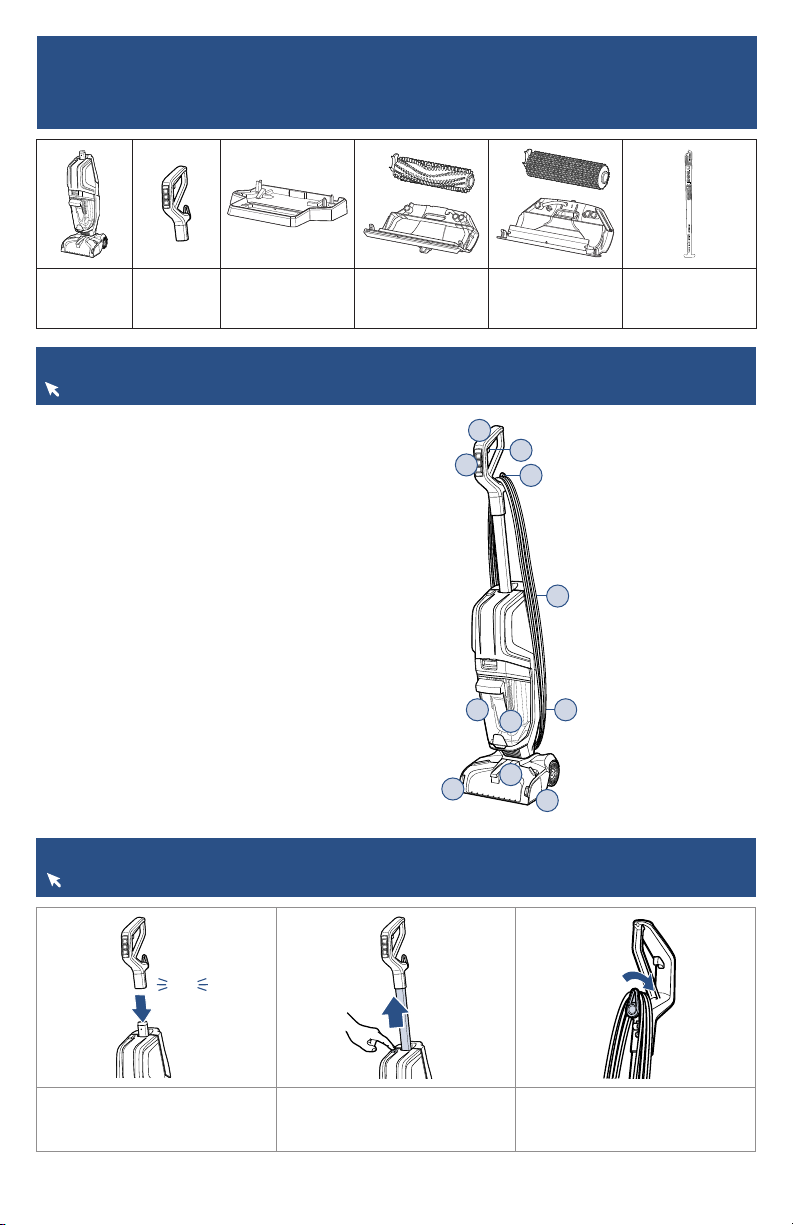
Assembly
Go to BISSELL.com/support for additional how-to videos.
click
1. Insert handle into handle
post until you hear a “click”.
4 BISSELL.com
2. Press button to extend
handle.
3. To easily unwrap the cord
for use, turn the Quick Release™
Cord Wrap downward.

Cleaning Formulas
FInd more formulas at BISSELL.com.
Keep plenty of BISSELL formulas on hand so you can clean whenever it fits your schedule. Always
use genuine BISSELL formulas in your machine. Other formulas may harm the machine and void the
warranty. Do not use Hard Floor Formula on area rugs or carpet.
PET Stain + Odor
Removes tough pet
stains
Includes Scotchgard™
Protector
Clean + Refresh
Powerful cleaning
and odor elimination
with Febreze
freshness
Pretreat
Pretreat spots and stains to improve carpet
cleaning performance.
PET PRO
OXY Stain
Destroyer
Permanently
removes tough
pet stains &
odors with OXY
PET Stain
Pretreat
Permanently
removes tough
pet stains &
odors with
Enzyme Action
PET Pretreat
+ Sanitize
Penetrates to
sanitize and
loosen tough
stains
Pet Stain & Odor
+ Antibacterial
Cleans and controls
odor causing bacteria
Use with EasyFill
System™ only
Boost
Add Boost carpet cleaning formula enhancers to
any formula to increase its effectiveness.
OXY Boost
Removes old,
set-in stains
permanently
PRO MAX
Clean + Protect
Our most powerful
formula for tough,
ground-in dirt & stains
Includes Scotchgard
Protector
PRO MAX
Boost
Add to formula
for 2X deep
cleaning power
PET PRO OXY
Urine Eliminator
Our best formula
for pet urine stains
& odors
Includes Scotchgard
Protector
WARNING To reduce the risk of fi re and electric shock due to internal component damage, use only BISSELL®
cleaning formulas intended for use with the carpet cleaning device.
BISSELL.com 5
PET OXY
Boost
Removes pet
stains and odors
permanently

Filling the Clean Water Tank
Go to BISSELL.com/support for additional how-to videos.
Note: Fill with warm (140°F/60°C MAX) tap water and add the appropriate BISSELL® formula. Do not
use boiling water. Do not heat water or tank in microwave.
1. The Clean Water Tank is on
the back of the machine.
4. Fill the Clean Water Tank with water and formula.
Cleaning Formula
Fill with hot tap water to the Water
Fill Line above Carpet Cleaning.
Add formula to the Formula Fill Line
above Carpet Cleaning. If you’re using
a Boost formula additive, add one
ounce to your tank.
2. Lift the tank straight up to
remove from the machine.
Antibacterial Formula with EasyFill System™
Fill with hot tap water to the Water Fill Line above the
EasyFill line. Twist the yellow cap back onto the tank.
Firmly insert the formula bottle into the cap on the tank
and squeeze until formula reaches the Formula line and
skip to step 6.
NOTICE: BISSELL Antibacterial formula is only for
BISSELL machines with EasyFill System™.
3. Unscrew the cap from the
Clean Water Tank.
5. Screw the cap back onto
the Clean Water Tank.
6 BISSELL.com
6. Align tank with grooves on
back of the machine. Slide tank
down until you hear a “click”.

Cleaning Carpets and Area Rugs
Go to BISSELL.com/support for how-to videos and cleaning tips.
Tips Before Cleaning
• If cleaning an entire room, consider moving your furniture to another area.
• Use a dry vacuum cleaner over area before using your deep cleaner.
• Pretreat stains with BISSELL Pretreat to improve performance on tough, set-in stains..
• Before cleaning area rugs, check the manufacturer’s tag and test an inconspicuous spot on the rug
for colorfastness. Don’t use on silk or delicate rugs.
• Do not overwet carpet. Be careful not to run over loose objects or edges of area rugs. Stalling the
brush may result in premature belt failure.
1. Ensure you are using the
Carpet Nozzle and Brush Roll.
2. Plug machine into a
properly grounded outlet.
10s
4. Gently place your foot
on the Foot of the machine
and pull back to recline the
machine.
Cleaning Modes & Instructions
Deep Clean Mode
Delivers a deep clean to your
carpet.
1. Hold Spray Trigger
• 1 pass forward
• 1 pass back
2. Release Spray Trigger
• 1 pass forward
• 1 pass back
5. Hold the Spray Trigger
for 10 seconds to prime the
system with cleaning solution
Note: When solution is
flowing, bubbles will form at
the edges of the Brush Roll
Nozzle. Holding the trigger
continuously may result in
overwetting your carpet.
Deep Clean Mode with
Antibacterial Formula
1. Hold Spray Trigger
• 1 pass forward
• 1 pass back
• 1 forward
2. Release Spray Trigger
• 1 pass back
3. Turn the machine ON and
OFF by pressing Deep Clean or
Express Clean.
6. Make forward and backward
passes based on your selected
cleaning mode. See “Cleaning
Modes & Instructions” below.
When finished, press Deep
Clean or Express clean to turn
unit OFF.
Express Clean Mode
Provides a lighter clean that
dries in 1 hour or less.
1. Hold Spray Trigger
• 1 pass forward
• 1 pass back
2. Release Spray Trigger
• 1 pass forward
• 1 pass back
BISSELL.com 7

Cleaning Your Stairs
Go to BISSELL.com/support for additional how-to videos.
1. Ensure you are using the
Carpet Nozzle and Brush Roll
for carpeted stairs and the
Hard Floor Nozzle and Brush
Roll for hard floor stairs.
4. Turn the machine ON and
OFF by pressing Deep Clean or
Express Clean.
2. Plug machine into a
properly grounded outlet.
5. Hold machine by placing
one hand on the Carry Handle
under the Dirty Water Tank
and one on the Upper Handle
of the machine.
Using CleanShot
Go to BISSELL.com/support for a full list of how-to videos.
3. Press button to retract
handle.
6. While holding the Spray
Trigger, make 1 pass forward.
Release the Spray Trigger and
make 1 pass back.
1. Press and hold the
CleanShot button located on
the Upper Handle.
2. Maneuver your machine
to completely cover the stain
with CleanShot spray. Release
the button when the stain
is completely soaked with
solution.
3. Maneuver the foot over the
stain to extract.
WARNING To reduce the risk of fire and electric shock:
When cleaning a hard surface, the Hard Floor Nozzle and Microfiber Brush Roll must be used and is only to be used with
BISSELL® Multi-Surface Floor Cleaning Formula intended for use with this appliance. Visit BISSELL.com to purchase.
8 BISSELL.com

Emptying the Dirty Water Tank
Go to BISSELL.com/support for a full list of how-to videos.
1. To release Dirty Water Tank,
press down on recessed button
on the top of the tank.
Tilt the tank slightly toward
you. Grab the handle and tank
with both hands and pull the
Dirty Water Tank up and away
to remove.
4. Rinse the inside of the Dirty
Water Tank. Rinse the float
located at the bottom of the
top of the Dirty Water Tank.
If the inside area where the
Dirty Water Tank sits is dirty,
wipe it clean with a rag.
2. Grab top of Dirty Water Tank in
recessed area on each side of the
Float Stack and pull upward to
remove top of tank.
The Float Stack prevents the tank
from overflowing. When the tank
is full, the Float Stack will shut
off your suction motor creating a
high-pitched sound indicating it is
time to empty your tank.
5. Leave parts out to dry
before reassembling.
Once parts are dry, reassemble
and replace the top of Dirty
Water Tank.
3. Pour dirty water and
debris out.
6. Angle the tank back into
body of machine inserting
bottom first. Tilt the top of the
tank toward the machine and
push into place until you hear
a “click”.
WARNING To reduce the risk of fire, electric shock or injury, turn power OFF and disconnect plug from
electrical outlet before performing maintenance or troubleshooting.
BISSELL.com 9

Cleaning & Replacing the Brush Roll and Chamber
Go to BISSELL.com/support for additional maintenance tips for your machine.
1. Grasp Brush Roll Nozzle on
both sides and pull upward to
remove.
4. Let your Brush Roll and
Brush Roll Nozzle dry before
reassembling.
2. Pull Brush Roll out by
grabbing the Brush Roll tab
and pulling upward.
5. Replace Brush Roll by
inserting the Brush Roll end
into the right side of the foot.
Then lock the pull tab into
place by pressing downward.
3. Rinse your brush roll and
brush roll nozzle with warm
water. The nozzle Clean Out
tool can be used to remove
hair and debris. Note: These
parts are not dishwasher or
automatic washing machine
safe.
If your Brush Roll chamber is
dirty, clean with a rag or towel.
6. Replace the Brush Roll
Nozzle by first lining up both
Brush Roll Nozzle tabs with the
edges of the foot. Then press
the nozzle back into place until
you hear a “click”.
WARNING To reduce the risk of fi re, electric shock or injury, turn power OFF and disconnect plug from
electrical outlet before performing maintenance or troubleshooting.
10 BISSELL.com

Using the Storage Tray (select models)
Go to BISSELL.com/support for feature videos of your machine.
1. Grasp Brush Roll Nozzle at
the front of the nozzle and pull
upward to remove.
4. Replace Brush Roll by
inserting the Brush Roll end
into the right side of the foot.
Then lock the pull tab into
place by pressing downward.
2. Pull Brush Roll out by
grabbing the Brush Roll tab
and pulling upward.
5. Replace the Brush Roll
Nozzle by first lining up the
Brush Roll Nozzle tabs with the
edges of the foot. Then press
the window back into place
until you hear a “click”.
3. Place the Brush Roll upright
in the Brush Roll Drying Tray
to dry.
Storing Your Machine
Visit BISSELL.com/support for additional maintenance tips for your machine.
Store your machine in a protected, dry a rea. When finished using the product, wrap cord around cord
wrap for storage.
NOTICE: To reduce the risk of a leaking condition, do not store unit where freezing may occur. Damage to
internal components may result.
WARNING To reduce the risk of fire, electric shock or injury, turn power OFF and disconnect plug from
electrical outlet before performing maintenance or troubleshooting.
BISSELL.com 11
 Loading...