

Page 1

Aurum
™
Total RNA Fatty and
Fibrous Tissue Kit
Instruction Manual
Catalog # 732-6830
The Aurum Total RNA Fatty and Fibrous Tissue Kit is composed of:
Module 1 – 732-6870 (Aurum Total RNA Fatty and Fibrous Tissue Module)
Module 2 – 732-6880 (PureZOL
packaged and shipped separately
™
RNA Isolation Reagent, 50 ml),
For technical support, call your local Bio-Rad office, or
in the US, call 1-800-4BIORAD (1-800-424-6723).
Page 2

Page 3

Table of Contents
Section 1 Introduction . . . . . . . . . . . . . . . . . . . . . . . . . . . .1
Section 2 Kit Components . . . . . . . . . . . . . . . . . . . . . . . . .2
Section 3 Storage Conditions . . . . . . . . . . . . . . . . . . . . . . .3
Section 4 Materials and Equipment Required
(Not Provided in the Kit) . . . . . . . . . . . . . . . . . . .3
Supplies for Tissue Grinding, Disruption,
and Homogenization . . . . . . . . . . . . . . . . . . . . . . . . . . .4
Additional Equipment Required for Vacuum Format . . . .4
Section 5 Before Using the Aurum™
Section 6 Vacuum Manifold Setup and Use With the
Total RNA Fatty and Fibrous Tissue Kit . . . . . . .5
Maximum Starting Material Amounts . . . . . . . . . . . . . . .5
Minimum Starting Material Amounts . . . . . . . . . . . . . . . .5
Reagents Used With the Aurum Total RNA
Fatty and Fibrous Tissue Kit . . . . . . . . . . . . . . . . . . . . . .7
Maintaining an RNase-Free Environment . . . . . . . . . . . .8
Sample Disruption and Homogenization . . . . . . . . . . . .9
Column Adaptor Plate . . . . . . . . . . . . . . . . . . .11
Guidelines for Vacuum Format . . . . . . . . . . . . . . . . . . .11
About the Column Adapter Plate (CAP) . . . . . . . . . . . .11
Preparing the Aurum Vacuum Manifold . . . . . . . . . . . .11
Vacuum Setup . . . . . . . . . . . . . . . . . . . . . . . . . . . . . . .12
Manifold Wash Setup . . . . . . . . . . . . . . . . . . . . . . . . . .13
Section 7 Vacuum Protocol . . . . . . . . . . . . . . . . . . . . . . .14
Section 8 Spin Protocol . . . . . . . . . . . . . . . . . . . . . . . . . .20
Section 9 Troubleshooting Guide . . . . . . . . . . . . . . . . . . .25
Section 10 Ordering Information . . . . . . . . . . . . . . . . . . . .32
Page 4

Page 5

Section 1
Introduction
The Aurum™ total RNA fatty and fibrous tissue kit produces high yields of
pure total RNA from samples that are difficult to disrupt. The kit is ideal for
fatty or fibrous tissues, or samples that are rich in RNases. It also works well
with most animal and plant tissues, cultured cells, yeast, and gram-negative
and gram-positive bacteria. With this kit, greater than 100 µg of total RNA can
be isolated from many sample types. Total RNA samples isolated using the
Aurum total RNA fatty and fibrous tissue kit are suitable for use in a variety of
downstream applications, including reverse transcription-PCR (RT-PCR), realtime PCR, in vitro translation, northern blots, and microarray analysis.
The Aurum total RNA fatty and fibrous kit uses a quick, easy-to-follow
procedure for the purification of total RNA from difficult-to-disrupt samples.
First, samples are disrupted and lysed using the PureZOL™ RNA isolation
reagent. Subsequently, chloroform is added to the lysate, mixed, and
centrifuged to achieve separation of the organic and aqueous phases. The
aqueous phase, which contains the RNA, is carefully recovered and mixed
with ethanol. The sample is then passed through a silica membrane packed in
the Aurum RNA binding mini column, where nucleic acids get bound. Wash
steps are performed to remove proteins and other cellular debris. An optional
on-column DNase I digest is performed to remove any remaining genomic
DNA. The RNA, which is eluted with the elution solution supplied in the kit, is
now ready for downstream applications without further manipulation.
The membrane in the Aurum RNA binding mini column selectively binds to
mRNA and larger rRNAs, while small RNA molecules less than
200 nucleotides, such as 5.8S rRNA, 5S rRNA, and tRNA (which together
comprise 15–20% of total RNA), are removed. The on-column DNase l digest
and subsequent wash steps that are performed during the purification
effectively remove genomic DNA contamination as well as the residual DNase
enzyme, eliminating the need for separate and lengthy DNase treatments and
DNase removal protocols on the eluted RNA.
The Aurum total RNA fatty and fibrous tissue kit is designed to isolate total
RNA from various amounts of tissue (5–100 mg) and cells (50–2.4 x 10
cells)*. The kit includes sufficient reagents and columns for 50 purifications. All
solutions and RNA binding mini columns in the kit are RNase-free, ensuring
the integrity of the isolated RNA. The Aurum total RNA fatty and fibrous tissue
kit may be used in a spin format, or in a vacuum format using the Aurum
vacuum manifold (catalog # 732-6470).
* The amount of starting material may be less for certain types of samples. For more detail, refer to
Section 5.
9
1
Page 6

Section 2
Kit Components
The Aurum™ total RNA fatty and fibrous tissue kit contains the following
components:
Components* Quantity/Amount
RNA binding mini columns 50
Capless wash tubes, 2.0 ml 50
Capped microcentrifuge tubes, 1.5 ml 50
Capped microcentrifuge tubes, 2.0 ml 100
DNase I (lyophilized) 1 vial
Low stringency wash solution 20 ml
(5x concentrate)
High stringency wash solution 40 ml
Elution solution 20 ml
DNase dilution solution 20 ml
PureZOL™ RNA isolation reagent** 50 ml
(packaged and shipped separately)
*There may be reagent remaining in the some bottles.
**PureZOL RNA isolation reagent contains poison (phenol) and an irritant (guanidine thiocyanate). The
reagent causes burns and can be fatal if ingested. When working with PureZOL, use gloves and
eye protection (lab glasses, shield, and safety goggles). Do not get on skin or clothing. Avoid
breathing vapor. Read warning notice on bottle and MSDS.
2
Page 7

Section 3
Storage Conditions
Store components of the kit at the recommended temperatures (see Table 1
below).
Table 1. Recommended storage temperature for the Aurum™ total
RNA fatty and fibrous tissue kit components.
Kit Components Storage Temperature
PureZOL™ RNA isolation reagent Store at 4–25°C
Low stringency wash buffer Room temperature (before and after the
addition of ethanol)
High stringency wash buffer Room temperature
Elution solution Room temperature
DNase dilution solution 4°C; allow solution to equilibrate to
room temperature before use
DNase I (lyophilized) Room temperature in lyophilized form;
once reconstituted in 250 µl of 10 mM
Tris, pH 7.5, aliquot and store at –20°C
in a nonfrost-free freezer. Do not freezethaw more than once after
reconstitution
Aurum RNA binding mini columns Room temperature
and microcentrifuge tubes
Section 4
Materials and Equipment Required
(Not Provided in the Kit)
• Microcentrifuge, capable of spinning at >12,000 x g at 4°C and room
temperature
• 95–100% ethanol, ACS grade or better
• Tris for DNase I reconstitution (catalog #161-0716)
• Chloroform (without additives such as isoamyl alcohol) for phase
separation; 0.2 ml of chloroform per 1 ml of PureZOL required
3
Page 8

Supplies for Tissue Grinding, Disruption, and Homogenization
• Fresh tissue: tissue cutter
• Frozen tissue: liquid nitrogen, mortar and pestle
• Tissue homogenizer: rotor-stator homogenizers, or bead mill
homogenizers recommended
Additional Equipment Required for Vacuum Format
• Aurum vacuum manifold with vacuum regulator and column adaptor plate
(catalog # 732-6470), or other vacuum manifold with luer fittings.
• Vacuum source (capability of –23 inHg required)
4
Page 9

Section 5
Before Using the Aurum™ Total RNA
Fatty and Fibrous Tissue Kit
Please read the following guidelines before proceeding with the total RNA
isolation.
Maximum Starting Material Amounts*
The Aurum total RNA fatty and fibrous tissue kit is designed to process up to
the amounts indicated below (per column):
•1 x 10
• One 10
•2.4 x 10
•3.0 x 10
• 100 mg of animal tissue (a 4 mm cube of most animal tissue weighs
• 100 mg of plant tissue
• 50 mg filamentous fungi
Warning: Processing larger amounts of starting material may lead to column
clogging and reduced RNA purity. It is crucial that the appropriate amount of
starting material be used. For samples that are known to be rich in RNA, it is
highly recommended that less than the maximum amount of starting material
be used so that the binding capacity of the column is not exceeded. In
addition, complete disruption and homogenization of the starting material is
critical to prevent column clogging and reduced RNA yields.
7
cultured mammalian cells grown in suspension
2
cm plate mammalian cultured cells grown in monolayer
9
of gram-positive or gram-negative bacteria (equivalent to
3 OD•ml of bacteria)
7
of yeast (equivalent to 3 OD•ml of yeast)
approximately 70–85 mg)
Minimum Starting Material Amounts
• 50 cultured mammalian cells
• 5 mg of animal tissue
• 5 mg plant tissue
* Spectrophotometric determination of bacterial or yeast culture density is a
REQUIREMENT for optimal total RNA isolation from these starting materials.
To determine the density of a bacterial or yeast culture (OD
50 µl of culture with 950 µl growth medium (20-fold dilution). Use the growth
medium as a blank and take the spectrophotometric reading at 600 nm.
Multiply this figure by 20 to calculate the OD
bacterial or yeast culture. Depending upon the OD
of the culture will be selected to provide an optimum amount of bacteria or
5
value of the undiluted
600
value, a specific volume
600
), combine
600
Page 10

yeast for processing. To calculate the volume of culture required, use the following
equation:
(OD
of undiluted culture) x (culture volume in ml) = # OD•ml
600
For example, 3 OD•ml of yeast would require 500 µl of an undiluted culture with an
OD
= 6.
600
Note: 1 OD
7
1 x 10
is equivalent to approximately 8 x 10⁸bacterial cells/ml, or
600
yeast cells/ml.
Table 2. Yield (per column) of total RNA from various samples using
the Aurum total RNA fatty and fibrous tissue kit.
Average Yield
Starting Material (Amount Used)* (µg)**
Cultured cells (1 x 10
7
)
293H 145
Bacteria (2.4 x 10
9
or 3 OD•ml)
E. coli 30
Yeast (3 x 10
7
or 3 OD•ml)
S. cerevisiae 64
Fatty animal tissue (100 mg)
Brain 96
Breast 58
Adipose 14
Fibrous animal tissue (100 mg)
Heart 85
Cartilage 54
Skin 63
Plant tissue (100 mg)
Potato 91
Arabidopsis 5
Filamentous fungi (50 mg)
Aspergillus niger 12
* Starting material amounts in parentheses are the maximum amounts recommended for this kit. Note: The
elution volume should be decreased to 30 µl if only a small amount of starting material (<500,000 cells or
<10 mg of animal or plant tissue) is used.
** Yield figures are representative of a minimum of 20 mini column preps performed in both vacuum and spin
formats.
6
Page 11

Reagents Used With the Aurum Total RNA Fatty and Fibrous
Tissue Kit
PureZOL™ RNA Isolation Reagent for Sample Lysis
Use 1 ml of PureZOL for up to:
• 100 mg of tissue
•1 x 10⁷cultured cells grown in suspension
• One 10 cm2plate of cultured cells grown in monolayer
•2.4 x 10⁹of gram-positive or gram-negative bacteria (equivalent to
3 OD•ml of bacteria)
•3 x 10
Low Stringency Wash Solution
• The low stringency wash solution is provided as a 5x concentrate. Add 4
DNase I
• 10 mM Tris, pH 7.5 prepared in DEPC-treated water (not supplied) is
• Reconstitute the lyophilized DNase I by adding 250 µl of 10 mM Tris, pH
7
of yeast (equivalent to 3 OD•ml of yeast)
volumes (80 ml) of 95–100% ethanol to the low stringency wash solution
concentrate before initial use
required to reconstitute the RNase-free DNase I that is provided as a
lyophilized powder
7.5 to the vial and mix by briefly pipetting up and down. Do not vortex
• Aliquot and store the reconstituted DNase I at –20°C in a nonfrost-free
freezer. Avoid freeze-thaw cycles
Note: 5 µl of the DNase I stock is needed per column or prep. When the
DNase is ready to be used, it must be mixed with 75 µl of the DNase
dilution solution (provided in the kit) per column. Once diluted with DNase
dilution solution, use the DNase immediately and do not refreeze for later
use
Elution Guidelines
• Apply elution solution directly to the membrane stack at the base of each
RNA binding mini column
Preparation of DEPC-Treated Water
• Autoclaving of laboratory solutions and buffers used for RNA preparation
does not guarantee the complete inactivation of RNases, which can
maintain residual activity causing RNA samples to be degraded. For this
reason, solutions and buffers should be treated with diethyl pyrocarbonate
7
Page 12

(DEPC) to inactivate RNases. DEPC is an efficient, strong, and nonspecific
RNase inhibitor that is usually used at a concentration of 0.1%
• To prepare a 0.1% (v/v) solution of DEPC-treated water, add 1.0 ml of
liquid DEPC per 1 L of water. Incubate the solution at 37°C for 1 hr while
mixing thoroughly. Autoclave the treated water to remove the DEPC
• Warning: DEPC is suspected to be a carcinogen and should be handled
with care. Always use gloves and open under a fume hood
Preparation of 10 mM Tris, pH 7.5, for DNase I Reconstitution
• To prepare 50 ml of 10 mM Tris, pH 7.5, add 60.6 mg of Tris (catalog #
161-0716) to 45 ml of DEPC-treated water. Mix until Tris is completely
dissolved. Adjust the pH of the solution by dropwise addition of 6N HCl.
Once the pH is adjusted to 7.5, add more DEPC-treated water to make a
final volume of 50 ml
Note: DEPC is destroyed by primary amines (e.g., Tris). If a solution
containing a primary amine will be DEPC-treated, omit the amine in
preparing the solution. Perform the DEPC treatment as described above
and add the amine to the autoclaved solution once the solution has
cooled
Preparation of 70% Ethanol
• To prepare 100 ml of 70% ethanol, add 70 ml of 95–100% ethanol to 30
ml of DEPC-treated water. Mix well before use.
Maintaining an RNase-Free Environment
• Although the components of this kit are provided free of contaminating
ribonucleases, great care must be taken not to contaminate the solutions
or the RNA binding columns. Gloves should always be worn when
handling RNA and should be changed frequently. Proceed through the
RNA isolation as quickly as possible with care
• Solutions that are prepared by the user should be treated with DEPC to
inactivate RNases as described above.
8
Page 13

• Nondisposable, nonautoclavable plasticware should be rinsed with 0.1 M
NaOH, 1 mM EDTA followed by several rinses with DEPC-treated water before
use
• Glassware and other autoclavable items may be treated using the DEPC
method described above for nonautoclavable plasticware, or by baking for 4
hr at 300°C
• Work surfaces and micropipets should be kept clean and wiped periodically
Sample Disruption and Homogenization
Successful isolation of total RNA is dependent on the efficient disruption and
homogenization of cells and tissues. Cell and tissue disruption is the physical
breakdown of cell walls and plasma membranes, usually done using mechanical
or enzymatic techniques. Efficient disruption facilitates the lysis of the starting
material and release of all the RNA contained in the sample, ensuring a high yield
of RNA. Incomplete disruption results in column clogging and significantly
reduced RNA yields. After disruption, proper mixing of the lysate is necessary to
produce a homogenous solution for efficient passage of the lysate through the
Aurum RNA binding mini column and for RNA to properly bind to the silica
membrane.
Isolation of RNA from nonadherent and adherent mammalian cultures typically
involves a straightforward disruption method such as repeated pipetting up and
down or passing through an 18-gauge needle and syringe. For animal and plant
tissues, more vigorous disruption methods may be required to increase the cell
surface area exposed to the PureZOL RNA isolation reagent while simultaneously
inhibiting RNases. Tissue disruption can be performed by first grinding with a
mortar and pestle under liquid nitrogen and then using either a rotor-stator
homogenizer or a bead mill homogenizer (see manufacturer instructions for more
detail). If a homogenizer is not available, passing the tissue sample through an
18-gauge needle and syringe may also work. However, RNA yields will not be as
high as when using a homogenizer.
Bacteria and yeast cells have thick cells walls that are difficult to break. Repeated
pipetting up and down or passing the sample through an 18-gauge needle and
syringe may not be sufficient for lysing bacteria and yeast cells. More vigorous
physical disruption methods, such as using a rotor-stator homogenizer or a bead
mill homogenizer (see manufacturer instructions for more detail), may be required
in order to lyse the bacterial and yeast cells.
9
Page 14

Table 3. Disruption and homogenization methods.
Starting
Material Disruption Method Homogenization Method
Animal tissue Grind tissue with a Pipetting up and down,
mortar and pestle rotor-stator homogenizer,
under liquid nitrogen, bead mill homogenizer, or
use a rotor-stator 18-gauge needle and syringe
homogenizer, bead
mill homogenizer, or
18-gauge needle
and syringe
Plant tissue Grind tissue with a Pipetting up and down,
mortar and pestle rotor-stator homogenizer,
under liquid nitrogen, bead mill homogenizer, or
use a rotor-stator 18-gauge needle and syringe
homogenizer, bead
mill homogenizer, or
18-gauge needle
and syringe
Cultured cells Pipet up and Pipetting up and down, or
down, or use 18-gauge 18-gauge needle and syringe
needle and syringe
Bacteria Rotor-stator Pipetting up and down,
homogenizer, bead rotor-stator homogenizer, or
mill homogenizer, bead mill homogenizer
pipet up and down,
or 18-gauge needle
and syringe
Yeast Rotor-stator Pipetting up and down,
homogenizer, bead rotor-stator homogenizer, or
mill homogenizer, or bead mill homogenizer
18-gauge needle
and syringe
• Mortar and pestle: freeze the tissue with liquid nitrogen, then grind it into a
fine powder under liquid nitrogen
• Pipet up and down: pass the lysate through a standard micropipet tip
several times
• 18-gauge needle and syringe: pass the lysate through the needle several
times
• Rotor-stator homogenizer: immerse the tip of the homogenizer into the
solution and homogenize for 30–60 sec
• For bead mill homogenizers, follow manufacturer's instructions
If column clogging occurs, switching to a more vigorous homogenization
method may lower the incidence of column clogging.
10
Page 15

Section 6
Vacuum Manifold Setup and Use With the
Column Adaptor Plate
Guidelines for Vacuum Format
• The recommended operating range is –17 to –20 inHg. Do not exceed
–25 inHg when performing this protocol. A vacuum regulator is strongly
recommended to establish the appropriate negative pressure.
Table 4. Pressure unit conversions.
To convert from inches of mercury (inHg) to: Multiply by:
millimeters of mercury or torr (mmHg, torr) 25.4
millibar (mbar) 33.85
atmospheres (atm) 0.03342
pounds per square inch (psi) 0.4912
kilopascals (kPa) 3.385
About the Column Adaptor Plate (CAP)
The Aurum™ CAP interfaces with the Aurum vacuum manifold to convert the
manifold from a plate-processing to a column-processing system. The CAP has
18 luer fittings in a 6 x 3 array and comes supplied with luer caps. Up to 18
Aurum RNA binding mini columns can be accommodated on the CAP without
the need for connectors or other manifold accessories. The CAP will also
accommodate other columns with luer ends.
When vacuum is applied to the manifold, the CAP should self-seat, forming
an airtight seal without the need to press it down. However, the application of
gentle downward force may occasionally be required to facilitate seating.
Preparing the Aurum™ Vacuum Manifold
Tubing provided in the Aurum vacuum manifold kit (catalog # 732-6470) is 4 ft
long and must be cut into appropriate pieces before proceeding.
Prior to setup, you may ensure that the gauge pointer is adjusted to zero by
removing the lens cover, followed by turning the adjustment pin located
beneath the dial face.
11
Page 16
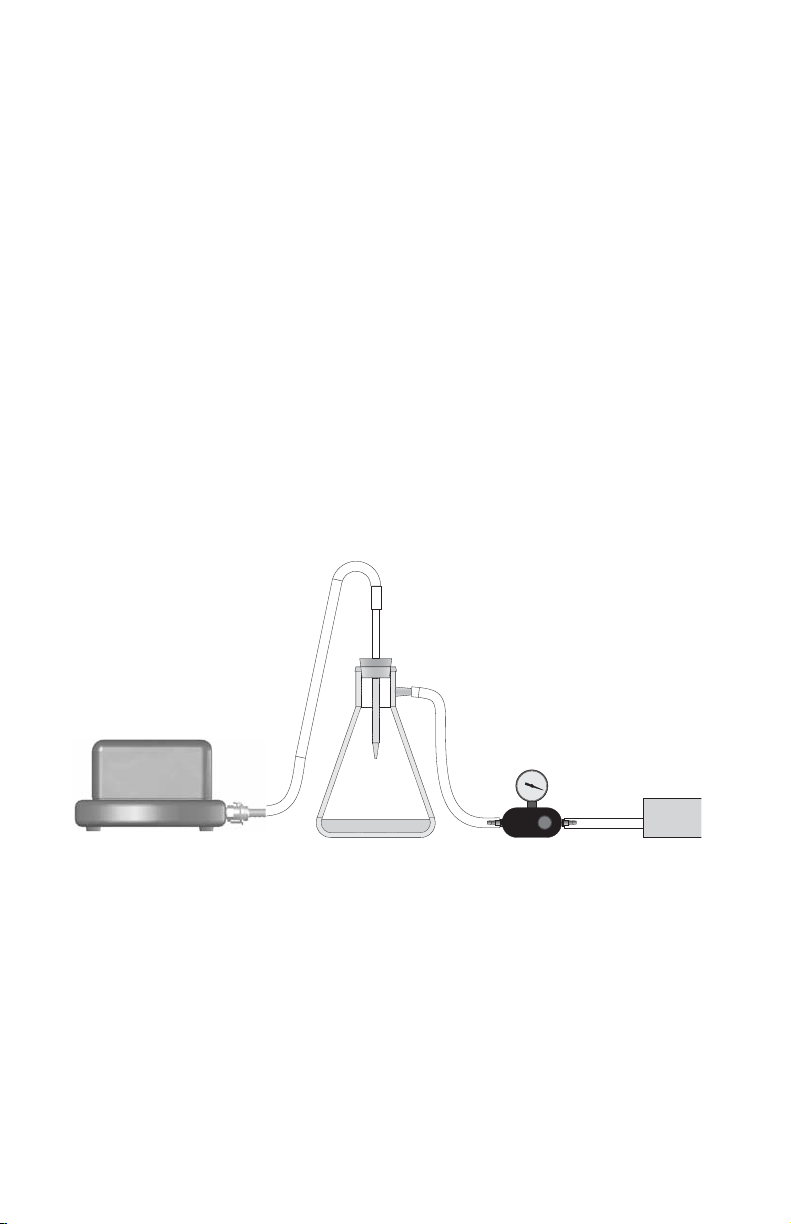
Vacuum Setup (Figure 1)
1. Cut tubing into three pieces of appropriate length.
2. Use one piece of tubing to connect to the right side of the vacuum
regulator to the vacuum source.
3. Use another piece of tubing to connect the left side of the vacuum
regulator to the sidearm of the filter flask.
4. Place a rubber stopper with hole into the mouth of the filter flask. Insert
a serological pipette (or comparable) into the hole of the stopper.
5. Snap in the black sealed end of the quick connect fitting into the
manifold base.
6. Finally, use the last piece of tubing to connect the filter flask to the quick
connect fitting of the nozzle of the manifold.
Note: Use of the Aurum™ vacuum regulator is strongly recommended
to ensure full control of the negative pressure of the manifold.
Vacuum manifold
Filter flask
Fig. 1. Vacuum setup conditions.
12
Vacuum regulator
Vacuum source
Page 17

Manifold Wash Setup (Figure 2)
1. Insert the CAP (luer ends up) into the depression in the vacuum manifold
top. Ensure that the CAP rests evenly on the gasket.
2. Insert the luer ends of the desired columns into the available luer fittings,
ensuring a tight fit.
3. Close the unused luer fittings with the caps provided. Close caps by
rotating clockwise until light resistance is encountered. Excessive
tightening of a cap may cause the luer fitting to dislodge when the cap is
removed.
4. The manifold is now ready for column processing according to the
vacuum protocol of the appropriate column purification kit.
5. When ready to elute, proceed with the appropriate spin elution step as
recommended by the protocol.
6. After finishing the elution, rinse the CAP and Aurum vacuum manifold
with water and air dry or wipe with paper towels.
CAP
Manifold
top
Manifold
base
Fig. 2. Manifold setup for column processing.
13
Page 18

Section 7
Vacuum Protocol
All steps are carried out at room temperature unless otherwise indicated.
Vacuum filtration steps should be carried out at –17 to –23 inHg for optimum
performance.
Important: If using the kit for the first time, please read Section 5, "Before
Using the Aurum™ Total RNA Fatty and Fibrous Tissue Kit," and Section 6,
"Vaccum Manifold Setup and Use With the Column Adaptor Plate" before
proceeding.
This procedure requires the Aurum vacuum manifold and column adaptor
plate (catalog # 732-6470), or any vacuum manifold with luer fittings. If the
necessary vacuum manifold is not available, follow the spin protocol in
Section 8.
Centrifugation steps can be performed on any commercially available
microcentrifuge that can accommodate 1.5 ml and 2.0 ml microcentrifuge
tubes and can spin at >
disposable polypropylene tubes be used throughout the procedure.
Procedure
1. Measure the amount of starting material. Note that the Aurum total
RNA fatty and fibrous tissue kit is designed to process up to the amounts
indicated below (per column):
•1 x 10
• One 10
•2.4 x 10
•3.0 x 10
7
cultured mammalian cells grown in suspension
2
cm plate mammalian cultured cells grown in monolayer
9
7
12,000 x g. It is recommended that sterile,
of gram-positive or gram-negative bacteria
of yeast
• 100 mg of animal tissue (a 4 mm cube of most animal tissue weighs
70–85 mg)
• 100 mg of plant tissue
• 50 mg filamentous fungi
14
Page 19

Warning: Processing larger amounts of starting material may lead to column
clogging and reduced RNA purity. It is crucial that the appropriate amount of
starting material be used. For samples that are known to be rich in RNA, it is
highly recommended that less than the maximum amount of starting material
be used so that the binding capacity of the column is not exceeded. In
addition, complete disruption and homogenization of the starting material is
critical to prevent column clogging and reduced RNA yields.
2. Disrupt and homogenize the sample. Below are recommended
procedures for disruption and homogenization.
Note: Incomplete disruption will clog the column in subsequent steps and
result in reduced yields of total RNA.
Fresh Tissue
Fresh tissues can be processed in PureZOL™ immediately after dissection.
Alternatively, freshly dissected tissue can be immediately frozen in liquid
nitrogen and processed using instructions for frozen tissue. Transfer up to
100 mg of freshly dissected tissue into a 2.0 ml microcentrifuge tube and
add 1 ml of PureZOL. Disrupt the sample for 30–60 sec using a rotor-stator
homogenizer or a bead mill homogenizer (refer to manufacturer instructions
for more details). Although not as effective, passing the tissue sample
through an 18-gauge needle and syringe can be used for sample
disruption if a homogenizer is not available. Pass the sample through the
needle and syringe until no more solid tissue is left in the lysate. The
sample volume should not exceed 10% of the volume of PureZOL used for
disruption. Proceed to step 3.
Frozen Tissue
Grind up the frozen tissues to fine powder with a mortar and pestle under
liquid nitrogen. Avoid thawing the sample by periodically adding liquid
nitrogen to the mortar. Weigh up to 100 mg of tissue and transfer the
sample into a 2.0 ml microcentrifuge tube. Add 1 ml of PureZOL and
disrupt for 30–60 sec using a rotor-stator homogenizer or a bead mill
homogenizer (refer to manufacturer's instructions for more details).
Although not as effective, passing the tissue sample through an 18-gauge
needle and syringe can be used for sample disruption if a homogenizer is
not available. Pass the sample through the needle and syringe until no
more solid tissue is left in the lysate. The sample volume should not exceed
10% of the volume of PureZOL used for disruption. Proceed to step 3.
15
Page 20

Cells Grown in a Monolayer
Cells grown in a monolayer should be lysed with PureZOL directly in the
culture dish. Aspirate the culture medium and immediately add 1 ml of
PureZOL to a 10 cm
2
dish. Pass the lysate through a pipet several times.
The amount of PureZOL added is dependent on the area of culture dish
(1 ml per 10 cm
2
) and not on cell number. Insufficient volumes of PureZOL
may result in DNA contamination. Proceed to step 3.
Note: Do not wash cells prior to the addition of PureZOL as this could
increase the possibility of mRNA degradation.
Suspension Cells (Mammalian, Plant, Bacterial, or Yeast)
Pellet the cells by centrifuging at 3,000–5,000 x g for 2 min. Immediately
lyse by adding 1 ml of PureZOL to 1 x 10
cells, 2.4 x 10
9
of gram-positive or gram-negative bacteria, or 3.0 x 10⁷of
7
cultured mammalian and plant
yeast (equivalent to 3 OD•ml of yeast). Pass the lysate through a pipet or
an 18-gauge needle and syringe several times. To improve the efficiency of
the cell lysis process, a rotor-stator homogenizer or a bead mill
homogenizer is recommended to disrupt the cell walls of yeast and
bacteria. Bacteria and yeast lysate can also be heated to 55°C for 10 min
prior to adding chloroform to increase lysis effectivity of PureZOL. Proceed
to step 3.
Note: Do not wash cells prior to the addition of PureZOL as this could
increase the possibility of mRNA degradation.
3. Once the sample has been disrupted in PureZOL, incubate the
lysate at room temperature for 5 min to allow the complete
dissociation of nucleoprotein complexes.
Note: Following the disruption step, the sample can be stored at –70°C for
at least one month. To process frozen lysates, samples should be thawed
at room temperature. If necessary, heat samples to 37°C in a water bath
for 5–10 min to completely dissolve salts. Avoid extended treatment at
37°C, which can cause chemical degradation of the RNA.
It is recommended that lysate from tissues that are rich in fat,
polysaccharides, proteins, and extracellular material be centrifuged at
12,000 x g for 10 min at 4°C following the 5 min incubation at room
temperature. This step removes any solid insoluble debris that was left
after the disruption step. Transfer the supernatant into a new 2.0 ml
microcentrifuge tube without aspirating the pellet, then proceed to step 4.
For lipid-rich samples, avoid transferring the excess fat that collects as a
top layer. Carryover of the solid debris can cause column clogging and
affect RNA sample purity.
16
Page 21

4. Add 0.2 ml of chloroform to the lysate, then cover and shake
vigorously for 15 sec. Do not vortex!
5. Incubate for 5 min at room temperature while periodically
mixing the sample.
6. Centrifuge at 12,000 x g for 15 min at 4°C.
Following centrifugation, the mixture will separate into three phases: an
upper, colorless aqueous phase, a white interphase, and a lower, red
organic phase. RNA will be exclusively in the aqueous phase, while DNA
and proteins remain in the interphase and organic phase. The volume of
the aqueous phase should be approximately 600 µl, or 60% of the volume
of PureZOL used in the initial disruption.
If removal of contaminating DNA is a requirement, prepare the DNase I
enzyme by following steps a-b below while centrifuging the samples for phase
separation:
a. DNase I is provided as a lyophilized powder. If the DNase has already
been reconstituted, skip to step b. Otherwise, reconstitute the DNase I
by adding 250 µl of 10 mM Tris, pH 7.5 (not provided) to the vial and
mix by pipetting up and down briefly. Do not vortex! See Section 4,
Materials and Equipment Required (Not Provided in the Kit), on how to
prepare 10 mM Tris, pH 7.5.
b. For each column to be processed, mix 5 µl of reconstituted DNase I
with 75 µl of DNase dilution solution in a 1.5 ml microcentrifuge tube.
Scale up proportionally if processing more than one column. Once
diluted with DNase dilution solution, do not refreeze for later use.
7. Without disturbing the interphase, immediately transfer the
aqueous phase to a 2.0 ml microcentrifuge tube.
Note: It is crucial that none of the interphase or organic phase is
transferred with the aqueous phase. It is recommended that some of the
aqueous phase be left behind to avoid the risk of contaminating the RNA
with contaminants such as phenol, which can interfere with downstream
applications.
8. Add an equal volume (approximately 600 µl) of 70% ethanol (not
provided) to the tube and mix thoroughly by pipetting up and
down.
9. Attach an Aurum total RNA binding mini column to a luer fitting
of the column adaptor plate on the Aurum vacuum manifold or
to a compatible vacuum manifold. Refer to Figure 2 for setup. The
vacuum source should be turned off and the vacuum regulator should be
completely open.
17
Page 22

10. Pipet 700 µl of the RNA sample into the RNA binding mini
column. Turn the vacuum on and adjust to –17 to –23 inHg by closing
the vacuum regulator. Continue to apply vacuum until all of the RNA
sample passes through the column. Open the vacuum regulator until the
gauge indicates 0 inHg.
11. Repeat step 11 for the remainder of the sample.
The Aurum total RNA fatty and fibrous tissue kit supplies RNase-free
DNase I to be used to treat samples for complete removal of
contaminating genomic DNA. If removal of genomic DNA is not a
requirement, proceed directly to step 14. Otherwise, perform on-column
DNase I digest by proceeding to step 12.
12. Add 700 µl of low stringency wash solution (already
supplemented with ethanol) to the RNA binding column and
close the vacuum regulator dial until the gauge indicates –17
to –23 inHg. Continue to apply the vacuum until the low stringency
wash solution passes through the column. Open the vacuum regulator
until the gauge indicates 0 inHg.
13. Remove any contaminating genomic DNA from the RNA
sample.
a. Add 80 µl of the diluted DNase I to each column processed, making
sure to add the DNase to the center of the membrane stack at the
bottom of each column.
b. Allow the DNase digest to incubate at room temperature for 15 min.
14. Add 700 µl of high stringency wash solution to the RNA
binding mini column and close the vacuum regulator dial until
the gauge indicates –17 to –23 inHg. Continue to apply the vacuum
until the high stringency wash solution passes through the column. Open
the vacuum regulator until the gauge indicates 0 inHg.
15. Add 700 µl of low stringency wash solution (already
supplemented with ethanol) to the RNA binding column and
close the vacuum regulator dial until the gauge indicates –17
to –23 inHg. Continue to apply the vacuum until the low stringency
wash solution has passed through the column. Open the vacuum
regulator until the gauge indicates 0 inHg.
16. Transfer the RNA binding mini column to a 2.0 ml capless tube
(provided). Centrifuge for 2 min at >12,000 x g to remove the
residual wash solution.
17. Transfer the RNA binding column to a 1.5 ml microcentrifuge
tube (provided).
18
Page 23

18. Pipet 40 µl (or 30 µl)†of the elution solution onto the center of
the membrane at the bottom of the RNA binding column.
†
Note: When isolating total RNA from small amounts of starting material
(<10 mg of tissue or 500,000 cells), perform a single elution with 30 µl
of the elution solution. Do not perform step 21.
19.Incubate 1 min for complete soaking and saturation of the
membrane.
20. Centrifuge for 2 min at >12,000 x g to elute the total RNA.
21. Repeat steps 18 and 19 using 40 µl of the elution solution if
the starting amounts of starting material is more than 10 mg of
tissue or 500,000 cells.
Note: The eluted total RNA samples can be used immediately in downstream
applications. Alternatively, the RNA sample can be aliquoted and stored at
–20°C or –70°C for later use.
19
Page 24

Section 8
Spin Protocol
Important: If using the kit for the first time, please read Section 6, "Before
Using the Aurum™ Total RNA Fatty and Fibrous Tissue Kit," before
proceeding.
Centrifugation steps can be performed on any commercially available
microcentrifuge that can accommodate 1.5 and 2.0 ml microcentrifuge tubes
and can spin at >
polypropylene tubes be used throughout the procedure.
Protocol
1. Measure the amount of starting material. Note that the Aurum total
RNA fatty and fibrous tissue kit is designed to process up to the amounts
indicated below (per column):
•1 x 10
• One 10
•2.4 x 10
•3.0 x 10
• 100 mg of animal tissue (a 4 mm cube of most animal tissue weighs
70–85 mg)
• 100 mg of plant tissue
• 50 mg filamentous fungi
12,000 x g. It is recommended that sterile, disposable
7
cultured mammalian cells grown in suspension
2
cm plate mammalian cultured cells grown in monolayer
9
gram-positive or gram-negative bacteria
7
yeast cells
Warning: Processing larger amounts of starting material may lead to column
clogging and reduced RNA purity. It is crucial that the appropriate amount of
starting material be used. For samples that are known to be rich in RNA, it is
highly recommended that less than the maximum amount of starting material
be used so that the binding capacity of the column is not exceeded. In
addition, complete disruption and homogenization of the starting material is
critical to prevent column clogging and reduced RNA yields.
2. Disrupt and homogenize the sample. Below are recommended
procedures for disruption and homogenization.
Note: Incomplete disruption will clog the column in subsequent steps and
result in reduced yields of total RNA.
Fresh Tissue
Fresh tissue can be processed in PureZOL™ immediately after dissection.
Alternatively, freshly dissected tissue can be immediately frozen rapidly in
liquid nitrogen and processed using instructions for frozen tissue. Transfer
20
Page 25

up to 100 mg of freshly dissected tissue into a 2.0 ml microcentrifuge tube
and add 1 ml of PureZOL. Disrupt the sample for 30–60 sec using a
rotor-stator homogenizer or a bead mill homogenizer (refer to manufacturer
instructions for more details). Although not as effective, passing the tissue
sample through an 18-gauge needle and syringe can be used for sample
disruption if a homogenizer is not available. Pass the sample through the
needle and syringe until no more solid tissue is left in the lysate. The
sample volume should not exceed 10% of the volume of PureZOL used for
disruption. Proceed to step 3.
Frozen Tissue
Grind up the frozen tissue to fine powder with a mortar and pestle under
liquid nitrogen. Avoid thawing the sample by periodically adding liquid
nitrogen to the mortar. Weigh up to 100 mg of tissue and transfer the
sample into a 2.0 ml microcentrifuge tube. Add 1 ml of PureZOL and
disrupt for 30–60 sec using a rotor-stator homogenizer or a bead mill
homogenizer (refer to manufacturer instructions for more details). Although
not as effective, passing the tissue sample through an 18-gauge needle
and syringe can be used for sample disruption if a homogenizer is not
available. Pass the sample through the needle and syringe until no more
solid tissue is left in the lysate. The sample volume should not exceed 10%
of the volume of PureZOL used for disruption. Proceed to step 3.
Cells Grown in a Monolayer
Cells grown in a monolayer should be lysed with PureZOL directly in the
culture dish. Aspirate the culture medium and immediately add 1 ml of
PureZOL to a 10 cm
2
dish. Pass the lysate through a pipet several times.
The amount of PureZOL added is dependent on the area of culture dish
(1 ml per 10 cm
2
) and not on cell number. Insufficient volumes of PureZOL
may result in DNA contamination. Proceed to step 3.
Note: Do not wash cells prior to the addition of PureZOL as this could
increase the possibility of mRNA degradation.
Suspension Cells (Mammalian, Plant, Bacterial, or Yeast)
Pellet the cells by centrifuging at 3,000–5,000 x g for 2 min. Immediately
lyse by adding 1 ml of PureZOL to 1 x 10
cells, 2.4 x 10
9
of gram-positive or gram-negative bacteria, or 3.0 x 10⁷of
7
cultured mammalian and plant
yeast (equivalent to 3 OD•ml of yeast). Pass the lysate through a pipet or
an 18-gauge needle and syringe several times. To improve the efficiency of
the cells lysis process, a rotor-stator homogenizer or a bead mill
homogenizer is recommended to disrupt the cell walls of yeast and
bacteria. Bacteria and yeast lysate can also be heated to 55°C for 10 min
prior to adding chloroform to increase lysis effectivity of PureZOL. Proceed
to step 3.
21
Page 26

Note: Do not wash cells prior to the addition of PureZOL as this could
increase the possibility of mRNA degradation.
3. Once the sample has been disrupted in PureZOL, incubate the
lysate at room temperature for 5 min to allow the complete
dissociation of nucleoprotein complexes.
Note: Following the disruption step, the sample can be stored at –70°C for
at least one month. To process frozen lysates, samples should be thawed
at room temperature. If necessary, heat samples to 37°C in a water bath
for 5–10 min to completely dissolve salts. Avoid extended treatment at
37°C, which can cause chemical degradation of the RNA.
It is recommended that lysate from tissues that are rich in fat,
polysaccharides, proteins, and extracellular material be centrifuged at
12,000 x g for 10 min at 4°C following the 5 min incubation at room
temperature. This step removes any solid insoluble debris that was left
after the disruption step. Transfer the supernatant into a new 2.0 ml
microcentrifuge tube without aspirating the pellet, then proceed to step 4.
For lipid-rich samples, avoid transferring the excess fat that collects as a
top layer. Carryover of the solid debris can cause column clogging and
affect RNA sample purity.
4. Add 0.2 ml of chloroform to the lysate, then cover and shake
vigorously for 15 sec. Do not vortex!
5. Incubate for 5 min at room temperature while periodically
mixing the sample.
6. Centrifuge at 12,000 x g for 15 min at 4°C.
Following centrifugation, the mixture will separate into three phases: an
upper, colorless aqueous phase, a white interphase, and a lower, red
organic phase. RNA will be exclusively in the aqueous phase, while DNA
and proteins remain in the interphase and organic phase. The volume of
the aqueous phase should be approximately 600 µl, or 60% of the volume
of PureZOL used in the initial disruption.
If removal of contaminating DNA is a requirement, prepare DNase I enzyme by
following steps a–b below while centrifuging the samples for phase separation:
a. DNase I is provided as a lyophilized powder. If the DNase has already
been reconstituted, skip to step b. Otherwise, reconstitute the DNase I
by adding 250 µl of 10 mM Tris, pH 7.5 (not provided) to the vial and
mix by pipetting up and down briefly. Do not vortex! See Section 4,
Materials and Equipment Required (Not Provided in the Kit), on how to
prepare 10 mM Tris, pH 7.5.
22
Page 27

b. For each column to be processed, mix 5 µl of reconstituted DNase I with
75 µl of DNase dilution solution in a 1.5 ml microcentrifuge tube. Scale up
proportionally if processing more than one column. Once diluted with
DNase dilution solution, do not refreeze for later use.
7. Without disturbing the interphase, immediately transfer
aqueous phase to a 2.0 ml microcentrifuge tube.
Note: It is crucial that none of the interphase or organic phase is
transferred with the aqueous phase. It is recommended that some of the
aqueous phase be left behind to avoid the risk of contaminating the RNA
with contaminants such as phenol, which can interfere with downstream
applications.
8. Add an equal volume (approximately 600 ml) of 70% ethanol
(not provided) to the tube and mix thoroughly by pipetting up
and down.
9. Insert an RNA binding column into a 2.0 ml capless wash tube
(provided).
For steps 10–21, all centrifugation steps are performed at room
temperature.
10. Pipet up to 700 µl of the RNA sample into the RNA binding
mini column. Centrifuge for 60 sec at >12,000 x g. Remove the
RNA binding column from the wash tube, discard the filtrate from the
wash tube and replace the column into the same wash tube.
11. Repeat step 10 for the remainder of the sample.
The Aurum total RNA fatty and fibrous tissue kit supplies RNase-free
DNase I to be used to treat samples for complete removal of
contaminating genomic DNA. If removal of genomic DNA is not a
requirement, proceed directly to step 14. Otherwise, perform on-column
DNase I digest by proceeding to step 12.
12. Add 700 µl of low stringency wash solution (already
supplemented with ethanol) to the RNA binding column.
Centrifuge for 30 sec at >12,000 x g. Discard the low stringency
wash solution from the wash tube and replace the column into the same
wash tube.
13. Remove any contaminating genomic DNA from the RNA
sample.
a. Add 80 µl of the diluted DNase I to each column processed, making
sure to add the DNase to the center of the membrane stack at the
bottom of each column.
b. Allow the DNase digest to incubate at room temperature for 15 min.
23
Page 28

14.Add 700 µl of high stringency wash solution to the RNA binding
column. Centrifuge for 30 sec at >
12,000 x g. Discard the high
stringency wash solution from the wash tube and place the column back
into the same wash tube.
15.Add 700 µl of low stringency wash solution (already
supplemented with ethanol) to the RNA binding column.
Centrifuge for 1 min at >
12,000 x g. Discard the filtrate from the wash tube
and place the column back into the same wash tube.
16.Centrifuge for an additional 2 min at >
12,000 x g to remove
residual wash solution.
17.Transfer the RNA binding column to a 1.5 ml capped
microcentrifuge tube (provided).
18.Pipet 40 µl (or 30 µl)
†
of the elution solution onto the center of
the membrane at the bottom of the RNA binding column.
†
Note: When isolating total RNA from small amounts of starting material
(<10 mg of tissue or 500,000 cells), perform a single elution with 30 µl of
the elution solution. Do not perform step 21.
19.Incubate 1 min for complete soaking and saturation of the
membrane.
20.Centrifuge for 2 min at >12,000 x g to elute the total RNA.
21.Repeat steps 18 and 19 using 40 µl of the elution solution if the
starting amounts of starting material is more than 10 mg of
tissue or 500,000 cells.
Note: The eluted total RNA samples can be used immediately in downstream
applications. Alternatively, the RNA sample can be aliquoted and stored at
–20°C or –70°C for later use.
24
Page 29

Section 9
Troubleshooting Guide
Problems that may be encountered during RNA purification:
Problem Possible Cause Recommended Solution
Incomplete Lysate was not mixed Once chloroform is
separation of properly after adding added, mix tubes
phases after chloroform (see step 4 vigorously by shaking
centrifugation in protocol) for 15 sec. Do not vortex!
Let the lysate incubate for
5 min at room
temperature, mix again
before centrifuging
Lysate was not Make sure that
centrifuged at the right centrifugation step is
temperature performed at 4°C
following the addition of
chloroform in order to
achieve complete
separation of the phases
Incorrect amount of For every 1 ml of PureZOL™
chloroform was added used, add 0.2 ml of
chloroform
RNA binding mini Incomplete disruption of Increase the duration or
column is clogging starting material intensity of sample
disruption. Make sure to
use the 1 ml of PureZOL
for each prep
Excessive amount of Do not exceed the
starting material maximum starting amount
limit for the kit (see
Section 5). If clogging
persists when using the
maximum starting
amount, reduce the
amount of material used
25
Page 30

Problem Possible Cause Recommended Solution
RNA binding mini Starting material is After the sample
column is clogging high in fat, proteins, disruption step,
(continued) polysaccharides, or centrifuge the lysate at
extracellular material, 12,000 x g for 10 min
causing RNA eluate at 4°C to pellet any
impurities debris present. Transfer
the supernatant into a
new 2.0 ml microcentrifuge tube, leaving
behind the pellet. Avoid
transferring the excess
fat that collects as a top
layer in lipid-rich
samples. Perform this
step before adding the
chloroform
Not enough vacuum Make sure vacuum
pressure was applied filtration steps are carried
for the filtrate to pass out at –17 to –23 inHg
through the columns for optimum performance.
Alternatively, transfer the
RNA binding columns to
a 2.0 ml capless tube
and centrifuge for 60 sec
at
>12,000 x g
Problems that may be encountered after RNA is eluted from the
column:
Low RNA yield Excessive amount of Do not exceed the
starting material maximum starting
amount limit for the kit
(see Section 5). If
clogging occurs when
using the maximum
starting amount, reduce
the amount of material
used
Inefficient elution Preheat the elution
solution to 70°C in water
bath prior to the elution
step
26
Page 31

Problem Possible Cause Recommended Solution
Low RNA yield Low amount of Do not use less than the
(continued) starting material recommended minimum
starting amount (see
Section 5). When
processing small
amounts of starting
material (<500,000 cells
or <10 mg of tissue),
perform a single elution
with 30 µl of elution
solution
Incomplete disruption Increase the duration or
of starting material intensity of sample
that causes cells not disruption. Make sure
to be lysed, and thus that 1 ml of PureZOL is
fail to release RNA used per prep
into the lysate to be
recovered
Incorrect use of wash Add the required amount
solutions. (Incorrect of ethanol to the
ethanol concentration low stringency wash
in the low stringency buffer before use
wash can cause
accidental elution of
the RNA from the
membrane)
Incorrect DNase I Use only the DNase
dilution solution used, dilution solution included
causing accidental in the kit to dilute the
elution of the RNA DNase I
from the membrane
Elution solution was Avoid pipetting the
not pipetted directly elution solution onto the
onto the center of the side of the column or on
membrane top of the ring that holds
the membrane stack in
place
Elution contamination Prior to eluting the RNA,
of the eluate make sure to perform the
purge spin step (see step
16 in spin protocol) to
remove residual ethanol
in the wash solution
27
Page 32

Problem Possible Cause Recommended Solution
Genomic DNA On-column DNase I Perform the on-column
contamination digest was not DNase I digest (see step
performed 14 in protocol)
Incomplete DNase I Increase the digest time
digest for starting materials that
are known to contain a
high level of genomic
DNA
DNase I is inactive Reconstitute the
lyophilized DNase I with
10 mM Tris, pH 7.5.
Aliquot and store the
reconstituted DNase I
enzyme in a nonfrost-free
freezer. Avoid freezethaw cycles by aliquoting
the enzyme for single use
only
Some of the white Leave some of the
interphase (after aqueous phase solution
phase separation) behind to avoid
was transferred with transferring the white
the aqueous phase interphase with the
aqueous phase (see
step 7 in the protocol)
RNA is degraded RNase contamination Make sure to use
of solutions provided RNase-free plasticware.
in the kit See Section 5,
Maintaining an
RNase-free Environment,
for detailed instructions
RNase contamination Treat all user-made
of solutions supplied solutions with DEPC
by the user before use (see Section 6
for instructions)
RNase contamination See Section 6,
of plasticware and Maintaining an RNase-free
work station Environment, for detailed
instructions
28
Page 33

Problem Possible Cause Recommended Solution
RNA is degraded Frozen tissue samples Add PureZOL directly to
(continued) were allowed to thaw or frozen samples before
sit at room temperature they thaw. Do not let
starting materials sit at
room temperature
Cells grown in either Cells grown in monolayer:
monolayer or aspirate the growth
suspension were medium and then add
washed prior to PureZOL directly to the
lysis with PureZOL plate. No trypsinization is
necessary
Cells grown in
suspension: pellet the
cells and aspirate growth
medium, then add
PureZOL directly to the
pellet
Starting tissue sample Make sure that starting
was not immediately material is immediately
frozen, or had gone processed following
through several dissection. Alternatively
freeze-thaw cycles the starting material must
before RNA be immediately frozen
purification was after dissection. Once
performed frozen, do not subject
starting material to
freeze-thaw cycles
Low RNA A
260/A280
Lysate was not Make sure to incubate
ratio incubated at room the lysate after the
temperature for disruption step for
5 min after the 5 min at room
disruption step temperature to allow
(see step 3 in complete dissociation of
protocol) nucleoprotein complexes
Ethanol contamination Prior to eluting the RNA,
of the eluate make sure to perform the
purge spin step (see step
16 in spin protocol) to
remove residual ethanol
in the wash solution
29
Page 34

Problem Possible Cause Recommended Solution
Low RNA A
260/A280
Some of the white Leave some of the
ratio interphase and the aqueous phase solution
(continued) organic phase behind to avoid
(containing proteins) transferring the white
were transferred with interphase with the
the aqueous phase aqueous phase (see
during aspiration into step 7 in the protocol)
a new tube
Starting material is After the sample
high in fat, proteins, disruption step,
polysaccharides, or centrifuge the lysate at
extracellular material, 12,000 x g for 10 min
causing RNA eluate at 4°C to pellet any
to be impure debris present. Transfer
the supernatant into a
new 2.0 ml microcentrifuge tube, leaving
behind the pellet. Avoid
transferring the excess
fat that collects as a top
layer in lipid-rich
samples. Perform this
step before adding the
chloroform
Wash solutions and Make sure that the pipets
elution solution were that are being used for
contaminated with RNA preparation are not
proteins and other used for protein and DNA
contaminants applications
The solution used to A
260/280
may vary based
dilute the RNA for on the pH of the
spectrophotometric solution used to dilute
reading has a low pH RNA samples. To get
(less than pH 6.5) more accurate and
consistent A
260/280
values, dilute your RNA
samples with a solution
that has a pH within the
6.5–8.5 range
30
Page 35

Problem Possible Cause Recommended Solution
Prepared total RNA RNA is degraded See troubleshooting
performs poorly section "RNA is
in downstream degraded"
applications
Ethanol contamination Make sure to perform the
of the eluate purge spin step (see
step 16) to remove
residual wash solution
prior to eluting the RNA
RNA is contaminated See troubleshooting
section "Low RNA
A
260/280
ratio"
31
Page 36

Section 10
Ordering Information
Catalog # Description
732-6830 Aurum Total RNA Fatty and Fibrous Tissue Kit
732-6870 Aurum Total RNA Fatty and Fibrous Tissue Module
(without PureZOL™ RNA Isolation Reagent)
732-6470 Aurum Vacuum Manifold
732-6890 PureZOL RNA Isolation Reagent, 100 ml
732-6880 PureZOL RNA Isolation Reagent, 50 ml
Related Products
Catalog # Description
732-6820 Aurum Total RNA Mini Kit
732-6800 Aurum Total RNA 96 Kit
732-6828 DNase I, RNase-Free, 1 vial
732-6826 Aurum RNA Binding Mini Columns, 50
732-6802 Aurum Total RNA Lysis Solution, 85 ml
732-6804 Aurum Total RNA Wash Solution, Low Stringency, 60 ml
732-6803 Aurum Total RNA Wash Solution, High Stringency, 150 ml
732-6805 Aurum DNase Dilution Solution, 20 ml
732-6801 Aurum Total RNA Elution Solution, 20 ml
32
Page 37

Page 38

Page 39

Page 40

Bio-Rad Laboratories, Inc.
2000 Alfred Nobel Dr.
Hercules, CA 94547 USA
(510) 741-1000
1-800-424-6723
10001298 Rev B
 Loading...