

Page 1

ProteinChip®OQ Kit
Instruction Manual and
Documentation
Catalog #C70-00080
For technical support call your local Bio-Rad office, or in the US, call 1-800-4BIORAD (1-800-424-6723)
For use with the ProteinChip SELDI system, Personal or Enterprise Edition,
with embedded system processor (ESP) version 1.1.15 or higher
Page 2

Notices
No part of this publication may be reproduced or transmitted in any form or by any means,
electronic or mechanical, including photocopy, recording, or any information storage or retrieval
system, without permission in writing from Bio-Rad.
Bio-Rad reserves the right to modify its products and services at any time. This user guide is
subject to change without notice.
Although prepared to ensure accuracy, Bio-Rad assumes no liability for errors or for any damages
resulting from the application or use of this information.
ProteinChip is a trademark of Bio-Rad Laboratories. Microsoft and Excel are trademarks of
Microsoft Corporation.
The SELDI process is covered by U.S. patents 5,719,060, 6,225,047, 6,579,719, and 6,818,411
and other issued patents and pending applications in the U.S. and other jurisdictions.
Copyright
©
2007 by Bio-Rad Laboratories. All rights reserved.
Page 3

Table of Contents
Chapter 1 Introduction ............................................................................................1
1.1 Product and Protocol Description........................................................................1
1.2 Storage and Handling..........................................................................................2
Chapter 2 Use of the ProteinChip®OQ Kit ............................................................4
2.1 Overview..............................................................................................................4
2.2 File and Protocol Setup .......................................................................................5
2.3 OQ Maintenance Procedures..............................................................................9
2.3.1 Maintenance Procedure 1 — High Voltage (HV) Conditioning ..............9
2.3.2 Maintenance Procedure 2 — Detector Calibration ................................9
2.4 OQ Tests............................................................................................................12
2.4.1 Test 1 — Detector Sensitivity ...............................................................12
2.4.2 Test 2 — Mass Drift and Resolution at 5.96 kD...................................15
2.4.3 Test 3 — Mass Resolution at 1 kD.......................................................19
2.4.4 Test 4 — Mass Accuracy .....................................................................22
Appendix A Installation Qualification (IQ) Certificate ...........................................29
Appendix B Protocol Acceptance Form .................................................................30
Appendix C Data Export Procedure........................................................................31
i
Page 4

Chapter 1
Introduction
Qualification of analytical instruments is a formal process of documenting that an instrument is
fit for its intended use and that it is maintained and calibrated.
• Installation qualification (IQ) checks that the correct system or instrument was received and
that it was properly installed. IQ is performed by a Bio-Rad service engineer following
installation of the ProteinChip®SELDI system. The engineer will provide an IQ certificate
upon completion (see Appendix A for an example of this certificate. If you do not have a
copy of this certificate, contact technical support). IQ should also be performed by a service
engineer when the ProteinChip SELDI system is moved to a new location and when the
software is upgraded.
• Operational qualification (OQ) demonstrates that the ProteinChip SELDI system operates in
accordance with Bio-Rad’s requirements. The ProteinChip SELDI OQ kit is used to qualify
the installation and operation of the ProteinChip SELDI system, Personal or Enterprise
Edition. Bio-Rad recommends that the OQ protocols be performed in total upon installation
(following IQ), on a regular basis to confirm that the system is performing to specifications,
and whenever it is suspected that the instrument is not performing to specifications.
For audit review, maintain records of IQ and OQ of the ProteinChip SELDI system in a single
notebook or folder.
1.1 Product and Protocol Description
The ProteinChip OQ kit contains all the ProteinChip arrays and instrument protocols required to
perform OQ on a ProteinChip SELDI system, Personal or Enterprise Edition. The kit is designed
to qualify the operating specifications of the ProteinChip instrument and is a valuable tool that
allows discrimination between assay and instrumentation problems.
The components of each ProteinChip OQ kit support maintenance and testing for a three month
period. Each kit contains the following:
1 CD containing the OQ instrument protocols and the ProteinChip SELDI OQ form
2 ProteinChip detector calibration arrays
6 ProteinChip detector qualification arrays
2 ProteinChip peptide standard arrays
1 ProteinChip OQ kit instruction manual
The OQ protocol involves two maintenance procedures (detector calibration and high voltage
conditioning) followed by a series of four tests of instrument resolution, mass accuracy and drift,
and sensitivity (Table 1).
1
Page 5

Completion of each maintenance procedure and test is tracked using the ProteinChip SELDI OQ
form, a Microsoft Excel spreadsheet supplied on the CD. Test data are exported to the
ProteinChip SELDI OQ form, which then calculates whether the test passed or failed.
Upon completion of the OQ procedure, save, print, sign, date, and place copies of the following
documentation into a notebook or folder for audit review:
• Protocol acceptance page (Appendix B)
• ProteinChip SELDI OQ form summary
Table 1. Summary of procedures and tests.
RReeccoommmmeennddeedd CCoonnssuummaabbllee EEssttiimmaatteedd TTiimmee
TTiittllee FFrreeqquueennccyy UUsseedd RReeqquuiirreedd DDeessccrriippttiioonn
File and protocol
IInniittiiaall SSeettuupp
setup 20 min Complete this procedure the
first time you use the
ProteinChip OQ kit. This
procedure creates the
file structure necessary for
storing the protocols and creates
the routines for high voltage
conditioning and mass calibration.
MMaaiinntteennaannccee
High voltage Weekly N/A 1–2 hr HV conditioning helps to
PPrroocceedduurree 11
(HV) depending on decontaminate the surfaces
conditioning instrument in the instrument.
MMaaiinntteennaannccee
Detector Weekly ProteinChip 45 min to 4 hr This procedure uses the
PPrroocceedduurree 22
calibration detector depending on ProteinChip detector
calibration instrument calibration array to adjust
array the detector voltage. These
adjustments are based on a
rolling average that stabilizes
the gain, improving spectral
reproducibility over the lifetime
of the detector.
TTeesstt 11
Detector Biweekly ProteinChip 30 min to 1 hr This test uses the ProteinChip
sensitivity detector detector calibration array to
qualification measure the signal-to-noise
array ratio (S/N) of immunoglobubulin
(IgG) at two different
concentrations (10 fmol and
140 fmol). Measurements are
compared to a specification, and
a pass/fail disposition is
obtained.
2
Page 6

Table 1. Summary of procedures and tests (
continued).
RReeccoommmmeennddeedd CCoonnssuummaabbllee EEssttiimmaatteedd TTiimmee
TTeesstt FFrreeqquueennccyy UUsseedd RReeqquuiirreedd DDeessccrriippttiioonn
TTeesstt 22
Mass drift and Weekly ProteinChip 20 min to 1 hr This test uses the ProteinChip
resolution at peptide peptide standard array to
5.96 kD standard array measure the mass drift and
resolution of insulin. These
measurements are compared to a
specification, and a pass/fail
disposition is obtained.
TTeesstt 33
Resolution at Weekly ProteinChip 20 min to 1 hr This test uses the ProteinChip
1 kD peptide peptide standard array to
standard array measure the resolution of
Arg-vasopressin. These
measurements are compared to
a specification, and a pass/fail
disposition is obtained. The test
is run in higher-resolution
(lower source voltage) mode.
TTeesstt 44
Mass Weekly ProteinChip 30 min to 1 hr This test evaluates the mass
accuracy peptide accuracy when compared to
standard internal and external
array calibrations. These measurements
are compared to a specification,
and a pass/fail disposition is
obtained.
1.2 Storage and Handling
Store the arrays supplied in the kit in the original packaging at room temperature and in a dry
and dark location. Each array is individually wrapped. Do not open the array packaging until
ready to use. Take care when handling the ProteinChip arrays to avoid contaminating or disturbing
the matrix crystals on the surface of the arrays.
3
Page 7

Chapter 2
Use of the ProteinChip OQ Kit
2.1 Overview
This chapter outlines the protocols used to perform the procedures and tests that comprise the
ProteinChip OQ kit. Please note the following:
• Export data acquired during testing to the ProteinChip SELDI OQ form using the export
instructions described in Appendix C
• Protocol transfer from the CD to ProteinChip data manager software needs only to occur
once; however, new files must be created each time a test is run
• Neither spreadsheets nor protocols are write-protected. Overwriting may result in erroneous
results and calculations
• Always perform the two maintenance procedures before running any of the tests
• Maintenance procedure 2 (detector calibration) is designed to standardize and stabilize
detector performance over time, by resetting any drift in the response due to natural component
aging. First or delayed use of this procedure may alter system response after calibration. Do
not run this procedure within a series of related experiments if it has been more than two
weeks since the last detector calibration
• All tests require peak measurements that are compared to specification. Incorrect peak
selection may lead to erroneous results. While selecting peaks for measurement, zoom in on
them so that they resemble the peaks in the examples provided
• When running single ProteinChip arrays on the ProteinChip instrument, Enterprise Edition,
always fill empty locations in the cassette with blank, expired, or used arrays. Blank arrays
are available as components of the ProteinChip cassette-compatible bioprocessor (catalog
#C50-30011)
• The ProteinChip detector calibration array and ProteinChip peptide standard array can be
used multiple times. After opening, store these arrays in a dry and dark place and in their
original packaging
• When running protocols, you specify how many sections (partitions) the spot is divided into
for sampling. You also specify which of these partitions should be used. For spectra intended
for analysis, no more than four ("of 4") partitions should be used, with 10 shots/pixel
4
Page 8

2.2 File and Protocol Setup
Complete this procedure the first time you run the ProteinChip OQ kit. This procedure sets up
the file structure necessary for storing the protocols and creates the routines for high voltage
conditioning (procedure 1) and mass accuracy (test 4).
Task
Step 1
Import Protocols
From CD
Step 2
Create the File
Structure
Note: Create new folders each
time the OQ tests are run. The
instructions in this manual
assume you are following the
convention described here.
However, any file structure and
naming convention may be
used.
5
Import the protocols supplied on the CD into the Protocols folder of ProteinChip
data manager software:
1. Insert the CD into the computer and launch ProteinChip data manager
software.
2. Select Protocols > Protocols > Import Protocols.
3. Use the Import Protocols dialog to import all protocols (files with a .ptx
extension) from the CD to the Protocols folder.
Note: The protocols are NOT write-protected. Do not alter them.
Create a new folder for each test (1–4) to be run:
1. In the Explorer pane of ProteinChip data manager software, open the
Projects folder and select File > New > Folder.
2. Create a folder,
OQ_####,
where
####
is the serial number of the instrument.
3. Click on this folder and select File > New > Folder. Create a separate folder
for the date of the test.
4. Click on the folder created in step 3 and select File > New > Folder.
Create a separate folder for each of the following tests:
• Test 1 Detector sensitivity
• Test 2 Mass drift and resolution 5.96 kD
• Test 3 Resolution 1 kD
• Test 4 Mass accuracy
Page 9

Step 3
Set Up the
High Voltage (HV)
Conditioning Routine
6
1. Insert a blank ProteinChip array into the reader. If blank arrays are not
available, use expired arrays or arrays that have already been used.
a. For the Enterprise Edition instrument: place a cassette filled with
12 blank or used arrays into the instrument.
b. For the Personal Edition instrument: insert a blank ProteinChip
array.
2. In ProteinChip data manager software, select the instrument and click Start.
3. In the Protocol Mode tab, select Instrument > Quick Run.
4. Select all 8 spots, then set up a Quick Run protocol as shown below:
a. For the Enterprise Edition instrument:
RC3 HV pos 15 kV conditioning, partition 1 of 8, all 8 spots
RC3 HV pos 20 kV conditioning, partition 1 of 8, all 8 spots
RC3 HV pos 25 kV conditioning, partition 1 of 8, all 8 spots
RC3 HV pos 30 kV conditioning, partition 1 of 8, all 8 spots
RC3 HV neg 15 kV conditioning, partition 1 of 8, all 8 spots
RC3 HV neg 20 kV conditioning, partition 1 of 8, all 8 spots
RC3 HV neg 25 kV conditioning, partition 1 of 8, all 8 spots
RC3 HV neg 30 kV conditioning, partition 1 of 8, all 8 spots
RC3 HV pos 15 kV conditioning, partition 1 of 8, all 8 spots
RC3 HV pos 20 kV conditioning, partition 1 of 8, all 8 spots
RC3 HV pos 25 kV conditioning, partition 1 of 8, all 8 spots
RC3 HV pos 30 kV conditioning, partition 1 of 8, all 8 spots
RC3 HV pos 25 kV conditioning, partition 1 of 8, all 8 spots
b. For the Personal Edition instrument:
RC3 HV pos 15 kV conditioning, partition 1 of 8, all 8 spots
RC3 HV pos 20 kV conditioning, partition 1 of 8, all 8 spots
RC3 HV pos 25 kV conditioning, partition 1 of 8, all 8 spots
RC3 HV pos 30 kV conditioning, partition 1 of 8, all 8 spots
RC3 HV pos 15 kV conditioning, partition 1 of 8, all 8 spots
RC3 HV pos 20 kV conditioning, partition 1 of 8, all 8 spots
RC3 HV pos 25 kV conditioning, partition 1 of 8, all 8 spots
RC3 HV pos 30 kV conditioning, partition 1 of 8, all 8 spots
RC3 HV pos 25 kV conditioning, partition 1 of 8, all 8 spots
5. Click Save in the Quick Run dialog, and save the protocol as
SoftHV
in the
Quick Run directory (C:\\XXXXXXX). The Quick Run directory location is
defined by the user. The default location, "My Documents", will work as
well as any other location that is easy to remember.
Page 10
Step 4
Create a Standard
Mass Calibration
Routine
7
6. In the Explorer pane of ProteinChip data manager software, select Projects
and click on any spectrum file (for example, the spectrum obtained during
installation).
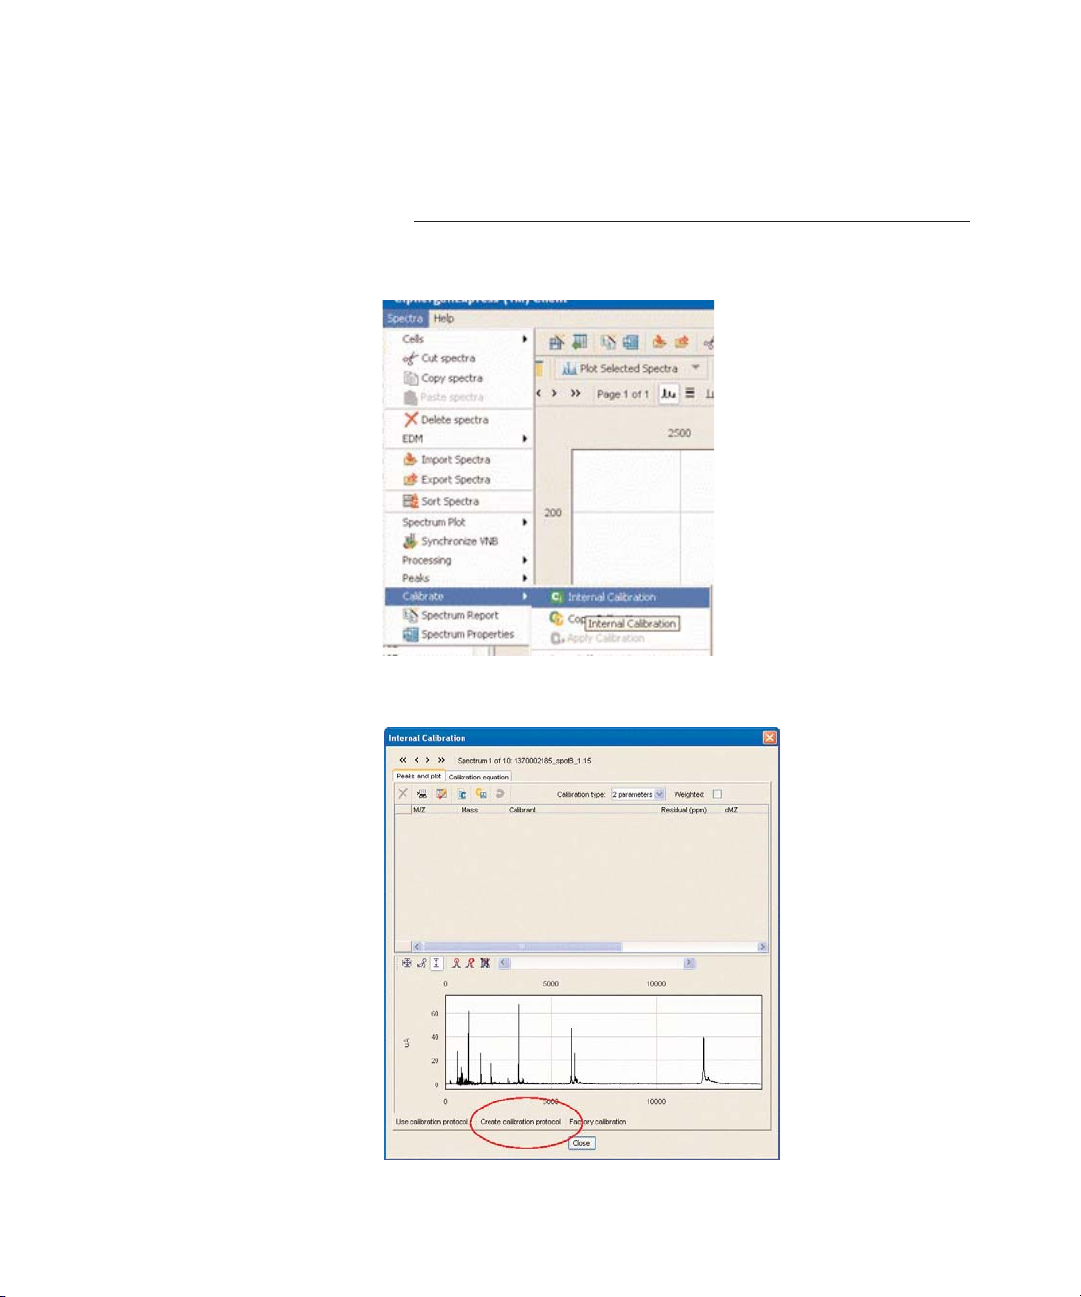
1. Select Spectra > Calibrate > Internal Calibration.
2. Select Create calibration protocol.
Page 11
8
3. In the Calibration protocol name field, enter
OQ Mass Cal.
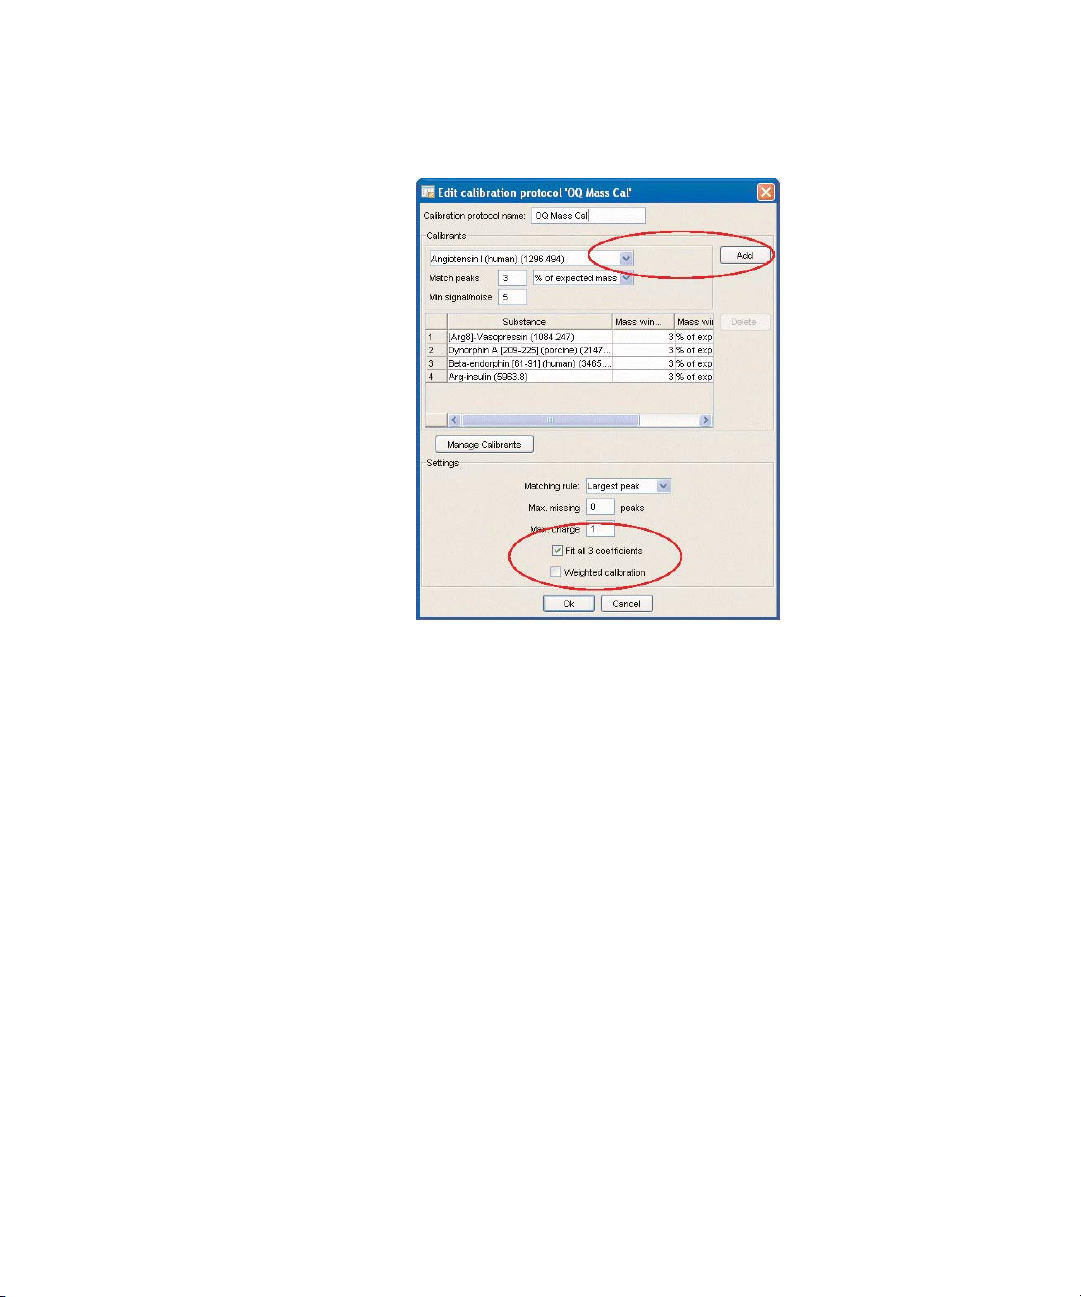
4. Select [Arg8]-Vasopressin (1084.247) from the drop-down list, and click Add
(keep the default values of 3% of expected peaks and minimum signal/noise
of 5).
5. Select Dynorphin A (2147.5) from the drop-down list, and click Add (keep the
default value of 3% of expected peaks and signal/noise of 5).
6. Select Beta-endorphin (3465.0) from the drop-down list, and click Add (keep
the default value at 3% of expected peaks and signal/noise of 5).
7. Select Arg-insulin (5963.8) from the drop-down list, and click Add (keep the
default value at 3% of expected peaks and signal/noise of 5).
8. Select Fit all 3 coefficients. Click OK.
Page 12

2.3 OQ Maintenance Procedures
2.3.1 Maintenance Procedure 1 –– High Voltage (HV) Conditioning
This procedure helps to decontaminate the surfaces of the ProteinChip instrument and is
essential for obtaining correct test results. Run this procedure weekly using any blank
ProteinChip array (or an array that has already been used). The procedure takes 1–2 hr to
complete. Therefore, to save time, we recommend running this protocol at the end of the day
prior to running the remaining tests. There is no need to stay with the instrument while the protocol
is running.
1. Launch ProteinChip data manager software, select the instrument, and click Start.
2. Insert a blank ProteinChip array into the instrument. If blank arrays are not available, use an
expired or used ProteinChip array.
Note: If using an Enterprise Edition instrument, place a cassette filled with used ProteinChip
arrays into the instrument. Blank arrays maybe used as long as at least one array in the
cassette has a bar code.
3. Open the Protocol Mode tab and select Instrument > Quick Run.
4. The Quick Run Protocol(s) dialog opens. Select the
SoftHV
protocol you saved during file
and protocol setup, step 3 and click Run.
5. After completion of the protocol, an “Acquisition Error” message appears. This is expected.
Click OK.
6. Record the operator name and date in the ProteinChip SELDI OQ form.
2.3.2 Maintenance Procedure 2 –– Detector Calibration
This procedure uses the ProteinChip detector calibration array to adjust the detector voltage.
These adjustments are based on a rolling average that stabilizes the gain, improving spectral
reproducibility over the lifetime of the detector. This procedure is essential for obtaining correct
test results and, when run on a weekly basis, is designed to improve reproducibility as the detector
ages.
Each run uses a single spot on the array, and each spot can only be used once. Store the array
in its original packaging and in a dry, dark location. Record usage data directly on the packaging.
The procedure requires 45 min to 4 hr to complete, depending on the state of the instrument.
Note: The detector calibration procedure is intended to standardize instrument performance
over time. First-time use may alter system response and is not recommended within a series of
experiments. It is, however, possible to manually set the voltage back to its original state through
the instrument’s web page.
9
Page 13

1. Insert the ProteinChip detector calibration array into the instrument.
Note: For the Enterprise Edition instrument, place the array into slot 1 of a cassette and fill the
rest of the slots with blank or used ProteinChip arrays.
2. Open the instrument’s interactive web page (http://pcs4000-####/index.jsp, where #### is
the instrument serial number). If the instrument is under local control, the web page will only
be on the local computer. If it is installed on an intranet, it will be available on all intranet
computers.
3. Select Calibrations > Automatic Detector Gain. The Detector Gain page opens. Check
that Automatic and NOT manual is selected.
4. If using the Enterprise Edition instrument, select Array number 1 (slot 1 in cassette).
5. If this is the first calibration performed on the instrument, or if the last calibration was performed
more than two weeks ago, select two previously unused spots. If this is a routine, weekly
calibration, select one unused spot.
6. Click Start.
10
Page 14

7. The time required to complete this procedure is variable, and it may require up to several
hours as the instrument continually collects data of a specific intensity. If the calibration routine
does not complete, run the procedure again with unused spots.
8. Once the procedure is complete, open ProteinChip data manager software, select the
instrument, and select Instrument > Reinitialize Instrument.
9. The maintenance procedure is complete. Record the operator name and date in the
ProteinChip SELDI OQ form.
11
Page 15

2.4 OQ Tests
2.4.1 Test 1 –– Detector Sensitivity
This test uses the ProteinChip detector qualification array to measure the signal-to-noise ratio
(S/N) of immunoglobubulin (IgG) at two different concentrations (10 fmol and 140 fmol).
Measurements are compared to a specification, and a pass/fail disposition is obtained.
Array Type ProteinChip detector qualification array
Usage Information Use once and discard; do not open until ready to use.
Recommended Testing Every other week
Frequency
Expected Testing Time 30 min to 1 hr
Pass/Fail Specification High concentration: pass if S/N is greater than 1,100
Low concentration: pass if S/N is greater than 5
1. Insert the ProteinChip detector qualification array into the instrument. If you are using an
Enterprise Edition instrument, place the array into any location within the cassette, fill the
remaining slots in the cassette with blank or used arrays, and place the cassette into the
instrument.
2. In ProteinChip data manager software, click Start and open the Protocol Mode tab.
3. Select Instrument > Preferences. In the Preferences dialog, click “…”. The Select Folder
dialog opens.
4. Select Projects > OQ_####/
Date
/Test 1 Detector Sensitivity, where #### is the serial
number of the instrument.
5. Run protocol “Test 1 Detector Sensitivity ” on partition 1 of 1 for all 8 spots on the array. Do
not change any values.
12
Page 16

6. Plot the peaks with noise set to 12,000 Da:
a. Select all 8 spectra.
b. Click on the data analysis icon . The Analysis Settings dialog opens.
c. Open the Noise tab and set Start Measuring Noise From to 12,000 Da. Click OK.
13
Page 17

7. Plot all 8 spectra and select the IgG peak using the peak selection tool.
Note: Spots with high concentrations (spots A, C, E, and G) alternate with those with low
concentrations (spots B, D, F, and H). Due to the different concentrations on different spots, it is
critical to export the peak data with the spots in alphabetical order from A to H.
8. Export the data following the instructions in Appendix C and selecting parameters for export
in the following order:
• Array bar code
• Spot name
• Substance mass
• Intensity
• Resolution
• S/N
9. Paste the data into the ProteinChip SELDI OQ form, data sheet “Test 1 Detector Sensitivity”.
10. The spreadsheet indicates if the test passed or failed.
11. If test 1 fails, run the detector calibration procedure (maintenance procedure), and repeat the
test. If the test fails a second time, contact technical support.
14
Page 18

2.4.2 Test 2 — Mass Drift and Resolution 5.96 kD
This test uses the ProteinChip peptide standard array to measure the mass drift and resolution
of insulin. These measurements are compared to a specification, and a pass/fail disposition is
obtained.
Array Type ProteinChip peptide standard array
Usage Information Each test uses 1 partition on all 8 spots on the array. The array
can be used up to 20 times (5 times on each of 4 partitions).
Store the array in the original packaging and record usage
information in the usage chart provided on the packaging. Laser
optimization steps use 1 of 15 partitions, and these reads do
not need to be recorded or monitored.
Recommended Testing Weekly
Frequency
Expected Testing Time 20 min to 1 hr
Pass/Fail Specification Mass drift: pass if less than 7 Da
Resolution: pass if average is greater than 750
1. Insert the ProteinChip peptide standard array into the instrument. If you are using an
Enterprise Edition instrument, place the array into a cassette, fill the remaining slots in the
cassette with blank or used arrays, and place the cassette into the instrument.
2. In ProteinChip data manager software, click Start and open the Protocol Mode tab.
3. Select Instrument > Preferences. In the Preferences dialog, click “…”. The Select Folder
dialog opens.
4. Select Projects > OQ_####/
Date
/Test 2 Mass Drift and Resolution 5.96 kD, where ####
is the serial number of the instrument.
5. Optimize the laser intensity. Run protocol “Test 2 Mass Drift and Resolution 5.96 kD” on any
partition (“n”) of 15 on spot D (for example, 1 of 15, 2 of 15, 3 of 15, etc). Adjust the laser
energy until the height of the insulin peak at 5,963 Da is 100–200 µA. This optimization step
does not need to be repeated on subsequent runs of test 2 unless the peak intensity falls
too low.
15
Page 19

6. Run the same protocol on partition “n” of 4 for all 8 spots. Record the
partition number on the usage chart provided with the product packaging.
7. Make sure that a peak intensity of 50–500 µA is visible on each spot. If peak intensities
appear out of this range, change the laser energy and run the test again.
16
Page 20

8. Plot the peaks with the filtering option turned off:
a. Select all 8 spectra. (Do not select the first laser optimization spectrum.)
b. Click the analysis settings icon. The Analysis Settings dialog opens.
c. Open the Filtering tab and deselect the On checkbox.
d. Click OK.
17
Page 21

9. Plot all 8 spectra. Using the peak selection tool, select the insulin peak (5.963 kD) in all spectra.
10. Export the data following the instructions in Appendix C and selecting the parameters for
export in the following order:
• Array bar code
• Spot name
• Substance mass
• Intensity
• Resolution
• S/N
11. Paste the data into the ProteinChip SELDI OQ form, data sheet “Test 2 Mass Drift and
Resolution”.
12. The spreadsheet indicates whether the test passed or failed.
13. If the test fails, run the HV conditioning procedure (maintenance procedure 1) and repeat the
test. Contact technical support if the test fails a second time.
18
Page 22

2.4.3 Test 3 –– Resolution at 1 kD
This test uses the ProteinChip peptide standard array to measure the resolution of Arg-8-vasopressin.
To do this, a higher-resolution, lower source mode (15 kV) is employed rather than the default
high-sensitivity source mode (voltage 25 kV).These measurements are compared to a specification,
and a pass/fail disposition is obtained.
Caution: Spectra taken using one source mode should not be compared either qualitatively or
quantitatively to spectra taken using other source modes. Spectra are only comparable within
modes.
Array Type ProteinChip peptide standard array
Usage Information Each test uses 1 partition on all 8 spots on the array. The array
can be used up to 20 times (5 times on each of 4 partitions).
Store the array in the original packaging and record usage
information in the usage chart provided and on the packaging.
Laser optimization steps use 1 of 15 partitions, and these reads
do not need to be recorded or monitored.
Recommended Testing Weekly
Frequency
Expected Testing Time 30 min to 1 hr
Pass/Fail Specification Pass if resolution is greater than 1000
1. Insert the ProteinChip peptide standard array into the instrument. If you are using an
Enterprise Edition instrument, place the array into a cassette, fill the remaining slots in the
cassette with blank or used arrays, and place the cassette into the instrument.
2. In ProteinChip data manager software, click Start and open the Protocol Mode tab.
3. Select Instrument > Preferences. In the Preferences dialog, click “…”. The Select Folder
dialog opens.
4. Select Projects > OQ_####/
Date
/Test 3 Resolution 1 kD, where #### is the serial number
of the instrument.
5. Optimize the laser intensity. Run protocol “Test 3 Resolution 1 kD” on any partition (“n”) of 15
on spot D. Adjust the laser energy until the height of the insulin peak at 5.96 kD is 100–200 µA.
This optimization step does not need to be repeated on subsequent runs of test 3 unless the
peak intensity falls too low.
6. Run the same protocol on partition “n” of 15 on spot D. Change the laser energy until the
height of the Arg-8-vasopressin peak at 1 kD is 100–200 µA.
7. Ensure that a peak intensity of 50–500 µA is visible on each spot. If peak intensities appear
out of this range, change the laser energy and run the test again.
19
Page 23

8. Plot the peaks with the filtering option turned off:
a. Select all 8 spectra.
b. Click the data analysis icon . The Analysis Settings dialog opens.
c. Open the Filtering tab and deselect the On checkbox.
d. Click OK.
20
Page 24

9. Plot all 8 spectra (do not select the first optimization spectrum). Using the peak selection
tool, select the Arg-8-vasopressin (1,084.247 Da) peak. Zoom in to ensure correct peak
selection.
10. Export the data following the instructions in Appendix C and selecting the parameters for
export in the following order:
• Array bar code
• Spot name
• Substance mass
• Intensity
• Resolution
• S/N
11. Paste data into the ProteinChip SELDI OQ form, data sheet “Test 3 Resolution 1 kD”.
12. The spreadsheet indicates if the test passed or failed. If the test fails, run the HV conditioning
procedure (maintenance procedure 1) and repeat the test. Contact technical support if the
test fails a second time.
21
Page 25

2.4.4 Test 4 — Mass Accuracy
This test uses the ProteinChip peptide standard array to test the mass accuracy of the system’s
internal and external calibrations. These measurements are compared to a specification, and a
pass/fail disposition is obtained.
Array Type ProteinChip peptide standard array
Usage Information Each test uses 1 partition on all 8 spots on the array. The array
can be used up to 20 times (5 times on each of 4 partitions).
Store the array in the original packaging and record usage
information in the usage chart provided and on the packaging.
Laser optimization steps use 1 of 15 partitions, and these reads
do not need to be recorded or monitored.
Recommended Testing Weekly
Frequency
Expected Testing Time 30 min to 1 hr
Pass/Fail Specification External calibration: Pass if average mass within 0.1% of
calibrant mass and pooled CV of <0.05
Internal calibration: Pass if average mass within 0.01% of
calibrant mass and pooled CV of <0.01
1. Insert the ProteinChip peptide standard array into the instrument. If you are using an
Enterprise Edition instrument, place the array into a cassette, fill the remaining slots in the
cassette with blank or used arrays, and place the cassette into the instrument.
2. In ProteinChip data manager software, click Start and open the Protocol Mode tab.
3. Select Instrument > Preferences. In the Preferences dialog, click “…”. The Select Folder
dialog opens.
4. Select Projects > OQ_####/
Date
/Test 4 Mass Accuracy, where #### is the serial number
of the instrument.
5. Optimize the laser intensity. Run protocol “Test 4 Mass Accuracy” on any partition (“n”) of 15
on spot D. Adjust the laser energy until the height of the insulin peak at 5.96 kD is 100–200 µA.
This optimization step does not need to be repeated on subsequent runs of test 4 unless the
peak intensity falls too low.
6. Run protocol “Test 4 Mass Accuracy”. Run on partition 1 of 1 for all 8 spots on chip. Do not
change any values.
22
Page 26

7. Plot the peaks with the filtering option turned off:
a. Select all 8 spectra.
b. Click the data analysis icon . The Analysis Settings dialog opens.
c. Open the Filtering tab and deselect the On checkbox.
d. Click OK.
8. Plot all 8 spectra. Using the peak selection tool, select all 7 peaks. Each spectrum should
resemble that shown below (intensities relative to each other may vary). Additional peaks
other than those indicated may consist of matrix, doubly-charged peaks, dimers or other
multimers, salt peaks, etc., as for any mass spectrum.
Peak Name Molecular Weight (Da)
1 Arg-8-vasopressin 1084.247
2 Somatostatin 1637.903
3 Dynorphin A 2147.5
4 ACTH 2933.5
5 Beta endorphin 3465
6 Arg-insulin 5963.8
7 Cytochrome C 12230.92
23
Page 27

Note: To ensure correct placement of the peak marker, zoom in on each peak during selection.
Though some plots appear acceptable when zoomed out, zooming in may reveal incorrect
placement of peak markers. This is more accurate when the expected peak width dialog box
option is set to 5.
24
Page 28

25
Page 29

9. Zoom in and check that all 7 peaks in all 8 spectra are marked correctly. Failure to do so
may result in incorrect results. Close the plot.
Mass Accuracy — External Calibration Test
Perform this test BEFORE the internal calibration test.
1. Click on the spectrum for spot D.
2. Select Spectra > Calibrate > Apply Calibration Protocol.
3. Select OQ Mass Cal.
4. Click OK. The spectrum flag changes from yellow to green.
5. In the main window, make sure that only the spectrum from spot D is selected. Click the
Copy Calibration button. The spectrum flag on spot D reverts to yellow.
6. Select all 8 spectra and click the Apply Calibration button. (Do not select the first
optimization spectrum.)
7. Export the data following the instructions in Appendix C and selecting the parameters for
export in the following order:
• Array bar code
• Spot name
• Substance mass
• Intensity
• Resolution
• S/N
• Peak #
8. Paste the data into the ProteinChip SELDI OQ form, data sheet “Test 4 Mass Accuracy”.
Paste the data into cell M41.
26
Spectrum
flag
Page 30

9. In the External Table, right-click on cell B3 and select Refresh Data.
10. The spreadsheet indicates if the test passed or failed. The test passes if the following
specifications are achieved:
• Peptide average mass within 0.1% of calibrant mass
• % Standard deviation (pooled CV) of <0.05
11. If the test fails, run the HV conditioning procedure (maintenance procedure 1), and repeat
the test. If the test fails a second time, contact technical support.
Mass Accuracy — Internal Calibration Test
Perform this test AFTER the external calibration test (above).
1. Check that all peaks have been selected and that all peaks are marked correctly (not on
shoulders, etc.).
2. Select all 8 spectra.
3. Select Spectra > Calibrate > Apply Calibration Protocol.
4. Select OQ Mass Cal.
27
Page 31

12. Click OK. The spectrum flag changes from yellow to green for all 8 spectra, once calibration
is complete.
13. Export the data following the instructions in Appendix C and selecting the parameters for
export in the following order:
• Array bar code
• Spot name
• Substance mass
• Intensity
• Resolution
• S/N
• Peak #
14. Paste the data into the ProteinChip SELDI OQ form, data sheet “Test 4 Mass Calibration”.
Paste the data into cell V41.
15. In the Internal Table, right-click on cell B21 and select Refresh Data.
16. The spreadsheet indicates if the test passed or failed. The test passes if the following
specifications are achieved:
• Peptide average mass within 0.01% of calibrant mass
• % Standard deviation (pooled CV) of <0.01
17. If the test fails, run maintenance procedure 1 (HV conditioning) and repeat the test. Contact
technical support if the test fails a second time.
28
Page 32

Appendix A
29
Page 33

Appendix B
Protocol Acceptance Form
Bio-Rad Laboratories recommends that the operational qualification (OQ) protocols be performed
in total on a regular basis to confirm that the ProteinChip SELDI system is performing to
specifications, or whenever it is suspected that the instrument is not performing to specifications.
I have reviewed the ProteinChip OQ kit instruction manual and agree that it provides the
appropriate procedures for the operational qualification of the ProteinChip SELDI system,
Personal or Enterprise Edition.
Customer Name (print)___________________ Signature___________________Date________
Reviewer Name/Title (print)________________ Signature__________________ Date________
30
Page 34

Appendix C
Data Export Procedure
Use this procedure to export the data obtained during testing to the Microsoft Excel spreadsheet
provided with the kit (ProteinChip SELDI OQ form). Following export, open the resulting .csv file
using the Excel program and copy and paste the contents into a COPY of the spreadsheet
provided. Retain this copy for your records.
1. In the Explorer pane, open the Projects folder and select the spectra to be exported. Click
the Export Spectra button in the toolbar. The Export Spectra dialog opens.
2. In the Export Spectra dialog, select Peak Information and click Export. The Peak
Information Export dialog opens.
3. Select parameters and the order in which they are to be exported. (These parameters are
specific to the test and are described in the instructions for the test.)
4. Click OK. The Save File dialog box opens. Enter the file name and click OK.
31
Page 35

Bio-Rad
10010680 Rev A
Laboratories, Inc.
Life Science
Group
Bulletin 0000 US/EG Rev A
Web site www.bio-rad.com USA 800 4BIORAD Australia 61 02 9914 2800 Austria 01 877 89 01 Belgium 09 385 55 11 Brazil 55 21 3237 9400
Canada 905 712 2771 China 86 21 6426 0808 Czech Republic 420 241 430 532 Denmark 44 52 10 00 Finland 09 804 22 00
Germany 089 318 84 0 Greece 30 210 777 4396 Hong Kong 852 2789 3300 Hungary 36 1 455 8800 India 91 124 4029300 Israel 03 963 6050
Italy 39 02 216091 Japan 03 5811 6270 Korea 82 2 3473 4460 Mexico 52 555 488 7670 The Netherlands 0318 540666 New Zealand 0508 805 500
Norway 23 38 41 30 Poland 48 22 331 99 99 Portugal 351 21 472 7700 Russia 7 495 721 14 04 Singapore 65 6415 3188 South Africa 27 861 246 723
Spain 34 91 590 5200 Sweden 08 555 12700 Switzerland 061 717 95 55 Taiwan 886 2 2578 7189 United Kingdom 020 8328 2000
France 01 47 95 69 65
00-0000 0000 Sig 1106
 Loading...