

Page 1

ProteinChip®Antibody Capture Kit
Instruction Manual
Catalog #K100-0005
For technical support,
call your local Bio-Rad office, or
in the US, call 1-800-4BIORAD
(1-800-424-6723).
Page 2
Introduction
Traditional immunoassay-based protein detection methods are often difficult to
develop and are complicated by antibodies cross-reacting and binding
nonspecifically to a variety of proteins and peptides. The ProteinChip antibody (Ab)
capture kit enables unambiguous species-specific protein identification and epitope
discovery experiments on one platform, and eliminates the need to develop a
sandwich assay. Using the components provided in the kit, antibodies are bound to
a ProteinChip array to detect antigen(s) of interest from crude samples derived from
in vivo or in vitro experimental models. Once an antibody-antigen complex has been
formed on the ProteinChip array, researchers can use the ProteinChip array for two
unique purposes: 1) to identify proteins bound to the antibody on the basis of
molecular weight using the ProteinChip SELDI reader, or 2) to conduct epitope
discovery experiments by proteolytically cleaving proteins captured on ProteinChip
arrays (on-chip proteolysis) and then using SELDI to highlight the peptide(s)
associated with the epitope, streamlining the process of sequencing the protein
binding site via tandem mass spectrometry (MS/MS).
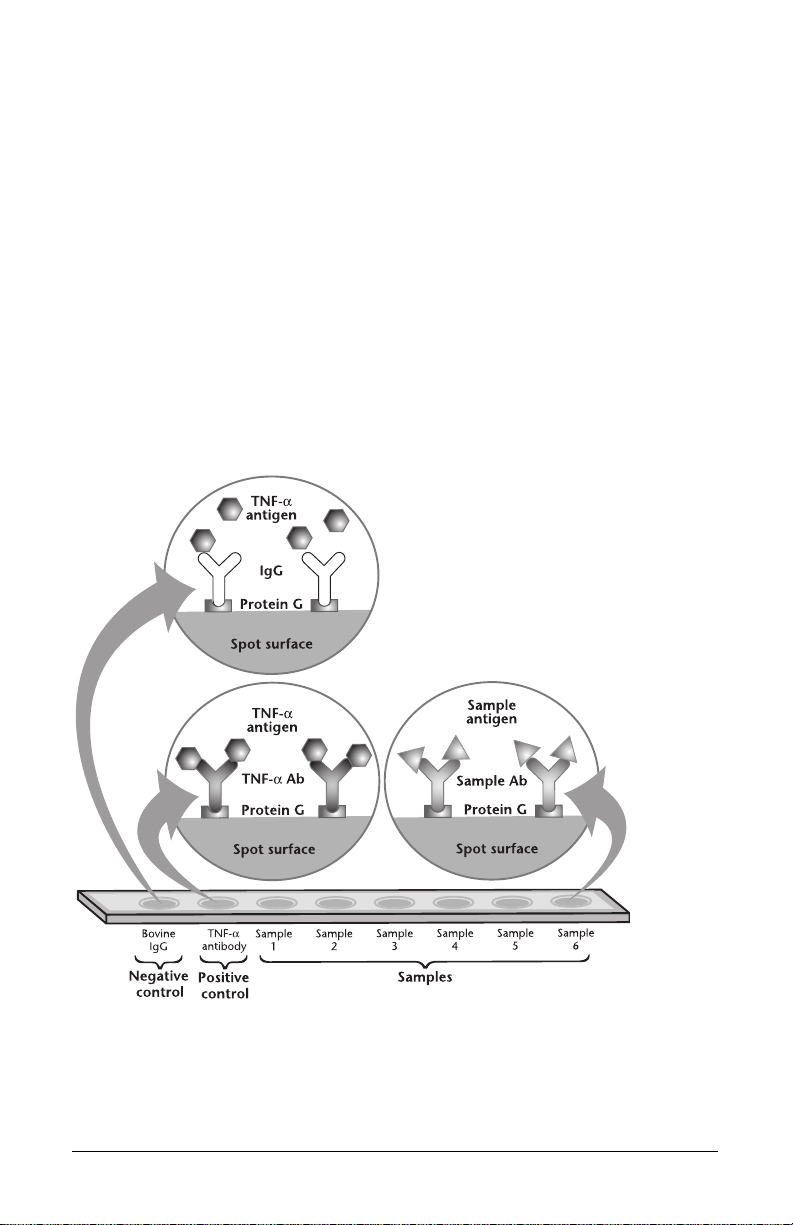
Fig. 1. Principles of the ProteinChip antibody capture kit. Protein G is covalently bound to the ProteinChip
PG20 array surface. An optional crosslinking step can be performed to crosslink IgG antibodies to protein G.
© 2007 Bio-Rad Laboratories, Inc.
Page 3

The key component of this kit is the ProteinChip PG20 array (ProteinChip PS20 array
precoupled with recombinant protein G (Pierce). Any antibody capable of binding
protein G can be used with the kit (see appendix for details). The kit also contains
positive (TNF-α antigen-antibody pair) and negative (bovine IgG) controls and a
crosslinking reagent to bind antibodies covalently to ProteinChip PG20 arrays.
Materials
Materials Included
n
TNF-α antibody (0.2 mg/ml anti-human TNF-α goat polyclonal antibody in
phosphate buffered saline (PBS), 20 µl
n
TNF-α antigen* (1.0 µM recombinant human TNF-α antigen in 0.1% bovine
serum albumin (BSA)/PBS), 10 µl
n
Bovine IgG (lyophilized), 750 µg
n
Wash buffer (0.5% Triton X-100 in PBS); 2 bottles, 120 ml each
n
PBS; 2 bottles, 120 ml each
n
1x PBS; 1 bottle, 4 ml**
n
ProteinChip PG20 arrays, 6
n
Bis(sulfosuccinimidyl) suberate (BS3) crosslinking reagent (0.5 mg/vial), 2
n
Deactivation buffer (0.5 M ethanolamine in PBS, pH 8.0), 4 ml
n
ProteinChip sinapinic acid (SPA) energy absorbing molecules (EAMs), 5 mg
n
Instruction manual
* Contains equimolar amounts of TNF with and without N-terminal methionine, yielding a double peak.
** The 4 ml PBS should be used to dilute the bovine IgG, antibody, and antigen, reconstitute the
crosslinking reagent, and deposit to the spots of the ProteinChip array when needed.
© 2007 Bio-Rad Laboratories, Inc.
Page 4

M
aterials Needed but Not Included
n
15 ml conical tubes
n
Rocking platform
n
Humidity chamber*
n
Lab timer
n
Ice bucket and ice
n
Microcentrifuge tubes
n
Calibrated pipets**
n
99+% trifluoroacetic acid (TFA)
Optional Materials
n
ProteinChip cassette-compatible bioprocessor (catalog #C50-30011)
n
MicroMix 5 plate and tube shaker*** (Diagnostic Products Corporation)
n
Sonicating water bath
Shipping and Storage
Table 1. Shipping and storage conditions for ProteinChip antibody capture kit components.
Item Shipping Storage
Anti-human TNF-α Dry ice –20°C (stable 6 months)
antibody 4°C (stable 2 weeks)
Recombinant human Dry ice –20°C (stable 6 months)
α antigen 4°C (stable 2 weeks)
TNF-
Bovine IgG Dry ice –20°C
Crosslinking reagent Dry ice –20°C
ProteinChip PG20 arrays Ambient with desiccant 4°C with desiccant
Wash buffer Ambient 4°C
PBS Ambient 4°C
Deactivation buffer Ambient 4°C
HEPES buffer Ambient 4°C
ProteinChip SPA EAMs Ambient Ambient or 4°C
* See the ProteinChip SELDI
humidity chamber if one is not r
System Applications Guide for detailed instructions on how to create a
eadily available.
** Calibrated pipets will yield more reproducible results.
*** When using a ProteinChip bioprocessor, a MicroMix 5 is recommended.
© 2007 Bio-Rad Laboratories, Inc.
Page 5

Protocol Flowchart
© 2007 Bio-Rad Laboratories, Inc.
Page 6

Step 1: Coupling Antibody to the ProteinChip Array
1. Thaw the TNF-α antibody and TNF-α antigen on ice.
2. Reconstitute 750 µg of the bovine IgG provided in the kit with 100 µl PBS to
obtain a final concentration of 7.5 mg/ml.
3. Add 4 µl reconstituted control bovine IgG to 146 µl of PBS to obtain a final
concentration of 0.2 mg/ml.
4. Place a ProteinChip PG20 array on a clean, flat surface.
5. Add 2 µl of the diluted bovine IgG to spot A on the array.
6. Add 2 µl of the TNF-α antibody to spot B on the array.
7. Add 2 µl 0.2 mg/ml antibody of interest to the remaining spots on the array.
8. Immediately transfer the array to a humidity chamber and incubate for 1 hour at
room temperature or overnight at 4°C. If larger sample volumes are being used
with a ProteinChip bioprocessor, incubate on a rocking platform.
9. Remove the bovine IgG and the TNF-α antibody from the array using a pipet
to prevent cross-contamination during the following wash steps. Do not touch
the surface of the array with the pipet tip.
10. Place the entire array into a 15 ml conical tube containing 8 ml wash buffer
and agitate on a rocking platform for 10 minutes at room temperature.
11. Pour off the wash buffer and add 8 ml PBS to the tube and agitate on a rocking
platform for 5 minutes at room temperature.
12. Pour off the PBS and repeat step 1.11 once for a total of two washes.
13. After the PBS washes, gently blot the excess buffer from the array surface
using a lint-free lab wipe without touching the active spots on the array.
Step 2: Crosslinking Antibody to Protein G (Optional)
1. Reconstitute the crosslinking reagent as follows: Warm the crosslinking reagent
to room temperature, dissolve 0.5 mg (one vial) of crosslinking reagent by
adding 1 ml of PBS into the vial, and vigorously vortex the vial.
2. After removing the buffer from the array (step 1.13), air-dry the array for
approximately 5 minutes. Do not allow the spots to dry completely. If the
spots dry, add 1 µl PBS to each spot on the array.
3. Add 1 µl of crosslinking reagent to each spot on the array.
4. Immediately transfer the array to a humidity chamber and incubate for
30 minutes at room temperature.
5. Add 1 µl deactivation buffer to each spot, transfer the array to the humidity
chamber, and incubate with agitation for 15
6. Blot the excess buf
fer from the surface of the array using a lint-free lab wipe
without touching the active spots on the ar
© 2007 Bio-Rad Laboratories, Inc.
minutes at room temperature.
.
ray
Page 7

7. Place the entire array in a 15 ml conical tube containing 8 ml of wash buffer.
Agitate on a rocking platform for 10 minutes. Pour off the wash buffer.
8. Pour off the wash buffer and add 8 ml of PBS to the conical tube. Agitate
vigorously on a shaker for 5 minutes.
9. Repeat step 2.8 for a total of two PBS washes.
Step 3: Capturing Antigens on the ProteinChip PG20 Array
1. After completing the PBS washes, pour off the buffer. Using a lint-free lab wipe,
gently blot away any excess buffer from the surface of the array without
touching the active spots on the array.
2. Dilute 1 µl of TNF-α antigen into 19 µl of PBS, and vortex. The final
concentration will be 50 fmol/µl.
3. Add 2 µl (100 fmol) of the diluted TNF-α antigen to spots A and B on the array.
4. Add 2 µl of sample to the remaining spots on the array (C–H), and transfer the
array to a humidity chamber.
5. Incubate the array for 1 hour at room temperature, or incubate overnight
at 4°C.
6. Place the array in a 15 ml conical tube containing 8 ml of wash buffer. Agitate
on a rocking platform for 10 minutes. Pour off the wash buffer.
7. Add 8 ml of PBS to the conical tube. Agitate on a rocking platform for
5 minutes at room temperature.
8. Pour off the PBS, add 8 ml fresh PBS, and agitate for 5 minutes.
9. Make 500 ml of a 1 mM HEPES solution by adding 500 µl of 1 M HEPES to
500 ml deionized water.
10. Pour off the PBS and rinse the array two times with 1 mM HEPES.
11. Remove the array from the conical tube, flick off the HEPES, and allow to
air-dry for approximately 10 minutes.
Step 4: EAM Preparation and Addition
1. Add 100 µl 99.8% acetonitrile and 100 µl 1.0% TFA into the vial containing
ProteinChip SPA EAM powder to obtain a final concentration of 25 mg/ml.
2. Vortex the vial for 5 minutes to dissolve the EAM powder. Alternatively,
incubate the vial for 5 minutes in a sonicating water bath.
3. Add 0.5 µl of this saturated EAM solution to each spot on the array and air-dry.
4. Repeat step 4.3 and air-dry the array completely (approximately 10 minutes)
.
before reading in a Pr
© 2007 Bio-Rad Laboratories, Inc.
oteinChip SELDI r
eader
Page 8

Step 5: Reading the ProteinChip PG20 Array in a ProteinChip
SELDI Reader
After the EAM has dried on the array, read the array in a ProteinChip SELDI reader.
The spot protocol used to read the array can be created once and saved. The data
collection parameters of the spot protocol are a function of molecular mass and
need to be adjusted for each antigen. See the operation manual for ProteinChip
data manager software for detailed instructions on how to create an optimized spot
protocol. When optimizing the protocol for the detection of TNF-
α antigen
(molecular mass 17.5 kD), set the Mass Range limits from 0 to 200,000 Da, and
the Focus Mass to 17,500 Da.
Ordering Information
Catalog # Description
K10-00005
C55-30058
C50-30011
C30-00002
ProteinChip Antibody Capture Kit, includes antibody, antigen, reagents, controls,
6 ProteinChip PG20 arrays, ProteinChip SPA energy absorbing molecules (EAMs),
instructions
ProteinChip PG20 Array, A–H format
ProteinChip Cassette-Compatible Bioprocessor, includes ProteinChip array forceps,
cassette hold-down frame, 12 blank ProteinChip arrays
ProteinChip SPA Energy Absorbing Molecules (EAMs),
5 mg/vial, 20
© 2007 Bio-Rad Laboratories, Inc.
Page 9

Appendix A
Immunoglobulin Binding Affinity to Protein G
The information in Table 2 is provided as a guideline and does not guarantee that all
antibodies will behave identically to the information provided in the table.
able 2: Binding affinity of various immunoglobulins to protein G.
T
pecies Immunoglobulin Binding Affinity**
S
Human Total IgG S
gG
I
IgG
IgG
IgG
1
2
3
4
S
S
S
S
Mouse Total IgG S
IgG
IgG
IgG
IgG
1
2a
2b
3
M
S
S
S
Rat Total IgG M
IgG
IgG
IgG
IgG
1
2a
2b
2c
M
S
W
S
Bovine Total IgG S
IgG1 S
IgG2 S
Cat Total IgG W
Dog Total IgG W
Goat Total IgG S
IgG
IgG
1
2
S
S
Guinea pig Total IgG W
Horse Total IgG S
IgG
(ab)
IgG
(c)
IgG(T) S
NB
MB
Pig Total IgG W
Rabbit Total IgG S
Sheep Total IgG S
IgG
IgG
1
2
S
S
* Information provided by Pierce.
** W, weak binding; M, medium binding; S, strong binding; NB, no binding.
*
© 2007 Bio-Rad Laboratories, Inc.
Page 10

Spectra of TNF-α Antigen Capture
0.2
0.1
0
-0.1
0.6
0.4
0.2
0
-0.2
0.4
0.2
0
1.0
0.5
0
1.0
Intensity
0.5
0
3
2
1
0
10
7.5
5.0
2.5
0
20
10
0
1,400
Fig. 2. Spectra illustrating the ef
of TNF-
α is 17.5
kD. TNF-
α quantities range fr
1,600
m/z, kD
fect of increasing TNF-a quantity on intensity.
om 130 amol to 532 fmol. The double peak in these
1,800
20,000
The molecular mass
spectra represents equimolar amounts of TNF-a with and without N-terminus methionine.
© 2007 Bio-Rad Laboratories, Inc.
Page 11

C
ovalently Crosslinking IgG Antibodies to Protein G
Antibodies captured by protein G on ProteinChip PG20 arrays are not covalently
bound to the surface of the array. When these arrays are analyzed in a ProteinChip
SELDI reader, peaks may be seen in the resulting spectra corresponding to intact
IgG (MH+ ~148 kD, M2H+ ~75 kD) or its fragments (~75 kD, ~48 kD, ~22 kD),
especially if a high laser energy is used. These peaks may interfere with the detection
or quantitation of an antigen of similar molecular weight. When the antibody is
crosslinked to protein G on the array, it becomes covalently attached to the array
surface and will not be desorbed from the array surface during the reading process.
The results of an antibody capture assay depicting crosslinked and noncrosslinked
antibody are shown in Figure 3. Without crosslinking, an IgG peak (molecular mass
148 kD) is often seen. When the IgG is crosslinked to the ProteinChip PG20 array,
the IgG peak is not observed. Crosslinking does not affect the peak intensity of
TNF-α antigen.
A
.75
.50
.25
0
15,000
B
Intensity
.075
.050
.025
0
120,000
Not Crosslinked
17,500
140,000 160,000
20,000
C
.4
.2
0
15,000 17,500
D
.4
.2
0
120,000
m/z, kD
Crosslinked
20,000
140,000 160,000
Fig. 3. Effect of crosslinking on TNF-α antigen and TNF-α antibody peak profiles. A, peak
corresponding to the 17.5 kD protein, TNFPG20 array; B, peak corresponding to the 145 kD TNFapplied to a ProteinChip PG20 array; C, peak corresponding to the 17.5 kD protein, TNFwhen 100 fmol TNFthe array; D, no peak is seen corresponding to the 145 kD TNFis added to a ProteinChip PG20 array.
formance Specifications
Per
α is applied to a ProteinChip PG20 array and the anti-TNF-α antibody is crosslinked to
α, is seen when 100 fmol TNF-α is applied to a ProteinChip
α IgG antibody is seen when 2.7 pmol of antibody is
α, is seen
α IgG antibody when 2.7 pmol of antibody
Using the reagents supplied with the ProteinChip antibody capture kit, the user
should be able to detect the TNFhuman TNF-
α antigen in 0.1% BSA/PBS) down to a level of 1 fmol at a signal-to-
noise ratio of at least 3. For the TNF-
α antigen positive control (1.0 µM recombinant
α control, the quantitation range will generally
be from 10–500 fmol.
Different antigens behave significantly differently in the antibody capture and SELDI
processes, so these values cannot be applied to any other antigen-antibody
system. The lower limit of detection and dynamic range for each antigen needs to
be determined for each system.
© 2007 Bio-Rad Laboratories, Inc.
Page 12

MicroMix is a trademark of Diagnostic Products Corporation. Triton is a trademark of Union Carbide.
Life Science
Group
06-0733 0307 Sig 1106
10008252 US/EG Rev D
Bio-Rad
Laboratories, Inc.
Web site www.bio-rad.com USA 800 4BIORAD Australia 61 02 9914 2800
Austria 01 877 89 01 Belgium 09 385 55 11 Brazil 55 21 3237 9400
Canada 905 712 2771 China 86 21 6426 0808 Czech Republic 420 241 430 532
Denmark 44 52 10 00 Finland 09 804 22 00 France 01 47 95 69 65
Germany 089 318 84 0 Greece 30 210 777 4396 Hong Kong 852 2789 3300
Hungary 36 1 455 8800 India 91 124 4029300 Israel 03 963 6050
Italy 39 02 216091 Japan 03 5811 6270 Korea 82 2 3473 4460
Mexico 52 555 488 7670 The Netherlands 0318 540666 New Zealand 0508 805 500
Norway 23 38 41 30 Poland 48 22 331 99 99 Portugal 351 21 472 7700
Russia 7 495 721 14 04 Singapore 65 6415 3188 South Africa 27 861 246 723
Spain 34 91 590 5200 Sweden 08 555 12700 Switzerland 061 717 95 55
Taiwan 886 2 2578 7189 United Kingdom 020 8328 2000
The SELDI process is covered by US patents 5,719,060, 5,894,063, 6,020,208, 6,027,942, 6,124,137,
6,225,047, 6,528,320, 6,579,719, and 6,734,022. Additional US and foreign patents are pending.
 Loading...