


GS 90
DE
Aufbauanleitung für Geräteschrank Größe 90, 150 und 230
GB
Assembly manual for equiment locker - size 90,150 and 230
FR
Instruction de montage pour l‘armoire à outils - taille
NL
Opbouwbeschrijving voor de Tuinkast - grotte 90,150 en 230
IT
Istruzioni per il montaggio Armadio per attrezzi - misura 90,150 e 230
ES
Instrucciones de montaje del armario de jardín - tamaño 90,150 y 230
90,150 et 230
BIOHORT GmbH
www.biohort.com
Find din oversættelse ...
Hitta din översättning ...
Finn din oversettelse ...
Találja meg fordítását ...
Najděte svůj překlad ...
www.biohort.com/downloads
1

Wichtige Punkte für den Aufbau!
Vorliegende Aufbauanleitung zeigt den Zusammenbau von „Geräteschrank“ Größe „230“; sie gilt sinngemäß auch für die
Größe „90“ & „150 “. Für einige Montageschritte benötigen Sie einen Helfer.
Important details regarding assembly! This assembly manual shows the erection of the garden shed model “Geräteschrank” size “230”; it
GB
is also valid for size “90” & “150” For several assembly steps additional assistance of one people will be required.
FR
Points importants lors du montage! “ Cette notice de montage décrit l´assemblage de l´abri „Geräteschrank“ taille « 230 »; celle-ci est
aussi valable pour la taille «90» «150». Pour certaines étapes, demandez l´aide d´une personne.
NL
Deze montage instructies hebben betrekking op de opbouw van de Geräteschrank , grootte 230. De instructies zijn ook van toepassing op de
grootte 90 & 150. Voor enkele montage stappen heeft u 1 persoon nodig om u te helpen.
ES
Notas importantes para el montaje: Estas instrucciones muestran el montaje de la caseta “Geräteschrank“ en tamaño 230. También son válidas para el tamaño 90 & 150. Es recomendable realizar el montaje con una otra persona.
IT
Indicazioni importanti per il montaggio! Le seguenti istruzioni di montaggio fanno riferimento all‘assemblaggio di „Geräteschrank“ misura
„230“; per analogia sono valide anche per la misura „90“ & „150“. Per alcune fasi di assemblaggio vi serviranno 1 aiutante.
Um Kratzer zu vermeiden, verwenden Sie bitte geeignete Unterlagen!
GB
Please use a suitable underlay to avoid scratches!
FR
Pour éviter les rayures, utilisez les supports appropriés!
NL
Om krassen te voorkomen raden wij u aan er iets onder te leggen!
ES
Por favor, coloque en el suelo una base protectora adecuada para evitar posibles arañazos.
IT
Utilizzare una base adatta per evitare graffi!
Schraubverbindungen grundsätzlich erst am Ende der Montage festziehen!
GB
Nuts not to be tightened before the end of assembly!
FR
Ne serrer les écrous à fond qu´à la fin du montage!
NL
Schroeven pas aan het einde van de montage vastdraaien!
ES
En principio, no apriete fijamente las tuercas hasta que no haya terminado de
montar la caseta.
IT
I dadi devono essere serrati a fondo soltanto alla fine del montaggio!
Nicht bei Wind aufbauen!
GB
Do not assemble the shed on a windy day!
FR
Ne pas assembler quand il y a du vent !
NL
Niet bij wind opbouwen!
ES
No monte la caseta si hace mucho viento.
IT
Non montare la casetta in giornate di vento!
Verwenden Sie bei der Montage Arbeitshandschuhe!
GB
Wear working gloves!
FR
Portez des gants de travail
NL
Handschoenen gebruiken!
ES
Utilice unos guantes de trabajo.
IT
Utilizzare guanti da lavoro
2

Optionales Zubehör - Symbol:
Arbeitsschritte die blau eingerahmt sind, zeigen den Einbau eines optionalen Zubehörteiles.
Symbol of optional accessories: Blue framed assembly steps show the installation
GB
of optional accessories.
FR
Accessoires en option-Symbole: La trame entourée en bleu indique une étape avec
accessoires en option. A réaliser uniquement si vous avez commandé cet accessoire.
NL
Extra Toebehoor: Montagestappen met een blauwe rand betreffen de inbouw van
extra toebehoor.
ES
Accesorio opcional – símbolo: Los pasos de montaje que se encuentran enmarcados
en azul muestran el montaje de una pieza de un accesorio opcional.
IT
Simbolo per accessori opzionali: Le fasi del montaggio incorniciate in colore azzurro mostrano l’installazione di un accessorio opzionale.
optionales Zubehör - Accesso...
Wasserwaagen - Symbol:
Betreffendes Einbauteil mit der Wasserwaage ausrichten.
GB
Symbol of spirit level: Align the respective parts by using the spirit level.
FR
Symbole niveau à bulle: Lorsque ce symbole apparaît, vous devez ajuster l´élément à l´aide d´un niveau
à bulle.
Waterpas – symbool: Bij montagestappen waar dit symbool bijstaat is het noodzakelijk het betreffende
NL
onderdeel waterpas in te bouwen.
ES
Símbolo del nivelador: Indica que se debe ajustar y centrar la pieza con la ayuda de un nivelador.
IT
Simbolo di livella a bolla d‘aria: Allineare il componente in questione con l‘ausilio di una livella a bolla d’aria.
Größenabhängiger Montageschritt!
GB
Size-Dependent assembly step!
FR
Dépendant de la taille assemblage étape!
NL
Size-Dependent montagestap!
ES
Paso de montaje de tamaño Dependiente!
IT
Taglia-Dependent fase di montaggio!
Nur für Größe 150
(Only for size 150 - Uniquement
Größenabhängiger Montageschritt
Montageschritt entfällt - Symbol:
Arbeitsschritt entfällt bei der im Symbol genannten Größe.
Symbol of assembly step not applicable: Assembly step is not applicable for the mentioned size in the symbol.
GB
Étape de montage à supprimer - Symbole: Cette étape est supprimée selon la taille indiquée dans le symbole.
FR
NL
Montagestap vervalt – symbool: Montagestap vervalt bij de in het symbool genoemde grootte.
onderdeel waterpas in te bouwen.
ES
Paso de montaje eliminado - Símbolo: Paso de trabajo eliminado en el tamaño indicado en el símbolo.
IT
Questa fase di montaggio viene annullata – simbolo: Questa fase di lavoro viene annullata nella misura indicata con il simbolo.
Maßstabsgetreue Abbildungen der zu verwendenden Schrauben:
GB
Scale drawing 1:1 of the screws in use
FR
Reproduction selon l´échelle 1:1.
NL
Afbeelding : schaal 1:1 (ware grootte)
ES
Reproducción a escala 1:1 de los tornillos que se utilizan para el montaje.
IT
Immagine in scala delle viti da utilizzare!
90
M 1:1
M4 x 10
M4 x 18
8 x 60
M6 x 8 6,3 x 22
3
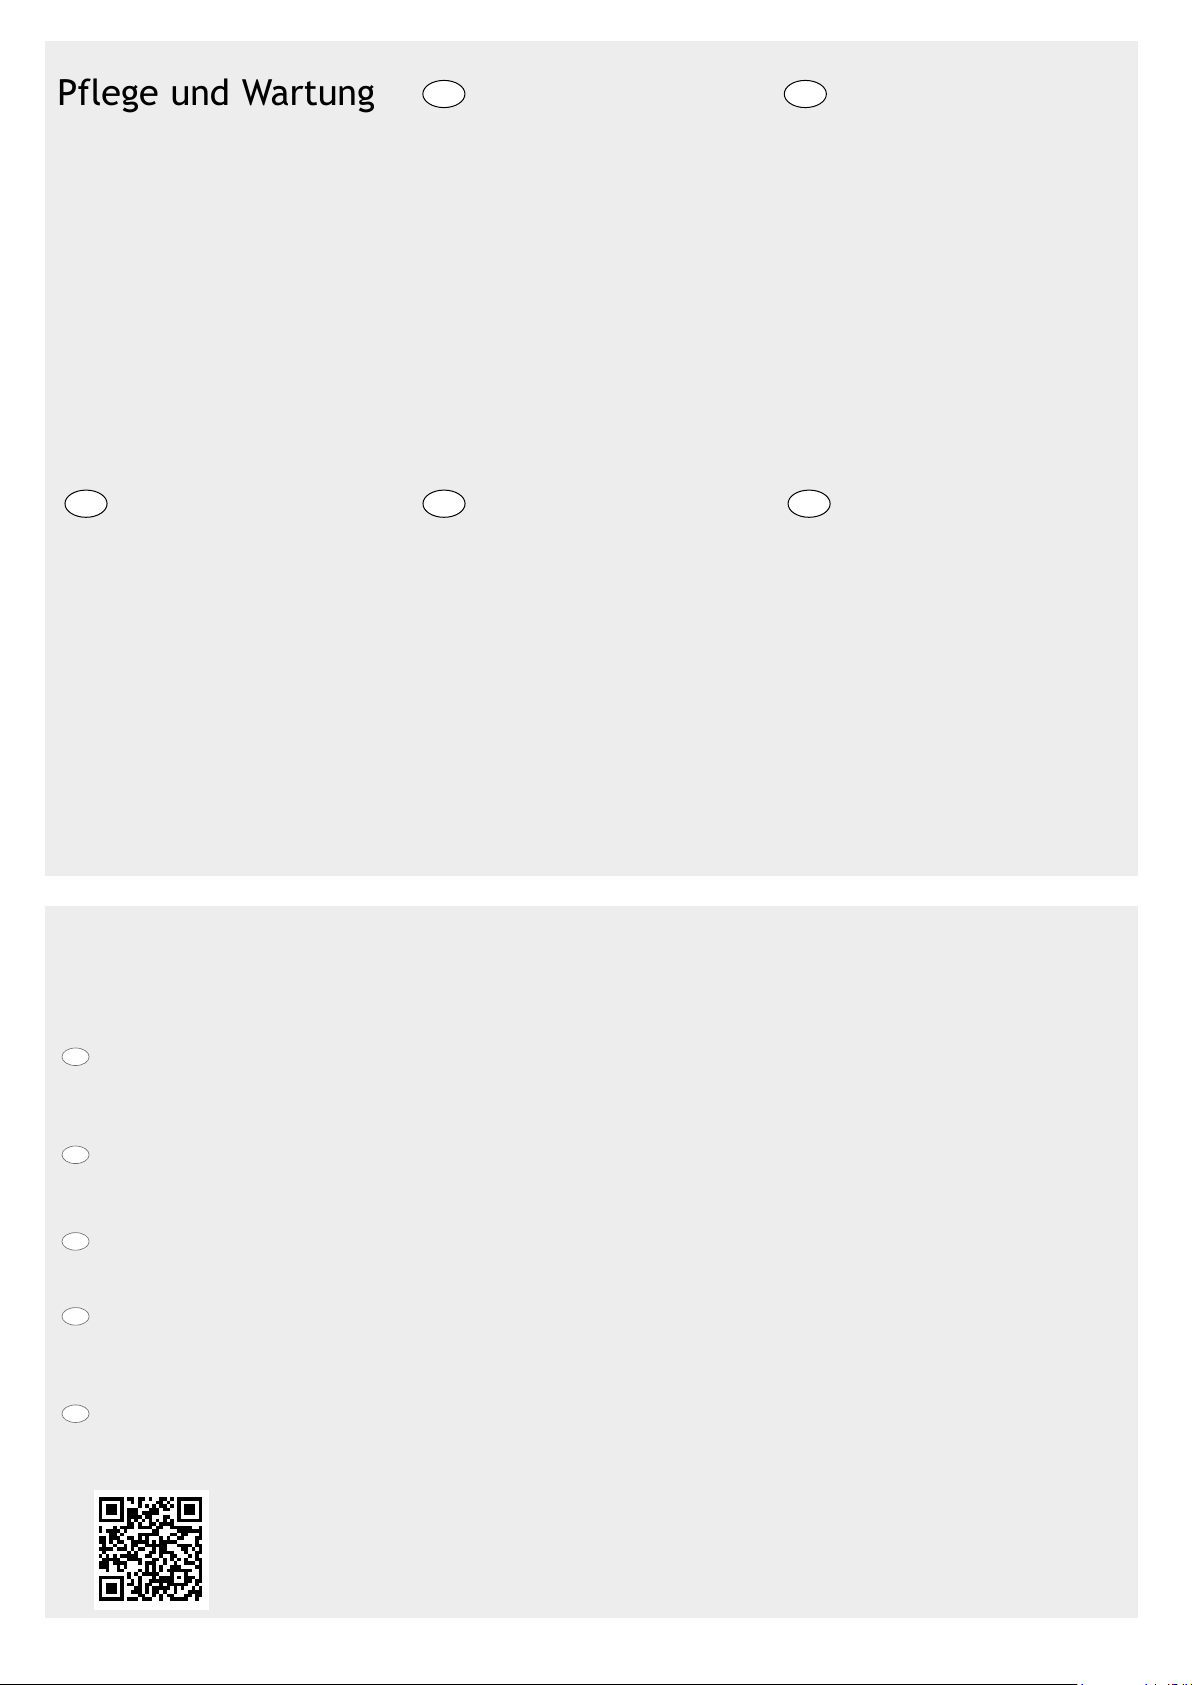
Pflege und Wartung
EN
Care and maintenance
FR
Entretien et maintenance
• Keine aggressiven Chemikalien
wie z.B. Chlor oder Streusalz
offen lagern!
• Sonnenmilch und andere Cremen
mit Wasser und Seife entfernen
• Keine scheuernden Reinigungsmittel verwenden!
• Tiefe Kratzer sofort mit
beiliegendem Lack ausbessern!
• Ölen Sie das Schloss jährlich!
NL ITES
Onderhoud
• Geen chemicaliën om de berging opslaan
• Zonnebrandolie/melk en andere cremes
met water en glansmiddel verwijderen
• Gebruik geen schuurmiddelen!
• Krassen direct met de meegeleverde lak
behandelen
• Slot jaarlijks oliën
• Do not store aggressive substances uncovered i.e. chlorine or road salt
• Remove suntan lotion or any other
creams with water and rinse aid!
• Do not use abrasive cleaning agents!
• Touch-up scratches immediately with
the paint provided.
• Lubricate the lock once a year!
• Ne pas stocker de produits chimiques
(chlore, sel, etc…)
• Nettoyez uniquement avec de l´eau les
crèmes solaires et autres crèmes (pas de
nettoyant chimique).
• Corrigez immédiatement les rayures avec
la laque jointe!
• Graissez la serrure et les charnières
chaque année !
Cuidado y mantenimiento Manutenzione
• No almacene productos químicos agresivos dentro de la caseta como por ejemplo
cloro y sal antiescarcha.
• Evite dejar huellas o restos de cremas
solares sobre la chapa. Limpie la caseta
siempre con agua o un trapo húmedo.
• Repare los arañazos lo antes posible con
el barniz que se incluye
• Aplique aceite en la cerradura y las bisa-
gras una vez al año
• Non lasciare prodotti chimici aggressivi
(come ad esempio cloro o sale per strade)
all’interno della casetta!
• Rimuovere crema solare e altre creme
con acqua e brillantante!
• Ritoccare immediatamente eventuali graf-
fi con la vernice fornita nella confezione!
• Lubrificare la serratura e le cerniere a
cadenza annuale!
Vorschläge für das Fundament
Bitte achten Sie bei der Fundamentgestaltung darauf, dass Niederschlagswasser nicht seitlich unter den Bodenprofilen in das
Gerätehaus eindringen kann! (siehe Varianten 1, 2, 3). Aufsteigende Bodenfeuchtigkeit und Kondensation vermeiden Sie mittels
einer starken Kunststofffolie unter dem Fundament.
GB
Proposals for a secure foundation
When making the foundation arrangements please take necessary precaution to ensure that water cannot leak in under the floor profiles
(see option 1, 2, 3). Rising ground moisture and condensation can be avoided by using a strong plastic sheet underneath the paving slabs
or underneath the concrete foundation.
Conseils pour les fondations
FR
Lors de la réalisation de la fondation, veillez à ce que l´eau de pluie ne puisse pas pénétrer dans l´abri ou par les côtés sous les profils de
sol (voir variantes 1,2,3). Vous pouvez éviter l´humidité du sol et la condensation en mettant un film plastique épais sous les plaques de
béton.
Voorstellen voor fundament
NL
Let er bij het maken van de fundering op dat regenwater niet onder het bodemprofiel kan doorlopen (zie voorbeeld 1,2,3). Een vochtige
bodem en condensatie kunt u vermijden door het aanbrengen van een sterke kunststoffolie onder de tegels of het betonfundament.
ES
Medidas y recomendaciones para los cimientos:
Al colocar los cimientos, asegúrese de que el agua de lluvia no puede penetrar en la caseta por los laterales debajo del perfil del suelo
(véase variante 1,2 y 3). Evite la humedad y la condensación en el suelo colocando una lámina de plástico bajo las losas o los cimientos de
hormigón.
IT
Proposte per il basamento:
ll basamento deve essere progettato in modo da evitare infiltrazioni di acqua piovana all‘interno della casetta (vedere proposta 1-2-3).
Un telo di plastica spesso posto in corrispondenza dell‘area di pavimento evita infiltrazioni di umidità dal terreno e la formazione di condensa.
Weitere Details betreffend Fundament finden Sie auch unter www.biohort.com/Fundament
Further details about foundations you will find on www.biohort.com/foundation
Pour détails supplémentaires veuillez consulter www.biohort.com/fondations
Verdere details over het fundament vindt u ook op www.biohort.com/fundament
4
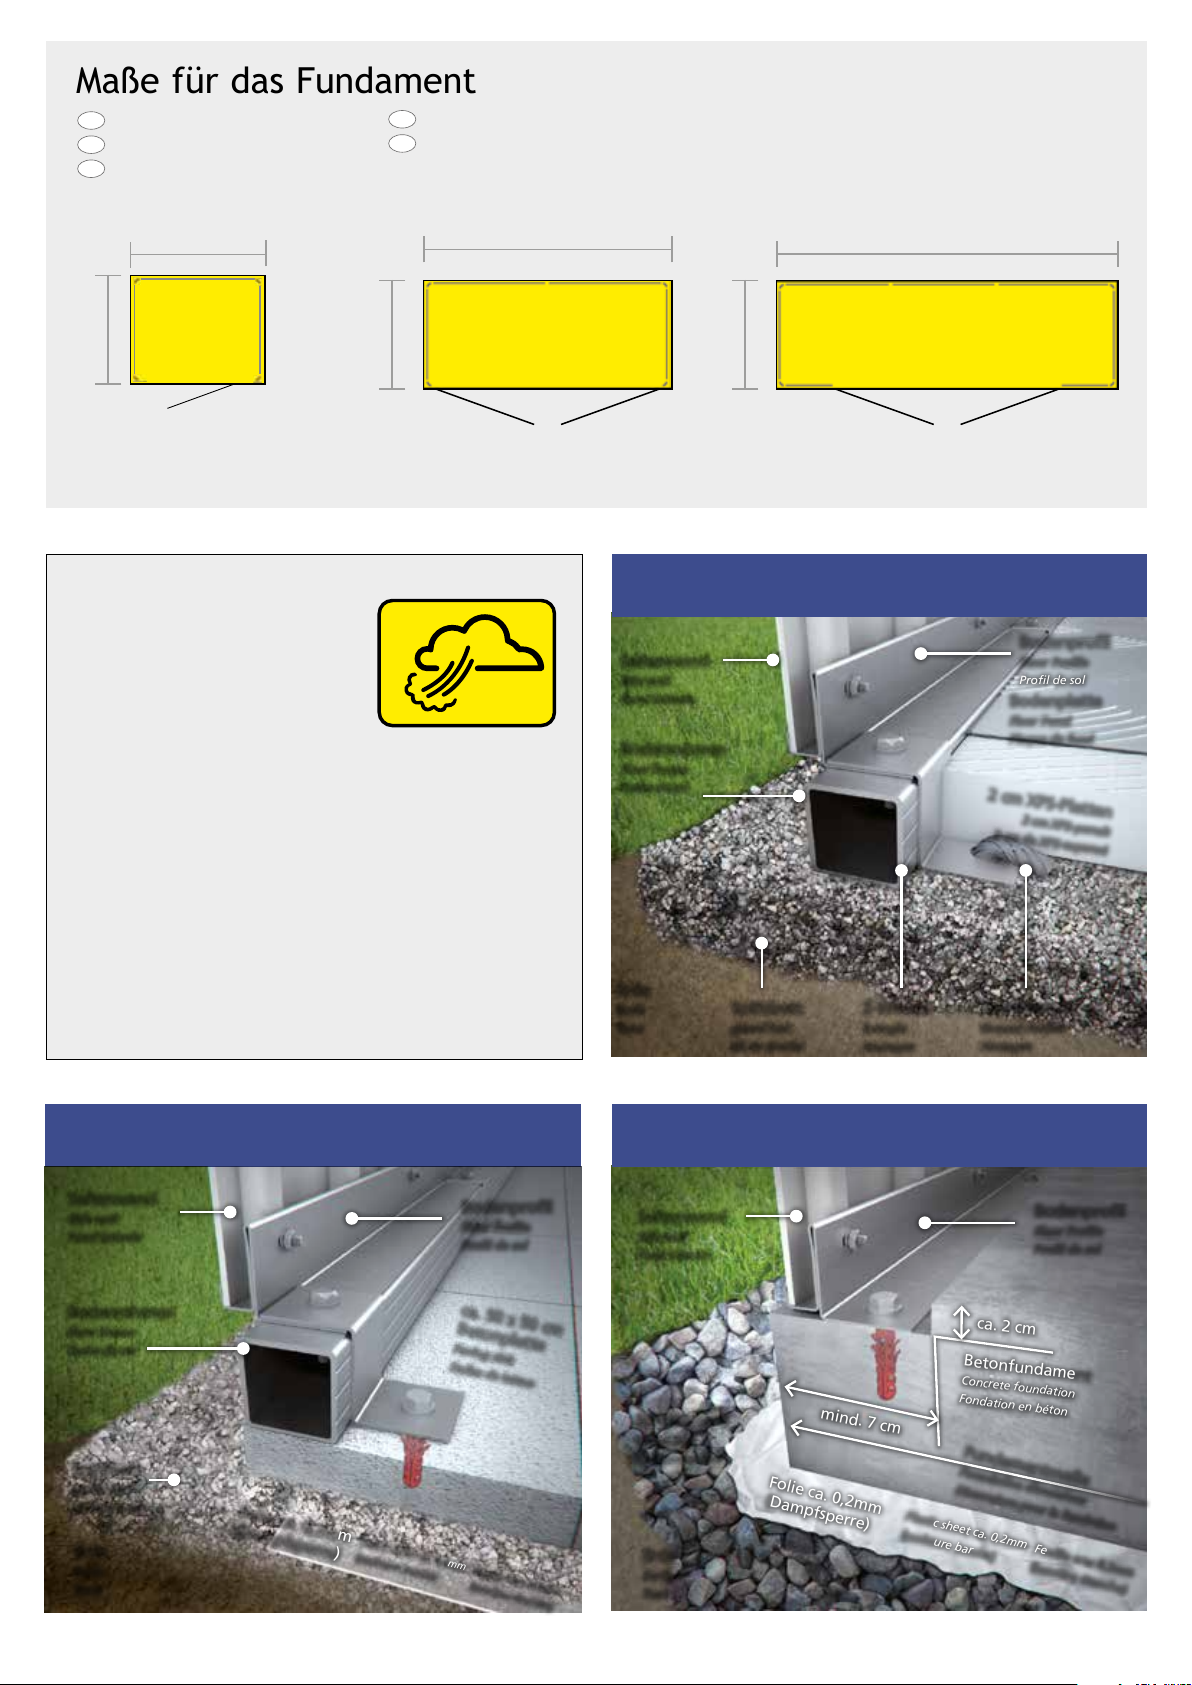
Maße für das Fundament
GB
Foundation dimensions
FR
Dimensions pour la fondation
NL
Maat voor het fundament
ES
Medidas de los cimientos
IT
Dimensioni del basamento
92
83
ACHTUNG ATTENTION
ATTENTION | ATTENTIE |
LET OP | ATENCIÓN |
ATTENZIONE
Die Verankerung ist wichtig, denken Sie an
Sturmböen!
Do not forget to anchor the shed against gale force wind!
L´ancrage est important, pensez aux rafales de vent!
GS 90
83
155
GS 150
227
83
GS 230
Variante, Proposal, Variant
Seitenwand
Side wall
Paroi latérale
Bodenrahmen
Floor Frame
Cadre de sol
1
Bodenprofil
Floor Profile
Profil de sol
Bodenplatte
Floor Panel
Plaque de fond
2 cm XPS-Platten
2 cm XPS-panels
2 cm de XPS-expansé
Verankering niet vergeten!
El anclaje es muy importante. Piense por ejemplo en rachas
fuertes de viento.
L‘ancoraggio della casetta è importante - pericolo in caso di
raffiche di vento!
Variante, Proposal, Variant
Seitenwand
Side wall
Paroi latérale
Bodenrahmen
Floor Frame
Cadre de sol
Splittbett
gravel bed
Lit de gravier
Erde
Earth
Terre
Folie ca. 0,2mm
(Dampfsperre)
Plastic sheet ca. 0,2mm
(moisture barrier)
2
Bodenprofil
Floor Profile
Profil de sol
ca. 50 x 50 cm
Betonplatte
Paving slab
Dalles de béton
Feuille env. 0,2mm
(barrière étanche)
Erde
Earth
Terre
Splittbett
gravel bed
Lit de gravier
Z-Winkel
Z-Angle
Ancrages
Variante, Proposal, Variant
Seitenwand
Side wall
Paroi latérale
Schotterbett
Gravel bed
Lit de macadam
Erde
Earth
Terre
mind. 7 cm
Folie ca. 0,2mm
(Dampfsperre)
Plastic sheet ca. 0,2mm
(moisture barrier)
Bodenanker
Ground Anchor
Ancrages
3Variante, Proposal, Variant 3
Bodenprofil
Floor Profile
Profil de sol
ca. 2 cm
Betonfundament
Concrete foundation
Fondation en béton
Fundamentmaße
Foundation dimensions
Dimensions pour la fondation
Feuille env. 0,2mm
(barrière étanche)
5

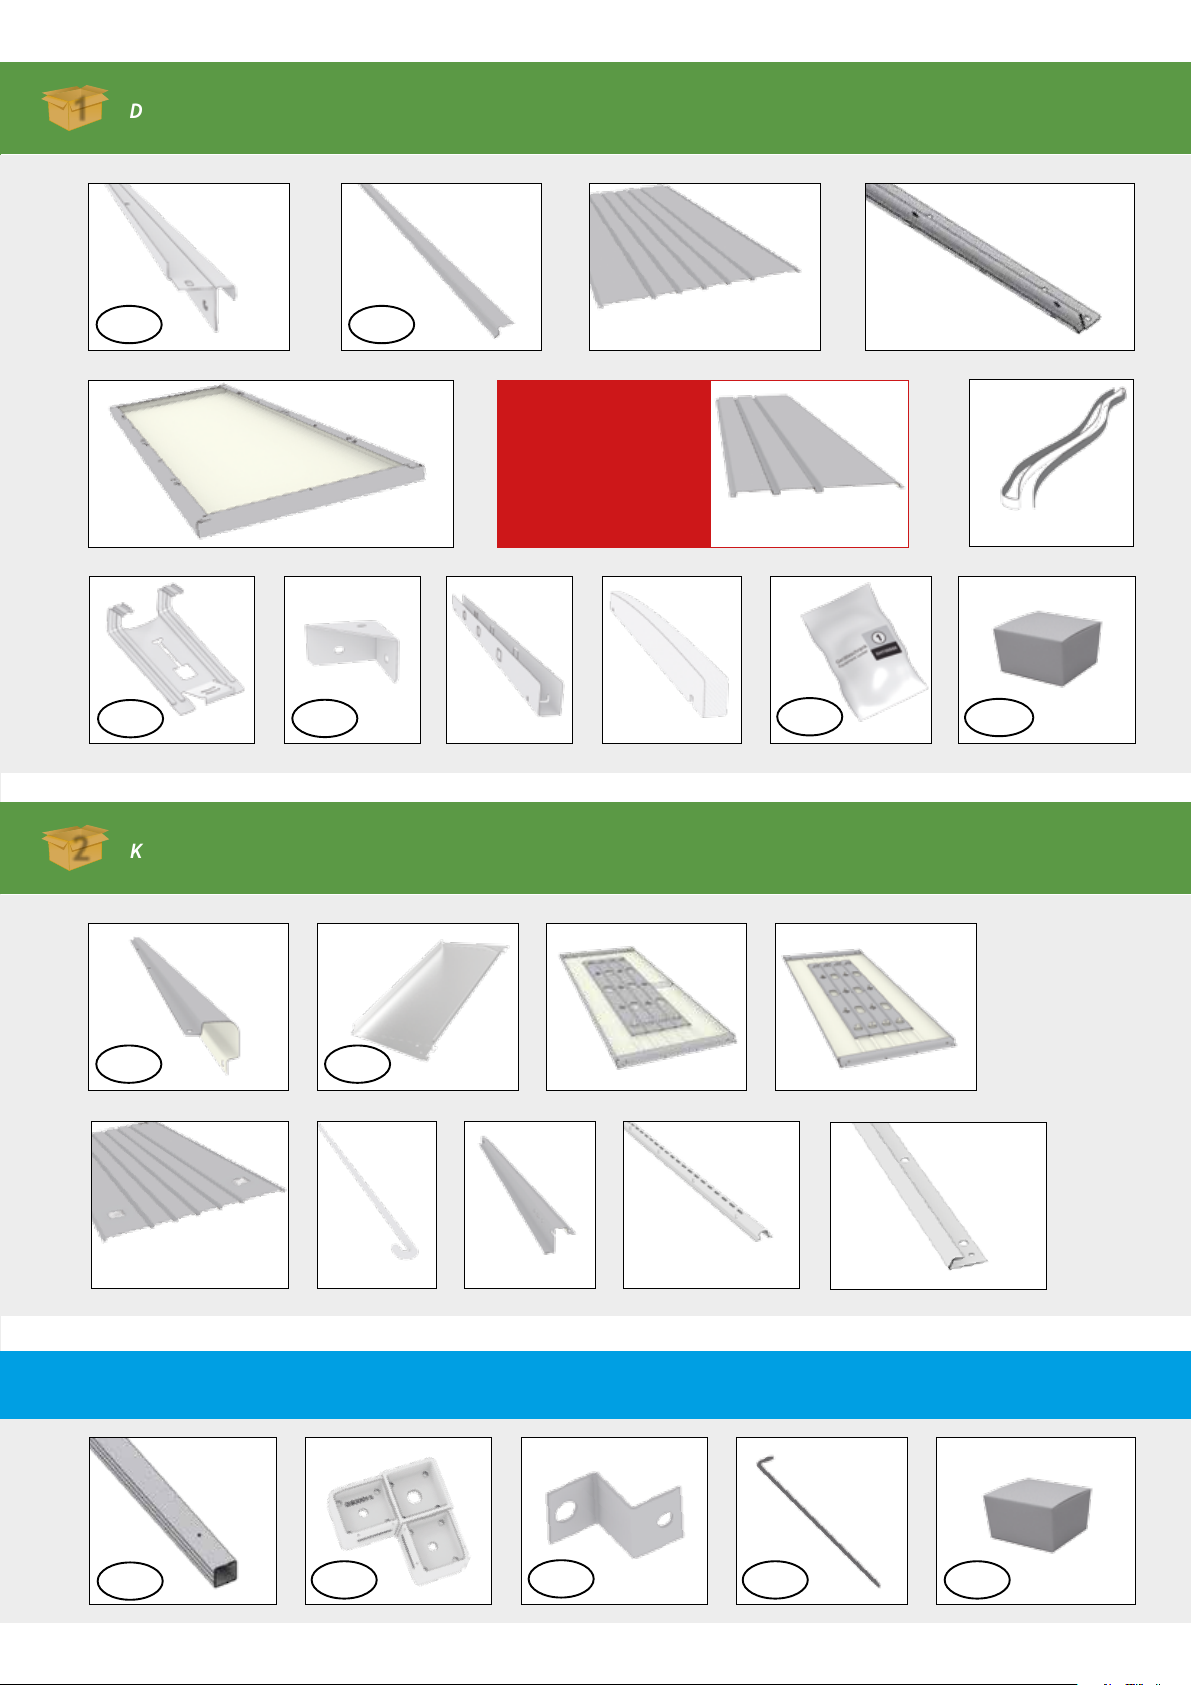
Teileübersicht Geräteschrank 90
Paket Nr. 1
parts list · liste des pièces · stuklijst · lista de piezas · lista de parti
AE AF
X
D1
D2
AC
G L
AI
AK
S TU
B
H I
R
J K
Teileübersicht Geräteschrank 150,230
parts list · liste des pièces · stuklijst · lista de piezas · lista de parti
6
F
AB
1
Paket Nr. 1
Dach-Profilpaket · top profile package · carton de profils de toit · dakprofielpakket · pacco profili
del tetto · kit de perfiles de tejado · de la puerta y del corpus
AE AF
X
2
AI
Paket Nr. 2
Korpus-Türpaket · corpus-door package · carton de l‘ossature · et la porte· deur-corpus pakket ·
pacchetto di corpus e porta · paquete de la puerta y del corpus
AD
Nur für Größe 230
(Only for size 230
Uniquement pour taille 230
Alleen voor maat 230
sólo para los tamaños 230
solo per misura 230)
S
G L
A
T
D1
U
D2
AC AK
H
I
M
B
C
R
Bodenrahmen
Floor Frame · Cadre de sol · Telaio perimetrale · Bodemframe · marco de suelo
ZB
ZC
ZD
ZE ZF
F
7
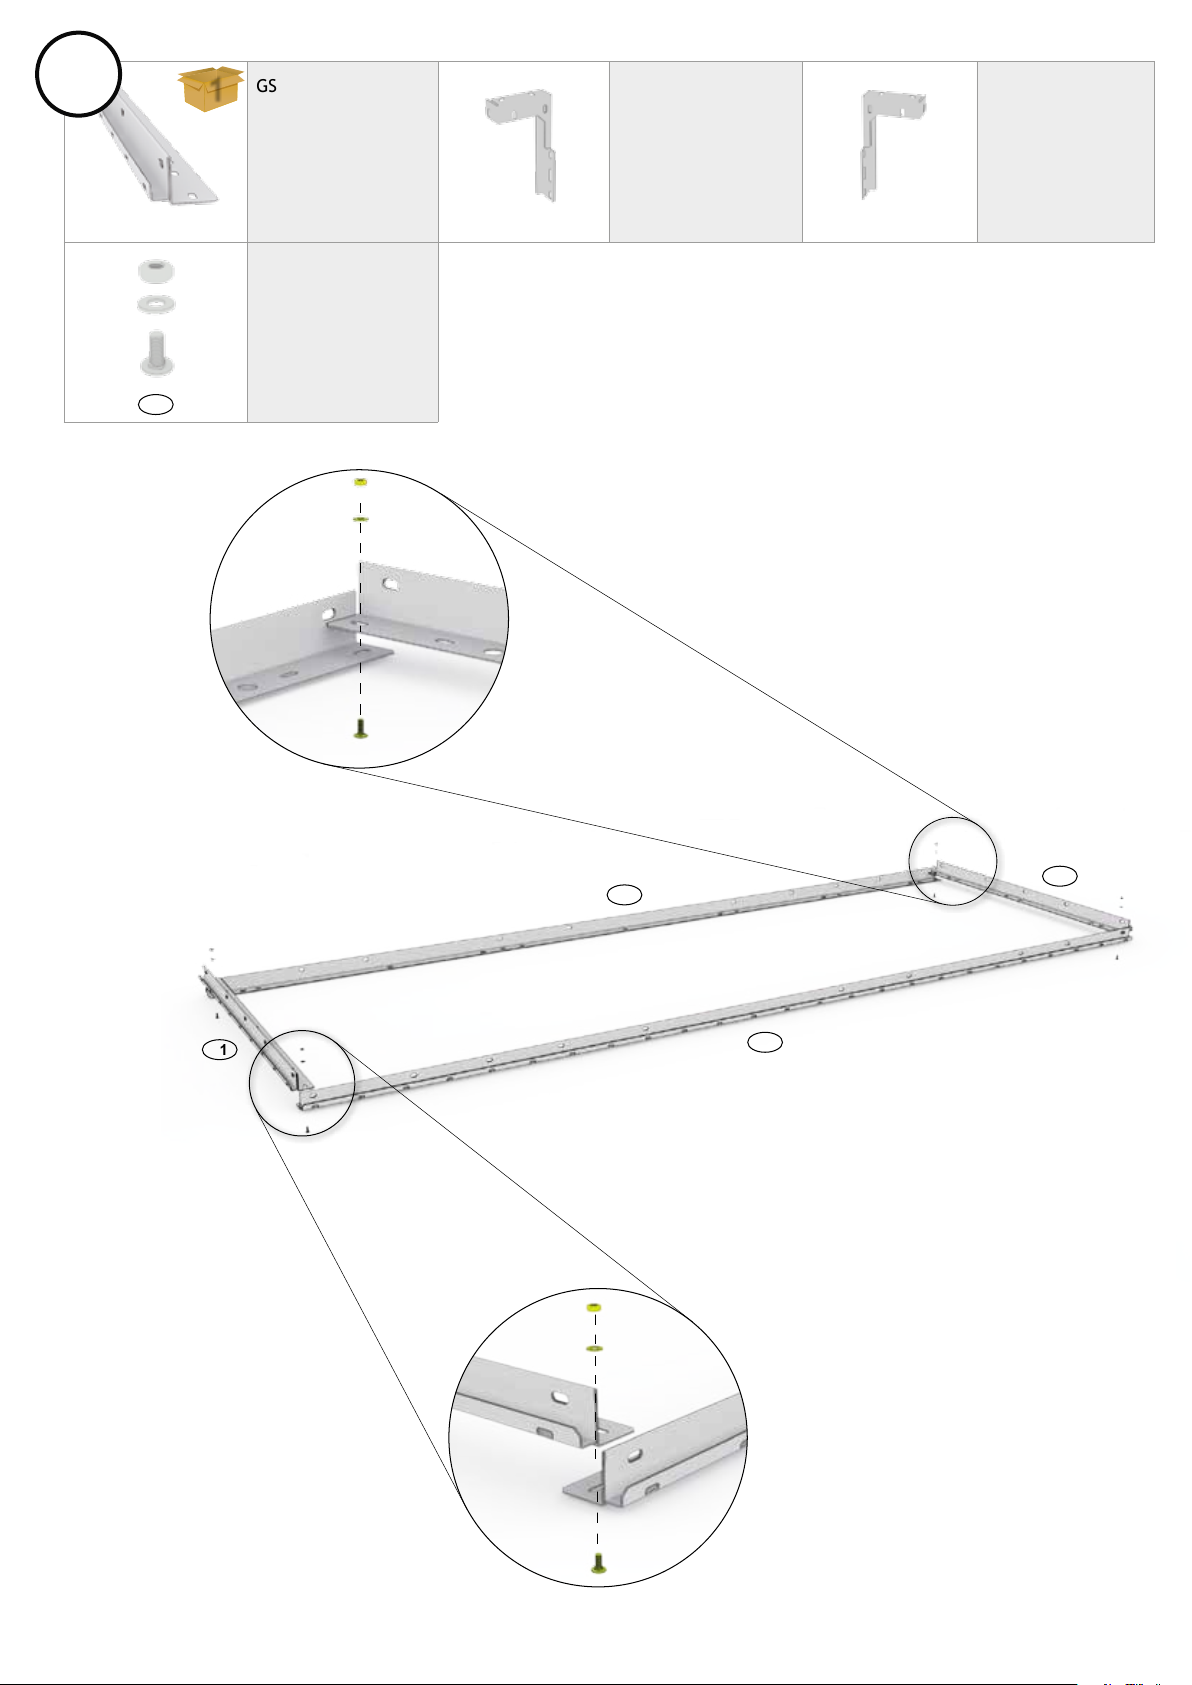
1.
GS 90: 2x L1 (770mm)
1
2x L2 (870mm)
GS 150: 2x L1 (770mm)
2x L2 (1490mm)
GS 230: 2x L1 (770mm)
L J
M4 x 10
D2
2x L2 (2210mm)
GS 90: 10x
GS 150: 4x
GS 230: 4x
GS 90: 1x GS 90: 1x
K
L1
L2
L1
L2
8
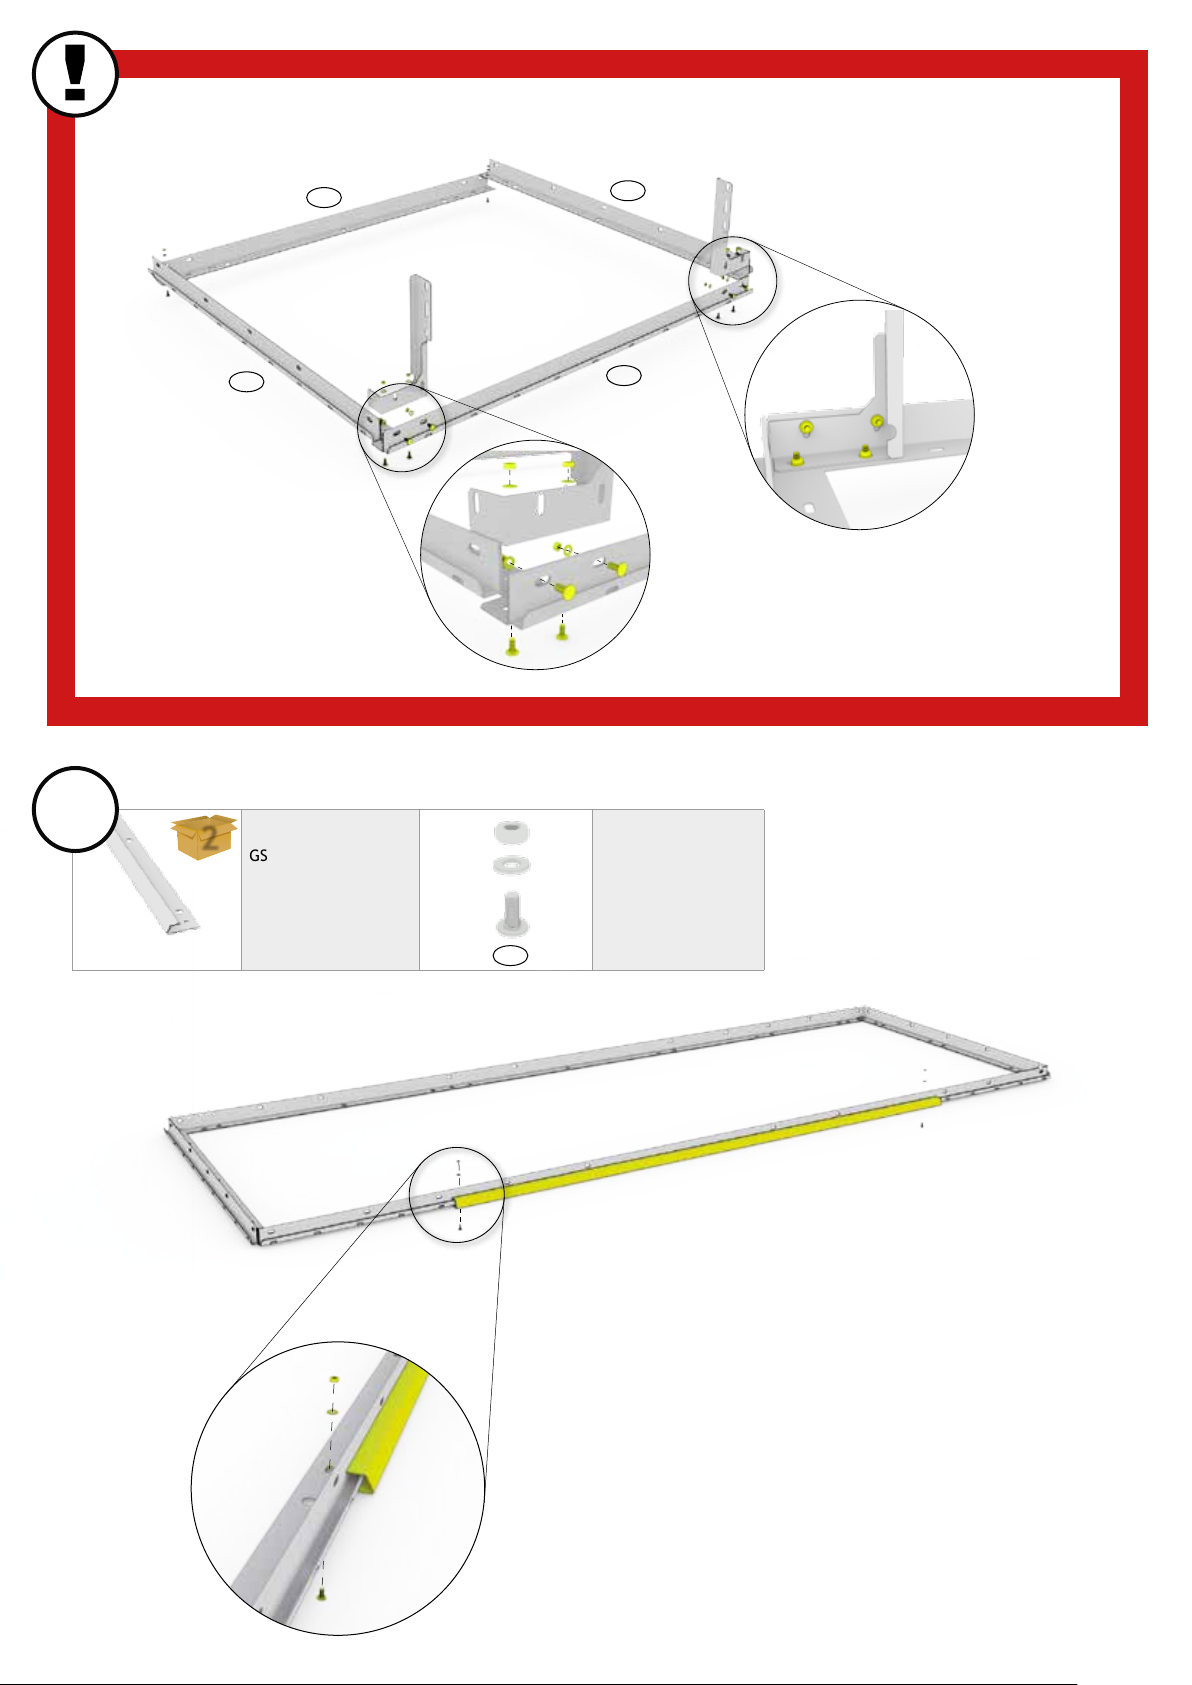
Größenabhängiger Montageschritt - Size-Dependent assembly step - Dépendant de la taille - Size-Dependent montagestap
Nur für Größe 90
Only for width 90 · Juste pour la largeur de 90 · Alleen voor breedte 90 · sólo para el ancho de
90 · solo per larghezza 90
L2
K
L1
J
2.
L1
Size-Dependent assembly step - Paso de montaje de tamaño Dependiente - Taglia-Dependent fase di montaggio
2
GS 90: 1x (690mm)
GS 150: 1x (1380mm)
GS 230: 1x (1380mm)
F
M4 x 10
D2
L2
GS 90: 2x
GS 150: 2x
GS 230: 2x
9

3.
H
2
GS 90: 1x
GS 150: 1x
GS 230: 1x
10
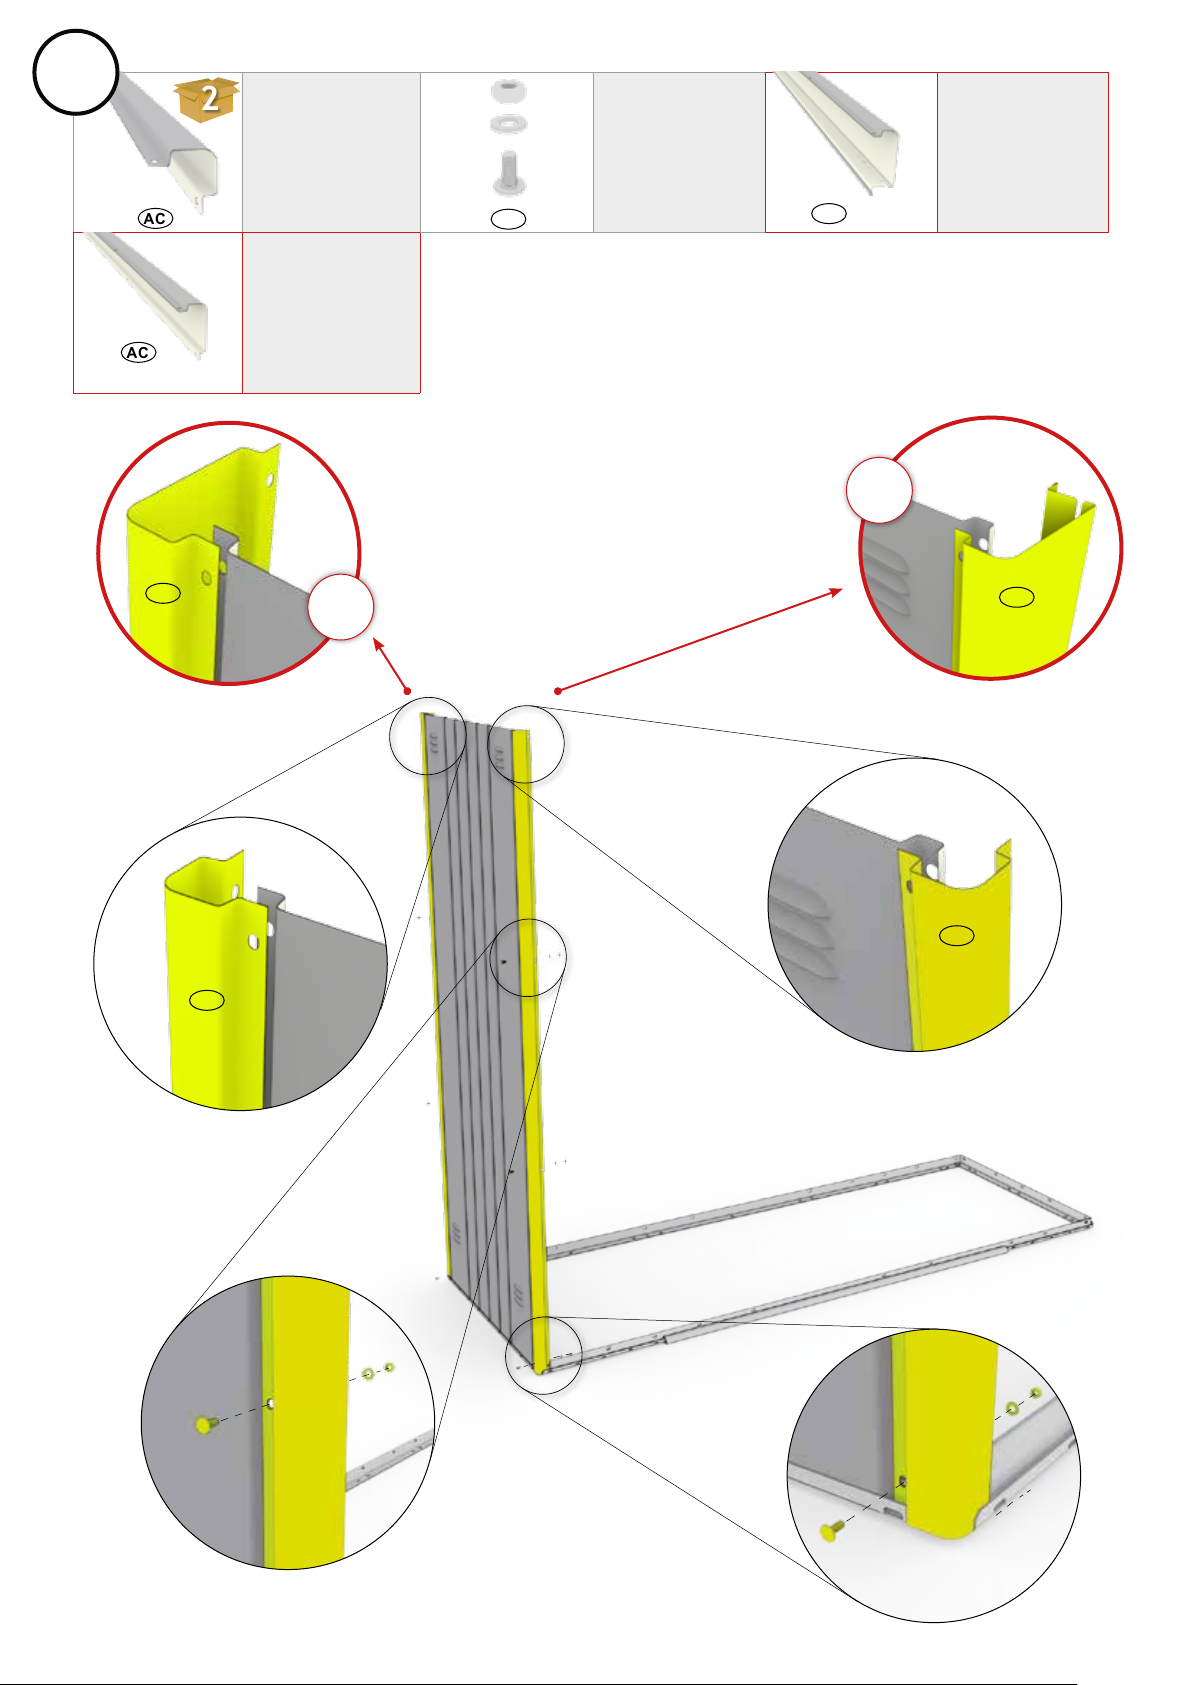
4.
AC
AC
2
GS 150: 2x
GS 230: 2x
GS 90: 1x
M4 x 10
D2
GS 90: 6x
GS 150: 6x
GS 230: 6x
GS 90: 1x
AB
90
AC
90
AB
AC
AC
11
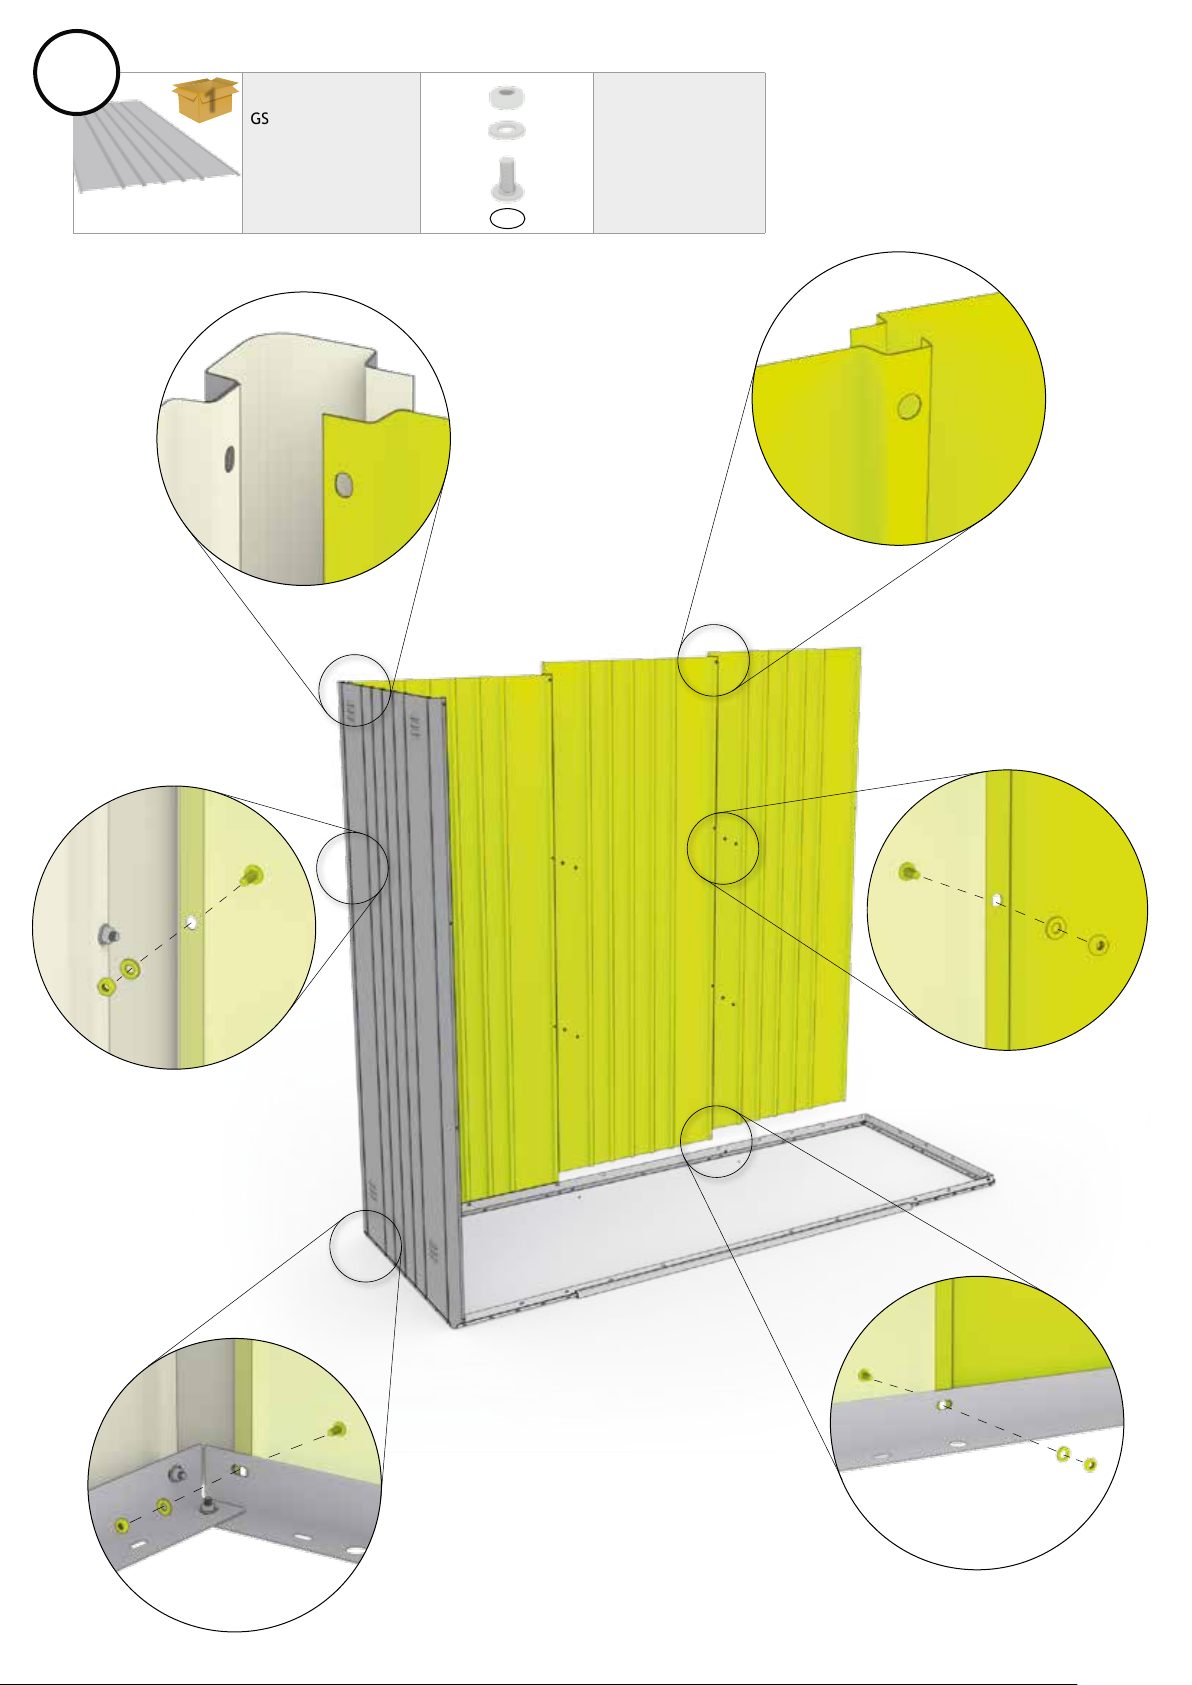
5.
1
GS 90: 1x
GS 90: 3x
G
GS 150: 2x
GS 230: 3x
M4 x 10
GS 150: 6x
GS 230: 9x
D2
12
 Loading...