

Page 1
USER GUIDE
Defence 6025 Call Blocker Single
Defence 6025 Call Blocker Twin
Defence 6025 Call Blocker Triple
Defence 6025 Call Blocker Quad
DECT Telephone With
answering machine
Binatone Helpline
(for UK only)
Mon - Fri - 8.00am to 8.00pm
Sat - 8.30am to 2.00pm
Tel: 0844 557 9677 **
** Calls cost 7ppm + your phone company's access charge.
Or visit our website: www.binatoneglobal.com
THIS EQUIPMENT IS NOT DESIGNED FOR MAKING
EMERGENCY TELEPHONE CALLS WITHOUT MAINS
POWER. ALTERNATIVE ARRANGEMENTS SHOULD BE
MADE FOR ACCESS TO EMERGENCY SERVICES.
Before operating this set,
please read these instructions carefully.
Page 2

TECHNICAL DETAILS
STANDARD DIGITAL ENHANCED CORDLESS TELECOMMUNICATION (DECT)
FREQUENCY RANGE 1.88 TO 1.9 GHZ (BANDWIDTH = 20 MHZ)
CHANNEL BANDWIDTH 1.728 MHZ
OPERATING RANGE UP TO 300M OUTDOORS; UP TO 50M INDOORS
OPERATING TIME STANDBY: 100 HOURS, TALKING: 10 HOURS
TEMPERATURE RANGE OPERATING 0
ELECTRICAL POWER BASE & CHARGER POWER ADAPTER UNITS:
CAUTION
USE ONLY ADAPTORS AND BATTERIES LISTED ABOVE.
Risk of explosion if the battery is replaced by an incorrect type.
Dispose of used batteries according to your local authority regulations.
Port specicaon
port (connected to the mains power supply) is a SELV port with respect to EN41003.
The
The
port (connected to the telephone line) is a TNV port with respect to EN41003.
CLEANING AND CARE
Do not clean any part of your phone system with benzene, thinners or other solvent chemicals
as this may cause permanent damage, which is not covered by the Guarantee.
When necessary, clean it with a damp cloth.
Keep your phone system away from hot, humid condions or strong sunlight, and don’t let it get wet.
Every effort has been made to ensure high standards of reliability for your phone system.
However, if something does go wrong, please do not try to repair it yourself, but consult your
supplier or call the Helpline.
BATTERY CHARGE TIME:15 HOURS
INPUT 100-240VAC 50/60Hz 150mA, OUTPUT 6VDC 450mA
VTECH - VT04EUK06045 / VT04EEU06045
RUIJING - RJ-AS060450B001 / RJ-AS060450E002
BATTERY INFORMATION (each handset)
TYPE NiMH (RECHARGEABLE BATTERY) 2X1.2V AAA SIZE, 400mAH
CORUN - Ni-MH AAAJ400
GPI - VT40AAAHC
CORUN - Ni-MH AAAJ300
GPI - VT30AAAHC
COSLIGHT - LH040-3AH45
0
C TO 400C, STORAGE -200C TO 600C
2
Page 3

TABLE OF CONTENTS
1 IMPORTANT SAFETY INSTRUCTIONS ..................................... 5
2 INSTALLING YOUR PHONE .................................................... 8
2.1 Connecng the Base Staon .......................................................................8
2.2 Installing and Charging the Handset Rechargeable Baeries ...................... 9
3 GET TO KNOW YOUR PHONE ...............................................10
3.1 Handset Overview ..................................................................................... 10
3.2 Base Staon Overview ...............................................................................13
3.3 Handset LCD Display Icons and Symbols ..................................................14
3.4 Menu Structure ......................................................................................... 15
3.5 Text and Digit Entry Table ..........................................................................16
4 USE YOUR PHONE ...............................................................18
4.1 Make a Call ................................................................................................ 18
4.2 Answer a Call ............................................................................................. 20
4.3 Adjust Earpiece and Speakerphone Volume ............................................. 20
4.4 Mute a Call ................................................................................................ 20
4.5 End a Call ................................................................................................... 20
4.6 Call Timer ..................................................................................................21
4.7 Turn the Handset Ringer ON/OFF ..............................................................21
4.8 Turn the Keypad Lock ON/OFF ..................................................................21
4.9 Redial the Last number .............................................................................21
4.10 Find the Handset (PAGING) ....................................................................... 23
4.11 Make an Internal Call.................................................................................23
5 PRIVATE PHONEBOOK .........................................................25
5.1 Store a Number Entry in the Phonebook ..................................................25
5.2 Review an Entry ......................................................................................... 26
5.3 Dial an Entry .............................................................................................. 27
5.4 Edit a Phonebook Entry ............................................................................. 27
5.5 Delete a Phonebook Entry .........................................................................27
5.6 Delete All Phonebook Entries .................................................................... 28
5.7 Check Phonebook Status ........................................................................... 28
5.8 Add a Phonebook Entry to VIP list ............................................................. 28
5.9 View a VIP Phonebook Entry ..................................................................... 29
5.10 Remove an Entry from the VIP list .............................................................29
5.11 Delete all VIP Phonebook entries ..............................................................30
3
Page 4

6 PHONE SETTINGS ................................................................31
6.1 Date and Time Sengs ..............................................................................31
6.2 Handset Sengs ........................................................................................32
6.3 Base Sengs .............................................................................................37
6.4 Reset Your Phone ...................................................................................... 38
6.5 Register a Handset.....................................................................................39
6.6 Deregister a Handset .................................................................................40
7 CALLER DISPLAY (NETWORK DEPENDENT) ...........................41
7.1 Call List ......................................................................................................41
7.2 View the Call List ....................................................................................... 42
7.3 Store a Call List Number into the Phonebook ...........................................42
7.4 Store a Call List Number into the Blacklist .................................................43
7.5 Delete an Entry in the Call List...................................................................43
7.6 Delete all Call List Entries ..........................................................................43
7.7 View the Details of a Call Entry .................................................................44
7.8 Call list Category ........................................................................................ 44
8 CALL BLOCKER .....................................................................45
8.1 Choose the Block Mode ............................................................................45
8.2 Add a Number to the Black List ................................................................. 46
8.3 View a Black List Entry ............................................................................... 46
8.4 Edit a Black List Entry ................................................................................47
8.5 Delete a Black List Entry ............................................................................ 47
8.6 Delete All Black List Entries .......................................................................47
8.7 Block Calls by Call Type ..............................................................................48
9 ANSWERING MACHINE (TAM) ............................................49
9.1 Switching TAM On/O ............................................................................... 49
9.2 Play messages on TAM .............................................................................. 50
9.3 Delete all Messages in the Answering Machine ........................................51
9.4 Record Memo on the Answering Machine ................................................52
9.5 Answering Machine Sengs .................................................................... 52
10 TROUBLESHOOTING ............................................................61
11 DECLARATION OF CONFORMITY ..........................................63
12 GUARANTEE AND SERVICE ..................................................65
4
Page 5

1 IMPORTANT SAFETY INSTRUCTIONS
Please follow these safety instructions when using your telephone
equipment to reduce the risk of fire, electric shock or injury:
1) Read and understand all the instrucons.
Follow all warnings and instrucons marked on the product.
2)
Unplug this product from the wall outlet before cleaning. Do not use
3)
liquid cleaners or aerosol cleaners. Use a damp cloth for cleaning.
Keep this product away from hot, humid condions or strong
4)
sunlight, and don’t let it get wet or use it near water (for example,
near a bath tub, kitchen sink, or swimming pool).
Do not overload wall outlets and extension cords as this can result
5)
in the risk of re or electric shock.
Unplug this product from the wall outlet and obtain the service of
6)
our Repair Centre under the following condions:
When the power supply cord or plug is damaged or frayed.
•
• If the product fails to operate normally despite following the
operang instrucons.
If the product has been dropped and the cabinet has been damaged.
•
• If the product exhibits a disnct change in performance.
7)
•
NEVER use your phone outdoors during a thunderstorm. Unplug
the base from the telephone line and the mains socket when
there are storm
covered by the guarantee.
•
For pluggable equipment, the socket-outlet (power adaptor) shall
8) Do not use the telephone to report a gas leak in the vicinity of the leak.
9)
10)
11) Please ensure that the baeries are inserted in the correct polarity.
12)
be installed near the equipment and shall be easily accessible.
Use only the supplied NiMH (Nickel Metal Hydride) baeries that
came with your phone or an authorised replacement recommended
by the manufacturer. There is a risk of explosion if you replace the
baery with an incorrect baery type. The use of other baery
types or non-rechargeable baeries/primary cells can be dangerous.
They may cause interference and/or damage to the unit or
surroundings. The manufacturer will not be held liable for damage
arising from such non-compliance.
Do not use third party charging pods. Damage may be caused to the
batteries.
Dispose of batteries safely. Do not burn, immerse them in water,
disassemble, or puncture the batteries.
s in your area. Damage caused by lightning is not
5
Page 6

Package contents
The package contains the following items:
• 1 Handset
• 1 Base staon
• 1 Mains power adapter
• 1 Telephone line cord
• 2 AAA NiMH rechargeable baeries
• User’s manual
NOTE: If you have purchased a Twin, Triple or Quad system, you will also
have the corresponding extra handset(s), batteries and charging pod(s)
with attached power adapter.
Connecon and Condions for Use
You can connect your phone to a direct exchange line (DEL) on a local
exchange with its own phone number; to an extension socket connected
to a DEL; or to an extension on an approved compable private exchange
(PBX). Do not connect as an extension to a pay phone.
The ringer equivalence numbers (REN) of all equipment (phones, fax
machines, modems, etc.) connected to an exchange line must not add
up to more than 4, otherwise one or more of them may not ring and/
or answer calls correctly. The phone has a REN of 1, and most other
telephones have a REN of 1 unless marked otherwise.
Call Blocker Funcon
The Defence 6025 Call Blocker system can be programmed to block
certain call types or calling numbers. (See section 8.)
For most of the Call Blocking funcons you must subscribe to and receive
the Caller Display service from your telephone line provider.
When a blocked call is received, the base and handsets will not ring, and the
handset backlights wi
answer a blocked call after its normal set number of rings and it will record
any message left by the caller, but with no call screening from the base.
NOTE: Other telephones connected in parallel to the Defence 6025 Call
Blocker may affect its operation.
ll not turn on. If the answering machine is enabled, it will
6
Page 7

Handset & Base Connecon
1) When purchased, all handsets are already registered to the base unit
and should link to it when they are all powered up.
2) To use your cordless handset and base unit together, you must be
able to establish a radio link between them. The signal between the
handset and the base unit is in accordance with the normal standards
for a DECT phone: Maximum range up to 300 metres outdoors or
50 metres indoors. Be aware that:
> Large metal objects, such as refrigerators, mirrors or ling
cabinets, between the handset and the base unit may block the
radio signal.
> Solid structures, such as walls, may reduce the signal strength.
> Electrical equipment may cause interference and/or aect the
range.
3) Do not place the base unit close to another telephone, TV or audio
equipment - it may cause interference.
4) Pung the base unit as high as possible ensures the best signal.
5) If the sound in the earpiece becomes faint or distorted during a call,
you may be going out of range of the base unit. Move nearer to the
base unit within 20 seconds; otherwise the call may be cut o.
7
Page 8
2 INSTALLING YOUR PHONE
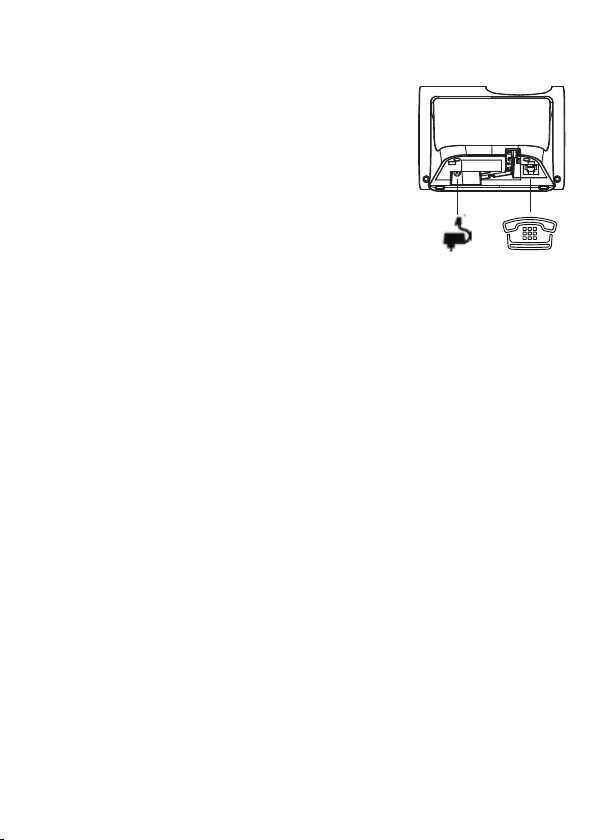
2.1 Connecng the Base Staon
1) Plug the mains power cable and telephone line
cord into their corresponding sockets in the
underside of the base station.
2) Plug the power adapter into a 100 - 240VAC,
50 - 60Hz mains power socket, and the telephone
line cord into a telephone line socket.
Warning:
Always use the cables provided in the box.
Use only the supplied adaptor, as others may damage the unit.
Note:
Place the base unit within easy reach of the mains power socket.
Never try to lengthen the mains power cable.
The base staon needs mains power for normal operaon, and the
cordless handsets will not work without it.
8
Page 9
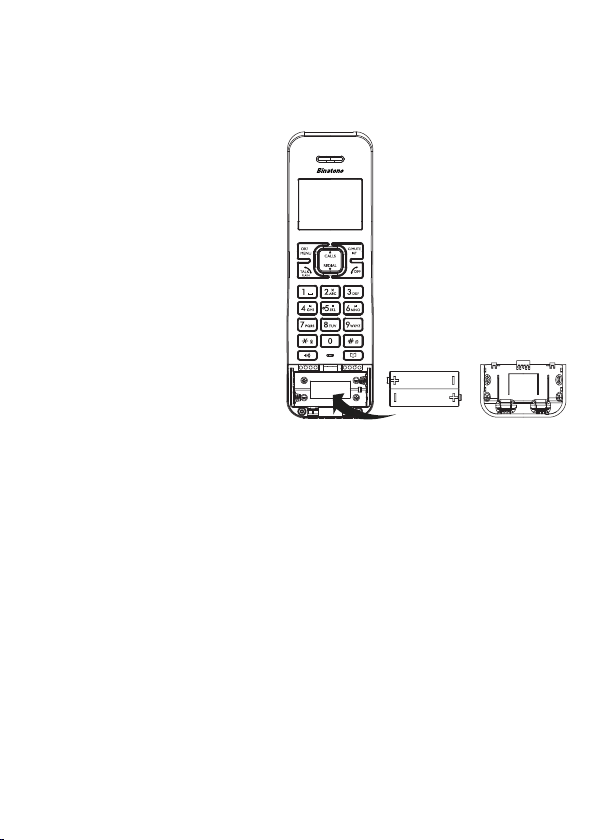
2.2 Installing and Charging the Handset Rechargeable Baeries
1)
Slide the cover down off the battery compartment in the front of
the handset.
Caution: Disconnect telephone line before replacing batteries.
Insert the 2 supplied
2)
batteries into the battery
compartment, observing the
correct polarity.
Warning:
Use only the supplied NiMH
rechargeable batteries.
3) Slide the baery cover
back over the baery
compartment unl it clicks
into place.
4) Place the handset on the
base and charge for 15 hours
before using the handset for
the rst me.
• Thehandsetwillgiveadoublebeepwhenitisproperlyplacedon
thebasetoindicatecharging.
Note: The handset may become warm when the batteries are being
charged or during prolonged periods of use. This is normal and does not
indicate a fault.
If you have a broadband line
If you connect your telephone to a line with a broadband connection, you
will need to insert a micro-filter between the telephone and the
telephone line; otherwise you may get interference between the
telephone and the broadband, which could cause problems.
In a home with broadband, every telephone must have a micro-filter
connected, not just the one at the telephone point that your modem is
connected to.
If you need more broadband micro-lters contact your broadband supplier.
9
Page 10
3 GET TO KNOW YOUR PHONE
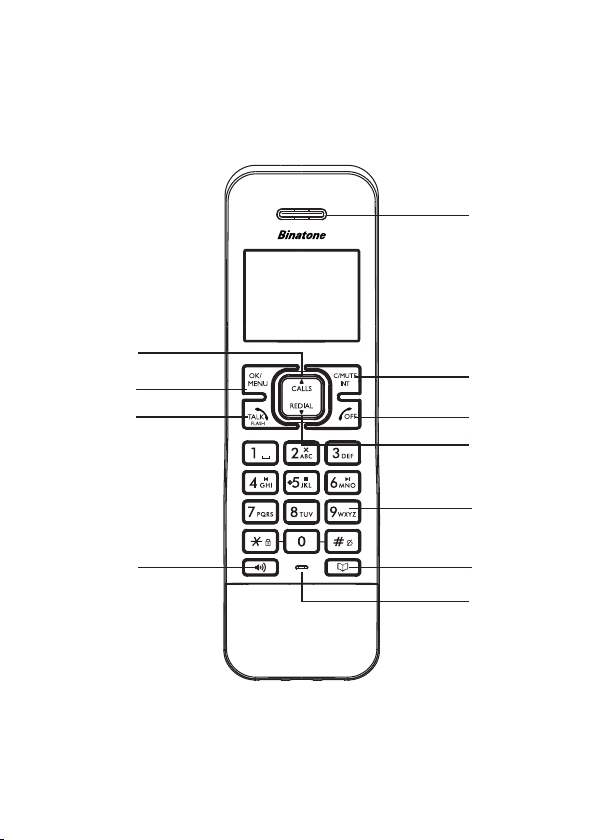
3.1 Handset Overview
①
②
③
⑤
⑥
⑦
⑧
⑨
④
⑩
⑪
10
Page 11
①
②
③
④
⑤
⑥
+
M
H
EARPIECE
m
In idle mode: Press to access the call list.
In menus and lists: Press to move up the opons.
During a call: Press to increase the volume.
During ringing: Press to increase the handset ringer
volume.
In idle mode: Press to access the main menu.
In sub-menu mode: Press to conrm the selecon.
During a call: Press to access Intercom/Phonebook/
Redial List/ Call List.
In idle mode / predialling mode / Redial list / Call List /
Phonebook List: Press to make a call .
During ringing: Press to answer a call.
During a call: Press to send a Recall signal (also called
Flash) for network services.
In idle mode: Press and hold to open the Redial List.
During a call: Press to turn on / o the speakerphone.
In Idle mode / predialling mode / Redial list / Call L
Phonebook List: Press to make a c
During ring
In idle mode: Press to iniate an intercom call.
In main menu mode: Press to go back to the idle screen.
In sub-menu mode: Press to go back to the previous
opon, or press and hold to go back to the idle screen.
In eding / pre-dial mode: Press to delete a character
/ digit, or press and hold to delete all the characters /
digits.
During a call: Press to mute / unmute the microphone.
g: Press to answer a call with speakerphone.
in
all with speakerphone.
ist /
11
Page 12

⑦
⑧
⑨
O
-
ALPHA-
NUMERIC
KEYPAD,
,
*
#
During a call: Press to end a call and go back to the idle
screen.
In menu / eding mode: Press to go back to the
previous menu, or press and hold to go back to the
idle screen.
In idle mode: Press and hold to power on/o the
handset.
In idle mode: Press to access the redial list.
In menus and lists: Press to move down the opons.
During a call: Press to decrease the volume.
During ringing: Press to decrease the handset ringer
volume.
Press to insert a digit / character / * /
key in idle mode: Press and hold to enable or
*
disable the keypad lock.
key in idle mode: Press and hold to turn on / o
#
the handset ringer.
#
# key in predialling / number editing mode:
Press and hold to insert a pause.
key in Call List mode: Press to view more digits
*
of the caller’s number if applicable.
⑩
⑪
P
MICRO-
PHONE
In idle mode: Press to access the phonebook list.
12
Page 13
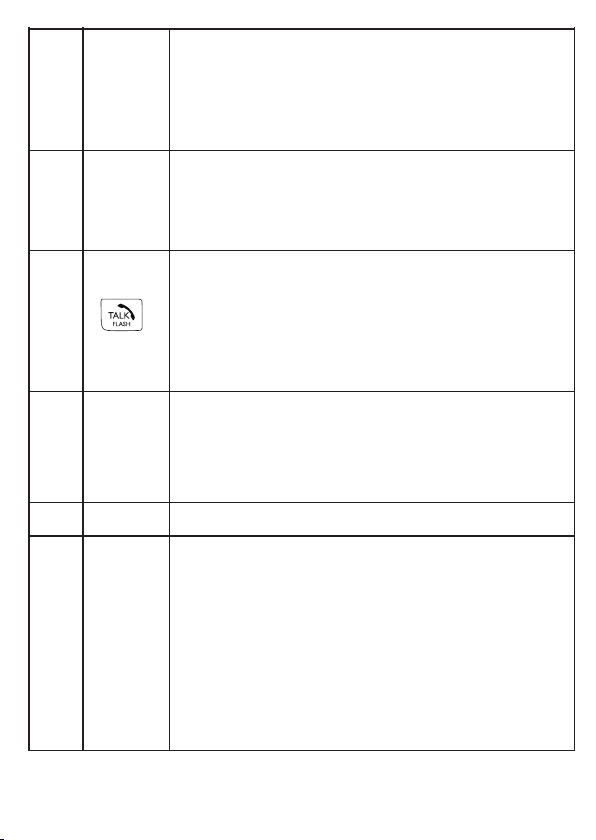
3.2 Base Staon Overview
①
②
③
④
⑤
TAM indicator
light
CHARGING
CRADLE
PLAY/STOP - Press to start or stop message
playback.
- On when the answering machine (TAM) is ON
- Flashes if new TAM messages are recorded, when the
TAM is being used, or when there is incoming ringing.
- Press to delete the playing message.
DELETE
When the phone is not in use, press and hold to
delete all previously reviewed messages.
PAG E - Press to page your handset(s).
Press and hold to enter registraon mode
Handset cradle for battery charging. (either facing
forward or back)
13
Page 14
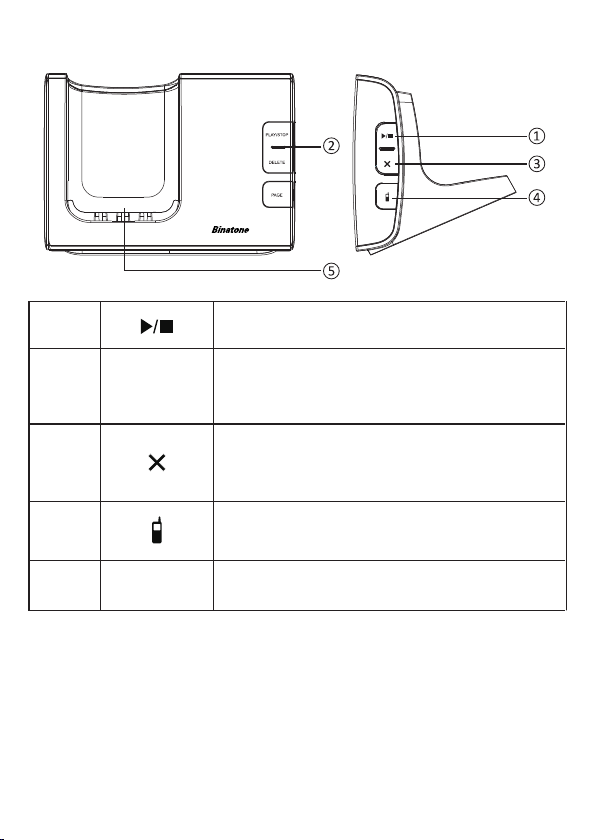
3.3 Handset LCD Display Icons and Symbols
The LCD display gives you informaon on the current status of the telephone.
Displays when the handset is registered and within range of the
base staon, with more blocks indicang a stronger signal.
Indicates the handset is on a call.
Flashes when there is an incoming call.
Indicates the handset ringer is switched o.
Indicates an alarm is set. Flashes when the alarm is sounding.
Indicates the keypad is locked.
Indicates the battery is fully charged.
Battery segments cycle during charging.
Indicates the battery needs charging.
Flashes when low battery power level is detected. (Note: the
handset backlight will not turn on when the battery is low.)
Indicates a new TAM message is playing or a new call is being
viewed in the calls list.
Indicates the speakerphone is turned on.
Indicates you have
service and is not usually available from UK network providers.)
Indicates the answering machine (TAM) is turned on.
Flashes if there is a new TAM message.
Indicates when any block mode is turned on.
Press mto start an intercom call.
(INT)
Press
(BACK)
m
Press
m
characters during predialling / eding or stop an alarm.
a new voicemail mess
to go back to the previous menu or cancel the current acon.
to mute / unmute the microphone during a call, delete
14
age. (This is a caller display
Page 15
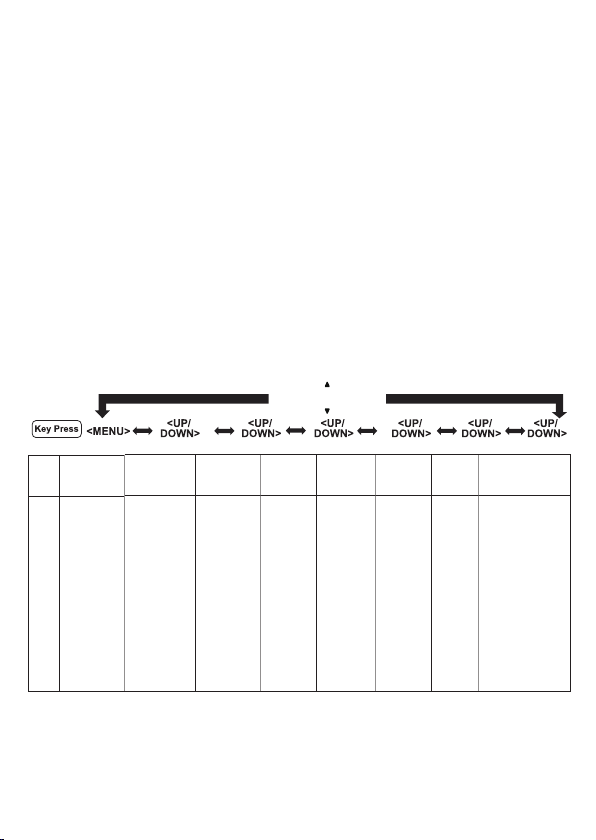
3.4 Menu Structure
In idle mode, press
to show CALL LIST, the rst opon in the Main
M
Menu list.
Press . to go to other opons in the menu list.
Press
Press
Press and hold
to enter a sub-menu or funcon.
M
to go back to the previous level.
m
to cancel the current operaon and return to the idle
m
screen.
Note: If you do not press any key on the handset for 30 seconds, the
display will automacally return to the idle screen.
Refer to the following for the menu structure.
CALLS
REDIAL
Main
CALL LIST PHONEBOOK CALL
Menu
Sub
menu
Shows EMPTY
or the rst Call
List entry.
Then <OK>
for:
DETAILS
ADD TO PB
ADD TO BLIST
DELETE
DELETE ALL
CATEGORY
ALL
CONTACTS
VIP
Shows EMPTY
or the rst
phonebook
entry.
Then <OK> for:
ADD
ADD / DEL
FROM VIP
VIEW
EDIT
DELETE
DELETE ALL
PB STATUS
BLOCKER
BLACK LIST
SETTINGS
BLOCK MODE
CALL TYPE
BS
SETTINGS
BS RINGER
RING
VOLUME
DELETE HS
FLASH TIME
CHANGE
PIN
HS
REGISTRATION
SETTINGS
ALARM
PIN? PIN? MSG PLAYBACK
RING SETUP
TONE SETUP
LANGUAGE
RENAME HS
AUTO
ANSWER
DATE & TIME
DEFAULT ANS. MACHINE
DEL ALL OLD
MEMO
TAM ON/OFF
TAM SETTINGS
ANSWER MODE
TAM LANGUAGE
OGM SETTINGS
ANSWER DELAY
RECORD TIME
BS SCREENING
REMOTE ACC.
COMPRESSION
CHANGE PIN
15
Page 16

3.5 Text and Digit Entry Table
The table below shows you where each leer and punctuaon character
can be found, by using repeated presses of the alphanumeric keypad.
This will be helpful when storing a name in the phonebook or renaming
your handset.
In eding mode, a cursor is displayed to indicate the current text entry
posion. It is posioned at the right of the last character entered.
Wring Tips:
Once a character is selected, the cursor will move to the next posion
aer a short pause.
You can move the cursor within the text using
Press
Press and hold
to delete the last character.
m
to delete the enre text string.
m
3.5.1. Character Set
Alphanumeric Eding
Key
Key press 1st 2nd 3rd 4th 5th 6th 7th 8th 9th 10th
1 space 1 @ _
2 A B C 2
3 D E F 3
4 G H I 4
5 J K L 5
6 M N O 6 Ñ
7 P Q R S
8 T U V 8 Ť
9 W
0 0 . , / : ;
* * *
# #
(For phonebook name eding and renaming handset)
# = < > ( )
Ä À Á Â Ã Å
Ď Đ È É Ë Ê
Ğ Ì Í Î Ï İ
Ł Ĺ Λ
Ń Ň Ö Ò Ó
7 Ŕ Ř Ś Ş Š
Ţ Ü Ù Ú Û
X Y Z 9 Ý Ÿ Ź Ž Ż
" ' ! ¡
.
.
Number Eding
(For phone number eding,
date/me eding)
0, P (Pause)
1
2
3
4
5
6
7
8
9
16
Page 17
Alphanumeric Eding
Key
Key press 11th 12th 13th 14th 15th 16th 17th 18th 19th 20th
1 & £ $ ¥
2 Ą Ă Æ Ç
3 Ę Ě Δ Φ 3
4 Γ 4
5 5
6 Ô Õ Ø 6
7 β П Ө Σ 7
8 8
9 Ω
0 ? ¿ * + - %
* *
# #
(For phonebook name eding and renaming handset)
€ [ ] { } ¤
Ć Č
Ξ Ψ
\ ^ ~ |
(For phone number eding,
Number Eding
date/me eding)
1
2
9
0, P (Pause)
17
Page 18

4 USE YOUR PHONE
Switch ON/OFF the Handset.
When the handset is in idle mode, press and hold
o. To switch the handset on, press and hold
O
4.1 Make a Call
4.1.1. Preparatory Dialling
1. Enter the phone number, maximum 24 digits. If you make a mistake,
press
2. Press to dial the number.
4.1.2. Direct Dialling
1.
Press and listen for dial tone.
2. Enter the phone number to dial.
NOTE:
to press
4.1.3. Call from the Phonebook
1.2.In idle mode, press P to access the phonebook list. OR
Press
Press . for ALL CONTACTS or VIP, then Mto open that list.
NOTE:
the phonebook, it will show EMPTY.
Press
3.
NOTE:
the rst leer of the name you want. For example, pressing
to delete the last digit.
m
If you make a mistake, you cannot correct it with m, but need
to stop the dialling and return to idle mode.
O
then . to show PHONEBOOK, then Mto select.
M
The rst phonebook entry will be displayed. If there is no entry in
to select the desired phonebook entry.
.
For a quick search, you can also press the numeric key containing
to switch the handset
O
.
2
will
show the rst entry starng with A. Pressing 2 twice will show the
rst entry starng with B, etc., then press
4. Press
/ H
to dial the number.
18
to nd the name you want.
.
Page 19

4.1.4. Call from the Call List
1. In idle mode, press
OR
M
Press
Note:
The first entry in the call list will be displayed. If there is no entry in the
call list, it will show EMPTY.
2. Press
3.
Press / H to dial the number.
Note:
You must subscribe to your network’s Caller Display service to be able to
see the caller’s number or name in the call list.
4.1.5. Call from the Redial List
1. Press
desired redial number.
Press / H to dial the number.
2.
4.1.6. Out of Range Warning
When the handset goes out of range of the base, the screen will display
OUT OF RANGE, and the call will be disconnected if you are on a
call. When you move back within range, the handset will automacally
reconnect to the base, and will be in idle mode, so if y
your call you will have to redial the number.
4.1.7. Handset Speakerphone
During a call, you can press Hto alternate between hands-free
speakerphone and handset earpiece.
to show CALL LIST, then press Mto access the call list.
to select the desired call list entry.
.
to access the redial list and press . to select the
-
to access the call list.
+
ou want to connue
19
Page 20

4.2 Answer a Call
If the handset is not on the base charger or a charger pod, or if AUTO
ANSWER is set to OFF:
When the phone rings, press
If the handset is on the base or a charger pod and if AUTO ANSWER is
set to ON:
When the phone rings, pick up the handset to answer the call.
If you wish to change the AUTO ANSWER seng, see “6.2.8. Set the Auto
Answer”. The default seng is OFF.
/ H
to answer the cal
l.
4.3 Adjust Earpiece and Speakerphone Volume
There are 5 levels (VOLUME 1 to VOLUME 5) to choose from for each of
the earpiece and speakerphone volumes.
During a call:
Press
shown. When you end the call, the seng will remain at the last selected level.
to select from VOLUME 1 to VOLUME 5. The current seng is
.
4.4 Mute a Call
You can mute the microphone so that you can talk to someone nearby
without leng the caller hear you during a call.
During a call:
Press m
1.
on the L
2.
Press
to mute the microphone and SECRECY ON will display
. Your caller cannot hear you.
CD
again to unmute the microphone.
m
4.5 End a Call
During a call press Oto end the call.
OR
Put the handset on the base or a charger pod to end the call.
20
Page 21

4.6 Call Timer
Your handset automacally shows the duraon of every call. The call
mer starts as soon as a call is answered or when dialling stops, and is
displayed for about 5 seconds aer the end of the call. It is shown in
hours, minutes and seconds format (HH:MM:SS).
4.7 Turn the Handset Ringer ON/OFF
In idle mode, press and hold #to turn off the handset ringer. RINGER OFF
appears briey and the ringer o icon is displayed on the status bar of the LCD.
In silent mode, press and hold #to turn on the handset ringer. RINGER
ON appears briefly and the ringer off icon will disappear.
4.8 Turn the Keypad Lock ON/OFF
In idle mode, press and hold *to turn on the keypad lock. KEYS
1.
LOCKED appears briefly and the keypad locked icon is displayed on
the status bar of the LCD.
To unlock the keypad, press and hold *. UNLOCKED appears
2.
briefly and the keypad locked icon will disappear.
4.9 Redial the Last number
You can redial up to 20 of the last numbers called. If you have stored a name
in the phonebook to go with the number, the name will be displayed as well.
The most recent last number will display at the top of the redial list.
4.9.1. Redial a Number from the Redial List
In idle mode, press -to access the redial list. (Or press and hold .)
1.
Note: If there are no numbers in the redial list, the display shows EMPTY.
Note: If an entry has more than 12 digits, press *t
2 Press .to browse the redial list.
Press / H to dial the selected redial number.
3.
21
o view the other digits.
Page 22

4.9.2. Store a Redial Number into the Phonebook
1. In idle mode, press
store.
2. Press
to show ADD TO PB.
M
, then . to nd the number you want to
-
3. Press
4. Press
5. Press
will be played when browsing the melody list.
(Note: the melody will only play when you receive a call from this number,
if you subscribe to caller display and the incoming number matches the
number stored.)
6. Press
4.9.3. Delete a Redial Number
1. In idle mode, press
delete.
2. Press
3. Press
delete.
4.9.4. Delete All Redial List Entries
1. In idle mode, press
2. Press
3.
Press M to show CONFIRM?
the delete.
and use the keypad to enter the name.
M
and use the keypad to edit the number if necessary.
M
and then . to select a melody. The respecve melody
M
to conrm.
M
, then . to nd the number you want to
-
and . to show DELETE.
M
to show CONFIRM?, then press M again to conrm the
M
.
-
and . to select DELETE ALL.
M
, then press M again to confirm
22
Page 23

4.10 Find the Handset (PAGING)
Paging is a useful way for finding lost handsets.
1. Press
2.
Note
If there is an incoming call during paging, the phone will ring with the
incoming call instead of paging.
on the side of the base station. All the registered handsets,
which are turned on and in range of the base, will produce the
paging tone and display PAGING on the LCD.
Press / O / m on any handset or on the base station
again to stop paging, or let it stop automatically after 60 seconds.
4.11 Make an Internal Call
This feature is only applicable when there are at least two registered
handsets. It allows you to make internal calls, transfer external calls from
one handset to another handset and set up a conference call between
two handsets and an external call. If the called handset is not answered
within 60 seconds, the called handset will stop ringing and the calling
handset will return to standby mode.
4.11.1. Call Another Handset
1. In idle mode, press m and the screen displays the rst of the other
registered handsets.
2. Press
3.
The called handset rings. Press on the called handset to
establish the internal call.
NoteS
• If only one handset is registered to the base staon, when you press
m
• If only two handsets are registered to the base staon, when you press
m
to nd the handset you want to call, and then press M.
.
it will display NOT POSSIBLE.
it will call the other handset immediately.
23
Page 24

4.11.2. Call All Handsets
1. In idle mode, press m and the screen displays the rst of the other
registered handsets.
Press . to show ALL, and then press M to ring all registered
2.
handsets.
4.11.3. Transfer an External Call to Another Handset
During an external call:
1. Press
2. Press
3. The external call is put on hold automacally and the called handset
rings.
Press on the called handset to establish an internal call.
4.
5. Press
charging cradle to end the current call with the external party.
6. The external call is transferred to the called handset.
4.11.4. Make a 3-way Conference Call
The conference call feature allows one external call to be shared with two
handsets (in intercom). The three pares can share the conversaon with
no addional network subscripon required.
During an external call:
1. Follow Steps 1 to 4 in the secon of Transfer an External Call to
Another Handset.
2. Press and hold
conference call.
Note
When either intercom handset hangs up during a conference call, it will
leave the other one sll connected to the external call.
to show INTERCOM.
M
and . to select the desired handset to intercom with.
M
on the calling handset or put the calling handset on the
O
on the calling handset to establish the 3-way
*
24
Page 25

5 PRIVATE PHONEBOOK
The phone system can store up to a total of 100 entries shared between
the Phonebook (including VIP entries) and the Black List (see secon 8). All
handsets will share the same phonebook list due to the call blocker feature
requirements, and therefore only one handset can access the phonebook at
any one me. Each phonebook entry can have a maximum of 24 digits for the
phone number and 12 characters for the name. You can also select dierent
melodies for your phonebook entries, but they will only play when you receive
a call if you subscribe to Caller Display and the incoming number matches the
stored number. The entries are stored alphabecally, and when viewed from
the main menu can be seen as ALL CONTACTS or just the VIP contacts.
5.1 Store a Number Entry in the Phonebook
1. In idle mode, press P to access the phonebook. OR
Press
ALL CONTACTS, then
NOTE: The first entry in the phonebook will be displayed. If there is
no entry stored in the phonebook, it will show EMPTY.
2. Press
3. Press
4. Press
5. Press
(Note: the melody will only play when you receive a call from this number,
if you subscribe to caller display and the incoming number matches the
number stored.)
6. Press
NOTE: If the phonebook is full, it will show PB FULL when you try to ADD
a new entry, and you will have to delete an entry before being able to add
another.
and . to select PHONEBOOK, then press M to show
M
again to open the full phonebook list.
M
to show ADD.
M
and then enter the name.
M
and then enter the number.
M
and . to select the desired melody.
M
to save.
M
25
Page 26

5.1.1. Entering Names
Use the keypad leers to enter names, e.g. to store TOM:
Press
Press
Press
5.1.2. Writing Tips
-
-
-
-
once to enter T.
8
three mes to enter O .
6
once to enter M.
6
Press
Press and hold
Aer a character is entered, the cursor moves to the next posion aer
a short pause, but you only need to wait if the next character requires
the same key.
Press
to delete the last character or digit.
m
to delete all characters or digits.
m
to move backward or forward through the characters / digits.
.
When entering a number, press and hold
-
dialling pause (will appear as P)
5.2 Review an Entry
1. In idle mode, press P. The rst entry in the phonebook will be displayed.
2. Press . to nd the phonebook entry you want to review.
TIP: To nd quickly, enter the rst character of the name using the keypad
leers (e.g. if it begins with C, press the 2 key three mes), and then
press
3. Press
4. Press
the number is longer than 12 digits, press *to see the others. Press
.
to scroll to the entry you want.
.
and . to select VIEW.
M
to show the melody and number of the selected entry. If
M
to see the Name or Melody.
26
to insert a 3-second
#
Page 27

5.3 Dial an Entry
While in the phonebook list, press . to nd the entry you want, or
enter the rst character of the name using the keypad leers (e.g. if it
begins with C, press the 2 key three mes), and then press. to nd the
entry you want.
1.
Press
/ H
5.4 Edit a Phonebook Entry
1. In idle mode, press P to access the phonebook.
to dial the selected entry.
2. Press
3. Press
4. Press
5. Press
Press
6.
7. Press
5.5 Delete a Phonebook Entry
1. In idle mode, press P to access the phonebook.
2.
Press . to select the entry you want to delete.
3. Press
4. Press
5. Press
to select the entry you want to edit.
.
then . to select EDIT.
M
then use the keypad to edit the name (if applicable).
M
then use the keypad to edit the number (if applicable).
M
then . to change the melody (if required).
M
to save.
M
then .to select DELETE.
M
to show CONFIRM?.
M
to conrm the delete.
M
27
Page 28

5.6 Delete All Phonebook Entries
1. In idle mode, press P to access the phonebook.
2. Press
3. Press
4. Press
5.7 Check Phonebook Status
You can check how many entries are in your phone and how many spaces
are available for more entries in the phonebook.
1. In idle mode, press
2. Press
3. Press
means 14 entries are stored out of the total 100 available spaces.
Note: The total spaces will be less than 100 if Black List entries are stored.
5.8 Add a Phonebook Entry to VIP list
1. In idle mode, press P to access the phonebook. OR
Press
CONTACTS, and Magain to access the phonebook.
2. Press .to select the desired phonebook entry.
3. Press
and . to select DELETE ALL.
M
to show CONFIRM?.
M
to conrm the delete all.
M
to access the phonebook.
P
then .to select PB STATUS.
M
to view the Memory Status, for example 14/100 USED
M
and .to select PHONEBOOK, then Mto show ALL
M
and .to select ADD TO VIP.
M
4. Press
indicates it is now a VIP entry.
to add the entry to the VIP list. A * next to the name
M
28
Page 29

5.9 View a VIP Phonebook Entry
1. In idle mode, press P to access the phonebook.
2. Press .to select the desired VIP phonebook entry, indicated by a *.
3. Press
4. Press
the number is longer than 12 digits, press *to see the others. Press
.
5.10 Remove an Entry from the VIP list
1. In idle mode, press P to access the phonebook.
2. Press .to select the desired VIP phonebook entry, indicated by a *.
3. Press
4. Press
in the Phonebook, but the * will disappear from next to its name.
Alternavely:
1. In idle mode, press
2. Press
3. Press
4. Press
5. Press
as a normal Phonebook entry.
and .to select VIEW.
M
to show the melody and number of the selected entry. If
M
to see the Name or Melody.
and .to select DEL FROM VIP.
M
to remove the entry from the VIP list. The entry will remain
M
then . to show PHONEBOOK.
M
then . to show VIP.
M
then . to select the desired VIP entry.
M
then . to show DELETE.
M
to conrm. The VIP entry will be deleted, but it will remain
M
29
Page 30

5.11 Delete all VIP Phonebook entries
1. In idle mode, press Mthen .to show PHONEBOOK.
2. Press
3. Press
4. Press
5. Press
will show EMPTY, but all will remain as normal Phonebook entries.
and .to show VIP.
M
and .to show DELETE ALL.
M
to display CONFIRM?.
M
to conrm. All VIP entries will be deleted and the display
M
30
Page 31

6 PHONE SETTINGS
Your phone comes with a selecon of sengs that you can change to
personalise your phone the way you like it to work.
6.1 Date and Time Sengs
You will need to set the correct me and date so that the handset shows
the correct time in idle mode and you know when you received
answering machine messages.
6.1.1. Set the Date Format
In idle mode, press
1.
Press
2.
3. Press
4. Press
MM-DD-YY).
5. Press
6.1.2. Set the Time Format
In idle mode, press
1.
Press
2.
Press
3.
4. Press
5. Press
and . to show DATE & TIME.
M
to show DATE FORMAT.
M
and . to select your desired date format (DD-MM-YY or
M
to conrm.
M
and . to show
M
and . to show
M
and . to select your desired me format (12 HR or 24 HR).
M
conrm.
M
and . to show HS SETTINGS.
M
and .
M
to show
DATE & TIME
TIME FORMAT
31
HS SETTINGS.
.
.
Page 32

6.1.3. Set the Time, Date, and Year
1.
In idle mode, press
2.
Press
M
3.
Press
M
and . to show DATE & TIME.
and . to show SET TIME.
and . to show HS SETTINGS.
M
4. Press
select A (a.m.) or P (p.m.) if in 12HR mode.
5. Press . to save the me.
6.
Press . to show SET DATE.
Press
7.
8. Press
MM/DD.
9. Press
then enter the me in the format set in 6.1.2., using . to
M
to show SET YEAR and then enter the last two digits of the year.
M
then enter the date in the format set in 6.1.1., DD/MM or
M
to save the date.
M
6.2 Handset Settings
6.2.1. Alarm
You can set an alarm on a handset. When an alarm is set, the
on the LCD. When the alarm time is reached, the and ALARM ON flash
on the screen. The handset also rings for 45 seconds.
NoteS
You can press any key to turn off the alarm. If, however, the snooze
-
funcon is acvated, the alarm will sound again at the end of the
snooze period of seven minutes unless you go into alarm sengs and
turn it o. You can also press and hold
to stop the alarm and turn o the snooze funcon.
while the alarm is sounding
O
displays
32
Page 33

A key press will sll disable the alarm even if the handset keypad is
-
locked when the alarm me is reached.
The alarm volume level is the same as the seng of the handset ringer
-
volume. If the handset ringer is set to VOLUME OFF, the alarm sll
sounds at VOLUME 1 level.
During a call, if an alarm is set and the alarm time is reached, ALARM
-
ON will still flash. An alarm tone will be emitted from the earpiece to
notify you the alarm time is reached. Once you press any key or press
and hold
screen.
During paging or ringing, the alarm will not sound when the alarm me
-
is reached.
1. In idle mode, press
to disable the alarm, it will revert to the call duraon
O
and . to show HS SETTINGS.
M
2. Press
3. Press
4. Press
If ON is selected:
1. Enter the me for the alarm, in the format set in 6.1.2., using
select A (a.m.) or P (p.m.) if in 12HR mode..
2. Press
3. Press
4. Press
to show ALARM.
M
and . to select ON or OFF.
M
to conrm.
M
to conrm. The display shows SNOOZE.
M
and . to select ON or OFF for the snooze funcon.
M
to conrm the alarm and snooze sengs.
M
33
.
to
Page 34

6.2.2. Set the Ringer Melody for External Calls
You can set the melody played when receiving an external call. There are
10 melodies available.
1.
In idle mode, press
2.
Press
M
and . to show RING SETUP.
and . to show HS SETTINGS.
M
3. Press
4. Press
Note
The respecve ringer melody will play as you step through the melody list.
5. Press
6.2.3. Set the Ringer Melody for Internal Calls
You can set the melody played when receiving an intercom call. There are
10 melodies available.
In idle mode, press
1.
Press
2.
Press
3.
4. Press
Note
The respecve ringer melody will play as you step through the melody list.
5. Press
to show EXT RING.
M
and . to select the desired ringer melody.
M
to conrm your choice.
M
and . to show
M
and . to show RING SETUP.
M
and . to show INT RING.
M
and . to select the desired ringer melody.
M
to conrm your choice.
M
HS SETTINGS.
34
Page 35

6.2.4. Set the Ringer Volume
You can set the handset ringer volume level to one of 6 ringer volume
levels including VOLUME OFF .
1.
In idle mode, press
and . to show HS SETTINGS.
M
2.
Press
3.
Press
4. Press
Note
The respecve ringer volume will play during your selecon.
5. Press
6.2.5. Set Alert Tones
Three dierent alert tones are on by default, but can be set o, if desired.
Key Tone - a single beep is emied when you press a key.
Low Baery Tone - emied while talking on the phone to alert you to
charge the handset baeries.
Out of Range Tone - emied while talking on the phone to alert you to
move closer to the base unit, before the call is lost.
In idle mode, press
1.
Press
2.
3. Press
RANGE.
Press
4.
and . to show
M
and . to show RING VOLUME.
M
and . to select the ringer volume
M
to conrm your choice.
M
M
and . to show
M
and . to select KEY TONE, BATTERY TONE or OUT OF
M
and . to select ON
M
RING SETUP.
and . to show HS SETTINGS.
TONE SETUP.
or OFF for these tones.
5. Press
to conrm your seng.
M
35
Page 36

6.2.6. Set the Language
On some models, you can change the language used for the handset display.
1.
In idle mode, press
2.
Press
3. Press
4. Press
immediately to the new language.
Note
If you want to change the language back to English, from idle mode,
quickly press
6.2.7. Rename the Handset
Press
1.
Press
2.
3. Press
4. Press
6.2.8. Set the Auto Answer
If you turn on the auto answer feature, you can answer a call
automacally by just liing the handset o the base or a charger without
having to press any key.
and . to show LANGUAGE.
M
and . to select your desired language.
M
to conrm the selecon, and the display will change
M
and then * 3 6 4 #.
M
and . to show HS SETTINGS.
M
and . to show RENAME HS.
M
and change the name (max 10 leers) for your handset
M
to conrm the new name.
M
and . to show
M
HS SETTINGS.
1.
In idle mode, press
2.
Press
M
3. Press
4. Press
M
M
and . to show HS SETTINGS.
M
and . to show
and . to select ON or OFF.
to conrm.
AUTO ANSWER.
36
Page 37

6.3 Base Sengs
6.3.1. Set the Base Ringer Melody
You can set the melody played when the base receives a call. There are 5
melodies available.
1.
In idle mode, press
and . to show BS SETTINGS.
M
2. Press
3. Press
4. Press
6.3.2. Set the Base Ringer Volume
Y
ou can set the base ringer volume level to one of 6 ringer volume levels
including VOLUME OFF .
In idle mode, press
1.
Press
2.
3. Press
4. Press
6.3.3. Set the Flash (Recall) Time
You may need to change the recall (ash) me if your phone is connected
to a private exchange (PBX). The recall time options are SHORT (the
default value of 100ms), MEDIUM (300ms) or LONG (600ms).
1. In idle mode, press
2.
Press
3. Press
4. Press
to show BS RINGER.
M
and . to select the ringer melody for the base.
M
to conrm your choice.
M
and . to show BS SETTINGS.
M
and . to show RING VOLUME.
M
and . to select the ringer volume for the base.
M
to conrm your choice.
M
and . to select BS SETTINGS.
M
and . to show
M
and . to select SHORT, MEDIUM or LONG.
M
to conrm the seng.
M
FLASH TIME.
37
Page 38

6.3.4. Change the System PIN Code
A 4-digit system PIN code is used to protect your phone against
unauthorised use when changing some system settings of the base
station. The default system PIN code is 0000.
1.
In idle mode, press
2.
Press
3. Press
4. Enter the current system PIN.
and . to show
M
to show OLD PIN? ----.
M
M
and .
to show BS SETTINGS.
CHANGE PIN.
5. Press
6. Press
Note
If the new PIN entered in Step 6 is not the same as the new system PIN entered in
Step 5, you must enter your new system PIN again in Step 5.
7. Press
6.4 Reset Your Phone
You can reset your phone to the default sengs. Aer reset, all your personal
sengs including your PINs will be reset to their factory defaults, and all
answering machine messages, call list entries and redial list entries (for that
handset) will be deleted, but your phonebook remains unchanged.
In idle mode, press
1.
2. Press
3. Enter the 4-digit system PIN.
4. Press
5. Press
the idle screen.
then enter your new 4-digit system PIN.
M
then enter your new 4-digit system PIN again.
M
to conrm your new PIN.
M
and . to show DEFAULT.
M
to show PIN? ----.
M
to show CONFIRM?.
M
to conrm and display WAITING briey before returning to
M
38
Page 39

6.5 Register a Handset
When you purchase a phone system, all handsets are already pre-
registered to the base staon, so you do not need to register them. Up to
ve handsets can be registered to a single base staon.
If for some reason, the handset is not registered to the base staon,
REGISTER will be displayed on the handset screen, and you will need to
register your handset following the process below.
1. Press and hold
seconds, until the base beeps and the TAM indicator light starts
flashing, to indicate the base station is in registration mode. It will
remain in registration mode for about a minute, and the steps
below must be completed within that time.
2. In idle mode on the handset, press
REGISTRATION.
3. Press
M
on the side of the base station for about five
and . to select
M
to show PIN?---- .
4. Enter the 4-digit system PIN and press
will ash on the display while it is trying to register. If the handset
registraon is successful, the handset will automacally be allocated
the next available handset number. This handset number is shown in
the handset display in standby mode.
If the handset registraon is not successful, the handset will give two
beeps and return to its idle mode, or show REGISTER again, and you
will need to try to register it again, making sure that the correct PIN is
entered.
39
to conrm. PLEASE WAIT
M
Page 40

6.6 Deregister a Handset
You may need to deregister a handset if one of your handsets becomes
faulty or lost and needs to be replaced.
You will need to enter the 4-digit System PIN (default seng 0000) in
order to de-register a handset from the base staon.
Note
You cannot deregister the handset that you are currently using.
1. In idle mode, press
and . to select BS SETTINGS.
M
2.
Press
3. Press
4. Enter the 4-digit system PIN.
5. Press
6. Press . to nd the handset you want to de-register.
7. Press
and . to show
M
to show PIN?----.
M
. The rst of the registered handsets is displayed.
M
to conrm and the handset will be de-registered.
M
DELETE HS.
40
Page 41

7 CALLER DISPLAY (NETWORK DEPENDENT)
7.1 Call List
This feature is available if you subscribe to the Caller Display service
from your telephone line provider. Your phone can store up to 50
received calls with date/time information in the Call List. The number
will be shown on the screen when the phone is ringing, and in the Call
List afterwards. If the number matches with one of the entries in your
Private Phonebook, the caller’s name stored in the private phonebook
will be displayed with the number and the handset will ring with the
melody associated with that phonebook entry.
The call list information might not be available for every incoming call
and callers might intentionally block their telephone numbers.
If a call is from someone who withheld their number, e.g. by dialling 141,
WITHHELD will display.
If a call is from an unavailable number, e.g. international or from a
private exchange, UNAVAILABLE will display.
If you have received 3 new calls, the idle mode display will show 3 NEW
CALLS.
Either All Calls or just Missed Calls are saved in the Call List, depending
on the setting in 7.8 Call List Category, with the newest call at the top of
the list.
Any unanswered calls, which have not been viewed in the calls list, are
indicated by a * at the top of the display.
When the list is full, and a new call is received, the oldest entry will
be deleted automatically.
41
Page 42

7.2 View the Call List
Review the Call List to nd out who called, to easily return a call, or to
save the caller’s name and number into your phonebook. EMPTY appears
if there are no records in the call list.
In idle mode, press +to access the call list.
1.
OR
In idle mode, press
to show CALL LIST and then press Magain.
M
2.
Press
The number or the name + number is shown. If the number is more
3.
than 12 digits long, a _ is displayed instead of the 12th digit, but you
can press * to see the rest of the digits.
Also, if you want to see the date and time of when the call was
received, press
me and date on the screen along with the name or number, with *
to see remaining digits, if more than 12 received.
to step through the list.
.
to show DETAILS and then Magain to show the
M
7.3 Store a Call List Number into the Phonebook
1. Follow Steps 1 and 2 in secon 7.2 View the Call list.
2. Press
3. Press
5.1.1 Entering Names)
4. Press
5. Press
the Phonebook.
(Note: the melody will only play when you receive a call from this number,
if the incoming number matches the number stored.).
Note
If the phonebook is full, it will show PB FULL when you select ADD TO PB,
and you will have to delete a phonebook entry before adding another.
and . to show ADD TO PB.
M
and then key in the name you want for the entry. (See
M
and then edit the number if necessary. (See 5.1.2 Wring Tips)
M
and .to select a melody, and
M
42
to save the entry to
M
Page 43

7.4 Store a Call List Number into the Blacklist
1. Follow Steps 1 and 2 in Secon 7.2 View the Call List.
2.
Press
3.
Press
and .to show ADD TO BLIST.
M
and then enter a name.
M
4. Press
5. Edit the number if necessary.
6. Press
7.5 Delete an Entry in the Call List
1. Follow Steps 1 and 2 in secon 7.2 View the Call list.
Press
2.
3. Press
4. Press Mto conrm the delete.
7.6 Delete all Call List Entries
1. Follow Steps 1 and 2 in secon 7.2 View the Call list.
2.
Press
3. Press
4. Press
and the selected call list number is displayed.
M
to store the blacklist entry and return to the calls list.
M
and . to show DELETE.
M
to show CONFIRM?.
M
and . to show DELETE ALL.
M
to show CONFIRM?.
M
to conrm the delete all.
M
43
Page 44

7.7 View the Details of a Call Entry
1. Follow Steps 1 and 2 in secon 7.2 View the Call list.
2. Press
3.
Press Mto see the number or name with the time and date of
when the call was received.
to show DETAILS.
M
4. Press
necessary.
5. Press
7.8 Call list Category
You can choose to store all calls or only the unanswered (missed) calls
into the call list.
1. In idle mode, press
Press
2.
3. Press
4. Press
to see more details of the name or addional numbers, if
*
to return to the Call List, if required.
m
to access the Call List.
+
and . to show CATEGORY.
M
and . to select ALL CALLS or MISSED CALLS.
M
to conrm.
M
44
Page 45

8 CALL BLOCKER
If you subscribe to Caller ID service, you can use the call blocker feature to
certain calls automatically by adding numbers into the Black List (see
block
8.2). You can also choose to block all calls or allow only calls from numbers in
the VIP list (see 5.8). Each handset can store up to a total of 100 entries
shared between the phonebook (including the VIP list) and the black list.
Calls can also be blocked by the following Call Types: Withheld,
Unavailable, Internaonal and Payphone. (See 8.7)
When a call is blocked, the telephone will not ring. If the answering
machine is turned on, the blocked call will be answered by the answering
machine without call screening from the base.
8.1 Choose the Block Mode
To acvate the number call blocker feature, you must rst choose the
block mode. You can choose to block all calls, allow only VIP entries, or
only block blacklist entries.
Press
1.
and .to show CALL BLOCKER.
M
Press
2.
3. Press
4. Press
5. Press
6. If OFF is selected, the set up is complete and all calls will be received
normally.
If BLOCK ALL, ALLOW VIP or BLOCK BLIST are selected, it will show
ALWAYS ON.
7. Press
or press
ON and TIME OFF for the period you want the blocking to be acve.
and .to show SETTINGS.
M
to show BLOCK MODE.
M
and .to select OFF, BLOCK ALL, ALLOW VIP, or BLOCK BLIST.
M
to conrm.
M
if you want the selected block mode to be on all the me,
M
to show TIMED, and then press
.
45
and set the TIME
M
Page 46

8.2 Add a Number to the Black List
1.
Press
and .to show CALL BLOCKER.
M
2. Press
3. Press
4.
Press
5. Press
Note: Each Black List entry reduces the capacity of the Phonebook store.
8.3 View a Black List Entry
Press
1.
2. Press
3. Press
Press
4.
5. Press
entry. If the number is more than 12 digits, press *to see the other
digits.
to show BLACK LIST.
M
twice to show ADD.
M
and then enter a Name, then
M
to store the number to the black list.
M
and .to show CALL BLOCKER.
M
to show BLACK LIST.
M
and .to select the desired black list entry.
M
and .to show VIEW.
M
to review the number and name of the selected Black List
M
and enter the Number.
M
46
Page 47

8.4 Edit a Black List Entry
1.
Press
2. Press
3. Press
Press
4.
5. Press
6. Edit the name and press
7. Edit the number and press
8.5 Delete a Black List Entry
Press
1.
and .to show CALL BLOCKER.
M
to show BLACK LIST.
M
and .to select the desired black list entry.
M
and .to show EDIT.
M
to display the current name.
M
.
M
M
and .to show CALL BLOCKER.
M
to conrm.
2. Press
3. Press
Press
4.
Press
5.
the Black List entry.
8.6 Delete All Black List Entries
1.
Press
2. Press
3.
Press
4. Press
5. Press
display will show EMPTY.
to show BLACK LIST.
M
and .to select the desired Black List entry.
M
and .to show DELETE.
M
to show CONFIRM?, then Magain confirm and delete
M
and .to show CALL BLOCKER.
M
to show BLACK LIST.
M
twice and then .to show DELETE ALL.
M
to display CONFIRM?.
M
to conrm. All Black List entries will be deleted and the
M
47
Page 48

8.7 Block Calls by Call Type
You can choose to block dierent types of incoming calls that normally do
not have a caller ID number by seng the respecve call type to ON.
Each Call Type (Withheld, Internaonal, Unavailable and Payphone) can
be blocked independently of the others.
1.
Press
2.
Press
3.
Press
and .to show CALL BLOCKER.
M
and .to show SETTINGS.
M
and .to show CALL TYPE.
M
4. Press
or PAYPHONE.
5. Press
6. Press
7. To set for other call types, repeat from step 4.
and .to select WITHHELD, INTERNAT’L, UNAVAILABLE,
M
and .to select ON or OFF.
M
to conrm the seng for that type.
M
48
Page 49

9 ANSWERING MACHINE (TAM)
Your phone system includes a telephone answering machine (TAM) that
records unanswered calls when it is switched on. The answering system can
store up to 59 messages within the maximum recording time of about 25
minutes. As well as recording incoming messages, you can record memos
for other users of your phone. If the answering machine memory is full, the
handset will display TAM FULL alternately with the handset name, and you will
have to delete messages before more new ones can be recorded.
When the TAM is full, it will only play your Answer Only outgoing message
and not allow the caller to leave a message.
Messages can be played back through the base or handset, but sengs
can only be done from a handset.
9.1 Switching TAM On/O
You can turn the answering machine on or off using the handset. When
the answering machine is set to ON, the base TAM indicator will be on
and the handset will display the TAM icon. Calls will be answered after
the set answer delay and if it is set to Answer and Record mode, the caller
can then leave you a message. When the answering system is set to OFF,
calls will be answered aer 14 rings and the answer only message will be
played to your callers. They will not be able to leave you a message.
1.
In idle mode, press
Press
2.
3. Press
4. Press
M
M
M
and . to show TAM ON/OFF.
and . to choose ON or OFF.
to conrm the seng.
and . to show ANS. MACHINE.
M
49
Page 50

9.2 Play messages on TAM
When new messages are recorded, the TAM indicator on the base and
TAM icon on the handset both flash.
If you have new messages, they are played first, and then saved as old
messages, until they are deleted. Old messages are played again after
all new messages are played completely.
9.2.1. Using the handset:
In idle mode, press
1.
and . to show ANS. MACHINE.
M
2. Press
3. Press
Note: The display shows the time and date that the message was
recorded, and a * symbol at the top of the screen if it is a new message.
4. For opons during playback:
Press
Press
Press
STOP to stop the playback.
FORWARD to skip on to the next message.
PREVIOUS to repeat the current message playing.
DELETE to delete the current message playing.
Alternavely, press the following digit keys:
5
6
4
4,4
2
to show MSG PLAYBACK.
M
to start playing any messages through its loudspeaker.
M
to increase or decrease the playback volume.
.
to listen more privately from the earpiece.
H
and . for the opons:
M
to stop the playback.
to skip on to the next message.
to repeat the current message playing.
to skip back to the previous message.
to delete the current message playing.
50
Page 51

9.2.2 Using the telephone base
In idle, press PLAY/STOP to start playing any messages.
1.
Note
The volume of playback cannot be adjusted.
While messages are playing, press PLAY/STOP to stop the
2.
playback.
3.
While a message is playing, press DELETE [X] to delete that message.
9.3 Delete all Messages in the Answering Machine
9.3.1 Using the telephone base:
In idle, press and hold DELETE [ X ]
reviewed messages.
9.3.2 Using the handset:
1.
In idle mode, press
2.
Press
M
3. Press
4. Press
Note
You cannot delete new messages, so you will have to play them before
trying to delete.
M
M
before returning to the previous menu.
M
and . to show DEL ALL OLD.
to show CONFIRM?.
to conrm the delete, and the display will show EMPTY
until it beeps to delete all previously
and . to show ANS. MACHINE.
51
Page 52

9.4 Record Memo on the Answering Machine
You can record a memo message for another user. When you record a
memo, the message is played in the same way as answering machine
messages. Memo recording can still function even when the answering
machine is turned off.
In idle mode, press
1.
2.
Press
M
and . to show MEMO.
and . to show ANS. MACHINE.
M
Press
3.
the display.
4.
Press
back. Let it play to the end or press
and save the memo, or press mat any time to cancel the recording.
9.5 Answering Machine Settings
9.5.1. Set the Answer mode
You can select ANS & REC , the default mode, if you want to allow callers to
leave a message, or ANSWER ONLY mode if you don’t want callers to leave a
message on the answering machine.
1. In idle mode, press
2. Press
3. Press
4. Press
5. Press
to start recording the memo, and RECORDING is shown on
M
to end your memo recording and the memo will then play
M
again to stop the playback
M
and . to show ANS. MACHINE.
M
and . to show TAM SETTINGS.
M
to show ANSWER MODE.
M
and . to select ANS & REC or ANSWER ONLY.
M
to conrm the seng.
M
52
Page 53

9.5.2. Set the TAM language
In idle mode, press
1.
Press
2.
Press
3.
4. Press
machine default outgoing message.
and . to show TAM SETTINGS.
M
and . to show TAM LANGUAGE.
M
and . to select your desired language for the answering
M
and . to show ANS. MACHINE.
M
5. Press
9.5.3. Record your Outgoing Message (OGM)
You can record your own OGM for ANS & REC mode or ANSWER ONLY
mode. When you record your own OGM, it will
machine answers the call. If your personal OGM is deleted, the pre-set OGM
will be restored automatically.
In idle mode, press
1.
Press
2.
Press
3.
4. Press
5.
Press
6. Press
displayed on the screen.
7. Press
playback automacally.
Alternatively, press m to return to the previous screen without saving
t
he personal OGM, and restoring the pre-set OGM automatically.
to conrm the seng.
M
be used when the answering
and . to show ANS. MACHINE.
M
and . to show TAM SETTINGS.
M
and . to show OGM SETTINGS.
M
and . to select ANS & REC or ANSWER ONLY.
M
and . to show RECORD MESS.
M
to start recording your personal OGM and RECORDING is
M
to stop and save your personal OGM, which will then
M
53
Page 54

9.5.4. Playback the Outgoing Message (OGM)
In idle mode, press
1.
and . to show ANS. MACHINE.
M
Press
2.
Press
3.
4. Press
5. Press
6. Press Mto play your OGM and PLAYING OGM is displayed on the screen.
7. Press
Note
If a personal OGM has not been recorded the pre-set OGM will be played.
9.5.5. Delete a personal OGM (Set OGM to default)
In idle mode, press
1.
Press
2.
Press
3.
4. Press
5. Press
6. Press Mto play your OGM and display PLAYING OGM.
7. Press m while the OGM is playing to delete your personal OGM and
return to the previous menu with the pre-set OGM restored.
and . to show TAM SETTINGS.
M
and . to show OGM SETTINGS.
M
and . to select ANS & REC or ANSWER ONLY.
M
to show PLAYBACK.
M
to stop the OGM playback and return to the previous menu.
M
and . to show ANS. MACHINE.
M
and . to show TAM SETTINGS.
M
and . to show OGM SETTINGS.
M
and . to select ANS & REC or ANSWER ONLY.
M
to show PLAYBACK.
M
54
Page 55

9.5.6. Set the Answer Delay
You can set the number of rings before the answering machine answers
and starts playing your OGM, to be aer two to eight rings or Time
Saver. If Time Saver is set, it will answer after 4 rings if there are no new
messages, or after 2 rings if there is a new message, so if you are calling
in to check your messages remotely and it doesn't answer after 2 or 3
rings, you can hang up to save time.
IMPORTANT: If your network voice messaging system (e.g. the 1571
service) is enabled, the Answer Delay must be less than 6 rings,
otherwise the network service will answer calls before the answering
machine and prevent it from recording any messages.
1.
In idle mode, press
2.
Press
M
3.
Press
M
and . to show TAM SETTINGS.
and . to show ANSWER DELAY.
and . to show ANS. MACHINE.
M
4. Press
TIME SAVER.
5. Press
9.5.7. Set the Recording Time of Incoming Message
You can set the maximum recording time available for each incoming
message.
In idle mode, press
1.
Press
2.
Press
3.
4. Press
5. Press
and . to select 2 RINGS, 4 RINGS, 6 RINGS, 8 RINGS or
M
to conrm your seng.
M
and . to show ANS. MACHINE.
M
and . to show TAM SETTINGS.
M
and . to show RECORD TIME.
M
and . to select 60S, 120S, 180S, or UNLIMITED.
M
to conrm your seng.
M
55
Page 56

9.5.8. Change the Compression Rate
Three different compression rates (HIGH, MEDIUM and LOW) are provided
for you to select different quality levels for recording incoming messages.
The lower the compression rate, the higher the recording quality level
attained, but the shorter the total recording time available. (LOW = 12
minutes, MEDIUM = 15 minutes, HIGH = 25 minutes, approximately.)
In idle mode, press
1.
Press
2.
3.
Press
Press
4.
Press
5.
9. Call Screening
9.5.
When the answering machine is on and takes a call, you can listen to
the caller leaving a message, and then decide whether to take the call in
person or leave the answering machine to connue recording.
By default the Base call screening is turned on and you cannot adjust the
volume.
9.5.9.1 Turn Base Screening On or O
Using the handset:
In idle mode, press
1.
Press
2.
Press
3.
4. Press
5. Press
and . to show TAM SETTINGS.
M
and . to show COMPRESSION.
M
and . to select HIGH, MEDIUM or LOW.
M
to confirm your setting.
M
and . to show TAM SETTINGS.
M
and . to show BS SCREENING.
M
and . to select ON or OFF.
M
to conrm the seng.
M
and . to show ANS. MACHINE.
M
and . to show ANS. MACHINE.
M
56
Page 57

9.5.9.2 Call Screening from a Handset
When the answer machine takes a call, the handset displays
1.
SCREENING?.
2.
Press
to listen to the caller via the earpiece, while the answer
M
machine continues recording, and the display changes to SCREENING.
3.
During screening, you can adjust the volume with the . keys or
listen via the speakerphone by pressing H.
If you want to stop screening and leave the answer machine to continue
4.
recording, press m, and the display will return to SCREENING?.
Note
At any time during call screening, if you want speak to the caller, you can
press T on the handset, and message recording will stop automatically
and any message already recorded will be saved.
Defence 6025 Call Blocker system
Remote operation
1. Using a tone-dialling phone, dial your home number
2. While your outgoing message is playing, press < * >
Key in your remote security code
3.
The default code is 0000. For details of how to set a new code, see the User Guide 9.5.10.2
on page 59.
Note: The <*> key must be entered while the OGM is still playing, and the 4-digit
PIN should follow without any delays.. If the 4-digit Remote Access
PIN is entered incorrectly three times consecutively, the line will be released automatically.
4. If the security code is accepted, use the codes on the other side of this card for remote operations.
Note: If your answering machine is switched off, the phone will answer after 14 rings and play the
Answer Only message, to allow you to enter the 4-digit remote access PIN.
(Default Remote Access PIN is 0000) to activate the remote access feature.
57
Page 58

10. Remote Access
9.5.
Your phone lets you check your messages, or otherwise operate your
answering system, remotely. You can do this by calling the answering
system when you are away from home and entering a remote access PIN
from a tone-dialling phone.
The 4-digit remote access PIN code is used to prevent unauthorised
access to your answering system, and you should change the default PIN
( 0000 ) to one of your own.
By default the remote access feature is allowed, but it can be deacvated
to prevent any remote access, even with the correct PIN.
Keys
While message is not
playing
2 Delete the current message playing
4 Repeat the current message from the beginning.
5 Start playing
messages.
6 Skip to play the next message
7 Turn on the answering
machine
8 Stop the current message playback
9
machine
While message is playing
Press twice to skip back to play the previous message
Stop the current message playback
58
Page 59

9.5.10.1 Activate or Deactivate Remote Access
1.
In idle mode, press
2.
Press
M
3.
Press
M
and . to show TAM SETTINGS.
and . to show REMOTE ACC.
and . to show ANS. MACHINE.
M
4. Press
remote access respecvely.
5. Press
9.5.10.2 Change the 4-Digit Remote Access PIN
Note
The Remote Access PIN is different to the System PIN Code (see 6.3.4).
1. In idle mode, press
2.
Press
3.
Press
4. Press
(default 0000).
5. Press
6. Press
7. Press
Note
If the new PIN entered in Step 6 is not the same as the new PIN entered
in Step 5, you must enter the new PIN again in Step 5.
and . to select ON or OFF to acvate or deacvate the
M
to conrm your seng.
M
and . to show
M
and . to show TAM SETTINGS.
M
and . to show CHANGE PIN
M
to show OLD PIN?----, and enter the current 4-digit PIN
M
to show NEW PIN?----, and enter your new 4-digit PIN.
M
to show CONFIRM?----, and re-enter your new 4-digit PIN.
M
to conrm your new PIN.
M
ANS. MACHINE.
.
59
Page 60

9.5.10.3 Access Your Answering Machine Remotely
Make sure the remote access is enabled (see 9.5.10.1).
1.
Place a call from a tone-dialling phone to your Defence 6025 Call
Blocker phone.
2. When the answering machine answers the call and starts playing the
OGM, press the < * > key to stop the OGM.
3. Enter the 4-digit Remote Access PIN (default 0000) without any
delays.
Note:
If the PIN is accepted a single beep is played.
If the wrong PIN is entered, a triple error beep is played and you can enter
the PIN again.
If the wrong PIN is entered incorrectly three mes consecuvely, the call
will be released automacally.
4. When in remote access mode, press 5 to start playing any messages.
While messages are playing:
Press
or 8 to stop the message playback;
5
Press
Press
Press
Press
When messages are not playing, press
machine on or press
When messages are not playing, if no keys are pressed within 10 seconds
the answering machine will automacally end the call.
to repeat the current message;
4
twice to skip back to the previous message;
4
to skip forward to the next message;
6
to delete the current message.
2
to turn the answering
7
to turn the answering machine o.
9
60
Page 61

10 TROUBLESHOOTING
If you have difficulty with your phone, please try the suggestions listed
below.
If you need further assistance, contact the Helpline on 0844 557 9677
(for UK only).
If you have a problem with your telephone line, please contact the
technical support of the network provider for further information. This
telephone is not equipped with a grounding function! Therefore some of
the functions may be limited when used in PBX systems.
Problem Soluons
My telephone does
not work at all.
Low baery shows on
screen.
The baeries do not
charge in the handset
or the handset
baeries do not
accept charge.
Make sure the baeries are installed and charged correctly. For
-
opmum daily performance, return the handset to the telephone
base or charger aer use.
Make sure the power adapter is securely plugged into a funconing
-
mains socket.
Make sure the telephone line cord is plugged rmly into the
-
telephone base and the telephone wall jack.
Unplug the electrical power to the telephone base. Wait for
-
approximately 15 seconds, then plug it back in. Allow up to one
minute for the handset and telephone base to synchronise.
Remove and re-insert the baeries. If that sll does not work, it might
-
be necessary to purchase new baeries.
Disconnect the telephone base from the telephone wall jack and plug
-
in a working telephone. If the other telephone does not work, the
problem is probably in the wiring or the telephone service. Call your
telephone service provider.
Place the handset in the telephone base for recharging.
-
Remove and re-install the baeries and use it unl fully depleted,
-
then recharge the handset in the telephone base.
If the above measures do not solve the problem, replace the
-
baeries.
Make sure the handset is placed in the telephone base or charger
-
correctly.
Remove and reinstall the baeries, then charge for up to 14 hours.
-
Purchase new baeries.
-
61
Page 62

Problem Causes Soluons
No dialling tone when
pressing
<TALK ON>
When connected to a
PBX, no and/or wrong
connecon aer dialling
OUT OF RANGE
is displayed
The call does not work. Service not acvated or
No display. Empty baery Recharge baery.
Answering Machine
The unit does not record
new message.
The caller cannot leave a
new message.
I cannot operate the
answering machine
remotely.
While recording an
outgoing message or
listening to message, the
unit rings and recording
stops.
a. The connecon cord of
key
the base staon is not
plugged in.
b. The adapter cord is not
plugged in correctly in
the base staon.
c. Another handset is
using the base to make
a call.
d. Wrong telephone line
cord
Dialling prex is needed. Insert the dialling prex.
a. Base staon out of
range.
b. Base staon not
connected to mains.
wrong operator or wrong
seng.
The answering machine is
turned o.
a. The answering machine
is turned o.
b. Message memory is full.
c. Answer only mode is
set.
a. You are entering the
wrong remote access
code.
b. You are pressing the dial
keys too quickly.
c. You are using a pulse
telephone.
d. The Remote Access
mode is Deacvated.
A call is being received. Answer the incoming call and try again
a. Check the connecons. Unplug and
plug back in the mains.
Check that the telephone cord has
ged into the base staon
been plug
and the phone socket.
b. Check the base staon plug and the
230V plug (remove and plug-in).
c. Wait unl the line is unoccupied.
d. Use the original telephone line cord
supplied.
Reduce the range.
Connect base staon to mains.
Check your Subscripon with network.
Turn on the answering machine.
a. Turn on the answering machine.
b. Erase unnecessary message.
c. Change to Ans & record mode.
a. If you forget the remote access
code, reset to the default sengs.
b. Press each key rmly.
c. Try again using a touch tonephone.
d. Acvate the Remote Access mode.
to record your out going message later.
62
Page 63

11 DECLARATION OF CONFORMITY
We the manufacturer / Importer: Binatone Telecom Plc, 1 Apsley Way
London, NW2 7HF. Declare under our sole responsibility that the following
product
Type of equipment: Digital Cordless Telephone
Country of Origin:
Brand:
Model name:
complies with the essenal protecon requirements of R&TTE Direcve
1999/5/EC on the approximaon of the laws of the Member States
relang to Radio Spectrum Maers, the Council Direcve 2004/108/
EC on the approximaon of the laws of the Member States relang to
Electromagnec Compability (EMC) and the European Community
Direcve 2006/95/EC relang to Electrical Safety.
Assessment of compliance of the product with the requirements relang
to the essenal requirements according to Arcle 3 R&TTE was based on
Annex III of the Direcve 1999/5/EC and the following standard:
Radio Spectrum: EN 301406 v2.1.1 (2009-07)
EMC: EN 301489-6 v1.3.1 (2008-08)
EN 301489-1 v1.9.2 (2011-09)
EN 55022: 2010
EN 55024: 2010
EN 61000-3-2 :2006+A1+A2:2009
EN 61000-3-3: 2008
Safety:
EN 60950-1: 2006+A11: 2009+A1: 2010+A12: 2011
EN 50360: 2001+A1: 2012 & EN 50385: 2002
Erp:
Operating Condition
Networked Standby Mode
Implementing regulation EC1275/2008 + amendment 801/2013
China
iDECT
Defence 6025 Call Blocker series
Power Consumption
0.65W (Ruijing)/ 0.7W (Vtech)
Manufacturer / Importer
(signature of authorized
person)
2 Mar 2015
Date
63
Signature
Page 64

The conformity to the requirements is validated by the
symbol.
Note: IncompliancewithDirecve2002/96/EC,whenyoupurchasea
productthatcomeswiththesymbolshownontheright,youarerequired
todisposeofelectricalandelectronicequipmentbyseparatewaste
colleconandyoucannotdisposeoftheproductasnormalwaste.
Thisequipmentandallitscomponents,subsystems
andconsumablematerialsformanintegralpartof
thisproductandwhenyoudecidetodisposeofthem
youhavetotakethemtoalocalrecyclingcentrefor
appropriatewastedisposal,incompliancewiththe
currentregulaons.
Detailsaboutthelocaonofthesecentrescanbeobtainedfromyourlocal
authority.
Notes for baery disposal
YourproductcontainsbaeriescoveredbytheEuropeanDirecve
2006/66/EC,whichmustnotbedisposedofwithnormalhouseholdwaste.
Pleasebeawareofthelocalrulesonseparatecolleconofbaeries.The
correctdisposalofbaerieshelpsprotecttheenvironmentandprevent
healthhazards.
64
Page 65

12 GUARANTEE AND SERVICE
This does not cover the product where the fault is due to misuse, abuse,
use in contravenon of the instrucons, or where the product has been
the subject of unauthorised modicaons or alteraons, or has been the
subject or commercial use.
In the event of a problem with the product within the guarantee period
please return it to your nearest Argos store. If the item is shown to have
had an inherent defect present at the me of sale, the store will provide
you with a replacement.
Your statutory rights remain unaected.
Guarantor: Argos Ltd
489 - 499 Avebury Boulevard
Central Milton Keynes
MK9 2NW
65
UK (Argos) Ver 6, Dec 2015
 Loading...