

Page 1

User Guide
DC200
1st edition
www.binatoneglobal.com
Page 2

Unpacking your Binatone Dash camera System
In the box you will find
·Dash camera Device
·Windscreen mount
·Cigarette charger
·User Guide
Keep the packaging materials in a safe place in
case you later need to transport the unit. Keep your
sales (till) receipt, which is your guarantee. Before
you can use the unit, you’ll need to fully charge the
battery as described on page 7.
WARNING:
When using the Dash camera device in your car, we
recommend that you always use the cigarette charger
in order to maintain the battery level.
The unit is not designed to be run on battery power
alone, the battery is there for backup purposes only.
IMPORTANT
Before start recording or take photography, please insert a Micro SD card into the
device in correct direction and ensure it is fixed in the card slot.
If you are adding a new SD card to the device, we recommend you format it before
use.
Micro SD card requirement: 4GB or above, CLASS 10 or above.
Technical Help – Please contact the helpline on 0844 557 9677 2
IMPORTANT
Page 3
SAFETY
Safety
Using your dash camera in the car
When using your dash camera while driving it is essential that you drive with due
care and attention. Never modify the settings or program your dash camera while
driving. Only look at the screen when it is safe to do so. When mounting the dash
camera in your car make sure that it does not obscure your view or impede the
operation of any driving controls.
Battery
Your dash camera device uses a Li-polymer battery. Do not use it in humid, wet
or corrosive environments. Do not operate or store your dash camera in high
temperatures (>60°) or in direct sun light. Do not pierce or break the battery
casing.
Failure to follow these cautions will invalidate the warranty and may
cause the battery to leak acid, become hot, explode or ignite and
cause injury or damage.
If you come into contact with leaked battery acid wash the contact
area thoroughly and seek medical attention.
The Li-polymer battery contained in this unit must be recycled or
disposed of properly.
Do not dispose of in household waste or burn.
3 Technical Help – Please contact the helpline on 0844 557 9677
Page 4

CONTENTS
CONTENTS
Important 02
In the Box 02
Safety 03
Using your dash camera in the Car 03
Battery 03
Contents 04
Quick Start Guide 07
Position of the Controls 07
Installing a Micro SD Card 09
Cigarette charger 09
Turning the Dash camera Unit On/Off 10
System Reset 10
Windscreen Holder Installation 11
Starting Up 12
Basic features 12
Entering the Setting menus 12
Power on/off 13
Video/Camera/Playback mode 13
Audible recording (Mic on/off) 13
Video Settings 13
Resolution setting 13
Loop recording setting 15
Exposure setting 15
White balance setting 15
Motion Detection setting 16
Technical Help – Please contact the helpline on 0844 557 9677 4
Page 5

CONTENTS
Record Audio setting 16
Date Stamp setting 16
G-sensor setting 17
Device setup 17
Park mode setup 18
Date/time setup 18
Auto power off setup 18
Screen Saver setup 19
Beep Sound setup 19
Language setup 19
Frequency setup 20
Flash setup 20
Format 20
Default setting 20
Version 21
Camera Settings 21
Resolution setting 22
Sequence setting 22
Quality setting 22
Sharpness setting 23
White Balance setting 23
ISO setting 24
Exposure setting 24
Anti-Shaking setting 24
Quick Review setting 25
Date Stamp setting 25
Playback setting 26
5 Technical Help – Please contact the helpline on 0844 557 9677
Page 6

CONTENTS
Delete setting 26
Protect setting 27
Playback on PC 27
Technical Support or contact 28
Technical Specifications 29
EC Declaration of Conformity 30
Technical Help – Please contact the helpline on 0844 557 9677 6
Page 7
QUICK START GUIDE
Quick Start Guide
Please make sure that you read all of the information contained within this user
guide before operating this unit.
If you experience any problems, please go through the user guide before contacting
the customer helpline.
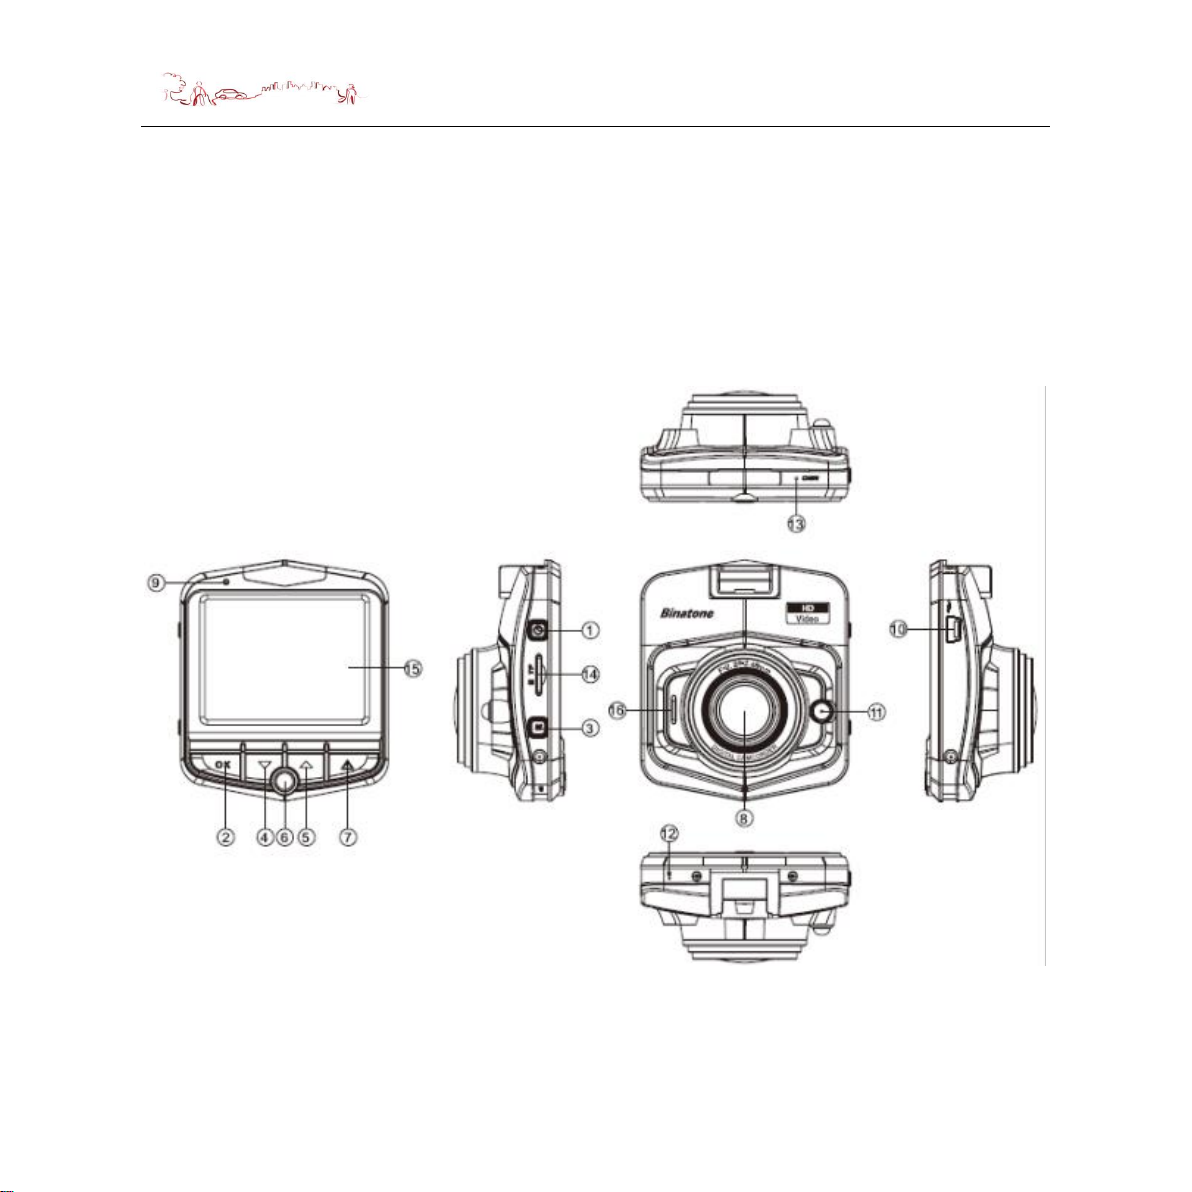
Position of the controls
1. On/Off Button – Press 1 second to power on.
Press and hold 2 seconds to power off.
7 Technical Help – Please contact the helpline on 0844 557 9677
Page 8

QUICK START GUIDE
Press to turn the LED light ON/OFF when the device in
video mode.
2. OK Button – Press to select and enter when you setting.
Press to start/stop recording (or take photograph) during
the device working.
3. Menu Button – Press to enter into (or exit) the menu (or setup).
4. Down Button – Press down to select menu.
Press to decrease volume during playback.
Press and hold to make fast forward during playback.
5. UP Button – Press up to select menu.
Press to increase volume during playback.
Press and hold to make fast backward during playback
Press to turn ON/OFF microphone during recording.
6. Parking Button– Press to turn parking monitor ON/OFF.
7. Lock Button – Press to switch working mode between Video/ Photo /
Playback.
Press to lock/unlock the current file during recording.
8. Lens
9. Charge Indicator – Green-unit ON, Flash-recording.
10. USB Port – For charging and data transfer.
11. LED Light
12. Reset Button– System reset switch
13. Microphone
14. Memory Card Slot –For use with Micro SD type cards.
15. LCD screen
16. Speaker
Technical Help – Please contact the helpline on 0844 557 9677 8
Page 9
QUICK START GUIDE
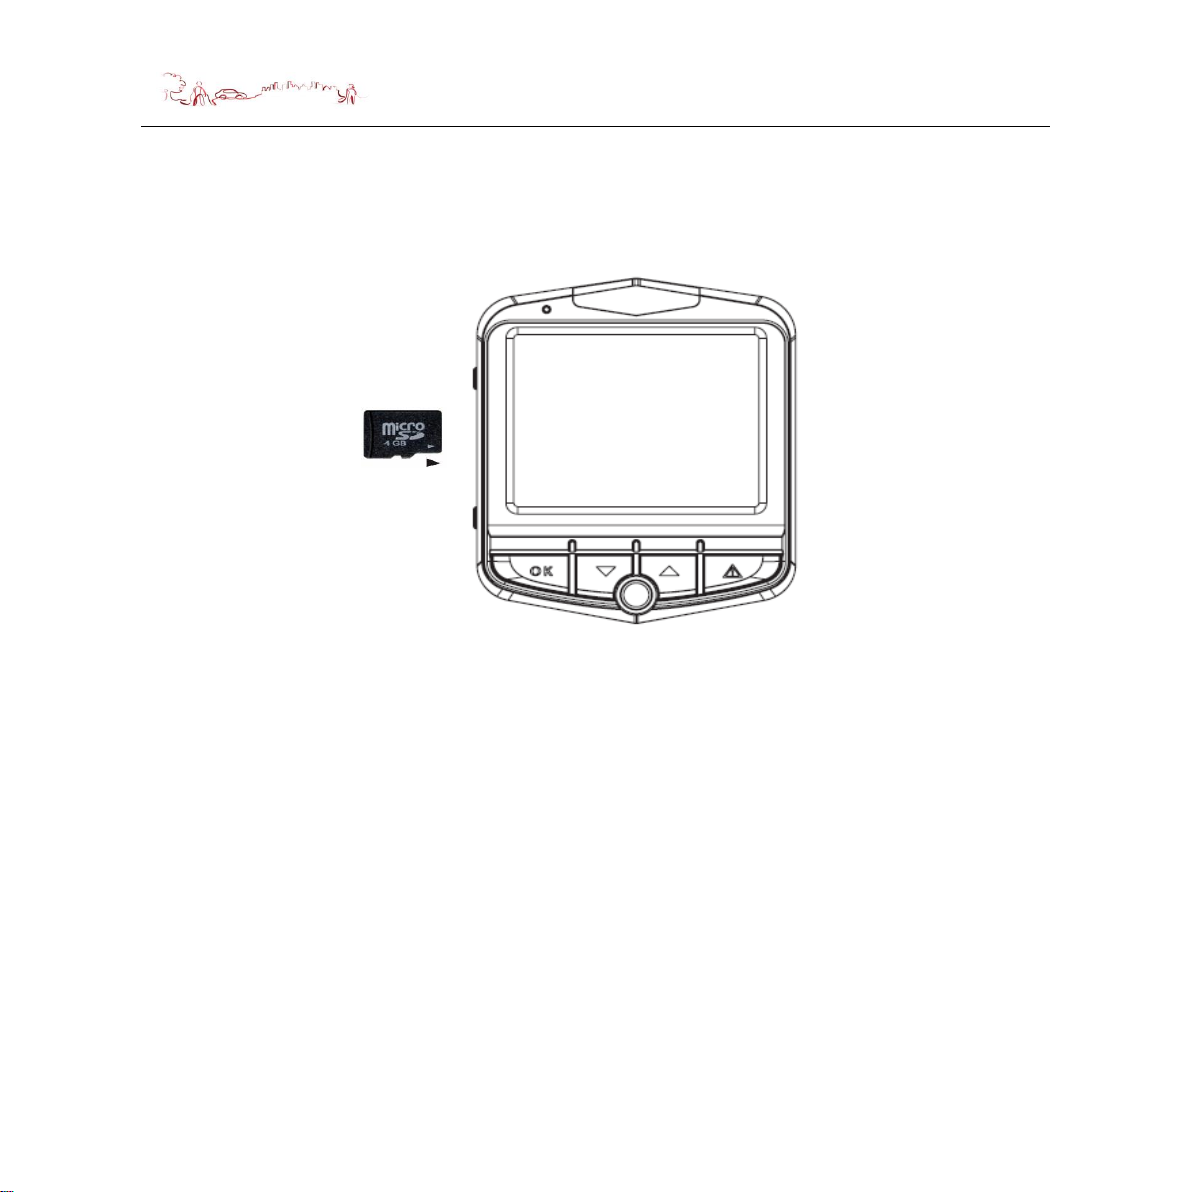
Installing a Micro SD Card
You may install it as described below.
At least 4GB
microSD
Switch the unit off first before installing or removing the MicroSD card.
When installing it can only be fitted one way – the contacts should be facing away
from you and the cut-off corner at the bottom (as shown above). Slide the card in
and push it in so that it clicks into place.
Once the card is installed it does not need to be removed.
If you need to remove the card, push the card in and it will eject from the slot.
Cigarette charger
When using your dash camera in the car we recommend that you always use the
Cigarette charger to power the unit.
Plug the Cigarette charger into the USB socket of the unit. Plug the other end of the
adapter into the car’s cigarette-lighter / 12V DC socket.
9 Technical Help – Please contact the helpline on 0844 557 9677
Page 10

QUICK START GUIDE
The adaptor is also compatible with 24V DC sources, as found in many heavy goods
vehicles.
Turning the dash camera Unit On/Off
Your dash camera will power on and start to record automatically as soon as it is
connected to power, and will shutdown automatically once it disconnect to power
over 10 seconds.
You can also power it on and off manually. Press the On/Off button for 1 second to
power on, press and hold the On/Off button for 2 seconds to power off.
System Reset
Under extreme circumstances it may be necessary to reboot the system. Reset the
system if the following situation occurs:
Long delay experienced with screen refresh rate or operation, resulting in an
inoperable unit.
The system will not turn off with the power button.
No response with press button.
The reset button can be found on the top of the unit. Insert the tip of the stylus pen or
small blunt implement into the reset hole in order to press the button. The system will
be immediately reset.
Technical Help – Please contact the helpline on 0844 557 9677 10
Page 11

QUICK START GUIDE
Windscreen Holder Installation
The Windscreen mount has a suction pad that fits to the windscreen or a flat area on
the dashboard.
A. Fitting to windscreen
Pull the lever away from the suction pad. Place the pad on the widescreen
and push the lever towards the pad until it clicks into place.
B. Fitting the Unit
Push the unit forward until it clicks into place at the top. Make sure you clean
the lens after installation.
C. Remove the unit from the Windscreen mount
Pull the unit backward and out of the Windscreen mount.
D. Remove the Windscreen mount from the windscreen;
Lift the lever away from the windscreen, then gentle pull the tab on the suction
cup to release the suction as you pull the mount away from the windscreen.
11 Technical Help – Please contact the helpline on 0844 557 9677
Page 12

MAIN MENU
Starting Up
Your dash camera will power on and start to record automatically as soon as it is
connected to power.
You can also power it on manually: Press the On/Off button for 1 second.
Your dash camera has been designed to be as simple to use as possible. The
purpose of a DVR is to continually record the road ahead and to automatically record
and save any incidents or accidents you might be involved in. To ensure that your
dash camera does this as efficiently as possible, it will always power up in to video
mode and begin recording automatically. Simply connect your dash camera to a
power source that comes on when you start the engine of your vehicle, and dash
camera will start recording automatically without you having to remember to press on
a button.
The following screens is displayed when the device power on.
Basic features
Your dash camera comes as standard with all features set to their optimum settings,
however the unit has certain user selectable features you can change to suit your
own requirements.
Entering the Setting menus
You can use the Menu button to enter the Settings menu and the Additional Settings
menu.
Technical Help – Please contact the helpline on 0844 557 9677 12
Page 13

MAIN MENU
Power on/off
Your dash camera will power on and start to record automatically as soon as it is
connected to power. You can also power it on and off manually. Press the power
button for 1 second to power on, press and hold the power button for 2 seconds to
power off.
Video/Camera/Playback mode
You can only switch the working mode when your dash camera is not recording. You
dash camera has 3 working mode: Video, Camera and Playback. You can press
Lock button to switch.
Audible recording (Mic on/off)
When recording video you have a choice of whether you want to have the mic turned
on to record audible sounds within your vehicle or to record video without sound.
Press the Up button to turn the mic on or off. The Mic icon on the LCD display will
change to confirm your selection.
Video Settings
Press menu button during the device in video mode standby, the following screen
are displayed. Press Up or Down button to select item or switch to page 2. You will
be able to change related parameters about the video.
1) Resolution setting
Press Up or Down button to select Resolution menu, then press OK button, the
following screen is displayed. Press Up or Down button to select the resolution
which you want, then press OK button, the resolution will be save and return to
the menu.
13 Technical Help – Please contact the helpline on 0844 557 9677
Page 14

Resolution
Card capacity
Recording time (minute)
1080FHD 1920*1080
4GB
25
8GB
50
16GB
100
32GB
200
1080P 1440*1080
4GB
40
8GB
80
16GB
160
32GB
320
720P 1280*720
4GB
45
8GB
90
16GB
180
32GB
360
WVGA
800*480
4GB
85
8GB
170
16GB
340
32GB
680
VGA
640*480
4GB
100
8GB
200
16GB
400
32GB
800
The higher resolution selected the more memory
required to save and store lengths of video. If you want
to store more video on one SD card, try reducing the
resolution.
MAIN MENU
Technical Help – Please contact the helpline on 0844 557 9677 14
Page 15

MAIN MENU
2) Loop recording setting
Press Up or Down button to select Loop recording menu, then press OK button,
the following screen is displayed. Press Up or Down button to select the time per
video which you want, you can select off also, then press OK button to confirm
your selection and return to menu.
If you selected “Off”, when you start video record, device will recording until micro
SD card full, and save the video as one file.
If you selected “X minutes”, means you had selected loop recording function,
video will be save in micro SD card as X minutes per file, when micro SD card full,
the oldest one will be delete and the latest video will save in same space, if the
oldest video was locked, the next one will be delete.
3) Exposure setting
Exposure determines how light or dark an image or video will appear when it's
been captured by your dash camera. You can adjust the exposure as you require.
For example, during the winter you may want to change the exposure to account
for the darker days.
Press Down button to select Exposure menu, then press OK button, the following
screen is displayed. Press Up or Down button to choose between +2.0,+5/3,+4/3,
+1.0, +2/3, +1/3, +0.0, -1/3, -2/3, -1.0, -4/3, -5/3 and -2.0. Then press OK button
to confirm and return to the menu. The greater exposure value, means that the
screen brightness will be higher.
4) White balance setting
White balancing can make the difference between a video that looks natural and
one that looks a little off, things may look a bit too blue (cool) or yellow (warm).
15 Technical Help – Please contact the helpline on 0844 557 9677
Page 16

MAIN MENU
Press Down button to select White balance menu, then press OK button, the
following screen is displayed. Press Up or Down button to select the mode which
you want, then press OK button to confirm your selection and return to the menu.
If you selected “Auto”, device will adjust white balance based on colour’s
temperature automatically.
5) Motion Detection setting
Press down button to select Motion Detection menu, then press OK button, and
then press Up or Down button to select “On” or “Off” mode which you want, then
press OK button to confirm your selection and return to the menu.
If you selected “On” mode, in standby state, once it detects images is changing, it
will record video and save the file for 10 seconds automatically, and then get
back to standby state .
6) Record Audio setting
Press down button to select Record Audio menu, then press OK button, and then
press Up or Down button to select “On” or “Off” mode which you want, then press
OK button to confirm your selection and return to the menu.
If you selected “On”, the video record will with voice, if you selected “Off”, the
video record will without voice.
7) Date Stamp setting
Press down button to select Date Stamp menu, then press OK button, and then
press Up or Down button to select “On” or “Off” mode which you want, then press
OK button to confirm your selection and return to the menu.
If you selected “On”, the video record will with date/time stamp, if you selected
“Off”, the video record will without stamp.
Technical Help – Please contact the helpline on 0844 557 9677 16
Page 17

MAIN MENU
8) G-sensor setting
Your DC200 has a built-in G-Sensor which continually monitors for impact or
sudden changes in direction or speed, so it can sense whether you vehicle has
been involved in an incident or accident. If the G-Sensor senses one of these
things, your DC200 will automatically lock and save the preceding length of video
recorded so that you will have a permanent record of the event.
Your unit comes with the G-Sensor set to low sensitivity, which we think is the
optimum setting but you can change this if required.
Press down button to select G-sensor menu, then press OK button, the following
screen is displayed. Press Up or Down button to select the mode which you want,
then press OK button to confirm your selection and return to the menu.
Selecting “Low”, “Middle” or “High” mode, adjusts the force required to trigger the
G-sensor function.
If device is in parking mode, on detecting vibration, it will be start up and record
video for 5 minutes, then save the file and return parking mode again
automatically.
Device setup
Press Menu button two times during the device standby, the following screen are
displayed. Press Up or Down button to select item or switch to page 2 and page 3.
17 Technical Help – Please contact the helpline on 0844 557 9677
Page 18

MAIN MENU
1) Park mode setup
If Park Mode is switched on, your dash camera will shut down 10 seconds after
ignition turns off but as soon as any movement is sensed with any external
disturbance to your vehicle, it will power up and start recording automatically.
Press down button to select Park mode menu, then press OK button, and then
press Up or Down button to select “On” or “Off” mode which you want, then press
OK button to confirm your selection and return to the menu.
If park mode selected “On” and G-sensor selected “Low” or “Middle” or “High”
mode, with the device shut down, on detecting vibration, it will be start up and
record video for 5 minutes, then save the file and shut down again automatically.
2) Date/time setup
Press down button to select Date/time menu, then press OK button, the following
screen is displayed. Press Up or Down button to correct date and time, then
press OK button, the date and time will be corrected. Press Menu Button to save
and exit to setup menu.
3) Auto power off setup
Press down button to select Auto power off menu, then press OK button, the
following screen is displayed. Press Up or Down button to select the mode which
you want, then press OK button to confirm your selection and return to the menu.
If you selected “Off”, device will never auto power off.
If you selected “X minutes”, device will be shutdown if no operating more than X
minute.
Technical Help – Please contact the helpline on 0844 557 9677 18
Page 19

MAIN MENU
4) Screen Saver setup
Press down button to select Screen saver menu, then press OK button, the
following screen is displayed. Press Up or Down button to select the mode which
you want, then press OK button to confirm your selection and return to the menu.
If you selected “Off”, screen will always display until device turn off.
If you selected “X minutes”, screen will go dark into saver mode if no operation
for more than X minutes.
5) Beep Sound setup
Press down button to select Beep Sound menu, then press OK button, and then
press Up or Down button to select “On” or “Off”, then press OK button to confirm
your selection and return to the menu.
If you selected “Off”, device will be silent when you press the button.
If you selected “On”, device will make Beep sound when you press the button.
6) Language setup , English only
19 Technical Help – Please contact the helpline on 0844 557 9677
Page 20

MAIN MENU
7) Frequency setup
Press down button to select Frequency menu, then press OK button, and then
press Up or Down button to select light frequency “50Hz” or “60Hz” , then press
OK button to confirm your selection and return to the menu.
When your dash camera working under the light, please make sure what
frequency of the light and set your device accordingly.
8) Flash setup
Press down button to select Flash menu, then press OK button, and then press
Up or Down button to select LED light “On” or “Off”, then press OK button to
confirm your selection and return to the menu.
You can use ON/OFF button to turn LED light ON or OFF also. When the device
in video mode, press ON/OFF button, the flash light will be turn on, press again,
the flash light will be turn off.
9) Format
You can use this function to format your micro SD card.
Press down button to select Format menu, then press OK button, and then press
Up or Down button to select “Cancel” or “OK”, then press OK button, the mode
will be save. If you selected “OK”, the Micro SD card will be format, all data will
be deleted.
Note, insert a new micro SD card into your device, please format first.
10) Default setting
Use this function to return your dash camera to it’s original default factory settings.
Press down button to select Default setting menu, then press OK button, and
then press Up or Down button to select “Cancel” or “OK”, then press OK button to
confirm.
If you selected “OK” and confirmed, device will be return to default setting.
If your device hung up or working not good, you can default it.
Technical Help – Please contact the helpline on 0844 557 9677 20
Page 21

MAIN MENU
11) Version
Press down button to select Version menu, then press OK button, you will see
the version of operating system software.
Camera setting
DC200 has been designed primarily to function as a DVR, to record the road ahead
and to save any incidents or accidents you may be involved in. However, in addition
to the DVR function, your DC200 can also be used to take still photographs.
DC200 will always power up in Video mode and start recording automatically, so to
switch to Camera mode, press OK button, to stop Video recording.
Press Lock button during the device standby in Video mode, switch device to camera
mode, the following screen is displayed.
Press menu button during the device standby in camera mode, the following screen
are displayed. Press Up or Down button to select item or switch to page 2 and page
3.
21 Technical Help – Please contact the helpline on 0844 557 9677
Page 22

MAIN MENU
1) Resolution setting
Press down button to select Resolution menu, then press OK button, the
following screen is displayed. Press down/up button to select the resolution which
you want, then press OK button, the resolution will be save. The bigger resolution
number means the photo quality will better than smaller one, but it need more
storage space to save photo file also.
2) Sequence setting
Press down button to select Sequence menu, then press OK button, and then
press Up or Down button to select “Off” or “On”, then press OK button to confirm
and return to the menu.
If you selected “Off”, you will take 1 photo when you press “OK” Button once;
If you selected “On”, you will take 5 photos when you press “OK” Button once.
3) Quality setting
Press down button to select Quality menu, then press OK button, the following
screen is displayed. Press Up or Down button to select which you want, then
press OK button to confirm your selection and return to the menu.
High quality photo will need more space to save the file.
Technical Help – Please contact the helpline on 0844 557 9677 22
Page 23

MAIN MENU
4) Sharpness setting
Press down button to select Sharpness menu, then press OK button, the
following screen is displayed. Press Up or Down button to select which you want,
then press OK button to confirm and return to the menu.
“Strong” means the clarity of image is the best.
5) White Balance setting
As same as video white balance setting.
23 Technical Help – Please contact the helpline on 0844 557 9677
Page 24

MAIN MENU
6) ISO setting
ISO setting controls the sensitivity of your camera's sensor to a given amount of
light, but higher ISO settings affects image noise.
Press down button to select ISO menu, then press OK button, the following
screen is displayed. Press Up or Down button to select which you want, then
press OK button to confirm your selection and return to the menu.
If you selected “Auto”, device will adjust ISO level automatically, based on the
brightness of environment.
7) Exposure setting
Same as video exposure setting.
8) Anti-Shaking setting
Press down button to select Anti-Shaking menu, then press OK button, the
following screen is displayed. Press Up or Down button to select “Off” or “On”,
then press OK button to confirm your selection and return to the menu.
Technical Help – Please contact the helpline on 0844 557 9677 24
Page 25

MAIN MENU
If you selected “On”, means anti-shaking function was opened, you will be able to
take a high quality image when the device shaking.
9) Quick Review setting
Press down button to select Quick Review menu, then press OK button, the
following screen is displayed. Press Up or Down button to select which you want,
then press OK button to confirm and return to the menu.
If you selected “Off”, quick review function will be turn off.
If you selected “2 seconds” or “5 seconds”, the review speed will under 2 or 5
seconds per photo.
10) Date Stamp setting
Press down button to select Date Stamp menu, then press OK button, the
following screen is displayed. Press Up or Down button to select which you want,
then press OK button to confirm and return to the menu.
If you selected “Off”, you will take photo without date/time stamp;
If you selected “Date”, you will take photo with date stamp only;
If you selected “Date/Time”, you will take photo with date & time stamp.
25 Technical Help – Please contact the helpline on 0844 557 9677
Page 26

MAIN MENU
Playback setting
Press Lock button twice during the device standby in Video mode, switch device to
Playback mode, the following screen is displayed.
1) Delete setting
Press down button to select Delete menu, then press OK button, the second
screen is displayed. Press Up or Down button to select the menu what you want
to do and then press OK button, the third screen is displayed. Press Up or Down
button to select the menu what you want to do.
If you selected “Cancel” and press “OK” button, will turn to first screen.
If you selected “OK” and press “OK” button, you selected will be delete.
Technical Help – Please contact the helpline on 0844 557 9677 26
Page 27

MAIN MENU
2) Protect setting
Press down button to select Protect menu, then press OK button, the second
screen is displayed. Press Up or Down button to select the menu what you want
to do and then press OK button, the third screen is displayed. Press Up or Down
button to select the menu what you want to do.
If you selected “Cancel” and press “OK” button, will turn to first screen.
If you selected “OK” and press “OK” button, you selected will be protect.
Playback on PC
You can view the recorded files from the microSD card on a PC (or even a
smartphone), if it accepts microSD card. Most video viewing software packages will
be able to view the files on the card.
27 Technical Help – Please contact the helpline on 0844 557 9677
Page 28

MAIN MENU
Technical Support or contact
If you have a technical problem with your device please contact the helpline on
0844 557 9677 or for more information regarding you product go to
www.binatoneglobal.com
Note: Calls cost 7p per minute plus your telephone company's access charge.
Technical Help – Please contact the helpline on 0844 557 9677 28
Page 29

Technical Specifications
Product dimension
7.1*6.2*3.1cm
Weight
53g
Display screen
2.4’’ LCD TFT screen
Lens view angle
120 degree
Option language
English only
Video file format
AVI
Image file format
JPEG
Extensible memory
Micro SD card slot
Capacity
Max. 32 GB class10 (Not included)
Microphone
Built-in
Cigarette charger
5V 1.5A
Battery
Built in rechargeable lithium battery
Supporting system
Windows 2000/XP/Vista/Window 7/ etc.
TECHNICAL SPECIFICATIONS
29 Technical Help – Please contact the helpline on 0844 557 9677
Page 30

EC DECLARATION CONFORMITY
BINATONE TELECOM PLC
1 Apsley Way London NW2 7HF,United Kingdom.
Tel: +44(0) 20 8955 2700 Fax: +44(0) 20 8344 8877
e-mail: binatoneuk@binatonetelecom.co.uk
________________________________________ .
EC Declaration of Conformity
We the manufacturer / Importer : Binatone Telecom Plc
1 Apsley Way London
NW2 7HF, United Kingdom.
Declare under our sole responsibility that the following product
Type of equipment: Dash camera
Model Name: DC200/CC200/DashCamera200 series
Country of Origin: China
Brand: Binatone
complies with the essential protection requirements of Article 3.1 (b) of R&TTE Directive 1999/5/EC and the
following standards:
EMC: EN55022:2010/AC:2011
EN55024:2010
EN61000-3-2:2006+A1:2009+A2:2009
EN61000-3-3:2013---AOC
Electrical Safety: EN 60950-1:2006 +A11:2009 +A1:2010+A12:2011+A2:2013---AOC
The product is labelled with the European Approval Marking CE as show. Any Unauthorized modification of the
product voids this Declaration.
Manufacturer / Importer
(signature of authorized person)
Henry Leung, Product Manager London,
Signature: Place & Date: 04 May, 2016
Technical Help – Please contact the helpline on 0844 557 9677 30
 Loading...