

Page 1
ENGLAND
Instruction Manual
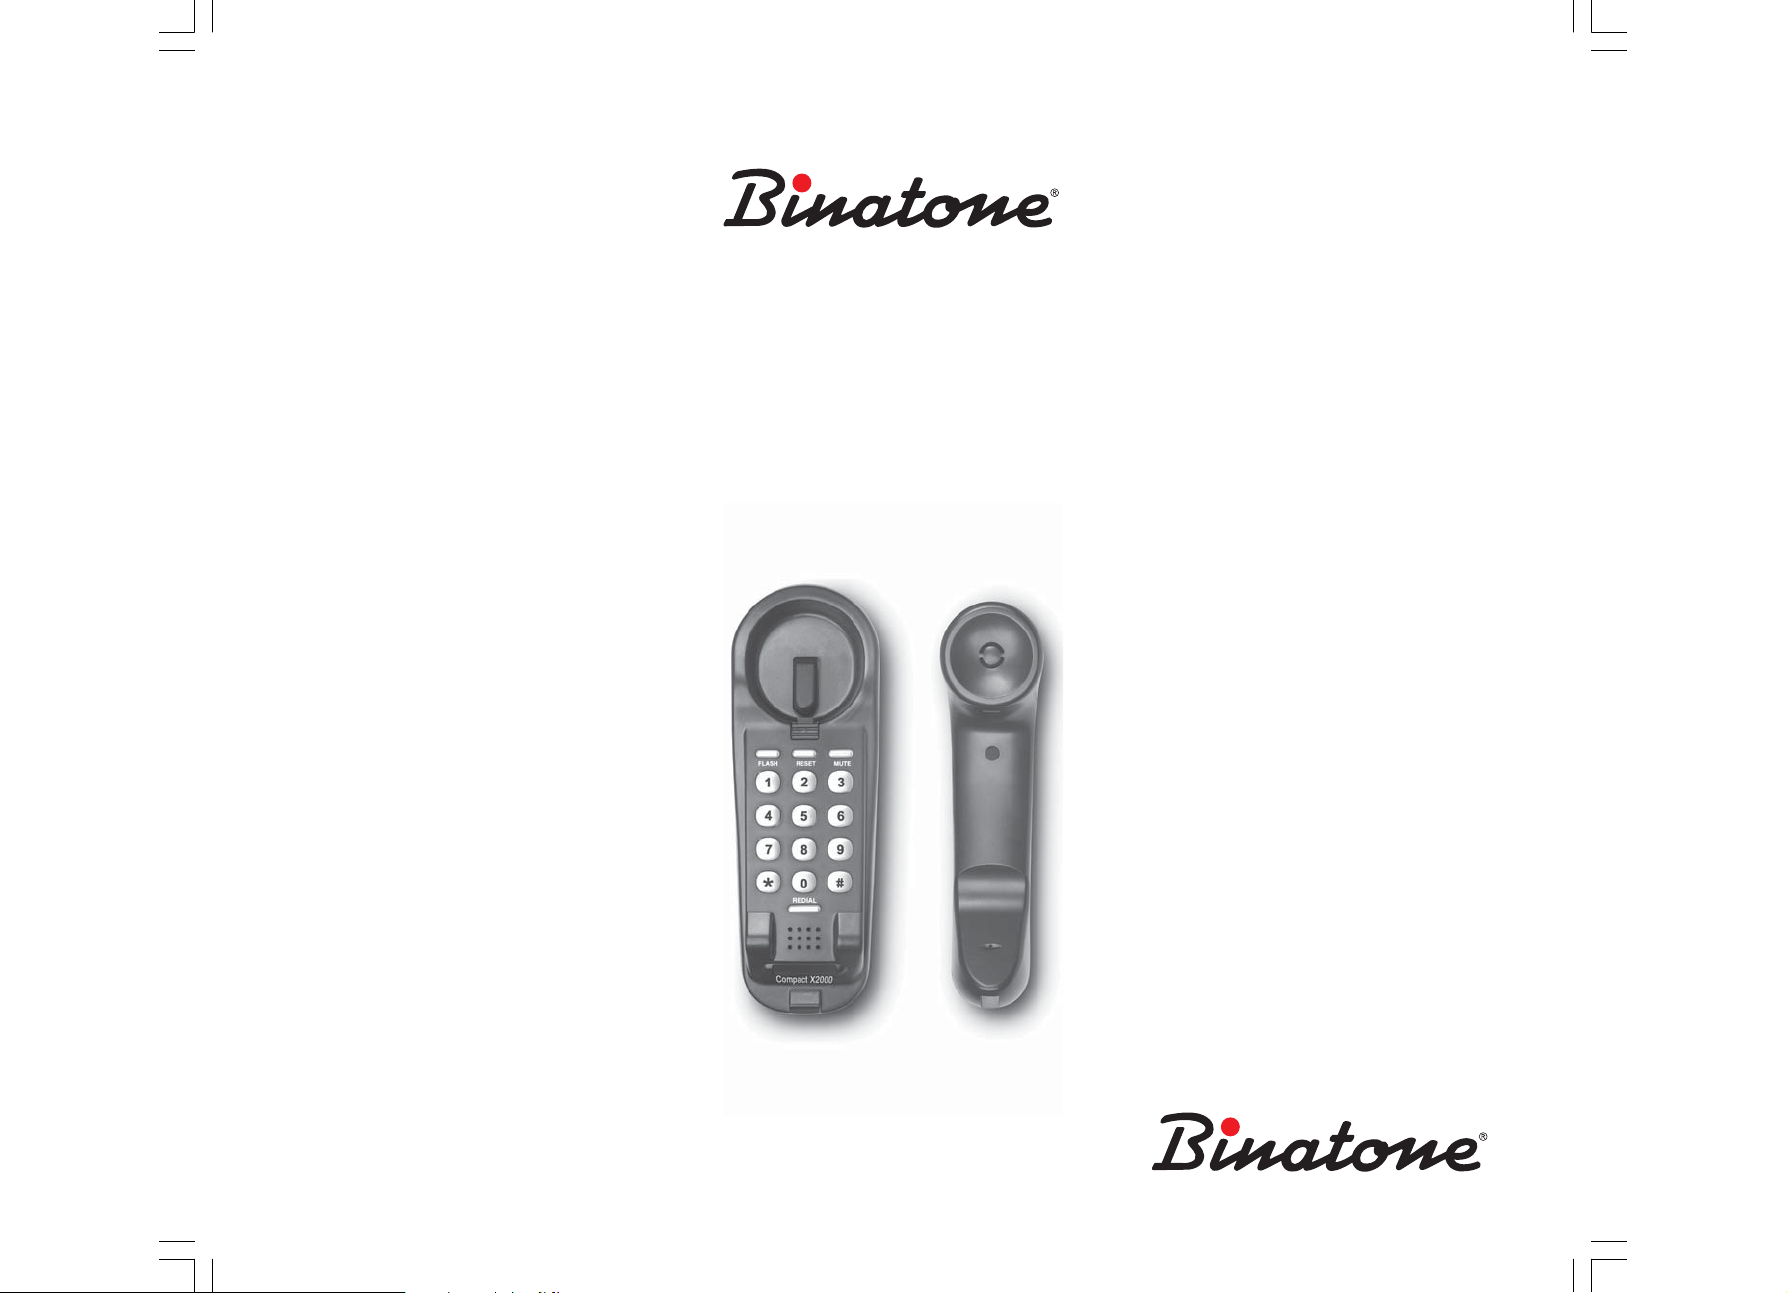
COMP ACT X2000
www.binatone.com
Corded Phone
Page 2
Compact X2000
Congratulations on your purchase of this
Binatone Phone.
All Binatone Appliances are the products
of continuous European design and develop-
ment. The products is assembled from the most
reliable components, in the most modern factories
in the Far East under constant supervision
ENGLISH
of qualified Production and Quality Control
Engineers. No compromises are made in the
product’s quality at any stage of the design or
production process.
We wish you many happy years of use
from your Binatone product.
Благодарим Вас за покупку телефона
торговой марки Binatone.
Вся техника Binatone изготовлена
в соответствии с европейскими
разработками. Все приборы собираются
из прочных и надежных деталей и блоков
на современных предприятиях
под непрерывным наблюдением
РУССКИЙ
квалифицированных специалистов в
области контроля качества продукции.
На любом этапе проектирования и
изготовления продукции огромное
внимание уделяется ее качеству.
Надеемся, что техника Binatone
прослужит Вам долгие годы.
ENGLAND
Дякуºмо, що Ви придбали телефон
торгово¿ марки Binatone.
Електропобутова техн³ка Binatone
виготовлена зг³дно з ºвропейськими
розробками. Прилади складаються з
м³цних ³ над³йних деталей та блок³в на
сучасних п³дприºмствах п³д пост³йним
наглядом квал³ф³кованих фах³вц³в з
УКРА¯НСЬКА
контролю якост³ продукц³¿. На будь-яких
етапах проектування ³ виготовлення
продукц³¿ величезна увага прид³ляºться ¿¿
якост³.
Ñïîä³âàºìîñÿ, ùî òåõí³êà Binatone
слугуватиме Вам протягом багатьох
ðîê³â.
Binatone постоянно расширяет сеть Сервисцентров. Если Ваш город не указан в
вышеприведенном списке, Вам следует связаться
с магазином и узнать, не открыт ли Сервис-центр
недавно. Полный перечень Сервис-центров
Binatone на территории СНГ и стран Балтии
приведен на сайте www.binatone.ru.
В случае, если в Вашем городе отсутствует
Сервис-центр Binatone, Вам следует обратиться в
магазин, где Вы приобрели наш товар и он
организует его ремонт или замену.
Page 3
ENGLISH..........................4
РУССКИЙ......................10
Список сервис-центров...26
УКРА¯НСЬКА..................18
Список серв³сних центр³в
Binatone íà Óêðà¿í³........28
ENGLISH
РУССКИЙ
УКРА¯НСЬКА
3
Page 4

CONTENTS
SAFETY MEASURES........................................................5
LOCATION OF CONTROLS...........................................5
INSTALLING AND CONNECTING...............................6
MAKING CALLS..............................................................7
Making calls.....................................................................7
Answering calls...............................................................7
Finishing calls...................................................................7
Turning the ringer off......................................................7
Redialing the last dialed number..................................7
Flash function usage.......................................................7
Microphone muting........................................................7
Dialing mode....................................................................8
FEATURES...........................................................................8
HELPFUL HINTS (TROUBLESHOOTING)......................8
AFTER-SALES SERVICE AND WARRANTY..................9
4
Page 5
Corded Phone
Compact X2000
Please read the safety instructions care-
fully before using this appliance. Please retain
the instructions for future reference
SAFETY MEASURES
When using this unit, the following safety precau-
tions should always be followed:
1. Do not clean the unit using chemical solvents, abrasive materials and aerosol cleaners – as they may
ooze into the telephone and become a cause of
damages that are not covered by the warranty. If
necessary, use a damp cloth for cleaning.
2. Do not expose the phone to high temperatures,
humidity and direct sunlight.
3. We have done everything to make this phone meet
the requirements of the quality standards. However, if some malfunction occurs, please do not try
to repair it by yourself.
4. Do not install this unit near water, for example,
near a bathtub, washbowl, kitchen sink, or other
sources of high humidity. Electrical equipment may
be a cause of serious injuries if You use it whilst
being wet or standing in water.
5. If you have dropped the base unit into water, do
not touch it until after You unplug the AC adapter
from the AC outlet; then take it out by the disconnected cords.
6. When mounting the phone on the wall, make sure
that there is no concealed wiring in the wall.
ENGLISH
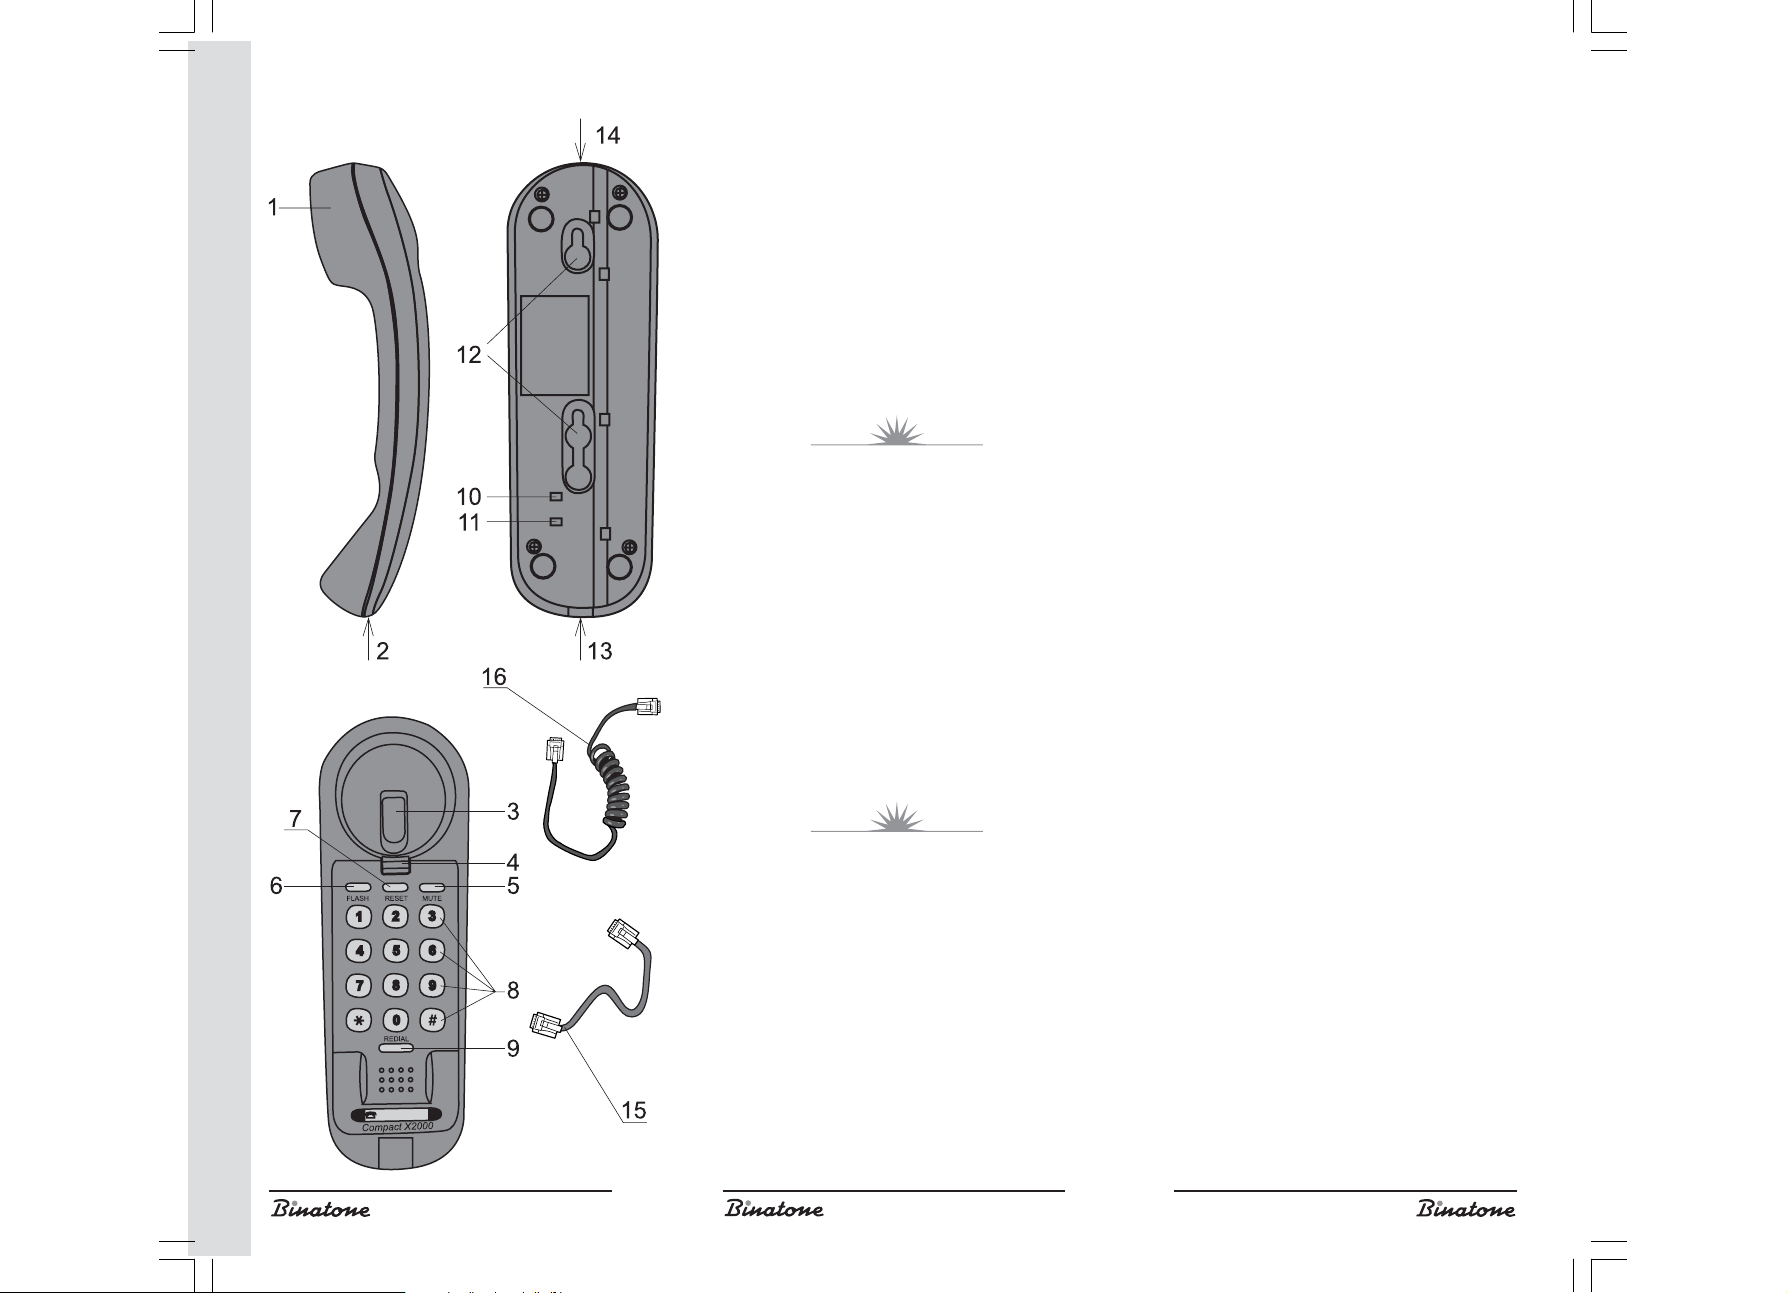
LOCATION
OF CONTROLS
1. The telephone receiver.
2. The receiver socket for wire plugging – is
used for plugging the receiver to the main unit.
3. The hook switch – is used for disconnecting the
phone from a telephone line.
4. The telephone receiver clamp – is used for
telephone receiver fixing, if Your phone is fastened to the wall.
5. The Mute button – is used for microphone disconnection during a phone call.
6. The Flash button – is used if Your phone is connected to an automatic telephone exchange that
requires Flash function.
7. The Reset button – is used for call connection
interruption.
5
Page 6
8. The dialing buttons.
9. The Redial button – is used for redialing.
10.The P-T switch – is used for the dial mode switching.
11.The HI/LOW switch – is used for the call volume adjustment.
12.The indexing holes – are used in order to fix
the phone to the wall.
13.The socket for plugging the wire from the
telephone receiver – is used to connect the tele-
phone receiver to the main unit.
14.The socket for the telephone line – is used
for connecting the phone to a telephone line.
15.The telephone wire – is used for connecting
the phone to a telephone line.
16.The telephone receiver wire – is used to con-
nect the telephone receiver to the main unit.
In your package
1. The main unit
2. The telephone receiver
3. The telephone line wire
4. The telephone receiver wire
INSTALLING AND
CONNECTING
1. Plug the telephone receiver wire [16] into the telephone receiver socket [2], plug the other end of
the wire [16] into the telephone set socket [13].
2. Plug the telephone line wire [15] into the socket
for the telephone line [14] located on rear side of
the telephone set, plug the other end of the wire
[15] to the telephone line socket.
3. Your phone can be placed on a table or wallmounted. If You want to place it on a table or on
any other horizontal surface, then simply place
the phone on that surface. If You want to mount
the phone on a wall or on any other vertical surface, then You can it using the indexing holes [12].
Wall mounting
You can mount Your phone on a wall using two
screws (not included).
Twist two screws in the wall, measure 8.5 cm be-
tween them along a vertical line.
Do not twist them completely into the wall, as there
has to be some distance between the wall and the
screw-heads to accommodate the phone.
Before installing the phone, connect the telephone
line wire and the telephone receiver wire to it.
Mount the phone on the screws. The underside of
6
Page 7

the telephone set has indexing holes [12] designated for fixing the phone on a wall. Then move
the telephone set down a little, in order to fix it.
Note: To settle the telephone receiver on
the set fastened to the wall, You
should rearrange the telephone
receiver end [4] in the proper
position.
MAKING
CALLS
Making calls
1. Take the telephone receiver [1].
2. Dial a phone number.
Answering calls
1. Take the telephone receiver [1], after You hear
the phone ringing.
2. When the call is over, hang the telephone receiver
up [1].
Finishing calls
In order to finish a call, simply hang the telephone
receiver up [1] or press the hook switch [3]. If You
want to make a call immediately after finishing the
previous call, then You can use the RESET [7] button.
Turning the ringer off
You can adjust the ringing volume for incoming
calls. Simply move HI/LOW switch [11] in required
position: HI – louder, LOW – quieter.
Redialing the last dialed number
1. Take the telephone receiver [1].
2. Press the REDIAL button [9].
3. Your phone will redial the phone number that was
last dialed.
Flash function usage
Press Flash button [6] in order:
To establish a conference communication, to use
the call retention and other services provided by Your
telecommunication carrier.
Microphone muting
If You do not want the person You are currently
calling to hear Your conversations with other people,
then press and hold the Mute button [5]. To return to
the normal call mode, release the Mute button [5].
ENGLISH
7
Page 8
Dialing mode
You can dial in pulse or tone mode. To select the
required mode simply move the P-T switch [10] in the
corresponding position: T – tone dialing, P – pulse
dialing.
Note: If You had selected the pulse dialing,
but You need temporarily to change
it to the tone dialing, then simply
press * [8]. After the call
disconnection Your phone will switch
to the pulse dialing mode once again.
FEATURES
1. Microphone disconnection
2. Flash function
3. Redialing of the last phone number
4. The ability to switch between tone and pulse dialing
5. Ringing volume adjustment
6. On-the-wall mounting (if necessary)
HELPFUL HINTS
(TROUBLESHOOTING)
Problem Remedy
Dialing is not
working
No dial tone
The phone is not
ringing
- check that the pulse/tone
switch is in the proper
position.
- disconnect the phone
from a telephone line,
wait 30 seconds and reconnect it to the line once
again.
- check whether the telephone line wire is connected to a telephone
line.
- check whether the hook
switch is outside the telephone set.
- it is possible that too
many parallel phones
are connected to a
single telephone line.
8
Page 9

AFTER-SALES
SERVICE AND
WARRANTY
If Your unit does not work or works improperly,
consult the authorized service center.
The warranty is void in the following cases
The above safety precautions and operation in-
struction requirements were not observed.
Improper care (liquids, dust, insects and other for-
eign items or substances getting inside the phone).
Application of excess physical force while oper-
ating the phone (mechanical damages resulting
from incorrect operation, shock or dropping).
Unauthorized repair or parts replacement car-
ried out by a non-authorized person or service
center.
Accidents, such as lightning strike, flood, fire and
other acts of God.
ENGLISH
Features may be changed by Binatone without any
notice.
Warranty details are set out in the warranty card
provided with the product.
Exploitation period: 3 years after the day of
purchase.
Manufacture: Binatone Industries Ltd, Great Brit-
ain, Wembley, 1 Beresford Avenue, Vitabiotics House
9
Page 10

СОДЕРЖАНИЕ:
МЕРЫ БЕЗОПАСНОСТИ..........................................11
ОПИСАНИЕ ДЕТАЛЕЙ ТЕЛЕФОНА.....................11
УСТАНОВКА И ПОДКЛЮЧЕНИЕ.........................12
ТЕЛЕФОННЫЕ ПЕРЕГОВОРЫ.................................13
Вызов..............................................................................13
Ответ на вызов............................................................13
Окончание вызова.....................................................13
Выбор громкости звонка...........................................14
Повторный набор номера........................................14
Использование функции Flash................................14
Отключение микрофона...........................................14
Режим набора номера...............................................14
ОСНОВНЫЕ ХАРАКТЕРИСТИКИ............................14
ПОЛЕЗНЫЕ СОВЕТЫ
(УСТРАНЕНИЕ НЕИСПРАВНОСТЕЙ).....................15
ПОСЛЕПРОДАЖНОЕ ОБСЛУЖИВАНИЕ..........15
10
Page 11

Проводной телефон
Compact X2000
Внимательно прочтите данную инструкцию
перед первым использованием, чтобы
ознакомиться с работой нового прибора.
Пожалуйста, сохраните инструкцию для
дальнейших справок.
ÌÅÐÛ
БЕЗОПАСНОСТИ
При работе с телефонным аппаратом
необходимо соблюдать следующие
меры предосторожности:
Не следует чистить аппарат с помощью
химических растворителей, абразивных
материалов, распылителей – они могут
проникнуть внутрь устройства и стать причиной
повреждений, на которые не распространяется
действие гарантии. При необходимости
протрите устройство влажной салфеткой.
Не подвергайте телефон воздействию высоких
температур, влажности и сильного солнечного
излучения.
Были предприняты все необходимые меры для
обеспечения соответствия аппарата
стандартам качества. Тем не менее, при
возникновении повреждений не пытайтесь
производить ремонт самостоятельно.
Не следует устанавливать телефон вблизи
раковин, ванной комнаты, душа или других
источников повышенной влажности.
Электрическое оборудование может стать
причиной серьезных травм, если Вы пользуетесь
им, будучи мокрым или стоя в воде.
Если базовый блок упал в воду, не берите его,
пока не отключите от телефонной линии; затем
вытащите базовый блок за отсоединенные
провода.
При установке на стену убедитесь, что в стене
не проходят электрические провода.
РУССКИЙ
ОПИСАНИЕ
ДЕТАЛЕЙ ТЕЛЕФОНА
1. Телефонная трубка.
2. Разъем для провода на телефонной
трубке – используется для подключения
телефонной трубки к базовому блоку.
3. Рычажный переключатель – используется
для прекращения соединения телефона с
телефонной линией.
11
Page 12

4. Фиксатор телефонной трубки –
используется для фиксации телефонной
трубки, если Ваш телефон висит на стене.
5. Кнопка Mute – используется для отключения
микрофона во время телефонного разговора.
6. Кнопка Flash - используется, если Ваш
телефон подключен к АТС, где требуется
функция Flash.
7. Кнопка Reset – используется для разрыва
соединения.
8. Кнопки для набора номера.
9. Кнопка Redial – используется для повторного
набора номера.
10.Переключатель P-T – используется для
переключения режима набора номера.
11.Переключатель HI/LOW – используется для
выбора громкости звонка.
12.Установочные отверстия – используются для
крепления телефона на стене.
13.Разъем для провода телефонной трубки
– используется для подключения телефонной
трубки к базовому блоку.
14.Разъем для телефонной линии –
используется для подключения телефонного
провода.
15.Телефонный провод – используется для
подключения телефона к телефонной линии.
16.Провод телефонной трубки – используется
для подключения телефонной трубки к
базовому блоку.
Комплектация
1. Базовый блок
2. Телефонная трубка
3. Шнур телефонной линии
4. Шнур телефонной трубки
УСТАНОВКА И
ПОДКЛЮЧЕНИЕ
1. Вставьте один конец провода для телефонной
трубки [16] в разъем на телефонной трубке
[2], вставьте другой конец провода для
телефонной трубки [16] в разъем на
телефонном аппарате [13].
2. Подключите телефонный провод [15] к разъему
для телефонной линии [14] на задней части
телефонного аппарата, подключите другой
конец телефонного провода [15] к розетке
телефонной линии.
3. Ваш телефон может быть установлен на столе
или на стене. Если Вы хотите установить
телефон на столе или любой другой
горизонтальной поверхности, просто поставьте
12
Page 13

Ваш телефон на эту поверхность. Если Вы
хотите установить телефон на стене или на
любой другой вертикальной поверхности, то для
этого на аппарате имеются установочные
отверстия [12], с помощью которых Вы можете
установить ваш телефон на вертикальной
поверхности.
Настенная установка
Ваш телефон можно установить на стене с
помощью двух шурупов (в комплекте не
прилагаются).
Вкрутите в стену два шурупа по вертикальной
линии, на расстоянии 8,5 см друг от друга.
Не закручивайте их до конца. Шляпки шурупов
должны находиться на некотором расстоянии
от стены, чтобы можно было закрепить телефон.
Перед тем как установить телефон, подключите
к нему телефонный провод и провод от
телефонной трубки.
Наденьте Ваш телефон на вкрученные шурупы.
На нижней стороне базы есть установочные
отверстия [12], которые предназначены для
фиксирования Вашего телефона на стене.
После чего, сдвиньте Ваш телефон немного вниз,
чтобы зафиксировать его.
Замечание: Чтобы зафиксировать
телефонную трубку на базе,
которая висит на стене,
необходимо переставить
фиксатор телефонной трубки
[4] в соответствующее
положение.
РУССКИЙ
ТЕЛЕФОННЫЕ
ПЕРЕГОВОРЫ
Вызов
1. Поднимите телефонную трубку [1].
2. Наберите телефонный номер.
Ответ на вызов
1. Поднимите телефонную трубку [1], когда телефон
зазвонит.
2. Когда разговор закончен, положите телефонную
трубку [1] на место.
Окончание вызова
Чтобы закончить вызов, просто положите
телефонную трубку [1] на место или нажмите на
рычажный переключатель [3]. Если Вы хотите
позвонить сразу после окончания предыдущего
разговора, то Вы можете воспользоваться кнопкой
RESET [7].
13
Page 14

Выбор громкости звонка
Вы можете регулировать громкость звонка при
входящем вызове. Для этого передвиньте
переключатель HI/LOW [11] в нужное Вам
положение. HI – громче, LOW – тише.
Повторный набор номера
1. Поднимите телефонную трубку [1].
2. Нажмите кнопку Redial [9].
3. Ваш телефонный аппарат наберет номер,
который Вы набирали последним.
Использование функции Flash
Нажмите кнопку Flash [6] чтобы:
Устанавливать конференц-связь, использовать
удержание вызова и другие услуги,
предоставляемые вашим оператором телефонной
связи или АТС.
Отключение микрофона
Если Вы не хотите, чтобы Ваш собеседник
слышал, как Вы разговариваете с другими людьми,
находящимися недалеко от Вас, нажмите и
удерживайте кнопку Mute [5]. Чтобы вернуться к
нормальному разговору, отпустите кнопку Mute
[5].
Режим набора номера
Вы можете набирать номер в импульсном или
тоновом режиме. Чтобы выбрать нужный Вам
режим, просто передвиньте переключатель P-T [10]
в соответствующее положение. T – тоновый режим,
P – импульсный режим.
Замечание: Если вы установили
импульсный режим набора
номера, но Вам временно
нужно перейти в тоновый
режим, то просто нажмите *
[8]. При разрыве соединения
Ваш телефон опять перейдет
на импульсный режим набора
номера.
ОСНОВНЫЕ
ХАРАКТЕРИСТИКИ
1. Отключение микрофона
2. Функция Flash
3. Повтор последнего набранного номера
4. Возможность набора номера в тоновом или
импульсном режиме
14
Page 15

5. Выбор громкости звонка
6. Возможность установки на стене
ПОЛЕЗНЫЕ СОВЕТЫ
(УСТРАНЕНИЕ
НЕИСПРАВНОСТЕЙ)
Неисправность
Не набирается
номер
Нет тонального
сигнала
Телефон не
звонит
Устранение
неисправности
- удостоверьтесь, что
переключатель pulse/
tone установлен в
правильное положение.
- отключите телефон от
линии, подождите 30
секунд и снова
подключите его к линии.
- удостоверьтесь, что
телефонный шнур
подключен к
телефонной линии.
- удостоверьтесь, что
рычаг телефонной
трубки выскочил наружу.
- на одной линии может
быть подключено
слишком много
параллельных
телефонов.
- проверьте положение
переключателя Ringer
On/Off
РУССКИЙ
ПОСЛЕПРОДАЖНОЕ
ОБСЛУЖИВАНИЕ
Если Ваш прибор не работает или работает
плохо, обратитесь в уполномоченный сервисный
центр за консультацией или ремонтом.
Гарантия не распространяется в
следующих случаях:
При несоблюдении описанных выше мер
безопасности и инструкции по эксплуатации.
При ненадлежащем уходе (проникновении
жидкости, пыли, насекомых и др. посторонних
предметов и веществ внутрь прибора).
15
Page 16

При применении излишних усилий во время
эксплуатации прибора или повреждениях
другого рода (механических повреждений в
результате неправильной эксплуатации, удара
или падения прибора).
При несанкционированном ремонте или
замене частей прибора, осуществленных не
уполномоченным на то лицом или сервисным
центром
При несчастных случаях, как то, удар молнии,
затопление, пожар и иных форс мажорных
обстоятельств.
16
Page 17

Характеристики могут быть изменены
компанией Binatone без какого-либо уведомления.
Гарантийный срок и другие детали указаны в
гарантийном талоне, который прилагается к
прибору.
Срок службы: 3 года со дня покупки.
Изготовитель: Binatone Industries Ltd, Great
Britain, Wembley, 1 Beresford Avenue, Vitabiotics
House (Бинатон Индастриз Лтд, Великобритания)
Сделано в КНР для Binatone Industries Ltd,
Великобритания
РУССКИЙ
17
Page 18

Ç̲ÑÒ
ПРАВИЛА БЕЗПЕКИ..................................................19
ОПИС ДЕТАЛЕЙ ТЕЛЕФОНУ.................................19
УСТАНОВКА ² ВМИКАННЯ......................................20
ТЕЛЕФОНН² ПЕРЕГОВОРИ........................................21
Виклик.............................................................................21
В³дпов³дь на виклик......................................................21
Зак³нчення виклику.....................................................21
Виб³р гучност³ дзв³нка.................................................21
Повторний наб³р номера...........................................22
Використання функц³¿ Flash.......................................22
Вимикання м³крофона...............................................22
Режим набору номера................................................22
ОСНОВН² ХАРАКТЕРИСТИКИ................................22
КОРИСН² ПОРАДИ
(УСУНЕННЯ НЕСПРАВНОСТЕЙ).............................23
П²СЛЯПРОДАЖЕВЕ ОБСЛУГОВУВАННЯ.............23
18
Page 19

Пров³дний телефон
Compact X2000
Уважно прочитайте дану ³нструкц³ю перед
першим використанням, щоб ознайомитися з
роботою нового приладу. Будь ласка, збереж³ть
³нструкц³ю для подальших дов³док.
ПРАВИЛА БЕЗПЕКИ
При робот³ з телефонним апаратом необх³дно
дотримувати таких правил безпеки:
Не сл³д чистити апарат за допомогою х³м³чних
розчинник³в, абразивних матер³ал³в,
розпилювач³в — вони можуть потрапити
всередину пристрою ³ стати причиною
ушкоджень, на як³ не поширюºться д³я гарант³¿.
За необх³дност³ протр³ть пристр³й вологою
серветкою.
Не п³ддавайте телефон впливов³ високих
температур, вологост³ та сильного сонячного
випром³нювання.
Було проведено вс³ необх³дн³ заходи для
забезпечення в³дпов³дност³ апарата
стандартам якост³. Проте, при виникненн³
ушкоджень не намагайтеся робити ремонт
самост³йно.
Не сл³д установлювати телефон поблизу
раковин, ванно¿ к³мнати, душу або ³нших
джерел п³двищено¿ вологост³. Електричне
устаткування може стати причиною серйозних
травм, якщо Ви користуºтеся ним, змокнувши
або стоячи у вод³.
Якщо базовий блок упав у воду, не виймайте
його, поки не вимкнете вилку мережного
адаптера з розетки; пот³м витягн³ть базовий
блок за в³д’ºднан³ проводи.
При установц³ на ст³ну переконайтеся, що в
ст³н³ не проходять електричн³ проводи.
УКРА¯НСЬКА
ОПИС ДЕТАЛЕЙ
ТЕЛЕФОНУ
1. Слухавка.
2. Розн³мання для проводу на слухавц³ –
використовуºться для п³дключення слухавки до
базового блоку.
3. Важ³льний перемикач – використовуºться
для припинення з’ºднання телефону з
телефонною л³н³ºю.
4. Ф³ксатор слухавки – використовуºться для
ф³ксац³¿ слухавки, якщо Ваш телефон висить на
ñò³í³.
19
Page 20

5. Кнопка Mute – використовуºться для
вимикання м³крофона п³д час телефонно¿
розмови.
6. Кнопка Flash - використовуºться, якщо Ваш
телефон п³дключений до АТС, де потр³бна
функц³я Flash.
7. Кнопка Reset – використовуºться для розриву
з’ºднання.
8. Кнопки для набору номера.
9. Кнопка Redial – використовуºться для
повторного набору номера.
10.Перемикач P-T – використовуºться для
перемикання режиму набору номера.
11.Перемикач HI/LOW – використовуºться для
вибору гучност³ дзв³нка.
12.Встановлювальн³ отвори –
використовуються для кр³плення телефону на
ñò³í³.
13.Розн³мання для проводу слухавки –
використовуºться для вмикання слухавки до
базового блоку.
14.Розн³мання для телефонно¿ л³н³¿ –
використовуºться для вмикання телефонного
проводу.
15.Телефонний пров³д – використовуºться для
п³дключення телефону до телефонно¿ л³н³¿.
16.Пров³д слухавки – використовуºться для
п³дключення слухавки до базового блоку.
Комплектац³я
1. Базовий блок
2. Слухавка
3. Шнур телефонно¿ л³н³¿
4. Шнур слухавки
УСТАНОВКА
² ВМИКАННЯ
1. Вставте один к³нець проводу для слухавки [16]
у розн³мання на слухавц³ [2], вставте ³нший
к³нець проводу для слухавки [16] у розн³мання
на телефонному апарат³ [13].
2. Ув³мкн³ть телефонний пров³д [15] äî
розн³мання для телефонно¿ л³н³¿ [14] íà çàäí³é
частин³ телефонного апарата, ув³мкн³ть ³нший
к³нець телефонного проводу [15] до розетки
телефонно¿ л³н³¿.
3. Ваш телефон може бути встановлений на стол³
або на ст³н³. Якщо Ви хочете встановити
телефон на стол³ або будь-який ³нш³й
горизонтальн³й поверхн³, просто поставте Ваш
телефон на цю поверхню. Якщо Ви хочете
встановити телефон на ст³н³ або на будь-який
20
Page 21

³нш³й вертикальн³й поверхн³, то для цього на
апарат³ º встановлювальн³ отвори [12], çà
допомогою яких Ви можете встановити Ваш
телефон на вертикальн³й поверхн³.
Наст³нна установка
Ваш телефон можна встановити на ст³н³ за
допомогою двох шуруп³в (до комплекту не
входять).
Вкрут³ть у ст³ну два шурупи по вертикальн³й л³н³¿,
на в³дстан³ 8,5 см один в³д одного.
Не закручуйте ¿х до к³нця. Шляпки шуруп³в
повинн³ знаходитися на деяк³й в³дстан³ в³д ст³ни,
щоб можна було закр³пити телефон.
Перед тим як установити телефон, п³дключ³ть
до нього телефонний пров³д ³ пров³д в³д слухавки.
Надягн³ть Ваш телефон на вкручен³ шурупи. На
нижн³й сторон³ бази º встановлювальн³ отвори [12],
призначен³ для ф³ксування вашого телефону на
ст³н³. П³сля чого зсуньте Ваш телефон трохи вниз,
щоб заф³ксувати його.
Зауваження: Щоб заф³ксувати
слухавку на баз³, яка висить на
ст³н³, необх³дно переставити
ф³ксатор слухавки [4] ó
в³дпов³дне положення.
ТЕЛЕФОНН²
ПЕРЕГОВОРИ
Виклик
1. П³дн³м³ть слухавку [1].
2. Набер³ть телефонний номер.
В³дпов³дь на виклик
1. П³дн³м³ть слухавку [1], коли телефон
задзвонить.
2. Коли розмова зак³нчена, поклад³ть слухавку [1]
íà ì³ñöå.
Зак³нчення виклику
Щоб зак³нчити виклик, просто поклад³ть
слухавку [1] на м³сце або натисн³ть на важ³льний
перемикач [3]. Якщо Ви хочете зателефонувати
в³дразу п³сля зак³нчення попередньо¿ розмови, то
можете скористатися кнопкою RESET [7].
Виб³р гучност³ дзв³нка
Ви можете регулювати гучн³сть дзв³нка при
вх³дному виклику. Для цього поставте перемикач
HI/LOW [11] у потр³бне Вам положення. HI –
голосн³ше, LOW – тих³ше.
21
УКРА¯НСЬКА
Page 22

Повторний наб³р номера
1. П³дн³м³ть слухавку [1].
2. Натисн³ть кнопку REDIAL [9].
3. Ваш телефонний апарат набере номер, який
Ви набирали останн³м.
Використання функц³¿ Flash
Натисн³ть кнопку Flash [6], ùîá:
Установлювати конференц-зв’язок,
використовувати утримання виклику й ³нш³ послуги,
надан³ вашим оператором телефонного зв’язку
або АТС.
Вимикання м³крофона
Якщо Ви не хочете, щоб Ваш сп³врозмовник чув,
як Ви розмовляºте з ³ншими людьми, що знаходяться
недалеко в³д Вас, натисн³ть ³ утримуйте кнопку Mute
[5]. Щоб повернутися до нормально¿ розмови,
в³дпуст³ть кнопку Mute [5].
Режим набору номера
Ви можете набирати номер в ³мпульсному або
тоновому режим³. Щоб вибрати потр³бний Вам
режим, просто поставте перемикач P-T [10] ó
в³дпов³дне положення. T – тоновий режим, P –
³мпульсний режим.
Зауваження: Якщо Ви встановили
³мпульсний режим набору
номера, але Вам тимчасово
потр³бно перейти в тоновий
режим, то просто натисн³ть
* [8]. При розрив³ з’ºднання ваш
телефон знову перейде в
³мпульсний режим набору
номера.
ОСНОВН²
ХАРАКТЕРИСТИКИ
1. Вимикання м³крофона
2. Функц³я Flash
3. Повтор останнього набраного номера
4. Можлив³сть набору номера в тоновому або
³мпульсному режим³
5. Виб³р гучност³ дзв³нка
6. Можлив³сть установки на ст³н³
22
Page 23

КОРИСН² ПОРАДИ
(УСУНЕННЯ
НЕСПРАВНОСТЕЙ)
Несправн³сть
Не набираºться
номер
Немаº тонального
сигналу
Телефон не
дзвонить
Усунення
несправност³
- упевн³ться, що
перемикач pulse/
tone встановлений у
правильне
положення.
- вимкн³ть телефон з
л³н³¿, почекайте 30
секунд ³ знову
вв³мкн³ть його до
л³н³¿.
- упевн³ться, що
телефонний шнур
вв³мкнений до
телефонно¿ л³н³¿.
- упевн³ться, що
важ³ль слухавки
вискочив назовн³.
- на одн³й л³н³¿ може
бути вв³мкнено
занадто багато
паралельних
телефон³в.
УКРА¯НСЬКА
П²СЛЯПРОДАЖЕВЕ
ОБСЛУГОВУВАННЯ
Якщо Ваш прилад не працюº або працюº
погано, зверн³ться до оф³ц³йного серв³сного центру
за консультац³ºю або ремонтом.
Гарант³я не надаºться в таких
випадках:
При недотриманн³ описаних вище правил
безпеки й ³нструкц³¿ з експлуатац³¿.
При неналежному догляд³ (попаданн³ р³дини,
пилу, комах та ³нших сторонн³х предмет³в ³
речовин усередину приладу).
При застосуванн³ зайвих зусиль п³д час
23
Page 24

експлуатац³¿ приладу або ушкодженнях ³ншого
роду (механ³чних ушкодженнях у результат³
неправильно¿ експлуатац³¿, удару або пад³ння
приладу).
При несанкц³онованому ремонт³ або зам³н³
частин приладу, зд³йснених не уповноваженою
на те особою або серв³сним центром.
При нещасних випадках, як, наприклад, удар
блискавки, затоплення, пожежа й ³нш³ форс
мажорн³ обставини.
24
Page 25

Характеристики можуть бути зм³нен³ компан³ºю
Binatone без будь-якого пов³домлення.
Гарант³йний терм³н ³ ³нш³ детал³ зазначен³ в
гарант³йному талон³, що додаºться до приладу.
Терм³н служби: 3 роки в³д дня покупки.
Виробник: Binatone Industries Ltd, Great Brit-
ain, Vitabiotics House, 1 Apsley Way, Staples Corner, London, NW2 7HF, UK. (Б³натон ²ндастр³з Лтд,
Великобритан³я)
Зроблено в КНР для Binatone Industries Ltd,
Великобритан³я
25
УКРА¯НСЬКА
Page 26

СПИСОК СЕРВИСЦЕНТРОВ BINATONE
РОССИЯ
АРХАНГЕЛЬСК “Ульянов”
163061, ул. Суворова, 12
тел.: (8182)776912
БЕЛГОРОД “Выбор”
308600, Проспект Ленина, 32
тел.: (0722)326592
ВЕЛИКИЙ НОВГОРОД “ТКТ”
173025, ул. Кочетова, 23а
тел.: (8162)611200
ВЛАДИВОСТОК “Спектр”
690106, Партизанский проспект, 2
тел.: (4232) 426317
ВОЛГОГРАД “Татал”
400057, ул. Армавирская, д.2
тел.: (8442) 459786
ВОРОНЕЖ “Беркут”
394006, ул. Ворошилова, 2
тел.: (0732)701670
ЕКАТЕРИНБУРГ “Сентри”
620098, пр-т Космонавтов, 45; тел.: (3432)
358601;
620042, ул. Орджоникидзе,д 26; тел.: (3432)
320571;
620027, ул. Лермонтова,д 15; тел.: (3432)
537355;
620137, ул. Академическая,д 30; тел.: (3432)
741455.
ИРКУТСК “Евросервис”
664047, ул. Байкальская, 198а
тел.: (3952) 541155
КАЛИНИНГРАД “Вестер Сервис”
236040, ул. Горького, 50
тел.: (0112) 273432
КЕМЕРОВО “Квэл”
650004, ул. Соборная, 8
тел: (3842) 358319
КИРОВ “Вятинсервис”
610005, Октябрьский проспект, 89
тел.: (8332) 363670
КОМСОМОЛЬСК НА АМУРЕ “ИнсайтСервис”
681016, óë. Ìèðà, 9
òåë.: (42172) 91558
КОСТРОМА “Аксон Сервис”
156603, ïð-ò Ìèðà, 64
26
Page 27

òåë.: (0942) 559639
КОСТРОМА “Гепард Сервис”
156013, ул. Молочная гора, 3 (Рыбные ряды)
тел.: (0942) 312501
КРАСНОТУРЬИНСК, Свердловская
область «Интерсервис Седельников»
624460 ул. 8-марта, д10, кв. 15
тел. (34314) 27039
КУРГАН “Товарищество
Предпринимателей”
640020, ул. Красина, 41
тел.: (3522) 457683
ЛИПЕЦК “СПС-Липецк”
398600, Петровский пр-д, 1
тел.: (0742) 777456
МАГАДАН “Центрвидеосервис”
685000, ул. Карла- Маркса, д. 33/15
тел.: (41322) 23322
МОСКВА “Интеруорлд Продактс”
123007, 4-ая Магистральная, д. 5
тел.: (095) 9379790
МОСКВА “ИВА-сервис”
ул. Ляпидевского д. 14.
тел.: (095) 5174978; (095) 4522795
МУРМАНСК “СиПиЭс”
183038, ул. Софьи Перовской, 37
тел.: (8152) 455031, (8152) 458701
НИЖНИЙ ТАГИЛ “Ока”
622016, ул. Октябрьской революции, 66
тел.: (3435) 410008
НОВОСИБИРСК “Сибирский сервис”
630054, ул. Плахотного, 39
тел.: (3832) 924712
НОРИЛЬСК «Баканов»
663300 ул. Комсомольская д. 11, кв.53
тел. (3919) 371002
ПСКОВ “Фронда”
180016, ул. Киселева, 16, оф.21, 2 этаж
тел.: (8112) 443198
С.-ПЕТЕРБУРГ “Интеруорлд Продактс”
196084, Московский пр-т, 79А
тел.: (812) 1186255
САМАРА “Сервис-Центр”
443096, ул. Мичурина, 15, оф.207 ТТЦ
“Аквариум”
тел.: (8462) 349428
САРАТОВ “Рим-2”
410064, Волочаевский пр-д, 3
тел.: (8452) 486172
РУССКИЙ
27
Page 28

СМОЛЕНСК “Гарант”
214000, ул. Ленина, д. 20/6
тел.: (0812) 618800
СОЛИКАМСК “Видео Сервис” (“Малов”)
618553, Пермская обл., ул. Северная, 70
тел.: (34253) 48785
СТАВРОПОЛЬ “Телемир Сервис”
355038, ул. Ленина, 468
тел.: (8652) 944213
ТЮМЕНЬ “Аверс Сервис”
625007, ул. Мельникайте, 131а
тел.: (3452) 391218
УССУРИЙСК “Вега-Гарант”
692519, Приморский край, ул. Советская, 29
òåë.: (42341) 21035
УФА, БАШКОРТОСТАН “Техно”
450000, ул. Чернышевского, 88
тел.: (3472)229918
ХАБАРОВСК “Народная Компания”
680007, ул. Волочаевская,8
тел.: (4212) 233333
КАЗАХСТАН
АЛМА-АТА “Планета сервис центр”
480002 Жибек Жолы, 32
тел. +7-3272-732999
СПИСОК СЕРВIСНИХ
ЦЕНТРIВ BINATONE
НА УКРА¯НI
Б³ла Церква “В²ДЕО-СЕРВ²С”
09100, провулок Пролетарський, 8
тел. (04463)51379
В³нниця “СКОРМАГ-СЕРВ²С”
21030, пр-т Юност³, 16
тел. (0432) 46-43-93, (0432) 46-82-13
Дн³пропетровськ “MТI”
49000, âóë.Ëåí³íà, 21à
òåë. (056) 370-13-60, (056) 778-08-21
Дн³пропетровськ “СЕРВ²СЦЕНТР”
49070, Червона площа, 3, оф³с 10
тел. (056) 370-78-30, (056) 744-67-66, (056) 74456-77
Донецьк ТОВ “ВЕСИ-СЕРВIС”
83062, Лен³нський пр-т, 4а
тел. (062) 345-61-90, (062) 345-61-91, (062) 34561-92
Житомир “ВИБ²Р”
10014, вул. Перемоги, 32
28
Page 29

òåë. (0412) 41-88-26
Запор³жжя “ТТП-94”
69000, вул. Яценко, 1
тел. (061) 224-70-72, 224-70-73, 224-70-74
36022, вул. Пролетарська 22
тел. (0532) 18-68-61, (0532) 57-21-64, (0532)
57-21-66
гâíå “Ò²ÊÎ-ÑÅвє
30018, вул. В³динська, 42а
тел. (0362) 62-94-29
²вано-Франк³вськ ТОВ “КАСКАДКАРПАТИ”
76018, вул. Галицька, 22
тел. (0342) 776-077
Êè¿â ÒΠ“ÐÀ²є
02218, вул. Радужна, 25 б
тел. (044) 540-49-90
Êè¿â ÒÎÂ “Êðîê-ÒÒÖ”
02222, пр-т Маяковського, 26
тел. (044) 515-85-00
Ки¿в ТОВ “Плутон”
04071, вул. Ярославська, 32/33
тел. (044) 463-77-70, (044) 416-30-06
Êè¿â ÒΠ“Ñîí³êî-Óêðà¿íà”
04114, вул. Вишгородська, 50
тел. (044) 430-20-97
Êè¿â ÒΠ“Ðàâ³ñ”
02068, вул. Ревуцького, 6
тел. (044) 564-98-08
К³ровоград “ОПТРОН”
25006, пр-т Комун³стичний, 1, оф. 7
тел. (0522) 249-647
Кременчук “²НЕК-КРЕМ²НЬ”
39605, Полтавська обл., вул. Перемоги, 17/6
тел. (05366) 3-11-21
Кривий Р³г ЧП “Д²МТЕХСЕРВ²С”
50069, вул. Волгоградська, 4
тел. (0564) 92-20-55, (0564) 74-36-15, (0564)
92-20-56
Луганськ “КОРСАК”
91058, вул. Коцюбинського, 27
тел. (0642) 34-56-06, (0642) 58-11-80
Льв³в ПП ф³рма “РОС³мпекс”
79034, вул. Панаса Мирного, 24a
тел. (0322) 70-30-44
Мар³уполь ТОВ “ВОЛД БЕСТ”
87500, вул. Варганова, 3
тел. (0629) 52-78-25, (0629) 52-37-07
Микола¿в СЦ “АЛАДД²Н”
54013, вул. Чкалова, 33
тел. (0512) 47-83-48
УКРА¯НСЬКА
29
Page 30

Н³кополь ТОВ “Прем’ºр-Серв³с”
53224, вул. Шевченка, 97-2
тел. (05662) 4-15-03
Одеса ТОВ “ЮГ СЕРВ²С ЦЕНТР”
65014, вул. Базарна, 26
тел. (0482) 22-13-87
Одеса “ПРОФЕСIОНАЛ”
65014, вул. Успенська, 24
тел. (0482) 42-91-52, (048) 777-08-22
Полтава “ПРОМЕЛЕКТРОН²КА”
Севастополь ТОВ “ПАНОРАМА — С”
99000, ÀÐ Êðèì, âóë. Ðóäíºâà, 33
òåë.(0692) 23-10-55, (0692) 24-05-79
Сºверодонецьк ПКП
“СªВЕРОДОНЕЦЬКРАД²ОТЕХН²КА” 93400,
Луганська обл., вул. В.Маяковського, 13
тел. (06452) 4-30-30, (06452) 4-78-16
С³мферополь “ГАРАНТ”
95013, АР Крим, вул. Трубаченко 7
тел.(0652) 49-37-70
Ñóìè “ÅËÜÔ”
40030, вул. Геро¿в Стал³нграда, 3
тел. (0542) 21-06-79, (0542) 34-03-40
Терноп³ль “ТЕРНАВА-СЕРВ²С”
46024, вул. Злуки, 39
тел. (0352) 43-30-12, 43-30-22
Õàðê³â ÑÏ “ÓÊвÌÊÎÌ”
61002, вул. Полтавський Шлях, 30
тел. (057) 712-15-19, факс (057) 712-38-60
61002, вул. Чернишевського, 56
тел. (0572) 586-686, (0572) 586-687
61000, вул. Бакул³на, 12
тел. (0572) 171-339
Херсон “РАД²О”
73000, вул. Радянська, 23
тел.(0552) 22-57-30, (0552) 22-61-21
Хмельницький ТОВ “ТРИТОН ЛТД”
29009, вул. Козацька, 42
тел/факс (0382) 65-02-33
Черкаси “ЕВРАЗ²Я-С”
18023, вул. Одеська, 8
тел.(0472) 66-36-53, (0472) 35-55-94
Черн³вц³ СЦ “ЕЛЕКТРОСЕРВ²С”
58000, вул. Л. Кобилиц³, 105
тел./факс (0372) 55-48-69
×åðí³ã³â “ÎÒÒΔ
14000, вул. К³рпоноса, 26
тел. (0462) 17-84-92
Ялта “АВ²-ЕЛЕКТРОН²КС”
98612, вул. Жадановського, 3
тел. (0654) 38-60-18
30
 Loading...