

Bimba Ultran Band Repair Instructions
Product Instructions
Ultran Band
Repair Instructions - Side 1
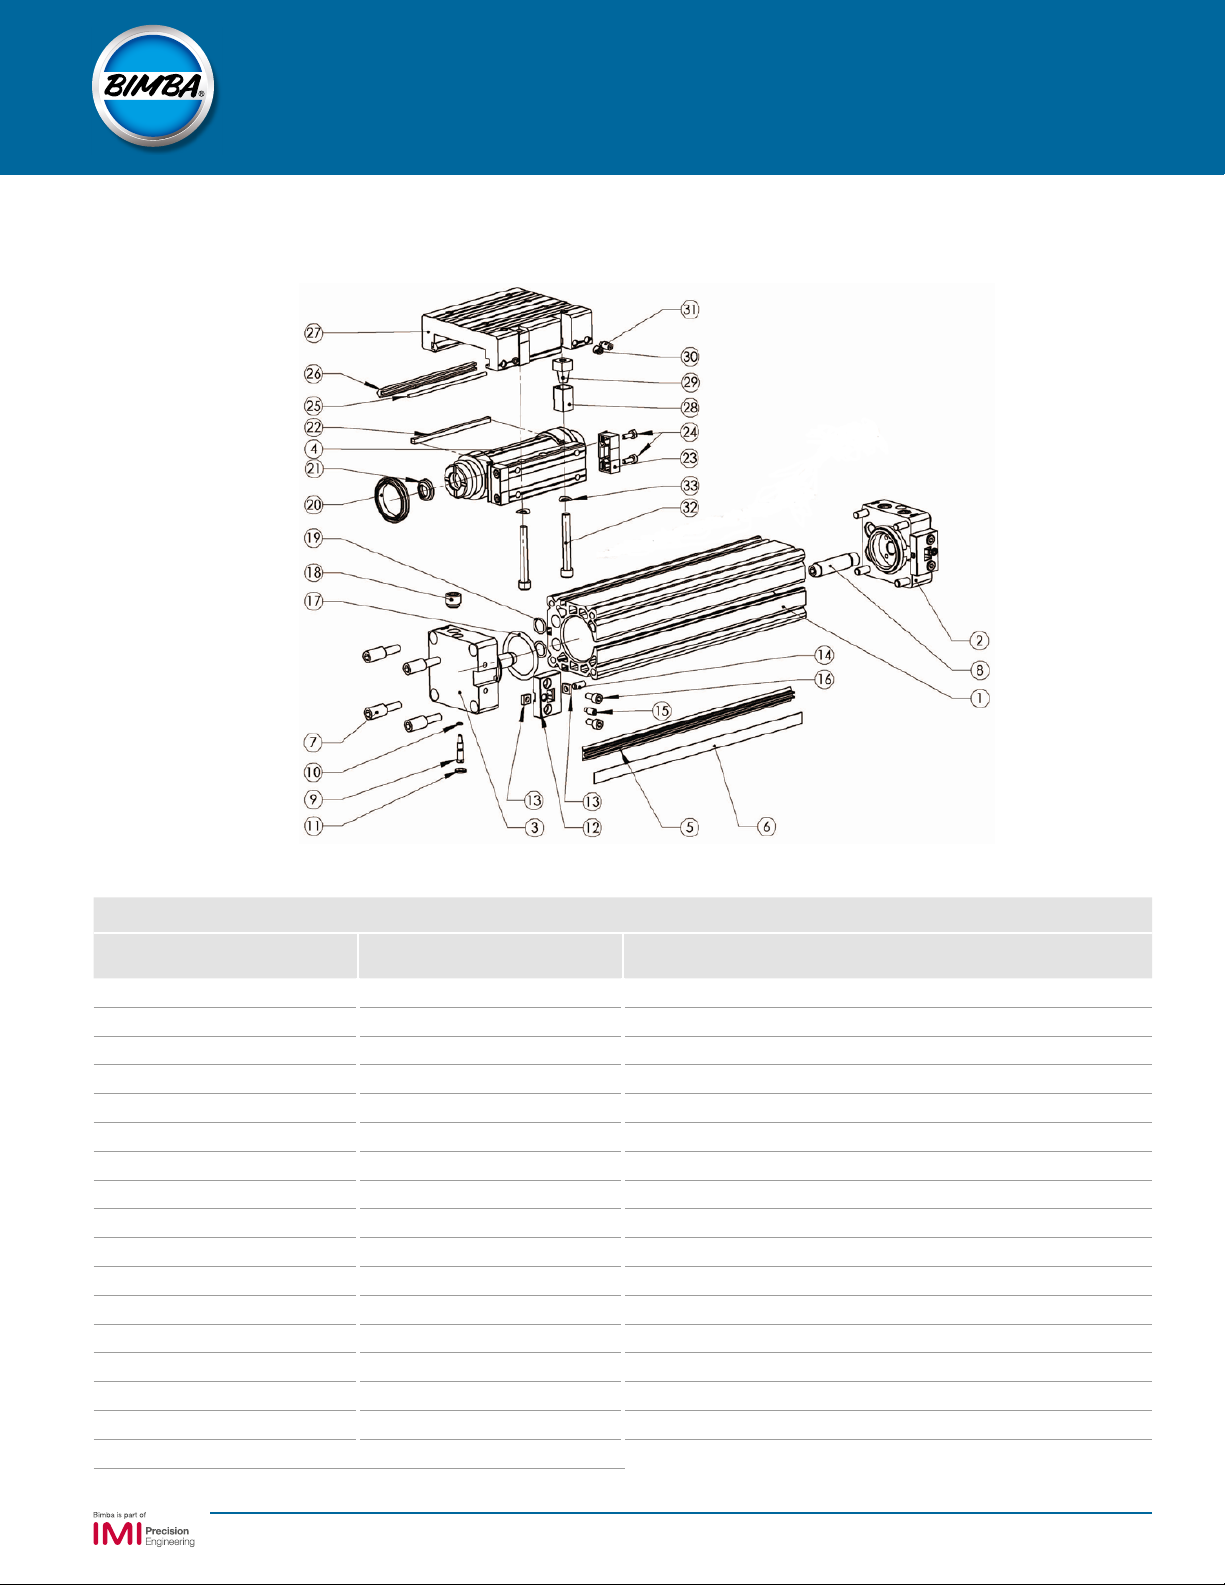
DRAWING
REFERENCE NO.
1 Body 18 Plug
2 Primary End Cap 19 O Ring (Gallery)
3 Secondary End Cap 20 Piston Seal
4 Yoke Assembly (Magnetic) 21 Cushion Seal
5 Sealing Strip 22 Wear Strip
6 Cover Strip 23 Scraper Block
7 Endcap Fasteners 24 Cap Head Screw
8 Cushion Spear 25 Wire Strip
9 Cushion Screw 26 Guide Strip
10 O Ring (Cushion Screw) 27 Carriage/Slide Bearing
11 Retaining Ring 28 Clamp Wedge
12 Strip Retainer 29 Cone Nut
13 Square Nut 30 Cone Point Grub Screw
14 Flat Point Grub Screw 31 Dog Point Grub Screw
15 Dog Point Grub Screw 32 Carriage Bolt
16 Cap Head Screw 33 Wave Washer
17 O Ring (Endcap/Body)
DESCRIPTION
TABLE OF PARTS
DRAWING
REFERENCE NO.
DESCRIPTION
1

Product Instructions
Ultran Band
Repair Instructions - Side 1
DISMANTLING AND REASSEMBLING
+ Undo and remove carriage bolt (32), washer (33), cone
nut (29) and clamp wedge (28).
+ Undo and remove grub screws (30 and 31) only on one
side of the carriage. This shoul d allow the guide strip and
wire strip (25) and (26) to slide out to one side. Carriage/
slide Bearing (27) can then be removed.
- Remove strip retainer (12) by unfastening the two screws
(16) and grub screw (14).
- Remove end cap fasteners (7) on both sides of ends of
the cylinder and remove end caps (2 and 3).
- Remove yoke (4), sealing strip (5) and cover strip (6) from
cylinder body.
- Remove piston seals (20) and cushion seals (21) being
careful not to damage any surfaces on the piston when
removing seals.
- Inspect body (1), bore and slot, and replace if damaged contact supplier.
- Clean piston assembly and re-lubricate using MS-2861.
- Lightly lubricate replacement piston seals (20) and
cushion seal (21). Mount piston seals (20) onto yoke (4).
Put cushion seals (21) into recess ensuring that the small
diameter is facing outwards.
- Lubricate sealing strip (5) lightly. Bend the last 2cm of the
strip and push through piston yoke (4).
- IT IS VERY IMPORTANT THAT THE SEAL STRIP IS
HANDLED WITH CARE. ALWAYS CHECK THAT THE
EDGES ARE NOT DAMAGED BEFORE ASSEMBLING
INTO CYLINDER.
- Lubricate bore of cylinder. Insert longest end of sealing
strip into body (1) followed by the yoke (4).
- Assemble strip retainer (12) to primary end cap (2) and
insert end cap into the end of bore where the yoke (4) is
situated.
- Secure endcap (2) with end cap fasteners (7).
- Slide yoke (4) to other end of body and repeat operation
with secondary endcap (3).
- Cut and insert cover strip (6) and clamp it with grub
screw (14). Feed through yoke (4) and secure on other
side.
- Tighten grub screw (15) on one end of cylinder until flush
with strip retainer (12). On the other end of the cylinder,
pull the sealing strip (5) to remove slack and secure with
grub screw (15). Cut off overlapping sealing strip (5).
- Insert wear strips (22) and screw on scraper block (23)
with cap head screws (24). This will tighten cover strip (6).
- Assemble carriage/slide bearing (27) to body (1) and
insert guide strip (26) and wire strip (25).
- Apply Loctite 222 to thread of grub screws (30 and 31)
and tighten until they are touching the guide strip.
- Check for free movement in carriage (27). Carriage (27)
should slide freely along cylinder body (1) but not have
any sideways movement.
- Insert cone nut (29) and clamp wedge (28) in position on
carriage (27). Secure carriage (27) to yoke (4) with screw
(32) and washer (33), apply Loctite 222 to threads. Do
not overtighten screws, check for free movement of yoke/
carriage assembly.
+ Instructions for dismantling and reassembling slide
bearing.
- Instructions for dismantling and reassembling cylinder.
TEST OF CYLINDER ONLY
- Connect cylinder to air supply.
- Pressurize both sides of the piston yoke and then
exhaust both sides.
- Actuate the cylinder with exhaust air restricted, full stroke
in both directions.
- Cycle cylinder 5 times, shut off valves and allow the
pressure to stabilize for one minute.
- Measure leak rate and check < 100 ml/min.
- Check breakout pressure < 2.0 bar.
- Check end cushioning works.
- Check function of magnet.
MAINTENANCE
- Maintenance work should be carried out with the
compressed air system depressurized.
- To dismantle the cylinder, read instructions above.
- Tools required:
> Allen keys
> Pliers
> Knife
> Flat blade screwdriver
> Loctite 222
- Prior to servicing cylinder, ensure that area to be used is
clean and free from dirt and dust.
- Use soft rags with a mild detergent for cleaning.
- Sliding surfaces should be cleaned and greased lightly at
regular intervals, depending on the degree of use and the
working environment.
Bimba Manufacturing Company
Monee, IL 60449-0068
Tel: 708.534.8544
Fax: 708 235 2014
Email: cs@imi-precision.com
Website: www.bimba.com
Form: BMS-1111
2
 Loading...