

Page 1

Thanks for demonstrating the Bimba pneumatic positioning control products!
line filter will solve the problem
PCS
PFC
ldi
SUDDENLY will result in overshoot, which will cause a correcting position signal to be applied, which will
Use these instructions to demonstrate PFC operation, adjustment, set-up, and capabilities. The cylinder has a rod
lock; instructions are provided to demonstrate its operation. We have also included instructions for integrating
the rod lock into an application.
The demo unit has been fully tested, and is performing well. All components are new, made to the latest revision. The
PFC has a rod insulator, typical of our latest design.
If on occasion you should find that the demo is not operating as it should, consider the following:
1. Air pressure should be 70-80 PSI. Lower air pressures may produce erratic operation.
2. If there is noise on the AC power applied to the electronics, the noise will be superimposed on the DC power
supplied to the PFC. Most of the time this will not be an issue. For the occasions where it is an issue, an AC
.
3. High amounts of ambient EMI may also cause erratic operation. Select an environment for your
demonstration away from potential sources of EMI, such as fluorescent lights, switching power supplies,
power lines, and electric motors.
To ensure top performance in field applications, always ask your customers:
Is the air clean? Are you using filters and desiccant driers? Are there contaminants in the environment? The
PFC is designed to operate using clean, dry, non-lubricated air. Enemies of the PFC are moisture, dirt, and
lubricants, especially silicon. Conductive inks silk screened onto the probe are eroded quickly when water or
contaminants condense onto the probe. In moist or dirty environments, filters and desiccant driers must be
used, and failure in these applications is a result of improper air prep, not defects in workmanship or
materials.
Is your PCS control connected properly? Fittings should be air tight, not cracked or leaking, sealed with Teflon
tape. Avoid small diameter air hoses; they reduce force. Avoid long lengths of hose between the PCS valve
ports and the PFC; long lengths slow response. All electrical connections, especially the control voltage to the
and the feedback signal from the
response. The simplest way to ensure adequate shielding and circumvent EMI interference problems
is to order a PCS control with the Q option and companion shielded cables. Power supplied to the PCS
should be clean.
Is your PCS control adjusted properly? Erratic operation is often caused by improper adjustment of the PCS
control. For smoother operation, increase the deadband and decel settings. If the control is set up under no
load and a load is applied, the deadband and decel may need to be increased. Trying to stop the load TOO
cause overshoot, and so on. The piston will buzz for a while back and forth before settling into position. The
adjustments on the PCS circuit board are via multi-(many)-turn pots. The pots do not have hard stops, so
they can be turned dozens of times; users sometimes lose track of what they are doing, and keep turning
them. To fix this problem, just follow the adjustment procedure in the enclosed instructions.
Have you specified the low friction option? For accurate positioning, always specify the low friction option. If the
customer complains about rough operation and the cylinder being used is not low friction, a low friction option
will help a lot.
What is your air pressure? At 70-80 psi, the PCS control and PFC cylinder operate normally. At low pressures,
operation will be rough and erratic.
Are you using flow controls? If flow controls are installed in the cylinder ports, erratic operation may result.
, must be shielded. Inadequate shie
ng results in erratic
Page 2
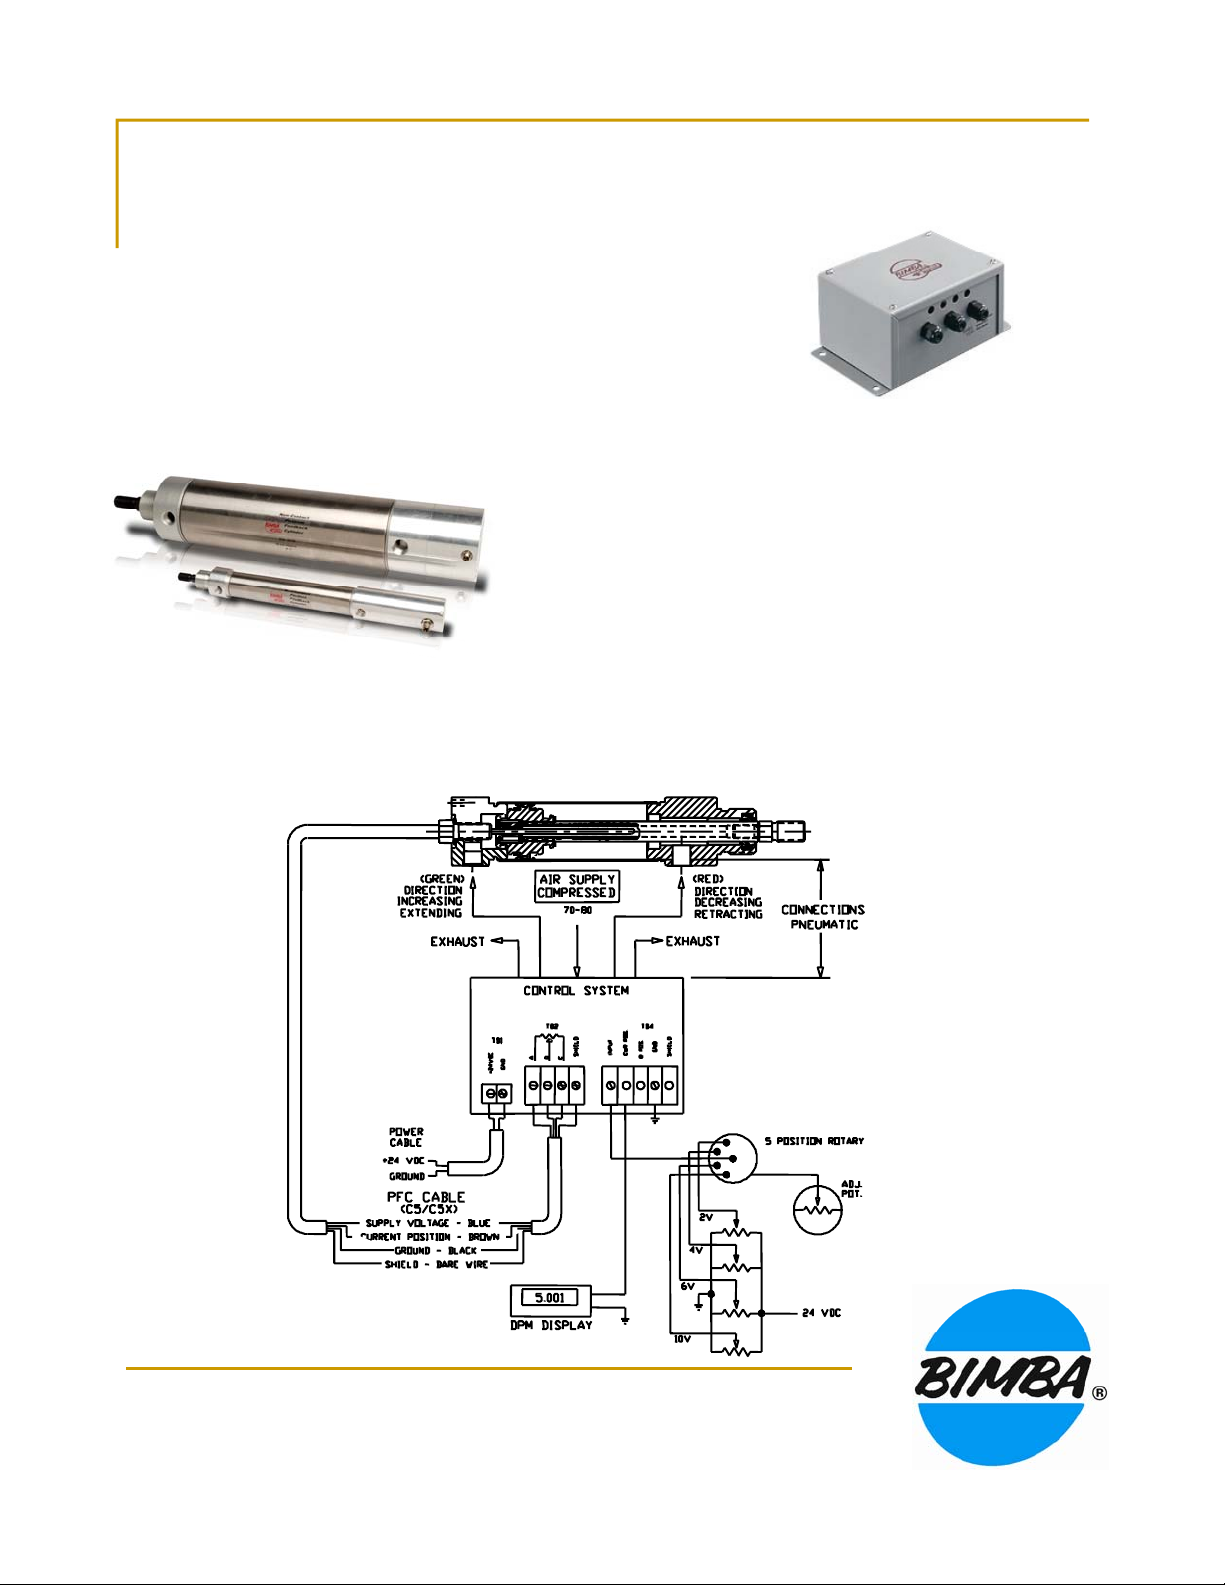
Bimba Model PCS Pneumatic Control
Components required for a complete closed loop system:
System
Learn how to:
Recognize the components required for a PCS system.
Understand how the PCS components are interconnected.
Be able to adjust Zero, Span, Deadband, Decel.
Understand basic PCS operation.
PCS electro-pneumatic controller (includes valves).
PFC, PFCN, PTF, or PTFN cylinder
Air supply (70-80 psi required for proper operation.
Regulated, filtered DC voltages.
24 VDC fixed for PCS.
0-10 VDC variable control voltage.
120 VAC line power for DPM if used.
DPM panel meter (for direct positioning readout)
Demo Case Circuit Diagram
Page 3
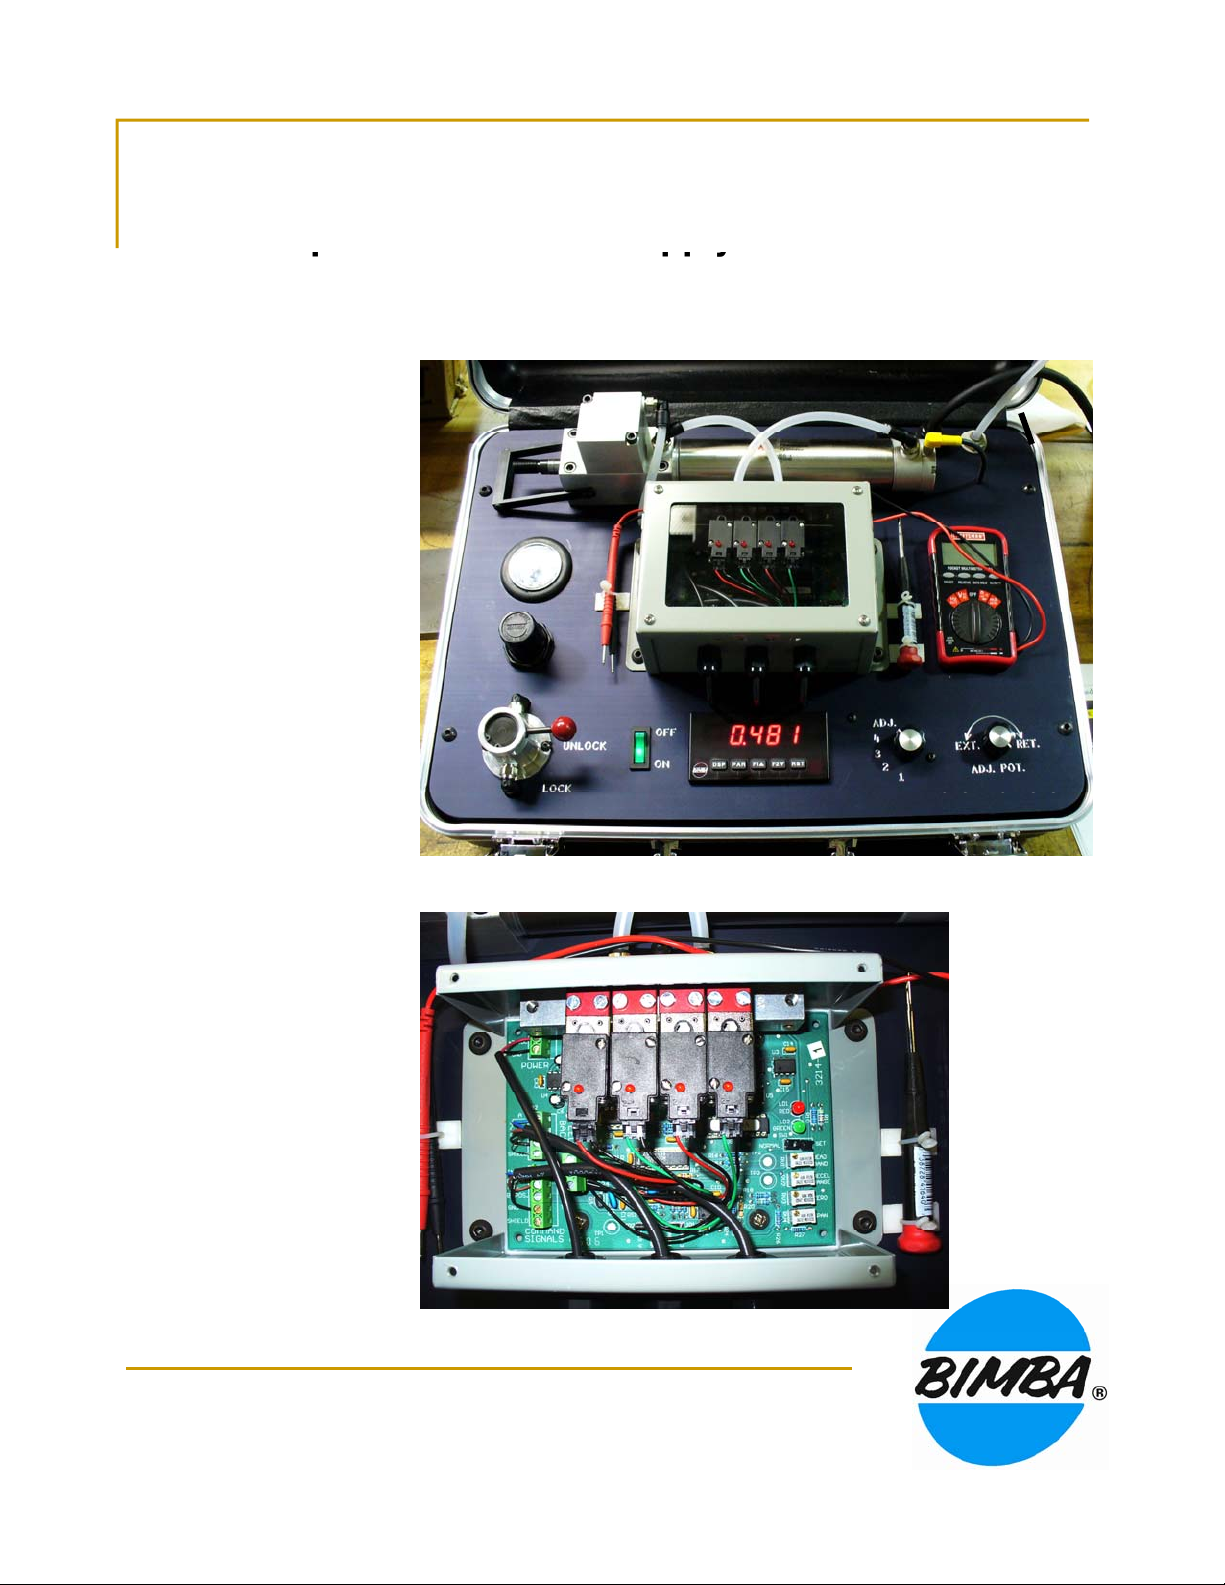
Getting started
pply
pppy
valves (see image to the
3
Rod Lock L
Potentiometer
Switch
DPM
terminal blocks. They are
Power up and connect air su
to demo case.
Be sure rod lock lever is in “UNLOCK” position.
Observe the connection of
air lines to cylinders and
right). Valves are part of the
PCS control. The demo
contains a DC power supply,
switch, and potentiometer,
which would normally be
supplied in the application.
The multimeter should be in
VOLTAGE position. It ranges
from volts to millivolts; don’t
be confused by this: 1000
mV equals 1 V.
Positions 1 through 4 on the
rotary switch move the piston
in increments of one inch.
Position 5 switches to the
potentiometer, which moves
the piston continuously to
any position in its stroke.
Bar
Rod Lock
1
2
Rotary
ever
RST
Multimeter
The DPM is only used to
display displacement in
inches.
Remove cover to expose the
PCS control. Review all
positions in the top three
clearly marked. Electrical
connection to valves is not
required of customer for
encased controls. Identify trim
pots and LEDs, which are also
clearly labeled.
Page 4

Set up and adjustments
position of the PFC rod. Smaller deadbands mean a tight tolerance and higher
A
2.Red LED means rod is being retracted: Air is
retracted position (not necessarily fully retracted).
Set the deadband (page 15) The deadband adjustment changes the tolerance on the ending
positioning accuracy. Higher deadbands are required for greater loads.
1. Application sizing chart (PCS manual page 23, below) identifies “Zero Friction Deadband
Voltage” for setting deadband. The deadband setting can be varied from 0.005 to 0.500 VDC.
2. Locate TP1, TP2, SW 1, and the deadband adjustment pot.
3. Move SW1 to SET position
4. Set DMM to DC volts and measure between TP1 and TP2.
5.
6. Move SW1 to NORMAL position.
djust deadband setscrew to 100 mV initially.
TP1
TP2
Identify LEDs and Span and Zero adjustments.
LED’s indicate valve operation
1. Green LED means rod is being extended: Air is
exhausted from Valve 1 (front) and pressure is applied
at valve 3 (rear)
exhausted from Valve 3 (rear) and pressure is applied
at valve 1 (front).
Set the zero position (page 16)
1. Set control voltage to 0.
2. Turn ZERO adjust CW until rod is in the desired
3. Red LED should not be on continuously.
Zero
Set the Span adjustment or end position (p.18)
1. Set control voltage to maximum (10 VDC)
2. Turn SPAN CCW until rod is in the desired fully extended position.
3. The green LED should not be on continuously.
LED’sSpan
SW1Deadband
Page 5

Set up and adjustments (cont’d.)
2.Turn DECEL adjust and monitor voltage with DMM
6.Rod lock is a failsafe for loss of power. A
3.Turn pot until rod bottoms out on bar, Back
Decel adjustment (page 19) The decel adjustment
regulates the distance ov er which the PFC rod
slows to a stop. Low Decel settings provide
fastest speeds. High Decel settings provide the
most stability for high loads. If deadband is set
TP1
TP3
Decel
Rod Lock Demo
1. Lower bar, set rotary switch to position 5.
2. Turn potentiometer so that rod is midstroke.
3. Push and pull rod – resistance to
movement is provided by the valves
controlled by the PCS.
4. Move Rod Lock lever to “LOCK.”
5. Push and pull rod again. “LOCK” position
removes air pressure from the rod lock
Tech Bulletin is included in this manual.
1. Locate TP1, TP3, and Decel adjustment.
3. Set to 1.5 V for PFC and 3.5 V for PFCN.
4. Step the control voltage up and down using the
5. Adjust DECEL to half the value; observe results.
6. Adjust DECEL to 6 V and observe results.
7. Reset DECEL to original value.
8. With actuator set in mid-stroke, push on end of
9. If decel is too short, cylinder will oscillate around
too low for the load, the rod will overshoot and
undershoot the target position, oscillating
before settling to a stop.
rotary switch. Actuator moves in steps.
actuator and observe results.
final position. If decel is too long, cylinder will
brake gradually. Speed is adjusted through decel
and deadband.
.
Measuring with the DPM
1. Set rotary switch to position 5.
2. Raise bar at end of Rod Lock.
off until PCS valves stop oscillating.
4. Hit Reset <RST> on DPM (zeros display).
5. Retract rod using potentiometer.
6. Place business card between rod and bar;
and turn pot until rod bottoms out on bar
as in (3).
7. Read thickness of card on DPM.
Bar
Page 6

Employing a Rod Lock with a PCS System
Limitation of Using a Rod Lock with a PCS Control System
violent motion or loss of control
retract ports would be supplied with full line pressure. Port 2 (shown in the figure) must
in a Linear Motion Control System
The Rod Lock is intended to be used as a failsafe to lock the PFC piston rod. It is not
intended to be used as a dynamic brake. The PFC’s piston rod must be at rest before
engaging the Rod Lock.
The Rod Lock allows rod movement when air pressure is applied, and clamps the rod
when air pressure is removed. When air pressure is removed, an internal spring engages
the Rod Lock mecahnism. The spring is overcome when the Rod Lock is pressurized.
Use a three-way, normally closed, spring return valve with the Rod Lock. The valve must
be energized to release the rod. If power or air pressure is lost, the Rod Lock/3-way
valve subsystem will clamp the cylinder’s rod.
To accurately move the piston rod and hold it in position, the PCS controls the pressure
on both sides of piston. When a Rod Lock is added, a leak in the system could engage
the Rod Lock, clamping the rod. The PCS control may attempt to overcome the Rod Lock
in order to move the rod into position, potentially applying a large pressure to one side of
the piston which could wear out the Rod Lock and eventually cause failure or cause
.
Pneumatic Circuit for Using the Rod Lock with a PCS
Refer to the figure on the next page. The valve labeled “Rod Clamp Valve” in the left
center of the figure is a three-way, normally open, spring return valve that operates the
Rod Lock. The PCS control’s valves are shown at the top center of the figure. The extend
and retract ports of the PCS are connected to additional valves which are only required
when the Rod Lock is employed. These must be 4-way valves with 5 ports. They allow
the PCS to operate normally when in motion. The valves are switched after the cylinder
comes to its commanded position. This places full line pressure at both the extend and
retract ports. As a result, the worst-case loading condition is reduced to the payload plus
the area of the cylinder’s rod times the line pressure. Spring return valves should be
added between the cylinder and the PCS. When power is lost, both the extend and
be plugged on both these valves to prevent the normal valve blow by from reducing the
effectiveness of this circuit. The 3-way valve recommended for the Rod Lock will clamp
the cylinder’s rod when power or compressed air is lost.
Page 7

Employing a Rod Lock with a PCS System
AND th
this h
in a Linear Motion Control System
Programming Requirements for Using the Rod Lock with a PCS Control
The PCS control has a digital (@Position) signal to indicate when the cylinder its at its
commanded position (actually within +/- the deadband setting of its commanded position). If the
rod is in motion and is about to overshoot the target, one could inadvertently engage the Rod
Clamp, causing it to act as a dynamic brake. It is therefore necessary to monitor the @Position
signal before engaging the Rod Lock to be certain that the payload is within the deadband zone
e system is stable. Once
the Rod Lock to engage. Then the two 4-way valves should be de-energized to divert full-line
pressure to both sides of the PFC piston.
as occurred the 3-way valve should be de-energized allow
Page 8

Employing a Rod Lock with a PCS System
the payload remains within the deadband zone during the delay).
9.Del
in a Linear Motion Control System
In the event of an air leak, if the Rod Lock is released and the rod is commanded to a new
position, the rod could jolt and the system could become unstable. To prevent this:
• Switch the two 4-way valves so that the PCS system is connected to the cylinder.
• Command a motion in the direction opposite to that of intended travel with the Rod
Lock still engaged to ensure that one side of the piston is energized.
• Delay a small amount of time to allow proper pressurization of the cylinder
• Issue the command to new position, with the Rod Clamp still engaged (this command
will insure the opposite side of the piston is energized).
• Delay briefly to allow pressurization of the opposite side of the cylinder.
• Disengage the Rod Clamp.
Programmed Sequence of Events
1. Command the PCS to move to its position.
2. Wait until either the @Position or Output signal indicates that the payload has
entered the deadband.
3. Delay for a moment to ensure that the system is stable (this is demonstrated when
4. Engage the Rod Clamp.
5. Switch the two 5-port valves so that both of the cylinders ports are at line pressure.
6. Perform whatever operations are required at this position.
7. Switch the two 5-port valves so that both the cylinder’s ports are connected to the
PCS.
8. Command the PCS to move in the opposite direction (with the Rod Clamp still
engaged).
ay for a short period of time.
10. Command the PCS to move to its next position (with the Rod Clamp still engaged).
11. Delay for a short period of time.
12. Disengage the Rod Clamp.
The durations of time delays (Steps 3, 9, & 11) are determined during system set up. Time
delays are typically 50 to 100 milliseconds. Steps 8 and 9 may not be necessary. The
durations of time delays and the need for steps 8 and 9 depend upon the final system
configuration and variables such as payload, payload orientation , supply pressure, valve
response time, and valve capacity.
Page 9

 Loading...