

Page 1
Assembly Instructions
Flat-II
General Repair Instructions
K-B-FT-
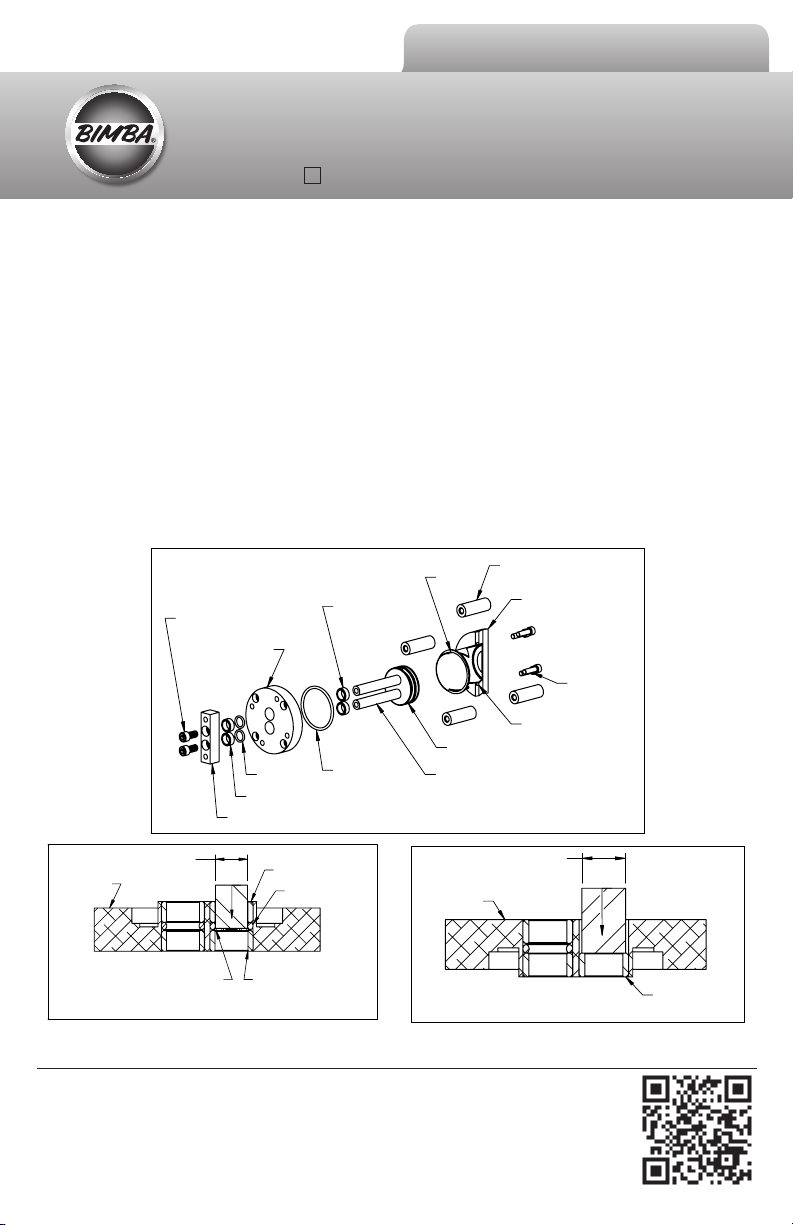
Disassembly
1) Using the appropriate allen wrench, remove the 2 bolts from end block.
2) Using the appropriate allen wrench, remove the 4 (8 for long stroke versions) body bolts from the
end caps.
3) Remove the body posts from assembly.
4) Remove the rod guide and rear head from the body.
5) Remove piston/rod assembly from body.
6) For cylinders with Viton option, please skip to step 9.
7) Install provided snap ring into the rod guide (shown in Figure 1).
8) Press out rear bushings from rod guide.
9) Remove the rod seals from the rod guide. (For cylinders with Viton option, a pick may be
needed.)
10) For cylinders with Viton option, please skip to step 12.
11) Press out rear bushings (as shown in Figure 2).
12) Remove body seals from rod guide and rear head.
13) Remove the piston seal(s) from the piston/rod assembly.
BODY POST
REAR HEAD
BODY BOLT
END BLOCK BOLT
ROD GUIDE
BODY
REAR BUSHING
BODY SEAL
ROD SEAL
PIN (NOT SUPPLIED)
ROD GUIDE
SNAP RING
FIGURE 1
ROD SEAL
FRONT BUSHING
END BLOCK
REAR ROD BUSHING
FRONT ROD BUSHING
(see reverse side for reassembly instructions)
Bimba Manufacturing Company
Monee, IL 60449-0068
Telephone: 708.534.8544
Fax: 708.235.2014
Email: cs@bimba.com
www.bimba.com
PISTON SEAL(S)
PISTON/ROD ASSEMBLY
PIN (NOT SUPPLIED)
ROD GUIDE
Form: BMS-1023
To learn more about this
product, scan this QR code
with your mobile device.
BODY SEAL
FIGURE 2
rev. 1: EC-37763
REAR BUSHING
Page 2

Assembly Instructions
Flat-II
General Repair Instructions
K-B-FT-
Reassembly
1) Lightly lubricate all of the new seals.
2) For cylinders with Viton option, please skip to step 4.
3) Press in the new front bushings into rod guide as shown in Figure 3.
4) Install the new rod seals into the rod guide behind the front bushings. (For Viton option
cylinders, the seals will be installed between the front and rear bushings.)
5) For cylinders with Viton options, please skip to step 7.
6) Press in the new rear bushings into the rod guide as shown in Figure 4.
7) Install new piston seal(s) onto piston/rod assembly.
8) Install the new body seals into the rod guide and rear head.
9) Carefully install the rod guide assembly into the piston/rod assembly.
10) Install the body into the rod guide. (Be careful not to damage the body seal.)
11) Install the rear head onto the body. (Be careful not to damage the body seal.)
12) Install the 4 posts back in between the rod guide and rear head.
13) Install the 4 (8 for long stroke versions) body bolts back into rod guide and rear head.
14) Torque the bolts to the applicable values in Table 1.
15) Retract the rods, then attach the end block using the two bolts that had been removed earlier
(torque bolts to the applicable values in Table 2).
PIN (NOT SUPPLIED)
ROD GUIDE
FLUSH
FRONT ROD BUSHING
FIGURE 3
Table 1: FT Body Bolts
Torque Specication
Bore
Size
3/4", 1-1/16" #4-40 7 (.58) 3.5 (.29)
1-1/2", 2" #10-24 35 (2.9) 19 (1.6)
Screw
Size
Torque: in-lb (ft-lb)
Standard “S” Option
(see reverse side for disassembly instructions)
Bimba Manufacturing Company
Monee, IL 60449-0068
Telephone: 708.534.8544
Fax: 708.235.2014
Email: cs@bimba.com
www.bimba.com
PIN (NOT SUPPLIED)
ROD GUIDE
FLUSH
FIGURE 4
REAR ROD BUSHING
ROD SEAL
FRONT ROD BUSHING
Table 2: FT End Block Bolts
Torque Specication
Bore
Size
3/4" #4-40 7 (.58) 3.5 (.29)
1-1/16" #8-32 25 (2.1) 12 (1.0)
1-1/2” 1/4-20 90 (7.5) 41 (3.4)
2” 5/16-18 150 (12.5) 87 (7.3)
Screw
Size
Torque: in-lb (ft-lb)
Standard “S” Option
Form: BMS-1023
rev. 1: EC-37763
To learn more about this
product, scan this QR code
with your mobile device.
 Loading...