

Page 1

BiPAC 7402NX(L)
802.11n 3G/ADSL2+
(VPN) Firewall Router
User Manual
Version released: 6.24b.dm2
Last Revision Date: 9-30-2010
Page 2

Billion BiPAC 7402NX(L) 802.11n 3G/ADSL2+ (VPN) Firewall Router
TTaabbllee ooff CCoonntteennttss
Chapter 1: Introduction ................................................................................................................1
Introduction to your Router.......................................................................................................1
Features ...................................................................................................................................1
Chapter 2: Installing the Router ...................................................................................................4
Important note for using this router...........................................................................................4
Package Contents ....................................................................................................................4
The Front LEDs ........................................................................................................................5
The Rear Ports.........................................................................................................................6
Cabling .....................................................................................................................................7
Chapter 3: Basic Installation ........................................................................................................8
Connecting Your Router ...........................................................................................................9
Factory Default Settings .........................................................................................................18
Web Interface (Username and Password)..........................................................................18
Device LAN IP settings.......................................................................................................18
ISP setting in WAN site.......................................................................................................18
DHCP server.......................................................................................................................18
LAN and WAN Port Addresses...........................................................................................18
Information from your ISP ......................................................................................................19
Configuring with your Web Browser .......................................................................................20
Chapter 4: Configuration............................................................................................................21
Status .....................................................................................................................................22
ADSL Status.......................................................................................................................22
3G Status............................................................................................................................23
EWAN Status......................................................................................................................25
iBurst Status.......................................................................................................................26
ARP Table...........................................................................................................................27
DHCP Table........................................................................................................................27
Routing T
NAT Sessions
UPnP Portmap....................................................................................................................29
PPTP Status .......................................................................................................................30
IPSec Status
L2TP Status........................................................................................................................31
Event Log
Error Log.............................................................................................................................33
IDS Log...............................................................................................................................33
Diagnostic...........................................................................................................................34
Quick Start..............................................................................................................................35
Configuration..........................................................................................................................38
LAN - Local Area Network..................................................................................................38
Bridge Interface...............................................................................................................38
Ethernet
IP Alias ............................................................................................................................39
IPv6 Autoconfig
Ethernet Client Filter .......................................................................................................41
Wireless ..........................................................................................................................42
Wireless Security
Wireless Client / MAC Address Filter
able......................................................................................................................28
.....................................................................................................................29
.......................................................................................................................30
...........................................................................................................................32
..........................................................................................................................39
...............................................................................................................40
............................................................................................................44
..............................................................................46
Table of Contents
Page 3

Billion BiPAC 7402NX(L) 802.11n 3G/ADSL2+ (VPN) Firewall Router
WPS................................................................................................................................47
Port Setting .....................................................................................................................59
DHCP Server ..................................................................................................................60
WAN - Wide Area Network .................................................................................................61
WAN Interface.................................................................................................................61
WAN Profile.....................................................................................................................63
ADSL Mode.....................................................................................................................80
System................................................................................................................................81
Time Zone.......................................................................................................................81
Remote Access ...............................................................................................................82
Firmware Upgrade ..........................................................................................................82
Backup / Restore.............................................................................................................83
Restart Router.................................................................................................................84
User Management...........................................................................................................85
Mail Alert .........................................................................................................................87
Firewall and Access Control...............................................................................................88
General Settings .............................................................................................................89
Packet Filter ....................................................................................................................90
Intrusion Detection
URL Filter
........................................................................................................................99
..........................................................................................................97
IM / P2P Blocking..........................................................................................................102
Firewall Log...................................................................................................................103
VPN - Virtual Private Networks (BiPAC 7402NX only)......................................................104
PPTP (Point-to-Point Tunneling Protocol) .....................................................................104
IPSec (IP Security Protocol).......................................................................................... 112
L2TP (Layer Two Tunneling Protocol) ...........................................................................121
QoS - Quality of Service...................................................................................................133
Prioritization ..................................................................................................................133
Outbound IP Throttling (LAN to WAN)...........................................................................135
Inbound IP Throttling (WAN to LAN) .............................................................................136
Virtual Server (known as Port Forwarding).......................................................................142
Add Virtual Server .........................................................................................................143
Edit DMZ Host...............................................................................................................144
Edit DMZ Host
Edit One-to-One NAT (Network Address T
...............................................................................................................145
ranslation) ...................................................146
Wake on LAN....................................................................................................................149
Time Schedule..................................................................................................................150
Configuration of Time Schedule ....................................................................................151
Advanced..........................................................................................................................152
Static Route...................................................................................................................152
Static ARP .....................................................................................................................152
Dynamic DNS................................................................................................................153
Device Management .....................................................................................................154
IGMP.............................................................................................................................158
MLD ..............................................................................................................................158
VLAN Bridge
.................................................................................................................159
Logout ..................................................................................................................................159
Chapter 5: Troubleshooting
......................................................................................................160
Problems starting up the router ............................................................................................160
Problems with the WAN Interface.........................................................................................160
Problems with the LAN Interface
Table of Contents
..........................................................................................160
Page 4

Billion BiPAC 7402NX(L) 802.11n 3G/ADSL2+ (VPN) Firewall Router
APPENDIX A: Product Support and Contact Information.........................................................161
Table of Contents
Page 5

Billion BiPAC 7402NX(L) 802.11n 3G/ADSL2+ (VPN) Firewall Router
Chapter 1: Introduction
Introduction to your Router
Welcome to the BiPAC 7402NX(L) 802.11n 3G/ ADSL2+ (VPN) Firewall Router. The router is an
“all-in-one” ADSL router, combining an ADSL modem, ADSL router and Ethernet network switch
functionalities, providing everything you need to get the machines on your network connected to the
Internet over your ADSL broadband connection. With features such as an ADSL Quick-Start wizard and
DHCP Server, you can be online in no time at all and with a minimum of fuss and configuration, catering
for first-time users to the guru requiring advanced features and control over their Internet connection and
network.
Features
Express Internet Access
This router complies with worldwide ADSL standards. It supports downstream rates of up to 12/24
Mbps with ADSL2/2+, 8 Mbps with ADSL, and upstream rates of up to 1 Mbps. With this technology,
users enjoy not only high-speed ADSL service but also broadband multimedia applications such as
interactive gaming, video streaming and real-time audio much more quickly and easily than ever. In
particular, by doubling the upstream data rate, the Annex M standard included in the BiPAC 7402NX
model supports the latest ADSL2/2+ for higher upload speeds.
Virtual Private Network (VPN) (VPN model only)
It allows user to make a tunnel with a remote site directly to secure the data transmission among
the connection. User can use embedded PPTP and L2TP client/server, IKE and IPSec which are
supported by this router to make a VPN connection or users can run the PPTP client in PC and the
router already provides IPSec and PPTP pass through function to establish a VPN connection if the
user likes to run the PPTP client in his local computer.
3G
With 3G-based Internet connection (requires an additional 3G USB modem), user can access
internet through 3G - whether you're seated at your desk or taking a cross-country train trip.
EWAN
Besides using 3G/ADSL to get connected to the Internet, the router offers its Ethernet port 1 as a
WAN port to be used to connect to Cable Modems and fiber optic lines. This alternative, yet faster
method to connect to the internet will provide users more flexibility to get online.
Dual WAN
Dual WAN is a new way of getting connected to the internet which is to use each two of the
3G/ADSL/EWAN to deal with the unexpected case and balance traffic load. That is a way of
improving greatly the robustness.
802.11n Wireless AP with WPA Support
With an integrated 802.11n Wireless Access Point in the router, the device delivers up to 6 times
faster speeds and 3 times farther range than an 802.11b/g wireless network. It offers a quick yet
easily accessible and mobile to the users among wired network, wireless network, broadband
connection (ADSL). In addition to having a 300Mbps. data rate, it is also backward compatible with
existing 802.11b/11g equipments. The supported features of
WPA2-PSK) and
and access control via Wireless LAN.
Wired Equivalent Privacy (WEP) enhance the security level of data protection
Wi-Fi Protected Access (WPA-PSK/
Table of Contents
1
Page 6

Billion BiPAC 7402NX(L) 802.11n 3G/ADSL2+ (VPN) Firewall Router
Fast Ethernet Switch
A 4-port 10/100/1000Mbps fast Ethernet switch is built in with automatic switching between MDI
and MDI-X for 10Base-T, 100Base-TX and 1000Base-TX ports. An Ethernet straight or crossover
cable can be used directly for auto detection.
Multi-Protocol to Establish a Connection
It supports PPPoA (RFC 2364 - PPP over ATM Adaptation Layer 5), RFC 1483 encapsulation over
ATM (bridged or routed), PPP over Ethernet (RFC 2516), and IPoA (RFC1577) to establish a
connection with the ISP. The product also supports VC-based and LLC-based multiplexing.
Quick Installation Wizard
It supports a WEB GUI page to install this device quickly. With this wizard, end users can enter the
information easily which they get from their ISP, then surf the Internet immediately.
Universal Plug and Play (UPnP) and UPnP NAT Traversal
This protocol is used to enable simple and robust connectivity among stand-alone devices and PCs
from many different vendors. It makes network simple and affordable for users. UPnP architecture
leverages TCP/IP and the Web to enable seamless proximity networking in addition to control and
data transfer among networked devices. With this feature enabled, users can now connect to Net
meeting or MSN Messenger seamlessly.
Network Address Translation (NAT)
Allows multi-users to access outside resources such as the Internet simultaneously with one IP
address/one Internet access account. Many application layer gateway (ALG) are supported such as
web browser, ICQ, FTP, Telnet, E-mail, News, Net2phone, Ping, NetMeeting, IP phone and others.
SOHO Firewall Security with DoS and SPI
Along with the built-in NAT natural firewall feature, the router also provides advanced hacker
pattern-filtering protection. It can automatically detect and block Denial of Service (DoS) attacks.
The router is built with Stateful Packet Inspection (SPI) to determine if a data packet is allowed
through the firewall to the private LAN.
Domain Name System (DNS) Relay
It provides an easy way to map the domain name (a friendly name for users such as
www.yahoo.com) and IP address. When a local machine sets its DNS server with this router’s IP
address, every DNS conversion request packet from the PC to this router will be forwarded to the
real DNS in the outside network.
Dynamic Domain Name System (DDNS)
The Dynamic DNS service allows you to alias a dynamic IP address to a static hostname. This
dynamic IP address is the WAN IP address. For example, to use the service, you must first apply for
an account from a DDNS service like http://www.dyndns.org/. More than 5 DDNS servers are
supported.
Quality of Service (QoS)
QoS gives you full control over which types of outgoing data traffic should be given priority by the
router, ensuring important data like gaming packets, customer information, or management
information move through the router ay lightning speed, even under heavy load. The QoS features
are configurable by source IP address, destination IP address, protocol, and port. You can throttle
the speed at which different types of outgoing data pass through the router, to ensure P2P users
don’t saturate upload bandwidth, or office browsing doesn’t bring client web serving to a halt. In
addition, or alternatively, you can simply change the priority of different types of upload data and let
the router sort out the actual speeds.
Table of Contents
2
Page 7

Billion BiPAC 7402NX(L) 802.11n 3G/ADSL2+ (VPN) Firewall Router
IPv6 supported
Internet Protocol version 6 (IPv6) is a version of the Internet Protocol that is designed to succeed
IPv4.
IPv6 has a vastly larger address space than IPv4. This results from the use of a 128-bit address,
whereas IPv4 uses only 32 bits. The new address space thus supports 2128 (about 3.4×1038)
addresses. This expansion provides flexibility in allocating addresses and routing traffic and
eliminates the primary need for network address translation (NAT), which gained widespread
deployment as an effort to alleviate IPv4 address exhaustion.
IPv6 also implements new features that simplify aspects of address assignment (stateless address
autoconfiguration) and network renumbering (prefix and router announcements) when changing
Internet connectivity providers. The IPv6 subnet size has been standardized by fixing the size of the
host identifier portion of an address to 64 bits to facilitate an automatic mechanism for forming the
host identifier from Link Layer media addressing information (MAC address).
Network security is integrated into the design of the IPv6 architecture. Internet Protocol Security
(IPsec) was originally developed for IPv6, but found widespread optional deployment first in IPv4
(into which it was back-engineered). The IPv6 specifications mandate IPsec implementation as a
fundamental interoperability requirement.
Virtual Server (“port forwarding”)
Users can specify some services to be visible from outside users. The router can detect incoming
service requests and forward either a single port or a range of ports to the specific local computer to
handle it. For example, a user can assign a PC in the LAN acting as a WEB server inside and
expose it to the outside network. Outside users can browse inside web servers directly while it is
protected by NAT. A DMZ host setting is also provided to a local computer exposed to the outside
network, Internet.
Rich Packet Filtering
Not only filters the packet based on IP address, but also based on Port numbers. It will filter packets
from and to the Internet, and also provides a higher level of security control.
Dynamic Host Configuration Protocol (DHCP) Client and Server
In the WAN site, the DHCP client can get an IP address from the Internet Service Provider (ISP)
automatically. In the LAN site, the DHCP server can allocate a range of client IP addresses and
distribute them including IP address, subnet mask as well as DNS IP address to local computers. It
provides an easy way to manage the local IP network.
Static and RIP1/2 Routing
It has routing capability and supports easy static routing table or RIP1/2 routing protocol.
Simple Network Management Protocol (SNMP)
It is an easy way to remotely manage the router via SNMP.
Web based GUI
It supports web based GUI for configuration and management. It is user-friendly and comes with
on-line help. It also supports remote management capability for remote users to configure and
manage this product.
Firmware Upgradeable
Device can be upgraded to the latest firmware through the WEB based GUI.
Rich Management Interfaces
It supports flexible management interfaces with local console port, LAN port, and WAN port. Users
can use terminal applications through the console port to configure and manage the device, or
Telnet, WEB GUI, and SNMP through LAN or WAN ports to configure and manage the device.
Table of Contents
3
Page 8
Billion BiPAC 7402NX(L) 802.11n 3G/ADSL2+ (VPN) Firewall Router
Important note for using this router
Chapter 2: Installing the Router
Package Contents
BiPAC 7402NX(L) 802.11n 3G/ ADSL2+ (VPN) Firewall Router
CD containing the on-line manual
RJ-11 ADSL/ telephone cable
Ethernet (CAT-5 LAN) cable
Three 2dbi detachable antennas
Power adapter
PS2-RS 232 console cable
Quick Start Guide
Splitter/ Micro-filter (Optional)
Chapter 2: Installing the router
4
Page 9

The Front LEDs
LED Meaning
1 Power
Billion BiPAC 7402NX(L) 802.11n 3G/ADSL2+ (VPN) Firewall Router
Both red and green LEDs lit together when power is ON.
Lit red means system failure.
Restart the device or contact support.
Lit green when the device is ready.
Ethernet Port
2
3 USB
4 Wireless
5 DSL
6 Internet
1X - 4X
(RJ-45 connector)
Lit when one of LAN ports are connected to Ethernet devices.
If the speed of transmission hits 1000Mbps light will appear
Green; If the speed of transmission hits 100Mbps light will appear
Orange. If the speed of transmission hits 10Mbps, light will not
shine.
Blinking when data is Transmitted / Received.
Lit green when the device is connected to a USB device and
ready.
Flashing when the device is sending/receiving data.
Lit green when the wireless connection is established.
Flashing when the device is sending/receiving data.
Flash once per second while wi-fi protected setup is in progress.
Lit Green when the device is successfully connected to an ADSL
DSLAM (“line sync”).
Lit red when WAN port fails to get IP address.
Lit green when WAN port gets IP address successfully.
Lit off when the device is in bridge mode or when WAN connection
is absent.
Chapter 2: Installing the router
5
Page 10

The Rear Ports
Billion BiPAC 7402NX(L) 802.11n 3G/ADSL2+ (VPN) Firewall Router
Port
Antenna Connect the detachable antenna to this port.
1
DSL
2
Ethernet
3
1X - 4X
(RJ-45 connector)
USB
4
5 Console
6 RESET
eaning
Connect the supplied RJ-11 (“telephone”) cable on this port
when connecting to the ADSL/telephone network.
Connect a UTP Ethernet cable (Cat-5 or Cat-5e) to one of the
LAN ports when connecting to a PC or an office/home
network of 10Mbps, 100Mbps or 1000Mbps.
Connect the USB cable on this port.
Console port.
3G/ HSDPA USB modem backup for Internet access.
To be sure the device is being turned on press RESET
button for:
1-3 seconds: quick reset the device.
6 seconds above, and power off, power on the device:
restore to factory default settings. (Cannot login to the router
or forgot your Username/Password. Press the button for more
than 6 seconds).
Caution: After pressing the RESET button for more than 6
seconds, to be sure you power cycle the device again.
Push WPS button for less than 5 sec to trigger Wi-Fi
7 WPS
Power
8
Power Switch
9
Protected Setup function; push WPS button for more than 5
sec to enable/disable WLAN Service.
Power ON/OFF switch
Connect the supplied power adapter to this jack.
Chapter 2: Installing the router
6
Page 11

Billion BiPAC 7402NX(L) 802.11n 3G/ADSL2+ (VPN) Firewall Router
Cabling
One of the most common causes of problems is the bad cabling or ADSL line(s). Make sure that all
connected devices are turned on. On the front of the product is a bank of LEDs. Verify that the LAN Link
and ADSL line LEDs are lit. If they are not, verify that you are using the proper cables.
Ensure that all other devices connected to the same telephone line as your router (e.g. telephones, fax
machines, analogue modems) have a line filter connected between them and the wall socket (unless you
are using a Central Splitter or Central Filter installed by a qualified and licensed electrician), and ensure
that all line filters are correctly installed and the right way around. Missing line filters or line filters installed
the wrong way around can cause problems with your ADSL connection, including causing frequent
disconnections.
Chapter 2: Installing the router
7
Page 12

Billion BiPAC 7402NX(L) 802.11n 3G/ADSL2+ (VPN) Firewall Router
Chapter 3: Basic Installation
The router can be configured with your web browser. A web browser is included as a standard application
in the following operating systems: Linux, Mac OS, Windows 7/98/NT/2000/XP/Me, etc. The product
provides an easy and user-friendly interface for configuration.
Please check your PC’s network components. The TCP/IP protocol stack and Ethernet network adapter
must be installed. If not, please refer to your Windows-related or other operating system manuals.
There are ways to connect with the router, either through an external repeater hub to the router or directly
connecting with PCs. However, to be sure PCs have an Ethernet interface installed properly prior to
connecting to the router device. You ought to configure your PCs to obtain an IP address through a
DHCP server or a fixed IP address that must be in the same subnet as the router. The default IP address
of the router is 192.168.1.254 and the subnet mask is 255.255.255.0 (i.e. any attached PC must be in the
same subnet, and have an IP address in the range of 192.168.1.1 to 192.168.1.253). The best and
easiest way is to configure the PC to get an IP address automatically from the router using DHCP. If you
encounter any problem accessing the router’s web interface it may also be advisable to uninstall any
kind of software firewall on your PCs, as they can cause problems accessing the 192.168.1.254 IP
address of the router. Users should make their own decisions on how to best protect their network.
Please follow the steps below for your PC’s network environment installation.
Any TCP/IP capable workstation can be used to communicate with
or through the router. To configure other types of workstations,
please consult the manufacturer’s documentation.
Chapter 3: Basic Installation
8
Page 13

Billion BiPAC 7402NX(L) 802.11n 3G/ADSL2+ (VPN) Firewall Router
Connecting Your Router
1. Connect this router to a LAN (Local Area Network) and the ADSL/telephone (ADSL) network.
2. Power on the device.
3. Make sure the Power is lit steadily and that the LAN LED is lit.
4. Connect RJ-11 cable to LINE Port when connecting to the telephone wall jack.
5. Connect USB 2.0 cable.
Chapter 3: Basic Installation
9
Page 14

Billion BiPAC 7402NX(L) 802.11n 3G/ADSL2+ (VPN) Firewall Router
Configuring PCs in Windows 7
1. Go to Start. Click on Control Panel.
Then click on Network and Internet.
2. When the Network and Sharing
Center window pops up, select and click
on Change adapter settings on the left
window panel.
3. Select the Local Area Connection,
and right click the icon to select
Properties.
Chapter 3: Basic Installation
10
Page 15

Billion BiPAC 7402NX(L) 802.11n 3G/ADSL2+ (VPN) Firewall Router
4. Select Internet Protocol Version 4
(TCP/IPv4) then click Properties.
5. In the TCP/IPv4 properties window,
select the Obtain an IP address
automatically and Obtain DNS Server
address automatically radio buttons.
Then click OK to exit the setting.
6. Click OK again in the Local Area
Connection Properties window to apply
the new configuration.
Chapter 3: Basic Installation
11
Page 16

Billion BiPAC 7402NX(L) 802.11n 3G/ADSL2+ (VPN) Firewall Router
Configuring PCs in Windows Vista
1. Go to St
2. Then click on Network and Sharing
Center at the top bar
3. When the Network and Sharing Center
window pops up, select and click on
Manage network connections on the left
window column.
4. Select the Local Area Connection, and
right click the icon to select Properties.
art. Click on Network.
Chapter 3: Basic Installation
12
Page 17

Billion BiPAC 7402NX(L) 802.11n 3G/ADSL2+ (VPN) Firewall Router
5. Select Internet Protocol Version 4
(TCP/IPv4) then click Properties.
6. In the TCP/IPv4 properties window,
select the Obtain an IP address
automatically and Obtain DNS Server
address automatically radio but- tons.
Then click OK to exit the set- ting.
7. Click OK again in the Local Area
Connection Properties window to
apply the new configuration
Chapter 3: Basic Installation
13
Page 18

Billion BiPAC 7402NX(L) 802.11n 3G/ADSL2+ (VPN) Firewall Router
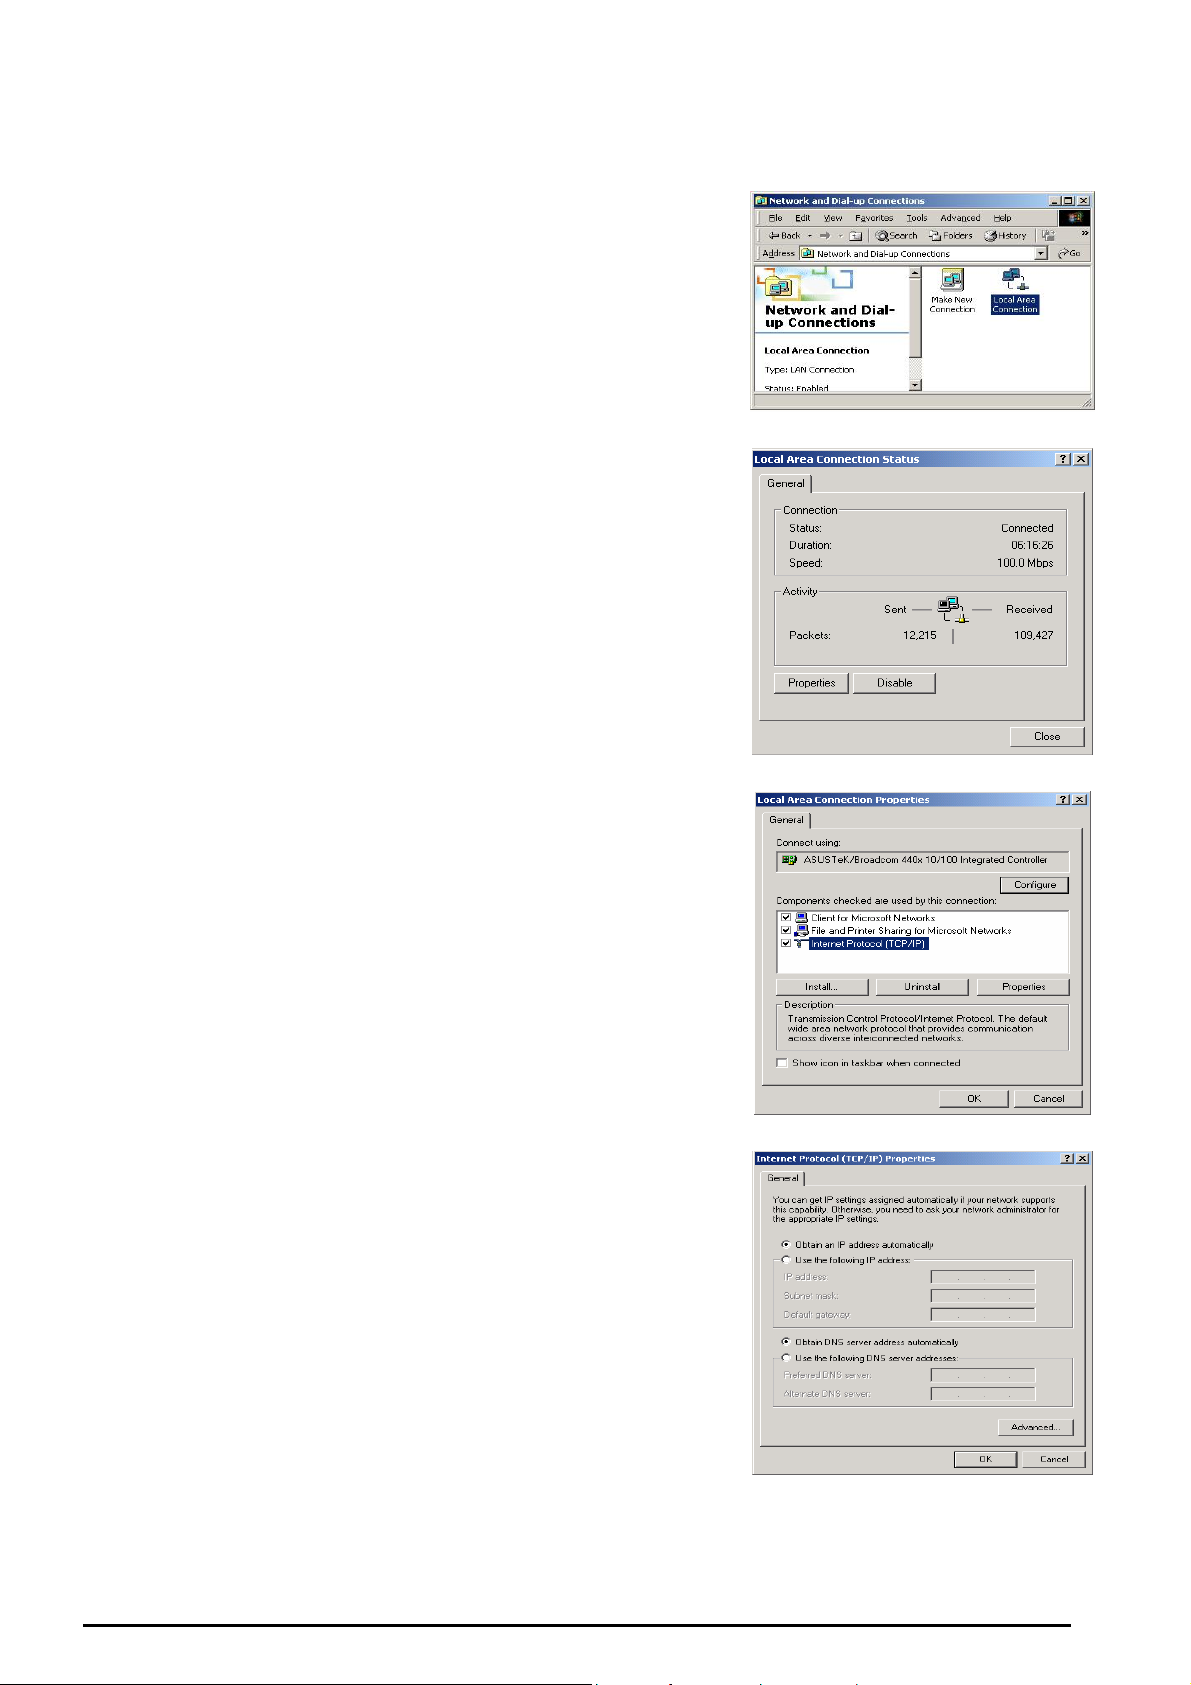
Configuring PCs in Windows in Window XP
1. Go to Start / Control Panel (in Classic View). In the Control
Panel, double-click Network Connections.
2. Double-click Local Area Connection. (See Figure 3.1)
3. In the LAN Area Connection Status window, click
Properties. (See Figure 3.2)
4. Select Internet Protocol (TCP/IP) and click Properties.
(See Figure 3.3)
5. Select the Obtain an IP address automatically and Obtain
DNS server address automatically radio buttons. (See
Figure 3.4)
6. Click OK to finish the configuration.
Figure 3.1: LAN Area Connection
Figure 3.2: LAN Connection Status
Figure 3.3: TCP / IP
Figure 3.4: IP Address & DNS
Configuration
Chapter 3: Basic Installation
14
Page 19
Billion BiPAC 7402NX(L) 802.11n 3G/ADSL2+ (VPN) Firewall Router
Configuring PCs in Windows 2000
1. Go to Start / Settings / Control Panel. In the Control Panel,
double-click Network and Dial-up Connections.
2. Double-click Local Area (“LAN”) Connection. (See Figure
3.5)
3. In the LAN Area Connection Status window, click
Properties. (See Figure 3.6)
4. Select Internet Protocol (TCP/IP) and click Properties.
(See Figure 3.7)
5. Select the Obtain an IP address automatically and Obtain
DNS server address automatically radio buttons. (See
Figure 3.8)
6. Click OK to finish the configuration.
Figure 3.5: LAN Area Connection
Figure 3.6: LAN Connection Status
Figure 3.7: TCP / IP
Figure 3.8: IP Address & DNS
Configuration
Chapter 3: Basic Installation
15
Page 20

Billion BiPAC 7402NX(L) 802.11n 3G/ADSL2+ (VPN) Firewall Router
Configuring PC in Windows 95/98/ME
1. Go to Start / Settings / Control Panel. In the Control Panel,
double-click Network and choose the Configuration tab.
2. Select TCP / IP -> NE2000 Compatible, or the name of any
Network Interface Card (NIC) in your PC. (See Figure 3.9)
3. Click Properties.
4. Select the IP Address tab. In this page, click the Obtain an IP
address automatically radio button. (See Figure 3.10)
5. Then select the DNS Configuration tab. (See Figure 3.11)
6. Select the Disable DNS radio button and click OK to finish
the configuration.
Figure 3.9: TCP / IP
Figure 3.10: IP Address
Figure 3.11: DNS Configuration
Chapter 3: Basic Installation
16
Page 21

Billion BiPAC 7402NX(L) 802.11n 3G/ADSL2+ (VPN) Firewall Router
Configuring PC in Windows NT4.0
1. Go to Start / Settings / Control Panel. In the Control
Panel, double-click Network and choose the Protocols tab.
2. Select TCP/IP Protocol and click Properties. (See Figure
3.12)
3. Select the Obtain an IP address from a DHCP server radio
button and click OK. (See Figure 3.13)
Figure 3.12: TCP / IP
Figure 3.13: IP Address
Chapter 3: Basic Installation
17
Page 22
Billion BiPAC 7402NX(L) 802.11n 3G/ADSL2+ (VPN) Firewall Router
A
A
Factory Default Settings
Before configuring your, you need to know the following default settings.
Web Interface (Username and Password)
Username: admin
Password: admin
The default username and password are “admin” and “admin” respectively.
ttention
ttention
Device LAN IP settings
IP Address: 192.168.1.254
Subnet Mask: 255.255.255.0
If you ever forget the username/password to login to the router, you may
press the RESET button up to 6 seconds to restore the factory default
settings.
Caution: After pressing the RESET button for more than 6 seconds, to be sure you power
cycle the device again.
ISP setting in WAN site
PPPoE
DHCP server
DHCP server is enabled.
Start IP Address: 192.168.1.100
IP pool counts: 100
LAN and WAN Port Addresses
The parameters of LAN and WAN ports are pre-set in the factory. The default values are shown below.
LAN Port WAN Port
IP address
Subnet Mask
DHCP server function
IP addresses for
distribution to PCs
192.168.1.254
255.255.255.0
Enabled
100 IP addresses continuing from
192.168.1.100 through 192.168.1.199
The PPPoE function is enabled
to automatically get the WAN
port configuration from the ISP.
18
Chapter 3: Basic Installation
Page 23

Billion BiPAC 7402NX(L) 802.11n 3G/ADSL2+ (VPN) Firewall Router
Information from your ISP
Before configuring this device, you have to check with your ISP (Internet Service Provider) to find out
what kind of service is provided such as DHCP (Obtain an IP Address Automatically, Static IP (Fixed IP
Address) and PPPoE.
Gather the information as illustrated in the following table and keep it for reference.
VPI/VCI, VC / LLC-based multiplexing, Username, Password, Service Name,
PPPoE(RFC2516)
PPPoA(RFC2364)
and Domain Name System (DNS) IP address (it can be automatically
assigned by your ISP when you connect or be set manually).
VPI/VCI, VC / LLC-based multiplexing, Username, Password and Domain
Name System (DNS) IP address (it can be automatically assigned by your ISP
when you connect or be set manually).
MPoA(RFC1483/RF
C2684)
IPoA(RFC1577)
Pure Bridge
VPI/VCI, VC / LLC-based multiplexing, IP address, Subnet mask, Gateway
address, and Domain Name System (DNS) IP address (it is a fixed IP
address).
VPI/VCI, VC / LLC-based multiplexing, IP address, Subnet mask, Gateway
address, and Domain Name System (DNS) IP address (it is a fixed IP
address).
VPI/VCI, VC / LLC-based multiplexing to use Bridged Mode.
Chapter 3: Basic Installation
19
Page 24
Billion BiPAC 7402NX(L) 802.11n 3G/ADSL2+ (VPN) Firewall Router
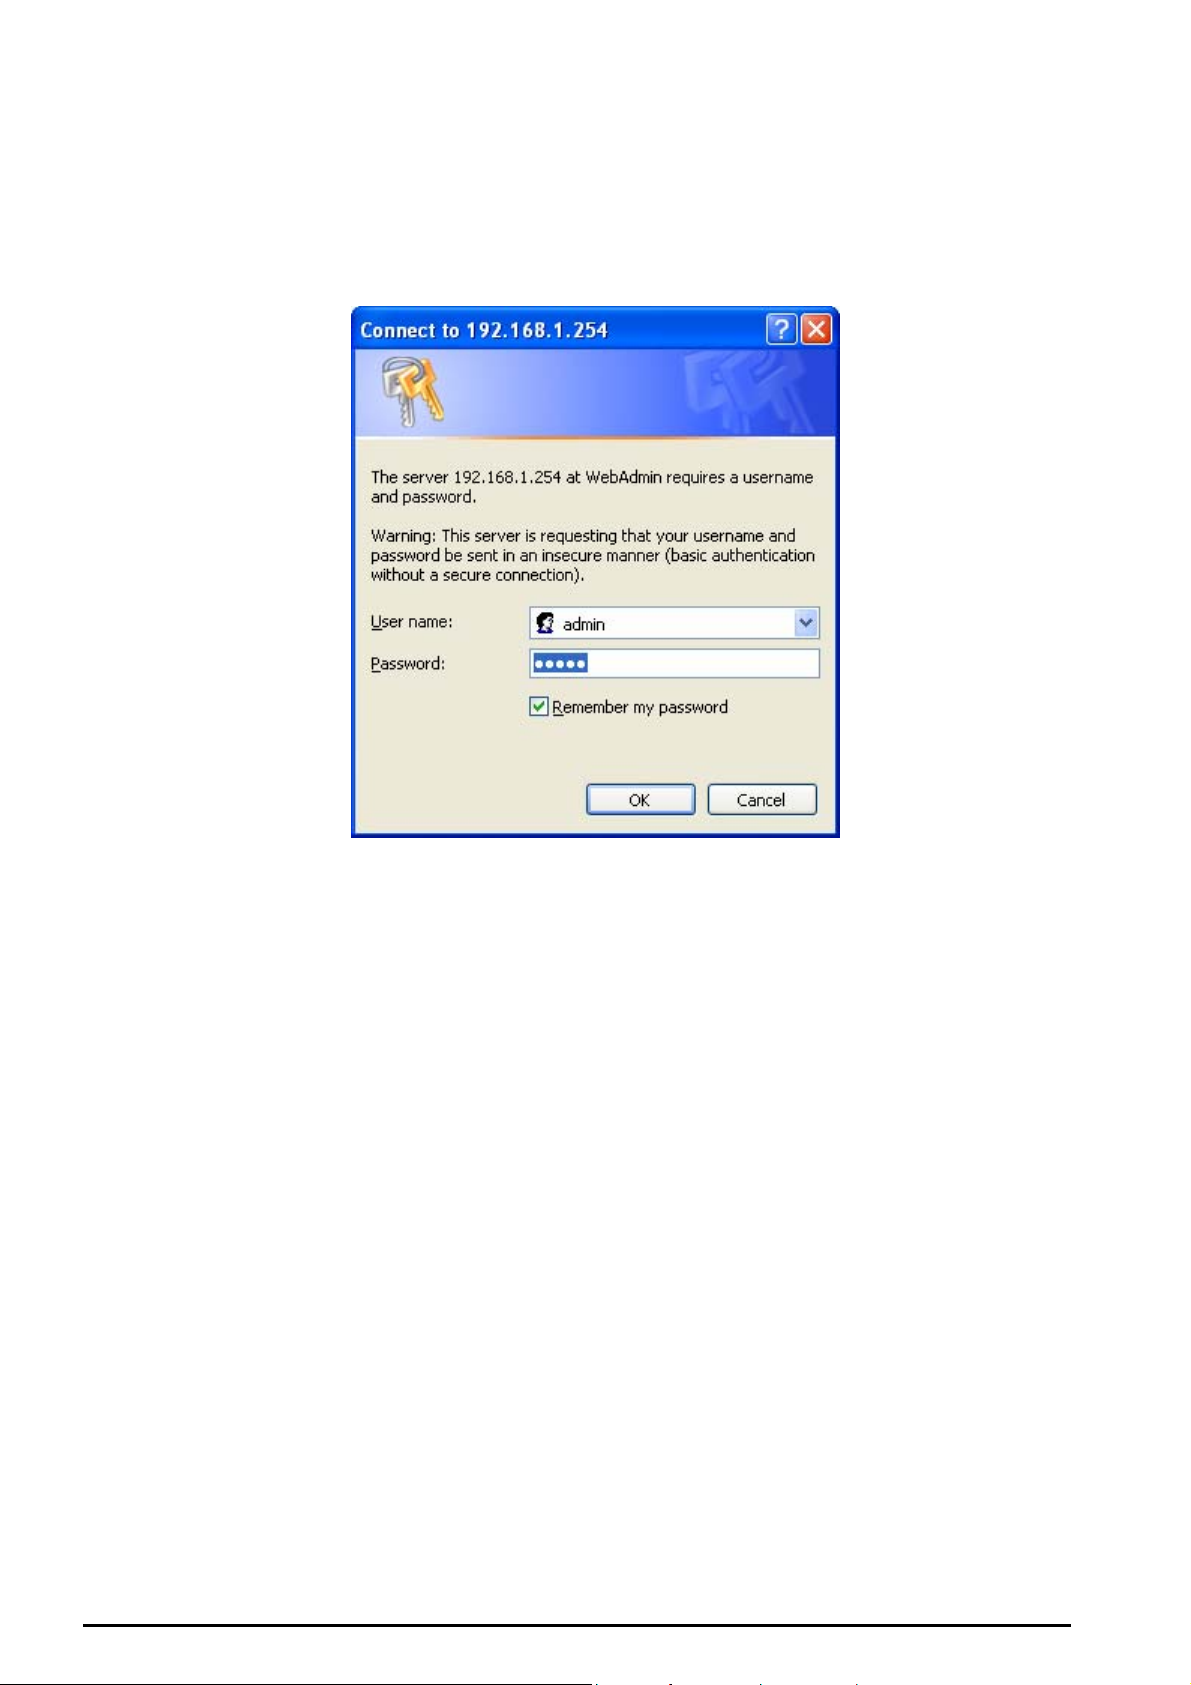
Configuring with your Web Browser
Open your web browser, enter the IP address of your router, which by default is 192.168.1.254, and click
“Go”, a user name and password window prompt will appear. The default username and password are
“admin” and “admin” respectively. (See Figure 3.14)
Figure 3.14: User name & Password Prompt Window
Congratulations! You are now successfully logon to the Router!
Chapter 3: Basic Installation
20
Page 25

Billion BiPAC 7402NX(L) 802.11n 3G/ADSL2+ (VPN) Firewall Router
Chapter 4: Configuration
At the configuration homepage, the left navigation pane where bookmarks are provided links you directly
to the desired setup page, including:
Status
- ADSL Status
- 3G Status
- EWAN Status
- IBurst Status
- ARP Table
- DHCP Table
- Routing Table
- NAT Sessions
- UPnP Portmap
- PPTP Status
- IPSec Status
- L2TP Status
- Event Log
- Error Log
- IDS Log
- Diagnostic
Quick Start
Configuration
- LAN
- WAN
- System
- Firewall
- VPN
- QoS
- Virtual Server
- Wake on LAN
- Time Schedule
- Advanced
Language (provides user interface in English and French languages)
Chapter 4: Configuration
21
Page 26

Billion BiPAC 7402NX(L) 802.11n 3G/ADSL2+ (VPN) Firewall Router
Status
ADSL Status
This section displays the ADSL overall status, which shows a number of helpful information such
as DSP firmware version.
Chapter 4: Configuration
22
Page 27

Billion BiPAC 7402NX(L) 802.11n 3G/ADSL2+ (VPN) Firewall Router
3G Status
This section displays the 3G Card’s overall status, which shows you a number of helpful information such
as the current signal strength and statistics on current and total bytes transferred and received (Note: 3G
card/modem does not come with the router).
Status: The current status of the 3G card.
Signal Strength: The signal strength bar indicates current 3G signal strength.
Network Name: The network name that the device is connected to.
Card Name: The name of the 3G card.
Card Firmware: The current firmware for the 3G card.
Card IMEI: the IMEI (International Mobile Equipment Identity) of the 3G card.
Card IMSI: International Mobile Subscriber Identification Number.
Current TX Bytes / Packets: The statistics of transmission, count for this call.
Current RX Bytes / Packets: The statistics of receive, count for this call.
Total TX Bytes / Packets: The statistics of transmission, count from system ready.
Total RX Bytes / Packets: The statistics of receive, count from system ready.
Current Connection Time: The duration for the current connection.
Chapter 4: Configuration
23
Page 28

Billion BiPAC 7402NX(L) 802.11n 3G/ADSL2+ (VPN) Firewall Router
Total Connection Time: The cumulative connection time.
Amount used: Show the traffic or hours has been used.
Billing period: The day from which the fee is charged.
Note: Only after you have checked to enable Usage Allowance
, the following information will be shown.
Chapter 4: Configuration
24
 Loading...