

Page 1

5
KOMPERNASS GMBH · BURGSTRASSE 21 · D-44867 BOCHUM
www.kompernass.com
ID-Nr.: KH808-08/08-V1
Page 2
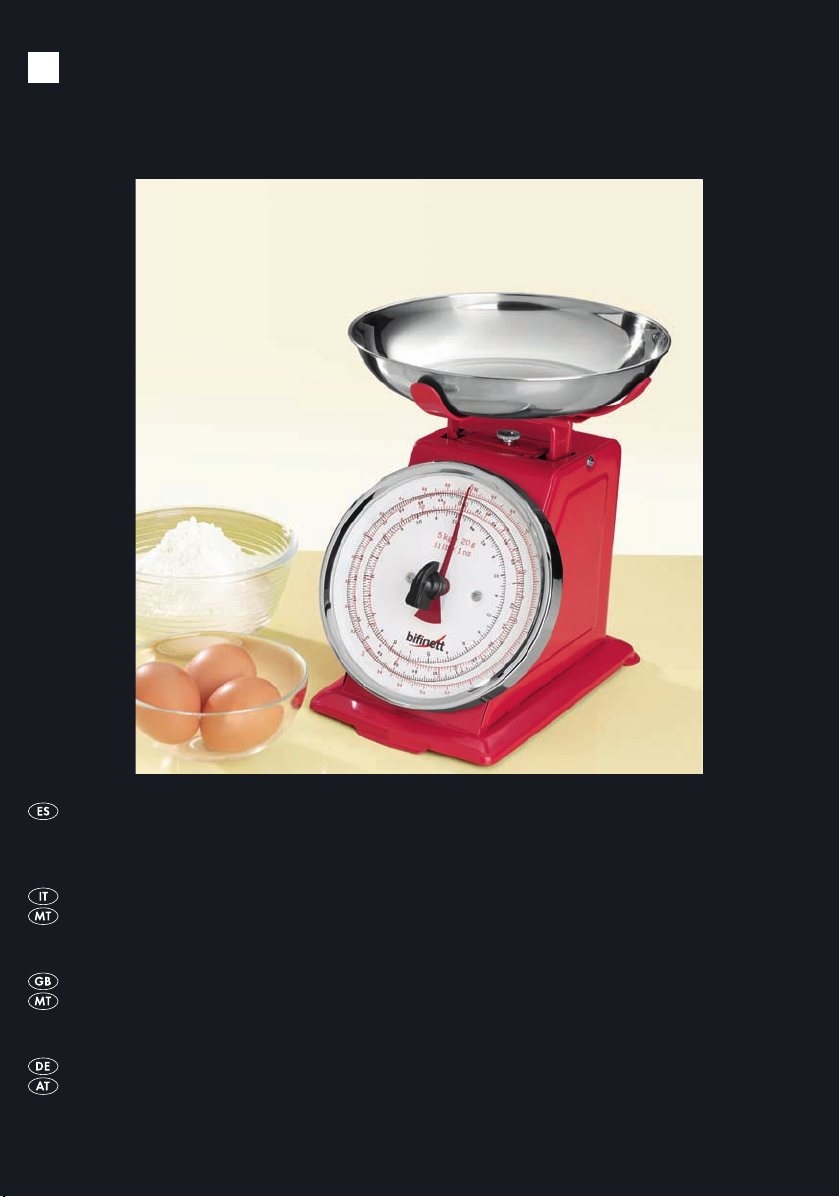
BALANZA DE COCINA
BILANCIA DA CUCINA
BALANZA DE COCINA
Instrucciones de uso
BILANCIA DA CUCINA
Istruzioni per l'uso
KITCHEN SCALES
Operating instructions
KÜCHENWAAGE
Bedienungsanleitung
KH808
Page 3

Page 4
KH 808
1
2
3
4
5
6
7
8
9
Page 5

Page 6

Page 7

BALANZA DE COCINA 2
¡Guardar estas instrucciones para preguntas posteriores – e, igualmente entregar éstas,
en caso de dar el aparato a terceras personas!
BILANCIA DA CUCINA 5
Conservare le presenti istruzioni per consultarle in futuro; in caso di cessione
dell'apparecchio a terzi, consegnare anche le istruzioni!
KITCHEN SCALES 8
Read the operating instructions carefully before using the appliance for the first time and
preserve this booklet for later reference. Pass the manual on to whomsoever might acquire
the appliance at a later date.
KÜCHENWAAGE 11
Lesen Sie die Bedienungsanleitung vor der ersten Verwendung aufmerksam durch und
heben Sie diese für den späteren Gebrauch auf. Händigen Sie bei Weitergabe des
Gerätes an Dritte auch die Anleitung aus.
- 1 -
Page 8

BALANZA DE COCINA
KH808
Uso conforme al previsto
La báscula de cocina está diseñada exclusivamente
para pesar alimentos en domicilios privados.
No utilice la báscula de cocina para usos comerciales
ni en el área industrial.
Indicaciones de seguridad
• Nunca someta a la báscula de cocina a un peso
superior a 5 kg. De hacerlo, la báscula podría
sufrir daños irreparables.
• No permita utilizar el aparato a personas (incluidos
los niños) cuyas facultades físicas, sensoriales o
mentales, así como su falta de conocimientos o
de experiencia, les impida hacer un uso seguro
del mismo si no están bajo vigilancia o han sido
instruidos correctamente acerca del uso del aparato.
• Vigile a los niños para asegurarse de que no
juegan con el aparato.
• Preste atención a no meter los dedos entre el
platillo y la báscula al echar lo que vaya a
pesar en el platillo. ¡Peligro de magulladuras!
Datos técnicos
Capacidad máxima: 5 kg/11 lb
Capacidad del bol: 1 l
Unidades de la escala: kg/lb
Designación: unidades de 20 g
unidades de 1 oz
Volumen de suministro
Báscula de cocina KH808
Platillo
Soporte del platillo
Instrucciones de uso
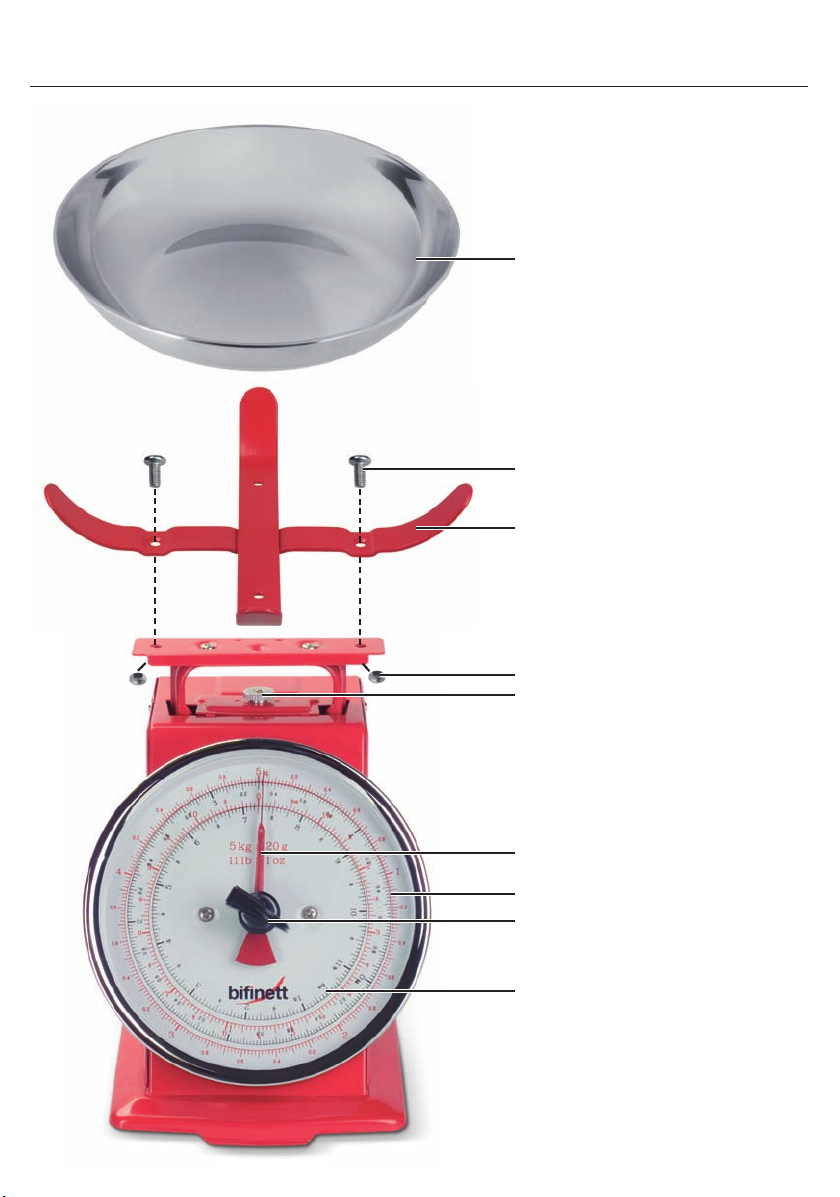
Descripción
1 Platillo
2 Tornillo
3 Soporte del platillo
4 Tuerca
5 Puesta a cero
6 Indicador
7 Escala fija
8 Asa
9 Disco escalar (función de taraje)
Montaje
Para montar la báscula de cocina necesita un destornillador de estrella. Para ayudarse, tome la hoja
desplegable del Manual de instrucciones de montaje.
• Retire de la báscula de cocina todo el material
de embalaje y todos los elementos de seguridad
para el transporte.
• Suelte los tornillos exteriores 2 del lado superior
de la báscula de cocina.
• Coloque el soporte del platillo 3 sobre la
báscula de cocina de manera que los orificios
para tornillos, situados en las cavidades, coincidan
exactamente encima de los orificios de la báscula.
• Introduzca los tornillos 2 por los orificios y
bloquéelos con las tuercas 4.
• Coloque el platillo 1 en el soporte 3.
- 2 -
Page 9

Emplazamiento
Coloque la báscula de cocina montada sobre una
base limpia y plana.
Manejo
Todas las indicaciones incluidas en estas instrucciones están en sistema métrico decimal (kg). Si desea
pesar con el sistema anglosajón de medidas (lb),
utilice la escala del interior del disco escalar 9,
y de la escala fija 7.
Pesar
• Coloque el disco escalar 9 del asa 8 en una
posición tal que los «0 kg» queden centrados
sobre la «posición de 12 horas».
• Gire el dispositivo de puesta a cero 5 hasta
que el indicador 6 quede en la marca de 5 kg
de la escala fija 7.
• Introduzca en el platillo el producto que desee
pesar 1.
Se puede leer el peso en las escalas.
Función acumulativa (función de taraje)
Con ayuda del disco escalar 9 y de la escala fija
7 puede pesar porciones y poner a «0» la báscula
entre los resultados intermedios.
¡Cuidado! ¡Daños en el aparato!
No someta la báscula nunca a más de 5 kg de
peso. Esto podría estropear la báscula de forma
irreparable.
• Puede repetir estos pasos varias veces, pero
nunca coloque más de 5 kg en total sobre el
platillo 1!
Cuidado y limpieza
Limpie la báscula de cocina con un paño húmedo.
En caso de suciedad persistente añada al paño un
detergente suave.
Evacuación
Evacue el aparato en un centro de evacuación
autorizado a través de las instalaciones de evacuación
comunitarias.
Preste atención a las normas en vigor.
En caso de duda póngase en contacto con las
instalaciones municipales de evacuación de residuos.
El material de embalaje debe desecharse
de forma respetuosa con el medio ambiente.
• Coloque en el platillo el producto que desee
pesar 1.
Lea el peso en el disco escalar 9.
• Gire ahora el disco escalar 9 hasta la marca
de «0 kg» quede justo en el indicador 6.
• Añada otra porción al platillo 1. Puede leer el
peso de la porción añadida en el disco escalar
9. En la escala fija 7 se lee el peso total.
Garantía y asistencia técnica
Este aparato tiene 3 años de garantía desde la
fecha de compra. . El aparato ha sido fabricado
cuidadosamente y ha sido probado antes de su entrega. Guarde el comprobante de caja como justificante
de compra. Si necesitara hacer uso de la garantía,
póngase en contacto por teléfono con su punto de
servicio habitual. Éste es el único modo de garantizar
un envío gratuito.
- 3 -
Page 10

La garantía cubre sólo fallos de material o fabricación,
pero no cubre las piezas sometidas a desgaste o
daños en las piezas frágiles, como p. ej. interruptores
o baterías. Este producto ha sido diseñado exclusivamente para el uso particular y no para el uso
industrial.
En caso de manipulación indebida e incorrecta, uso
de la fuerza y en caso de abrir el aparato personas
extrañas a nuestros centros de asistencia técnica
autorizados, la garantía pierde su validez. Esta
garantía no reduce en forma alguna sus derechos
legales.
Kompernass Service España
C/Invención 7
Polígono Industrial Los Olivos
28906 Getafe – Madrid
Tel.: 902/430758
Fax: 91/6652551
e-mail: support.es@kompernass.com
Importador
KOMPERNASS GMBH
BURGSTRASSE 21
44867 BOCHUM, (ALEMANIA)
www.kompernass.com
- 4 -
Page 11

BILANCIA DA CUCINA
KH808
Uso conforme alla destinazione
La bilancia da cucina è concepita esclusivamente
per pesare alimenti ad uso domestico privato.
Non utilizzare la bilancia da cucina a scopi
commerciali né in ambito industriale.
Avvertenze di sicurezza
• Non superare mai i 5 kg di peso sulla bilancia
da cucina. La bilancia potrebbe subire danni
irreparabili.
• Questo apparecchio non è indicato per l'uso da
parte di persone (inclusi bambini) con limitate
capacità fisiche, sensoriali o mentali o prive dell'esperienza e/o della conoscenza necessaria, a
meno che tali persone non vengano sorvegliate
da un responsabile per la sicurezza o abbiano
ricevuto indicazioni sull'impiego dell'apparecchio.
• Sorvegliare i bambini per assicurarsi che non
giochino con l'apparecchio.
• Accertarsi che le dita non si trovino tra il recipiente
e la bilancia da cucina mentre si stanno versando
alimenti nel recipiente. Pericolo di schiacciamento!
Dati tecnici
Portata max: 5 kg/11 lb
Capienza del recipiente: 1 l
Unità di misura della scala: kg/lb
Graduazione: stadi da 20 g
stadi da 1 oz
Materiale in dotazione
Bilancia da cucina KH808
Recipiente
Supporto a croce per recipiente
Istruzioni per l'uso
Descrizione
1 Recipiente
2 Vite
3 Supporto a croce per recipiente
4 Dado
5 Azzeratore di peso
6 Ago
7 Scala fissa
8 Impugnatura
9 Disco graduato (funzione taratura)
Montaggio
Per il montaggio della bilancia da cucina occorre
un cacciavite a croce. Per il montaggio aiutarsi con
la pagina ripiegata delle istruzioni per l'uso.
• Rimuovere tutto il materiale dell'imballaggio e
tutti i fermagli per il trasporto in sicurezza della
bilancia da cucina.
• Svitare le viti esterne 2 sul lato superiore della
bilancia da cucina.
• Posizionare il supporto a croce per recipiente 3
sulla bilancia da cucina, in modo tale che i fori
per le viti che si trovano nelle cavità si trovino
esattamente sopra i fori per le viti della bilancia
da cucina.
• Spingere le viti 2 attraverso gli appositi fori e
serrarle con i dadi 4.
• Collocare il recipiente 1 sul supporto a croce 3.
- 5 -
Page 12

Montaggio
Posizionare la bilancia da cucina montata su una
superficie piana pulita.
Azionamento
Tutti i dati riportati nel presente manuale di istruzioni
per l'uso si riferiscono al Sistema Internazionale metrico (kg). Se si intende utilizzare il Sistema Inglese
(lb), fare riferimento alla scala interna sia sul disco
graduato 9 sia sulla scala fissa 7.
Pesatura
• Posizionare il disco graduato 9 dall'impugnatura 8 in modo tale che la misura "0 kg" si trovi
in alto al centro in "posizione ore 12".
• Ruotare l'azzeratore di peso 5 finché l'ago 6
raggiunge il contrassegno 5kg sulla scala fissa 7.
• Introdurre l'alimento da pesare nel recipiente 1.
Si può leggere il peso su entrambe le scale.
Funzione di pesatura parziale
(funzione taratura)
Con l'ausilio del disco graduato 9 e della scala
fissa 7 è possibile effettuare una pesatura parziale
e impostare poi la bilancia su "0" per pesare ulteriori
quantità parziali.
Attenzione! Danni all'apparecchio!
Non superare mai i 5 kg di peso sulla bilancia da
cucina. La bilancia potrebbe subire danni irreparabili.
• Si possono ripetere più volte queste operazioni,
senza però introdurre mai più di 5 kg all'interno
del recipiente 1!
Pulizia e cura
Pulire la bilancia da cucina con un panno umido. In
caso di sporco ostinato, versare un po' di detergente
delicato sul panno.
Smaltimento
Smaltire l'apparecchio presso un'azienda autorizzata
o presso l'ente comunale di smaltimento.
Rispettare le prescrizioni attualmente in vigore.
In caso di dubbio, mettersi in contatto con l'ente di
smaltimento competente.
Smaltire tutti i materiali dell'imballaggio in
modo ecocompatibile.
• Introdurre l'alimento da pesare nel recipiente 1.
Leggere il peso sul disco graduato 9.
• Ruotare il disco graduato 9 finché la misura
"0 kg" si trova esattamente sopra l'ago 6.
• Introdurre l'alimento da sottoporre a pesatura
parziale nel recipiente 1. Sul disco graduato 9
si può leggere il peso parziale (quantità aggiunta).
Sulla scala fissa 7 si può leggere il peso totale.
- 6 -
Page 13

Garanzia e assistenza
Questo apparecchio è garantito per tre anni a partire
dalla data di acquisto. L'apparecchio è stato prodotto
con cura e debitamente collaudato prima della
consegna. Conservare lo scontrino come prova
d'acquisto. Nei casi contemplati dalla garanzia,
mettersi in comunicazione telefonicamente con il
centro di assistenza più vicino. Solo in tal modo è
possibile garantire una spedizione gratuita della
merce.
La garanzia copre solo i difetti del materiale o di
fabbricazione. Il prodotto è destinato esclusivamente
all'uso domestico e non a quello commerciale.
La garanzia decade in caso di impiego improprio
o manomissione, uso della forza e interventi non
eseguiti dalla nostra filiale di assistenza autorizzata.
Questa garanzia non costituisce alcun limite ai diritti
legali del consumatore.
Kompernass Service Italia
Corso Lino Zanussi 11
33080 Porcia (PN)
Tel.: 0434/1851001
Fax: 0434/1851001
e-mail: support.it@kompernass.com
Importatore
KOMPERNASS GMBH
BURGSTRASSE 21
44867 BOCHUM, GERMANY
www.kompernass.com
- 7 -
Page 14

KITCHEN SCALES
KH 808
Intended Use
This kitchen scale is designed for the weighing of
foodstuffs in domestic households only.
Do not use the scale for commercial purposes or in
industrial applications.
Safety instructions
• Never burden the kitchen scale with more than
5 kg. This could irreparably damage the scales.
• This appliance is not intended for use by individuals
(including children) with restricted physical, physiological or intellectual abilities or deficiences in
experience and/or knowledge unless they are
supervised by a person responsible for their safety
or receive from this person instruction in how the
appliance is to be used.
• Children should be supervised to ensure that
they do not play with the appliance..
• Ensure that your fingers are not between the
bowl and the kitchen scale when filling the bowl
with items to be weighed. Risk of pinching!
Technical data
Maximum weighing range: up to 5 kg/11lb
Capacity of the bowl: 1 ltr
Units on the scale: kg/lb
Division: 20 gr. steps
1 oz steps
Items supplied
Kitchen Scales KH 808
Bowl
Bowl holder
Operating instructions
Description
1 Bowl
2 Screw
3 Bowl holder
4 Nut
5 Zero adjuster
6 Indicator
7 fixed scale
8 Grip
9 Scale disc (Tare Function)
Assembly
For assembly of the kitchen scale you require a
cross-head screwdriver. As an assembly assistent,
use the fold-out page of the operating instructions.
• Remove all packaging materials and all transport
restraints from the kitchen scales.
• Loosen the outer screws 2 on the upper side of
the kitchen scales.
• Place the bowl holder 3 on the kitchen scale so
that the screwholes, located in the recesses, lie
directly over the screwholes in the kitchen scales.
• Push the screws 2 through the screwholes and
secure them with the nuts 4.
• Place the bowl 1 in the bowl holder 3.
- 8 -
Page 15

Placement
Place the fully assembled kitchen scale onto a clean
and level surface.
Operation
All details in the instructions refer to the metric system
of measurement (kg). Should you wish to weigh with
the Anglo-American system of measurement (lb),
please use the inner scale on the scale disc 9, as
well as on the fixed scale 7.
Weighing
• Position the scale disc 9 on the grip 8 such
that the “0 kg” stands on the top in the middle,
at the “12-o-clock” location.
• Turn the zero adjuster 5 until the indicator 6
points to the 5kg marking on the fixed scale 7.
• Place the item(s) to be weighed in the bowl 1.
You can read the weight off on the scale.
Caution! Appliance damage!
Never burden the kitchen scale with more than 5 kg.
This could irreparably damage the scales.
• You can repeat these steps several times, however,
never burden the scale with more than 5 kg in
total in the bowl 1!
Cleaning and care
Clean the kitchen scale with a moist cloth. For stubborn
soiling use a mild detergent on the cloth.
Disposal
Dispose of the appliance through an approved disposal centre or at your community waste facility.
Observe the currently applicable regulations.
In case of doubt, please contact your waste disposal
centre.
Weight-add function (Tare function)
With the help of the scale disc 9 and the fixed
scale 7 you can weigh partial quantities and, for
the weighing of additional partial quantities, reset
the scale back to “0”.
• Place the item(s) to be weighed in the bowl 1.
Read off the weight on the scale disc 9.
• Now turn the scale disc 9 until the “0 kg”
stands directly over the indicator 6.
• Add a further partial quantity to the bowl 1. On
the scale disc 9 you can read off the weight of
the partial quantity. On the fixed scale 7 you
can read off the weight of the total ingredients.
Dispose of all packaging materials in an
environmentally friendly manner.
Warranty and Service
You receive a 3-year warranty for this device as of
the purchase date. The appliance has been manufactured with care and meticulously examined before
delivery. Please retain your receipt as proof of purchase. In the case of a warranty claim, please make
contact by telephone with our service department.
Only in this way can a post-free despatch for your
goods be assured.
- 9 -
Page 16

The warranty covers only claims for material and
manufacturing defects, not for worn parts or for
damage to fragile components, e.g. buttons or
batteries. This product is for private use only and is
not intended for commercial use.
The warranty becomes void in the event of abusive
and improper handling, use of force and internal
modifications not carried out by our authorized
Service Centre. Your statutory rights are not restricted
in any way by this warranty.
DES Ltd
Units 14-15
Bilston Industrial Estate
Oxford Street
Bilston
WV14 7EG
Tel.: 0870/787-6177
Fax: 0870/787-6168
e-mail: support.uk@kompernass.com
Irish Connection
Harbour view
Howth
Co. Dublin
Tel: 00353 (0) 87 99 62 077
Fax: 00353 18398056
e-mail: support.ie@kompernass.com
Importer
KOMPERNASS GMBH
BURGSTRASSE 21
44867 BOCHUM, GERMANY
www.kompernass.com
- 10 -
Page 17

KÜCHENWAAGE KH808
Bestimmungsgemäßer
Gebrauch
Die Küchenwaage ist nur zum Abwiegen von
Lebensmitteln in privaten Haushalten konzipiert.
Benutzen Sie die Küchenwaage nicht zu gewerblichen Zwecken oder im industriellen Bereich.
Sicherheitshinweise
• Belasten Sie die Küchenwaage nie mit mehr als
5 kg. Die Waage kann irreparabel beschädigt
werden.
• Dieses Gerät ist nicht dafür bestimmt, durch
Personen (einschließlich Kinder) mit eingeschränkten physischen, sensorischen oder
geistigen Fähigkeiten oder mangels Erfahrung
und/oder mangels Wissen benutzt zu werden,
es sei denn, sie werden durch eine für ihre
Sicherheit zuständige Person beaufsichtigt oder
erhielten von ihr Anweisungen, wie das Gerät
zu benutzen ist.
• Kinder sollten beaufsichtigt werden, um sicherzustellen, dass sie nicht mit dem Gerät spielen.
• Achten Sie darauf, dass sich keine Finger zwischen Schale und Küchenwaage befinden, wenn
Sie das Wiegegut in die Schale füllen. Quetschgefahr!
Technische Daten
Maximaler Wiegebereich: 5 kg/11lb
Kapazität der Schüssel: 1 l
Einheiten der Skala: kg/lb
Einteilung: 20 g -Schritte
1 oz - Schritte
Lieferumfang
Küchenwaage KH808
Schale
Schalenkreuz
Bedienungsanleitung
Beschreibung
1 Schale
2 Schraube
3 Schalenkreuz
4 Mutter
5 Nullsteller
6 Zeiger
7 feste Skala
8 Griff
9 Skala-Scheibe (Tarierfunktion)
Montage
Sie benötigen zur Montage der Küchenwaage einen Kreuzschlitzschraubendreher. Nehmen Sie die
Ausklappseite der Bedienungsanleitung für die
Montage zur Hilfe.
• Entfernen Sie das gesamte Verpackungsmaterial
und alle Transportsicherungen von der Küchenwaage.
• Lösen Sie die äußeren Schrauben 2 an der
Oberseite der Küchenwaage.
• Setzen Sie das Schalenkreuz 3 so auf die
Küchenwaage, dass die Schraublöcher, die sich
in den Vertiefungen befinden, genau über den
Schraublöchern an der Küchenwaage liegen.
• Schieben Sie die Schrauben 2 durch die
Schraublöcher und kontern Sie diese mit den
Muttern 4.
• Setzen Sie die Schale 1 in das Schalenkreuz
3.
- 11 -
Page 18

Aufstellen
Stellen Sie die fertig montierte Küchenwaage auf
einen sauberen und ebenen Untergrund.
Bedienen
Alle Angaben in der Anleitung beziehen sich auf
das metrische Maßsystem (kg). Wenn Sie mit dem
angloamerikanischen Maßsystem (lb) wiegen wollen, benutzen Sie bitte die jeweils innen liegende
Skala auf der Skala-Scheibe 9, sowie auf der festen Skala 7.
Wiegen
• Stellen Sie die Skala-Scheibe 9 am Griff 8 so
ein, dass die “0 kg” oben in der Mitte auf der
“12-Uhr-Position” steht.
• Drehen Sie den Nullsteller 5 so lange, bis der
Zeiger 6 auf der 5kg-Markierung auf der festen
Skala 7 steht.
• Füllen Sie das zu wiegende Gut in die Schale
1.
Sie können das Gewicht an den Skalen ablesen.
Achtung! Geräteschäden!
Belasten Sie die Küchenwaage nie mit mehr als
5 kg. Die Waage kann irreparabel beschädigt werden.
• Sie können diese Schritte mehrmals wiederholen,
geben Sie jedoch nie mehr als insgesamt 5 kg in
die Schale 1!
Reinigen und Pflegen
Reinigen Sie die Küchenwaage mit einem feuchten
Tuch. Geben Sie bei hartnäckigeren Verschmutzungen ein mildes Spülmittel auf das Tuch.
Entsorgen
Entsorgen Sie das Gerät über einen zugelassenen
Entsorgungsbetrieb oder über Ihre kommunale
Entsorgungseinrichtung.
Beachten Sie die aktuell geltenden Vorschriften.
Setzen Sie sich im Zweifelsfall mit Ihrer Entsorgungseinrichtung in Verbindung.
Zuwiege-Funktion (Tarierfunktion)
Sie können mit Hilfe der Skala-Scheibe 9 und der
festen Skala 7 Teilmengen wiegen und für das
Wiegen weiterer Teilmengen die Waage auf “0”
stellen.
• Geben Sie das zu wiegende Gut in die Schale
1.
Lesen Sie das Gewicht auf der Skala-Scheibe 9
ab.
• Drehen Sie nun die Skala-Scheibe 9 so weit, bis
die “0 kg” genau über dem Zeiger 6 steht.
• Geben Sie eine weitere Teilmenge in die Schale
1. Auf der Skala-Scheibe 9 können Sie das
Gewicht der Teilmenge ablesen. Auf der festen
Skala 7 können Sie das Gewicht der gesamten
Menge ablesen.
Führen Sie alle Verpackungsmaterialien
einer umweltgerechten Entsorgung zu.
Garantie und Service
Sie erhalten auf dieses Gerät 3 Jahre Garantie ab
Kaufdatum. Das Gerät wurde sorgfältig produziert
und vor Anlieferung gewissenhaft geprüft. Bitte bewahren Sie den Kassenbon als Nachweis für den
Kauf auf. Bitte setzen Sie sich im Garantiefall mit
Ihrer Servicestelle telefonisch in Verbindung. Nur so
kann eine kostenlose Einsendung Ihrer Ware
gewährleistet werden.
- 12 -
Page 19

Die Garantieleistung gilt nur für Material- oder Fabrikationsfehler, nicht aber für Verschleißteile oder
für Beschädigungen an zerbrechlichen Teilen, z. B.
Schalter oder Akkus. Das Produkt ist lediglich für
den privaten und nicht für den gewerblichen
Gebrauch bestimmt.
Bei missbräuchlicher und unsachgemäßer Behandlung, Gewaltanwendung und bei Eingriffen, die
nicht von unserer autorisierten Service-Niederlassung vorgenommen wurden, erlischt die Garantie.
Ihre gesetzlichen Rechte werden durch diese Garantie nicht eingeschränkt.
Schraven
Service- und Dienstleistungs GmbH
Gewerbering 14
47623 Kevelaer, Germany
Tel.: +49 (0) 180 5 008107
(14 Ct/Min. aus dem dt. Festnetz ggf. abweichende Preise
aus dem Mobilfunknetz)
Fax: +49 (0) 2832 3532
e-mail: support.de@kompernass.com
Kompernaß Service Österreich
Rittenschober KG
Gmundner Strasse 10
A-4816 Gschwandt
Tel.: +43 (0) 7612 6260516
Fax: +43 (0) 7612 626056
e-mail: support.at@kompernass.com
Importeur
KOMPERNASS GMBH
BURGSTRASSE 21
44867 BOCHUM, GERMANY
www.kompernass.com
- 13 -
 Loading...