

Page 1
KH 1108
MICROWAVE OVEN WITH GRILL
Page 2
Status 03/2004 · Ident.-No.: 1108-032004-1_GB
Kompernaß Handelsgesellschaft mbH · Burgstraße 21 · D-44867 Bochum (Germany)
Page 3
Microwave Oven with Grill KH 1108
Page 4

Introduction / Contents
Please read these instructions carefully before
installing and starting your microwave oven. Please
note the SERIAL NUMBER which can be found on
the type plate of your microwave oven into the
adjacent field and store this information for later.
SERIAL NUMBER:
4
Safety Notes
• PRECAUTIONARY MEASURES
TO PREVENT POSSIBLE EXCESSIVE CONTACT
WITH MICROWAVE ENERGY ................................................ Page 05
IMPORTANT SAFETY NOTES ................................................ Page 05
Technical Notes
• TECHNICAL INFORMATION ................................................ Page 06
• BEFORE CONTACTING CUSTOMER SERVICES ................................................ Page 06
• INSTALLATION ................................................ Page 06
• NOTES ON EARTHING ................................................ Page 06
• RADIO INTERFERENCE ................................................ Page 07
• COOKING WITH YOUR MICROWAVE ................................................ Page 07
• GUIDELINE ON COOKING DISHES ................................................ Page 07
Parts and Control Panel
• DESIGNATION OF PARTS ................................................ Page 08
• CONTROL PANEL ................................................ Page 08
Operation
• SETTING THE CLOCK ................................................ Page 09
• COOKING WITH YOUR MICROWAVE ................................................ Page 09
• GRILLING ................................................ Page 09
• COMBINTION COOKING ................................................ Page 09
• AUTOMATIC COOKING ................................................ Page 09
• DEFROSTING BY WEIGHT ................................................ Page 10
• QUICK / JET DEFROST ................................................ Page 10
• MULTI STAGE COOKING ................................................ Page 10
• TIMED START ................................................ Page 10
• QUICK START ................................................ Page 10
• CHILD-PROOF LOCK ................................................ Page 11
• MEMORY ................................................ Page 11
Cleaning and Maintenance ................................................ Page 11
Disposal ................................................ Page 12
Warranty ................................................ Page 12
Defrosting ................................................ Page 13
Cooking ................................................ Page 14
Grilling ................................................ Page 15
Tips ................................................ Page 16
Recipe suggestions ................................................ Page 17
6
7
9
8
10
11
13
12
1
3
5
4
2
Page 5

Safety Notes
PRECAUTIONARY MEASURES
TO PREVENT EXCESSIVE CONTACT
WITH MICROWAVE ENERGY
• Do not attempt to operate this microwave oven
with an opened door since operating the microwave
oven with an open door can lead to being exposed
to hazardous microwaves. It is important not to
break open or manipulate the safety lock.
• Do not tuck anything between the oven front and
door and ensure that no impurities or residues from
cleaning agents gather on the sealing surfaces.
• Do not operate the microwave oven if damaged.
It is of utmost importance that the door of the oven
closes properly and that there is no damage to:
- the door (bent), - hinges and locks (broken or
loose),
- door seals and sealing surfaces.
Have the appliance re-set or repaired by the listed
customer service branch or respectively qualified
skilled staff only.
IMPORTANT SAFETY NOTES
When using electrical appliances elementary
precautionary measures must be adhered to
for your safety, including:
WARNING: To reduce the risk of burns, electric
shock, fires, injuries or excessive contact with
microwaves:
Read all instructions prior to use.
• Use this appliance only according to its intended
purpose and as directed in this manual. Do not
use any corrosive chemicals or vapours for this
equipment. This type of oven is designed especially
for heating, cooking or drying foods. It is not
designed for industrial use or use in laboratories.
• Do not operate the microwave when empty.
• Do not operate this appliance if damage is visible
to the cable or plugs, if it does not operate properly
or is damaged or has been dropped.
If the power cable is defect it must be replaced by
the manufacturer or his maintenance partner or
similarly qualified skilled staff so as to avoid any
danger.
• WARNING: Allow the unsupervised operation of the
microwave by children only after carefully instructing
them on how to operate the microwave to ensure
the risk-free use of the oven and that children
understand the risks in the event of improper
handling.
• To minimise the risk of fire in the microwave:
Keep an eye on the microwave at all times when
heating food in plastic or paper containers since the
materials may ignite.
• Remove wire closures from paper or plastic bags
before placing them in the microwave.
• Should you notice smoke, switch off the appliance
or disconnect the plug and keep the door closed so
as to suffocate possible flames.
• Do not use the inside of the microwave for storage.
Do not leave paper articles, cooking utensils or food
in the microwave if it is not being used.
• WARNING: Fluids and other food must not be
heated in tightly sealed containers as they may
explode.
When heating beverages in the microwave,
spattering may be delayed if the beverage is brought
to boil. Please handle the container with particular
care.
• Do not deep-fry in the microwave. Hot oil may
damage microwave parts and utensils or even lead
to skin burns.
• Eggs in their shell and hard boiled eggs should not
be heated in the microwave as they may even
explode after microwave heating has been terminated.
• Pierce thick-skinned foods such as potatoes, whole
pumpkins, apples, and chestnuts before cooking.
• The content of baby bottles and baby jars should
be stirred or shaken.
Caution: Prior to consumption check the
temperature in order to avoid life-threatening
burns to the baby.
• Cooking utensils may heat up from the heat exerted
by the food and may have to be handled with an
oven cloth only.
Cooking utensils should be checked as to suitability
for use in microwave ovens.
WARNING: Maintenance and repair work which
requires the removal of the cover which serves as
protection against microwaves endangers the life of
persons other than skilled staff.
1
2
5
Page 6

Technical Notes
TECHNICAL INFORMATION
Power: 230 V~50 Hz,
800 W (microwave)
1000 W (grill)
Actual frequency: 2450 MHz
External dimensions: 295 (H), 458 (W),
380 mm (D)
Inner dimensions: 206 (H), 300 (W),
302 mm (D)
Capacity: 20 ltr
Standard cooking: Turntable system
Ø 270 mm
Net weight: approx. 15,1 kg
BEFORE CONTACTING CUSTOMER SERVICES
If the microwave is not working:
- Verify that the plug is correctly connected to the
outlet. If not, completely disconnect the plug from
the outlet, wait 10 seconds and then reconnect.
- Check if a fuse has blown and if the voltage safety
switch is still on. If both seem to operate correctly,
test the outlet with another appliance.
- Check if the control panel programming is correct
and if the timer has been set.
- Check if the door has been firmly closed, with the
lock of the door engaged, otherwise the generation
of microwaves in the oven is blocked.
If none of the above remedies the problem, contact
the named customer services branch or a qualified
expert. Do not attempt to modify or repair the
appliance independently.
INSTALLATION
Ensure that the packaging materials have been
completely removed from the inside of the door.
WARNING: Inspect the oven for damages such
as a distorted or bent door, damaged door seals
and seal surfaces, defect or loose door hinges and
locks as well as grooves on the inside or on the
door. If there is visible damage, do not operate the
oven and consult a qualified maintenance expert.
• This microwave must be placed on a level, stable
base which can bear the microwave's own weight
plus the heaviest food which most likely will be
cooked in the microwave.
• Do not position the microwave at a location where
heat, dampness or high humidity arise, and do not
place it close to inflammable materials.
• To function properly the oven requires sufficient air
circulation. Allow for 20 cm of space above the
oven, and 10 cm behind, and to the sides 5 cm
respectively.
• Do not cover or block any openings of the appliance.
Do not remove the microwave's feet.
• Do not operate the oven unless the glass turntable,
rotating ring, and drive shaft have been correctly
positioned.
• Check if the power cable is not damaged and does
not lead underneath the oven through or over
a hot or sharp surface. The outlet must be freely
accessible to be able to remove the plug in the
event of an emergency.
• Do not use the oven outdoors.
EARTHING
The present appliance must be earthed. This oven
is equipped with a cable featuring an earth lead with
earth plug. This requires a specially installed and
earthed wall connection. In the event of a short
circuit the earthed connection prevents the risk
of an electric shock via the discharge cable. It is
recommended to use an independent electric circuit
for the oven which supplies the oven only. The use
of high voltage is dangerous and can cause fires and
other accidents which may damage the oven.
WARNING: The improper handling of the earth plug
can lead to the risk of an electric shock.
Note:
If you have any questions regarding earthed
connections or the electric instructions ask an
electric expert or maintenance specialist.
Neither the manufacturer nor the dealer can accept
liability for damage to the oven or for personal injury
resulting from the non-observance of the procedure
for the electrical connections. The wires of this
electric main can be identified according to the follo
wing colour code:
Green and yellow = earth; blue = NEUTRAL
brown = current bearing
3
6
Page 7

Technical Notes
RADIO INTERFERENCE
Operating the microwave can lead to interference
with your radio, television or similar equipment.
In the event of such interference the following
measures can help reduce or eliminate such
interference:
- Clean the door and sealing surface of the oven.
- Redirect the receiving antenna of the radio or
television.
- Place microwave at another place than where
the receiver is.
- Remove the microwave from the receiver.
Plug the microwave into another outlet so that the
microwave and receiver are supplied by a different
leg of the power circuit.
COOKING WITH YOUR MICROWAVE
• Arrange your food with consideration.
• The thickest parts should be close to the edge.
• Observe the cooking time. Select the shortest
cooking time and extend it if need be. Food cooked
excessively long can start smoking and ignite.
• Cover the food while cooking with a lid. The lid will
prevent the food from spattering and contributes
to the even cooking of the food.
• Turn the food during microwave preparation once so
that e.g. chicken or Hamburger dishes are more
quickly cooked.
• Large foods such as roast meat must be turned at
least five times.
• Rearrange food items like meat balls completely
after half of the cooking time has passed by turning
them and rotating those which previously were at
the centre of the dish, to the edge.
GUIDELINE ON COOKING DISHES
The ideal material for a microwave oven is
microwave permeable, i.e. it allows energy to pass
through the container in order to heat the food.
Only use a temperature sensor recommended for
this oven. Microwaves can not permeate metal.
For this reason, do not use metal containers or
metal dishes. Do not use any products made of
recycled paper when heating in the microwave as
they may contain minute metal fragments which
may cause sparks and/or fires. It is recommended
to use round/oval dishes instead of square/oblong
dishes since food caught in the corners may easily
boil away.
The bottom table is a general guideline for choosing
the correct dishes.
COOKING MICRO- GRILL COMBI
DISHES WAVE NATION
Heatproof glass Yes Yes Ye s
Non-heatproof
glass No No No
Heatproof
ceramics Yes Yes Ye s
Microwave
plastic dishes Yes No No
Kitchen towel Yes No No
Metal tray /plate No Yes No
Metal base No Yes No
Tin foil &
tin containers No Yes No
7
Page 8

Parts and Control Panel
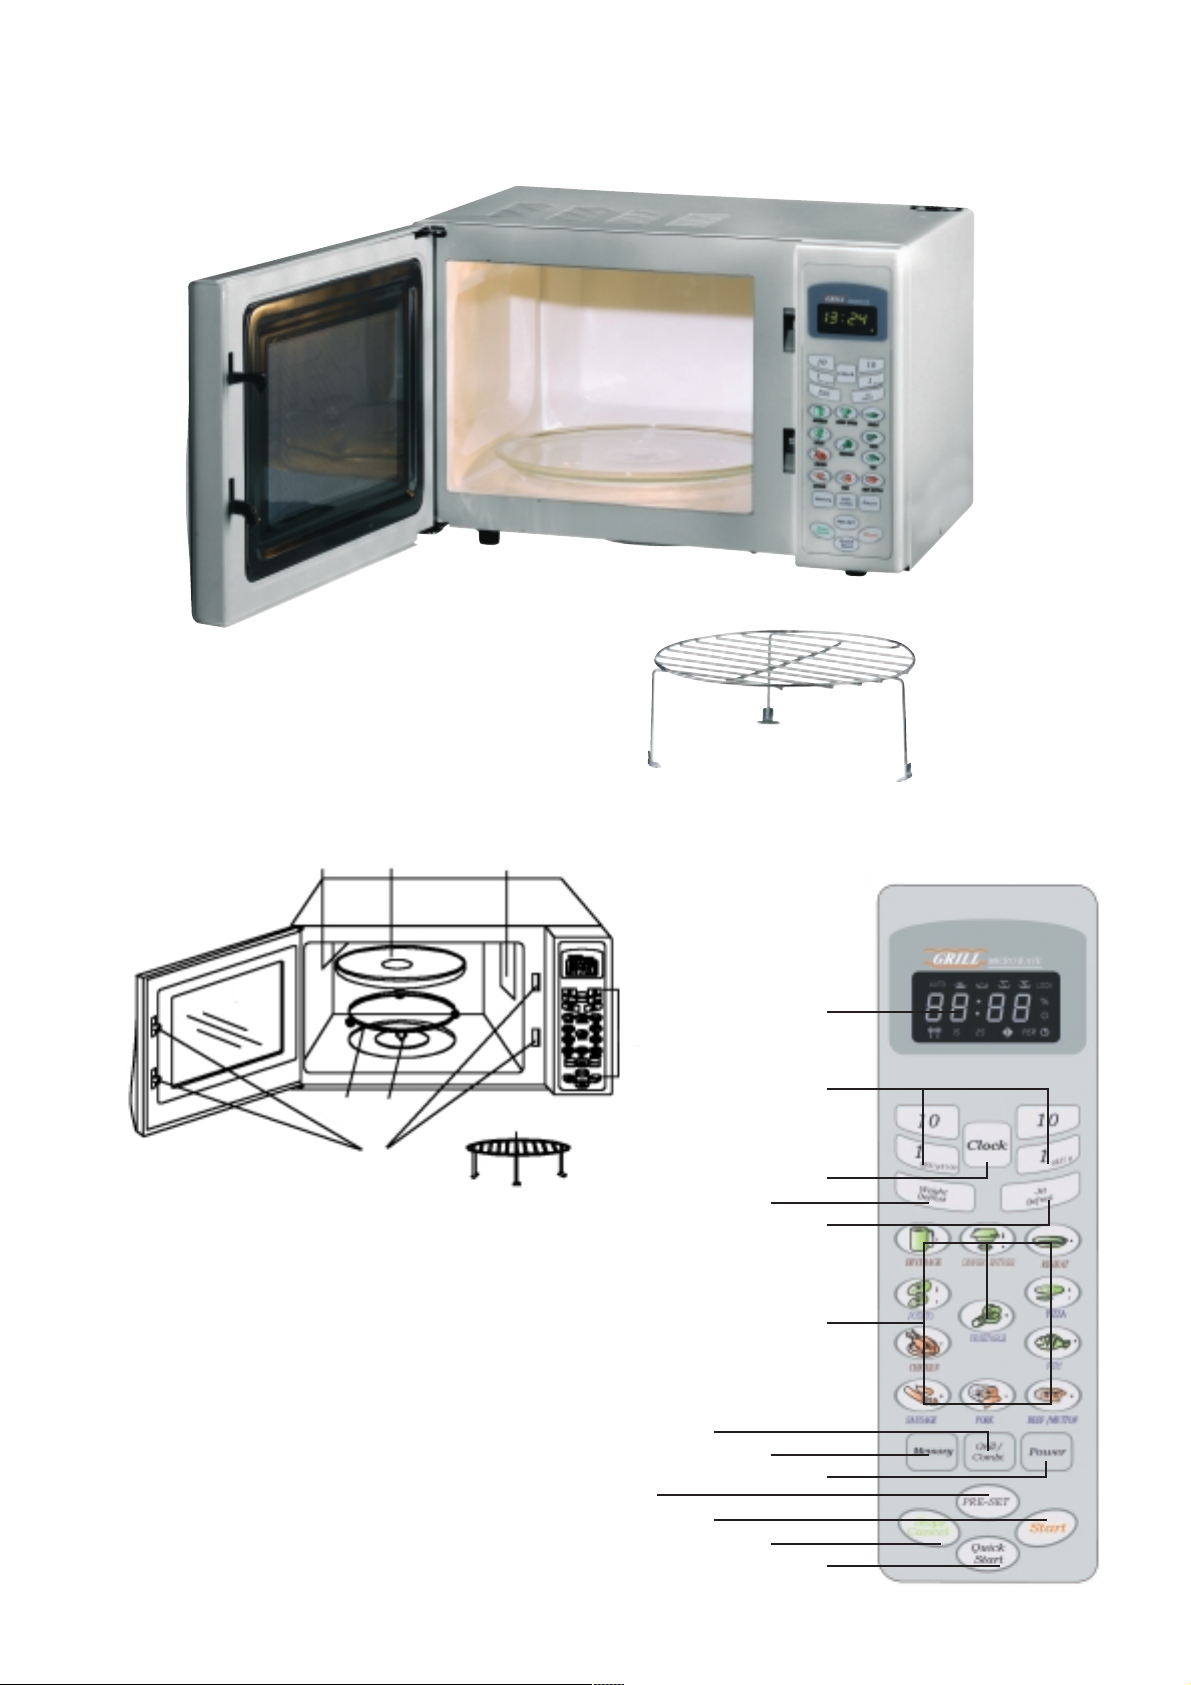
DESIGNATION OF PARTS
Heater
Glass plate
Vent
Control panel
Metal base / grill
Safety door lock
Drive shaft
Rotating ring
Oven window
Safety door lock :
Pull the handle to open the door. Opening the door
while cooking interrupts the operation, the set
programme or function is stored. Cooking continues
as soon as the door is closed and the START button
is activated.
Glass plate
:
Leave the glass plate and the rotating ring
during
operation at all times in the appliance. The rotating
glass plate ensures the even distribution of energy
and microwaves.
Metal base / grill
:
Use the metal base for roasting and combined
cooking.
Place a heatproof plate below the metal base.
This catches grease and food spills.
Caution: The metal base must be used on the glass
plate only. Use an oven glove or similar item to
remove the food after grilling. Please observe that
the inside of the appliance may be very hot; handle
with the appropriate care.
CONTROL PANEL
MENU MODE DISPLAY
Cooking time, power, mode and time are displayed.
NUMBER FIELDS
Set time, cooking time or weight. Press the
respective number fields.
QUICK SELECT
Prompt pre-set quick programming – for cooking
conventional foods.
CLOCK
Set digital clock.
POWER
Start microwave – press button once or several
times to select the power level.
GRILL/COMBI
Select cooking mode – press three times.
WEIGHT DEFROST
Programme defrosting – based on weight of food
to be defrosted.
JET DEFROST
Quick defrost function where defrost and rest times
alternate rapidly to quickly and effectively thaw out
frozen goods.
PRE-SET
This timed starter functions allows you to place food
in the microwave and programme it so that the food
is cooked at a later moment in time.
MEMORY
To set a multi-stage cooking programme.
START
Press to initiate cooking. Wrong operations are
signalled by way of two rapidly following alarm
signals.
QUICK START
Press to quickly activate full microwave power
STOP/CANCEL
Press to cancel the setting of a cooking programme.
Press once to temporarily halt cooking, and twice
to cancel completely.
Press and hold to activate child-proof lock.
4
8
Page 9

Operation
OPERATION
A signal is heard every time when touching the
button which confirms the contact or the choice
of programme.
SETTING THE CLOCK
Press CLOCK
once to display the 12-h clock,
and twice for a 24-h display. Then press the
respective number fields to set the current time.
Example: To set the clock to 6:00 am or pm:
• Press CLOCK
. The display indicates 12 hr (12-h
display), or press CLOCK twice, the display then
indicates 24 hr (24-h display).
• Press the 1-MIN button until 6:00 is displayed (or
18:00 if using the 24-h time display).
• To confirm, press CLOCK again. If the wrong time
has been set, such as 6:70 or 25:40, the display will
indicate after confirming this incorrect entry with the
CLOCK button the 12:00 H or 24 H display, allowing
you to enter the correct time.
Check the time while cooking by pressing the
CLOCK
button.
COOKING IN THE MICROWAVE
To cook in the microwave the time and power
should be set. The longest cooking time which
can be set by pressing the number fields is 99 min.
99 sec.
Example: To cook food for 5 minutes at 60% micro-
wave power rating -
• Press POWER
three times.
• Press the 1-MIN button five times.
• Press START
.
Note: Press START during cooking for a display of
the power rating lasting 3 seconds.
POWER BUTTON
By pressing POWER
repeatedly select one
of the following power ratings to operate the
microwave:
Press Power Description
1 x 100% High
2 x 080% Medium-high
3 x 060% Medium
4 x 040% Medium-low
5 x 020% Low
GRILL
Caution - you could get burned!
When the GRILL function is used, the inside of the
microwave oven can become very hot.
Always wear oven gloves whenever you touch hot
foods or dishes or take them out of the microwave
oven.
The grill function is useful mainly for thinly sliced
meat, steaks, meat balls, shashlik, sausages or
chicken. It is also suitable for baked sandwiches
and gratins.
Example: To grill food for 12 minutes:
• Press the Grill/Combi button
once.
• Press the 10-MIN button once and the 1-MIN button
twice.
• Press START
.
COMBINATION COOKING
Combination 1:
The longest possible cooking time for this setting
is 99 min., 99 sec.
30 % time for cooking with microwave,
70 % for grilling.
Recommended for fish, potatoes or gratins.
Combination 2:
55 % time for cooking with microwave,
45 % for grilling.
For puddings, omelettes, jacket potatoes and
poultry.
Example: To set the oven for 25 minutes to
COMBINATION cooking -
• Touch Grill/Combi button
two or three times.
• Press 10-MIN button twice and 1-MIN button
5 times.
• Press START
.
AUTOMATIC COOKING
To prepare food with the following cooking mode it
is not necessary to enter the cooking duration and
the power level. It is sufficient to enter the type of
food to be cooked, as well as its weight.
For this, press the respective button which illustrates
the food to be cooked. This then shows a number of
pre-set weight parameters. Select the one which
corresponds to the weight of the item which you
have placed in the microwave. The microwave then
starts to cook the food once you press START
.
Example: To cook 400 g fish, for example, proceed
as follows.
• Press STOP/CANCEL .
• Press the FISH button three times.
• Press START
.
5
9
Page 10

Operation
Enter the food's weight:
The weight parameters are needed to determine
the required cooking time. When pressing the
symbol buttons once or several times, the display
indicates a number of pre-set weight parameters
(for beverages and complete main courses the
number of portions). As soon as the correct weight
of the food which you have placed in the microwave
is displayed, press START
.
Note:
Certain foods may require that the door of the
microwave be opened after half of the cooking time
has passed, in order to check if they are fully cooked
and to turn the food to achieve even cooking. When
doing so, please be careful when handling very hot
foods in the microwave. To continue cooking,
simply close the door. The microwave automatically
continues operation for the remaining time.
DEFROST BY WEIGHT
The appliance can defrost meat, poultry and
seafood. Defrosting time and power are set automatically as soon as the weight of the food has
been programmed.
The following table shows the maximum permissible
weight for every category:
Food Maximum Display
weight
Meat 2300 g d1
Poultry 4000 g d2
Seafood 0900 g d3
Example: To defrost 600 g shrimps.
• Place the shrimps to be defrosted in the oven.
• Press WEIGHT DEFROST
three times.
• Press the 0.1 kg (1g=100) button six times to enter
the weight.
• Press START
.
For food whose weight exceeds the permissible
defrost limits, please use the Quick Defrost
function. If you accidentally enter a weight which
exceeds the maximum weight illustrated in the
table, the display clears automatically to enable
a new input.
QUICK DEFROST
For the DEFROST function enter the defrost time.
Example: To set the oven for a 5 minute DEFROST
period.
• Press DEFROST
.
• Press the 1-MIN button five times.
• Press START
.
MULTI STAGE COOKING
The appliance can be programmed as such that
several functions are performed subsequently.
Example: To set the following programme:
1. QUICK DEFROST;
2. Cooking in the microwave;
3. Grilling.
Proceed as follows:
1. Press STOP/CANCEL
to delete possible previous
settings.
2. Press
to enter the QUICK DEFROST programme.
3. Use the number fields to enter the cooking time
and then the power level with POWER
.
4. Press MEMORY .
5. Press (enter grill programme).
6. Press START
.
Note:
DEFROST or WEIGHT DEFROST should only be
an element of a programme if these functions are
set in the very beginning. The display indicates the
programme phase the appliance is in. At the end of
the total time 4 audio signals can be heard.
TIMED START
This function allows starting the appliance at a later
point in time.
Example: It is 11:10 and you wish to start the
appliance at 11:30.
Proceed as follows:
1. Press PRE-SET
.
2. Use the number fields to enter 11:30 hr as the
starting time.
3. Set a programme.
4. Press START
. (The display per for PRE-SET
flashes)
Note:
Be sure to place food in the oven prior to starting
cooking.
QUICK START
This mode assists in quick starting the appliance.
Press QUICK START
once or several times to set
the cooking time at increments of 30 seconds.
The microwave immediately starts operation at full
power.
Press 1 x = 0:30 minutes,
Press 2 x = 1:00 minute,
Press 3 x = 1:30 minutes etc.
Example: To operate the microwave for two minutes
in this mode:
• Press QUICK START
four times and the appliance
starts immediately at full power.
10
Page 11

Operation / Cleaning
Extend the cooking time during running operation
by pressing this button.
CHILD SAFETY LOCK
This setting prevents the unsupervised operation
of the oven by small children.
The display shows lock and the appliance can not
be operated for as long as this child-safety lock is
activated.
• Activate child safety lock (LOCK):
Hold the STOP/CANCEL
button for 3 seconds.
First an audio signal sounds and then the display
indicates lock.
• Deactivate child safety lock:
Again, hold the STOP/CANCEL
button for 3
seconds until the display no longer indicates lock.
AUTOMATIC MEMORY FUNCTION
Upon completing every cooking programme
three audio signals indicate the end of the
programme. This automatic memory function is
repeated every two minutes until the door of the
appliance is opened or the STOP/CANCEL button
has been pressed.
CLEANING AND MAINTENANCE
Before cleaning, disconnect the microwave and
remove the plug from the outlet.
• Keep the inside of the microwave clean at all times.
• If food spatters or spilled fluids line the inside walls
of the microwave, remove with a damp cloth.
• If the microwave is more strongly soiled, use mild
washing-up liquid.
• Avoid using aerosol cleaners and other harsh
cleaning agents as they may cause stains, stripes
or dull the surface of the door.
• Clean the outside with a damp cloth.
• To avoid damage to the functional parts inside the
microwave do not allow water to seep through
the vents.
• Wipe both sides of the door and window as well
as the seals of the door and neighbouring parts
regularly with a damp cloth to remove food spatters
or spills. Do not use abrasive cleaning agents.
• Prevent the control panel from becoming wet. When
cleaning the control panel, leave the door open in
order to avoid an accidental activation of the microwave.
• If vapours build up inside or to the outside of the
microwave door, remove these with a soft cloth.
Vapours may build up if the microwave is operated
under very humid conditions. This is absolutely
normal.
• Clean the glass plate regularly. Rinse the plate with
warm soap suds or in the dishwasher.
• The rotating ring and the door of the oven should
also be regularly cleaned in order to prevent excessive
noise. Simply wipe the ground of the microwave
with mild washing-up liquid. The rotating ring can be
cleaned with mild soap suds or in the dishwasher.
Be sure to correctly replace the rotating ring after
having removed it from the inside for cleaning
purposes.
• Remove odours by placing a deep microwave dish
with a cup of water and the juice and zest of a
lemon in the microwave and heating this for 5
minutes. Wipe off thoroughly and dry with a soft
cloth.
• When having to replace the lamp inside the oven,
ask your dealer to replace it or consult our customer
services (see warranty card).
6
11
Page 12

Disposal / Warranty
DISPOSAL
The packaging is wholly composed of environmentally-friendly materials that can be disposed
of at a local recycling centre.
Please contact your local council office to find
out about disposal facilities for your worn-out
appliances.
WARRANTY
This piece of equipment is covered by a 3-year
warranty as of the date of purchase. The equipment
was produced with the greatest of care and underwent thorough testing before delivery. In the unlikely
event of detecting a functional defect, please return
the equipment in its original packaging with the
proof of purchase to the closest service address.
Damage caused due to improper handling as well
as regular wear of the parts are not covered by this
warranty.
Beaver Electronic Services
The Lodge, Premier Business Park
Long Street, Walsall
West Midlands, WS2 9DY
Tel.: 0 87 07/87 61 77
Fax: 0 19 22/72 54 17
e-mail: support.uk@kompernass.com
Irish Connection Ltd
41 Harbour View
Howth, Co. Dublin
Tel 087-99 62 077
Fax: 18 39 80 56
e-mail: support.ie@kompernass.com
8
7
12
Page 13

Defrosting
The microwave is an ideal device for defrosting frozen foods quickly
and evenly.
The power output, defrosting and standing time settings must be selected
to suit the consistency and quantity of the food to be defrosted.
Microwaves always penetrate food from the outside and move towards
the inside. Therefore the middle parts of particularly large pieces of food
should not be fully defrosted as in doing this the outside layers may be
burned.
Correct defrosting starts with the original freezing. Take this into account
and proportion the quantities as small as possible, flat and suited your
household requirements. You should also take into account the size of the
bowls or dishes in which you will be defrosting later in the microwave.
The following defrosting table gives the defrosting times of some common
foods. In addition to defrosting times, the table also gives standing times all related to the quantity of food. During standing times, heat flows from
the defrosted layers into the centre of the food, which may still be frozen,
and thus temperature differences are evened out. Leave the frozen food
inside or outside of the switched-off microwave during the standing time.
The values given in the table are approximate only and variations may
occur in practice. This can be caused by several factors to do with the
food.
To use the integrated DEFROST function.
• Press the DEFROST button
.
• Enter the defrosting time using the numerical keys .
• Press the START button
.
FOOD WEIGHT DEFROSTING STANDING ADVICE/
TIME TIME TIPS
Bread rolls 150 g / 2 pcs. approx. 1 min.
Bread 500 g 8-10 min. 10-20 min.
Cream cake 400-800 g 8-12 min. 90-120 min. Defrost the cake only
Butter 250 g approx. 1 min. 20-30 min. Remove the packaging and
place the butter on a plate
Cheese 500 g 5-6 min. 60-90 min. Turn the piece of cheese
(piece) over once after half the time
has elapsed
Cooked 200 g approx. 3 min. 10-15 min. Turn the piece of cooked
meats meat once after half the
time has elapsed. Cut the
slices before standing time
carefully using a knife.
Strawberries 250 g approx. 8 min. 5-10 min. Defrost the strawberries or
other fruit in a bowl with a
lid. Carefully stir once after
half the time has elapsed
carefully
Before defrosting meat, poultry or fish please read the section WEIGHT
DEFROST in the operating instructions supplied with the microwave.
Freezing and
defrosting –
how it’s done …
Defrosting table
9
13
Page 14

Cooking
A suitable bowl or dish with a lid must always be used to cook foods in a
microwave where nothing to the contrary is indicated. The information on
cooking relates to food at domestic refrigerator temperature. First of all,
defrost the food before cooking. Note: the defrosting time can be between
5 and 15 minutes for frozen vegetables (-18°C, approx. 300-450 g).
Observe the instructions on the packaging. Prepare the vegetables by
washing and cleaning them.
Always observe the relevant cooking instructions. Some foods require
liquid to be added (for vegetables normally 1-2 dessert spoonfuls (DS) per
100 g), whilst others, e.g. cucumbers, onions, fungi and spinach, do not.
On the other hand, other foods require to be stirred at least once during
cooking.
Once again, as with defrosting, standing time is important. The time
for temperature equalisation and the associated post-microwave further
cooking period should be between 5 and 10 minutes.
Leave the food inside or outside of the switched-off microwave during
the standing time.
Herbs, spices and/or, if called for, a little butter can be added to the
vegetables after the standing time.
In the case of ready-made or frozen dishes, microwave cooking should
follow the times given on the packaging.
The information in the following table is intended as guidance only.
Cooking –
how it’s done …
Cooking table
Observe
the standing times
Cooking instructions
are important
FOOD WEIGHT LIQUID POWER COOKING COOKING
ADDED SETTING TIME MINS ADVICE
Boiled potato 250 g 3 DS water 960 watts approx.5 min. Cut into pieces roughly all the same size –
pour off water immediately after cooking
Noodles 125 g 600ml water 720 watts approx. 5 min. First boil the water at 960 watts (approx. 7 min.)
Add the noodles and cook without a lid
Rice 100 g 300ml water 960 watts approx. 3-4 min. Absorbing time depends on the type of rice.
Natural rice requires longer.
Cauliflower 400 g 4 DS water 960 watts approx. 6-7 min. Values given also apply to broccoli
Peas 300 g 3 DS water 960 watts approx. 3-4 min.
Spinach 500 g – 960 watts approx. 6 min.
Fungi/
mushrooms 400 g – 960 watts approx. 5-6 min. Add a little butter before cooking
Fish fillets 400-600 g see advice 720 watts approx. Add 1 DS water, lemon, stock or wine per 100 g
8-12 min. of fish
10
14
Page 15

Grill table
Grilling
Always use the metal stand where grilling is called for. In addition,
a heat resistant plate must be placed under the stand. The plate is there
to catch the juices, fat, stock and cooking debris given off by the food.
The grill function is intended for thin slices of meat, fish, rissoles,
shashlyks, sausages or chicken pieces. Slices of toast or toasted bread
rolls can be made using the grill (please refer to the TIPS section) as well
as covered toasts (such as Hawaii toast).
You can select the grill function
using the menu symbols - directly or
with the quick select buttons
.
For some foods or ways of cooking, you can use a combined process of
cooking and grilling. This mode automatically selects the appropriate
cooking and grilling times. For further details please read the section about
COMBINED GRILLING AND MICROWAVING in the operating instructions
supplied with the microwave.
Prepare the food that you wish to grill exactly as normal. For example,
descale fish and clean them. Rub poultry with seasoning and always cook
chicken legs from the skinned side first.
Turn the food after the first cooking time indicated.
The 1st value given is the cooking tome for the first side; the 2nd value
is for the second side to be cooked.
Note: enter the times for the first and second sides separately.
The values given in the following table are approximate only and variations
may occur in practice. This can be caused by several factors to do with the
food, e.g. temperature, shape).
FOOD FUNCTION COOKING FUNCTION COOKING
(1st side) TIME MINS (2nd side) TIME MINS
2 turkey
steaks 400g Grill approx. 12 Grill approx. 10
2 chicken
legs 500g Grill approx. 8 Grill approx. 7
2 shashlyks 400g Grill approx. 12 Grill approx. 12
2 trout 400g Combi 1 approx. 8 Grill approx. 7
4 rissoles 600g Combi 1 approx. 12 Grill approx. 8
2 neck
cutlets 600g Grill approx. 15 Grill approx. 13
Grilling –
how it’s done …
11
15
Page 16

Tips
You can also use your microwave as a kitchen clock - accurate to the
minute – without having the microwave or grill in operation. The delay
function allows you to use the clock like an alarm clock. Take note of the
current time and enter the following information to tell the microwave
the desired time to switch on. Press PRESET
, enter the time to switch
on the microwave using the NUMERIC KEYS
and press the START
button . The digital display flashes “PER”. The microwave sounds
4 beeps to let you know that the set period has elapsed.
Always use microwave-suitable bowls or dishes for defrosting, cooking etc.
In most cases glass dishes are ideal for cooking.
You should purchase some microwave-suitable dishes with lids in a range
of sizes.
You can make bread rolls crispy-fresh using the grill function
on your
microwave. Before crisping up, moisten the bread rolls with a little water.
Crisp up the bread rolls for about 2-3 minutes depending on the type and
size. So that the bread rolls are also “oven-fresh” inside, we recommend
that you cut the rolls after the first grilling and crisp them again for 1-2
minutes.
Place the frozen pizza on to the metal stand
without defrosting. Use
the pizza function from the quick select buttons and select from the
appropriate preset weights. Pressing the pizza button once causes a
weight of 150 g to appear; another press gives 320 g. Select the preset
weight that is closest to the weight of your pizza and press START
. After
the automatic cooking period has elapsed, if necessary you can extend the
cooking time of the pizza by using the grill function . This can sometimes
be required if your pizza is heavier than the preset weight.
The operating instructions indicate the various microwave power settings
in percent and their equivalents in watts. You can find this is the section
about Power Settings. The short table below gives you a summary.
100 % = 1200 watts
080 % = 0960 watts
060 % = 0720 watts
040 % = 0480 watts
020 % = 0240 watts
Your microwave
as a kitchen clock
Pizza
Making bread rolls
crispy-fresh
Power settings percentage values
and watts
Microwave-suitable
cooking dishes
12
16
Page 17

Recipe suggestions
Ingredients for 4 portions:
300 g onions, 30 g butter, salt, white pepper, 500 ml instant meat stock,
125 ml dry white wine, 2 slices of toast, 2 slices of immature Gouda
cheese
Preparation:
Peel the onions and slice them into rings. Place them in microwave-suitable
dish with the butter and pepper. Add the meat stock, then cover and cook
for approx. 10 minutes at 1200 watts. Add white wine to taste. Cut the
toast into little cubes. Pour the onion soup into four soup bowls and
add some cubed toast to each. Lay a half-slice of cheese on top of the
portions. Place the four bowls on the turntable and grill for approx.
10 minutes to gratinate.
Ingredients:
200 g dry lentils, 50 g streaky bacon, 125 g belly pork,
some suitable vegetables, e.g. parsley, carrots, celery, or leeks,
500 ml water, 1 bay-leaf, 250 g potatoes, 2 smoked cooked sausages,
seasoning: salt, pepper, vinegar, sugar
Preparation:
Soak the lentils overnight in plenty of water.
Clean and wash the vegetables and cut them into small pieces. Dice the
meat and the bacon. Place the soaked lentils with 500 ml water, meat,
bacon, vegetables and bay-leaf in a microwave-suitable bowl.
Cover and cook at 960 watts for 8 to 10 minutes. In the meantime, peel,
wash and dice the potatoes and slice the cooked sausages. Add the diced
potato and the sliced cooked sausage to the cooking bowl and mix well.
Cover and cook at 720 watts for approx. 15 minutes. Season to taste.
Ingredients:
500 g washed cauliflower, 250 ml water, salt,
1 DS cornflour, 2 egg whites, 2 egg yokes, 1 carton of cream (200 ml),
2 DS chopped chives, 1 pinch of Cayenne, 150 g uncooked ham (lean),
50 g grated Emmental cheese.
Preparation:
Split the cauliflower into flowerets; place them in a microwave-suitable
bowl with 250 ml water and some salt. Cover and cook at full power (1200
watts) for approx. 5 minutes. Decant and keep the stock. Stir the cornflour
into the cream and add it to the stock. Cook at full power (1200 watts) for
between 2 to 3 minutes, stirring several times. Add the egg yokes, chives
and the Cayenne pepper. Beat the egg whites and fold in. Now place the
cauliflower and the ham (in strips) into a flat dish, pour the sauce over
them and sprinkle with cheese. Cook and gratinate using combination 2
at 720 watts for 16 to 18 minutes.
Onion soup
with cheese
Cauliflower
cheese
Lentil soup
with bacon
13
17
Page 18

Recipe suggestions
Ingredients:
150 g macaroni, 500 ml water, 1 teaspoonful (TS) salt,
1 onion, 1 clove of garlic, 20 g butter, 300 g minced meat (e.g. half
pork/half beef), 1 packet tomato puree with herbs (approx. 350 g),
400 g broccoli, 4 DS water, 1 tub soured cream (200 g),
150 g slices semi-mature Gouda,
seasoning: salt, pepper
Preparation:
Place 500 ml water with 1 teaspoonful of salt in a microwave-suitable
bowl with a lid and bring it to the boil at full power (1200 watts) in approx.
8 minutes.
Then add the macaroni and cook at 960 watts for 2 to 3 minutes and at
480 watts for approx. 3 further minutes. Then collect in a colander and let
it drip off water. Now braise the onions and the clove of garlic with the
butter in a microwave-suitable bowl at 960 watts for approx. 3 minutes.
Add the minced meat and the tomato puree – then cook the mixture for a
further 6 to 7 minutes at 960 watts. Stir in 3/4 tub of soured cream and
season to taste with salt and pepper.
Wash and clean the broccoli and place it with 4 dessert spoonfuls of water
in a microwave-suitable bowl. Cover and precook at 960 watts for approx.
5 minutes and let it drip off water.
Place the macaroni, vegetables and minced meat sauce into a soufflé dish
and mix together. Distribute the remaining 1/4 tub of soured cream over it
and cover with the slices of cheese.
Cook and gratinate using combination 1 at 720 watts for approx. 15
minutes.
Ingredients:
4 pork fillets à approx. 150 g, 350 g pink mushrooms, 150 g diced ham,
2 tubs of cream (400 ml), 2 DS tomato purée,
seasoning: salt, pepper, paprika
Preparation:
Season the pork fillets and place them in a flat soufflé dish. Clean and
halve the mushrooms and add them with the ham to the fillets in the
soufflé dish.
Stir the cream, tomato purée and paprika in a microwave-suitable bowl
and cook for 3 to 4 minutes at 960 watts. Then pour this sauce over the
fillets. Cook and gratinate using combination 1 at 480 watts for
approx. 20 minutes.
Ingredients:
1000 g potatoes, fat (to grease the soufflé dish), 2 DS breadcrumbs
1 tub cream (200 ml), 50 g grated Emmental cheese, butter (flaked),
seasoning: salt, pepper
Preparation:
Peel and wash the potatoes, then slice them thinly and season. Grease the
soufflé dish. Layer the potatoes in the soufflé dish and pour the cream over
them. Then sprinkle with the cheese and breadcrumbs and place the butter
flakes on top.
Gratinate using combination 2 at 720 watts for approx. 18 minutes.
Macaroni
minced meat
soufflé
with broccoli
Mushroom
fillet of pork
in piquant
pepper sauce
Gratinated
potatoes
18
Page 19

Recipe suggestions
Ingredients:
1 chicken (approx. 1000 g), 300 g mushrooms, 500 g asparagus,
250 ml meat stock, 100 ml cream, 2 packets white sauce (instant),
1 DS white wine,
seasoning: salt, pepper, nutmeg
Preparation:
Sprinkle the chicken with salt and place it in a microwave-suitable dish.
Cover and cook at 1200 watts for approx. 15 minutes. Clean and halve the
mushrooms, peel the asparagus and cut into 2 to 3 cm long pieces.
Remove the skin and de-bone the cooked chicken; then cut the flesh into
bite-sized pieces. Place the meat stock, chicken pieces, asparagus and the
mushrooms into a microwave-suitable bowl. Cover and cook for approx. 12
minutes at 960 watts, stirring occasionally. Now stir in the cream and
sauce powder and cook for between 3 and 4 minutes at 960 watts. Season
to taste with white wine, salt, pepper and nutmeg.
Ingredients:
400 g chicken breast fillets, 1 small zucchini, 1 small green pepper,
125 ml instant chicken stock, 200 g leeks, 150 g kohlrabi, 150 g celeriac,
2 DS crème fraîche, 50 g curd cheese with herbs
Preparation:
Clean and wash the vegetables. Cut the leeks into rings, slice kohlrabi and
celeriac thinly. Braise in a microwave-suitable dish with a lid for approx. 5
minutes at 960 watts. Cut the chicken breast fillets into small pieces, slice
the zucchini in half and dice the pepper. Place them together with the hot
chicken stock and the other ingredients into the dish. Cover and cook for
approx. 10 to 12 minutes at 960 watts, stirring occasionally. Then stir in the
crème fraîche and the curd cheese with herbs.
Ingredients for 4 dumplings:
4 wheat bread rolls, 1/2 TS salt, 150 ml milk, 40 g butter, 3 eggs,
2-3 DS breadcrumbs, 2-3 DS chopped parsley, 30 g diced bacon (for bacon
dumplings)
Preparation:
Cut the bread into small pieces and sprinkle them with salt. Heat the milk
in a microwave-suitable bowl (for 1 to 2 minutes at 1200 watts), then pour
it over the bread roll pieces and let them stand for approx. 15 minutes.
Beat the butter and eggs into a froth, add the softened bread pieces with
the breadcrumbs and the parsley and knead everything into a good dough
(Note: for bacon dumplings knead in the diced bacon).
Moisten your hands and form 4 equal-sized dumplings and dip them briefly
into cold water. Cover and cook for approx. 5 minutes at 720 watts - the
dumplings are now ready to serve.
Chicken
fricassee
Breadcrumb
or bacon
dumplings
Green
chicken stew
19
Page 20

Recipe suggestions
Ingredients:
40 g flour, 30 g butter, 250 ml instant stock, 250 ml milk
seasoning: salt, white pepper, sugar
Preparation:
Place the flour, butter, the hot stock and milk in a microwave-suitable bowl,
mix them well and cook for approx. 3 minutes at full power (1200 watt),
stirring briskly from time to time. Then cook for a further 3 minutes at only
480 watts.
Stir again and season to taste.
Ingredients:
250 ml milk, pith from 1/2 vanilla pod, 1 tub cream (250 ml),
2 DS cornflour, 3 DS sugar, 1 egg yoke
Preparation:
Stir the milk, vanilla pith, cream, cornflour and sugar in a microwavesuitable dish. Cook for approx. 3 to 4 minutes at 1200 watts, stirring once
during the process. Stir the finished sauce thoroughly and mix in the egg
yoke.
Ingredients:
250 g short grain rice, 1 litre milk, 1 TS butter, 40 g sugar, cinnamon and
sugar (for sprinkling) or fruit compote
seasoning: salt
Preparation:
Place the short grain pudding rice, milk, a pinch of salt, butter and sugar in
a large microwave-suitable bowl. Cover and cook, for approx. 10 minutes
at full power (1200 watts), bringing to the boil, then stir and let swell for
approx 10 minutes at only 240 watts. Afterwards let the rice stand for a
few minutes, then stir and sprinkle with cinnamon and sugar to taste or
add fruit compote.
Ingredients:
250 g frozen strawberries, 250 g frozen raspberries, 1 packet vanilla sugar,
2 DS sugar, 2 DS cornflour
Preparation:
First stir the cornflour into 3 DS water. Place the fruit in a microwavesuitable dish. Cover and defrost and heat for approx. 6 minutes at full
power (1200 watts). Squash the fruit slightly and add the vanilla sugar,
sugar and stirred cornflour. Stir well, cover and cook for approx. 5 minutes
at 960 watts.
Then pour the red fruit pudding into dessert bowls and let cool. Serve the
red fruit pudding with the vanilla sauce ...
No responsibility is accepted for the recipes. All ingredients and preparation instructions are indicative only.
You should modify the suggested recipes to suit your personal experience. We wish you success with your
cooking and hope you enjoy your meals.
White sauce
Vanilla sauce
Red fruit pudding
(with strawberries
and raspberries)
Rice pudding
20
Page 21

Page 22

Page 23

Page 24

www.kompernass.com
design, photos and translations by ORFGEN Marketing & Communication · Essen / Germany
 Loading...