

Page 1
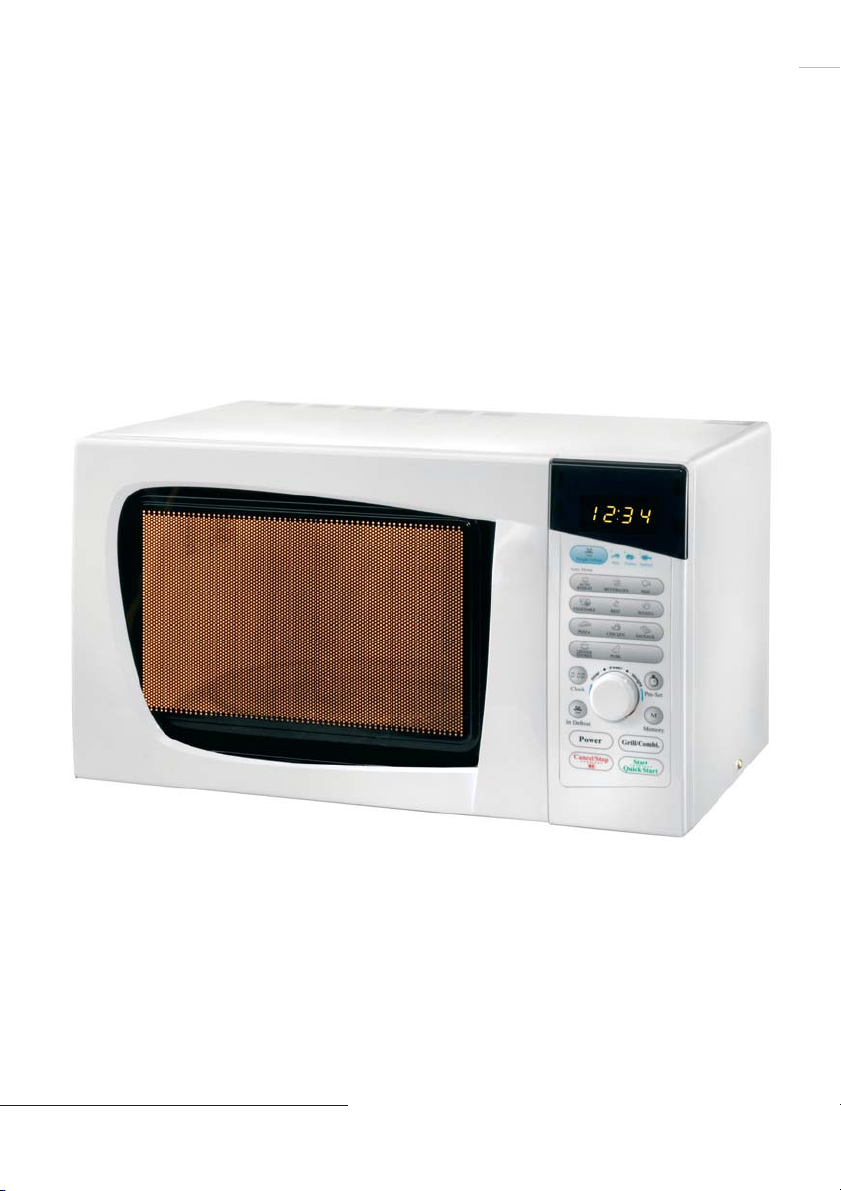
Microwave with Grill
KH 1107
Page 2
A
Q W
E
R
U
I
B
i
u
y
t
TY
O
P
{
}
q
w
r
e
Page 3

BA-Ident-No.: 1107-072004-1/G B
Kompernaß Handelsgesellschaft mbH · Burgstraße 21 · D-44867 B ochum ( Germany)
Page 4

Introduction
Appropriate use .................................................................................... Page 8
Delivery scope ...................................................................................... Page 8
Identification of parts ............................................................................ Page 8
Technical data ...................................................................................... Page 9
Safety
Safety precautions to prevent excessive exposure to microwave
energy .................................................................................................. Page 9
Important safety instructions ................................................................ Page 9
Earthing instructions / proper installation .............................................. Page 10
Radio interference on other appliances ................................................. Page 10
Content
Before you begin
Basic principles for cooking in the microwave oven .............................. Page 11
Always use suitable cookware .............................................................. Page 11
Installing the oven ................................................................................ Page 11
Description of functions
Setting the time .................................................................................... Page 12
Setting 12-hour mode .......................................................................... Page 12
Setting 24-hour mode .......................................................................... Page 12
Setting the time ..................................................................................... Page 12
5GB
Page 5

Content
Operation
Cooking in the microwave .................................................................... Page 13
Grill function ......................................................................................... Page 14
Grill/Combi cooking .............................................................................. Page 14
Express Start ........................................................................................ Page 15
Defrosting by weight ............................................................................ Page 15
Defrosting ............................................................................................ Page 16
Memory function .................................................................................. Page 16
Auto menu ............................................................................................ Page 16
Check functions .................................................................................... Page 17
Child safety lock ................................................................................... Page 17
Magnetic control safety function ........................................................... Page 17
Acoustic signal functions ...................................................................... Page 18
Cleaning and care .................................................................................... Page 18
Disposal ................................................................................................... Page 18
Warranty/Customer Service .................................................................... Page 19
Tips
Freezing and defrosting – the easy way … ........................................... Page 19
Cooking – the easy way … .................................................................. Page 20
Grilling – the easy way … .................................................................... Page 22
6 GB
Page 6

Recipes
Onion soup au gratin ............................................................................ Page 24
Lentil stew ............................................................................................ Page 24
Cauliflower cheese ............................................................................... Page 25
Macaroni and mince bake with broccoli ................................................ Page 25
Mushroom and fillet of pork in spicy paprika sauce .............................. Page 25
Potato gratin ......................................................................................... Page 26
Chicken fricassee ................................................................................. Page 26
Green chicken casserole ....................................................................... Page 26
Bread or bacon dumplings .................................................................... Page 27
White sauce ......................................................................................... Page 27
Custard ................................................................................................ Page 27
Rice pudding ........................................................................................ Page 27
Red fruit jelly (with strawberries and raspberries) ................................. Page 27
Content
7GB
Page 7

Introduction/ Safety
Microwave with Grill KH 1107
Introduction
Appropriate use
This microwave oven is intended for heating and
preparation of food as described in the instruction
manual.
Any modification of the appliance is contrary to
the intended use and can result in serious accidents. The manufacturer accepts no responsibility for damage caused by use of the appliance
contrary to its intended purpose.
This microwave oven is not intended for commercial use.
Delivery scope
Please check immediately after unpacking the
appliance that the contents are complete.
1 microwave oven, model KH 1107
1 roller ring
1 glass plate
1 metal rack for grill operation
1 operating manual
1 warranty card
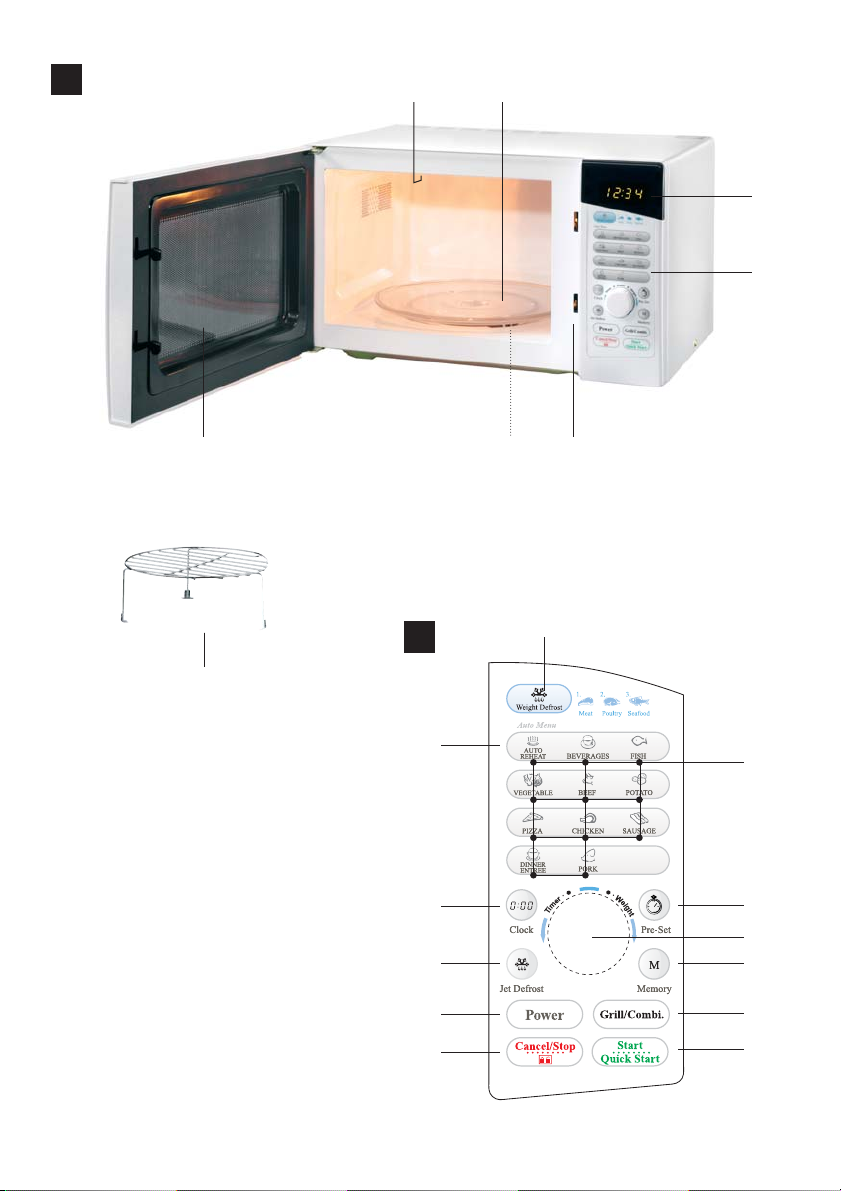
Identification of parts
Buttons/controls on the control panel
O
Weight Defrost
P
Buttons for 11 pre-programmed
cooking functions
{
Pre-Set button
}
Control knob
q
Memory button
w
Grill/Combi button
e
Start/Quick Start
r
Cancel/Stop button
t
Power button
y
Jet Defrost
u
Clock button
i
Auto reheat button
Door safety latch
T
Pull the handle to open the door. If the door is
opened during cooking, operation is interrupted
and the set program or function is retained.
Cooking resumes when the door is closed and the
Start button is pressed.
Glass plate
W
Always leave the glass plate with the roller ring
Y
. in the microwave during operation.
The rotating glass plate ensures even energy and
microwave distribution.
Q
Air vent
W
Glass plate
E
LED display
R
Control panel
T
Door safety latch
Y
Roller ring
U
Window
I
Metal rack for grill operation
8GB
Metal rack/grill
I
Use the metal rack for grilling.
Place a heat-resistant plate underneath the metal
rack to catch splashes or drops of grease and
food.
Caution: the metal rack must only be used on the
glass plate. After grilling, use an oven cloth or pan
Page 8

Introduction/ Safety
holder to remove the metal rack.
Please be aware that the inside of the oven can
get very hot, and appropriate care must be taken.
Technical data
Rated voltage: 230 V ~ 50 Hz
Maximum power output: Microwave: 800 W
Grill: 1000 W
Capacity: 20.5 l
Diameter of rotating plate: 270 mm
Dimensions: 485 x 285 x 340 mm
Weight: 13.7 kg
Safety
Safety precautions to prevent excessive exposure to microwave energy
· Do not attempt to operate the oven with the
door open, since this can lead to exposure to
a harmful level of microwave energy.
It is important that the safety locks are not
broken open or tampered with in any way.
· Do not wedge anything between the front of
the oven and the door; make sure that no dirt
or cleaning agent residue are allowed to accumulate on the sealing surfaces.
· Do not use the microwave if it is damaged. It
is particularly important that the door closes
properly and there is no damage to the following:
- the door (bent),
- hinges and locks (broken or loose),
- door seals and sealing surfaces.
· The oven must only be adjusted or repaired
by the named service centre or by a properly
qualified specialist.
Important safety instructions
Certain elementary safety precautions must be
taken to ensure personal safety when using
electrical appliances. These precautions include
the following:
Danger: to reduce the risk of burns, electric
shocks, fire, injury or excessive exposure to
microwave energy:
Read all instructions before using the oven for the
first time.
· Use this appliance for the intended purpose as
described in this manual only. Do not use any
corrosive chemicals or vapours in the oven.
This microwave is specially designed for heating, cooking or drying foods.
It is not equipped for industrial or laboratory
use.
· Do not operate the microwave when it is
empty.
· Do not operate the oven if the cable or plug is
damaged, the oven is not working properly, or
if it is damaged or has been dropped.
Avoid all hazards. A faulty power cable or plug
should only be replaced by the manufacturer
or a similarly qualified specialist.
· Danger: do not allow children to use the
microwave unattended unless they have
been given appropriate instructions to enable
them to use the appliance safely and ensure
that they understand the dangers involved in
improper use.
· To minimize the risk of fire in the microwave:
if you are heating food in plastic or paper
containers, keep an eye on the microwave at
all times, as it is possible for the materials to
catch fire.
· Remove clips containing wire from paper or
plastic bags before you put the bag in the
microwave.
9GB
Page 9

Safety
· If you notice any smoke, switch the oven off
or pull out the plug and keep the oven door
closed to smother any flames.
· Do not store anything inside the oven cavity.
Do not leave any paper articles, cooking
utensils or foodstuffs in the microwave when
it is not in use.
· Warning: liquids and other foodstuffs must not
be heated in sealed, airtight containers, since
they can explode and damage the appliance.
When heating drinks in the microwave, there
may be a delay before the liquid begins to
bubble when boiling. Care must therefore be
taken when handling the cup/container.
· Do not fry foods in the microwave. Hot oil can
damage parts of the appliance and utensils
and may cause burns to the skin.
· Eggs in shells and hard-boiled eggs should
not be heated in the microwave, since they
can explode even after cooking in the microwave has stopped.
· Foods with a thick skin, such as potatoes,
whole pumpkins, apples and chestnuts must
be pierced before cooking.
· The contents of baby bottles and jars of baby
food should be stirred or shaken.
· Danger: please check the temperature of food
before giving it to a baby; this can prevent in
some cases serious burns.
· Cooking utensils can become hot as a result
of the heat emitted by the heated foods and
it may only be possible to touch them with
an oven cloth or pan holder. It is important to
check whether cooking utensils are suitable
for use in microwave ovens.
Danger: maintenance or repair work requiring
removal of any covers which protect against
exposure to microwave energy poses a danger to anyone other than a qualified specialist.
10 GB
Earthing instructions /
proper installation
This appliance must be earthed. It is supplied
with a cable with an earth lead and an earthed
plug. A properly installed and earthed wall socket
is required for this plug. In the event of a short
circuit, earthing reduces the risk of an electric
shock through the discharge cable. It is recommended that a separate power circuit is used to
supply the microwave on its own. High voltages
are dangerous and can cause fires or other
accidents, which may result in damage to the
microwave oven.
Risk to life: improper handling of the earth plug
poses a risk of electric shock.
Note: if you have any questions regarding earthing or the electrical instructions, please consult
an electrician or service specialist.
Neither the manufacturer nor the dealer can
assume liability for damage to the microwave or
for personal injury resulting from non-compliance
with the instructions relating to electrical connection of the appliance.
Radio interference on other appliances
Operation of the microwave can cause interference on your radio, television or similar devices.
If such interference occurs, you can reduce or
eliminate it in the following ways:
! Clean the door and sealing surfaces of the
microwave.
! Adjust the receiving aerial of the radio or
television.
! Install the microwave in a different place from
where the receiver is located.
! Take the microwave away from the receiver.
! Plug the microwave into a different socket.
The microwave and receiver should use different branches of the power circuit.
Page 10

Before you begin
Before you begin
Basic principles for cooking in the
microwave oven
!
Organise the food well.
! The thickest parts should be placed at the edge.
! Take care with the cooking time. Always
select the shortest cooking time stated
and extend it if necessary. Foods which are
cooked for far too long can begin to smoke or
burst into flames.
! Cover the food with a lid during cooking. The
lid prevents splattering and helps to ensure
that the foods cook evenly.
! Turn the food once during preparation in the
microwave so that e.g. chicken or hamburgers are cooked through more quickly.
! Large pieces of food, e.g. roasts, must be
turned at least once.
! Change the position of small pieces of food,
e.g. meatballs, halfway through the cooking
time. Turn the meatballs and move the ones
from the centre to the edge.
! Round/oval cookware is preferable to square/
oblong, since food in the corners can easily
get overcooked.
The list below is a general guideline for
choosing the right cookware.
Cookware Micro-
wave
Heat-resistant
glass
Non-heat-resistant glass
Heat-resistant
ceramic
Plastic cookware suitable
for microwaves
Kitchen paper Yes No No
Metal tray/plate No Yes No
Yes Yes Yes
No No No
Yes Yes Yes
Yes No No
Grill Combi-
nation
Always use suitable cookware
!
The ideal material for a microwave oven must
be permeable for microwaves, i.e. it allows
the energy to pass through the container to
heat the food.
Use only the kind of thermometer that is
recommended for this oven. Microwaves cannot penetrate metal. For this reason, no metal
dishes, pots or utensils should be used in the
microwave.
! Do not use any products made of recycled pa-
per in the microwave. These may contain tiny
fragments of metal, which can cause sparks
and/or fire.
Metal rack No Yes No
Aluminium foil
& foil containers
No Yes No
Installing the oven
!
Choose an even surface with enough space to
allow air to flow to and from the oven.
! Make sure that there is a minimum space of
7.5 cm (3.0 inches) between the oven and the
surrounding walls. Make sure that the door of
the microwave opens properly.
11GB
Page 11

Before you begin /Description of functions /Operation
! Make sure that the mains plug is easily
accessible so that it can be reached and
removed easily in a hazardous situation.
! Make sure that there is a space of at least 30
cm (12 inches) above the microwave.
! Do not remove the feet from under the micro-
wave.
! Do not block any of the air vents. The oven
may otherwise be damaged.
! Place the oven as far away from radios and
television sets as possible.
Operation of the microwave can cause interference with radio or television reception.
! Plug the appliance into a standard domes-
tic socket. Make sure that the voltage and
frequency comply with the data stated
on the power rating label on the appliance.
Warning: do not place the microwave above
a cooker or other heat-generating appliance.
Installation in such a location could damage the
microwave oven and render the warranty invalid.
! Remove the packaging material and any
protective film from the surface of the oven
casing.
Note: do not remove the light brown mica cover,
which is screwed onto the inside of the oven cavity to protect the magnetic tubes.
Setting 12-hour mode
1. Press button u “Clock” once.
A red clock symbol appears in the LED display
and 12-hour mode is indicated by “12 H”.
2. Turn the control knob
3. Press button
to the minute setting.
4. Turn the control knob
5. To end adjustment press button
the LED display “:” flashes to indicate that the
clock has been set successfully.
}
to set the hour.
u
“Clock”; the display changes
}
to set the minutes.
u
“Clock”. In
Setting 24-hour mode
1. Press button u “Clock” twice. A red clock
symbol appears in the LED display and 24hour mode is indicated by “24 H”.
2. Turn the control knob
3. Press button
to the minute setting.
4. Turn the control knob
5. To end adjustment press button
the LED display “:” flashes to indicate that the
clock has been set successfully.
Note: if you press “Cancel/Stop”
other action or use no other button or control
within a minute, the oven automatically switches
back to its previous status.
}
to set the hour.
u
“Clock”; the display changes
}
to set the minutes.
u
“Clock”. In
r
or take no
Description of functions
Setting the time
As soon as you plug the mains plug into the
socket and power is supplied to the oven, the LED
display reads “0:00”. The oven emits an acoustic
signal and goes into standby mode;
12 GB
Setting the kitchen timer
The microwave has a kitchen timer,
which can be set even while the microwave is
not in operation.
1. Press the output key t 6 times until “0“
appears in the display.
2. Now set the time with the regulator } .
The current time setting appears in the
display.
Page 12

Operation
You can set time from 1 second to
95 minutes.
3. Press the Start
now runs backwards.
A signal tone rings as soon as the set time
comes.
e
key. The kitchen timer
Operation
Cooking in the microwave
To use the traditional basic microwave functions
(reheating, cooking), you simply need to select
the microwave power level and set the required
cooking time.
There are five power settings from 20 to 100 %.
The highest setting for the cooking time is 95
minutes.
1) Selecting the power level:
! Press button
number of times to set the required power
level:
t
“Power” the appropriate
! once for 100 % power, this corresponds to
800 watts.
! twice for 80 % power, this corresponds to
640 watts.
! three times for 60 % power, this corresponds
to 480 watts.
! four times for 40 % power, this corresponds
to 320 watts.
! five times for 20 % power, this corresponds
to 160 watts.
2) Setting the cooking time:
Turn the control knob
Note: the increments for setting the time
with the control knob are as follows:
· from 0 to 1 min: in 5 second increments
· from 1 to 5 min: in 10 second increments
· from 5 to 10 min: in 30 second increments
· from 10 to 30 min: in 1 minute increments
· from 30 to 95 min: in 5 minute increments
3) Starting cooking:
To start cooking, press the “Start/Quick Start”
e
button
and cooking time flash in the LED display. The
colon (:) in the time display flashes and the time
begins to count down.
Note: if you press button
during cooking, the cooking time increases by
30 seconds, while the power setting remains
unchanged.
Interrupting cooking (Cancel/Stop)
Cooking can be stopped, interrupted and resumed.
Cancelling/ending input
Press button
input of data.
The oven switches back into standby mode.
. The symbols for microwave operation
}
to set the cooking time.
e
“Start/Quick Start”
r
“Cancel/Stop” to cancel or end
The power setting is shown in the LED display
(e.g. P 80 for 80 % power).
Interrupting cooking
Press button
cooking. The oven interrupts cooking and stops
r
“Cancel/Stop” once to interrupt
13GB
Page 13

Operation
the remaining time. Press button e “Start/Quick
Start” to resume cooking.
Stopping cooking
Press button
r
“Cancel/Stop” twice to stop
cooking. The oven switches back into standby
mode.
Grill function
The grill function is suitable for thin slices of
meat, steaks, burgers, sausages or chicken
pieces. It is also an excellent way of preparing
toasted sandwiches, gratins and crisping up
bread rolls.
1. Press button
w
“Grill/Combi” once to activate
the grill function. The red symbol for the grill
function and G-1 appear in the LED display.
2. Set the required cooking time with the control
}
knob
. The maximum possible cooking time
setting is 95 minutes.
3. Press button
e
“Start/Quick Start” to start the
grill function.
Note: if you press button e “Start/Quick Start”
during cooking, the cooking time increases by
30 seconds, while the power setting remains
unchanged.
Grill/Combi cooking
This function combines the grill function and
normal microwave operation. In combined mode,
the microwave automatically cooks for a certain
amount of time and grills for the remaining time
in one operation. You may notice a quiet clicking
noise when the oven is changing between cooking modes.
14 GB
Grill/Combi 1
In Grill/Combi 1, microwave power accounts for
55 % and the grill for 45 % of the cooking time.
This is suitable for e.g. puddings, omelettes or
poultry dishes.
1. Press button
w
“Grill/Combi” twice to activate
Grill/Combi 1.
The red symbol for microwave operation and
grill function and C-1 appear in the LED display.
2. Set the required cooking time with the control
}
knob
. The maximum possible cooking time
setting is 95 minutes.
3. Press button
e
“Start/Quick Start” to start
operation.
Note: if you press button
e
“Start/Quick Start”
during cooking, the cooking time increases by
30 seconds, while the power setting remains
unchanged.
Grill/Combi 2
In Grill/Combi 2, microwave power accounts for
36 % and the grill for 64 % of the cooking time.
This is suitable for example for cooking fish,
potatoes or gratins.
1. Press button
w
“Grill/Combi” three times to
activate Grill/Combi 2.
The red symbol for microwave operation
and grill function and C-2 appear in the LED
display.
2. Set the required cooking time with the control
}
knob
. The maximum possible cooking time
setting is 95 minutes.
• Press button
e
“Start/Quick Start” to start
operation.
Note: if you press button e “Start/Quick Start”
during cooking, the cooking time increases by
Page 14

Operation
30 seconds, while the power setting remains
unchanged.
Programming settings
This program allows you to pre-program several
setting functions.
If you have made the settings correctly, the
microwave starts the program automatically at
the set time.
1. Press the “Pre-Set” button
{
.
The LED display shows "0:00", and the hours
numeral flashes;
2. Turn the knob
3. Press the “Pre-Set” button
}
to set the hour.
{
; the minutes
numerals now begin to flash.
4. Turn the knob
}
to set the minutes.
5. Enter the required cooking program.
To do this, press the corresponding button.
Note: you can set a maximum of three power levels in succession. If the microwave has already
been programmed, defrosting is not possible.
power. “P80” appears in the LED display.
6. Turn the knob
}
to set the cooking time
(duration: 10:00) at 80 % power.
7. Press button
q
“Memory”. “3-3” appears in
the LED display.
8. Press button
t
“Power” five times to set
20 % power.
“P20” appears in the LED display.
9. Turn the knob
}
to set the cooking time
(duration: 5:00) at 20 % power.
10. Press button
e
“Start” to activate the preset-
tings.
Express Start
This function allows you to begin cooking straight
away at 100 % power for 30 seconds (or longer,
up to 95 minutes).
! Press button
symbols for microwave operation and
cooking time flash in the LED display.
The colon (:) in the time display flashes and
the time begins to count down.
e
“Start/Quick Start” once. The
Example
To cook food at 100 % microwave power for 15
minutes + 10 minutes at 80 % microwave power
+ 5 minutes at 20 % microwave power, you
make the following settings:
1. Press button
q
“Memory”. The LED display
shows "3-1".
2. Press button
t
“Power” once to set 100 %
power. "P100" appears in the LED display.
3. Turn the knob
}
to set the cooking time
(Duration: 15:00) at 100 % power.
4. Press button
q
“Memory”. “3-2” appears in
the LED display.
5. Press button
t
“Power” twice to set 80 %
Note: press button
e
“Start/Quick Start” during
cooking to increase the cooking time by 30
seconds with each press of the button.
Defrosting by weight
This function enables you to defrost meat, poultry
and seafood with ease. The defrosting time and
power are calculated and set automatically after
the weight has been entered.
1. Press button
- once to defrost meat (“dEF1” appears in the
LED display),
- twice to defrost poultry (“dEF2” appears in
the LED display)
O
“Weight Defrost”:
15GB
Page 15

Operation
- three times to defrost seafood (“dEF3” appears in the LED display)
The red symbols for microwave operation
and defrost function also appear in the LED
display.
2. Turn the control knob
}
to set the weight of
the food to be defrosted in grams (“g” appears in the LED display).
You can set the following weight ranges for
the different types of food:
Meat: 100 to 2300 g
Poultry: 100 to 4000 g
Seafood: 100 to 1000 g
3. To start defrosting by weight, press the
“Start/Quick Start”
e
button. The colon (:) in
the time display flashes and the entered time
begins to count down.
Defrosting
1. Press button y “Jet Defrost”. The red
symbols for microwave operation and defrost
function appear in the LED display.
2. Turn the knob
}
to set the defrosting time.
The maximum possible defrosting time setting
is 95 minutes.
3. Press button
e
“Start/Quick Start” to start
defrosting.
The colon (:) in the time display flashes, and
the entered time begins to count down.
Memory function
You can use the memory function to perform
up to 3 microwave operations in succession. If
you choose several operations and one of them
includes defrosting, defrosting must be set as the
first in the sequence.
When one operation is finished, the oven beeps
and the next begins immediately (button
16 GB
e
“Start/Quick Start” is deactivated if several
operations have been stored).
Example:
to set 5 minutes microwave operation at 100 %
power followed by 10 minutes grill operation,
proceed as follows:
1. Press button
q
“Memory”. “3-1” appears in
the LED display.
2. Press button
t
“Power” once to set microwave operation at 100 %. Then turn the
control knob
3. Press button
}
and set “5:00”.
q
“Memory” once again. “3-2”
appears in the LED display.
4. Press button
w
“Grill/Combi” once to set the
grill function.
Then turn the knob
5. Press button
}
and set “10:00”.
e
“Start” to start the stored
operations.
Auto menu
For foods to be prepared in auto menu mode, it
is not necessary to enter the cooking time or the
power setting. You only need to enter the type of
food you wish to cook and its weight.
To do this, press the button on which the food you
wish to cook is pictured and named. Various preset weight parameters then appear. Choose the
one that corresponds to the weight of the food
you have placed in the microwave.
Entering the weight of the food
The weight parameters are required to determine
the necessary cooking time.
If you press the symbol buttons one or more
Page 16

Operation
times, a number of pre-set weight parameters
appear on the LED display. For drinks these are in
“ml” and for starters the number of portions.
As soon as the correct number for the weight of
the food you wish to cook appears, press but-
e
ton
“Start”. “Auto-Cook” appears in the LED
display.
Note: for some types of food it may be necessary to open the door of the microwave halfway
through the cooking time. This allows you to check
whether the food is cooked or to turn the food
over for even cooking. Please take care when
handling the very hot foods in the microwave.
Close the door to resume cooking. Press button
e
“Start”. The microwave automatically
resumes operation for the remaining time.
Example 1:
To cook 400 g fish, proceed as follows:
1. Press (in standby mode) the “Fish” button
three times.
2. Press button
e
“Start”.
Check functions
To check the time during operation:
u
Press button
“Clock” during cooking. The time
appears for 2 to 3 seconds in the LED display.
To check the power level during operation
t
Press button
“Power” during cooking. The
active power setting appears for 2 to 3 seconds
in the LED display.
Child safety lock
Switch this setting on to prevent unintentional
use of the microwave by small children and other
people who are unfamiliar with its operation.
The symbol for the child safety lock appears in
the LED display, and the microwave cannot be
operated as long as this function is active.
Setting the child safety lock
Example 2:
To heat 300 ml water, proceed as follows:
1. Press (in standby mode) the “Beverages”
button twice.
2. Press button
e
“Start”.
Example 3:
To cook a starter, proceed as follows:
1. Press (in standby mode) the “Dinner entree”
button once.
2. Press button
e
“Start”.
Hold button
r
“Cancel/Stop” down for 3 seconds.
The microwave first beeps, then the symbol for
the child safety lock appears in the LED display.
Switching off the child safety lock
Hold button
r
“Cancel/Stop” down again for
3 seconds until the microwave beeps and the
symbol for the child safety lock disappears.
Magnetic control safety function
If the microwave has been in uninterrupted operation at 100 % power for 30 minutes or more,
17GB
Page 17

Operation /Cleaning and care /Disposal/Warranty/ Customer Service
the power is automatically reduced to 80 %. This
occurs both when the memory function is active
and in any other status.
Acoustic signal functions
At the end of the cooking time, the microwave
emits 5 long beeps.
Notes:
- If you have pressed a button and activated a
valid function, a long beep is emitted. However, if you have pressed an invalid button
or selected an invalid function, no beep will
follow.
- If you do not press the Start button within
5 minutes of successfully setting cooking
operation, the microwave returns to standby
mode (the time appears on the display).
Cleaning and care
Before cleaning the microwave, switch it off and
remove the plug from the socket.
! Always keep the inside of the microwave clean.
! If any splashes of food or spilt liquids stick to
the walls of the microwave, wipe them away
with a damp cloth.
! Use a mild washing-up liquid to clean the
microwave if it is very dirty.
! Avoid using cleaning sprays and other strong
cleaning agents, since these may cause
stains, streaks or cloudiness of the door
surface.
! Clean the outside walls with a damp cloth.
! To prevent damage to the functional parts
inside the microwave, do not allow water to
get into the air vents.
18 GB
! Remove splashes or dirt regularly.
Clean the door, both sides of the window, door
seals and all adjacent parts with a damp cloth.
Do not use scouring cleaning agents.
! If misting occurs on the inside or outside of
the microwave door, clean it away with a
soft cloth. This can occur if the microwave
is operated in very humid conditions. This is
completely normal.
! Clean the glass plate regularly. Wash the plate
in warm soapy water or in the dishwasher.
! Likewise clean the roller ring and microwave
door regularly to prevent excessive noise during operation. Wipe the floor of the microwave
with a mild washing-up liquid.
You can also wash the roller ring in mild soapy
water or in the dishwasher. After removing the
roller ring from the base of the oven cavity
for cleaning, please ensure that it is replaced
properly.
! Remove odours regularly. To do this, place a
deep microwave-safe bowl containing one
cup of water and the juice and rind of a lemon
in the microwave.
Heat for 5 minutes. Clean the microwave out
thoroughly and rub dry with a soft cloth.
! If the bulb inside the microwave needs
changing, please have this done by a dealer
or contact our Service Centre (see warranty
card).
Disposal
The packaging is made entirely from recyclable
materials. It can be disposed of in your local
recycling containers.
For information on disposing of your old appliance, please contact your district or town council.
Page 18

Tips
Warranty/Customer Service
The Customer Service Office responsible for your
country is shown on the enclosed warranty card.
Tips
Freezing and defrosting – the easy
way …
The microwave is ideally suited to defrosting frozen foods quickly and easily. The choice of power
in watts, defrosting and standing times depend
on the type and quantity of food.
Microwaves always pass from the outside to the
inside of the food. This means that it is not possible to defrost to the middle of particularly large
pieces of food, since the outer layers begin to
cook before the centre is defrosted.
Proper defrosting begins with freezing. Care
should be taken when freezing food, making portions as small, flat and suitable for the needs of
your household as possible. Please also take into
account the size of the various dishes or plates
you will later put in the microwave to defrost the
frozen food.
The following defrosting table gives a summary
of defrosting times for a number of common
foodstuffs. Alongside time and quantity, you will
also find the so-called “standing time”. This is
the time in which the temperature evens out as
the heat from the defrosted layers spreads into
the centre and to the layers of food in the middle
that may still be frozen. Leave the frozen food
in the microwave (switched off) or outside the
microwave during this standing time.
The stated values may vary according to the
properties of the food in question.
Use the integrated “Defrost” function.
1. Press button
2. Enter the defrosting time.
3. Press button
Type of food Bread rolls
Weight/Quantity 50 g / 2 pcs.
Defrosting time approx. 1 min
Standing time --
Info/Tips --
Type of food Bread
Weight/Quantity 500 g
Defrosting time 8-10 min
Standing time 10-20 min.
Info/Tips --
Type of food Cream gateau
Weight/Quantity 400-800 g
Defrosting time 8-12 min.
Standing time 90-120 min.
Info/Tips Only defrost the gateau
Type of food Butter
y
“Defrost”.
e
“Start”.
slightly
19GB
Page 19

Tips
Weight/Quantity 250 g
Defrosting time approx. 1 min.
Standing time 20-30 min.
Info/Tips Remove the packing and
place the butter on a plate
Type of food Cheese (piece)
Weight/Quantity 500 g
Defrosting time 5-6 min.
Standing time 60-90 min.
Info/Tips Turn the piece of cheese
once halfway through the
time
Type of food Sliced sausage/salami
Weight/Quantity 200 g
Defrosting time approx. 3 min.
Standing time 10-15 min.
Defrosting time approx. 8 min
Standing time 5-10 min.
Info/Tips Defrost strawberries and
other fruit in a tray with
a lid. Stir carefully once
halfway through the time
For information on defrosting meat, poultry and
seafood, please read the chapter “Defrosting by
weight” in the operating manual supplied with
the microwave.
Cooking – the easy way …
!
To cook foods always (unless otherwise
stated) use microwave-safe cookware with
a lid. The cooking details refer to chilled food
(from the fridge). Always defrost food before
cooking.
Note: the defrosting time for frozen vegetables (-18°C, approx. 300-450 g) can vary
between 5 and 15 minutes.
Follow the instructions on the packet if in
doubt. Prepare vegetables by washing and
cleaning them before cooking.
Info/Tips Turn the meat once
halfway through the time;
before the standing time
carefully separate the
slices with a knife
Type of food Strawberries
Weight/Quantity 250 g
20 GB
Preparation instructions are important
! Please always follow instructions for prepara-
tion. Whilst some foods require liquid to be
added (generally 1-2 tablespoons per 100 g of
vegetables), no liquid is added for e.g. cucumbers, onions, mushrooms and spinach. Other
foods must be stirred at least once during the
cooking time.
Page 20

Tips
Follow the standing times
! As for defrosting, the so-called standing time
is particularly important for cooking in the
microwave. The time allowed for even temperature distribution and the associated aftercooking should always be 5 to 10 minutes.
! Leave the food inside the microwave oven
(switched off) or outside the microwave during this standing time.
! You can season the vegetables after the
standing time or add a little butter as required.
! Please follow the times for preparation in the
microwave shown on the packet of ready
meals in trays or frozen meals.
! The details shown in the following table are
only intended as a guideline.
Cooking table
Type of food Boiled potatoes
Weight/Quantity 250 g
Add liquid 3 tablespoons of
water
Wattage/Power 640 watts
Weight/Quantity 125 g
Add liquid 600 ml water
Wattage/Power 480 watts
Cooking time in min. approx. 5 min.
Preparation instructions
Type of food Rice
Weight/Quantity 100 g
Add liquid 300 ml water
Wattage/Power 640 watts
Cooking time in min. approx. 3-4 min
Preparation instructions
First bring the water
to the boil at 800 W
(approx. 7 min.). Add
the pasta and cook
without a lid.
The soaking time
depends on the type
of rice. Wholegrain
takes longer.
Cooking time in min. approx. 5 min.
Preparation instructions
Type of food Pasta
All pieces should be
roughly the same size –
pour off the water
directly after the
cooking time
Type of food Cauliflower
Weight/Quantity 400 g
Add liquid 4 tbsp water
Wattage/Power 640 watts
Cooking time in min. approx. 6-7 min.
21GB
Page 21

Tips
Preparation instructions
Type of food Peas
Weight/Quantity 300 g
Add liquid 3 tbsp water
Wattage/Power 640 watts
Cooking time in min. approx. 3-4 min.
Preparation instructions
Type of food Spinach
Weight/Quantity 500 g
Add liquid --
The same details also
apply for broccoli.
--
Wattage/Power 640 watts
Cooking time in min. approx. 5-6 min.
Preparation instructions
Type of food Fillet of fish
Weight/Quantity 400-600 g
Add liquid see instructions
Wattage/Power 480 watts
Cooking time in min. approx. 8-12 min.
Preparation instructions
Add a little butter
before cooking
Add 1 tablespoon of
water, lemon, stock or
wine per 100 g of fish
Grilling – the easy way …
Wattage/Power 640 watts
Cooking time in min. approx. 6 min.
Preparation instructions
Type of food Mushrooms
Weight/Quantity 400 g
Add liquid --
22 GB
--
!
Please always use the metal rack I to grill
food. Place a large heatproof plate underneath
the rack to catch meat fat and juices, stock
and splashes of food.
! The grill function is suitable for e.g. thin slices
of meat, fish, rissoles, kebabs, sausages or
pieces of chicken. The grill can also be used
to make toast, crisp up bread rolls (see also
“TIPS”) and cheese on toast/toasted sandwiches (e.g. Hawaii).
! You can select the grill function directly or se-
lect a number of foods via the express select
buttons with menu symbols.
! For some foods and/or their particular method
of preparation, combined cooking and grilling
is a good option. These two functions are then
Page 22

Tips
carried out automatically for an appropriate
length of cooking and grilling time. For further
details please read the chapter “Grill/Combi
cooking”.
! Prepare any foods you intend to grill in
exactly the same way as usual. For example,
first clean (remove the scales) and gut fish.
Rub seasoning into poultry and always cook
chicken legs from the skin side first.
! Turn the food over after the first cooking time
given. Time 1 refers to the time for the first
side, Time 2 to the time for the second side.
Note: always enter the times for the first and
second sides separately.
The data stated below may vary. They depend on
the different properties (e.g. temperature, form)
of the food.
Grilling table
Type of food 2 turkey steaks
400 g
Time (1st side) in
min
Function Grill
Time (2nd side) in
min.
Type of food 2 kebabs 400 g
Function Grill
Time (1st side) in
min
Function Grill
Time (2nd side) in
min.
Type of food 2 trout 400 g
Function Combi 1
approx. 8
approx. 7
approx. 12
approx. 12
Function Grill
Time (1st side) in
min
Function Grill
Time (2nd side) in
min.
Type of food 2 chicken legs 500 g
Function Grill
approx. 12
approx. 10
Time (1st side) in
min
Funktion Grill
Time (2nd side) in
min.
Type of food 4 rissoles 600 g
Function Combi 1
Time (1st side) in
min
approx. 8
approx. 7
approx. 12
23GB
Page 23

Tips/Recipes
Function Grill
Time (2nd side) in
min.
Type of food 2 neck cutlets 600 g
Function Grill
Time (1st side) in
min
Function Grill
Time (2nd side) in
min.
Suitable cookware
Always use dishes or bowls that are suitable for
use in microwave ovens to defrost, grill or cook
food. In most cases suitable glass containers are
the best choice for cooking in the microwave.
It is best to have a good variety of microwave-safe
cookware in a range of sizes, complete with lids.
approx. 8
approx. 15
approx. 13
Recipes
Onion soup au gratin
Ingredients for 4 portions
300 g onions, 30 g butter, salt, white pepper, 500
ml instant meat stock, 125 ml dry white wine, 2
slices of toasted bread, 2 slices of young Gouda
Preparation:
Peel the onions and slice them in rings. Place
them with the butter and pepper in a microwavesafe dish, add the meat stock and cover with the
lid; cook for approx. 12-15 minutes at 800 watts.
At the end of the cooking time, add the white
wine and season to taste. Now cut the toasted
bread into small cubes.
Pour the onion soup into 4 soup bowls and place
the bread cubes on top. Cover with half a slice of
cheese for each bowl.
Place the 4 soup bowls on the rotating plate and
grill for approx. 10 minutes to melt the cheese.
Lentil stew
Crisping up bread rolls
Using grill function, you can use your microwave
to crisp up bread rolls. To do this, brush the bread
rolls before baking with a little water. Bake the
bread rolls in the microwave for approx. 2-3 minutes, depending on quantity and type. To ensure
that the bread rolls are “fresh from the oven” on
the inside too, we recommend that you cut them
open after grilling for the first time and bake for a
further 1-2 minutes.
24 GB
Ingredients:
200 g dried lentils, 50 g streaky bacon, 125 g
belly pork, 1 bunch of herbs and vegetables for
soup, 500 ml water, 1 bay leaf, 250 g potatoes, 2
smoked stewing sausages,
Seasoning: salt, pepper, vinegar, sugar
Preparation:
Soak the lentils overnight in plenty of water.
Clean and wash the herbs and vegetables and
chop into small pieces. Cube the meat and bacon.
Drain the lentils and place them in a microwavesafe dish together with 500 ml water, the meat,
bacon, herbs and vegetables and the bay leaf.
Cook with the lid on at 640 watts for 10-12
Page 24

Recipes
minutes. During this time, wash and cube the
potatoes and slice the sausages. Add the potato
cubes and slices of sausage to the stew and mix
well. Cook with the lid on at 480 watts for approx.
18 minutes. After cooking, season to taste.
Cauliflower cheese
Ingredients:
500 g cleaned cauliflower, 250 ml water, salt, 1
tablespoon cornflour, 2 egg whites, 2 egg yolks, 1
pot of cream (200 ml), 2 tablespoons of chopped
chives, 1 pinch of Cayenne pepper, 150 g raw
ham (lean), 50 g grated Emmental cheese
Preparation:
Cut the cauliflower into florets and place them
with 250 ml water and salt in a microwave-safe
dish. Cook on full power (800 watts) with the
lid on for approx. 5 minutes. Pour the juice from
the cauliflower and set aside. Mix the cornflour
with the cream and add the mixture to the juice.
Cook at full power (800 watts) for approx. 2 to 3
minutes to bring to the boil, stirring several times.
Add the egg yolk, chives and Cayenne pepper;
whisk the egg whites until they are stiff and turn
carefully into the sauce.
Now place the cauliflower and ham (in strips) in a
shallow aluminium tray, pour the sauce over the
top and sprinkle with grated cheese. Cook and
grill using Combination 2 at 480 watts for 18-22
minutes.
Macaroni and mince bake
with broccoli
Ingredients:
150 g macaroni, 500 ml water, 1 tsp salt,
1 onion, 1 clove of garlic, 20 g butter, 300 g “half
and half” mince, 1 packet of tomato puree with
herbs (approx. 350 g), 400 g broccoli, 4 tablespoons water, 1 pot of sour cream (200 g), 150 g
slices of medium Gouda
Seasoning: salt, pepper
Preparation:
Place 500 ml water and 1 teaspoon of salt in a
microwave-safe dish and heat to boiling point
with the lid on at full power (800 watts) for approx. 10 minutes.
Then add the macaroni and cook for 3-5 minutes
at 640 watts and approximately a further 3-5
minutes at 320 watts. After cooking turn out into
a strainer and drain.
Steam the onions and garlic clove together with
the butter in a microwave-safe dish for approx.
4-5 minutes at 640 watts. Then add the mince
and tomato puree and cook all the ingredients
together for a further 8-10 minutes at 640 watts.
Stir in 3/4 of a pot of sour cream and season with
salt and pepper to taste.
Wash and clean the broccoli and place it with 4
tablespoons of water in a microwave-safe dish.
Part-cook with the lid on at 800 watts for approx.
6-8 minutes and then drain.
Place the macaroni, vegetables and meat sauce
into an ovenproof dish and mix. Spread the
remaining 1/4 of a pot of sour cream over the top
and cover with slices of cheese.
Cook and grill using Combination 1 at 480 watts
for approx. 16-18 minutes.
Mushroom and fillet of pork in spicy
paprika sauce
Ingredients:
4 fillets of pork of approx. 150 g each, 350 g
pink mushrooms, 150 g cubes of bacon, 2 pots
of cream (400 ml), 2 tablespoons of tomato
concentrate
Seasoning: salt, pepper, paprika
25GB
Page 25

Recipes
Preparation:
Season the fillets of pork and place them in
a shallow ovenproof dish. Clean and slice the
mushrooms and place them with the bacon in the
dish with the fillets of pork.
Mix the cream, tomato concentrate and paprika
in a microwave-safe dish and cook at 640 watts
for approx. 5-6 minutes to bring to the boil.
Then pour the sauce over the fillets. Cook and
grill using Combination 1 at 320 watts for approx.
20-22 minutes.
Potato gratin
Ingredients:
1000 g potatoes, butter or margarine (to grease
the baking dish), 2 tablespoons breadcrumbs,
1 pot of cream (200 ml), 50 g grated Emmental
cheese, small knobs of butter
Seasoning: salt, pepper
Preparation:
Peel and wash the potatoes, cut them into thin
slices and season with salt and pepper. Grease
an ovenproof dish, place the slices of potato in
layers in the dish and pour cream over the top.
Sprinkle with cheese and breadcrumbs and top
with small knobs of butter.
Cook using Combination 2 at 480 watts for approx. 20 minutes.
Chicken fricassee
Ingredients:
1 chicken (approx. 1000 g), 300 g mushrooms,
500 g asparagus, 250 ml instant meat stock,
100 ml cream, 2 packets of white sauce (instant),
1 tbsp white wine
Seasoning: salt, pepper, nutmeg
Preparation:
Sprinkle salt on the chicken and place it in a
microwave-safe dish.
Cook with the lid on at 800 watts for approx.
16-18 minutes.
Clean and cut the mushrooms in half, peel the
asparagus and cut into 2 to 3 cm long pieces.
Remove the skin and bones from the cooked
chicken and cut the meat into bitesize pieces.
Place the meat stock, chicken meat, asparagus
and mushrooms in a microwave-safe dish. Cook
with the lid on at 640 watts for approx. 13-15
minutes, stirring occasionally. Stir in the cream
and white sauce powder and cook for a further
5-6 minutes at 640 watts to bring to the boil. Add
white wine, salt, pepper and nutmeg to taste.
Green chicken casserole
Ingredients:
400 g chicken breast fillets, 1 small courgette, 1
small green pepper, 125 ml instant chicken stock,
200 g leeks, 150 g kohlrabi, 150 g celery stalks,
2 tbsp crème fraîche, 50 g cream cheese with
herbs
Preparation:
Clean and wash the vegetables. Cut the leeks
into rings and the kohlrabi and celery into thin
slices. Steam in a microwave-safe dish with the
lid on for approx. 6-8 minutes at 640 watts. Cut
the chicken breast fillet into small pieces, the
courgette into half slices and the green pepper
in cubes and place together with the hot chicken
stock in the dish with the other ingredients. Cook
with the lid on at 640 watts for approx. 12-15
minutes, stirring occasionally. After cooking, mix
in the crème fraîche and the cream cheese with
herbs.
26 GB
Page 26

Recipes
Bread or bacon dumplings
Ingredients for 4 dumplings:
4 wheat bread rolls, 1/2 tsp salt, 150 ml milk, 40
g butter, 3 eggs, 2-3 tbsp breadcrumbs, 2-3 tbsp
chopped parsley, 30 g bacon cubes (for bacon
dumplings)
Preparation:
Cut the bread rolls into small pieces and sprinkle
with salt. Heat the milk in a microwave-safe bowl
(approx. 2-4 minutes at 800 watts) and pour it
over the bread. Leave to stand for approx. 15
minutes.
Beat the butter and eggs together until frothy,
add the soaked bread rolls together with the
breadcrumbs and parsley and knead well to form
a dough (Note: for bacon dumplings also knead in
the bacon cubes).
Moisten your hands and form 4 dumplings of the
same size and dip them briefly into cold water.
Cook with the lid on for approx. 6-8 minutes at
480 watts; the dumplings are then ready to serve.
White sauce
Ingredients:
40 g flour, 30 g butter, 250 ml instant stock, 250
ml milk
Seasoning: salt, white pepper, sugar
Preparation:
Place the flour, butter, the hot stock and milk in
a microwave-safe bowl, mix well and heat at
full power of 800 watts for approx. 4-5 minutes,
occasionally stirring the mixture vigorously. Then
cook for approx. a further 4-5 minutes at just
320 watts. Mix well and add the seasonings to
taste.
Custard
Ingredients:
250 ml milk, paste of 1/2 vanilla pod, 1 pot of
cream (250 ml), 2 tbsp cornflour, 3 tbsp sugar, 1
egg yolk
Preparation:
Mix the milk, vanilla paste, cream, cornflour and
sugar in a microwave-safe bowl. Heat for approx.
4-5 minutes at 800 watts to bring to the boil, stirring occasionally. When the sauce is ready, mix
well and add the egg yolk to thicken.
Rice pudding
Ingredients:
250 g round-grain rice, 1 litre milk, 1 tsp butter,
40 g sugar, cinnamon and sugar (to sprinkle on
top) or stewed fruit
Seasoning: salt
Preparation:
Place the round-grain rice, milk, a pinch of salt,
butter and the sugar in a large microwave-safe
dish.
Heat at full power of 800 watts for approx. 10-12
minutes to bring to the boil, stir and simmer gently at just 160 watts for approx. 20-22 minutes.
Leave to stand for a few more minutes, stir again
and sprinkle cinnamon and sugar on the top or
add stewed fruit, depending on taste.
Red fruit jelly (with strawberries and
raspberries)
Ingredients:
250 g frozen strawberries, 250 g frozen raspberries, 1 packet of vanilla sugar, 2 tbsp sugar, 2
tbsp cornflour
27GB
Page 27

Recipes
Preparation:
First mix the cornflour in 3 tbsp water. Place the
fruit in a microwave-safe dish and cover with
the lid; microwave at 800 watts for approx. 6-8
minutes to defrost and heat the fruit.
Mash the fruit slightly and add the vanilla sugar,
sugar and cornflour/water mixture. Mix well and
cook with the lid on for approx. 6-8 minutes at
640 watts.
Pour the jelly into dessert bowls and leave to
cool.
Why not serve the red fruit jelly with the custard
described above...
All recipes without guarantee. All ingredients and preparation
details given are guidelines. Please vary these recipes accord-
ing to your own personal experience/taste. We wish you happy
cooking and enjoy your meal!
28 GB
 Loading...