

Page 1
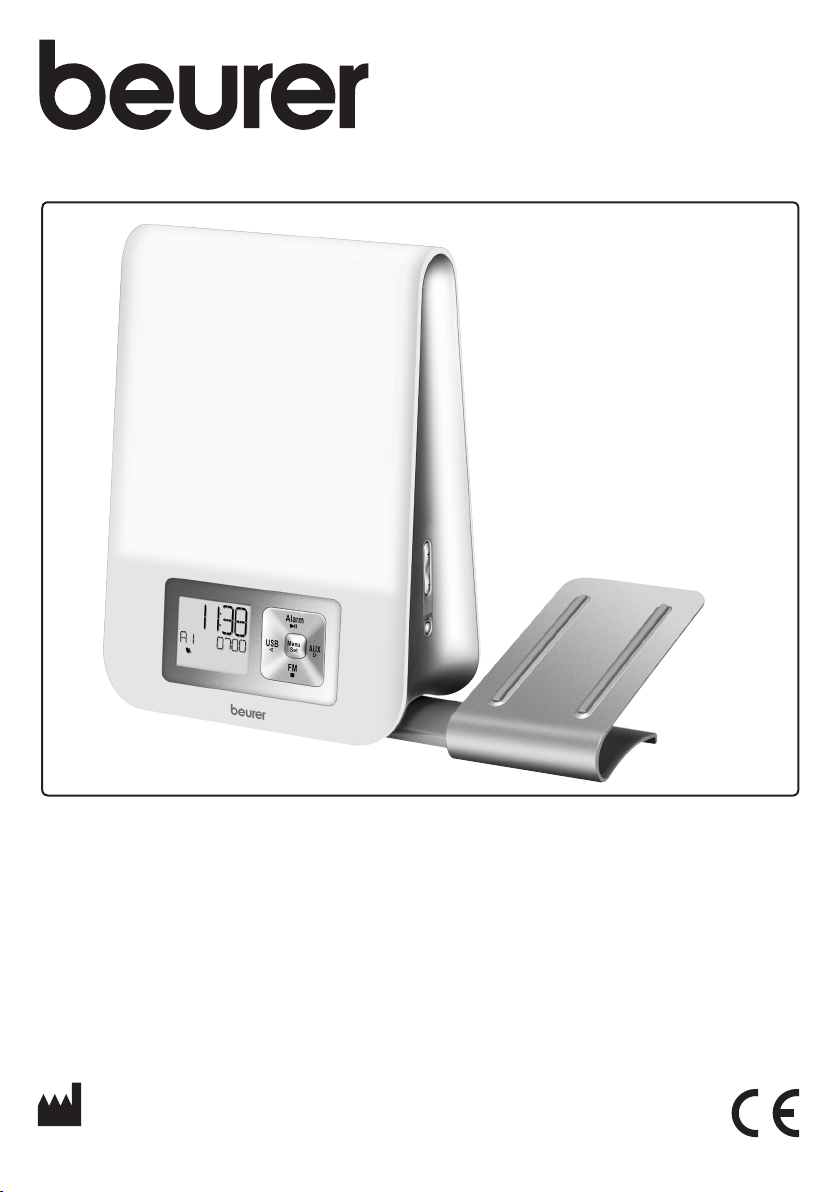
WL 80
D
Lichtwecker
Gebrauchsanweisung .................. 2
G
Wake-up light
Instructions for use ...................... 9
F
Lumière de réveil
Mode d'emploi ............................ 16
E
Luz para despertar
Instrucciones de uso .................. 23
BEURER GmbH • Söflinger Str. 218 • 89077 Ulm (Germany)
Tel.: +49 (0) 731 / 39 89-144 • Fax: +49 (0) 731 / 39 89-255
www.beurer.com • Mail: kd@beurer.de
I
Luce sveglia
Istruzioni per l'uso ..................... 30
T
Ișıklı Çalar Saat
Kullanma Talimatı ....................... 37
r
Световой будильник
Инструкция по применению .. 44
Q
Budzik świetlny
Instrukcja obsługi ...................... 52
Page 2

D DEUTSCH
Lesen Sie diese Gebrauchsanweisung sorgfältig durch, bewahren Sie sie
für den späteren Gebrauch auf, machen Sie sie anderen Benutzern zugänglich und beachten Sie die Hinweise.
Inhaltsverzeichnis
1. Zum Kennenlernen .......................................................................................................................... 3
2. Zeichenerklärung ............................................................................................................................. 3
3. Bestimmungsgemäßer Gebrauch .................................................................................................. 3
4. Warn-/ Sicherheitshinweise ............................................................................................................ 3
5. Gerätebeschreibung ........................................................................................................................ 4
6. Inbetriebnahme ................................................................................................................................ 4
7. Grundeinstellungen ......................................................................................................................... 4
7.1 Uhrzeit einstellen .......................................................................................................................... 4
7.2 Alarmeigenschaften einstellen ..................................................................................................... 5
7.3 Displayhelligkeit einstellen ........................................................................................................... 5
7.4 Snooze-Dauer einstellen .............................................................................................................. 5
7.5 Tastenton einschalten /ausschalten ............................................................................................. 5
8. Gerätefunktionen ............................................................................................................................. 5
8.1 Alarm einstellen ............................................................................................................................ 5
8.1.1 Alarm einschalten (ON)........................................................................................................ 5
8.1.2 Alarm pro Tag einschalten (DAY) ......................................................................................... 6
8.1.3 Alarm dauerhaft deaktivieren (OFF)..................................................................................... 6
8.2 Alarm ausschalten........................................................................................................................ 6
8.2.1 Alarm ausschalten während Sonnenaufgang:..................................................................... 6
8.2.2 Schlummermodus (Snooze) bei Alarm ................................................................................ 6
8.2.3 Alarm ausschalten bei Weckton .......................................................................................... 6
8.3 AUX-Modus ................................................................................................................................. 6
8.4 USB-Modus ................................................................................................................................. 6
8.5 Radio-Modus ............................................................................................................................... 6
8.6 Gute-Nacht-Funktion (Radio Sleep-Timer) ................................................................................... 7
8.7 Lichtfunktionen ............................................................................................................................ 7
8.7.1 Leselampe ........................................................................................................................... 7
8.7.2 Sonnenuntergangsfunktion ................................................................................................. 7
8.7.3 Stimmungslicht mit Farbwechsel ........................................................................................ 7
8.8 Auf Werkseinstellung zurücksetzen ............................................................................................. 7
9. Reinigung/Aufbewahrung ............................................................................................................... 8
10. Entsorgung ....................................................................................................................................... 8
11. Technische Daten ............................................................................................................................ 8
12. Garantie ............................................................................................................................................ 8
Lieferumfang
•
Lichtwecker mit Wurfantenne
•
Netzadapter
•
AUX-Kabel
•
Gebrauchsanweisung
•
Halterung für Smartphone / MP3-Player
2
Page 3
Sehr geehrte Kundin, sehr geehrter Kunde,
wir freuen uns, dass Sie sich für ein Produkt unseres Sortimentes entschieden haben. Unser Name steht für hochwertige und eingehend geprüfte Qualitätsprodukte aus
den Bereichen Wärme, Gewicht, Blutdruck, Körpertemperatur, Puls, Sanfte Therapie, Massage, Luft und Beauty.
Mit freundlicher Empfehlung
Ihr beurer-Team
1. Zum Kennenlernen
Der beurer Lichtwecker WL 80 ermöglicht Ihnen ein sanftes und natürliches Erwachen aus Ihrem Schlaf. Duch das
langsam heller werdende LED-Licht wird ein Sonnenaufgang simuliert. Auf diese Weise können Sie sich langsam an die Lichtverhältnisse gewöhnen und Ihr Körper
bereitet sich behutsam auf das Aufwachen vor. Sie können zusätzlich einen Weckton einstellen, der nach dem
simulierten Sonnenaufgang ertönt und Sie beim Aufwachen akustisch unterstützt. Als Weckton stehen Ihnen Radio und verschiedene Klänge zur Verfügung. Der beurer
Lichtwecker WL 80 verhilft Ihnen zu einem ausgeruhten
und zufriedenen Start in den Tag.
2. Zeichenerklärung
Warnhinweis auf Verletzungs-
WARNUNG
ACHTUNG
Hinweis
gefahren oder Gefahren für Ihre
Gesundheit.
Sicherheitshinweis auf mögliche
Schäden am Gerät/Zubehör.
Hinweis auf wichtige Informationen.
Entsorgung gemäß Elektro- und
Elektronik-Altgeräte EG-Richtlinie –WEEE (Waste Electrical and
Electronic Equipment
Hersteller
Dieses Produkt erfüllt die Anforderungen der geltenden europäischen und nationalen Richtlinien.
haftet nicht für Schäden, die durch unsachgemäßen oder
falschen Gebrauch verursacht wurden.
4. Warn-/ Sicherheitshinweise
WARNUNG
•
Betreiben Sie das Gerät nur mit dem mitgelieferten
Netzadapter und nur mit der auf dem Netzadapter notierten Netzspannung.
•
Überprüfen Sie vor dem Gebrauch das Gerät und Zubehör auf sichtbare Schäden. Benutzen Sie es im Zweifelsfall nicht und wenden Sie sich an Ihren Händler oder
an die angegebene Kundendienstadresse.
•
Das Gerät ist nur für den Einsatz im häuslichen/privaten Umfeld bestimmt, nicht im gewerblichen Bereich.
•
Dieses Gerät kann von Kindern ab 8 Jahren und darüber sowie von Personen mit verringerten physischen,
sensorischen oder mentalen Fähigkeiten oder Mangel
an Erfahrung und Wissen benutzt werden, wenn sie
beaufsichtigt oder bezüglich des sicheren Gebrauchs
des Gerätes unterwiesen wurden und die daraus resultierenden Gefahren verstehen.
•
Kinder dürfen nicht mit dem Gerät spielen.
•
Reinigung und Benutzer-Wartung dürfen nicht von Kindern ohne Beaufsichtigung durchgeführt werden.
•
Wenn die Netzanschlussleitung dieses Gerätes beschädigt ist, muss sie durch den Hersteller oder seinen Kundendienst oder einer ähnlich qualifizierten Person ersetzt
werden, um Gefährdungen zu vermeiden.
•
Schalten Sie das Gerät im Falle von Defekten oder Betriebsstörungen sofort aus und trennen Sie das Gerät
vom Stromanschluss.
•
Stecken Sie den Netzadapter niemals ein oder aus,
wenn Sie feuchte Hände haben.
•
Halten Sie Kinder vom Verpackungsmaterial fern (Erstickungsgefahr).
•
Verlegen Sie das Stromkabel so, dass niemand darüber stolpern kann.
•
Halten Sie das Gerät, den Netzadapter und das Stromkabel von Wasser fern!
ACHTUNG
3. Bestimmungsgemäßer Gebrauch
WARNUNG
Das Gerät darf nur für den Zweck verwendet werden, für
den es entwickelt wurde, und auf die in der Gebrauchsanweisung angegebene Art und Weise. Jeder unsachgemäße Gebrauch kann gefährlich sein. Der Hersteller
•
Schützen Sie das Gerät vor Stößen, Feuchtigkeit,
Schmutz, starken Temperaturschwankungen und direkter Sonneneinstrahlung.
•
Lassen Sie das Gerät nicht fallen.
3
Page 4
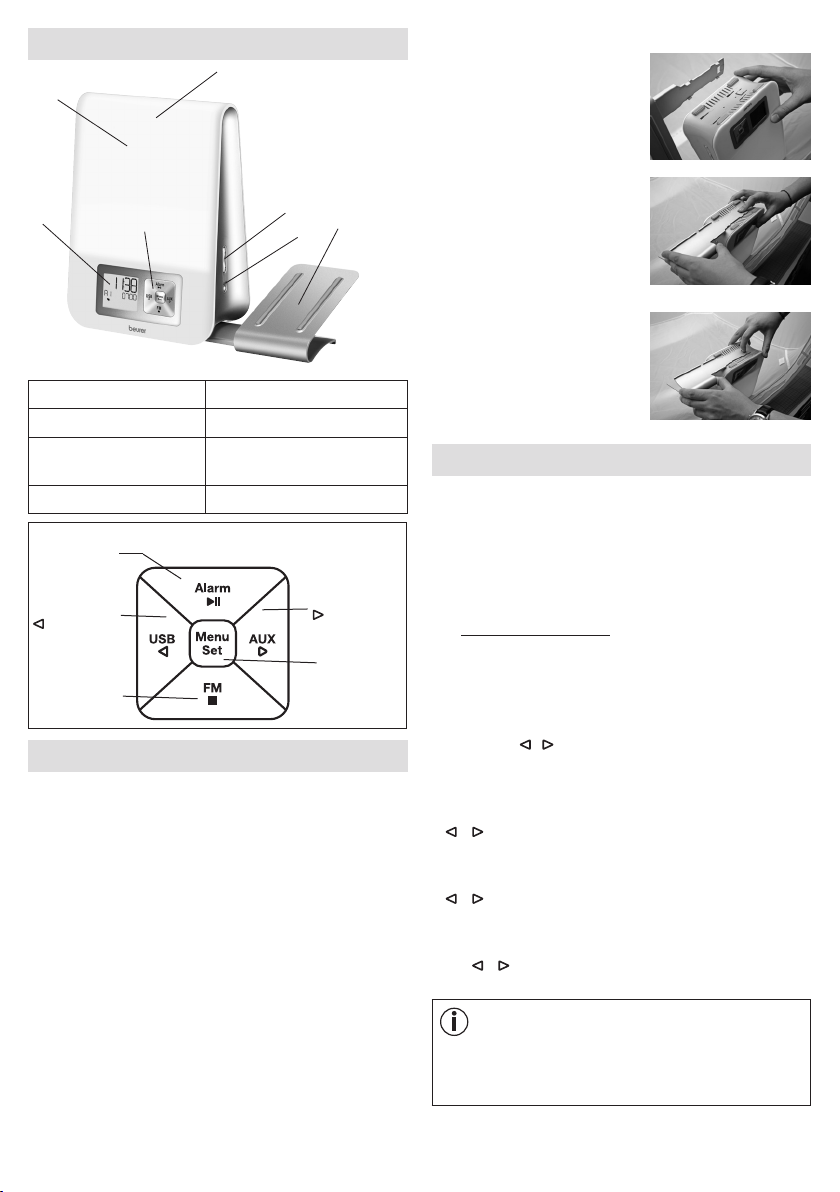
5. Gerätebeschreibung
3
2
5
1
1 Display 5 +/- Tasten
2 Lichtfläche 6 Light-Taste
3 Snooze-Funktion (An-
tippen auf Lichtfläche).
4 Tastenfeld
Alarm-Taste /
►ǁ-Taste
USB-Taste /
-Taste
Radio-Taste /
■ -Taste
4
7 Halterung für Smartphone
/ MP3-Player
7
6
AUX-Taste /
-Taste
Menu/SetTaste
6. Inbetriebnahme
•
Entfernen Sie das Verpackungsmaterial.
•
Überprüfen Sie, ob alle Teile im Lieferumfang enthalten sind
.
•
Überprüfen Sie Gerät, Netzadapter und Stromkabel auf
Beschädigungen.
•
Stellen Sie das Gerät auf eine ebene und feste Fläche.
•
Stecken Sie den Netzadapteranschluss in die Netzadapterbuchse auf der Rückseite des Geräts.
•
Stecken Sie den Netzadapter in eine geeignete Steckdose.
•
Auf dem Display des Geräts erscheint die Uhrzeit.
•
Legen Sie die Wurfantenne des Geräts nach hinten.
Halterung für Smartphone befestigen
1.
Die vier Einrasthaken der Halterung auf die vier rechteckigen Önungen des Lichtweckers auflegen.
2.
Mit dem rechten Zeigenfinger die Halterung nach unten drücken und sie mit der
anderen Hand in Pfeilrichtung
vorsichtig schieben, bis sie
hör- und spürbar einrastet.
3. Zum Entfernen, die Entriegelung am Lichtwecker drücken
und die Halterung vorsichtig
in Pfeilrichtung schieben.
7. Grundeinstellungen
In den Grundeinstellungen können Sie nacheinander
die Uhrzeit (
gestellten Alarmzeiten (
3
), die Displayhelligkeit (
(
SNOOZE
7.1 Uhrzeit einstellen
•
Am eingeschalteten Gerät Menu/Set-Taste drücken.
"
TIME
cken.
•
Stunden-Modus "
Modus mit / -Tasten einstellen (24-Stunden-Modus
oder 12-Stunden-Modus). Mit Menu/Set-Taste bestätigen.
•
Stundenanzeige blinkt im Display. Die Stunden mit
tigen.
•
Minutenanzeige blinkt im Display. Die Minuten mit
tigen.
•
Wochentaganzeige blinkt im Display. Den Wochentag
mit / -Tasten einstellen. Mit Menu/Set-Taste bestätigen.
MON
THU
SUN
TIME
), die Alarmeigenschaften für die ein-
ALARM 1, ALARM 2, ALARM
DISPLAY
) und den Tastenton (
" blinkt im Display. Erneut Menu/Set-Taste drü-
24 Hr
/ -Tasten einstellen. Mit Menu/Set-Taste bestä-
/ -Tasten einstellen. Mit Menu/Set-Taste bestä-
Hinweis
= Montag,
= Donnerstag,
= Sonntag.
TUE
= Dienstag,
FRI
= Freitag,
), die Snooze-Dauer
BEEP
) einstellen.
" blinkt im Display. Stunden-
WED
= Mittwoch,
SAT
= Samstag,
4
Page 5
7.2 Alarmeigenschaften einstellen
Sie können sich entweder mit einer der 8 Aufwachmelodien, einem Weckton, per Radio, oder eigener Musik via
USB-Stick wecken lassen.
Zu den eingestellten Alarmzeiten (siehe Kapitel 8.1) können Sie folgende Alarmeigenschaften einstellen: Weckton, Lautstärke, Sonnenaufgang, Dauer des Sonnenaufgangs, Helligkeit des Sonnenaufgangs.
Um die Alarmeigenschaften einzustellen, befolgen Sie die
folgenden Handlungsschritte:
•
Am eingeschalteten Gerät Menu/Set-Taste drücken.
"
TIME
" blinkt im Display.
•
Mit / -Tasten gewünschten Alarmspeicherplatz
wählen (
ALARM 1, ALARM 2
sen Funktionen Sie einstellen wollen. Mit Menu/SetTaste bestätigen.
•
Aktuell eingestellter Weckton (z.B.
Mit / -Tasten gewünschten Weckton wählen. Mit
Menu/Set-Taste bestätigen.
Hinweis
BUZZ
= Piepton
SOUND 1-8
RADIO
USB
•
Lautstärke des Alarms (
gewünschte Lautstärke (1 bis 10) einstellen. Mit Menu/
Set-Taste bestätigen.
•
Sonnenaufgangsfunktion blinkt (
Mit / -Tasten die Sonnenaufgangsfunktion einschalten (ON) oder ausschalten (
bestätigen.
Sie können sich zusätzlich zum Weckton mit einer Sonnenaufgangsfunktion wecken lassen. Die Sonnenaufgangsfunktion ist ein simulierter Sonnenaufgang. Hierbei wird das LED-Licht vor der eigentlich eingestellten
Weckzeit langsam heller.
•
Wenn die Sonnenaufgangsfunktion eingeschaltet
ist, blinkt die Dauer des Sonnenaufgangs (10
Mit / -Tasten gewünschte Dauer des Sonnenaufgangs, vor dem Zeitpunkt der Weckzeit, wählen (1, 2,
5, 10, 20 oder 30 Minuten). Mit Menu/Set-Taste bestätigen.
•
Helligkeit des Sonnenaufgangs blinkt (
play. Mit / -Tasten gewünschte Helligkeit des
Sonnenaufgangs zum Zeitpunkt der Weckzeit wählen
(5, 10, 15 oder 20). Mit Menu/Set-Taste bestätigen.
= 8 verschiedene Aufwachmelodien
= Radio
= Über angeschlossenen USB-Stick
Hinweis
oder
ALARM 3
BUZZ
VOL
) blinkt. Mit / -Tasten
SUNRISE
OFF
). Mit Menu/Set-Taste
20 LI
), des-
) blinkt.
MIN
) im Dis-
).
).
5
Wenn Sie relativ schnell vom Licht wach werden, ist
eine Reduzierung der Helligkeit sinnvoll.
7.3 Displayhelligkeit einstellen
•
Am eingeschalteten Gerät Menu/Set-Taste drücken.
"
TIME
" blinkt im Display.
•
Mit / -Tasten
Taste bestätigen.
•
Die aktuelle Displayhelligkeit blinkt (
Mit / -Tasten gewünschte Displayhelligkeit wählen (OFF, 1,2, oder 3). Mit Menu/Set-Taste bestätigen.
Hinweis
Nach dem Einstellen dauert es ca. 10 Sekunden, bis
die aktuelle eingestellte Displayhelligkeit erscheint, da
nach jedem Tastendruck (auch Snooze-Funktion) das
Display für 10 Sekunden automatisch auf der höchsten Stufe leuchtet.
DISPLAY
wählen. Mit Menu/Set-
3 DISPLAY
7.4 Snooze-Dauer einstellen
•
Am eingeschalteten Gerät Menu/Set-Taste drücken.
"
TIME
" blinkt im Display.
•
Mit / -Tasten
Taste bestätigen.
•
Snooze-Dauer blinkt (
ten gewünschte Snooze-Dauer wählen (1, 2, 5, 10, 20
oder 30 Minuten). Mit Menu/Set-Taste bestätigen.
SNOOZE
wählen. Mit Menu/Set-
5 MIN SNOOZE
). Mit / -Tas -
7.5 Tastenton einschalten /ausschalten
•
Am eingeschalteten Gerät Menu/Set-Taste drücken.
"
TIME
" blinkt im Display.
•
Mit / -Tasten
Taste bestätigen.
•
Mit / -Tasten den Tastenton einschalten (ON) oder
ausschalten (
FEEDBACK
OFF
). Mit Menu/Set-Taste bestätigen.
wählen. Mit Menu/Set-
8. Gerätefunktionen
8.1 Alarm einstellen
Das Gerät besitzt drei Alarm-Speicherplätze, die Sie unterschiedlich einstellen können.
8.1.1 Alarm einschalten (ON)
1.
Am eingeschalteten Gerät so oft ALARM-Taste drücken, bis gewünschter Alarm-Speicherplatz im Display
erscheint (
2. Mit / -Tasten drücken, bis im Display
Menu/Set-Taste drücken. Im Display blinkt die Stun-
3.
denanzeige des Alarms. Mit / -Tasten Stunde einstellen und mit Menu/Set-Taste bestätigen.
A1, A2 oder A3).
ON
steht.
).
Page 6
4.
Im Display blinkt die Minutenanzeige des Alarms.
Mit / -Tasten Minute einstellen und mit Menu/SetTaste bestätigen.
END.
5. Im Display erscheint kurz
Der eingestellte Alarm
ist nun aktiviert und erscheint im Display.
8.1.2 Alarm pro Tag einschalten (
Sie können mit der
DAY
-Funktionzu zu jedem eingestell-
DAY
)
ten Alarm zusätzlich festlegen, an welchen Wochentagen
der Alarm ertönen soll.
1.
Am eingeschalteten Gerät so oft ALARM-Taste drücken, bis gewünschter Alarm-Speicherplatz im Display
erscheint (
2. Mit / -Tasten drücken, bis im Display
3.
Menu/Set-Taste drücken. Im Display erscheint
(Montag) und
A1, A2 oder A3).
off.
DAY
steht.
MON
4. Mit / -Tasten den Alarm für Montag aktivieren (on)
oder deaktivieren (
off
). Mit Menu/Set-Taste bestäti-
gen.
5.
Im Display erscheint
TUE
(Dienstag). Die restlichen Wochentage wie im vorherigen Punkt bei Montags einstellen. Anschließend die Alarmzeit wie in Kapitel 8.1.1
beschrieben, einstellen.
8.1.3 Alarm dauerhaft deaktivieren (
OFF
)
Um einen eingestellten Alarm dauerhaft zu deaktivieren,
gehen Sie wie folgt vor:
1.
Am eingeschalteten Gerät so oft ALARM-Taste drücken, bis gewünschter Alarm-Speicherplatz im Display
erscheint (
A1, A2 oder A3).
2. Mit / -Tasten drücken, bis im Display OFF steht.
3. Mit Menu/Set-Taste bestätigen.
4. Im Display erscheint END. Der Alarm ist nun dauerhaft
deaktiviert.
8.2 Alarm ausschalten
8.2.1 Alarm ausschalten während Sonnenaufgang:
Bei eingeschalteter Sonnenaufgangsfunktion fängt das
Gerät vor der eingestellten Alarmzeit langsam an zu
leuchten und das Display zeigt "SUNRISE" an. Sie können
diesen Sonnenaufgang durch Drücken einer beliebigen
Taste ausschalten. Der Weckton wird zur eingestellten
Alarmzeit dennoch ertönen.
8.2.2 Schlummermodus (Snooze) bei Alarm
Das Gerät besitzt einen Schlummermodus (Snooze).
Wenn der Alarm angeht und Sie die Snooze-Funktion
drücken (antippen der Lichtfläche), wird der Alarm nach
der eingestellten Snooze-Dauer (siehe Kapitel 7.4) erneut ertönen.
8.2.3 Alarm ausschalten bei Weckton
Wenn der Alarm ertönt, beliebige Taste außer Snooze
drücken. Der Alarm ist nun ausgeschaltet und wird erst
wieder zur eingestellten Alarmzeit ertönen.
8.3 AUX-Modus
Sie können eine externe Audioquelle (z.B. MP3-Player,
Smartphone oder CD-Player) über den AUX-Eingang mit
dem Lichtwecker verbinden.
1. Mitgelieferte AUX-Kabel an Audioquelle anschließen.
2.
Andere Ende des AUX-Kabels in den AUX-Eingang auf
der Geräterückseite stecken.
3. AUX-Taste am Gerät drücken. Externe Audioquelle ist
nun mit Lichtwecker verbunden.
4. Mit den seitlichen +/- Tasten Lautstärke regeln.
5.
Um den AUX-Modus wieder zu verlassen, ■-Taste drücken.
6. Nach Gebrauch das AUX-Kabel wieder ausstecken.
8.4 USB-Modus
Sie haben die Möglichkeit einen USB-Stick (bis zu 32
GB) über den USB-Anschluss an den Lichtwecker anzuschließen und Musik zu hören. Das Gerät kann folgende
Dateiformate abspielen: MP3, WMA und WAV.
Hinweis
Das Gerät kann nur Musikdateien abspielen, die im
Stammverzeichnis abgelegt sind. Musikdateien, die
sich in Unterverzeichnissen befinden, kann das Gerät
nicht abspielen.
Wenn Sie den USB-Modus nutzen möchten, befolgen Sie
die folgenden Handlungsschritte.
1.
USB-Stick in den USB-Anschluss des Lichtweckers
stecken (befindet sich auf Geräterückseite).
2. Wenn USB-Stick bereits steckt: Am eingeschalteten
Gerät USB-Taste drücken.
"USB", die aktuelle Liednummer- und Lieddauer erscheinen im Display.
3.
Um zum nächsten Lied zu wechseln, -Taste drücken.
Um zum vorherigen Lied zu wechseln, -Taste drücken.
Um Wiedergabe zu pausieren, ►ǁ-Taste drücken.
Um zwischen "normaler Wiedergabe",
"Wiedergabewiederholung"(P) und "Wiedergabewiederholung aller Lieder"( P
ALL
) zu wechseln, Menu/
Set-Taste drücken.
4. Mit den seitlichen +/- Tasten Lautstärke regeln.
5. Um USB-Modus zu beenden, ■ -Taste drücken.
8.5 Radio-Modus
Mit dem Gerät können Sie auch Radio hören.
6
Page 7
Wenn Sie den Radio-Modus nutzen möchten, befolgen
Sie die folgenden Handlungsschritte.
1.
Am eingeschalteten Gerät FM-Taste drücken.
Die aktuelle Senderfrequenz und Programmnummer
(z.B. P1) erscheinen im Display.
2.
Mit / -Tasten gewünschte Programmnummer wählen (z.B.
P1
oder P2), auf dem ein Sender gespeichert
werden soll.
3.
-Taste gedrückt halten, um automatischen Sender-
suchlauf zu starten. Um einen Sender auf der ausgewählten Programmnummer zu speichern (z.B.
Menu/Set-Taste drücken.
4.
Um zwischen den gespeicherten Sendern zu wechseln,
/ -Tasten drücken.
8.6
Gute-Nacht-Funktion (Radio Sleep-Timer)
Wenn der Radio-Modus eingeschaltet ist, können Sie zusätzlich eine Gute-Nacht-Funktion hinzuschalten.
Mit der Gute-Nacht-Funktion können Sie einstellen, nach
wie vielen Minuten sich das Radio automatisch ausschalten soll.
Wenn Sie die Gute-Nacht-Funktion nutzen möchten, befolgen Sie die folgenden Handlungsschritte:
1.
Am eingeschalteten Gerät FM-Taste drücken, um in den
Radio-Modus zu gelangen.
2. Menu/Set-Taste drücken,
Display.
3. Mit Menu/Set-Taste gewünschte Zeit einstellen, nach
der sich das Radio automatisch ausschalten soll ( 2, 5,
10, 15, 20, 30, 45 oder 60 Minuten). Um die Auswahl
zu bestätigen, 5 Sekunden warten. Danach erscheint
automatisch im Display ein kleines -Symbol
2 MIN sleep
P1),
erscheint im
8.7 Lichtfunktionen
8.7.1 Leselampe
1. Am eingeschalteten Gerät Light-Taste drücken.
2. Das Licht geht an und
Mit +/- Tasten gewünschte Lichthelligkeit einstellen
(wählbar 1-20).
3.
Um das Licht wieder auszuschalten, drücken Sie die
Light-Taste so oft bis "
scheint.
8.7.2 Sonnenuntergangsfunktion
Sie können mit dem Gerät auch einen Sonnenuntergang
simulieren. Hierbei wird das Licht nach einer eingestellten
Dauer langsam dunkler.
Um mit dem Gerät einen Sonnenuntergang zu simulieren,
befolgen Sie die folgenden Handlungsschritte:
1.
Am eingeschalteten Gerät seitliche Light-Taste drücken.
20 light
LIGHT off"
erscheint im Display.
im Display er-
2. Das Licht geht an,
gleich danach mit seitlichen +/- Tasten gewünschte
Lichthelligkeit einstellen (wählbar 1-20). Mit Light-Taste
bestätigen.
3. Mit seitlichen +/- Tasten gewünschte Dauer des Sonnenuntergangs wählen (2, 5, 10, 15, 20, 30, 45 oder 60
Minuten). Anschließend 5 Sekunden warten. Die Sonnenuntergangsfunktion ist danach automatisch aktiviert
und im Display erscheint ein kleines -Symbol. Das
Licht wird nun automatisch nach Ablauf der eingestellten Dauer des Sonnenuntergangs ausgehen.
Hinweis
Sonnenuntergang mit Musik
Sie können mit dem Gerät auch einen Sonnenuntergang simulieren und nebenbei Musik hören. Hierbei
wird das Licht nach einer eingestellten Dauer langsam
dunkler. Die Musik wird nach der eingestellten Dauer
automatisch ausgeschaltet.
Um mit dem Gerät einen Sonnenuntergang mit Musik zu starten, befolgen Sie die folgenden Handlungsschritte:
1. Am eingeschalteten Gerät gewünschte Musikquelle
wählen (USB, Radio(FM) oder AUX).
2. Die weiteren Schritte wie unter "8.7.2 Sonnenunter-
gangsfunktion" durchführen.
8.7.3 Stimmungslicht mit Farbwechsel
Sie können den Lichtwecker auch als Stimmungslicht mit
Farbwechsel verwenden.
1. Am eingeschalteten Gerät 3x die Light-Taste drücken.
2.
LIGHT change
3.
Wenn Ihnen während des Farbwechsels ein Farblicht
dauerhaft anzeigen lassen möchten, können Sie dieses
durch Drücken der Light-Taste fixieren.
erscheint im Display.
4. Um das Licht ganz auszuschalten, erneut Light-Taste
drücken.
20 light
10 sunset
erscheint im Display.
erscheint im Display.
erscheint im Display und
LIGHT fixed
8.8 Auf Werkseinstellung zurücksetzen
Wenn Sie am Lichtwecker alle Einstellungen auf die
Werkseinstellung zurücksetzen möchten, befolgen Sie
die folgenden Handlungsschritte:
1.
Netzadapter des Lichtweckers von der Steckdose trennen.
2. Menu/Set-Taste und Light-Taste am ausgeschalteten
Gerät beide gedrückt halten und Netzadapter des Lichtweckers wieder in Steckdose einstecken. Die Tasten
ca. 10 Sekunden gedrückt halten, bis "
Display angezeigt wird.
3. Das Gerät ist nun auf die Werkseinstellung zurückgesetzt.
7
DEFAULT"
im
Page 8
9. Reinigung/Aufbewahrung
•
Reinigen Sie das Gerät mit einem trockenen Tuch.
•
Verwenden Sie keine scheuernden Reinigungsmittel.
•
Achten Sie darauf, dass kein Wasser in das Gerät eindringt. Falls dies doch einmal der Fall sein sollte, dann
verwenden Sie bitte das Gerät erst dann wieder, wenn
es völlig trocken ist.
•
Gerät und Steckernetzteil keinesfalls in Wasser oder
andere Flüssigkeiten tauchen.
•
Schützen Sie das Gerät vor Stößen, Feuchtigkeit, Staub,
Chemikalien, starken Temperaturschwankungen und zu
nahen Wärmequellen (Öfen, Heizungskörper).
10. Entsorgung
Im Interesse des Umweltschutzes darf das Gerät am Ende seiner Lebensdauer nicht mit dem Hausmüll entfernt
werden. Die Entsorgung kann über entsprechende Sammelstellen in Ihrem Land erfolgen. Befolgen Sie die örtlichen Vorschriften bei der Entsorgung der Materialien. Entsorgen Sie das Gerät
gemäß der Elektro- und Elektronik Altgeräte EG-Richtlinie
– WEEE (Waste Electrical and Electronic Equipment). Bei
Rückfragen wenden Sie sich an die für die Entsorgung
zuständige kommunale Behörde.
11. Technische Daten
Beleuchtungsstärke
Licht LED Technologie
Lichtstufen
Stimmungslicht
Lichtweckerfunktion
SonnenaufgangsFunktion
Snooze-Dauer 1, 2, 5, 10, 20, 30 Minuten
Sonnenuntergang-
Funktion
Gute-Nacht-Funktion (Sleep Radio)
LCD-Hintergrundbeleuchtung
Uhrzeit
Alarm
Maximal ca. 2500 Lux (bei 15 cm
Abstand)
20 Lichtstufen mit Simulation von
Morgenrot
Automatischer RGB Farbwechsel
mit individueller Farbfixierung
Aus 2, 5, 10, 15, 20, 30, 45, 60
Minuten vor Alarm
Maximale Lichtstärke bis zum
Alarm: Lichtstufe 5, 10, 15, 20
2, 5, 10, 15, 20, 30, 45, 60 Minuten
2, 5, 10, 15, 20, 30, 45, 60 Minuten
Aus, 1, 2, 3
12h / 24h Umstellbar, 15 Minuten Puer bei Stromausfall
3 Alarmzeiten (Aus, An, Tag)
Weckton, 8 Klänge, Radio, MP3
über USB-Stick
8
Tastenton Aus, An
AUX Line-In, 3,5 mm Klinkenstecker
Wiedergabe über USB-Stick,
maximal 32GB.
Dateiformate: MP3, WMA, WAV,
USB
Radio
Lautsprecher 2 Watt
Netzteil Spannungsversorgung
Netzteil Schutzklasse
Technische Änderungen vorbehalten.
maximal 9999 Dateien, nur im
Stammverzeichnis lesbar, Unterverzeichnisse werden nicht unterstützt. 5 V Ausgangsspannung
Frequenzbereich UKW 87,5 108 MHz, 10 Speicherplätze
Eingang: 110-240 V, AC, 50/60
Hz, 0,5 A
Ausgang: 9 V, DC, 1500mA
Schutzklasse II
12. Garantie
Sie erhalten 3 Jahre Garantie ab Kaufdatum auf Material
und Fabrikationsfehler des Produktes.
Die Garantie gilt nicht:
•
im Falle von Schäden, die auf unsachgemäßer Bedienung beruhen,
•
für Verschleißteile,
•
für Mängel, die dem Kunden bereits bei Kauf bekannt
waren,
•
bei Eigenverschulden des Kunden.
Die gesetzlichen Gewährleistungen des Kunden bleiben
durch die Garantie unberührt. Für Geltendmachung eines Garantiefalles innerhalb der Garantiezeit ist durch
den Kunden der Nachweis des Kaufes zu führen. Die
Garantie ist innerhalb eines Zeitraumes von 3 Jahren abKaufdatum gegenüber der Beurer GmbH, Söflinger Straße 218, 89077 Ulm, Germany geltend zu machen. Der
Kunde hat im Garantiefall das Recht zur Reparatur der
Ware bei unserem eigenen oder bei von uns autorisierten
Werkstätten. Weitergehende Rechte werden dem Kunden
(aufgrund der Garantie) nicht eingeräumt.
Page 9

G ENGLISH
Read these instructions for use carefully and keep them for later use, be
sure to make them accessible to other users and observe the information
they contain.
Table of contents
1. Getting to know your device ......................................................................................................... 10
2. Signs and symbols ......................................................................................................................... 10
3. Intended use ................................................................................................................................... 10
4. Warning notices/safety notes ....................................................................................................... 10
5. Device description ......................................................................................................................... 11
6. Initial use ........................................................................................................................................ 11
7. Basic settings ................................................................................................................................. 11
7.1 Setting the time .......................................................................................................................... 11
7.2 Setting the alarm properties ...................................................................................................... 12
7.3 Setting the display brightness ................................................................................................... 12
7.4 Setting the snooze duration ....................................................................................................... 12
7.5 Switching the button tone on/o ............................................................................................... 12
8. Device functions ............................................................................................................................ 12
8.1 Setting the alarm ........................................................................................................................ 12
8.1.1 Switching the alarm on (ON) ............................................................................................. 12
8.1.2 Setting an alarm for each day (DAY) ................................................................................. 13
8.1.3 Permanently deactivating the alarm (OFF) ........................................................................ 13
8.2 Switching o the alarm .............................................................................................................. 13
8.2.1 Switching off the alarm during sunrise: ............................................................................. 13
8.2.2 Snooze mode (Snooze) for the alarm ................................................................................ 13
8.2.3 Switching off the alarm when the alarm tone sounds ....................................................... 13
8.3 AUX mode .................................................................................................................................. 13
8.4 USB mode ................................................................................................................................. 13
8.5 Radio mode ............................................................................................................................... 13
8.6 Good night function (radio sleep timer) ...................................................................................... 14
8.7 Light functions ........................................................................................................................... 14
8.7.1 Reading lamp .................................................................................................................... 14
8.7.2 Sunset function ................................................................................................................. 14
8.7.3 Mood light with change of colour ..................................................................................... 14
8.8 Resetting the device to factory settings .................................................................................... 14
9. Cleaning and storage .................................................................................................................... 14
10. Disposal .......................................................................................................................................... 15
11. Technical data ................................................................................................................................ 15
Included in delivery
•
Wake-up light with cable antenna
•
Mains adapter
•
AUX cable
•
Instructions for use
•
Holder for smartphone/MP3 player
9
Page 10

Dear customer,
Thank you for choosing one of our products. Our name
stands for high-quality, thoroughly tested products for
applications related to heating, weight, blood pressure,
body temperature, pulse, gentle therapy, massage, air
and beauty.
With kind regards,
Your Beurer team
4. Warning notices/safety notes
•
•
1. Getting to know your device
The Beurer WL 80 wake-up light wakes you from sleep
in a gentle and natural manner. The LED light gradually
becomes brighter like a rising sun, allowing you to slowly
become accustomed to the light conditions and your
body to gently prepare itself for waking up. You can also
set an alarm tone that is sounded following the simulated
sunrise and provides an acoustic aid to help you wake
up. You can choose between the radio or various sounds.
The Beurer WL 80 wake-up light provides a rested and
pleasant start to your day.
•
•
•
•
2. Signs and symbols
Warning notice indicating a risk
WARNING
IMPORTANT
Note
of injury or damage to health.
Safety note indicating possible
damage to the device/accessory.
Note on important information.
Disposal in accordance with the
Waste Electrical and Electronic
Equipment EC Directive – WEEE
Manufacturer
This product satisfies the
requirements of the applicable
European and national
directives.
3. Intended use
WARNING
The device must only be used for the purpose for
which it is designed and in the manner specified in the
instructions for use. Any improper use can be dangerous.
The manufacturer is not liable for damage resulting from
improper or careless use.
•
•
•
•
•
•
•
•
WARNING
Only operate the device with the mains adapter
provided and at the mains voltage specified on the
mains adapter.
Before use, inspect the device and accessories for
visible damage. If you have any doubts, do not use
the device and contact your retailer or the specified
Customer Services address.
The device is only intended for domestic/private use,
not for commercial use.
This device may be used by children over the age of
eight and by people with reduced physical, sensory
or mental skills or a lack of experience or knowledge,
provided that they are supervised or have been
instructed on how to use the device safely and are fully
aware of the consequent risks of use.
Children must not play with the device.
Cleaning and user maintenance must not be performed
by children unless supervised.
If the mains connection cable of this device is damaged,
it must be replaced by the manufacturer, its customer
service department or a similarly qualified person to
avoid any risk.
In the case of defects or operational faults, switch the
device o immediately and disconnect the device from
the mains socket.
Never plug in or unplug the mains adapter when you
have wet hands.
Keep packaging material away from children (risk of
suocation).
Arrange the mains cable so that it is not a trip hazard.
Keep the device, mains adapter and mains cable away
from water.
IMPORTANT
Protect the device from impacts, humidity, dirt, marked
temperature fluctuations and direct sunlight.
Do not drop the device.
10
Page 11

5. Device description
3
2
5
1
1 Display 5 +/- buttons
2 Light area 6 Light button
3 Snooze function
(taplight area)
4 Keypad
Alarm button /
►ǁ button
USB button /
button
Radio button /
■ button
4
7 Holder for smartphone /
MP3 player
7
6
AUX button /
button
Menu/Set
button
6. Initial use
•
Remove the packaging material.
•
Check that all parts listed are present
•
Check the device, mains adapter and mains cable for
damage.
•
Place the device on a firm, even surface.
•
Insert the mains adapter connector into the mains
adapter socket on the rear of the device.
•
Insert the mains adapter into a suitable socket.
•
The time is shown on the device display.
•
Route the cable antenna of the device to the rear.
.
Securing the smartphone holder
1.
Position the four latching
hooks of the holder onto the
four rectangular openings on
the wake-up light.
2.
Press down the holder
with your right index finger
and use your left hand to
carefully slide the holder in
the direction of the arrow until
you hear and see it engage.
3. To remove, press the release
on the wake-up light and
carefully slide the holder in
the direction of the arrow.
7. Basic settings
In the basic settings, you can set the time (
properties for the set alarm times (
ALARM 3
snooze duration (
in the order stated here.
), the display brightness (
SNOOZE
) and the button tone (
7.1 Setting the time
•
When the device is switched on, press the
Menu/Set button. "
the Menu/Set button again.
•
The hour mode "
mode using the / buttons (24-hour mode or 12-hour
mode). Confirm using the Menu/Set button.
•
The hour display flashes in the display. Set the hours
using the / buttons. Confirm using the Menu/Set
button.
•
The minute display flashes in the display. Set the
minutes using the / buttons. Confirm using the
Menu/Set button.
•
The weekday display flashes in the display. Set the day
of the week using the / buttons. Confirm using the
Menu/Set button.
Note
MON
= Monday,
THU
= Thursday,
SUN
= Sunday.
TIME
" flashes in the display. Press
24 Hr
" flashes in the display. Set hour
TUE
= Tuesday,
FRI
= Friday,
TIME
), the alarm
ALARM 1, ALARM 2,
DISPLAY
WED
= Wednesday,
SAT
= Saturday,
), the
BEEP
)
11
Page 12
7.2 Setting the alarm properties
You can choose to wake up with one of the 8 wake-up
melodies, an alarm tone, the radio or your own music
via a USB stick.
For the alarm times that have been set (see section 8.1),
you can configure the following alarm properties: alarm
tone, volume, sunrise, duration of sunrise, brightness of
sunrise.
To configure the alarm properties, proceed as follows:
•
When the device is switched on, press the Menu/Set
button. "
•
Use the / buttons to select the desired alarm
storage location (
for which you wish to configure the functions
using the Menu/Set button.
•
The currently set alarm tone (e.g.
the / buttons to select the desired alarm tone.
Confirm using the Menu/Set button.
SOUND 1-8
RADIO
USB
•
The alarm volume (
to set the desired volume (1 to 10). Confirm using the
Menu/Set button.
•
The sunrise function flashes (
buttons to switch the sunrise function on (ON) or o
(
You can also choose to be woken up by a sunrise
function in addition to the alarm tone. The sunrise
function is a simulated sunrise. In the process, the LED
light slowly turns brighter prior to the actual alarm time
that is set.
•
If the sunrise function is switched on, the duration of
the sunrise flashes (10
to select the duration of the sunrise prior to the alarm
time (1, 2, 5, 10, 20 or 30 minutes). Confirm using the
Menu/Set button.
•
The brightness of the sunrise flashes (
display. Use the / buttons to select the desired
brightness of the sunrise at the alarm time (5, 10, 15
or 20). Confirm using the Menu/Set button. If you are
woken up by light relatively quickly, then we recommend
reducing the brightness.
TIME
" flashes in the display.
ALARM 1, ALARM 2 or ALARM 3
Note
BUZZ
= acoustic signal
= 8 dierent wake-up melodies
= radio
= via connected USB stick
VOL
) flashes. Use the / buttons
SUNRISE
OFF
). Confirm using the Menu/Set button.
Note
MIN
). Use the / buttons
BUZZ
) flashes. Use
). Use the /
20 LI
.
Confirm
) in the
)
7.3 Setting the display brightness
•
When the device is switched on, press the Menu/Set
button. "
TIME
" flashes in the display.
•
Use the / buttons to select
using the Menu/Set button.
•
The current display brightness flashes (
Use the / buttons to select the desired brightness
(OFF, 1, 2, or 3). Confirm using the Menu/Set button.
Note
Once the setting is made, it takes approx. 10 seconds
for the currently configured display brightness to
appear. This is because the display is automatically
illuminated at the highest setting for 10 seconds
each time a button is pressed (including the snooze
function).
DISPLAY
3 DISPLAY
. Confirm
7.4 Setting the snooze duration
•
When the device is switched on, press the Menu/Set
button. "
TIME
" flashes in the display.
•
Use the / buttons to select
the Menu/Set button.
•
The snooze duration flashes (
/ buttons to select the desired snooze duration (1,2,
5, 10, 20 or 30 minutes). Confirm using the Menu/Set
button.
SNOOZE
5 MIN SNOOZE
. Confirm using
). Use the
7.5 Switching the button tone on/o
•
When the device is switched on, press the Menu/Set
button. "
TIME
" flashes in the display.
•
Use the / buttons to select
using the Menu/Set button.
•
Use the / buttons to switch the button tone on
(ON) or o (
OFF
). Confirm using the Menu/Set button.
FEEDBACK
. Confirm
8. Device functions
8.1 Setting the alarm
The device features three alarm memory spaces that can
be configured individually.
8.1.1 Switching the alarm on (ON)
1.
When the device is switched on, keep pressing the
ALARM button until the desired alarm memory space
appears in the display (
Press the / buttons until
2.
3.
Press the Menu/Set button. The hour display of the
alarm flashes in the display. Use the / buttons to
set the hour and confirm using the Menu/Set button.
A1, A2
or A3).
ON
appears in the display.
).
12
Page 13
4. The minute display of the alarm flashes in the display.
Use the / buttons to set the minute and confirm
using the Menu/Set button.
END
is briefly shown in the display. The set alarm is
5.
now activated and appears in the display.
8.1.2 Setting an alarm for each day (
For each alarm that has been set, you can use the
DAY
)
DAY
function to specify the days of the week on which the
alarm should sound.
1.
When the device is switched on, keep pressing the
ALARM button until the desired alarm memory space
appears in the display (
2.
Press the / buttons until
A1, A2 or A3).
DAY
is shown in the
display.
3.
Press the Menu/Set button.
MON
(Monday) and
off
appear in the display.
4.
Use the / buttons to activate (on) or deactivate
(
off
) the alarm for Monday. Confirm using the
Menu/Set button.
5.
TUE
(Tuesday) appears in the display. Make the settings
for the other days of the week in the same way as for
Monday, as described in the previous point. Then set
the alarm time as described in section 8.1.1.
8.1.3 Permanently deactivating the alarm (
OFF
)
To permanently deactivate a set alarm, proceed as
follows:
1.
When the device is switched on, keep pressing the
ALARM button until the desired alarm memory space
appears in the display (
2.
Press the / buttons until OFF appears in the display.
A1, A2 or A3).
3. Confirm using the Menu/Set button.
4.
END appears in the display. The alarm is now
permanently deactivated.
8.2 Switching o the alarm
8.2.1 Switching o the alarm during sunrise:
When the sunrise function is switched on, the device
slowly begins to light up prior to the set alarm time and
"SUNRISE" is shown in the display. You can switch o
this sunrise by pressing any button. However, the alarm
tone will still sound at the set alarm time.
8.2.2 Snooze mode (Snooze) for the alarm
The device features a snooze mode (Snooze).
If the alarm sounds and you press the Snooze function
(by tapping the light area), the alarm will sound again once
the set snooze duration has elapsed (see section 7.4).
8.2.3
Switching o the alarm when the alarm tone sounds
When the alarm sounds, press any button apart from
Snooze. The alarm is now switched o and will only
sound again at the set alarm time.
8.3 AUX mode
You can connect an external audio source (e.g. MP3
player, smartphone or CD player) to the wake-up light
via the AUX input.
1. Connect the supplied AUX cable to an audio source.
2.
Insert the other end of the AUX cable into the AUX input
on the rear of the device.
3.
Press the AUX button on the device. The external audio
source is now connected to the wake-up light.
4. Use the +/- buttons on the side to adjust the volume.
5. Press the ■ button to exit AUX mode again.
6. Disconnect the AUX cable after use.
8.4 USB mode
You have the option of connecting a USB stick (up to
32 GB) to the wake-up light via the USB connection,
enabling you to listen to music. The device can play the
following file formats: MP3, WMA and WAV.
Note
The device can only play music files that are stored
inthe root directory. Music files that are stored in subdirectories cannot be played.
If you wish to use USB mode, proceed as follows:
1.
Insert the USB stick into the USB connection on the
wake-up light (located on the rear of the device).
2. If the USB stick is already inserted: when the device
is switched on, press the USB button.
"USB", the current song number and the song length
appear in the display.
3.
To switch to the next song, press the button. To switch
to the previous song, press the button. To pause
playback, press the ►ǁ button. To switch between
"Standard playback", "Repeat" (P) and "Repeat all
songs" ( P
ALL
), press the Menu/Set button.
4. Use the +/- buttons on the side to adjust the volume.
5. To end USB mode, press the ■ button.
8.5 Radio mode
You can also use the device to listen to the radio.
If you wish to use radio mode, proceed as follows:
1. When the device is switched on, press the FM button.
The current station frequency and programme number
(e.g.
P1
) appear in the display.
13
Page 14
2.
Use the / buttons to select the desired programme
number (e.g.
saved.
3.
Press and hold the button to start the automatic
station search. To save a station under the selected
programme number (e.g.
button.
4. To switch between the saved stations, press the
buttons.
P1
or P2) under which a station is to be
P1), press the
Menu/Set
/
8.6 Good night function (radio sleep timer)
If radio mode is switched on, you can also enable a good
night function.
You can use the good night function to set the number
of minutes after which the radio should automatically
switch o.
If you wish to use the good night function, proceed as
follows:
1. When the device is switched on, press the FM button
to access radio mode.
2.
Press the Menu/Set button;
in the display.
3. Use the Menu/Set button to set the desired time after
which the radio should automatically switch o (2, 5,
10, 15, 20, 30, 45 or 60 minutes). Wait 5 seconds to
confirm the selection. A small icon will subsequently
appear in the display.
2 MIN sleep
appears
8.7 Light functions
8.7.1 Reading lamp
1.
When the device is switched on, press the Light button.
2.
The light turns on and
Use the +/- buttons to set the desired brightness for the
light (can be selected between 1-20).
3.
To switch the light o again, keep pressing the Light
button until "
8.7.2 Sunset function
The device can also be used to simulate a sunset. In the
process, the light slowly turns darker after a set duration.
To simulate a sunset with the device, proceed as follows:
1.
When the device is switched on, press the Light button
on the side.
2.
The light turns on and
display; immediately afterwards, use the +/- buttons
on the side to set the desired brightness of the light
(can be selected between 1-20). Use the Light button
to confirm.
3.
Use the +/- buttons on the side to select the desired
duration of the sunset (2, 5, 10, 15, 20, 30, 45 or
60 minutes), then wait for 5 seconds. The sunset
10 sunset
20 light
LIGHT off
appears in the display.
" appears in the display.
20 light
appears in the display.
appears in the
function is then activated automatically and a small
icon appears in the display. The light will now go
out automatically once the configured duration of the
sunset has elapsed.
Note
Sunset with music
The device can also be used to simulate a sunset while
you listen to music. In the process, the light slowly
turns darker after a set duration. The music is switched
o automatically after the set duration has elapsed.
To start a sunset with music on the device, proceed
as follows:
1. When the device is switched on, select the desired
music source (USB, radio (FM) or AUX).
2.
Perform the subsequent steps as in "8.7.2 Sunset
function".
8.7.3 Mood light with change of colour
The wake-up light can also be used as a mood light with
change of colour.
1.
When the device is switched on, press the Light button
3x.
2.
LIGHT change
3.
If you wish to have a coloured light permanently
displayed, this can be set by pressing the Light button
while the colour-change operation is in progress.
fixed
appears in the display.
4.
To fully switch o the light, press the Light button again.
appears in the display.
LIGHT
8.8 Resetting the device to factory settings
If you wish to reset all settings on the wake-up light to
the factory settings, proceed as follows:
1.
Remove the mains adapter of the wake-up light from
the socket.
2.
Press and hold both the Menu/Set button and the Light
button on the device, which is now switched o, and
reinsert the mains adapter of the wake-up light into
the socket. Keep pressing the buttons about 10 sec..
3. The device has now been reset to the factory settings.
9. Cleaning and storage
•
Clean the device with a dry cloth.
•
Do not use any abrasive cleaning products.
•
Ensure that no water enters the device. If this should
happen, reuse the device only when it has fully dried
out.
•
Never immerse the device or mains part plug in water
or other liquids.
14
Page 15
•
Protect the device from impacts, humidity, dust,
chemicals, marked temperature fluctuations and nearby
sources of heat (ovens, heaters).
10. Disposal
For environmental reasons, do not dispose of the device
in the household waste at the end of its useful life.
Dispose of the device at a suitable local collection
or recycling point. Observe the local regulations
for material disposal. Dispose of the device in
accordance with EC Directive – WEEE (Waste
Electrical and Electronic Equipment). If you have any
questions, please contact the local authorities responsible
for waste disposal.
11. Technical data
Illuminance
Light LED technology
Light levels
Mood light
Wake-up light
function
Sunrise function
Snooze duration 1, 2, 5, 10, 20, 30 minutes
Sunset function
Good night
function
(sleepradio)
LCD backlighting O, 1, 2, 3
Time
Alarm
Button tone O, On
AUX Line-in, 3.5 mm jack plug
USB
Radio
Max. approx. 2500 lux
(atdistance of 15 cm)
20 light levels with simulation
ofdawn
Automatic RGB colour change,
option of setting individual colour
O, 2, 5, 10, 15, 20, 30, 45,
60minutes prior to alarm
Maximum light intensity up to
alarm: Light level 5, 10, 15, 20
2, 5, 10, 15, 20, 30, 45, 60 minutes
2, 5, 10, 15, 20, 30, 45, 60 minutes
Toggle 12h/24h mode, 15 minute
buer in event of power failure
3 alarm times (O, On, Day)
Alarm tone, 8 sounds, radio,
MP3 via USB stick
Playback via USB stick, max.
32 GB.
File formats: MP3, WMA, WAV,
max. 9999 files, can only be read
in root directory, subdirectories
are not supported. 5 V output
voltage
Frequency range VHF 87.5-108
MHz, 10 memory spaces
15
Speaker 2 Watt
Mains part
voltage supply
Mains part
protection class
Subject to technical changes.
Input: 110-240 V, AC, 50/60 Hz,
0.5 A
Output: 9 V, DC, 1500 mA
Protection class II
Page 16

F FRANÇAIS
Lisez attentivement cette notice, conservez-la pour un usage ultérieur,
mettez-la à disposition des autres utilisateurs et suivez les consignes qui y
figurent.
Table des matières
1. Familiarisation avec l'appareil ...................................................................................................... 17
2. Symboles utilisés ........................................................................................................................... 17
3. Utilisation conforme aux recommandations ............................................................................... 17
4. Consignes de sécurité ................................................................................................................... 17
5. Description de l'appareil ............................................................................................................... 18
6. Mise en service .............................................................................................................................. 18
7. Réglages de base .......................................................................................................................... 18
7.1 Réglage de l’heure ..................................................................................................................... 18
7.2 Réglage des propriétés de l'alarme ........................................................................................... 19
7.3 Réglage de la luminosité de l'écran ........................................................................................... 19
7.4 Réglage de la durée de la fonction snooze ................................................................................ 19
7.5 Activation/désactivation du bip des touches ............................................................................. 19
8. Fonctions de l'appareil .................................................................................................................. 20
8.1 Réglage de l’alarme ................................................................................................................... 20
8.1.1 Activation (ON) de l'alarme ............................................................................................... 20
8.1.2 Réglage des jours de l'alarme (DAY) ................................................................................. 20
8.1.3 Désactivation permanente de l'alarme (OFF) .................................................................... 20
8.2 Désactivation de l'alarme ........................................................................................................... 20
8.2.1 Désactivation de l'alarme pendant un lever de soleil: ...................................................... 20
8.2.2 Fonction de rappel d'alarme (Snooze) .............................................................................. 20
8.2.3 Désactivation de l'alarme .................................................................................................. 20
8.3 Mode AUX .................................................................................................................................. 20
8.4 Mode USB ................................................................................................................................. 20
8.5 Mode radio ................................................................................................................................. 21
8.6 Fonction bonne nuit (Radio/Sleep/Timer) .................................................................................. 21
8.7 Fonctions lumineuses ................................................................................................................ 21
8.7.1 Lampe de lecture .............................................................................................................. 21
8.7.2 Fonction coucher de soleil ................................................................................................ 21
8.7.3 Lumière d'ambiance avec changement de couleur .......................................................... 21
8.8 Repasser aux réglages d'usine .................................................................................................. 22
9. Nettoyage/stockage ...................................................................................................................... 22
10. Élimination des déchets ................................................................................................................ 22
11. Données techniques ..................................................................................................................... 22
Contenu
•
Lumière de réveil avec antenne volante
•
Adaptateur secteur
•
Câble AUX
•
Mode d'emploi
•
Support pour smartphone/lecteur MP3
16
Page 17
Chère cliente, cher client,
Nous vous remercions d'avoir choisi l'un de nos
produits. Notre société est réputée pour l'excellence
de ses produits et les contrôles de qualité auxquels ils
sont soumis. Nos produits couvrent les domaines de la
chaleur, du poids, de la pression sanguine, de la température corporelle, de la thérapie douce, des massages,
de l’amélioration de l’air et de la beauté.
Sincères salutations,
Votre équipe Beurer
3. Utilisation conforme
aux recommandations
AVERTISSEMENT
L'appareil ne doit être utilisé qu'aux fins pour lesquelles
il a été conçu et conformément aux indications données
par ce mode d'emploi. Toute utilisation inappropriée peut
être dangereuse. Le fabricant ne peut être tenu pour
responsable des dommages causés par une utilisation
inappropriée ou non conforme.
1. Familiarisation avec l'appareil
La lumière de réveil Beurer WL 80 vous ore un réveil en
douceur et naturel. La lumière LED, s'intensifiant progressivement, permet de simuler un lever de soleil. Vous
pouvez alors tranquillement vous habituer aux conditions lumineuses et votre corps se préparer doucement
au réveil. En plus de la simulation de lever de soleil, vous
pouvez paramétrer une sonnerie qui vous accompagne
lors de votre réveil. Pour la sonnerie, vous pouvez choisir
entre la radio et plusieurs sonorités. La lumière de réveil
WL 80 de Beurer vous permet de débuter la journée
reposé et du bon pied.
2. Symboles utilisés
Ce symbole vous avertit des
AVERTISSEMENT
ATTENTION
Remarque
risques de blessures ou des
dangers pour votre santé.
Ce symbole vous avertit des
éventuels dommages au niveau
de l’appareil ou d’un accessoire.
Ce symbole indique des informations importantes.
Élimination conformément à
la directive européenne WEEE
(Waste Electrical and Electronic
Equipment) relative aux déchets
d'équipements électriques et
électroniques
Fabricant
Ce produit répond aux exigences
des directives européennes et
nationales en vigueur.
4. Consignes de sécurité
AVERTISSEMENT
•
Utilisez l'appareil uniquement avec l’adaptateur secteur
fourni et à la tension indiquée sur l'adaptateur secteur.
•
Avant l'utilisation, vérifiez si l'appareil et les accessoires
présentent des dégâts visibles. En cas de doute, ne
l’utilisez pas et adressez-vous à votre revendeur ou au
service client indiqué.
•
L’appareil ne doit être utilisé que dans un environnement
domestique/privé et pas dans un cadre professionnel.
•
Cet appareil peut être utilisé par les enfants à partir de
8ans ainsi que les déficients physiques, sensoriels ou
mentaux et les personnes ayant peu de connaissances
ou d'expérience à la condition qu'ils soient surveillés
ou sachent comment l'utiliser en toute sécurité et en
comprennent les risques.
•
Les enfants ne doivent pas jouer avec cet appareil.
•
Le nettoyage et l'entretien ne doivent pas être eectués
par des enfants sans surveillance.
•
Si le câble d'alimentation électrique de l'appareil est
endommagé, il doit être remplacé par le fabricant, son
service client ou toute autre personne qualifiée afin
d'éviter tout danger.
•
En cas de défaut ou de panne, éteignez immédiatement
l’appareil et débranchez l’alimentation.
•
Ne branchez ou débranchez jamais l'adaptateur secteur
si vous avez les mains humides.
•
Conservez l'emballage hors de portée des enfants
(risque d’étouement).
•
Placez le câble d'alimentation de manière à ce que
personne ne puisse trébucher dessus.
•
Tenez l'appareil, l'adaptateur secteur et le câble à l'écart
de l'eau!
17
Page 18

ATTENTION
•
Protégez l'appareil contre les chocs, l'humidité, les
saletés, les fortes variations de température et l'ensoleillement direct.
•
Ne laissez pas tomber l'appareil.
•
Branchez l'adaptateur secteur sur une prise secteur
adaptée.
•
L'heure s'ache sur l'écran de l'appareil.
•
Placez l'antenne volante de l'appareil vers l'arrière.
Fixation du support pour smartphone
5. Description de l'appareil
3
2
5
1
1 Écran 5 Touche +/2 Surface lumineuse 6 Touche Light
3 Fonction Snooze
(appuyer sur la surface
lumineuse).
4 Clavier
Touche Alarm/
touche ►ǁ
Touche USB/
touche
Touche Radio/
touche ■
4
7 Support pour smartphone/lecteur MP3
7
6
Touche AUX/
touche
Touche
Menu/Set
6. Mise en service
•
Retirez le matériel d'emballage.
•
Vérifiez que toutes les pièces sont présentes lors de
la livraison
•
Vérifiez que l'appareil, l'adaptateur secteur et le câble
ne sont pas endommagés.
•
Posez l'appareil sur une surface stable et plane.
•
Branchez la fiche de l'adaptateur secteur dans la prise
de l'adaptateur secteur à l'arrière de l'appareil.
.
1.
Accrochez les quatre
crochets du support dans les
quatre ouvertures rectangulaires de la lumière de réveil.
2.
Avec l'index droit, poussez le
support vers le bas et, avec
l'autre main, faites-le glisser
doucement dans le sens de
la flèche jusqu'à sentir et
entendre un clic.
3.
Pour le retirer, appuyez sur
le bouton de déblocage sur
la lumière de réveil et faites
glisser doucement le support
dans le sens de la flèche.
7. Réglages de base
Dans les réglages de base, vous pouvez régler l'un
après l'autre l'heure (
pour l'heure réglée (
luminosité de l'écran (
snooze (
SNOOZE
7.1 Réglage de l’heure
•
Lorsque l'appareil est allumé, appuyez sur la touche
Menu/Set. «
nouveau sur la touche Menu/Set.
•
Le mode «
à l'aide des touches / (mode 24h ou mode 12h)
Confirmez en appuyant sur la touche Menu/Set.
•
L'achage de l'heure clignote à l'écran. Réglez les
heures à l'aide des touches / . Confirmez en
appuyant sur la touche Menu/Set.
•
L'achage des minutes clignote à l'écran. Réglez
les minutes à l'aide des touches / . Confirmez en
appuyant sur la touche Menu/Set.
•
L'achage du jour clignote à l'écran. Réglez le jour à
l'aide des touches
touche Menu/Set.
18
24 Hr
TIME
), les propriétés de l'alarme
ALARM 1, ALARM 2, ALARM 3
DISPLAY
) et le bip des touches (
TIME
» clignote à l'écran. Appuyez à
» clignote à l'écran. Réglez le mode
/ . Confirmez en appuyant sur la
), la durée de la fonction
BEEP
).
), la
Page 19

Remarque
MON
= lundi,
THU
= jeudi,
SUN
= dimanche.
TUE
= mardi,
FRI
= vendredi,
WED
= mercredi,
SAT
= samedi,
7.2 Réglage des propriétés de l'alarme
Vous pouvez choisir d'être réveillé par l'une des 8 mélodies de réveil, une sonnerie, la radio ou par votre propre
musique en connectant une clé USB.
Pour l'heure de réveil programmée (voir chapitre 8.1),
vous pouvez définir les propriétés de l'alarme suivantes:
sonnerie, volume, lever de soleil, durée du lever de soleil,
luminosité du lever de soleil.
Pour régler les propriétés de l'alarme, eectuez les étapes
suivantes:
•
Lorsque l'appareil est allumé, appuyez sur la touche
Menu/Set. «
•
À l'aide des touches / , sélectionnez l'emplacement d'alarme (
que vous voulez régler. Confirmez en appuyant sur la
touche Menu/Set.
•
Le signal sonore actuel (par ex.
des touches / , sélectionnez le signal sonore souhaité.
Confirmez en appuyant sur la touche Menu/Set.
Remarque
BUZZ
SOUND 1-8
RADIO
USB
= via clé USB connectée
•
Volume de l'alarme (
/ , réglez le volume souhaité (1 à 10). Confirmez en
appuyant sur la touche Menu/Set.
•
La fonction lever de soleil clignote (
des touches / , activez (ON) ou désactivez (
fonction lever de soleil. Confirmez en appuyant sur la
touche Menu/Set.
Remarque
En plus de la sonnerie, vous pouvez également vous
faire réveiller par la fonction lever de soleil. La fonction
lever de soleil simule un lever de soleil. La LED devient
de plus en plus lumineuse avant que le signal sonore
ne retentisse.
TIME
» clignote à l'écran.
ALARM 1, ALARM 2 ou ALARM 3
BUZZ
= bip
= 8 mélodies de réveil diérentes
= radio
VOL
) clignote. À l'aide des touches
) clignote. À l'aide
SUNRISE
). À l'aide
OFF
) la
avant la sonnerie (1, 2, 5, 10, 20 ou 30 minutes).
Confirmez en appuyant sur la touche Menu/Set.
•
La luminosité du lever de soleil (
l'écran. À l'aide des touches / , choisissez la luminosité du lever de soleil souhaitée au moment de la
sonnerie (5, 10, 15 ou 20). Confirmez en appuyant sur la
touche Menu/Set. Si la lumière vous réveille assez rapidement, nous vous conseillons de réduire la luminosité.
20 LI
7.3 Réglage de la luminosité de l'écran
•
Lorsque l'appareil est allumé, appuyez sur la touche
Menu/Set. «
•
À l'aide des touches / , sélectionnez
Confirmez en appuyant sur la touche Menu/Set.
•
La luminosité de l'écran actuelle clignote (
À l'aide des touches / , sélectionnez la luminosité
de l'écran souhaitée (OFF, 1, 2, ou 3). Confirmez en
appuyant sur la touche Menu/Set.
Remarque
Après le réglage, il faut environ 10secondes pour
)
que la luminosité réglée apparaisse, car dès que
vous appuyez sur une touche (et sur Snooze), l'écran
s'éclaire automatiquement au plus haut niveau de
luminosité pendant 10secondes.
7.4
Réglage de la durée de la fonction snooze
•
Lorsque l'appareil est allumé, appuyez sur la touche
Menu/Set. «
•
À l'aide des touches / , sélectionnez
Confirmez en appuyant sur la touche Menu/Set.
•
La durée de la fonction snooze clignote (
SNOOZE
durée de la fonction snooze souhaitée (1, 2, 5, 10, 20
ou 30minutes). Confirmez en appuyant sur la touche
Menu/Set.
7.5
Activation/désactivation du bip des
TIME
» clignote à l'écran.
3 DISPLAY
TIME
» clignote à l'écran.
). À l'aide des touches / , sélectionnez la
touches
•
Lorsque l'appareil est allumé, appuyez sur la touche
Menu/Set. «
•
À l'aide des touches / , sélectionnez
Confirmez en appuyant sur la touche Menu/Set.
•
À l'aide des touches / , activez (ON) ou désactivez
(
OFF
la touche Menu/Set.
TIME
» clignote à l'écran.
) le bip des touches. Confirmez en appuyant sur
) clignote à
DISPLAY
SNOOZE
5 MIN
FEEDBACK
.
).
.
.
•
Lorsque la fonction lever de soleil est activée, la durée
du lever de soleil clignote (10
/ , choisissez la durée du lever de soleil souhaitée
MIN
). À l'aide des touches
19
Page 20

8. Fonctions de l'appareil
8.1 Réglage de l’alarme
L'appareil propose trois alarmes diérentes qui peuvent
être réglées indépendamment l'une de l'autre.
8.1.1 Activation (ON) de l'alarme
1.
Lorsque l'appareil est allumé, appuyez sur la touche
ALARM autant de fois que nécessaire jusqu'à ce que
l'emplacement de l'alarme souhaité s'ache à l'écran
A1, A2 ou A3).
(
2.
Appuyez sur les touches / jusqu'à ce que
s' ache.
Appuyez sur la touche Menu/Set. L'achage de l'heure
3.
de l'alarme clignote à l'écran. À l'aide des touches
/ , réglez l'heure et confirmez en appuyant sur la
touche Menu/Set.
4. L'achage des minutes de l'alarme clignote à l'écran.
À l'aide des touches / , réglez les minutes et
confirmez en appuyant sur la touche Menu/Set.
END
clignote brièvement à l'écran. L'alarme est alors
5.
réglée et achée à l'écran.
8.1.2 Réglage des jours de l'alarme (
À l'aide de la fonction
chaque alarme enregistrée, quels jours vous voulez que
l'alarme sonne.
1.
Lorsque l'appareil est allumé, appuyez sur la touche
ALARM autant de fois que nécessaire jusqu'à ce que
l'emplacement de l'alarme souhaité s'ache à l'écran
(
A1, A2
ou A3)
2.
Appuyez sur les touches / jusqu'à ce que
s'ache.
3. Appuyez sur la touche Menu/Set.
s'achent à l'écran.
4. À l'aide des touches
(
off
) l'alarme pour lundi. Confirmez en appuyant sur
la touche Menu/Set.
5.
TUE
(mardi) s'ache à l'écran. Réglez le reste de
la semaine comme indiqué précédemment pour
lundi. Réglez ensuite l'alarme comme indiqué au
chapitre 8.1.1.
8.1.3 Désactivation permanente de l'alarme (
Procédez comme suit pour désactiver une alarme de
façon permanente:
1.
Lorsque l'appareil est allumé, appuyez sur la touche
ALARM autant de fois que nécessaire jusqu'à ce que
l'emplacement de l'alarme souhaité s'ache à l'écran
(
A1, A2 ou A3).
DAY
.
/ , activez (on) ou désactivez
DAY
)
, vous pouvez définir, pour
MON
(lundi) et
OFF
O N
DAY
off
)
2.
Appuyez sur les touches / jusqu'à ce que OFF
s'ache.
3. Confirmez en appuyant sur la touche Menu/Set.
4.
END clignote à l'écran. L'alarme est alors désactivée
de façon permanente.
8.2 Désactivation de l'alarme
8.2.1
Désactivation de l'alarme pendant un lever de
soleil:
Lorsque la fonction de lever de soleil est activée, l'appareil s'éclaire lentement avant l'heure de réveil programmée
et l'écran ache «SUNRISE ». Vous pouvez désactiver le
lever de soleil en appuyant sur n'importe quelle touche.
Cela ne désactivera pas l'alarme.
8.2.2 Fonction de rappel d'alarme (Snooze)
L'appareil propose la fonction de rappel d'alarme
(Snooze). Si, lorsque l'alarme se déclenche, vous
appuyez sur Snooze (sur la surface lumineuse), l'alarme
sonne à nouveau après la durée de la fonction snooze
définie (voir chapitre 7.4).
8.2.3 Désactivation de l'alarme
Lorsque l'alarme sonne, appuyez sur n'importe quelle
touche sauf Snooze. L'alarme est alors désactivée et ne
sonnera à nouveau qu'à l'heure réglée.
8.3 Mode AUX
Vous pouvez connecter une source externe (par exemple,
lecteur MP3, smartphone ou lecteur CD) via l'entrée AUX
de la lumière de réveil.
1. Branchez le câble AUX fourni à la source audio.
2.
Branchez l'autre extrémité du câble dans la sortie AUX,
à l'arrière de l'appareil.
3.
Appuyez sur la touche AUX. La lumière de réveil est
alors connectée à la source externe.
4. Réglez le volume à l'aide des touches latérales +/-.
5. Pour quitter le mode AUX, appuyez sur la touche ■.
6. Après utilisation, débranchez le câble AUX.
8.4 Mode USB
Vous avez la possibilité de brancher une clé USB (jusqu'à
32Go) à la lumière de réveil via le câble USB pour écouter
de la musique. L'appareil prend en charge les formats
suivants: MP3, WMA et WAV.
Remarque
L'appareil ne peut lire que les fichiers musicaux placés
dans le répertoire racine. Les fichiers musicaux placés
dans les sous-répertoires ne pourront pas être lus.
20
Page 21

Si vous souhaitez utiliser le mode USB, veuillez suivre
les étapes suivantes.
1.
Branchez la clé USB dans la prise USB de la lumière
de réveil (à l'arrière de l'appareil).
2. Une fois la clé est insérée: lorsque l'appareil est
allumé, appuyez sur la touche USB. «USB», le
numéro du morceau et sa durée s'achent à l'écran.
3.
Pour passer au morceau suivant, appuyez sur la
touche . Pour revenir au morceau précédent, appuyez
sur la touche . Pour mettre la lecture en pause, appuyez
sur la touche ►ǁ. Pour passer de «lecture normale» à
«répéter le morceau» (P) à «répéter tous les morceaux»
(P
ALL
), appuyez sur la touche Menu/Set.
4. Réglez le volume à l'aide des touches latérales +/-.
5. Pour quitter le mode USB, appuyez sur la touche ■.
8.5 Mode radio
Avec cet appareil, vous pouvez également écouter la
radio. Si vous souhaitez utiliser le mode radio, veuillez
suivre les étapes suivantes.
1.
Lorsque l'appareil est allumé, appuyez sur la touche
FM. La station actuelle et le numéro de programme
(parex. P1) s'achent à l'écran.
2.
À l'aide des touches / , sélectionnez le numéro
de programme (par ex.
P1
ou P2) sur lequel vous
souhaitez enregistrer la station.
3.
Maintenir la touche enfoncée pour lancer la recherche
automatique de stations. Pour enregistrer une station
sur le numéro de programme souhaité (par ex. P1)
appuyez sur la touche Menu/Set.
4.
Pour passer d'une station enregistrée à une autre,
appuyez sur les touches / .
8.6 Fonction bonne nuit (Radio/Sleep/Timer)
Lorsque le mode radio est activé, vous pouvez
programmer la fonction bonne nuit.
Avec cette fonction, vous pouvez paramétrer l’arrêt automatique après une durée choisie de la radio.
Si vous souhaitez utiliser la fonction bonne nuit, veuillez
suivre les étapes suivantes:
1.
Lorsque l'appareil est allumé, appuyez sur la touche
FM pour activer le mode radio.
2.
Appuyez sur la touche Menu/Set,
s' ache à l'écran.
3. À l'aide de la touche Menu/Set, réglez la durée après
laquelle vous souhaitez que la radio s'éteigne (2, 5, 10,
15, 20, 30, 45 ou 60minutes). Pour confirmer votre
choix, attendez 5secondes. Ensuite, le petit symbole
s'ache automatiquement à l'écran.
2 MIN sleep
8.7 Fonctions lumineuses
8.7.1 Lampe de lecture
1.
Lorsque l'appareil est allumé, appuyez sur la touche
Light.
2.
La lampe s'allume et
Àl'aide de la touche +/-, réglez la luminosité souhaitée
(entre 1 et 20).
3.
Pour éteindre la lampe, appuyez sur la touche
Light autant de fois que nécessaire jusqu'à ce que
«
LIGHT off
8.7.2 Fonction coucher de soleil
» s'ache à l'écran.
Cet appareil vous permet de simuler le coucher du soleil.
La lumière perd progressivement en intensité pendant
une durée choisie.
Pour simuler un coucher de soleil, veuillez suivre les
étapes suivantes:
1.
Lorsque l'appareil est allumé, appuyez sur la touche
latérale Light.
2.
La lampe s'allume et
moment, réglez la luminosité souhaitée (entre 1 et 20) à
l'aide des touches +/- latérales. Confirmez en appuyant
sur la touche Light.
3.
Avec les touches latérales +/-, sélectionnez la durée de
coucher de soleil souhaitée (2, 5, 10, 15, 20, 30, 45 ou
60minutes). Attendez ensuite 5secondes. La fonction
coucher de soleil est alors activée et le petit symbole
s'ache automatiquement à l'écran. La lumière s'éteint
automatiquement après la durée de coucher de soleil
,
définie.
Remarque
Coucher de soleil en musique
Cet appareil vous permet de simuler le coucher du
soleil en diusant de la musique. La lumière perd
progressivement en intensité pendant une durée
choisie. La musique s'arrête automatiquement après
la durée définie.
Pour programmer un coucher de soleil en musique,
veuillez suivre les étapes suivantes:
1.
Lorsque l'appareil est allumé, sélectionnez la source
musicale souhaitée (USB, radio (FM) ou AUX).
2.
Ensuite, suivez les étapes indiquées au chapitre
«8.7.2 Fonction coucher de soleil».
8.7.3 Lumière d'ambiance avec changement de couleur
Vous pouvez aussi utiliser la lumière de réveil comme
lumière d'ambiance avec couleur changeante.
1.
Lorsque l'appareil est allumé, appuyez 3 fois sur la
touche Light.
21
20 light
20 light
10 sunset
s'ache à l'écran.
s'ache à l'écran. À ce
s'ache à l'écran.
Page 22

2.
LIGHT change
3. Pendant le changement de couleur, vous pouvez fixer
une lumière colorée en appuyant sur la touche Light.
LIGHT fixed
4.
Pour éteindre complètement la lumière, appuyez à
nouveau sur la touche Light.
s'ache à l'écran.
s'ache à l'écran.
8.8 Repasser aux réglages d'usine
Pour repasser la lumière de réveil aux réglages d’usine,
veuillez suivre les étapes suivantes:
1.
Débranchez l'adaptateur secteur de la lumière de réveil
de la prise.
2.
Lorsque l'appareil est éteint, maintenez les touches
Menu/Set et Light en même temps, puis rebranchez
la lumière de réveil.
3. L'appareil est repassé aux réglages d'usine.
9. Nettoyage/stockage
•
Nettoyez l'appareil à l'aide d'un chion sec.
•
N'utilisez pas de produits nettoyants abrasifs.
•
Assurez-vous que l'eau ne s'infiltre pas à l'intérieur.
Sicela devait se produire, utilisez de nouveau l'appareil uniquement lorsqu'il est complètement sec.
•
Ne jamais plonger l'appareil et l'adaptateur secteur
dans de l'eau ou d'autres liquides.
•
Protégez l'appareil contre les coups, l’humidité, la poussière, les produits chimiques, les fortes variations de
température et les sources de chaleur trop proches
(four, radiateur).
10. Élimination des déchets
Dans l'intérêt de la protection de l'environnement, l'appareil ne doit pas être jeté avec les ordures ménagères à la
fin de sa durée de service. L’élimination doit se
faire par le biais des points de collecte compétents dans votre pays. Respectez les réglementations locales en matière d’élimination des matériaux. Veuillez éliminer l’appareil conformément à la directive européenne – WEEE (Waste Electrical and Electronic
Equipment) relative aux appareils électriques et électroniques usagés. Pour toute question, adressez-vous aux
collectivités locales responsables de l’élimination et du
recyclage de ces produits.
11. Données techniques
Intensité
lumineuse
Lumière Technologie LED
env. 2500lux max.
(pour 15cm de distance)
Niveau
d'intensité
lumineuse
Lumière
d'ambiance
Fonction de
lumière de réveil
Fonction lever
desoleil
Durée de la
fonction snooze
Fonction coucher
de soleil
Fonction bonne
nuit (Sleep/radio)
Rétroéclairage
del'écran LCD
Heure
Alarme
Bip des touches Désactivé, activé
AUX Prise Line-In, prise jack 3,5mm
USB
Radio
Haut-parleur 2watts
Alimentation
élec trique de
l'adaptateur
secteur
Classe de sécurité de l'adaptateur secteur
Sous réserve de modifications techniques.
20 niveaux d'intensité lumineuse
avec simulation d'aube
Changement de couleur RVB
automatique avec fixation de
couleur individuelle
2, 5, 10, 15, 20, 30, 45, 60minutes
avant la sonnerie
Intensité lumineuse maximale
jusqu'à l'alarme: intensité
lumineuse 5, 10, 15, 20
1, 2, 5, 10, 20, 30minutes
2, 5, 10, 15, 20, 30, 45, 60minutes
2, 5, 10, 15, 20, 30, 45, 60minutes
Éteint, 1, 2, 3
Heure au format 12h ou 24h,
batterie tampon de 15minutes en
cas de coupure de courant
Alarme réglable sur 3heures dié rentes (désactivée, activée, jour)
Sonnerie, 8mélodies, radio, MP3
via clé USB
Lecture sur clé USB, 32Go max.
Format des données: MP3, WMA,
WAV, 9999fichiers max., lisibles
uniquement dans le répertoire
racine, les sous-répertoires ne
sont pas pris en charge. Tension
de sortie 5V
Plage de fréquences FM 87,5 –
108MHz, 10 emplacements de
sauvegarde
Entrée: AC 110240V/50~60Hz/0,5A
Sortie: 9V, CC/1500mA
Classe de sécurité II
22
Page 23

E ESPAÑOL
Lea atentamente estas instrucciones de uso, consérvelas para su futura
utilización, póngalas a disposición de otros usuarios y respete las
indicaciones.
Índice
1. Información general ...................................................................................................................... 24
2. Símbolos ......................................................................................................................................... 24
3. Uso correcto .................................................................................................................................. 24
4. Indicaciones de seguridad yadvertencias .................................................................................. 24
5. Descripción del aparato ................................................................................................................ 25
6. Puesta en funcionamiento ............................................................................................................ 25
7. Ajustes básicos .............................................................................................................................. 25
7.1 Ajuste de la hora ........................................................................................................................ 25
7.2 Ajuste de las propiedades de la alarma ..................................................................................... 26
7.3 Ajuste del brillo de la pantalla .................................................................................................... 26
7.4 Ajuste de la duración de la repetición ........................................................................................ 26
7.5 Encendido y apagado del sonido de las teclas ......................................................................... 26
8. Funciones del aparato ................................................................................................................... 26
8.1 Ajuste de la alarma..................................................................................................................... 26
8.1.1 Activación de la alarma (ON) ............................................................................................. 26
8.1.2 Activación de la alarma por día (DAY) ............................................................................... 27
8.1.3 Desactivación permanente de la alarma (OFF) ................................................................. 27
8.2 Desactivación de la alarma ........................................................................................................ 27
8.2.1 Desactivación de la alarma durante el amanecer: ............................................................ 27
8.2.2 Modo de repetición de la alarma (Snooze)........................................................................27
8.2.3 Desactivación de la alarma cuando suena el tono de alarma ........................................... 27
8.3 Modo AUX .................................................................................................................................. 27
8.4 Modo USB ................................................................................................................................. 27
8.5 Modo radio ................................................................................................................................. 28
8.6 Función de buenas noches (Radio Sleep-Timer) ......................................................................28
8.7 Funciones de luz ........................................................................................................................ 28
8.7.1 Lámpara de lectura ........................................................................................................... 28
8.7.2 Función de puesta de sol .................................................................................................. 28
8.7.3 Luz tenue que cambia de color ......................................................................................... 28
8.8 Restablecimiento a la configuración defábrica ........................................................................ 28
9. Limpieza/conservación ................................................................................................................. 29
10. Eliminación ..................................................................................................................................... 29
11. Datos técnicos ............................................................................................................................... 29
Artículos suministrados
•
Luz para despertar con antena flexible
•
Adaptador de red
•
Cable AUX
•
Instrucciones de uso
•
Soporte para smartphone/reproductor MP3
23
Page 24

Estimada clienta, estimado cliente:
Nos alegramos de que haya elegido un producto de nuestra colección. Nuestro nombre es sinónimo de productos
de alta y comprobada calidad en los sectores de energía
térmica, peso, tensión sanguínea, temperatura corporal,
pulso, tratamiento suave, masaje, aire y belleza.
Atentamente,
El equipo de Beurer
1. Información general
La luz para despertar WL 80 de Beurer proporciona un
despertar suave y natural. Con una luz LED que ilumina
la habitación lentamente se simula el amanecer. De esta
forma, usted puede acostumbrarse poco a poco a la
luz y su cuerpo se prepara para un plácido despertar.
Además de la simulación del amanecer, puede ajustar
una alarma de despertador que complemente el despertar con sonido. Como tono de alarma puede elegir
entre la radio o distintos sonidos. La luz para despertar
WL 80 de Beurer le ayuda a comenzar el día de forma
relajada y agradable.
2. Símbolos
Aviso sobre riesgos de lesiones
ADVERTENCIA
ATENCIÓN
Nota
u otros peligros para la salud.
Indicación de seguridad sobre
posibles desperfectos del aparato o de los accesorios.
Indicación de información
importante.
Eliminación según la Directiva
europea sobre residuos de aparatos eléctricos y electrónicos
(RAEE)
Fabricante
Este producto cumple los requisitos de las directrices europeas
y nacionales vigentes.
4. Indicaciones de seguridad
yadvertencias
ADVERTENCIA
•
No utilice el aparato con un adaptador de red distinto
del suministrado ni con una tensión de red distinta de
la indicada en el mismo.
•
Antes de utilizar el equipo, compruebe si el equipo o
los accesorios presentan defectos visibles. En caso de
duda no lo use y póngase en contacto con su distribuidor o con la dirección de atención al cliente indicada.
•
Este aparato está diseñado exclusivamente para su uso
privado o en el hogar y no para uso industrial.
•
Este aparato puede ser utilizado por niños mayores de
8 años, así como por personas con facultades físicas,
sensoriales o mentales limitadas, o con poca experiencia o conocimientos, siempre que estén vigiladas o se
les indique cómo usarlo de forma segura y entiendan
los peligros que conlleva.
•
Los niños no deberán jugar nunca con el aparato.
•
Las tareas de limpieza y de mantenimiento ordinario
no deberán ser realizadas por niños sin supervisión.
•
Si el cable de alimentación de red de este aparato se
daña, su sustitución deberá ponerse en manos del
fabricante, de su servicio técnico o de una persona cualificada para tal labor a fin de evitar peligros.
•
Apague el aparato inmediatamente en caso de detectar
defectos o fallos de funcionamiento y desenchúfelo de
la toma de corriente.
•
No enchufe o desenchufe el adaptador de red con las
manos húmedas.
•
Mantenga a los niños alejados del material de embalaje
(peligro de asfixia).
•
Tienda el cable de corriente de modo que nadie pueda
tropezar con él.
•
Mantenga el aparato, el adaptador de red y el cable de
corriente lejos del agua.
ATENCIÓN
3. Uso correcto
ADVERTENCIA
Solo podrá usarse para el fin para el que ha sido diseñado y del modo indicado en las instrucciones de uso.
Todo uso inadecuado puede ser peligroso. Por lo tanto,
el fabricante declinará toda responsabilidad por daños
y perjuicios debidos a un uso inadecuado o incorrecto.
•
•
24
Proteja el aparato de impactos, humedad, suciedad,
grandes oscilaciones térmicas y exposición directa a
la luz solar.
Evite que el aparato se caiga.
Page 25

5. Descripción del aparato
3
2
Fijación del soporte para el smartphone
1.
Coloque los cuatro enganches de bloqueo del soporte
sobre las cuatro aberturas
rectangulares de la luz para
despertar.
5
1
1 Pantalla 5 Teclas +/2 Superficie luminosa 6 Tecla de la luz
3 Función de repetición
(tocar ligeramente la
superficie luminosa)
4 Campo de tecla
Tecla de alarma/
Tecla ►ǁ
Tecla USB/
Tecla
Tecla Radio/
Tecla ■
4
7 Soporte para smartphone/
reproductor MP3
7
6
Tecla AUX/
Tecla
Tecla
Menu/Set
6. Puesta en funcionamiento
•
Desempaquete el aparato.
•
Compruebe que estén todas las piezas enumeradas en
el volumen de suministro.
•
Compruebe que el aparato, el adaptador de red y el
cable de corriente no presenten daños.
•
Coloque el aparato sobre una superficie plana y estable.
•
Enchufe el conector del adaptador de red en la toma
para el adaptador de red de la parte posterior del
equipo.
•
Enchufe el adaptador de red a una toma de corriente
apta.
•
En la pantalla del aparato aparece la hora.
•
Coloque la antena flexible del aparato hacia atrás.
2.
Con el índice derecho,
presione el soporte hacia
abajo y deslícelo cuidadosamente con la otra mano
en la dirección de la flecha
hasta que oiga y note cómo
queda encajado.
3.
Para retirarlo, presione el
desbloqueo en la luz para
despertar y deslice el soporte
cuidadosamente en la dirección de la flecha.
7. Ajustes básicos
En los ajustes básicos, puede configurar la hora (
las características de la alarma para las horas ajustadas
(
ALARM 1, ALARM 2, ALARM 3
(
DISPLAY
sonido de las teclas (
), la duración de la repetición (
BEEP
), el brillo de la pantalla
).
7.1 Ajuste de la hora
•
Con el aparato encendido, pulse la tecla Menu/Set.
En la pantalla parpadeará "
tecla Menu/Set.
•
El formato de la hora "
talla. Ajuste el formato de la hora con las teclas /
(formato 24 horas o formato 12 horas). Confirme con
la tecla Menu/Set.
•
En la pantalla parpadeará la indicación de la hora.
Ajuste la hora con las teclas / . Confirme con la tecla
Menu/Set.
•
En la pantalla parpadeará la indicación de los minutos.
Ajuste los minutos con las teclas / . Confirme con la
tecla Menu/Set.
•
En la pantalla parpadeará la indicación del día de la
semana. Ajuste el día de la semana con las teclas / .
Confirme con la tecla Menu/Set.
Nota
MON
= lunes,
jueves,
FRI
= viernes,
TUE
= martes,
24 Hr
SAT
= sábado,
TIME
". Vuelva a pulsar la
" parpadeará en la pan-
WED
= miércoles,
SUN
TIME
SNOOZE
THU
= domingo.
),
) y el
=
25
Page 26

7.2 Ajuste de las propiedades de la alarma
Puede despertarse con una de las 8 melodías, un tono de
alarma, con la radio o con su propia música mediante una
memoria USB. Para las horas de alarma ajustadas (véase
el capítulo 8.1), puede configurar las siguientes propiedades: tono de alarma, volumen, amanecer, duración del
amanecer, luminosidad del amanecer.
Para ajustar las propiedades de la alarma, siga los
siguientes pasos:
•
Con el aparato encendido, pulse la tecla Menu/Set.
Enla pantalla parpadeará "
•
Con las teclas / , elija la posición de memoria de la
alarma deseada (
cuyas funciones desea configurar
tecla Menu/Set.
•
Parpadeará el tono de alarma ajustado (p. ej.
Seleccione el tono de alarma que desee con las teclas
/ . Confirme con la tecla Menu/Set.
ALARM 1, ALARM 2 o ALARM 3
TIME
".
.
Confirme con la
BUZZ
).
forma relativamente rápida con la luz, recomendamos
reducir la luminosidad.
7.3 Ajuste del brillo de la pantalla
•
Con el aparato encendido, pulse la tecla Menu/Set.
Enla pantalla parpadeará "
•
Con las teclas / , seleccione
con la tecla Menu/Set.
•
El brillo actual de la pantalla (
Con las teclas / , elija el brillo de la pantalla deseado
(OFF, 1, 2 o 3). Confirme con la tecla Menu/Set.
)
Nota
Después de la configuración, pasarán unos 10 segundos hasta que aparezca el brillo de la pantalla
configurado, ya que después de cada pulsación de
la tecla (también la función de repetición), la pantalla
se ilumina automáticamente durante 10 segundos al
máximo nivel.
TIME
".
DISPLAY
3 DISPLAY
) parpadea.
. Confirme
Nota
BUZZ
= pitido
SOUND 1-8
RADIO
USB
•
El volumen de la alarma (
/ , ajuste el volumen deseado (1 a 10). Confirme con
la tecla Menu/Set.
•
La función del amanecer (
las teclas / , conecte la función de amanecer (ON) o
desconéctela (
Puede despertarse con un tono de alarma y la función
de amanecer. La función de amanecer simula un
amanecer. Con ella, la luz LED se va encendiendo
lentamente antes de la hora fijada para que suene el
despertador.
•
Cuando está encendida la función de amanecer,
laduración del amanecer (10
lasteclas / , puede elegir la duración deseada del
amanecer, antes de la hora fijada para que suene el
despertador (1, 2, 5, 10, 20 o 30 minutos). Confirme
con la tecla Menu/Set.
•
La luminosidad del amanecer (
la pantalla. Con las teclas / , puede elegir la luminosidad deseada del amanecer a la hora fijada para
que suene el despertador (5, 10, 15 o 20 minutos).
Confirme con la tecla Menu/Set. Si se despierta de
= 8 melodías diferentes para despertarse
= radio
= a través de la memoria USB conectada
VOL
) parpadea. Con las teclas
Nota
SUNRISE
OFF
). Confirme con la tecla Menu/Set.
) parpadea. Con
MIN
) parpadea. Con
20 LI
) parpadea en
7.4 Ajuste de la duración de la repetición
•
Con el aparato encendido, pulse la tecla Menu/Set.
Enla pantalla parpadeará "
•
Con las teclas / , seleccione
la tecla Menu/Set.
•
La duración de la repetición (
dea. Con las teclas / , elija la duración deseada de la
repetición (1, 2, 5, 10, 20 o 30 minutos). Confirme con
la tecla Menu/Set.
7.5
Encendido y apagado del sonido de las
TIME
".
SNOOZE
5 MIN SNOOZE
. Confirme con
teclas
•
Con el aparato encendido, pulse la tecla Menu/Set.
Enla pantalla parpadeará "
•
Con las teclas / , seleccione
con la tecla Menu/Set.
•
Con las teclas / , encienda el sonido de la teclas (ON)
o apáguelo (
OFF
). Confirme con la tecla Menu/Set.
TIME
".
FEEDBACK
. Confirme
8. Funciones del aparato
8.1 Ajuste de la alarma
El aparato tiene tres posiciones de memoria de la alarma
que pueden configurarse de formas diferentes.
8.1.1 Activación de la alarma (ON)
1.
Con el aparato encendido, pulse la tecla ALARM hasta
que aparezca en la pantalla la posición de memoria de
la alarma deseada (
2. Pulse las teclas
ON.
26
A1, A2
o A3).
/ hasta que aparezca en la pantalla
) parpa-
Page 27

3.
Pulse la tecla Menu/Set. El indicador de hora de la
alarma parpadea en la pantalla. Ajuste la hora con las
teclas / y confírmela con la tecla Menu/Set.
El indicador de minutos de la alarma parpadea en
4.
la pantalla. Ajuste los minutos con las teclas
/ y
confírmelos con la tecla Menu/Set.
En la pantalla aparece brevemente
5.
END.
La alarma
configurada está ahora activada y aparece en la
pantalla.
8.1.2 Activación de la alarma por día (
Con la función
DAY
puede establecer además para cada
DAY
)
alarma configurada qué días de la semana deberá sonar.
1.
Con el aparato encendido, pulse la tecla ALARM hasta
que aparezca en la pantalla la posición de memoria de
la alarma deseada (
2. Pulse las teclas
DAY
.
3. Pulse la tecla Menu/Set. En la pantalla aparece
(lunes) y
off.
A1, A2
o A3).
/ hasta que aparezca en la pantalla
MON
4. Active la alarma con las teclas / para que suene el
lunes (on) o desactívela (
off
). Confirme con la tecla
Menu/Set.
5.
En la pantalla aparece
TUE
(martes). El resto de los días
de la semana se ajustan como se ha descrito para el
lunes. A continuación, ajuste la hora de la alarma como
se explica en el capítulo 8.1.1.
8.1.3 Desactivación permanente de la alarma (
OFF
)
Para desactivar una alarma configurada, proceda como
se indica a continuación:
1.
Con el aparato encendido, pulse la tecla ALARM hasta
que aparezca en la pantalla la posición de memoria de
la alarma deseada (
2. Pulse las teclas
A1, A2
o A3).
/ hasta que aparezca en la pantalla
OFF.
3. Confirme con la tecla Menu/Set.
4.
En la pantalla aparece END. Ahora la alarma está
desactivada permanentemente.
8.2 Desactivación de la alarma
8.2.1 Desactivación de la alarma durante el amanecer:
Cuando está activada la función de amanecer, el aparato comienza a iluminarse lentamente antes de la hora
ajustada para que suene la alarma y en la pantalla aparece "SUNRISE". Puede desactivar el amanecer pulsando
cualquier tecla. Aunque lo desactive, el tono de alarma
sonará a la hora ajustada para la alarma.
8.2.2 Modo de repetición de la alarma (Snooze)
El aparato cuenta con un modo de repetición de la alarma
(Snooze). Cuando suena la alarma y se pulsa la función
Snooze (tocando la superficie luminosa), la alarma vuelve
a sonar después del tiempo de repetición (véase el capítulo 7.4).
8.2.3 Desactivación de la alarma cuando suena el tono
de alarma
Cuando suena la alarma, pulse una tecla cualquiera,
excepto "Snooze". Ahora la alarma está desactivada y
no volverá a sonar nuevamente hasta la hora ajustada.
8.3 Modo AUX
Puede conectar una fuente de audio externa (por ejemplo,
reproductor MP3, smartphone o reproductor de CD) a la
luz para despertar a través de la entrada AUX.
1. Conexión del cable AUX suministrado a una fuente de
audio.
2.
Conecte el otro extremo del cable AUX a la entrada AUX
de la parte trasera del aparato.
3.
Pulse la tecla AUX en el aparato. La fuente de audio
externa está conectada a la luz para despertar.
4. Regule el volumen con las teclas laterales +/-.
5. Para volver a salir del modo AUX, pulse la tecla ■.
6. Vuelva a sacar el cable AUX después del uso.
8.4 Modo USB
Tiene la posibilidad de conectar una memoria USB (hasta
32 GB) en el puerto USB de la luz para despertar y escuchar música. El aparato puede reproducir los siguientes
formatos de archivos: MP3, WMA y WAV.
Nota
El aparato solo puede reproducir archivos de música
que se encuentren en el directorio raíz. El aparato
no puede reproducir los archivos de música que se
encuentren en subdirectorios.
Si desea utilizar el modo USB, siga los siguientes pasos.
1.
Conecte la memoria USB a la entrada USB de la luz
para despertar (se encuentra en la parte trasera del
aparato).
2. Una vez conectada la memoria USB: con el aparato
encendido, pulse la tecla USB. En la pantalla aparecen "USB", el número de la canción y la duración de
la canción que está escuchando.
3.
Para pasar a la siguiente canción, pulse la tecla . Para
pasar a la canción anterior, pulse la tecla . Para pausar
la reproducción, pulse la tecla ►ǁ. Para cambiar entre
"reproducción normal", "repetición de la reproducción"
(P) y "repetición de la reproducción de todas las can-
ALL
ciones" (P
27
), pulse la tecla Menu/Set.
Page 28

4. Regule el volumen con las teclas laterales +/-.
5. Para finalizar el modo USB, pulse la tecla ■.
8.5 Modo radio
Con el aparato también puede escuchar la radio.
Si desea utilizar el modo radio, siga los siguientes pasos.
1.
Con el aparato encendido, pulse la tecla FM. En la
pantalla aparecen la frecuencia actual de la emisora y
el número de programa (p. ej. P1).
2.
Con las teclas / , elija el número de programa deseado
(p. ej.
P1 o P2
) en el que se grabará una emisora.
3.
Mantenga pulsada la tecla para empezar la búsqueda
automática de emisoras. Para grabar una emisora en el
número de programa elegido (p. ej. P1), pulse la tecla
Menu/Set.
4.
Para pasar de una emisora a otra, pulse las teclas / .
8.6 Función de buenas noches
(Radio Sleep-Timer)
Si el modo radio está activado, podrá conectar también
la función de buenas noches.
Con esta función, puede configurar después de cuántos
minutos se apagará la radio automáticamente.
Si desea utilizar la función de buenas noches, siga los
siguientes pasos.
Con el aparato encendido, pulse la tecla FM para
1.
acceder al modo radio.
2.
Pulse la tecla Menu/Set, en la pantalla aparecerá
2 MIN sleep
3.
Con la tecla Menu/Set, ajuste el tiempo tras el
cualdesea que se apague automáticamente la radio
(2, 5, 10, 15, 20, 30, 45 o 60 minutos). Para confirmar
la selección, espere 5 segundos. Después, aparecerá
automáticamente en la pantalla un pequeño símbolo .
.
8.7 Funciones de luz
8.7.1 Lámpara de lectura
1. Con el aparato encendido, pulse la tecla Light.
2. La luz se enciende y aparece en la pantalla
Con las teclas +/-, ajuste la luminosidad que desee
(puede elegir entre 1-20).
3. Para volver a apagar la luz, pulse la tecla Light hasta
que aparezca en la pantalla "
LIGHT off"
20 light
.
.
8.7.2 Función de puesta de sol
Con el aparato también podrá simular una puesta de sol.
Con esta función, la luz irá atenuándose progresivamente
durante un tiempo ajustable.
Para simular la puesta de sol con el aparato, siga los
siguientes pasos:
1. Con el aparato encendido, pulse la tecla lateral Light.
2.
La luz se enciende y aparece en la pantalla
inmediatamente después ajuste la luminosidad deseada
con las teclas laterales +/- (puede elegir entre 1-20).
Confirme con la tecla Light. En la pantalla aparece
10 sunset
3. Elija la duración de la puesta de sol con las teclas laterales +/- (2, 5, 10, 15, 20, 30, 45 o 60 minutos). A continuación, espere 5 segundos. La función de puesta de
sol se activa después automáticamente y en la pantalla
aparece un pequeño símbolo . Una vez transcurrido
el tiempo ajustado para la puesta de sol, la luz se apagará automáticamente.
Puesta de sol con música
Con el aparato también podrá simular una puesta de
sol y escuchar música a la vez. Con esta función, la luz
irá atenuándose progresivamente durante un tiempo
ajustable. La música se apaga una vez transcurrido el
tiempo ajustado.
Para activar la puesta de sol con música, siga los
siguientes pasos:
1. Con el aparato encendido, elija la fuente de música
2.
8.7.3 Luz tenue que cambia de color
También puede utilizar la luz para despertar como una
luz tenue con cambio de color.
1.
Con el aparato encendido, pulse tres veces la tecla
Light.
2. En la pantalla aparece
3.
Si durante el cambio de color desea que uno de los colores se muestre durante más tiempo, puede fijarlo pulsando la tecla Light. En la pantalla aparece
4.
Para apagar definitivamente la luz, vuelva a pulsar la
tecla Light.
.
Nota
deseada (USB, Radio (FM) o AUX).
Ejecute los pasos posteriores como se explica en
"8.7.2 Función de puesta de sol".
LIGHT change
20 light
.
LIGHT fixed
;
.
8.8 Restablecimiento a la configuración
defábrica
Si desea restablecer todos los ajustes de la luz para despertar a la configuración de fábrica, siga los siguientes
pasos:
28
Page 29

1.
Desenchufe el adaptador de red de la luz para despertar
de la toma de corriente.
2.
Con el aparato apagado, mantenga pulsadas las teclas
Menu/Set y Light, y enchufe de nuevo el adaptador
de red de la luz para despertar a la toma de corriente.
3. El aparato vuelve a tener la configuración de fábrica.
9. Limpieza/conservación
•
Limpie el aparato con un trapo seco.
•
No use productos abrasivos.
•
Evite que entre agua en el aparato. Si penetrara agua
en el interior, no vuelva a utilizarlo hasta que esté completamente seco.
•
No sumerja nunca el aparato ni el bloque de alimentación en agua ni en ningún otro líquido.
•
Proteja el aparato de golpes, humedad, polvo, sustancias químicas, fuertes cambios de temperatura y de
la cercanía de fuentes de calor (hornos o radiadores).
10. Eliminación
Para la protección del medio ambiente no se debe
desechar el aparato al final de su vida útil junto con la
basura doméstica. Se puede desechar en los
puntos de recogida adecuados de que dispone
su zona. Respete las normas locales referentes a
la eliminación de residuos. Deseche el aparato
según la Directiva europea sobre residuos de aparatos
eléctricos y electrónicos (RAEE). Para más información,
póngase en contacto con la autoridad municipal competente en materia de eliminación de residuos.
11. Datos técnicos
Iluminancia
Luz Tecnología LED
Niveles de luz
Luz tenue
Función de luz
para despertar
Función de
amanecer
Duración de repetición de la alarma
Función de puesta
de sol
aprox. 2.500 lux como máx.
(a 15 cm de distancia)
20 niveles de luz con simulación
de aurora
Cambio de color RGB automático
con fijación de color individual
Apagado 2, 5, 10, 15, 20, 30, 45
o60 minutos antes de la alarma
Luminosidad máxima hasta
laalarma: niveles de luz 5, 10,
15, 20
1, 2, 5, 10, 20 o 30 minutos
2, 5, 10, 15, 20, 30, 45 o 60 minutos
Función de
buenas noches
(Sleep Radio)
Retroiluminación
LCD
Hora
Alarma
Sonido de las
teclas
AUX
USB
Radio
Altavoz 2vatios
Alimentación
de tensión de
lafuente de
alimentación
Clase de protección de la fuente
de alimentación
Salvo modificaciones técnicas.
2, 5, 10, 15, 20, 30, 45 o 60 minutos
Apagado, 1, 2, 3
Configurable 12h/24h, tope de
15 minutos en caso de corte
eléctrico
3 tiempos de alarma
( apagado,encendido, día)
Tono de alarma, 8 sonidos, radio,
MP3 a través de memoria USB
Encendido, apagado
Entrada, 3,5 mm, conector
deaudio
Reproducción a través de
memoria USB, máximo 32 GB.
Formatos de archivos: MP3,
WMA, WAV, máximo 9999 archivos, solo son legibles aquellos
que se encuentren en el directorio
raíz, no pueden leerse aquellos
que se encuentren en los subdirectorios. Voltaje de salida de 5 V
Rango de frecuencias UKW
87,5- 108 MHz, 10 posiciones
de memoria
Entrada: 110-240 V, CA, 50/60
Hz, 0,5 A
Salida: 9 V, CC, 1500 mA
Clase de protección II
29
Page 30

I ITALIANO
Leggere attentamente le presenti istruzioni per l'uso, conservarle per impieghi
futuri, renderle accessibili ad altri utenti e attenersi alle indicazioni.
Sommario
1. Introduzione ................................................................................................................................... 31
2. Spiegazione dei simboli ................................................................................................................ 31
3. Uso conforme ................................................................................................................................. 31
4. Segnalazioni di rischi e indicazioni di sicurezza ......................................................................... 31
5. Descrizione dell'apparecchio ....................................................................................................... 32
6. Messa in servizio ........................................................................................................................... 32
7. Impostazioni di base...................................................................................................................... 32
7.1 Impostazione dell'ora ................................................................................................................. 32
7.2 Impostazione delle caratteristiche dellasveglia .........................................................................33
7.3 Impostazione della luminosità del display ................................................................................. 33
7.4 Impostazione della durata dello snooze.....................................................................................33
7.5 Attivazione/disattivazione del segnale acustico dei pulsanti ..................................................... 33
8. Funzioni dell'apparecchio ............................................................................................................. 34
8.1 Impostazione della sveglia ......................................................................................................... 34
8.1.1 Attivazione della sveglia (ON) ............................................................................................ 34
8.1.2 Impostazione giornaliera della sveglia (DAY) ..................................................................... 34
8.1.3 Disattivazione permanente della sveglia (OFF) ................................................................. 34
8.2 Spegnimento della sveglia ......................................................................................................... 34
8.2.1 Spegnimento della sveglia durante la simulazione del sorgere del sole .......................... 34
8.2.2 Modalità snooze quando suona la sveglia ........................................................................ 34
8.2.3 Spegnimento della sveglia mentre suona ......................................................................... 34
8.3 Modalità AUX ............................................................................................................................. 34
8.4 Modalità USB ............................................................................................................................. 34
8.5 Modalità Radio ........................................................................................................................... 35
8.6 Funzione "buona notte" (Radio Sleep Timer) ............................................................................ 35
8.7 Funzioni luminose ......................................................................................................................35
8.7.1 Lampada da lettura ........................................................................................................... 35
8.7.2 Funzione di simulazione del tramonto del sole ................................................................. 35
8.7.3 Luce d'atmosfera con variazione cromatica ..................................................................... 35
8.8 Ripristino delle impostazioni di fabbrica .................................................................................... 36
9. Pulizia/Conservazione ................................................................................................................... 36
10. Smaltimento ................................................................................................................................... 36
11. Dati tecnici......................................................................................................................................36
Fornitura
•
Luce sveglia con antenna filare
•
Adattatore
•
Cavo AUX
•
Istruzioni per l'uso
•
Supporto per smartphone/lettore MP3
30
Page 31

Gentile cliente,
siamo lieti che Lei abbia scelto un prodotto del nostro
assortimento. Il nostro marchio è garanzia di prodotti di
elevata qualità, controllati nei dettagli, relativi ai settori
calore, peso, pressione, temperatura corporea, pulsazioni, terapia dolce, massaggio, aria e bellezza.
Cordiali saluti
Team Beurer
1. Introduzione
La luce sveglia WL 80 di Beurer consente un risveglio dolce e naturale. Una luce a LED con intensità
che aumenta gradualmente simula il sorgere del sole.
Inquesto modo gli occhi si abituano lentamente alle
condizioni di luce e il corpo si prepara gradualmente al
risveglio. È possibile inoltre impostare una sveglia che
suona dopo la simulazione del sorgere del sole in modo
da facilitare il risveglio. Come toni sveglia è possibile
scegliere fra radio e diversi suoni. La luce sveglia WL 80
di Beurer aiuta a svegliarsi riposati e in perfetta forma per
arontare al meglio la giornata.
2. Spiegazione dei simboli
Segnalazione di rischio di lesioni
AVVERTENZA
ATTENZIONE
Nota
o pericoli per la salute
Segnalazione di rischi di possibili
danni all'apparecchio/agli
accessori
Indicazione di importanti
informazioni
Smaltimento secondo le norme
previste dalla Direttiva CE
sui rifiuti di apparecchiature
elettriche ed elettroniche (RAEE).
Produttore
Il presente prodotto soddisfa i
requisiti delle direttive europee
e nazionali vigenti.
4. Segnalazioni di rischi e indicazioni di sicurezza
AVVERTENZA
•
Utilizzare l'apparecchio esclusivamente con l'adattatore in dotazione e con la tensione di rete indicata
sul l'adattatore.
•
Prima dell'utilizzo, verificare che l'apparecchio e gli
accessori non siano danneggiati. In caso di dubbio
non utilizzare l'apparecchio e gli accessori e consultare il proprio rivenditore o contattare il Servizio clienti
indicato.
•
L'apparecchio è destinato solo a uso domestico/privato
e non industriale.
•
Questo apparecchio può essere utilizzato da ragazzi di
età superiore a 8 anni e da persone con ridotte capacità
fisiche, percettive o mentali o non in possesso della
necessaria esperienza e conoscenza, esclusivamente
sotto supervisione oppure se sono stati istruiti in merito
alle misure di sicurezza e comprendono i rischi ad esse
correlati.
•
I bambini non devono giocare con l'apparecchio.
•
La pulizia e la manutenzione a cura dell'utente non
devono essere eseguite da bambini, a meno che non
siano sorvegliati.
•
Se il cavo di alimentazione dell'apparecchio viene
danneggiato, richiedere la sostituzione al produttore, al
Servizio clienti o a un tecnico ugualmente qualificato,
per evitare qualsiasi rischio.
•
In caso di difetti o malfunzionamenti, spegnere immediatamente l'apparecchio e staccarlo dalla corrente.
•
Non collegare o scollegare l'alimentatore con le mani
umide.
•
Tenere lontani i bambini dal materiale d'imballaggio
(pericolo di soocamento).
•
Posare il cavo di alimentazione in modo tale che
nessuno possa inciamparvi.
•
Tenere l'apparecchio, l'adattatore e il cavo di alimentazione lontani dall'acqua!
3. Uso conforme
AVVERTENZA
L'apparecchio può essere utilizzato solo per lo scopo per
il quale è stato concepito e come descritto nelle presenti
istruzioni per l'uso. Qualsiasi uso non conforme comporta
un pericolo. Il produttore non risponde di danni causati
da un uso inappropriato o non conforme.
31
ATTENZIONE
•
Non esporre l'apparecchio a urti, umidità, sporcizia, forti
sbalzi di temperatura e direttamente alla luce solare.
•
Non far cadere l'apparecchio.
Page 32

5. Descrizione dell'apparecchio
3
2
5
1
1 display 5 pulsanti +/2 superficie luminosa 6 pulsante Light
3 funzione snooze (leg-
gera pressione sulla
superficie luminosa)
4 zona pulsanti
Pulsante Sveglia /
pulsante ►ǁ
Pulsante USB /
pulsante
Pulsante Radio /
pulsante ■
4
7 supporto per smartphone/
lettore MP3
7
6
Pulsante AUX /
pulsante
Pulsante
Menu/Set
6. Messa in servizio
•
Rimuovere il materiale d'imballaggio.
•
Verificare che tutti i componenti siano compresi nella
fornitura
.
•
Controllare se l'apparecchio, l'adattatore e il cavo sono
danneggiati.
•
Posizionare l'apparecchio su una superficie piana e
stabile.
•
Inserire l'attacco dell'adattatore nella presa corrispondente sul retro dell'apparecchio.
•
Inserire l'adattatore in una presa di corrente adeguata.
•
Sul display dell'apparecchio compare l'ora.
•
Posizionare l'antenna filare sul retro dell'apparecchio.
Fissaggio del supporto per smatphone
1.
Appoggiare i quattro ganci
a incastro del supporto sulle
quattro aperture rettangolari
della luce sveglia.
2.
Premere il supporto verso
il basso con l'indice destro
e spingerlo delicatamente
nella direzione della freccia
con l'altra mano finché non
scatta in posizione.
3.
Per rimuoverlo, premere lo
sblocco sulla luce sveglia
e spingere delicatamente il
supporto nella direzione della
freccia.
7. Impostazioni di base
Le impostazioni di base consentono di impostare in
TIME
sequenza l'ora (
per gli orari sveglia impostati (
ALARM 3
durata dello snooze (
pulsanti (
), la luminosità del display (
BEEP
7.1 Impostazione dell'ora
•
Premere il pulsante Menu/Set sull'apparecchio acceso.
"
TIME
" lampeggia sul display. Premere nuovamente il
pulsante Menu/Set.
•
La modalità a "
stare la modalità ore con i pulsanti / (modalità a 24
ore o modalità a 12 ore). Confermare con il pulsante
Menu/Set.
•
L'ora lampeggia sul display. Impostare le ore con i
pulsanti / . Confermare con il pulsante Menu/Set.
•
I minuti lampeggiano sul display. Impostare i minuti con
i pulsanti / . Confermare con il pulsante Menu/Set.
•
Il giorno lampeggia sul display. Impostare il giorno con
i pulsanti / . Confermare con il pulsante Menu/Set.
Nota
MON
= lunedì,
THU
= giovedì,
SUN
= domenica
), le caratteristiche della sveglia
ALARM 1, ALARM 2,
SNOOZE
).
24 h
TUE
FRI
) e il segnale acustico dei
" lampeggia sul display. Impo-
= martedì,
= venerdì,
WED
= mercoledì,
SAT
DISPLAY
= sabato,
), la
32
Page 33

7.2
Impostazione delle caratteristiche
dellasveglia
È possibile farsi svegliare con 8 diverse suonerie, un tono
sveglia, con la radio o con musica propria mediante chiavetta USB.
Per gli orari sveglia impostati (vedere il capitolo 8.1) è
possibile impostare le seguenti caratteristiche della
sveglia: tono sveglia, volume, simulazione del sorgere
del sole, durata della simulazione del sorgere del sole,
luminosità della simulazione del sorgere del sole.
Per impostare le caratteristiche della sveglia, procedere
come descritto di seguito:
•
Premere il pulsante Menu/Set sull'apparecchio acceso.
"
TIME
" lampeggia sul display.
•
Con i pulsanti / selezionare la posizione di memoria
della sveglia desiderata (
ALARM 3
Confermare con il pulsante Menu/Set.
•
Il tono sveglia attualmente impostato (ad es.
lampeggia. Con i pulsanti / selezionare il tono
sveglia desiderato. Confermare con il pulsante
Menu/Set.
SOUND 1-8
RADIO
USB
•
Il volume della sveglia (
/ impostare il volume desiderato (da 1 a 10). Confer-
mare con il pulsante Menu/Set.
•
La funzione di simulazione del sorgere del sole
(
SUNRISE
(ON) o disattivare (
sorgere del sole. Confermare con il pulsante Menu/Set.
Oltre al tono sveglia, è possibile farsi svegliare dalla
funzione di simulazione del sorgere del sole. La funzione di simulazione del sorgere del sole simula il sorgere del sole. La luce a LED aumenta di intensità prima
dell'ora impostata per la sveglia.
) di cui si intende impostare la funzione
Nota
BUZZ
= segnale acustico
= 8 diverse suonerie
= radio
= mediante chiavetta USB collegata
) lampeggia. Con i pulsanti / attivare
OFF
Nota
ALARM 1, ALARM 2 o
BUZZ
VOL
) lampeggia. Con i pulsanti
) la funzione di simulazione del
•
Sul display lampeggia la luminosità della simulazione
del sorgere del sole (
zionare la luminosità della simulazione del sorgere del
sole desiderata quando suona la sveglia (5, 10, 15 o 20).
Confermare con il pulsante Menu/Set. Se ci si sveglia
rapidamente in presenza di luce, è opportuno ridurre
la luminosità.
20 LI
). Con i pulsanti / sele-
7.3 Impostazione della luminosità del display
•
Premere il pulsante Menu/Set sull'apparecchio acceso.
"
TIME
" lampeggia sul display.
•
Con i pulsanti / selezionare
con il pulsante Menu/Set.
•
L'attuale luminosità del display lampeggia
(
3 DISPLAY
nosità del display desiderata (OFF, 1, 2, o 3). Confermare con il pulsante Menu/Set.
.
)
Nota
Dopo l'impostazione sono necessari circa 10 secondi
anché compaia la luminosità del display impostata in
quanto ogni volta che si preme un pulsante (anche la
funzione snooze), il display s'illumina automaticamente
per 10 secondi alla massima luminosità.
). Con i pulsanti / selezionare la lumi-
DISPLAY
. Confermare
7.4 Impostazione della durata dello snooze
•
Premere il pulsante Menu/Set sull'apparecchio acceso.
"
TIME
" lampeggia sul display.
•
Con i pulsanti / selezionare
con il pulsante Menu/Set.
•
La durata dello snooze lampeggia (
Con i pulsanti / selezionare la durata dello snooze
desiderata (1, 2, 5, 10, 20 o 30 minuti). Confermare con
il pulsante Menu/Set.
7.5
Attivazione/disattivazione del segnale
SNOOZE
. Confermare
5 MIN SNOOZE
acustico dei pulsanti
•
Premere il pulsante Menu/Set sull'apparecchio acceso.
"
TIME
" lampeggia sul display.
•
Con i pulsanti / selezionare
mare con il pulsante Menu/Set.
•
Con i pulsanti / attivare (ON) o disattivare (
il segnale acustico dei pulsanti. Confermare con il
pulsante Menu/Set.
FEEDBACK
. Confer-
OFF
).
)
•
Se è stata attivata la funzione di simulazione del
sorgere del sole, lampeggia la durata del sorgere
del sole (10
durata della simulazione del sorgere del sole desiderata prima dell'ora impostata per la sveglia (1, 2, 5, 10,
20 o 30minuti). Confermare con il pulsante Menu/Set.
MIN
). Con i pulsanti / selezionare la
33
Page 34

8. Funzioni dell'apparecchio
8.1 Impostazione della sveglia
L'apparecchio è dotato di tre posizioni di memoria della
sveglia che possono essere impostate diversamente.
8.1.1 Attivazione della sveglia (ON)
1.
Sull'apparecchio acceso premere ripetutamente il
pulsante ALARM finché sul display non compare la
posizione di memoria della sveglia desiderata (
o A3).
Premere i pulsanti / finché sul display non compare
2.
ON.
3. Premere il pulsante Menu/Set. Sul display lampeggia
l'ora della sveglia. Con i pulsanti / impostare l'ora
e confermare con il pulsante Menu/Set.
Sul display lampeggiano i minuti della sveglia. Con i
4.
pulsanti / impostare i minuti e confermare con il
pulsante Menu/Set.
Sul display compare brevemente
5.
stata è ora attiva e compare sul display.
8.1.2 Impostazione giornaliera della sveglia (
La funzione
settimana in cui deve suonare la sveglia impostata.
1.
Sull'apparecchio acceso premere ripetutamente il
pulsante ALARM finché sul display non compare la
posizione di memoria della sveglia desiderata (
o A3).
2.
Premere i pulsanti / finché sul display non compare
DAY
3.
Premere il pulsante Menu/Set. Sul display compare
MON
4.
Con i pulsanti / attivare (ON) o disattivare (
la sveglia per lunedì. Confermare con il pulsante
Menu/Set.
5.
Sul display compare
giorni della settimana some descritto nel punto precedente per il lunedì. Infine impostare l'ora della sveglia
come descritto nel capitolo 8.1.1.
8.1.3 Disattivazione permanente della sveglia (
Per disattivare permanentemente la sveglia, procedere
come descritto di seguito:
1.
Sull'apparecchio acceso premere ripetutamente il
pulsante ALARM finché sul display non compare la posizione di memoria della sveglia desiderata (
2.
Premere i pulsanti / finché sul display non compare
OFF.
3. Confermare con il pulsante Menu/Set.
DAY
.
(lunedì) e
consente inoltre di stabilire i giorni della
Off.
TUE
END.
(martedì). Impostare i restanti
A1, A2
La sveglia impo-
DAY
)
A1, A2
OFF
OFF
)
A1, A2 o A3).
)
34
4.
Sul display compare END. La sveglia è disattivata
permanentemente.
8.2 Spegnimento della sveglia
8.2.1 Spegnimento della sveglia durante la simulazione
del sorgere del sole
Se la funzione di simulazione del sorgere del sole è
attiva, l'apparecchio inizia ad illuminarsi prima della
sveglia impostata e il display visualizza "SUNRISE".
La simulazione del sorgere del sole può essere disattivata premendo un pulsante qualsiasi. La sveglia suona
comunque all'ora impostata.
8.2.2 Modalità snooze quando suona la sveglia
L'apparecchio è dotato di una modalità snooze. Se suona
la sveglia e si preme la funzione snooze (leggera pressione
sulla superficie luminosa), la sveglia suona di nuovo dopo
la durata dello snooze impostata (vedere il capitolo 7.4).
8.2.3 Spegnimento della sveglia mentre suona
Quando suona la sveglia, premere un pulsante qualsiasi
tranne snooze. La sveglia è spenta e suona di nuovo
all'ora impostata.
8.3 Modalità AUX
È possibile collegare una sorgente audio esterna (ad es.
lettore MP3, smartphone o lettore CD) alla luce sveglia
mediante l'ingresso AUX.
1.
Collegare il cavo AUX in dotazione alla sorgente audio.
2.
Inserire l'altra estremità del cavo AUX nell'ingresso AUX
sul retro dell'apparecchio.
3.
Premere il pulsante AUX sull'apparecchio. La sorgente
audio esterna è ora collegata alla luce sveglia.
4. Regolare il volume con i pulsanti laterali +/-.
5. Per uscire dalla modalità AUX, premere il pulsante ■.
6. Staccare il cavo AUX dopo l'uso.
8.4 Modalità USB
È possibile collegare una chiavetta USB (fino a 32 GB)
alla luce sveglia mediante la porta USB per ascoltare la
musica. L'apparecchio è in grado di riprodurre i seguenti
formati di file: MP3, WMA e WAV.
Nota
L'apparecchio è in grado di riprodurre solo i file musicali presenti nella directory principale. Non è in grado di
riprodurre file musicali che si trovano in sottodirectory.
Per utilizzare la modalità USB, procedere come descritto
di seguito:
1.
Collegare la chiavetta USB alla porta USB della luce
sveglia (sul retro dell'apparecchio).
Page 35

2. Quando la chiavetta USB è già inserita: premere il
pulsante USB sull'apparecchio acceso. "USB", sul
display compare il numero e la durata del brano
musicale.
3.
Per passare al brano successivo, premere il pulsante .
Per tornare al brano precedente, premere il pulsante .
Per mettere in pausa la riproduzione, premere il pulsante
►ǁ. Per passare da "riproduzione normale" a "ripeti
riproduzione" (P) e "ripeti riproduzione di tutti i brani"
(P
ALL
), premere il pulsante Menu/Set.
4. Regolare il volume con i pulsanti laterali +/-.
5. Per uscire dalla modalità USB, premere il pulsante ■.
8.5 Modalità Radio
L'apparecchio consente anche di ascoltare la radio.
Per utilizzare la modalità Radio, procedere come descritto
di seguito:
1.
Premere il pulsante FM sull'apparecchio acceso.
La frequenza dell'emittente corrente e il numero del
programma (ad es. P1) compaiono sul display.
2.
Con i pulsanti / selezionare il numero del programma
desiderato (ad es.
3.
Temere premuto il pulsante per avviare la ricerca
automatica delle emittenti. Per salvare un'emittente
sul numero di programma selezionato (ad es. P1),
premere il pulsante Menu/Set.
4.
Per scorrere le emittenti salvate, premere i pulsanti
/ .
P1 o P2
) su cui salvare l'emittente.
8.6 Funzione "buona notte"
(Radio Sleep Timer)
Quando è attiva la modalità Radio, è possibile attivare
anche la funzione "buona notte".
La funzione "buona notte" consente di impostare dopo
quanti minuti la radio si deve spegne automaticamente.
Per utilizzare la funzione "buona notte", procedere come
descritto di seguito:
1.
Premere il pulsante FM sull'apparecchio acceso per
accedere alla modalità Radio.
2.
Premere il pulsante Menu/Set, sul display compare
2 MIN Sleep.
3. Con il pulsante Menu/Set impostare il tempo desiderato dopo il quale la radio si deve spegnere automaticamente (2, 5, 10, 15, 20, 30, 45 o 60 minuti). Per confermare la selezione, attendere 5 secondi. A questo punto
sul display compare un piccolo simbolo .
8.7 Funzioni luminose
8.7.1 Lampada da lettura
1. Premere il pulsante Light sull'apparecchio acceso.
2. La luce si accende e sul display compare
Con i pulsanti +/- impostare la luminosità desiderata
(da 1 a 20).
3. Per spegnere nuovamente la luce, premere il pulsante
Light finché sul display non compare "
8.7.2 Funzione di simulazione del tramonto del sole
L'apparecchio consente di simulare anche il tramonto del
sole. La luce si scurisce sempre più una volta trascorso
l'intervallo di tempo impostato.
Per simulare il tramonto del sole con l'apparecchio,
procedere come descritto di seguito:
1.
Premere il pulsante Light sul lato dell'apparecchio
acceso.
2. La luce si accende e sul display compare
Impostare ora la luminosità desiderata (da 1 a 20) con
i pulsanti laterali +/-. Confermare con il pulsante Light.
Sul display compare
3.
Con i pulsanti laterali +/- selezionare la durata della
simulazione del tramonto del sole desiderata (2, 5, 10,
15, 20, 30, 45 o 60 minuti). Infine attendere 5 secondi.
La funzione di simulazione del tramonto del sole è attivata automaticamente e sul display compare un piccolo
simbolo . La luce si spegne automaticamente una
volta trascorso il tempo impostato per la simulazione
del tramonto del sole.
Nota
Simulazione del tramonto del sole con musica
L'apparecchio consente di simulare anche il tramonto del sole ascoltando la musica. La luce si scurisce
sempre più una volta trascorso l'intervallo di tempo
impostato. La musica si spegne automaticamente
dopo l'intervallo di tempo impostato.
Per simulare il tramonto del sole con la musica,
procedere come descritto di seguito:
1. Sull'apparecchio acceso selezionare la sorgente di
musica desiderata (USB, Radio (FM) o AUX).
2.
Per il resto procedere come descritto nel capitolo
"8.7.2 Funzione di simulazione del tramonto del sole".
8.7.3 Luce d'atmosfera con variazione cromatica
La luce sveglia può essere utilizzata anche come luce
d'atmosfera con funzione di variazione cromatica.
1.
Premere 3 volte il pulsante Light sull'apparecchio
acceso.
2. Sul display compare
35
10 Sunset.
Light Change
20 Light.
LIGHT Off"
20 Light.
.
.
Page 36

3.
Per visualizzare permanentemente una luce colorata
durante la variazione cromatica, impostarla premendo
il pulsante Light. Sul display compare
4.
Per disattivare completamente la luce, premere nuovamente il pulsante Light.
Light Fixed
.
8.8 Ripristino delle impostazioni di fabbrica
Per ripristinare le impostazioni di fabbrica della luce
sveglia, procedere come descritto di seguito:
1.
Staccare l'adattatore della luce sveglia dalla presa di
corrente.
2.
Tenere premuti i pulsanti Menu/Set e Light contemporaneamente sull'apparecchio spento e inserire nuovamente l'adattatore della luce sveglia nella presa di
corrente.
3.
L'apparecchio è ora ripristinato alle impostazioni di
fabbrica.
9. Pulizia/Conservazione
•
Pulire l'apparecchio con un panno asciutto.
•
Non utilizzare detergenti abrasivi.
•
Accertarsi che non penetri acqua nell'apparecchio.
Sedovesse succedere, utilizzare nuovamente l'apparecchio solo quando è completamente asciutto.
•
Non immergere l'apparecchio e l'alimentatore in acqua
o altri liquidi.
•
Non esporre l'apparecchio a urti, umidità, polvere,
prodotti chimici, forti sbalzi di temperatura e fonti di
calore troppo vicine (forni, caloriferi).
10. Smaltimento
A tutela dell'ambiente, al termine del suo utilizzo l'apparecchio non deve essere smaltito nei rifiuti domestici.
Losmaltimento va eettuato negli appositi centri
di raccolta. Attenersi alle norme locali vigenti per
lo smaltimento dei materiali. Smaltire l'apparecchio secondo la direttiva europea sui rifiuti di
apparecchiature elettriche ed elettroniche (RAEE). Per
eventuali chiarimenti, rivolgersi alle autorità comunali
competenti per lo smaltimento.
11. Dati tecnici
Intensità luce
Luce Tecnologia LED
Livelli di
luminosità
Luce d'atmosfera
Massimo circa 2500 Lux
(conuna distanza di 15 cm)
20 livelli di luminosità con simulazione del sorgere del sole
Variazione cromatica automatica e impostazione dei colori
individuale
36
Funzione di luce
sveglia
Funzione di
simulazione del
sorgere del sole
Durata dello
snooze
Funzione di
simulazione del
tramonto del sole
Funzione
" buonanotte"
(Sleep Radio)
Display LCD
retroilluminato
Ora
Sveglia
Segnale acustico
dei tasti
AUX Line-In, spina jack da 3,5 mm
USB
Radio
Altoparlanti 2 Watt
Alimentato-
re tensione di
alimentazione
Classe di
pro tezione
alimentatore
Salvo modifiche tecniche.
O, 2, 5, 10, 15, 20, 30 e
60 minuti prima della sveglia
Intensità luminosa massima finoalla sveglia: livello di luminosità 5, 10, 15, 20
1, 2, 5, 10, 20, 30 minuti
2, 5, 10, 15, 20, 30, 45, 60 minuti
2, 5, 10, 15, 20, 30, 45, 60 minuti
O, 1, 2, 3
12 h/24 h commutabile,
15 minuti di autonomia in caso
di interruzione di corrente
3 orari sveglia (O, On, Giorno)
Tono sveglia, 3 suoni, radio,
MP3 mediante chiavetta USB
O, On
Riproduzione mediante
chiavetta USB, massimo 32 GB
Formati dei file: MP3, WMA,
WAV, massimo 9999 file, leggibili
solo dalla directory principale, le
sottodirectory non sono supportate. Tensione di uscita 5 V
Range di frequenze onde
ultracorte da 87,5 a 108 MHz,
10posizioni di memoria
Ingresso: 110-240 V, CA,
50/60 Hz, 0,5 A
Uscita: 9 V, CC, 1500 mA
Classe di protezione II
Page 37

T TÜRKÇE
Lütfen bu kullanım kılavuzunu dikkatle okuyun, ileride kullanmak üzere
saklayın, diğer kullanıcıların erişebilmesini sağlayın ve içindeki yönergelere
uyun.
İçindekiler
1. Ürün özellikleri ............................................................................................................................... 38
2. İşaretlerin açıklaması .................................................................................................................... 38
3. Amacına uygun kullanım ............................................................................................................... 38
4. Uyarı/güvenlik açıklamaları ........................................................................................................... 38
5. Cihaz açıklaması ............................................................................................................................ 39
6. Çalıştırma ....................................................................................................................................... 39
7. Temel ayarlar .................................................................................................................................. 39
7.1 Saati ayarlama ........................................................................................................................... 39
7.2 Alarm özelliklerinin ayarlanması ................................................................................................. 39
7.3 Ekran aydınlığının ayarlanması ................................................................................................... 40
7.4 Erteleme süresinin ayarlanması ................................................................................................. 40
7.5 Tuş sesini açma/kapatma .......................................................................................................... 40
8. Cihaz işlevleri ................................................................................................................................. 40
8.1 Alarmın ayarlanması ................................................................................................................... 40
8.1.1 Alarmın açılması (ON) ........................................................................................................ 40
8.1.2 Günlük alarmın açılması (DAY) .......................................................................................... 41
8.1.3 Alarmın kalıcı olarak kapatılması (OFF) ............................................................................. 41
8.2 Alarmın kapatılması .................................................................................................................... 41
8.2.1 Güneşin doğuşu sırasında alarmın kapatılması: ................................................................ 41
8.2.2 Alarm sırasında erteleme (Snooze) modu ..........................................................................41
8.2.3 Uyandırma sesi sırasında alarmın kapatılması .................................................................. 41
8.3 AUX modu .................................................................................................................................. 41
8.4 USB modu ................................................................................................................................. 41
8.5 Radyo modu .............................................................................................................................. 41
8.6 İyi geceler özelliği (Radio Sleep-Timer) ...................................................................................... 42
8.7 Işık işlevleri ................................................................................................................................. 42
8.7.1 Okuma lambası ................................................................................................................. 42
8.7.2 Güneşin batışı işlevi .......................................................................................................... 42
8.7.3 Renk değişimli ortam ışığı ................................................................................................. 42
8.8 Fabrika ayarlarına geri alma ....................................................................................................... 42
9. Temizlik/Saklama ........................................................................................................................... 42
10. Bertaraf etme .................................................................................................................................43
11. Teknik veriler .................................................................................................................................. 43
Teslimat kapsamı
•
Antenli ışıklı çalar saat
•
Adaptör
•
AUX kablosu
•
Kullanma talimatı
•
Akıllı telefon / MP3 çalar yuvası
37
Page 38

Sayın müşterimiz,
Ürünlerimizden birini seçtiğiniz için teşekkür ederiz. Isı,
ağırlık, kan basıncı, vücut sıcaklığı, nabız, yumuşak terapi,
masaj, hava ve güzellik konularında değerli ve titizlikle
test edilmiş kaliteli ürünlerimiz, dünyanın her tarafında
tercih edilmektedir.
Yeni cihazınızı iyi günlerde kullanmanızı dileriz
Beurer Ekibiniz
1. Ürün özellikleri
Beurer ışıklı çalar saat WL 80, uykunuzdan yavaş ve
doğal bir şekilde uyanmanızı sağlar. Yavaşça aydınlanan
LED lambası ile güneşin doğulşu simüle edilir. Bu şekilde
gözünüz ışık koşullarına yavaşça alışır ve vücudunuz
dikkatlice uyanmaya hazırlanır. Ayrıca güneşin doğuşu
simülasyonundan sonra duyulacak ve uyanırken size sesli
olarak yardımcı olacak bir uyandırma sesi ayarlayabilirsiniz. Uyandırma sesi olarak radyo veya farklı melodiler
arasından seçim yapabilirsiniz. beurer WL 80 ışıklı çalar
saat ile güne dinlenmiş ve huzurlu bir şekilde başlayabilirsiniz.
2. İşaretlerin açıklaması
Yaralanma ve sağlığınız için
UYARI
DİKKAT
Not
tehlike uyarı talimatları.
Cihaz ve aksesuarlarındaki olası
hasarlar için güvenlik uyarısı.
Önemli bilgilere yönelik not.
Atık Elektrikli ve Elektronik
Eşya Direktifine (WEEE Waste Electrical and Electronic
Equipment) uygun olarak
bertaraf edilmelidir.
Üretici
Bu ürün geçerli Avrupa Birliği
yönergelerinin ve ulusal
yönergelerin gereklerini yerine
getirmektedir.
3. Amacına uygun kullanım
UYARI
Bu cihaz yalnız geliştirilme amacına uygun olarak ve
bu kullanma talimatında belirtilen şekilde kullanılmalıdır. Amacına uygun olmayan her türlü kullanım tehlikeli
olabilir. Uygunsuz ve yanlış kullanımdan ötürü oluşacak
hasarlardan üretici firma sorumlu değildir.
4. Uyarı/güvenlik açıklamaları
UYARI
•
Cihazı sadece birlikte verilen adaptör ve adaptörün
üzerinde belirtilen şebeke gerilimi ile çalıştırın.
•
Kullanmadan önce, cihazda ve aksesuarlarında gözle
görülür hasarlar olmadığından emin olun. Şüpheli
durumlarda kullanmayın ve satıcınıza veya belirtilen
müşteri hizmetleri adresine başvurun.
•
Cihaz ticari kullanım için değil, yalnızca evde/kişisel
amaçlarla kullanılmak üzere tasarlanmıştır.
•
Bu cihaz, 8 yaş ve üzeri çocuklar ve fiziksel, algısal ve
akli becerileri kısıtlı veya tecrübesi ve bilgisi yetersiz olan
kişiler tarafından ancak gözetim altında veya cihazın
emniyetli kullanımı hakkında bilgilendirilmiş olmaları ve
cihazın kullanımı sonucu ortaya çıkabilecek tehlikelerin
bilincinde olmaları koşuluyla kullanılabilir.
•
Çocuklar cihazla oynamamalıdır.
•
Temizlik ve kullanıcı bakımı, gözetim altında olmadıkları
sürece çocuklar tarafından yapılmamalıdır.
•
Bu cihazın elektrik kablosu hasar görmüşse, tehlikeli
durumları önlemek için üretici veya üreticinin müşteri
hizmetleri ya da benzeri kalifiye bir şahıs tarafından
değiştirilmelidir.
•
Arıza veya işlev bozukluğu durumunda cihazı hemen
kapatın ve cihazın fişini prizden çekin.
•
Adaptörü asla ıslak elle çıkarıp takmayın.
•
Çocukları ambalaj malzemesinden uzak tutun (boğulma
tehlikesi).
•
Elektrik kablosunu kimse takılıp düşmeyecek şekilde
döşeyin.
•
Cihazı, adaptörü ve elektrik kablosunu sudan uzak
tutun!
DİKKAT
•
Cihazı darbelerden, nemden, kirden, aşırı sıcaklık
değişikliklerinden ve doğrudan güneş ışığından koruyun.
•
Cihazı düşürmeyin.
38
Page 39

5. Cihaz açıklaması
3
2
5
1
1 Ekran 5 +/- tuşları
2 Işık yüzeyi 6 Işık tuşu
3 Erteleme (Snooze)
işlevi (ışık yüzeyi üzerine dokunulduğunda).
4 Tuş takımı
Alarm tuşu /
►ǁ tuşu
USB tuşu /
tuşu
Radyo tuşu /
■ tuşu
4
7 Akıllı telefon / MP3 çalar
yuvası
7
6
AUX tuşu /
tuşu
Menu/Set
tuşu
6. Çalıştırma
•
Ambalajı açın.
•
Teslimat kapsamındaki tüm parçaların olup olmadığını
kontrol edin
•
Cihazda, adaptörde ve elektrik kablosunda hasar olup
olmadığını kontrol edin.
•
Cihazı düz ve sağlam bir yüzeyin üzerine koyun.
•
Adaptör bağlantısını cihazın arka tarafındaki adaptör
girişine takın.
•
Adaptörü uygun bir prize takın.
•
Cihaz ekranında saat görünür.
•
Cihazın anten kablosunu arkaya doğru yerleştirin.
.
Akıllı telefon yuvasının sabitlenmesi
1.
Yuvanın dört adet kilit
kancasını ışıklı çalar saatin
dört adet dikdörtgen deliği
üzerine yerleştirin.
2.
Sağ işaret parmağınızla
yuvayı aşağı doğru bastırırken diğer elinizle, duyulabilir ve hissedilebilir şekilde
yerine oturuncaya kadar ok
yönünde dikkatlice itin.
3.
Çıkarmak için ışıklı çalar
saatteki serbest bırakma
noktasına bastırın ve yuvayı
dikkatlice ok yönünde ittirin.
7. Temel ayarlar
Temel ayarlarda artarda saati (
zamanları için alarm özelliklerini (
2, ALARM 3
süresini (
), ekran aydınlığını (
SNOOZE
) ve tuş sesini (
7.1 Saati ayarlama
•
Cihaz açık haldeyken Menu/Set tuşuna basın. Ekranda
"
TIME
" yanıp söner. Yeniden Menu/Set tuşuna basın.
•
Ekranda "
modu). Menu/Set tuşuyla onaylayın.
•
Ekranda saat göstergesi yanıp söner. Saati / tuşlarıyla ayarlayın. Menu/Set tuşuyla onaylayın.
•
Ekranda dakika göstergesi yanıp söner. Dakikayı /
tuşlarıyla ayarlayın. Menu/Set tuşuyla onaylayın.
•
Ekranda haftanın günü göstergesi yanıp söner. Haftanın
gününü / tuşlarıyla ayarlayın. Menu/Set tuşuyla
onaylayın.
MON
THU
SUN
24 Hr
" saat modu yanıp söner. saat modunu
/ tuşlarıyla ayarlayın (24 saat modu veya 12 saat
Not
= Pazartesi,
= Perşembe,
= Pazar.
TUE
FRI
7.2 Alarm özelliklerinin ayarlanması
8 farklı uyandırma melodisinden biriyle, alarm sesiyle,
radyoyla veya USB belleğinizdeki kendi müziğinizle
uyanabilirsiniz.
Ayarlanan alarm zamanları (bkz. Bölüm 8.1) için aşağıdaki
alarm özelliklerini ayarlayabilirsiniz: Uyandırma sesi,
39
TIME
DISPLAY
BEEP
= Salı,
= Cuma,
), ayarlanan alarm
ALARM 1, ALARM
), erteleme
) ayarlayabilirsiniz.
WED
= Çarşamba,
SAT
= Cumartesi,
Page 40

ses seviyesi, güneşin doğuşu, güneşin doğuşu süresi,
güneşin doğuşu aydınlığı.
Alarm özelliklerini ayarlamak için aşağıdaki eylem
adımlarını izleyin:
•
Cihaz açık haldeyken Menu/Set tuşuna basın. Ekranda
"
TIME
" yanıp söner.
•
/ tuşlarıyla özelliklerini ayarlamak istediğiniz alarm
kayıt yerini (
seçin. Menu/Set tuşuyla onaylayın.
•
Ayarlanmış olan uyandırma sesi (örn.
söner. / tuşlarıyla istenen uyandırma sesini seçin.
Menu/Set tuşuyla onaylayın.
Not
BUZZ
SOUND 1-8
RADIO
USB
ALARM 1, ALARM 2
= Bip sesi
= 8 farklı uyandırma melodisi
= Radyo
= Bağlı olan USB bellek üzerinden
veya
ALARM 3
BUZZ
) yanıp
•
Ayarlanmış olan ekran aydınlığı (
söner. / tuşlarıyla istenen ekran aydınlığını (OFF, 1,
2 veya 3) seçin. Menu/Set tuşuyla onaylayın.
Not
Ayarlandıktan sonra ekran aydınlığının görünmesi
yaklaşık 10 saniye sürer çünkü tuşa her basıldığında
(erteleme özelliği dahil) ekran 10 saniye boyunca
otomatik olarak en yüksek düzeyde yanar.
)
3 DISPLAY
7.4 Erteleme süresinin ayarlanması
•
Cihaz açık haldeyken Menu/Set tuşuna basın. Ekranda
"
TIME
" yanıp söner.
•
/ tuşlarıyla
tuşuyla onaylayın.
•
Şekerleme süresi (
tuşlarıyla istenen erteleme süresini (1, 2, 5, 10, 20 veya
30 dakika) seçin. Menu/Set tuşuyla onaylayın.
SNOOZE
menüsünü seçin. Menu/Set
5 MIN SNOOZE
) yanıp söner. /
) yanıp
•
Alarmın ses seviyesi (
rıyla istenen ses seviyesini (1 ile 10 arasında) ayarlayın.
Menu/Set tuşuyla onaylayın.
•
Güneşin doğuşu özelliği (
/ tuşlarıyla güneşin doğuşu özelliğini açın (ON) veya
kapatın (
OFF
). Menu/Set tuşuyla onaylayın.
Not
Uyandırma sesine ek olarak güneşin doğuşu özelliğiyle
uyanabilirsiniz. Güneşin doğuşu özelliği güneşin doğuşunu simüle eder. Bu özellikte LED ışık ayarlanan uyandırma zamanından önce yavaşça aydınlanmaya başlar.
•
Güneşin doğuşu özelliği açıksa, güneşin doğuşu
süresi yanıp söner (10
zamanından önceki istenen güneşin doğuşu süresini
(1,2, 5, 10, 20 veya 30 dakika) seçin. Menu/Set tuşuyla
onaylayın.
•
Ekranda güneşin doğuşunun aydınlığı (
söner. / tuşlarıyla uyandırma zamanından önceki
istenen güneşin doğuşunun aydınlığını (5, 10, 15
veya20) seçin. Menu/Set tuşuyla onaylayın. Eğer ışık
sizi görece çabuk uyandırıyorsa aydınlığın azaltılması
mantıklı olur.
VOL
) yanıp söner. / tuşla-
SUNRISE
MIN
). / tuşlarıyla uyandırma
) yanıp söner.
20 LI
) yanıp
7.3 Ekran aydınlığının ayarlanması
•
Cihaz açık haldeyken Menu/Set tuşuna basın. Ekranda
"
TIME
" yanıp söner.
•
/ tuşlarıyla
tuşuyla onaylayın.
DISPLAY
menüsünü seçin. Menu/Set
7.5 Tuş sesini açma/kapatma
•
Cihaz açık haldeyken Menu/Set tuşuna basın. Ekranda
"
TIME
" yanıp söner.
•
/ tuşlarıyla
tuşuyla onaylayın.
•
/ tuşlarıyla tuş sesini açın (ON) veya kapatın (
Menu/Set tuşuyla onaylayın.
FEEDBACK
menüsünü seçin. Menu/Set
OFF
).
8. Cihaz işlevleri
8.1 Alarmın ayarlanması
Cihazın farklı şekillerde ayarlanabilen üç alarm kayıt yeri
vardır.
8.1.1 Alarmın açılması (ON)
1. Cihaz açık haldeyken ekranda istenen alarm kayıt yeri
(
A1, A2
veya A3) gösterilinceye kadar ALARM tuşuna
basın.
ON
2. Ekranda
Menu/Set tuşuna basın. Ekranda alarmın saat
3.
göstergesi yanıp söner. / tuşlarıyla saati ayarlayın
ve Menu/Set tuşuyla onaylayın.
Ekranda alarmın dakika göstergesi yanıp söner.
4.
/ tuşlarıyla dakikayı ayarlayın ve Menu/Set tuşuyla
onaylayın.
Ekranda kısa bir süre
5.
şimdi etkinleştirilmiştir ve ekranda gösterilir.
gösterilinceye kadar / tuşlarına basın.
END
görülür. Ayarlanan alarm
40
Page 41

8.1.2 Günlük alarmın açılması (
DAY
özelliğiyle ayarlanmış olan her alarm için ek olarak
ilgili alarmın haftanın hangi günlerinde çalacağını belirleyebilirsiniz.
1. Cihaz açık haldeyken ekranda istenen alarm kayıt yeri
(
A1, A2
veya A3) gösterilinceye kadar ALARM tuşuna
basın.
2.
Ekranda
DAY
gösterilinceye kadar / tuşlarına basın.
3.
Menu/Set tuşuna basın. Ekranda
off
gösterilir.
4.
/ tuşlarıyla Pazartesi günü için alarmı etkinleştirin
(on) veya kapatın (
5.
Ekranda
TUE
off
(Salı) gösterilir. Geri kalan haftanın
günlerini, yukarıdaki maddede Pazartesi günü için
verilen açıklamadaki gibi ayarlayın. Ardından alarm
zamanını Bölüm 8.1.1 altında açıklandığı gibi ayarlayın.
8.1.3 Alarmın kalıcı olarak kapatılması (
Ayarlanmış olan alarmı kalıcı olarak kapatmak için
aşağıdaki yolu izleyin:
DAY
)
MON
(Pazartesi) ve
). Menu/Set tuşuyla onaylayın.
OFF
)
8.3 AUX modu
Işıklı çalar saate AUX girişi üzerinden harici bir ses kaynağı
(örn. MP3 çalar, akıllı telefon veya CD çalar) bağlayabilirsiniz.
1.
2.
3.
4. Yandaki +/- tuşlarıyla ses seviyesini ayarlayın.
5. AUX modundan çıkmak için ■ tuşuna basın.
6. Kullandıktan sonra AUX kablosunu yerinden çıkarın.
8.4 USB modu
Işıklı çalar saate USB girişi üzerinden bir USB bellek
(maks. 32 GB) bağlayabilir ve müzik dinleyebilirsiniz.
Cihaz aşağıdaki dosya formatlarını çalabilir: MP3, WMA
ve WAV.
1. Cihaz açık haldeyken ekranda istenen alarm kayıt yeri
(
A1, A2
veya A3) gösterilinceye kadar ALARM tuşuna
basın.
2.
Ekranda OFF gösterilinceye kadar / tuşlarına basın.
3. Menu/Set tuşuyla onaylayın.
4. Ekranda END görülür. Alarm şimdi kalıcı olarak kapatılmıştır.
USB modunu kullanmak istiyorsanız aşağıdaki eylem
adımlarını izleyin.
1.
8.2 Alarmın kapatılması
8.2.1 Güneşin doğuşu sırasında alarmın kapatılması:
Güneşin doğuşu özelliği etkinleştirilmiş olduğunda cihaz
ayarlanmış olan alarm zamanından önce aydınlanmaya
başlar ve ekranda "SUNRISE" gösterilir. Bu güneşin
doğuşunu herhangi bir tuşa basarak kapatabilirsiniz
Ayarlanmış olan alarm zamanına ait uyandırma sesi yine
de çalacaktır.
8.2.2 Alarm sırasında erteleme (Snooze) modu
Cihaz erteleme moduna (Snooze) sahiptir.
Alarm çalmaya başladığında Snooze işlevine basarsanız
(ışık yüzeyine dokunarak), ayarlanmış olan erteleme
süresinin (bkz. Bölüm 7.4) ardından alarm yeniden
çalacaktır.
8.2.3 Uyandırma sesi sırasında alarmın kapatılması
Alarm çalmaya başladığında Snooze (erteleme)
dışındaki herhangi bir tuşa basın. Alarm kapatılır ve
ancak ayarlanmış olan alarm zamanı geldiğinde yeniden
çalacaktır.
2. USB bellek zaten takılıysa: Cihaz açık haldeyken USB
3.
4. Yandaki +/- tuşlarıyla ses seviyesini ayarlayın.
5. USB modunu sonlandırmak için ■ tuşuna basın.
8.5 Radyo modu
Cihazla radyo da dinleyebilirsiniz.
Radyo modunu kullanmak istiyorsanız aşağıdaki eylem
adımlarını izleyin.
1. Cihaz açık haldeyken FM tuşuna basın. Ekranda ayarlı
2.
Cihazla birlikte verilen AUX kablosunu ses kaynağına
takın.
AUX kablosunun diğer ucunu cihazın arka tarafındaki
AUX girişine takın.
Cihaz üzerindeki AUX tuşuna basın. Harici ses kaynağı
şimdi ışıklı çalar saate bağlanmıştır.
Not
Cihaz yalnız kök dizin içine kaydedilmiş olan müzik
dosyalarını çalabilir. Cihaz alt dizinler içinde bulunan
müzik dosyalarını çalamaz.
USB belleği ışıklı çalar saatin USB girişine takın (cihazın
arka tarafındadır).
tuşuna basın. Ekranda "USB", ayarlanmış olan parça
numarası ve parçanın süresi gösterilir.
Bir sonraki parçaya geçmek için tuşuna basın. Bir
önceki parçaya geçmek için tuşuna basın. Çalmayı
duraklatmak için ►ǁ tuşuna basın. "Normal çal", "tekrar
çal" (P) ve "tüm parçaları tekrar çal" ( P
ALL
) modlarını
değiştirmek için Menu/Set tuşuna basın.
olan istasyon frekansı ve istasyon kayıt yeri numarası
(örn. P1) gösterilir.
/ tuşlarıyla bir istasyonun kaydedilmesini istedi-
ğiniz istasyon kayıt yerinin numarasını (örn.
P2
) seçin.
P1
veya
41
Page 42

3.
Otomatik istasyon aramayı başlatmak için tuşunu
basılı tutun. Bir istasyonu seçtiğiniz istasyon kayıt yerine
(örn. P1) kaydetmek için Menu/Set tuşuna basın.
4. Kayıtlı olan istasyonlar arsında geçiş yapmak için
tuşlarına basın.
/
8.6 İyi geceler özelliği (Radio Sleep-Timer)
Radyo modu açıkken ek olarak iyi geceler modunu etkinleştirebilirsiniz.
İyi geceler özelliğiyle radyonun kaç dakika sonra otomatik
olarak kapanacağını ayarlayabilirsiniz.
İyi geceler özelliğini kullanmak istiyorsanız aşağıdaki
adımları izleyin.
1.
Cihaz açık haldeyken FM tuşuna basarak radyo moduna
geçin.
2.
Menu/Set tuşuna basın, ekranda
rilir.
3.
Menu/Set tuşuyla radyonun otomatik olarak kapanmasını istediğiniz zamanı ayarlayın (2, 5, 10, 15, 20, 30,
45 veya 60 dakika). Seçimin onaylanması için 5 saniye
bekleyin. Bunun ardından ekranda otomatik olarak
küçük bir simgesi gösterilir
2 MIN sleep
göste-
8.7 Işık işlevleri
8.7.1 Okuma lambası
1. Cihaz açık haldeyken Light tuşuna basın.
2.
Işık yanar ve ekranda
rıyla istediğiniz ışık aydınlığını (1-20 arasında seçilebilir)
ayarlayın.
3.
Işığı kapatmak için ekranda
kadar Light tuşuna basın.
8.7.2 Güneşin batışı işlevi
Cihazla güneşin batışını da simüle edebilirsiniz. Bu
özellikte ışık ayarlanan bir süre sonunda yavaşça kararır.
Cihazla güneşin batışını simüle etmek için aşağıdaki
eylem adımlarını izleyin:
1. Cihaz açık haldeyken yandaki Light tuşuna basın.
2.
Işık yanar, ekranda
yandaki +/- tuşlarıyla istenen ışık aydınlığını ayarlayın
(1-20 arasında seçilebilir). Light tuşuyla onaylayın.
Ekranda
3.
Yandaki +/- tuşlarıyla istenen güneşin batışı süresini
(2,5, 10, 15, 20, 30, 45 veya 60 dakika) seçin. Ardından
5 saniye bekleyin. Bunun ardından güneşin batışı özelliği
etkinleştirilmiş olur ve ekranda küçük bir simgesi
gösterilir. Işık şimdi ayarlanan güneşin batışı süresi
sonunda otomatik olarak sönecektir.
10 sunset
20 light
"LIGHT off"
20 light
gösterilir.
gösterilir. +/- tuşla-
gösterilinceye
gösterildiğinde hemen
Not
Müzikle güneşin batışı
Cihazla güneşin batışını simüle edebilir ve bu sırada
müzik dinleyebilirsiniz. Bu özellikte ışık ayarlanan bir
süre sonunda yavaşça kararır. Müzik ayarlanan süre
sonunda otomatik olarak kapatılır.
Cihazla güneşin batışını müzikle birlikte başlatmak için
aşağıdaki eylem adımlarını izleyin:
1.
Cihaz açık haldeyken istenen müzik kaynağını
(USB,Radio (FM) veya AUX) seçin.
2. Diğer adımları "8.7.2 Güneşin batışı işlevi" altındaki
gibi uygulayın.
8.7.3 Renk değişimli ortam ışığı
Işıklı çalar saati renk değişimli ortam ışığı olarak da kullanabilirsiniz.
1. Cihaz açık haldeyken Light tuşuna 3 kez basın.
2. Ekranda
3. Renk değişimi sırasında bir ışık renginin sürekli olarak
4.
LIGHT change
gösterilmesini istiyorsanız Light tuşuna basarak onu
sabitleyebilirsiniz. Ekranda
Işığı tamamen kapatmak için yeniden Light tuşuna
basın.
gösterilir.
LIGHT fixed
gösterilir.
8.8 Fabrika ayarlarına geri alma
Işıklı çalar saatteki ayarların hepsini fabrika ayarlarına geri
almak istiyorsanız aşağıdaki eylem adımlarını izleyin:
1. Işıklı çalar saatin adaptörünü prizden çıkarın.
2.
Cihaz kapalı haldeyken Menu/Set tuşunu ve Light
tuşunu basılı tutun ve ışıklı çalar saatin adaptörünü
yeniden prize takın.
3. Cihaz şimdi fabrika ayarlarına geri alınmıştır.
9. Temizlik/Saklama
•
Cihazı kuru bir bezle temizleyin.
•
Aşındırıcı temizlik maddesi kullanmayın.
•
Cihazın içine su kaçmamasına dikkat edin. Yine de içine
su kaçacak olursa cihazı ancak tamamen kuruduğunda
yeniden kullanın.
•
Cihazı ve fişli adaptörü asla su veya başka sıvılara
daldırmayın.
•
Cihazı darbelerden, nemden, tozdan, kimyasallardan,
aşırı sıcaklık değişikliklerinden ve çok yakın ısı kaynaklarından (soba, kalorifer radyatörü) koruyun.
42
Page 43

10. Bertaraf etme
Çevreyi koruma adına kullanım ömrü sona erdikten sonra
cihazı evsel atıklarla birlikte atmayın. Cihaz, ülkenizdeki
uygun atık toplama merkezleri üzerinden bertaraf
edilebilir. Malzemelerin bertaraf edilmesi sırasında
yerel yönetmeliklere uyun. Cihazı atık elektrikli
ve elektronik eşya direktifine (WEEE - Waste
Electrical and Electronic Equipment) uygun olarak bertaraf
edin. Bertaraf etme ile ilgili diğer sorularınızı, ilgili yerel
makamlara iletebilirsiniz.
11. Teknik veriler
Aydınlatma gücü
Işık LED teknolojisi
Işık kademeleri
Ortam ışığı
Işıklı çalar saat
işlevi
Güneşin doğuşu
işlevi
Snooze süresi 1, 2, 5, 10, 20, 30 dakika
Güneşin batışı
işlevi
İyi geceler işlevi
(Sleep Radio)
LCD arka plan
aydınlatması
Saat
Alarm
Tuş sesi Kapalı, Açık
AUX Line-In, 3,5 mm jak
USB
Maksimum yakl. 2500 Lux
(15 cm mesafe için)
Sabah kızıllığını simüle eden
20ışık kademesi
Otomatik RGB renk değişimi
vebireysel renk sabitleme
Kapalı, alarmdan önce 2, 5,
10,15, 20, 30, 45, 60 dakika
Alarma kadar maksimum ışık
seviyesi: Işık kademesi 5, 10,
15, 20
2, 5, 10, 15, 20, 30, 45, 60 dakika
2, 5, 10, 15, 20, 30, 45, 60 dakika
Kapalı, 1, 2, 3
12h / 24h seçilebilir, elektrik
kesintisinde 15 dakika
yedekleme gücü
3 alarm zamanı
(Kapalı, Açık, Gün)
Uyandırma sesi, 8 melodi, radyo,
USB bellekten MP3
USB bellek üzerinden çalma,
maks. 32GB
Dosya formatları: MP3,
WMA, WAV, maksimum
9999 dosya, yalnız kök dizin
içinden okunabilir, alt dizinler
desteklenmez. 5 V çıkış voltajı
Radyo
Hoparlör 2 Watt
Güç kaynağı
adaptörü
Adaptörün
koruma sınıfı
Teknik değişiklik hakkı saklıdır.
Frekans aralığı FM 87,5 108MHz, 10 istasyon kayıt yeri
Giriş: 110-240 V, AC, 50/60 Hz,
0,5 A
Çıkış: 9 V, DC, 1500mA
Koruma Sınıfı II
43
Page 44

r РУССКИЙ
Внимательно прочтите данную инструкцию по применению, сохраните
ее для последующего использования, храните ее в месте, доступном
для других пользователей, и следуйте ее указаниям.
Содержание
1. Для ознакомления ....................................................................................................................... 45
2. Пояснения ксимволам ................................................................................................................ 45
3. Использование по назначению ................................................................................................. 45
4. Предупреждения и указания потехнике безопасности ....................................................... 45
5. Описание прибора ....................................................................................................................... 46
6. Подготовка к работе .................................................................................................................... 46
7. Основные настройки ................................................................................................................... 46
7.1 Настройка времени .................................................................................................................. 46
7.2 Настройка параметров функции будильника ....................................................................... 47
7.3 Настройка яркости дисплея .................................................................................................... 47
7.4 Настройка временного интервала для функции повтора сигнала (Snooze) ....................... 48
7.5 Включение и выключение звука при нажатии кнопок .......................................................... 48
8. Функции прибора ......................................................................................................................... 48
8.1 Настройка будильника............................................................................................................. 48
8.1.1 Включение будильника (ON) ........................................................................................... 48
8.1.2 Настройка дня недели для сигнала будильника (DAY) ................................................. 48
8.1.3 Полное отключение функции будильника (OFF) ........................................................... 48
8.2 Выключение будильника ......................................................................................................... 48
8.2.1 Выключение будильника во время восхода солнца ..................................................... 48
8.2.2 Функция повтора сигнала (Snooze)
при срабатывании будильника ................................................................................................ 48
8.2.3 Выключение будильника при срабатывании звукового сигнала ................................ 49
8.3 Режим AUX................................................................................................................................ 49
8.4 Режим USB ............................................................................................................................... 49
8.5 Режим радио ............................................................................................................................ 49
8.6 Функция «Спокойной ночи»
(таймер сна с радио) ............................................................................................................... 49
8.7 Функции подсветки .................................................................................................................. 49
8.7.1 Лампа для чтения ............................................................................................................ 49
8.7.2 Функция заката солнца ................................................................................................... 49
8.7.3 Лампа со сменой цветов ................................................................................................. 50
8.8 Возвращение к заводским настройкам ................................................................................. 50
9. Очистка/Хранение ....................................................................................................................... 50
10. Утилизация .................................................................................................................................... 50
11. Технические характеристики ..................................................................................................... 50
12. Гарантия ......................................................................................................................................... 51
Комплект поставки
•
Световой будильник с гибкой антенной
•
Сетевой адаптер
•
Кабель AUX
•
Инструкция по применению
•
Держатель для смартфона/MP3-плеера
44
Page 45

Уважаемый покупатель!
Благодарим Вас за выбор продукции нашей фирмы.
Мы производим современные, тщательно протестированные, высококачественные изделия для
обогрева, измерения массы, артериального давления,
температуры тела, пульса, для мягкой терапии,
массажа, очистки воздуха и косметического ухода.
С наилучшими пожеланиями,
компания Beurer
1. Для ознакомления
Световой будильник beurer WL80 делает процесс
пробуждения приятным и естественным. Постепенно
возрастающая интенсивность светодиодного света
имитирует восход солнца. Глаза медленно привыкают
к возрастающей яркости, организм не подвергается
стрессу от резкого пробуждения. Вы можете дополнительно установить сигнал будильника, который
зазвучит после симуляции восхода солнца. В качестве
такого сигнала можно выбрать радио или различные
звуки. Световой будильник beurer WL80 помогает
начать новый день в бодром состоянии духа и хорошо
отдохнувшим.
2. Пояснения ксимволам
Предупреждает об опас-
ПРЕДУПРЕЖДЕНИЕ
ВНИМАНИЕ
Указание
ности травмирования или
ущерба для здоровья.
Указывает на возможность
повреждения прибора/
принадлежностей.
Отмечает важную информацию.
Утилизация прибора в соответствии с Директивой ЕС
по отходам электрического
и электронного оборудования — WEEE (Waste
Electrical and Electronic
Equipment).
Производитель
Это изделие соответствует
требованиям действующих европейских и национальных директив.
45
3. Использование по назначению
ПРЕДУПРЕЖДЕНИЕ
Прибор разрешается использовать исключительно
вцелях, для которых он был разработан, а также в соответствии с указаниями, приведенными винструкции
по применению. Любое применение не по назначению
может быть опасным. Изготовитель не несет ответственности за ущерб, вызванный неквалифицированным или неправильным использованием прибора.
4. Предупреждения и указания
потехнике безопасности
ПРЕДУПРЕЖДЕНИЕ
•
Используйте прибор только с входящим в комплект
поставки сетевым адаптером и только с напряжением, указанным на адаптере.
•
Перед использованием проверьте прибор и его
принадлежности на наличие видимых повреждений.
При наличии сомнений не используйте прибор
иобратитесь к продавцу или по указанному адресу
сервисной службы.
•
Прибор предназначен для домашнего/частного
использования, использование прибора в коммерческих целях запрещено.
•
Данный прибор может использоваться детьми
старше 8лет, а также лицами с ограниченными
физическими, сенсорными или умственными
способностями или с недостаточными знаниями
и опытом в том случае, если они находятся под
присмотром взрослых или проинструктированы
о безопасном применении прибора и возможных
опасностях.
•
Не позволяйте детям играть с прибором.
•
Очистку и техническое обслуживание детям
разрешается выполнять только под присмотром
взрослых.
•
Если провод сетевого питания этого прибора
поврежден, то во избежание опасности он подлежит
замене производителем, сервисной службой или
другим компетентным специалистом.
•
В случае появления дефектов и неполадок в работе
немедленно отключите прибор и отсоедините его
от сети.
•
Не подсоединяйте сетевой адаптер к сети и не отсоединяйте его от сети влажными руками.
•
Не давайте упаковочный материал детям (опасность
удушения).
Page 46

•
Разместите кабель таким образом, чтобы об него
нельзя было споткнуться.
•
Не допускайте попадания воды на прибор, сетевой
адаптер и электрический кабель!
ВНИМАНИЕ
•
Защищайте прибор от ударов, влажности, загрязнения, сильных колебаний температуры и прямых
солнечных лучей.
•
Не роняйте прибор.
5. Описание прибора
3
2
5
1
1 Дисплей 5 Кнопки +/2 Светящаяся поверх-
ность
3 Функция повтора
сигнала Snooze
(коснуться светящейся поверхности)
4 Кнопочная панель
управления
Кнопка Alarm /
кнопка ►ǁ
Кнопка
USB /
Кнопка
радио /
Кнопка ■
4
6 Кнопка Light (Свет)
7 Держатель для смартфона/MP3-плеера
6
Кнопка
AUX /
Кнопка
Menu/Set
7
6. Подготовка к работе
•
Удалите упаковку.
•
Проверьте комплектность поставки
•
Убедитесь, что прибор, сетевой адаптер и электрический кабель не повреждены.
•
Установите прибор на устойчивую ровную поверхность.
•
Вставьте присоединение сетевого адаптера в гнездо
в нижней части прибора.
•
Вставьте сетевой адаптер в подходящую розетку.
•
На дисплее прибора появится время.
•
Сложите гибкую антенну прибора назад.
Установка держателя для смартфона
1.
Установите 4 фиксатора на
держателе в 4 квадратных
паза на световом будильнике.
2.
Надавите на держатель
правым указательным
пальцем, а другой рукой
аккуратно подвиньте
держатель в направлении
стрелки, чтобы он зафиксировался со щелчком.
3.
Чтобы снять держатель,
нажмите на кнопку разблокировки на световом
будильнике и аккуратно
подвиньте крепление
внаправлении стрелки.
.
7. Основные настройки
Базовые настройки позволяют настраивать время
(
TIME
), параметры функции будильника для установ-
ленного времени срабатывания (
ALARM 3
интервал для функции повтора сигнала (
извук при нажатии кнопок (
), яркость дисплея (
7.1 Настройка времени
•
Нажмите кнопку Menu/Set на включенном приборе.
На дисплее начнет мигать индикатор «
Нажмите кнопку Menu/Set еще раз.
•
На дисплее начнет мигать режим отображения
времени «
времени кнопками / (24-часовой или 12-часовой
46
24 Hr
». Настройте режим отображения
ALARM 1, ALARM 2,
DISPLAY
BEEP
), временной
).
SNOOZE
TIME
)
».
Page 47

режим). Подтвердите выбор нажатием кнопки
Menu/Set.
•
На дисплее начнет мигать индикатор часов. Установите часы при помощи кнопок / . Подтвердите
выбор нажатием кнопки Menu/Set.
•
На дисплее начнет мигать индикатор минут. Установите минуты при помощи кнопок / . Подтвердите
выбор нажатием кнопки Menu/Set.
•
На дисплее начнет мигать индикатор дней недели.
Установите день недели при помощи кнопок / .
Подтвердите выбор нажатием кнопки Menu/Set.
Указание
MON
= понедельник,
да,
THU
= четверг,
SUN
= воскресенье.
TUE
= вторник,
FRI
= пятница,
WED
SAT
= суббота,
= сре-
7.2 Настройка параметров функции
будильника
Будильник может будить Вас по-разному: одной
из 8 мелодий, звуком будильника, с помощью
радио или с помощью Вашей собственной музыки
сUSB-накопителя.
Для установленного времени срабатывания
(см. главу 8.1) можно настроить следующие параметры функции будильника: звуковой сигнал будильника, громкость, восход солнца, длительность
восхода солнца, яркость восхода солнца.
Для настройки параметров функции будильника
выполните следующие действия.
•
Нажмите кнопку Menu/Set на включенном приборе.
На дисплее начнет мигать индикатор «
•
С помощью кнопок / выберите ячейку памяти
будильника (
функции которой Вы хотите настроить. Подтвердите
выбор нажатием кнопки Menu/Set.
•
На дисплее начнет мигать индикатор выбранного
звукового сигнала (например,
желаемый звуковой сигнал будильника с помощью
кнопок / . Подтвердите выбор нажатием кнопки
Menu/Set.
Указание
BUZZ
SOUND 1-8
RADIO
USB
= использование подключенного USB-
накопителя
ALARM 1, ALARM 2
= звуковой сигнал
= 8 различных мелодий будильника
= радио
или
BUZZ
TIME
».
ALARM 3
). Выберите
),
желаемую громкость (от 1 до 10). Подтвердите
выбор нажатием кнопки Menu/Set.
•
На дисплее начнет мигать индикатор функции
восхода солнца (
/ можно включить (ON) или выключить (
функцию восхода солнца. Подтвердите выбор нажатием кнопки Menu/Set.
Указание
Будильник может будить Вас звуковым сигналом
в сочетании с функцией восхода солнца. Функция
восхода солнца представляет собой симуляцию
восхода солнца. При этом яркость светодиодного
света постепенно увеличивается до установленного
времени срабатывания будильника.
•
Если включить функцию восхода солнца, на дисплее
начнет мигать индикатор длительности восхода
солнца (10
димо выбрать желаемую длительность «восхода
солнца» до времени срабатывания будильника
(1,2,5, 10, 20 или 30 минут). Подтвердите выбор
нажатием кнопки Menu/Set.
•
На дисплее начнет мигать индикатор яркости
восхода солнца (
/ выберите желаемую яркость восхода солнца
в момент срабатывания будильника (5, 10, 15 или
20). Подтвердите выбор нажатием кнопки Menu/Set.
Если от света Вы просыпаетесь относительно
быстро, то имеет смысл снизить уровень яркости.
SUNRISE
MIN
). С помощью кнопок / необхо-
20 LI
). С помощью кнопок
). С помощью кнопок
OFF
7.3 Настройка яркости дисплея
•
Нажмите кнопку Menu/Set на включенном приборе.
На дисплее начнет мигать индикатор «
•
С помощью кнопок / выберите
Подтвердите выбор нажатием кнопки Menu/Set.
•
На дисплее начнет мигать индикатор установленной
на данный момент яркости экрана (
С помощью кнопок / выберите необходимую
яркость дисплея (OFF, 1, 2, или 3). Подтвердите
выбор нажатием кнопки Menu/Set.
Указание
Яркость дисплея изменится примерно через 10секунд после подтверждения выбора, так как после
каждого нажатия кнопок (в том числе и функции
Snooze) дисплей автоматически светится с максимальной яркостью в течение 10секунд.
TIME
».
DISPLAY
3 DISPLAY
)
.
).
•
На дисплее начнет мигать индикатор громкости
сигнала (
VOL
). С помощью кнопок / установите
47
Page 48

7.4
Настройка временного интервала для
функции повтора сигнала (Snooze)
•
Нажмите кнопку Menu/Set на включенном приборе.
На дисплее начнет мигать индикатор «
•
С помощью кнопок / выберите
Подтвердите выбор нажатием кнопки Menu/Set.
•
На дисплее начнет мигать длительность временного
интервала для функции Snooze (
С помощью кнопок / выберите желаемый
временной интервал для функции Snooze (1, 2, 5,
10, 20 или 30минут). Подтвердите выбор нажатием
кнопки Menu/Set.
7.5
Включение и выключение звука при
TIME
».
SNOOZE
5 MIN SNOOZE
нажатии кнопок
•
Нажмите кнопку Menu/Set на включенном приборе.
На дисплее начнет мигать индикатор «
•
С помощью кнопок / выберите
Подтвердите выбор нажатием кнопки Menu/Set.
•
С помощью кнопок / можно включить (ON) или
выключить (
дите выбор нажатием кнопки Menu/Set.
OFF
) звук при нажатии кнопок. Подтвер-
TIME
».
FEEDBACK
8. Функции прибора
8.1 Настройка будильника
Прибор имеет три ячейки памяти для будильника,
которые можно настраивать по Вашему желанию.
8.1.1 Включение будильника (ON)
1.
Нажимайте кнопку ALARM на включенном приборе
до тех пор, пока на дисплее не отобразится нужная
ячейка памяти будильника (
Нажимайте кнопки / до тех пор, пока на дисплее
2.
не появится
3.
Нажмите кнопку Menu/Set. На дисплее начнет
мигать индикатор часов для времени срабатывания будильника. С помощью кнопок / установите часы и подтвердите выбор нажатием кнопки
Menu/Set.
На дисплее начнет мигать индикатор минут для
4.
времени срабатывания будильника. С помощью
кнопок / установите минуты и подтвердите
выбор нажатием кнопки Menu/Set.
На дисплее на короткое время появится
5.
Выбранное время срабатывания будильника активировано и отображается на дисплее.
ON.
A1, A2
или A3).
END.
8.1.2 Настройка дня недели для сигнала будильника
(
DAY
)
С помощью функции
сигнала будильника можно установить дни недели,
покоторым он должен звучать.
.
1.
Нажимайте кнопку ALARM на включенном приборе
до тех пор, пока на дисплее не отобразится нужная
ячейка памяти будильника (
).
2.
Нажимайте кнопки / до тех пор, пока на дисплее
не появится
3.
Нажмите кнопку Menu/Set. На дисплее появится
MON
(понедельник) и
4. С помощью кнопок / Вы можете включить (on)
или отключить (
дельник. Подтвердите выбор нажатием кнопки
Menu/Set.
5.
На дисплее появится индикатор
Настройте остальные дни недели так, как описано
.
впредыдущем пункте. После этого настройте время
срабатывания будильника, как описано в главе 8.1.1.
8.1.3 Полное отключение функции будильника (
Чтобы полностью отключить функцию будильника,
выполните следующие действия.
1.
Нажимайте кнопку ALARM на включенном приборе
до тех пор, пока на дисплее не отобразится нужная
ячейка памяти будильника (
2.
Нажимайте кнопки / до тех пор, пока на дисплее
не появится OFF.
3. Подтвердите выбор нажатием кнопки Menu/Set.
4.
На дисплее появится END. Функция будильника
полностью отключена.
DAY
для каждого настроенного
A1, A2
DAY
.
off.
off
) сигнал будильник на поне-
A1, A2
или A3)
TUE
(вторник).
или A3)
.
.
8.2 Выключение будильника
8.2.1
Выключение будильника во время восхода
солнца
При включенной функции восхода солнца до установленного времени срабатывания будильника яркость
свечения начинает постепенно увеличиваться и на
дисплее появляется индикатор «SUNRISE». «Восход
солнца» можно выключить нажатием любой кнопки.
При этом звуковой сигнал будильника все равно
раздастся в назначенное время.
8.2.2 Функция повтора сигнала (Snooze)
при срабатывании будильника
Прибор имеет функцию повтора сигнала (Snooze).
Если Вы включите функцию Snooze (дотронетесь
до светящейся поверхности) после срабатывания
будильника, он вновь сработает спустя установленное
время для функции Snooze (см. главу 7.4).
OFF
)
48
Page 49

8.2.3
Выключение будильника при срабатывании
звукового сигнала
При срабатывании будильника нажмите любую
кнопку, кроме Snooze. Будильник выключится
исработает вновь только в заданное время.
8.3 Режим AUX
Вы можете подсоединить внешний источник звука
(например МР3-плеер, смартфон или CD-плеер)
ксветовому будильнику через вход AUX.
1.
Подключите кабель AUX, входящий в комплект
поставки.
2. Другой конец кабеля AUX подключите к входу AUX,
расположенному на задней стенке прибора.
3.
Нажмите кнопку AUX на приборе. Теперь внешний
источник звука подсоединен к световому будильнику.
4.
Отрегулируйте громкость с помощью боковых
кнопок +/-.
5. Чтобы выйти из режима AUX, нажмите кнопку ■.
6. Отсоедините кабель AUX после использования.
8.4 Режим USB
Вы можете подключить USB-накопитель (до 32ГБ)
ксветовому будильнику через разъем USB и слушать
музыку. Прибор может проигрывать следующие
форматы: MP3, WMA и WAV.
Указание
Прибор может проигрывать только те файлы,
которые расположены в корневом каталоге. Прибор не может проигрывать файлы, расположенные
в подкаталогах.
Для использования режима USB выполните следующие действия.
1.
Подключите USB-накопитель к разъему USB
на световом будильнике, который расположен
назадней стенке прибора.
2. При подключенном USB-накопителе: нажмите
кнопку USB на включенном приборе. На дисплее
появится «USB», номер и длительность мелодии.
3.
Чтобы перейти к следующей мелодии, нажмите
кнопку . Чтобы перейти к предыдущей мелодии,
нажмите кнопку . Чтобы приостановить воспроизведение, нажмите кнопку ►ǁ. Чтобы перемещаться
между функциями «обычное воспроизведение»,
«повторное воспроизведение» (P) и «повторное
воспроизведение всех мелодий» (P
майте кнопку Menu/Set.
4.
Отрегулируйте громкость с помощью боковых
кнопок +/-.
5. Чтобы выйти из режима USB, нажмите кнопку ■.
ALL
), нажи-
8.5 Режим радио
С помощью прибора Вы также можете слушать радио.
Для использования режима радио выполните следующие действия.
1.
Нажмите кнопку FM на включенном приборе.
Надисплее отобразится текущая радиочастота
иномер программы (например P1).
2. С помощью кнопок
димой программы (например,
будет присвоена определенная радиостанция.
3.
Чтобы начать автоматический поиск радиостанций, нажмите и удерживайте нажатой кнопку
. Чтобы сохранить радиостанцию под определенной программой (например, P1), нажмите кнопку
Menu/Set.
4.
Чтобы переключаться между сохраненными радиостанциями, нажимайте кнопку / .
/ выберите номер необхо-
P1
или P2), которой
8.6 Функция «Спокойной ночи»
(таймер сна с радио)
При включенном режиме радио Вы дополнительно
можете включить функцию «Спокойной ночи».
Функция «Спокойной ночи» позволяет выбрать, через
сколько минут радио автоматически отключится.
Для использования функции «Спокойной ночи»
выполните следующие действия.
1.
Нажмите кнопку FM на включенном приборе, чтобы
войти в режим радио.
2.
Нажмите кнопку Menu/Set. На дисплее появится
индикатор
3.
С помощью кнопки Menu/Set установите время,
поистечении которого радио автоматически отключится (2, 5, 10, 15, 20, 30, 45 или 60минут). Чтобы
подтвердить выбор, подождите 5секунд. После
этого на дисплее появится маленький значок .
2 MIN sleep
.
8.7 Функции подсветки
8.7.1 Лампа для чтения
1. Нажмите кнопку Light на включенном приборе.
2. Включится свет, и на дисплее появится индикатор
20 light.
до 20) с помощью кнопок +/-.
3.
Чтобы выключить свет, нажимайте кнопку Light
до тех пор, пока на дисплее не появится надпись
«
LIGHT off
8.7.2 Функция заката солнца
С помощью данного прибора Вы также можете симулировать закат солнца. При этом через установленное
время яркость света начнет уменьшаться.
49
Установите желаемую яркость света (от1
».
Page 50

Чтобы симулировать закат солнца, выполните следующие действия.
1.
На включенном приборе нажмите кнопку Light
набоковой стенке прибора.
2. Включится свет, и на дисплее появится индикатор
20 light
емую яркость света (от 1 до 20) с помощью боковых
кнопок +/-. Подтвердите выбор нажатием кнопки
Light. На дисплее появится
3.
Выберите необходимую длительность «заката
солнца» (2, 5, 10, 15, 20, 30, 45 или 60 минут)
с помощью боковых кнопок +/-. Подождите
5секунд. После этого функция заката солнца активируется автоматически и на дисплее появится
маленький значок . По истечении установленного времени заката солнца свет автоматически
выключится.
Закат солнца с музыкой
С помощью данного прибора Вы также можете
симулировать закат солнца, одновременно слушая
музыку. При этом через установленное время
яркость света начнет уменьшаться. Музыка автоматически выключается по истечении установленного времени.
Для запуска функции заката солнца с музыкой,
выполните следующие действия.
1.
Выберите необходимый источник музыки (USB,
радио (FM) или AUX) на включенном приборе.
2.
Далее выполните действия, описанные в главе
«8.7.2 Функция заката солнца».
8.7.3 Лампа со сменой цветов
Световой будильник также можно использовать как
лампу со сменой цветов.
1.
Нажмите кнопку Light на включенном приборе
3раза.
2. На дисплее появится
3.
Если во время смены цветов Вы захотите, чтобы
конкретный цвет горел постоянно, Вы сможете
зафиксировать его нажатием кнопки Light.
Надисплее появится
4.
Чтобы выключить свет, повторно нажмите кнопку
Light.
. Сразу после этого установите жела-
10 sunset
Указание
LIGHT change
LIGHT fixed
.
.
.
8.8 Возвращение к заводским настройкам
Если Вы хотите сбросить все настройки светового
будильника и вернуться к заводским настройкам,
выполните следующие действия.
1.
Вытащите сетевой адаптер светового будильника
из розетки.
2. На выключенном приборе нажмите и удерживайте
нажатыми кнопки Menu/Set и Light и снова воткните
сетевой адаптер светового будильника в розетку.
3.
Настройки прибора были сброшены и Вы вернулись
к заводским настройкам.
9. Очистка/Хранение
•
Очищайте прибор влажной салфеткой.
•
Не используйте абразивные чистящие средства.
•
Следите за тем, чтобы в прибор не попала вода.
Вслучае попадания в прибор воды используйте его
только после полного высыхания.
•
Ни в коем случае не погружайте прибор и сетевой
адаптер в воду или другие жидкости.
•
Прибор следует предохранять от ударов, влажности, пыли, химикатов, сильных колебаний температуры и не устанавливать их вблизи источников
тепла (печей, радиаторов отопления).
10. Утилизация
В интересах защиты окружающей среды по окончании срока службы следует утилизировать прибор
отдельно от бытового мусора. Утилизация
должна производиться через соответствующие пункты сбора в Вашей стране. Соблюдайте местные законодательные нормы по
утилизации отходов. Прибор следует утилизировать
согласно Директиве ЕС поотходам электрического
и электронного оборудования — WEEE (Waste
Electrical and Electronic Equipment). Вслучае вопросов
обращайтесь вместную коммунальную службу, ответственную за утилизацию отходов.
11. Технические
характеристики
Освещенность
Свет Светодиодная технология
Уровни света
Лампа со сменой
цветов
Функция светового будильника
50
макс. 2500лк (на расстоянии
15см)
20 уровней света с симуляцией
утренней зари
Автоматическая смена цветов (красный, зеленый синий)
свозможностью фиксации
цвета
Выкл., за 2, 5, 10, 15, 20, 30, 45,
60минут до момента срабатывания сигнала будильника
Page 51

Максимальная сила света до
Функция восхода
солнца
Время короткого
сна (до повторного срабатывания)
Функция захода
солнца
Функция
«Спокойной
ночи» (таймер
длярадио)
Светодиодная
фоновая подсветка
Время
Будильник
Звук при нажатии кнопок
AUX
USB
Радио
Динамик 2Вт
Питающее
напряжение
блока питания
Класс защиты
блока питания
Возможны технические изменения.
срабатывания сигнала будиль-
ника: уровень света — 5, 10,
15 и 20
1, 2, 5, 10, 20 и 30 минут
2, 5, 10, 15, 20, 30, 45 и 60минут
2, 5, 10, 15, 20, 30, 45 и 60минут
Выкл., 1, 2, и 3
12ч/24ч на выбор, буферная
память на 15минут при отключении электроэнергии
3 времени срабатывания
будильника (выключено,
включено, день недели)
Звук будильника, 8 мелодий,
радио, МР3 через USBнакопитель
Выключен, включен
Line-In, контактный штекер
3,5мм
Воспроизведение через USBнакопитель, максимум 32ГБ.
Форматы файлов: MP3, WMA,
WAV, максимум: 9999 файлов.
Проигрываются только из корневого каталога, подкаталоги
не поддерживаются. Напряжение на выходе: 5В.
Диапазон частот УКВ:
87,5—108МГц, 10 ячеек
памяти
Вход: 110—240В перем. тока,
50/60Гц, 0,5A
Выход: 9В пост. тока, 1500мА
Класс защиты: II
12. Гарантия
Мы предоставляем гарантию на дефекты материалов иизготовления на срок 24 месяца со дня
продажи через розничную сеть
Гарантия не распространяется:
•
на случаи ущерба, вызванного неправильным
использованием
•
на быстроизнашивающиеся части (лампочкиисточники света)
•
на дефекты, окоторых покупатель знал вмомент
покупки
•
на случаи собственной вины покупателя.
Товар сертифицирован: радиоприемник с функцией
будильника и мягкого пробуждения светом –
Срок эксплуатации изделия: мин. 5 лет
Фирма-изготовитель:
Бойрер Гмбх, Софлингер штрассе 218,
89077-УЛМ, Германия
Фирма-импортер:
OOO БОЙРЕР, 109451 г. Москва,
ул. Перерва, 62,корп.2, офис 3
Сервисный центр:
109451 г. Москва, ул. Перерва, 62,
корп.2, Тел(факс) 495–658 54 90
bts-service@ctdz.ru
Дата продажи _____________________________________
Подпись продавца _______________________________
Штамп магазина ___________________________________
Подпись покупателя_______________________________
51
Page 52

Q POLSKI
Należy dokładnie przeczytać i zachować niniejszą instrukcję obsługi,
przechowywać ją w miejscu dostępnym dla innych użytkowników
iprzestrzegać podanych w niej wskazówek.
Spis treści
1. Informacje ogólne .......................................................................................................................... 53
2. Objaśnienie symboli ...................................................................................................................... 53
3. Użytkowanie zgodne zprzeznaczeniem ...................................................................................... 53
4. Ostrzeżenia i wskazówki dotyczące bezpieczeństwa ................................................................ 53
5. Opis urządzenia ............................................................................................................................. 54
6. Uruchomienie ................................................................................................................................. 54
7. Ustawienia podstawowe ............................................................................................................... 54
7.1 Ustawianie godziny .................................................................................................................... 54
7.2 Ustawianie właściwości alarmu ................................................................................................. 55
7.3 Ustawienie jasności wyświetlacza ............................................................................................. 55
7.4 Ustawienie długości drzemki (snooze) ....................................................................................... 55
7.5 Włączanie/wyłączanie dźwięku przycisków ............................................................................... 55
8. Funkcje urządzenia ........................................................................................................................ 55
8.1 Ustawianie alarmu ..................................................................................................................... 55
8.1.1 Włączanie alarmu (ON) ...................................................................................................... 56
8.1.2 Ustawianie alarmu na dany dzień (DAY) ............................................................................ 56
8.1.3 Trwała dezaktywacja alarmu (OFF) ................................................................................... 56
8.2 Wyłączanie alarmu ..................................................................................................................... 56
8.2.1 Wyłączanie alarmu podczas wschodu słońca: ................................................................. 56
8.2.2 Trym drzemki (snooze) przy alarmie .................................................................................. 56
8.2.3 Wyłączanie alarmu przy sygnale dźwiękowym ................................................................. 56
8.3 Tryb AUX .................................................................................................................................... 56
8.4 Tryb USB .................................................................................................................................... 56
8.5 Tryb radiowy ............................................................................................................................... 57
8.6 Funkcja Dobranoc (Radio Sleep-Timer) ..................................................................................... 57
8.7 Funkcje światła...........................................................................................................................57
8.7.1 Lampa do czytania ............................................................................................................ 57
8.7.2 Funkcja zachodu słońca....................................................................................................57
8.7.3 Nastrojowe światło ze zmianą koloru ................................................................................ 57
8.8 Przywracanie ustawień fabrycznych .......................................................................................... 58
9. Czyszczenie/Przechowywanie .....................................................................................................58
10. Utylizacja ........................................................................................................................................ 58
11. Dane techniczne ............................................................................................................................ 58
Zawartość opakowania
•
Budzik świetlny z elastyczną anteną kablową
•
Zasilacz
•
Kabel AUX
•
Instrukcja obsługi
•
Uchwyt do smartfonu/ odtwarzacza MP3
52
Page 53

Szanowna Klientko, szanowny Kliencie!
Cieszymy się, że wybrali Państwo nasz produkt. Firma
Beurer oferuje dokładnie przetestowane produkty wysokiej jakości przeznaczone do pomiaru ciężaru, ciśnienia,
temperatury i tętna, a także przyrządy do łagodnej terapii,
masażu, zabiegów upiększających, inhalacji i ogrzewania.
Z poważaniem
Zespół Beurer
1. Informacje ogólne
Budzik świetlny WL 80 firmy Beurer umożliwia delikatną,
naturalną pobudkę. Powolne rozjaśnianie diod LED symuluje wschód słońca. W ten sposób można się powoli przyzwyczaić do warunków świetlnych, a ciało przygotowuje
się w tym czasie do przebudzenia. Dodatkowo można
ustawić dźwięk budzika, który rozlega się po symulacji
wschodu słońca i pomaga w budzeniu poprzez sygnał
akustyczny. Jako sygnał dźwiękowy można wybrać radio
lub różne dźwięki. Budzik świetlny WL 80 firmy Beurer
ułatwia delikatną i radosną pobudkę.
2. Objaśnienie symboli
Ostrzeżenie przed niebezpie-
OSTRZEŻENIE
UWAGA
Wskazówka
czeństwem obrażeń ciała lub
utraty zdrowia.
Ostrzeżenie przed niebezpieczeństwem uszkodzenia urządzenia lub akcesoriów.
Wskazówka z ważnymi informacjami.
Utylizacja zgodnie z dyrektywą
WE w sprawie zużytego sprzętu elektrycznego i elektronicznego– WEEE (Waste Electrical
and Electronic Equipment).
Producent
Niniejszy produkt spełnia wymagania obowiązujących dyrektyw
europejskich i krajowych.
3. Użytkowanie zgodne
zprzeznaczeniem
OSTRZEŻENIE
Urządzenie może być używane wyłącznie do celu w jakim
zostało zaprojektowane i w sposób określony w niniejszej
instrukcji obsługi. Każde niewłaściwe użycie może być
niebezpieczne. Producent nie ponosi odpowiedzialności
za szkody wynikłe z niewłaściwego użycia urządzenia.
4. Ostrzeżenia i wskazówki
dotyczące bezpieczeństwa
OSTRZEŻENIE
•
Urządzenie należy podłączać do napięcia sieciowego wyłącznie za pomocą dostarczonego zasilacza.
Napięcie musi być zgodne z napięciem sieciowym
podanym na zasilaczu.
•
Przed użyciem należy sprawdzić urządzenie i akcesoria
pod kątem widocznych uszkodzeń. W razie wątpliwości
należy przestać korzystać z urządzenia oraz zwrócić się
do przedstawiciela handlowego lub serwisu na podany
adres.
•
Urządzenie jest przeznaczone do stosowania tylko
wstrefie domowej/prywatnej, a nie do celów komercyjnych.
•
Urządzenie może być obsługiwane przez dzieci od
8 roku życia oraz osoby z ograniczoną sprawnością
fizyczną, ruchową i umysłową lub brakiem doświadczenia i wiedzy tylko wtedy, gdy znajdują się one pod
nadzorem lub otrzymały instrukcje dotyczące bezpiecznego korzystania z urządzenia i są świadome zagrożeń
wynikających z jego użytkowania.
•
Dzieciom nie wolno bawić się urządzeniem.
•
Czyszczenie i konserwacja urządzenia nie mogą być
przeprowadzane przez dzieci, chyba że znajdują się
one pod opieką osoby dorosłej.
•
Aby uniknąć niebezpieczeństwa, w przypadku uszkodzenia kabla zasilającego urządzenia jego wymianę
należy zlecić producentowi, w dziale obsługi klienta lub
odpowiednio wykwalifikowanemu fachowcowi.
•
W razie uszkodzeń lub niewłaściwego działania urządzenie należy natychmiast wyłączyć i odłączyć od zasilania.
•
Nie wkładać ani nie wyjmować zasilacza wilgotnymi
rękami.
•
Opakowanie należy przechowywać w miejscu niedostępnym dla dzieci (niebezpieczeństwo uduszenia).
•
Kabel sieciowy należy położyć tak, aby uniemożliwić
ewentualne potknięcie się o niego.
•
Urządzenie, zasilacz i przewód zasilający nie mogą mieć
kontaktu z wodą!
UWAGA
•
Urządzenie należy chronić przed wstrząsami, wilgocią,
zanieczyszczeniem, dużymi wahaniami temperatury
ibezpośrednim nasłonecznieniem.
•
Przyrząd należy chronić przed upadkiem.
53
Page 54

5. Opis urządzenia
3
2
5
1
1 Wyświetlacz 5 Przyciski +/2 Powierzchnia świetlna
3 Funkcja drzemki
(snooze) (dotknięcie
powierzchni świetlnej)
4 Pole przycisków
Przycisk alarmu /
Przycisk ►ǁ
Przycisk USB /
Przycisk
Przycisk Radio /
Przycisk ■
4
6 Przycisk świetlny
7 Uchwyt do smartfonu /
odtwarzacza MP3
7
6
Przycisk AUX /
Przycisk
Przycisk
Menu/Set
6. Uruchomienie
•
Zdejmij opakowanie.
•
Sprawdź, czy nie brakuje żadnych elementów
•
Sprawdź, czy urządzenie, zasilacz i kabel nie zostały
uszkodzone.
•
Ustaw urządzenie na równej i twardej powierzchni.
•
Podłącz złącze zasilacza do gniazda zasilacza z tyłu
urządzenia.
•
Podłącz wtyczkę sieciową do odpowiedniego gniazdka.
•
Na wyświetlaczu urządzenia pojawi się godzina.
•
Przełóż antenę kablową urządzenia do tyłu.
.
Mocowanie uchwytu do smartfonu
1.
Włóż cztery zaskakujące
haczyki uchwytu do czterech prostokątnych otworów
budzika świetlnego.
2.
Za pomocą palca wskazującego prawej ręki przyciśnij uchwyt w dół i przesuń
ostrożnie drugą ręką zgodnie
z kierunkiem strzałki, aż usłyszysz i wyczujesz, iż nastąpiło zatrzaśnięcie.
3.
W celu usunięcia należy przycisnąć odblokowanie przy
budziku świetlnym i przesunąć uchwyt ostrożnie
zgodnie z kierunkiem strzałki.
7. Ustawienia podstawowe
W ustawieniach podstawowych można kolejno ustawić
godzinę (
czasów alarmu (
jasność wyświetlacza (
(
SNOOZE
7.1 Ustawianie godziny
•
•
•
•
•
TIME
), właściwości alarmu dla ustawionych
ALARM 1, ALARM 2, ALARM 3
DISPLAY
) oraz dźwięk przycisków (
Na włączonym urządzeniu wciśnij przycisk Menu/Set.
Na wyświetlaczu zacznie migać „
wciśnij przycisk Menu/Set.
Na wyświetlaczu zacznie migać tryb godzinowy
„
24 Hr
”. Tryb godzinowy należy ustawić za pomocą
przycisków / (tryb 24-godzinny lub 12-godzinny).
Potwierdź za pomocą przycisku Menu/Set.
Na wyświetlaczu zacznie migać wskaźnik godziny.
Ustaw godziny za pomocą przycisków / . Potwierdź
za pomocą przycisku Menu/Set.
Na wyświetlaczu zacznie migać wskaźnik minut. Ustaw
minuty za pomocą przycisków / . Potwierdź za
pomocą przycisku Menu/Set.
Na wyświetlaczu zacznie migać wskaźnik dnia tygodnia. Ustaw dzień tygodnia za pomocą przycisków
/ . Potwierdź za pomocą przycisku Menu/Set.
Wskazówka
MON
= poniedziałek,
THU
= czwartek,
SUN
= niedziela.
TUE
FRI
= piątek,
), długość drzemki
BEEP
TIME
= wtorek,
SAT
).
”. Ponownie
WED
= środa,
= sobota,
),
54
Page 55

7.2 Ustawianie właściwości alarmu
Można wybrać budzenie za pomocą jednej z 8 melodii
budzenia, sygnału dźwiękowego, radia lub własnej
muzyki odtwarzanej z nośnika pamięci USB.
Dla ustawionych czasów alarmu (patrz rozdział 8.1) mona
ustawić następujące właściwości alarmu: sygnał dźwiękowy, głośność, czas trwania wschodu słońca, jasność
wschodu słońca.
Aby ustawić właściwości alarmu, należy postępować
zgodnie z poniższymi wskazówkami:
•
Na włączonym urządzeniu wciśnij przycisk Menu/Set.
TIME
Na wyświetlaczu zacznie migać „
•
Za pomocą przycisków / wybierz odpowiednią
pozycję pamięci alarmu (
ALARM 3
za pomocą przycisku Menu/Set.
•
Zacznie migać aktualnie ustawiony sygnał dźwiękowy
(np.
dany sygnał dźwiękowy. Potwierdź za pomocą przycisku Menu/Set.
SOUND 1-8
RADIO
USB
•
Zacznie migać głośność alarmu (
przycisków / ustaw odpowiednią głośność (od1do
10
•
Zacznie migać funkcja wchodu słońca (
pomocą przycisków / włącz (ON) lub wyłącz (
funkcję wschodu słońca. Potwierdź za pomocą przycisku Menu/Set.
Oprócz sygnału dźwiękowego w celu budzenia można
ustawić funkcję wschodu słońca. Funkcja wschodu
słońca jest symulacją rzeczywistego wschodu słońca.
Światło diody LED powoli staje się coraz jaśniejsze
przez ustawionym czasem budzenia.
•
W przypadku włączenia funkcji wschodu słońca,
zaczyna migać czas trwania wchodu słońca (10
Za pomocą przycisków / wybierz pożądany czas
trwania wschodu słońca przed czasem budzenia
(1,2,5, 10, 20 lub 30 minut). Potwierdź za pomocą
przycisku Menu/Set.
), którego funkcje chcesz ustawić. Potwierdź
BUZZ
). Za pomocą przycisków / wybierz pożą-
Wskazówka
BUZZ
= krótki sygnał dźwiękowy
= 8 różnych melodii budzenia
= radio
= poprzez podłączony nośnik pamięci USB
). Potwierdź za pomocą przycisku Menu/Set.
Wskazówka
ALARM 1, ALARM 2
”.
VOL
). Za pomocą
SUNRISE
). Za
OFF
MIN
lub
)
).
•
Na wyświetlaczu zacznie migać jasność wschodu
słońca (
20 LI
). Za pomocą przycisków / wybierz
pożądaną jasność wschodu słońca przed czasem
budzenia (5, 10, 15 lub 20). Potwierdź za pomocą
przycisku Menu/Set. Jeśli względnie szybko budzisz
się pod wpływem światła, zasadne jest zredukowanie
jasności.
7.3 Ustawienie jasności wyświetlacza
•
Na włączonym urządzeniu wciśnij przycisk Menu/Set.
TIME
Na wyświetlaczu zacznie migać „
•
Za pomocą przycisków / wybierz
Potwierdź za pomocą przycisku Menu/Set.
•
Zacznie migać aktualnie ustawiona jasność wyświetlacza (
3 DISPLAY
wybierz pożądaną jasność wyświetlacza (OFF, 1, 2
lub3). Potwierdź za pomocą przycisku Menu/Set.
Wskazówka
Po ustawieniu należy odczekać ok. 10 sekund, aż
pojawi się aktualnie ustawiona jasność wyświetlacza,
ponieważ po każdym wciśnięciu przycisku (także funkcji drzemki) wyświetlacza przez 10 sekund automatycznie świeci na najwyższym poziomie.
). Za pomocą przycisków /
”.
DISPLAY
7.4 Ustawienie długości drzemki (snooze)
•
Na włączonym urządzeniu wciśnij przycisk Menu/Set.
Na wyświetlaczu zacznie migać „
•
Za pomocą przycisków / wybierz
Potwierdź za pomocą przycisku Menu/Set.
•
Zaczyna migać długość drzemki (
Za pomocą przycisków / wybierz pożądaną
długość drzemki (1, 2, 5, 10, 20 lub 30 minut). Potwierdź
za pomocą przycisku Menu/Set.
TIME
”.
SNOOZE
5 MIN SNOOZE
).
7.5 Włączanie/wyłączanie dźwięku
przycisków
•
Na włączonym urządzeniu wciśnij przycisk Menu/Set.
Na wyświetlaczu zacznie migać „
•
Za pomocą przycisków / wybierz
Potwierdź za pomocą przycisku Menu/Set.
•
Za pomocą przycisków / włącz (ON) lub wyłącz
(
OFF
) dźwięk przycisków. Potwierdź za pomocą przy-
cisku Menu/Set.
TIME
”.
FEEDBACK
8. Funkcje urządzenia
8.1 Ustawianie alarmu
Urządzenie dysponuje trzema miejscami pamięci
alarmów, które można ustawiać w różny sposób.
.
.
.
55
Page 56

8.1.1 Włączanie alarmu (ON)
1.
Na włączonym urządzeniu wciskaj tak długo przycisk
ALARM, aż na wyświetlaczu pojawi się pożądane
miejsce pamięci alarmu (
Przyciskaj przyciski / tak długo, aż na wyświetlaczu
2.
pojawi się
3.
Wciśnij przycisk Menu/Set. Na wyświetlaczu zacznie
ON.
A1, A2
lub A3).
migać wskaźnik godziny alarmu. Za pomocą przycisków / ustaw godzinę i potwierdź przyciskiem
Menu/Set.
Na wyświetlaczu zacznie migać wskaźnik minut alarmu.
4.
Za pomocą przycisków / ustaw minuty i potwierdź
przyciskiem Menu/Set.
Na wyświetlaczu pojawi się na krótko symbol
5.
END.
Ustawiony alarm jest obecnie aktywowany i pojawia
się na wyświetlaczu.
8.1.2 Ustawianie alarmu na dany dzień (
Za pomocą funkcji
DAY
dla każdego ustawionego alarmu
DAY
)
można dodatkowo zdefiniować, w jakie dni tygodnia
alarm powinien się włączyć.
1.
Na włączonym urządzeniu wciskaj tak długo przycisk
ALARM, aż na wyświetlaczu pojawi się pożądane
miejsce pamięci alarmu (
2.
Przyciskaj przyciski / tak długo, aż na wyświetlaczu
pojawi się
3.
Wciśnij przycisk Menu/Set. Na wyświetlaczu pojawi się
symbol
DAY.
MON
(poniedziałek) oraz
A1, A2
lub A3).
off.
4. Za pomocą przycisków / aktywuj (on) lub dezaktywuj (
off
) alarm dla poniedziałku. Potwierdź za
pomocą przycisku Menu/Set.
5.
Na wyświetlaczu pojawi się symbol
TUE
(wtorek).
Pozostałe dni tygodnia ustaw zgodnie z opisem
wpoprzednim punkcie dla poniedziałku. Następnie
ustaw czas alarmu zgodnie z opisem w rozdziale 8.1.1.
8.2 Wyłączanie alarmu
8.2.1 Wyłączanie alarmu podczas wschodu słońca:
Przy włączonej funkcji wschodu słońca urządzenie
zaczyna powoli świecić przed ustawionym czasem
alarmu i na wyświetlaczu pojawia się „SUNRISE”. Ten
wschód słońca mona wyłączyć poprzez wciśnięcie
dowolnego przycisku. Mimo to w ustawionym czasie
alarmu rozlegnie się sygnał dźwiękowy.
8.2.2 Trym drzemki (snooze) przy alarmie
Urządzenie jest wyposażone w tryb drzemki (snooze).
Kiedy rozlegnie się alarm i wciśnięta zostanie funkcja
Snooze (dotknięcie powierzchni świetlnej), po upływie
ustawionej długości drzemki (patrz rozdział 7.4) alarm
zabrzmi ponownie.
8.2.3 Wyłączanie alarmu przy sygnale dźwiękowym
Kiedy rozlegnie się alarm, wciśnij dowolny przycisk
oprócz Snooze. Alarm zostanie wówczas wyłączony
irozlegnie się ponownie dopiero w ustawionym czasie
alarmu.
8.3 Tryb AUX
Za pomocą wejścia AUX można podłączyć do budzika
świetlnego zewnętrzne źródło plików audio (np. odtwarzacz MP3, smarfon lub odtwarzacz CD).
1.
Podłącz zawarty w pakiecie dostawy kabel AUX do
źródła plików audio.
2.
Drugą końcówkę kabla AUX należy podłączyć do urządzenia od tylnej strony.
3.
Wciśnij przycisk AUX na urządzeniu. Zewnętrzne
źródło plików audio jest obecnie połączone z budzikiem świetlnym.
4.
Za pomocą bocznych przycisków +/- wyreguluj
głośność.
5. Aby opuścić tryb AUX, wciśnij przycisk ■.
6. Po użyciu kabel AUX należy usunąć.
8.1.3 Trwała dezaktywacja alarmu (
OFF
)
Aby trwale dezaktywować ustawiony alarm, należy
wykonać następujące czynności:
1.
Na włączonym urządzeniu wciskaj tak długo przycisk
ALARM, aż na wyświetlaczu pojawi się pożądane
miejsce pamięci alarmu (
2.
Przyciskaj przyciski / tak długo, aż na wyświetlaczu
A1, A2
lub A3)
.
pojawi się OFF.
3. Potwierdź za pomocą przycisku Menu/Set.
4. Na wyświetlaczu pojawi się symbol END. Alarm został
trwale dezaktywowany.
8.4 Tryb USB
Do budzika świetlnego można podłączyć za pomocą
wejścia USB nośnik pamięci USB (maks. do 32 GB), aby
słuchać muzyki. Urządzenie może odtwarzać następujące
formaty plików: MP3, WMA oraz WAV.
Wskazówka
Urządzenie może odtwarzać tylko pliki muzyczne, które
są przechowywane w katalogu głównym. Pliki muzyczne, które znajdują się w katalogach podrzędnych, nie
mogą być przez urządzenie odtwarzane.
Jeśli chcesz użyć trybu USB, postępuj zgodnie z poniższymi wskazówkami.
56
Page 57

1.
Umieść nośnik pamięci USB w wejściu USB budzika
świetlnego (znajduje się na tylnej ścianie urządzenia).
2. Po umieszczeniu nośnika pamięci: Na włączonym
urządzeniu wciśnij przycisk USB. Na wyświetlaczu
pojawią się: „USB”, aktualny numer oraz czas trwania
utworu.
3.
Aby przejść do kolejnego utworu, wciśnij przycisk .
Aby przejść do poprzedniego utworu, wciśnij przycisk
. Aby zatrzymać odtwarzanie, wciśnij przycisk ►ǁ. Aby
zmieniać pomiędzy trybem „zwykłego odtwarzania”,
„powtarzaniem odtwarzania” (P) oraz „powtarzaniem
odtwarzania wszystkich utworów” (P
ALL
), wciskaj
przycisk Menu/Set.
4.
Za pomocą bocznych przycisków +/- wyreguluj
głośność.
5. Aby zakończyć tryb USB, użyj przycisku ■.
8.5 Tryb radiowy
Za pomocą urządzenia można także słuchać radia.
Jeśli chcesz użyć trybu radiowego, postępuj zgodnie
zponiższymi wskazówkami.
1.
Na włączonym urządzeniu wciśnij przycisk FM. Na
wyświetlaczu pojawi się aktualna częstotliwość
nadawcza oraz numer programu (np. P1).
2.
Za pomocą przycisków / wybierz pożądany numer
programu (np.
P1
lub P2), pod którym stacja nadawcza
powinna zostać zapamiętana.
3.
Przytrzymaj wciśnięty przycisk , aby uruchomić
automatyczne wyszukiwanie stacji nadawczych. Aby
zapamiętać stację nadawczą pod wybranym numerem
programu (np. P1), wciśnij przycisk Menu/Set.
4.
Aby zmieniać zapamiętane stacje nadawcze, używaj
przycisków / .
8.6 Funkcja Dobranoc (Radio Sleep-Timer)
W przypadku włączenia trybu radia, można dodatkowo
włączyć funkcję Dobranoc.
Za pomocą funkcji Dobranoc można ustawić, po ilu minutach radio powinno wyłączyć się automatycznie.
Jeśli chcesz użyć funkcji Dobranoc, postępuj zgodnie
zponiższymi wskazówkami:
1.
Na włączonym urządzeniu wciśnij przycisk FM, aby
przejść do trybu radiowego.
2. Wciśnij przycisk Menu/Set, a na wyświetlaczu pojawi
się informacja
3.
Za pomocą przycisku Menu/Set ustaw pożądany czas,
po którym radio powinno się wyłączyć automatycznie
(2, 5, 10, 15, 20, 30, 45 lub 60 minut). Aby potwierdzić
wybór, odczekaj 5 sekund. Następnie na wyświetlaczu
automatycznie pojawi się mały symbol .
2 MIN sleep
.
8.7 Funkcje światła
8.7.1 Lampa do czytania
1. Na włączonym urządzeniu wciśnij przycisk Light.
2.
Światło zaczyna świecić się, a na wyświetlaczu pojawia
się informacja
ustaw odpowiednią jasność światła (dowolnie od 1
do20).
3.
Aby wyłączyć światło, wciskaj przycisk Light do chwili,
aż na wyświetlaczu pojawi się opcja „
8.7.2 Funkcja zachodu słońca
Za pomocą urządzenia można przedstawić także symulację zachodu słońca. W tym przypadku światło po ustawionym czasie będzie powoli ściemniać się.
Aby za pomocą urządzenia przedstawić symulację
zachodu słońca, postępuj zgodnie z poniższymi wskazówkami:
1.
Na włączonym urządzeniu wciśnij boczny przycisk
Light.
2.
Światło włącza się, na wyświetlaczu pojawia się
20 light
bocznych przycisków +/- pożądaną jasność światła
(dowolnie od 1 do 20). Potwierdź przyciskiem Light.
Nawyświetlaczu pojawi się informacja
3. Za pomocą bocznych przycisków +/- ustaw pożądany
czas trwania zachodu słońca (2, 5, 10, 15, 20, 30, 45
lub 60 minut). Następnie należy odczekać 5 sekund.
Funkcja zachodu słońca jest następnie automatycznie
aktywowana i na wyświetlaczu pojawia się mały symbol
. Światło wyłączy się teraz automatycznie po upływie
ustawionego czasu trwania zachodu słońca.
Wskazówka
Zachód słońca z muzyką
Za pomocą urządzenia można przedstawić także
symulację zachodu słońca i słuchać w tym czasie
muzyki. W tym przypadku światło po ustawionym
czasie będzie powoli ściemniać się. Muzyka wyłącza
się automatycznie po upływie ustawionego czasu.
Aby za pomocą urządzenia przedstawić symulację
zachodu słońca z muzyką, postępuj zgodnie
zponiższymi wskazówkami:
1.
Na włączonym urządzeniu wybierz odpowiednie
źródło muzyki (USB, radio (FM) lub AUX).
2.
Wykonaj kolejne kroki zgodnie z opisem w części
„8.7.2 Funkcja zachodu słońca”.
8.7.3 Nastrojowe światło ze zmianą koloru
Urządzenie może być również używane także jako nastrojowe oświetlenie ze zmianą koloru.
20 light
. Za pomocą przycisków +/-
LIGHT off
”.
i zaraz po tym należy ustawić za pomocą
10 sunset
.
57
Page 58

1. Na włączonym urządzeniu wciśnij trzykrotnie przycisk
Light.
2.
Na wyświetlaczu pojawi się informacja
3.
Jeśli podczas zmiany koloru zechcesz, aby kolorowe
światło było wyświetlane stale, możesz ustawić to
poprzez wciśnięcie przycisku Light. Na wyświetlaczu
pojawi się informacja
4.
Aby całkowicie wyłączyć światło, wciśnij ponownie
przycisk Light.
LIGHT fixed
LIGHT change
.
.
8.8 Przywracanie ustawień fabrycznych
Jeśli chcesz przywrócić w budziku świetlnym wszystkie
ustawienia fabryczne, postępuj zgodnie z poniższymi
wskazówkami:
1.
Należy odłączyć zasilacz budzika świetlnego od
gniazda sieciowego.
2.
Przytrzymaj wciśnięte oba przyciski Menu/Set oraz
Light na wyłączonym urządzeniu i podłącz zasilacz
budzika świetlnego do gniazda sieciowego.
3.
W urządzeniu zostały przywrócone ustawienia
fabryczne.
9. Czyszczenie/Przechowywanie
•
Urządzenie należy czyścić suchą ściereczką.
•
Nie należy używać środków czyszczących do szorowania.
•
Nie wolno dopuścić, aby woda dostała się do wnętrza
urządzenia. Wrazie zmoczenia urządzenia można go
użyć ponownie dopiero po całkowitym osuszeniu.
•
Nie zanurzać urządzenia ani zasilacza w wodzie lub
innych cieczach.
•
Chronić urządzenie przed wstrząsami, wilgocią,
kurzem, chemikaliami, dużymi wahaniami temperatury
i zbyt blisko znajdującymi się źródłami ciepła (np. piec,
grzejnik).
10. Utylizacja
Ze względu na ochronę środowiska po zakończeniu użytkowania urządzenia nie wolno wyrzucać z odpadami
domowymi. Utylizację należy zlecić w odpowiednim punkcie zbiórki w danym kraju. Podczas
utylizacji należy przestrzegać lokalnych przepisów
dotyczących utylizacji materiałów. Urządzenie
należy zutylizować zgodnie z dyrektywą o zużytych urządzeniach elektrycznych i elektronicznych – WEEE (Waste
Electrical and Electronic Equipment). W razie pytań należy
zwrócić się do odpowiedniej instytucji odpowiedzialnej
za utylizację.
11. Dane techniczne
Natężenie
oświetlenia
Światło Technologia LED
Poziomy światła
Oświetlenie nastrojowe
Funkcja zastosowania światła
podczas budzenia
Funkcja wschodu
słońca
Długość drzemki 1, 2, 5, 10, 20, 30 minut
Funkcja zachodu
słońca
Funkcja Dobranoc
(Sleep Radio)
Oświetlenie LCD
w tle
Godzina
Alarm
Dźwięk
przycisków
AUX Line-In, 3,5 mm wtyczka Jack
USB
Radio
Głośnik 2 Watt
Napięcie zasilania
zasilacza
Klasa ochronności zasilacza
Prawo do zmian technicznych zastrzeżone.
Maksymalnie ok. 2500 luksów
(przy 15 cm odległości)
20 poziomów światła z symulacją
świtu
Automatyczna zmiana kolorów
RGB z indywidualnym ustawieniem koloru
Wył., 2, 5, 10, 15, 20, 30, 45,
60minut przed alarmem
Maksymalna siła światła do chwili
alarmu: Poziom światła 5, 10,
15, 20
2, 5, 10, 15, 20, 30, 45, 60 minut
2, 5, 10, 15, 20, 30, 45, 60 minut
Wył., 1, 2, 3
Możliwość zmiany trybu 12h /
24h, bufor 15 minut przy awarii
prądu
3 czasy alarmu (Wył., Wł., Dzień)
Sygnał dźwiękowy, 8 tonów,
radio, MP3 za pomocą nośnika
pamięci USB
Wył., Wł.
Odtwarzanie z nośnika pamięci
USB, maksymalnie 32 GB.
Formaty plików: MP3, WMA,
WAV, maksymalnie 9999 plików,
odczyt możliwy tylko z katalogu
głównego, niemożliwy z podkatalogów. Napięcie wyjściowe 5 V
Zakres częstotliwości UKW
87,5–108 MHz, 10 miejsc
pamięci
Wejście: 110-240 V, AC,
50/60Hz, 0,5 A
Wyjście: 9 V, DC, 1500mA
Klasa ochronności II
58
Page 59

59
Page 60

60
751.692-0814_WL80_Irrtum und Änderungen vorbehalten
 Loading...