

Page 1
HTE 50
r
Q
O
P
K
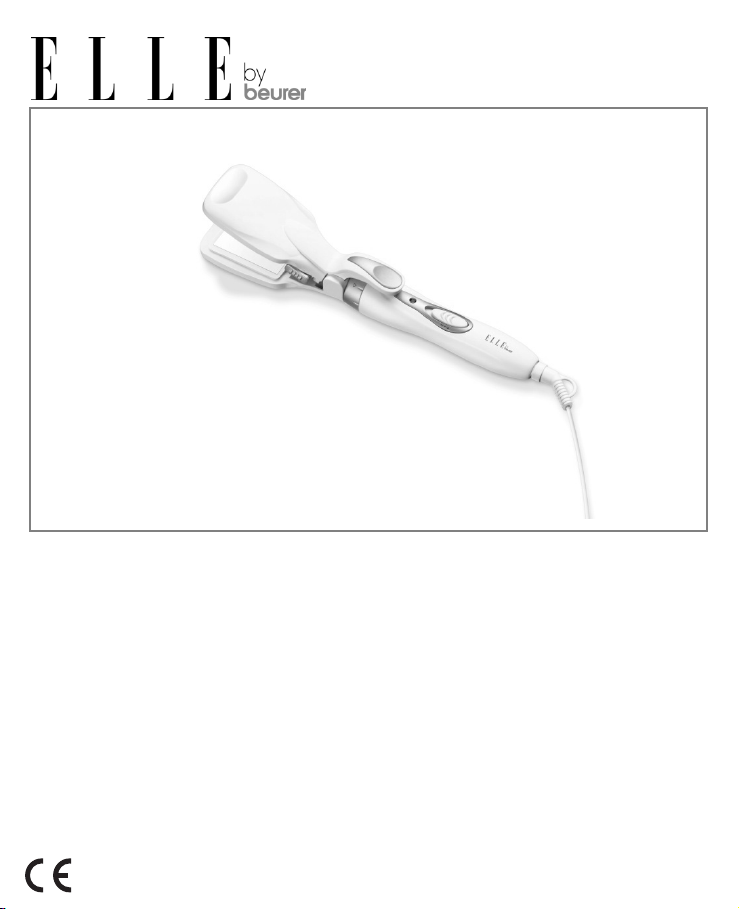
Multifunktionsstyler
D
Gebrauchsanweisung ................ 2 - 13
Multi-function styler
G
Operating instructions .............. 14 - 24
Fer multifonctions
F
Mode d'emploi .......................... 25 - 36
Moldeador multifunción
E
Instrucciones de uso ................ 37 - 48
Styler multifunzione
I
Istruzioni per l'uso .................... 49 - 60
Çok fonksiyonlu şekillendirici
T
Kullanım kılavuzu ..................... 61 - 71
Мультистайлер для волос
Инструкция по применению ...72 - 84
Wielofunkcyjne urządzenie do stylizacji włosów
Instrukcja obsługi ......................85 - 96
Multifunctionele styler
Gebruiksaanwijzing ................97 - 108
Modelador de cabelos multifuncional
Instruções de utilização ........109 - 119
Styler πολλαπλών λειτουργιών
Οδηγίες χρήσεως..................120 - 131
Page 2

D Deutsch
Inhalt
1 Zum Kennenlernen ................................... 2
2 Zeichenerklärung ...................................... 3
3 Bestimmungsgemäßer Gebrauch ............. 3
4 Sicherheitshinweise für Ihre Gesundheit .. 3
5 Gerätebeschreibung ................................. 5
6 Bedienen .................................................. 7
7 Gerät reinigen und pflegen ..................... 11
8 Technische Daten ................................... 12
9 Entsorgen ............................................... 12
10 Garantie und Service .............................. 13
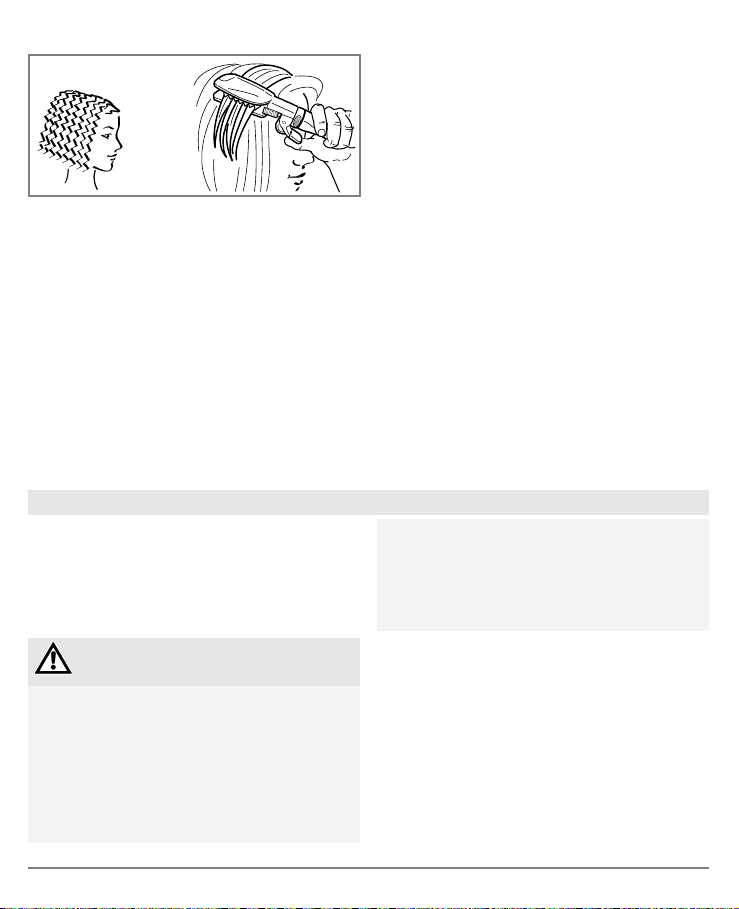
1 Zum Kennenlernen
Mit dem Multifunktionsstyler können Sie Ihre
Haare in die unterschiedlichsten Formen
bringen und für jede Gelegenheit Ihren
individuellen Look kreieren.
Das 360° Drehgelenk am Netzkabel
ermöglicht eine flexible Handhabung des
Multifunktionsstylers.
Das Easy Lock System ermöglicht ein
schnelles Wechseln der Aufsätze.
Die Keramik-Beschichtung des Krepp- und
Glätteisens sorgt für eine gleichmäßige
Lieferumfang
• Multifunktionsstyler
• Glätteisen
• Kreppeisen
• großer Lockenstab
• kleiner Lockenstab
• flacher Lockenstab
• Spiralaufsatz
• Bürstenaufsatz
• Diese Gebrauchsanleitung
Wärmeverteilung und eine glatte
Oberflächenstruktur. Dies sorgt für ein
schonendes Styling Ihrer Haare.
Das Gerät ist nur für den in dieser
Gebrauchsanleitung beschriebenen Zweck
vorgesehen.
Der Hersteller kann nicht für Schäden haftbar
gemacht werden, die durch unsachgemäßen
oder leichtsinnigen Gebrauch entstehen.
2
Page 3
2 Zeichenerklärung
Folgende Symbole werden in der Gebrauchsanleitung bzw. auf dem Gerät verwendet.
Gefahr Das Gerät darf nicht in der Nähe von Wasser oder im Wasser
Warnung Warnhinweis auf Verletzungsgefahren oder Gefahren für Ihre
Achtung Sicherheitshinweis auf mögliche Schäden am Gerät/Zubehör.
Hinweis Hinweis auf wichtige Informationen.
(z. B. Waschbecken, Dusche, Badewanne) verwendet werden –
Gefahr eines Stromschlags!
Gesundheit.
3 Bestimmungsgemäßer Gebrauch
Der Multifunktionsstyler darf ausschließlich
zum Formen und Stylen der Haare in
Eigenanwendung für den Privatgebrauch
verwendet werden!
Warnung
Verwenden Sie das Gerät ausschließlich:
• zur äußerlichen Anwendung
• für den Zweck, für den es entwickelt wurde
und auf die in dieser Gebrauchsanleitung
angegebenen Art und Weise.
Jeder unsachgemäße Gebrauch kann
gefährlich sein!
Das Gerät trägt die CE-Kennzeichnung und
entspricht folgenden EU-Richtlinien:
• 2006/95/EC Niederspannungsrichtlinie
• 2004/108/EC EMV-Richtlinie
4 Sicherheitshinweise für Ihre Gesundheit
Warnung
Um gesundheitlichen Schäden vorzubeugen,
wird in folgenden Fällen von dem Gebrauch
des Gerätes dringend abgeraten:
• Bei einer sichtbaren Beschädigung des
Geräts, des Netzkabels/-steckers oder des
Zubehörs. Benutzen Sie es im Zweifelsfall
nicht und wenden Sie sich an Ihren
Händler oder an die angegebene
Kundendienstadresse.
Um gesundheitlichen Schäden
vorzubeugen, folgende Punkte beachten:
• Personen (einschließlich Kinder), die
aufgrund ihrer physischen, sensorischen
oder geistigen Fähigkeiten oder ihrer
Unerfahrenheit oder Unkenntnis nicht in
der Lage sind, das Gerät sicher zu
benutzen, dürfen dieses Gerät nicht ohne
Aufsicht oder Anweisung durch eine
verantwortliche Person benutzen.
• Kinder müssen beim Benutzen des Geräts
beaufsichtigt werden.
3
Page 4

• Kabel nur am Netzstecker aus der
Steckdose ziehen.
• Als zusätzlichen Schutz wird die Installation
einer Fehlerstrom-Schutzeinrichtung RCD
mit einem Bemessungsauslösestrom von
nicht mehr als 30 mA im Stromkreis des
Badezimmers empfohlen. Informationen
dazu erhalten Sie bei Ihrem örtlichen
Elektro-Fachbetrieb.
• Benutzen Sie keine Zusatzteile, die nicht
vom Hersteller empfohlen bzw. als Zubehör
angeboten werden.
• Achten Sie darauf, dass sich in der Nähe
des Gerätes keine leicht entzündlichen
Flüssigkeiten befinden.
• Legen sie das Gerät nur auf einer nicht
brennbaren Unterlage ab.
• Verwenden Sie das Gerät nicht an
Kunsthaaren – Brandgefahr!
• Das Gerät darf nicht abgedeckt werden –
Brandgefahr!
• Sie dürfen das Gerät keinesfalls öffnen
oder reparieren, da sonst eine einwandfreie
Funktion nicht mehr gewährleistet ist. Bei
Nichtbeachten erlischt die Garantie.
• Lassen Sie das Gerät im Falle einer
Störung oder Beschädigung durch eine
qualifizierte Fachwerkstatt reparieren.
• Wenn das Gerät heruntergefallen ist oder
anderweitige Schäden davongetragen hat,
darf es nicht mehr benutzt werden.
• Verwenden Sie keine Verlängerungskabel
im Badezimmer, damit im Notfall der
Netzstecker schnell zu erreichen ist.
• Das Gerät während des Gebrauchs nie
unbeaufsichtigt lassen.
• Benutzen Sie das Gerät nicht im Freien.
• Wenn Sie das Gerät an Dritte weitergeben,
müssen Sie diese Gebrauchsanleitung
mitgeben.
Gefahr
• Benutzen Sie das Gerät niemals in der
Nähe von Badewannen, Waschbecken,
Duschen oder anderen Gefäßen die
Wasser oder andere Flüssigkeiten
beinhalten – Gefahr eines Stromschlags!
• Sollte das Gerät trotz aller
Vorsichtsmaßnahmen in das Wasser fallen,
dann ziehen Sie sofort den Netzstecker
aus der Steckdose! Greifen Sie nicht in das
Wasser!
• Lassen Sie das Gerät vor erneutem
Gebrauch von einer autorisierten
Fachwerkstatt überprüfen! Lebensgefahr
durch Stromschlag!
• Tauchen Sie das Gerät niemals in Wasser
oder eine andere Flüssigkeit!
Vor der Inbetriebnahme
Warnung
• Halten Sie Kinder von
Verpackungsmaterialien fern –
Erstickungsgefahr!
• Vor Gebrauch des Gerätes ist jegliches
Verpackungsmaterial zu entfernen.
• Schließen Sie das Gerät nur an eine
Steckdose mit der auf dem Typenschild
angegebenen Spannung an.
• Erfragen Sie die Netzspannung des
jeweiligen Ortes, wenn sie Ihnen
unbekannt ist.
4
Page 5

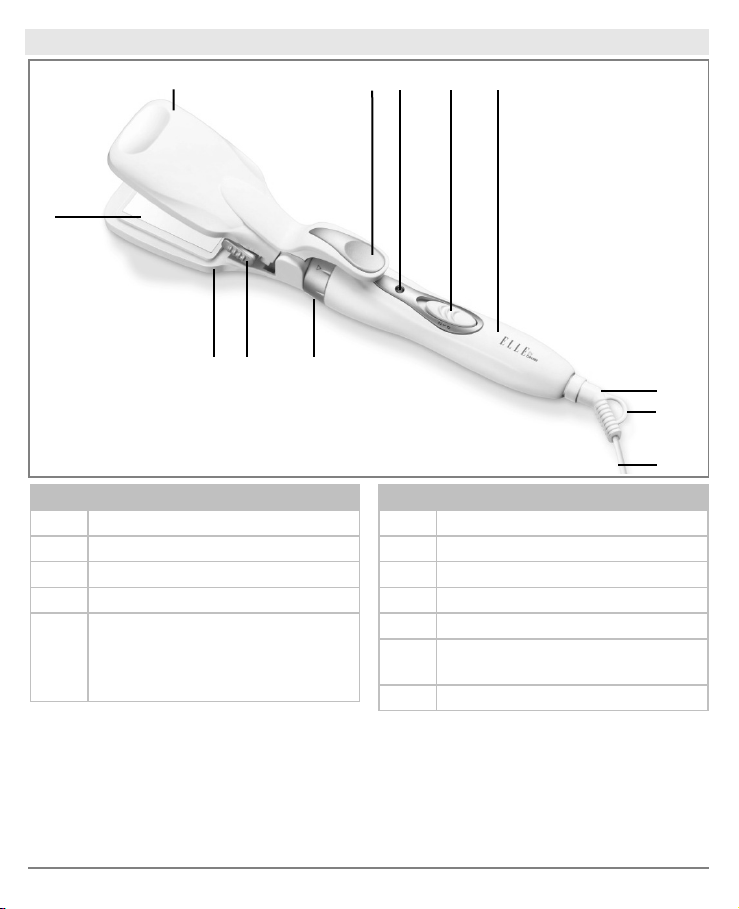
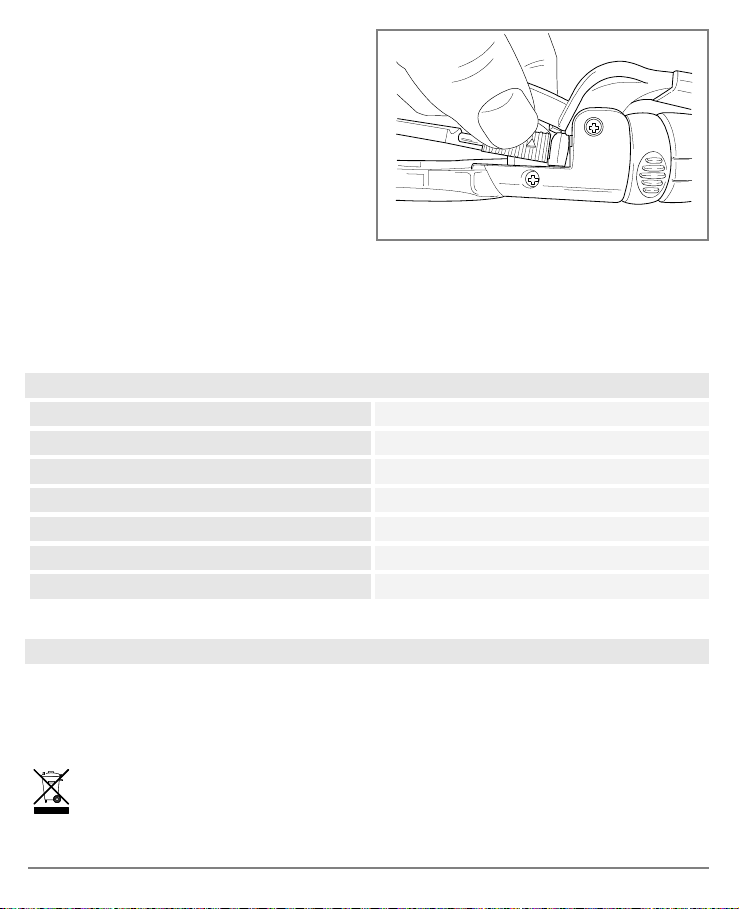
5 Gerätebeschreibung
2 3 4 5 6
1
12 11 10
Pos Benennung
1 Keramik beschichtete Heizplatte
2 Klappe
3 Hebel zum Öffnen der Klappe
4 Betriebs-Kontrollleuchte
5 Schiebeschalter für die Heizstufen:
0 Aus
1 niedrige Stufe
2 hohe Stufe
Pos Benennung
6 Griff
7 360° Drehgelenk
8 Knickschutz mit Aufhängeöse
9 Netzkabel
10 Verriegelungsring
11
Wahlschalter für die Funktion des
Glätt/Krepp-Eisens [F, G]
12 Glätt/Krepp-Aufsatz
7
8
9
5
Page 6

A B C
13 13 13
D E F G
Pos Benennung
A
Großer Lockenstab für voluminöse
Locken
B Kleiner Lockenstab für sanfte Locken
C
Flacher Lockenstab für gekreppte
Locken
D Spiralaufsatz für Korkenzieherlocken
6
Pos Benennung
E
F Kreppeisen für gekreppte Wellen
G Glätteisen für glatte Haare
13 Aufstellbügel
Bürstaufsatz für geschmeidige
Wellen
Page 7

6 Bedienen
Achtung
• Entwirren Sie das Netzkabel [9] wenn es
verdreht ist.
• Ziehen, verdrehen und knicken Sie das
Netzkabel [9] nicht bzw. ziehen oder legen
Sie es nicht über/auf scharfe, spitze
Gegenstände oder heiße Oberflächen.
• Klemmen Sie das Netzkabel [9] nicht in
z. B. Schubladen, Türen oder zwischen
den Heizplatten [1, 2] ein.
Warnung
• Stellen Sie sich auf einen trockenen,
elektrisch nicht leitfähigen Untergrund.
• Stellen Sie sicher, dass Ihre Hände trocken
sind!
• Ihre Haare müssen trocken sein!
• Das Gerät kann je nach
Temperatureinstellung und
Gebrauchsdauer sehr heiß werden. Fassen
Sie es im heißen Zustand nur am Griff [6]
an – Verbrennungs- und Brandgefahr!
• Berühren Sie die Heizplatten [1, 2] nicht!
• Berühren Sie die Aufsätze nicht, solange
sie noch heiß sind!
• Klemmen Sie keine Gegenstände zwischen
den Heizplatten [1, 2] und dem Heizrohr
und der Lockenzange ein.
• Schalten Sie das Gerät sofort aus, wenn es
defekt ist oder Betriebsstörungen vorliegen.
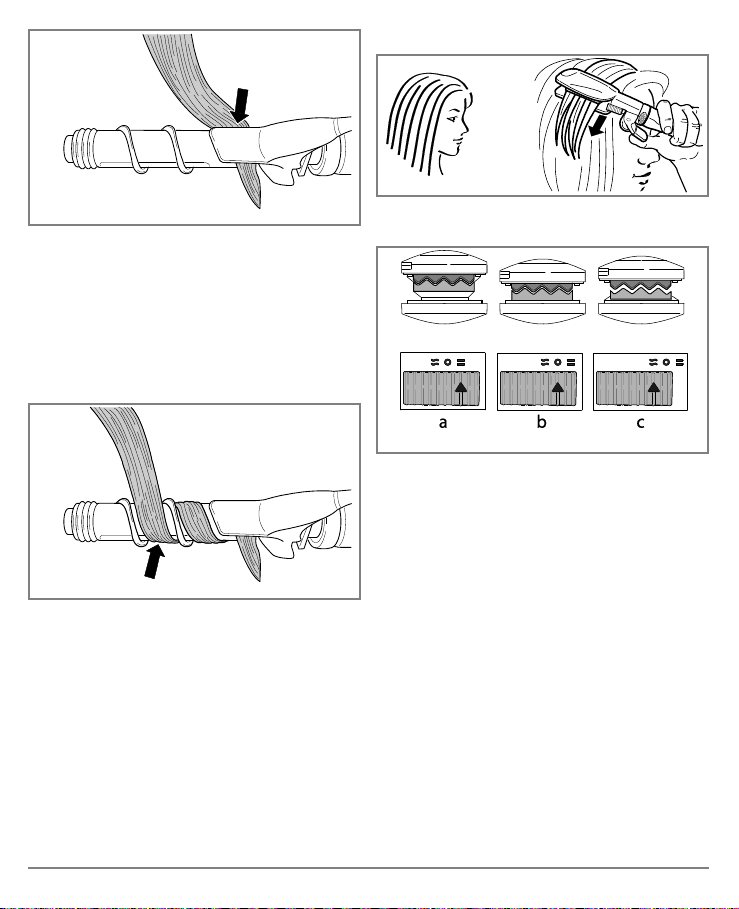
Aufsätze wechseln
Warnung
• Lassen Sie den aufgesteckten Aufsatz vor
dem Abbauen immer abkühlen –
Verbrennungsgefahr!
• Wählen Sie den für die zu stylende Frisur
passenden Aufsatz [12, A, B, C] aus.
• Drehen Sie den Verriegelungsring [10] bis
zum Anschlag im Uhrzeigersinn. Der
aufgesteckte Aufsatz wird entriegelt.
• Ziehen Sie den Aufsatz vom Griff [6] ab.
• Richten Sie den ausgewählten Aufsatz, wie
in der Grafik gezeigt, aus.
• Schieben Sie den ausgewählten Aufsatz,
ohne die beiden Metallstifte zu verkanten,
vorsichtig in den Griff [6].
• Drehen Sie den Verriegelungsring [10] bis
zum Anschlag gegen den Uhrzeigersinn.
Der Aufsatz wird verriegelt.
• Prüfen Sie, ob der Aufsatz fest mit dem Griff
verbunden ist.
7
Page 8
• Legen Sie den Multifunktionsstyler oder
stellen Sie den Multifunktionsstyler mit dem
ausgeklappten Aufstellbügel [13] auf eine
stabile, waagrechte und nicht brennbare
Unterlage oder halten Sie den
Multifunktionsstyler in der Hand.
Temperatur einstellen
Die Temperatur kann mit dem Schiebeschalter
[5] in zwei Stufen eingestellt werden. Wir
empfehlen folgende Temperatureinstellung:
Stufe Haartyp
1: niedrig
2: hoch Normales und starkes Haar
Hinweis
• Je höher die gewählte Temperatur ist,
desto rascher erhalten Sie das gewünschte
Ergebnis.
• Wählen Sie mit dem Schiebeschalter [5] die
gewünschte Temperaturstufe.
• Der Multifunktionsstyler ist nach einigen
Minuten betriebsbereit.
Feines, brüchiges, gefärbtes
oder blondiertes Haar
Haare formen
Haare vorbereiten
• Trocknen Sie Ihr Haar vollständig, bevor Sie
den Multifunktionsstyler verwenden.
• Das Haar sollte sauber und frei von
Stylingprodukten sein.
• Kämmen Sie Ihr Haar mit einem grob
gezahnten Kamm um es zu entwirren.
Locken/Wellen formen
Sie können die Haare mit den Lockenstäben
[A, B, C] formen:
• Teilen Sie das Haar in einzelne Strähnen
mit einer Breite von circa 2 Zentimetern ein.
Halten Sie die Strähne straff.
• Drücken Sie auf den Hebel des
Lockenstabs um die Lockenzange zu
öffnen.
• Legen Sie die Haarsträhne mit der
Haarspitze zwischen das Heizrohr und die
Lockenzange des Lockenstabs.
• Schließen Sie die Lockenzange um die
Haarsträhne zu fixieren.
• Wickeln Sie die Strähne in Richtung Kopf
auf den Lockenstab.
• Lassen Sie den Lockenstab für circa 8 bis
10 Sekunden im Haar. So erhalten Sie
beste Ergebnisse, ohne die Haare zu sehr
zu strapazieren bzw. zu beschädigen.
• Öffnen Sie die Lockenzange und ziehen Sie
das Heizrohr vorsichtig aus der Locke.
Haarspitzen formen
• Legen Sie die Haarsträhne mit der
Haarspitze zwischen das Heizrohr und die
Lockenzange des Lockenstabs.
• Schließen Sie die Lockenzange um die
Haarsträhne zu fixieren
• Sie können die Haarspitzen formen, indem
Sie den Lockenstab entsprechend nach
außen oder innen drehen, bevor Sie ihn
über die Haarspitzen nach außen ziehen.
8
Page 9
Bürstaufsatz verwenden
Spiralaufsatz verwenden
Sie können den Bürstaufsatz [E] mit dem
Lockenstab [B] verwenden:
• Prüfen Sie, ob der Lockenstab [B] abgekühlt
ist.
• Schieben Sie den Bürstaufsatz [E] mit der
Einkerbung nach oben vorsichtig bis zum
Anschlag auf den kalten Lockenstab [B].
• Teilen Sie das Haar in einzelne Strähnen
ein. Halten Sie die Strähne straff.
• Wickeln Sie die Haarsträhne auf die Bürste.
• Warten Sie circa 10 Sekunden, bevor Sie
die Haarsträhne wieder abwickeln.
Sie können den Spiralaufsatz [D] mit dem
Lockenstab [A] verwenden:
• Prüfen Sie, ob der Lockenstab [A] abgekühlt
ist.
• Schieben Sie den Spiralaufsatz [D] mit den
Riffeln auf dem Aufsatz nach oben bis zur
Mitte über den geschlossenen, abgekühlten
Lockenstab [A].
• Drücken Sie auf den Hebel des
Lockenstabs um die Lockenzange zu
öffnen.
• Schieben Sie den Spiralaufsatz [D]
vorsichtig bis zum Anschlag auf den kalten
Lockenstab [A].
• Schließen Sie die Lockenzange.
• Teilen Sie das Haar in einzelne Strähnen
ein. Halten Sie die Strähne straff.
9
Page 10
• Drücken Sie auf den Hebel des
Lockenstabs [A] um die Lockenzange zu
öffnen.
• Legen Sie die Haarsträhne mit der
Haarspitze zwischen das Heizrohr und die
Lockenzange des Lockenstabs [A].
• Schließen Sie die Lockenzange um die
Haarsträhne zu fixieren.
Glätteisen verwenden
• Stecken Sie den Glätt/Krepp-Aufsatz [12]
auf den Multifunktionsstyler.
• Wickeln Sie die Strähne in Richtung Kopf
um den Spiralaufsatz [D]. Achten Sie
darauf, dass die Haarsträhne wie in der
Abbildung gezeigt aufgewickelt wird.
• Warten Sie circa 10 Sekunden, bevor Sie
die Haarsträhne wieder abwickeln.
• Öffnen Sie die Lockenzange und ziehen Sie
die Haarsträhne aus der Lockenzange.
10
Glätten zu Kreppen
• Schieben Sie den Wahlschalter [11] in die
Position „Glätten“ [a]. Das Glätteisen [G]
kann jetzt verwendet werden.
• Teilen Sie das Haar in einzelne Strähnen mit
einer Breite von circa 3 Zentimeter ein. Halten
Sie die Strähne straff und legen Sie sie am
Haaransatz zwischen die Glätteisen [G].
• Bewegen Sie den Haarglätter langsam und
gleichmäßig vom Haaransatz bis zu den
Haarspitzen. Bleiben Sie mit dem
Haarglätter nicht länger als 8 - 10 Sekunden
auf einer Stelle. So erhalten Sie beste
Ergebnisse, ohne die Haare zu sehr zu
strapazieren bzw. zu beschädigen.
• Sie können die Haarspitzen formen, indem
Sie den Haarglätter entsprechend nach
außen oder innen drehen, bevor Sie ihn
über die Haarspitzen nach außen ziehen.
Page 11

Kreppeisen verwenden
• Bauen Sie den Glätt/Krepp-Aufsatz [12] an
den Multifunktionsstyler an.
• Schieben Sie den Wahlschalter [11] in die
Position „Kreppen“ [c]. Das Kreppeisen [F]
kann jetzt verwendet werden.
• Teilen Sie das Haar in einzelne Strähnen
ein. Halten Sie die Strähne straff und legen
Sie sie am Haaransatz zwischen die
Kreppeisen [F].
• Schließen Sie das Kreppeisen [F] für circa
10 Sekunden. So erhalten Sie beste
Ergebnisse, ohne die Haare zu sehr zu
strapazieren bzw. zu beschädigen.
7 Gerät reinigen und pflegen
Hinweise
• Ihr Gerät ist wartungsfrei.
• Schützen Sie das Gerät vor Staub, Schmutz
und Feuchtigkeit.
Reinigen
Achtung
• Ziehen Sie vor dem Reinigen stets den
Netzstecker aus der Steckdose.
• Achten Sie darauf, dass kein Wasser in
das Geräteinnere gelangt!
• Gerät nicht in der Spülmaschine reinigen!
• Öffnen Sie das Kreppeisen [F] wieder und
nehmen Sie die Haarsträhne heraus.
• Wiederholen Sie den Vorgang, bis Sie an
der Haarspitze angekommen sind.
Nach dem Gebrauch
• Schalten Sie das Gerät am Schiebeschalter
[5] in Stellung 0.
• Legen Sie den Multifunktionsstyler zum
Abkühlen mit dem Aufstellbügel auf eine
stabile, waagrechte und nicht brennbare
Unterlage oder halten Sie den
Multifunktionsstyler in der Hand.
• Ziehen Sie nach jedem Gebrauch den
Netzstecker aus der Steckdose.
• Das Netzkabel [9] nicht um das Gerät
wickeln!
• Bewahren Sie das Gerät an einem
trockenen und für Kinder unzugänglichen
Platz auf.
• Das Gerät kann an der Aufhängeöse [8] an
einem Haken aufgehängt werden.
• Benutzen Sie keine scharfen, spitzen,
scheuernden, ätzende Reinigungsmittel
oder harte Bürsten!
• Reinigen Sie es nicht mit leicht
entzündbaren Flüssigkeiten!
• Das Gerät und die Aufsätze können mit einem
weichen, mit warmem Wasser
angefeuchteten, Tuch gereinigt werden.
• Trocknen Sie das Gerät und die Aufsätze
nach dem Reinigen sorgfältig!
11
Page 12
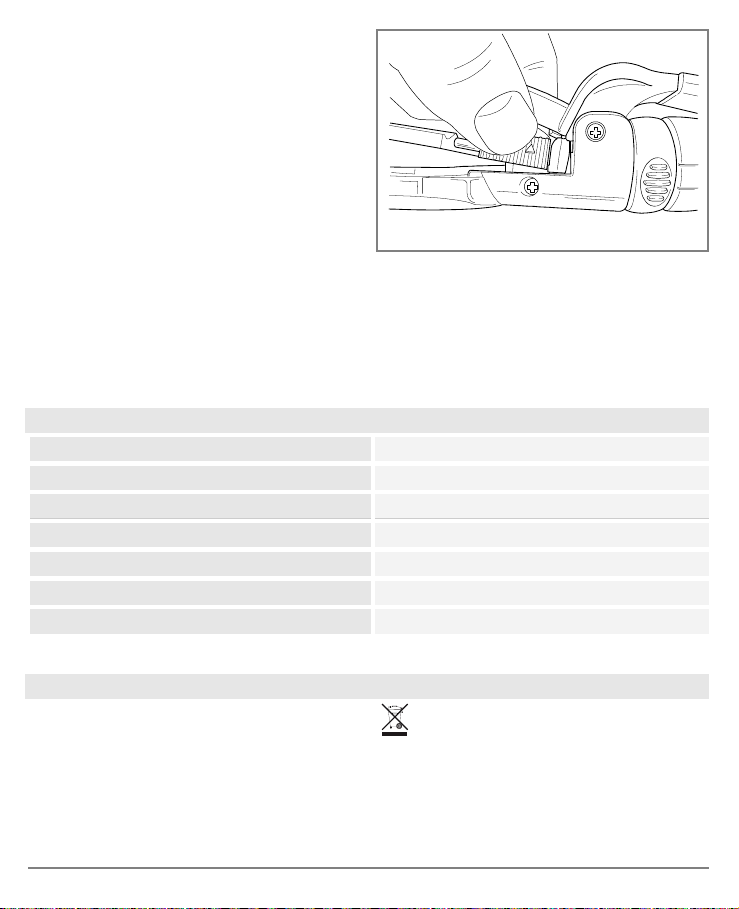
Glätt-/Kreppeisen [F/G] reinigen
• Schieben Sie den Wahlschalter [11] in die
Position „Glätten“ [a].
• Drücken Sie auf den Hebel [3] um den
Glätt/Krepp-Aufsatz [12] zu öffnen.
• Schieben Sie mit den Fingern der anderen
Hand den Wahlschalter [11] in die Position
„Kreppen“ [c]. Das Glätt-/Kreppeisen [F, G]
wird entriegelt.
• Nehmen Sie das Glätt-/Kreppeisen [F, G]
aus dem Glätt/Krepp-Aufsatz [12] heraus.
• Das Glätt-/Kreppeisen [F, G] kann jetzt
ebenfalls, wie die anderen Aufsätze,
gereinigt werden.
• Bauen Sie das Glätt-/Kreppeisen [F, G]
nach dem Reinigen wieder ein. Das
Einbauen erfolgt sinngemäß in umgekehrter
Weise wie das Ausbauen.
8 Technische Daten
Gewicht circa 330 g
Spannungsversorgung 220 bis 240 V ~, 50 Hz
Leistungsaufnahme 25 W
Temperaturbereich 125 bis 160 °C
Schutzklasse
Umgebungsbedingungen Nur für Innenräume zugelassen
Zulässiger Temperaturbereich -10 bis +40 °C
Technische Änderungen vorbehalten.
II
9 Entsorgen
Im Interesse des Umweltschutzes darf das
Gerät am Ende seiner Lebensdauer nicht mit
dem Hausmüll entfernt werden.
Die Entsorgung kann über entsprechende
Sammelstellen in Ihrem Land erfolgen.
12
Befolgen Sie die örtlichen Vorschriften
bei der Entsorgung der Materialien.
Entsorgen Sie das Gerät gemäß der
Elektro- und Elektronik Altgeräte EGRichtlinie 2002/96/EC – WEEE (Waste
Electrical and Electronic Equipment).
Page 13

Bei Rückfragen wenden Sie sich an die für die
Entsorgung zuständige kommunale Behörde.
Rücknahmestellen für Ihre Altgeräte erhalten
Sie z. B. bei der örtlichen Gemeinde-
10 Garantie und Service
Wir leisten 3 Jahre Garantie ab Kaufdatum für
Material- und Fabrikationsfehler des
Produktes.
Die Garantie gilt nicht:
• Im Falle von Schäden, die auf
unsachgemäßer Bedienung beruhen.
• Für Verschleißteile.
• Für Mängel, die dem Kunden bereits bei
Kauf bekannt waren.
• Bei Eigenverschulden des Kunden.
Die gesetzlichen Gewährleistungen des
Kunden bleiben durch die Garantie unberührt.
bzw. Stadtverwaltung, den örtlichen
Müllentsorgungsunternehmen oder bei Ihrem
Händler.
Für Geltendmachung eines Garantiefalles
innerhalb der Garantiezeit ist durch den
Kunden der Nachweis des Kaufes zu führen.
Die Garantie ist innerhalb eines Zeitraumes
von 3 Jahren ab Kaufdatum gegenüber der
Beurer GmbH
Söflinger Straße 218
89077 Ulm, Germany
geltend zu machen. Der Kunde hat im
Garantiefall das Recht zur Reparatur der Ware
bei unserem eigenen oder bei von uns
autorisierten Werkstätten. Weitergehende
Rechte werden dem Kunden (aufgrund der
Garantie) nicht eingeräumt.
13
Page 14

G English
Contents
1 About the unit ......................................... 14
2 Signs and symbols ................................. 15
3 Intended use ........................................... 15
4 Safety instructions for your health .......... 15
5 Unit description ....................................... 17
6 Operation ................................................ 19
7 Cleaning and care of the unit .................. 23
8 Technical specifications .......................... 24
9 Disposal .................................................. 24
1 About the unit
With the multi-function styler, you can shape
your hair in a wide variety of styles and create
your individual look for every occasion.
The 360° rotatable joint on the mains cable
makes for flexible use of the multi-function
styler.
The easy lock system makes it possible to
switch the attachments quickly.
Included in delivery
• Multi-function styler
• Straightening iron
• Crimping iron
• Large curling iron
• Small curling iron
• Flat curling iron
• Spiral attachment
• Brush attachment
• This instruction manual
The ceramic coating of the crimping and
straightening iron provides for an even heat
distribution and a smooth surface texture.
This provides for gentle styling of your hair.
The unit is intended only for the purposes
described in this instruction manual.
The manufacturer cannot be held liable for any
damages that are caused through improper or
careless use.
14
Page 15
2 Signs and symbols
The following symbols appear in these instructions or on the unit.
Danger The unit must not be used in the vicinity of water or in water
(e.g. washbasin, shower, bathtub) – risk of electric shock!
Warning Warning instruction indicating a risk of injury or damage to health.
Important Safety note indicating possible damage to the unit/accessories.
Note Important information to be noted.
3 Intended use
The multi-function styler must be used only for
individual, private shaping and styling of your
hair!
Warning
Use the unit only:
• For external use
• For the purpose for which it was developed
and in the manner specified in these
instructions for use.
Any improper use can be dangerous!
The unit carries the CE mark and complies
with the following EU directives:
• 2006/95/EC the Low Voltage Directive
• 2004/108/EC the EMC Directive
4 Safety instructions for your health
Warning
To prevent harm to your health, we
To avoid harm to your health, observe the
following points:
• People (including children) who are not
urgently recommend that you not use the
unit in the following situations:
• If the unit, mains cable/plug or accessories
are visibly damaged. When in doubt, do not
use the unit and contact your dealer or the
customer service address provided.
• Children must be supervised when using
able to use the unit safely due to their
physical, sensory or mental abilities or their
lack of experience or knowledge must not
use this unit without supervision or
instruction by a responsible person.
the unit.
15
Page 16
• Pull the cord out of the socket by the mains
plug only.
• For additional protection, we recommend
installing a residual-current device (RCD)
with a rated current of no more than 30 mA
in the electrical circuit of the bathroom.
More information can be obtained from
your local electrical supply store.
• Do not use any add-on parts that are not
recommended by the manufacturer or
offered as an accessory.
• Ensure that there are no highly flammable
liquids in the vicinity of the unit.
• Place the unit only on a non-combustible
surface.
• Do not use the unit on artificial hair – fire
hazard!
• The unit must not be covered – fire hazard!
• Never open or attempt to repair the unit
yourself, as otherwise proper function is no
longer guaranteed. Failure to observe this
regulation shall void the warranty.
• If the unit malfunctions or is damaged,
have it repaired by a qualified specialised
workshop.
• Do not use the unit if it has fallen or been
dropped on the floor or is otherwise
damaged.
• Do not use an extension cord in the
bathroom, so that you can quickly reach
the mains plug in an emergency.
• Never leave the unit unsupervised during
operation.
• Do not use the unit in the open air.
• If you give the unit to a third party, you
must include these instructions for use.
Danger
• Never use the unit in the vicinity of
bathtubs, washbasins, showers or other
vessels containing water or other liquids
– risk of electric shock!
• If the unit falls into water despite all safety
precautions, remove the plug from the
socket immediately! Do not reach into the
water!
• Before using the unit again, have it
checked by an authorised specialised
workshop! Risk of fatal injury from electric
shock!
• Never immerse the unit in water or another
liquid!
Before using the unit for the first time
Warning
• Keep children away from packaging
materials – risk of suffocation!
• Before you use the unit for the first time,
remove all packaging materials.
• Plug the unit into a socket with the voltage
specified on the identification plate only.
• Inquire about the mains voltage of the
respective location if it is unknown to you.
16
Page 17
5 Unit description
2 3 4 5 6
1
12 11 10
Item Description
1 Ceramic-coated heating plate
2 Flap
3 Lever for opening the flap
4 Operation indicator lamp
5 Slide switch for the heat levels:
0 Off
1 Low level
2 High level
Item Description
6 Handle
7 360° rotatable joint
8 Bend protection with hanging eyelet
9 Mains cable
10 Lock ring
11
Selector switch for the function of the
straightening/crimping iron [F, G]
12 Straightening/crimping attachment
7
8
9
17
Page 18

A B C
13 13 13
D E F G
Item Description
A
Large curling iron for voluminous
curls
B Small curling iron for gentle curls
C Flat curling iron for crimped curls
D Spiral attachment for corkscrew curls
18
Item Description
E Brush attachment for sleek waves
F Crimping iron for crimped waves
G Straightening iron for straight hair
13 Stand
Page 19
6 Operation
Important
• Straighten the mains cable [9] if it
becomes twisted.
• Do not pull, twist or kink the mains
cable [9]; do not pull or lay it across/on
sharp, pointy objects or hot surfaces.
• Do not clamp the mains cable [9], for
example in drawers, doors or between the
heating plates [1, 2].
Warning
• Stand on a dry, electrically non-conductive
surface.
• Ensure that your hands are dry!
• Your hair must be dry!
• Depending on the temperature setting and
duration of use, the unit can become very
hot. If the unit is hot, touch it only by its
handle [6] – burn and fire hazard!
• Do not touch the heating plates [1, 2]!
• Do not touch the attachments as long as
they are still hot!
• Do not clamp any objects between the
heating plates [1, 2] and the barrel and the
curling tong.
• Switch the unit off immediately if it is
defective or malfunctioning.
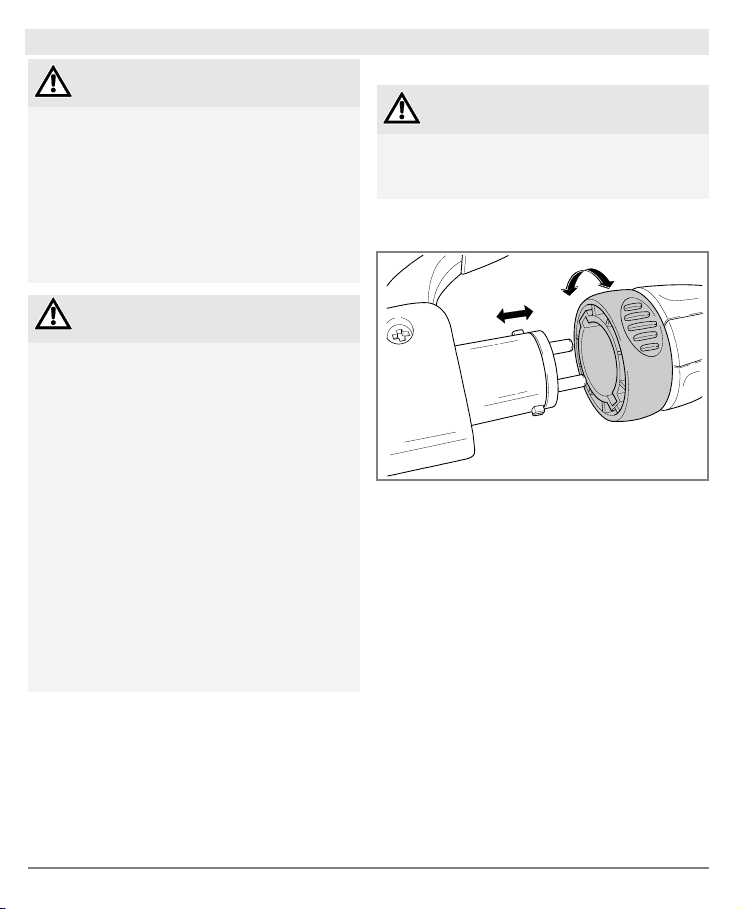
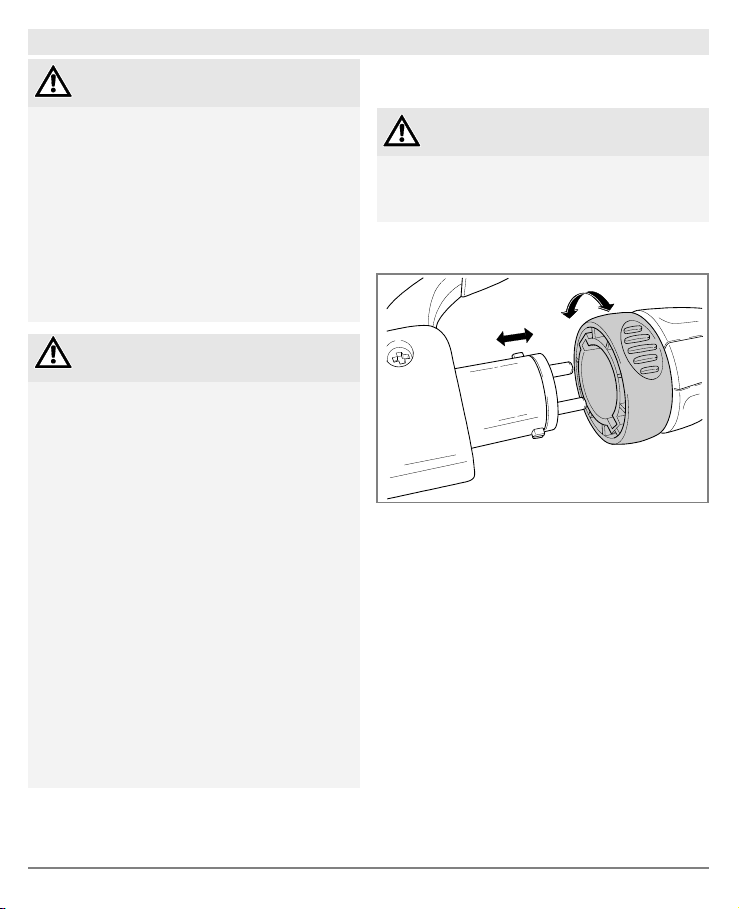
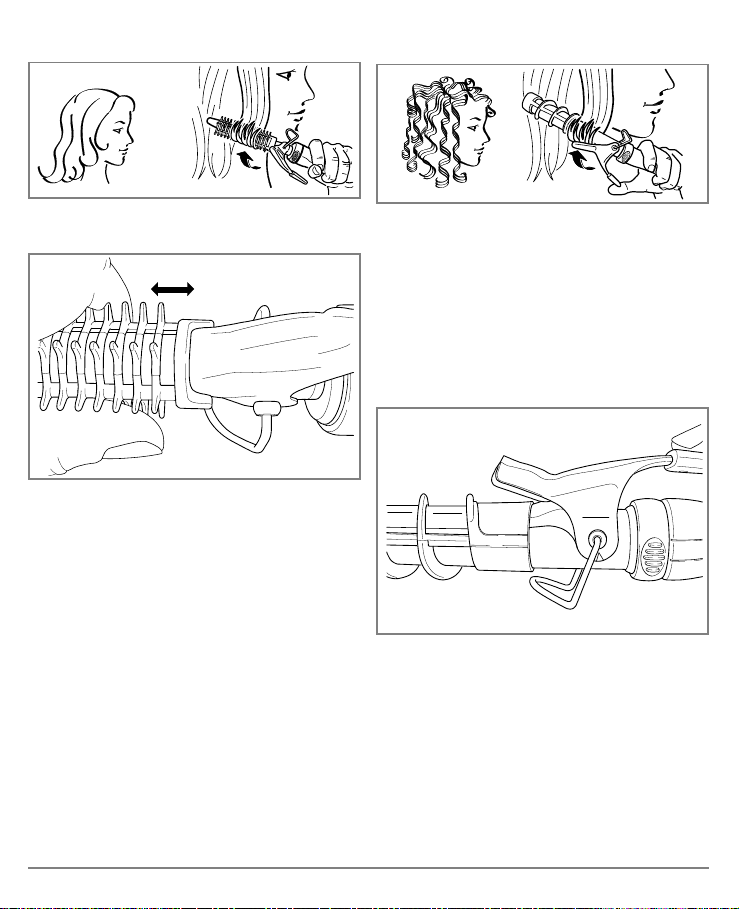
Changing attachments
Warning
• When the attachment is in place on the
unit, always let it cool down before
removing it – burn hazard!
• Select the right attachment [12, A, B, C] for
the desired hairstyle.
• Turn the lock ring [10] clockwise until it
stops. The attachment is unlocked.
• Remove the attachment from the handle [6].
• Align the selected attachment as shown in
the figure.
• Push the selected attachment carefully into the
handle [6], without jamming the two metal pins.
• Turn the lock ring [10] anti-clockwise until it
stops. The attachment is locked.
• Check whether the attachment is firmly
connected with the handle.
• Lay the multi-function styler or place it with
the stand unfolded [13] onto a stable,
horizontal and non-combustible surface or
hold the multi-function styler in your hand to
let it cool.
19
Page 20
Adjusting the temperature
You can set the temperature at two levels
using the slide switch [5]. We recommend the
following temperature settings:
Level Hair type
1: Low
2: High Normal and thick hair
Note
• The higher the selected temperature, the
more quickly you get the desired result.
• Select the desired temperature level via the
slide switch [5].
• The multi-function styler is ready for use in a
few minutes.
Fine, fragile, coloured or
bleached hair
Shaping hair
Preparing hair
• Dry your hair completely before using the
multi-function styler.
• Your hair should be clean and free of styling
products.
• Comb your hair with a wide-toothed comb to
untangle it.
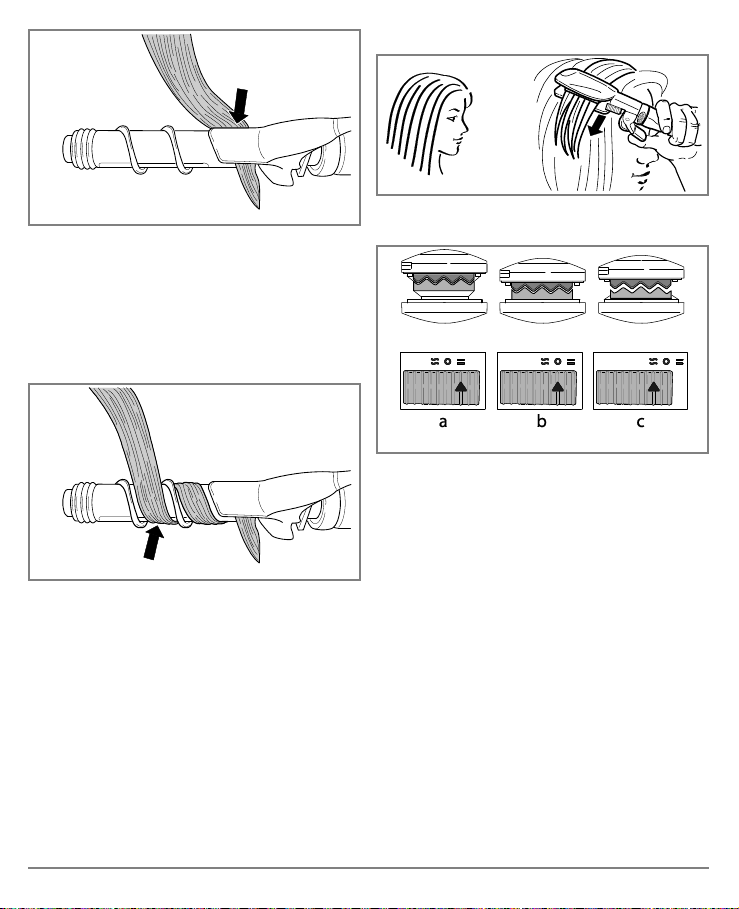
Shaping curls/waves
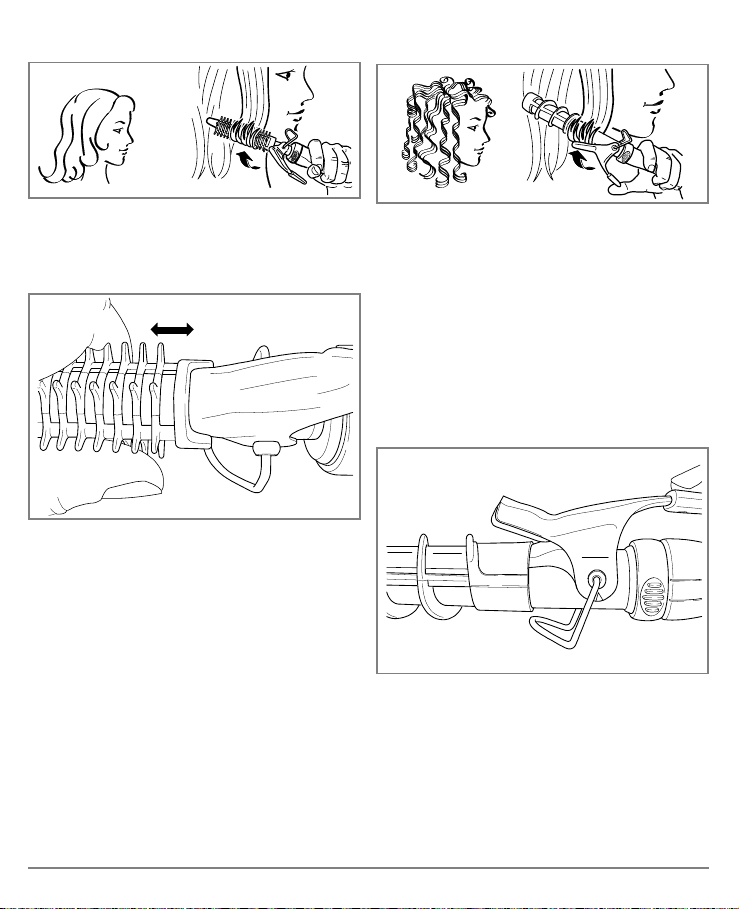
You can shape your hair with the curling irons
[A, B, C]:
• Divide your hair into individual strands with
a width of about 2 cm. Hold the strands taut.
• Press the lever of the curling iron to open
the curling tong.
• Place the hair strand ends between the
barrel and the curling tong of the curling
iron.
• Close the curling tong to hold the hair
strands in place.
• Wind the strands toward your head onto the
curling iron.
• Leave the curling iron in your hair for about
8 to 10 seconds. This way you will obtain
the best results without overstraining or
damaging your hair.
• Open the curling tong and carefully pull the
barrel out of the curl.
Shaping hair ends
• Place the hair strand ends between the
barrel and the curling tong of the curling
iron.
• Close the curling tong to hold the hair
strands in place.
• You can shape the ends by twisting the
curling iron either outward or inward before
you pull it out over the ends.
20
Page 21

Using the brush attachment
Using the spiral attachment
You can use the brush attachment [E] with the
curling iron [B]:
• Check whether the curling iron [B] has
cooled down.
• Carefully push on the brush attachment [E],
with the notch facing upward, onto the cold
curling iron [B] as far as it will go.
• Divide your hair into individual strands. Hold
the strands taut.
• Wind the hair strands onto the brush.
• Wait about 10 seconds before you unwind
the hair strands again.
You can use the spiral attachment [D] with the
curling iron [A]:
• Check whether the curling iron [A] has
cooled down.
• Push the spiral attachment [D] with the
grooves on the attachment upwards to the
centre onto the closed, cold curling tongs
[A].
• Press the lever of the curling iron to open
the curling tong.
• Carefully push on the spiral attachment [D]
onto the cold curling iron [A] as far as it will
go.
• Close the curling tong.
• Divide your hair into individual strands.
Hold the strands taut.
21
Page 22
• Press the lever of the curling iron [A] to
open the curling tong.
• Place the hair strand ends between the
barrel and the curling tong of the curling
iron [A].
• Close the curling tong to hold the hair
strands in place.
Using the straightening iron
• Attach the straightening/crimping
attachment [12] to the multi-function styler.
• Wind the strands toward your head around
the spiral attachment [D]. Always ensure
that the hair strands are wound up as
shown in the figure.
• Wait for about 10 seconds before you
unwind the hair strands again.
• Open the curling tong and pull the hair
strands out of the curling tong.
22
Straighten Closed Crimp
• Slide the selector switch [11] into the
"Straighten" position [a]. Now the
straightening iron [G] can be used.
• Divide your hair into individual strands with a
width of about 3 cm. Hold the strands taut
and place them between the straightening
iron [G] at the roots.
• Move the straightener slowly and smoothly
from the roots to the ends. Do not keep the
straightener at any one place for longer than
8 to 10 seconds. This way you will obtain
the best results without overstraining or
damaging your hair.
• You can shape the ends by twisting the
straightener either outward or inward before
you pull it out over the ends.
Page 23

Using the crimping iron
• Attach the straightening/crimping
attachment [12] to the multi-function styler.
• Slide the selector switch [11] into the
"Crimp" position [c]. Now the crimping iron
[F] can be used.
• Divide your hair into individual strands. Hold
the strands taut and place them between
the crimping iron [F] at the roots.
• Close the crimping iron [F] for about 10
seconds. This way you will obtain the best
results without overstraining or damaging
your hair.
7 Cleaning and care of the unit
Notes
• Your unit is maintenance-free.
• Protect the unit from dust, dirt and moisture.
Cleaning
Important
• Always remove the plug from the socket
before cleaning.
• Ensure that no water enters the inside of
the unit!
• Do not wash the unit in a dishwasher!
• Do not use any strong, sharp, abrasive,
corrosive cleaning agents or hard brushes!
• Open the crimping iron [F] again and take
the hair strands out.
• Repeat the process until you have reached
the hair ends.
After use
• Switch off the unit by moving the slide
switch [5] into position 0.
• Place the multi-function styler with the stand
down onto a stable, horizontal and
non-combustible surface or hold the
multi-function styler in your hand to let it cool.
• Remove the plug from the socket after each
use.
• Do not wind the mains cable [9] around the
unit!
• Store the unit in a dry place that is out of
reach of children.
• The unit can be hung on a hook by the
hanging eyelet [8].
• Do not clean it with any highly flammable
liquids!
• The unit and the attachments can be cleaned
with a soft cloth that has been moistened
with warm water.
• Dry the unit and the attachments carefully
after cleaning them!
23
Page 24
Cleaning the straightening/crimping iron
A
A
A
[F/G]
• Slide the selector switch [11] into the
"Straighten" position [a].
• Press on the lever [3] to open the
straightening/crimping attachment [12].
• Use the fingers on your other hand to slide
the selector switch [11] into the "Crimp"
position [c]. Now the straightening/crimping
iron [F, G] is unlocked.
• Remove the straightening/crimping iron
[F, G] from the straightening/crimping
attachment [12].
• Now the straightening/crimping iron [F, G]
can be cleaned, like the other attachments.
• Attach the straightening/crimping iron [F, G]
again after cleaning it. Attach it by following
the removal steps in reverse order.
8 Technical specifications
Weight
Power supply 220 - 240 V ~, 50 Hz
Power consumption 25 W
Temperature range 125 to 160 °C
Safety class
mbient conditions Only approved for indoor use
llowable temperature range -10 to +40 °C
Subject to technical modifications.
pprox. 330 g
II
9 Disposal
In the interest of protecting the environment,
the unit must not be thrown out with the
household waste at the end of its service life.
Dispose of the unit at a suitable local
collection or recycling point.
Observe the local regulations for
material disposal.
Dispose of the unit in accordance with
EC Directive 2002/96/EC–WEEE (Waste
24
Electrical and Electronic Equipment).
If you have any questions, please contact the
local authorities responsible for waste
disposal.
You can find out about collection points for
your old units e.g. from the local municipal
government, the local waste disposal
company or your dealer.
Page 25

F Français
Sommaire
1 Familiarisation avec l'appareil ................. 25
2 Symboles utilisés .................................... 26
3 Utilisation conforme aux prescriptions .... 26
4 Consignes de sécurité pour votre santé . 26
5 Description de l'appareil ......................... 28
6 Utilisation ................................................ 30
7 Nettoyage et entretien de l'appareil ........ 34
8 Caractéristiques techniques ................... 35
9 Mise au rebut .......................................... 35
1 Familiarisation avec l'appareil
Le fer multifonctions vous permet d'effectuer
différentes mises en forme de vos cheveux et
de créer votre look individuel pour chaque
occasion.
L'articulation tournante à 360° au niveau du
câble d'alimentation permet un maniement
flexible du fer multifonctions.
Le système "Easy Lock" permet un
changement rapide entre les différents
éléments amovibles.
Volume de livraison
• Fer multifonctions
• Fer à lisser
• Fer à crêper
• Grand fer à friser
• Petit fer à friser
• Fer à friser plat
• Embout spiralé
• Embout à brosse
• Le présent mode d'emploi
Le revêtement en céramique du fer à crêper et
du fer à lisser assure une répartition uniforme
de la chaleur et une structure superficielle
lisse. Ceci garantit une mise en forme de vos
cheveux tout en les ménageant.
L'appareil est uniquement prévu pour le but
décrit dans le présent mode d'emploi.
Le fabricant ne peut être tenu pour
responsable de dommages résultant d'une
utilisation inappropriée ou imprudente.
25
Page 26

2 Symboles utilisés
Les symboles suivants sont utilisés dans le mode d'emploi ou sur l'appareil.
Danger L'appareil ne doit pas être utilisé à proximité de l'eau ou dans
Avertissement Indication d'avertissement de risques de blessures ou de dangers
Attention Indication d'endommagements possibles de l'appareil /
Remarque Indication d'informations importantes.
l'eau (p. ex. lavabo, douche, baignoire) – risque d'électrocution !
pour votre santé.
des accessoires.
3 Utilisation conforme aux prescriptions
Le fer multifonctions est exclusivement conçu
pour la mise en forme et le styling des
cheveux, à usage privé !
Avertissement
Utilisez l'appareil exclusivement :
• pour un usage extérieur
• pour l'usage auquel il est destiné et selon
la méthode décrite dans le présent mode
d'emploi.
Toute utilisation inappropriée peut s'avérer
dangereuse !
L'appareil porte le sigle CE et satisfait aux
directives UE suivantes :
• 2006/95/CE - directive sur la basse tension
• 2004/108/CE - directive CEM
4 Consignes de sécurité pour votre santé
Avertissement
Afin d'éviter des dommages corporels,
l'utilisation de l'appareil est fortement
déconseillé dans les cas suivants :
• En cas d'endommagement visible de
l'appareil, du câble d'alimentation / du
connecteur ou des accessoires. En cas de
doute, n'utilisez pas l'appareil et adressezvous à votre revendeur ou au service
après-vente indiqué.
Afin d'éviter des dommages pour votre
santé, observez les points suivants :
• Les personnes (y compris les enfants), qui
compte tenu de leurs facultés physiques,
sensoriques ou intellectuelles, ou compte
tenu de leur manque de connaissances, ne
sont pas en mesure d'utiliser l'appareil en
toute sécurité, ne doivent pas utiliser cet
appareil sans la surveillance ou l'instruction
d'une personne responsable.
• Les enfants doivent rester sous
surveillance pendant l'utilisation de
l'appareil.
• Débranchez le câble de la prise de courant
en tirant uniquement sur la fiche secteur.
26
Page 27
• L'installation d'un dispositif à courant
différentiel résiduel DDR avec un courant
de déclenchement n'excédant pas de
30 mA est recommandée dans le circuit
électrique de la salle de bain en tant que
protection supplémentaire. Pour de plus
amples informations, veuillez contacter
votre entreprise électrique locale.
• N'utilisez pas de pièces supplémentaires
qui n'ont pas été recommandées par le
fabricant ou qui ne sont pas proposées en
tant qu'accessoires.
• Assurez-vous qu'aucun liquide facilement
inflammable ne se trouve à proximité de
l'appareil.
• Déposez uniquement l'appareil sur un
support ininflammable.
• N'utilisez pas l'appareil sur des cheveux
synthétiques – risque d'incendie !
• L'appareil ne doit pas être recouvert –
risque d'incendie !
• Vous ne devez en aucun cas ouvrir ou
réparer l'appareil, faute de quoi le
fonctionnement de l'appareil ne serait plus
garanti. En cas de non-respect de ce point,
la garantie est annulée.
• En cas de dérangement ou
d'endommagement, faites réparer l'appareil
par un atelier spécialisé.
• Si l'appareil est tombé ou s'il a subi
d'autres dommages, il ne doit plus être
utilisé.
• N'utilisez pas de câble de rallonge dans la
salle de bain, afin de pouvoir atteindre
rapidement la fiche secteur en cas
d'urgence.
• Ne laissez pas l'appareil sans surveillance
pendant l'utilisation.
• N'utilisez pas l'appareil à l'extérieur.
• Si vous transmettez l'appareil à une tierce
personne, veuillez également lui remettre
le présent mode d'emploi.
Danger
• N'utilisez en aucun cas l'appareil à
proximité de baignoires, de lavabos, de
douches ou d'autres récipients qui
contiennent de l'eau ou d'autres liquides –
risque d'électrocution !
• Si malgré toutes les mesures de précaution
l'appareil devait tomber dans l'eau,
débranchez immédiatement la fiche
secteur de la prise de courant !
N'intervenez pas avec les mains dans
l'eau !
• Faites contrôler l'appareil par un atelier
spécialisé avant de le réutiliser ! Risque de
danger de mort par choc électrique !
• Ne plongez en aucun cas l'appareil dans
l'eau ou dans un autre liquide !
Avant la mise en service
Avertissement
• Gardez les enfants éloignés des matériaux
d'emballage – danger d'étouffement !
• Avant d'utiliser l'appareil, retirez tous les
matériaux d'emballage.
• Raccordez l'appareil uniquement à une
prise de courant dont la tension correspond
à celle indiquée sur la plaque signalétique.
• Demandez la tension secteur du lieu
respectif s'il elle vous est inconnue.
27
Page 28

5 Description de l'appareil
2 3 4 5 6
1
12 11 10
Rep. Désignation
1
Plaque chauffante revêtue de
céramique
2 Clapet
3 Levier pour l'ouverture du clapet
4 Témoin lumineux de fonctionnement
5
Interrupteur à coulisse pour les
niveaux de chauffage :
0 OFF
1 niveau faible
28
2 niveau élevé
Rep. Désignation
6 Poignée
7 Articulation tournante à 360°
8
Protection anti-brisure avec anneau
de suspension
9 Câble d'alimentation
10 Bague de verrouillage
11
Sélecteur pour la fonction fer à
lisser / fer à crêper [F, G]
12 Elément pour lissage / crêpage
7
8
9
Page 29

A B C
13 13 13
D E F G
Rep. Désignation
A
Grand fer à friser pour des boucles
volumineuses
B Petit fer à friser pour boucles douces
C
Fer à friser plat pour boucles
crêpées
D
Embout spiralé pour boucles en
tire-bouchon
Rep. Désignation
E
F
G Fer à lisser pour cheveux lisses
13 Etrier de relèvement
Embout à brosse pour ondulations
souples
Fer à crêper pour ondulations
crêpées
29
Page 30
6 Utilisation
Attention
• Démêlez le câble d'alimentation [9] s'il est
vrillé.
• Ne tirez pas, ne vrillez pas et ne pliez pas
le câble d'alimentation [9], ne le tirez pas
ou ne le posez pas par-dessus / sur des
objets tranchants, pointus ou des surfaces
chaudes.
• Ne coincez pas le câble d'alimentation [9]
p. ex. au niveau de tiroirs et de portes, ni
entre les plaques chauffantes [1, 2].
Avertissement
• Tenez-vous sur un sol / support sec,
électriquement non conducteur.
• Assurez-vous que vos mains soient
sèches !
• Vos cheveux doivent être secs !
• L'appareil peut devenir très chaud, en
fonction du réglage de la température et de
la durée d'utilisation. A l'état chaud, tenez
uniquement l'appareil par la poignée [6] –
danger de brûlures et risque d'incendie !
• Ne touchez pas les plaques chauffantes
[1, 2] !
• Ne touchez pas les éléments amovibles
tant qu'ils sont encore chauds !
• Ne coincez pas d'objets entre les plaques
chauffantes [1, 2] ni entre le tube chauffant
et la pince à boucles.
• Eteignez immédiatement l'appareil en cas
de défauts ou de dysfonctionnements.
Remplacement des éléments
amovibles
Avertissement
• Laissez toujours refroidir l'élément
amovible monté avant de le retirer – risque
de brûlures !
• Sélectionnez l'élément amovible [12, A, B,
C] adapté au style de coiffure souhaité.
• Tournez la bague de verrouillage [10]
jusqu'en butée dans le sens des aiguilles
d'une montre. L'élément monté est
déverrouillé.
• Retirez l'élément de la poignée [6].
• Alignez l'élément sélectionné, comme
illustré sur la figure ci-dessus.
• Engagez avec précaution l'élément
sélectionné dans la poignée [6], sans
déformer les deux broches métalliques.
• Tournez la bague de verrouillage [10]
jusqu'en butée dans le sens inverse des
aiguilles d'une montre. L'élément est
verrouillé.
30
Page 31

• Contrôlez la bonne fixation de l'élément sur
la poignée.
• Posez le fer multifonctions avec ou sans
l'étrier de redressement [13] déplié sur un
support stable, horizontal et ininflammable,
ou maintenez le fer multifonctions dans la
main.
Réglage de la température
Deux niveaux de température peuvent être
réglés à l'aide de l'interrupteur à coulisse [5].
Nous recommandons les réglages de
température suivants :
Niveau Type de cheveux
1 : faible
2 : élevé Cheveux normaux et forts
Remarque
• Plus la température sélectionnée est
élevée, plus rapidement vous obtiendrez le
résultat souhaité.
• Sélectionnez le niveau de température
souhaité par l'intermédiaire de l'interrupteur
à coulisse [5].
• Le fer multifonctions est opérationnel au
bout de quelques minutes.
cheveux fins, fragiles, colorés
ou blonds
Mise en forme des cheveux
Préparation des cheveux
• Séchez entièrement vos cheveux avant
d'utiliser le fer multifonctions.
• Les cheveux devraient être propres et
exempts de produits de styling,
• Coiffez vos cheveux avec un peigne
grossier afin de les démêler.
Formage de boucles / d'ondulations
Vous pouvez former vos cheveux à l'aide des
fers à friser [A, B, C] :
• Répartissez les cheveux en mèches d'une
largeur environ 2 centimètres. Maintenez
les mèches tendues.
• Pressez le levier du fer à friser pour ouvrir la
pince à boucles.
• Posez les mèches avec la pointe des
cheveux entre le tube chauffant et la pince à
boucles du fer à friser.
• Fermez la pince à boucles pour fixer les
mèches de cheveux.
• Enroulez les mèches autour du fer à friser,
en direction de la tête.
• Laissez le fer à friser pendant environ 8 à
10 secondes dans les cheveux. Vous
obtiendrez ainsi les meilleurs résultats, sans
trop surmener les cheveux et sans les
endommager.
• Ouvrez la pince à boucles et retirez avec
précaution le tube chauffant de la boucle.
Mise en forme des pointes des cheveux
• Posez les mèches avec la pointe des
cheveux entre le tube chauffant et la pince à
boucles du fer à friser.
• Fermez la pince à boucles pour fixer les
mèches de cheveux
• Vous pouvez former les extrémités des
cheveux en tournant respectivement le fer à
friser vers l'extérieur ou vers l'intérieur,
avant de le tirer au-delà des extrémités des
cheveux.
31
Page 32
Utilisation de l'embout à brosse
Utilisation de l'embout spiralé
Vous pouvez utiliser l'embout à brosse [E]
avec le fer à friser [B] :
• Contrôlez si le fer à friser [B] est refroidi.
• Engagez avec précaution l'embout à brosse
[E] avec l'encoche vers le haut sur le fer à
friser [B] froid, jusqu'en butée.
• Répartissez les cheveux en mèches
individuelles. Maintenez les mèches
tendues.
• Enroulez les mèches autour de la brosse.
• Attendez environ 10 secondes avant de
dérouler à nouveau les mèches de cheveux.
Vous pouvez utiliser l'embout spiralé [D] avec
le fer à friser [A] :
• Contrôlez si le fer à friser [A] est refroidi.
• Engagez l'embout spiralé [D], avec les
encoches vers le haut, sur le fer à friser [A]
refroidi et fermé, jusqu'au milieu du fer.
• Pressez le levier du fer à friser pour ouvrir la
pince à boucles.
• Engagez avec précaution l'embout spiralé
[D] jusqu'en butée sur le fer à friser [A] froid.
• Fermez la pince à boucles.
• Répartissez les cheveux en mèches
individuelles. Maintenez les mèches
tendues.
32
Page 33

• Pressez le levier du fer à friser [A] pour
ouvrir la pince à boucles.
• Posez les mèches avec la pointe des
cheveux entre le tube chauffant et la pince à
boucles du fer à friser [A].
• Fermez la pince à boucles pour fixer les
mèches de cheveux.
Utilisation du fer à lisser
• Montez l'élément de lissage / crêpage [12]
sur le fer multifonctions.
• Enroulez les mèches autour de l'embout
spiralé [D], en direction de la tête. Veillez à
enrouler les mèches de cheveux comme
illustré sur la figure ci-dessus.
• Attendez environ 10 secondes avant de
dérouler à nouveau les mèches de cheveux.
• Ouvrez la pince à boucles et retirez la
mèche de cheveux de la pince à boucles.
lissage fermé crêpage
• Poussez le sélecteur [11] en position "lissage"
[a]. Le fer à lisser [G] peut à présent être utilisé.
• Répartissez les cheveux en mèches d'une
largeur environ 3 centimètres. Maintenez les
mèches tendues et insérez-les à la base des
cheveux entre les fers à lisser [G].
• Déplacez lentement et régulièrement le lisseur
pour cheveux depuis la base des cheveux
jusqu'à l'extrémité des cheveux. Ne restez pas
plus de 8 à 10 secondes au même endroit avec
le lisseur de cheveux. Vous obtiendrez ainsi les
meilleurs résultats, sans trop surmener les
cheveux et sans les endommager.
• Vous pouvez former les extrémités des
cheveux en tournant respectivement le
lisseur pour cheveux vers l'extérieur ou vers
l'intérieur, avant de le tirer au-delà des
extrémités des cheveux.
33
Page 34
Utilisation du fer à crêper
• Ouvrez à nouveau le fer à crêper [F] et
• Répétez le processus jusqu'à la pointe des
Après l'utilisation
• Désactivez l'appareil en amenant
• Montez l'élément de lissage / crêpage [12]
sur le fer multifonctions.
• Poussez le sélecteur [11] en position
"crêpage" [c]. Le fer à crêper [F] peut à
présent être utilisé.
• Répartissez les cheveux en mèches
individuelles. Maintenez les mèches
tendues et insérez-les à la base des
cheveux entre les fers à crêper [G].
• Fermez le fer à crêper [F] pendant environ
10 secondes. Vous obtiendrez ainsi les
meilleurs résultats, sans trop surmener les
cheveux et sans les endommager.
• Laissez refroidir le fer multifonctions en le
• Débranchez la fiche secteur de la prise de
• N'enroulez pas le câble d'alimentation [9]
• Conservez l'appareil dans un endroit sec et
• L'appareil peut être suspendu à un crochet
7 Nettoyage et entretien de l'appareil
Remarques
• Votre appareil n'exige aucun entretien.
• Protégez l'appareil contre les poussières,
les saletés et l'humidité.
Nettoyage
Attention
• Débranchez systématiquement la fiche
secteur de la prise de courant avant
d'effectuer le nettoyage.
• Veillez à ce que l'eau ne puisse par
parvenir à l'intérieur de l'appareil !
• Ne nettoyez pas l'appareil dans le lavevaisselle !
• N'utilisez pas d'objets tranchants, pointus,
• Ne nettoyez pas l'appareil avec des
• L'appareil et les éléments amovibles peuvent
• Séchez soigneusement l'appareil et les
retirez la mèche de cheveux.
cheveux.
l'interrupteur à coulisse [5] sur la position
"0".
posant avec l'étrier de redressement sur un
support stable, horizontal et ininflammable
ou maintenez le fer multifonctions dans la
main.
courant après chaque utilisation.
autour de l'appareil !
à l'abri des enfants.
par le biais de l'anneau de suspension [8].
de produits de nettoyage corrosifs ou de
brosses dures !
liquides facilement inflammables !
être nettoyés avec un chiffon doux et
humidifié à l'eau chaude.
éléments amovibles après le nettoyage !
34
Page 35

Nettoyage du fer à lisser / fer à crêper [F/G]
A
• Poussez le sélecteur [11] en position
"lissage" [a].
• Pressez le levier [3] pour ouvrir l'élément de
lissage / crêpage [12].
• Poussez avec les doigts de l'autre main le
sélecteur [11] en position "crêpage" [c]. Le
fer à lisser / fer à crêper [F, G] est
déverrouillé.
• Retirez le fer à lisser / fer à crêper [F, G] de
l'élément de lissage / crêpage [12].
• A présent le fer à lisser / fer à crêper [F, G]
peut également être nettoyé, comme les
autres éléments amovibles.
• Remontez le fer à lisser / fer à crêper [F, G]
après le nettoyage. Le montage s'effectue
dans le sens inverse du démontage.
8 Caractéristiques techniques
Poids env. 330 g
limentation électrique 220 à 240 V ~, 50 Hz
Puissance absorbée 25 W
Plage de température 125 à 160 °C
Degré de protection
Conditions environnementales Uniquement pour un usage à l'intérieur
Plage de température admissible -10 à +40 °C
Sous réserve de modifications techniques.
II
9 Mise au rebut
Dans l'intérêt de la protection de
l'environnement, à la fin de sa durée de vie
l'appareil ne doit pas être éliminé avec les
ordures ménagères.
La mise au rebut peut s'effectuer par le biais
de points de collecte compétents dans votre
pays.
Observez les prescriptions locales
concernant l'élimination des matériaux.
Eliminez l'appareil conformément à la
directive européenne 2002/96/CE –
WEEE (Waste Electrical and Electronic
Equipment) relative aux appareils
électriques et électroniques usagés
35
Page 36

Pour toute question, veuillez vous adresser
aux collectivités locales responsables pour
l'élimination et du recyclage de ces produits.
Vous obtiendrez des informations sur les
points de collecte pour votre appareil usagé
p. ex. auprès de la mairie de votre commune
ou ville, auprès des entreprises d'élimination
de déchets locales ou auprès de votre
revendeur.
36
Page 37

E Español
Índice
1 Introducción ............................................ 37
2 Aclaración de los símbolos ..................... 38
3 Uso previsto ............................................ 38
4 Indicaciones de seguridad para
su salud .................................................. 38
5 Descripción del aparato .......................... 40
6 Manejo .................................................... 42
7 Limpieza y cuidado del aparato .............. 46
8 Datos técnicos ........................................ 47
9 Eliminación ............................................. 47
1 Introducción
Con el moldeador multifunción puede darle las
más diversas formas a su pelo y crear un look
personal para cada ocasión.
La junta giratoria de 360° del cable de
corriente le permite manejar de un modo
flexible el moldeador multifunción.
El sistema de cierre fácil le permite cambiar
rápidamente las piezas adicionales.
El revestimiento de cerámica de la plancha
alisadora y onduladora proporciona un reparto
Volumen de suministro
• Moldeador multifunción
• Plancha alisadora
• Plancha onduladora
• Rizador grande
• Rizador pequeño
• Rizador plano
• Accesorio en espiral
• Cepillo adicional
• Estas instrucciones de uso
uniforme del calor y permite que el pelo se
deslice de manera óptima sobre su superficie.
Con ello obtendrá un moldeado perfecto sin
dañar el cabello.
El aparato tiene como única finalidad la
descrita en estas instrucciones de uso.
El fabricante no se responsabiliza de los
daños producidos por un uso inadecuado o
imprudente del aparato.
37
Page 38

2 Aclaración de los símbolos
Se utilizan los siguientes símbolos en las instrucciones de uso y en el aparato.
Peligro No debe utilizarse el aparato cerca del agua o ser sumergido en
agua (p. ej. lavabo, ducha, bañera). ¡Riesgo de electrocución!
Advertencia Nota de advertencia sobre peligros de lesiones o riesgo para su
salud.
Atención Nota de seguridad sobre posibles daños en el
aparato/accesorios.
Nota Nota sobre informaciones importantes.
3 Uso previsto
El moldeador multifunción está indicado para
su uso en el ámbito privado
Advertencia
Utilice el aparato exclusivamente:
• para aplicaciones externas
• con la finalidad para la que ha sido
desarrollado y de la forma que se indica en
estas instrucciones de uso.
Cualquier ucso indebido puede resultar
peligroso
El aparato dispone del etiquetado CE y
cumple con las siguientes directivas europeas:
• Directiva de baja tensión 2006/95/CE
• Directiva sobre compatibilidad
electromagnética 2004/108/CE
4 Indicaciones de seguridad para su salud
Advertencia
Para evitar daños en la salud, se
desaconseja el uso del aparato en los
siguientes casos:
• Cuando el aparato, el cable, el enchufe o
los componentes se encuentren
visiblemente dañados. En caso de dudas,
no lo utilice y consulte a su distribuidor o al
Servicio de Atención al Cliente indicado.
Para evitar daños en la salud, tenga en
cuenta los siguientes puntos:
• Las personas (incluidos niños) que, debido
a sus facultades físicas, sensoriales o
psíquicas, su inexperiencia o
desconocimiento, no estén en condiciones
de usar el aparato de forma segura, no
deberían hacerlo sin la supervisión o
indicación de una persona responsable.
• Se debe vigilar a los niños cuando usen el
aparato.
• Para extraer el cable de la toma de
corriente, hágalo tirando del enchufe.
38
Page 39
• Como protección adicional, se recomienda
la instalación de un dispositivo protector de
corriente de fuga RCD con una corriente
de desconexión de no más de 30 mA en el
circuito eléctrico del baño. Puede solicitar
más información en su empresa de servicio
eléctrico local.
• No use piezas de repuesto que no
recomiende el fabricante o que no se le
ofrezcan como accesorios.
• Asegúrese de que no haya líquidos que
puedan arder con facilidad cerca del
aparato.
• Coloque el aparato únicamente sobre una
superficie no inflamable.
• No utilice el aparato en cabellos artificiales.
¡Riesgo de incendio!
• No se debe cubrir el aparato. ¡Riesgo de
incendio!
• No debe abrir ni reparar el aparato en
ningún caso; de lo contrario, no se
garantiza su correcto funcionamiento.
En caso de no cumplir esta condición, se
anulará la garantía.
• En caso de avería o daño, lleve a reparar
el aparato a un establecimiento técnico
autorizado.
• Si se cae el aparato o ha sufrido otro tipo
de daños, no se debe volver a utilizar.
• No utilice alargadores en el cuarto de baño
con el fin de que, en caso de emergencia,
se pueda alcanzar el enchufe rápidamente.
• No deje el aparato desatendido durante su
uso.
• No utilice el aparato al aire libre.
• Si entrega el aparato a otra persona,
entréguele también las instrucciones de
uso.
Peligro
• Nunca utilice el aparato cerca de bañeras,
lavabos, duchas u otros recipientes que
contengan agua u otros líquidos. !Riesgo
de electrocución!
• Si, a pesar de todas las medidas
preventivas, el aparato cayera al agua,
desconecte el enchufe de la toma de
corriente. ¡No lo saque del agua!
• Antes de volver a utilizarlo, llévelo un
centro técnico autorizado para que lo
revise. ¡Peligro de muerte por descarga
eléctrica!
• Nunca sumerja el aparato en agua o en
cualquier otro líquido
Antes de la puesta en funcionamiento
Advertencia
• Mantenga a los niños alejados de los
materiales de embalaje. Peligro de asfixia.
• Antes de utilizar el aparato, retire todo el
material de embalaje.
• Conecte el aparato solo a una toma de
corriente que tenga la tensión indicada en
la placa de identificación.
• Si no la conoce, averigüe la tensión de
corriente del lugar en cuestión.
39
Page 40

5 Descripción del aparato
2 3 4 5 6
1
12 11 10
Pos. Nombre
1
Plancha de calor con recubrimiento
de cerámica
2 Tapa
3 Palanca para abrir la tapa
4 Luz de control de funcionamiento
5
Conmutador deslizante para los
niveles de calor:
0 apagado
1 nivel bajo
40
2 nivel alto
Pos. Nombre
6 Mango
7 Junta giratoria de 360°
8
Protección contra doblado con
argolla
9 Cable de red
10 Anillo de bloqueo
11
Conmutador-selector de la plancha
alisadora/onduladora [F, G]
12
Pieza adicional para
alisado/ondulado
7
8
9
Page 41

A B C
13 13 13
D E F G
Pos. Nombre
A
Rizador grande para rizos
voluminosos
B Rizador pequeño para rizos suaves
C Rizador plano para ondulaciones
D
Accesorio en espiral para
tirabuzones
Pos Nombre
E Cepillo adicional para ondas grandes
F
G Plancha alisadora para cabello liso
13 Asa abatible
Plancha onduladora para ondas
pequeñas
41
Page 42

6 Manejo
Atención
• Desenrede el cable de corriente [9] si está
retorcido.
• No enrede, doble o tire del cable de
corriente [9] ni lo coloque encima de
objetos punzantes o afilados o superficies
calientes.
• No aprisione el cable de corriente [9] con
cajones, puertas o entre las planchas
calientes [1, 2], entre otros.
Advertencia
• Colóquese sobre un suelo seco y no
conductivo eléctricamente.
• Asegúrese de tener las manos secas
• Su cabello debe estar seco
• El aparato puede calentarse mucho según
la regulación de temperatura y la duración
de uso. Cuando esté caliente, agárrelo solo
por el mango [6]. ¡Riesgo de quemaduras e
incendio!
• No toque las planchas calientes [1, 2]
• No toque las piezas adicionales mientras
estén calientes.
• No aprisione objetos entre las planchas de
calor [1, 2] ni entre el tubo calorífero y la
pinza del rizador.
• Desconecte el aparato inmediatamente si
está defectuoso o si existen anomalías en
su funcionamiento.
Cambiar las piezas adicionales
Advertencia
• Deje enfriar siempre la pieza encajada
antes de desmontarla. ¡Riesgo de
quemaduras!
• Elija la pieza adicional adecuada para el
tipo de peinado [12, A, B, C].
• Gire el anillo de bloqueo [10] hasta el
tope en el sentido de las agujas del reloj.
Se desbloqueará la pieza adicional
acoplada.
• Saque la pieza adicional del mango [6].
• Coloque la pieza seleccionada como se
indica en la imagen.
• Coloque con cuidado la pieza adicional
elegida en el mango [6] sin bloquear ambas
clavijas de metal.
• Gire el anillo de bloqueo [10] hasta el tope
en el sentido contrario al de las agujas del
reloj. Se bloqueará la pieza adicional.
• Compruebe si la pieza adicional está bien
unida al mango.
42
Page 43

• Coloque el moldeador multifunción con el
asa abatible desplegada [13] sobre una
superficie no inflamable, horizontal y firme,
o sosténgalo en la mano.
Ajustar la temperatura
La temperatura puede ajustarse en dos
niveles con el conmutador deslizante [5].
Recomendamos el siguiente ajuste de
temperatura:
Nivel Tipo de cabello
1: bajo
2: alto Cabello fuerte y normal
Nota
• Cuanto mayor sea la temperatura, más
rápido obtendrá el resultado que desea.
• Elija con el conmutador deslizante [5] el
nivel de temperatura que desee.
• El moldeador multifunción estará listo para
usarse en pocos minutos.
Cabello rubio o teñido,
quebradizo o fino
Dar forma al cabello
Preparar el cabello
• Séquese bien el cabello antes utilizar el
moldeador multifunción.
• El cabello debe estar limpio y no llevar
ningún producto de estilismo.
• Cepíllese el cabello con un cepillo de
cerdas gruesas para desenredarlo.
Crear rizos/ondas
Utilice los distintos rizadores [A, B, C] para dar
forma al cabello:
• Reparta el cabello en mechones
individuales con una anchura de unos
2 centímetros. Mantenga los mechones
estirados.
• Presione la palanca del rizador para abrir la
pinza.
• Coloque los mechones con las puntas del
cabello entre el tubo calorífero y la pinza del
rizador.
• Cierre la pinza para fijar los mechones de
pelo.
• Envuelva los mechones en el rizador con
dirección a la cabeza.
• Deje el rizador en el cabello de 8 a 10
segundos. De este modo, obtendrá los
mejores resultados sin estropear o dañar
demasiado el cabello.
• Abra la pinza y retire con cuidado el tubo
calorífero del rizo.
Dar forma a las puntas del cabello
• Coloque los mechones con las puntas del
cabello entre el tubo calorífero y la pinza del
rizador.
• Cierre la pinza para fijar los mechones de
pelo.
• Podrá dar forma a las puntas del cabello
girando el rizador, bien hacia dentro o hacia
fuera, antes de tirar del rizador hacia fuera
sobre las puntas del cabello.
43
Page 44
Utilizar el cepillo adicional
Utilizar el accesorio en espiral
Utilice el cepillo adicional [E] con el rizador [B]:
• Compruebe si el rizador [B] se ha enfriado.
• Desplace con cuidado el cepillo adicional
[E] con la entalladura hacia arriba hasta el
tope del rizador [B].
• Reparta el cabello en mechones
individuales. Mantenga los mechones
estirados.
• Envuelva los mechones en el cepillo.
• Espere unos 10 segundos antes de
desenvolver los mechones.
Utilice el accesorio en espiral [D] con el
rizador [A]:
• Compruebe si el rizador [A] se ha enfriado.
• Deslice el accesorio espiral [D] con los
peines en el accesorio hacia arriba hasta el
centro por encima del rizador de pelo [A]
cerrado y enfriado.
• Presione la palanca del rizador para abrir la
pinza.
• Desplace con cuidado el accesorio en
espiral [D] hasta el tope del rizador [A].
• Cierre la pinza del rizador.
• Reparta el cabello en mechones
individuales. Mantenga los mechones
estirados.
44
Page 45

• Presione la palanca del rizador [A] para
abrir la pinza.
• Coloque los mechones con las puntas del
cabello entre el tubo calorífero y la pinza del
rizador [A].
• Cierre la pinza para fijar los mechones de
pelo.
Utilizar la plancha alisadora
• Encaje la pieza adicional para alisado/
ondulado [12] en el moldeador multifunción.
• Envuelva los mechones en el accesorio en
espiral [D] en dirección a la cabeza.
Asegúrese de que envuelve los mechones
de pelo como se muestra en la imagen.
• Espere unos 10 segundos antes de
desenvolver los mechones de pelo.
• Abra la pinza del rizador y retire con
cuidado el rizo del tubo calorífero.
alisar cerrado ondular
• Mueva el conmutador-selector [11] a la
posición "alisar" [a]. Ahora se podrá utilizar
la plancha alisadora [G].
• Reparta el cabello en mechones individuales
con una anchura de unos 3 centímetros.
Mantenga los mechones estirados y
colóquelos entre las planchas alisadoras [G]
por la raíz.
• Mueva el alisador despacio y uniformemente
desde la raíz hasta las puntas del cabello. No
deje el alisador de cabello más de 8 -10
segundos en la misma posición. De este modo
obtendrá los mejores resultados sin estropear
o dañar demasiado el cabello.
• Podrá dar forma a las puntas del cabello
girando el alisador, hacia dentro o hacia
fuera, antes de tirar del rizador hacia fuera
sobre las puntas del cabello.
45
Page 46

Utilizar la plancha onduladora
• Encaje la pieza adicional para
alisado/ondulado [12] en el moldeador
multifunción.
• Mueva el conmutador-selector [11] a la
posición "ondular" [c]. Ahora se podrá
utilizar la plancha onduladora [F].
• Reparta el cabello en mechones
individuales. Mantenga los mechones
estirados y colóquelos entre las planchas
onduladoras [F] por la raíz del cabello.
• Cierre la plancha onduladora [F] durante
unos 10 segundos. De este modo obtendrá
los mejores resultados sin estropear o
dañar demasiado el cabello.
7 Limpieza y cuidado del aparato
Indicaciones
• Su aparato no requiere mantenimiento.
• Proteja el aparato del polvo, la suciedad y la
humedad.
Limpieza
Atención
• Antes de limpiar el aparato, desconecte
siempre el enchufe de la toma de corriente.
• Procure que no entre agua en el interior del
aparato.
• No lave el aparato en el lavavajillas.
• Abra de nuevo la plancha onduladora [F]
y saque los mechones.
• Repita el proceso hasta que haya llegado a
las puntas del cabello.
Después del uso
• Cambie la posición del conmutador
deslizante [5] del aparato a 0.
• Deje enfriar el moldeador multifunción con
el asa abatible sobre una superficie no
inflamable, horizontal y firme, o sosténgalo
en la mano.
• Desconecte el enchufe de la toma de
corriente después de cada uso.
• No enrolle el cable de corriente [9]
alrededor del aparato.
• Guarde el aparato en un lugar seco fuera
del alcance de los niños.
• El aparato se podrá colgar de la argolla [8]
en un gancho.
• No use ningún producto de limpieza que
sea corrosivo, abrasivo, punzante o
cortante, ni cepillos rígidos.
• No lo limpie con líquidos que puedan arder
con facilidad.
• Podrá limpiar el aparato y los accesorios con
un paño humedecido en agua caliente.
• Seque bien el aparato y los accesorios
después de limpiarlos.
46
Page 47

Limpieza de las planchas
A
alisadoras/onduladoras [F/G]
• Mueva el conmutador-selector [11] a la
posición "alisar" [a].
• Presione la palanca [3] para abrir la pieza
adicional para alisado/ondulado [12].
• Mueva el conmutador-selector [11] con los
dedos de la otra mano a la posición
"ondular" [c]. Se desbloqueará la plancha
alisadora/onduladora [F, G].
• Saque la plancha de alisado/rizado [F, G]
de la pieza adicional para
alisado/ondulado [12].
• Ahora también se podrá limpiar la plancha
de alisado/ondulado como las otras piezas.
• Monte de nuevo la plancha alisadora/
onduladora [F, G] después de limpiarla. Para
el montaje se siguen los mismos pasos que en
el desmontaje, pero a la inversa.
8 Datos técnicos
Peso aprox. 330 g
limentación de tensión 220 hasta 240 V ~, 50 Hz
Consumo de potencia 25 W
Rango de temperatura 125 hasta 160 °C
Clase de protección
Condiciones del entorno Indicado exclusivamente para uso interior
Rango de temperatura permitido -10 hasta +40 °C
Reservado el derecho a realizar modificaciones técnicas.
II
9 Eliminación
En interés de la protección del medio ambiente,
cuando el aparato cumpla su vida útil no debe
eliminarse junto con la basura doméstica.
La eliminación se puede hacer en el punto limpio
correspondiente de su país.
Cumpla las normativas locales para la
eliminación de materiales.
Elimine el aparato según lo establecido
en la Directiva 2002/96 /CE – WEEE
(Waste Electrical and Electronic
Equipment) sobre residuos de aparatos
eléctricos y electrónicos.
47
Page 48

Si tiene alguna duda o consulta le rogamos
que se ponga en contacto con el organismo
responsable de su municipio.
Podrá deshacerse de su antiguo aparato, por
ejemplo, llevándolo al ayuntamiento de su
ciudad o comunidad, a la empresa de
recogida de basura o a su fabricante.
48
Page 49

I Italiano
Indice
1 Informazioni sul prodotto ........................ 49
2 Significato dei simboli ............................. 50
3 Utilizzo conforme alle disposizioni .......... 50
4 Avvertenze di sicurezza per la salute ..... 50
5 Descrizione dell'apparecchio .................. 52
6 Funzionamento ....................................... 54
7 Pulizia e cura dell'apparecchio ............... 58
8 Dati tecnici .............................................. 59
9 Smaltimento ............................................ 59
1 Informazioni sul prodotto
Con lo styler multifunzione è possibile creare
tantissimi tipi di acconciature e realizzare il
look giusto per ogni occasione.
La rotazione a 360° del cavo di alimentazione
rende lo styler multifunzione molto
maneggevole.
Grazie al sistema easy lock è possibile
passare velocemente da un accessorio
all'altro.
Il rivestimento in ceramica del ferro per frisé
e del ferro lisciacapelli permette una
La fornitura comprende:
• Styler multifunzione
• Ferro lisciacapelli
• Ferro per frisé
• Arricciacapelli (grande)
• Arricciacapelli (piccolo)
• Arricciacapelli (piatto)
• Accessorio a spirale
• Accessorio a spazzola
• Le presenti istruzioni per l'uso
distribuzione uniforme del calore e crea una
struttura superficiale liscia. Il che permette di
creare uno styling delicato dei propri capelli.
L'apparecchio è idoneo solo all'utilizzo
descritto nelle presenti istruzioni per l'uso.
Il produttore non può essere ritenuto
responsabile di danni derivanti da un utilizzo
non idoneo o non appropriato
dell'apparecchio.
49
Page 50

2 Significato dei simboli
A
A
I seguenti simboli vengono utilizzati nelle istruzioni per l'uso o sull'apparecchio.
Pericolo L'apparecchio non deve essere utilizzato quando ci si trova vicino
Avviso Segnalazione circa il rischio di incidenti o pericoli per la salute.
Attenzione
Nota
all'acqua o nell'acqua (ad esempio lavandino, doccia, vasca da
bagno) – pericolo di scossa elettrica!
vvertenza di sicurezza circa la possibilità di danni
all'apparecchio o agli accessori.
vvertenza contenente informazioni importanti.
3 Utilizzo conforme alle disposizioni
Lo styler multifunzione può essere usato
esclusivamente per mettere in piega e
acconciare i capelli, maneggiandolo
personalmente e in ambito privato!
Avviso
Utilizzare l'apparecchio esclusivamente:
• per uso esterno
• per lo scopo per cui è stato progettato, e
secondo le modalità descritte nelle presenti
istruzioni per l'uso.
Qualsiasi utilizzo non conforme alle
disposizioni può risultare pericoloso!
L'apparecchio riporta la marcatura CE ed
è conforme alle seguenti direttive UE:
• 2006/95/CE Direttiva bassa tensione
• 2004/108/CE Direttiva EMC
4 Avvertenze di sicurezza per la salute
Avviso
Per evitare danni alla salute, si sconsiglia
vivamente l'utilizzo dell'apparecchio nei
seguenti casi:
• In caso di danneggiamento visibile
dell'apparecchio, del cavo o della spina di
alimentazione, oppure degli accessori. Se
si hanno dubbi, non utilizzare l'apparecchio
e rivolgersi al rivenditore o al servizio di
assistenza clienti, all'indirizzo indicato.
Per evitare danni alla salute, rispettare le
seguenti indicazioni:
• Le persone (bambini compresi) che, a
causa delle loro capacità fisiche, sensoriali
o intellettive, della loro mancanza di
esperienza o di conoscenze, non sono in
grado di usare l'apparecchio in modo
sicuro, non possono utilizzarlo senza la
supervisione o la guida di una persona
responsabile.
• È necessario sorvegliare i bambini quando
utilizzano l'apparecchio.
50
Page 51

• Estrarre il cavo dalla presa afferrandolo
sempre per la spina.
• Come ulteriore misura protettiva, si
raccomanda l'installazione nel circuito
elettrico della stanza da bagno di un
dispositivo differenziale con taratura della
corrente di scatto non superiore a 30 mA.
Per informazioni in proposito, consultare il
locale rivenditore specializzato in forniture
elettriche.
• Non utilizzare componenti aggiuntivi che
non siano stati raccomandati dal produttore
oppure offerti come accessori.
• Assicurarsi che nelle vicinanze
dell'apparecchio non vi siano liquidi
facilmente infiammabili.
• Appoggiare l'apparecchio solo su una
superficie non infiammabile.
• Non utilizzare l'apparecchio con capelli
sintetici – pericolo di incendio!
• Non coprire l'apparecchio – pericolo di
incendio!
• Non aprire o riparare mai l'apparecchio,
perché altrimenti non si garantisce più il
suo corretto funzionamento. Nel caso
questa disposizione non venga rispettata,
la garanzia decade.
• In caso di guasto o danneggiamento, far
riparare l'apparecchio presso un'officina
specializzata.
• Se l'apparecchio è caduto o ha subito
danneggiamenti di altro tipo, non può più
essere utilizzato.
• Non utilizzare prolunghe nella stanza da
bagno, affinché in caso di emergenza la
spina di alimentazione sia velocemente
raggiungibile.
• Non lasciare mai l'apparecchio incustodito
durante l'uso.
• Non utilizzare l'apparecchio all'aperto.
• Se si consegna l'apparecchio a un'altra
persona, allegare le presenti istruzioni per
l'uso.
Pericolo
• Non utilizzare mai l'apparecchio in
vicinanza di vasche da bagno, lavandini,
docce o altri recipienti contenenti acqua o
altri liquidi – pericolo di scossa elettrica!
• Se, nonostante tutte le precauzioni,
l'apparecchio dovesse cadere nell'acqua,
estrarre immediatamente la spina dalla
presa! Non mettere le mani nell'acqua!
• Prima di usare nuovamente l'apparecchio,
è necessario farlo revisionare presso
un'officina specializzata! Pericolo di morte
a causa di scosse elettriche!
• Non immergere mai l'apparecchio
nell'acqua o in altri liquidi!
Prima di usare l'apparecchio per la
prima volta
Avviso
• Tenere i bambini lontani dal materiale di
imballaggio – pericolo di soffocamento!
• Prima di usare l'apparecchio, rimuovere
tutti i materiali di imballaggio.
• Collegare l'apparecchio esclusivamente a
una presa che utilizzi il voltaggio indicato
sulla targhetta dei dati tecnici.
• Se non la si conosce, è indispensabile
informarsi su quale sia la tensione di
alimentazione locale.
51
Page 52
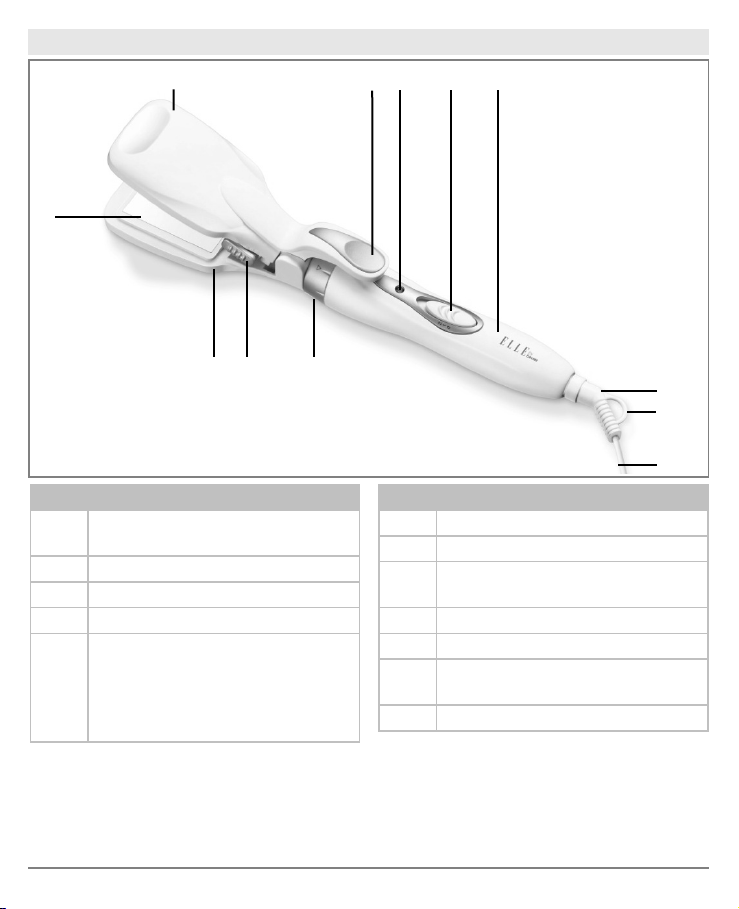
5 Descrizione dell'apparecchio
2 3 4 5 6
1
12 11 10
Pos. Descrizione
1
Piastra riscaldante rivestita in
ceramica
2 Placche di sicurezza
3 Leva per aprire le placche
4 Spia di controllo
5
Interruttore a scorrimento per la
regolazione del calore:
0 Off
1 livello basso
52
2 livello alto
Pos. Descrizione
6 Impugnatura
7 Rotazione a 360°
8
Rinforzo antipiegamento con
occhiello per appendere
9 Cavo di alimentazione
10 Anello di chiusura
11
Interruttore per la funzione ferro
lisciacapelli e ferro per frisé [F, G]
12 Accessorio lisciacapelli e per frisé
7
8
9
Page 53

A B C
13 13 13
D E F G
Pos. Descrizione
A
Arricciacapelli (grande) per ricci
voluminosi
B
Arricciacapelli (piccolo) per ricci
delicati
C Arricciacapelli (piatto) per frisé
D Accessorio a spirale per boccoli
Pos. Descrizione
E
F Ferro per frisé
G Ferro lisciacapelli per capelli lisci
13
Accessorio a spazzola per onde
morbide
Supporto per appoggiare il ferro
arricciacapelli
53
Page 54

6 Funzionamento
Attenzione
• Districare il cavo di alimentazione [9] se è
attorcigliato.
• Non tirare, ruotare o piegare il cavo di
alimentazione [9], e non tirarlo o
appoggiarlo su oggetti appuntiti o taglienti,
oppure su superfici calde.
• Non piegare il cavo di alimentazione [9]
ad es. nei cassetti, nelle porte o tra le
piastre riscaldanti [1, 2].
Avviso
• Stare su una superficie asciutta e non
conduttiva.
• Assicurarsi che le mani siano asciutte!
• I capelli devono essere asciutti!
• L'apparecchio può diventare molto caldo a
seconda della temperatura impostata e
della durata di utilizzo. Quando è caldo,
afferrarlo solo dall'impugnatura [6]
– pericolo di ustioni e di incendio!
• Non toccare le piastre riscaldanti [1, 2]!
• Non toccare gli accessori finche non si
sono raffreddati!
• Non incastrare alcun oggetto tra le piastre
riscaldanti [1, 2] e il tubo elettrico e
l'arricciacapelli.
• Spegnere subito l'apparecchio nel caso in
cui fosse difettoso o si verificassero
anomalie nel funzionamento.
Cambiare gli accessori
Avviso
• Prima di estrarre l'accessorio inserito,
accertarsi che si sia raffreddato - pericolo
di incendio!
• Scegliere l'accessorio adatto
all'acconciatura che si intende creare
[12, A, B, C].
• Ruotare l'anello di chiusura [10] in senso
orario fino allo scatto. L'accessorio inserito
si sblocca.
• Tirare l'accessorio dall'impugnatura [6].
• Sistemare l'accessorio prescelto seguendo
le indicazioni della figura.
• Inserire accuratamente l'accessorio
prescelto nell'impugnatura [6] facendo
attenzione alle punte metalliche.
• Ruotare l'anello di chiusura [10] in senso
antiorario fino allo scatto. L'accessorio si
blocca.
• Verificare il corretto inserimento di
accessorio e impugnatura.
54
Page 55
• Riporre lo styler multifunzione in posizione
orizzontale oppure, utilizzando il supporto
estraibile [13], appoggiarlo su una superficie
stabile, piatta e non infiammabile oppure
tenerlo in mano.
Regolazione della temperatura
L'interruttore a scorrimento [5] permette una
regolazione della temperatura su due livelli.
Consigliamo la seguente impostazione di
temperatura:
Livello Tipo di capelli
1: basso
2: alto capelli normali e forti
Nota
• Più alta è la temperatura selezionata, più in
fretta si riesce a ottenere il risultato
desiderato.
• Scegliere la temperatura desiderata
utilizzando l'interruttore a scorrimento [5].
• Lo styler multifunzione sarà pronto per l'uso
dopo pochi minuti.
capelli fini, fragili, tinti e
ossigenati
Acconciare i capelli
Preparazione dei capelli
• Asciugare i capelli in modo accurato prima
di utilizzare lo styler multifunzione.
• I capelli devono essere puliti e privi di
prodotti per lo styling.
• Pettinare i capelli con un pettine a denti
larghi per districarli.
Modellare ricci e onde
È possibile modellare i capelli utilizzando gli
arricciacapelli [A, B, C]:
• Dividere i capelli in singole ciocche larghe
circa 2 centimetri. Tenere la ciocca tesa.
• Spingere sulla leva per aprire
l'arricciacapelli.
• Inserire le ciocche di capelli con le punte tra
il tubo elettrico e l'arricciacapelli.
• Chiudere l'arricciacapelli per fissare le
ciocche di capelli.
• Avvolgere le ciocche sul ferro procedendo
verso la testa.
• Lasciare i capelli inseriti nel ferro
arricciacapelli per 8 - 10 secondi. Così si
ottiene il miglior risultato senza sciupare
troppo i capelli o rovinarli.
• Aprire l'arricciacapelli ed estrarre con
cautela il tubo elettrico dai capelli.
Come modellare le punte dei capelli
• Inserire le ciocche di capelli con le punte tra
il tubo elettrico e l'arricciacapelli.
• Chiudere l'arricciacapelli per fissare le
ciocche di capelli
• Si possono modellare le punte dei capelli
ruotando il ferro arricciacapelli verso
l'esterno o l'interno prima di lasciar andare
la ciocca.
55
Page 56

Utilizzare l'accessorio a spazzola
Utilizzare l'accessorio a spirale
È possibile utilizzare l'accessorio a
spazzola [E] con l'arricciacapelli [B]:
• Verificare che l'arricciacapelli [B] si sia
raffreddato.
• Sistemare accuratamente l'accessorio a
spazzola [E] con l'intaglio rivolto verso l'alto
fino allo scatto nell'arricciacapelli
raffreddato [B].
• Dividere i capelli in singole ciocche. Tenere
la ciocca tesa.
• Avvolgere le ciocche intorno alla spazzola.
• Attendere circa 10 secondi prima di
svolgere le ciocche.
È possibile utilizzare l'accessorio a spirale [D]
con l'arricciacapelli [A]:
• Verificare che l'arricciacapelli [A] si sia
raffreddato.
• Spingere la spirale [D] con le scanalature
sull'accessorio verso l'alto fino al centro
dell'arricciacapelli raffreddato e chiuso [A].
• Spingere sulla leva per aprire
l'arricciacapelli.
• Sistemare accuratamente l'accessorio a
spirale [D] fino allo scatto sull'arricciacapelli
[A] freddo.
• Chiudere l'arricciacapelli.
• Dividere i capelli in singole ciocche.
Tenere la ciocca tesa.
56
Page 57

• Spingere sulla leva dell'arricciacapelli [A]
per aprirlo.
• Inserire le ciocche di capelli con le punte
tra il tubo elettrico e l'arricciacapelli [A].
• Chiudere l'arricciacapelli per fissare le
ciocche di capelli.
Utilizzo del ferro lisciacapelli
• Inserire l'accessorio lisciacapelli/frisé [12]
nello styler multifunzione.
• Avvolgere le ciocche intorno all'accessorio a
spirale procedendo verso la testa [D].
Avvolgere le ciocche dei capelli
accuratamente procedendo come indicato
nella figura.
• Attendere circa 10 secondi prima di
svolgere le ciocche.
• Aprire l'arricciacapelli ed estrarre con
cautela i capelli.
liscio inattivo frisé
• Posizionare l'interruttore [11] su "liscio" [a].
Adesso è possibile utilizzare il ferro
lisciacapelli [G].
• Dividere i capelli in singole ciocche larghe
circa 3 centimetri.. Tenere la ciocca tesa e
inserirla tra i ferri lisciacapelli [G] in
corrispondenza dell'attaccatura dei capelli.
• Muovere la piastra lentamente e in modo
costante dall'attaccatura fino alle punte dei
capelli. Non rimanere con il lisciacapelli più
di 8 - 10 secondi sullo stesso punto. Così si
ottiene il miglior risultato senza sciupare
troppo i capelli o rovinarli.
• Si possono modellare le punte dei capelli
ruotando la piastra verso l'esterno o l'interno
prima di lasciar andare la ciocca.
57
Page 58

Utilizzo del ferro per frisé
• Inserire l'accessorio lisciacapelli/frisé [12]
nello styler multifunzione.
• Posizionare l'interruttore [11] su "frisé" [c].
Adesso è possibile utilizzare il ferro per
frisé [F].
• Dividere i capelli in singole ciocche. Tenere
la ciocca tesa e inserirla tra i ferri per frisé
[F] in corrispondenza dell'attaccatura dei
capelli.
• Chiudere il ferro per frisé [F] per circa 10
secondi. Così si ottiene il miglior risultato
senza sciupare troppo i capelli o rovinarli.
7 Pulizia e cura dell'apparecchio
Avvertenze
• L'apparecchio non necessita di
manutenzione.
• È sufficiente proteggerlo dalla polvere,
dalla sporcizia e dall'umidità.
Pulizia
Attenzione
• Prima di pulire l'apparecchio, estrarre
sempre la spina dalla presa.
• Assicurarsi che non entri acqua all'interno
dell'apparecchio!
• Non lavare l'apparecchio nella
lavastoviglie!
• Riaprire il ferro per frisé [F] ed estrarre le
ciocche.
• Ripetere l'operazione fino alle punte.
Dopo l'uso
• Spegnere l'apparecchio posizionando
l'interruttore a scorrimento [5] su 0.
• Lasciar raffreddare lo styler multifunzione.
Utilizzando l'apposito supporto, posizionare
il ferro arricciacapelli su una superficie
stabile, piatta e non infiammabile oppure
tenerlo in mano.
• Dopo ogni utilizzo, estrarre la spina dalla
presa.
• Non avvolgere il cavo di alimentazione [9]
intorno all'apparecchio!
• Riporre l'apparecchio in un luogo asciutto e
fuori dalla portata dei bambini.
• Si può appendere l'apparecchio a un gancio
mediante l'apposito occhiello [8].
• Non utilizzare oggetti taglienti o appuntiti,
detergenti abrasivi o aggressivi, oppure
spazzole dure!
• Non pulire l'apparecchio con liquidi
facilmente infiammabili!
• È possibile pulire l'apparecchio e gli accessori
con un panno morbido, leggermente
inumidito con acqua tiepida.
• Asciugare accuratamente l'apparecchio e gli
accessori dopo averli puliti!
58
Page 59

Pulizia del ferro lisciacapelli/frisé [F/G]
• Posizionare l'interruttore [11] su "liscio" [a].
• Premere la leva [3] per aprire l'accessorio
lisciacapelli/frisé [12].
• Utilizzando la mano libera, spingere
l'interruttore [11] su "frisé" [c]. Il ferro
lisciacapelli/frisé [F, G] si sblocca.
• Estrarre il ferro lisciacapelli/frisé [F, G]
dall'accessorio lisciacapelli/frisé [12].
• Adesso è possibile pulire il ferro
lisciacapelli/frisé [F, G] come gli altri
accessori.
• Dopo la pulizia, rimontare il ferro
lisciacapelli/frisé [F, G]. Per rimontarlo
procedere in modo inverso rispetto allo
smontaggio.
8 Dati tecnici
Peso circa 330 g
Tensione di alimentazione da 220 a 240 V ~, 50 Hz
Potenza assorbita 25 W
Livelli di temperatura da 125 fino a 160 °C
Classe di protezione
Condizioni ambientali Omologato solo per uso in ambienti chiusi
Intervallo di temperatura consentito da -10 fino a +40 °C
Con riserva di modifiche tecniche.
II
9 Smaltimento
Per la salvaguardia dell'ambiente, alla fine
della sua vita utile l'apparecchio non deve
essere smaltito insieme ai normali rifiuti
domestici.
Lo smaltimento avviene a opera di centri di
raccolta autorizzati del proprio paese.
Rispettare le disposizioni locali per lo
smaltimento dei materiali.
Smaltire l'apparecchio rispettando le
norme previste dalla direttiva CE sui
rifiuti d'apparecchi elettrici ed elettronici
2002/96/CE – WEEE (Waste Electrical
and Electronic Equipment).
59
Page 60

In caso di domande, rivolgersi agli organismi
comunali competenti sullo smaltimento.
L'ubicazione dei punti di ritiro delle
apparecchiature vecchie può essere richiesta
all'Amministrazione comunale, alle imprese
locali di smaltimento rifiuti oppure al proprio
rivenditore.
60
Page 61

T Türkçe
İçerik
1 Ürün Özellikleri ....................................... 61
2 İşaretlerin açıklaması .............................. 62
3 Amacına uygun kullanım ........................ 62
4 Sağlığınız için Güvenlik Talimatları ........ 62
5 Cihaz açıklaması .................................... 64
6 Kullanım .................................................. 66
7 Cihaz temizliği ve bakımı ........................ 70
8 Teknik veriler .......................................... 71
9 Elden çıkarma ......................................... 71
1 Ürün Özellikleri
Çok fonksiyonlu şekillendiriciilesaçlarınızı
farklı şekillere sokabilir ve her ortam için
kişisel saç modelinizi yaratabilirsiniz.
Çok fonksiyonlu şekillendiricinin şebeke
kablosundaki 360° dönen mafsal kullanım
kolaylığı sağlamaktadır.
Kolay kilit sistemi başlıkların çabuk değişimini
sağlamaktadır.
Teslimat kapsamı
• Çok fonksiyonlu şekillendirici
• Düzleştirici maşa
• Tost maşası
• Büyük saç maşası
• Küçük saç maşası
• Düz saç maşası
• Spiral başlık
• Fırçalı başlık
• Bu kullanım kılavuzu
Tost ve düzleştirici maşanın seramik
kaplaması, orantılı sıcaklık dağılımını ve saç
yüzeyinin düzleşmesini sağlar. Bu saçınızı
koruyarak şekillendirmenize imkan verir.
Cihaz sadece kullanım kılavuzunda açıklanan
şekilde kullanı
Uygunsuz ve dikkatsiz kullanımdan ötürü
oluşacak hasarlardan üretici firma sorumlu
değildir.
m için tasarlanmıştır.
61
Page 62

2 İşaretlerin açıklaması
Aşağıdaki semboller kullanım kılavuzunda ya da cihazın üzerinde kullanılmıştır.
Tehlike Cihaz su yakınında ya da suda
Uyarı Yaralanma ve sağlığınız için tehlike uyarı talimatları.
Dikkat Cihaz ve aksesuarlarındaki olası hasarlar için güvenlik uyarısı.
Not Önemli bilgilere yönelik not.
(örneğin Lavaboda, Duşta, Küvette) kullanılmamalıdır – Elektrik
çarpma tehlikesi!
3 Amacına uygun kullanım
Çok fonksiyonlu şekillendirici
sadecesaçlarınızı biçimlendirmek ve
şekillendirmek amaçlı şahsi kullanım içindir!
Uyarı
Cihazı sadece şu şekilde kullanınız:
• haricen kullanım
• Amacına uygun, tasarlanan ve kullanım
kılavuzunda belirtilen şekilde
kullanılmalıdır.
Her uygunsuz kullanım tehlikeli olabilir!
Cihaz CE sembolü taşımaktadır ve AB
standartlarına uygundur:
• 2006/95/EC Alçak gerilim standartları
• 2004/108/EC EMV standartları
4 Sağlığınız için Güvenlik Talimatları
Uyarı
Sağlığa zararını önlemek için aşağıda
belirtilen durumlarda cihazın kullanımı
tavsiye edilmez:
• Cihazın, kablosunun veya fişinin ve
aksesuarlarının gözle görülür hasarında.
Şüpheli durumlarda kullanmayın ve
satıcınıza veya belirtilen müşteri hizmetleri
adresine başvurun.
Sağlığa zararını önlemek için aşağıda
belirtilen hususları dikkate alınız:
• Fiziksel, algısal ve akli becerileri nedeniyle
ya da tecrübesizlik ve bilgisizliklerinden
dolayı cihazı kullanamayacak durumda
olan kişiler (çocuklar dahil), cihazı yetkili bir
kişinin gözetimi ve direktifleri olmadan
kullanmamalıdır.
• Çocuklar gözetim altında kullanmalıdırlar.
• Kabloyu sadece fişinden tutup çekin.
• Ek koruma önlemi olarak, banyonun
elektrik devresinde 30 mA den daha fazla
olmayan kaçak akımını ölçen elektrik
koruyucu cihaz RCD kurulumu tavsiye
edilmektedir. Daha fazla bilgi için
62
Page 63
bölgenizdeki yetkili elektrik servisine
başvurunuz.
• Üretici tarafından tavsiye edilmeyen veya
aksesuar olarak sunulmayan ek parçalar
kullanmayın.
• Kolay alev alabilecek sıvıların cihazın
yanında olmamasına dikkat ediniz.
• Cihazı sadece ısıya dayanıklı yerlere
koyunuz.
• Cihazı sentetik saçlarda kullanmayın. –
Yangın tehlikesi!
• Cihaz örtülmemelidir.–Yangın tehlikesi!
• Cihazı kesinlikle açmayınız ve tamir
etmeyiniz, aksi taktirde kusursuz çalışması
garanti edilememektedir. Bu husus dikkate
alınmadığı takdirde garanti geçerliliğini
yitirir.
• Arıza veya hasar durumlarında cihazı
yetkili servise tamir ettiriniz.
• Cihaz düşürüldüğü ya da başka türlü hasar
aldığı taktirde bir daha kullanılmamalıdır.
• Acil durumlarda fişe hemen ulaşabilmek
için banyoda uzatma kablosu kullanmayın.
• Cihazı kullanılırken gözetiminiz altında
olmalıdır.
• Cihazı açık alanda kullanmayın.
• Cihazı üçüncü şahıslara verirken kullanım
kılavuzunu yanında veriniz.
Tehlike
• Cihazı hiçbir zaman tehlike oluşturabileceği
küvet, lavabo, duş ve benzeri su ya da sıvı
içeren yerlerde kullanmayın. – Elektrik
çarpma tehlikesi!
• Tüm koruma önlemlerine rağmen cihaz
suya düşerse hemen fişini prizden çekin!
Suyun içine elinizi sokmayınız!
• Tekrar kullanıma almadan önce yetkili
teknik servis tarafından cihazı kontrol
ettiriniz! Elektrik çarpmasından dolayı
hayati tehlike!
• Cihazı hiç bir zaman suya ya da başka bir
sıvıya sokmayınız!
Kullanımdan Önce
Uyarı
• Çocukları ambalaj malzemesinden uzak
tutun - Boğulma tehlikesi!
• Kullanım öncesi cihazdan her türlü ambalaj
malzemesi çıkartılmalıdır.
• Cihazı sadece model etiketindeki belirtilen
gerilimli prize takınız.
• Yerel şebeke gerilimi bilginiz dışındaysa
öğreniniz.
63
Page 64

5 Cihaz açıklaması
2 3 4 5 6
1
12 11 10
Pos Adlandırma
1 Seramik kaplı ısı plakası
2 Kapak
3 Kapağı açmak için kaldıraç
4 Çalışma kontrol ışığı
5 Isı ayarlarının sürme şalteri:
0 Kapalı
1 Düşük ayar
64
2 Yüksek ayar
Pos Adlandırma
6 Kol
7 360° dönen mafsal
8 Kulplu bükülme koruyucusu
9 Elektrik kablosu
10 Kilitleme halkası
11
Düzleştirici veya tost maşası [F, G]
fonksiyonlarının seçme şalteri
12 Düzleştirici veya tost maşası başlığı
7
8
9
Page 65

A B C
13 13 13
D E F G
Pos Adlandırma
A
Hacimli bukleler için büyük saç
maşası
B
Yumuşak dalgalar için küçük saç
maşası
C Tostlu bukleler için düz saç maşası
TR Kıvırcık bukleler için spiral başlık
Pos Adlandırma
E Yumuşak dalgalar için fırçalı başlık
F Tostlu dalgalar için tost maşası
G Düz saçlar için düzleştirici maşa
13 Yüzeyi yakmasını engelleyen sistem
65
Page 66

6 Kullanım
Dikkat
• Şebeke kablosu [9] büküldüyse düzeltiniz.
• Şebeke kablosunu [9] çekmeyin ve
bükmeyiniz. Keskin yada sivri nesnelerin
üzerine veya sıcak yüzeylere koymayınız.
• Şebeke kablosunu [9] örneğin
çekmecelere, kapılara veya ısı plakaları [1,
2] arasına sıkıştırmayınız.
Uyarı
• Kuru ve elektrik akımını iletmeyen bir yüzey
üzerinde durunuz.
• Ellerinizin kuruluğundan emin olunuz!
• Saçlarınız kuru olmalıdır!
• Cihaz ısı ayarına ve kullanım süresine göre
çok sıcak olabilir. Cihaz çok sıcak
durumdayken sadece sapından [6] tutunuz
– Yanma ve yangın tehlikesi!
• Isı plakasına [1, 2] dokunmayınız!
• Sıcak olduğu müddetçe başlıklara
dokunmayınız!
• Isı plakaları [1, 2] ve ısı borusu ve bukle
pensesinin arasına herhangi bir nesne
sıkıştırmayınız.
• Arıza veya işlev bozukluğu durumunda
cihazı hemen kapatın.
Başlıkların değişimi
Uyarı
• Cihaza takılı olan başlığı çıkarmadan önce
daima soğumaya bırakınız – Yanma
tehlikesi!
• Şekillendireceğiz saç modeline göre uygun
başlığı [12, A, B, C] seçiniz.
• Kilitleme halkasını [10] saat yönünde
sonuna kadar çeviriniz. Cihaza takılı olan
başlığın kilidi açılır.
• Başlığı sapından [6] tutup çekin.
• Seçtiğiniz başlığı grafikte gösterildiği gibi
doğrultunuz.
• Seçtiğiniz başlığı metal pimlerin dönmesine
izin vermeden sapın [6] içine itiniz.
• Kilitleme halkasını [10] saat yönünün tersine
sonuna kadar çeviriniz. Başlık kilitlenir.
• Başlığın sapa düzgün oturup oturmadığını
kontrol edin.
• Çok fonksiyonlu şekillendiriciyi yatırınız
veya yüzeyi yakmasını engelleyen sistem
[13] ilesağlam, düz ve yanmayan bir
yüzeye koyun veya elinizde tutun.
66
Page 67

Isıyı ayarlamak
Isı sürme şalterindeki [5] iki ayar ile
ayarlanabilir. Aşağıdaki ısı ayarları tavsiye
edilir:
Kademe Saç tipi
1: Düşük
2: Yüksek normal ve güçlü saç
Not
• Isı ayarını ne kadar yüksek seçerseniz o
kadar çabuk istediğiniz sonuca ulaşırsınız.
• Sürme şalteri [5] üzerinden arzu edilen ısı
ayarını seçiniz.
• Çok fonksiyonlu şekillendirici bir kaç dakika
sonra kullanıma hazır olur.
İnce, yıpranmış, boyanmış
veya rengi açılmış saçlarda
Saçları şekillendirmek
Saçların hazırlanması
• Çok fonksiyonlu şekillendiriciyi kullanmadan
önce saçlarınızı tamamen kurutunuz.
• Saç temiz ve herhangi şekillendirici üründen
arınmış olmalıdır.
• Saçlarınızı çözmek için büyük dişli tarakla
tarayınız.
Bukle veya dalga şekillendirmesi
Saçlarınızı saç maşaları [A, B, C] ile
şekillendirebilirsiniz:
• Saçlarınızı yaklaşık 2 santimetre
genişliğinde tutamlara ayırınız. Saç tutamını
gergin tutun.
• Bukle pensesini açmak için saç maşasının
ına bastırınız.
kaldırac
• Saç tutamını saç ucuyla ısı borusu ve saç
maşasının bukle pensesi arasına koyunuz.
• Saç tutamını sabitlemek için bukle pensesini
kapatınız.
• Saç tutamını başınıza doğru saç maşasına
sarınız.
• Saç maşasını 8 ila 10 saniye arası
saçınızda tutun. Böylece saçı yıpratmadan
veya zarar vermeden en iyi sonuca
ulaşırsınız.
• Bukle pensesini açınız ve ısı borusunu
dikkatlice bukleden dış
Saç uçlarını şekillendirmek
• Saç tutamını saç ucuyla ısı borusu ve saç
maşasının bukle pensesi arasına koyunuz.
• Saç tutamını sabitlemek için bukle pensesini
kapatınız
• Saç uçlarınızı aşağı doğru çekmeden önce
saç maşasını istediğiniz biçimde içe veya
dışa doğru çevirerek saç uçlarınıza şekil
verebilirsiniz.
arıya doğru çekin.
67
Page 68

Fırçalı başlığın kullanımı
Spiral başlığın kullanımı
Fırçalı başlığı [E] saç maşası [B] ile
kullanabilirsiniz:
• Saç maşasının [B] soğuyup soğumadığını
kontrol edin.
• Fırçalı başlığı [E] girinti yeriyle yukarıya
doğru sonunda kadar soğuk saç maşasının
[B] üzerine dikkatlice itiniz.
• Saçınızı tutamlara ayırınız. Saç tutamını
gergin tutun.
• Saç tutamını fırçanın üzerine sarınız.
• Saç tutamını tekrar açmadan önce yaklaşık
10 saniye bekleyiniz.
Spiral başlığı [D] saç maşası [A] ile
kullanabilirsiniz:
• Saç maşasının [A] soğuyup soğumadığını
kontrol edin.
• Spiral başlığı [D] başlığın üzerindeki tırtıklar
yönünde yukarıya doğru ortaya kadar
kapalı, soğuk saç maşasının [A] üzerine
itiniz.
• Bukle pensesini açmak için saç maşasının
kaldıracına bastırınız.
• Spiral başlığı [D] dikkatlice sonuna kadar
soğuk saç maşasının [A] üzerine itiniz.
• Bukle pensesini kapatınız.
• Saçınızı tutamlara ayırınız. Saç tutamını
gergin tutun.
68
Page 69

• Bukle pensesini açmak için saç maşasının
[A] kaldıracına bastırınız.
• Saç tutamını saç ucuyla ısı borusu ve saç
maşasının [A] bukle pensesi arasına
koyunuz.
• Saç tutamını sabitlemek için bukle pensesini
kapatınız.
Düzleştirici maşanın kullanımı
• Düzleştirici veya tost maşası başlığını [12]
çok fonksiyonlu şekillendiricinin üzerine
takınız.
• Saç tutamını başınıza doğru spiral başlığa
[D] sarınız. Saç tutamlarını şekilde
gösterildiği gibi sarıldığına dikkat ediniz.
• Saç tutamını tekrar açmadan önce yaklaşık
10 saniye bekleyiniz.
• Bukle pensesini açın ve saç tutamını bukle
pensesinden çekip çıkartınız.
Düzleştir
• Seçme şalterini [11] „Glätten“ [a]
pozisyonuna itiniz. Düzleştirici maşası [G]
artık kullanıma hazırdır.
• Saçlarınızı yaklaşık 3 santimetre genişliğinde
tutamlara ayırınız. Saç tutamını gergin tutunuz
ve saç dibinden başlayarak düzleştirme
maşası [G] arasına koyunuz.
• Saç düzleştiriciyi yavaş ve orantılı bir
şekilde saç dibinden ucuna doğru hareket
ettiriniz. Saç düzleştiriciyi 8 ila 10 saniyeden
fazla aynı yerde tutmayınız. Böylece saçı
yıpratmadan veya zarar vermeden en iyi
sonuca ulaşırsınız.
• Saç uçlarınız
saç düzleştiriciyi istediğiniz biçimde içe veya
dışa doğru çevirerek saç uçlarınıza şekil
verebilirsiniz.
kapalı
ı aşağı doğru çekmeden önce
Tost
69
Page 70

Tost maşasının kullanım
• Düzleştirici veya tost maşası başlığını [12]
çok fonksiyonlu şekillendiricinin üzerine
takınız.
• Seçme şalterini [11] „Kreppen“ [c]
pozisyonuna itiniz. Tost maşası [F] artık
kullanıma hazırdır.
• Saçınızı tutamlara ayırınız. Saç tutamını
gergin tutunuz ve saç dibinden başlayarak
tost maşası [F] arasına koyunuz.
• Tost maşasını [F] yaklaşık 10 saniye kapalı
tutun. Böylece saçı yıpratmadan veya zarar
vermeden en iyi sonuca ulaşırsınız.
7 Cihaz temizliği ve bakımı
Yönergeler
• Cihazın düzenli bakıma ihtiyacı yoktur.
• Cihazı toz, kir ve rutubetten koruyun.
Temizlik
Dikkat
• Temizlemeden önce cihazın bağlantı fişini
prizden çekin.
• Cihazın içine su kaçmamasına dikkat
ediniz!
• Cihazı bulaşık makinesinde yıkamayın!
• Keskin, sivri, aşındırıcı, yakıcı temizlik
maddeleri ya da sert fırçalar kullanmayın!
• Tost maşası
çıkartınız.
• Saç uçlarına inene kadar bu işlemi
tekrarlayınız.
nı [F] açın ve saç tutamınızı
Kullanımdan sonra
• Cihazı sürme şalterinden [5] 0 konumuna
getiriniz.
• Çok fonksiyonlu şekillendiriciyi soğuması
için yüzeyi yakmasını engelleyen sistem ile
sağlam, düz ve yanmayan bir yüzeye koyun
veya elinizde tutun.
• Her kullanımdan sonra fişi prizden çekin..
• Şebeke kablosunu [9] cihazın etrafına
sarmayınız!
• Cihazı kuru ve çocukların uzanamayacağı
bir yerde muhafaza ediniz.
• Cihazı kulpundan [8] herhangi bir askıya
asabilirsiniz.
• Cihazını kolay alev alabilecek sıvılarla
temizlemeyiniz!
• Cihazın dışını ve başlıkları yumuşak ve hafif
ılık suyla ıslatılmış bezle silebilirsiniz.
• Cihazın ve başlıkları temizledikten sonra
dikkatlice kurulayın!
Düzleştirici veya tost maşasının [F/G]
temizliği
• Seçme şalterini [11] „Glätten“ [a]
pozisyonuna itiniz.
• Düzleştirici veya tost başlığını [12] açmak
için kaldıraca [3] bastırınız.
• Diğer elinizin parmaklarıyla seçme şalterini
[11] „Kreppen“ [c] pozisyonuna itiniz.
70
Page 71

Düzleştirici veya tost maşasının [F/G] kilidi
A
açılır.
• Başlıkları [12] düzleştirici veya tost
maşasından [F, G] dışarı çıkartın.
• Düzleştirici veya tost maşası [F, G] şimdi
diğer başlıklar gibi temizlenebilir.
• Düzleştirici veya tost maşasını [F, G]
temizledikten sonra tekrar yerine takınız.
Sökme işlemi sırasının tam tersi
uygulanarak takma işlemi yapılır.
8 Teknik veriler
ğırlık yaklaşık 330 gr.
Gerilim beslemesi 220 ila 240 V ~, 50 Hz
Güç 25 W
Sıcaklık aralıkları 125 - 160 °C
Koruma Sınıfı
Ortam Koşulları Sadece kapalı alanlarda onaylıdır
Onaylanmış Sıcaklık Aralığı -10 - +40 °C
Teknik değişiklik hakkı saklı tutulmuştur.
II
9 Elden çıkarma
Çevreyi koruma adına kullanım ömrü sona
erdikten sonra cihazı ev çöpüne atmayınız.
Cihaz, ülkenizdeki uygun atık toplama
merkezleri üzerinden elden çıkarılabilir.
Malzemelerin bertaraf edilmesi sırasında
yerel yönetmeliklere uyun.
Cihazınızı elektrik - elektronik eski
cihazlar standartlarına uygun şekilde
bertaraf ediniz. EGstandardı 2002/96/EC
– WEEE (Waste Electrical and
Electronic Equipment).
Bertarafınızla ilgili diğer sorularınızı yerel
makamlara iletebilirsiniz.
Eski cihazlarınız için geri alma yerlerini
örneğin yerel belediyelerden, valiliklerden,
yerel çöp toplama şirketlerinden ya da
satıcınızdan öğrenebilirsiniz.
71
Page 72

r Русский
Оглавление
1 Для ознакомления ................................ 72
2 Пояснения к символам ......................... 73
3 Использование по назначению ............ 73
4 Указания по технике безопасности ..... 73
5 Описание прибора ................................ 75
6 Применение ........................................... 77
7 Очистка прибора и уход за ним ........... 81
8 Технические характеристики ............... 82
9 Утилизация ............................................ 83
10 Гарантия ................................................ 84
1 Для ознакомления
С помощью мультистайлера для волос
можно придать любую форму волосам
и создать индивидуальный имидж для
любой жизненной ситуации.
Шарнирное соединение, которое может
вращаться на 360°, располагает сетевым
кабелем и обеспечивает гибкие
возможности применения мультистайлера
для волос.
Система Easy Lock делает возможной
быструю смену насадок.
Объем поставки
• Мультистайлер для волос
• Выпрямляющая пластина
• Гофрирующая пластина
• Большая плойка- насадка
• Малая плойка- насадка
• Плоская плойка
• Спиральная насадка
• Щётка
• Данная инструкция по применению
Керамическое покрытие выпрямляющей
и гофрирующей пластины обеспечивают
равномерное распределение тепла
и ровную структуру поверхности. Это
способствует бережному стайлингу волос.
Прибор должен использоваться только
в целях, описываемых в данной инструкции
по применению.
Производитель не несет ответственности
за ущерб, причиненный вследствие
использования прибора не по назначению
или халатного обращения с ним.
72
Page 73

2 Пояснения к символам
В инструкции по применению и на приборе используются следующие символы.
Опасность Прибор не должен использоваться вблизи воды или
Предостережение Предупреждает об опасности травмирования или ущерба
Внимание Указывает на возможность повреждения
Указание Отмечает важную информацию
в воде (например, в умывальной раковине, душе, ванне) –
опасность удара током!
для здоровья.
прибора/принадлежностей.
.
3 Использование по назначению
Мультистайлер для волос предназначен
для личного пользования только для
придания формы волосам и стайлинга!
Предостережение
Используйте прибор исключительно для
следующих целей:
• для наружного применения
• для целей, для которых прибор был
собственно разработан в соответствии с
указаниями, приведенными в данной
инструкции по применению.
Любое применение не по назначению
может быть опасным!
Прибор располагает маркировкой CE
и соответствует следующим директивам
ЕС:
• 2006/95/EC Директива по низковольтным
устройствам
• 2004/108/EC Директива по ЭМС
4 Указания по технике безопасности
Предостережение
Во избежание причинения вреда
здоровью настоятельно не
рекомендуется использовать прибор
в следующих случаях:
• При наличии визуального повреждения
прибора, сетевого кабеля и штекера или
принадлежностей. При возникновении
сомнений не используйте прибор
и обратитесь к продавцу или по
указанному адресу сервисной службы.
Во избежание причинения вреда
здоровью необходимо соблюдать
следующие пункты:
• Лица (включая детей), которые по
причине своих физических, сенсорных
или умственных способностей или в
силу неопытности или незнания не могут
безопасно пользоваться прибором,
должны применять его только под
надзором или в соответствии с
указаниями ответственного лица.
• Дети должны пользоваться прибором
только под надзором взрослых.
73
Page 74

• Извлекать кабель из розетки только за
штекер.
• В качестве дополнительной защиты
рекомендуется установка автомата
защитного отключения тока
повреждения RCD с током расцепления
не более 30 мА в электрической цепи
ванной комнаты. Соответствующую
информацию можно получить у местного
предприятия электроснабжения.
• Не используйте дополнительные
детали, которые не рекомендованы
производителем и не предлагаются в
качестве принадлежностей.
• Следите за тем, чтобы вблизи прибора
не было легко воспламеняемых
жидкостей.
• Кладите прибор только на огнестойкую
поверхность.
• Не используйте прибор для
искусственных волос — опасность
возгорания!
• Прибор не следует накрывать какими-
либо предметами – опасность
возгорания!
• Ни в коем случае не открывайте прибор
и не ремонтируйте его самостоятельно,
поскольку надежность
функционирования в этом случае
больше не гарантируется.
Несоблюдение этих требований ведет к
потере гарантии.
• В случае неисправности или
повреждения прибора обратитесь за
квалифицированной помощью в
специализированную мастерскую.
• Если прибор упал или получил иные
повреждения, не следует использовать
его далее.
• Не используйте удлинительный кабель в
ванной комнате, чтобы в опасной
ситуации сетевой штекер был в зоне
досягаемости.
• Никогда не оставляйте прибор во время
использования без внимания.
• Не используйте прибор на свежем
воздухе.
• При передаче прибора третьему лицу
следует передать также и эту
инструкцию по применению.
Опасность
• Никогда не используйте прибор вблизи
ванн, умывальных раковин, душа или
других емкостей с водой или другими
жидкостями – существует опасность
удара электрическим током!
• Если прибор, несмотря на все меры
предосторожности, упал в воду,
немедленно извлеките штекер из
розетки! Не касайтесь воды!
• Перед дальнейшим использованием
прибора обратитесь в авторизованную
специализированную мастерскую на
предмет проверки исправности прибора!
Опасность для жизни в связи с ударом
электрическим током!
• Никогда не погружайте прибор в воду
или какую-либо другую жидкость!
Перед вводом в эксплуатацию
Предостережение
• Не давайте упаковочный материал
детям — опасность удушения!
• Перед использованием прибора следует
удалить все упаковочные материалы.
• Допускается включать прибор только в
розетку с указанным на типовой
табличке напряжением.
• Узнайте, какое напряжение в сети в
месте Вашего нахождения, если оно
Вам неизвестно.
74
Page 75

5 Описание прибора
2 3 4 5 6
1
12 11 10
Поз. Наименование
1
Нагревательная пластина с
керамическим покрытием
2 Зажим
3 Рычаг для открытия зажима
4
Контрольная лампа режима
работы
5 Переключатель ступеней нагрева:
0 Выкл.
1 низкая ступень
2 высокая ступень
Поз. Наименование
6 Ручка
7 Шарнирное соединение 360°
8 Защита от надлома, с проушиной
9 Сетевой кабель
10 Фиксирующее кольцо
11
Переключатель функции
выпрямляющей/гофрирующей
пластины [F, G]
12
Выпрямляющая/гофрирующая
насадка
7
8
9
75
Page 76

д
A B C
13 13 13
D E F G
Поз. Наименование
A
Большая плойка- насадка для
объемных локонов
B
Малая плойка- насадка
локонов
C
Плоская плойка для
гофрированных локонов
D
Спиральная плойка-насадка для
76
спиральных локонов
ля мягких
Поз. Наименование
E Щётка для мягких волн
F
Гофрирующая пластина для
гофрированных волн
G
Выпрямляющая пластина для
прямых волос
13 Подставка
Page 77
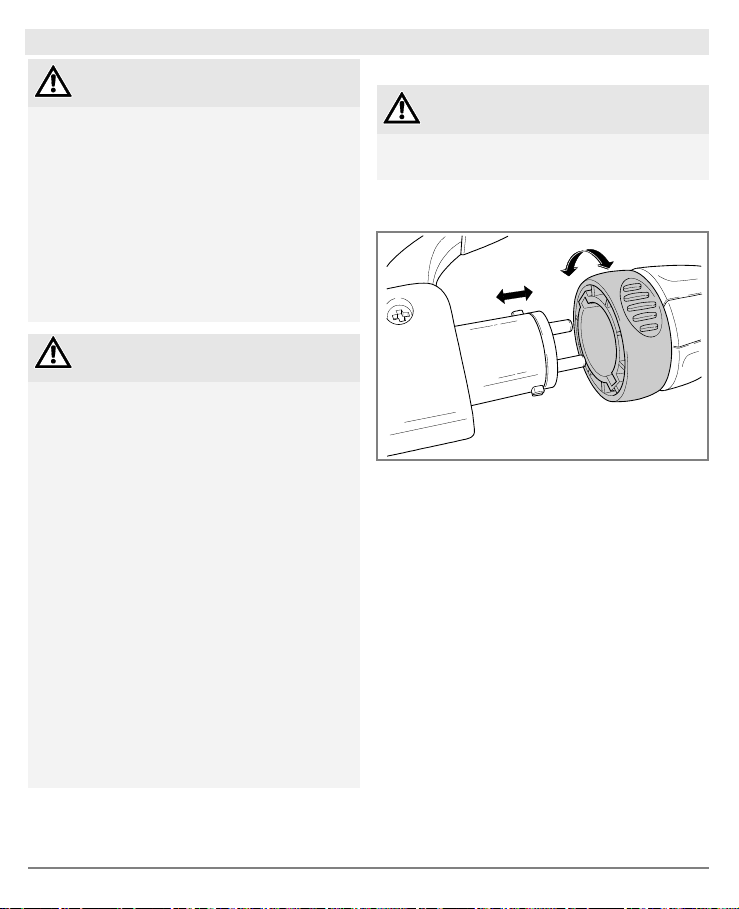
6 Применение
Внимание
• Распрямите сетевой кабель [9], если он
запутан.
• Не тяните, не перекручивайте и не
перегибайте сетевой кабель [9] или не
тяните и не кладите его поверх острых
предметов или горячих поверхностей.
• Не зажимайте сетевой кабель [9],
например, выдвижными ящиками,
дверями или между нагревательными
пластинами [1, 2].
Предостережение
• Встаньте на сухое основание, не
проводящее электроэнергии.
• Убедитесь, что Ваши руки сухие!
• Волосы должны быть сухими!
• Прибор в зависимости от заданной
температуры и продолжительности
применения может стать очень горячим.
Касайтесь прибора в горячем состоянии
только за ручку [6] – опасность ожога и
возгорания!
• Не касайтесь нагревательных пластин
[1, 2].
• Не касайтесь горячих насадок!
• Не зажимайте никаких предметов между
нагревательными пластинами [1, 2] и
нагревательной трубкой и щипцами
плойки.
• В случае дефектов или неполадок в
работе немедленно отключите прибор.
Смена насадок
Предостережение
• Перед снятием насадки дайте ей остыть
— существует опасность ожога!
• Выберите подходящую для прически
насадку [12, A, B, C].
• Поверните фиксирующее кольцо [10] до
упора по часовой стрелке.
Установленная насадка будет
разблокирована.
• Стяните насадку с ручки [6].
• Ориентируйте выбранную насадку в
соответствии с изображением.
• Осторожно вставьте выбранную насадку
в ручку [6], не допуская перекоса обоих
металлических штифтов.
• Поверните фиксирующее кольцо [10] до
упора против часовой стрелки. Насадка
будет заблокирована
• Проверьте прочность соединения
насадки с ручкой.
.
77
Page 78
• Поставьте мультистайлер для волос или
установите его с откинутой подставкой
[13] на устойчивую горизонтальную
огнестойкую опору или удерживайте
мультистайлер в руке.
Установка температуры
Температуру (две ступени) можно задать
с помощью переключателя [5]. Мы
рекомендуем следующие установки
температуры:
Ступень Тип волос
1: низкая
2: высокая
Указание
• Чем выше выбранная температура, тем
быстрее достигается желаемый
результат.
• Выберите с помощью выключателя [5]
желаемый температурный режим.
• Через несколько минут мультистайлер
для волос будет готов к эксплуатации.
тонкий, ломкий,
окрашенный или
осветленный волос
нормальный и толстый
волос
Придание формы волосам
Подготовка волос
• Полностью высушите волосы, прежде
чем использовать мультистайлер для
волос.
• Волосы должны быть чистыми и не
должны содержать остатков продуктов,
используемых для стайлинга.
• Расчешите волосы расческой с крупными
зубьями.
Создание локонов/волн
Придать форму волосам можно с помощью
плоек- насадок [A, B, C]:
• Распределите волосы на отдельные
пряди шириной
Держите прядь натянутой.
• Нажмите на рычаг плойки, чтобы открыть
щипцы.
• Уложите конец пряди между
нагревательной трубкой и щипцами
плойки.
• Опустите щипцы, чтобы зафиксировать
прядь волос.
• Наматывайте прядь на плойку в
направлении головы.
• Оставьте плойку на волосах примерно на
8 - 10 секунд. Так Вы получите
наилучшие
сильно повреждая волос.
• Откройте щипцы и осторожно извлеките
нагревательную трубку из локона.
Придание формы концам волос
• Уложите конец пряди между
нагревательной трубкой и щипцами
плойки.
• Опустите щипцы, чтобы зафиксировать
прядь волос.
• Придать форму концам волос можно,
поворачивая плойку соответственно
наружу или вовнутрь, прежде
раскрыть зажим.
примерно 2 сантиметра.
результаты, не слишком
чем
78
Page 79
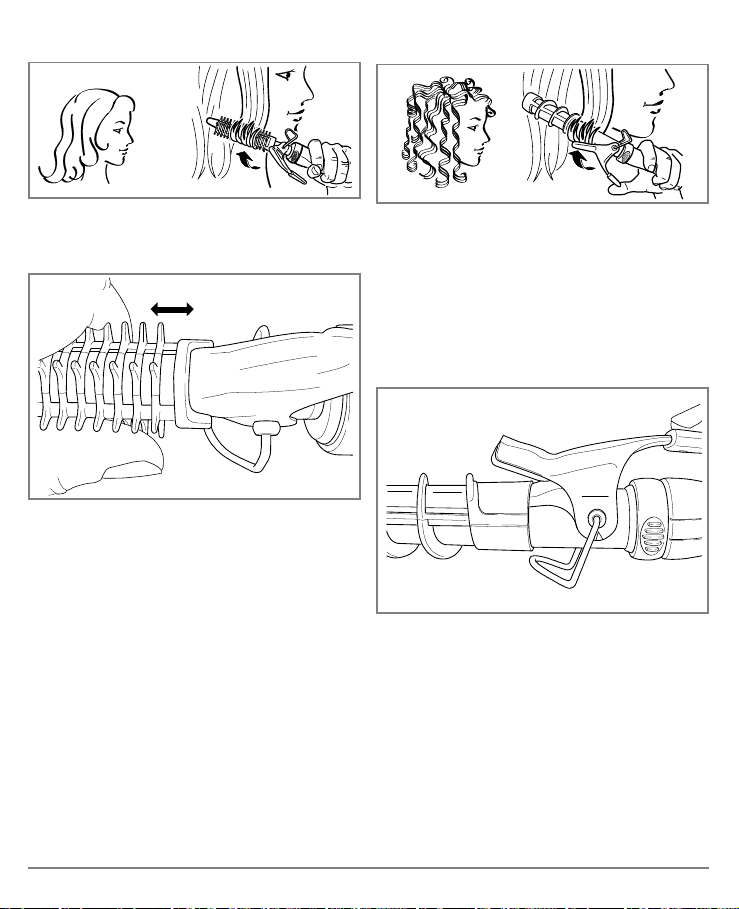
Использование щётки
Использование спиральной насадки
Щётку [E] можно использовать с плойкой
[B]:
• Проверьте, остыла ли плойка [B].
• Осторожно переместите щётку [E]
углублением вверх до упора на холодную
плойку [B].
• Распределите волосы на отдельные
пряди. Держите прядь натянутой.
• Накрутите прядь на щётку.
• Подождите примерно 10 секунд, затем
раскрутите прядь.
Спиральную насадку [D] можно
использовать с плойкой [А]:
• Проверьте, остыла ли плойка [А].
• Переместите спиральную насадку [D]
выступами вверх до середины закрытой,
остывшей плойки [A].
• Нажмите на рычаг плойки, чтобы открыть
щипцы.
• Осторожно переместите спиральную
насадку [D] до упора на холодную плойку
[А].
• Закройте щипцы.
• Распределите волосы на отдельные
пряди. Держите прядь натянутой.
79
Page 80

Использование выпрямляющей
пластины
• Нажмите на рычаг плойки [A], чтобы
открыть щипцы.
• Уложите конец пряди между
нагревательной трубкой и щипцами
плойки [A].
• Опустите щипцы, чтобы зафиксировать
прядь волос.
• Наматывайте прядь на спиральную
насадку [D] в направлении головы.
Следите за тем, чтобы прядь волос
закручивалась в соответствии
с иллюстрацией.
• Подождите примерно 10 секунд, затем
раскрутите прядь.
• Откройте щипцы и извлеките прядь из
щипцов.
• Установите
выпрямляющую/гофрирующую насадку
[12] на мультистайлер для волос.
закрытое
выпрямить
• Переместите переключатель [11]
в положение «Выпрямить» [a]. Теперь
можно использовать выпрямляющую
пластину [G].
• Распределите волосы на отдельные пряди
шириной примерно 3 сантиметра. Держите
прядь натянутой и уложите ее у корней
волос между выпрямляющими пластинами
[G].
• Медленно и равномерно передвигайте
выпрямитель для волос от корней
к концам волос. Не оставляйте
выпрямитель для волос
более 8–10 секунд. Так Вы получите
наилучшие результаты, не слишком
сильно повреждая волос.
положение
гофрировать
на одном месте
80
Page 81
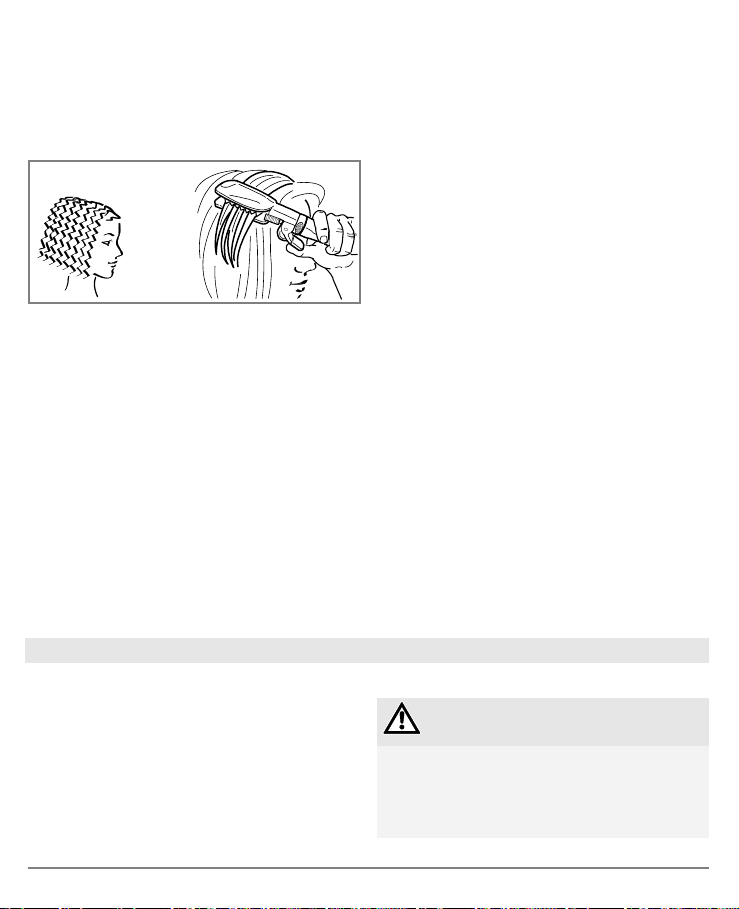
• Вы можете придать форму концам волос,
поворачивая выпрямитель для волос
соответственно наружу или вовнутрь,
а затем протягивая его наружу до концов
волос.
Использование гофрирующей пластины
• Установите
выпрямляющую/гофрированную насадку
[12] на мультистайлер для волос.
• Переместите переключатель [11] в
положение «Гофрировать» [с]. Теперь
можно использовать гофрирующую
пластину [F].
• Распределите волосы на отдельные
пряди. Держите прядь натянутой и
уложите ее у корней волос между
гофрирующими пластинами [F].
• Сомкните гофрирующие пластины [F]
примерно на 10 секунд. Так Вы получите
наилучшие
сильно повреждая волос.
результаты, не слишком
• Снова откройте гофрирующую пластину
[F] и извлеките прядь волос.
• Повторите процедуру, пока не дойдете
до корней волос.
После применения
• Включите прибор, переместив
переключатель [5] в положение 0.
• Для охлаждения установите
мультистайлер для волос с откинутой
подставкой на устойчивую
горизонтальную огнестойкую опору или
удерживайте его в руке.
• После каждого применения извлекайте
сетевой штекер из сети.
• Не наматывайте сетевой кабель [9] на
прибор!
• Храните прибор в сухом месте,
недоступном для
• Прибор может быть подвешен за
проушину [8] на крючок.
детей.
7 Очистка прибора и уход за ним
Указания
• Ваш прибор не требует технического
обслуживания.
• Защищайте прибор от пыли, грязи и
влаги.
Очистка
Внимание
• Перед проведением очистки всегда
извлекайте сетевой штекер из сети.
• Следите за тем, чтобы внутрь прибора
не попала вода!
81
Page 82

• Не мойте прибор в посудомоечной
машине!
• Не используйте острых, заостренных,
абразивных и разъедающих чистящих
средств или жестких щеток!
• Не используйте для очистки
воспламеняемые жидкости!
• Прибор и насадки можно очистить
с помощью мягкой ткани, смоченной
в теплой воде.
• Тщательно высушите прибор и насадки
после очистки!
Очистка выпрямляющих/гофрирующих
пластин [F/G]
• Переместите переключатель [11]
в положение «Выпрямить» [a].
• Нажмите на рычаг [3], чтобы открыть
выпрямляющую/гофрирующую насадку
[12].
• Пальцами другой руки переместите
переключатель [11] в положение
«Гофрировать
» [с].
Выпрямляющая/гофрирующая пластина
[F/G] деблокирована.
• Снимите выпрямляющие/гофрирующие
пластины [F/G] с выпрямляющей/
гофрирующей насадки [12].
• Выпрямляющая/гофрирующая пластина
[F/G] теперь может быть также очищена,
как и другие насадки.
• Снова установите
выпрямляющую/гофрирующую пластину
[F/G]. Установка выполняется в обратной
демонтажу последовательности.
8 Технические характеристики
Вес около 330 г
Источник питания от 220 до 240 В ~, 50 Гц
Потребляемая мощность 25 Вт
Температурный диапазон от 125 до 160 °C
Класс защиты
Окружающие условия Только для внутренних помещений
Допустимый температурный диапазон от -10 до +40 °C
Возможны технические изменения.
II
82
Page 83

9 Утилизация
В интересах защиты окружающей среды по
окончании срока службы следует
утилизировать прибор отдельно от
бытового мусора.
Утилизация должна производиться через
соответствующие пункты сбора в Вашей
стране.
Соблюдайте местные
законодательные нормы по
утилизации отходов.
Прибор следует утилизировать
согласно Директиве ЕС по отходам
электрического и электронного
оборудования 2002/96/EC — WEEE
(Waste Electrical and Electronic
Equipment).
В случае вопросов обращайтесь
коммунальную службу, ответственную за
утилизацию отходов.
в местную
Информацию о приеме Ваших
старых приборов можно получить
в местной администрации,
организации по вывозу мусора или
у продавца.
83
Page 84

10 Гарантия
Мы предоставляем гарантию на дефекты материалов и изготовления на срок 24 месяца
со дня продажи через розничную сеть
Гарантия не распространяется:
- на случаи ущерба, вызванного неправильным использованием
- на быстроизнашивающиеся части (насадки)
- на дефекты, о которых покупатель знал в момент покупки
- на случаи собственной вины покупателя.
Товар сертифицирован: электроприборы для ухода
№РОСС DE .AГ 93.В00758 срок действия с 12.04.2012 по 11.04.2015 гг.
Срок эксплуатации изделия: мин 5 лет
Фирма изготовитель: Бойрер Гмбх, Софлингер штрассе 218
89077-УЛМ, Германия
Фирма-импортер: OOO Бойрер, 109451 г. Москва, ул. Перерва, 62, корп.2, офис 3
Сервисный центр: 109451 г. Москва, ул. Перерва , 62, корп.2
Тел(факс) 495—658 54 90
bts-service@ctdz.ru
Дата продажи_______________________________________________________________
Подпись продавца ___________________________________________________________
Штамп магазина ____________________________________________________________
Подпись покупателя _________________________________________________________
за волосами, ООО «Гарантия»
84
Page 85

Q Polski
Spis treści
1 Informacje o urządzeniu ......................... 85
2 Objaśnienia do rysunków ....................... 86
3 Zastosowanie zgodne
z przeznaczeniem ................................... 86
4 Wskazówki dotyczące bezpieczeństwa
zdrowia ................................................... 86
5 Opis urządzenia ...................................... 88
6 Obsługa .................................................. 90
7 Czyszczenie i konserwacja urządzenia .. 94
8 Dane techniczne ..................................... 95
9 Utylizacja ................................................ 95
1 Informacje o urządzeniu
Dzięki wielofunkcyjnemu urządzeniu do
stylizacji włosów można nadać fryzurze
dowolny kształt i stworzyć swój indywidualny
wizerunek na każdą okazję.
Obrotowy przegub przewodu zasilającego o
zakresie 360° gwarantuje maksymalną
wygodę podczas używania wielofunkcyjnego
urządzenia do stylizacji włosów.
System Easy Lock umożliwia szybką wymianę
nasadek.
Powłoka ceramiczna wkładki karbującej i
prostującej zapewnia równomiernie
Zakres dostawy
• Wielofunkcyjne urządzenie do stylizacji
włosów
• wkładka prostująca
• wkładka karbująca
• gruba lokówka
• cienka lokówka
• płaska lokówka
• nasadka spiralna
• nakładka w kształcie szczotki
• Instrukcja obsługi
rozprowadzenie ciepła i gładką strukturę
powierzchni. Dzięki temu stylizacja fryzury jest
bardzo delikatna.
Urządzenie jest przeznaczone do użytkowania
zgodnie z przeznaczeniem, w sposób opisany
w instrukcji obsługi.
Producent nie może ponosić
odpowiedzialności za szkody powstałe w
wyniku lekkomyślnego lub niezgodnego z
przeznaczeniem użytkowania urządzenia.
85
Page 86

2 Objaśnienia do rysunków
W instrukcji obsługi lub na urządzeniu zastosowano następujące symbole:
Niebezpieczeństwo Urządzenia nie można używać w pobliżu wody lub w wodzie
Ostrzeżenie Ostrzeżenie przed niebezpieczeństwem obrażeń ciała lub utraty
Uwaga Ostrzeżenie przed niebezpieczeństwem uszkodzenia urządzenia
Wskazówka Ważne informacje.
(np. nad napełnioną wodą umywalką, w brodziku lub wannie)
– niebezpieczeństwo porażenia prądem!
zdrowia.
lub akcesoriów.
3 Zastosowanie zgodne z przeznaczeniem
Wielofunkcyjne urządzenie do stylizacji jest
przeznaczone do użytku własnego w prywatnym
domu i można je stosować wyłącznie do
modelowania i stylizowania włosów!
Ostrzeżenie
Urządzenie można stosować wyłącznie:
• do użytku zewnętrznego
• zgodnie z przeznaczeniem, w sposób
podany w instrukcji obsługi.
Każde użycie niezgodne z przeznaczeniem
może być niebezpieczne!
Urządzenie nosi oznakowanie CE i spełnia
wymagania następujących dyrektyw Unii
Europejskiej:
• Dyrektywy niskonapięciowej 2006/95/EC
• Dyrektywy kompatybilności
elektromagnetycznej 2004/108/EC
4 Wskazówki dotyczące bezpieczeństwa zdrowia
Ostrzeżenie
Aby nie narażać zdrowia, nie zaleca się
stosowania urządzenia w przypadku:
• widocznego uszkodzenia urządzenia,
przewodu zasilającego/wtyczki lub
akcesoriów. W razie wątpliwości należy
zaniechać eksploatacji urządzenia i
skontaktować się z przedstawicielem
handlowym lub z biurem obsługi klienta
pod podanym adresem.
Aby nie narażać zdrowia należy
przestrzegać następujących wskazówek:
• Osoby (w tym dzieci), które ze względu na
ograniczone zdolności fizyczne,
sensoryczne lub umysłowe, brak
wystarczającego doświadczenia lub wiedzy
nie są w stanie bezpiecznie obsługiwać
urządzenia, nie mogą korzystać z
urządzenia bez nadzoru lub pouczenia
odpowiedzialnej osoby.
• Dzieci mogą korzystać z urządzenia
jedynie pod nadzorem.
86
Page 87

• Przewód wyciągać z gniazda wyłącznie
trzymając za wtyczkę.
• Jako dodatkową ochronę zaleca się
zamontowanie w instalacji elektrycznej w
łazience wyłącznika różnicowoprądowego
RCD ze znamionowym prądem
wyłączającym nie większym niż 30 mA.
Informacje na ten temat można uzyskać w
lokalnym sklepie elektrycznym.
• Nie używać elementów dodatkowych, które
nie są zalecane przez producenta lub nie
stanowią wyposażenia dodatkowego.
• Należy dopilnować, aby w pobliżu
urządzenia nie znajdowały się łatwopalne
płyny.
• Urządzenie odkładać wyłącznie na
powierzchnię ognioodporną.
• Nie używać urządzenia do suszenia
sztucznych włosów – niebezpieczeństwo
pożaru!
• Nie przykrywać urządzenia –
niebezpieczeństwo pożaru!
• Urządzenia nie należy pod żadnym
pozorem otwierać ani naprawiać, ponieważ
w przeciwnym razie może przestać
prawidłowo działać. Nieprzestrzeganie
powyższych zasad powoduje wygaśnięcie
gwarancji.
• W przypadku nieprawidłowego działania
lub uszkodzenia urządzenia należy zlecić
jego naprawę autoryzowanemu punktowi
serwisowemu.
• Jeśli urządzenie upadło lub zostało
uszkodzone w inny sposób, nie wolno go
używać.
• Nie używać w łazience przedłużaczy, aby
w razie potrzeby mieć łatwy dostęp do
wtyczki.
• Nie zostawiać włączonego urządzenia bez
nadzoru.
• Nie używać urządzenia na zewnątrz.
• W przypadku przekazania urządzenia
osobom trzecim, należy dołączyć niniejszą
instrukcję obsługi.
Niebezpieczeństwo
• Nigdy nie używać urządzenia w pobliżu
wanny, umywalki, prysznica lub innych
zbiorników wypełnionych wodą lub innymi
płynami – niebezpieczeństwo porażenia
prądem!
• Jeśli mimo zachowania wszystkich
środków ostrożności urządzenie wpadnie
do wody, należy natychmiast wyciągnąć
wtyczkę z gniazda! Nie wyciągać
urządzenia z wody!
• Przed ponownym użyciem urządzenia
należy zlecić jego sprawdzenie
autoryzowanemu punktowi serwisowemu!
Zagrożenie życia z powodu porażenia
prądem!
• Nigdy nie zanurzać urządzenia w wodzie
ani innym płynie.
Przed pierwszym uruchomieniem
Ostrzeżenie
• Opakowanie przechowywać poza
zasięgiem dzieci – niebezpieczeństwo
uduszenia!
• Przed użyciem urządzenia należy
całkowicie usunąć opakowanie.
• Urządzenie podłączać tylko do gniazda
o napięciu podanym na tabliczce
znamionowej.
• W razie potrzeby należy dowiedzieć się,
jakie jest lokalne napięcie sieciowe.
87
Page 88

5 Opis urządzenia
2 3 4 5 6
1
12 11 10
Poz. Nazwa
1 Płytka grzejna z powłoką ceramiczną
2 Obudowa
3 Dźwignia do otwierania obudowy
4 Lampka kontrolna
5
Przełącznik przesuwny do
ustawiania stopnia grzania:
0 Wył.
1 niski stopień
88
2 wysoki stopień
Poz. Nazwa
6 Uchwyt
7 Przegub obrotowy 360°
8
Zabezpieczenie przed zaginaniem
przewodu wraz z uchwytem do
zawieszenia
9 Przewód zasilający
10 Pierścień blokujący
11
Przełącznik funkcji
prostownicy/karbownicy [F, G]
12 Nasadka prostująca/karbująca
7
8
9
Page 89
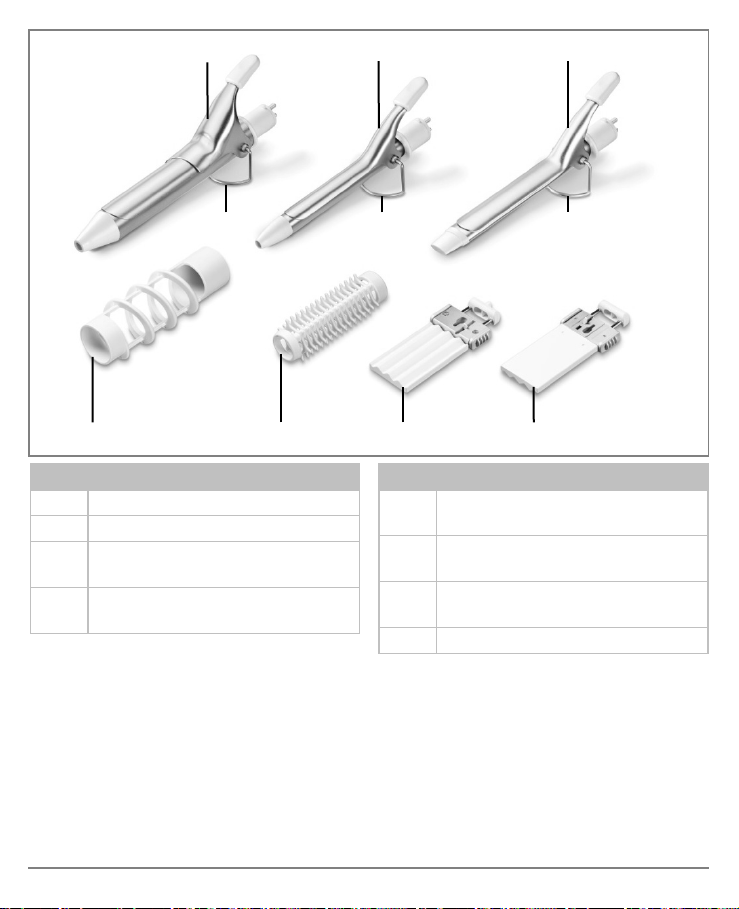
A B C
13 13 13
D E F G
Poz. Nazwa
A Gruba lokówka do dużych loków
B Cienka lokówka do delikatnych loków
C
Płaska lokówka do zygzakowatych
loków
D
Nasadka spiralna do uzyskania
efektu korkociągu
Poz. Nazwa
E
F
G
13 Rozkładana podpórka
Nasadka w kształcie szczotki do
modelowania sprężystych fal
Karbownica do uzyskania
karbowanych fal
Prostownica umożliwiająca
wygładzenie włosów
89
Page 90

6 Obsługa
Uwaga
• Jeśli przewód zasilający [9] jest skręcony,
należy go wyprostować.
• Przewodu zasilającego [9] nie wolno
ciągnąć, skręcać ani zginać, jednocześnie
nie dopuszczając do zetknięcia przewodu
z ostrymi przedmiotami, krawędziami lub
gorącą powierzchnią.
• Nie zatrzaskiwać przewodu zasilającego [9]
np. w szufladach, między drzwiami lub
między płytkami grzejnymi [1, 2].
Ostrzeżenie
• Należy stawać na suchym podłożu, które
nie przewodzi prądu.
• Upewnić się, że ręce są suche!
• Włosy muszą być suche!
• Urządzenie nagrzewa się i w zależności
od nastawionej temperatury oraz czasu
użytkowania może być bardzo gorące.
W takim przypadku chwytać je wyłącznie
za uchwyt [6] – niebezpieczeństwo
poparzenia i pożaru!
• Nie dotykać płytek grzejnych [1, 2]!
• Nie dotykać nasadek, dopóki nie ostygną!
• Nie zatrzaskiwać żadnych przedmiotów
między płytkami grzejnymi [1, 2] lub między
elementem grzejnym lokówki a
szczypcami.
• Jeśli urządzenie jest uszkodzone lub
dojdzie do zakłóceń w eksploatacji, należy
je natychmiast wyłączyć.
Wymiana nasadek
Ostrzeżenie
• Przed demontażem nałożonej nasadki
należy poczekać, aż ostygnie –
niebezpieczeństwo poparzenia!
• Wybrać nasadkę odpowiednią do stylizacji
danej fryzury [12, A, B, C].
• Obrócić do oporu pierścień blokujący [10]
w kierunku zgodnym z ruchem wskazówek
zegara. Nałożona nasadka zostanie
odblokowana.
• Zdjąć nasadkę z uchwytu [6].
• Ustawić wybraną nasadkę zgodnie z
instrukcją graficzną.
• Wybraną nasadkę ostrożnie wsunąć w
uchwyt [6], nie uszkadzając obu
metalowych wtyków .
• Obrócić do oporu pierścień blokujący [10]
w kierunku przeciwnym do ruchu
wskazówek zegara. Nasadka zostanie
zablokowana.
• Sprawdzić, czy połączenie nasadki z
uchwytem jest stabilne.
90
Page 91

• Wielofunkcyjne urządzenie do stylizacji
włosów położyć lub postawić za pomocą
rozłożonej podpórki [13] na stabilnym,
poziomym i żaroodpornym podłożu lub
trzymać urządzenie w ręku.
Nastawianie temperatury
Za pomocą przełącznika przesuwnego [5]
możliwa jest dwustopniowa regulacja
temperatury. Zaleca się następujące
ustawienia temperatury:
Stopień Rodzaj włosów
1: niski
2: wysoki Włosy normalne i grube
Wskazówka
• Im wyższa jest nastawiona temperatura,
tym szybciej uzyskuje się żądany efekt.
• Za pomocą przełącznika przesuwnego [5]
wybrać żądany stopień temperatury.
• Wielofunkcyjne urządzenie do stylizacji
włosów jest gotowe do użycia w ciągu kilku
minut.
Włosy cienkie, łamliwe,
farbowane lub rozjaśniane
Modelowanie włosów
Przygotowanie włosów
• Przed użyciem urządzenia do stylizacji
należy całkowicie wysuszyć włosy.
• Włosy powinny być czyste, wolne od
pozostałości kosmetyków do stylizacji.
• W celu rozplątania włosów należy je
rozczesać grzebieniem o szerokim
rozstawie zębów.
Modelowanie loków/fal
Włosy można modelować za pomocą lokówek
[A, B, C]:
• Podzielić włosy na pojedyncze pasma o
szerokości około 2 centymetrów. Trzymać
pasma w taki sposób, aby były naprężone.
• Nacisnąć dźwignię lokówki, aby otworzyć
szczypce.
• Koniec pasma włosów umieścić między
elementem grzejnym a szczypcami lokówki.
• Zamknąć szczypce, aby zablokować pasmo
łosów.
w
• Nawinąć pasmo na lokówkę w kierunku
głowy.
• Pozostawić lokówkę we włosach przez
około 8 do 10 sekund. Dzięki temu można
uzyskać optymalny rezultat, nie
dopuszczając jednocześnie do
przesuszenia lub uszkodzenia włosów.
• Otworzyć szczypce i ostrożnie wyjąć
element grzejny z włosów.
Modelowanie końcówek włosów
• Koniec pasma włosów umieścić między
elementem grzejnym a szczypcami lokówki.
• Zamknąć szczypce, aby zablokować pasmo
włosów.
• Aby wymodelować końcówki włosów,
należy odpowiednio obrócić lokówkę,
wywijając je na zewnątrz lub podwijając do
wewnątrz, a następnie przesunąć
wzdłuż końcówek włosów i wyciągnąć ją na
zewnątrz.
lokówkę
91
Page 92

Używanie nasadki w kształcie szczotki
Używanie nasadki spiralnej
Nasadkę w kształcie szczotki [E] można
używać w połączeniu z lokówką [B]:
• Sprawdzić, czy lokówka [B] ostygła.
• Nasadkę w kształcie szczotki [E] ostrożnie
wsunąć do oporu karbowaniem do góry na
zimną lokówkę [B].
• Podzielić włosy na pojedyncze pasma.
Trzymać pasma w taki sposób, aby były
naprężone.
• Nawinąć pasmo włosów na szczotkę.
• Poczekać około 10 sekund, a następnie
odwinąć modelowane pasmo.
Nasadkę spiralną [D] można używać w
połączeniu z lokówką [A]:
• Sprawdzić, czy lokówka [A] ostygła.
• Przesuń nasadkę spiralną [D] z rowkami na
nasadce do góry, aż do środka przez
zamknięty, ochłodzony pręt lokówki [A].
• Nacisnąć dźwignię lokówki, aby otworzyć
szczypce.
• Nasadkę spiralną [D] ostrożnie wsunąć do
oporu na zimną lokówkę [A].
• Zamknąć szczypce lokówki.
• Podzielić włosy na pojedyncze pasma.
Trzymać pasma w taki sposób, aby były
naprężone.
92
Page 93
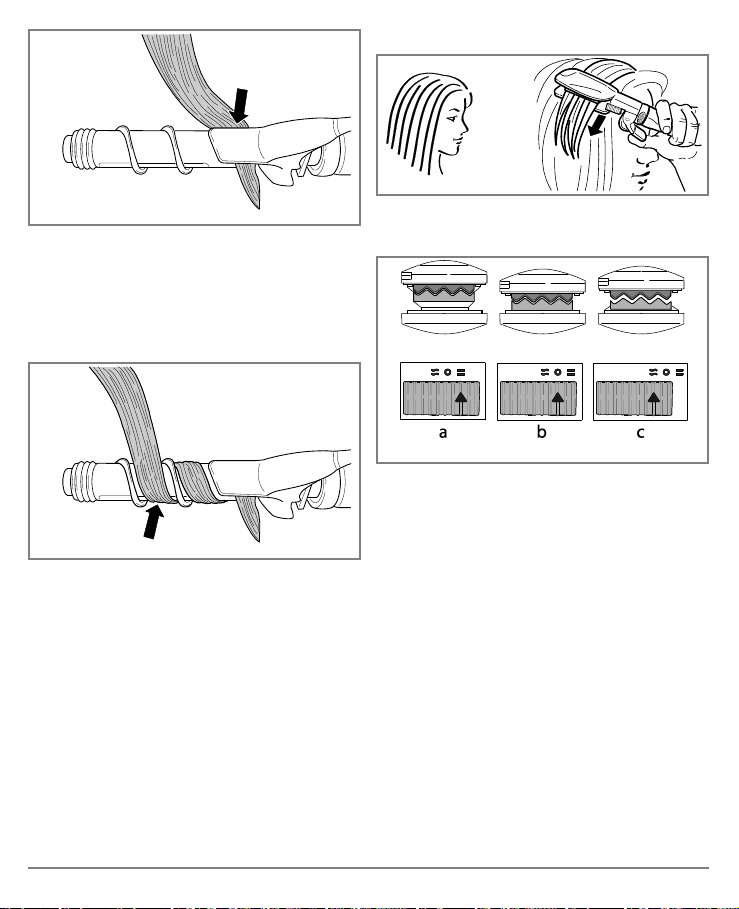
• Nacisnąć dźwignię lokówki [A], aby
otworzyć szczypce.
• Koniec pasma włosów umieścić między
elementem grzejnym a szczypcami
lokówki [A].
• Zamknąć szczypce, aby zablokować pasmo
włosów.
Używanie prostownicy
• Nałożyć nasadkę prostującą/karbującą [12]
na wielofunkcyjne urządzenie do stylizacji
włosów.
• Nawinąć pasmo na nasadkę spiralną [D] w
kierunku głowy. Należy zwrócić uwagę, aby
pasmo włosów było nawinięte w sposób
przedstawiony na rysunku.
• Poczekać około 10 sekund, a następnie
odwinąć modelowane pasmo.
• Otworzyć szczypce i wyjąć z nich pasmo
włosów.
Prostowanie wył.
• Ustawić przełącznik [11] w pozycji
„Prostowanie“ [a]. Prostownica [G] jest gotowa
do użycia.
• Podzielić włosy na pojedyncze pasma o
szerokości około 3 centymetrów. Trzymać
pasmo w taki sposób, aby było naprężone i
umieścić je między płytkami grzejnymi
prostownicy [G], chwytając pasmo u nasady.
• Powoli, równomiernie przesuwać prostownicę
wzdłuż całego pasma, od nasady włosów po
ich końcówki. Nie trzymać włosów między
płytkami dłużej niż 8 - 10 sekund. Dzięki temu
można uzyskać optymalny rezultat, nie
dopuszczając jednocześnie do przesuszenia
lub uszkodzenia włosów.
• Aby wymodelować końcówki włosów, należy
odpowiednio obrócić prostownic
na zewnątrz lub podwijając do wewnątrz, a
następnie przesunąć prostownicę wzdłuż
końcówek włosów i wyciągnąć ją na zewnątrz.
Karbowanie
ę, wywijając je
93
Page 94

Używanie karbownicy
• Ponownie otworzyć karbownicę [F] i wyjąć
z niej pasmo włosów.
• Czynności powtarzać, przesuwając się
stopniowo od nasady do koń
Po użyciu
• Ustawić przełącznik przesuwny [5] w
pozycji 0.
• Zamocować nasadkę prostującą/karbującą
[12] na wielofunkcyjnym urządzeniu do
stylizacji.
• Ustawić przełącznik [11] w pozycji
„Karbowanie“ [c]. Karbownica [F] jest
gotowa do użycia.
• Podzielić włosy na pojedyncze pasma.
Trzymać pasmo w taki sposób, aby było
naprężone i umieścić je między płytkami
grzejnymi karbownicy [F], chwytając pasmo
u nasady.
• Zamknąć karbownicę [F] na około 10
sekund. Dzięki temu można uzyskać
optymalny rezultat, nie dopuszczając
jednocześnie do przesuszenia lub
uszkodzenia włosów.
• Pozostawić urządzenie wielofunkcyjne do
ostygnięcia, ustawiając je na podpórce na
stabilnym, poziomym i żaroodpornym
podłożu lub trzymać urządzenie w ręku.
• Po zakończeniu suszenia/stylizacji włosów
należy wyciągnąć wtyczkę z gniazda.
• Nie owijać przewodu zasilającego [9] wokół
urządzenia!
• Przechowywać urządzenie w miejscu
suchym i niedostępnym dla dzieci.
• Urządzenie można zawiesić na haczyku
za pomocą specjalnego uchwytu [8].
7 Czyszczenie i konserwacja urządzenia
Wskazówki
• Urządzenie nie wymaga konserwacji.
• Urządzenie należy chronić przed pyłem,
brudem i wilgocią.
Czyszczenie
Uwaga
• Przed przystąpieniem do czyszczenia
zawsze wyciągać wtyczkę z gniazda.
• Uważać, aby woda nie dostała się do
środka urządzenia!
• Nie czyścić urządzenia w zmywarce!
• Nie używać żrących, ostrych, szorujących
środków czyszczących ani twardych
szczotek!
• Nie czyścić płynami łatwopalnymi!
• Urządzenie oraz nasadki można czyścić
miękką, zwilżoną w ciepłej wodzie
ściereczką.
• Po czyszczeniu starannie osuszyć
urządzenie oraz nasadki!
cówek włosów.
94
Page 95

Czyszczenie prostownicy/karbownicy [F/G]
• Ustawić przełącznik [11] w pozycji
„Prostowanie“ [a].
• Nacisnąć dźwignię [3], aby otworzyć
nasadkę prostującą/karbującą [12].
• Palcami drugiej ręki przesunąć przełącznik
[11] na pozycję „Karbowanie“ [c]. Płytka
prostująca/karbująca [F, G] zostanie
odblokowana.
• Wyjąć płytkę prostującą/karbującą [F, G] z
nasadki prostującej/karbującej [12].
• Płytki prostujące/karbujące [F, G] można
teraz wyczyścić w taki sam sposób, jak
pozostałe nasadki.
• Po czyszczeniu ponownie zamontować
płytki prostujące/karbujące [F, G]. Montaż
polega na wykonaniu tych samych
czynności w odwrotnej kolejności.
8 Dane techniczne
Ciężar ok. 330 g
Napięcie zasilające 220 do 240 V ~, 50 Hz
Pobór mocy 25 W
Zakres temperatury 125 do 160 °C
Klasa ochrony
Warunki eksploatacji Tylko do użytku w pomieszczeniach
Dopuszczalny zakres temperatury -10 do +40 °C
Zastrzegamy sobie prawo do zmian technicznych.
II
9 Utylizacja
Ze względu na ochronę środowiska
naturalnego urządzenia nie należy wyrzucać
po zakończeniu okresu eksploatacji wraz ze
zwykłymi odpadami domowymi.
Urządzenie należy odnieść do punktu zbiórki
zużytego sprzętu elektrycznego i
elektronicznego.
Należy przestrzegać krajowych
przepisów dotyczących utylizacji
materiałów.
Urządzenie należy zutylizować zgodnie
z dyrektywą 2002/96/EC – WEEE
(Waste Electrical and Electronic
Equipment) o zużytych urządzeniach
elektrycznych i elektronicznych.
95
Page 96

W razie pytań należy zwrócić się do
odpowiedniej instytucji odpowiedzialnej za
utylizację.
Zużyte urządzenia można zwrócić np. w
Urzędach Gmin lub Miast, w firmach
zajmujących się usuwaniem odpadów lub
sklepach prowadzących sprzedaż takiego
sprzętu.
96
Page 97

O Nederlands
Inhoud
1 Kennismaking ......................................... 97
2 Verklaring van de tekens ........................ 98
3 Reglementair gebruik ............................. 98
4 Veiligheidsvoorschriften voor uw
gezondheid ............................................. 98
5 Beschrijving van het toestel .................. 100
6 Bedienen .............................................. 102
7 Toestel reinigen en onderhouden ......... 106
8 Technische gegevens ........................... 107
9 Verwijdering .......................................... 107
1 Kennismaking
Met de multifunctionele styler kunt u uw haar
in de verschillendste vormen brengen en voor
elke gelegenheid uw individuele look creëren.
Het draaischarnier van 360° aan het netsnoer
maakt een flexibele bediening van de
multifunctionele styler mogelijk.
Het Easy Lock systeem maakt het snel
wisselen van de opzetstukken mogelijk.
De keramische coating van het glad- en
krulijzer zorgt voor een gelijkmatige
Leveromvang
• Multifunctionele styler
• Gladijzer
• Krulijzer
• Grote krultang
• Kleine krultang
• Platte krultang
• Spiraalopzetstuk
• Borstelopzetstuk
• Deze gebruikshandleiding
warmteverdeling en een gladde
oppervlaktestructuur. Dit zorgt voor een
perfecte styling van uw haar.
Het toestel is alleen voor de in deze
gebruiksaanwijzing beschreven toepassing
bestemd.
De fabrikant kan niet aansprakelijk gemaakt
worden voor schade die door ondeskundig of
lichtzinnig gebruik ontstaat.
97
Page 98

2 Verklaring van de tekens
De volgende symbolen worden in de gebruiksaanwijzing of op het toestel gebruikt.
Gevaar Het toestel mag niet in de buurt van water of in het weter
Waarschuwing Waarschuwing voor verwondingsgevaren of gevaren voor uw
Attentie Waarschuwing voor mogelijke schade aan het toestel of de
Aanwijzing Verwijzing naar belangrijke informatie.
(bijv. wastafel, douche, bad) gebruikt worden – gevaar voor een
elektrische schok!
gezondheid.
accessoires.
3 Reglementair gebruik
De multifunctionele styler mag uitsluitend voor
het vormen en stileren van uw haar gebruikt
worden. Het toestel is uitsluiten voor
privégebruik bestemd!
Waarschuwing
Gebruik het toestel uitsluitend:
• voor uitwendig gebruik
• voor de toepassing waarvoor het
ontwikkeld werd en op de in deze
gebruiksaanwijzing beschreven manier.
Elk ondeskundig gebruik kan gevaarlijk zijn!
Het toestel draagt de CE-aanduiding en
voldoet aan de volgende EU-richtlijnen:
• 2006/95/EC laagspanningsrichtlijn
• 2004/108/EC EMC-richtlijn
4 Veiligheidsvoorschriften voor uw gezondheid
Waarschuwing
Om schade aan de gezondheid te vermijden,
wordt in de volgende gevallen dringend van
het gebruik van het toestel afgeraden:
• Bij een zichtbare beschadiging van het
toestel, van het netsnoer, de netstekker of
het toebehoren. Gebruik het in geval van
twijfel niet en neem contact op met uw
leverancier of met het opgegeven
klantendienstadres.
Om schade aan de gezondheid te
vermijden, de volgende punten in acht
nemen:
• Personen (inclusief kinderen) die op basis
van hun fysieke, sensorische of geestelijke
capaciteiten of hun onervarenheid of
onwetendheid niet in staat zijn om het
toestel veilig te gebruiken, mogen dit
98
Page 99

toestel niet zonder toezicht of instructie van
een verantwoordelijke persoon gebruiken.
• Kinderen moeten bij het gebruik van het
toestel in het oog gehouden worden.
• Kabel alleen aan de netstekker uit het
stopcontact trekken.
• Als bijkomende bescherming wordt de
installatie van een
foutstroomveiligheidsinrichting RCD met
een dimensioneringsuitschakelstroom van
niet meer dan 30 mA in de stroomkring van
de badkamer aanbevolen. Informatie
hierover krijgt u bij uw plaatselijke
elektrovakhandel.
• Gebruik geen onderdelen die niet door de
fabrikant aanbevolen of als toebehoren
aangeboden worden.
• Zorg ervoor dat zich in de buurt van het
toestel geen licht ontvlambare vloeistoffen
bevinden.
• Leg het toestel alleen op een nietbrandbare ondergrond neer.
• Gebruik het toestel niet bij kunsthaar –
brandgevaar!
• Het toestel mag niet afgedekt worden –
brandgevaar!
• U mag het toestel in geen geval openen of
repareren, omdat anders een perfecte
werking niet meer gegarandeerd is. Opent
u het toestel toch, dan vervalt de garantie.
• Laat het toestel in het geval van een
storing of beschadiging in een
gekwalificeerde werkplaats repareren.
• Als het toestel gevallen is of andere schade
heeft opgelopen, dan mag het niet meer
gebruikt worden.
• Gebruik geen verlengkabels in de
badkamer, zodat in geval van nood de
netstekker snel te bereiken is.
• Het toestel tijdens het gebruik nooit
onbeheerd laten.
• Gebruik het toestel niet in de open lucht.
• Als u het toestel aan derden doorgeeft,
moet u deze gebruiksaanwijzing
meegeven.
Gevaar
• Gebruik het toestel nooit in de buurt van
badkuipen, wastafels, douches of andere
recipiënten die water of andere vloeistoffen
bevatten – gevaar voor een elektrische
schok!
• Als het toestel ondanks alle
voorzorgsmaatregelen in het water valt,
trek dan onmiddellijk de stekker uit het
stopcontact! Grijp nooit in het water!
• Laat het toestel voor nieuw gebruik door
een geautoriseerde vakwerkplaats
controleren! Levensgevaar door elektrische
schok!
• Dompel het toestel nooit in water of een
andere vloeistof!
Voor de ingebruikneming
Waarschuwing
• Houd kinderen uit de buurt van
verpakkingsmaterialen –
verstikkingsgevaar!
• Voor het gebruik van het toestel moet al
het verpakkingsmateriaal verwijderd
worden.
• Sluit het toestel alleen op een stopcontact
met de op het typeplaatje opgegeven
spanning aan.
• Vraag naar de netspanning van de
betreffende plaats als deze u onbekend is.
99
Page 100

5 Beschrijving van het toestel
2 3 4 5 6
1
12 11 10
Pos Benaming
1
Keramisch gecoate
verwarmingsplaat
2 Klep
3 Hendel voor het openen van de klep
4 Bedrijfscontrolelampje
5
Schuifschakelaar voor de
verwarmingsstanden:
0 Uit
1 Lage stand
100
2 Hoge stand
Pos Benaming
6 Greep
7 360° draaischarnier
8 Knikbescherming met ophangoog
9 Netsnoer
10 Vergrendelingsring
11
Keuzeschakelaar voor de functie van
het glad/krulijzer [F, G]
12 Glad/krulopzetstuk
7
8
9
 Loading...