


Precautions
Models: 9A-12, 9AV-12, 9AE-12, 9AEV-12, 9AEV-12SS
!BE CAREFUL WHEN OPERATING OR CLEANING MACHINE AS SURFACES MAY BE HOT!
!DISCONNECTCLEANING. ELECTRICAL POWER PRIOR TO MAINTENANCE AND
!ALL MAINTENANCE AND CLEANING MUST BE PERFORMED ACCORDING TO THIS MANUAL.
!NEVER USE ANY SHARP OBJECTS, CAUSTIC OVEN CLEANER, OR DEGREASER TO CLEAN MACHINE OR PRESS PLATES.
!IN CASE OF POWER FAILURE, SHUT DOWN MACHINE.
!FOR EMERGENCY SHUT DOWN, PUSH MASTER SWITCH.
READ AND FOLLOW ALL THE DIRECTIONS IN THIS MANUAL. DO NOT
!LOSE OR THROW THIS MANUAL AWAY. DO NOT USE STAND ALONE MIDWEDGE UNLESS YOU HAVE READ THE MANUAL.
!DO NOT CONNECT TO A CIRCUIT OPERATING AT MORE THAN 150 VOLTS TO GROUND.
1 |
10-06-14 |

Table of Contents
Precautions................................................................................................................................... |
1 |
Table of Contents.......................................................................................................................... |
2 |
Policy & Procedure for Returning BE&SCO Parts........................................................................ |
3 |
Warnings, Storyboard................................................................................................................... |
4 |
Delivery & Inspection.................................................................................................................... |
4 |
Qualified Service Person and Adjustments................................................................................... |
5 |
Specifications................................................................................................................................ |
6 |
Components.................................................................................................................................. |
7 |
Control Panel............................................................................................................................. |
8-9 |
Operation Instructions................................................................................................................. |
10 |
Temperature Controller Instructions............................................................................................ |
11 |
Operation Troubleshoot............................................................................................................... |
12 |
Cleaning...................................................................................................................................... |
13 |
Maintenance................................................................................................................................ |
17 |
Dough Making............................................................................................................................. |
21 |
Dough Making Troubleshoot....................................................................................................... |
22 |
Tortilla Making............................................................................................................................. |
24 |
Tortilla Making Troubleshoot....................................................................................................... |
25 |
Tortilla Recipe.............................................................................................................................. |
29 |
Closing Statement....................................................................................................................... |
31 |
Parts and Pictures....................................................................................................................... |
32 |
Warranty...................................................................................................................................... |
51 |
Neither this manual nor any part may be reproduced or transmitted in any form or by any means, electronic or mechanical, including photocopying microfilming and recording, or by information storage and retrieval system, without permission in writing from Bakery Equipment & Service Co., Inc.
2

Policy & Procedure for Returning BE&SCO Parts
Returning BE&SCO Parts:
To return any BE&SCO parts you must follow BE&SCO’s procedure for returning. No returns will be accepted outside of this procedure. BE&SCO warrants parts for 1 year or 3000 hours, which ever comes first, for full credit. This does not include wear and tear items as stated in our manual.
This warranty does not cover any defect due to or resulting from handling, abuse, misuse, improper maintenance and cleaning, or harsh chemical action, nor shall it extend to any unit from which the serial number has been removed or altered, or acts of God. Adjustments such as calibrations, leveling, tightening of fasteners or plumbing connections normally associated with original installation are the responsibility of the dealer or installer and not of BAKERY EQUIPMENT
& SERVICE CO., INC.
Procedure for Returning BE&SCO Parts:
1.Call BE&SCO Parts Department at 1-800-683-0928 or email parts@bescomfg.com. At this time you may request a repair and return, advance replacement or a credit of the component. The Parts Department will then issue you an RA (Return Authorization) number to return the BE&SCO part. After you are issued an RA number. You have 10 working days to return the old part for full credit or you will be invoiced for the new part.
2.Package the component and a detailed description of what is wrong with the component. Write the RA number on the outside of the package in a visible place and send the return to:
BE&SCO - Parts Department
RA#
1623-27 N. San Marcos
San Antonio, TX 78201
To obtain warranty on return parts the customer or the end user will be responsible for that particular item to be shipped back to BE&SCO. Freight is not covered under warranty, going or coming. BE&SCO recommends that you insure any parts that are being returned to BE&SCO, as BE&SCO Inc. is not responsible for any damage or loss that occurs during shipping. If the part is damaged or lost during shipping, BE&SCO will not be responsible for repair or replacement of the parts.
3

Warnings
For Emergency Shutdown press the red side of the Master Switch.
In case of power failure, shutdown machine.
Storyboards
The laminated poster included in your shipment is called a Storyboard. A Storyboard shows how to operate or care for the machine. It should be posted on a wall close by the machine. Both front and back have the same information but in two different languages - Spanish and English.
Delivery & Damage
We firmly pack Midwedge Machines in wooden crates before giving them to the shipping company. After we give the merchandise to the shipping company, they are responsible for delivering your purchase; therefore, BE&SCO will not be responsible for loss or damage of your shipment. If you find your purchase damaged, call the shipping company.
4

Qualified Service Person
A Qualified Service Person is an employee of a firm, a corporation or a company that will:
1.Install, connect, repair, service, and replace parts of the Stand Alone Midwedge 9A either electrical or mechanical.
2.Follow rules and regulations of the National Electrical Code, ANSI/NFPA 70 or Canada’s CSA STD. C22.1, or any other local codes.
Adjustments
A Midwedge is shipped in a wooden crate with fillings in. Have two people take the Midwedge machine carefully out of the wooden crate and set it up.
Any further adjustments you think maybe needed must be done by a Qualified Service Person. If you can not locate a Qualified Service Person, call BE&SCO at (210) 734-5124 for assistance in locating a Service Representative. Lastly, the warranty does not cover these adjustments.
5

Specifications
The Midwedge works on 120 volt or 240 volt grounded circuits. The voltage and phase must be compatible with the power supply to safely operate. Any installation not matching the electrical specifications for the machine will void your warranty and may damage the unit. Machine installation must follow rules and regulations of the National Electrical Code, ANSI/ NFPA 70 or Canada’s CSA STD. C22.1, or any other local codes.
Models 9A and 9AE
...............................................................Voltage |
120V |
Cycles................................................................ |
60 Hz |
Phase................................................................. |
single |
Amperage........................................................... |
20 |
Total Heating Element........................................ |
1800 Watts |
Press Motor Size................................................ |
1/15 HP |
Press Motor Voltage........................................... |
120 Volts |
Press Motor Amperage...................................... |
0.90 |
|
|
Models 9AV and 9AEV
...............................................................Voltage |
240V |
Cycles................................................................ |
60 Hz |
Phase................................................................. |
single |
Amperage........................................................... |
14 |
Total Heating Element........................................ |
3000 Watts |
Press Motor Size................................................ |
1/15 HP |
Press Motor Voltage........................................... |
240 Volts |
Press Motor Amperage...................................... |
0.90 |
|
|
6

Components
7
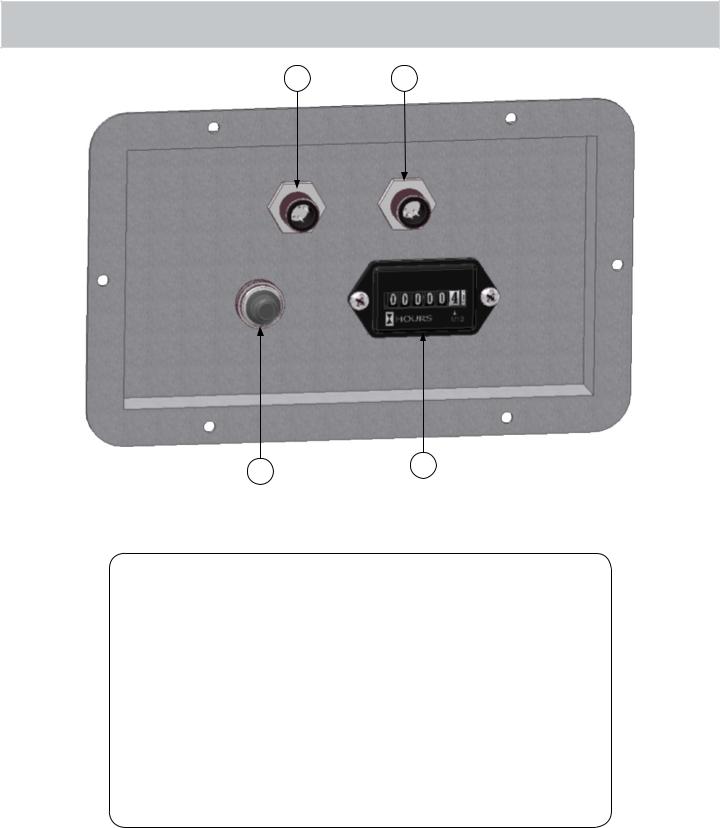
Control Panel Side 1
3 4
1 |
2 |
|
1.The Control Fuse/ Circuit Breaker protects the unit system against an overload in the main power.
2.The HOUR METER tracks hour usage against the motor.
3.The CABLE CONNECTOR on the left is for the cable that controls the signal to the Dough Trolley Loader.
4.The CABLE CONNECTOR on the right connects the cable that powers the Dough Trolley Loader.
8
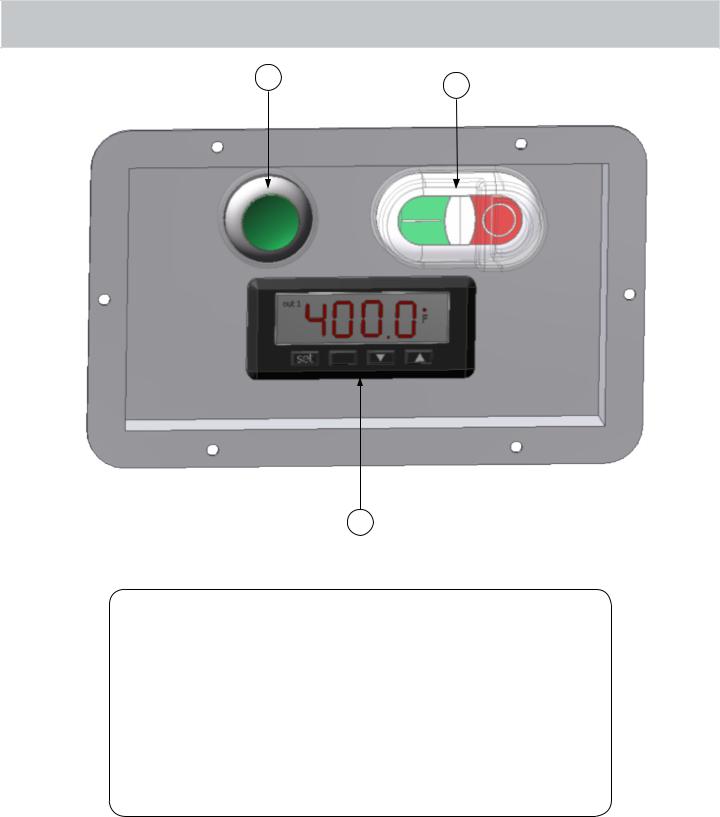
Control Panel Side 2
3 |
1 |
|
2
1.The HEAT ON/OFF SWITCH turns the power on to the machine and is also the emergency shut down switch.
2.The TEMPERATURE CONTROLLER allows you to set the actual temperature of the plates.
3.The MOTOR SWITCH starts the press plates. Press the switch in to Activate/Deactivate the motor.
9

Midwedge Operation Instructions
!Before Start-up, make sure that the Midwedge press plates have been well cleaned.
START UP
1.Press the HEAT ON/OFF switch on. Wait for approx. 20-30 minutes to warm up. When the Temperature Controls reaches set temperature between 380-400°F the press is ready.
2.Press the MOTOR switch on. The press plates will begin to press.
3.Dust the dough ball with flour, wait until the hopper gate opens and drop the dough ball into the hopper: Note: Over dusting of the first few dough balls may be necessary to establish a cure on the Midwedge press plates to prevent sticking.
4.A tortilla is made when the hopper closes and the dough ball drops between the press plates. When the press plates open again, the tortilla will slide over the exit slide.
SHUT DOWN
To shut down the Midwedge, simply reverse the previous steps.
1.Press the MOTOR switch to turn off motor.
2.Press the HEAT ON/OFF switch off.
3.Always clean the Midwedge between use.
10
11
TEMPERATURE CONTROL INSTRUCTIONS
*THERE ARE TWO TYPES OF TEMPERATURE CONTROLLERS THAT WILL COME INSTALLED IN YOUR MACHINE PLEASE DETERMINE WHETHER YOU HAVE TYPE A OR TYPE B AND FOLLOW INSTRUCTIONS BELOW
TYPE A
INSTRUCTIONS:
WHEN POWERED UP UNIT WILL FLASH SEVERAL TIMES
PLATE TEMPERATURE WILL DISPLAY ONCE FLASHING STOPS
TO CHANGE TEMPERATURE SET POINT: -PRESS SET BUTTON (A) ONCE
-SET TEMPERATURE IS NOW DISPLAYED
A  B
B 
 C
C
-USE UP AND DOWN BUTTONS (B) & (C) TO CHANGE SET POINT -PRESS SET BUTTON (A) AGAIN TO EXIT
-PLATE TEMPERATURE IS NOW DISPLAYED
TYPE B |
|
|
|
|
INSTRUCTIONS: |
|
|
WHEN POWERED UP UNIT WILL DISPLAY F |
|
|
PLATE TEMPERATURE WILL DISPLAY NEXT |
|
|
TO CHANGE TEMPERATURE SET POINT: |
|
C |
-PRESS SET BUTTON (A) ONCE |
|
-SP (SET POINT) WILL DISPLAY |
|
|
|
-PRESS SET BUTTON (A) A SECOND TIME |
|
|
-SET TEMPERATURE WILL DISPLAY |
|
|
-USE UP AND DOWN BUTTONS (B) & (C) TO CHANGE SET POINT |
A |
B |
-PRESS SET BUTTON (A) AND DOWN BUTTON (B) AT THE SAME TIME TO EXIT |
-PLATE TEMPERATURE IS NOW DISPLAYED |

Operation Troubleshooting
|
PROBLEM |
CAUSE |
REMEDY |
|
|
|
|
|
|
A. No power to machine. |
A. Check branch line circuit |
|
|
breaker. |
|
|
|
|
|
1 |
Stand Alone Midwedge |
|
B. Check to see if machine is |
B. Machine not plugged in. |
plugged into electrical outlet. |
||
|
does not come on. |
|
|
|
|
|
C. Make sure safety shell is |
|
|
C. Shell is not closed properly. |
placed in properly with knobs |
|
|
tightened. |
|
|
|
|
|
|
|
|
|
|
Temperature Controller |
|
|
|
lights up, press plates |
|
A. Check if motor plug harness |
2 |
heat up. Press motor |
A. Plug harness not connected. |
is connected to the female |
|
light comes on. Press |
|
receptacle. |
|
motor would not run. |
|
|
|
|
|
|
|
|
A. Top Press Plate power harness |
A. Call the service company. |
|
Top Press Plate is not |
disconnected. |
|
3 |
|
|
|
getting hot. |
|
|
|
|
B. Top Press Plate thermostat is |
B. Call the service company. |
|
|
|
||
|
|
not functioning. |
|
|
|
|
|
|
|
|
|
|
|
A. Bottom Press Plate power |
A. Call the service company. |
|
|
harness disconnected. |
|
|
Bottom Press Plate is |
|
|
4 |
|
|
|
not getting hot. |
|
|
|
|
B. Bottom Press Plate thermostat |
|
|
|
|
B. Call the service company. |
|
|
|
is not functioning. |
|
|
|
|
|
12

How to remove a stuck tortilla during production
Introduction:
Build up of small amounts of dirt and flour stick to the press plates during tortilla production over time which cause tortilla jams to occur. This section will show you how to remove a tortilla jam. Be very careful while removing the jam. If you touch the machine without a mitt, the heated metal can easily burn. Follow the instructions below exactly.
|
|
Items needed: |
|
|
|
A. |
Cleaning Stick |
|
|
|
B. |
Oven Mitt |
|
|
|
|
|
|
|
Item |
|
Description |
QTY |
Part Number |
A |
|
Cleaning Stick |
1 |
949912005 |
B |
|
Oven Mitt |
1 |
949952010 |
If you do not have these materials call BE&SCO’s Parts Department @ 210-734-5124.
Precautions:
•Do not wash Press Plates in water.
•Wear oven mitts for protection.
•Do not clean press plates with any brand name cleaners, degreasers, and/or sharp objects, such as:
13

How to remove a stuck tortilla during production
CAUTIONS HOT: When cleaning the press plates while in production always
!use the oven mitt and cleaning stick to keep a safe distance between you and the hot surface. Make sure to always turn off the press motor before you start cleaning the press plates.
1. Turn off the Press Motor by depressing the green push button.
2.Pull the locking pin and place it under the machine.
Caution: locking pin extremely hot.
3. Pull the white knob opening the top plate.
4. Use the BE&SCO Oven Mitt and Cleaning Stick to remove the tortilla jam.
14
Cleaning the Stand Alone Midwedge Press
Introduction:
Cleaning keeps the inside and outside of the machine free from dust, flour, or any other build-up. If the machine remains unclean for along period of time, the oil and build-up clog the moving parts and could slow or halt production and damage the unit. This section will show you how to clean the machine.
Order these materials as needed through the BE&SCO’s Parts Department @ 210-734-5124.
Description |
QTY |
Part Number |
BE&SCO Manuals |
1 |
Machine Manual |
BE&SCO Storyboards |
1 |
Machine Storyboard |
Cleaning Stick 20” |
1 |
949912005 |
Cleaning Stick 26” |
1 |
949912006 |
BE&SCO Oven Mitt |
1 |
949952010 |
Grade Slick’em Gallon |
1 |
911522101 |
Grade Slick’em Qt. |
1 |
911522100 |
Stainless Steel Cleaner & Polish |
1 |
911512016 |
Grease, Ultra Hi Temp |
1 |
911211003 |
Vacuum Cleaner with Hose Attachment |
n/a |
n/a |
Soft Dry & Damp Cloth |
n/a |
n/a |
15

Cleaning the Stand Alone Midwedge Press
1. Make sure you have all the approved cleaning supplies and service products. Please use only these approved items.
2. Before cleaning make sure you turn off the machine and allow to completely cool approx. 20-30 minutes.
3.To clean the press plates, pull the locking pin out, pull out the exit slide and pull the white knob to open the top plate.
4. Loosen the two front black knobs to loosen the shell.
5. Pull the shell back to expose the plates and motor compartment.
6. Clean the plates with the
Green Scrub pad. Use Brown pad for heavy build-up.
7. Spray Slick’em on a cloth. Apply to both top and bottom plates.
8. Use a compact vacuum to |
9. Clean the exterior with |
vacuum up the debris in the motor |
Stainless Steel Cleaner. The |
compartment. |
press is clean and ready to use. |
16
 Loading...