

Bernina Industrial 950 Instruction Manual
-=
=-L--
- ~=
-
-
--
~-.- '"': ==
~§§§- -
- .: §.
==
-~
-~
---
-
----
--
-
-
.=---~
-
-
./=
"=
-
-
-
-
--
-
---'
._-'
'-
-----_
.•.
_-
_.-
~-----
--
--
----
--
'-
'-
-
-
-
-
-
~
",-
./
""
..-
..--
,..-
~
-"
-"
-"
./
./
..r
,/
-<
---
./
""
-~
--.-
-
-
-
Industrial
950
Instruction Manual
Bedienungsanleitung
Manual
d'
instructions
Manuale
d'
instruzione
Manual de instrucciones

Safety instructions
IMPORTANT! SAFETY INSTRUCTIONS
The following safety instructions should always be
followed:
Before using the machine, read the safety instructions
and the instruction manual carefully.
Please follow the instructions below very carefully when
setting up, operating and cleaning the appliance:
Use this appliance only for its intended use as descri-
bed in this manual.
Never operate the appliance if parts are defective or
missing.
The appliance may only be operated when all protec-
tive covers are correctly fitted.
The motor voltage mentioned on the specification
plate must correspond with the electrical voltage of
the place where the appliance is used. Do not use the
machine if this is not the case.
.
-",
Use only attachments recommended by the manu-
facturer as contained in this manual.
Never operate the machine where aerosol (spray pro-
ducts) are being used or where oxygen is being admi-
nistered.
-.
Keep flammable and volatile liquids well away from
the appliance.
Switch the machine off or remove the plug from the
power supply when making any adjustments in the
needle area.
Always unplug the machine from the electrical supply
when cleaning or lubricating or when work is comple-
ted. In addition wait until the machine has come to a
complete standstill when using a clutch motor.
Always unplug by grasping the plug and not the cable.
Do not press the foot control when switching the
appliance on .
.
,......,.
The needle and other moving parts (thread take-up,
hook and handwheel) are sources of injury (injury to
fingers). It is therefore important to keep your eyes on
to work.
Always use the prescribed needle system. Do not use
blunt or damaged needles.
Keep ventilation openings of the motor and foot con-
trol free from the accumulation of lint, dust and loose
cloth.
Before tilting the machine, turn the power switch to
,,0", remove the plug from the power supply and let
the machine come to a complete standstill. Be careful
of sharp, protruding parts and when tilting the machi-
ne back again, make sure that your fingers do not get
trapped between the machine and the sewing table.
Keep these instructions carefully for your own safety .
Contents
<:»
"
1
Safety Instructions
'../
C!:
2
Content
2
3
Details of the machine
Setting up the machine
4
Removing and inserting the bobbin case
"-'
Winding the bobbin
5
Inserting the bobbin
Selecting needle and thread
Inserting the needle
6
Changing the presserfoot
'-'
Threading the upper thread
Bringing up the lower thread
'-"
7
Thread tension
Lowering the feed-dog
Presserfoot lifter (FHS-FreeHand System)
-'
Sewing tips
Standard Accessories
8
Presserfeet
9
Presserfeet
'-'
Practical sewing ~
10
Practical stitches
Decorative stitches
Y.".f'-
-::»
Basic settings
11
Straight stitch, zig-zag
12
Practical stitches, decorative stitches
'-"
Practical sewing
13
Sewing with decorative stitches
14
Buttonhole
--../
15
Buttonhole with gimp
Buttonhole foot with slide
<::»
16
Blind hem
Vari-Overlock
17
Sewing in zips
'--
Darning
Maintenance
18
Cleaning, Lubricating
<::»
19
Solving problems
"-
-
20
Index
<:»
'-./
->,
<:»
<:»
'-'
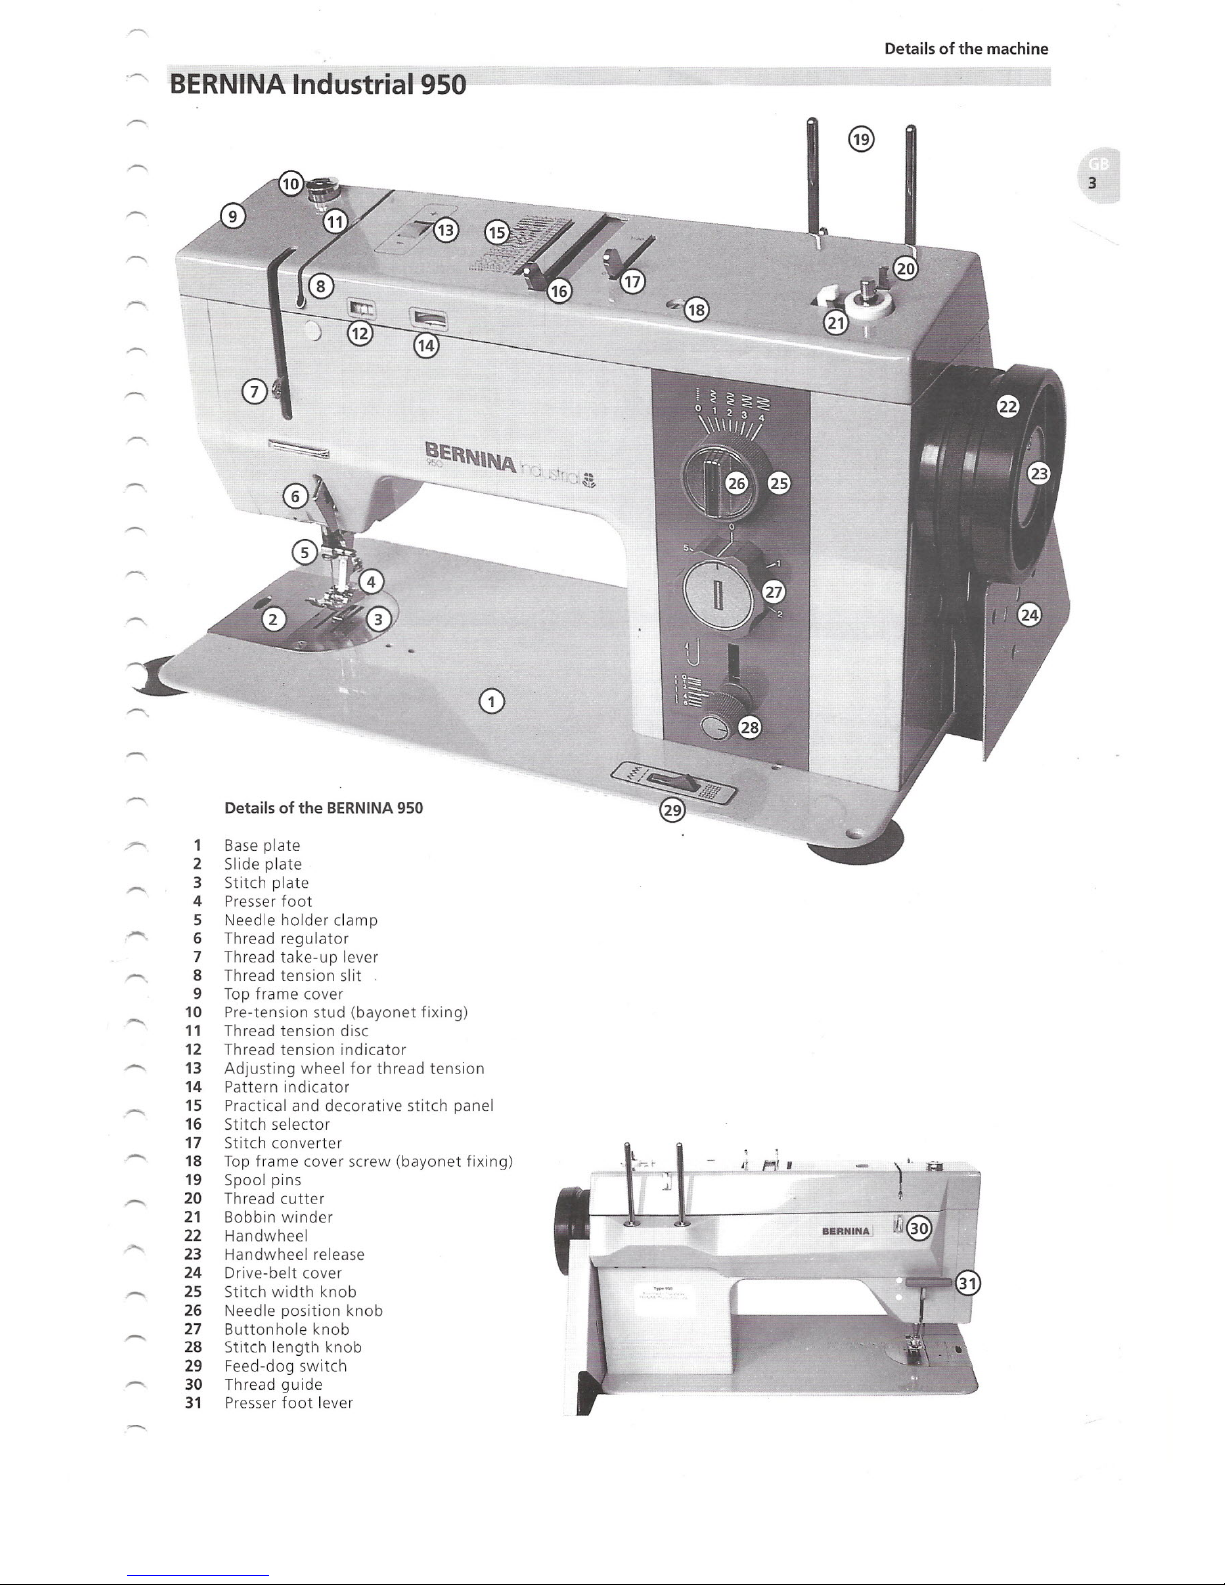
BERNINA Industrial 950
Details of the machine
Details of the BERNINA 950
1 Base plate
2 Slide plate
3 Stitch plate
4 Presser foot
5 Needle holder clamp
6 Thread regulator
7 Thread take-up lever
8 Thread tension slit
9 Top frame cover
10 Pre-tension stud (bayonet fixing)
11 Thread tension disc
12 Thread tension indicator
13 Adjusting wheel for thread tension
14 Pattern indicator
15 Practical and decorative stitch panel
16 Stitch selector
17 Stitch converter
18 Top frame cover screw (bayonet fixing)
19 Spool pins
20 Thread cutter
21 Bobbin winder
22 Handwheel
23 Handwheel release
24 Drive-belt cover
25 Stitch width knob
26 Needle position knob
27 Buttonhole knob
28
Stitch length knob
29 Feed-dog switch
30 Thread guide
31 Presser foot lever
3
Setting up the machine
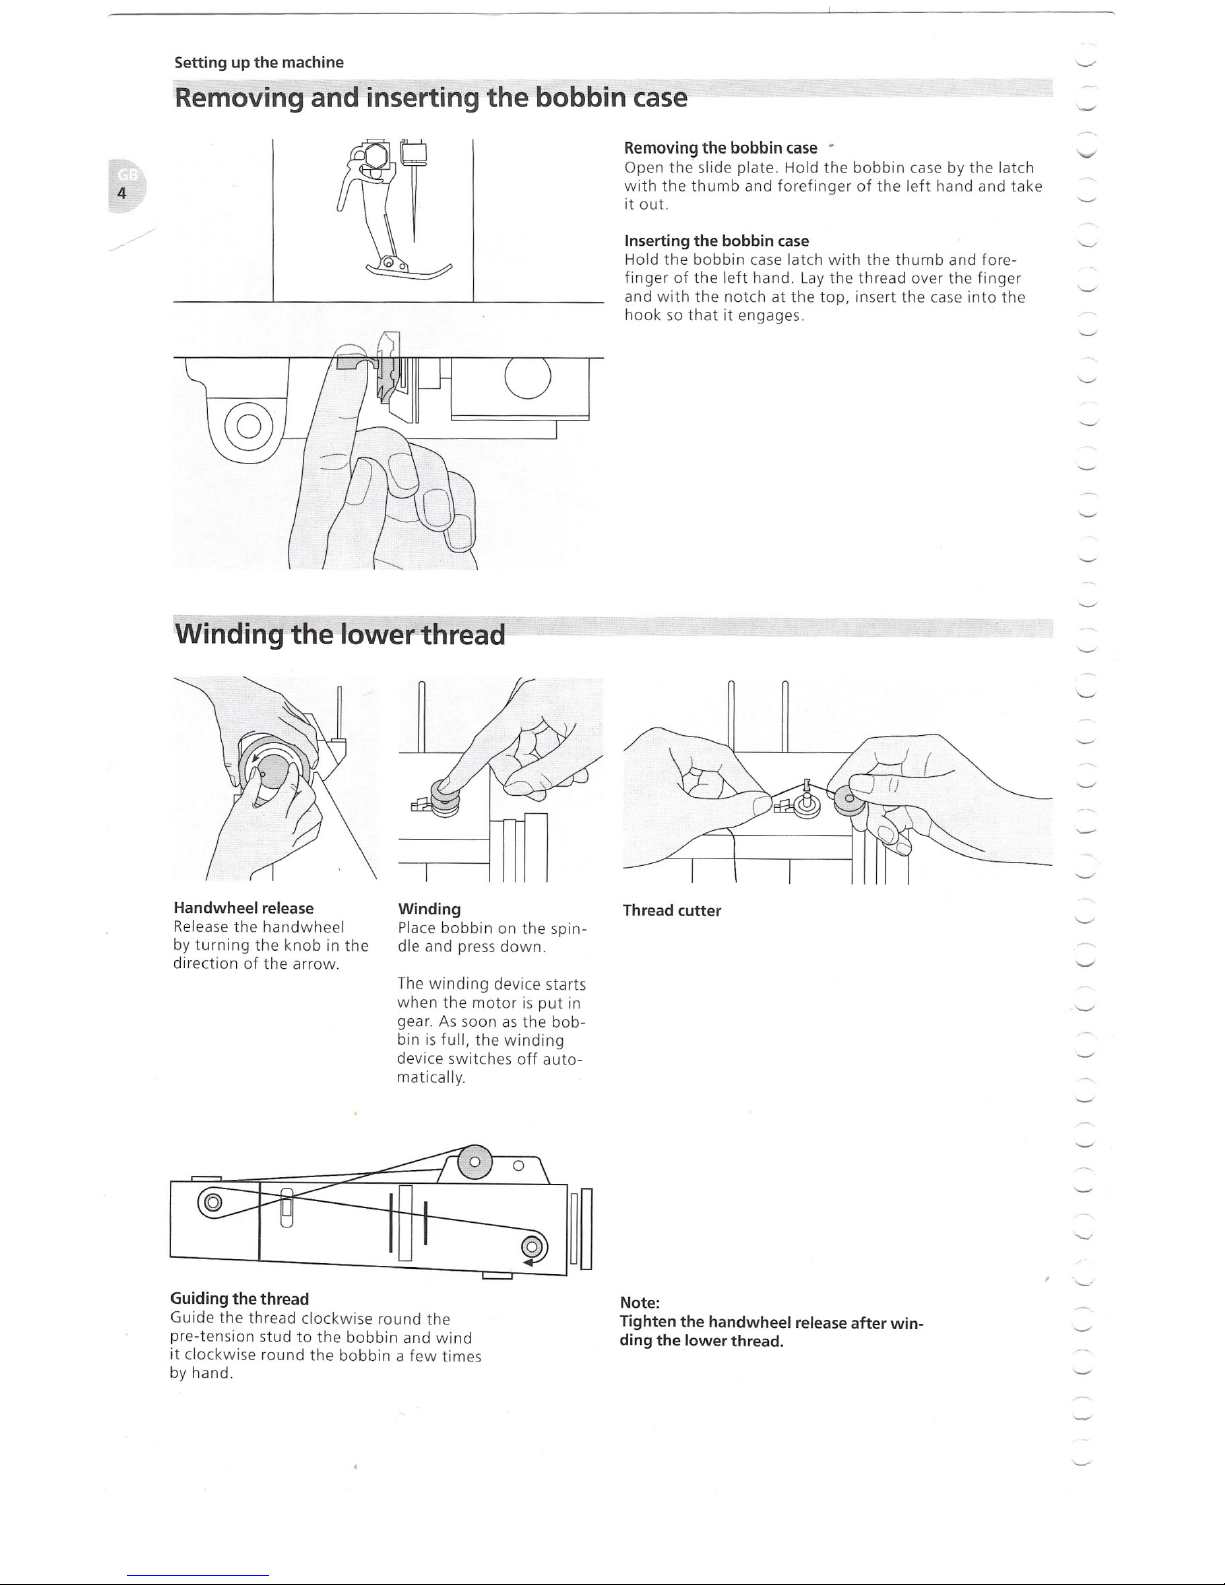
Removing and inserting the bobbin case
4
Winding the lower-thread
Handwheel release
Release the handwheel
by turning the knob in the
direction of the arrow.
Winding
Place bobbin on the spin-
dle and press down.
The winding device starts
when the motor is put in
gear. As soon as the bob-
bin is full, the winding
device switches off auto-
matically.
Guiding the thread
Guide the thread clockwise round the
pre-tension stud to the bobbin and wind
it clockwise round the bobbin a few times
by hand.
Removing the bobbin case •
Open the slide plate. Hold the bobbin case by the latch
with the thumb and forefinger of the left hand and take
it out.
Inserting the bobbin case
Hold the bobbin case latch with the thumb and fore-
finger of the left hand. Lay the thread over the finger
and with the notch at the top, insert the case into the
hook so that it engages.
Thread cutter
Note:
Tighten the handwheel release after win-
ding the lower thread.

Inserting the bobbin
Inserting
Insert the bobbin with the
thread running in an anti-
clockwise direction.
:
••....•..
Threading
Draw the thread through
the slot and below the
spring until it lies in the
T-shaped slot at the end of
the spring.
Selecting needle and thread
Selecting needle and
thread
Use only left-twisted
th read. The correct size of
needle allows the thread
to pass easily through the
eye and the long groove.
Left or Z twisted.
Special needles
»<
We recommend the use of special needles which are
designed for specific fabrics and materials.
.-'
»
2:>
287 WH SES
- fine ballpoint for fine
knits and synthetics
287WH SUK
- medium ballpoint for
thick knits
287WH L
- cutting point for leather,
suede, imitation leather
and plastic
Inserting the needle
Needle system 287 WH
Insert the needle fully with
the long groove to the
front.
The direction of the eye
should be between the 6
and 7 on a clock.
,.......
'"'
.....•.
,I
,
-
-
>'"'.
-9
I
3-
-
,~/;
-
,
c-...
I' ,
Lower thread tension
Normal tension
Sharp hand movement
=
bobbi n case tu rns
Hand still=bobbin case
stiII.
Needle
70
Thread
Darning thread
o
Embroidery
thread No. 30
Mercerised cotton
Polyester
Thick mercerised
cotton,
Polyester
Buttonhole thread
(cordonnet) for
decorative seams
Setting up the machine
5
Adjustment
Adjusting the bobbin
thread tension:
+ tighter tension
- looser tension
80
90
100 110-120
o
o
o o
o o
o o
o
o
Use the screwdriver from
the accessory box to loo-
sen and tighten the needle
clamp screw.
 Loading...