

Page 1

VERAS 9
VERAS
VERAS
In-the-ear hearing instruments
7
5
INSTRUCTIONS
FOR USE
Page 2

Page 3

TABLE OF CONTENTS
Introduction 7
Description of features 8
Inserting instruments 9
Removing instruments 10
Operating instruments (ON/OFF) 11
Changing the volume level 12
Changing programs 14
Telecoil function 15
Telephone use 16
Changing the battery 18
Data logging and learning 20
Operating the instruments with remote control 21
Operating the instruments with SoundGate 22
Instrument care 23
3
Page 4

Page 5

Cleaning the sound outlet 24
Using your hearing instruments 27
Using the telephone 30
Environmental protection 31
Product approval, markings and compliance 32
Compliance with radio communi cations
requirements for the USA and Canada 34
Compliance with requirements for Europe 37
Cell phone and hearing instrument compatibility 39
International warranty 41
Your hearing instrument conguration 42
Accessories 44
General warnings and safety guidelines 45
Notes 49
Common problems and solutions 50
Service 54
5
Page 6

Congratulations on the purchase of your new
Bernafon hearing instruments. With a little practice,
you will soon be on your way to better hearing.
Please read the entire contents of this booklet
before using your hearing instruments. It contains
instructions and important information about the
use and handling of your hearing instruments
and batteries.
6
Page 7

VR_I LU_ ITC 1ov ervi ew_ BW_ HI
VR_I LU_I TC2ov ervi ew_B W_HI
VR_I LU_CI Cover view_ BW_HI
Introduction
The following instruments are covered in these
instructions:
Veras ITE instruments
VR9 ITCD VR9 ITC VR9 CIC
VR7 ITCD VR7 ITC VR7 CIC
VR5 ITCD VR5 ITC VR5 CIC
Note: Custom hearing instruments vary in size
and shape due to the unique characteristics of
individual ears.
7
Page 8
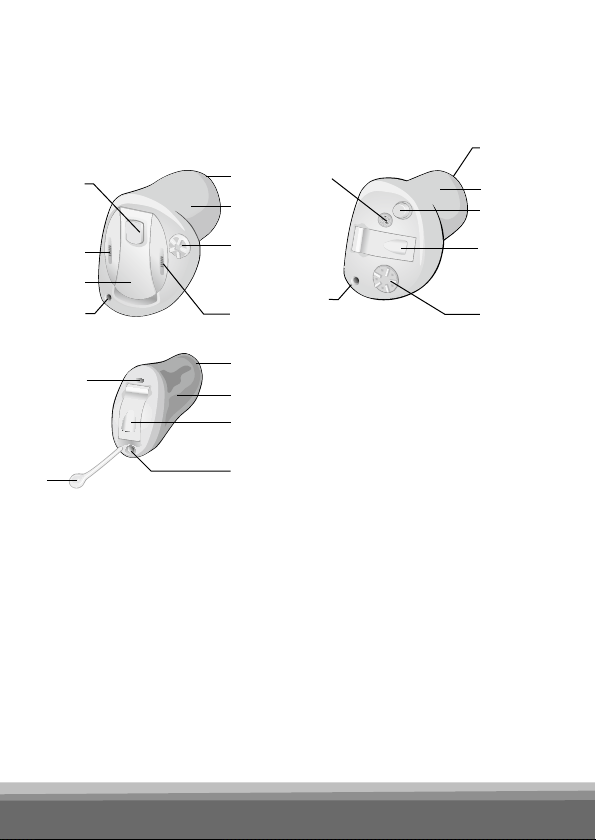
Description of features
VR_I LU_ITC 1overv iew_BW_ HI
VR_I LU_ITC2o verview_ BW_HI
VR_I LU_CIC overvie w_BW_H I
6
3
2
4
3
2
6
9
5
1
ITCD ITC
4
7
CIC
1 Vent
2 Canal
3 Sound outlet with
wax protection
4 Microphone opening
5 Battery drawer
8
8
4
1
5
8
3
2
5
1
6 Push button (optional)
7 Pull-out string
8 Volume control (optional)
9 Second microphone
opening
Page 9
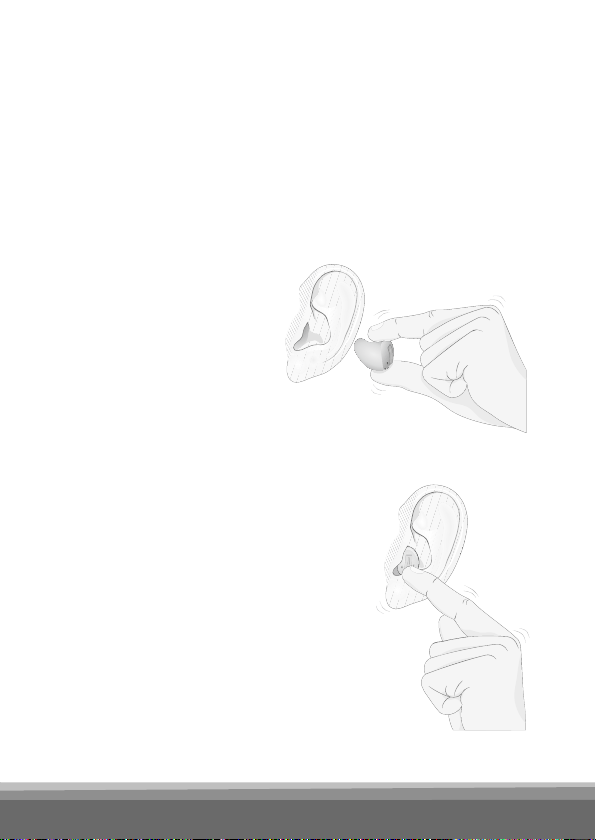
Inserting instruments
It takes patience and practice to insert your in-
struments correctly. If you have difculty, please
consult your hearing care professional.
• Insert your right
instrument with
your right hand and
your left instrument
with your left hand.
• Hold your instrument between your
thumb and index nger with the microphone
towards the top.
• Place the canal part of your
instrument into your ear canal.
• Gently pull your ear lobe down
with the other hand while
pushing the hearing instrument
in until it feels secure.
9
Page 10

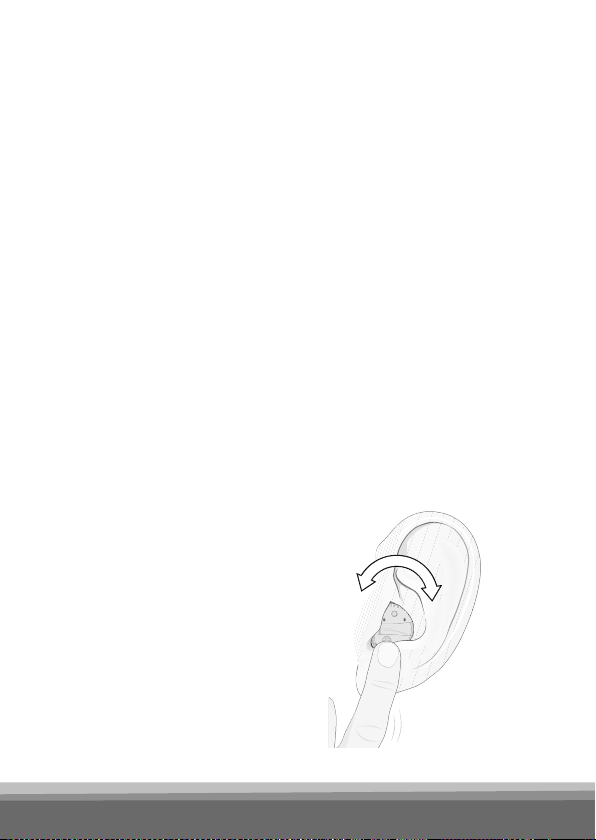
Removing instruments
• Use your thumb to push up against the bottom
(back part) of your ear to loosen the instrument.
• Grasp the instrument at its edge between your
thumb and forenger, and gently remove it from
your ear.
• If your hearing instrument has a removal (pull-
out) string, pull it gently.
Important: Do not try to remove your instrument by pulling on the battery drawer.
This may cause damage. Contact your hearing
care professional if you are having problems
removing the instrument.
10
Page 11
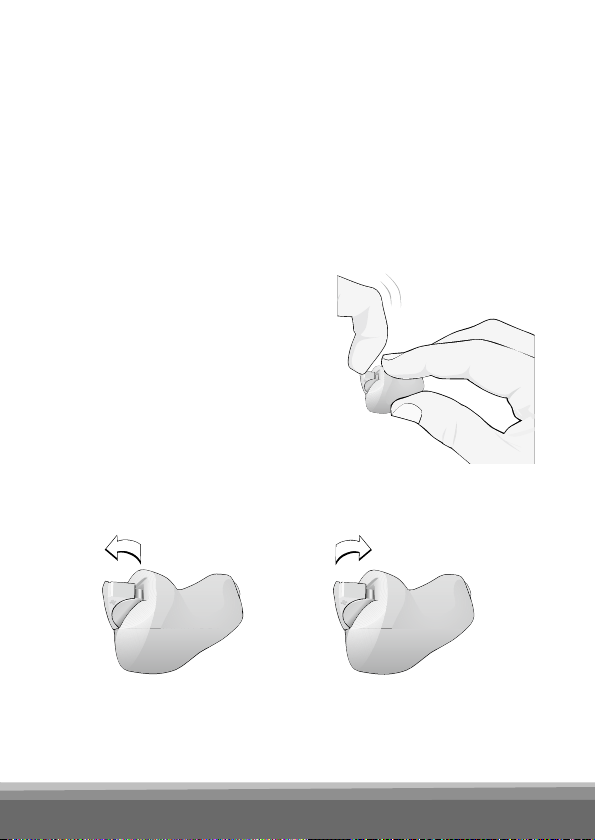
Operating instruments (ON/OFF)
To turn the instrument ON
Push the battery drawer closed until it snaps. The
hearing instrument will make one long beep as it
starts.
To turn the instrument OFF
Place your ngernail un-
derneath the front edge of
the battery drawer and lift
to open.
open (OFF) closed (ON)
Note: Never force the battery drawer open or closed.
11
Page 12
Changing the volume level
Your hearing instruments are programmed to be
at a comfortable volume level for your hearing
loss. They are designed to automatically adjust to
changes in the sound environment.
Some models allow you to adjust the volume
yourself, either with an optional control on the
instrument or an optional remote control.
Volume control wheel
(optional for all ITCD and ITC)
To increase the volume
Turn the volume control
towards your front. The
instrument will beep when
you reach the programmed
maximum.
louder softer
12
Page 13

To decrease the volume
Turn the volume control towards your back. The
instrument will beep when your reach the programmed minimum.The volume control has no
mechanical stop.
You can continue to turn it, but the loudness will
only be altered between the programmed minimum and maximum. Your hearing care professional
can program the volume to remain at a xed level,
if desired.
Note: Your instruments automatically return to
a preset loudness level when the instrument
starts, the battery is low, or when the program
is changed. If you nd that you frequently need
to turn the volume up or down, your hearing care
professional may need to adjust your settings.
13
Page 14

Changing programs
(ITCD and ITC instruments)
Your hearing instrument can be congured with 3
to 4 listening programs. Please see page 42 to nd
out which programs have been congured for your
hearing instruments. You can change programs as
follows:
Push Button
If your instrument has been made with an optional
push button, you can use it to change programs.
You will hear the same number of beeps as the
program you are in each time you press the push
button.
RC-P remote control (optional for VR9 and VR7
and VR5 ITCDs only)
You may change programs and adjust the volume
level with the RC-P remote control. See page 21
for instructions.
SoundGate (optional for VR9 and VR7 ITCDs only)
If you have a SoundGate communication device
paired to your instruments, you can use it to
change the program and volume level. Please see
page 22 for instructions.
14
Page 15

Telecoil function
(optional for ITCD and ITC instruments)
The telecoil helps you hear better when using a
telephone or in buildings where inductive loop
systems are installed (places of worship, halls,
theatres, etc.). When the telecoil is active, you
hear directly through the telephone or inductive
loop. To access the telecoil, go to the telecoil
program. See page 42.
This symbol or a similar sign should
be displayed wherever a permanent
loop has been installed.
Note: Not all telephones are compatible with
hearing instruments.
15
Page 16
Telephone use
Auto Telephone (all ITCDs)
Your instrument may have an Auto Telephone
functionality. When the hearing instrument is close
to a telephone receiver, the Auto Telephone will
activate a phone program. When you end your conversation, the hearing instrument will automatically
return to the previous program.
Note: All telephones can
activate the Auto Telephone. The tele phone
receiver may need to
have a special magnet
tted. Please follow the
separate instructions
for mounting the magnet,
which are available from
your hearing care professional.
16
Page 17

Your hearing care professional can congure your
instruments to allow answering the phone on both
ears or on your preferred ear. If you have a preferred ear, the instrument on the opposite side can
be programmed to sound softer or to mute when
the Auto Telephone is active. Please see page 42
to nd out how your instruments are congured.
Warning
• Keep magnets out of reach of children and
pets. If a magnet is swallowed, see a doctor
immediately.
• Do not wear the magnet in a breast pocket
and keep it 30 cm away from pacemakers
and other active implants.
• Use the magnet on the opposite side from
active implantable devices.
• Keep the magnet 30 cm away from credit
cards or other magnetically sensitive items.
17
Page 18

Changing the battery
When the battery is about to run out, the instrument
will beep at regular intervals.
The battery should be replaced immediately.
The following battery sizes are used:
– ITC and ITCD: size 312 battery
– CIC: size 10 battery
• Gently swing the
battery drawer fully open,
but do not force it.
• Take out the used battery.
• Remove the sticker
from the new battery.
• Place the battery into
the drawer with the at,
smooth side facing up
(+ sign) as shown in the
drawing.
• Close the battery drawer
securely.
18
Page 19

Important battery information
• Battery life will vary with conditions of use
(batteries will run down faster in noisy environments).
• Always keep spare batteries on hand.
• A used battery should be replaced immediately.
• If you are not going to use your hearing instru-
ments for a few days, remove the batteries.
• Any moisture found on a battery should be
wiped off immediately with a soft cloth.
• Used batteries should be returned to your
battery supplier or hearing care professional
for safe disposal.
• Never dispose of batteries by burning them.
They may explode and cause injury.
• Never dispose of batteries with household
waste. They cause environmental pollution.
Note: Always remove zinc-air batteries before
drying your hearing instrument with a drying kit.
Drying out zinc-air batteries shortens their lifetime.
19
Page 20

Data logging and learning
Data logging
The data log automatically stores information
about your use of the hearing instruments such
as changes made to the volume control, hours
of wear, etc. This information can be used by your
hearing care professional to adjust your instruments. If you do not want this feature to be active,
please ask your hearing care professional to turn
it off.
Data learning
(optional for VR9 and VR7 ITCD and ITC only)
If your instrument is equipped with data learning,
your hearing care professional can activate this
feature to help customize your hearing instruments. When data learning is operating, the
instrument keeps track of how often and how
much you adjust the volume control and “learns”
your preferred setting. This new setting can
be made permanent during your follow-up visit.
20
Page 21

Operating the hearing instruments
with the optional RC-P remote
control
If you have purchased a remote control you can
use it to change programs, adjust the volume level
up and down, or mute the instruments.
For complete operating instructions, please read
the separate RC-P remote control instructions for
use booklet.
1
2
3
1 Program cycle button
2 Volume control
3 Mute button
4 Status light
4
21
Page 22

Operating the instrument with the
optional SoundGate communication
device
If you have purchased a SoundGate you may use
it to perform basic functions such as program
changes and volume adjustments. In addition, the
SoundGate serves as a link between your hearing
instruments and external sources such as music
players, cell phones, computers, etc.
For complete operating instructions, please read
the separate SoundGate instructions for use
booklet.
(VR9 and VR7 ITCDs only)
SoundGate (optional)
1 Volume control
and program change
2 Phone
3 Music connection
e.g. MP3
®
4 Bluetooth
music/audio
5 Battery indicator
22
1
2
3
4
5
Page 23

Instrument care
Healthy ears produce a waxy substance that can
clog your hearing instruments. Please follow these
cleaning instructions to prevent wax build-up and
ensure optimal performance of your instruments.
Every night
• Check your instruments for ear wax and wipe
them clean with a cloth or tissue.
• If necessary, use the cleaning tool to remove
wax from the canal and vent openings on your
instrument.
• Open the battery drawer fully to allow air to
circulate.
• A dry storage kit is recommended to remove
any moisture that may have accumulated in the
instrument.
23
Page 24

Cleaning the sound outlet
The sound outlet is an integral part of your hearing
instrument and should be kept clean and free
from ear wax at all times. Your instruments are
built with a wax protection system. Please follow
the instructions for the type of wax protection your
instrument uses. If you have questions, please ask
your hearing care professional.
WaxBuster system
• Wipe the hearing instru-
ment with a dry soft
cloth. Carefully wipe
away traces of wax on
the WaxBuster.
• Place the tip on a dry
soft cloth over a smooth
surface. Gently press
the WaxBuster and drag
the hearing instrument
across the cloth.
• Clean your hearing instruments with the small
brush or the soft cloth provided.
24
Page 25

Do not insert tools into the sound outlet.
This could damage the receiver. If you cannot clean
the hearing instruments completely, it is best to
contact your hearing care professional.
NoWax system
• Always inspect your NoWax lter before using
the instrument to ensure that it has not become
detached from the instrument.
• Change the lter if you can see that it is clogged
or if the instrument does not sound normal.
Shell Filter Tool Removal tool
25
Page 26

• Remove the tool from the shell and push the
removal part into the old wax lter to remove it
from the instrument.
• Push the new lter into the hearing instrument.
• Discard the used tool.
Avoid heat, humidity and chemicals
• Do not expose the instruments to extreme heat
by leaving them in the car, near a radiator, etc.
• Avoid exposing your instruments to moisture
i.e. steambaths, showers, heavy rain, etc.
• Never attempt to dry your instruments with
a hair dryer, microwave oven, etc.
• Remove your instruments before applying
aftershave, hairspray, oils, perfume, mosquito
repellent, lotions, etc. Allow the product to
dry before wearing your instruments.
• Protect your instruments by keeping them in
the case when you are not wearing them.
26
Page 27

Using your hearing instruments
Hearing instruments do not restore perfect hearing. They make sounds louder and help you make
the most of the hearing you have. While some
immediate benet is usually noticed, it often takes
several weeks for your brain to adapt to the new
sounds.
The following tips will help you learn to use your
instruments. If you have trouble adjusting, consult
your hearing care professional.
Getting started
• Wear your instruments at home in a quiet
environment. Have a conversation with one
person or listen to a news program on TV.
• You will benet most if you wear your instru-
ments all day long. Increase the time each
day until you are comfortable wearing them for
several hours at a time.
27
Page 28

• You may notice that your own voice sounds
louder. If the voices of others are at a comfortable level, try speaking at a lower volume.
• Sounds like footsteps, chirping birds, rustling
paper, etc. may seem quite loud at rst because
you probably haven’t heard them for awhile.
They will soon fade to the background.
Dining out
• Start with a quiet restaurant (no music or enter-
tainment).
• Request a table away from the kitchen and other
noisy areas.
• Conversation will be easier in a smaller group.
In the car
• Sit with your better ear toward the center of the
car.
• Turn off the radio.
• Keep windows closed to minimize trafc, road
and wind noise.
28
Page 29

Attending theatre, concerts, lectures, etc.
• Ask if there is a loop system available. If not,
request to be seated near the front.
• Try to sit with your better ear closer to the sound
source.
• Become familiar with the program in advance
to make it easier to follow.
At work
• Inform your co-workers about your hearing loss.
• If you hear only part of a conversation, repeat
what you have heard and ask for the missing
information.
29
Page 30

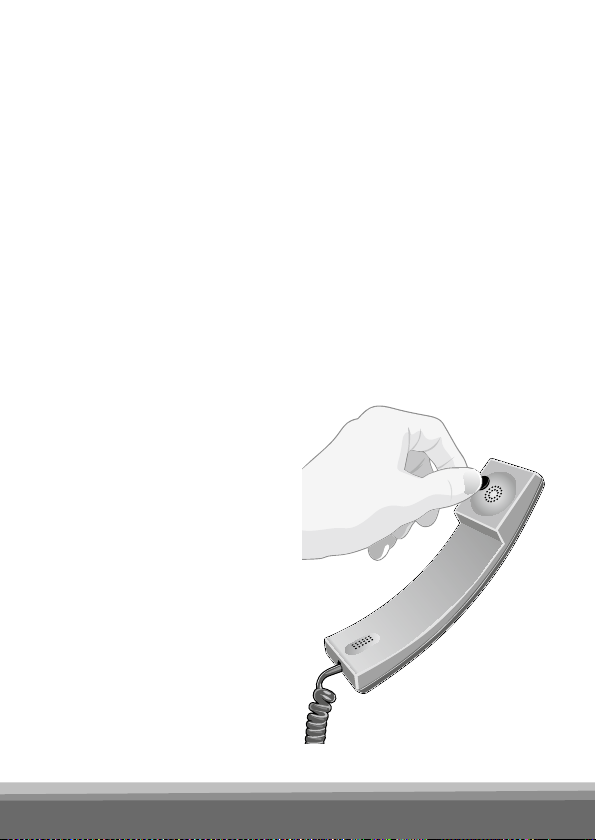
Using the telephone
• Hold the receiver close to the microphone
inlet of your hearing instrument. If this causes
whistling, move the receiver away a small
distance.
• If voices over the telephone are too soft or
background noise is a problem, use the telecoil
(if your instrument has this option). Be aware
that not all phones are telecoil compatible.
• Mobile phones may cause interference with the
telecoil. In this case, the microphone mode will
give a better result.
• Before purchasing a mobile phone, test it with
your hearing instrument.
• People with a greater degree of hearing loss may
need a volume control on the telephone.
30
Page 31

Environmental protection
Your hearing instruments contain electronic
components subject to the Directive 2002/96/EC
on waste electrical and electronic equipment.
Help to protect the environment by not disposing
of your hearing instruments or batteries with your
unsorted household waste. Please recycle your
hearing instruments and batteries according to
your local regulations or return them to your hearing care professional for disposal.
31
Page 32

Product approval, markings
and compliance
All Bernafon Veras hearing instrument models
comply with international standards concerning
electromagnetic compatibility. Due to the limited
size available on the instruments all relevant
approval markings are found in this document.
Electromagnetic interference
Your hearing instrument has been thoroughly
tested for electromagnetic interference. However,
some products may emit electromagnetic energy
causing unforeseen interference with hearing
instruments. Examples include induction cooking
appliances, shop alarm systems, mobile phones,
fax machines, personal computers, X-rays, CT
scans, etc.
Even though your hearing instruments are designed to comply with the most stringent international standards of electromagnetic compatibility,
they may emit electromagnetic energy that can
cause interference with other devices.
32
Page 33

Your hearing instruments may contain a
radio transmitter using short range magnetic
induction technology working at 3.84 MHz.
The magnetic eld strength of the transmitter
is < – 42 dBμA /m @ 10 m.
The electromagnetic emission from the radio
system is well below international limits for human
exposure. By comparison, the electromagnetic
energy of the hearing instrument is lower than that
generated by household items such as halogen
lamps, computer monitors, dishwashers etc.
33
Page 34

Compliance with radio
communi cations requirements
for the USA and Canada
Bernafon AG
Veras hearing instrument models VR9 ITCD;
VR7 ITCD; VR5 ITCD
FCC ID U6XFUITE01
IC: 7031A-FUITE01
Statement of compliance:
This device complies with part 15 of the FCC
Rules and RSS-210 of Industry Canada. Operation
is subject to the following two conditions:
(1) This device may not cause harmful interference,
and
(2) This device must accept any interference
received, including interference that may
cause undesired operation.
This Class B digital apparatus complies with
Canadian ICES-003.
Note: This equipment has been tested and found
to comply with the limits for a Class B digital
device, pursuant to part 15 of the FCC Rules.
34
Page 35

These limits are designed to provide reasonable
protection against harmful interference in a
residential installation.
This equipment generates, uses and can radiate
radio frequency energy and, if not installed and
used in accordance with the instructions, may
cause harmful interference to radio communica-
tions. However, there is no guarantee that inter-
ference will not occur in a particular installation.
If this equipment does cause harmful interference
to radio or television reception, which can be determined by turning the equipment off and on, the
user is encouraged to try to correct the interference by one or more of the following measures:
– Reorient or relocate the receiving antenna.
– Increase the separation between the equipment
and receiver.
– Connect the equipment into an outlet on a
circuit different from that to which the receiver
is connected.
– Consult the dealer or an experience radio/TV
technician for help.
35
Page 36

Caution: Changes or modications not
expressly approved by Bernafon AG could
void the user’s authority to operate the
equipment.
36
Page 37

Compliance with requirements
for Europe
This device is in conformance with the requirements of the Directive 93/42/EEC of the Council
of the European Communities concerning medical
devices, MDD. This is certied by applying the
following marking:
This device also complies with the essential
requirements of the Directive 1999/5/EC of the
European Parliament on radio equipment and
telecommunications terminal equipment, R&TTE.
It operates as an inductive application in a
harmonized frequency band according to the
Commission Decision 2008/432/EC and may
be used in all member states of the EU and EFTA.
This is certied by applying the following marking:
37
Page 38

Declarations of conformity are available at:
Bernafon AG
Morgenstrasse 131
3018 Bern
Switzerland
38
Page 39

Cell phone and hearing instrument
compatibility
Some hearing instrument users have reported a
buzzing sound in their instruments when they are
using cell phones, indicating that the cell phone
and hearing instrument may not be compatible.
The compatibility of a particular hearing aid and
cell phone can be predicted by adding the rating
for the hearing aid immunity to the rating for the
cell phone emissions (ANSI C63.19-2006 American
National Standard Methods of Measurement of
Compatibility between Wireless Communication
Devices and Hearing Aids).
For example, the sum of a hearing aid with a
rating of 2 (M2/ T2) and a telephone with a rating
of 3 (M3/T3) would result in a combined rating of
5. According to the standard, any combined rating
that equals at least 5 would provide “normal use”;
a combined rating of 6 or greater would indicate
“excellent performance.”
39
Page 40

The immunity of your Veras hearing instrument
is at least M2/ T2. The equipment performance
measurements, categories and system classications are based upon the best information available
but Bernafon cannot guarantee that all users will
be satised.
40
Page 41

International warranty
Your hearing instruments have a limited warranty,
covering defects in materials and workmanship.
This warranty covers the hearing instruments
themselves, but not accessories such as batteries,
tubing, earmolds, etc.
This warranty is void if a defect is the result
of misuse or mistreatment. The warranty is
also void if the hearing instruments have been
repaired by nonauthorized service personnel.
Please review the warranty with your hearing
care professional and make sure that your warranty
card is completed correctly.
41
Page 42

Your hearing instrument
configuration
Available programs (ITCD and ITC only)
Your hearing instruments are programmed in the
following way:
Program Beeps Function
1 1
2 2
3 3
4 4
Optional telecoil (ITCD and ITC only)
M right ear M left ear M none
Your instrument has been programmed for:
M Microphone + Telecoil (right ___ ; left ___ )
M Telecoil only (right ___ ; left ___ )
Your instrument uses:
M WaxBuster M NoWax
42
Page 43

Telephone use options (VR9 and VR7 ITCD and
ITC only)
Preferred telephone ear
M Both M Right M Left
B e h a v i o r o f i n s t r u m e n t o n t h e n o n - t e l e p h o n e e a r
M No change
M Microphone is 6 dB softer when Auto Telephone
or Telephone Program is active
M Instrument mutes when Auto Telephone or
Tele phone Program is active
Right and left instruments synchronized
(For ITCD only)
When this feature is active, program and volume
changes made to one instrument are automatically
made in the other through a wireless communication link.
M Active M Inactive
43
Page 44

Accessories
Bernafon offers a wide range of optional accessories that may be purchased to enhance your
hearing system. Depending on hearing instrument
type and local regulations, the following accessories are available:
• Remote control
• SoundGate communication device (for wireless
connection to cell phones, music players, etc.)
• TV adapter (for wireless connection to your
tele vision via the SoundGate)
• Phone adapter (for wireless connection to
your landline phone via the SoundGate)
• Cleaning and drying kit
For further information on accessories please
contact your hearing care professional.
44
Page 45

General warnings and safety
guidelines
Hearing instruments and batteries can be dangerous if swallowed or improperly used. Such actions
can result in severe injury, permanent hearing loss
or even fatality.
Familiarize yourself completely with the following
general warnings before using your hearing instruments.
• Hearing instruments should be used only as
directed and adjusted by your trained hearing
care professional. Misuse or improper adjustments can result in sudden and permanent
hearing loss.
• Hearing aids will not restore normal hearing
or prevent hearing loss resulting from organic
conditions.
• Never allow others to wear your hearing instru-
ments, because they are adjusted for your hearing requirements and may permanently damage
another person’s hearing.
45
Page 46

• A slap to your ear while wearing the instrument
could be harmful. Avoid wearing your hearing
instrument while playing contact sports (e.g.
rugby, football etc.).
• Be aware that use of a hearing instrument may
cause excess ear wax to build up in the ear canal
which may require removal by a trained medical
professional.
• In rare cases, a hearing aid or earmold may cause
a discharge from the ear or allergic reaction.
See a physician immediately if these conditions
oc cur.
• An earmold is a custom-made product. If you
experience discomfort or irritation of your ear,
please see your hearing care professional imme-
diately for modication of the earmold.
• Hearing instruments, their parts and batteries
should be kept out of reach of infants, children
and anyone who might swallow these items or
otherwise cause themselves injury.
• Discard batteries and keep them out of sight
of infants, small children, persons of mental
incapacity or pets.
46
Page 47

• Clean your hearing instruments and their parts
on a regular basis as recommended. Microorganisms from unclean instruments may cause
skin irritations.
• Be careful with leaking battery liquid, as it is a
hazardous substance.
• Never try to recharge non-rechargeable batteries.
• Never change the battery or adjust the controls
of the hearing instrument in front of infants,
small children and persons of mental incapacity.
• Never put your hearing instrument or batteries in
your mouth, they could easily be swallowed.
• Keep batteries away from medications. Batteries
are easily mistaken for pills.
• In case a battery or hearing instrument is
swallowed, see a doctor immediately.
• Be aware of the possibility that your instruments
may stop functioning without notice. Keep this
in mind while you circulate in trafc or otherwise
depend on warning sounds.
47
Page 48

• Trafc or other warning sounds may also be
reduced in level by a directional microphone
when these sounds are coming from behind you.
• Never insert cleaning tools into the sound
outlet or microphone inlet. This could damage
the hearing instruments.
48
Page 49

Notes
49
Page 50

Common problems and solutions
Problem Possible cause Solution
Instrument
whistles
or squeals
No volume,
level too soft
or humming
noise
Instrument not inserted correctly Re-insert instrument
Ear wax accumulation in ear canal Consult your hearing care professional or physician
Instrument may be too loose Consult your hearing care professional
Instrument may not be turned ON Check that the battery drawer is closed completely
Battery may be dead or inserted
wrong way
Volume level too soft Increase volume level with control on instrument
Instrument may be in telecoil (optional)
position
Ear wax accumulation in ear canal Consult your hearing care professional or physician
Battery contacts may be dirty
or corroded
Instrument sound outlet may
be blocked
Microphone sound inlet may
be blocked
Your hearing loss may have
increased
50
Page 51

Insert a fresh battery
or remote control
Check to make sure you are in the intended program
Open and close the battery drawer several times or
clean the battery contacts carefully with a dry Q-tip
Check the sound outlet and change the lter if you
can see that it is clogged
Consult your hearing care professional, do not try
to clean this yourself
Consult your hearing care professional
51
Page 52

Problem Possible cause Solution
Whirring noise,
fading, weak
or motor-boating
sounds
Battery contacts may be dirty
or corroded
Moisture in hearing instrument Place instrument in Dry-Aid pack. Remove battery
Low battery Insert a fresh battery
Instrument
Low battery Insert a fresh battery
switches from
ON to OFF
periodically
52
Page 53

Open and close the battery drawer several times or
clean the battery contacts carefully with a dry Q-tip
rst. Consult your hearing care professional.
53
Page 54

Service
If none of the actions, listed on the previous
pages, solve the problem, contact your hearing
care professional.
Do not attempt to repair your hearing
instruments yourself.
Place stamp with dispenser name and address here:
54
Page 55

55
Page 56

Australia
Bernafon Australia Pty. Ltd.
12/97 Castlemaine Street
Milton QLD 4064
Freecall 1800 809 111
Phone +61 7 3250 0300
Fax +61 7 3250 0372
www.bernafon.com.au
Canada
Bernafon Canada Ltd.
500 Trillium Drive, Unit 15
Kitchener, Ontario
Canada N2R 1A7
Phone +1 519 748 6669
Toll Free +1 800 265 8250
Toll Free Fax +1 888 748 9158
www.bernafon.ca
Manufacturer
Switzerland
Bernafon AG
Morgenstrasse 131
3018 Bern
Phone +41 31 998 15 15
Fax +41 31 998 15 90
www.bernafon.com
New Zealand
Bernafon New Zealand Ltd.
1, Building F
Level
27-29 William Pickering Drive
Albany, Auckland 0632
Toll Free 0800 44 22 57
Telephone +64 9 415 7917
Fax +64 9 415 7916
www.bernafon.co.nz
United Kingdom
Bernafon UK
Cadzow Industrial Estate
Off Low Waters Road
Hamilton
ML3 7QE Scotland
Phone +44 1698 285 968
Fax +44 1698 421 456
www.bernafon.co.uk
United States of America
Bernafon, LLC
200 Cottontail Lane, Bldg. B
Somerset, NJ 08873
Phone +1 888-941-4203
Fax +1 732-560-4877
www.bernafon-us.com
www.hear-it.org
For more information about
hearing and hearing loss
11.09/BAG/956-80-510-00/subject to change
 Loading...