

Page 1

ACRIVA 9
ACRIVA 7
Nano BTE
Nano RITE
Behind-the-ear hearing instruments
INSTRUCTIONS
FOR USE
Page 2

2
Page 3
TABLE OF CONTENTS
General Warnings and Safety Guidelines 7
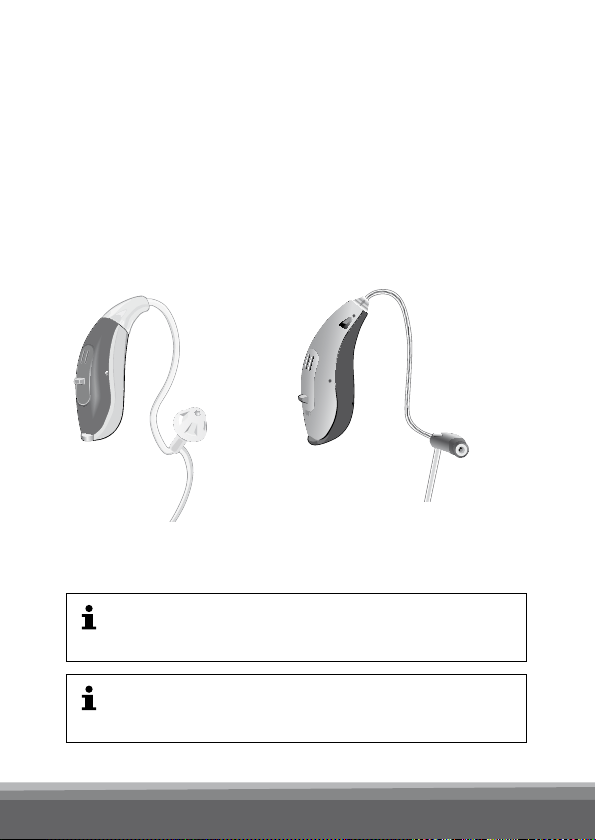
Introduction 13
Acriva Nano BTE with Spira Flex
Thin Tube System 14
Acriva Nano BTE with Earhook 15
Ear Piece Overview for Nano BTE 16
Acriva Nano RITE with Speaker Unit 17
Ear Piece Overview for Nano RITE 18
Placement 20
Operating Your Instruments 26
Changing the Volume Level 27
Changing Programs 29
Muting 30
Telecoil Function (for Nano RITE only) 31
Telephone Use (for Nano RITE only) 32
Changing the Battery 34
Data Logging and Learning 36
Operating the Hearing Instruments
with the Optional RC-P Remote Control 37
3
Page 4

4
Page 5
Operating the Hearing Instruments with the
Optional SoundGate Communication Device 38
Instrument Care 40
Using Your Hearing Instruments 58
Tips for Communicating
with Hearing Impaired People 62
Your Hearing Instrument Conguration 64
Accessories 67
Environmental Protection 68
Product Approval, Markings and Compliance 69
Cell Phone and Hearing Instrument Compatibility
71
International Warranty 73
Common Problems and Solutions 74
Information for the Hearing Care Professional 80
Compliance with Requirements for Europe 82
Compliance with Radio Communications
Requirements for the USA and Canada 84
Information and Explanation of Symbols 86
Service 90
5
Page 6

Congratulations on the purchase of your new
Bernafon hearing instruments. The amplication of
sound provided by your hearing instruments was
adjusted by your hearing care professional to the
needs of your individual hearing loss. With a little
practice, you will soon be on your way to better
hearing.
Please read the entire contents of this booklet
before using your hearing instruments. It contains
instructions and important information about the
use and handling of your hearing instruments
and batteries.
6
Page 7

General Warnings and Safety
Guidelines
Hearing instruments and batteries can be dangerous
if swallowed or improperly used. Such actions can
result in severe injury, permanent hearing loss or
even fatality.
Familiarize yourself completely with the following
general warnings before using your hearing instruments.
Hazard Warnings
Never allow others to wear your hearing
instruments, because they are adjusted
for your hearing requirements and may
permanently damage another person’s
hearing.
A slap to your ear while wearing the
instrument could be harmful. Avoid wearing your hearing instrument while playing
contact sports (e.g. rugby, football, etc.).
7
Page 8
Hearing instruments, their parts and
batteries should be kept out of reach of
infants, children and anyone who might
swallow these items or otherwise cause
themselves injury.
Discard batteries and keep them out of
sight of infants, small children, persons of
mental incapacity or pets.
Clean your hearing instruments and their
parts on a regular basis as recommended.
Micro-organ isms from unclean instruments
may cause skin irritations.
Be careful with leaking battery liquid, as it
is a hazardous substance.
Never try to recharge non-rechargeable
batteries.
Never change the battery or adjust the
controls of the hearing instrument in front
of infants, small children and persons of
mental incapacity.
8
Page 9
Be aware of the possibility that your
instruments may stop functioning without
notice. Keep this in mind while you circulate
in trafc or otherwise depend on warning
sounds.
Trafc or other warning sounds may also be
reduced in level by a directional microphone
when these sounds are coming from
behind you.
Remove your instruments before applying
aftershave, hairspray, oils, perfume,
mosquito repellent, lotions, etc. Allow
the product to dry before wearing your
instruments.
9
Page 10

Warning to Hearing Care Professional
and User
Special care should be taken when tting
and using a hearing instrument with
maximum sound pressure capability in
excess of a maximum of 132 dB SPL
(IEC 60318-4) since there may be a risk of
impairing the remaining hearing of the
hearing instrument user.
10
Page 11

Safety Information
· Hearing instruments should be used only as
directed and adjusted by your trained hearing
care professional. Misuse or improper adjustments can result in sudden and permanent
hearing loss.
· Hearing instruments will not restore normal
hearing or prevent hearing loss resulting from
organic conditions.
· Never put your hearing instrument or batteries in
your mouth, they could easily be swallowed.
· Keep batteries away from medications.
Batteries are easily mistaken for pills.
· In case a battery or hearing instrument is
swallowed, see a doctor immediately.
· Be aware that use of a hearing instrument may
cause excess ear wax to build up in the ear canal
which may require removal by a trained medical
professional.
· In rare cases, a hearing instrument or earmold
may cause a discharge from the ear or allergic
reaction. See a physician immediately if these
conditions occur.
· An earmold is a custom-made product. If you
experience discomfort or irritation of your ear,
please see your hearing care professional
immediately for modication of the earmold.
11
Page 12

· Never insert cleaning tools into the sound
outlet or microphone inlet. This could damage
the hearing instruments.
· Do not expose hearing instruments to extreme
heat by leaving them in the car, near a radiator,
etc.
· Do not wear your hearing instrument while swim-
ming, snorkeling or diving, as it is not designed for
such activities.
· Do not immerse your hearing instrument in water
or other liquids.
· It is recommended to remove your hearing
instruments before sleeping.
· Protect your instruments by keeping them in
the case when you are not wearing them.
12
Page 13
Introduction
Bernafon nano BTE IFU
VR_ILU_nanoBTEwithSpira_BW_HI
The following instruments are covered in these
instructions:
Acriva Nano BTE Acriva Nano RITE
AR9 N AR9 NR
AR7 N AR7 NR
Acriva Nano BTE instruments are available
either with earhooks or Spira Flex thin tubes.
Acriva Nano RITE instruments are available
either with M- or P-Speaker.
13
Page 14
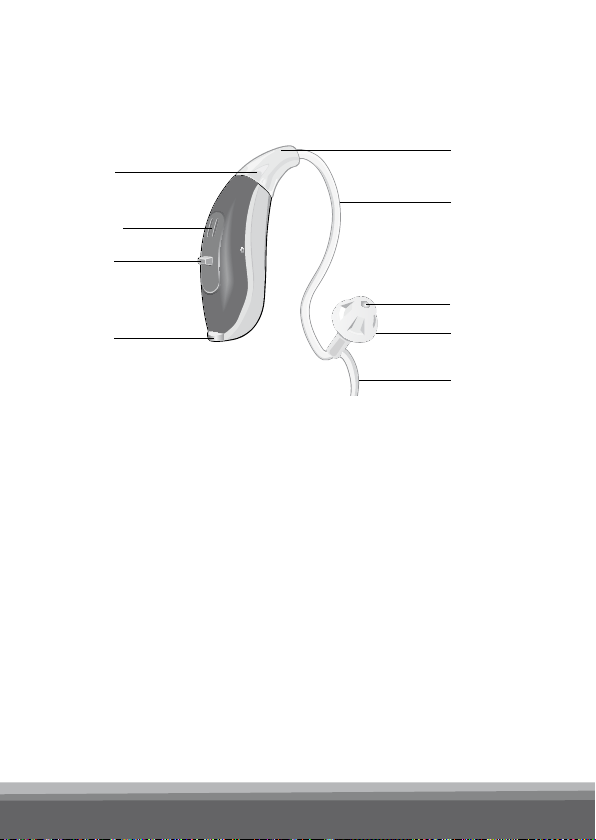
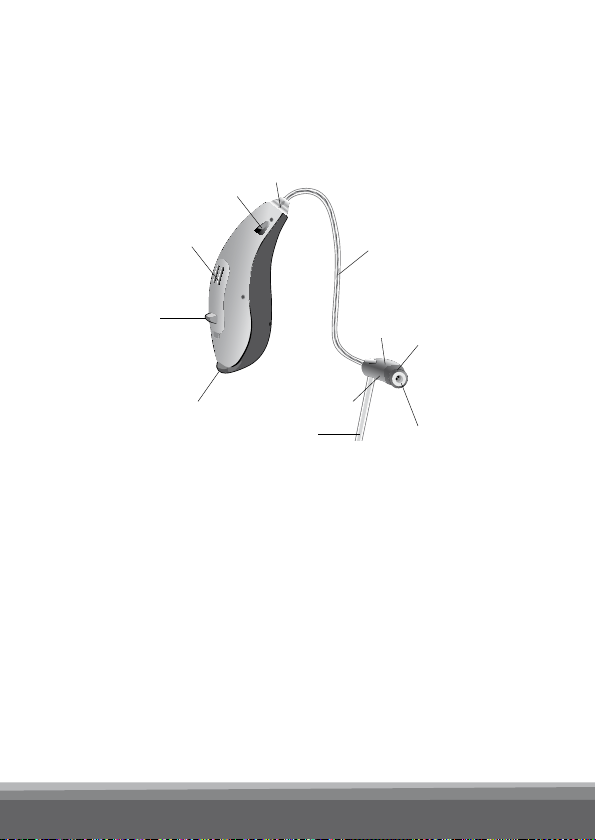
Acriva Nano BTE with Spira Flex
Bernafon nano BTE IFU
VR_ILU_nanoBTEwithSpira_BW_HI
Thin Tube System
3
2
4
2a
1
5
8
6
7
2 Microphone
2a Second microphone
3 Adapter
4 Spira Flex thin tube
14
1 Push button
5 Sound outlet
6 Dome
7 Concha clip
8 Battery door
Page 15
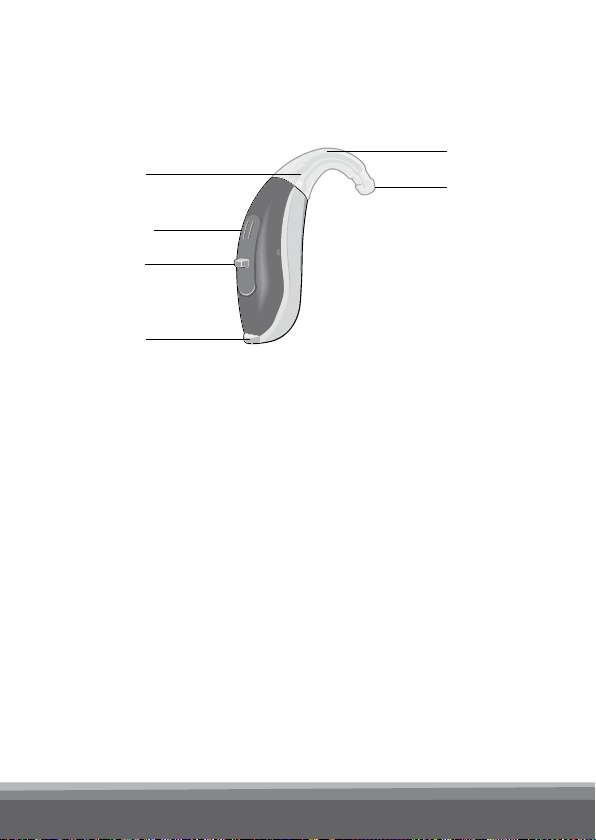
Acriva Nano BTE with Earhook
Bernafon nano BTE IFU
VR_ILU_nanoBTEwithHook_BW_HI
2
2a
1
5
3
4
1 Push button
2 Microphone
2a Second microphone
3 Earhook
4 Sound outlet
5 Battery door
15
Page 16
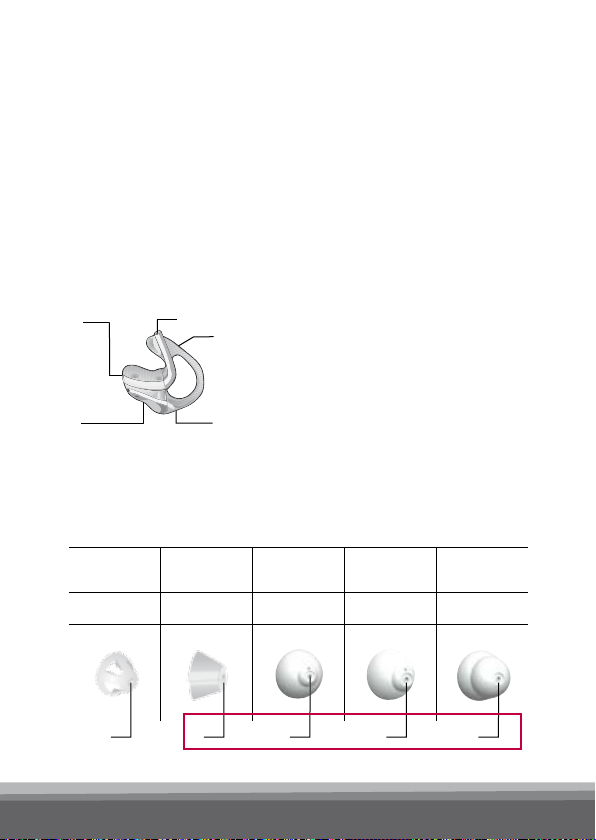
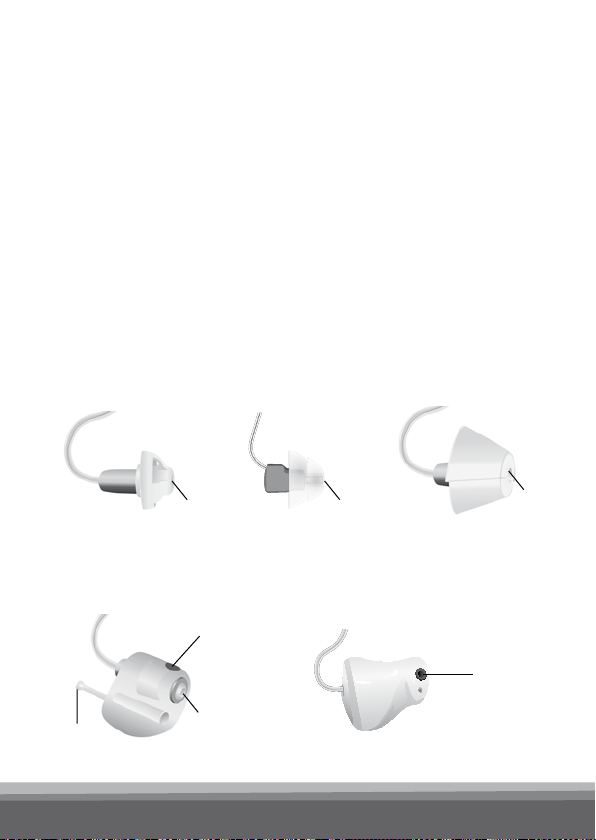
Ear Piece Overview for Nano BTE
Domes, custom molds and earmolds are ear
pieces used to secure the sound tube in your ear
canal and to protect the sound outlet (2) from wax.
Earmold (Used with Earhook)
2
1
3
4
5
q Earmold
Domes Used with Spira Flex Thin Tube
1 Canal
2 Sound outlet
3 Tubing
4 Helix
5 Vent
Open
Dome
Tul ip
Dome
Dome,
Large Vent
Dome,
Small Vent
q q q q q
2
16
2 2 2 2
Power
Dome
Page 17
Acriva Nano RITE with Speaker Unit
3
2
2a
1
8
1 Push button
2 Microphone
2a Second microphone
3 Connector plug
4 Wire
5 Left/right indicator
4
6
5
7
9 10
6 Speaker
7 Speaker unit size
marking
8 Battery door
9 Ear grip
10 NoWax lter
17
Page 18
Ear Piece Overview for Nano RITE
Domes, custom molds (Micro Mold and Lite Tip)
and Power Molds are ear pieces used to secure
the speaker in your ear canal and to protect the
sound outlet (20) from wax. The custom molds
have a marking (21) (red = right; blue = left). The
marking should point upwards in the ear canal.
The removal cord (22) is for easy removal.
Open Dome Power Dome Tuli p Dome
20
q q q
Custom mold
Power Mold
(Micro Mold, Lite Tip)
21
22
20
q q
18
20
20
20
Page 19
Left/Right Ear Marking
A color marking inside the battery
door can help you to distinguish
between the left and right
instruments.
Red = right; Blue = left
19
Page 20
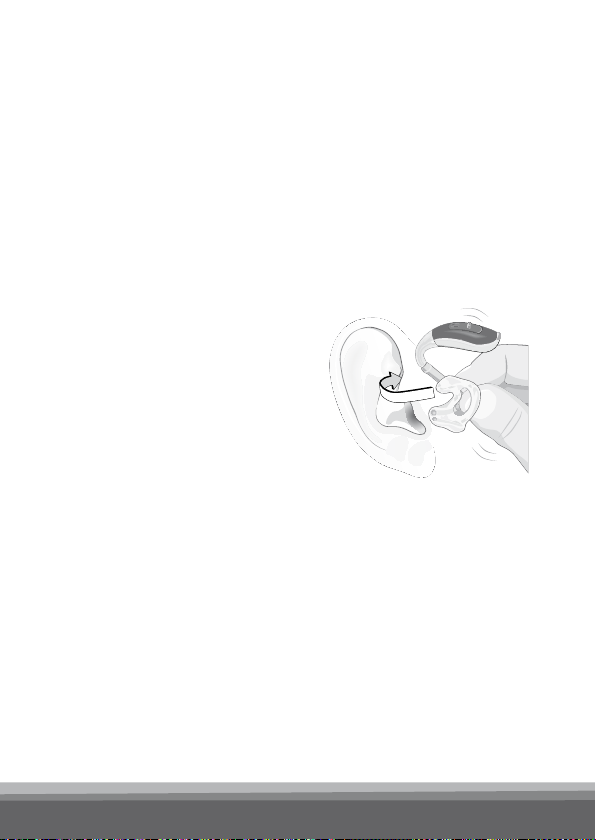
Placement
VR_ILU_InsertingNanoBTEhook1_BW_HI
It takes patience and practice to insert your
ear piece correctly. If you have difculty, please
consult your hearing care professional.
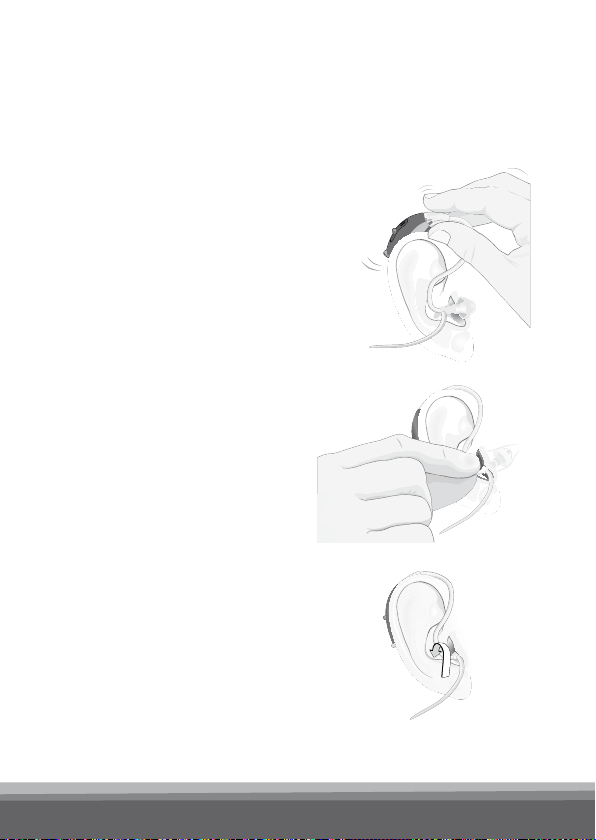
Inserting Your Nano BTE with an Earmold
· Hold the earmold by the
tubing so that the helix
part is pointing straight
up and the canal part is
pointing at the ear canal
entrance.
· Insert the canal part into
your ear canal, twisting
slightly to ease the helix
portion into place. It may
help to pull the ear lobe
down with the other hand,
or pull the top of the ear
back and up.
20
Page 21
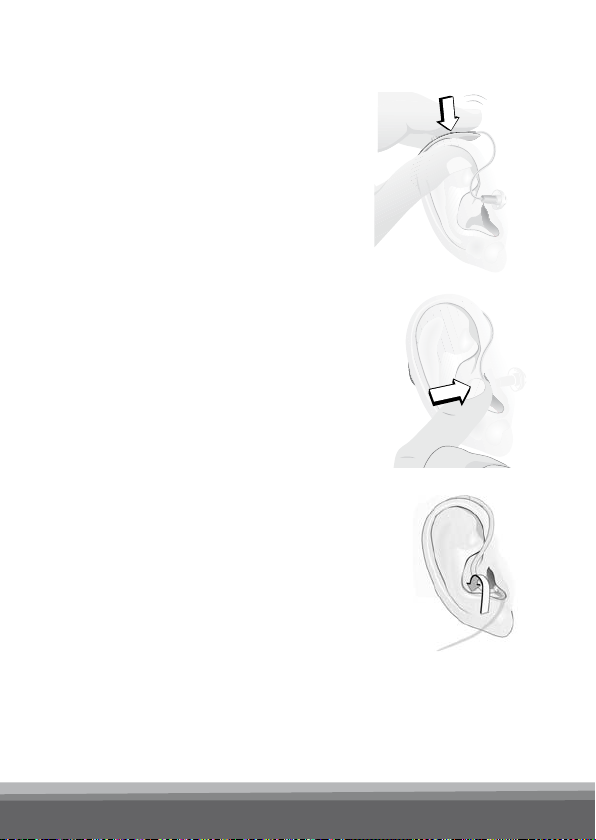
· Run your index nger down the
skin just in front of your ear.
If you can touch the helix part
of the earmold, it is not inserted
correctly. Gently push it behind
the fold of your ear.
· Lift the hearing instrument into
place behind your ear. Be careful
not to twist the tubing.
Removing Your Nano BTE and Earmold
· Lift the instrument from your ear rst.
· Push the back of your ear with your thumb
to loosen the helix part of the earmold, then
use your index nger to remove it.
· Grasp the helix part of the earmold and twist
it forwards.
· Gently pull the earmold straight out of the
ear, holding on to the helix part of the mold.
Do not remove the earmold by pulling on the
hearing instrument. This could disconnect
the instrument from the earmold or damage
the tubing.
21
Page 22
Inserting Your Nano BTE with a
Bernafon nano BTE IFU
VR_ILU_InsertingNanoBTEspira1_BW_HI
Bernafon nano BTE IFU
VR_ILU_InsertingNanoBTEspira3_BW_HI
Spira Flex Thin Tube
Practice inserting your thin tube correctly.
· First, position the hearing
instrument behind your ear.
· Grasp the bend of the thin
tube and gently push the
dome into your ear canal
until the tube rests against
the side of your head.
· Push the ear grip into
the bowl of your ear.
· If the thin tube is sticking
out from your ear, insert
the dome further.
If the ear grip is sticking
out, it has not been
positioned correctly.
22
Page 23

Removing Your Nano BTE and
Spira Flex Thin Tube
· Grasp the bend of the thin tube and gently
pull the tube and dome out of your ear.
· Lift the instrument from behind your ear.
Do not remove the thin tube and dome
by pulling on the hearing instrument.
This might disconnect the instrument from
the thin tube.
23
Page 24
Inserting Your Nano RITE with a Speaker
· Look for the side marking:
left = blue; right = red.
· Make sure the dome is
pushed rmly onto
the speaker.
· Position the hearing
instrument behind your ear.
· Grasp the speaker between
your thumb and index nger.
The dome or custom mold
should point towards the ear
canal opening.
· Gently push the speaker into
your ear canal, until the wire
sits ush against the side of
your head.
· If you have an ear grip attached
to the speaker, gently push it
into your ear as shown.
· When looking in the mirror the
speaker should be difcult to see.
24
Page 25
Removing Your Nano RITE with a Speaker
To remove the speaker, grasp the wire between
your thumb and index nger. Do not pull on the ear
grip. Gently pull the speaker out of your ear.
Never insert the speaker in the ear canal
without the dome attached. Do not force
the speaker too deeply into your ear canal.
Do not apply any lubrication to the ear piece
as this may damage the speaker.
If the dome is not correctly attached and
falls off in the ear canal, please see your
medical practitioner.
Do not remove by pulling on the hearing
instrument, as the speaker may be damaged
at the connector.
25
Page 26
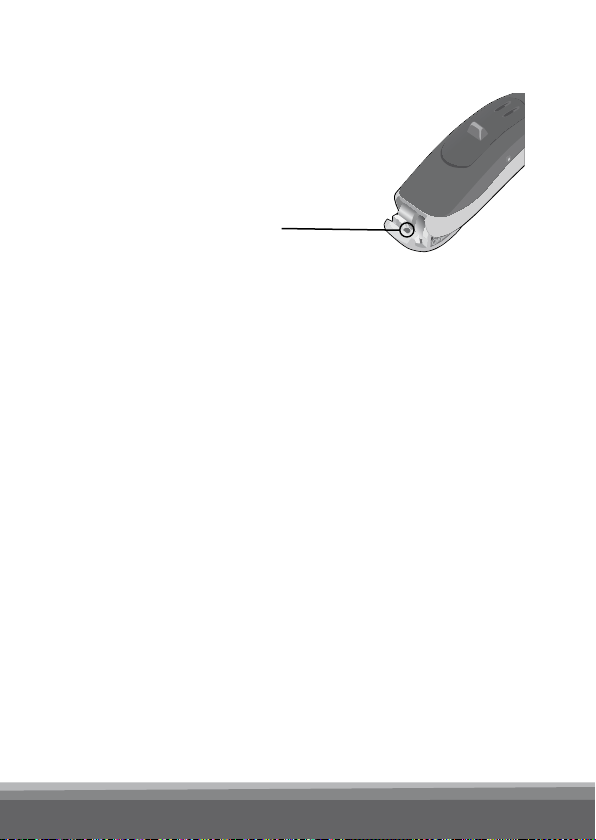
Operating Your Instruments (ON/OFF)
Bernafon nano BTE IFU
VR_ILU_OnOffFunctionNanoBTE_BW_HI
Click “ON” Click “OFF”
To Turn the Instrument ON
Close the battery door completely. The hearing
instrument will emit one long beep when it starts up.
To Turn the Instrument OFF
Open the battery door slightly until a click is felt.
Never force the battery door open or closed.
26
Page 27

Changing the Volume Level
The instrument automatically adjusts the volume to
the changing sound environment. If you desire to
manipulate the volume yourself, your hearing care
professional can program the push button to
used as a volume control. Please see page
see how this has been congured for your hearing
instruments. You may also use the optional RC-P
remote control or the SoundGate communication
device for this purpose. Please follow the detailed
directions in the Instructions for Use included with
these devices. Your hearing instruments will emit
a click to conrm that a volume change has been
made and then will beep to inform you when the
maximum or minimum volume has been reached.
be
65 to
27
Page 28
Your instrument automatically returns to a
preset loudness level when it starts, the
battery is low, or when the program is
changed. If you nd that the loudness of
your hearing instrument is not adequate,
your hearing care professional may need to
adjust your hearing instrument settings.
28
Page 29

Changing Programs
Your hearing instrument can be congured with up
to 4 listening programs (optional). Please see page
64 to nd out which programs have been cong-
ured for your hearing instruments. You can change
programs as follows:
Push button
A press on the button will cause the program to
change. This will take 1 – 2 seconds until you hear
the program change. The number of beeps you hear
will tell you which program you are in.
RC-P or SoundGate
The program can be changed with either of these
devices. Please see pages 37 and 38 for
instructions or follow the detailed directions in the
Instructions for Use included with these devices.
29
Page 30

Muting
Your hearing care professional can congure a
Mute option in your hearing instruments. Please
see page 65 to see how the push button has
been congured or the Instructions for Use that
are included with the optional RC-P remote.
To un-mute the hearing instruments give any
control on the instrument, SoundGate or RC-P
a push.
Do not use the Mute function to turn off the
hearing instrument due to the fact that in
this mode it is still drawing current from the
battery.
30
Page 31

Telecoil Function
(for Nano RITE only)
The telecoil helps you hear better when using a
telephone or in buildings where inductive loop
systems are installed (places of worship, halls,
theatres, etc.). When the telecoil is active, you
hear directly through the telephone or inductive
loop. To access the telecoil, go to the telecoil
program. See page 64.
This symbol or a similar sign should
be displayed wherever a permanent
loop has been installed.
Not all telephones are compatible with the
telecoil mode.
31
Page 32

Telephone Use
(for Nano RITE only)
Auto Telephone
Your instrument has an
Auto Telephone functionality. When the hearing
instrument is close to
a telephone receiver, the
Auto Telephone will
activate a phone program.
When you end your
conversation, the hearing
instrument will automatically return to the previous
program.
Not all telephones can activate the Auto
Telephone. The telephone receiver may
need to have a special magnet tted. Please
follow the separate instructions for mounting
the magnet, which are available from your
hearing care professional.
32
Page 33

Your hearing care professional can congure your
instruments to allow answering the phone on both
ears or on your preferred ear. If you have a
preferred ear, the instrument on the opposite side
can be programmed to sound softer or to mute
when the Auto Telephone (Acriva 9 NR only) or the
Telephone Program (Acriva 9 | 7 NR only) is active.
Please see page 66 to nd out how your instru-
ments are congured.
· Keep magnets out of reach of children
and pets. If a magnet is swallowed, see a
doctor immediately.
· Keep the magnet 30 cm (1 ft) away from
pacemakers and other active implants.
· Use the magnet on the opposite side from
active implantable devices.
· Keep the magnet 30 cm (1 ft) away from
credit cards or other magnetically sensitive
items.
33
Page 34

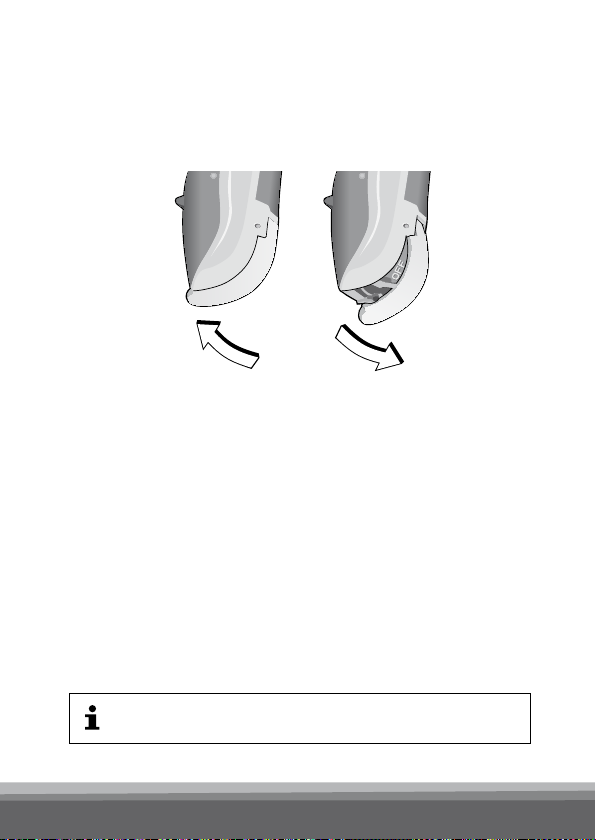
Changing the Battery
When the battery is running out, the instrument
will beep at regular intervals. You should be
prepared to replace the battery. The time until the
instruments stop working depends on the battery
type and manufacturer. Mercury-free batteries
generally cause earlier warning beeps.
Your hearing instrument uses a size 312 battery.
To Change a Battery:
· Gently swing the battery
door fully open, but do not
force it.
· Remove the used battery.
· Remove the sticker from
the new battery.
· Place the battery into the
door with the at, smooth
side facing up (+ sign).
· Close the battery door
securely.
34
Page 35

Important Battery Information
· Battery life will vary with conditions of use
(batteries will run down faster in noisy
environments).
· Once the sticker is removed, it takes several
seconds for the battery to give the adequate
voltage.
· Always keep spare batteries on hand.
· A used battery should be replaced immediately.
· If you are not going to use your hearing
instruments for a few days, remove the batteries.
· Any moisture found on a battery should be wiped
off immediately with a soft cloth.
· Used batteries should be returned to your
battery supplier or hearing care professional
for safe disposal.
· Never dispose of batteries by burning them.
They may explode and cause injury.
· Never dispose of batteries with household
waste. They cause environmental pollution.
Always remove zinc-air batteries before
drying your hearing instrument with a drying
kit. Drying out zinc-air batteries shortens
their lifetime.
35
Page 36

Data Logging and Learning
Data Logging
The data log automatically stores information
about your use of the hearing instruments such
as changes made to the volume control, hours
of wear, etc. This information can be used by your
hearing care professional to adjust your instruments.
If you do not want this feature to be active, please
ask your hearing care professional to turn it off.
Data Learning
If your instrument is equipped with Data Learning,
your hearing care professional can activate this
feature to help customize your hearing instruments.
When Data Learning is operating, the instrument
keeps track of how often and how much you adjust
the volume control and “learns” your preferred
setting. This new setting can be made permanent
during a follow-up visit with your hearing care
professional.
36
Page 37

Operating the Hearing Instruments
with the Optional RC-P
Remote Control
If you have purchased a remote control you can
use it to change programs, adjust the volume level
up and down, or mute the instruments.
For complete operating instructions, please read
the separate RC-P remote control instructions for
use booklet.
5
1
2
3
1 Program cycle button
2 Volume control
3 Mute button
4 Status light
5 Key lock
4
37
Page 38

Operating the Hearing Instruments
with the Optional SoundGate
Communication Device
If you have purchased a SoundGate you may use
it to perform basic functions such as program
changes and volume adjustments. In addition, the
SoundGate serves as a link between your hearing
instruments and external sources such as music
players, cell phones, computers, etc.
For complete operating instructions, please read
the separate SoundGate instructions for use
booklet.
38
Page 39

SoundGate 2
1 Power on/off
2 LED indicator
3 Volume control
4 Auxiliary Input Key
5 TV key
6 Phone key
7 Microphone inlet
8 Neck strap inlet
9 3.5 mm input jack
10 Micro-USB charger jack
SoundGate
1 Volume control
and program change
2 Phone
3 Music/audio key
®
4 Bluetooth
key
5 Battery indicator
6 Key lock
7 84 5 6
3
1
2
910
6
1
2
3
4
5
39
Page 40

Instrument Care
Healthy ears produce a waxy substance that can
clog your hearing instruments. Please follow these
cleaning instructions to prevent wax build-up and
ensure optimal performance of your instruments.
General Care Instructions
Treat your hearing instrument like any other delicate
electronic device (check the safety guidelines on
page 7) and make sure that the instrument and
the speaker do not come in contact with moisture
or water.
· Always clean and dry your hands thoroughly
before manipulating the instrument.
· Do not use your hearing instrument without a
dome or mold.
· Never mount a used dome on the speaker or
Spira Flex thin tube.
40
Page 41

If Your Hearing Instrument Get in Contact
with Water
Should your hearing instrument get in contact
with water and stop working, please follow these
guidelines:
· Gently wipe off any water on the outside of the
hearing instrument.
· Open the battery door and remove the battery.
· Gently wipe off any water in the battery door.
· Let the hearing device dry with the battery door
left open for approximately 30 minutes.
· Insert a new fresh battery (see page xy) and
close the battery door. Your hearing instrument
should work normally again.
If your hearing instrument does not
work properly, consult your hearing care
professional.
41
Page 42

Every Night
· Check your instruments for ear wax and wipe
them clean with a cloth or tissue.
· If necessary, use the cleaning tool to remove
wax from the canal and vent openings on your
earmold or dome.
· Open the battery door fully to allow air to
circulate.
· A dry storage kit is recommended to remove
any moisture that may have accumulated in the
instrument. Always remove zinc-air batteries
before drying your hearing instrument with a
drying kit. Drying out zinc-air batteries shortens
their lifetime.
42
Page 43

If you Have a Nano BTE with Earmold
VR_ILU_CleaningEarmoldAttachNano_BW_HI
You should wash your earmolds regularly. The
hearing instruments themselves must never be
washed or allowed to get wet!
· Handle your instruments over a soft surface
to avoid damage in case you drop them.
· Disconnect the earmold from
the hearing instrument by
grasping the end of the hook
rmly with one hand and
grasping the tubing rmly with
the other hand.
· Pull the tubing away from the earhook.
· Gently clean the earmold in warm soapy water.
· Rinse the earmold and allow it
to dry completely.
· Use an air puffer to remove
any remaining moisture in the
tubing.
· When re-attaching the earmold to the
instrument, it is important to position it correctly.
43
Page 44

If You Have a Nano BTE with Spira Flex Thin Tube
If you have the thin tube system, make sure that the
tube and dome are kept free of ear wax at all times.
· Grasp the adapter rmly
and disconnect the thin
tube from the instrument
by pulling it off.
· Use a soft dry cloth
or tissue to clean the
outside of the thin tube
and dome.
· To remove wax from the
thin tube, insert the cleaning wire at the connector
end. Push the wire all the way into the thin tube
until it comes out through the dome.
· Pull the cleaning wire out through the dome and
discard it.
· Reattach the thin tube connector to the adapter by
pushing the thin tube connector into the hearing
instrument adapter.
44
Page 45

· If your hearing care
professional has selected a
vented dome for your
hearing instrument, use the
cleaning wire to remove the
wax from the vents.
To avoid blocking the thin tube, do not use
water to clean it.
45
Page 46

Exchanging the Spira Flex Thin Tube
Bernafon nano BTE IFU
VR_ILU_ExchangingSpiraNanoBTE_BW_HI
If the thin tube becomes discolored, stiff or
brittle, it should be replaced.
· Hold the instrument by the adapter and grasp
the tube close to the connector.
· Pull rmly to remove the old tube.
· Attach the new sound tube by pushing it rmly
into the connector.
46
Page 47

Exchanging the Dome on the
Spira Flex Thin Tube
The dome should be changed regularly. The
frequency of dome changes will depend on how
fast ear wax builds up on the dome. Inspect your
instrument’s dome for yellowing, hardening and
cracks. In the case of these changes, consider
replacing your dome or contacting your hearing
care professional.
Spare domes can be obtained from your hearing
care professional.
· Clean your hands thoroughly
before replacing the dome.
Never change the dome with
wet or dirty ngers.
· Remove the old dome by
pulling it off the end of the thin
tube.
· Push a new dome as far as
possible onto the thin tube.
When attached correctly, the
dome should touch the plastic
ring around the thin tube.
47
Page 48

If the dome is not securely attached to the
thin tube, it could fall off in your ear canal.
If this happens, please see your medical
practitioner.
Your hands must be clean and dry before
replacing the dome. Never remount a used
dome on the thin tube. A remounted dome
is more likely to fall off in the ear canal.
48
Page 49

If You Have a Nano RITE with a Custom Mold
Clean your custom mold after every use by wiping
it with a clean dry cloth. In most cases, there is a
hole through the custom mold (below the speaker
unit). This is the vent. If the vent is plugged with
wax, insert a cleaning tool from the opposite end
(nearest the speaker wire), and push through to
remove the wax. If no cleaning tool was supplied
with your hearing instrument, please contact your
hearing care professional.
49
Page 50

WaxStop System
The WaxStop system is applicable for the
following acoustic setups:
· M-Speaker used with a Micro Mold
· P-Speaker used with any ear pieces
(i.e. domes and Power Mold)
If you are unsure about your acoustic setup, please
contact your hearing care professional to get the
relevant information.
Note that the WaxStop system is explained
with a Micro Mold. The same procedure is
also suitable if your hearing instrument is
connected to a P-Speaker.
50
Page 51

1) Take the stick with the new WaxStop on it (1).
On the opposite end is a removal plug for the
used WaxStop (2).
1
2
2) Insert the removal plug (2) into the opening
of the used WaxStop and pull it slowly out.
Keep the stick straight.
51
Page 52

3) To insert the new WaxStop turn the stick
around and place the new lter in the sound
outlet and gently remove the stick.
4) A WaxStop cannot be reused; safely throw the
stick away.
52
Page 53

NoWax System
The NoWax systems are applicable for the following acoustic setup:
· M-Speaker used with a dome or Lite Tip
· P-Speaker used with a Power Mold
If you are unsure about your acoustic setup, please
contact your hearing care professional to get the
relevant information.
Replace the wax protection on your sound outlet
by following this procedure:
Visually inspect the NoWax in the end of the
speaker. If it is clogged or there is no sound
coming from the device, replace the NoWax
lter.
Note that the NoWax is explained with a
M-speaker. The same procedure is also
suitable if you want to change the NoWax
on a Power Mold.
53
Page 54

1) Remove a tool from the turtle, insert its empty
1
3
1
3
end into the old lter and pull it out.
1
2) Push a new lter into the sound outlet.
2
3) Discard the used tool.
54
Page 55

Exchanging the Speaker Unit (for Nano Rite
only)
The speaker and the speaker wire are delicate
pieces sensitive to moisture, ear wax and
mechanical overload.
· Manipulate them with caution.
· Do not pull the speaker unit off the hearing
instrument by yourself.
· Do not twist the cable connected to the speaker.
· Should the speaker detach from the instrument,
ask your hearing care professional for support.
· In some cases, the speaker unit has to be
changed. Your hearing care professional will make
the change.
55
Page 56

Exchanging the Dome on the Speaker Unit
The dome should be changed regularly. The
frequency of dome changes will depend on how
fast ear wax accumulates on the dome. Inspect
your instrument’s dome for yellowing, hardening
and cracks. In the case of these changes, consider
replacing your dome or contacting your hearing
care professional.
Spare domes may be obtained from your hearing
care professional.
· Clean your hands thoroughly before replacing the
dome. Never change the dome with wet or dirty
ngers.
· Push the new dome as far as possible onto the
speaker.
· Make sure the dome is pushed rmly onto the
speaker.
Your hands must be clean and dry before
replacing the dome. Never remount a used
dome on the speaker. A remounted dome is
more likely to fall off in the ear canal.
56
Page 57

Exchanging the Dome on the Speaker Unit
1) Hold the end of the dome
between your ngers and
pull it off.
2) Take a fresh dome
out of the package.
3) Place the new dome on the
speaker so it ts securely.
57
Page 58

Using Your Hearing Instruments
Hearing instruments do not restore perfect
hearing. They make sounds louder and help you
make the most of the hearing you have. While
some immediate benet is usually noticed, it often
takes several weeks for your brain to adapt to the
new sounds.
The following tips will help you learn to use your
instruments. If you have trouble adjusting, consult
your hearing care professional.
Getting Started
· Wear your instruments at home in a quiet
environment. Have a conversation with one
person or listen to a news program on TV.
· You will benet most if you wear your instruments
all day long. Increase the time each day until you
are comfortable wearing them for several hours at
a time.
58
Page 59

· You may notice that your own voice sounds
louder. If the voices of others are at a comfortable
level, try speaking at a lower volume.
· Sounds like footsteps, chirping birds, rustling
paper, etc. may seem quite loud at rst because
you probably haven’t heard them for a while.
They will soon fade to the background.
Dining Out
· Start with a quiet restaurant (no music or
entertainment).
· Request a table away from the kitchen and other
noisy areas.
· Conversation will be easier in a smaller group.
In the Car
· Sit with your better ear toward the center of the
car, if possible.
· Turn off the radio.
· Keep windows closed to minimize trafc, road
and wind noise.
59
Page 60

Attending Theatre, Concerts, Lectures, etc.
· Try to sit with your better ear closer to the sound
source, if possible.
· Become familiar with the program in advance
to make it easier to follow.
· If your hearing is similar in both ears, sit in the middle.
· If you wear a Nano RITE inquire if a loop is available.
When the telecoil is active, you hear directly through
the inductive loop (see page 31). If no loop is
available, sit towards the front.
At Work
· Inform your co-workers about your hearing loss
and teach them to talk clearly. Keep eye contact
when conversing.
· Focus on the person nearest to you.
· If you hear only part of a conversation, repeat what
you have heard and ask for the missing information.
At Home
· Always use your hearing instruments.
· Inform family and friends about your situation.
· Teach your family to talk clearly and keep eye
contact when conversing.
· Teach your family how to involve you in
conversations.
· Avoid background noise.
60
Page 61

Hearing on the Telephone
· Hold the receiver close to the microphone
inlet of your hearing instrument. If this causes
whistling, move the receiver away a small
distance.
· Before purchasing a mobile phone, test it with
your hearing instrument.
· People with a greater degree of hearing loss may
need a volume control on the telephone.
For Nano RITE Hearing Instruments Only
· If voices over the telephone are too soft or
background noise is a problem, use the telecoil
(be aware that not all phones are telecoil
compatible).
· When using the telecoil, hold the phone behind
the ear, next to your hearing instrument for
better reception.
· Mobile phones may cause interference with the
telecoil. In this case, the microphone mode will
give a better result.
61
Page 62

Tips for Communicating
with Hearing Impaired People
(Suggestions for Family Members and Friends)
Speech should be clear and distinct. Some people
may need to slow down a little but if speech is too
slow it can be even more difcult to understand.
· Do not shout! Many people with hearing
impairment are very sensitive to loud sounds.
· If you are having difculty being understood,
rephrase the statement rather than repeating
the same words several times.
· Do not try to have a conversation from another
room or with your back turned. Talk face to face!
· Avoid eating, drinking or smoking while talking
and keep your hands away from your face.
· Minimize background noise – turn off the TV or
radio or move to a quiet area for conversation.
· Try to give some warning when the topic changes
during group conversations – it is much easier to
follow the conversation when you know what is
being discussed.
· Ensure there is good light on your face – the
eyes and ears work best together for maximum
understanding of speech.
62
Page 63

· Encourage those with hearing instruments to
wear them as often as possible.
· Most of all, be patient and understanding.
Even when wearing hearing instruments, many
people will still not hear or understand everything
the rst time.
63
Page 64

Your Hearing Instrument Configuration
Available Programs (optional)
Your hearing instruments are programmed in
the following way:
Program Beeps Function
1 1
2 2
3 3
4 4
Right and Left Instruments Synchronized
When this feature is active, changes made
to one instrument are automatically made in the
other through a wireless communication link.
64
Page 65

Push Button (two Nano hearing instruments)
left right
Short push
(less than 1 sec.)
Medium push
(about 1 sec.)
volume
h
down
program
h
change
volume
h
up
program
h
change
h synchronized
Long push
(about 2 sec.)
h
mute
h
mute
h synchronized
Push Button (one hearing instrument)
Short push
(less than 1 sec.)
Medium push
(about 1 sec.)
Long push
(about 2 sec.)
volume down
h
volume up
h
program change
h
It is not possible to mute the hearing
instrument in a monaural tting with the
push button.
65
Page 66

Telephone Use
Preferred telephone ear:
M Both M Right M Left
Behavior of Instrument on the Non-Telephone Ear
M No change
M The microphone is softer when the Auto
Telephone or Telephone Program is active
M The instrument mutes when the Auto Telephone
or Telephone Program is active
66
Page 67

Accessories
Bernafon offers a wide range of optional accessories
that may be purchased to enhance your hearing
system. Depending on hearing instrument type and
local regulations, the following accessories are
available:
· Remote control (RC-P)
· SoundGate communication device (for wireless
connection to cell phones, music players, etc.)
· TV adapter (for wireless connection to your
television via the SoundGate)
· Phone adapter (for wireless connection to
your landline phone via the SoundGate)
· Cleaning and drying kit
For further information on accessories please
contact your hearing care professional.
67
Page 68

Environmental Protection
Your hearing instruments contain electronic
components subject to the Directive 2002/96/EC
on waste electrical and electronic equipment.
Help to protect the environment by not disposing
of your hearing instruments or batteries with your
unsorted household waste. Please recycle your
hearing instruments and batteries according to
your local regulations or return them to your
hearing care professional for disposal.
68
Page 69

Product Approval, Markings
and Compliance
All Bernafon Acriva hearing instrument models
comply with international standards concerning
electromagnetic compatibility. Due to the limited
size available on the instruments all relevant
approval markings are found in this document.
Electromagnetic Interference
Your hearing instrument has been thoroughly
tested for electromagnetic interference. However,
some products may emit electromagnetic energy
causing unforeseen interference with hearing
instruments. Examples include induction cooking
appliances, shop alarm systems, mobile phones, fax
machines, personal computers, X-rays, CT scans,
etc.
Even though your hearing instruments are designed
to comply with the most stringent international
standards of electromagnetic compatibility, they
may emit electromagnetic energy that can cause
interference with other devices.
69
Page 70

Your hearing instruments contain a radio transmitter
using short range magnetic induction technology
working at 3.84 MHz.
The magnetic eld strength of the transmitter
is < – 42 dBμA/m @ 10 m.
The electromagnetic emission from the radio
system is well below international limits for human
exposure. By comparison, the electromagnetic
energy of the hearing instrument is lower than that
generated by household items such as halogen
lamps, computer monitors, dishwashers etc.
70
Page 71

Cell Phone and Hearing Instrument
Compatibility
Some hearing instrument users have reported a
buzzing sound in their instruments when they are
using cell phones, indicating that the cell phone
and hearing instrument may not be compatible.
The compatibility of a particular hearing aid and
cell phone can be predicted by adding the rating
for the hearing aid immunity to the rating for the
cell phone emissions (ANSI C63.19-2006 American
National Standard Methods of Measurement of
Compatibility between Wireless Communication
Devices and Hearing Aids).
For example, the sum of a hearing aid with a
rating of 2 (M2/ T2) and a telephone with a rating
of 3 (M3/T3) would result in a combined rating
of 5. According to the standard, any combined
rating that equals at least 5 would provide “normal
use”; a combined rating of 6 or greater would
indicate “excellent performance.”
71
Page 72

The immunity of your Acriva hearing instrument
is at least M2/ T2. The equipment performance
measurements, categories and system classications are based upon the best information available
but Bernafon cannot guarantee that all users will
be satised.
72
Page 73

International Warranty
Your hearing instruments have a limited warranty,
covering defects in materials and workmanship.
This warranty covers the hearing instruments
themselves, but not accessories such as batteries,
tubing, earmolds, etc.
This warranty is void if a defect is the result
of misuse or mistreatment. The warranty is
also void if the hearing instruments have been
repaired by nonauthorized service personnel.
Please review the warranty with your hearing
care professional and make sure that your warranty
card is completed correctly.
73
Page 74

Common Problems and Solutions
Problem Possible Cause Solution
Instrument
whistles
or squeals
No volume,
level too soft
or humming
noise
Speaker and dome/mold not fully
inserted
Ear wax accumulation in ear canal Consult your hearing care professional or physician
Earmold may be too loose Consult your hearing care professional
Tubing may be split or improperly
connected
Instrument may not be turned ON Check that the battery door is closed completely
Battery may be dead or inserted
upside down
Volume level too soft Increase volume level with the control on the
Instrument may be in telecoil
position
Wax lter blocked by ear wax Replace the wax lter
Dome may be blocked by ear wax Exchange the dome
Ear wax accumulation in the ear
canal
Battery contacts may be dirty or
corroded
74
Page 75

Re-insert the speaker and the dome/mold
Consult your hearing care professional
Insert a fresh battery or re-insert the battery
correctly
instrument or remote control
Check to make sure you are in the intended
program
Consult your hearing care professional or physician
Open and close the battery door several times or
clean the battery contacts carefully with a clean
dry cotton swab
75
Page 76

Problem Possible Cause Solution
No volume,
Speaker may be blocked Consult your hearing care professional for
level too soft or
humming noise
Instrument sound outlet may be
blocked
Microphone sound inlet may be
blocked
Your hearing loss may have
increased
Instrument may be muted Press any button on the remote control or hearing
Whirring noise,
fading, weak
or motorboating sounds
Instrument
switches from
ON to OFF
periodically
76
Battery contacts may be dirty
or corroded
Moisture in hearing instrument Place instrument in Dry-Aid pack. Remove battery
Low battery Insert a fresh battery
Low battery Insert a fresh battery
Page 77

changing
Check the tubing and the earmold or dome
Consult your hearing care professional, do not try
to clean this yourself
Consult your hearing care professional
instrument to unmute
Open and close the battery door several times
or clean the battery contacts carefully with a dry
cotton swab
rst. Consult your hearing care professional.
77
Page 78

Problem Possible Cause Solution
Instrument
Low battery Insert a fresh battery
beeps without
any action from
you (e.g. program change)
Dome fell off
during removal
78
Dome was not mounted correctly
on the thin tube
Page 79

Carefully remove the dome. If you cannot safely
reach it, contact your medical professional.
79
Page 80

Information for the
Hearing Care Professional
A hearing care professional should advise a
prospective hearing instrument user to consult
with a licensed physician (preferably an ear
specialist) promptly, before dispensing a hearing
instrument, if the hearing care professional
determines through inquiry, actual observation or
review of any other available information concerning the prospective user, that the prospective user
has any of the following conditions:
· Visible congenital or traumatic deformity of the
external or middle ear.
· History of active drainage from the ear within
the previous 90 days.
· History of sudden or rapidly progressive hearing
loss within the previous 90 days.
· Acute or chronic dizziness or vertigo.
· Unilateral hearing loss of a sudden or recent
onset within the previous 90 days.
80
Page 81

· Audiometric air-bone gap equal to or greater
than 15 decibels at 500 hertz (Hz), 1000 Hz, and
2000 Hz.
· Visible evidence of signicant cerumen accumu-
lation or a foreign body in the ear canal.
· Pain or discomfort in the ear.
Special care should be exercised in selecting and
tting a hearing instrument whose maximum
sound pressure level exceeds 132 decibels due
to the fact that there may be risk of impairing the
remaining hearing of the hearing instrument user.
Children with Hearing Loss
A child with a hearing loss should be directed to
a physician for medical evaluation and to other
professionals for evaluation and rehabilitation since
hearing loss may cause problems with language
development and the educational and social
growth of a child.
81
Page 82

Compliance with Requirements
for Europe
This device is in conformance with the requirements of the Directive 93/42/EEC of the Council
of the European Communities concerning medical
devices, MDD. This is certied by applying the
following marking:
This device also complies with the essential
requirements of the Directive 1999/5/EC of the
European Parliament on radio equipment and
telecommunications terminal equipment, R&TTE.
It operates as an inductive application in a
harmonized frequency band according to the
Commission Decision 2008/432/EC and may
be used in all member states of the EU and EFTA.
This is certied by applying the following marking:
82
Page 83

Declaration of conformity is available at:
Bernafon AG
Morgenstrasse 131
3018 Bern
Switzerland
83
Page 84

Compliance with Radio
Communications Requirements
for the USA and Canada
Bernafon AG
Acriva hearing instrument models AR9 N; AR7 N
FCC ID U6Xyyyyyyy
IC: 7031A-yyyyyyy
Acriva hearing instrument models AR9 NR; AR7 NR
FCC ID U6Xyyyyyyy
IC: 7031A-yyyyyyy
Statement of compliance:
This device complies with part 15 of the FCC Rules
and RSS-210 of Industry Canada. Operation is
subject to the following two conditions:
(1) This device may not cause harmful interference,
and
(2) This device must accept any interference
received, including interference that may cause
undesired operation.
This Class B digital apparatus complies with
Canadian ICES-003.
This equipment has been tested and found to
comply with the limits for a Class B digital device,
pursuant to part 15 of the FCC Rules.
84
Page 85

These limits are designed to provide reasonable
protection against harmful interference in a
residential installation.
This equipment generates, uses and can radiate
radio frequency energy and, if not installed and used
in accordance with the instructions, may cause
harmful interference to radio communications.
However, there is no guarantee that inter ference
will not occur in a particular installation.
If this equipment does cause harmful interference
to radio or television reception, which can be
determined by turning the equipment off and on,
the user is encouraged to try to correct the interference by one or more of the following measures:
· Reorient or relocate the receiving antenna.
· Increase the separation between the equipment
and receiver.
· Connect the equipment into an outlet on a
circuit different from that to which the receiver
is connected.
· Consult the dealer or an experience radio/ TV
technician for help.
Changes or modications not expressly
approved by Bernafon AG could void the
user’s authority to operate the equipment.
85
Page 86

Information and Explanation of
Symbols
The CE conformity marking
indicates conformance to all
applicable European Directives
This symbol indicates that the
products described in these
instructions for use adhere to the
requirements for an applied part of
Type B of EN 60601-1. The surface
of the hearing instrument is
specied as applied part of Type B.
This symbol indicates that it is
important for the user to read and
take into account the relevant
information in these instructions
for use
86
Page 87

This sign indicates important
safety information that must be
observed to minimize risks or to
avoid hazardous situations
Important information for handling
and product safety
The crossed-out wheeled bin
indicates that the European
Directive on waste of electronic
equipment applies
oper ating
condi tions
tra nspor t
and sto rage
condi tions
The product is designed such that
it functions without problem or
restrictions if used as intended,
unless otherwise noted in these
instructions for use
During transport or storage, the
temperature should not exceed
the limit value of – 25°/60° Celsius
87
Page 88

Notes
88
Page 89

Notes
89
Page 90

Service
If none of the actions, listed on the previous
pages, solve the problem, contact your hearing
care professional.
Do not attempt to repair your hearing
instruments yourself.
Place stamp with dispenser name and address here:
90
Page 91

Placeholder
for FSC logo
< >
8,15 mm
< 15 mm >
9,0 mm
< >
< 19 mm >
Page 92

Australia
Bernafon Australia Pty. Ltd.
629 Nudgee Road
Nundah QLD 4012
Freecall 1800 809 111
Phone +61 7 3250 0300
info@bernafon.com.au
Canada
Bernafon Canada Ltd.
500 Trillium Drive, Unit 15
Kitchener, Ontario
Canada N2R 1A7
Phone +1 519 748 6669
Toll Free +1 800 265 8250
contact@bernafon.ca
Manufacturer
Bernafon AG
Morgenstrasse 131
3018 Bern
Switzerland
Phone +41 31 998 15 15
info@bernafon.ch
New Zealand
Bernafon New Zealand Ltd.
Level 1, Building F
27-29 William Pickering Drive
Albany, Auckland 0632
Toll Free 0800 44 22 57
Phone +64 9 415 7917
info@bernafon.co.nz
United Kingdom
Bernafon UK
Cadzow Industrial Estate
Off Low Waters Road
Hamilton
ML3 7QE Scotland
Phone +44 1698 285 968
info@bernafon.co.uk
United States of America
Bernafon, LLC
2501 Cottontail Lane, Suite 102
Somerset, NJ 08873
Phone +1 888-941-4203
info@bernafon-us.com
www.bernafon.com
www.bernafon.com
For more information about
hearing and hearing loss
08.12/BAG/127203/UK/subject to change
 Loading...