

Berkel EASY LINE, RED LINE 250, Home Line 250, RED LINE 220, RED LINE 300 Instruction Manual
...
Red.
Since 1898.
RED LINE
HOME LINE
EASY LINE
INSTRUCTION MANUAL - US
EN
FR
MANUEL D’INSTRUCTIONS - US
ES
MANUAL DEL USUARIO - US
PT
MANUAL DE INSTRUÇÕES - US
(A)
(B)
(C)
SAFETY
(D) (E) (F)
(G)
(L) (M) (N)
(O) (P)
(H) (I)
2

EN
USER MANUAL - US: Electric Slicers Red Line - Home Line - Easy Line
MODELS:
RSEGMD (Home Line 250) - RSEGS/RSEGM/RSEGL/RSAGS/RSAGM/RSAGL (Redline 220/250/300)
ESEGS/ESEGM/ESEGL/ESAGS/ESAGM/ESAGL (Easyline 220/250/300)
8
9
14
19
3
4
7
17
6
15
1
2
5
OF THE MACHINE
1. Start button
2. Stop button
3. Identication plate,
technical informations
4. Foot
5. Thickness adjustment knob
6. Thickness gauge plate
7. Safety guards
8. Meat table
9. Product press holder knob
10. Blade
11. Safety ring (blade guard)
12. Sharpener (optional)
13. Blade cover knob
14. Slice guard
15. Baseplate
16. Plate support
17. Product press holder
18. Blade guard disk
19. Power cable
12
GENERAL PLAN
Fig. 1
16
13
10
18
OFF 2 ON 1
11
3

IMPORTANT
SAFEGUARDS
- Read all the instructions
before using the machine;
- to protect against risk of
electrical shock do not put
the slicer in water or other
liquid;
- close supervision is necessary when any appliance is
used near children;
- this product is not intended to be used by children;
- unplug from outlet when
not in use, before putting on
or taking off parts, and before cleaning;
- avoid contacting moving
parts. Never feed food by
hand. Always use completely assembled slicer with
meat table (8) and product
holder (17);
- do not operate any appliance with a damaged cord
or plug or after the appliance malfunctions, or is
dropped or damaged in any
manner. Contact the manufacturer at their customer
service telephone number
indicated in the “Service”
section for information on
examination, repair, or adjustment;
- the use of attachments
not recommended or sold
by the manufacturer may
cause re, electric shock or
injury;
- do not use outdoors;
- do not let cord hang over
edge of table or counter;
- blade is sharp. Handle
carefully when cleaning;
4
- operate the machine only
if properly trained and in
perfect psycho-physical
conditions;
- do not use the machine in
any way other than what indicated in this manual;
- use the machines only in
full structural, mechanical
and system efciency;
- install the machine in conformity to the instructions
indicated in the “Installation” section;
- install the machine in a
location out of the reach
of personnel unauthorised
to operate it and especially
out of the reach of minors;
- stay highly concentrated
when using the machine
and avoid any distraction
during use;
- do not allow the machine
to be used by others who
have not read and fully understood the content of this
manual;
- do not wear baggy clothing or clothing with open
sleeves;
- do not allow anyone else,
other than the operator, to
approach during product
cutting operations;
- do not remove, cover or
modify the tags located on
the machine body and, in
case of damage of these, replace them promptly;
- do not remove the transparent guards and do not
modify or bypass any mechanical and electrical protective devices;
- slice only the permitted
products, do not attempt
cuts on prohibited type
products;
- always keep clean and dry
the sliced product resting
surface, the work area all
around the machine and the
operator oor area;
- do not use the machine as
a resting surface and do not
place any objects on it other
than food used for cutting
operations;
- do not use the slicer when,
due to normal wear, the
distance between the edge
of the blade and the blade
guard ring exceeds 6 mm
(0.2 in). In this case, contact Van Berkel USA, Inc. to
change the blade;
- do not use the machine
with temporary or non-insulated cables, power strips
or extension cords;
- periodically check the condition of the power cable on
the machine body. When
necessary, have qualied
personnel replacing it;
- immediately stop the machine in the event of a defect, abnormal operation,
suspicion of breakdown, incorrect movement, unusual
noises;
- use protective gloves for
cleaning and maintenance
operations;
- place and remove the
goods to be sliced on the
meat table only with the
carriage completely pulled
back and with the thickness
adjustment knob placed in
the safety position (on the
position 0) - Fig. (A);
- for movement of the meat

table during cutting operations use only the handle
located on the arm or the
product presser grip;
- never put your hands on
the food product while slicing. Always keep your hands
behind the protection devices and far from the blade;
- use of cutting accessories
which were not provided by
the manufacturer with the
machine is prohibited.
The manufacturer declines
any responsibility coming
from inappropriate use,
modications and/or repairs
carried out by the user or
unauthorised personnel, use
of replacement parts that
are not original or not specic for the machine model.
The machine shall not be
used in open areas and/or
areas which are exposed to
atmospheric agents and in
environments with vapours,
fumes or corrosive and/or
abrasive powders, with risk
of re or explosion and in
any case where the use of
antiexplosive components
is required.
RESIDUAL RISKS: The safety ring around the blade is
made in conformity to all
the standards but, in order
to allow the sharpening
operations, the protection
in the sharpening area may
not entirely eliminate the
risk of cutting.
WARNING! Risk of
!
injury from sharp
blade! During the blade
cleaning and sharpening
operations, pay extra attention to keep your hands
as far as possible from the
unprotected area. Use of
protective gloves is recommended.
SAVE THESE
INSTRUCTIONS!
Operating conditions:
- Temperature from -5°C
(23°F) to +40°C (104°F)
- Max. humidity 95%
Do not slice:
- frozen food products;
- food products with bones;
- any other product not intended for food use.
WARNING! Motor
!
may overheat! After
a maximum 15 minutes
of continuous use, switch
OFF the machine and allow
to cool down.
DESCRIPTION
Circular blade slicer machine suitable for cutting
only the food products of
the types and within the
dimensional limits indicated in this manual. The main
parts of the machine are
shown in the general component diagram reported
in picture 1. This product is
for household use only.
INSTALLATION OF
THE MACHINE
Install the machine on a
at, smooth and dry surface
suitable for supporting the
weight of the machine itself plus the products to be
sliced.
WARNING! Verify
!
that there are no obstacles to the meat table
travel and to the loading of
products.
The machine must be installed in the immediate vicinity of an approved standard outlet connected to an
electrical supply system,
which is in conformity with
the prevailing regulations
for:
- magneto-thermic protec-
tion;
- automatic differential
switch;
- earthing system.
Before carrying out electrical hook up verify that
the characteristics of the
electrical power supply is in
accordance with those indicated on the machine information plate.
OPERATION
WARNING! Risk of in-
!
jury from sharp blade!
Check that the thickness
adjustment knob (5) is in
the safety position (on the 0
position) - Fig. (A).
1. Pull the meat table (8) all
the way back (towards the
operator) in the loading position - Fig. (L);
5

2. lift the product holder
(17) into the standby position;
3. place the product to be
sliced on the meat table
near the operator side wall.
Block it with the product
holder applying slight pressure;
4. adjust the slice thickness.
Activate the blade (10) by
pressing the start button
(1). Grip the product holder
handle (9) and start an alternative cutting motion;
5. at the end of the cutting
operations return the slice
thickness adjustment knob
to the safety position and
pull the meat table back.
Stop the blade motion by
pressing the stop button (2).
CLEANING
Before using, clean the machine at least once a day –
or more often if necessary
– and always after a long
period of inactivity.
WARNING! Risk of
!
electric shock! Be-
fore cleaning, disconnect
the plug from the electrical
mains socket and place the
thickness adjustment knob
in the safety position.
WARNING! Risk of in-
!
jury from sharp blade!
Check that the thickness
adjustment knob (5) is in
the safety position (on the 0
position) - Fig. (A).
Products for cleaning:
6
use only hot water and biodegradable mild detergent,
using a soft, spongy cloth
and a semi-rigid nylon brush
for the sharp areas of the
plate and the product holder. Do not clean the machine
with jets of water or steam
or similar methods.
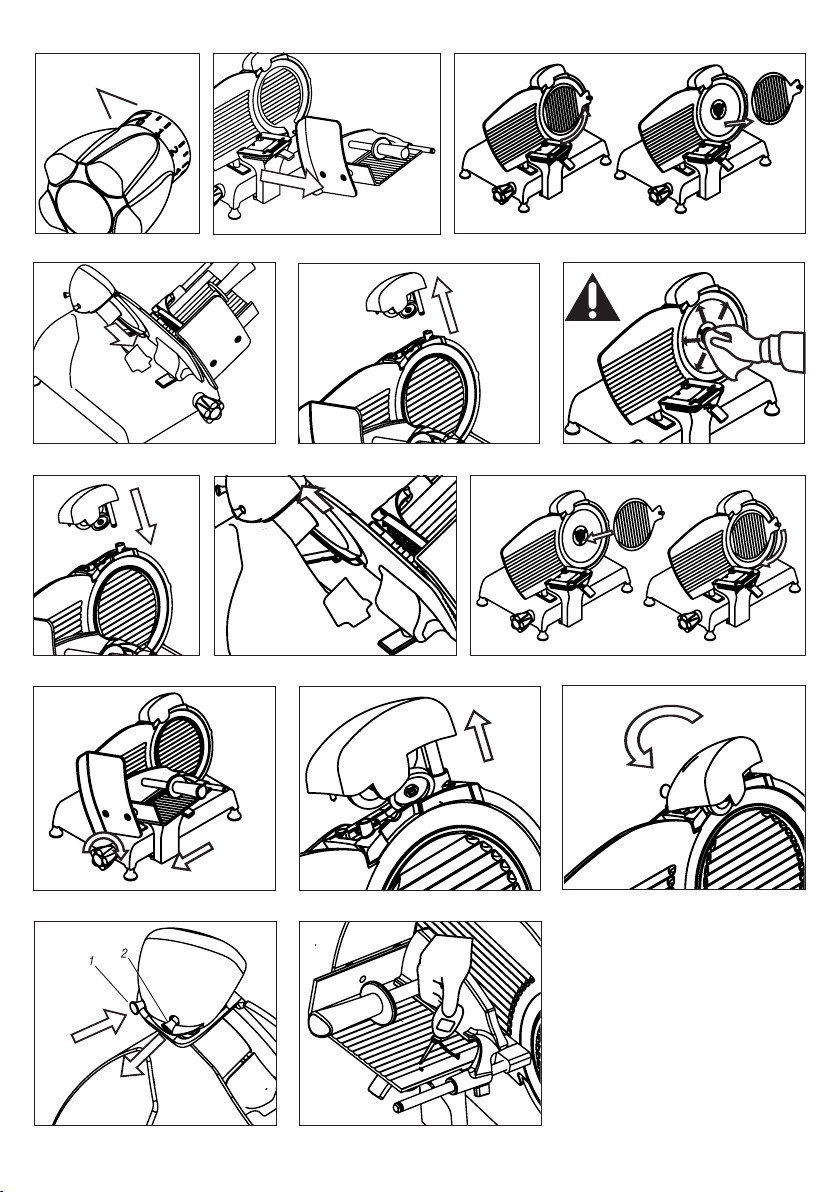
Dismantling:
- the meat table (only for
the machine equipped with
the meat table removable
mechanism):
1) with the thickness adjustment knob in the safety position, pull back the
carriage all the way until
the travel limit toward
the operator; 2) use the
meat table release lever,
keeping the support at
the travel limit in order to
free the meat table from
its support. To correctly
carry out the operation it
may be necessary to act
simultaneously also on
the thickness adjustment
knob, rotating it slightly
with respect to the safety position; 3) extract the
product holder unit sliding the meat table from
its support - Fig. (B);
- the blade cover:
1) rotate the blade cover
90° counter clock-wise
using the special knob; 2)
a spring facilitates the extraction of the blade cover - Fig. (C);
- the slice deector:
remove the slice deector following the direction
shown in the gure - Fig. (D);
- the sharpener (only for
the machine equipped with
sharpener):
remove the complete
sharp unit pulling it upward - Fig. (E).
WARNING! Risk of in-
!
jury from sharp blade!
For the cleaning operations
of the sharp areas of the
plates, the product holder
and the blade, use of protective gloves is also recommended.
Cleaning:
- the blade: press a damp
cloth on the surface of the
blade and move it slowly
from the center toward the
outside on the blade cover
side and the opposite side Fig. (F). In the same way dry,
it using a dry cloth. NEVER
turn on the machine while
cleaning the blade;
- the safety ring: use a soft
brush to clean the area between the blade and the
safety ring. Be careful NOT
to put your hands close to
the blade;
- the machine body: use a
damp cloth or a sponge,
rinsing frequently with hot
water. Dry carefully.
Reassembling:
- the sharpener (only for
the machine equipped
with sharpener): insert the
sharpener unit as shown in
the gure - Fig. (G) - until it
comes to a stop in the correct position;
- the slice deector: posi-

tion the slice deector in its
seat - Fig. (H);
- the blade cover: reassemble
the blade cover and rotate it
90° clockwise until it locks
into its initial position - Fig (I);
- the meat table (only for
the machine equipped with
the meat table removable mechanism): insert the
meat table on the carriage,
verify that the securing lever returns to the initial
position, verify that the carriage slides freely and check
the correct operation of the
thickness adjustment knob.
MAINTENANCE
Blade Sharpening
(only for the machine
equipped with sharpener)
Frequency and duration of
sharpening depend on the
use of the equipment.
WARNING! If the ma-
!
chine is equipped with
its specic optional sharpener, follow the instructions. Otherwise, contact
the manufacturer or to one
of the Authorized Service
Centers (see SERVICE).
For sharpening, follow the
instructions:
1. position the thickness
adjustment knob in the
safety position - Fig. (A);
2. pull the meat table all
the way back - Fig. (L);
3. raise the sharpener Fig. (M) - and rotate it to
position it in the sharpening conguration -
Fig. (N);
4. release the sharpener;
5. activate the blade by
pressing the start button;
6. carry out sharpening
of the blade pressing
sharpening spring button for 10-15 seconds
- Fig. (O-1);
7. release the above-mentioned button;
8. pull and hold the nishing spring button for
2-3 seconds and release
the button - Fig. (O-2);
9. stop the blade motion
by pressing the stop
button;
10. raise the sharpener and
rotate it to its original
position;
11. release it until it stops;
12. proceed with cleaning
the slicer.
Lubrication
After a regular period of
use, it may be necessary
to lubricate the carriage
guides. We recommend executing this operation every
3 months. For lubrication,
only use acid free oil (we
recommend Vaseline oil).
Do not use vegetable oil.
SERVICE
No user-serviceable parts
are inside. Refer servicing
to qualied personnel. All
the repair and replacement
operations (like blade replacement, replacement
of the motor belt, replacement of the sub-basaplate
electrical system components, repair of structural parts, repair and/or
re-placement of sub-baseplate components, or
similar) shall be executed
exclusively by personnel
authorized by the manufacturer.
In the event service is needed, please contact Van
Berkel USA, Inc. where the
cost of repair or electrical
or mechanical adjustment
can be estimated before the
repair is undertaken. You
may also return your food
slicer to Van Berkel USA,
Inc. for servicing. Please include your return address
and a brief description of
the problem or damage
to the slicer on a separate
sheet inside the box.
Send your slicer, insured
and postage prepaid to:
Van Berkel USA, Inc.
8578 NW 23rd Street
Miami, FL 33122 - USA.
Retain evidence of shipping
for your protection.
Phone Number - Service Department: (786) 261-0766.
E-mail – Service Depar tment:
service@berkelinternational.
com.
WARRANTY AND
RESPONSIBILITY
Van Berkel USA, Inc. (“Van
Berkel”) warrants to the
rst and original buyer of
new equipment that said
equipment, when installed
in accordance with our instructions within North
7

America and subjected to
normal use and care, is free
from defects in material or
workmanship for a period
of one (1) year from the date
of original purchase (“Warranty Period”). Van Berkel
will repair or replace, at our
option, any product or part
that is defective in material
and workmanship without
charge if the product is returned to us postage prepaid with dated proof of
purchase and serial number
within the Warranty Period. This warranty does not
apply to commercial use or
any product abuse.
VAN BERKEL SPECIFICALLY DISCLAIMS ANY
IMPLIED WARRANTY OF
MERCHANTABILITY OR
EXPRESSED OR IMPLIED
WARRANTY OF FITNESS
FOR A PARTICULAR PUR-
POSE. VAN BERKEL SHALL
NOT BE LIABLE FOR ANY
INCIDENTAL OR CONSE-
QUIENTIAL DAMAGES TO
BUYER OR ANY THIRD
PARTY, INCLUDING,
WITHOUT LIMITATION,
LOSS OF PROPERTY, PERSONAL INJURY, OR STATUTORY OR EXEMPLARY
DAMAGES, WHETHER IN
NEGLICENCE, WARRANTY, STRICT LIABILITY OR
OTHERWISE.
This warranty is not transferable and is limited to the
rst and original buyer from
a Van Berkel Authorized
Channel of Distribution. No
warranty is given to subsequent transferees.
8
THE FOREGOING WARRANTY PROVISIONS ARE
A COMPLETE AND EXCLU-
SIVE STATEMENT OF THE
WARRANTY BETWEEN
THE BUYER AND SELLER.
VAN BERKEL NEITHER
ASSUMES NOR AUTHORIZES ANY PERSONS TO
ASSUME ANY OTHER OBLIGATION OR LIABILITY
IN CONNECTION WITH
SAID EQUIPMENT.
Example of items not covered under warranty, but
not limited to just these
items:
1. acts of God, re, water
damage, burglary, accident,
theft, vandalism;
2. freight damage;
3. improper installation or
alteration of equipment;
4. use of generic or aftermarket parts;
5. repairs made by anyone
other than a Van Berkel
designated servicer;
6. periodic maintenance of
equipment including but
not limited to lubrication
and sharpening, and other
adjustments required due
to installation set-up or normal wear;
7. replacement of worn
blades, knives, stones, knobs,
accessories, and miscellaneous expendable supply items;
8. cleaning of equipment;
9. misuse or abuse.
DEMOLITION OF
THE SLICER
The machines are comprised of:
- aluminium/magnesium alloy structure;
- inserts and various components and stainless steel;
- electrical parts and electrical cables;
- electric motor;
- plastic material, etc.
If dismantling and demolition are entrusted to third
parties, use only companies
authorised for disposal of
the above-mentioned materials. Packaging materi-
als and appliances contain
recyclable materials. Your
appliance contains valuable materials that can be
recovered or can be recyclable. Separation of the
remaining waste materials
into different types facilitates the recycling of valuable raw materials. Leave
the appliances at a collection point. You can obtain
information on disposal
from your local authorities.

Troubleshooting
PROBLEM REASON REMEDY
The machine does not start when
the on button is pressed
The machine starts when the on
button is pressed but the operation
indicator light does not turn on
Lack of power or defective
control circuit
The indicator light may be
defective
Check that the plug has been
correctly inserted. If the machine
still does not start, contact the
Service Center
Do not use the machine with the
indicator light off. Contact the
Service Center
The machine does not stop when
the stop button is pressed
The control circuit may be
defective
Immediately stop the machine,
removing the plug from the mains
outlet. Contact the service center
9
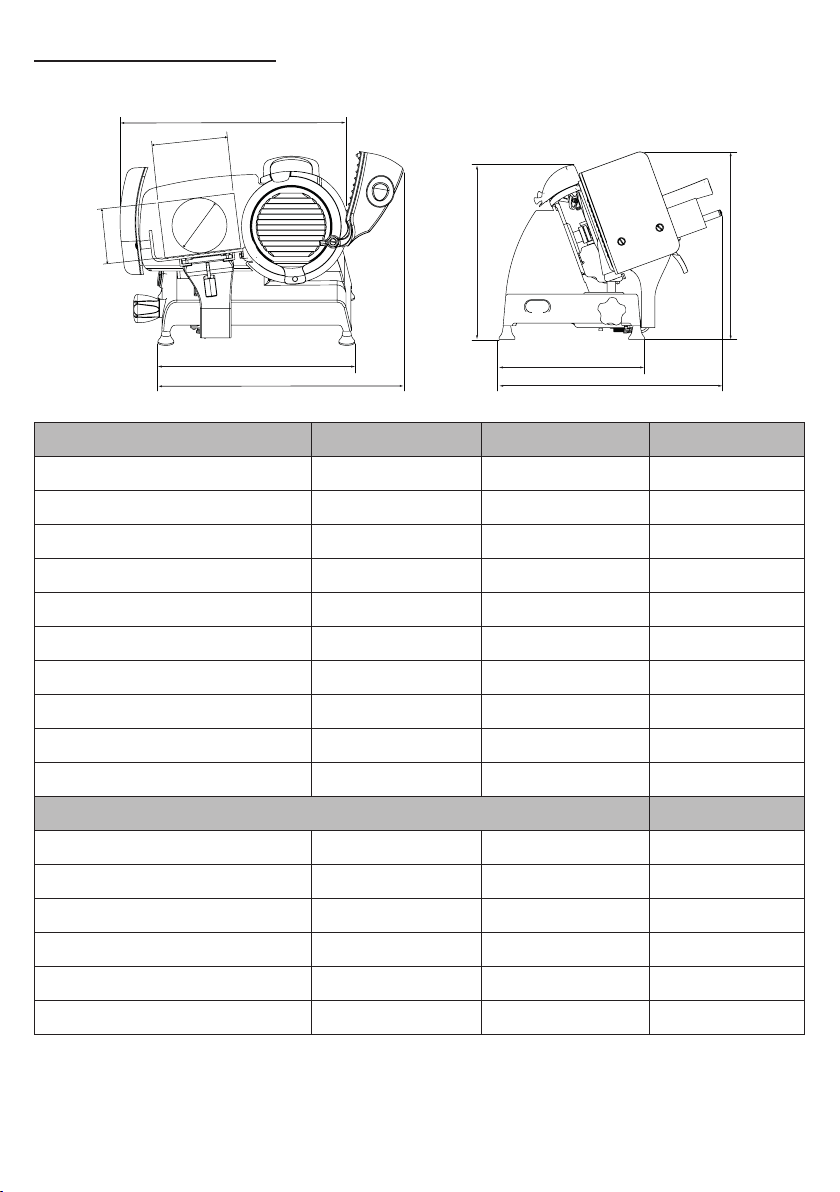
TECHNICAL CHARACTERISTICS
I
B
C
A
G
H
L
E
F
MODEL 220 250 300
A 168 mm 178 mm 230 mm
B 185 mm 185 mm 245 mm
C 160 mm 175 mm 225 mm
D 395 mm 395 mm 480 mm
E 320 mm 320 mm 380 mm
F 505 mm 505 mm 475 mm
G 390 mm 390 mm 430 mm
H 435 mm 435 mm 485 mm
I 490 mm 515 mm 635 mm
L 580 mm 570 mm 630 mm
SPECIFICATIONS
D
Circular cutting capacity 168 mm 178 mm 230 mm
Rectangular cutting capacity 185x160 mm 187x175 mm 245x225 mm
Max slice thickness 14 mm 14 mm 12 mm
Blade diameter 220 mm 250 mm 300 mm
Weight 22 Kg 22 Kg 27 kg
Motor raiting 0,19 kW 0,19 kW 0,21 kW
Note: As we actually strive to improve our products, specications are necessarily subject to change
without notice.
10

FR
MANUEL D’INSTRUCTIONS - US: Trancheuses électriques Red Line - Home Line - Easy Line
MODÈLES:
RSEGMD (Home Line 250) - RSEGS/RSEGM/RSEGL/RSAGS/RSAGM/RSAGL (Redline 220/250/300)
ESEGS/ESEGM/ESEGL/ESAGS/ESAGM/ESAGL (Easyline 220/250/300)
8
9
14
19
3
4
7
17
6
15
1
2
5
PRINCIPAUX
1. Bouton de démarrage
2. Bouton d’arrêt
3. Plaque d’identication,
données techniques
4. Pied d’appui
5. Poignéè de réglage de
l’épaisseur de la tranche
6. Plaque de la jauge
d’épaisseur (écran)
7. Protection de sécurité
8. Plateau port-aliment
9. Poignée du presse-aliment
10. Lame
11. Anneau de sécurité
12. Aiguisoir (en option)
13. Poignée du couvre-lame
14. Deecteur de tranche
15. Base
16. Support du plateau
17. Presse-aliment
18. Disque pare-lame
19. Câble d’alimentation
12
ÉLÉMENTS
Fig. 1
16
13
10
18
OFF 2 ON 1
11
11
 Loading...