

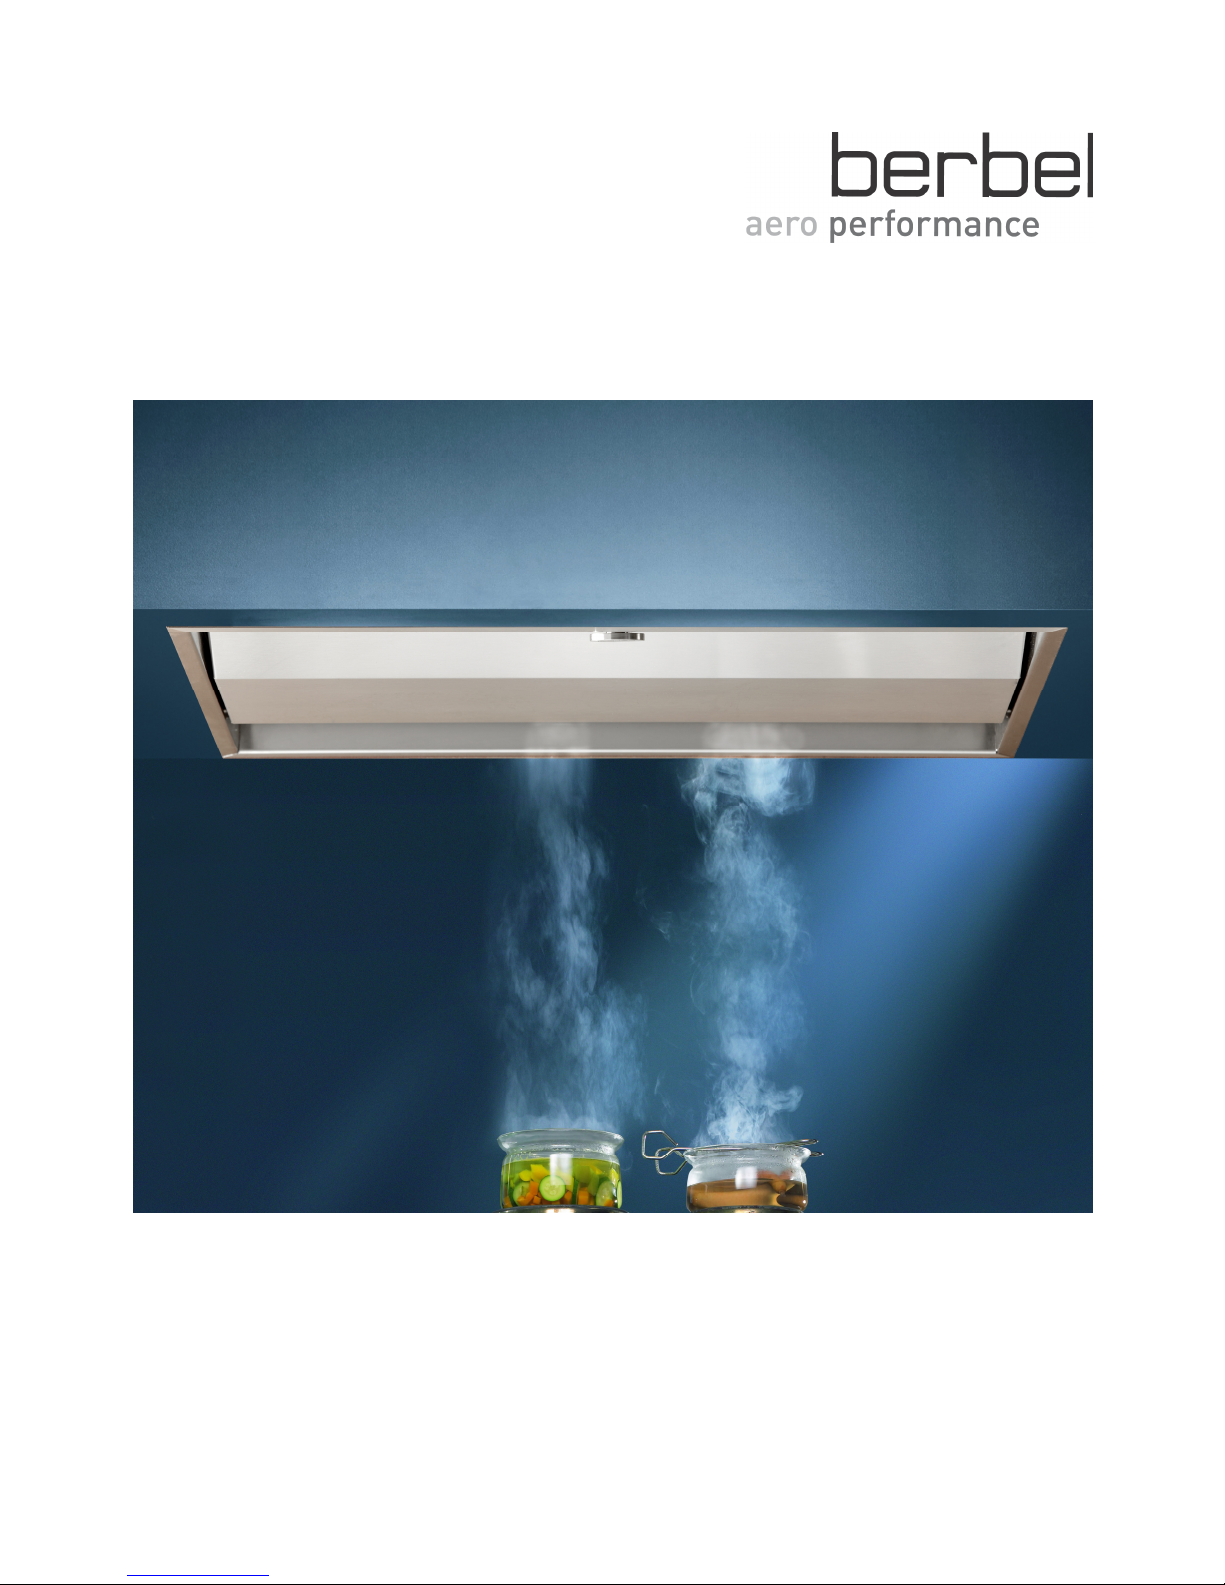
Berbel BLB 60 FL, BLB 90 FLE, BLB 90 FL, BLB 60 FLE Operating And Installation Instructions
berbel-
Fan Module BLB
Operating and installation instructions for the models:
BLB 60 FL / BLB 90 FL
BLB 60 FLE / BLB 90 FLE
01/2011 (updated 08/2015)
English translation of the German original manual
This manual helps you to use and install our product
as intended, safely and economically.
In the following text, our product the berbel-
Lüfterbaustein BLB 60 FL, BLB 90 FL, BLB 60 FLE
and BLB 90 FLE will be referred to as the 'device' in
short.
This manual is intended for the following persons:
§ Persons using the device
§ Persons cleaning the device
§ Persons disposing of the device
§ Persons installing the device
Everyone in these groups of people must have read
and understood the contents of this manual. Other
persons should not be permitted to use the device
unsupervised (children or persons with impaired
mental or sensory abilities for example).
You can increase the reliability and service life of the
equipment and minimise risks by following the
instructions in this manual.
Layout features in the text
The text in this manual is laid out in a standard way.
This helps you to easily distinguish between the
various elements:
Normal text
Cross references
§ Lists or
Ø Action steps.
Tips contain special information to help you
use the device economically.
Design features in the illustrations
The illustrations consist of greyscale representations.
If elements are referred to in the text or in the legends,
these elements are marked with a position number
Movements or actions to be carried out are indicated
by motion or direction arrows. If there are several steps
to be performed in sequence shown on one illustration,
the order is indicated by numbers (1., 2., etc.):

3
Most functions (operation, maintenance) and the assembly of all devices which are described in these
instructions are identical.
All the following descriptions and illustrations are therefore valid for the berbel- fan fodule
BLB 60 FL, BLB 60 FLE, BLB 90 FL and BLB 90 FLE.
The few exceptions to this are referred to directly in the text at the appropriate places.
The berbel-Lüfterbaustein BLB 90 FL is mainly shown in the illustrations.
Contents
Safety.....................................................................................................................................................................5
Proper and intended use............................................................................................................................................5
Ban on independent conversions and modifications..................................................................................................5
Layout of hazard notices.............................................................................................................................................5
Layout of notices regarding damage to property or the environment.........................................................................5
General safety instructions......................................................................................................................................6
Basic safety instructions.............................................................................................................................................6
Safety instructions for the user................................................................................................................................6
Safety instructions for the installer...........................................................................................................................7
Operating instructions...........................................................................................................................................10
Description for the user.........................................................................................................................................10
Possible operating modes........................................................................................................................................10
Device view with closed lower section......................................................................................................................11
Device view with opened lower section....................................................................................................................12
Operating.............................................................................................................................................................13
Turning on the ventilation function............................................................................................................................13
Changing the power level.........................................................................................................................................14
Turning off the ventilation function............................................................................................................................15
Turning the lighting on and off..................................................................................................................................16
Cleaning...............................................................................................................................................................17
Cleaning intervals.....................................................................................................................................................17
Cleaning with normal soiling.....................................................................................................................................17
Cleaning when heavily soiled...................................................................................................................................18
Cleaning the surfaces...............................................................................................................................................20
Cleaning the rotary knob...........................................................................................................................................21
Maintenance.........................................................................................................................................................22
Maintaining the device..............................................................................................................................................22
Changing the bulbs...................................................................................................................................................22
Changing the filter filling (hybrid and recirculated air filters).....................................................................................22
Troubleshooting....................................................................................................................................................25

4
Installation instructions..........................................................................................................................................27
Description for the installer....................................................................................................................................27
Possible operating modes........................................................................................................................................27
Information about extracted air mode.......................................................................................................................28
Basics about the device............................................................................................................................................33
Device view from above............................................................................................................................................34
Device view from underneath with a closed lower section.......................................................................................35
Device view from underneath with opened lower section........................................................................................36
Preparation for installation....................................................................................................................................37
Qualifications of personnel.......................................................................................................................................37
Prerequisites for the mechanical end assembly.......................................................................................................37
Brief overview of the installation...............................................................................................................................38
Tools and equipment needed...................................................................................................................................40
Unpacking.................................................................................................................................................................40
Check the delivery....................................................................................................................................................41
Remove the parts for installation..............................................................................................................................42
Remove the lower section........................................................................................................................................43
Remove the capillary trap.........................................................................................................................................43
Remove the bracket..................................................................................................................................................44
Create the installation cut-out...................................................................................................................................44
Installing the device..............................................................................................................................................45
Safety distances are observed.................................................................................................................................46
Fitting the bracket BLB 60 FL(E)..............................................................................................................................46
Fitting the bracket BLB 90 FL(E)..............................................................................................................................47
Hang the device........................................................................................................................................................48
Align the device horizontally.....................................................................................................................................49
Secure the lock.........................................................................................................................................................49
Only BLB 60 FLE / BLB 90 FLE: Connect the connection cable of the fan.............................................................50
Connecting the wall box and the window contact switch contacts...........................................................................51
Creating the exhaust air connection.........................................................................................................................54
Install the other parts................................................................................................................................................57
Connect the power supply........................................................................................................................................58
Initial cleaning.......................................................................................................................................................58
Cleaning the surfaces...............................................................................................................................................58
Cleaning the controls................................................................................................................................................58
Disassembling the device.....................................................................................................................................59
Disposal...............................................................................................................................................................60
Disposal of the packaging.........................................................................................................................................60
Gerät Disposal ..........................................................................................................................................................60
Technical specifications........................................................................................................................................61
Volume flow for operation with an external fan.........................................................................................................61
Fan module BLB 60..................................................................................................................................................61
Contact.................................................................................................................................................................62
Contacting the customer services of the manufacturer............................................................................................62
General safety instructions
Safety 5
Safety
Proper and intended use
The device can be used to extract cooking vapours
when cooking in private households.
Ø Only use this device in private kitchens.
This device has been exclusively intended for this
purpose and must only be put to this use. The device
may only be used in the manner described in this
manual.
Any other use of or modification to the device is
considered improper usage and may lead to damage.
The manufacturer is not liable for damages which
occur as a result of improper use, incorrect installation
or incorrect operation. This device is not intended for
commercial use.
Ban on independent conversions and
modifications
§ Do not undertake and independent modifications of
or conversions to the device. Conversions or
modifications without the approval of berbel
Ablufttechnik GmbH are not permitted.
§ Never bridge or bypass the protective equipment
found on the device.
Layout of hazard notices
In this manual you will find the following categories of
hazard notices:
DANGER
Notices with the word DANGER warn
of a hazardous situation which will
result in death or serious injuries.
WARNING
Notices with the word WARNING warn
of a hazardous situation which can
lead to death or serious injuries.
CAUTION
Notices with the word CAUTION warn
of a situation that can lead to minor or
moderate injuries.
Layout of notices regarding damage to
property or the environment
ATTENTION
These notices warn of a situation that
can lead to damage to property or to
the environment.

Safety
6 Safety
General safety instructions
Ø Read this chapter carefully before installing, using,
or cleaning the device.
Specific, important safety instructions can be
found:
- in the "Safety instructions for the installer" for
persons installing or removing the device.
- in the "Safety instructions for the user" for
persons operating or cleaning the device. Read
these chapters carefully to avoid danger, injuries
and damage.
Ø Follow the safety and danger notices during all
activities on the device.
Ø Make sure that only persons who have read and
understood the contents of this manual use the
device.
Children or other persons with impaired mental or
sensory abilities should not be permitted to use the
device unsupervised.
Ø Include this manual if you pass the device on.
Basic safety instructions
This section contains the basic safety instructions for
handling the device. Additional safety instructions,
concerning the particular actions and processes, can
be found in the respective chapters.
§ Take note of all safety instructions and danger
notices in this manual.
§ Check the device and all its parts for visible
damage. In the event of damage, contact your
dealer or berbel customer service. You may only
use the device if it is in perfect working order.
§ Always let qualified specialist personnel conduct
maintenance or repair work. Otherwise, you
endanger yourself and others.
§ Only use this device in private kitchens.
§ Use this device only when the capillary trap is fitted
and with the lower section closed.
§ Make sure that there are no unsupervised children
in the vicinity of the device and that they do not play
with it.
Safety instructions for the user
Read this chapter carefully before using or cleaning the
device.
Ø Follow the warning notices during all activities on
the device.
Avoiding dangers caused by electric shock
§ Do not use the device with a damaged electrical
connection cable.
§ The mains plug must be easily accessible so that
you can quickly and easily isolate the device from
the mains supply in the event of an emergency. If
the mains plug is inaccessible following installation,
an all-pole isolating device with a contact gap of at
least 3 mm must be installed and accessible.
§ In the event of a malfunction, disconnect the device
immediately from the mains. Only allow trained
specialist personnel to repair the device.
§ Do not kink or crush the mains cable.
§ Only use the device if it is connected and fused in
accordance with the technical data.
§ Never open the housing of the device's fan unit.
§ Keep the device dry.
§ Avoid exposing the device to dripping or splashing
water or other fluids.
§ Do not place any objects filled with fluids, like vases
for example, above the device or on the device.
If fluid does enter the device:
- Immediately shut off the power supply
by removing the fuse, for example. -
Make sure that the power supply
of the device cannot be unintentionally
reconnected. Perhaps by designating a person to
prevent the fuse being switched on again.
- Allow the device to dry.
- Have the device checked and repaired by trained,
specialist personnel prior to using the device
again.

Safety instructions for the
installer
Safety 7
Avoiding the risk of explosion
§ Do not operate the device in an environment with a
risk of explosion.
Avoiding the risk of fire
§ Do not use the device during a fire or when there is
an imminent danger of fire (e.g. a smell of gas) in
the household.
§ Make sure that the hob has cooled down before you
cover it.
A dirty device can cause fire hazards.
§ Keep the device in perfect working order and check
it regularly.
§ Regularly remove any grease residues which are
present. Grease residues pose a fire hazard.
Overheated oil and a naked flame can cause fire
hazards.
§ Do not flambé underneath the device. Naked flames
can cause damage to neighbouring cabinets for
example.
§ Never deep-fry food unattended under the device.
Overheated oil can spontaneously ignite.
When operating over a gas stove or a gas unit:
§ Make sure that the gas flame is kept low. Naked
flames should not appear beyond the edge of the
pan base.
In recirculated air mode:
§ A covered or sealed ventilation outlet can cause a
fire hazard. Do not place any objects like lids or
plates for example on or in front of the ventilation
slits of the device. In the case of recirculated air
devices, out flowing air must be able to escape
back into the kitchen through the ventilation slits
without impediment.
§ No objects should be mounted in the area of the
ventilation slits of the device which could impede
the air flow. Make sure that out flowing air is able to
flow into the kitchen without impediment.
Operating over a solid-fuel burning fireplace:
The device may only be used over a fireplace for solid
fuels (e.g. a coal-burning stove) if:
§ the fireplace has a sealed cover which cannot be
removed. Otherwise there is an increased fire risk
due to flying sparks.
§ the legal and country-specific regulations are
observed.
Avoiding risks of injury
§ To prevent the risk of falling, use a stable step-
ladder for all work on the device, for example
replacing the filter and cleaning the device.
§ To prevent the risk of injury by falling parts, do not
place any objects on the device.
Avoiding the risk of suffocation
If the device and an open fireplace which uses air from
the room for its oxygen supply, gases or waste gases
may be drawn into the room.
§ Ensure there is an adequate supply of fresh air into
the dwelling.
§ Never let children play with the foil or other parts of
the packaging.
§ Store the film or other parts of the packaging in a
location which is inaccessible to children.
§ Make sure that all of the permits required for
operation in your country have been obtained (e.g.
the master chimney sweep).
§ Make sure that all standards and guidelines for
operating the device in your country are observed.
Avoiding environmental damage
§ Dispose of the device and its accessories in
accordance with the legal regulations.
Safety instructions for the installer
The safety instructions concerning the device's
installation can be found in this section. Additional
safety instructions, concerning the particular actions

Safety
8 Safety
and processes, can be found in the respective
chapters.
Ø Read this chapter carefully before installing the
device.
Ø Follow all the safety and danger notices during all
activities on the device.
Ø Only install this device in private kitchens.
Ø Make sure that the power cable is free from voltage
during installation.
Ø Check the device and all its parts for visible
damage. In the event of damage, contact your
dealer or berbel customer service. You may only
install the device if it is in perfect working order.
Ø Mount the device using the supplied brackets only
on load bearing building parts (solid construction).
Ø Use appropriate fastening mechanisms for any
other sort of installation. If in doubt, please check
with the dealer. Otherwise, you endanger yourself
and others.
Ø Always let qualified specialist personnel conduct
repair work. Otherwise, you endanger yourself and
others.
Avoiding dangers caused by electric shock
§ Only let trained, qualified electricians work on the
power supply.
The electricians must have the following knowledge
and abilities as a minimum:
§ Basic knowledge of electrical engineering
§ Knowledge of country-specific regulations
and standards (e.g. in Germany,
DIN 57100/VDE 0100, part 701)
§ Knowledge of the applicable
safety regulations
§ Knowledge of the applicable legal
regulations for gas installations (e.g.
in Germany the technical rules for gas
installations TRGI).
§ Only install the device if it is connected and fused in
accordance with the technical data.
§ Do not kink or crush the mains cable.
§ Do not use the device with a damaged electrical
connection cable.
§ In the event of a malfunction, disconnect the device
immediately from the mains.
§ The mains plug must be easily accessible so that
you can quickly and easily isolate the device from
the mains supply in the event of an emergency. If
the mains plug is inaccessible following installation,
an all-pole isolating device with a contact gap of at
least 3 mm must be installed and accessible.
§ If the device is moved from a cold environment into
a hot one, condensation may form inside the
device. In this case wait about 2 to 3 hours before
bringing the device into service.
§ Avoid exposing the device to liquids.
§ Keep the device dry.
Avoiding the risk of explosion
§ Do not install the device in an environment with a
risk of explosion.
Avoiding the risk of fire
§ Make sure that the hob has cooled down before you
cover it.
In recirculated air mode:
§ A covered or sealed ventilation outlet can cause a
fire hazard. In the case of recirculated air devices,
out flowing air must be able to escape back into the
kitchen through the ventilation slits without
impediment.
§ You may not install any objects that could impede
the airflow. Make sure that out flowing air is able to
flow into the kitchen without impediment.

Safety instructions for the
installer
Safety 9
The device may only be installed over a fireplace for
solid fuels (e.g. a coal-burning stove) if:
§ the fireplace has a sealed cover which cannot be
removed. Otherwise there is an increased fire risk
due to flying sparks.
§ the legal and country-specific regulations are
observed.
Avoiding risks of injury
§ To prevent the risk of falling, use a stable
stepladder for all work on the device, for example
replacing the filter, installing and cleaning the
device.
§ To prevent the risk of injury by falling parts, do not
place any objects on the device.
§ To prevent injury from falling parts, only use
suitable fastening materials.
§ To prevent cuts from broken glass, use suitable
protective gloves.
Avoiding the risk of suffocation
If the device and an open fireplace which uses air from
the room for its oxygen supply, gases or waste gases
may be drawn into the room.
§ Make sure that all of the permits required for
operation in your country have been obtained (e.g.
the master chimney sweep).
§ Make sure that all standards and guidelines for
operating the device in your country are observed.
§ Ensure there is an adequate supply of fresh air into
the dwelling.
§ Never let children play with the foil or other parts of
the packaging.
§ Store the film or other parts of the packaging in a
location which is inaccessible to children.
Minimising the danger of collapse
In extracted air mode:
§ The wall breakthrough that is needed must be
created by technically qualified persons. Wall
breakthroughs affect the building's structural
stability. Improperly made wall breakthroughs could
result in the building collapsing.
Operating instructions
10 Operating instructions
Operating instructions
Description for the user
The following illustrations show the way the
possible operating modes work. The devices
used are shown as symbols. The illustrations are
meant to serve as a guide. The illustrated device
shapes may differ from your device.
With this device you can suck in and clean cooking
vapours. Cleaning the room air that is sucked in is
done in several cleaning stages. Dirt particles, such as
fat and oil particles, are trapped on the upper and lower
sections.
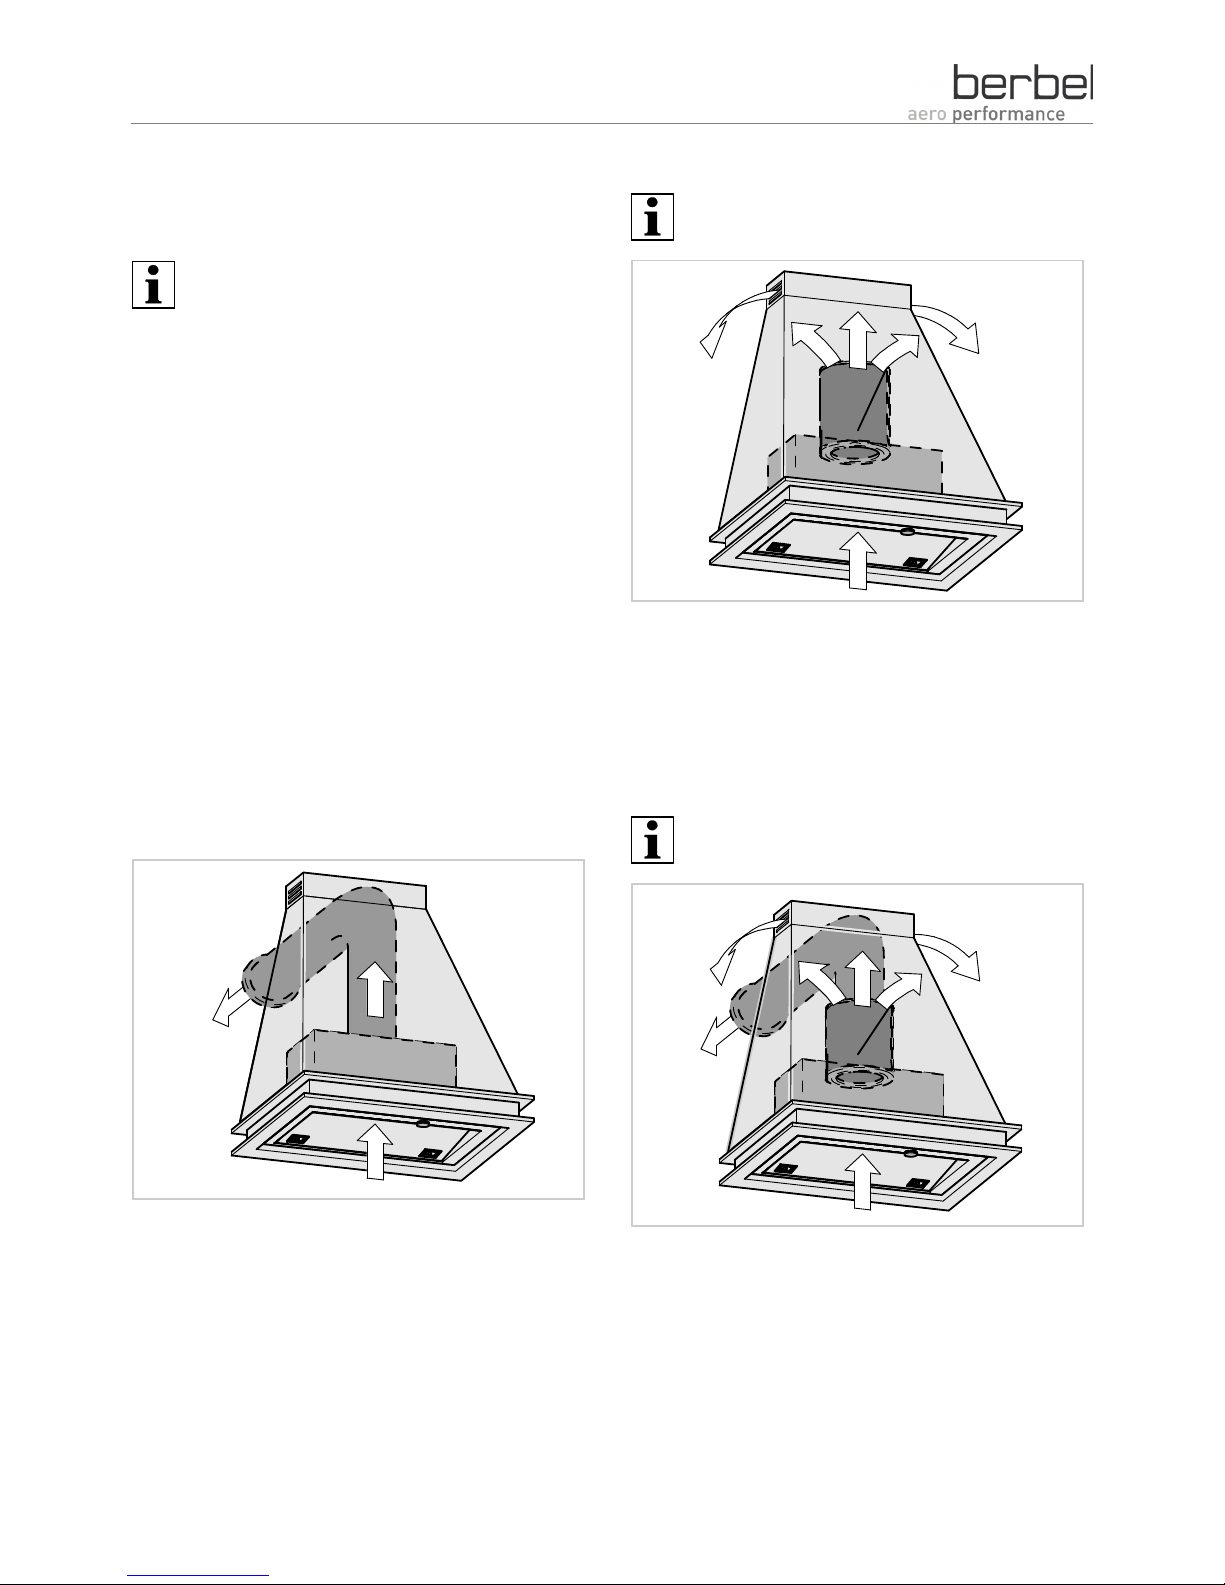
Possible operating modes
The device can work in different operating modes:
§ Recirculated air mode
§ Extracted air mode
§ Hybrid mode
The individual operating modes are described in the
next sections.
Extracted air mode
The device draws room air in and filters dirt particles
out of the air. The cleaned air is discharged outside.
Recirculated air mode
The filter filling must be replaced at regular
intervals in recirculated air mode.
The device draws room air in and filters dirt particles
out of the air.
The filter filling in the recirculated air filter neutralises
any smelly odours present. The odour-free, cleaned
room air is fed back into the room.
Hybrid mode
The filter filling must be replaced regular intervals
in hybrid mode.
The device draws room air in and filters dirt particles
out of the air. Part of the cleaned air is discharged
outside. The filter filling in the hybrid filter neutralises
the existing odour components of the remaining air
sucked in from the room. The odourless, cleaned room
air is then fed back into the room.
Description for the
user
Operating instructions 11
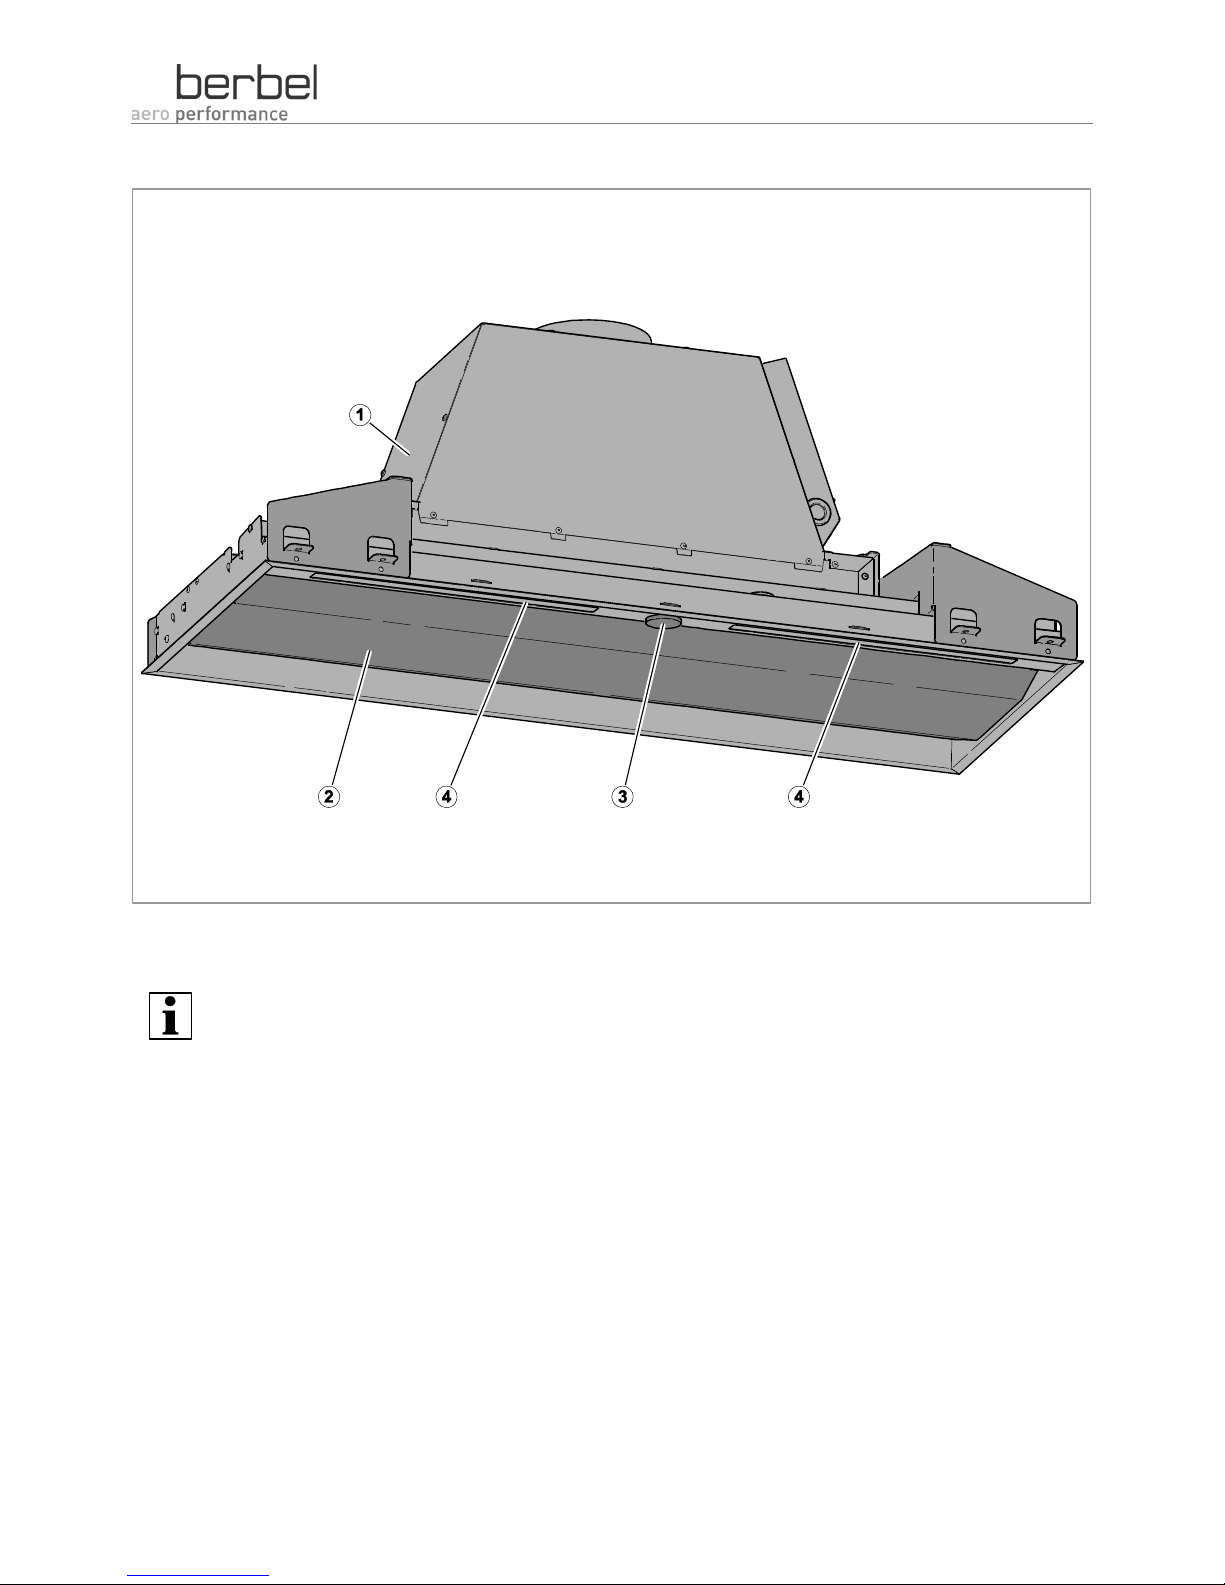
Device view with closed lower section
fan module BLB 90 FL Rotary knob (on and off switch)
Lower section Illumination
All the following descriptions and illustrations are therefore valid for the berbel- fan module
BLB 60 FL, BLB 60 FLE, BLB 90 FL and BLB 90 FLE.
The berbel- fan module BLB 90 FL is mainly shown in the illustrations.
Description for the user
12 Operating instructions
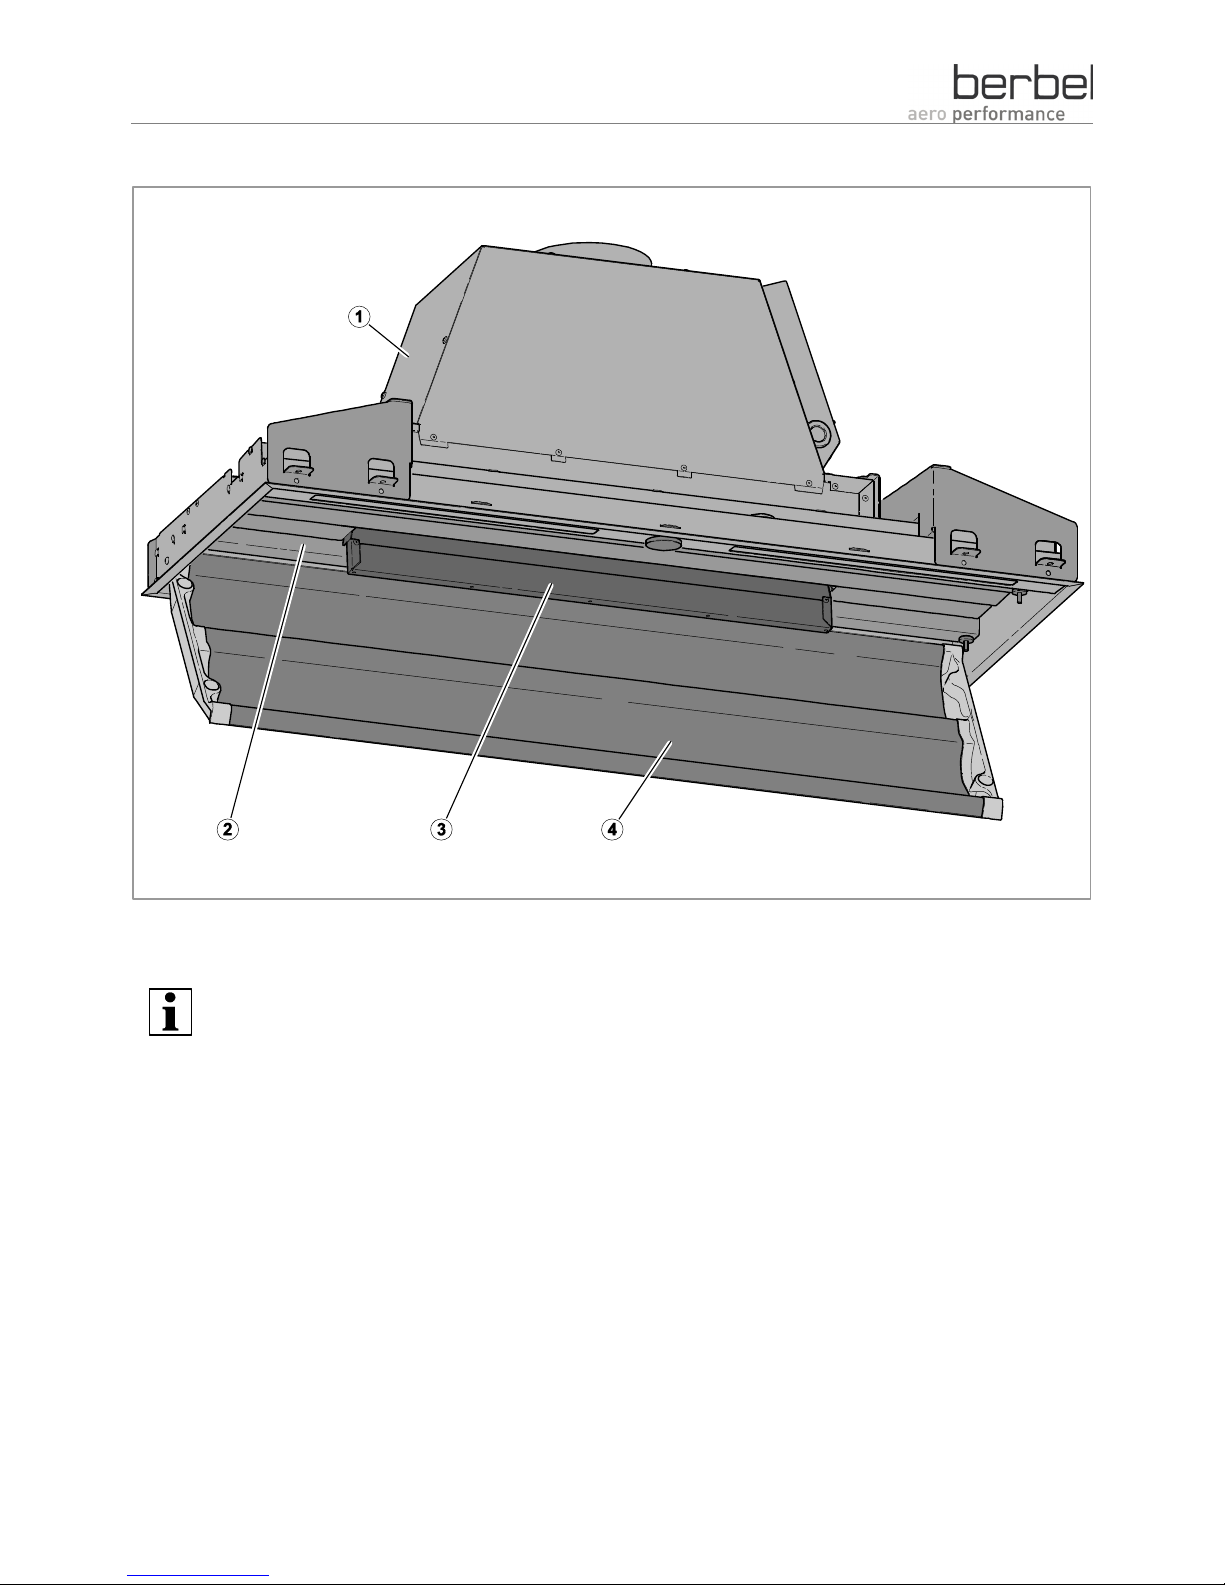
Device view with opened lower section
fan module BLB 90 FL Capillary trap
Upper section Lower section
All the following descriptions and illustrations are therefore valid for the berbel- fan module
BLB 60 FL, BLB 60 FLE, BLB 90 FL and BLB 90 FLE.
The berbel- fan module BLB 90 FL is mainly shown in the illustrations.

Operating
Operating instructions 13
Operating
WARNING
Suffocation risk due to low oxygen
levels when operating the device.
Ø Ensure there is an adequate supply
of fresh air into the dwelling.
Ø Make sure that the device is
connected to a window contact
switch for safe operation.
Ø Make sure that all country-specific
statutory regulations are observed
(e.g. in Germany the requirements of
the federal state's fire regulations).
The functions of the device are controlled using the
control panel. This device is fitted with a rotary knob
(ThinCoder) for operation.
The rotary knob is located on the bottom side of the
device.
You can find out how to operate all the device functions
using this rotary knob in the following sections.
Turning on the ventilation function
WARNING
Explosion risk and fire hazard from gas
or explosive or flammable gas mixtures
in the kitchen when operating electrical
equipment.
If you smell gas or there is a suspicion
of flammable gas:
Ø Do not operate or switch on any
electrical equipment.
Ø Ensure there is an adequate supply
of fresh air into the dwelling.
Ø Leave the building.
Ø Call the fire brigade.
WARNING
Risk of burns from flambéing, naked
flames or overheated fat/oil under the
device.
Naked flames can cause burns, e.g. to
the skin.
Ø Always keep naked flames small
(e.g. with a gas cooker). The gas
flame should not extend beyond the
base of the pan.
Ø Prepare foods using fats or oils only
under supervision.
Ø Do not flambé underneath the
device.
Operating
14 Operating instructions
ATTENTION
Risk of fire due to flambéing or
overheated oil and fat under the
device.
Naked flames can cause damage to
neighbouring cabinets and objects for
example.
Ø Never leave deep fat fryers
unattended during use.
Ø Do not flambé underneath the
device.
The following tip only applies for recirculated air mode.
Ø If you turn the device on and notice unpleasant
odours, then you should replace the filter's
filling.
See Cleaning starting at page 17.
If you turn on the device and notice that the fan noise
has increased, you should clean the device.
See Cleaning starting at page 17.
After six hours of continuous operation the device
automatically switches off the ventilation mode.
Ø If required, turn the device on again.
To remove cooking vapours best:
Ø Turn the device on when you start cooking.
Ø If you are frying, turn the device to its highest
power setting.
Use the run-on function in hybrid and
recirculated air modes so that the filter used
(BHF or BUF) is dried after the actual cooking
process. This prevents smells developing and
ensures it reaches its maximum service life.
You can operate the device in four different power
levels.
To turn the device on, proceed as follows:
Ø Turn the rotary knob clockwise from level "0" to the
desired power level.
The rotary knob snaps into each power level.
The device operates immediately at the selected power
level.
Changing the power level
During operation, you can set a different power level at
any time.
Ø Turn the rotary knob from the current position to
the position of the desired power level.
The rotary knob snaps into each power level.
The device operates at the selected power level.
After six hours of continuous operation the device
automatically switches off the ventilation mode.
Ø If required, turn the device on again.

Operating
Operating instructions 15
Turning off the ventilation function
To turn off the ventilation function, proceed as follows:
Ø Turn the rotary knob anti-clockwise to the "0"
position.
The rotary knob snaps into each power level.
The device turns off the ventilation function.
Operating
16 Operating instructions
Turning the lighting on and off
The device is fitted with an energy saving LED light to
light up the hob.
The lighting can be used independently from the fan.
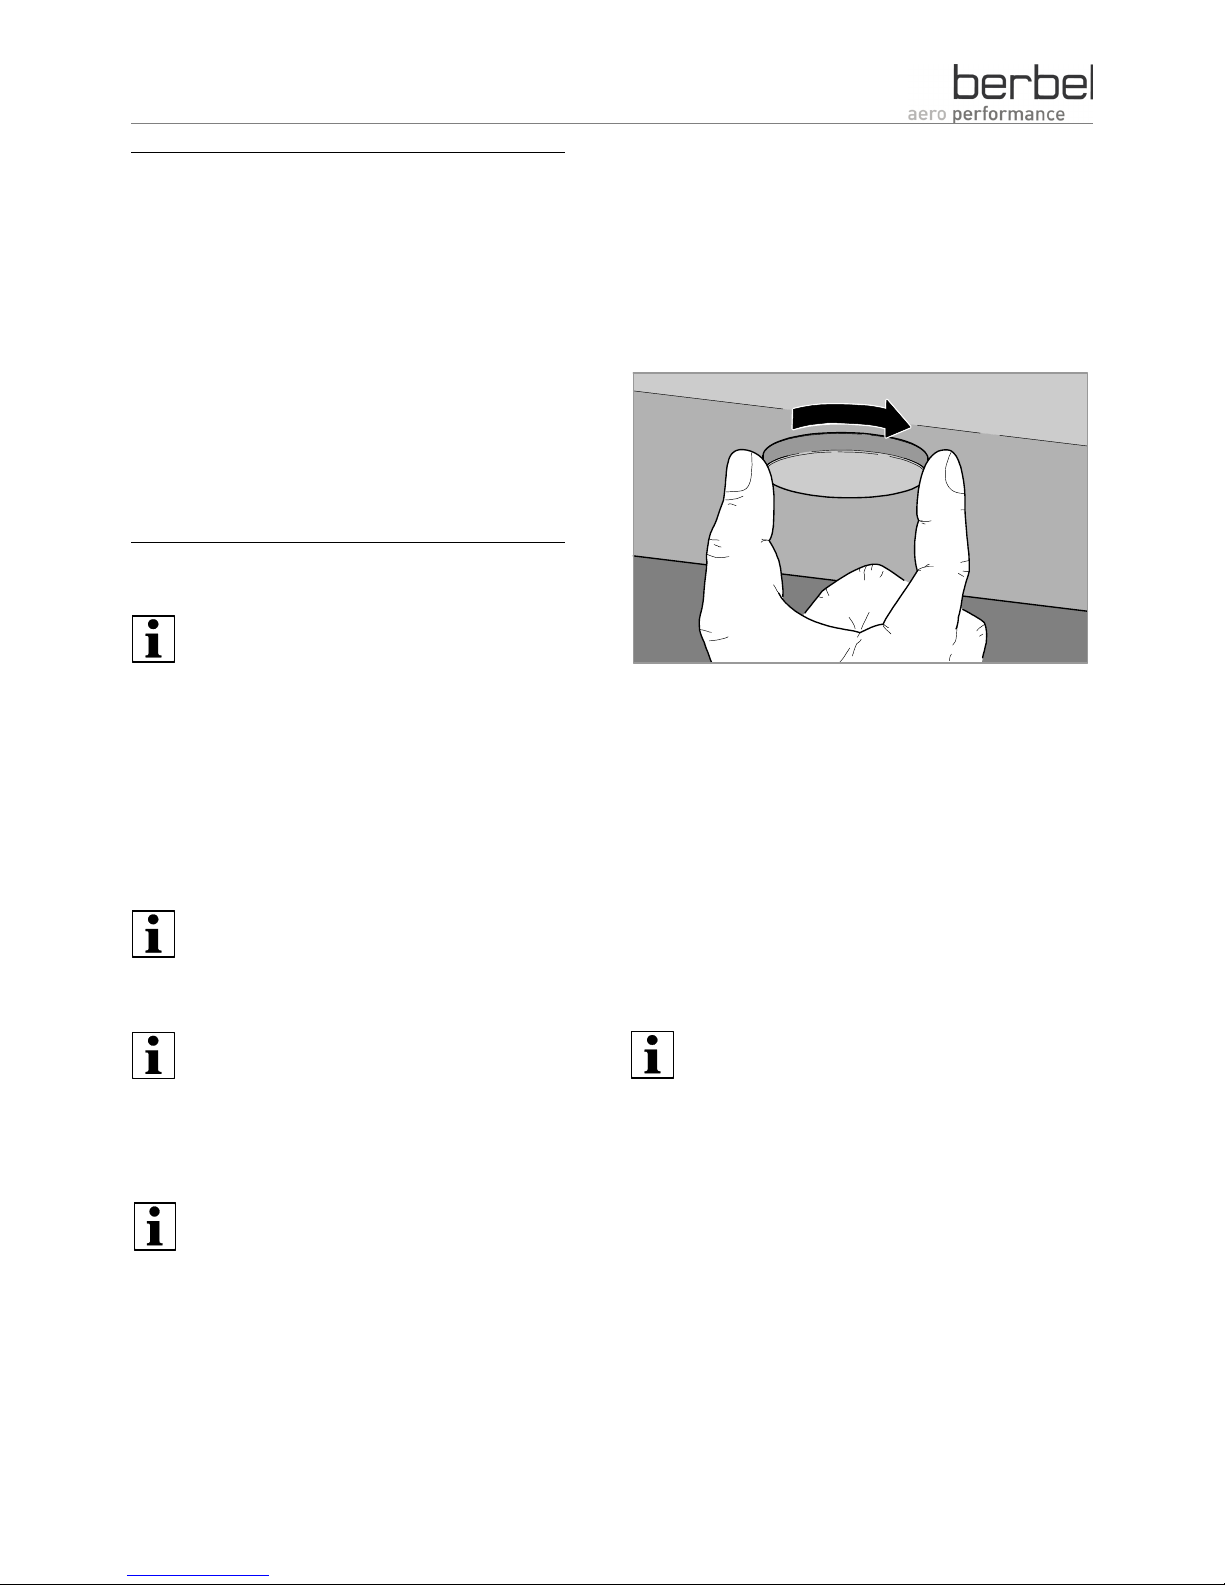
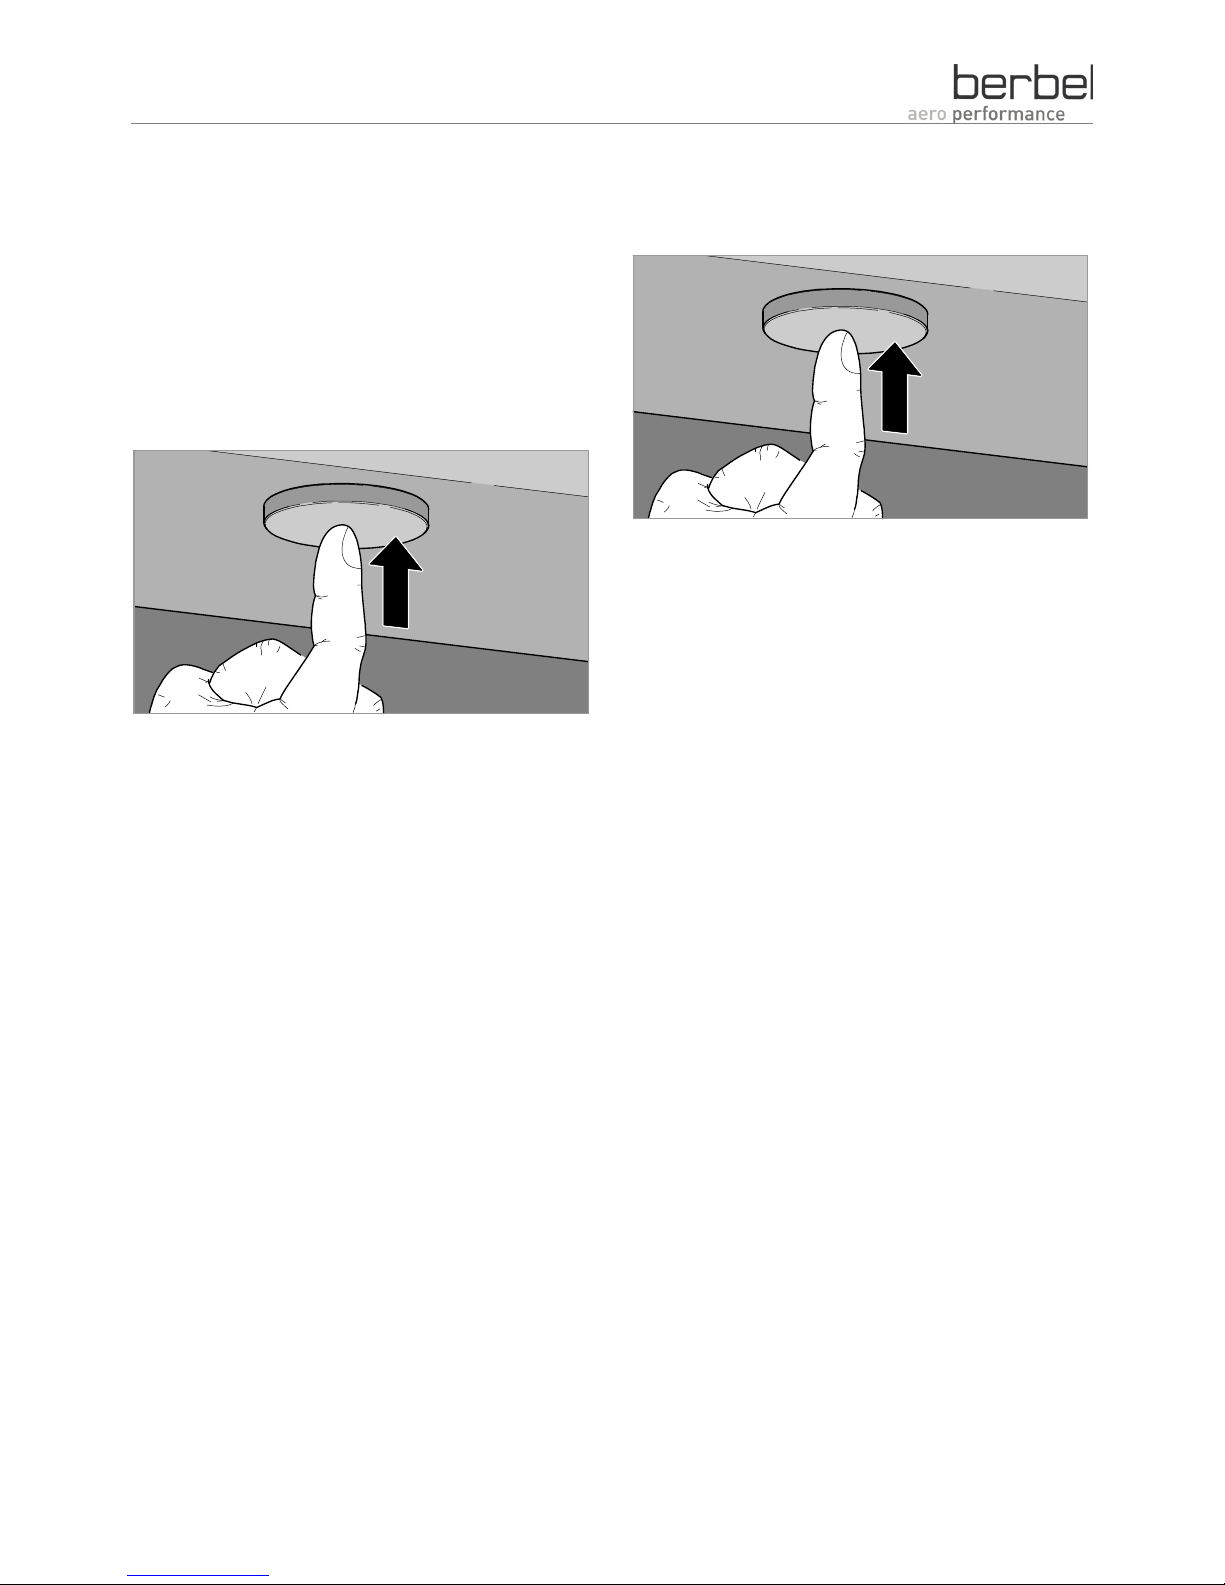
Turn the lighting on
To turn on the lighting, proceed as follows:
Ø Press on the rotary knob with a finger.
The lighting is switched on.
Turn the lighting off
To turn off the lighting, proceed as follows:
Ø Press on the rotary knob with a finger.
The lighting is switched off.
Cleaning
Operating instructions 17
Cleaning
DANGER
Fatal electrical shocks through liquids
that get into the device.
Ø Never spill liquids into the device.
Ø Ensure that fluids never get into the
device.
WARNING
Risk of fire from grease residues in
and on the device.
Ø You should regularly clean the
device.
ATTENTION
Damage to the surfaces from sharp
objects or abrasive cleaning agents.
Ø Never use sharp objects, abrasive or
aggressive cleaning agents.
Ø Use a soft, damp cloth.
Cleaning intervals
Usage Time interval
Little or
occasional
use.
After each cooking session.
See Cleaning with normal soiling on
page 17.
Daily or
heavy
use.
At least every three weeks.
See Cleaning when heavily soiled on
page 18.
Cleaning with normal soiling
The device is designed to capture foreign particles
from the room air that is sucked in and to collect them
in a grease tray.
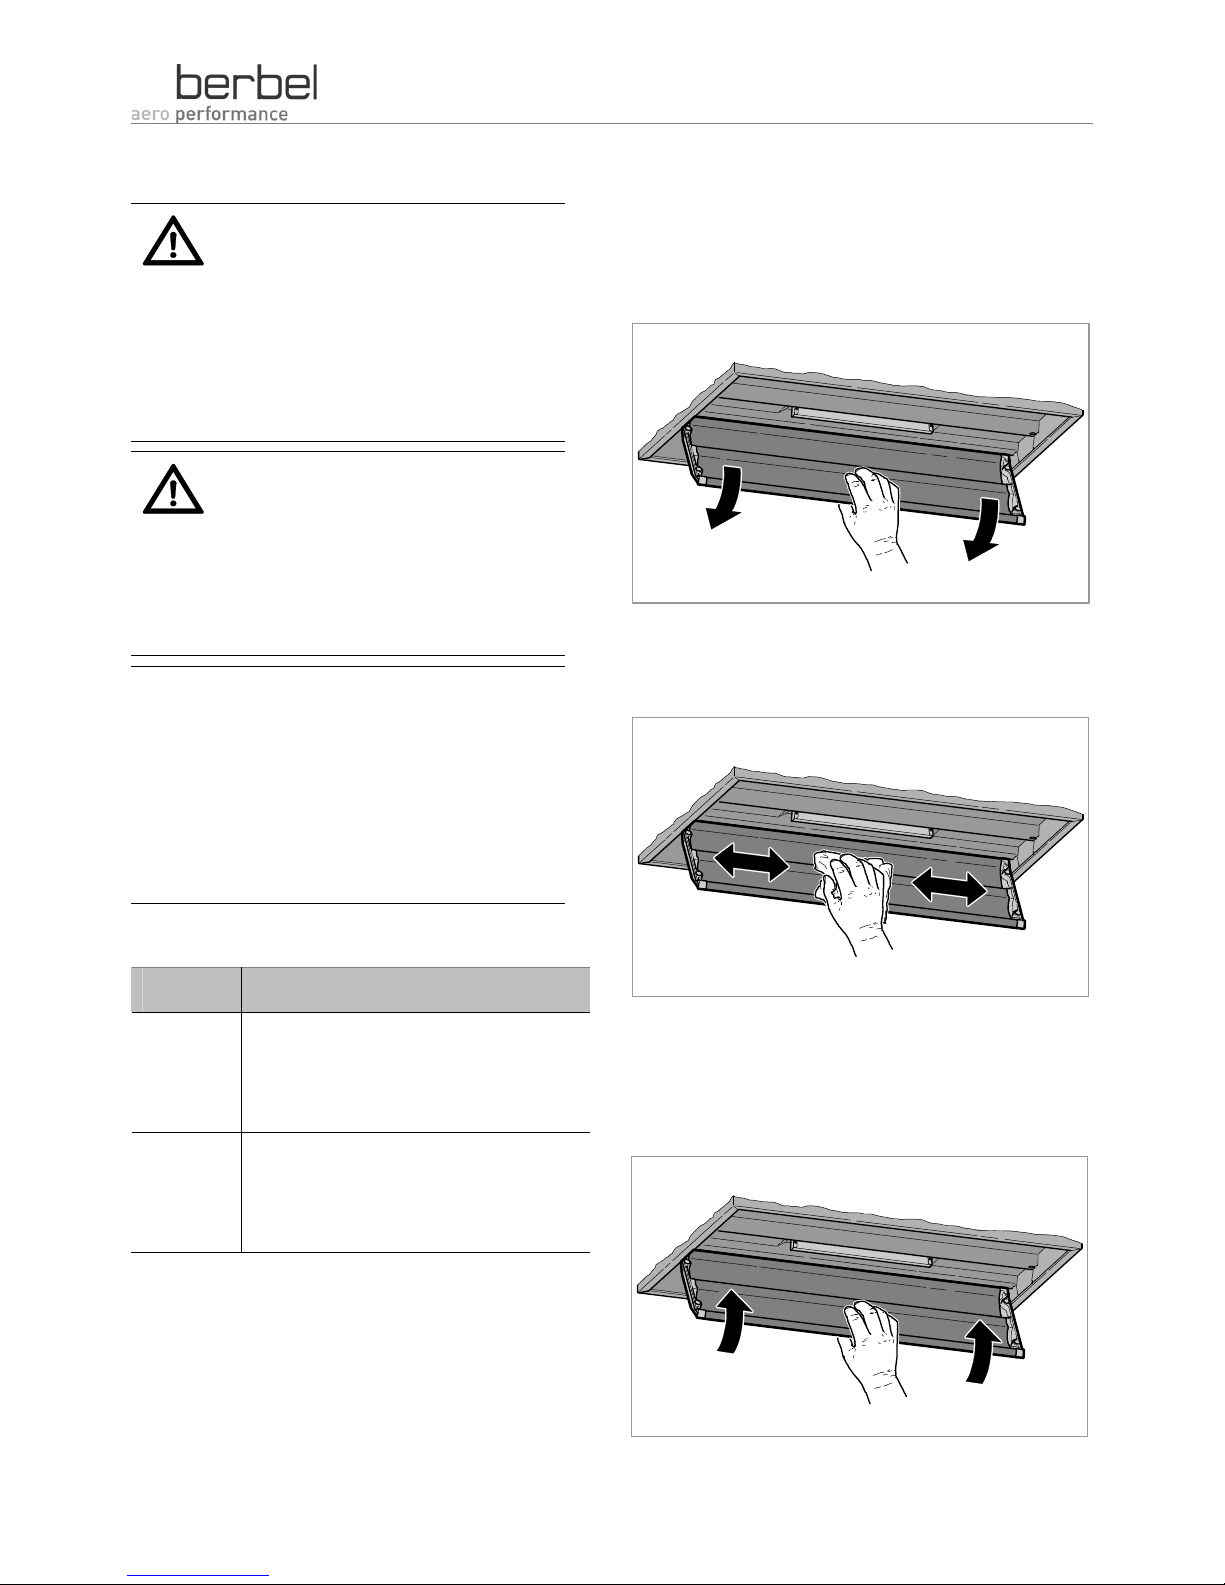
Proceed as follows to clean the device at normal
soiling levels:
Ø Turn off the device.
Ø Open the lower section by pulling the rounded
edge on the front side downwards.
Ø Use a soft, damp cloth or kitchen paper towels for
cleaning.
Ø Wipe off the upper and lower sections.
Close the lower section.
Ø Close the lower section by pushing it upwards until
the two magnetic fasteners can be heard to click
together.
Cleaning
18 Operating instructions
Cleaning when heavily soiled
If the device is heavily soiled, you must remove the
lower section and the capillary trap. These can be
easily removed and refitted, and they can be reused
after they have been cleaned.
Proceed as follows to clean the device at heavy soiling
levels:
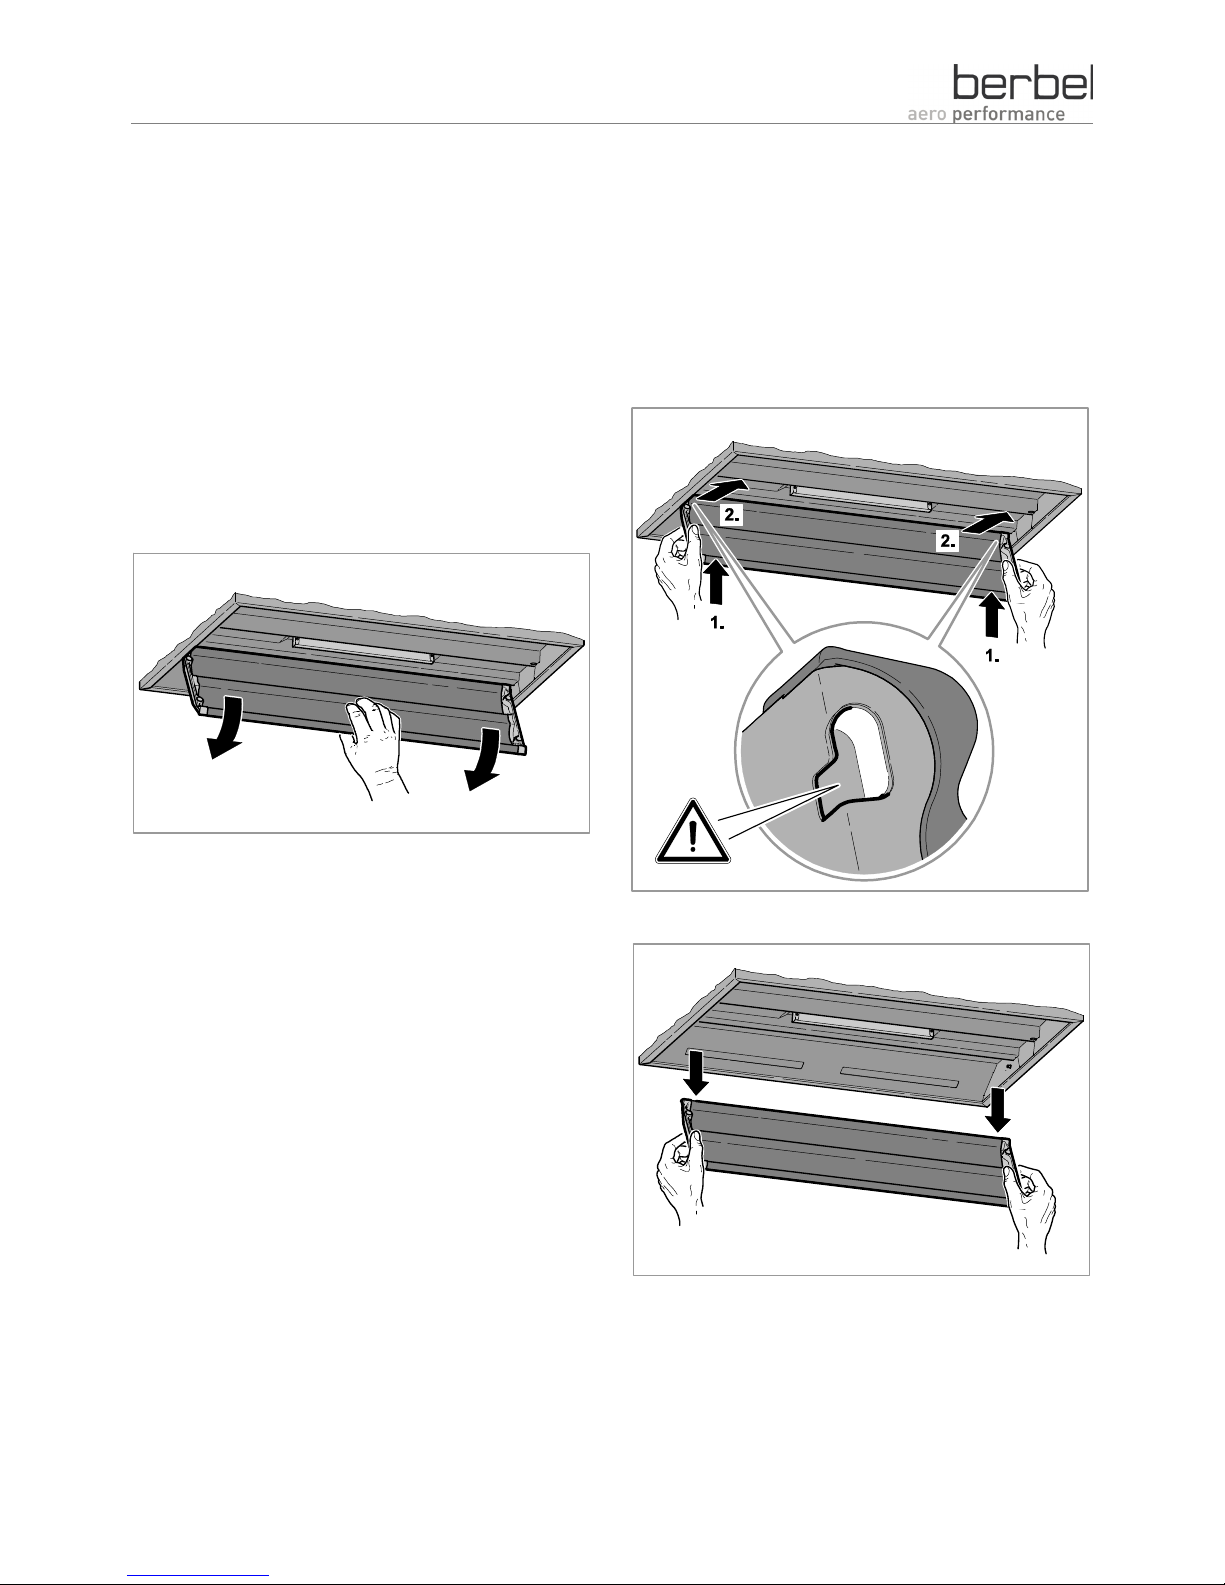
Remove the lower section
Ø Turn off the device.
Ø Open the lower section by putting the rounded
edge downwards.
Ø Use a soft, damp cloth or kitchen paper towels for
cleaning.
Ø Wipe off the upper and lower sections.
Ø Grasp the lower section on its sides with both
hands when it is hanging down perpendicularly.
Ø Lift the lower section about 2 cm (1.).
Ø Release the lower section by pulling it forwards
(2.).
Ø Remove the lower section.
Cleaning
Operating instructions 19
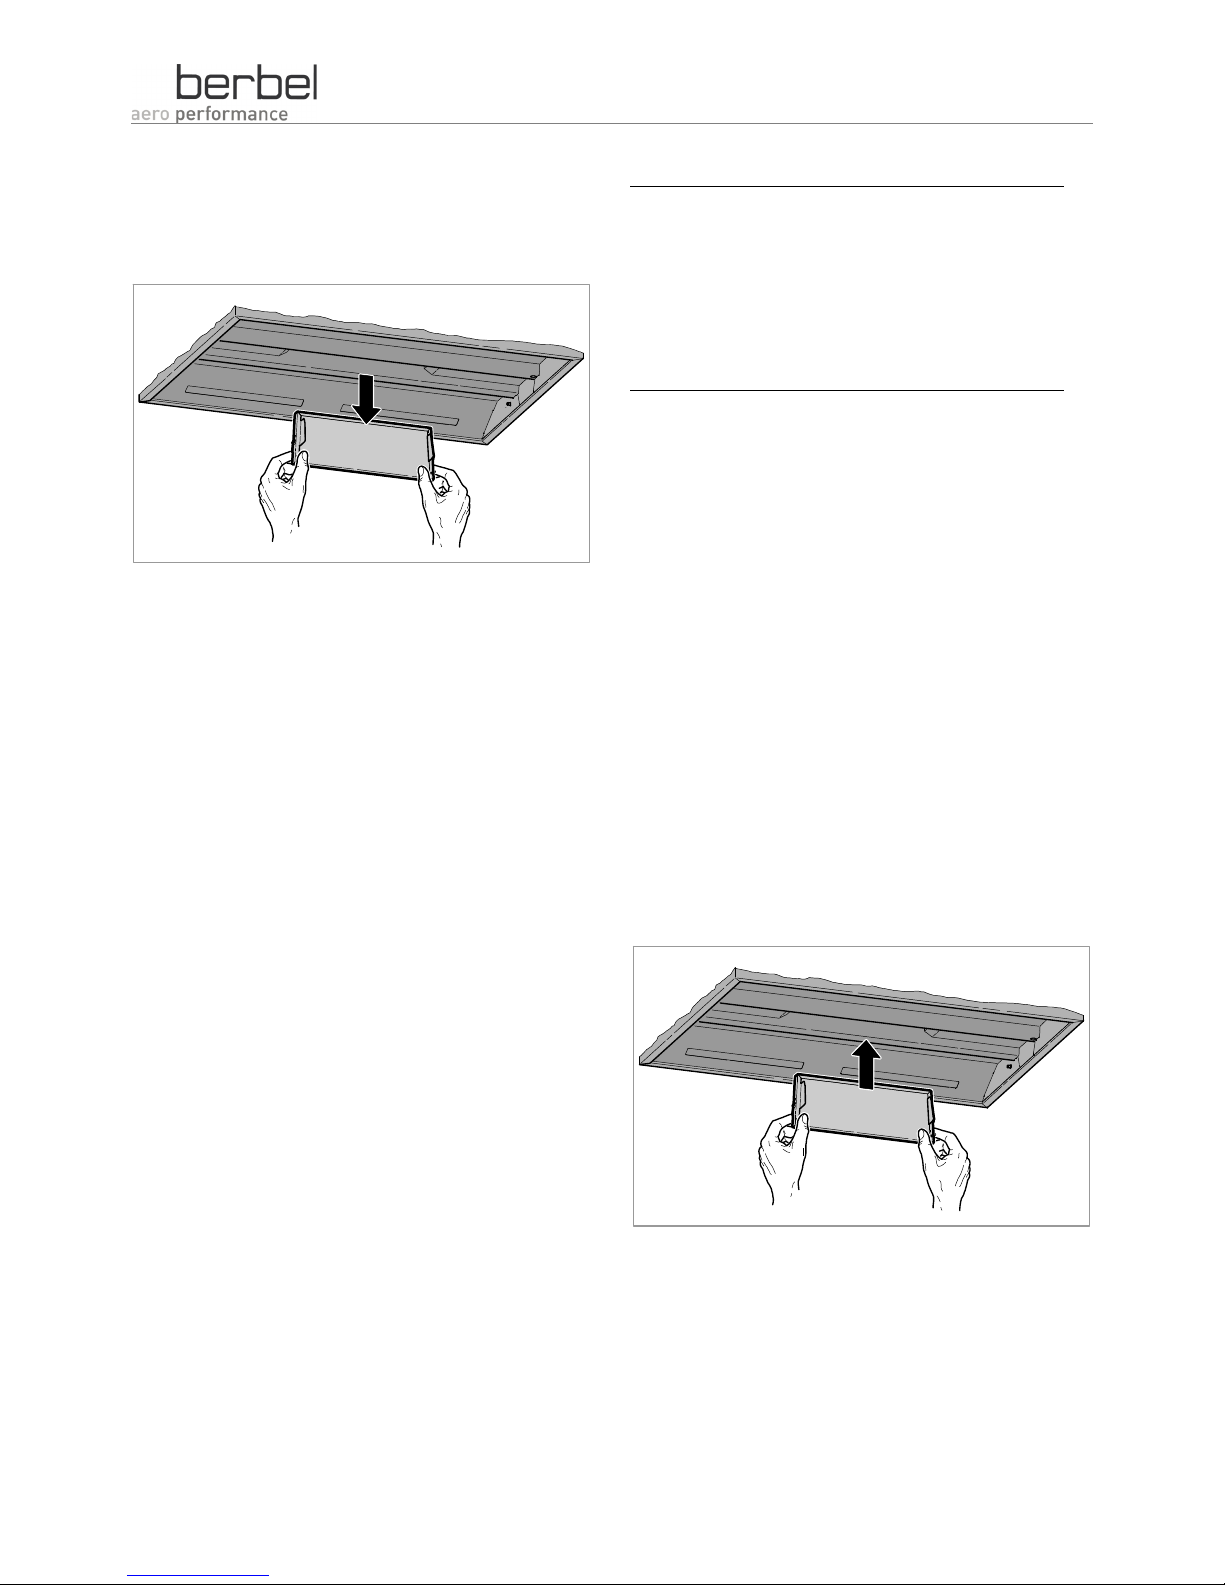
Remove the capillary trap
Ø Grasp the sides of the capillary trap with both
hands.
Ø Pull the capillary trap downwards.
Clean the parts
ATTENTION
Damage to the lower section by
improper cleaning.
Ø Clean the lower section e.g. with a
damp cloth.
Ø Clean the lower section e.g. with a damp cloth.
Ø Clean the upper section e.g. with a damp cloth.
Ø Clean the capillary trap e.g. in the dish washer.
Ø Clean the four surfaces of the recess for the
capillary trap e.g. with a damp cloth.
Ø Clean the two edges above the recess for the
capillary trap e.g. with a damp cloth.
After cleaning replace the cleaned and dry parts as
follows:
Insert the capillary trap
Ø Make sure that the capillary trap is completely dry
before re-inserting.
Ø Insert the capillary trap into the device by pressing
it firmly upwards with both hands.
The capillary trap snaps into place.
Cleaning
20 Operating instructions
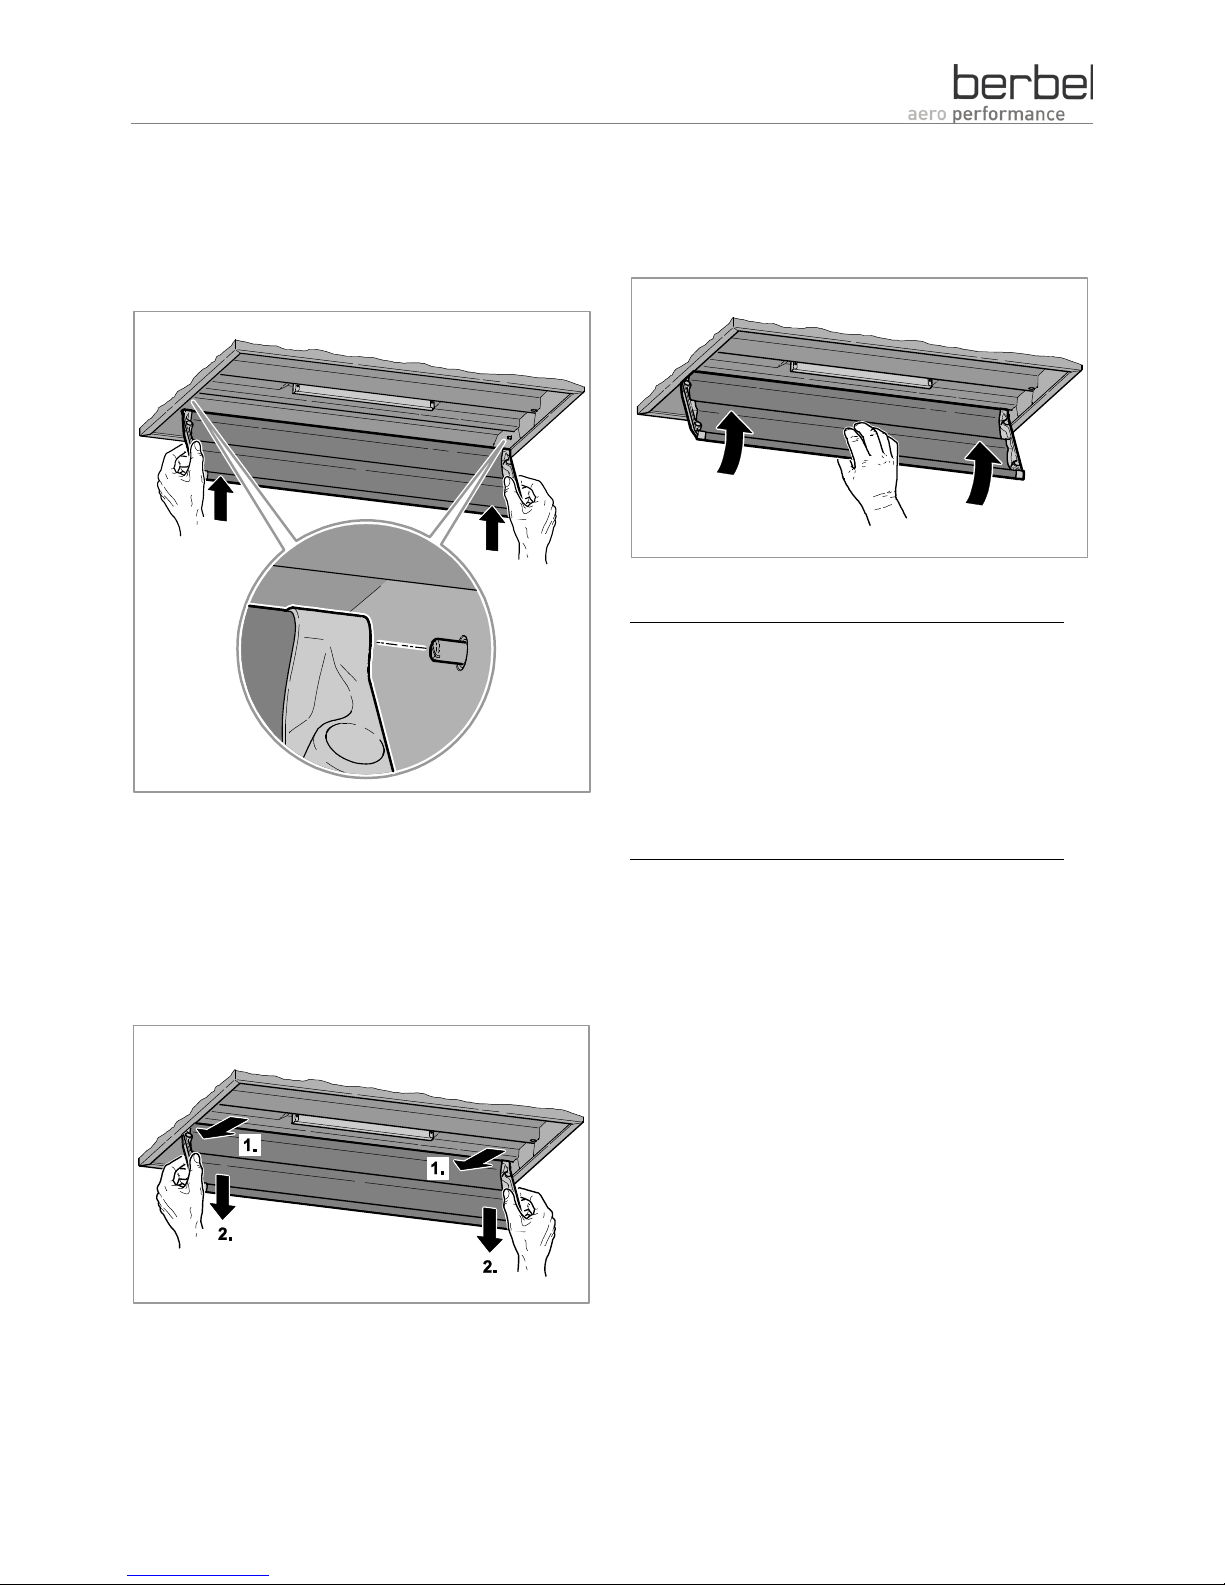
Reassemble the lower section.
Ø Grip the lower section with both hands.
Ø Insert the lower section into the device from below
until the guide grooves of the lower section are in
front of the device guide pins at the same time.
Ø Press the lower section rearwards into the device
(1.).
Ø Pull the lower section downwards (2.) until it clicks
into place.
Ø Make sure that the lower section is fitted correctly.
The lower section is fitted correctly when you can
move it easily.
Close the lower section.
Ø Close the lower section by pushing it upwards until
the two magnetic fasteners can be heard to click
together.
Cleaning the surfaces
ATTENTION
Damage to the surfaces from sharp
objects or abrasive cleaning agents.
Ø Never use sharp objects, abrasive or
aggressive cleaning agents.
Ø Use a soft, damp cloth.
Clean the surfaces with a soft, damp cloth and a mild
household cleaner.
 Loading...