


Table of Contents
Important safety instructions .............................................................................................. 2
Product information ............................................................................................................. 4
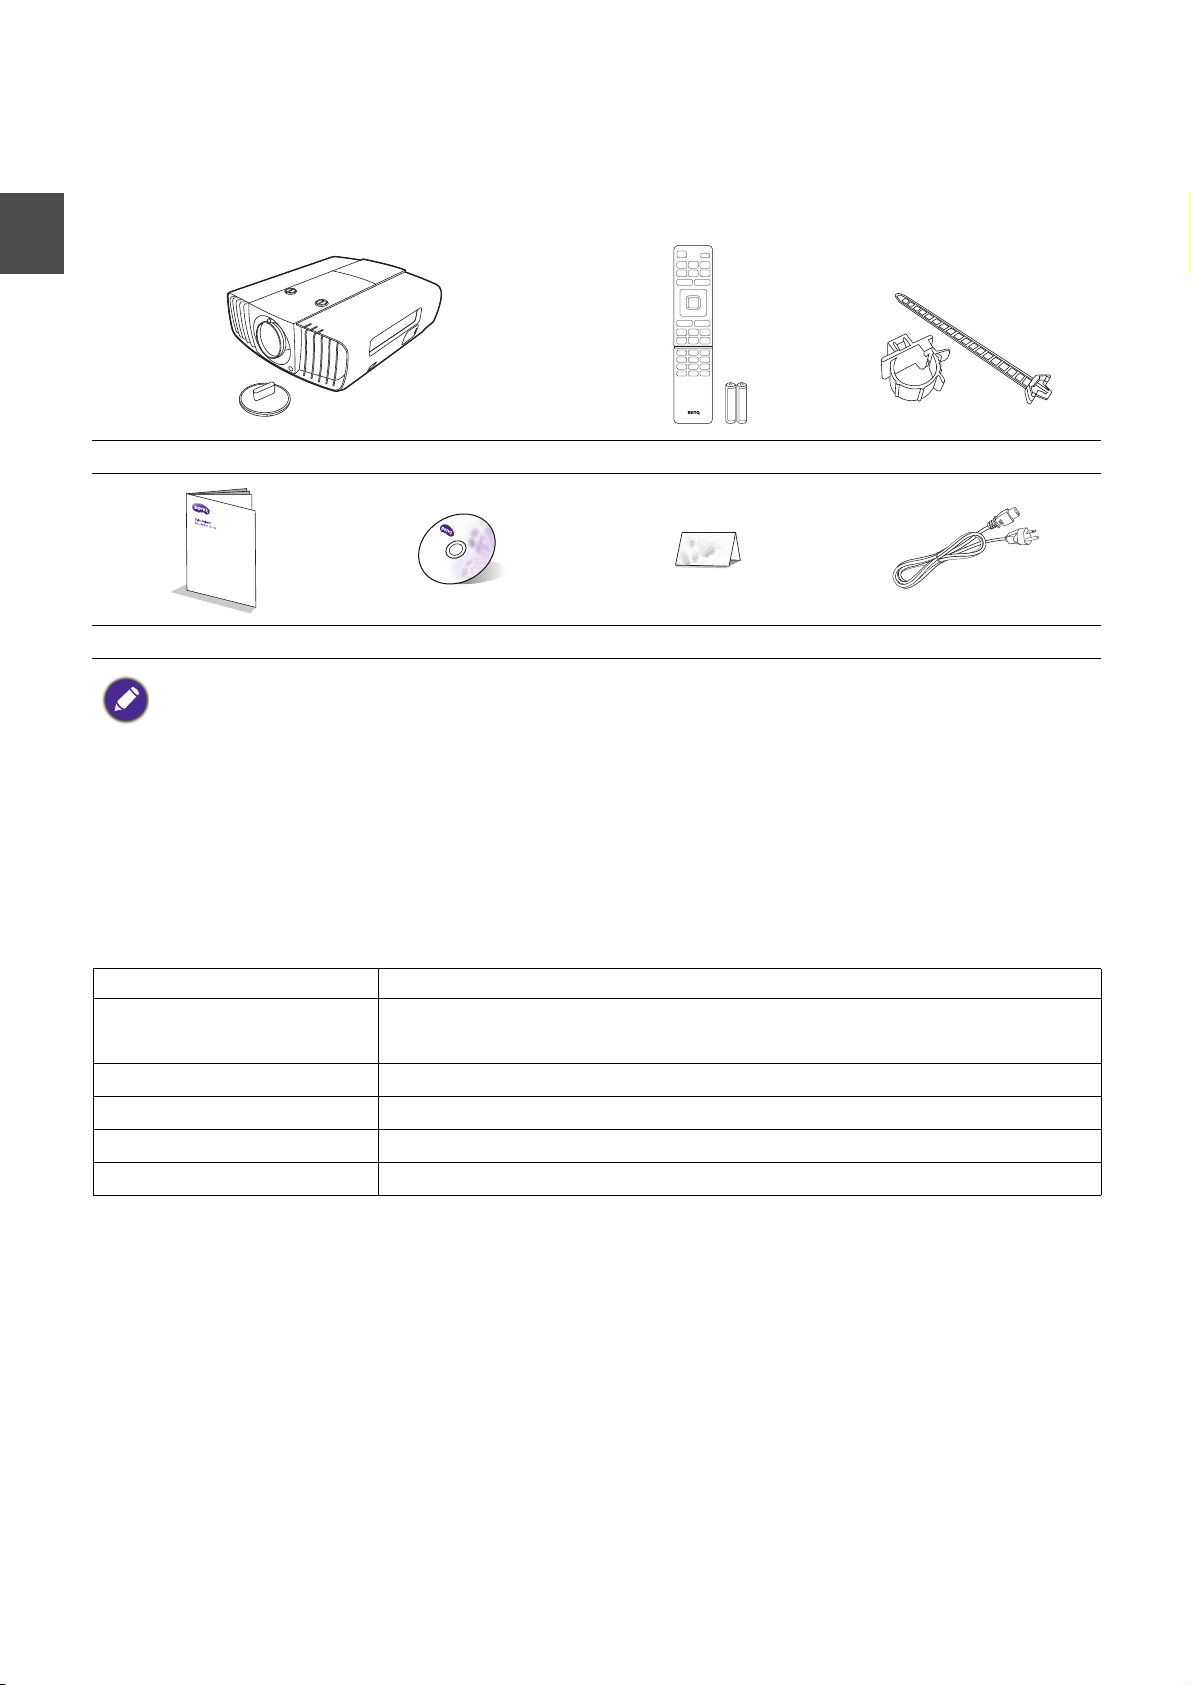
Shipping contents .......................................................................................................................................4
Specifications ............................................................................................................................................... 4
Projector dimensions ................................................................................................................................5
Terminals ...................................................................................................................................................... 5
Remote control........................................................................................................................................... 6
Installation ............................................................................................................................. 7
Projection dimensions ............................................................................................................................... 7
Shifting the projection lens....................................................................................................................... 8
Ceiling mount installation diagram ......................................................................................................... 9
Using the cable tie set ............................................................................................................................. 10
RS232 command ................................................................................................................. 11
RS232 pin assignment ..............................................................................................................................11
English
1

English
Important safety instructions
Your projector is designed and tested to meet the latest standards for safety of information technology
equipment. However, to ensure safe use of this product, it is important that you follow the instructions
mentioned in the user manual / installation guide and marked on the product.
1. Please read the user manual / installation guide before you operate your projector. Save
it for future reference.
2. Do not look straight at the projector lens during operation. The intense light beam may
damage your eyes.
3. Refer servicing to qualified service personnel.
4. Always open the lens shutter (if any) or remove the lens cap (if any) when the
projector light source is on.
5. The light source becomes extremely hot during operation.
6. In some countries, the line voltage is NOT stable. This projector is designed to operate safely
within a mains voltage between 100 to 240 volts AC, but could fail if power cuts or surges of ±10
volts occur. In areas where the mains voltage may fluctuate or cut out, it is
recommended that you connect your projector through a power stabilizer, surge
protector or uninterruptible power supply (UPS).
7. Do not block the projection lens with any objects when the projector is under operation as this
could cause the objects to become heated and deformed or even cause a fire. To temporarily turn
off the light source, use the blank function.
8. Do not operate light sources beyond the rated light source life.
9. Never replace the lamp assembly or any electronic components unless the projector is unplugged.
10. Do not place this product on an unstable cart, stand, or table. The product may fall, sustaining
serious damage.
11. Do not attempt to disassemble this projector. There are dangerous high voltages inside which may
cause death if you should come into contact with live parts.
Under no circumstances should you ever undo or remove any other covers. Refer servicing only to
suitably qualified professional service personnel.
12. Do not block the ventilation holes.
- Do not place this projector on a blanket, bedding or any other soft surface.
- Do not cover this projector with a cloth or any other item.
- Do not place inflammables near the projector.
If the ventilation holes are seriously obstructed, overheating inside the projector may result in a fire.
13. Always place the projector on a level, horizontal surface during operation.
- Do not use if tilted at an angle of more than 10 degrees left to right, nor at angle of more than 15 degrees front to
back. Using the projector when it is not fully horizontal may cause a malfunction of, or damage to, the lamp.
14. Do not stand the projector on end vertically. Doing so may cause the projector to fall over, causing
injury or resulting in damage to the projector.
15. Do not step on the projector or place any objects upon it. Besides probable physical damage to the
projector, doing so may result in accidents and possible injury.
16. When the projector is under operation, you may sense some heated air and odor from its
ventilation grill. It is a normal phenomenon and not a product defect.
2
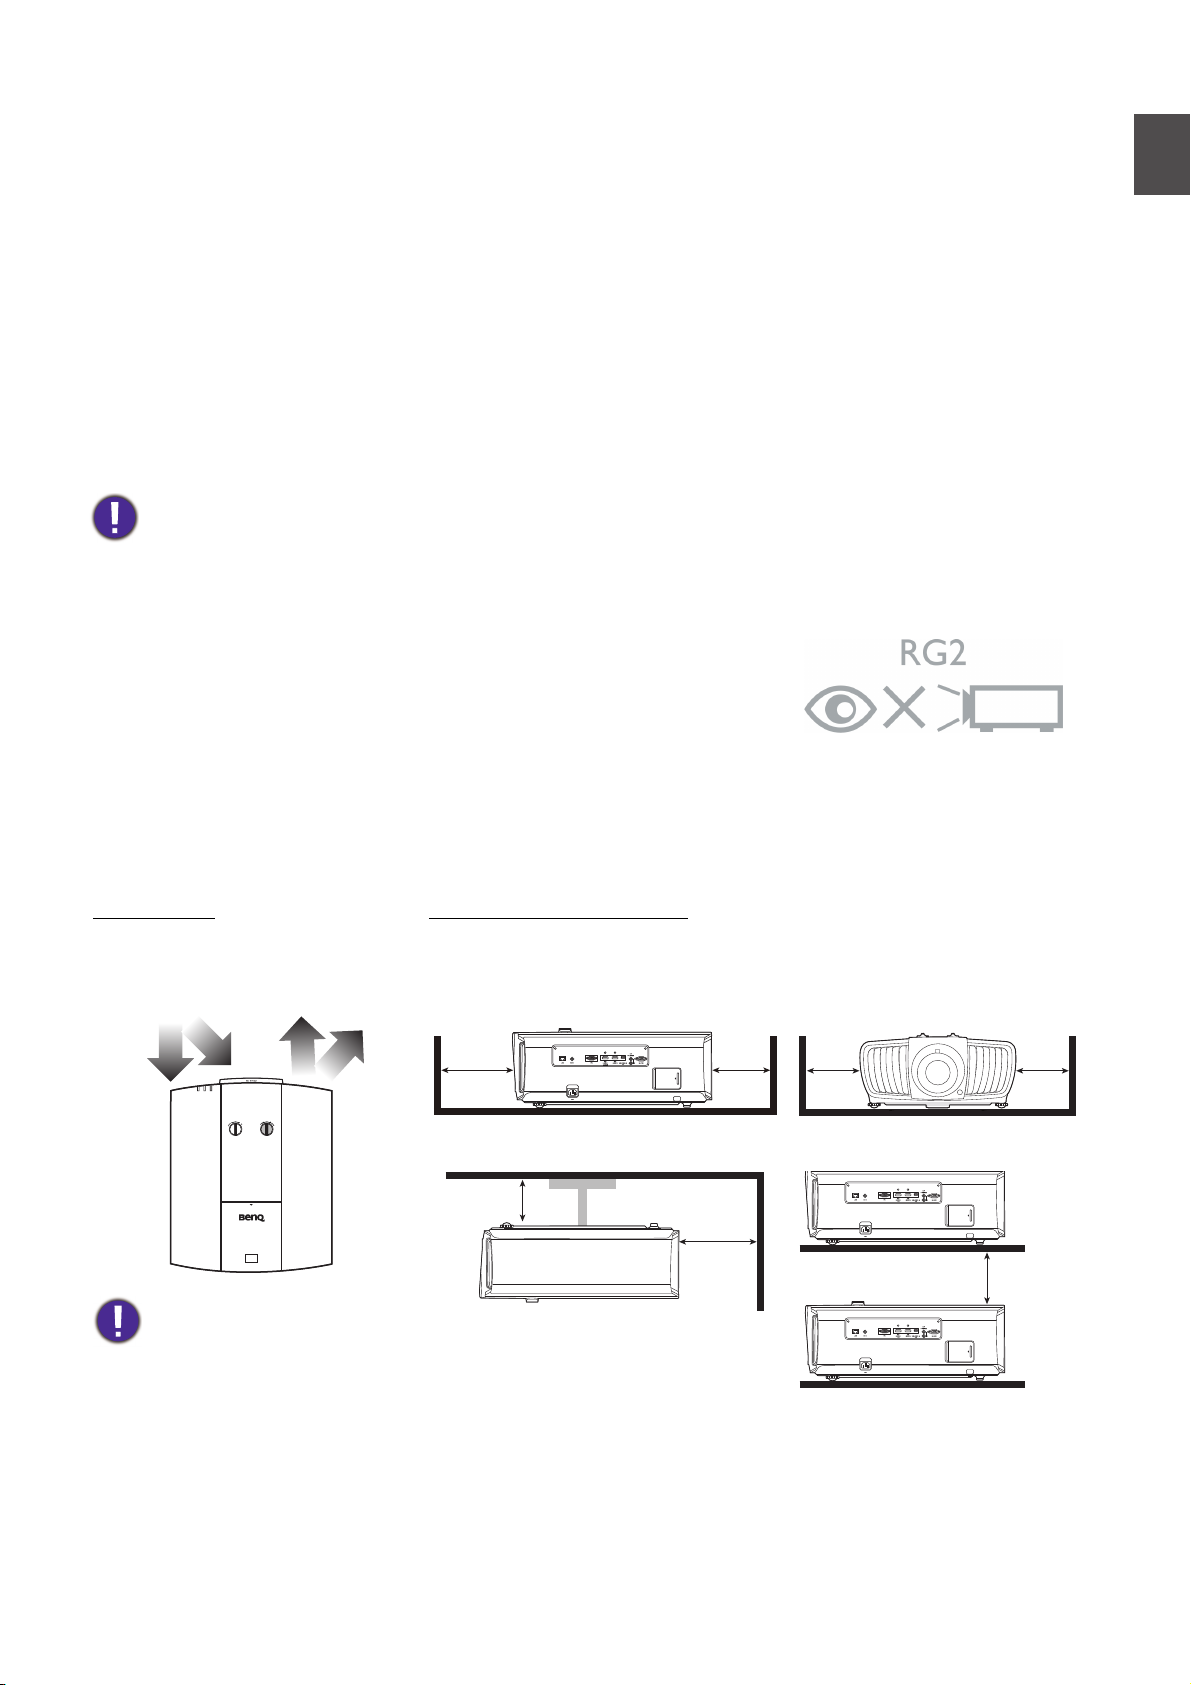
17. Do not place liquids near or on the projector. Liquids spilled into the projector may cause it to fail.
Air inlet Air outlet
50 cm
above
70 cm
above
50 cm
above
50 cm
above
30 cm
above
50 cm
above
Minimum 100 mm
If the projector does become wet, disconnect it from the power supply's power outlet and call
BenQ to have the projector serviced.
18. This product is capable of displaying inverted images for ceiling mount installation.
19. This apparatus must be earthed.
20. Do not place this projector in any of the following environments.
- Space that is poorly ventilated or confined. Allow at least 50 cm clearance from walls and free flow of air around the
projector.
- Locations where temperatures may become excessively high, such as the inside of a car with all windows rolled up.
- Locations where excessive humidity, dust, or cigarette smoke may contaminate optical components, shorten the
projector's life span and darken the image.
- Locations near fire alarms
- Locations with an ambient temperature above 40°C / 104°F
- Locations where the altitudes are higher than 3000 m (10000 feet).
Hg - Lamp contains mercury. Manage in accordance with local disposal laws. See www.lamprecycle.org.
Risk Group 2
1. According to the classification of photobiological safety of light
sources and light source systems, this product is Risk Group 2,
IEC 62471-5:2015.
English
2. Possibly hazardous optical radiation emitted from this product.
3. Do not stare at operating light source. May be harmful to the
eyes.
4. As with any bright source, do not stare into the direct beam.
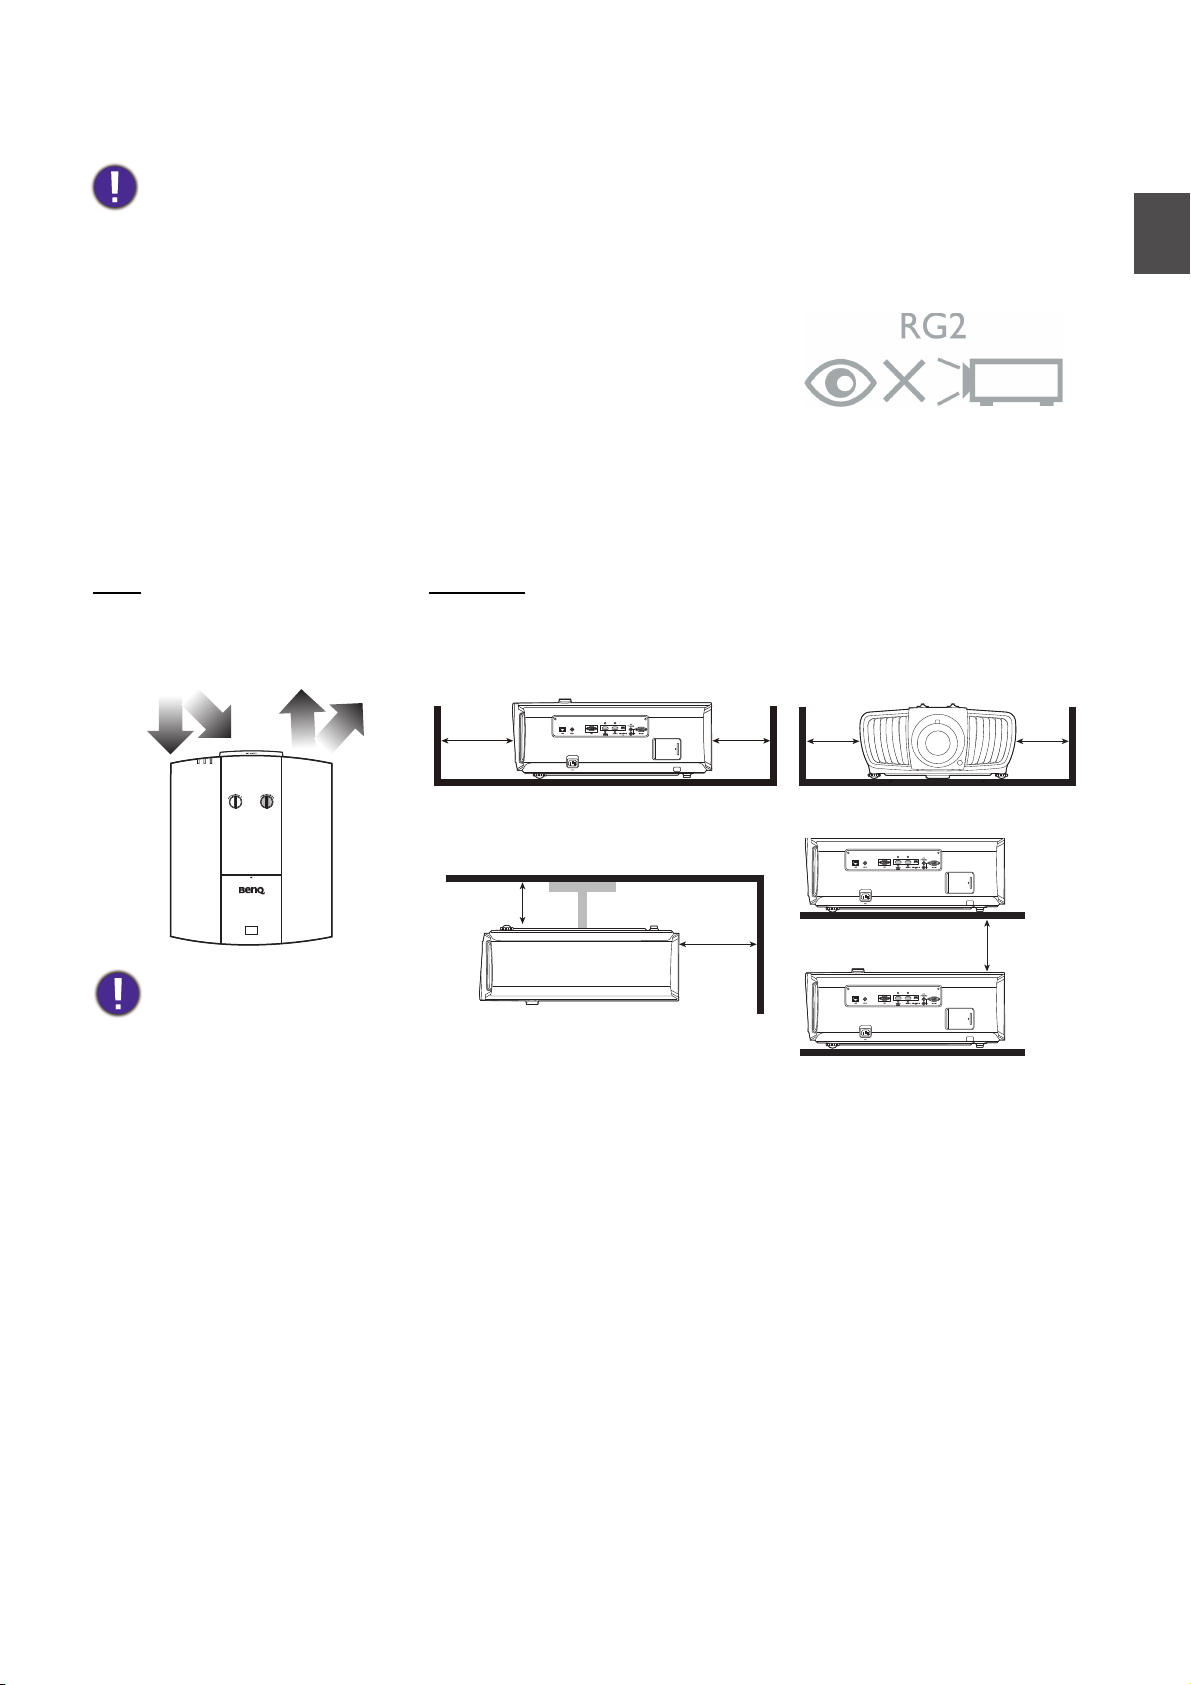
Cooling notice
Ventilation Caution for installation
For proper ventilation of the projector, make sure to leave some
space around the projector as shown in the illustration below:
• Table • Table
TEMP
POWER
LAMP
• Ceiling • Stacking
Avoid using the projector in a
poorly ventilated or confined
space.
3
English
Product information
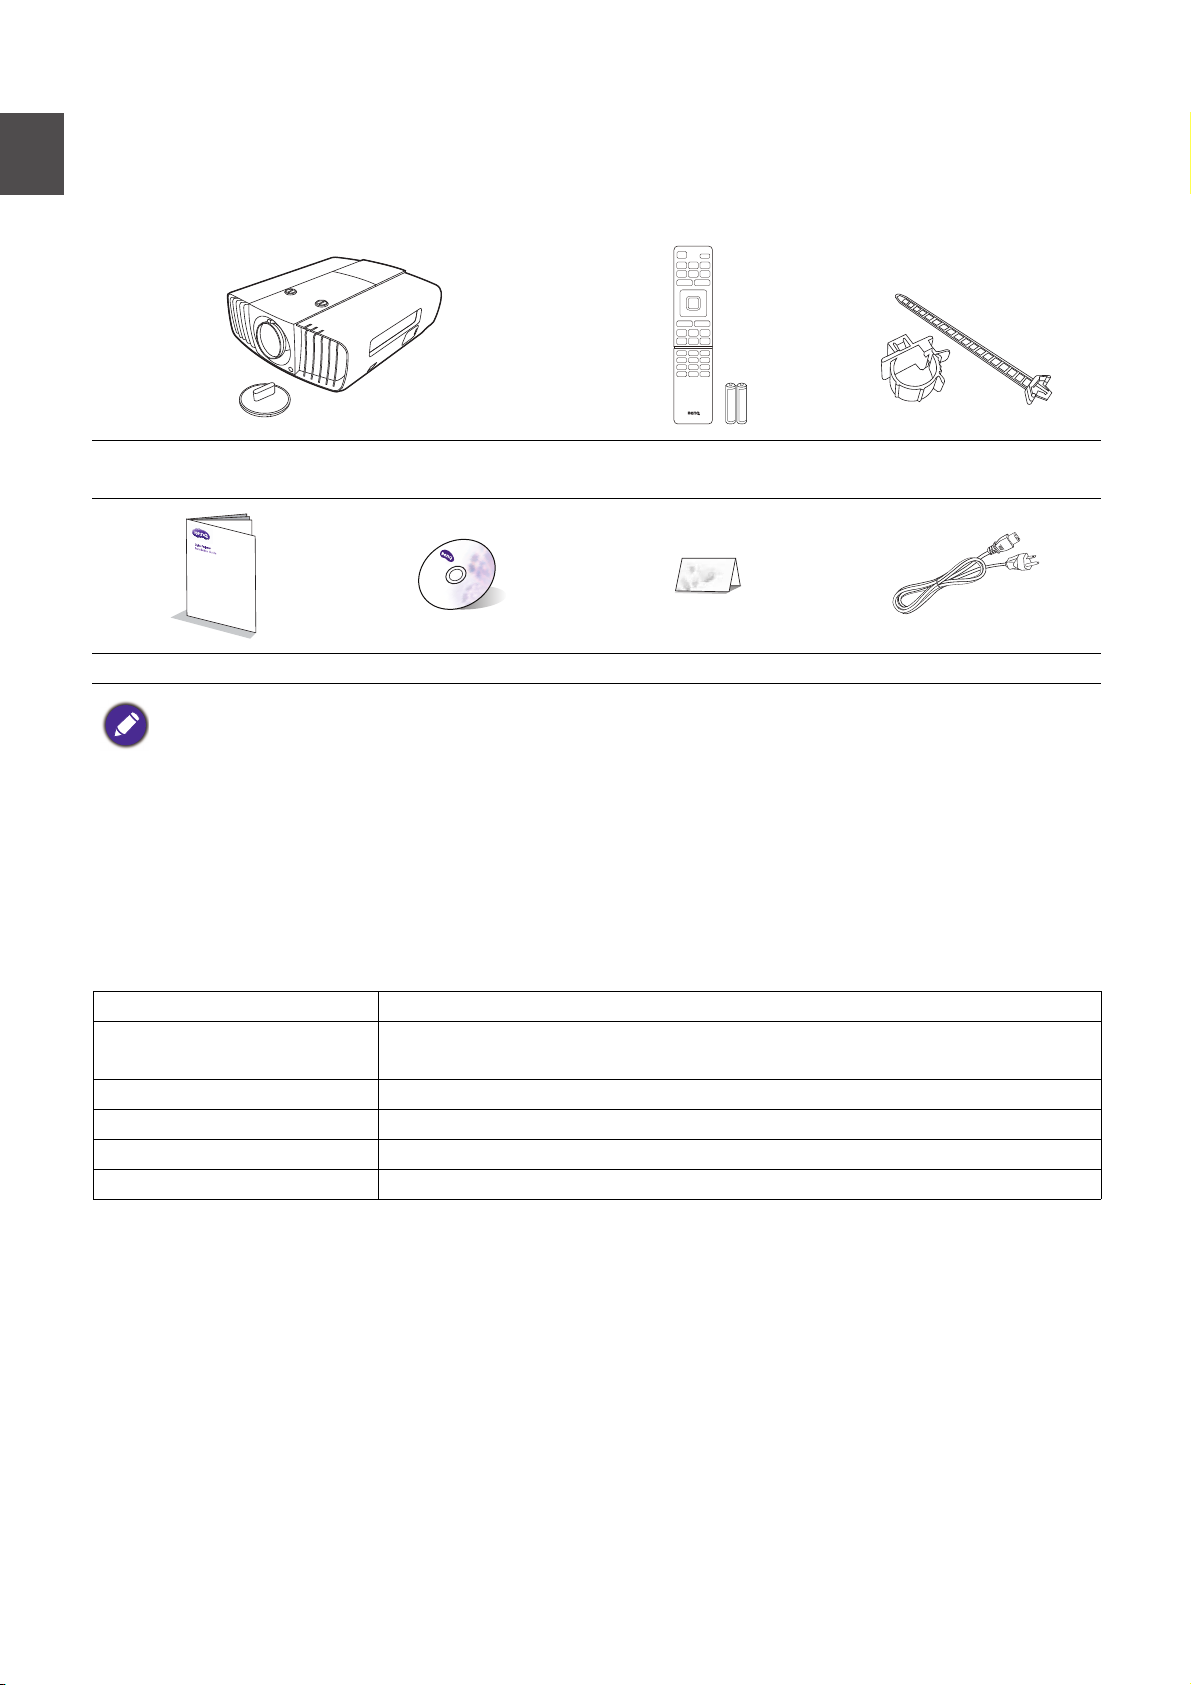
Shipping contents
Projector
Installation guide User manual CD Warranty card* Power cord
• The supplied accessories will be suitable for your region, and may differ from those illustrated.
• *The warranty card is only supplied in some specific regions. Please consult your dealer for detailed information.
Remote control with
batteries
Cable tie set x 3
Optional accessories
1. Spare lamp kit
2. Ceiling mount kit
3. RS232 cable
4. Anamorphic lens
5. BenQ DGD5 3D Glasses
Specifications
Display system 1-CHIP DMD
Resolution 3840 x 2160 with XPR
2716 x 1528 without XPR
Light source 240 W lamp
Brightness 2200 Lumens
Power consumption 384 W (Max); < 0.5 W (Standby)
Weight 14.8 Kg (32.6 lbs)
4
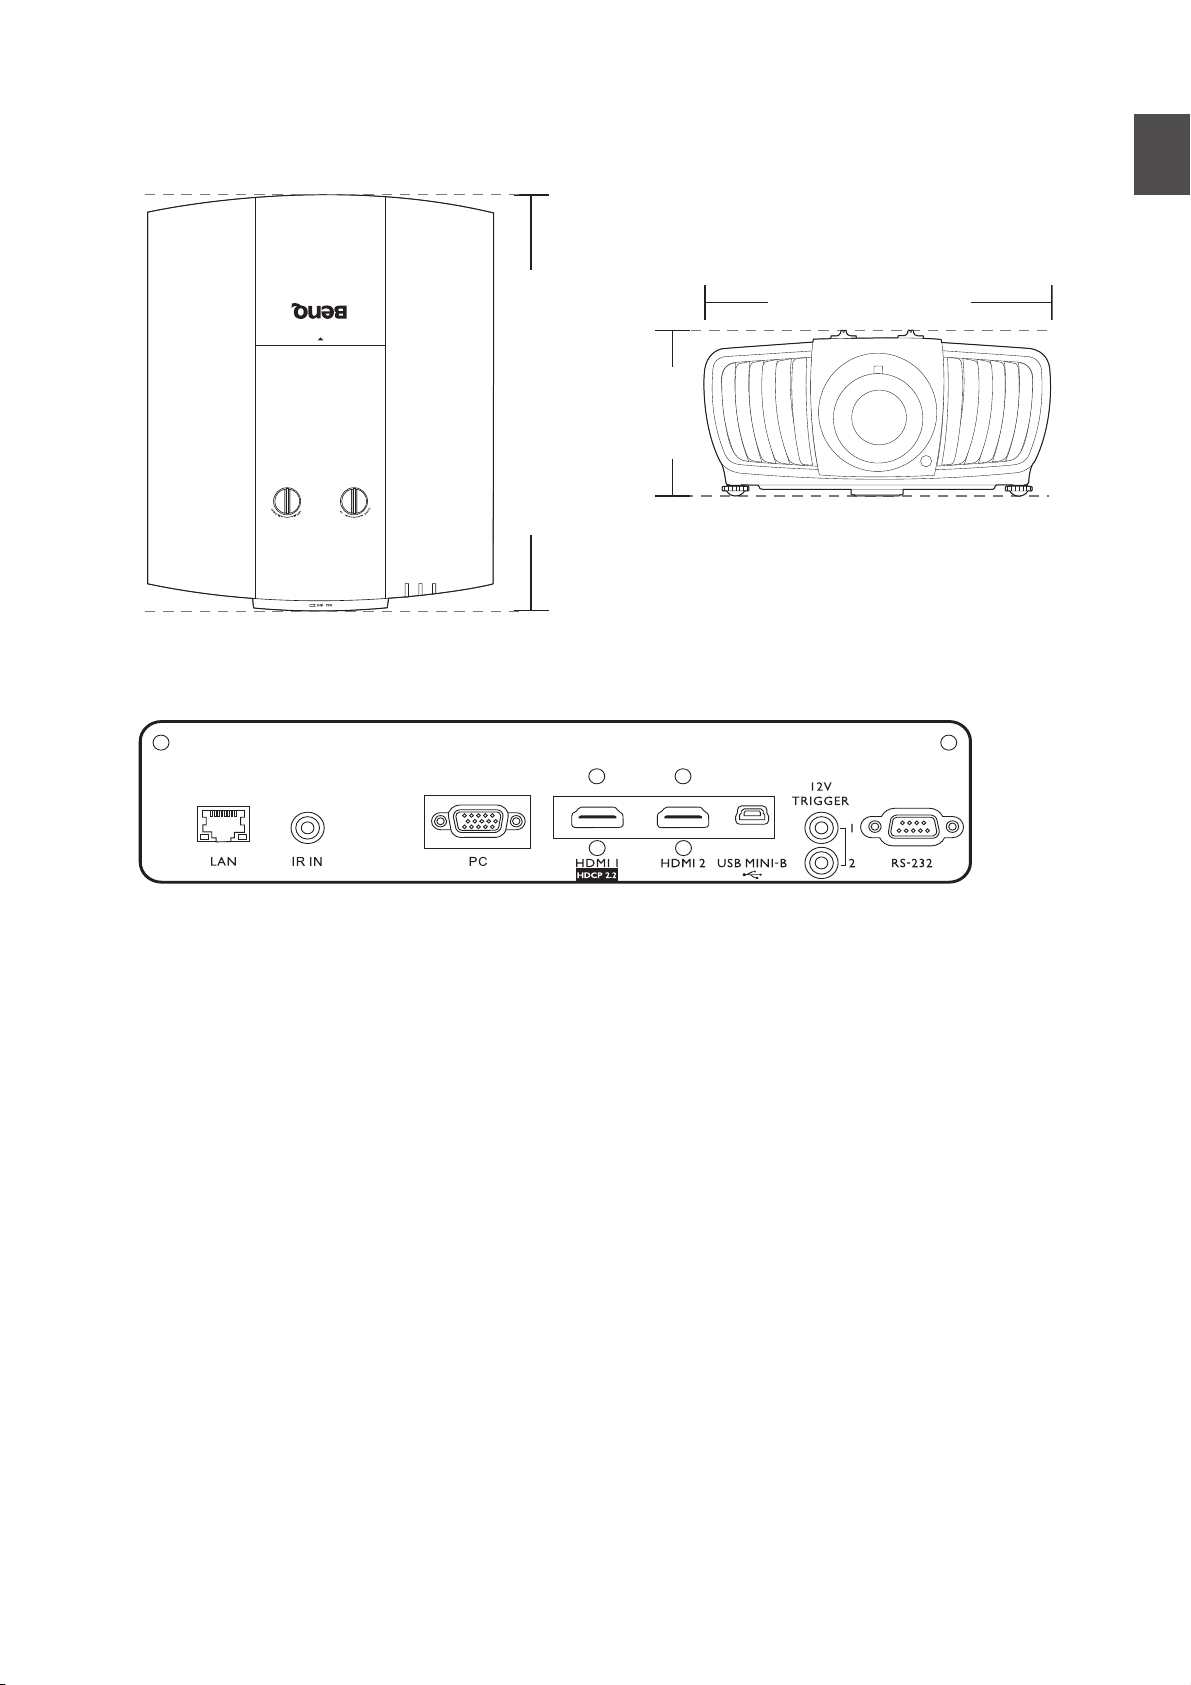
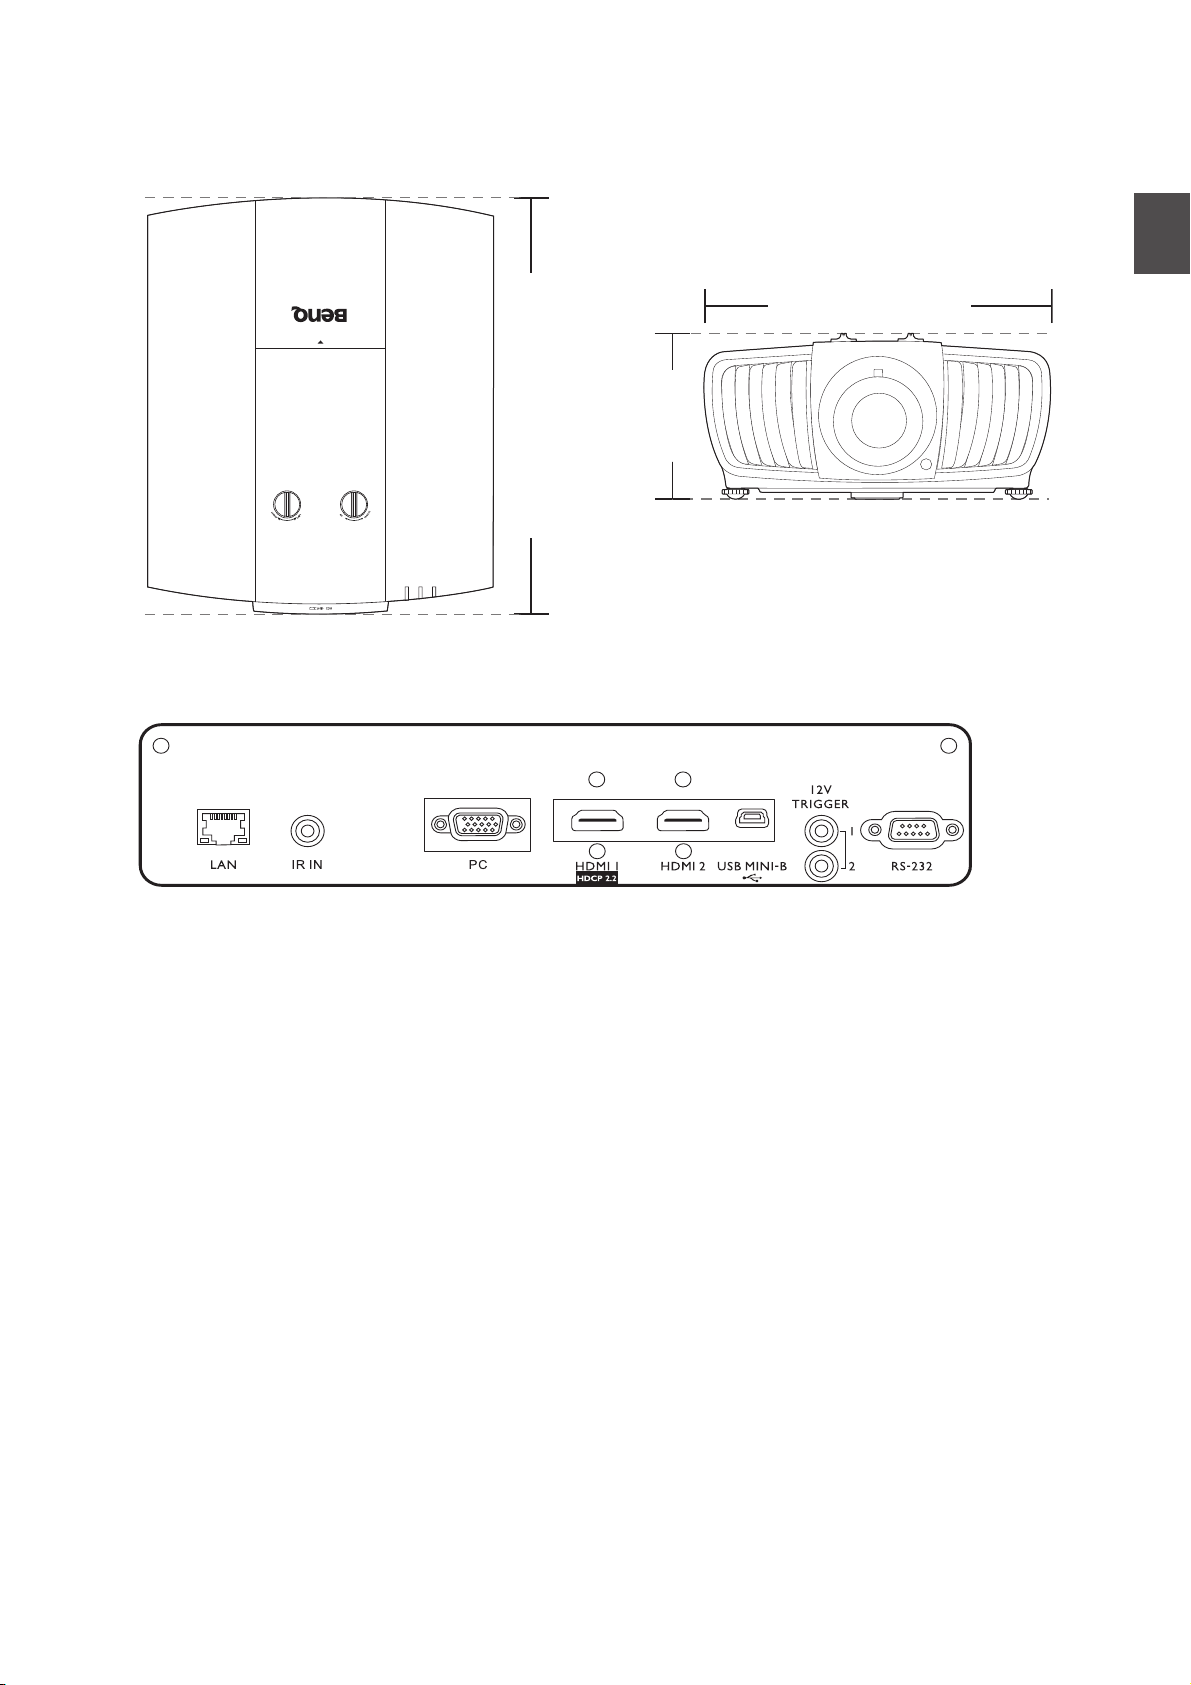
Projector dimensions
POWER
TEMP
LAMP
470.7
564.7 224.9
Unit: mm
470.7 mm (W) x 224.9 mm (H) x 564.7 mm (D)
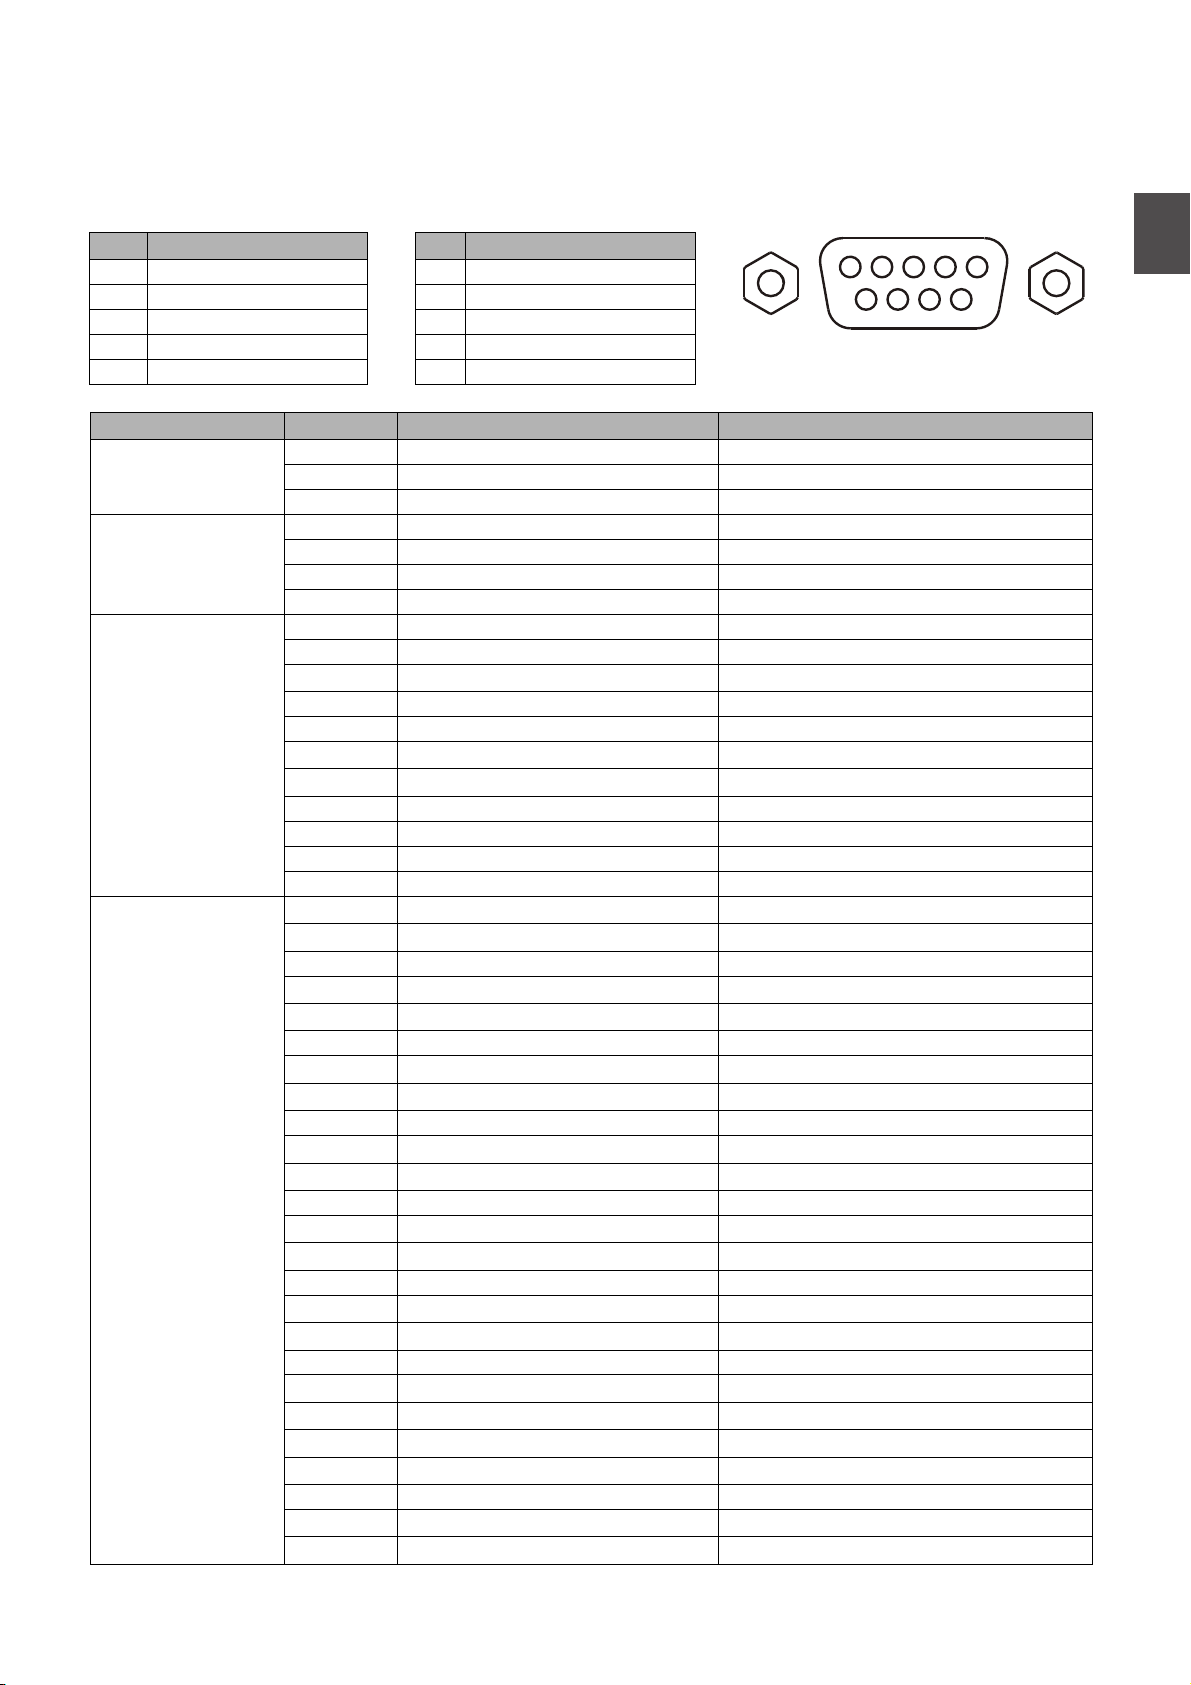
Te r m i n a l s
English
• LAN (10/100M)
For connection to a RJ45 Cat5/Cat6
Ethernet cable to control the projector
through a network.
• IR IN
For use with an IR extender cable to
ensure better signal reception from the
remote control.
• PC
15-pin VGA port for connection to a RGB
source or PC.
• HDMI 1 (Version 2.0) and its cable tie hole
Connection to an HDMI (4K) source.
Connection to a cable tile set.
• HDMI 2 (Version 1.4a) and its cable tie hole
Connection to an HDMI source.
Connection to a cable tile set.
• USB MINI-B
For firmware upgrade only.
• 12V TRIGGER 1/2
Triggers external devices such as an electric screen
or light control, etc.
• RS232
Standard 9-pin D-sub interface for connection to a
PC control system and projector maintenance.
5
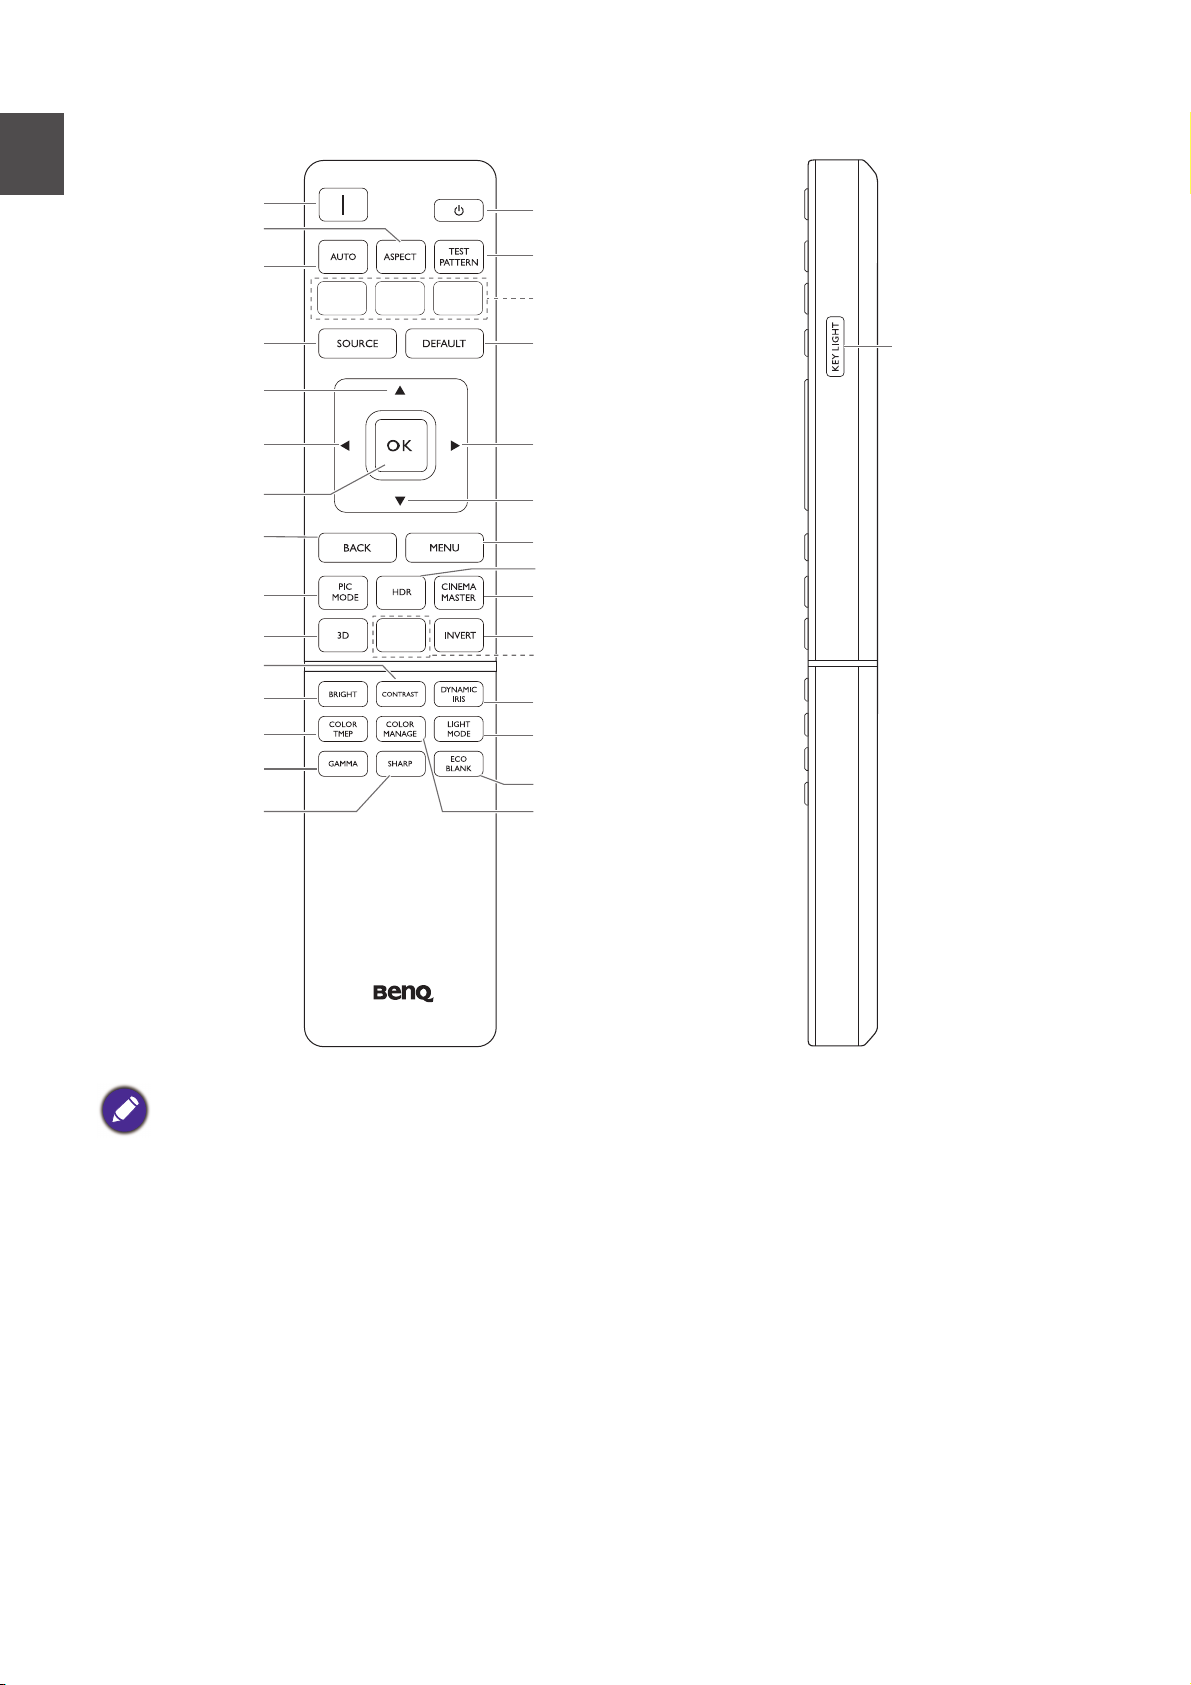
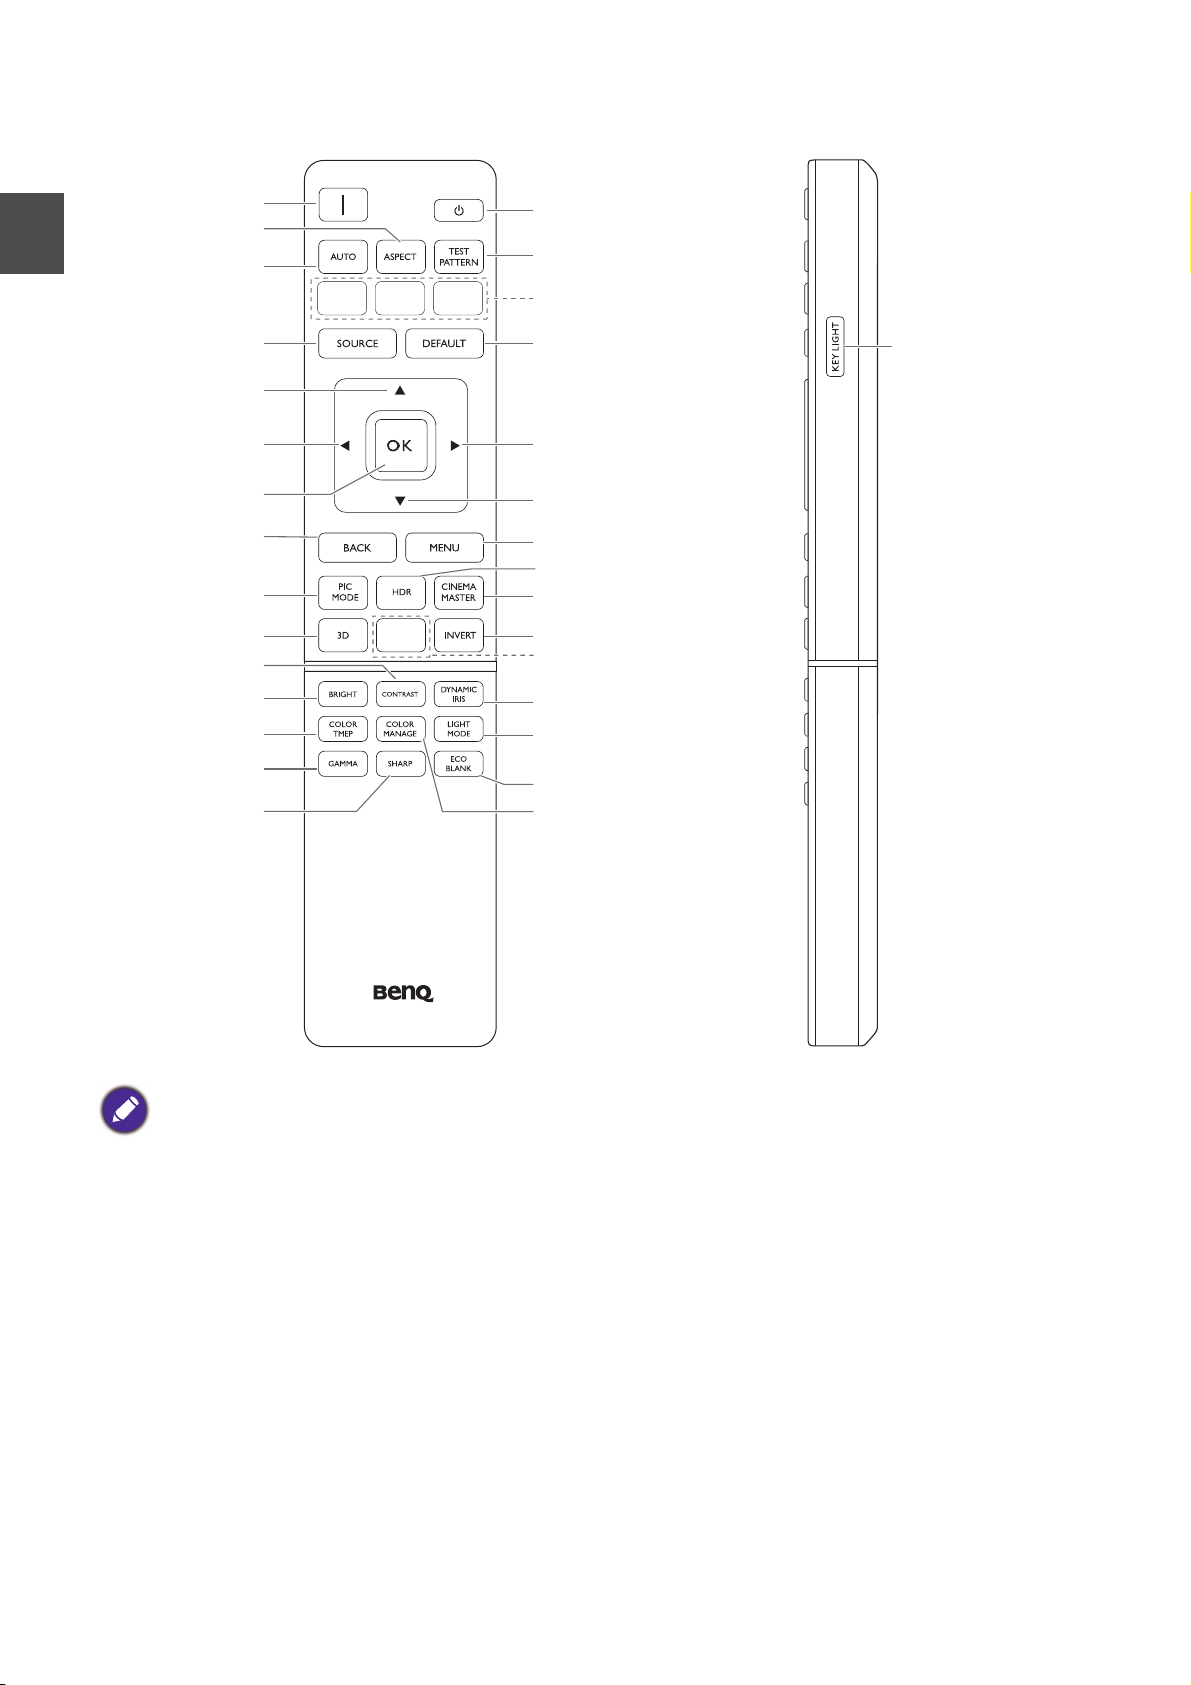
English
On
Off
AUTO
ASPECT
SOURCE
Up
Left
OK
BACK
3D
CONTRAST
PIC MODE
COLOR TEMP
GAMMA
SHARP
TEST PATTERN
DEFAULT
Right
Down
MENU
CINEMAMASTER
INVERT
DYNAMIC IRIS
LIGHT MODE
COLOR MANAGE
ECO BLANK
KEY LIGHT
No function*
HDR
BRIGHT
No function*
Remote control
* This button is not available for this model.
6
Installation
LAN
PC
RS232
12V
TRIGGHER
IR IN
1
2
HDMI 2-USB MINIB
HDMI 1
HDCP 2.2
H
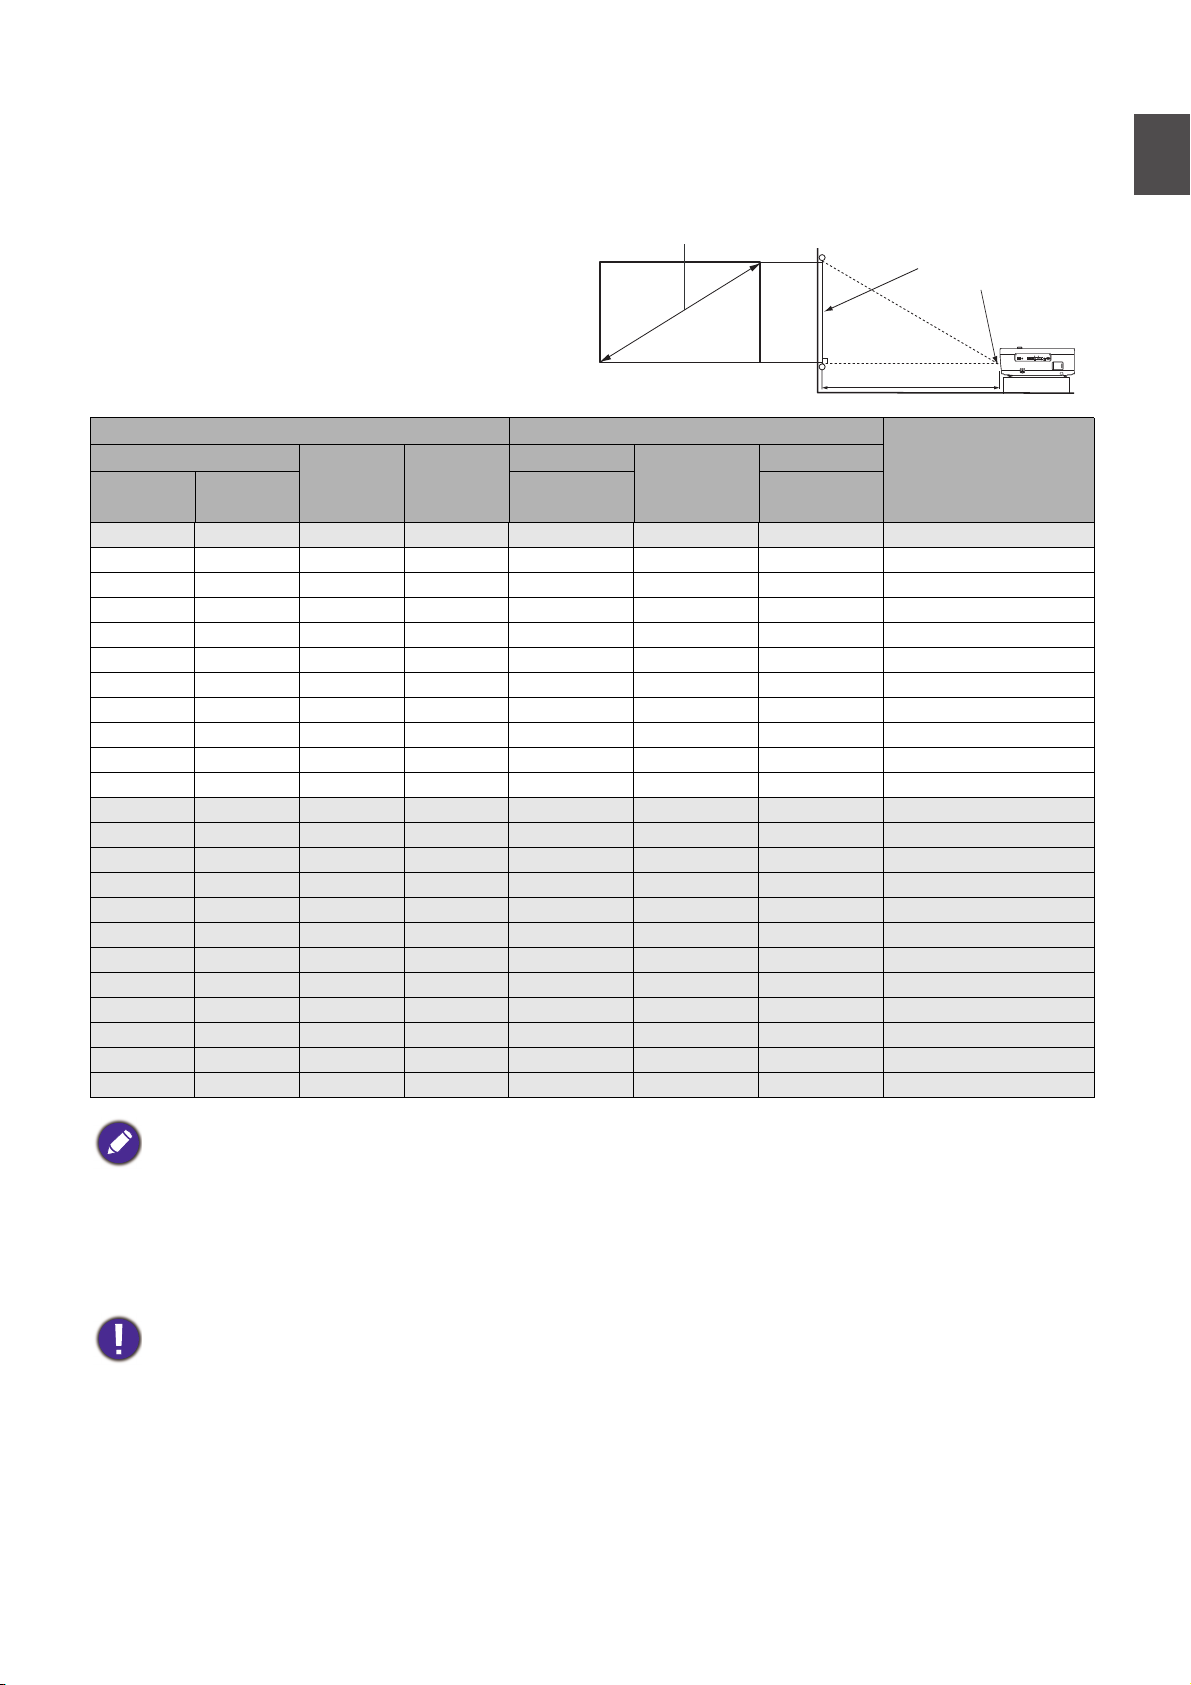
W
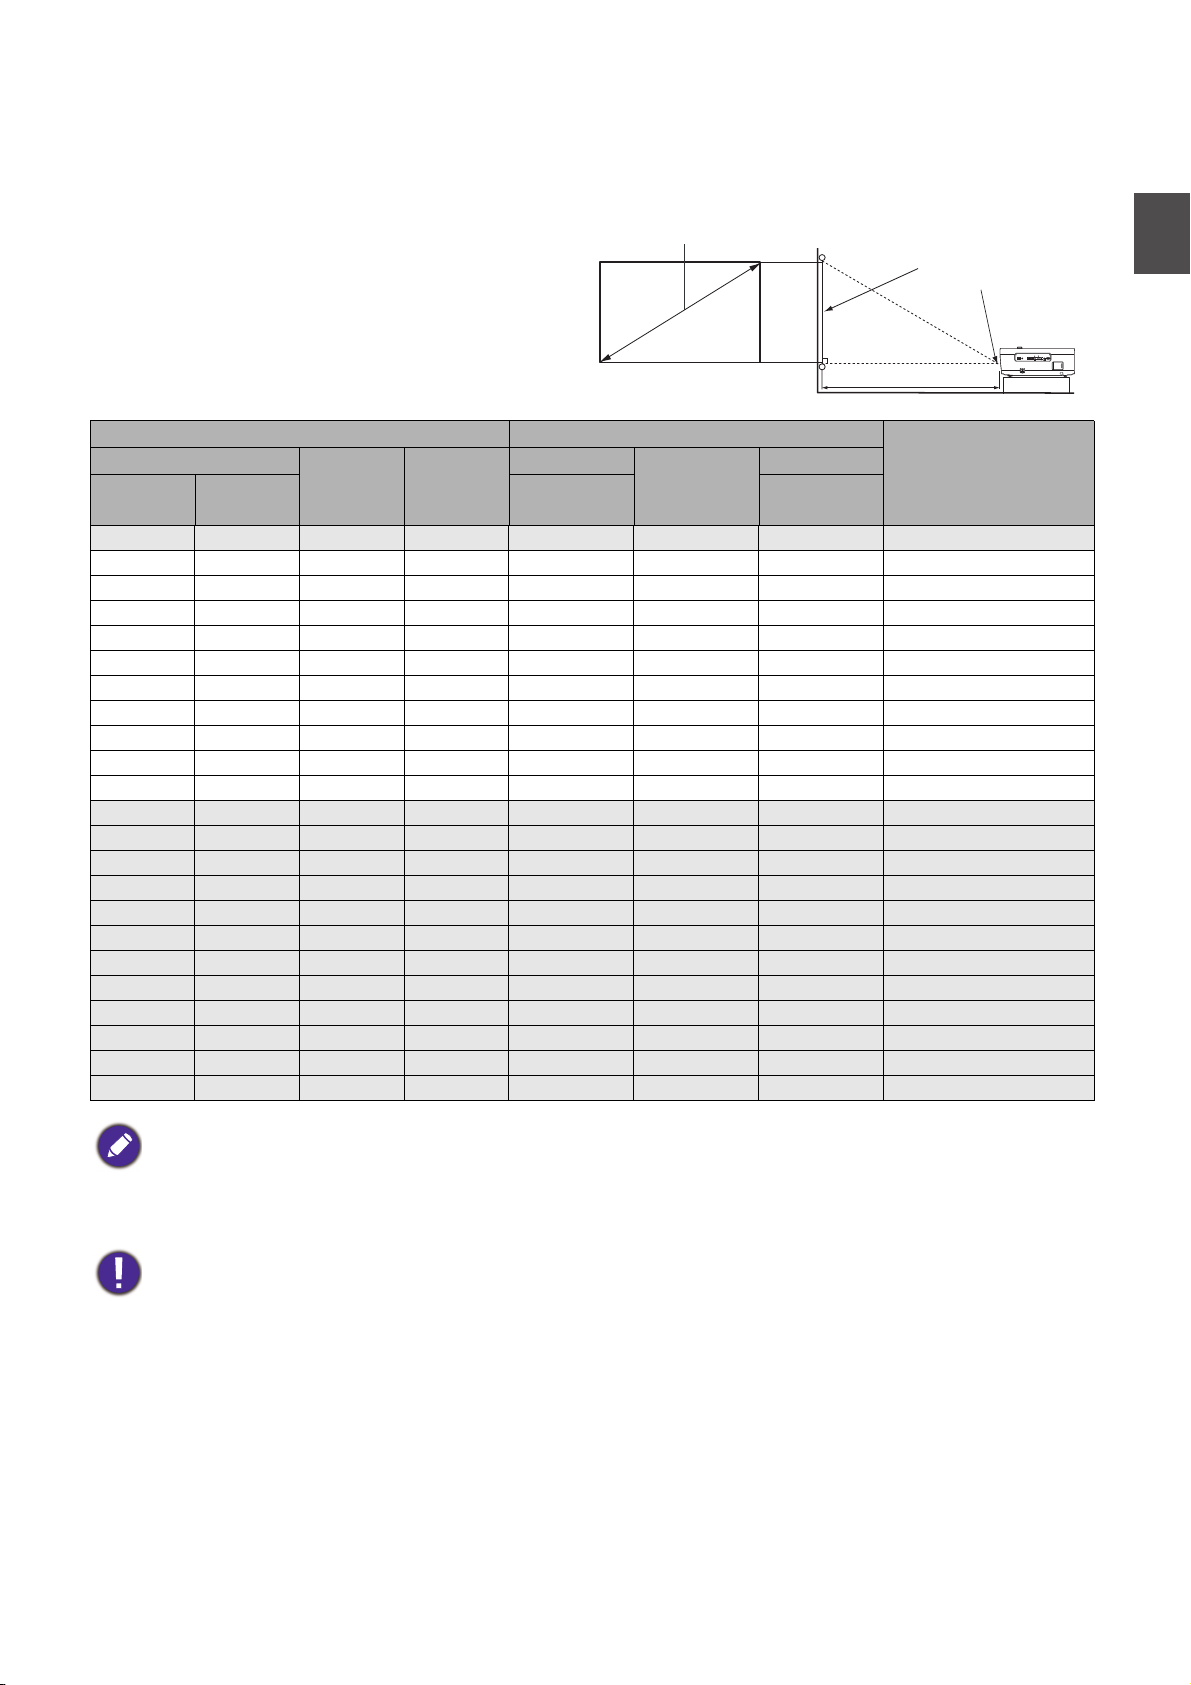
Projection distance
Center of lens
Screen
16:9 Screen diagonal
Projection dimensions
• The screen aspect ratio is 16:9 and the
projected picture is in a 16:9 aspect ratio
Screen size Distance from screen (mm)
Diagonal
Inch mm
80 2032 1771 996 2400 3000 3600 149
90 2286 1992 1121 2700 3375 4050 168
100 2540 2214 1245 3000 3750 4500 187
110 2794 2435 1370 3300 4125 4950 205
120 3048 2657 1494 3600 4500 5400 224
130 3302 2878 1619 3900 4875 5850 243
140 3556 3099 1743 4200 5250 6300 262
150 3810 3321 1868 4500 5625 6750 280
160 4064 3542 1992 4800 6000 7200 299
170 4318 3763 2117 5100 6375 7650 318
180 4572 3985 2241 5400 6750 8100 336
190 4826 4206 2366 5700 7125 8550 355
200 5080 4428 2491 6000 7500 9000 374
210 5334 4649 2615 6300 7875 9450 392
220 5588 4870 2740 6600 8250 9900 411
230 5842 5092 2864 6900 8625 10350 430
240 6096 5313 2989 7200 9000 10800 448
250 6350 5535 3113 7500 9375 11250 467
260 6604 5756 3238 7800 9750 11700 486
270 6858 5977 3362 8100 10125 12150 504
280 7112 6199 3487 8400 10500 12600 523
290 7366 6420 3611 8700 10875 13050 542
300 7620 6641 3736 9000 11250 13500 560
W (mm) H (mm)
Min length
(max.
zoom)
Average
Max length
(min.
zoom)
Highest lens position
English
Lowest/
(mm)
• To optimize your projection quality, we suggest doing the projection by following the values in the non-gray cells.
The values in the gray cells are for reference only.
• All measurements are approximate and may vary from the actual sizes.
BenQ recommends that if you intend to permanently install the projector, you should physically test the
projection size and distance using the actual projector in situ before you permanently install it, so as to make
allowance for this projector's optical characteristics. This will help you determine the exact mounting position so
that it best suits your installation location.
• Ceiling installation must be done by a qualified professional. Contact your dealer for more information. It is not
recommended you install the projector yourself.
• Only use the projector on a solid, level surface. Serious injury and damage can occur if the projector is dropped.
• Do not use the projector in an environment where extreme temperature occurs. The projector must be used at
temperatures between 32 degrees Fahrenheit (0 degrees Celsius) and 104 degrees Fahrenheit (40 degrees
Celsius).
• Screen damage will occur if the projector is exposed to moisture, dust or smoke.
• Do not cover the vents on the projector. Proper ventilation is required to dissipate heat. Damage to the projector
will occur if the vents are covered.
7
English
POWER
TEMP
LAMP
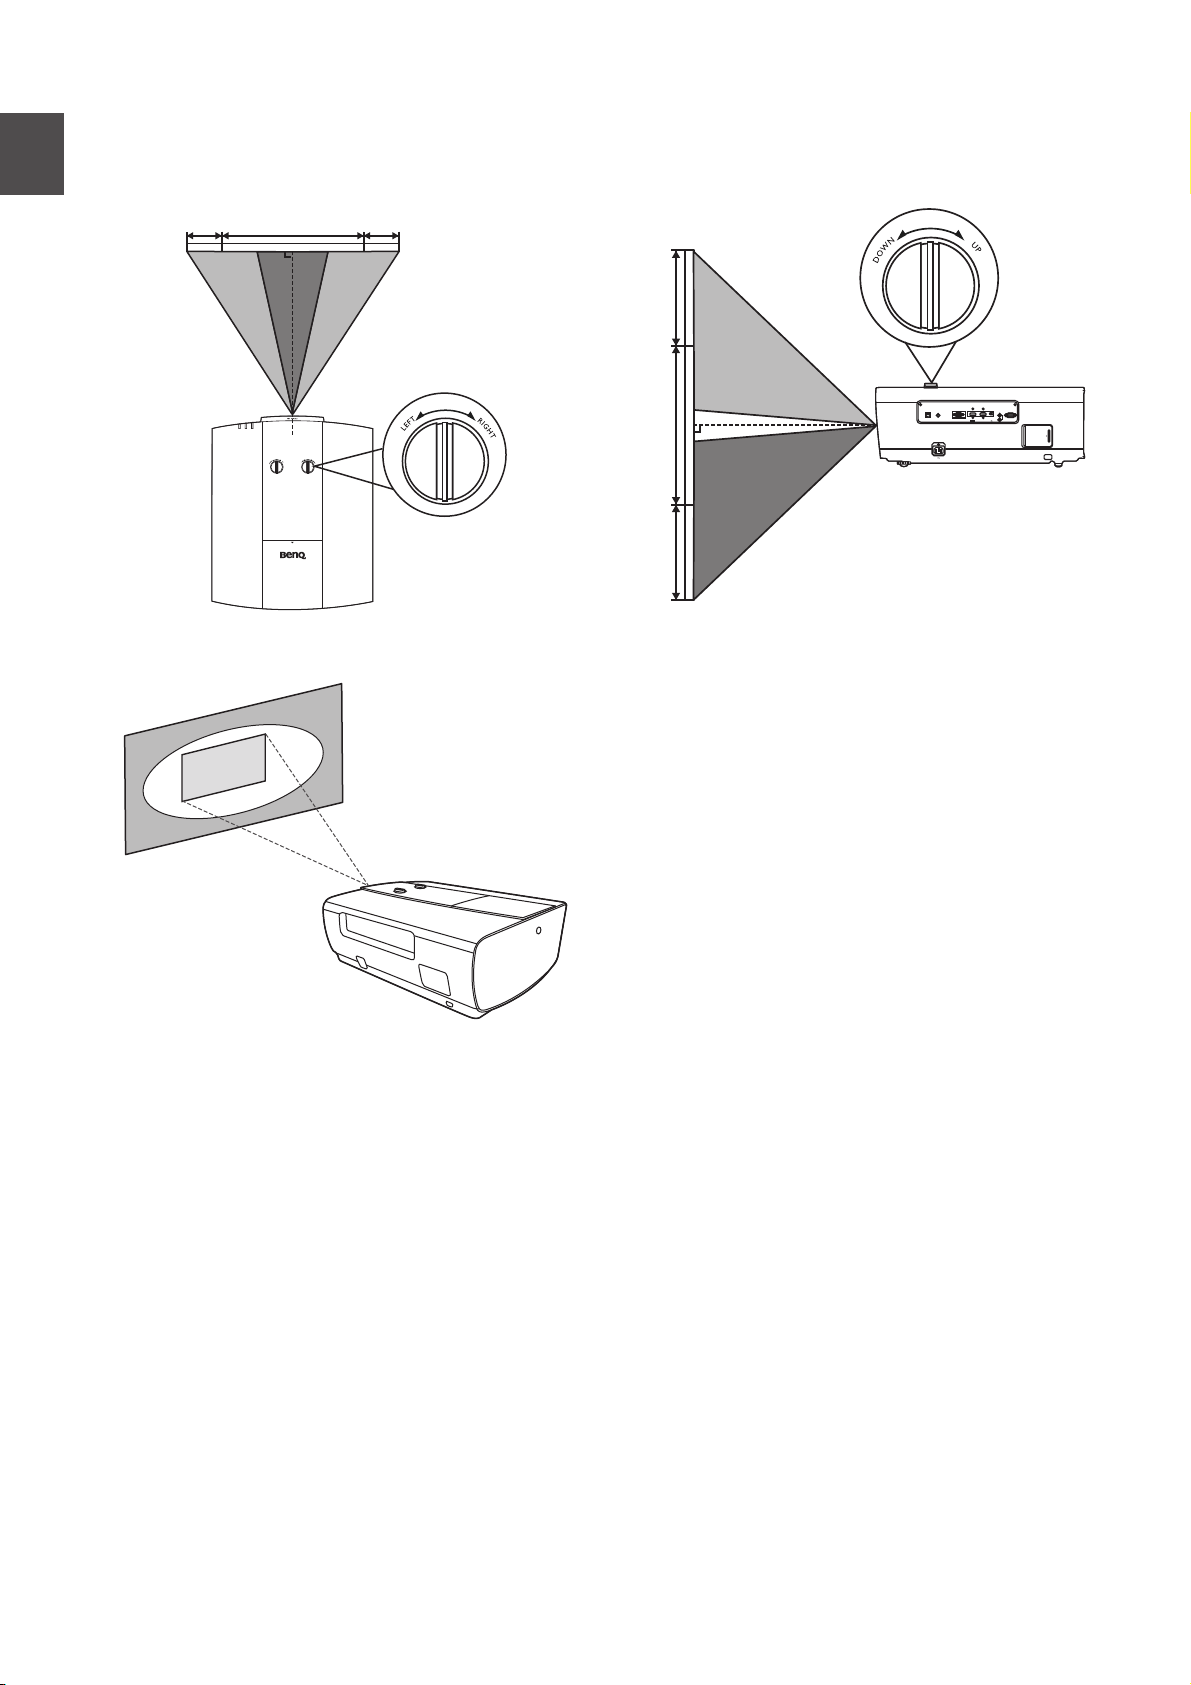
27%27%
1 screen width
LAN
PC
-
RS232
12V
TRIGGHER
IR IN
1
2
HDMI 2-USB MINIB
HDMI 1
HDCP 2.2
65%
65%
1
s
c
r
e
e
n
h
e
i
gh
t
Shifting the projection lens
The horizontal position The vertical position
The projection range
8
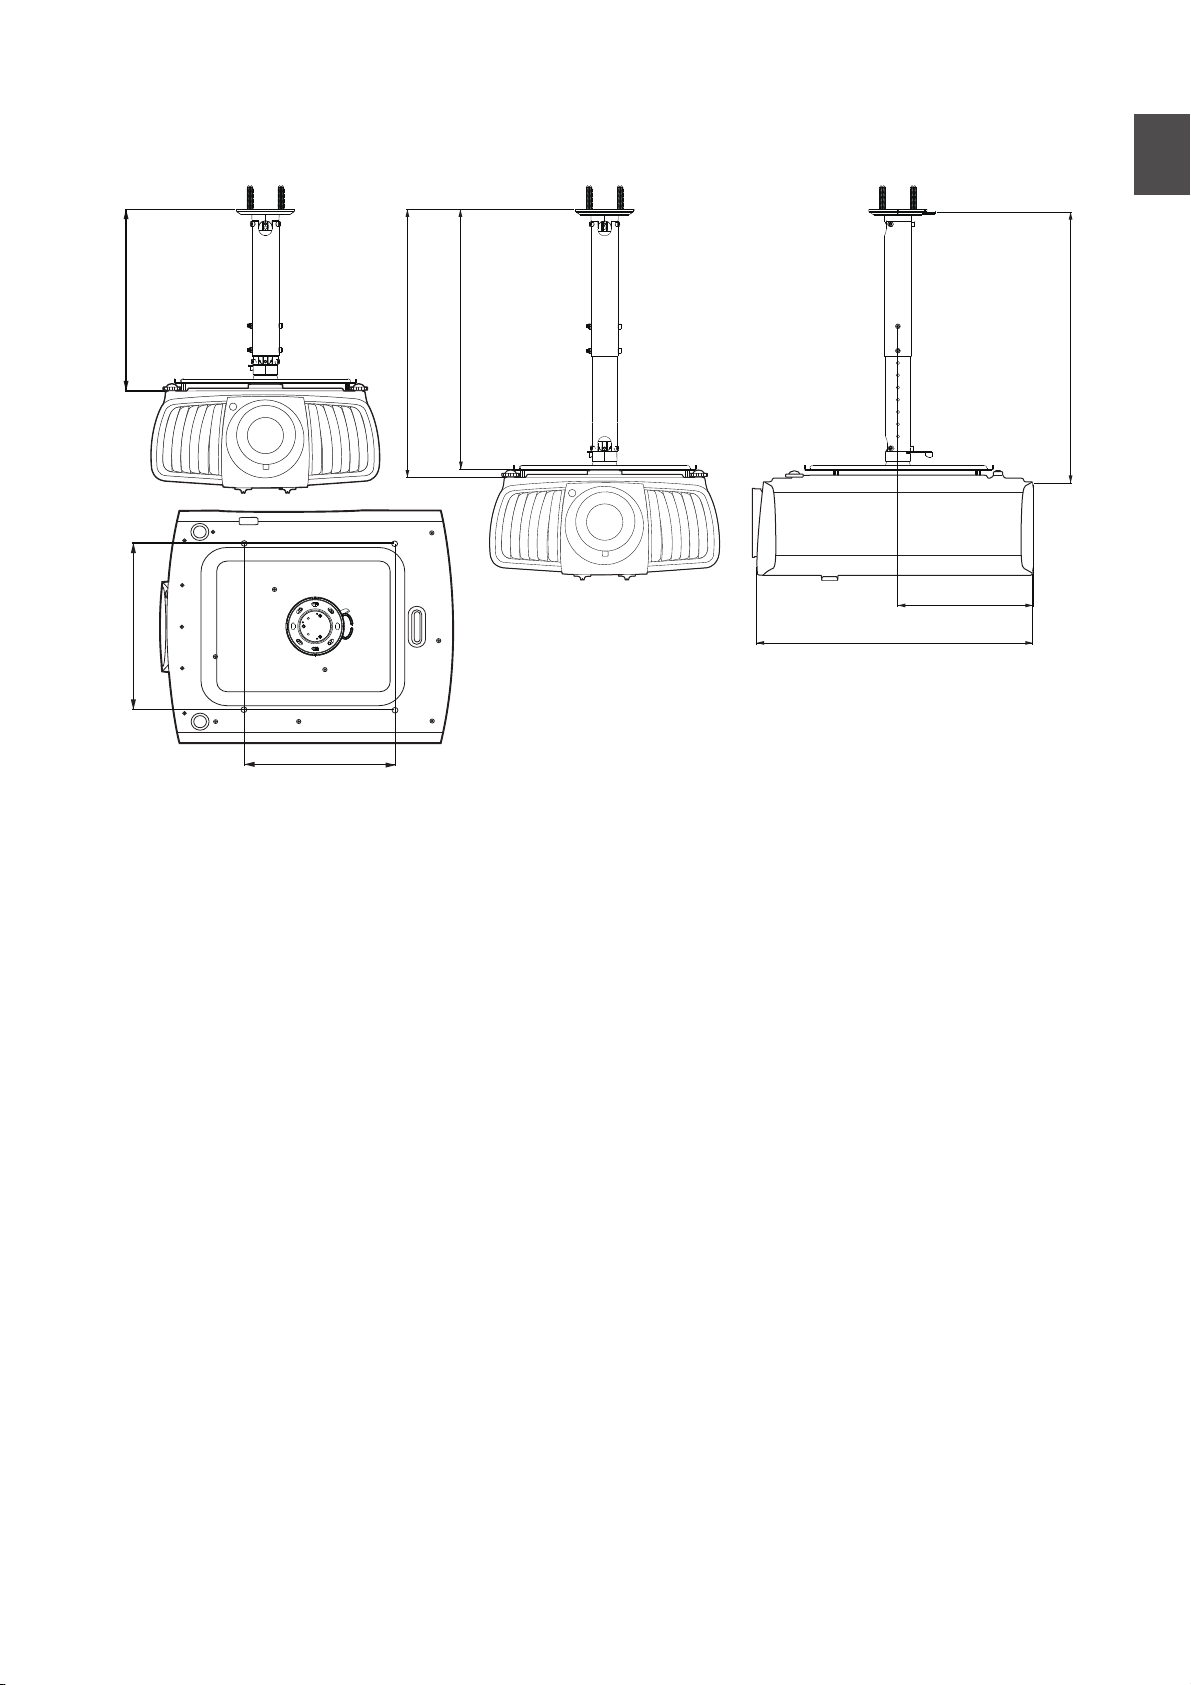
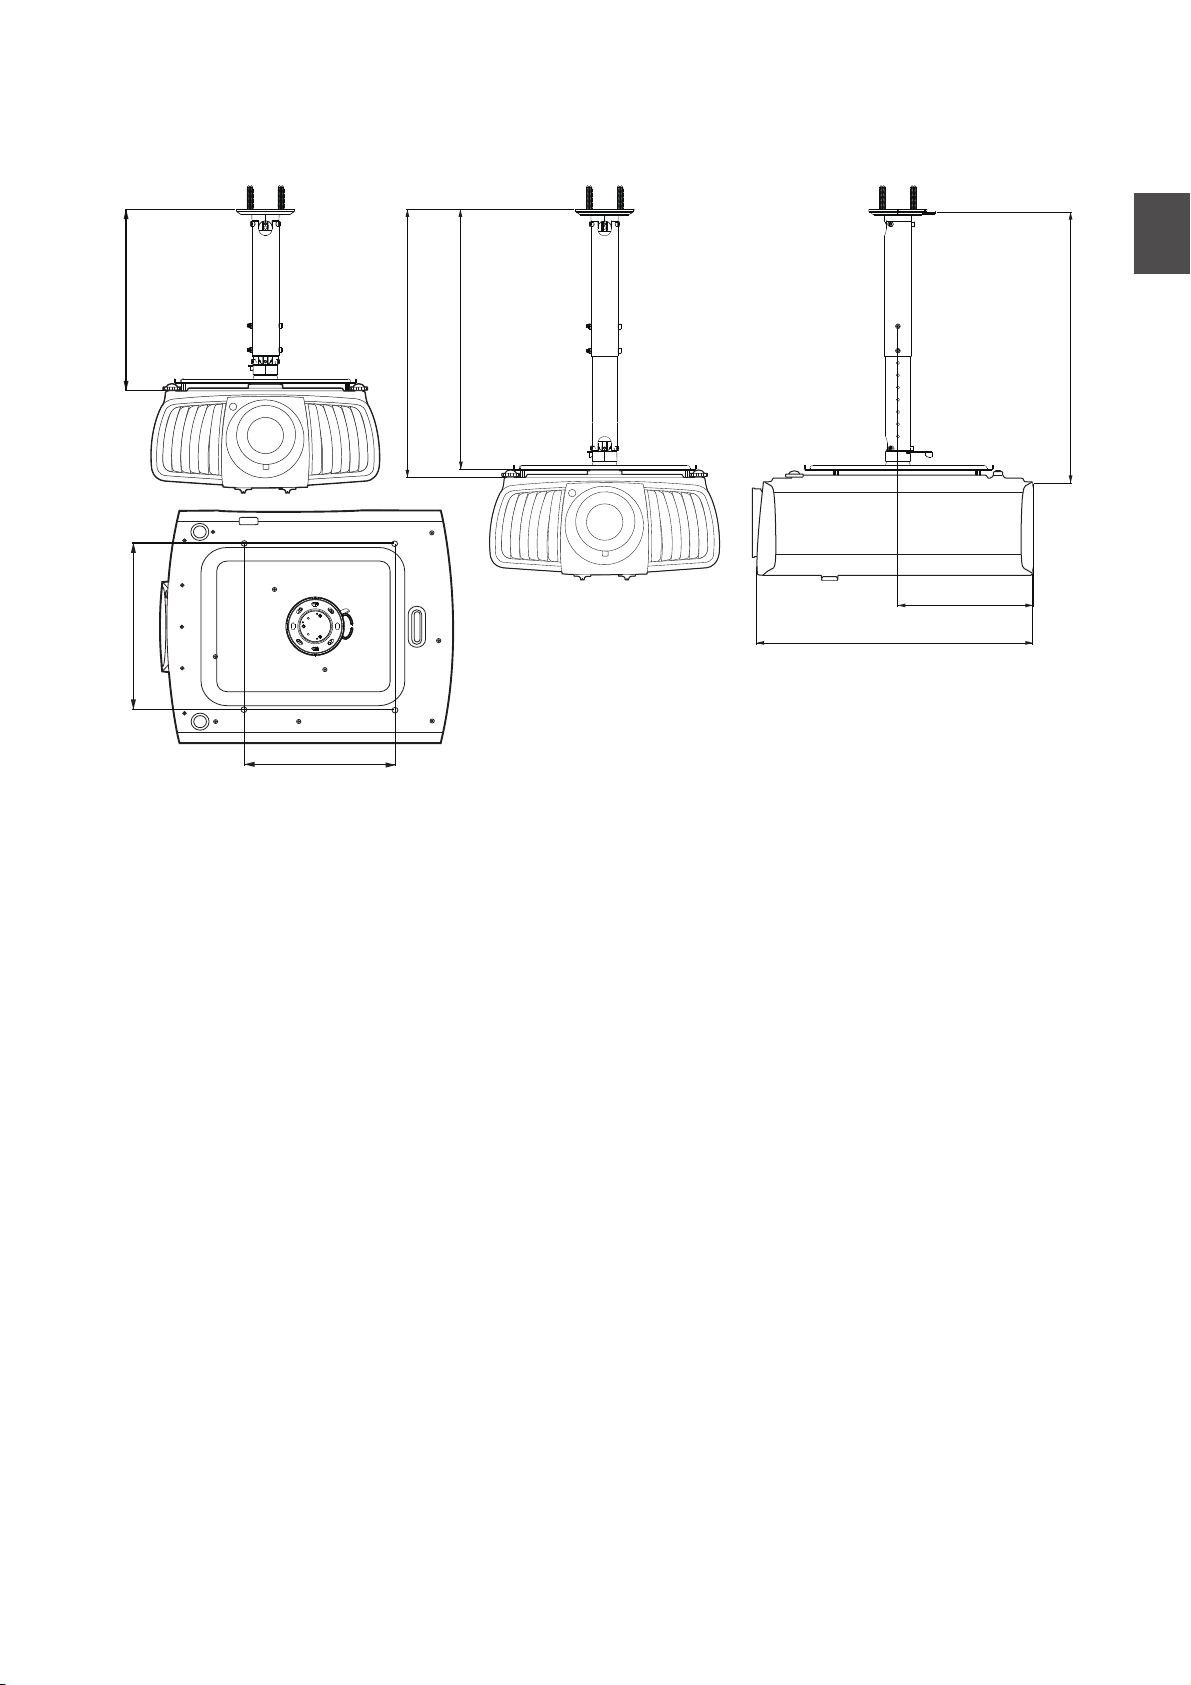
Ceiling mount installation diagram
290
337
372.8
547.8
530.8
553.39
564.49
275.79
Ceiling mount screw: M6
(Max L = 25 mm; Min L = 20 mm)
Unit: mm
English
9
English
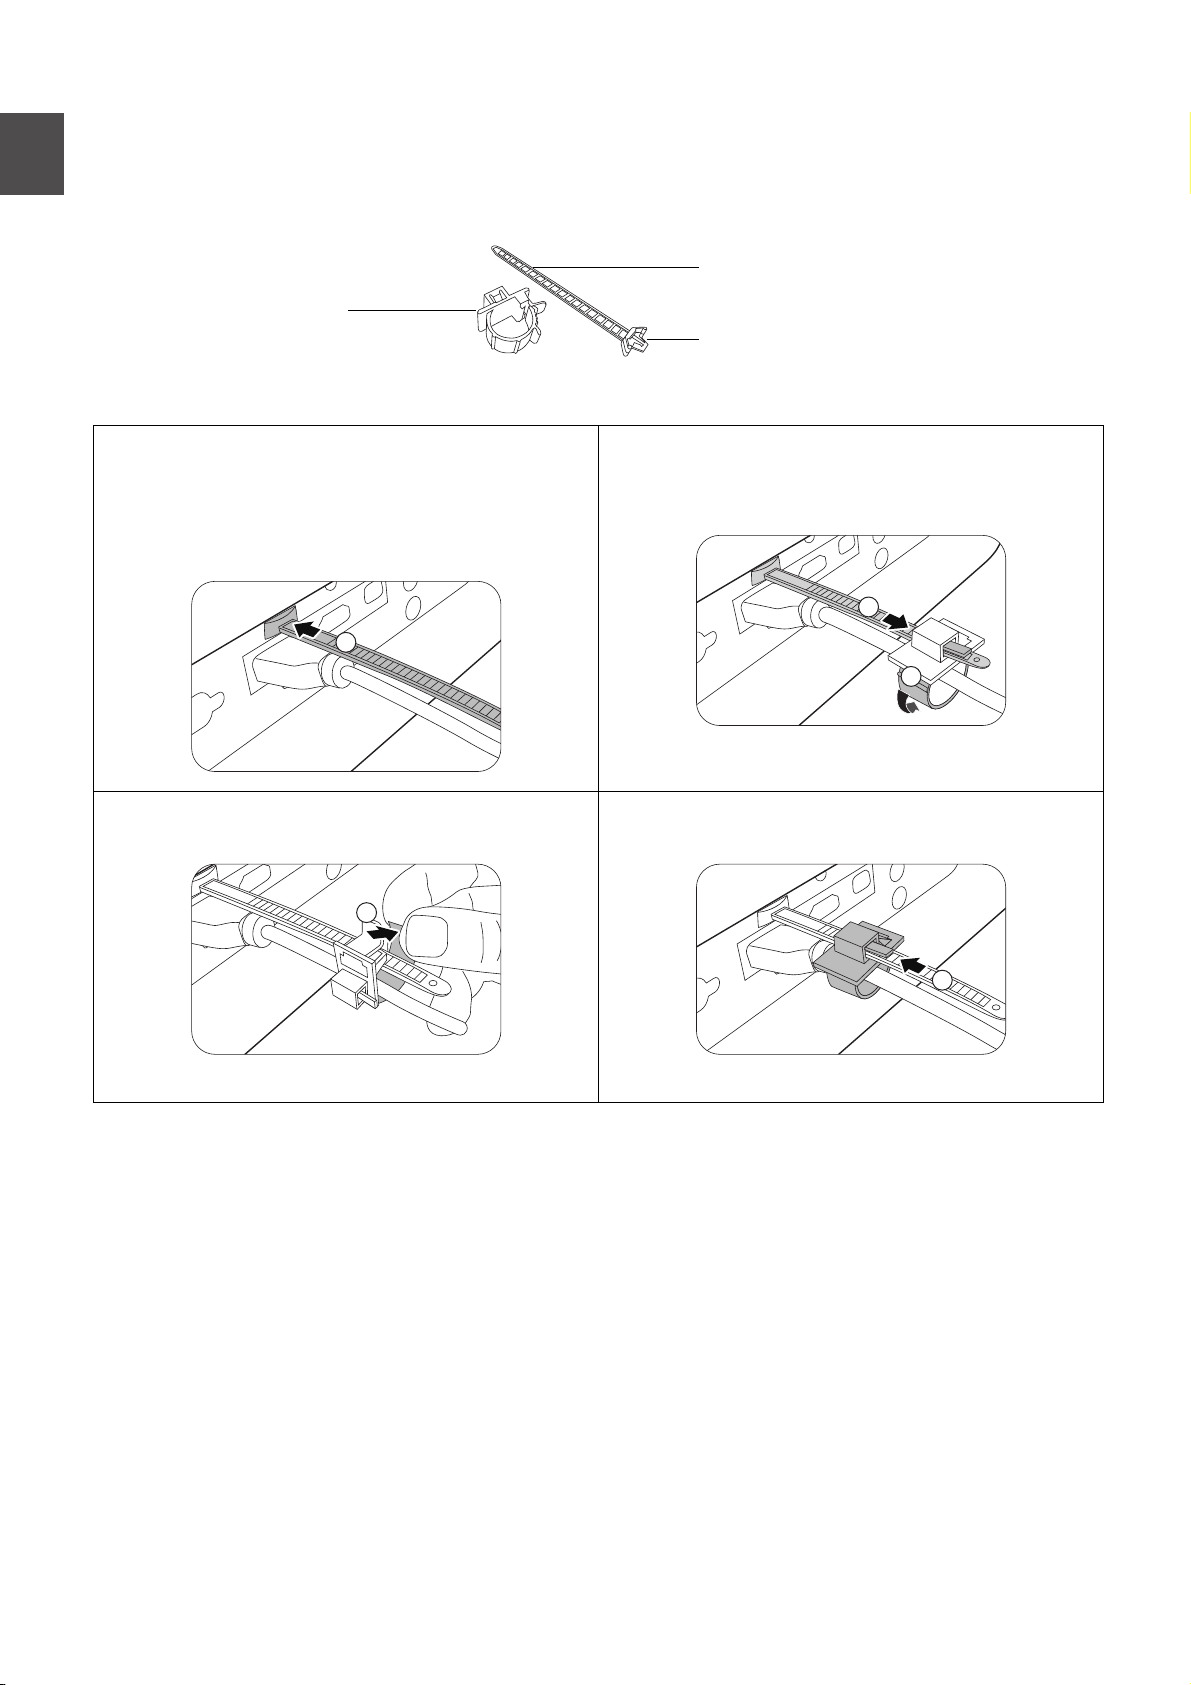
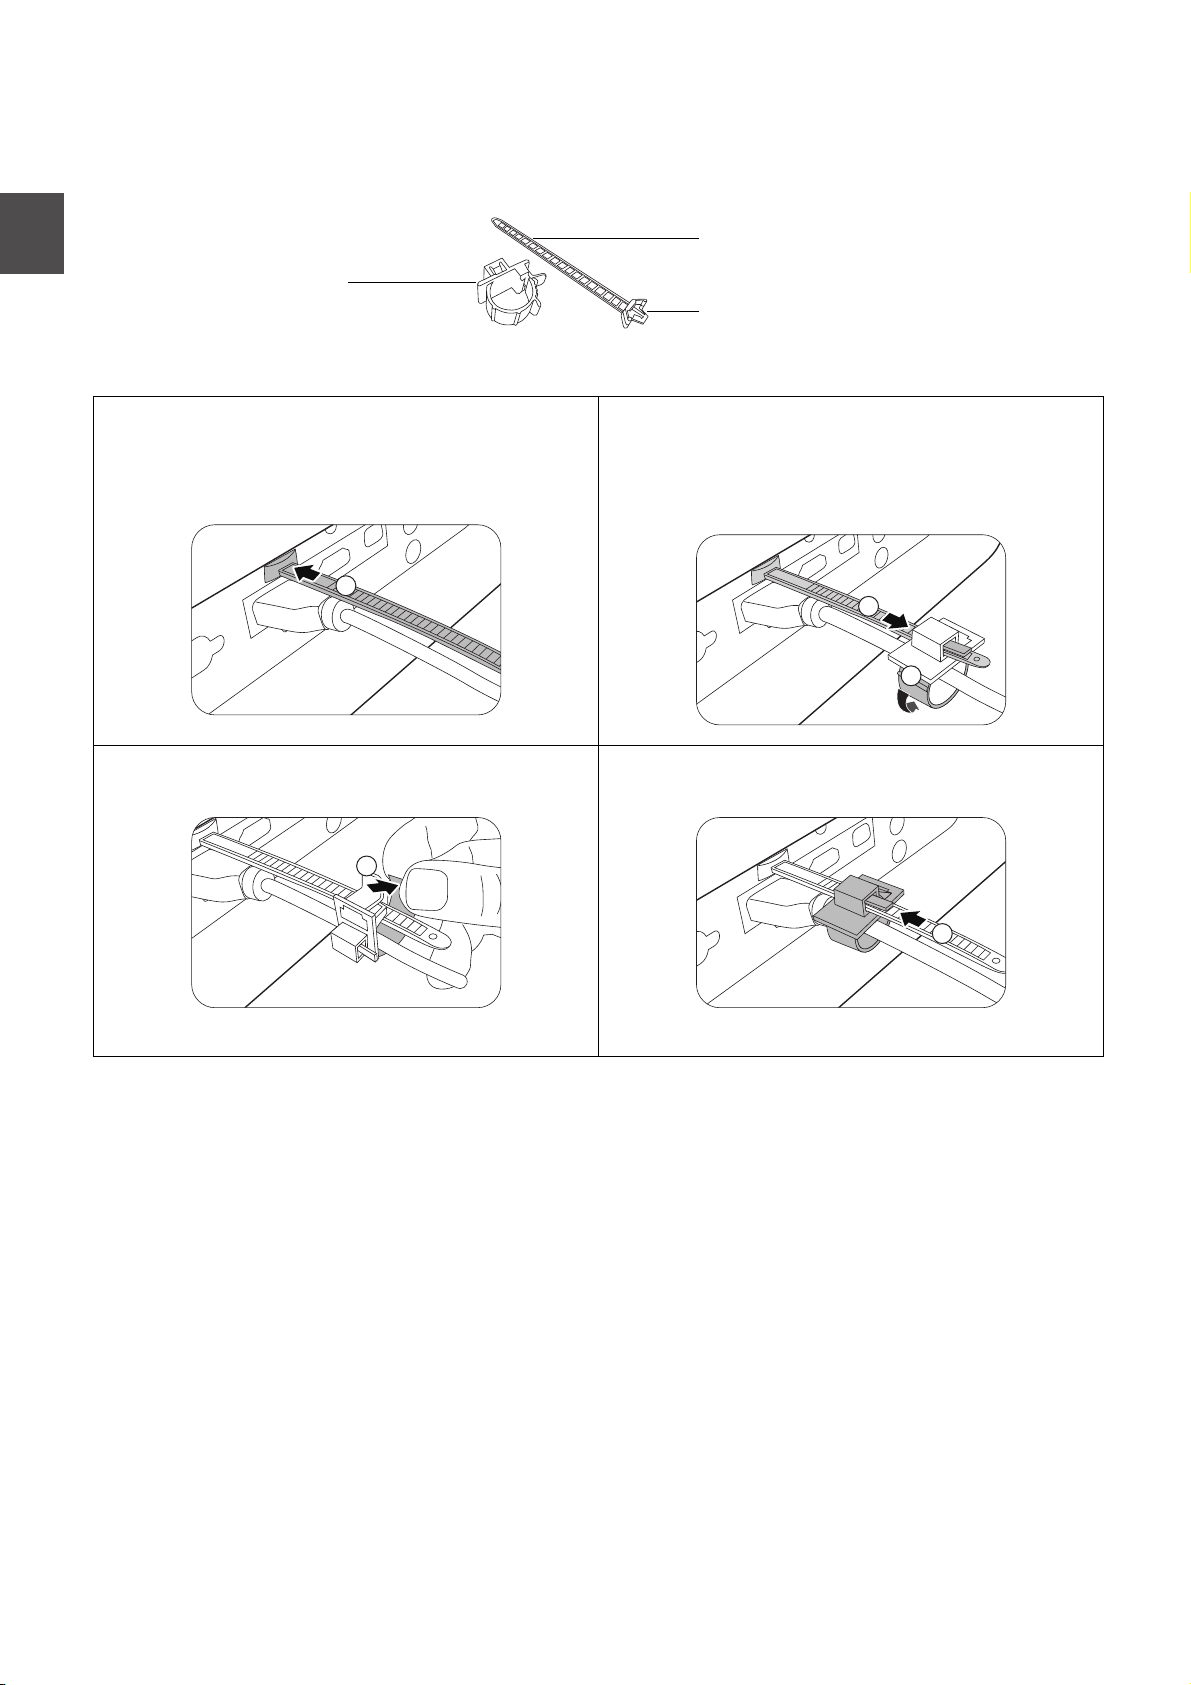
Cable tie
Cable tie ratchet
Cable tie head
1
3
2
Using the cable tie set
The cable tie set helps prevent a cable plug from falling out of the connecting port. It contains the
following parts.
To use the cable tie set:
1. Firmly plug a cable to a correct port on the
projector. Insert the cable tie head to the
cable tie hole right above the connecting port.
Note that the cable tie cannot be removed
from the hole once it is inserted.
2. Take the cable tie ratchet. Slightly open the
ratchet to surround the connecting cable.
3. Insert the end of the cable tie to the cable tie
ratchet as illustrated.
4. Close the cable tie ratchet by pressing its tab.
4
5. Move the cable tie ratchet along with the
cable tie to the end of the cable plug.
5
10
The cable tie installation is done.
RS232 command
RS232 pin assignment
No. Serial No. Serial
1NC 6NC
2RX 7RTSZ
3TX 8CTSZ
4NC 9NC
5GND
Function Ty p e Operation ASCII
Write Power On <CR>*pow=on#<CR>
Power
Source Selection
Picture Mode
Picture Settings
Write Power Off <CR>*pow=off#<CR>
Read Power status <CR>*pow=?#<CR>
Write COMPUTER/YpbPr <CR>*sour=RGB#<CR>
Write HDMI <CR>*sour=hdmi#<CR>
Write HDMI 2 <CR>*sour=hdmi2#<CR>
Read Current source <CR>*sour=?#<CR>
Write Bright <CR>*appmod=bright#<CR>
Write Cinema <CR>*appmod=cine#<CR>
Write Standard/Vivid <CR>*appmod=std#<CR>
Write THX <CR>*appmod=thx#<CR>
Write Silence <CR>*appmod=silence#<CR>
Write User1 <CR>*appmod=user1#<CR>
Write User2 <CR>*appmod=user2#<CR>
Write ISF Night <CR>*appmod=isfnight#<CR>
Write ISF Day <CR>*appmod=isfday#<CR>
Write 3D <CR>*appmod=threed#<CR>
Read Picture Mode <CR>*appmod=?#<CR>
Write Contrast + <CR>*con=+#<CR>
Write Contrast - <CR>*con=-#<CR>
Read Contrast value <CR>*con=?#<CR>
Write Brightness + <CR>*bri=+#<CR>
Write Brightness - <CR>*bri=-#<CR>
Read Brightness value <CR>*bri=?#<CR>
Write Color + <CR>*color=+#<CR>
Write Color - <CR>*color=-#<CR>
Read Color value <CR>*color=?#<CR>
Write Tint + <CR>*tint=+#<CR>
Write Tint - <CR>*tint=-#<CR>
Read Tint value <CR>*tint=?#<CR>
Write Sharpness + <CR>*sharp=+#<CR>
Write Sharpness - <CR>*sharp=-#<CR>
Read Sharpness value <CR>*sharp=?#<CR>
Write Flesh Tone + <CR>*fleshtone=+#<CR>
Write Flesh Tone - <CR>*fleshtone=-#<CR>
Read Flesh Tone value <CR>*fleshtone=?#<CR>
Write Color Temperature-Warm <CR>*ct=warm#<CR>
Write Color Temperature-Normal <CR>*ct=normal#<CR>
Write Color Temperature-Cool <CR>*ct=cool#<CR>
Write Color Temperature-Lamp native <CR>*ct=native#<CR>
Read Color Temperature status <CR>*ct=?#<CR>
Write Aspect 4:3 <CR>*asp=4:3#<CR>
Write Aspect 16:9 <CR>*asp=16:9#<CR>
Write Aspect Auto <CR>*asp=AUTO#<CR>
English
12345
6789
11
English
Function Ty p e Operation ASCII
Write Aspect Real <CR>*asp=REAL#<CR>
Write Aspect Anamorphic <CR>*asp=ANAM#<CR>
Write Aspect Anamorphic 2.4:1 <CR>*asp=ANAM2.4:1#<CR>
Write Aspect Anamorphic 16:9 <CR>*asp=ANAM16:9#<CR>
Read Aspect status <CR>*asp=?#<CR>
Write Overscan Adjustment + <CR>*overscan=+#<CR>
Write Overscan Adjustment - <CR>*overscan=-#<CR>
Read Overscan Adjustment value <CR>*overscan=?#<CR>
Write Auto <CR>*auto#<CR>
Write Noise Reduction + <CR>*NR=+#<CR>
Write Noise Reduction - <CR>*NR=-#<CR>
Read Noise Reduction vaule <CR>*NR=?#<CR>
Write Red Gain + <CR>*RGain=+#<CR>
Write Red Gain - <CR>*RGain=-#<CR>
Read Red Gain value <CR>*RGain=?#<CR>
Write Green Gain + <CR>*GGain=+#<CR>
Write Green Gain - <CR>*GGain=-#<CR>
Read Green Gain value <CR>*GGain=?#<CR>
Write Blue Gain + <CR>*BGain=+#<CR>
Write Blue Gain - <CR>*BGain=-#<CR>
Read Blue Gain value <CR>*BGain=?#<CR>
Write Red Offset + <CR>*ROffset=+#<CR>
Write Red Offset - <CR>*ROffset=-#<CR>
Read Red Offset value <CR>*ROffset=?#<CR>
Picture Settings
(Continued)
Write Green Offset + <CR>*GOffset=+#<CR>
Write Green Offset - <CR>*GOffset=-#<CR>
Read Green Offset value <CR>*GOffset=?#<CR>
Write Blue Offset + <CR>*BOffset=+#<CR>
Write Blue Offset - <CR>*BOffset=-#<CR>
Read Blue Offset value <CR>*BOffset=?#<CR>
Write Gamma Selection-1.8 <CR>*gamma=1.8#<CR>
Write Gamma Selection-2.0 <CR>*gamma=2.0#<CR>
Write Gamma Selection-2.1 <CR>*gamma=2.1#<CR>
Write Gamma Selection-2.2 <CR>*gamma=2.2#<CR>
Write Gamma Selection-2.3 <CR>*gamma=2.3#<CR>
Write Gamma Selection-2.4 <CR>*gamma=2.4#<CR>
Write Gamma Selection-2.6 <CR>*gamma=2.6#<CR>
Write Gamma Selection-2.8 <CR>*gamma=2.8#<CR>
Write Gamma Selection-BenQ <CR>*gamma=benq#<CR>
Read Gamma Selection status <CR>*gamma=?#<CR>
Write Brilliant color on <CR>*BC=on#<CR>
Write Brilliant color off <CR>*BC=off#<CR>
Read Brilliant color status <CR>*BC=?#<CR>
Write HDMI Format -Auto <CR>*HDMI=auto#<CR>
Write HDMI Format -PC Signal <CR>*HDMI=pc#<CR>
Write HDMI Format -Video Signal <CR>*HDMI=video#<CR>
Read HDMI Format status <CR>*HDMI=?#<CR>
Write CEC on <CR>*cec=on#<CR>
Write CEC off <CR>*cec=off#<CR>
Read CEC status <CR>*cec=?#<CR>
12
Function Ty p e Operation ASCII
Write Splash Screen-BenQ <CR>*splash=benq#<CR>
Write Splash Screen-Black <CR>*splash=black#<CR>
Write Splash Screen-Blue <CR>*splash=blue#<CR>
Write Splash Screen status <CR>*splash=?#<CR>
Write Background Color-Black <CR>*background=black#<CR>
Write Background Color-Blue <CR>*background=blue#<CR>
Write Background Color-Purple <CR>*background=purple#<CR>
Read Background Color status <CR>*background=?#<CR>
Write Projector Position-Front Table <CR>*pp=FT#<CR>
Write Projector Position-Rear Table <CR>*pp=RE#<CR>
Write Projector Position-Rear Ceiling <CR>*pp=RC#<CR>
Write Projector Position-Front Ceiling <CR>*pp=FC#<CR>
Read Projector Position status <CR>*pp=?#<CR>
Write Quick auto search/Auto source search <CR>*QAS=on#<CR>
Write Quick auto search/Auto source search <CR>*QAS=off#<CR>
Quick auto search status/Auto source
search status
<CR>*QAS=?#<CR>
Operation Settings
Lamp Control
Read
Write Menu Display Time -Always On <CR>*menutime=on#<CR>
Write Menu Display Time -5 sec <CR>*menutime=5s#<CR>
Write Menu Display Time -10 sec <CR>*menutime=10s#<CR>
Write Menu Display Time -15 sec <CR>*menutime=15s#<CR>
Write Menu Display Time -20 sec <CR>*menutime=20s#<CR>
Write Menu Display Time -25 sec <CR>*menutime=25s#<CR>
Write Menu Display Time -30 sec <CR>*menutime=30s#<CR>
Read Menu Display Time status <CR>*menutime=?#<CR>
Write Menu Position-Center <CR>*menuposition=center#<CR>
Write Menu Position-Top-Left <CR>*menuposition=tl#<CR>
Write Menu Position - Top-Right <CR>*menuposition=tr#<CR>
Write Menu Position-Bottom-Right <CR>*menuposition=br#<CR>
Write Menu Position-Bottom-Left <CR>*menuposition=bl#<CR>
Read Menu Positions status <CR>*menuposition=?#<CR>
Write Reminder Message - On <CR>*reminder=on#<CR>
Write Reminder Message - Off <CR>*reminder=off#<CR>
Read Reminder Message status <CR>*reminder=?#<CR>
Write Direct Power On-on <CR>*directpower=on#<CR>
Write Direct Power On-off <CR>*directpower=off#<CR>
Read Direct Power On-status <CR>*directpower=?#<CR>
Write Standby Settings-Network on <CR>*standbynet=on#<CR>
Write Standby Settings-Network off <CR>*standbynet=off#<CR>
Read Standby Settings-Network status <CR>*standbynet=?#<CR>
Read Lamp Hour <CR>*ltim=?#<CR>
Write Normal mode <CR>*lampm=lnor#<CR>
Write Eco mode <CR>*lampm=eco#<CR>
Write Smart Eco mode <CR>*lampm=seco#<CR>
Read Lamp Mode status <CR>*lampm=?#<CR>
English
13

English
Function Ty p e Operation ASCII
Read Model Name <CR>*modelname=?#<CR>
Write Blank On <CR>*blank=on#<CR>
Write Blank Off <CR>*blank=off#<CR>
Read Blank status <CR>*blank=?#<CR>
Write Menu On <CR>*menu=on#<CR>
Write Menu Off <CR>*menu=off#<CR>
Write Up <CR>*up#<CR>
Write Down <CR>*down#<CR>
Write Right <CR>*right#<CR>
Write Left <CR>*left#<CR>
Write Enter/OK <CR>*enter#<CR>
Write BACK <CR>*back#<CR>
Write 3D Auto <CR>*3d=auto#<CR>
Write 3D Sync Off <CR>*3d=off#<CR>
Write 3D Sync Frame Sequential <CR>*3d=fs#<CR>
Write 3D inverter disable <CR>*3d=da#<CR>
Write 3D inverter <CR>*3d=iv#<CR>
Read 3D Sync status <CR>*3d=?#<CR>
Write Language + <CR>*lang=+#<CR>
Write Language - <CR>*lang=-#<CR>
Read Language status <CR>*lang=?#<CR>
Write Auto Power off -disable <CR>*APOFF=DIS#<CR>
Miscellaneous
Write Auto Power off - 5 min <CR>*APOFF=5#<CR>
Write Auto Power off - 10 min <CR>*APOFF=10#<CR>
Write Auto Power off - 15 min <CR>*APOFF=15#<CR>
Write Auto Power off - 20 min <CR>*APOFF=20#<CR>
Write Auto Power off - 25 min <CR>*APOFF=25#<CR>
Write Auto Power off - 30 min <CR>*APOFF=30#<CR>
Read Auto Power off status <CR>*APOFF=?#<CR>
Write AMX Device Discovery-on <CR>*amxdd=on#<CR>
Write AMX Device Discovery-off <CR>*amxdd=off#<CR>
Read AMX Device Discovery status <CR>*amxdd=?#<CR>
Read MAC Address <CR>*macaddr=?#<CR>
Write Quick Cooling on <CR>*QCooling=on#<CR>
Write Quick Cooling off <CR>*QCooling=off#<CR>
Read Quick Cooling status <CR>*QCooling=?#<CR>
Write High Altitude mode on <CR>*Highaltitude=on#<CR>
Write High Altitude mode off <CR>*Highaltitude=off#<CR>
Read High Altitude mode status <CR>*Highaltitude=?#<CR>
Write Key Lock on <CR>*keylock=on#<CR>
Write Key Lock off <CR>*keylock=off#<CR>
Read Key Lock status <CR>*keylock=?#<CR>
Write LED indicator on <CR>*led=on#<CR>
Write LED indicator off <CR>*led=off#<CR>
Read LED indicator status <CR>*led=?#<CR>
14

目錄
重要安全說明 ........................................................................................................................ 16
產品資訊 ...............................................................................................................................18
包裝盒內容 ...............................................................................................................................................18
規格 .............................................................................................................................................................18
投影機尺寸 ...............................................................................................................................................19
端子 .............................................................................................................................................................19
遙控器 ........................................................................................................................................................ 20
安裝 ....................................................................................................................................... 21
投影尺寸 ....................................................................................................................................................21
投影鏡頭偏移........................................................................................................................................... 22
天花板安裝圖........................................................................................................................................... 23
使用訊號線束組 ...................................................................................................................................... 24
RS232 指令 ........................................................................................................................... 25
RS232 針腳分配 .......................................................................................................................................25
繁體中文
15

重要安全說明
本投影機經設計完成及測試通過,符合資訊科技設備的最新安全標準。然而,為確保您安全地
繁體中文
使用本產品,請務必遵循本使用手冊 / 安裝指南的指示與產品本身所標示的指示。
1. 操作投影機之前,請先閱讀本使用手冊 / 安裝指南。請妥善保存本手冊,以供日後參考。
2. 操作時請勿直視投影機鏡頭。強光可能會造成您的視力受損。
3. 有關維修問題,請洽詢合格的維修人員。
4. 投影機的光源亮起時,請務必打開或移除鏡頭蓋 (如果有的話)。
5. 操作期間光源會變得很燙。
6. 有些國家的電壓不穩定。本投影機所設計安全操作的電壓區間為 100 至 240 伏特交流電,但
如果發生斷電或功率驟然起伏達 ±10 伏特就會發生故障。如果在主電壓可能會波動或中斷的
區域使用本投影機,建議您經由穩壓器、雷擊突波保護器或不斷電系統 (UPS) 連接電源。
7. 當投影機在運作中,請勿讓任何物品擋住投影的鏡頭,因為這樣可能會使得該物品遇熱變形
甚至造成火災。若要暫時關閉光源,請使用空白功能。
8. 請勿使用超過額定壽命的光源。
9. 投影機插頭如果尚未拔下,請勿更換燈泡或任何電子零件。
10. 請勿將投影機放置在不平穩的手推車、架子或桌子上。否則投影機可能會掉落,造成嚴重損
壞。
11. 請勿打開投影機的機殼。機身內含有危險的高電壓配件,萬一接觸人體時可能會造成電擊
死亡。
請勿在任何狀況下打開或移除其它部分的護蓋。有關維修問題,請洽詢合格專業的維修
人員。
12. 請勿阻塞通風口。
- 請勿將投影機放置於毯子、寢具或其它柔軟物品的表面上。
- 請勿用布或其它物品覆蓋投影機。
- 請勿將易燃物放在投影機附近。
如果通風口嚴重阻塞而使投影機內部過熱,可能會引起火災。
13. 操作時請將設備置於平坦、水平的表面。
- 如果左右傾斜超過 10 度、前後超過 15 度,請勿使用投影機。使用投影機時,如果將投影機擺放在不平坦的
位置上,可能會導致燈泡故障或損壞。
14. 請勿將投影機直立擺放。因投影機可能會不穩摔落,導致人身受傷或投影機損壞。
15. 請勿踩在投影機上,或在上面放置任何物品。這樣除可能導致投影機損壞外,還可能造成意
外及人身受傷。
16. 當使用投影機時,您也許會在通風口附近感覺到些微的熱風與氣味。此乃正常現象,並不是
產品有瑕疵。
17. 請勿將液體放在投影機附近或放在投影機上。液體如果濺到投影機內,可能導致投影機故
障。投影機如果不慎弄濕,請立即拔掉電源線,並聯絡 BenQ,安排投影機的維修事宜。
18. 投影機可安裝於天花板上,顯示反轉影像。
19. 本裝置必須接地。
20. 請勿將本投影機放置在下列任何環境中。
- 不通風或密閉場所。投影機離牆面至少要有 50 公分的距離,且周圍空氣要流通。
- 過熱場所。例如:車窗緊閉的車內。
- 潮濕、多塵或煙霧瀰漫的場所。因為可能會污染光學元件,縮短投影機的使用壽命,並使投影影像變暗。
- 靠近火災警報器的場所。
16
- 周圍溫度超過 40°C/104°F 的場所。
進氣口 出風口
50 公分
以上
70 公分
以上
50 公分
以上
50 公分
以上
30 公分
以上
50 公分
以上
至少 100 公釐
- 海拔超過 3000 公尺 (10000 英呎)的場所。
Hg - 燈泡內含水銀。請依據當地法規進行處理。詳細資訊,請參閱 www.lamprecycle.org。
風險群組 2
1. 根據光源及光源系統的光生物安全分類,本產品屬於 IEC
62471-5:2015 的風險群組 2。
2. 本產品可能發出有害的光學輻射。
3. 請勿直視發光的光源,這樣可能對眼睛造成傷害。
4. 在有任何明亮的光源時,請勿直視光束。
冷卻注意事項
通風
TEMP
POWER
LAMP
安裝注意
為使投影機達到適當的通風效果,請務必如下圖所示使投影機
周圍保留一些空間:
• 桌面 • 桌面
• 天花板 • 堆疊
繁體中文
避免在不通風或密閉場所
使用。
17
產品資訊
繁體中文
包裝盒內容
投影機 隨附電池的遙控器
安裝指南 使用手冊光碟
• 所提供的配件適用於購買所在地區,且可能會與手冊上的圖片有所不同。
• * 保證書僅於某些地區提供。詳情請詢問您的經銷商。
保證書 *
選購配件
1. 備用燈泡組
2. 天花板吊掛工具組
3. RS232 訊號線
4. 歪像鏡頭
5. BenQ DGD5 3D 眼鏡
規格
顯示系統
解析度 3840 x 2160 (使用 XPR)
光源 240 瓦燈泡
亮度 2200 流明
耗電量 384 瓦 (最大);< 0.5 瓦 (待機)
重量 14.8 公斤 (32.6 磅)
1-CHIP DMD
2716 x 1528 (不使用 XPR)
訊號線束組 x 3
電源線
18
投影機尺寸
POWER
TEMP
LAMP
470.7
564.7 224.9
單位:公釐
470.7 公釐 (寬) x 224.9 公釐 (高) x 564.7 公釐 (深)
端子
繁體中文
• LAN (10/100M)
用來連接 RJ45 Cat5/Cat6 乙太網路訊號
線,以透過網路控制投影機。
• IR IN
專供紅外線增強線使用,確保更好的遙
控器訊號接收。
• PC
15 針 VGA 埠,用於連接 RGB 或電腦。
• HDMI 1 (2.0 版)及其訊號線束孔
連接 HDMI (4K) 信號源。
連接訊號線束組。
• HDMI 2 (1.4a 版)及其訊號線束孔
連接 HDMI 信號源。
連接訊號線束組。
• USB MINI-B
僅適用於韌體升級。
• 12V TRIGGER 1/2
啟動外接裝置,例如電動布幕或光線控制等。
• RS232
標準 9 針 D-sub 介面,用於連接電腦控制系統
及投影機維護使用。
19
遙控器
開啟
關閉
AUTO
ASPECT
SOURCE
上
左
OK
BACK
3D
CONTRAST
PIC MODE
COLOR TEMP
GAMMA
SHARP
TEST PATTERN
DEFAULT
右
下
MENU
CINEMAMASTER
INVERT
DYNAMIC IRIS
LIGHT MODE
COLOR MANAGE
ECO BLANK
KEY LIGHT
沒有功能 *
HDR
BRIGHT
沒有功能 *
繁體中文
* 此機型沒有此按鈕。
20
安裝
LAN
PC
RS232
12V
TRIGGHER
IR IN
1
2
HDMI 2-USB MINIB
HDMI 1
HDCP 2.2
高
寬
投影距離
鏡頭中心
螢幕
16:9 螢幕對角線
投影尺寸
• 螢幕縱橫比為 16:9,投影影像縱橫比為
16:9
繁體中文
對角線
英吋 公釐
螢幕尺寸 投影距離 (公釐)
寬
(公釐)高(公釐)
最小長度
(使用最大
鏡頭)
平均值
最大長度
(使用最小
鏡頭)
最低 /
最高鏡頭位置
(公釐)
80 2032 1771 996 2400 3000 3600 149
90 2286 1992 1121 2700 3375 4050 168
100 2540 2214 1245 3000 3750 4500 187
110 2794 2435 1370 3300 4125 4950 205
120 3048 2657 1494 3600 4500 5400 224
130 3302 2878 1619 3900 4875 5850 243
140 3556 3099 1743 4200 5250 6300 262
150 3810 3321 1868 4500 5625 6750 280
160 4064 3542 1992 4800 6000 7200 299
170 4318 3763 2117 5100 6375 7650 318
180 4572 3985 2241 5400 6750 8100 336
190 4826 4206 2366 5700 7125 8550 355
200 5080 4428 2491 6000 7500 9000 374
210 5334 4649 2615 6300 7875 9450 392
220 5588 4870 2740 6600 8250 9900 411
230 5842 5092 2864 6900 8625 10350 430
240 6096 5313 2989 7200 9000 10800 448
250 6350 5535 3113 7500 9375 11250 467
260 6604 5756 3238 7800 9750 11700 486
270 6858 5977 3362 8100 10125 12150 504
280 7112 6199 3487 8400 10500 12600 523
290 7366 6420 3611 8700 10875 13050 542
300 7620 6641 3736 9000 11250 13500 560
• 為了達到最佳的投影品質,建議按照非灰色儲存格中的數值進行投影。灰色儲存格中的數值僅供參考。
• 所有測量值皆為近似值,可能會與實際的大小有些許出入。
如果您要將投影機固定安裝在某個地方,BenQ 建議您先使用這台投影機作實地測試,確認其投影尺寸和
距離,並參考其光學特性之後再做安裝。這將會幫助您找到最佳的吊掛位置。
• 天花板安裝必須由合格的專業人員進行。如需詳細資訊,請聯絡您的經銷商。不建議自行安裝投影機。
• 投影機只能在堅固、平坦的表面上使用。若投影機掉落,則可能造成嚴重傷害和損壞。
• 請勿在極熱或極冷環境中使用投影機。投影機必須在華氏 32 度(攝氏 0 度)至華氏 104 度 (攝氏 40 度)
之間的環境下使用。
• 若投影機處於潮濕、多塵或煙霧瀰漫的環境將會導致螢幕損壞。
• 請勿阻塞投影機的通風口。必須保持良好通風以排除熱氣。若擋住通風口將會導致投影機損壞。
21
投影鏡頭偏移
POWER
TEMP
LAMP
27%27%
1 螢幕寬度
LAN
PC
-
RS232
12V
TRIGGHER
IR IN
1
2
HDMI 2-USB MINIB
HDMI 1
HDCP 2.2
65%
65%
1
螢
幕
高
度
水平位置 垂直位置
繁體中文
投影範圍
22
天花板安裝圖
290
337
372.8
547.8
530.8
553.39
564.49
275.79
天花板安裝螺絲:M6
(最大長度 = 25 公釐;最小長度 = 20 公釐)
單位:公釐
繁體中文
23
使用訊號線束組
訊號線束
訊號線束棘齒
訊號線束頭
1
3
2
訊號線束組有助於防止訊號線插頭從連接埠鬆脫。包含的部份如下:
繁體中文
若要使用訊號線束組:
1. 將訊號線牢固插入於投影機的正確連接埠。
將訊號線束頭插入於連接埠正上方的訊號
線束孔。請注意,將訊號線束插入孔中,
便無法取出。
2. 拿起訊號線束棘齒。略微打開棘齒包住連
接訊號線。
3. 將訊號線束的末端插入於訊號線束棘齒,
如圖所示。
4. 按壓訊號線束棘齒的垂片,使訊號線束棘
齒閉合。
4
5. 沿著訊號線束將訊號線束棘齒移到訊號線
插頭的末端。
5
24
訊號線束安裝至此完成。
RS232 指令
RS232 針腳分配
編號 序列 編號 序列
1NC 6NC
2RX 7RTSZ
3TX 8CTSZ
4NC 9NC
5GND
功能 類型 操作
寫入 開機
電源
信號源選取
圖片模式
圖片設定
寫入 關機
讀取 電源狀態
寫入
寫入
寫入
讀取 目前信號源
寫入 明亮
寫入 劇院
寫入
寫入
寫入 靜音
寫入
寫入
寫入
寫入
寫入
讀取 圖片模式
寫入
寫入
讀取 對比值
寫入
寫入
讀取 亮度值
寫入
寫入
讀取 色彩值
寫入
寫入
讀取 色調值
寫入
寫入
讀取 銳利度值
寫入
寫入
讀取 膚色值
寫入
寫入
寫入
寫入
讀取 色溫狀態
寫入
寫入
COMPUTER/YPbPr <CR>*sour=RGB#<CR>
HDMI <CR>*sour=hdmi#<CR>
HDMI 2 <CR>*sour=hdmi2#<CR>
標準 / 鮮艷
THX <CR>*appmod=thx#<CR>
使用者 1
使用者 2
ISF Night <CR>*appmod=isfnight#<CR>
ISF Day <CR>*appmod=isfday#<CR>
3D <CR>*appmod=threed#<CR>
對比 +
對比 -
亮度 +
亮度 -
色彩 +
色彩 -
色調 +
色調 -
銳利度 +
銳利度 -
膚色 +
膚色 -
色溫 - 暖色調
色溫 - 正常
色溫 - 冷色調
色溫 - 燈泡原色
4:3 縱橫比
16:9 縱橫比
12345
6789
ASCII
<CR>*pow=on#<CR>
<CR>*pow=off#<CR>
<CR>*pow=?#<CR>
<CR>*sour=?#<CR>
<CR>*appmod=bright#<CR>
<CR>*appmod=cine#<CR>
<CR>*appmod=std#<CR>
<CR>*appmod=silence#<CR>
<CR>*appmod=user1#<CR>
<CR>*appmod=user2#<CR>
<CR>*appmod=?#<CR>
<CR>*con=+#<CR>
<CR>*con=-#<CR>
<CR>*con=?#<CR>
<CR>*bri=+#<CR>
<CR>*bri=-#<CR>
<CR>*bri=?#<CR>
<CR>*color=+#<CR>
<CR>*color=-#<CR>
<CR>*color=?#<CR>
<CR>*tint=+#<CR>
<CR>*tint=-#<CR>
<CR>*tint=?#<CR>
<CR>*sharp=+#<CR>
<CR>*sharp=-#<CR>
<CR>*sharp=?#<CR>
<CR>*fleshtone=+#<CR>
<CR>*fleshtone=-#<CR>
<CR>*fleshtone=?#<CR>
<CR>*ct=warm#<CR>
<CR>*ct=normal#<CR>
<CR>*ct=cool#<CR>
<CR>*ct=native#<CR>
<CR>*ct=?#<CR>
<CR>*asp=4:3#<CR>
<CR>*asp=16:9#<CR>
繁體中文
25
繁體中文
(續)
圖片設定
功能 類型 操作
寫入 自動縱橫比
寫入 真實縱橫比
寫入 縱橫比歪像
寫入
寫入
讀取 縱橫比狀態
寫入
寫入
讀取 過掃描調整值
寫入 自動
寫入
寫入
讀取 雜訊降低值
寫入
寫入
讀取 紅色增強值
寫入
寫入
讀取 綠色增強值
寫入
寫入
讀取 藍色增強值
寫入
寫入
讀取 紅色差距值
寫入
寫入
讀取 綠色差距值
寫入
寫入
讀取 藍色差距值
寫入
寫入
寫入
寫入
寫入
寫入
寫入
寫入
寫入
讀取
寫入
寫入
讀取
寫入
寫入
寫入
讀取
寫入
寫入
讀取
縱橫比歪像 2.4:1
縱橫比歪像 16:9
過掃描調整 +
過掃描調整 -
雜訊降低 +
雜訊降低 -
紅色增強 +
紅色增強 -
綠色增強 +
綠色增強 -
藍色增強 +
藍色增強 -
紅色差距值 +
紅色差距值 -
綠色差距值 +
綠色差距值 -
藍色差距值 +
藍色差距值 -
Gamma 選擇 - 1.8
Gamma 選擇 - 2.0
Gamma 選擇 - 2.1
Gamma 選擇 - 2.2
Gamma 選擇 - 2.3
Gamma 選擇 - 2.4
Gamma 選擇 - 2.6
Gamma 選擇 - 2.8
Gamma 選擇 - BenQ
Gamma 選擇狀態
Brilliant color 開啟
Brilliant color 關閉
Brilliant color 狀態
HDMI 格式 - 自動
HDMI 格式 - PC 訊號
HDMI 格式 - 視訊訊號
HDMI 格式狀態
CEC 開啟
CEC 關閉
CEC 狀態
ASCII
<CR>*asp=AUTO#<CR>
<CR>*asp=REAL#<CR>
<CR>*asp=ANAM#<CR>
<CR>*asp=ANAM2.4:1#<CR>
<CR>*asp=ANAM16:9#<CR>
<CR>*asp=?#<CR>
<CR>*overscan=+#<CR>
<CR>*overscan=-#<CR>
<CR>*overscan=?#<CR>
<CR>*auto#<CR>
<CR>*NR=+#<CR>
<CR>*NR=-#<CR>
<CR>*NR=?#<CR>
<CR>*RGain=+#<CR>
<CR>*RGain=-#<CR>
<CR>*RGain=?#<CR>
<CR>*GGain=+#<CR>
<CR>*GGain=-#<CR>
<CR>*GGain=?#<CR>
<CR>*BGain=+#<CR>
<CR>*BGain=-#<CR>
<CR>*BGain=?#<CR>
<CR>*ROffset=+#<CR>
<CR>*ROffset=-#<CR>
<CR>*ROffset=?#<CR>
<CR>*GOffset=+#<CR>
<CR>*GOffset=-#<CR>
<CR>*GOffset=?#<CR>
<CR>*BOffset=+#<CR>
<CR>*BOffset=-#<CR>
<CR>*BOffset=?#<CR>
<CR>*gamma=1.8#<CR>
<CR>*gamma=2.0#<CR>
<CR>*gamma=2.1#<CR>
<CR>*gamma=2.2#<CR>
<CR>*gamma=2.3#<CR>
<CR>*gamma=2.4#<CR>
<CR>*gamma=2.6#<CR>
<CR>*gamma=2.8#<CR>
<CR>*gamma=benq#<CR>
<CR>*gamma=?#<CR>
<CR>*BC=on#<CR>
<CR>*BC=off#<CR>
<CR>*BC=?#<CR>
<CR>*HDMI=auto#<CR>
<CR>*HDMI=pc#<CR>
<CR>*HDMI=video#<CR>
<CR>*HDMI=?#<CR>
<CR>*cec=on#<CR>
<CR>*cec=off#<CR>
<CR>*cec=?#<CR>
26
操作設定
燈泡控制
功能 類型 操作
寫入
寫入
寫入
寫入 開機畫面狀態
寫入
寫入
寫入
讀取 背景色狀態
寫入
寫入
寫入
寫入
讀取 投影機位置狀態
寫入
寫入
讀取
寫入
寫入
寫入
寫入
寫入
寫入
寫入
讀取 主選單顯示時間狀態
寫入
寫入
寫入
寫入
寫入
讀取 主選單位置狀態
寫入
寫入
讀取 提醒訊息狀態
寫入 開啟直接開機
寫入 關閉直接開機
讀取 直接開機狀態
寫入
寫入
讀取
讀取 燈泡使用時間
寫入 正常模式
寫入 省電模式
寫入 智慧節能模式
讀取 燈泡模式狀態
開機畫面 - BenQ
開機畫面 - 黑色
開機畫面 - 藍色
背景色 - 黑色
背景色 - 藍色
背景色 - 紫色
投影機位置 - 正放前投
投影機位置 - 正放後投
投影機位置 - 倒吊後投
投影機位置 - 倒吊前投
快速自動搜尋 / 自動搜尋來源
快速自動搜尋 / 自動搜尋來源
快速自動搜尋狀態 / 自動搜尋來源狀態
主選單顯示時間 - 一律開啟
主選單顯示時間 - 5 秒
主選單顯示時間 - 10 秒
主選單顯示時間 - 15 秒
主選單顯示時間 - 20 秒
主選單顯示時間 - 25 秒
主選單顯示時間 - 30 秒
主選單位置 - 居中
主選單位置 - 左上角
主選單位置 - 右上角
主選單位置 - 右下角
主選單位置 - 左下角
提醒訊息 - 開啟
提醒訊息 - 關閉
待機設定 - 網路開啟
待機設定 - 網路關閉
待機設定 - 網路狀態
ASCII
<CR>*splash=benq#<CR>
<CR>*splash=black#<CR>
<CR>*splash=blue#<CR>
<CR>*splash=?#<CR>
<CR>*background=black#<CR>
<CR>*background=blue#<CR>
<CR>*background=purple#<CR>
<CR>*background=?#<CR>
<CR>*pp=FT#<CR>
<CR>*pp=RE#<CR>
<CR>*pp=RC#<CR>
<CR>*pp=FC#<CR>
<CR>*pp=?#<CR>
<CR>*QAS=on#<CR>
<CR>*QAS=off#<CR>
<CR>*QAS=?#<CR>
<CR>*menutime=on#<CR>
<CR>*menutime=5s#<CR>
<CR>*menutime=10s#<CR>
<CR>*menutime=15s#<CR>
<CR>*menutime=20s#<CR>
<CR>*menutime=25s#<CR>
<CR>*menutime=30s#<CR>
<CR>*menutime=?#<CR>
<CR>*menuposition=center#<CR>
<CR>*menuposition=tl#<CR>
<CR>*menuposition=tr#<CR>
<CR>*menuposition=br#<CR>
<CR>*menuposition=bl#<CR>
<CR>*menuposition=?#<CR>
<CR>*reminder=on#<CR>
<CR>*reminder=off#<CR>
<CR>*reminder=?#<CR>
<CR>*directpower=on#<CR>
<CR>*directpower=off#<CR>
<CR>*directpower=?#<CR>
<CR>*standbynet=on#<CR>
<CR>*standbynet=off#<CR>
<CR>*standbynet=?#<CR>
<CR>*ltim=?#<CR>
<CR>*lampm=lnor#<CR>
<CR>*lampm=eco#<CR>
<CR>*lampm=seco#<CR>
<CR>*lampm=?#<CR>
繁體中文
27
繁體中文
其它
功能 類型 操作
讀取 機型
寫入 開啟空白畫面
寫入 關閉空白畫面
讀取 空白畫面狀態
寫入 開啟功能表
寫入 關閉功能表
寫入 上
寫入 下
寫入 右
寫入 左
寫入
寫入 返回
寫入
寫入
寫入
寫入
寫入
讀取
寫入
寫入
讀取 語言狀態
寫入
寫入
寫入
寫入
寫入
寫入
寫入
讀取 自動關機狀態
寫入
寫入
讀取
讀取
寫入 快速冷卻開啟
寫入 快速冷卻關閉
讀取 快速冷卻狀態
寫入 高海拔模式開啟
寫入 高海拔模式關閉
讀取 高海拔模式狀態
寫入 按鍵鎖開啟
寫入 按鍵鎖關閉
讀取 按鍵鎖狀態
寫入
寫入
讀取
輸入 / 確認
3D 自動
3D Sync 關閉
3D Sync 影格順序
停用 3D 反轉
3D 反轉
3D Sync 狀態
語言 +
語言 -
自動關機 - 停用
自動關機 - 5 分鐘
自動關機 - 10 分鐘
自動關機 - 15 分鐘
自動關機 - 20 分鐘
自動關機 - 25 分鐘
自動關機 - 30 分鐘
AMX 裝置搜尋 - 開啟
AMX 裝置搜尋 - 關閉
AMX 裝置搜尋狀態
MAC 位址
LED 指示燈亮起
LED 指示燈熄滅
LED 指示燈狀態
ASCII
<CR>*modelname=?#<CR>
<CR>*blank=on#<CR>
<CR>*blank=off#<CR>
<CR>*blank=?#<CR>
<CR>*menu=on#<CR>
<CR>*menu=off#<CR>
<CR>*up#<CR>
<CR>*down#<CR>
<CR>*right#<CR>
<CR>*left#<CR>
<CR>*enter#<CR>
<CR>*back#<CR>
<CR>*3d=auto#<CR>
<CR>*3d=off#<CR>
<CR>*3d=fs#<CR>
<CR>*3d=da#<CR>
<CR>*3d=iv#<CR>
<CR>*3d=?#<CR>
<CR>*lang=+#<CR>
<CR>*lang=-#<CR>
<CR>*lang=?#<CR>
<CR>*APOFF=DIS#<CR>
<CR>*APOFF=5#<CR>
<CR>*APOFF=10#<CR>
<CR>*APOFF=15#<CR>
<CR>*APOFF=20#<CR>
<CR>*APOFF=25#<CR>
<CR>*APOFF=30#<CR>
<CR>*APOFF=?#<CR>
<CR>*amxdd=on#<CR>
<CR>*amxdd=off#<CR>
<CR>*amxdd=?#<CR>
<CR>*macaddr=?#<CR>
<CR>*QCooling=on#<CR>
<CR>*QCooling=off#<CR>
<CR>*QCooling=?#<CR>
<CR>*Highaltitude=on#<CR>
<CR>*Highaltitude=off#<CR>
<CR>*Highaltitude=?#<CR>
<CR>*keylock=on#<CR>
<CR>*keylock=off#<CR>
<CR>*keylock=?#<CR>
<CR>*led=on#<CR>
<CR>*led=off#<CR>
<CR>*led=?#<CR>
28

目录
重要安全说明 ........................................................................................................................ 30
产品信息 ...............................................................................................................................32
物品清单 ....................................................................................................................................................32
规格 .............................................................................................................................................................32
投影机尺寸 ...............................................................................................................................................33
端子 .............................................................................................................................................................33
遥控器 ........................................................................................................................................................ 34
安装 ....................................................................................................................................... 35
投影尺寸 ....................................................................................................................................................35
移动投影镜头........................................................................................................................................... 36
吊装图解.................................................................................................................................................... 37
使用束线组 ............................................................................................................................................... 38
RS232 命令 ........................................................................................................................... 39
RS232 针脚分配 .......................................................................................................................................39
简体中文
29

重要安全说明
您的投影机经过设计和测试,符合最新信息技术设备的安全标准。然而,为确保安全使用本投
影机,按本用户手册 / 安装指南中的说明及产品上的标记进行操作是至关重要的。
1. 请在使用投影机之前阅读本用户手册 / 安装指南。请妥善保存本使用手册以备日后参考。
简体中文
2. 请勿在使用过程中直视投影机镜头。强光束可能会损害眼睛。
3. 请找专业维修人员进行维修。
4. 投影机光源开启时,请切记要打开镜头门 (如有)或取下镜头盖 (如有)。
5. 运作期间光源的温度极高。
6. 在某些国家,电源电压不稳定。本投影机在 100 到 240 伏的交流电源电压范围内可以正常运
行,但在停电或电压波动超过 ±10 伏时会无法正常运行。在电源电压可能波动或断电的区
域,建议您通过电源稳压器、电涌保护器或不间断电源 (UPS) 来连接投影机。
7. 投影机工作时,请勿使用任何物体阻挡投影镜头,否则会造成物体过热、变形甚至起火。若
要暂时关闭光源,请使用空屏功能。
8. 请勿使用超过额定光源寿命的光源。
9. 在没有拔掉投影机电源之前,请勿更换灯泡或任何电子元件。
10. 请勿将投影机置于不稳的推车、架子或桌子上。投影机可能跌落,遭受严重损坏。
11. 请勿尝试拆解本投影机。机身内部含有危险的高电压组件,万一接触人体时可能会造成电击
死亡。
在任何情况下,您都不可以打开或卸下其它护盖。请洽询专业技术人员进行维修。
12. 请勿堵塞通风孔。
- 请勿将投影机放置在毯子、寝具或其它柔软的表面上。
- 请勿用布或其它物体覆盖投影机。
- 请勿在投影机附近放置任何易燃品。
如果通风口严重受阻,投影机内部过高的热度可能会引起火灾。
13. 使用过程中应始终将投影机置于水平表面上。
- 请勿在左右倾斜角度大于 10 度或前后倾斜角度大于 15 度的情况下使用投影机。使用投影机时,如果未完全
水平放置,可能会导致灯泡出现故障或损坏。
14. 请勿垂直竖立投影机。这样会导致投影机倾倒,造成人身伤害或投影机损坏。
15. 请勿踩踏投影机或在投影机上面放置任何物体。否则除了可能对投影机造成损坏外,还可能
导致事故和人身伤害。
16. 当投影机在运行时,您可能会感觉有热气和气味从通风栅中排出。这是正常现象,并非产品
缺陷。
17. 请勿在投影机附近或投影机上面放置液体。液体如果溅入投影机内,可能导致投影机故障。
如果投影机已被淋湿,请将投影机电源线从墙壁插座上拔掉,然后通知 BenQ 人员维修投
影机。
18. 本产品可以安装在屋顶上以便吊装投影。
19. 本设备必须接地。
30

20. 请勿将投影机置于任何以下环境中。
进风口 出风口
50 厘米
以上
70 厘米
以上
50 厘米
以上
50 厘米
以上
30 厘米
以上
50 厘米
以上
至少 100 毫米
- 通风不佳或狭窄的空间。请至少离墙 50 厘米,并确保投影机周围空气流通。
- 温度过高的地方,如窗户紧闭的汽车内。
- 过度潮湿、有灰尘或烟雾的地方,这样会污染光学元件,缩短投影机使用寿命并使图像变暗。
- 火警附近的地方。
- 环境温度高于 40°C / 104°F 的地方。
- 海拔高于 2000 米(6561 英尺)的地方。
汞 - 此灯泡含有水银。请按当地处理法规进行管理。请参见 www.lamprecycle.org。
风险组 2
1. 根据光源和光源系统的光生物学安全性,本产品为风险组 2,
IEC 62471-5:2015。
2. 此设备可能有危害性的光辐射。
3. 请勿在操作灯泡时盯着光源,可能对眼睛有害。
4. 正如任何强光源一样,请勿直接注视该光束。
冷却注意事项
简体中文
通风 安装注意事项
要使投影机获得适当的通风,请确保在投影机周围留下适当空
间,如下图所示:
• 桌面 • 桌面
TEMP
POWER
LAMP
• 天花板 • 堆栈
请避免在通风较差或狭窄的空
间环境中使用投影机。
31

产品信息
物品清单
简体中文
投影机 装有电池的遥控器
安装指南 用户手册光盘
• 随本投影机提供的附件适用于您所在的地区,可能与手册上图解中所述的不同。
• * 仅部分特定地区提供保修卡。详细信息请咨询经销商。
保修卡 *
选配附件
1. 备用灯泡组
2. 吊装套件
3. RS232 线
4. 变形镜头
5. BenQ DGD5 3D 眼镜
规格
显示系统
分辨率 3840 x 2160 带 XPR
光源 240 W 灯泡
亮度 2200 流明
功耗 384 W (最大); < 0.5 W (待机)
重量 14.8 公斤 (32.6 磅)
1-CHIP DMD
2716 x 1528 不带 XPR
束线组 x 3
电源线
32

投影机尺寸
POWER
TEMP
LAMP
470.7
564.7 224.9
单位:毫米
470.7 毫米 (宽) x 224.9 毫米 (高) x 564.7 毫米 (厚)
端子
简体中文
• LAN (10/100M)
用于连接 RJ45 Cat5/Cat6 以太网线以通
过网络控制投影机。
• IR IN
用于使用红外线延伸器线以确保更好地
接收遥控器信号。
• PC
15 针 VGA 端口,用于连接到 RGB 信号
源或电脑。
• HDMI 1 (版本 2.0)及其束线孔
连接到 HDMI (4K) 信号源。
连接到束线组。
• HDMI 2 (版本 1.4a)及其束线孔
连接到 HDMI 信号源。
连接到束线组。
• USB MINI-B
仅用于固件升级。
• 12V TRIGGER 1/2
用于触发外接设备,如电动幕或灯光控制等。
• RS232
标准 9 针 D-sub 接口,用于连接到电脑控制系
统和投影机维护。
33

遥控器
打开
关闭
AUTO
ASPECT
SOURCE
上
左
OK
BACK
3D
CONTRAST
PIC MODE
COLOR TEMP
GAMMA
SHARP
TEST PATTERN
DEFAULT
右
下
MENU
CINEMAMASTER
INVERT
DYNAMIC IRIS
LIGHT MODE
COLOR MANAGE
ECO BLANK
KEY LIGHT
无功能 *
HDR
BRIGHT
无功能 *
简体中文
* 该按钮在此型号中无法使用。
34

安装
LAN
PC
RS232
12V
TRIGGHER
IR IN
1
2
HDMI 2-USB MINIB
HDMI 1
HDCP 2.2
高
宽
投影距离
镜头中心
屏幕
16:9 屏幕对角线
投影尺寸
• 屏幕宽高比为 16:9,投影图像宽高比为
16:9
简体中文
屏幕尺寸 与屏幕之间的距离 (毫米)
对角线
英寸 毫米 (最大缩放) (最小缩放)
宽
(毫米)高(毫米)
最小长度
平均值
最大长度
最低 /
最高镜头位置
(毫米)
80 2032 1771 996 2400 3000 3600 149
90 2286 1992 1121 2700 3375 4050 168
100 2540 2214 1245 3000 3750 4500 187
110 2794 2435 1370 3300 4125 4950 205
120 3048 2657 1494 3600 4500 5400 224
130 3302 2878 1619 3900 4875 5850 243
140 3556 3099 1743 4200 5250 6300 262
150 3810 3321 1868 4500 5625 6750 280
160 4064 3542 1992 4800 6000 7200 299
170 4318 3763 2117 5100 6375 7650 318
180 4572 3985 2241 5400 6750 8100 336
190 4826 4206 2366 5700 7125 8550 355
200 5080 4428 2491 6000 7500 9000 374
210 5334 4649 2615 6300 7875 9450 392
220 5588 4870 2740 6600 8250 9900 411
230 5842 5092 2864 6900 8625 10350 430
240 6096 5313 2989 7200 9000 10800 448
250 6350 5535 3113 7500 9375 11250 467
260 6604 5756 3238 7800 9750 11700 486
270 6858 5977 3362 8100 10125 12150 504
280 7112 6199 3487 8400 10500 12600 523
290 7366 6420 3611 8700 10875 13050 542
300 7620 6641 3736 9000 11250 13500 560
• 要优化投影质量,我们建议使用非灰色区域的數值进行投影。灰色区域中的數值仅供参考。
• 所有测试尺寸都是大约值,实际尺寸可能会有所不同。
BenQ 建议,如果您要将投影机固定安装在某个地方,请先使用这台投影机作实地测试,确认投影大小和
距离,并参考其光学性能之后再进行安装。这会帮助您找到最适合的安装位置。
• 吊装必须由合格专业人员完成。请联系您的经销商以了解更多信息。不建议您自行安装投影机。
• 仅在稳固、水平的表面上使用投影机。如果投影机跌落,可导致严重的人身伤害并损坏设备。
• 请勿在极端温度的环境下使用投影机。投影机必须在华氏 32 度(摄氏 0 度)到华氏 104 度 (摄氏 40 度)
之间的环境中使用。
• 如果投影机暴露在潮湿、多尘或烟雾的环境下会造成屏幕损坏。
• 请勿覆盖投影机的通风口。散热需要良好的通风。如果通风口堵塞,可能损坏投影机。
35

移动投影镜头
POWER
TEMP
LAMP
27%27%
1 屏幕宽度
LAN
PC
-
RS232
12V
TRIGGHER
IR IN
1
2
HDMI 2-USB MINIB
HDMI 1
HDCP 2.2
65%
65%
1
屏
幕
高
度
水平位置 垂直位置
简体中文
投影范围
36

吊装图解
290
337
372.8
547.8
530.8
553.39
564.49
275.79
吊装螺丝:M6
(最大长度 25 毫米;最小长度 20 毫米)
单位:毫米
简体中文
37

使用束线组
束线带
束线带棘齿
束线带头
1
3
2
束线组有助于防止电缆插头从连接端口松脱。它含有以下部分:
简体中文
若要使用束线组:
1. 将线缆紧紧插入投影机上正确的端口。将
束线带头插入连接端口上方的束线孔。请
注意,一旦束线带头插入束线孔,束线带
将无法取出。
2. 拿起束线带棘齿。轻轻打开棘齿以围绕连
接线缆。
3. 将束线带的一端插入束线带棘齿,如图
所示。
4. 按其凸舌可关闭束线带棘齿。
4
5. 将束线带棘齿沿束线带移动至线缆插头端。
5
38
束线带安装完成。

RS232 命令
RS232 针脚分配
编号 串行 编号 串行
1NC 6NC
2RX 7RTSZ
3TX 8CTSZ
4NC 9NC
5GND
功能 类型 操作
写入 电源开启
电源
输入源选择
图像模式
图像设置
写入 电源关闭
读取 电源状态
写入
写入
写入
读取 当前信号源
写入 明亮
写入 影院
写入
写入
写入 静音
写入
写入
写入
写入
写入
读取 图像模式
写入
写入
读取 对比度值
写入
写入
读取 亮度值
写入
写入
读取 色彩值
写入
写入
读取 色调值
写入
写入
读取 锐度值
写入
写入
读取 肤色值
写入
写入
写入
写入
读取 色温状态
写入
写入
COMPUTER/YPbPr <CR>*sour=RGB#<CR>
HDMI <CR>*sour=hdmi#<CR>
HDMI 2 <CR>*sour=hdmi2#<CR>
标准 / 生动
THX <CR>*appmod=thx#<CR>
用户 1
用户 2
ISF Night <CR>*appmod=isfnight#<CR>
ISF Day <CR>*appmod=isfday#<CR>
3D <CR>*appmod=threed#<CR>
对比度 +
对比度 -
亮度 +
亮度 -
色彩 +
色彩 -
色调 +
色调 -
锐度 +
锐度 -
肤色 +
肤色 -
色温 - 暖色
色温 - 正常
色温 - 冷色
色温 - 灯泡 (自然)
4:3 宽高比
16:9 宽高比
12345
6789
简体中文
ASCII
<CR>*pow=on#<CR>
<CR>*pow=off#<CR>
<CR>*pow=?#<CR>
<CR>*sour=?#<CR>
<CR>*appmod=bright#<CR>
<CR>*appmod=cine#<CR>
<CR>*appmod=std#<CR>
<CR>*appmod=silence#<CR>
<CR>*appmod=user1#<CR>
<CR>*appmod=user2#<CR>
<CR>*appmod=?#<CR>
<CR>*con=+#<CR>
<CR>*con=-#<CR>
<CR>*con=?#<CR>
<CR>*bri=+#<CR>
<CR>*bri=-#<CR>
<CR>*bri=?#<CR>
<CR>*color=+#<CR>
<CR>*color=-#<CR>
<CR>*color=?#<CR>
<CR>*tint=+#<CR>
<CR>*tint=-#<CR>
<CR>*tint=?#<CR>
<CR>*sharp=+#<CR>
<CR>*sharp=-#<CR>
<CR>*sharp=?#<CR>
<CR>*fleshtone=+#<CR>
<CR>*fleshtone=-#<CR>
<CR>*fleshtone=?#<CR>
<CR>*ct=warm#<CR>
<CR>*ct=normal#<CR>
<CR>*ct=cool#<CR>
<CR>*ct=native#<CR>
<CR>*ct=?#<CR>
<CR>*asp=4:3#<CR>
<CR>*asp=16:9#<CR>
39

简体中文
(续)
图像设置
功能 类型 操作
写入 自动宽高比
写入 实际宽高比
写入 宽高比变形
写入
写入
读取 宽高比状态
写入
写入
读取 过扫描调整值
写入 自动
写入
写入
读取 降噪值
写入
写入
读取 红色增益值
写入
写入
读取 绿色增益值
写入
写入
读取 蓝色增益值
写入
写入
读取 红色偏移值
写入
写入
读取 绿色偏移值
写入
写入
读取 蓝色偏移值
写入
写入
写入
写入
写入
写入
写入
写入
写入
读取 灰度系数选择状态
写入
写入
读取
写入
写入
写入
读取
写入
写入
读取
宽高比变形 2.4:1
宽高比变形 16:9
过扫描调整 +
过扫描调整 -
降噪 +
降噪 -
红色增益 +
红色增益 -
绿色增益 +
绿色增益 -
蓝色增益 +
蓝色增益 -
红色偏移 +
红色偏移 -
绿色偏移 +
绿色偏移 -
蓝色偏移 +
蓝色偏移 -
灰度系数选择 - 1.8
灰度系数选择 - 2.0
灰度系数选择 - 2.1
灰度系数选择 - 2.2
灰度系数选择 - 2.3
灰度系数选择 - 2.4
灰度系数选择 - 2.6
灰度系数选择 - 2.8
灰度系数选择 - BenQ
Brilliant Color 打开
Brilliant Color 关闭
Brilliant Color 状态
HDMI 格式 - 自动
HDMI 格式 - PC 信号
HDMI 格式 - 视频信号
HDMI 格式状态
CEC 打开
CEC 关闭
CEC 状态
ASCII
<CR>*asp=AUTO#<CR>
<CR>*asp=REAL#<CR>
<CR>*asp=ANAM#<CR>
<CR>*asp=ANAM2.4:1#<CR>
<CR>*asp=ANAM16:9#<CR>
<CR>*asp=?#<CR>
<CR>*overscan=+#<CR>
<CR>*overscan=-#<CR>
<CR>*overscan=?#<CR>
<CR>*auto#<CR>
<CR>*NR=+#<CR>
<CR>*NR=-#<CR>
<CR>*NR=?#<CR>
<CR>*RGain=+#<CR>
<CR>*RGain=-#<CR>
<CR>*RGain=?#<CR>
<CR>*GGain=+#<CR>
<CR>*GGain=-#<CR>
<CR>*GGain=?#<CR>
<CR>*BGain=+#<CR>
<CR>*BGain=-#<CR>
<CR>*BGain=?#<CR>
<CR>*ROffset=+#<CR>
<CR>*ROffset=-#<CR>
<CR>*ROffset=?#<CR>
<CR>*GOffset=+#<CR>
<CR>*GOffset=-#<CR>
<CR>*GOffset=?#<CR>
<CR>*BOffset=+#<CR>
<CR>*BOffset=-#<CR>
<CR>*BOffset=?#<CR>
<CR>*gamma=1.8#<CR>
<CR>*gamma=2.0#<CR>
<CR>*gamma=2.1#<CR>
<CR>*gamma=2.2#<CR>
<CR>*gamma=2.3#<CR>
<CR>*gamma=2.4#<CR>
<CR>*gamma=2.6#<CR>
<CR>*gamma=2.8#<CR>
<CR>*gamma=benq#<CR>
<CR>*gamma=?#<CR>
<CR>*BC=on#<CR>
<CR>*BC=off#<CR>
<CR>*BC=?#<CR>
<CR>*HDMI=auto#<CR>
<CR>*HDMI=pc#<CR>
<CR>*HDMI=video#<CR>
<CR>*HDMI=?#<CR>
<CR>*cec=on#<CR>
<CR>*cec=off#<CR>
<CR>*cec=?#<CR>
40

操作设置
灯泡控制
功能 类型 操作
写入
写入
写入
写入 开机画面状态
写入
写入
写入
读取 背景色状态
写入
写入
写入
写入
读取 投影机位置状态
写入
写入
读取
写入
写入
写入
写入
写入
写入
写入
读取 菜单显示时间状态
写入
写入
写入
写入
写入
读取 菜单位置状态
写入
写入
读取 提示信息状态
写入
写入
读取
写入
写入
读取
读取 灯泡使用时间
写入 正常模式
写入 节能模式
写入 智能省电模式
读取 灯泡模式状态
开机画面 - BenQ
开机画面 - 黑色
开机画面 - 蓝色
背景色 - 黑色
背景色 - 蓝色
背景色 - 紫色
投影机位置 - 桌上正投
投影机位置 - 桌上背投
投影机位置 - 吊装背投
投影机位置 - 吊装正投
快速自动搜索 / 自动搜索信号源
快速自动搜索 / 自动搜索信号源
快速自动搜索状态 / 自动搜索信号源
状态
菜单显示时间 - 始终打开
菜单显示时间 - 5 秒
菜单显示时间 - 10 秒
菜单显示时间 - 15 秒
菜单显示时间 - 20 秒
菜单显示时间 - 25 秒
菜单显示时间 - 30 秒
菜单位置 - 居中
菜单位置 - 左上角
菜单位置 - 右上角
菜单位置 - 右下角
菜单位置 - 左下角
提示信息 - 打开
提示信息 - 关闭
直接开机 - 打开
直接开机 - 关闭
直接开机 - 状态
待机设置 - 网络开启
待机设置 - 网络关闭
待机设置 - 网络状态
ASCII
<CR>*splash=benq#<CR>
<CR>*splash=black#<CR>
<CR>*splash=blue#<CR>
<CR>*splash=?#<CR>
<CR>*background=black#<CR>
<CR>*background=blue#<CR>
<CR>*background=purple#<CR>
<CR>*background=?#<CR>
<CR>*pp=FT#<CR>
<CR>*pp=RE#<CR>
<CR>*pp=RC#<CR>
<CR>*pp=FC#<CR>
<CR>*pp=?#<CR>
<CR>*QAS=on#<CR>
<CR>*QAS=off#<CR>
<CR>*QAS=?#<CR>
<CR>*menutime=on#<CR>
<CR>*menutime=5s#<CR>
<CR>*menutime=10s#<CR>
<CR>*menutime=15s#<CR>
<CR>*menutime=20s#<CR>
<CR>*menutime=25s#<CR>
<CR>*menutime=30s#<CR>
<CR>*menutime=?#<CR>
<CR>*menuposition=center#<CR>
<CR>*menuposition=tl#<CR>
<CR>*menuposition=tr#<CR>
<CR>*menuposition=br#<CR>
<CR>*menuposition=bl#<CR>
<CR>*menuposition=?#<CR>
<CR>*reminder=on#<CR>
<CR>*reminder=off#<CR>
<CR>*reminder=?#<CR>
<CR>*directpower=on#<CR>
<CR>*directpower=off#<CR>
<CR>*directpower=?#<CR>
<CR>*standbynet=on#<CR>
<CR>*standbynet=off#<CR>
<CR>*standbynet=?#<CR>
<CR>*ltim=?#<CR>
<CR>*lampm=lnor#<CR>
<CR>*lampm=eco#<CR>
<CR>*lampm=seco#<CR>
<CR>*lampm=?#<CR>
简体中文
41

简体中文
其它
功能 类型 操作
读取 型号名称
写入 空屏打开
写入 空屏关闭
读取 空屏状态
写入 菜单打开
写入 菜单关闭
写入 上
写入 下
写入 右
写入 左
写入
写入 返回
写入
写入
写入
写入
写入
读取
写入
写入
读取 语言状态
写入
写入
写入
写入
写入
写入
写入
读取 自动关机状态
写入
写入
读取
读取
写入 快速冷却打开
写入 快速冷却关闭
读取 快速冷却状态
写入 高海拔模式打开
写入 高海拔模式关闭
读取 高海拔模式状态
写入 按键锁定打开
写入 按键锁定关闭
读取 按键锁定状态
写入
写入
读取
输入 / 确定
3D 自动
3D 同步关闭
3D 同步帧连续
3D 反转禁用
3D 反转
3D 同步状态
语言 +
语言 -
自动关机 - 禁用
自动关机 - 5 分钟
自动关机 - 10 分钟
自动关机 - 15 分钟
自动关机 - 20 分钟
自动关机 - 25 分钟
自动关机 - 30 分钟
AMX
设备发现 - 打开
AMX 设备发现 - 关闭
AMX 设备发现状态
MAC 地址
LED 指示灯打开
LED 指示灯关闭
LED 指示灯状态
ASCII
<CR>*modelname=?#<CR>
<CR>*blank=on#<CR>
<CR>*blank=off#<CR>
<CR>*blank=?#<CR>
<CR>*menu=on#<CR>
<CR>*menu=off#<CR>
<CR>*up#<CR>
<CR>*down#<CR>
<CR>*right#<CR>
<CR>*left#<CR>
<CR>*enter#<CR>
<CR>*back#<CR>
<CR>*3d=auto#<CR>
<CR>*3d=off#<CR>
<CR>*3d=fs#<CR>
<CR>*3d=da#<CR>
<CR>*3d=iv#<CR>
<CR>*3d=?#<CR>
<CR>*lang=+#<CR>
<CR>*lang=-#<CR>
<CR>*lang=?#<CR>
<CR>*APOFF=DIS#<CR>
<CR>*APOFF=5#<CR>
<CR>*APOFF=10#<CR>
<CR>*APOFF=15#<CR>
<CR>*APOFF=20#<CR>
<CR>*APOFF=25#<CR>
<CR>*APOFF=30#<CR>
<CR>*APOFF=?#<CR>
<CR>*amxdd=on#<CR>
<CR>*amxdd=off#<CR>
<CR>*amxdd=?#<CR>
<CR>*macaddr=?#<CR>
<CR>*QCooling=on#<CR>
<CR>*QCooling=off#<CR>
<CR>*QCooling=?#<CR>
<CR>*Highaltitude=on#<CR>
<CR>*Highaltitude=off#<CR>
<CR>*Highaltitude=?#<CR>
<CR>*keylock=on#<CR>
<CR>*keylock=off#<CR>
<CR>*keylock=?#<CR>
<CR>*led=on#<CR>
<CR>*led=off#<CR>
<CR>*led=?#<CR>
42

Table des matières
Consignes de sécurité importantes .................................................................................. 44
Informations du produit ..................................................................................................... 46
Contenu de l’emballage ..........................................................................................................................46
Caractéristiques ........................................................................................................................................46
Dimensions de projection ......................................................................................................................47
Prises ...........................................................................................................................................................47
Télécommande.......................................................................................................................................... 48
Installation ........................................................................................................................... 49
Dimensions de projection ......................................................................................................................49
Décalage de l’objectif de projection..................................................................................................... 50
Diagramme de configuration de montage au plafond...................................................................... 51
Utiliser le groupe attache de câble....................................................................................................... 52
Commande RS232 .............................................................................................................. 53
Affectation de broches RS232 ...............................................................................................................53
Français
43

Consignes de sécurité importantes
Votre projecteur a été conçu et testé conformément aux normes de sécurité les plus récentes en
matière d’équipements informatiques. Cependant, pour assurer une utilisation sans danger, il est
important de suivre les instructions de le manuel d’utilisation / guide d’installation ainsi que celles
apposées sur le produit.
1. Veuillez lire le manuel d’utilisation / guide d’installation avant d’utiliser l’appareil pour
la première fois. Conservez-le pour toute consultation ultérieure.
Français
2. Ne regardez pas directement l’objectif de projection lorsque l’appareil est en cours
d’utilisation. L’intensité du faisceau lumineux pourrait entraîner des lésions oculaires.
3. Confiez les opérations d’entretien et de réparation à un technicien qualifié.
4. N’oubliez pas d’ouvrir l’obturateur (le cas échéant) ni de retirer le couvercle de
l’objectif (le cas échéant) lorsque la source lumineuse du projecteur est allumée.
5. La source lumineuse atteint une température très élevée lorsque l’appareil est en cours
d’utilisation.
6. Dans certains pays, la tension d’alimentation n’est PAS stable. Ce projecteur est conçu pour
fonctionner en toute sécurité à une tension située entre 100 et 240 volts CA. Cependant, une
panne n'est pas exclue en cas de hausse ou de baisse de tension de l'ordre de ±10 volts. Dans les
zones où l’alimentation secteur peut fluctuer ou s’interrompre, il est conseillé de
relier votre projecteur à un stabilisateur de puissance, un dispositif de protection
contre les surtensions ou un onduleur (UPS).
7. Évitez de placer des objets devant l’objectif de projection lorsque le projecteur est en cours
d’utilisation car ils risqueraient de se déformer en raison de la chaleur ou de provoquer un
incendie. Pour éteindre temporairement la source lumineuse, utilisez la fonction vide.
8. N’utilisez pas les sources lumineuses au-delà de leur durée de vie nominale.
9. Ne remplacez jamais la lampe ni aucun composant électronique tant que le projecteur n’est pas
débranché.
10. Ne posez pas cet appareil sur un chariot, un support ou une table instable. Il risquerait de tomber
et d’être sérieusement endommagé.
11. N’essayez en aucun cas de démonter ce projecteur. Un courant de haute tension circule à
l’intérieur de votre appareil. Tout contact avec certaines pièces peut présenter un danger de mort.
Vous ne devez en aucun cas démonter ou retirer quelque autre protection que ce soit. Ne confiez
les opérations d’entretien et de réparation qu’à un technicien qualifié.
12. N’obstruez pas les orifices de ventilation.
- Ne placez pas le projecteur sur une couverture, de la literie ou toute autre surface souple.
- Ne recouvrez pas le projecteur avec un chiffon ni aucun autre élément.
- Ne placez pas de produits inflammables à proximité du projecteur.
Une importante obstruction des orifices de ventilation peut entraîner une surchauffe du projecteur
qui risque alors de prendre feu.
13. Placez toujours le projecteur sur une surface plane et horizontale avant de l’utiliser.
- N’utilisez pas le projecteur lorsqu’il est placé sur une surface inclinée à plus de 10 degrés sur la gauche ou la droite ou
à plus de 15 degrés vers l’avant ou l’arrière. Une inclinaison trop importante du projecteur peut être à l’origine de
dysfonctionnements, voire d’une détérioration de la lampe.
14. Ne posez pas le projecteur sur le flanc. Il risque de basculer et de blesser quelqu’un ou encore de
subir de sérieux dommages.
44

15. Ne vous appuyez pas sur le projecteur et ne placez aucun objet dessus. Une charge trop élevée
Entrée d’air Sortie d’air
50 cm au
dessus
70 cm au
dessus
50 cm au
dessus
50 cm au
dessus
30 cm au
dessus
50 cm au
dessus
Minimum 100 mm
risque non seulement d’endommager le projecteur, mais également d’être à l’origine d’accidents et
de blessures corporelles.
16. De l’air chaud et une odeur particulière peuvent s’échapper de la grille de ventilation lorsque le
projecteur est sous tension. Il s’agit d’un phénomène normal et non d’une défaillance.
17. Ne placez pas de liquides sur le projecteur, ni à proximité. Tout déversement pourrait être à
l’origine d’une panne. Si le projecteur devait être mouillé, débranchez-le de la prise secteur et
contactez BenQ pour une réparation.
18. Cet appareil peut afficher des images renversées pour des configurations de montage au plafond.
19. Cet appareil doit être mis à la terre.
20. Évitez de placer le projecteur dans l’un des environnements ci-dessous.
- Espace réduit ou peu ventilé. l’appareil doit être placé à une distance minimale de 50 cm des murs et l’air doit pouvoir
circuler librement autour du projecteur.
- Emplacements soumis à des températures trop élevées, par exemple dans une voiture aux vitres fermées.
- Emplacements soumis à un taux d’humidité excessif, poussiéreux ou enfumés risquant de détériorer les composants
optiques, de réduire la durée de vie de l’appareil ou d’assombrir l’image.
- Emplacements situés à proximité d’une alarme incendie.
- Emplacements dont la température ambiante dépasse 40°C / 104°F.
- Emplacements où l’altitude excède 3000 mètres (10000 pieds).
Hg - La lampe contient du mercure. Traiter en accord avec les lois locales d’élimination. Voir www.lamprecycle.org.
Groupe de risque 2
1. Selon la classification de la sécurité photobiologique des sources
lumineuse et systèmes de sources lumineuse, ce produit est du
Groupe de risque 2, CEI 62471-5:2015.
2. Rayonnement optique éventuellement dangereux émis par ce produit.
3. Ne regardez pas la source lumineuse en fonction. Cela pourrait
blesser vos yeux.
4. Comme pour toute source lumineuse, ne regardez pas directement le rayon lumineux.
Français
Avis de refroidissement
Ventilation Avertissement pour l’installation
LAMP
Évitez d’utiliser le projecteur
dans un espace mal ventilé ou
confiné.
TEMP
POWER
Pour une ventilation adéquate du projecteur, assurez-vous de laisser
un espace autour du projecteur comme indiqué dans l’illustration
ci-dessous :
• Table • Table
• Plafond • Empilage
45

Informations du produit
Contenu de l’emballage
Français
Projecteur Télécommande et piles
Guide d’installation
• Les accessoires fournis dépendent de votre région et peuvent présenter des différences par rapport aux
accessoires illustrés.
• *La carte de garantie n’est fournie que dans certaines régions. Veuillez contacter votre revendeur pour des
informations détaillées.
CD du manuel
d’utilisation
Accessoires disponibles en option
1. Lampe supplémentaire
2. Kit de montage au plafond
3. Câble RS232
Caractéristiques
Groupe attache de câble
x 3
Carte de garantie* Cordon d’alimentation
4. Objectif anamorphique
5. Lunettes 3D BenQ DGD5
Système d’affichage DMD 1 puce
Résolution 3840 x 2160 avec XPR
2716 x 1528 sans XPR
Source lumineuse Lampe 240 W
Luminosité 2200 Lumens
Consommation 384 W (max) ; < 0,5 W (veille)
Poids 14,8 kg (32,6 lb)
46

Dimensions de projection
POWER
TEMP
LAMP
470,7
564,7 224,9
Unité : mm
470,7 mm (L) x 224,9 mm (H) x 564,7 mm (P)
Prises
Français
• LAN (10/100M)
Pour la connexion d’un câble Ethernet
RJ45 Cat5/Cat6 pour contrôler le
projecteur via un réseau.
• IR IN
Pour une utilisation avec un câble
d’extension IR pour assurer une meilleure
réception du signal de la télécommande.
• PC
Port VGA 15 broches pour la connexion à
une source RVB ou un PC.
• HDMI 1 (Version 2.0) et son trou d’attache de
câble
Connexion à une source HDMI (4K).
Connexion à un groupe attache de câble.
• HDMI 2 (Version 1.4a) et son trou d’attache
de câble
Connexion à une source HDMI.
Connexion à un groupe attache de câble.
• USB MINI-B
Pour la mise à niveau du micrologiciel uniquement.
• 12V TRIGGER 1/2
Déclenche les appareils externes tels qu’un écran
électrique ou le contrôle de l’éclairage, etc.
• RS232
Interface D-sub standard à 9 broches pour la
connexion à un système de contrôle PC et à la
maintenance du projecteur.
47

Télécommande
Activ.
Désact.
AUTO
ASPECT
SOURCE
Haut
Gauche
OK
BACK
3D
CONTRAST
PIC MODE
COLOR TEMP
GAMMA
SHARP
TEST PATTERN
DEFAULT
Droite
Bas
MENU
CINEMAMASTER
INVERT
DYNAMIC IRIS
LIGHT MODE
COLOR MANAGE
ECO BLANK
KEY LIGHT
Sans fonction*
HDR
BRIGHT
Sans fonction*
Français
* Ce bouton n’est pas disponible pour ce modèle.
48

Installation
LAN
PC
RS232
12V
TRIGGHER
IR IN
1
2
HDMI 2-USB MINIB
HDMI 1
HDCP 2.2
H
L
Distance de projection
Centre de l’objectif
Écran
Diagonale d’écran 16:9
Dimensions de projection
• Le format de l’écran est 16:9 et l’image
projetée est au format 16:9
Taille d’écran Distance de l’écran (mm)
Diagonale
Pouce mm (zoom max.) (zoom min.)
L (mm) H (mm)
Distance min.
Moyenne
Distance max.
Positio n
la plus basse/haute
de l’objectif (mm)
80 2032 1771 996 2400 3000 3600 149
90 2286 1992 1121 2700 3375 4050 168
100 2540 2214 1245 3000 3750 4500 187
110 2794 2435 1370 3300 4125 4950 205
120 3048 2657 1494 3600 4500 5400 224
130 3302 2878 1619 3900 4875 5850 243
140 3556 3099 1743 4200 5250 6300 262
150 3810 3321 1868 4500 5625 6750 280
160 4064 3542 1992 4800 6000 7200 299
170 4318 3763 2117 5100 6375 7650 318
180 4572 3985 2241 5400 6750 8100 336
190 4826 4206 2366 5700 7125 8550 355
200 5080 4428 2491 6000 7500 9000 374
210 5334 4649 2615 6300 7875 9450 392
220 5588 4870 2740 6600 8250 9900 411
230 5842 5092 2864 6900 8625 10350 430
240 6096 5313 2989 7200 9000 10800 448
250 6350 5535 3113 7500 9375 11250 467
260 6604 5756 3238 7800 9750 11 700 486
270 6858 5977 3362 8100 10125 12150 504
280 7112 6199 3487 8400 10500 12600 523
290 7366 6420 3611 8700 10875 13050 542
300 7620 6641 3736 9000 11250 13500 560
Français
• Pour optimiser votre qualité de projection, nous suggérons de faire la projection en suivant les valeurs dans les
cellules non grises. Les valeurs dans les cellules grises sont pour référence seulement.
• Toutes les mesures sont approximatives et peuvent varier des tailles réelles.
Si vous avez l’intention d’installer le projecteur de façon permanente, BenQ vous recommande de tester
physiquement la taille et la distance de projection à l’emplacement précis d’installation du projecteur avant de
l’installer de façon permanente, afin de prendre en compte les caractéristiques optiques de ce projecteur. Cela
vous aidera à déterminer la position de montage exacte la mieux adaptée à l’emplacement de votre installation.
• L’installation au plafond doit être effectuée par un professionnel qualifié. Contactez votre revendeur pour plus
d’informations. Il n’est pas recommandé d’installer le projecteur vous-même.
• Utilisez toujours le projecteur sur une surface solide et plane. Des blessures graves et des dégâts peuvent survenir
si le projecteur tombe.
• N’utilisez pas le projecteur dans un environnement où se produisent des températures extrêmes. Le projecteur
doit être utilisé à des températures comprises entre 32 degrés Fahrenheit (0 degrés Celsius) et 104 degrés
Fahrenheit (40 degrés Celsius).
• Des dommages à l'écran se produiront si le projecteur est exposé à l’humidité, à la poussière ou à la fumée.
• Ne couvrez pas les entrées et sorties d’air du projecteur. Une ventilation adéquate est requise pour dissiper la
chaleur. Des dommages au projecteur se produiront si les entrées et sorties d’air sont couverts.
49

Décalage de l’objectif de projection
POWER
TEMP
LAMP
27%27%
1 largeur
d’écran
LAN
PC
-
RS232
12V
TRIGGHER
IR IN
1
2
HDMI 2-USB MINIB
HDMI 1
HDCP 2.2
65%
65%
1
h
au
t
e
u
r
d
’
é
c
r
an
La position horizontale La position verticale
Français
La plage de projection
50

Diagramme de configuration de montage au plafond
290
337
372.8
547.8
530.8
553.39
564.49
275.79
Vis de montage au plafond : M6
(L max. = 25 mm ; L min. = 20 mm)
Unité : mm
Français
51

Utiliser le groupe attache de câble
Attache de câble
Cliquet d’attache
de câble
Tête d’attache de
câble
1
3
4
2
Le groupe attache de câble permet d’éviter qu’une prise de câble sorte du port de connexion. Il
contient les éléments suivants.
Français
Pour utiliser le groupe attache de câble :
1. Branchez fermement un câble à un port
approprié du projecteur. Insérez la tête
d’attache de câble dans le trou d’attache de
câble juste au-dessus du port de connexion.
Notez que l’attache de câble ne peut pas être
retirée du trou une fois qu’elle est insérée.
2. Prenez le cliquet d’attache de câble. Ouvrez
légèrement le cliquet pour entourer le câble
de connexion.
3. Insérez l’extrémité de l’attache de câble dans
le cliquet d’attache de câble, comme illustré.
4. Fermez le cliquet d’attache de câble en
appuyant sur son onglet.
5. Déplacez le cliquet d’attache de câble avec
l’attache de câble à l’extrémité de la prise du
câble.
52
5
L’installation de l’attache de câble est finie.

Commande RS232
Affectation de broches RS232
Nº Série Nº Série
1NC 6NC
2RX 7RTSZ
3TX 8CTSZ
4NC 9NC
5GND
12345
6789
Fonction Ty p e Fonctionnement ASCII
Écriture Sous tension <CR>*pow=on#<CR>
Alimentation
Sélection de la source
Mode Image
Paramètres image
Écriture Hors tension <CR>*pow=off#<CR>
Lecture État d’alimentation <CR>*pow=?#<CR>
Écriture COMPUTER/YPbPr <CR>*sour=RGB#<CR>
Écriture HDMI <CR>*sour=hdmi#<CR>
Écriture HDMI 2 <CR>*sour=hdmi2#<CR>
Lecture Source actuelle <CR>*sour=?#<CR>
Écriture Lumineux <CR>*appmod=bright#<CR>
Écriture Cinéma <CR>*appmod=cine#<CR>
Écriture Standard/Vif <CR>*appmod=std#<CR>
Écriture THX <CR>*appmod=thx#<CR>
Écriture Silence <CR>*appmod=silence#<CR>
Écriture Util. 1 <CR>*appmod=user1#<CR>
Écriture Util. 2 <CR>*appmod=user2#<CR>
Écriture ISF Night <CR>*appmod=isfnight#<CR>
Écriture ISF Day <CR>*appmod=isfday#<CR>
Écriture 3D <CR>*appmod=threed#<CR>
Lecture Mode Image <CR>*appmod=?#<CR>
Écriture Contraste + <CR>*con=+#<CR>
Écriture Contraste - <CR>*con=-#<CR>
Lecture Valeur du contraste <CR>*con=?#<CR>
Écriture Luminosité + <CR>*bri=+#<CR>
Écriture Luminosité - <CR>*bri=-#<CR>
Lecture Valeur de la luminosité <CR>*bri=?#<CR>
Écriture Couleur + <CR>*color=+#<CR>
Écriture Couleur - <CR>*color=-#<CR>
Lecture Valeur de la couleur <CR>*color=?#<CR>
Écriture Teinte + <CR>*tint=+#<CR>
Écriture Teinte - <CR>*tint=-#<CR>
Lecture Valeur de la teinte <CR>*tint=?#<CR>
Écriture Netteté + <CR>*sharp=+#<CR>
Écriture Netteté - <CR>*sharp=-#<CR>
Lecture Valeur de la netteté <CR>*sharp=?#<CR>
Écriture Ton chair + <CR>*fleshtone=+#<CR>
Écriture Ton chair - <CR>*fleshtone=-#<CR>
Lecture Valeur du ton chair <CR>*fleshtone=?#<CR>
Écriture Température des couleurs-Chaud <CR>*ct=warm#<CR>
Écriture Température des couleurs-Normal <CR>*ct=normal#<CR>
Écriture Température des couleurs-Froid <CR>*ct=cool#<CR>
Écriture
Lecture État de la température des couleurs <CR>*ct=?#<CR>
Écriture Rapport 4:3 <CR>*asp=4:3#<CR>
Écriture Rapport 16:9 <CR>*asp=16:9#<CR>
Écriture Rapport auto <CR>*asp=AUTO#<CR>
Température des couleurs-Lampe
d’origine
<CR>*ct=native#<CR>
Français
53

Français
Paramètres image
(Suite)
Fonction Ty p e Fonctionnement ASCII
Écriture Rapport réel <CR>*asp=REAL#<CR>
Écriture Rapport Anamorphique <CR>*asp=ANAM#<CR>
Écriture Rapport Anamorphique 2,4:1 <CR>*asp=ANAM2.4:1#<CR>
Écriture Rapport Anamorphique 16:9 <CR>*asp=ANAM16:9#<CR>
Lecture État du rapport <CR>*asp=?#<CR>
Écriture Réglage hors balayage + <CR>*overscan=+#<CR>
Écriture Réglage hors balayage - <CR>*overscan=-#<CR>
Lecture Valeur de réglage hors balayage <CR>*overscan=?#<CR>
Écriture Auto <CR>*auto#<CR>
Écriture Réduction du bruit + <CR>*NR=+#<CR>
Écriture Réduction du bruit - <CR>*NR=-#<CR>
Lecture État de réduction du bruit <CR>*NR=?#<CR>
Écriture Gain rouge + <CR>*RGain=+#<CR>
Écriture Gain rouge - <CR>*RGain=-#<CR>
Lecture Valeur du gain rouge <CR>*RGain=?#<CR>
Écriture Gain vert + <CR>*GGain=+#<CR>
Écriture Gain vert - <CR>*GGain=-#<CR>
Lecture Valeur du gain vert <CR>*GGain=?#<CR>
Écriture Gain bleu + <CR>*BGain=+#<CR>
Écriture Gain bleu - <CR>*BGain=-#<CR>
Lecture Valeur du gain bleu <CR>*BGain=?#<CR>
Écriture Décalage rouge + <CR>*ROffset=+#<CR>
Écriture Décalage rouge - <CR>*ROffset=-#<CR>
Lecture Valeur du décalage rouge <CR>*ROffset=?#<CR>
Écriture Décalage vert + <CR>*GOffset=+#<CR>
Écriture Décalage vert - <CR>*GOffset=-#<CR>
Lecture Valeur du décalage vert <CR>*GOffset=?#<CR>
Écriture Décalage bleu + <CR>*BOffset=+#<CR>
Écriture Décalage bleu - <CR>*BOffset=-#<CR>
Lecture Valeur du décalage bleu <CR>*BOffset=?#<CR>
Écriture Sélection gamma - 1,8 <CR>*gamma=1.8#<CR>
Écriture Sélection gamma - 2,0 <CR>*gamma=2.0#<CR>
Écriture Sélection gamma - 2,1 <CR>*gamma=2.1#<CR>
Écriture Sélection gamma - 2,2 <CR>*gamma=2.2#<CR>
Écriture Sélection gamma - 2,3 <CR>*gamma=2.3#<CR>
Écriture Sélection gamma - 2,4 <CR>*gamma=2.4#<CR>
Écriture Sélection gamma - 2,6 <CR>*gamma=2.6#<CR>
Écriture Sélection gamma - 2,8 <CR>*gamma=2.8#<CR>
Écriture Sélection gamma - BenQ <CR>*gamma=benq#<CR>
Lecture État de sélection gamma <CR>*gamma=?#<CR>
Écriture Brilliant Color activé <CR>*BC=on#<CR>
Écriture Brilliant Color désactivé <CR>*BC=off#<CR>
Lecture État de Brilliant Color <CR>*BC=?#<CR>
Écriture Format HDMI - Auto <CR>*HDMI=auto#<CR>
Écriture Format HDMI - Signal PC <CR>*HDMI=pc#<CR>
Écriture Format HDMI - Signal vidéo <CR>*HDMI=video#<CR>
Lecture État de format HDMI <CR>*HDMI=?#<CR>
Écriture CEC activé <CR>*cec=on#<CR>
Écriture CEC désactivé <CR>*cec=off#<CR>
Lecture État CEC <CR>*cec=?#<CR>
54

Fonction Ty p e Fonctionnement ASCII
Écriture Écran d’accueil - BenQ <CR>*splash=benq#<CR>
Écriture Écran d’accueil - Noir <CR>*splash=black#<CR>
Écriture Écran d’accueil - Bleu <CR>*splash=blue#<CR>
Écriture État de l’écran d’accueil <CR>*splash=?#<CR>
Écriture Couleur de fond - Noir <CR>*background=black#<CR>
Écriture Couleur de fond - Bleu <CR>*background=blue#<CR>
Écriture Couleur de fond - Violet <CR>*background=purple#<CR>
Lecture État de la couleur de fond <CR>*background=?#<CR>
Écriture Position du projecteur - Sol avant <CR>*pp=FT#<CR>
Écriture Position du projecteur - Sol arrière <CR>*pp=RE#<CR>
Écriture Position du projecteur - Plafond arr. <CR>*pp=RC#<CR>
Écriture Position du projecteur - Plafond avant <CR>*pp=FC#<CR>
Lecture État de la position du projecteur <CR>*pp=?#<CR>
Recherche auto rapide/Recherche auto
de la source
Recherche auto rapide/Recherche auto
de la source
État de recherche auto rapide/État de
recherche auto de la source
Paramètres de veille - Réseau
désactivé
<CR>*QAS=on#<CR>
<CR>*QAS=off#<CR>
<CR>*QAS=?#<CR>
<CR>*standbynet=off#<CR>
Paramètres de
fonctionnement
Contrôle de la lampe
Écriture
Écriture
Lecture
Écriture Durée aff. des menus - Tj allumé <CR>*menutime=on#<CR>
Écriture Durée aff. des menus - 5 sec <CR>*menutime=5s#<CR>
Écriture Durée aff. des menus - 10 sec <CR>*menutime=10s#<CR>
Écriture Durée aff. des menus - 15 sec <CR>*menutime=15s#<CR>
Écriture Durée aff. des menus - 20 sec <CR>*menutime=20s#<CR>
Écriture Durée aff. des menus - 25 sec <CR>*menutime=25s#<CR>
Écriture Durée aff. des menus - 30 sec <CR>*menutime=30s#<CR>
Lecture État de durée aff. des menus <CR>*menutime=?#<CR>
Écriture Position des menus - Centre <CR>*menuposition=center#<CR>
Écriture Position des menus - Coin sup. Gauche <CR>*menuposition=tl#<CR>
Écriture Position des menus - Coin sup. Droit <CR>*menuposition=tr#<CR>
Écriture Position des menus - Coin inf. Droit <CR>*menuposition=br#<CR>
Écriture Position des menus - Coin inf. gauche <CR>*menuposition=bl#<CR>
Lecture État des positions du projecteur <CR>*menuposition=?#<CR>
Écriture Message de rappel - Activé <CR>*reminder=on#<CR>
Écriture Message de rappel - Désactivé <CR>*reminder=off#<CR>
Lecture État du message de rappel <CR>*reminder=?#<CR>
Écriture Mise sous tension directe - activée <CR>*directpower=on#<CR>
Écriture Mise sous tension directe - désactivée <CR>*directpower=off#<CR>
Lecture Mise sous tension directe - État <CR>*directpower=?#<CR>
Écriture Paramètres de veille - Réseau activé <CR>*standbynet=on#<CR>
Écriture
Lecture Paramètres de veille - État du réseau <CR>*standbynet=?#<CR>
Lecture Heures lampe <CR>*ltim=?#<CR>
Écriture Mode normal <CR>*lampm=lnor#<CR>
Écriture Mode éco <CR>*lampm=eco#<CR>
Écriture Mode Éco Smart <CR>*lampm=seco#<CR>
Lecture État du mode lampe <CR>*lampm=?#<CR>
Français
55

Français
Fonction Ty p e Fonctionnement ASCII
Lecture Nom de modèle <CR>*modelname=?#<CR>
Écriture Vide activé <CR>*blank=on#<CR>
Écriture Vide désactivé <CR>*blank=off#<CR>
Lecture État vide <CR>*blank=?#<CR>
Écriture Menu activé <CR>*menu=on#<CR>
Écriture Menu désactivé <CR>*menu=off#<CR>
Écriture Haut <CR>*up#<CR>
Écriture Bas <CR>*down#<CR>
Écriture Droite <CR>*right#<CR>
Écriture Gauche <CR>*left#<CR>
Écriture Entrée/OK <CR>*enter#<CR>
Écriture RETOUR <CR>*back#<CR>
Écriture Auto 3D <CR>*3d=auto#<CR>
Écriture Sync 3D désactivée <CR>*3d=off#<CR>
Écriture Trame séquentielle sync 3D <CR>*3d=fs#<CR>
Écriture Inversion 3D désactivé <CR>*3d=da#<CR>
Écriture Inversion 3D <CR>*3d=iv#<CR>
Lecture État sync 3D <CR>*3d=?#<CR>
Écriture Langue + <CR>*lang=+#<CR>
Écriture Langue - <CR>*lang=-#<CR>
Lecture État de la langue <CR>*lang=?#<CR>
Écriture Alim. auto. désact. -désactivé <CR>*APOFF=DIS#<CR>
Divers
Écriture Alim. auto. désact. - 5 min <CR>*APOFF=5#<CR>
Écriture Alim. auto. désact. - 10 min <CR>*APOFF=10#<CR>
Écriture Alim. auto. désact. - 15 min <CR>*APOFF=15#<CR>
Écriture Alim. auto. désact. - 20 min <CR>*APOFF=20#<CR>
Écriture Alim. auto. désact. - 25 min <CR>*APOFF=25#<CR>
Écriture Alim. auto. désact. - 30 min <CR>*APOFF=30#<CR>
Lecture État de alim. auto. désact. <CR>*APOFF=?#<CR>
Écriture Découverte d'appareil AMX-activé <CR>*amxdd=on#<CR>
Écriture Découverte d'appareil AMX-désactivé <CR>*amxdd=off#<CR>
Lecture État de découverte d'appareil AMX <CR>*amxdd=?#<CR>
Lecture Adresse MAC <CR>*macaddr=?#<CR>
Écriture Refroidissement rapide activé <CR>*QCooling=on#<CR>
Écriture Refroidissement rapide désactivé <CR>*QCooling=off#<CR>
Lecture État de Refroidissement rapide activé <CR>*QCooling=?#<CR>
Écriture Mode Haute altitude activé <CR>*Highaltitude=on#<CR>
Écriture Mode Haute altitude désactivé <CR>*Highaltitude=off#<CR>
Lecture État Mode Haute altitude <CR>*Highaltitude=?#<CR>
Écriture Verrouillage des touches activé <CR>*keylock=on#<CR>
Écriture Verrouillage des touches désactivé <CR>*keylock=off#<CR>
Lecture État du verrouillage des touches <CR>*keylock=?#<CR>
Écriture Voyant LED activé <CR>*led=on#<CR>
Écriture Voyant LED désactivé <CR>*led=off#<CR>
Lecture État du voyant LED <CR>*led=?#<CR>
56

Inhaltsverzeichnis
Wichtige Sicherheitshinweise ........................................................................................... 58
Produktinformationen ....................................................................................................... 60
Lieferumfang ..............................................................................................................................................60
Technische Daten ....................................................................................................................................60
Projektor Abmessungen ......................................................................................................................... 61
Anschlüsse .................................................................................................................................................61
Fernbedienung........................................................................................................................................... 62
Installation ........................................................................................................................... 63
Projektionsgrößen ....................................................................................................................................63
Projektionslinse verschieben.................................................................................................................. 64
Deckenmontage Installationsabbildung................................................................................................ 65
Verwendung des Kabelbindersets ........................................................................................................ 66
RS232 Befehl ....................................................................................................................... 67
RS232 Pinbelegung ................................................................................................................................... 67
Deutsch
57

Wichtige Sicherheitshinweise
Der Projektor wurde so entwickelt und getestet, dass er die neuesten Normen für Sicherheit bei
Geräten der Informationstechnologie erfüllt. Um die Sicherheit dieses Produktes zu gewährleisten,
müssen Sie jedoch die in diesem Benutzerhandbuch/dieser Installationsanleitung und auf dem Produkt
vermerkten Anweisungen befolgen.
1. Lesen Sie vor Inbetriebnahme des Projektors dieses Benutzerhandbuch/
Installationsanleitung sorgfältig durch. Bewahren Sie es auf, um bei Bedarf darauf
zurückgreifen zu können.
2. Sehen Sie während des Betriebs nicht direkt in die Projektorlinse. Durch das helle Licht
Deutsch
können Ihre Augen geschädigt werden.
3. Wartungsarbeiten nur von Fachpersonal ausführen lassen.
4. Öffnen Sie immer die Blende der Linse (falls vorhanden), oder entfernen Sie die
Schutzkappe (falls vorhanden) von der Linse, wenn die Lichtquelle des Projektors
eingeschaltet ist.
5. Die Lichtquelle wird während des Betriebs extrem heiß.
6. In manchen Ländern ist die Netzspannung NICHT stabil. Dieser Projektor kann innerhalb eines
Bereichs von 100 bis 240 Volt Wechselstrom betrieben werden. Er kann jedoch bei Stromausfällen
oder Spannungsschwankungen von ±10 Volt ausfallen. An Orten mit Stromausfällen oder
instabiler Netzspannung sollten Sie daher in Verbindung mit dem Projektor einen
Stromstabilisator, einen Überspannungsschutz oder eine unterbrechungsfreie
Stromversorgung (USV) installieren.
7. Sorgen Sie dafür, dass die Projektionslinse bei Betrieb frei ist, da andernfalls Beschädigungen durch
Wärme entstehen können oder Brandgefahr besteht. Um die Lichtquelle vorübergehend
auszuschalten, verwenden Sie die Keine Anzeige Funktion.
8. Benutzen Sie die Lichtquellen nicht über die angegebene Betriebsdauer hinaus.
9. Wechseln Sie erst dann das Lampenmodul oder andere elektronische Komponenten aus, wenn der
Projektor vom Netz getrennt ist.
10. Sorgen Sie für einen sicheren und stabilen Stand des Produkts. Andernfalls kann es herunterfallen
und beschädigt werden.
11. Versuchen Sie niemals den Projektor auseinanderzubauen. Im Inneren des Gerätes stehen Teile
unter Spannung. Der Kontakt mit diesen Teilen kann zu lebensgefährlichen Verletzungen führen.
Andere Abdeckungen dürfen unter keinen Umständen geöffnet oder entfernt werden. Wenden Sie
sich für Reparaturen an einen entsprechend qualifizierten professionellen Kundendienst.
12. Blockieren Sie nicht die Belüftungsöffnungen.
- Stellen Sie den Projektor nicht auf eine Decke, auf Bettzeug oder auf eine andere weiche Oberfläche.
- Bedecken Sie den Projektor nicht mit einem Tuch oder einem anderen Gegenstand.
- In der Nähe des Projektors dürfen sich keine leicht entflammbaren Stoffe befinden.
Wenn die Belüftungsöffnungen blockiert sind, kann Überhitzung im Projektor zu einem Brand
führen.
13. Stellen Sie den Projektor für den Betrieb immer auf einer ebenen, waagerechten Fläche auf.
- Verwenden Sie das Gerät nicht auf unebenen Flächen mit einer Neigung von mehr als 10 Grad (nach rechts/links) bzw.
15 Grad (nach vorne/hinten). Die Verwendung des Projektors auf nicht waagerechten Flächen kann zu Fehlfunktionen
oder Beschädigungen der Lampe führen.
14. Stellen Sie das Gerät nicht senkrecht auf eine Seite. Andernfalls kann der Projektor umfallen und
beschädigt werden oder Verletzungen verursachen.
58

15. Treten Sie nicht auf den Projektor, und stellen Sie nichts auf das Gerät. Andernfalls können Schäden
POWER
TEMP
LAMP
Lufteinlass Luftauslass
50 cm
über
70 cm
über
50 cm
über
50 cm
über
30 cm
über
50 cm
über
Minimum 100 mm
am Projektor sowie Unfälle und Verletzungen die Folge sein.
16. Während das Gerät in Betrieb ist, treten möglicherweise aus dem Belüftungsgitter heiße Luft oder
auffallende Gerüche aus. Dies ist normal und weist nicht auf einen Defekt des Gerätes hin.
17. Stellen Sie keine Flüssigkeiten auf den Projektor oder in seine Nähe. Wenn Flüssigkeiten in das
Projektorinnere eindringen, kann dies zu Fehlfunktionen des Projektors führen. Wenn Flüssigkeit in
den Projektor eingedrungen ist, trennen Sie das Netzkabel von der Steckdose, und setzen Sie sich
mit BenQ in Verbindung, um den Projektor reparieren zu lassen.
18. Dieser Projektor kann Bilder umgedreht anzeigen, so dass er auch an der Decke montiert werden
kann.
19. Dieses Gerät muss geerdet werden.
20. Stellen Sie den Projektor nicht an folgenden Standorten auf:
- Orte mit unzureichender Belüftung oder unzureichendem Platz. Der Abstand zur Wand muss mindestens 50 cm
betragen, und die Belüftung des Projektors darf nicht behindert sein.
- Orte mit sehr hohen Temperaturen, z. B. in Kraftfahrzeugen mit verschlossenen Fenstern und Türen.
- Orte mit sehr hoher Luftfeuchtigkeit oder hoher Konzentration von Staub und Zigarettenrauch. Hierdurch können
optische Bauteile verunreinigt, die Nutzungsdauer des Projektors verringert und das Bild verdunkelt werden.
- Orte in der Nähe von Feuermeldern
- Orte mit Temperaturen über 40°C / 104°F.
- Orte in einer Höhe von über 3000 m (10000 Fuß).
Quecksilber - Diese Lampe enthält Quecksilber. Entsorgen Sie sie entsprechend der vor Ort geltenden Gesetze und
Deutsch
Bestimmungen. Siehe www.lamprecycle.org.
Risikogruppe 2
1. Nach der Klassifikation der photobiologischen Sicherheit von
Lichtquellen und Lichtquellensystemen ist dieses Produkt
Risikogruppe 2, IEC 62471-5:2015.
2. Möglicherweise gefährliche optische Strahlung könnte von diesem
Produkt emittiert werden.
3. Blicken Sie nicht in die eingeschaltete Lichtquelle. Könnte schädlich für die Augen sein.
4. Schauen Sie wie bei jeder hellen Quelle nicht direkt in den Lichtstrahl.
Kühlungshinweis
Belüftung Achtung bei Installation
Für eine ausreichende Kühlung des Projektors stellen Sie bitte sicher,
dass genügend Abstand um den Projektor wie unten abgebildet
eingehalten wird:
• Tabelle • Tabelle
Vermeiden Sie es, den
Projektor in einem schlecht
belüfteten oder engen Raum
zu benutzen.
• Decke • Stapel
59

Produktinformationen
Lieferumfang
Deutsch
Projektor
Installationsanleitung Benutzerhandbuch-CD Garantiekarte* Netzkabel
• Das mitgelieferte Zubehör ist für Ihr Land geeignet und kann von dem abgebildeten Zubehör abweichen.
• *Die Garantiekarte wird nur in bestimmten Regionen mitgeliefert. Erkundigen Sie sich darüber bei Ihrem Händler.
Fernbedienung mit
Batterien
Kabelbinderset x 3
Optionales Zubehör
1. Ersatzlampe
2. Deckenmontagesatz
3. RS232-Kabel
4. Anamorphe Linse
5. BenQ DGD5 3D-Brille
Technische Daten
Anzeigesystem 1-CHIP DMD
Auflösung 3840 x 2160 mit XPR
2716 x 1528 ohne XPR
Lichtquelle 240 W-Lampe
Helligkeit 2200 Lumen
Stromverbrauch 384 W (Max); < 0,5 W (Standby)
Gewicht 14,8 Kg (32,6 lbs)
60

Projektor Abmessungen
POWER
TEMP
LAMP
470,7
564,7 224,9
Einheit: mm
470,7 mm (B) x 224,9 mm (H) x 564,7 mm (T)
Anschlüsse
Deutsch
• LAN (10/100M)
Für den Anschluss an ein RJ45 Cat5/Cat6
Ethernet-Kabel zur Steuerung des
Projektors über ein Netzwerk.
• IR IN
Zur Nutzung mit dem beilegenden
IR-Verlängerungskabel zur Gewährleistung
eines besseren Signalempfangs von der
Fernbedienung.
• PC
15-Pin VGA Port für Verbindung mit RGB
Quelle oder PC.
• HDMI 1 (Version 2.0) und Kabelbinderöffnung
Verbindung mit einer HDMI (4K) Quelle.
Verbindung mit einem Kabelbinderset.
• HDMI 2 (Version 1.4a) und
Kabelbinderöffnung
Verbindung mit einer HDMI-Quelle.
Verbindung mit einem Kabelbinderset.
• USB MINI-B
Nur für Firmware-Upgrade.
• 12V TRIGGER 1/2
Für externe Geräte wie z.B. einen elektrischen
Bildschirm oder Lichtsteuerung, usw.
• RS232
Standard 9-Pin D-Sub Schnittstelle für Verbindung
mit einem PC Steuerungssystem und
Projektorwartung.
61

Fernbedienung
Ein
Aus
AUTO
ASPECT
SOURCE
Oben
Links
OK
BACK
3D
CONTRAST
PIC MODE
COLOR TEMP
GAMMA
SHARP
TEST PATTERN
DEFAULT
Rechts
Unten
MENU
CINEMAMASTER
INVERT
DYNAMIC IRIS
LIGHT MODE
COLOR MANAGE
ECO BLANK
KEY LIGHT
Keine Funktion*
HDR
BRIGHT
Keine Funktion*
Deutsch
* Diese Taste ist für dieses Modell nicht verfügbar.
62

Installation
LAN
PC
RS232
12V
TRIGGHER
IR IN
1
2
HDMI 2-USB MINIB
HDMI 1
HDCP 2.2
H
B
Projektionsabstand
Mitte der Objektivlinse
Bildschirm
16:9 Leinwanddurchmesser
Projektionsgrößen
• Das Bildformat der Leinwand beträgt 16:9 und
das des projizierten Bildes beträgt 16:9
Bildschirmgröße Abstand von Leinwand (mm) Niedrigste/
Diagonal
Zoll mm (max. Zoom) (min. Zoom)
80 2032 1771 996 2400 3000 3600 149
90 2286 1992 1121 2700 3375 4050 168
100 2540 2214 1245 3000 3750 4500 187
110 2794 2435 1370 3300 4125 4950 205
120 3048 2657 1494 3600 4500 5400 224
130 3302 2878 1619 3900 4875 5850 243
140 3556 3099 1743 4200 5250 6300 262
150 3810 3321 1868 4500 5625 6750 280
160 4064 3542 1992 4800 6000 7200 299
170 4318 3763 2117 5100 6375 7650 318
180 4572 3985 2241 5400 6750 8100 336
190 4826 4206 2366 5700 7125 8550 355
200 5080 4428 2491 6000 7500 9000 374
210 5334 4649 2615 6300 7875 9450 392
220 5588 4870 2740 6600 8250 9900 411
230 5842 5092 2864 6900 8625 10350 430
240 6096 5313 2989 7200 9000 10800 448
250 6350 5535 3113 7500 9375 11250 467
260 6604 5756 3238 7800 9750 11700 486
270 6858 5977 3362 8100 10125 12150 504
280 7112 6199 3487 8400 10500 12600 523
290 7366 6420 3611 8700 10875 13050 542
300 7620 6641 3736 9000 11250 13500 560
B (mm) H (mm)
Minimale Länge
Durchschnitt
Maximale Länge
Linsenposition
Höchste
(mm)
Deutsch
• Um Ihre Projektionsqualität zu optimieren, empfehlen wir Ihnen, die Projektion mit den Werten in den nicht
grauen Zellen zu machen. Die Werte in den grauen Zellen dienen lediglich als Beispiel.
• Alle Werte sind lediglich Schätzungen und können von den tatsächlichen Abmessungen abweichen.
Wenn Sie den Projektor dauerhaft montieren möchten, empfiehlt BenQ, vor dem Anbringen Projektionsgröße
und -abstand mit dem Projektor an Ort und Stelle zu testen, um die optischen Eigenschaften des jeweiligen
Projektors zu berücksichtigen. So können Sie die ideale Montageposition für Ihre spezielle Raumsituation
ermitteln.
• Die Deckeninstallation muss von einem Fachmann vorgenommen werden. Kontaktieren Sie Ihren Händler, um
weitere Informationen zu erhalten. Es wird nicht empfohlen, den Projektor allein zu installieren.
• Verwenden Sie den Projektor nur auf einer festen, ebenen Oberfläche. Schwere Verletzungen und Schäden können
auftreten, wenn der Projektor fallen gelassen wird.
• Verwenden Sie den Projektor nicht in Bereichen mit extremen Temperaturen. Die Projektor darf nur in Bereichen
zwischen 32 Grad Fahrenheit (0 Grad Celsius) und 104 Grad Fahrenheit (40 Grad Celsius) verwendet werden.
• Schäden am Bildschirm werden auftreten, wenn der Projektor Feuchtigkeit, Staub oder Rauch ausgesetzt wurde.
• Blockieren Sie nicht die Lüftungsschlitze am Projektor. Eine ausreichende Lüftung ist erforderlich, um Wärme
abzuführen. Der Projektor wird beschädigt werden, wenn die Lüftungsschlitze blockiert sind.
63

Projektionslinse verschieben
POWER
TEMP
LAMP
27%27%
1 Leinwandbreite
LAN
PC
-
RS232
12V
TRIGGHER
IR IN
1
2
HDMI 2-USB MINIB
HDMI 1
HDCP 2.2
65%
65%
1
L
ei
n
w
a
n
d
h
ö
h
e
Die horizontale Position Die vertikale Position
Deutsch
Der Projektionsbereich
64

Deckenmontage Installationsabbildung
290
337
372.8
547.8
530.8
553.39
564.49
275.79
Schraube für Deckenmontage: M6
(Max L = 25 mm; Min L = 20 mm)
Einheit: mm
Deutsch
65

Verwendung des Kabelbindersets
Kabelbinder
Kabelbinderklemme
Kabelbinderkopf
1
3
4
2
Das Kabelbinderset hilft bei der Vermeidung, dass ein Kabelstecker aus dem Anschluss fällt. Es enthält
die folgenden Teile.
Verwendung des Kabelbindersets:
Deutsch
1. Verbinden Sie ein Kabel fest mit dem richtigen
Anschluss am Projektor. Fügen Sie den
Kabelbinderkopf in die Kabelbinderöffnung
über dem Anschluss ein. Beachten Sie, dass
der Kabelbinder nicht von der Öffnung
entfernt werden kann, wenn er eingefügt
wurde.
2. Nehmen Sie die Kabelbinderklemme. Öffnen
Sie die Klemme etwas, um das Anschlusskabel
zu umschließen.
3. Fügen Sie ein Ende des Kabelbinders in die
Kabelbinderklemme wie abgebildet ein.
4. Schließen Sie die Kabelbinderklemme, indem
Sie auf die Lasche drücken.
5. Verschieben Sie die Kabelbinderklemme am
Kabel bis zum Ende des Kabelsteckers.
66
5
Die Installation des Kabelbinders ist damit
abgeschlossen.

RS232 Befehl
RS232 Pinbelegung
Nr. Seriell Nr. Seriell
1NC 6NC
2RX 7RTSZ
3TX 8CTSZ
4NC 9NC
5GND
Funktion Ty p Bedienung ASCII
Schreiben Einschalten <CR>*pow=on#<CR>
Strom
Quellenauswahl
Bildmodus
Bildeinstellungen
Schreiben Abschaltung <CR>*pow=off#<CR>
Lesen Betriebsstatus <CR>*pow=?#<CR>
Schreiben COMPUTER/YPbPr <CR>*sour=RGB#<CR>
Schreiben HDMI <CR>*sour=hdmi#<CR>
Schreiben HDMI 2 <CR>*sour=hdmi2#<CR>
Lesen Aktuelle Quelle <CR>*sour=?#<CR>
Schreiben Hell <CR>*appmod=bright#<CR>
Schreiben Kino <CR>*appmod=cine#<CR>
Schreiben Standard/Lebendig <CR>*appmod=std#<CR>
Schreiben THX <CR>*appmod=thx#<CR>
Schreiben Stille <CR>*appmod=silence#<CR>
Schreiben Benutzer1 <CR>*appmod=user1#<CR>
Schreiben Benutzer2 <CR>*appmod=user2#<CR>
Schreiben ISF Night <CR>*appmod=isfnight#<CR>
Schreiben ISF Day <CR>*appmod=isfday#<CR>
Schreiben 3D <CR>*appmod=threed#<CR>
Lesen Bildmodus <CR>*appmod=?#<CR>
Schreiben Kontrast + <CR>*con=+#<CR>
Schreiben Kontrast - <CR>*con=-#<CR>
Lesen Kontrastwert <CR>*con=?#<CR>
Schreiben Helligkeit + <CR>*bri=+#<CR>
Schreiben Helligkeit - <CR>*bri=-#<CR>
Lesen Helligkeitswert <CR>*bri=?#<CR>
Schreiben Farbe + <CR>*color=+#<CR>
Schreiben Farbe - <CR>*color=-#<CR>
Lesen Farbwert <CR>*color=?#<CR>
Schreiben Farbton + <CR>*tint=+#<CR>
Schreiben Farbton - <CR>*tint=-#<CR>
Lesen Farbtonwert <CR>*tint=?#<CR>
Schreiben Bildschärfe + <CR>*sharp=+#<CR>
Schreiben Bildschärfe - <CR>*sharp=-#<CR>
Lesen Schärfewert <CR>*sharp=?#<CR>
Schreiben Hautton + <CR>*fleshtone=+#<CR>
Schreiben Hautton - <CR>*fleshtone=-#<CR>
Lesen Hauttonwert <CR>*fleshtone=?#<CR>
Schreiben Farbtemperatur-Warm <CR>*ct=warm#<CR>
Schreiben Farbtemperatur-Normal <CR>*ct=normal#<CR>
Schreiben Farbtemperatur-Kühl <CR>*ct=cool#<CR>
Schreiben Farbtemperatur-Native Lampe <CR>*ct=native#<CR>
Lesen Farbtemperaturstatus <CR>*ct=?#<CR>
Schreiben Bildformat 4:3 <CR>*asp=4:3#<CR>
Schreiben Bildformat 16:9 <CR>*asp=16:9#<CR>
Schreiben Bildformat Automatisch <CR>*asp=AUTO#<CR>
12345
6789
Deutsch
67

Deutsch
Bildeinstellungen
(Fortsetzung)
Funktion Ty p Bedienung ASCII
Schreiben Bildformat Real <CR>*asp=REAL#<CR>
Schreiben Bildformat Anamorph <CR>*asp=ANAM#<CR>
Schreiben Bildformat Anamorph 2,4:1 <CR>*asp=ANAM2.4:1#<CR>
Schreiben Bildformat Anamorph 16:9 <CR>*asp=ANAM16:9#<CR>
Lesen Bildformat Status <CR>*asp=?#<CR>
Schreiben Overscan Anpassung + <CR>*overscan=+#<CR>
Schreiben Overscan Anpassung - <CR>*overscan=-#<CR>
Lesen Overscan Anpassungswert <CR>*overscan=?#<CR>
Schreiben Auto <CR>*auto#<CR>
Schreiben Rauschminderung + <CR>*NR=+#<CR>
Schreiben Rauschminderung - <CR>*NR=-#<CR>
Lesen Rauschminderungswert <CR>*NR=?#<CR>
Schreiben Rot Verstärkung + <CR>*RGain=+#<CR>
Schreiben Rot Verstärkung - <CR>*RGain=-#<CR>
Lesen Rot Verstärkung Wert <CR>*RGain=?#<CR>
Schreiben Grün Verstärkung + <CR>*GGain=+#<CR>
Schreiben Grün Verstärkung - <CR>*GGain=-#<CR>
Lesen Grün Verstärkung Wert <CR>*GGain=?#<CR>
Schreiben Blau Verstärkung + <CR>*BGain=+#<CR>
Schreiben Blau Verstärkung - <CR>*BGain=-#<CR>
Lesen Blau Verstärkung Wert <CR>*BGain=?#<CR>
Schreiben Rot Versatz + <CR>*ROffset=+#<CR>
Schreiben Rot Versatz - <CR>*ROffset=-#<CR>
Lesen Rot Versatz Wert <CR>*ROffset=?#<CR>
Schreiben Grün Versatz + <CR>*GOffset=+#<CR>
Schreiben Grün Versatz - <CR>*GOffset=-#<CR>
Lesen Grün Versatz Wert <CR>*GOffset=?#<CR>
Schreiben Blau Versatz + <CR>*BOffset=+#<CR>
Schreiben Blau Versatz - <CR>*BOffset=-#<CR>
Lesen Blau Versatz Wert <CR>*BOffset=?#<CR>
Schreiben Gamma Auswahl - 1,8 <CR>*gamma=1.8#<CR>
Schreiben Gamma Auswahl - 2,0 <CR>*gamma=2.0#<CR>
Schreiben Gamma Auswahl - 2,1 <CR>*gamma=2.1#<CR>
Schreiben Gamma Auswahl - 2,2 <CR>*gamma=2.2#<CR>
Schreiben Gamma Auswahl - 2,3 <CR>*gamma=2.3#<CR>
Schreiben Gamma Auswahl - 2,4 <CR>*gamma=2.4#<CR>
Schreiben Gamma Auswahl - 2,6 <CR>*gamma=2.6#<CR>
Schreiben Gamma Auswahl - 2,8 <CR>*gamma=2.8#<CR>
Schreiben Gamma Auswahl - BenQ <CR>*gamma=benq#<CR>
Lesen Gamma Auswahlstatus <CR>*gamma=?#<CR>
Schreiben Brillant Farbe ein <CR>*BC=on#<CR>
Schreiben Brillant Farbe aus <CR>*BC=off#<CR>
Lesen Brillant Farbe Status <CR>*BC=?#<CR>
Schreiben HDMI Format - Auto <CR>*HDMI=auto#<CR>
Schreiben HDMI Format - PC Signal <CR>*HDMI=pc#<CR>
Schreiben HDMI Format - Video Signal <CR>*HDMI=video#<CR>
Lesen HDMI Formatstatus <CR>*HDMI=?#<CR>
Schreiben CEC ein <CR>*cec=on#<CR>
Schreiben CEC aus <CR>*cec=off#<CR>
Lesen CEC Status <CR>*cec=?#<CR>
68

Funktion Ty p Bedienung ASCII
Schreiben Startbild - BenQ <CR>*splash=benq#<CR>
Schreiben Startbild - Schwarz <CR>*splash=black#<CR>
Schreiben Startbild - Blau <CR>*splash=blue#<CR>
Schreiben Startbild Status <CR>*splash=?#<CR>
Schreiben Hintergrundfarbe - Schwarz <CR>*background=black#<CR>
Schreiben Hintergrundfarbe - Blau <CR>*background=blue#<CR>
Schreiben Hintergrundfarbe - Lila <CR>*background=purple#<CR>
Lesen Hintergrundfarbe Status <CR>*background=?#<CR>
Schreiben Projektorposition - Tisch vorn <CR>*pp=FT#<CR>
Schreiben Projektorposition - Tisch hinten <CR>*pp=RE#<CR>
Schreiben Projektorposition - Decke hinten <CR>*pp=RC#<CR>
Schreiben Projektorposition - Decke vorn <CR>*pp=FC#<CR>
Lesen Projektorpositionsstatus <CR>*pp=?#<CR>
Schnelle Auto-Suche/
Auto-Quellensuche
Schnelle Auto-Suche/
Auto-Quellensuche
Schnelle Auto-Suche Status/
Auto-Quellensuche Status
Standby Einstellungen - Netzwerk
Status
<CR>*QAS=on#<CR>
<CR>*QAS=off#<CR>
<CR>*QAS=?#<CR>
<CR>*standbynet=?#<CR>
Betriebseinstellungen
Lampensteuerung
Schreiben
Schreiben
Lesen
Schreiben Menü-Anzeigezeit - Immer ein <CR>*menutime=on#<CR>
Schreiben Menü-Anzeigezeit - 5 Sek. <CR>*menutime=5s#<CR>
Schreiben Menü-Anzeigezeit - 10 Sek. <CR>*menutime=10s#<CR>
Schreiben Menü-Anzeigezeit - 15 Sek. <CR>*menutime=15s#<CR>
Schreiben Menü-Anzeigezeit - 20 Sek. <CR>*menutime=20s#<CR>
Schreiben Menü-Anzeigezeit - 25 Sek. <CR>*menutime=25s#<CR>
Schreiben Menü-Anzeigezeit - 30 Sek. <CR>*menutime=30s#<CR>
Lesen Menü-Anzeigezeit Status <CR>*menutime=?#<CR>
Schreiben Menüposition - Mitte <CR>*menuposition=center#<CR>
Schreiben Menüposition - Oben links <CR>*menuposition=tl#<CR>
Schreiben Menüposition - Oben rechts <CR>*menuposition=tr#<CR>
Schreiben Menüposition - Unten rechts <CR>*menuposition=br#<CR>
Schreiben Menüposition - Unten links <CR>*menuposition=bl#<CR>
Lesen Menüpositionsstatus <CR>*menuposition=?#<CR>
Schreiben Erinnerungsmeldung - Ein <CR>*reminder=on#<CR>
Schreiben Erinnerungsmeldung - Aus <CR>*reminder=off#<CR>
Lesen Erinnerungsmeldung Status <CR>*reminder=?#<CR>
Schreiben Direkt Strom Ein - Ein <CR>*directpower=on#<CR>
Schreiben Direkt Strom Ein - Aus <CR>*directpower=off#<CR>
Lesen Direkt Strom Ein - Status <CR>*directpower=?#<CR>
Schreiben Standby Einstellungen - Netzwerk ein <CR>*standbynet=on#<CR>
Schreiben Standby Einstellungen - Netzwerk aus <CR>*standbynet=off#<CR>
Lesen
Lesen Lampenstd. <CR>*ltim=?#<CR>
Schreiben Normaler Modus <CR>*lampm=lnor#<CR>
Schreiben Ökomodus <CR>*lampm=eco#<CR>
Schreiben Smart Eco Modus <CR>*lampm=seco#<CR>
Lesen Lampenmodus Status <CR>*lampm=?#<CR>
Deutsch
69

Deutsch
Funktion Ty p Bedienung ASCII
Lesen Modellname <CR>*modelname=?#<CR>
Schreiben Leer ein <CR>*blank=on#<CR>
Schreiben Leer aus <CR>*blank=off#<CR>
Lesen Leer Status <CR>*blank=?#<CR>
Schreiben Menü ein <CR>*menu=on#<CR>
Schreiben Menü aus <CR>*menu=off#<CR>
Schreiben Oben <CR>*up#<CR>
Schreiben Unten <CR>*down#<CR>
Schreiben Rechts <CR>*right#<CR>
Schreiben Links <CR>*left#<CR>
Schreiben Eingabe/OK <CR>*enter#<CR>
Schreiben ZURÜCK <CR>*back#<CR>
Schreiben 3D Auto <CR>*3d=auto#<CR>
Schreiben 3D Sync. Aus <CR>*3d=off#<CR>
Schreiben 3D Sync. Frame Sequential <CR>*3d=fs#<CR>
Schreiben 3D Inverter deaktivieren <CR>*3d=da#<CR>
Schreiben 3D Inverter <CR>*3d=iv#<CR>
Lesen 3D-Synchronisierung Status <CR>*3d=?#<CR>
Schreiben Sprache + <CR>*lang=+#<CR>
Schreiben Sprache - <CR>*lang=-#<CR>
Lesen Sprachstatus <CR>*lang=?#<CR>
Schreiben Autom. Abschaltung - deaktivieren <CR>*APOFF=DIS#<CR>
Verschiedenes
Schreiben Autom. Abschaltung - 5 Min. <CR>*APOFF=5#<CR>
Schreiben Autom. Abschaltung - 10 Min. <CR>*APOFF=10#<CR>
Schreiben Autom. Abschaltung - 15 Min. <CR>*APOFF=15#<CR>
Schreiben Autom. Abschaltung - 20 Min. <CR>*APOFF=20#<CR>
Schreiben Autom. Abschaltung - 25 Min. <CR>*APOFF=25#<CR>
Schreiben Autom. Abschaltung - 30 Min. <CR>*APOFF=30#<CR>
Lesen Autom. Abschaltung Status <CR>*APOFF=?#<CR>
Schreiben AMX Geräteerkennung-ein <CR>*amxdd=on#<CR>
Schreiben AMX Geräteerkennung-aus <CR>*amxdd=off#<CR>
Lesen AMX Geräteerkennung Status <CR>*amxdd=?#<CR>
Lesen MAC-Adresse <CR>*macaddr=?#<CR>
Schreiben Schnellkühlung ein <CR>*QCooling=on#<CR>
Schreiben Schnellkühlung aus <CR>*QCooling=off#<CR>
Lesen Schnellkühlung Status <CR>*QCooling=?#<CR>
Schreiben Höhenmodus ein <CR>*Highaltitude=on#<CR>
Schreiben Höhenmodus aus <CR>*Highaltitude=off#<CR>
Lesen Höhenmodus Status <CR>*Highaltitude=?#<CR>
Schreiben Tastensperre ein <CR>*keylock=on#<CR>
Schreiben Tastensperre aus <CR>*keylock=off#<CR>
Lesen Tastensperre Status <CR>*keylock=?#<CR>
Schreiben LED-Anzeige ein <CR>*led=on#<CR>
Schreiben LED-Anzeige aus <CR>*led=off#<CR>
Lesen LED Anzeigestatus <CR>*led=?#<CR>
70

Sommario
Importanti istruzioni sulla sicurezza ................................................................................ 72
Informazioni sul prodotto .................................................................................................. 74
Contenuto della confezione ..................................................................................................................74
Specifiche tecniche ...................................................................................................................................74
Dimensioni del proiettore .....................................................................................................................75
Terminali ....................................................................................................................................................75
Telecomando............................................................................................................................................. 76
Installazione ........................................................................................................................ 77
Dimensioni di proiezione .......................................................................................................................77
Spostamento dell'obiettivo di proiezione ........................................................................................... 78
Schema per l'installazione a soffitto ..................................................................................................... 79
Uso del ferma cavi.................................................................................................................................... 80
Comando RS232 ................................................................................................................. 81
Assegnazione pin RS232 .........................................................................................................................81
Italiano
71

Importanti istruzioni sulla sicurezza
Il proiettore è stato progettato e sottoposto a test per soddisfare i più recenti standard di sicurezza
previsti per le apparecchiature informatiche. Tuttavia, per un utilizzo sicuro del prodotto, è importante
seguire le istruzioni riportate nel presente manuale utente/guida all'installazione e indicate sul prodotto
stesso.
1. Leggere il presente manuale utente/guida all'installazione prima di utilizzare il
proiettore. Conservarlo per poterlo consultare in seguito.
2. Durante l'uso, non guardare direttamente nell'obiettivo del proiettore. L'intenso raggio
luminoso potrebbe provocare danni alla vista.
3. Per la manutenzione rivolgersi a personale tecnico qualificato.
4. Aprire sempre l’otturatore dell’obiettivo (se presente) o rimuovere il coperchio
Italiano
dell’obiettivo (se presente) quando la sorgente di illuminazione del proiettore è
accesa.
5. Durante il funzionamento dell'apparecchio, la sorgente di illuminazione raggiunge temperature
elevate.
6. In alcuni Paesi, la tensione di linea NON è stabile. Questo proiettore è stato progettato per
funzionare conformemente agli standard di sicurezza a una tensione compresa tra 100 e 240 VCA;
tuttavia, potrebbero verificarsi guasti in caso di interruzioni o variazioni di tensione di ±10 volt.
Nelle zone soggette a variazioni o cadute di tensione, si consiglia di collegare il
proiettore tramite uno stabilizzatore di tensione, un limitatore di sovratensione o un
gruppo di continuità (UPS).
7. Non bloccare l'obiettivo di proiezione con oggetti durante il funzionamento del proiettore per
evitare il rischio che gli oggetti si surriscaldino, si deformino o che si sviluppino incendi. Per
spegnere temporaneamente la sorgente di illuminazione, usare la funzione blank.
8. Non utilizzare le sorgenti di illuminazione oltre il loro periodo di durata nominale.
9. Non sostituire il complesso lampada o qualsiasi altro componente elettronico quando il proiettore
è collegato alla presa di alimentazione.
10. Non collocare il prodotto su tavoli, sostegni o carrelli non stabili. Il prodotto potrebbe cadere e
riportare seri danni.
11. Non tentare di smontare il proiettore. L'alta tensione presente all'interno del dispositivo potrebbe
essere letale in caso si venisse a contatto con parti scoperte.
Non smontare né estrarre in nessun caso altri coperchi. Per la manutenzione rivolgersi unicamente
a personale tecnico qualificato.
12. Non ostruire le aperture di ventilazione.
- Non collocare il proiettore su coperte, lenzuola o altre superfici morbide.
- Non coprire il proiettore con un panno o altri oggetti.
- Non collocare materiali infiammabili vicino al proiettore.
Se le aperture di ventilazione sono ostruite, il surriscaldamento del proiettore può provocare un
incendio.
13. Durante il funzionamento, collocare il proiettore su una superficie piana orizzontale.
- Non posizionare l'unità con il lato sinistro inclinato di oltre 10 gradi rispetto a quello destro o il lato anteriore
inclinato di oltre 15 gradi rispetto a quello posteriore. L'utilizzo del proiettore su un piano non completamente
orizzontale potrebbe causare il malfunzionamento della lampada, nonché danneggiarla.
14. Non collocare l'unità in posizione verticale. Così facendo si può causare la caduta dell’apparecchio,
che provocherebbe lesioni all'operatore o danni all’apparecchio stesso.
72

15. Non calpestare il proiettore, né collocare oggetti sopra di esso. Oltre ai danni fisici al proiettore,
Ingresso aria Uscita aria
Più di
50 cm
Più di
70 cm
Più di
50 cm
Più di
50 cm
Più di
30 cm
Più di
50 cm
Minimo 100 mm
potrebbero infatti verificarsi incidenti, con pericolo di lesioni.
16. Quando il proiettore è in funzione, dalla griglia di ventilazione possono fuoriuscire odore e aria
calda. Questo è un fenomeno normale e non un difetto del prodotto.
17. Non collocare liquidi accanto o sopra al proiettore. Eventuali infiltrazioni di sostanze liquide
possono danneggiare il proiettore. In tal caso, scollegare il cavo di alimentazione dalla presa di
alimentazione e contattare BenQ per richiedere la riparazione del proiettore.
18. Questo prodotto è in grado di riprodurre immagini invertite per le installazioni a soffitto.
19. Questo apparato deve essere collegato a terra.
20. Non collocare il proiettore in ambienti con le seguenti caratteristiche.
- Spazi poco ventilati o chiusi. Posizionare il proiettore a una distanza di almeno 50 cm dalle pareti e lasciare uno spazio
sufficiente per assicurare un'adeguata ventilazione intorno all'unità.
- Ambienti con temperature eccessivamente elevate, ad esempio l'interno di un'automobile con i finestrini chiusi.
- Ambienti eccessivamente umidi, polverosi o fumosi che possono contaminare i componenti ottici, riducendo la vita
utile del proiettore e oscurandone lo schermo.
- Luoghi posti nelle vicinanze di allarmi antincendio.
- Ambienti con temperature superiori a 40°C / 104°F
- Luoghi la cui altitudine superiora i 3000 m (10000 piedi).
Hg – La lampada contiene mercurio. Maneggiare secondo quanto previsto dalle leggi locali sullo smaltimento. Vedere
www.lamprecycle.org.
Italiano
Gruppo rischio 2
1. In relazione alla classificazione della sicurezza fotobiologica delle
sorgenti di illuminazione e dei sistemi sorgente di illuminazione, il
prodotto appartiene al Gruppo rischio 2, IEC62471-5:2015.
2. Il prodotto potrebbe emettere radiazioni ottiche pericolose.
3. Non fissare la sorgente di illuminazione durante il funzionamento. Potrebbe arrecare problemi agli
occhi.
4. Come per qualsiasi altra sorgente luminosa, non fissare in modo diretto il fascio di luce.
Avviso sul raffreddamento
Ventilazione Precauzioni per l'installazione
Per una corretta ventilazione del proiettore, assicurarsi di lasciare
dello spazio attorno al proiettore come mostrato nell'immagine di
seguito:
• Tavolo • Tavolo
TEMP
POWER
LAMP
Evitare di utilizzare il proiettore
in uno spazio limitato o non ben
ventilato.
• Soffitto • Su scaffale
73

Informazioni sul prodotto
Contenuto della confezione
Proiettore
Italiano
Guida all'installazione CD del Manuale Utente Garanzia* Cavo di alimentazione
• Gli accessori vengono forniti in base al paese in cui il proiettore viene utilizzato e possono differire da quelli
illustrati.
• *La garanzia limitata viene fornita solo in paesi specifici. Rivolgersi al rivenditore per ottenere informazioni
dettagliate.
Accessori opzionali
1. Kit lampada di ricambio
2. Kit per il montaggio a soffitto
3. Cavo RS232
Specifiche tecniche
Telecomando con
batterie
4. Obiettivo anamorfico
5. Occhiali 3D BenQ DGD5
3 ferma cavi
Sistema di visualizzazione 1-CHIP DMD
Risoluzione 3840 x 2160 con XPR
2716 x 1528 senza XPR
Sorgente di illuminazione Lampada da 240 W
Luminosità 2200 Lumen
Consumo energetico 384 W (Massimo); < 0,5 W (Standby)
Peso 14,8 Kg (32,6 lbs)
74

Dimensioni del proiettore
POWER
TEMP
LAMP
470,7
564,7 224,9
Unità: mm
470,7 mm (L) x 224,9 mm (A) x 564,7 mm (P)
Te r m i n a l i
Italiano
• LAN (10/100M)
Per il collegamento al cavo Ethernet RJ45
Cat5/Cat6 per controllare il proiettore
mediante la rete.
• IR IN
Per l'uso con una prolunga IR in modo da
garantire una migliore ricezione del segnale
dal telecomando.
• PC
Porta VGA a 15-pin per il collegamento a
una sorgente RGB o PC.
• HDMI 1 (Versione 2.0) e relativo foro ferma
cavi
Per il collegamento a una sergente HDMI (4K).
Per il collegamento a un set di ferma cavi.
• HDMI 2 (Versione 1.4a) e relativo foro ferma
cavi.
Per il collegamento a una sergente HDMI.
Per il collegamento a un set di ferma cavi.
• USB MINI-B
Solo per l'aggiornamento firmware.
• 12V TRIGGER 1/2
Attiva i dispositivi esterni, ad esempio schermi
elettrici o controllo delle luci, ecc.
• RS232
Interfaccia D-sub a 9-pin standard per il
collegamento al sistema di controllo PC e la
manutenzione del proiettore.
75

Telecomando
On
Off
AUTO
ASPECT
SOURCE
Su
Sinistra
OK
BACK
3D
CONTRAST
PIC MODE
COLOR TEMP
GAMMA
SHARP
TEST PATTERN
DEFAULT
Destra
Giù
MENU
CINEMAMASTER
INVERT
DYNAMIC IRIS
LIGHT MODE
COLOR MANAGE
ECO BLANK
KEY LIGHT
Nessuna funzione*
HDR
BRIGHT
Nessuna funzione*
Italiano
* Questo pulsante non è disponibile per questo modello.
76

Installazione
LAN
PC
RS232
12V
TRIGGHER
IR IN
1
2
HDMI 2-USB MINIB
HDMI 1
HDCP 2.2
A
L
Distanza di proiezione
Centro dell'obiettivo
Schermo
Diagonale schermo 16:9
Dimensioni di proiezione
• Le proporzioni dello schermo sono impostate
su 16:9 e l’immagine proiettata è 16:9
Dimensioni schermo Distanza dallo schermo (mm)
Diagonale
Pollici mm (zoom massimo) (zoom minimo)
L (mm) A (mm)
Lunghezza minima
Media
Lunghezza massima
Posizione più bassa/
più alta dell’obiettivo
80 2032 1771 996 2400 3000 3600 149
90 2286 1992 1121 2700 3375 4050 168
100 2540 2214 1245 3000 3750 4500 187
110 2794 2435 1370 3300 4125 4950 205
120 3048 2657 1494 3600 4500 5400 224
130 3302 2878 1619 3900 4875 5850 243
140 3556 3099 1743 4200 5250 6300 262
150 3810 3321 1868 4500 5625 6750 280
160 4064 3542 1992 4800 6000 7200 299
170 4318 3763 2117 5100 6375 7650 318
180 4572 3985 2241 5400 6750 8100 336
190 4826 4206 2366 5700 7125 8550 355
200 5080 4428 2491 6000 7500 9000 374
210 5334 4649 2615 6300 7875 9450 392
220 5588 4870 2740 6600 8250 9900 411
230 5842 5092 2864 6900 8625 10350 430
240 6096 5313 2989 7200 9000 10800 448
250 6350 5535 3113 7500 9375 11250 467
260 6604 5756 3238 7800 9750 11700 486
270 6858 5977 3362 8100 10125 12150 504
280 7112 6199 3487 8400 10500 12600 523
290 7366 6420 3611 8700 10875 13050 542
300 7620 6641 3736 9000 11250 13500 560
(mm)
Italiano
• Per ottimizzare la qualità di proiezione, si consiglia di eseguire la proiezione seguendo i valori nelle celle non grigie.
I valori nelle celle grigie sono solo di riferimento.
• Tutte le misurazioni sono approssimative e possono variare dalle dimensioni effettive.
Se si desidera installare in modo permanente il proiettore, BenQ consiglia di controllare fisicamente le dimensioni
delle immagini proiettate e la distanza utilizzando il proiettore sul posto prima di procedere all'operazione, in
modo da valutare le caratteristiche ottiche del dispositivo. In questo modo è possibile determinare la posizione di
montaggio più adatta all'installazione.
• L'installazione a soffitto deve essere eseguita da un professionista. Contattare il fornitore per ulteriori
informazioni. Si consiglia di non installare da soli il proiettore.
• Utilizzare il proiettore esclusivamente su una superficie piana e solida. In caso di caduta del proiettore si possono
verificare serie lesioni e danni.
• Non usare il proiettore in un ambiente con temperature estreme. Il proiettore deve essere utilizzato a
temperature comprese tra 32° Fahrenheit (0° Celsius) e 104° Fahrenheit (40° Celsius).
• In caso di esposizione del proiettore a umidità, polvere e fumo, lo schermo si potrebbe danneggiare.
• Non coprire le aperture di ventilazione del proiettore. Una corretta ventilazione è necessaria per dissipare il
calore. In caso di aperture di ventilazione ostruite, il proiettore si potrebbe danneggiare.
77

Spostamento dell'obiettivo di proiezione
POWER
TEMP
LAMP
27%27%
Larghezza 1
schermo
LAN
PC
-
RS232
12V
TRIGGHER
IR IN
1
2
HDMI 2-USB MINIB
HDMI 1
HDCP 2.2
65%
65%
A
l
t
e
z
z
a
1
s
c
h
e
r
m
o
Posizione orizzontale Posizione verticale
Italiano
Intervallo di proiezione
78

Schema per l'installazione a soffitto
290
337
372.8
547.8
530.8
553.39
564.49
275.79
Vite per installazione a soffitto: M6
(Max. L = 25 mm; Min. L= 20 mm)
Unità: mm
Italiano
79

Uso del ferma cavi
Ferma cavi
Elemento di fissaggio
ferma cavi
Testa ferma cavi
1
3
2
5
Il ferma cavi aiuta a evitare che la presa del cavo si stacchi dalla porta di collegamento. Contiene le
seguenti componenti.
Per usare il ferma cavi:
Italiano
1. Collegare il cavo alla porta corretta sul
proiettore. Inserire la testa del ferma cavi
nell'apertura del ferma cavi direttamente sopra
alla porta di collegamento. Notare che il ferma
cavi non può essere rimosso dal foro una volta
inserito.
2. Afferrare l'elemento di fissaggio ferma cavi.
Aprire leggermente l'elemento di fissaggio per
avvolgere il cavo di collegamento.
3. Inserire l'estremità del ferma cavi
nell'elemento di fissaggio ferma cavi come
illustrato.
4. Chiudere l'elemento di fissaggio ferma cavi
premendo la linguetta.
4
5. Spostare l'elemento di fissaggio lungo il ferma
cavi fino alla presa del cavo.
80
L'installazione del ferma cavi è completata.

Comando RS232
Assegnazione pin RS232
N. Seriale N. Seriale
1NC 6NC
2RX 7RTSZ
3TX 8CTSZ
4NC 9NC
5GND
Funzione Tipo Operazione ASCII
Scrittura Accensione <CR>*pow=on#<CR>
Alimentazione
Selezione sorgente
Modalità immagine
Impostazioni immagine
Scrittura Spegnimento <CR>*pow=off#<CR>
Lettura Stato alimentazione <CR>*pow=?#<CR>
Scrittura COMPUTER/YPbPr <CR>*sour=RGB#<CR>
Scrittura HDMI <CR>*sour=hdmi#<CR>
Scrittura HDMI 2 <CR>*sour=hdmi2#<CR>
Lettura Sorgente corrente <CR>*sour=?#<CR>
Scrittura Luminoso <CR>*appmod=bright#<CR>
Scrittura Cinema <CR>*appmod=cine#<CR>
Scrittura Standard/Vivace <CR>*appmod=std#<CR>
Scrittura THX <CR>*appmod=thx#<CR>
Scrittura Silenzioso <CR>*appmod=silence#<CR>
Scrittura Utente1 <CR>*appmod=user1#<CR>
Scrittura Utente2 <CR>*appmod=user2#<CR>
Scrittura ISF Night <CR>*appmod=isfnight#<CR>
Scrittura ISF Day <CR>*appmod=isfday#<CR>
Scrittura 3D <CR>*appmod=threed#<CR>
Lettura Modalità immagine <CR>*appmod=?#<CR>
Scrittura Contrasto + <CR>*con=+#<CR>
Scrittura Contrasto - <CR>*con=-#<CR>
Lettura Valore contrasto <CR>*con=?#<CR>
Scrittura Luminosità + <CR>*bri=+#<CR>
Scrittura Luminosità - <CR>*bri=-#<CR>
Lettura Valore luminosità <CR>*bri=?#<CR>
Scrittura Colori + <CR>*color=+#<CR>
Scrittura Colori - <CR>*color=-#<CR>
Lettura Valore colore <CR>*color=?#<CR>
Scrittura Tinta + <CR>*tint=+#<CR>
Scrittura Tinta - <CR>*tint=-#<CR>
Lettura Valore tinta <CR>*tint=?#<CR>
Scrittura Nitidezza + <CR>*sharp=+#<CR>
Scrittura Nitidezza - <CR>*sharp=-#<CR>
Lettura Valore nitidezza <CR>*sharp=?#<CR>
Scrittura Tono pelle + <CR>*fleshtone=+#<CR>
Scrittura Tono pelle - <CR>*fleshtone=-#<CR>
Lettura Valore tono pelle <CR>*fleshtone=?#<CR>
Scrittura Temperatura colore - Caldo <CR>*ct=warm#<CR>
Scrittura Colore temperatura - Normale <CR>*ct=normal#<CR>
Scrittura Temperatura colore - Freddo <CR>*ct=cool#<CR>
Scrittura Temperatura colore - Lampada originale <CR>*ct=native#<CR>
Lettura Stato temperatura colore <CR>*ct=?#<CR>
Scrittura Proporzioni 4:3 <CR>*asp=4:3#<CR>
Scrittura Proporzioni 16:9 <CR>*asp=16:9#<CR>
Scrittura Proporzioni automatiche <CR>*asp=AUTO#<CR>
12345
6789
Italiano
81

Funzione Tipo Operazione ASCII
Italiano
Impostazioni immagine
(Continua)
Scrittura Formato reale <CR>*asp=REAL#<CR>
Scrittura Formato anamorfico <CR>*asp=ANAM#<CR>
Scrittura Formato anamorfico 2,4:1 <CR>*asp=ANAM2.4:1#<CR>
Scrittura Formato anamorfico 16:9 <CR>*asp=ANAM16:9#<CR>
Lettura Stato proporzioni <CR>*asp=?#<CR>
Scrittura Regolazione overscan + <CR>*overscan=+#<CR>
Scrittura Regolazione overscan - <CR>*overscan=-#<CR>
Lettura Valore regolazione overscan <CR>*overscan=?#<CR>
Scrittura Auto <CR>*auto#<CR>
Scrittura Riduzione rumore + <CR>*NR=+#<CR>
Scrittura Riduzione rumore - <CR>*NR=-#<CR>
Lettura Valore riduzione rumore <CR>*NR=?#<CR>
Scrittura Guadagno rosso + <CR>*RGain=+#<CR>
Scrittura Guadagno rosso - <CR>*RGain=-#<CR>
Lettura Valore guadagno rosso <CR>*RGain=?#<CR>
Scrittura Guadagno verde + <CR>*GGain=+#<CR>
Scrittura Guadagno verde - <CR>*GGain=-#<CR>
Lettura Valore guadagno verde <CR>*GGain=?#<CR>
Scrittura Guadagno blu + <CR>*BGain=+#<CR>
Scrittura Guadagno blu - <CR>*BGain=-#<CR>
Lettura Valore guadagno blu <CR>*BGain=?#<CR>
Scrittura Offset rosso + <CR>*ROffset=+#<CR>
Scrittura Offset rosso - <CR>*ROffset=-#<CR>
Lettura Valore offset rosso <CR>*ROffset=?#<CR>
Scrittura Offset verde + <CR>*GOffset=+#<CR>
Scrittura Offset verde - <CR>*GOffset=-#<CR>
Lettura Valore offset verde <CR>*GOffset=?#<CR>
Scrittura Offset blu + <CR>*BOffset=+#<CR>
Scrittura Offset blu - <CR>*BOffset=-#<CR>
Lettura Valore offset blu <CR>*BOffset=?#<CR>
Scrittura Selezione gamma - 1,8 <CR>*gamma=1.8#<CR>
Scrittura Selezione gamma - 2,0 <CR>*gamma=2.0#<CR>
Scrittura Selezione gamma - 2,1 <CR>*gamma=2.1#<CR>
Scrittura Selezione gamma - 2,2 <CR>*gamma=2.2#<CR>
Scrittura Selezione gamma - 2,3 <CR>*gamma=2.3#<CR>
Scrittura Selezione gamma - 2,4 <CR>*gamma=2.4#<CR>
Scrittura Selezione gamma - 2,6 <CR>*gamma=2.6#<CR>
Scrittura Selezione gamma - 2,8 <CR>*gamma=2.8#<CR>
Scrittura Selezione gamma - BenQ <CR>*gamma=benq#<CR>
Lettura Stato selezione gamma <CR>*gamma=?#<CR>
Scrittura Colori brillanti on <CR>*BC=on#<CR>
Scrittura Colori brillanti off <CR>*BC=off#<CR>
Lettura Stato Colori brillanti <CR>*BC=?#<CR>
Scrittura Formato HDMI - Auto <CR>*HDMI=auto#<CR>
Scrittura Formato HDMI - Segnale PC <CR>*HDMI=pc#<CR>
Scrittura Formato HDMI - Segnale video <CR>*HDMI=video#<CR>
Lettura Stato formato HDMI <CR>*HDMI=?#<CR>
Scrittura CEC on <CR>*cec=on#<CR>
Scrittura CEC off <CR>*cec=off#<CR>
Lettura Stato CEC <CR>*cec=?#<CR>
82

Funzione Tipo Operazione ASCII
Scrittura Schermata d'avvio - BenQ <CR>*splash=benq#<CR>
Scrittura Schermata d'avvio - Nero <CR>*splash=black#<CR>
Scrittura Schermata d'avvio - Blu <CR>*splash=blue#<CR>
Scrittura Stato Schermata d'avvio <CR>*splash=?#<CR>
Scrittura Colore sfondo - Nero <CR>*background=black#<CR>
Scrittura Colore sfondo - Blu <CR>*background=blue#<CR>
Scrittura Colore sfondo - Porpora <CR>*background=purple#<CR>
Lettura Stato colore sfondo <CR>*background=?#<CR>
Scrittura Posizione proiettore - Frontale tavolo <CR>*pp=FT#<CR>
Scrittura Posizione proiettore - Poster. tavolo <CR>*pp=RE#<CR>
Scrittura Posizione proiettore - Poster. soffitto <CR>*pp=RC#<CR>
Scrittura Posizione proiettore - Front. soffitto <CR>*pp=FC#<CR>
Lettura Stato posizione proiettore <CR>*pp=?#<CR>
Ricerca automatica rapida/Ricerca
automatica sorgente
Ricerca automatica rapida/Ricerca
automatica sorgente
Stato Ricerca automatica
rapida/Ricerca automatica sorgente
<CR>*QAS=on#<CR>
<CR>*QAS=off#<CR>
<CR>*QAS=?#<CR>
Impostazioni di
funzionamento
Controllo lampada
Scrittura
Scrittura
Lettura
Scrittura Tempo visualizz. menu - Sempre On <CR>*menutime=on#<CR>
Scrittura Tempo visualizz menu - 5 sec <CR>*menutime=5s#<CR>
Scrittura Tempo visualizz menu - 10 sec <CR>*menutime=10s#<CR>
Scrittura Tempo visualizz menu - 15 sec <CR>*menutime=15s#<CR>
Scrittura Tempo visualizz menu - 20 sec <CR>*menutime=20s#<CR>
Scrittura Tempo visualizz menu - 25 sec <CR>*menutime=25s#<CR>
Scrittura Tempo visualizz menu - 30 sec <CR>*menutime=30s#<CR>
Lettura Stato Tempo visualizz menu <CR>*menutime=?#<CR>
Scrittura Posizione menu - Al centro <CR>*menuposition=center#<CR>
Scrittura Posizione menu - In alto a sinistra <CR>*menuposition=tl#<CR>
Scrittura Posizione menu - In alto a destra <CR>*menuposition=tr#<CR>
Scrittura Posizione menu - In basso a destra <CR>*menuposition=br#<CR>
Scrittura Posizione menu - In basso a sinistra <CR>*menuposition=bl#<CR>
Lettura Stato posizione menu <CR>*menuposition=?#<CR>
Scrittura Messaggio promemoria - Attivo <CR>*reminder=on#<CR>
Scrittura Messaggio promemoria - Disattivo <CR>*reminder=off#<CR>
Lettura Stato messaggio promemoria <CR>*reminder=?#<CR>
Scrittura Accensione diretta - Attivo <CR>*directpower=on#<CR>
Scrittura Accensione diretta - Disattivo <CR>*directpower=off#<CR>
Lettura Stato Accensione diretta <CR>*directpower=?#<CR>
Scrittura Impostazioni standby - Rete attiva <CR>*standbynet=on#<CR>
Scrittura Impostazioni standby - Rete disattiva <CR>*standbynet=off#<CR>
Lettura Stato Impostazioni standby - Rete <CR>*standbynet=?#<CR>
Lettura Ore lamp <CR>*ltim=?#<CR>
Scrittura Modalità normale <CR>*lampm=lnor#<CR>
Scrittura Modalità ECO <CR>*lampm=eco#<CR>
Scrittura Modalità eco intuit. <CR>*lampm=seco#<CR>
Lettura Stato modalità lampada <CR>*lampm=?#<CR>
Italiano
83

Italiano
Funzione Tipo Operazione ASCII
Lettura Nome modello <CR>*modelname=?#<CR>
Scrittura Inattività attiva <CR>*blank=on#<CR>
Scrittura Inattività disattiva <CR>*blank=off#<CR>
Lettura Stato inattività <CR>*blank=?#<CR>
Scrittura Menu attivo <CR>*menu=on#<CR>
Scrittura Menu disattivo <CR>*menu=off#<CR>
Scrittura Su <CR>*up#<CR>
Scrittura Giù <CR>*down#<CR>
Scrittura Destra <CR>*right#<CR>
Scrittura Sinistra <CR>*left#<CR>
Scrittura Invio/OK <CR>*enter#<CR>
Scrittura INDIETRO <CR>*back#<CR>
Scrittura Auto 3D <CR>*3d=auto#<CR>
Scrittura Sincronizzazione 3D disattiva <CR>*3d=off#<CR>
Sequenza fotogrammi sincronizzazione
3D
<CR>*3d=fs#<CR>
Var ie
Scrittura
Scrittura Invertitore 3D disattivato <CR>*3d=da#<CR>
Scrittura Invertitore 3D <CR>*3d=iv#<CR>
Lettura Stato Sincronizzazione 3D <CR>*3d=?#<CR>
Scrittura Lingua + <CR>*lang=+#<CR>
Scrittura Lingua - <CR>*lang=-#<CR>
Lettura Stato lingua <CR>*lang=?#<CR>
Scrittura Auto spegnimento - Disattivo <CR>*APOFF=DIS#<CR>
Scrittura Auto spegnimento - 5 min <CR>*APOFF=5#<CR>
Scrittura Auto spegnimento - 10 min <CR>*APOFF=10#<CR>
Scrittura Auto spegnimento - 15 min <CR>*APOFF=15#<CR>
Scrittura Auto spegnimento - 20 min <CR>*APOFF=20#<CR>
Scrittura Auto spegnimento - 25 min <CR>*APOFF=25#<CR>
Scrittura Auto spegnimento - 30 min <CR>*APOFF=30#<CR>
Lettura Stato Auto spegnimento <CR>*APOFF=?#<CR>
Scrittura Scopri dispositivo AMX - Attivo <CR>*amxdd=on#<CR>
Scrittura Scopri dispositivo AMX - Disattivo <CR>*amxdd=off#<CR>
Lettura Stato Scopri dispositivo AMX <CR>*amxdd=?#<CR>
Lettura Indirizzo MAC <CR>*macaddr=?#<CR>
Scrittura Raffreddamento rapido attivo <CR>*QCooling=on#<CR>
Scrittura Raffreddamento rapido disattivo <CR>*QCooling=off#<CR>
Lettura Stato Raffreddamento rapido <CR>*QCooling=?#<CR>
Scrittura Modalità altitudine elevata attiva <CR>*Highaltitude=on#<CR>
Scrittura Modalità altitudine elevata disattiva <CR>*Highaltitude=off#<CR>
Lettura Stato modalità altitudine elevata <CR>*Highaltitude=?#<CR>
Scrittura Blocco tasti attivo <CR>*keylock=on#<CR>
Scrittura Blocco tasti disattivo <CR>*keylock=off#<CR>
Lettura Stato blocco tasti <CR>*keylock=?#<CR>
Scrittura Indicatore LED on <CR>*led=on#<CR>
Scrittura Indicatore LED off <CR>*led=off#<CR>
Lettura Stato indicatore LED <CR>*led=?#<CR>
84

Содержание
Впуск воздуха Выпуск воздуха
Не
менее
50 см
Не
менее
70 см
Не
менее
50 см
Не
менее
50 см
Не менее
30 см
Не менее
50 см
Минимум 100 мм
Важные инструкции по технике безопасности ........................................................86
Информация о продукте ..............................................................................................88
Комплект поставки .................................................................................................. 88
Технические характеристики ..................................................................................88
Размеры проектора .................................................................................................89
Разъемы ...................................................................................................................89
Пульт ДУ .................................................................................................................. 90
Установка ........................................................................................................................ 91
Проекционные размеры .........................................................................................91
Сдвиг проекционного объектива ............................................................................92
Схема крепления на потолке ................................................................................. 93
Использование комплекта кабельной стяжки....................................................... 94
Команда RS-232 .............................................................................................................. 95
Назначение контактов разъема RS-232 ................................................................ 95
Русский
Уведомление об охлаждении
Вентиляция Меры предосторожности при установке
Для надлежащей вентиляции проектора обязательно
оставляйте свободное пространство вокруг проектора, как
показано на следующей рисунке:
• Стол • Стол
TEMP
POWER
LAMP
• Потолок • Монтаж в стойке
Не используйте проектор в
помещении с плохой
вентиляцией или в тесном
пространстве.
85

Важные инструкции по технике безопасности
Ваш проектор разработан и протестирован в соответствии с последними стандартами по
безопасности оборудования для информационных технологий. Тем не менее, для
обеспечения безопасного использования этого продукта необходимо выполнять
инструкции, указанные в руководстве пользователя / руководстве по установке и на
самом продукте.
1. Перед работой с проектором прочтите руководство пользователя / руководство
по установке. Сохраните его для наведения справок в будущем.
2. Не смотрите в объектив во время работы проектора. Интенсивный луч света
опасен для зрения.
3. Техническое обслуживание должны проводить специалисты сервисного
центра.
4. Когда включен источник света проектора, обязательно открывайте затвор
объектива (если есть) или снимайте крышку объектива.
Русский
5. Во время работы источник света очень сильно нагревается.
6. В некоторых странах напряжение в сети НЕ стабильно. Проектор рассчитан на
безотказную эксплуатацию при напряжении сети питания перем. тока от 100 до 240 В,
однако сбои питания и скачки напряжения свыше ±10 В могут привести к выходу
проектора из строя. Поэтому при опасности сбоев питания или скачков
напряжения рекомендуется подключать проектор через стабилизатор
напряжения, фильтр для защиты от перенапряжения или источник
бесперебойного питания (UPS).
7. Когда проектор работает, не загораживайте объектив никакими другими предметами,
так как это может привести к их нагреванию и деформации, а также к возгоранию.
Для временного выключения источник света используйте функцию "Пустой экран".
8. Не используйте источники света после истечения установленного изготовителем
срока их службы.
9. Запрещается заменять лампу и другие электронные компоненты, пока вилка шнура
питания проектора не вынута из розетки.
10. Не ставьте это устройство на неустойчивую тележку, подставку или стол. Устройство
может упасть и серьезно повредиться.
11. Не пытайтесь разбирать этот проектор. Внутри проектора - опасное для жизни
высокое напряжение, которое может стать причиной смерти при случайном контакте
с деталями, находящимися под напряжением.
Ни при каких обстоятельствах нельзя отвинчивать или снимать никакие другие
крышки. Все виды технического обслуживания должны проводиться в сервисном
центре.
12. Не перекрывайте вентиляционные отверстия.
- Не ставьте этот проектор на одеяло, постельные принадлежности и другие мягкие поверхности.
- Не накрывайте проектор тканью и любыми другими предметами.
- Не размещайте рядом с проектором легко воспламеняющиеся предметы.
Нарушение вентиляции проектора через эти отверстия может привести к перегреву
проектора и вызвать возгорание.
86

13. Во время работы проектор должен быть установлен на ровной горизонтальной
поверхности.
- Наклон влево или вправо не должен превышать 10 градусов, а вперед и назад - 15 градусов.
Эксплуатация проектора в наклонном положении может привести к нарушению работы лампы или ее
повреждению.
14. Не устанавливайте проектор вертикально на торец. Из-за этого проектор может
упасть и выйти из строя либо травмировать пользователя.
15. Не вставайте на проектор и не ставьте на него никакие предметы. Помимо опасности
повреждения самого проектора, это может привести к несчастному случаю и травме.
16. Во время работы проектора вы можете ощутить поток теплого воздуха со
специфическим запахом из вентиляционной решетки проектора. Это - обычное
явление и не является неисправностью устройства.
17. Не ставьте емкости с жидкостью на проектор или рядом с ним. Попадание жидкости
внутрь корпуса может привести к выходу проектора из строя. В случае попадания
жидкости в проектор выньте вилку шнура
питания из розетки и обратитесь в
сервисный центр BenQ для обслуживания.
18. В случае крепления на потолке это устройство может проецировать зеркально
отображенные изображения.
19. Это устройство должно быть заземлено.
Русский
20. Не устанавливайте проектор в следующих местах:
- В местах с плохой вентиляцией или в ограниченном пространстве. Расстояние от стен должно быть
не менее 50 см, а вокруг проектора должна обеспечиваться свободная циркуляция воздуха.
- В местах, где температура может повыситься, например, в салоне автомобиля с закрытыми окнами.
- В местах с повышенной влажностью, содержанием пыли или сигаретного дыма - это
к загрязнению оптических компонентов, сократить срок службы проектора и снизить яркость
изображения.
- Поблизости от датчиков пожарной сигнализации.
- В местах с температурой окружающего воздуха выше 40°C / 104°F.
- В местах, расположенных на высоте свыше 3000 м (10000 футов).
Hg - Лампа содержит ртуть. Соблюдайте местные законы об утилизации. См. сведения не веб-сайте
www.lamprecycle.org.
может привести
Группа риска 2
1. В соответствии с классификацией фотобиологической
безопасности источников света и систем источника
света, этот продукт относится к Группе риска 2, IEC
62471-5:2015.
2. Это устройство может испускать опасное видимое
излучение.
3. Не смотрите на работающий источник света. Это может
причинить вред глазам.
4. Как и при использовании любого источника яркого
света, не смотрите прямо на испускаемый луч света.
87

Информация о продукте
Комплект поставки
Проектор
Русский
Пульт
дистанционного
управления с
батарейками
Набор кабельных
стяжек x 3
Руководство по
установке
• Состав комплекта принадлежностей соответствует вашему региону, поэтому некоторые
принадлежности могут отличаться от показанных.
• *Гарантийный талон прилагается только для некоторых регионов. Подробности уточните у
продавца.
Руководство
пользователя на
компакт-диске
Гарантийный талон* Шнур питания
Дополнительно покупаемые принадлежности
1. Запасной комплект лампы
2. Комплект для потолочного крепления
3. Кабель RS232
4. Анаморфный объектив
5. 3D-очки BenQ DGD5
Технические характеристики
Проекционная система Однокристальное цифровое микрозеркальное устройство
(DMD)
Разрешение 3840 x 2160 с XPR
2716 x 1528 без XPR
Источник света Лампа 240 Вт
Яркость 2200 люмен
Потребляемая
мощность
Вес 14,8 кг (32,6 фунт.)
384 Вт (макс.); < 0,5 Вт (в режиме ожидания)
88

Размеры проектора
POWER
TEMP
LAMP
470,7
564,7 224,9
Единица измерения: мм
470,7 мм (Ш) x 224,9 мм (В) x 564,7 мм (Г)
Разъемы
• LAN (10/100M)
Для подключения кабеля Ethernet с
разъемом RJ-45 (Кат. 5/Кат. 6) для
управления проектором по сети.
• IR IN
Для использования с кабелем
ИК-удлинителя - он улучшает прием
сигналов от пульта ДУ.
• PC
15-контактный разъем VGA для
подключения к источнику сигнала
RGB или ПК.
Русский
• HDMI 1 (Версия 2.0) и его отверстие
кабельной стяжки
Для подключения к источнику HDMI (4K).
Подключение к комплекту кабельной
стяжки.
• HDMI 2 (Версия 1.4a) и его отверстие
кабельной стяжки
Подключение к источнику HDMI.
Подключение к комплекту кабельной
стяжки.
• USB MINI-B
Только для обновления микропрограммы.
• 12V TRIGGER 1/2
Для активации внешних устройств,
например, электрического экрана,
устройства управления освещением и т.д.
• RS232
Стандартный 9-контактный интерфейс типа
D-sub для подключения к системе
управления ПК и управления проектором.
89

Пульт ДУ
Вкл.
Выкл.
AUTO
ASPECT
SOURCE
Вверх
Влево
OK
BACK
3D
CONTRAST
PIC MODE
COLOR TEMP
GAMMA
SHARP
TEST PATTERN
DEFAULT
Вправо
Вниз
MENU
CINEMAMASTER
INVERT
DYNAMIC IRIS
LIGHT MODE
COLOR MANAGE
ECO BLANK
KEY LIGHT
Не используется*
HDR
BRIGHT
Не используется*
Русский
* Эта кнопка недоступна для этой модели.
90

Установка
LAN
PC
RS232
12V
TRIGGHER
IR IN
1
2
HDMI 2-USB MINIB
HDMI 1
HDCP 2.2
В
Ш
Проекционное
расстояние
Центр объектива
Экран
Диагональ экрана 16:9
Проекционные размеры
• Формат кадра экрана - 16:9, формат
кадра проецируемого изображения -
16:9
Размер экрана Расстояние от экрана (мм)
По диагонали
Дюйм мм
Ш (мм) В (мм)
Мин. расст.
(макс.
увел.)
Среднее
Макс.
расст.
(мин.
увел.)
Самая низкая/
Самая высокая
позиция объектива
80 2032 1771 996 2400 3000 3600 149
90 2286 1992 1121 2700 3375 4050 168
100 2540 2214 1245 3000 3750 4500 187
110 2794 2435 1370 3300 4125 4950 205
120 3048 2657 1494 3600 4500 5400 224
130 3302 2878 1619 3900 4875 5850 243
140 3556 3099 1743 4200 5250 6300 262
150 3810 3321 1868 4500 5625 6750 280
160 4064 3542 1992 4800 6000 7200 299
170 4318 3763 2117 5100 6375 7650 318
180 4572 3985 2241 5400 6750 8100 336
190 4826 4206 2366 5700 7125 8550 355
200 5080 4428 2491 6000 7500 9000 374
210 5334 4649 2615 6300 7875 9450 392
220 5588 4870 2740 6600 8250 9900 411
230 5842 5092 2864 6900 8625 10350 430
240 6096 5313 2989 7200 9000 10800 448
250 6350 5535 3113 7500 9375 11250 467
260 6604 5756 3238 7800 9750 11700 486
270 6858 5977 3362 8100 10125 12150 504
280 7112 6199 3487 8400 10500 12600 523
290 7366 6420 3611 8700 10875 13050 542
300 7620 6641 3736 9000 11250 13500 560
(мм)
Русский
• Для обеспечения оптимального качества проецирования мы советуем для проецирования
выбирать значения из ячеек без серой заливки. Значения из ячеек с серой заливкой указаны
только для справки.
• Все размеры являются примерными и могут отличаться от фактических.
Компания BenQ рекомендует в случае стационарной установки проектора сначала протестировать
на месте установки оптимальность выбранных значений
проекционного расстояния и размера
проецируемого изображения, чтобы учесть реальные допуски оптических характеристик этого
проектора. Такое тестирование позволит точно определить оптимальное место установки
проектора.
91

• Уст ановку под потолком должен производить квалифицированный специалист. Дополнительные
POWER
TEMP
LAMP
27%27%
1 ширина
экрана
LAN
PC
-
RS232
12V
TRIGGHER
IR IN
1
2
HDMI 2-USB MINIB
HDMI 1
HDCP 2.2
65%
65%
1
в
ы
с
о
т
а
э
к
р
а
н
а
сведения можно узнать у вашего продавца. Советуем не устанавливать проектор самостоятельно.
• Устанавливайте проектор только на твердой ровной поверхности. Упавший проектор может выйти
из строя или причинить пользователю серьезную травму.
• Не используйте проектор при экстремальной температуре. Проектор нужно использовать при
температуре в
диапазоне от 32 до 104 градусов Фаренгейта (от 0 до 40 градусов Цельсия).
• Если проектор попадет во влажную, пыльную или задымленную среду, то экран повредится.
• Не перекрывайте вентиляционные отверстия на корпусе проектора. Для отвода тепла требуется
надлежащая вентиляция. Перекрытие вентиляционных отверстий приведет к неисправности
проектора.
Сдвиг проекционного объектива
Положение по горизонтали Положение по вертикали
Русский
Диапазон проецирования
92

Схема крепления на потолке
290
337
372.8
547.8
530.8
553.39
564.49
275.79
Винт для крепления на потолке: M6
(макс. L = 25 мм; мин. L = 20 мм)
Единица измерения: мм
Русский
93

Использование комплекта кабельной стяжки
Кабельная стяжка
Замок кабельной
стяжки
Гол овк а кабельной
стяжки
1
3
2
Комплект кабельной стяжки помогает предотвратить выпадение кабельного штекера из
соединительного разъема. Он состоит из следующих частей.
Порядок использования комплекта кабельной стяжки:
1. Плотно вставьте штекер кабеля в
соответствующий разъем проектора.
Вставьте головку кабельной стяжки в
отверстие кабельной стяжки
3. Вставьте конец кабельной стяжки в
замок кабельной стяжки, как показано.
4. Закройте замок кабельной стяжки,
надавив его лапку.
непосредственно над соединительным
Русский
разъемом. Учтите, что после того, как
кабельная стяжка будет вставлена в
отверстие, ее нельзя будет извлечь.
4
2. Возьмите замок кабельной стяжки.
Немного откройте замок, чтобы он
обхватил соединительный кабель.
5. Сдвиньте замок кабельной стяжки
вдоль кабельной стяжки к концу
штекера кабеля.
94
5
Установка кабельной стяжки
завершена.

Команда RS-232
Назначение контактов разъема
RS-232
№ Последовательный № Последовательный
1 НЗ 6 НЗ
2 ПРМ 7 Запрос на передачу
3 ПРД 8 Сброс передачи
4 НЗ 9 НЗ
5 ЗЕМЛЯ
Функция Тип Действие ASCII
Запись Вкл. питание <CR>*pow=on#<CR>
Питание
Выбор источника
Режим изображения
Параметры
изображения
Запись Выкл. питание <CR>*pow=off#<CR>
Чтение Уровень заряда <CR>*pow=?#<CR>
Запись COMPUTER/YpbPr <CR>*sour=RGB#<CR>
Запись HDMI <CR>*sour=hdmi#<CR>
Запись HDMI 2 <CR>*sour=hdmi2#<CR>
Чтение Текущий источник <CR>*sour=?#<CR>
Запись Яркий <CR>*appmod=bright#<CR>
Запись Кино <CR>*appmod=cine#<CR>
Запись Стандартный/Яркое <CR>*appmod=std#<CR>
Запись THX <CR>*appmod=thx#<CR>
Запись Заглушить <CR>*appmod=silence#<CR>
Запись Пользов. 1 <CR>*appmod=user1#<CR>
Запись Пользов. 2 <CR>*appmod=user2#<CR>
Запись ISF Night <CR>*appmod=isfnight#<CR>
Запись ISF Day <CR>*appmod=isfday#<CR>
Запись 3D <CR>*appmod=threed#<CR>
Чтение Режим изображения <CR>*appmod=?#<CR>
Запись Контрастность + <CR>*con=+#<CR>
Запись Контрастность - <CR>*con=-#<CR>
Чтение Величина контрастности <CR>*con=?#<CR>
Запись Яркость + <CR>*bri=+#<CR>
Запись Яркость - <CR>*bri=-#<CR>
Чтение Величина яркости <CR>*bri=?#<CR>
Запись Цвет + <CR>*color=+#<CR>
Запись Цвет - <CR>*color=-#<CR>
Чтение Величина цвета <CR>*color=?#<CR>
Запись Оттенок + <CR>*tint=+#<CR>
Запись Оттенок - <CR>*tint=-#<CR>
Чтение Величина оттенка <CR>*tint=?#<CR>
Запись Резкость + <CR>*sharp=+#<CR>
Запись Резкость - <CR>*sharp=-#<CR>
Чтение Величина резкости <CR>*sharp=?#<CR>
Запись Телесный тон
Запись Телесный тон - <CR>*fleshtone=-#<CR>
Чтение Величина телесного тона <CR>*fleshtone=?#<CR>
Запись Цветовая температура - Тепл ая <CR>*ct=warm#<CR>
Запись Цветовая температура - Обычная <CR>*ct=normal#<CR>
Запись Цветовая температура - Холодная <CR>*ct=cool#<CR>
Запись
Чтение
Запись Формат кадра 4:3 <CR>*asp=4:3#<CR>
Цветовая температура - Без
коррекции
Состояние параметра "Цветовая
температура"
+ <CR>*fleshtone=+#<CR>
<CR>*ct=native#<CR>
<CR>*ct=?#<CR>
12345
6789
Русский
95

Русский
Функция Тип Действие ASCII
Запись Формат кадра 16:9 <CR>*asp=16:9#<CR>
Запись Формат кадра Авто <CR>*asp=AUTO#<CR>
Запись Формат кадра Реальный <CR>*asp=REAL#<CR>
Запись Формат кадра Анаморфный <CR>*asp=ANAM#<CR>
Запись Формат кадра - Анаморфный 2,4:1 <CR>*asp=ANAM2.4:1#<CR>
Запись Формат кадра - Анаморфный 16:9 <CR>*asp=ANAM16:9#<CR>
Состояние параметра "Формат
кадра"
- <CR>*GGain=-#<CR>
параметра "Выбор гаммы" <CR>*gamma=?#<CR>
<CR>*asp=?#<CR>
Параметры
изображения
(продолжение)
Чтение
Запись Регулировка переразвертки + <CR>*overscan=+#<CR>
Запись Регулировка переразвертки - <CR>*overscan=-#<CR>
Чтение Величина регулировки переразвертки <CR>*overscan=?#<CR>
Запись Авто <CR>*auto#<CR>
Запись Подавление помех + <CR>*NR=+#<CR>
Запись Подавление помех - <CR>*NR=-#<CR>
Чтение Величина подавления помех <CR>*NR=?#<CR>
Запись Уровень красного + <CR>*RGain=+#<CR>
Запись Уровень красного - <CR>*RGain=-#<CR>
Чтение Величина уровня красного <CR>*RGain=?#<CR>
Запись Уровень зеленого + <CR>*GGain=+#<CR>
Запись Уровень зеленого
Чтение Величина уровня зеленого <CR>*GGain=?#<CR>
Запись Уровень синего + <CR>*BGain=+#<CR>
Запись Уровень синего - <CR>*BGain=-#<CR>
Чтение Величина уровня синего <CR>*BGain=?#<CR>
Запись Смещение красного + <CR>*ROffset=+#<CR>
Запись Смещение красного - <CR>*ROffset=-#<CR>
Чтение Величина смещения красного <CR>*ROffset=?#<CR>
Запись Смещение зеленого + <CR>*GOffset=+#<CR>
Запись Смещение зеленого - <CR>*GOffset=-#<CR>
Чтение Величина смещения зеленого <CR>*GOffset=?#<CR>
Запись Смещение синего + <CR>*BOffset=+#<CR>
Запись Смещение синего - <CR>*BOffset=-#<CR>
Чтение Величина смещения синего <CR>*BOffset=?#<CR>
Запись Выбор гаммы - 1,8 <CR>*gamma=1.8#<CR>
Запись Выбор гаммы - 2,0 <CR>*gamma=2.0#<CR>
Запись Выбор гаммы - 2,1 <CR>*gamma=2.1#<CR>
Запись Выбор гаммы - 2,2 <CR>*gamma=2.2#<CR>
Запись Выбор гаммы - 2,3 <CR>*gamma=2.3#<CR>
Запись Выбор гаммы - 2,4 <CR>*gamma=2.4#<CR>
Запись Выбор гаммы - 2,6 <CR>*gamma=2.6#<CR>
Запись Выбор гаммы - 2,8 <CR>*gamma=2.8#<CR>
Запись Выбор гаммы - BenQ <CR>*gamma=benq#<CR>
Чтение Состояние
Запись Вкл. Brilliant Color <CR>*BC=on#<CR>
Запись Выкл. Brilliant Color <CR>*BC=off#<CR>
Чтение Состояние параметра "Brilliant color" <CR>*BC=?#<CR>
Запись Формат HDMI - Авто <CR>*HDMI=auto#<CR>
Запись Формат HDMI - Сигнал ПК <CR>*HDMI=pc#<CR>
Запись Формат HDMI - Видеосигнал <CR>*HDMI=video#<CR>
Чтение Состояние параметра "Формат HDMI" <CR>*HDMI=?#<CR>
Запись Вкл. CEC <CR>*cec=on#<CR>
Запись Выкл. CEC <CR>*cec=off#<CR>
Чтение Состояние параметра CEC <CR>*cec=?#<CR>
96

Функция Тип Действие ASCII
Запись Начальный экран - BenQ <CR>*splash=benq#<CR>
Запись Начальный экран - Черный <CR>*splash=black#<CR>
Запись Начальный экран - Синий <CR>*splash=blue#<CR>
Состояние параметра "Начальный
экран"
Положение проектора - Сзади на
столе
Положение проектора - Сзади на
потол
Положение проектора - Спер. на
потолок
Состояние параметра "Положение
проектора"
Быстрый автопоиск/Автопоиск
источника
Быстрый автопоиск/Автопоиск
источника
Состояние параметра "Быстрый
автопоиск/Автопоиск источника"
Состояние
меню"
Состояние параметра "Положение
меню"
Состояние параметра
"Напоминающее сообщение"
Состояние
включение питания"
Состояние параметра "Настройки
реж. ожид. - Сеть"
параметра "Время вывода
параметра "Прямое
<CR>*splash=?#<CR>
<CR>*pp=RE#<CR>
<CR>*pp=RC#<CR>
<CR>*pp=FC#<CR>
<CR>*pp=?#<CR>
<CR>*QAS=on#<CR>
<CR>*QAS=off#<CR>
<CR>*QAS=?#<CR>
<CR>*menutime=?#<CR>
<CR>*menuposition=?#<CR>
<CR>*reminder=?#<CR>
<CR>*directpower=?#<CR>
<CR>*standbynet=?#<CR>
Настройки рабочего
режима
Управление лампой
Запись
Запись Цвет фона - Черный <CR>*background=black#<CR>
Запись Цвет фона - Синий <CR>*background=blue#<CR>
Запись Цвет фона - Фиолетовый <CR>*background=purple#<CR>
Чтение Состояния параметра "Цвет фона" <CR>*background=?#<CR>
Запись Положение проектора - Спер. на стол <CR>*pp=FT#<CR>
Запись
Запись
Запись
Чтение
Запись
Запись
Чтение
Запись Время вывода меню - Пост. вкл <CR>*menutime=on#<CR>
Запись Время вывода меню - 5 с <CR>*menutime=5s#<CR>
Запись Время вывода меню - 10 с <CR>*menutime=10s#<CR>
Запись Время вывода меню - 15 с <CR>*menutime=15s#<CR>
Запись Время вывода меню - 20 с <CR>*menutime=20s#<CR>
Запись Время вывода меню - 25 с <CR>*menutime=25s#<CR>
Запись Время вывода меню - 30 с <CR>*menutime=30s#<CR>
Чтение
Запись Положение меню - В центре <CR>*menuposition=center#<CR>
Запись Положение меню - Слева сверху <CR>*menuposition=tl#<CR>
Запись Положение меню - Справа сверху <CR>*menuposition=tr#<CR>
Запись Положение меню - Справа снизу <CR>*menuposition=br#<CR>
Запись Положение меню - Слева снизу <CR>*menuposition=bl#<CR>
Чтение
Запись Напоминающее сообщение - Вкл. <CR>*reminder=on#<CR>
Запись Напоминающее сообщение - Выкл. <CR>*reminder=off#<CR>
Чтение
Запись Вкл. прямое включение питания <CR>*directpower=on#<CR>
Запись Выкл. прямое включение питания <CR>*directpower=off#<CR>
Чтение
Запись Настройки реж. ожид. - Сеть вкл. <CR>*standbynet=on#<CR>
Запись Настройки реж. ожид. - Сеть выкл. <CR>*standbynet=off#<CR>
Чтение
Чтение Наработка лампы <CR>*ltim=?#<CR>
Запись Режим обычный <CR>*lampm=lnor#<CR>
Запись Режим Эко <CR>*lampm=eco#<CR>
Запись Режим Интел. Эко <CR>*lampm=seco#<CR>
Чтение Состояние параметра "Режим лампы" <CR>*lampm=?#<CR>
Русский
97

Функция Тип Действие ASCII
Чтение Название модели <CR>*modelname=?#<CR>
Запись Вкл. "Пустой экран" <CR>*blank=on#<CR>
Запись Выкл. "Пустой экран" <CR>*blank=off#<CR>
Чтение Состояние параметра "Пустой экран" <CR>*blank=?#<CR>
Запись Вкл. меню <CR>*menu=on#<CR>
Запись Выкл. меню <CR>*menu=off#<CR>
Запись Вверх <CR>*up#<CR>
Запись Вниз <CR>*down#<CR>
Запись Вправо <CR>*right#<CR>
Запись Влево <CR>*left#<CR>
Запись Ввод/OK <CR>*enter#<CR>
Запись НАЗАД <CR>*back#<CR>
Запись 3D Авто <CR>*3d=auto#<CR>
Запись Выкл. Синхр. 3D <CR>*3d=off#<CR>
Запись Синхр. 3D, Чередование кадров <CR>*3d=fs#<CR>
Запись Откл. инвертирование 3D <CR>*3d=da#<CR>
Запись Инвертирование 3D <CR>*3d=iv#<CR>
Русский
Прочие
Чтение Состояние параметра "Синхр. 3D" <CR>*3d=?#<CR>
Запись Язык + <CR>*lang=+#<CR>
Запись Язык - <CR>*lang=-#<CR>
Чтение Состояние параметра "Язык" <CR>*lang=?#<CR>
Запись Автоотключение - откл. <CR>*APOFF=DIS#<CR>
Запись Автоотключение - 5 мин <CR>*APOFF=5#<CR>
Запись Автоотключение - 10 мин <CR>*APOFF=10#<CR>
Запись Автоотключение - 15 мин <CR>*APOFF=15#<CR>
Запись Автоотключение - 20 мин <CR>*APOFF=20#<CR>
Запись Автоотключение - 25 мин <CR>*APOFF=25#<CR>
Запись Автоотключение - 30 мин <CR>*APOFF=30#<CR>
Чтение
Запись Обнаружение устройства AMX - вкл. <CR>*amxdd=on#<CR>
Запись Обнаружение устройства AMX - выкл. <CR>*amxdd=off#<CR>
Чтение
Чтение MAC-адрес <CR>*macaddr=?#<CR>
Запись Вкл. быстрое охлаждение <CR>*QCooling=on#<CR>
Запись Выкл. быстрое охлаждение <CR>*QCooling=off#<CR>
Чтение
Запись Вкл. режим "Большая высота" <CR>*Highaltitude=on#<CR>
Запись Выкл. режим "Большая высота" <CR>*Highaltitude=off#<CR>
Чтение
Запись Блокировка клавиш - вкл. <CR>*keylock=on#<CR>
Запись Блокировка клавиш -
Чтение
Запись Индикатор - вкл. <CR>*led=on#<CR>
Запись Индикатор - выкл. <CR>*led=off#<CR>
Чтение Состояние параметра Индикатор <CR>*led=?#<CR>
Состояние параметра
"Автоотключение"
Состояние параметра "Обнаружение
устройства AMX"
Состояние параметра "Быстрое
охлаждение"
Состояние параметра "Большая
высота"
выкл. <CR>*keylock=off#<CR>
Состояние параметра "Блокировка
клавиш"
<CR>*APOFF=?#<CR>
<CR>*amxdd=?#<CR>
<CR>*QCooling=?#<CR>
<CR>*Highaltitude=?#<CR>
<CR>*keylock=?#<CR>
98

차례
중요 안전 지침 .................................................................................................................... 100
제품 정보 ............................................................................................................................ 102
제품 구성 ................................................................................................................................................102
사양 ...........................................................................................................................................................102
프로젝터 치수 .......................................................................................................................................103
단자 ...........................................................................................................................................................103
리모컨 ..................................................................................................................................................... 104
설치 ..................................................................................................................................... 105
영사 크기 ................................................................................................................................................105
영사 렌즈 이동 ..................................................................................................................................... 106
천장 설치 그림 ..................................................................................................................................... 107
케이블 타이 세트 사용 ...................................................................................................................... 108
RS232 명령 ......................................................................................................................... 109
RS232 핀 할당 ........................................................................................................................................109
한국어
99
 Loading...