


LCD Monitor
Palette Master Element
How to Use Guide
V 3.3
2
Proprietary Calibration Software
Palette Master Element software simplifies calibration and reliably produces accurate color results.
Palette Master Element can be used to fine tune the color engine in SW series monitors and fully
supports X-Rite / Datacolor colorimeters.
NOTE: Illustrations for reference only. Vary by purchased model.
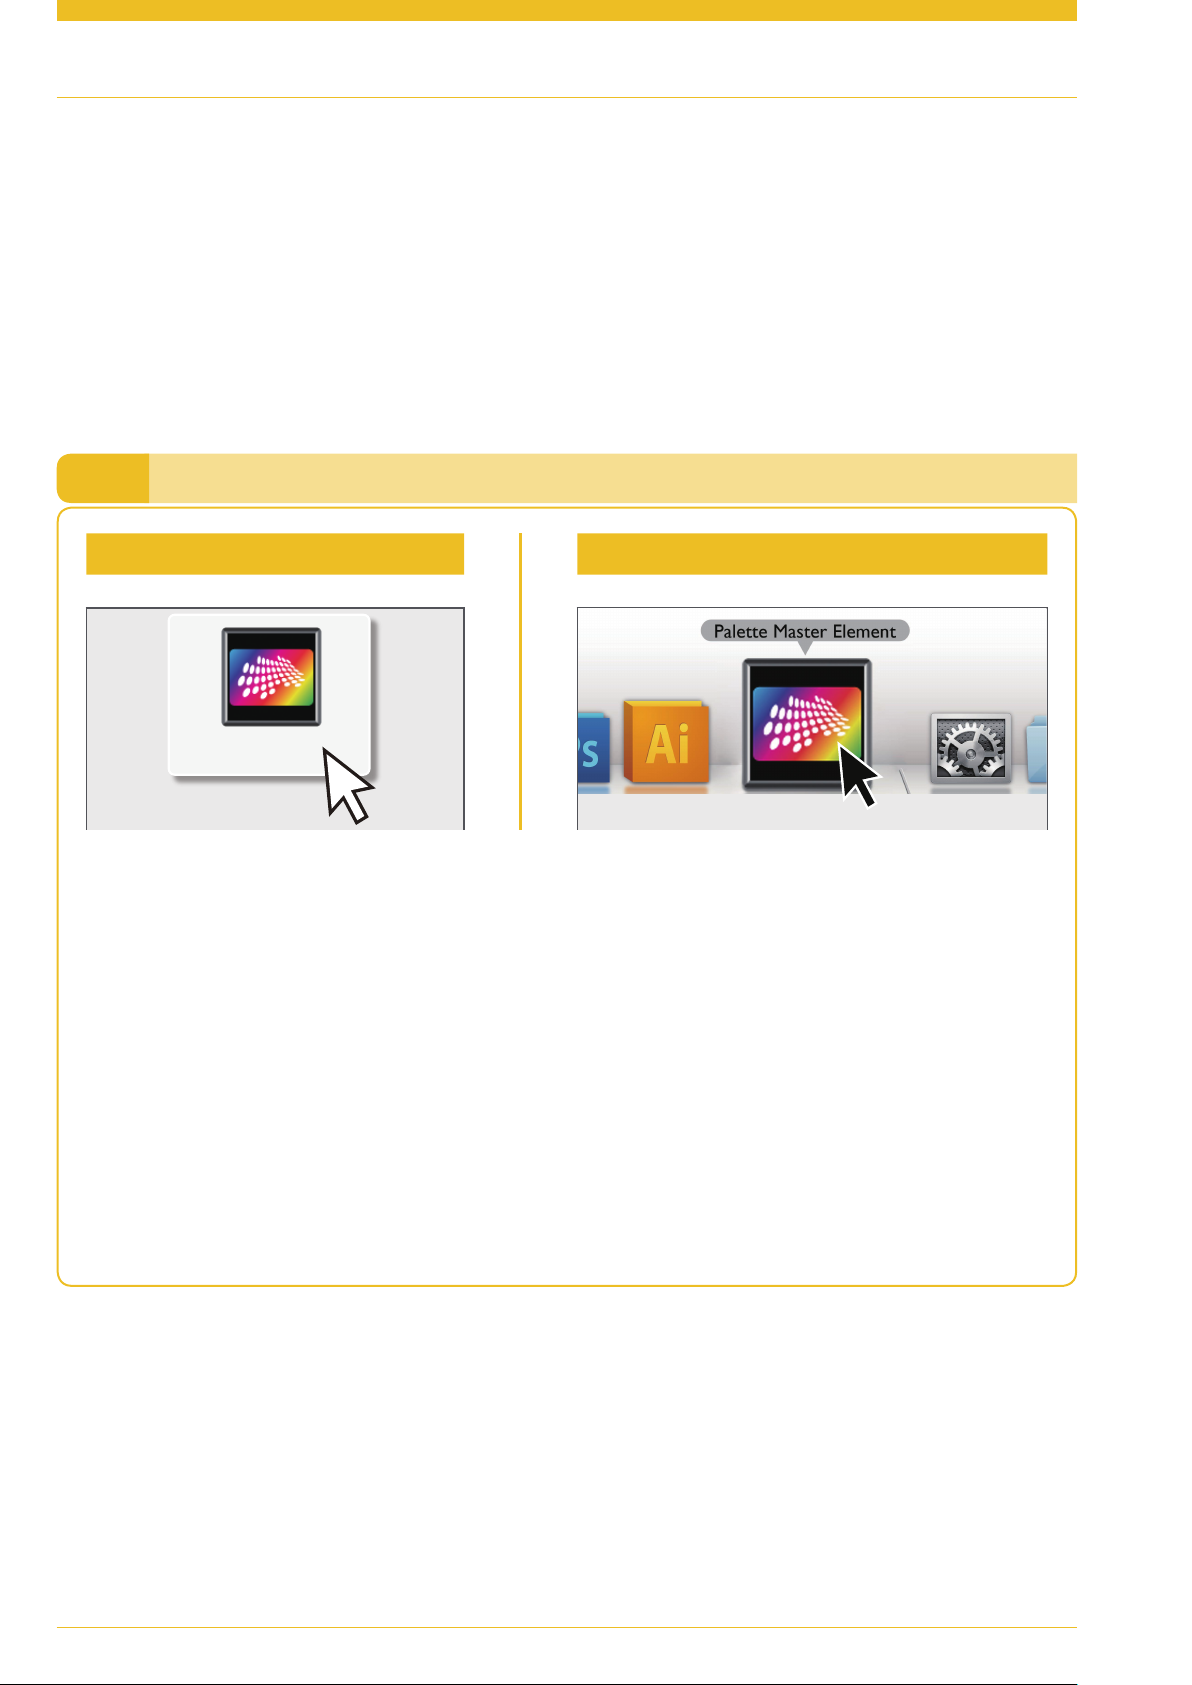
Launching Palette Master ElementI.
For Windows For Mac
Double-click on the icon Double-click on the icon in the Dock
Palette Master
Element
Attention
XCheck to see that the USB cable is connected to both the monitor and the computer.
XCheck to see that colorimeter is connected to the monitor’s USB port.
XYou are recommended to use the original USB-C™ cable that came with the monitor. If a separately purchased
USB-C™ cable is used, make sure the cable is certified by USB-IF and is full-featured, with power delivery and
video / audio / data transfer functions.
XConverters/adapters are not recommended to connect your source device to the monitor, as the compatibility
of the converters/adapters in the market cannot be guaranteed.
XBefore monitor calibration, turn on both the monitor and the computer to warm up for 30 minutes.
XDisable the power management functions of the computer and the monitor. Make sure that both will not in
power save mode and the screen saver will not be activated during adjustment or measurement.
Launching Palette Master Element
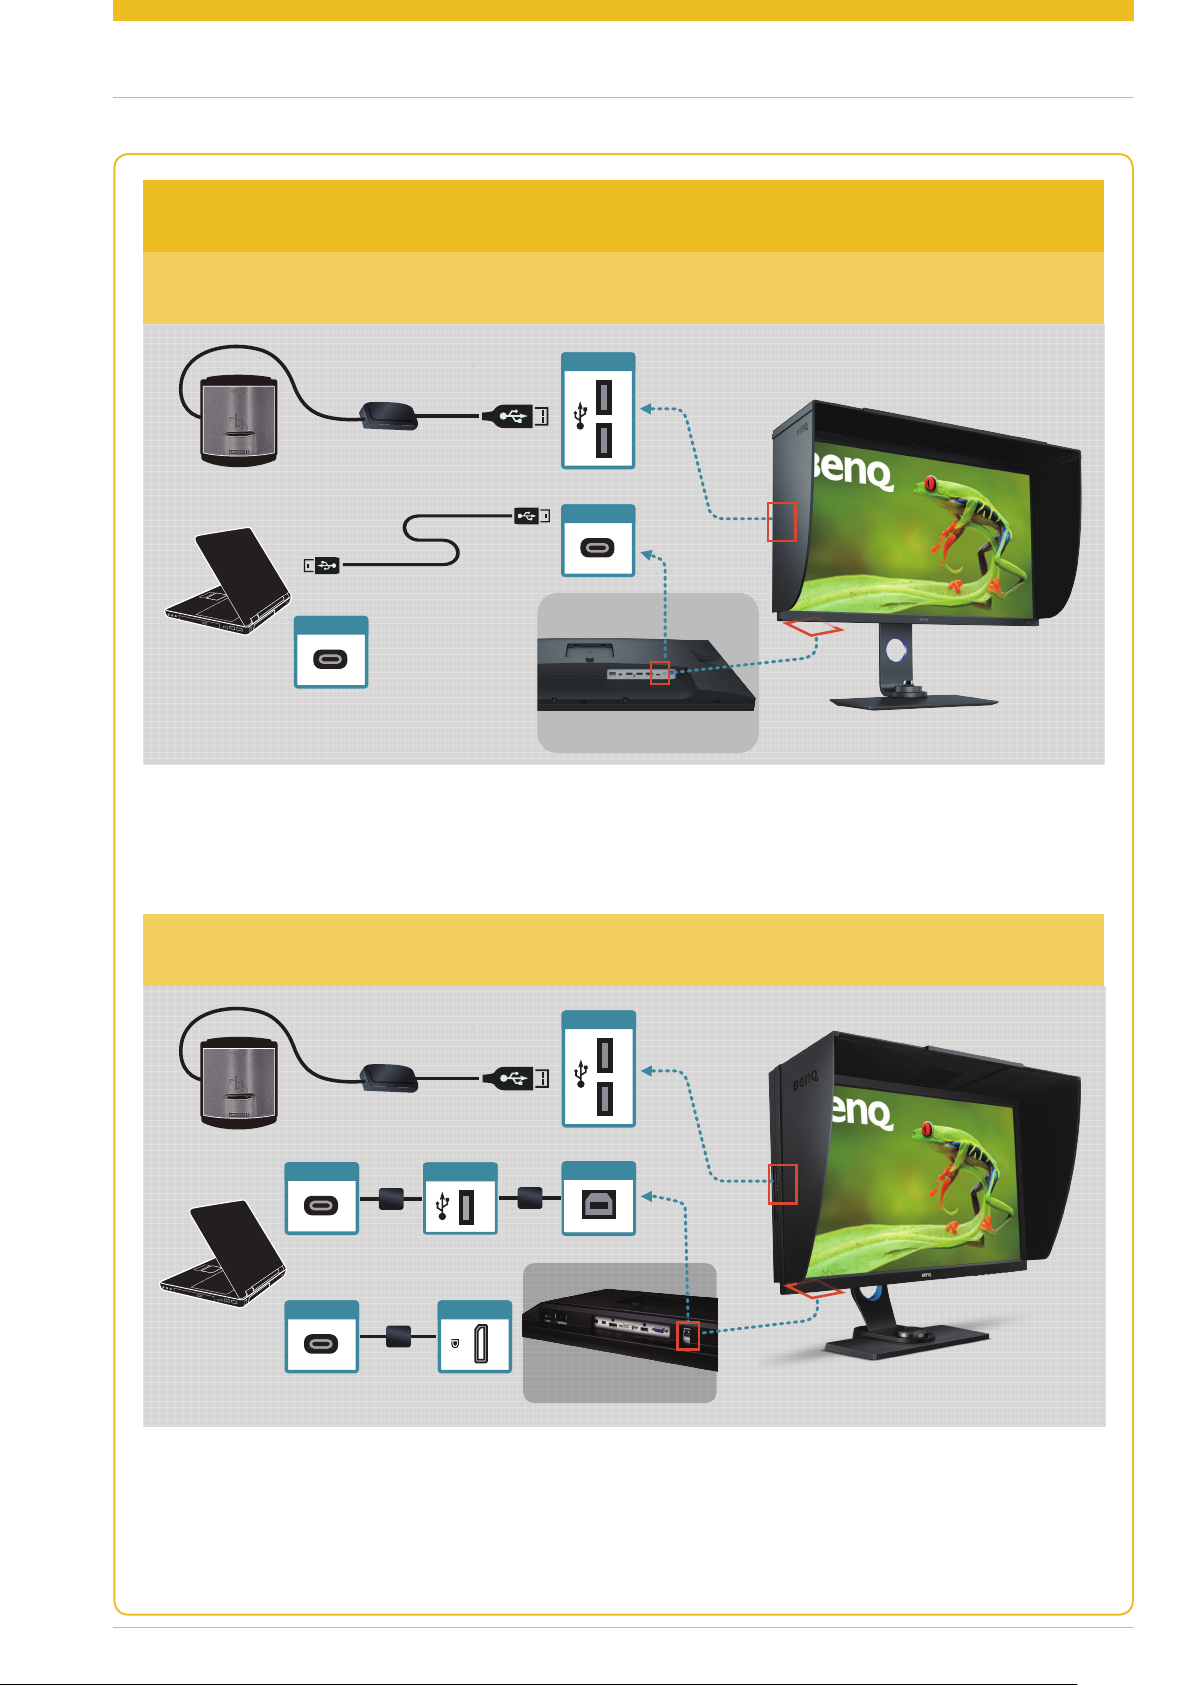
Connection via USB-C™ ports
USB-C™ ports on both PC/laptop and monitor
3
USB-C™ ports on PC/laptop only
(via converter)
(via converter)
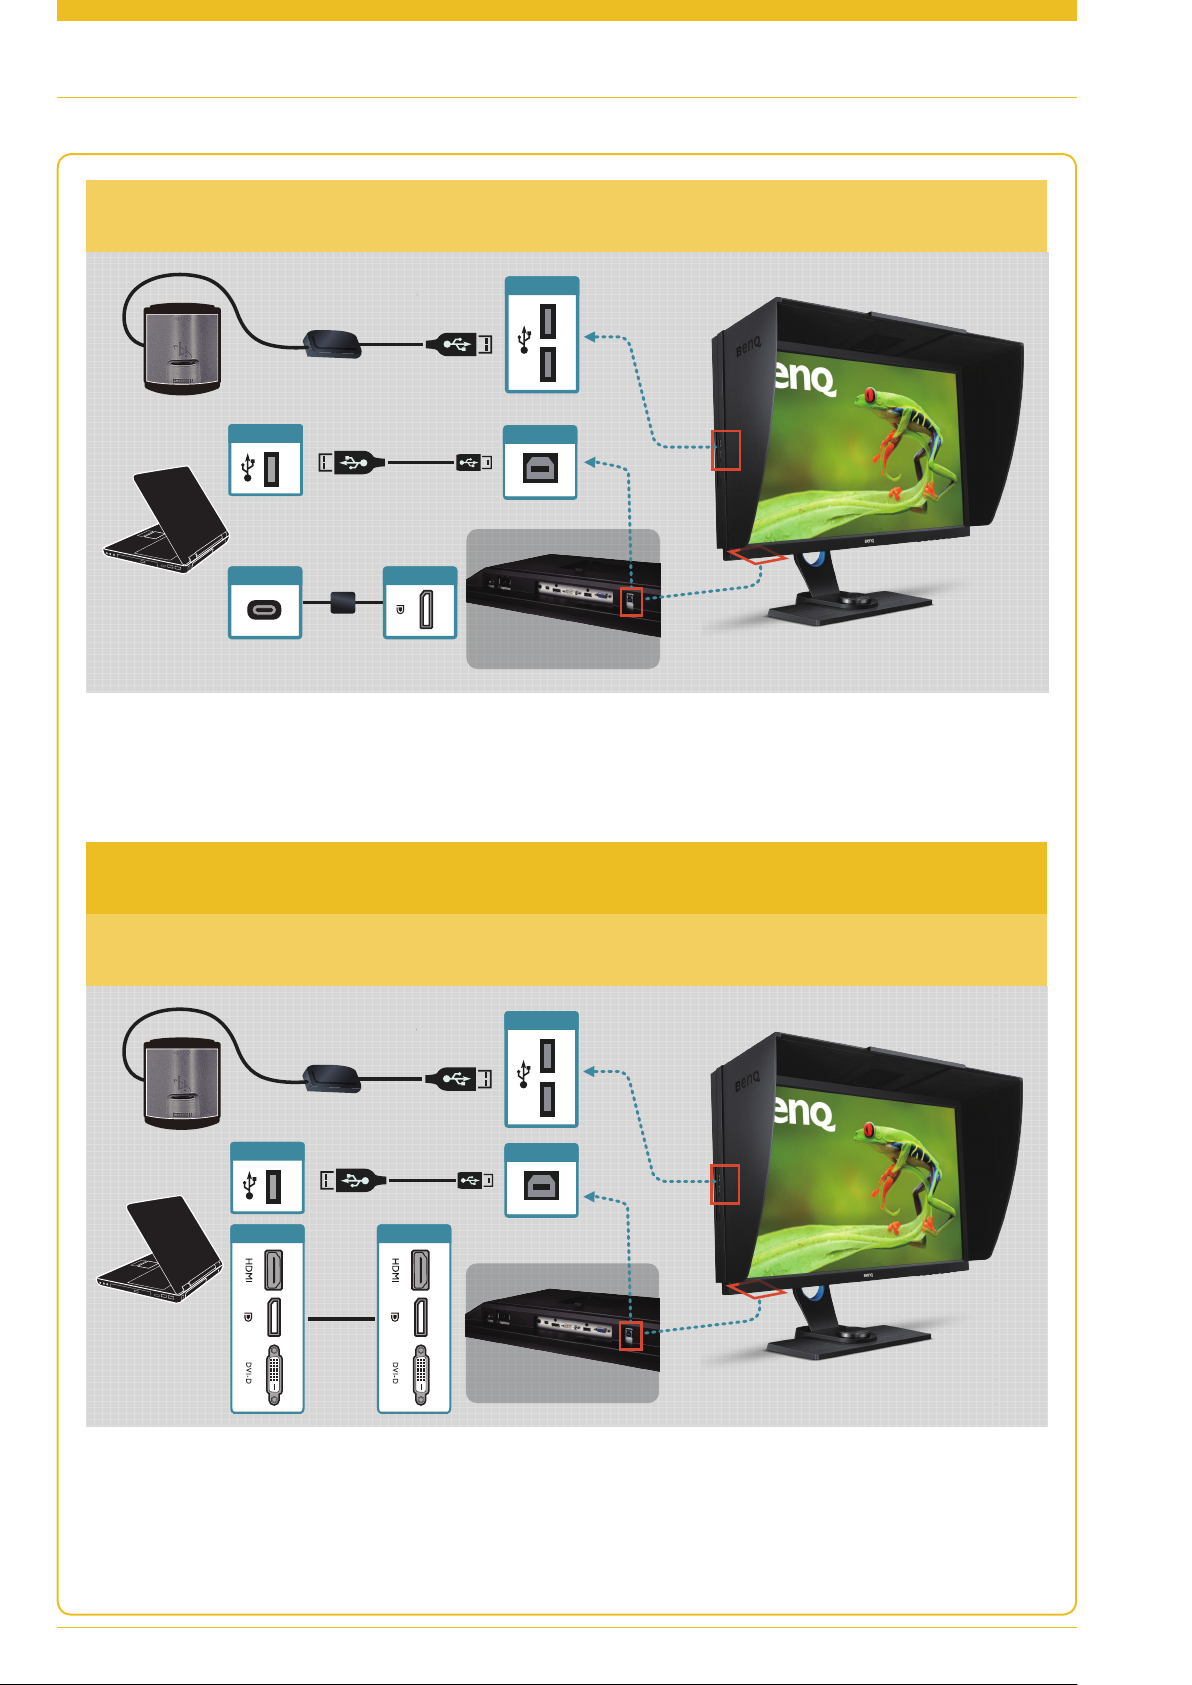
Launching Palette Master Element
4
One USB-C™ port on PC/laptop
(via converter)
Connection via non-USB-C™ ports
No USB-C™ ports on both PC/laptop and monitor
Launching Palette Master Element
5
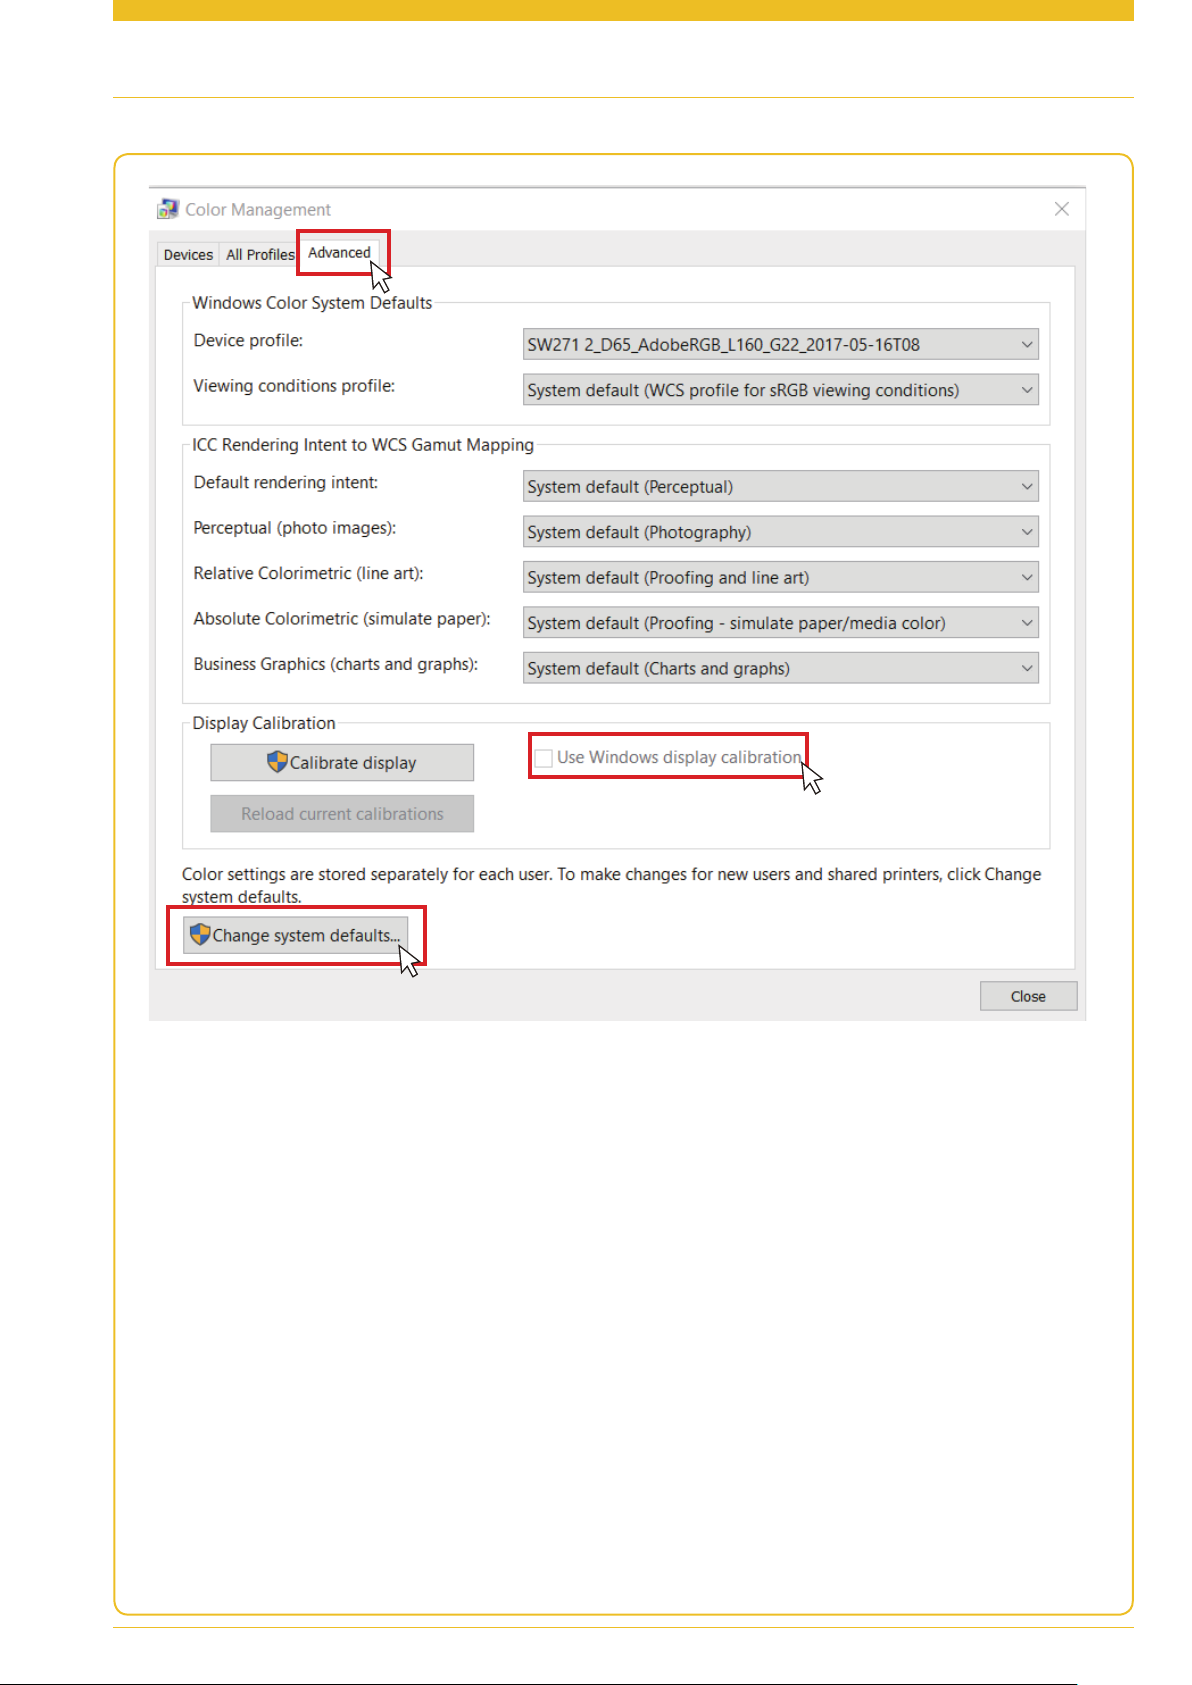
XIf your OS is Windows 10, Windows 8, or Windows 7, and the Windows Display Calibration function is enabled,
please follow the steps below to disable this setting.
1. Select Control Panel, Color Management, and Advanced.
2. Click Change system defaults and select the Advanced tab of the displayed dialog box.
3. Uncheck Use Windows display calibration check box.
XWhen multiple monitors are connected, each monitor should display an independent screen. For details on
changing the settings, see the user manual of the graphics card.
XIf you wish to maximize compatibility with other software (e.g., Photoshop), choose V2 in Profile Version, and
Matrix in Profile Type.
Launching Palette Master Element
6
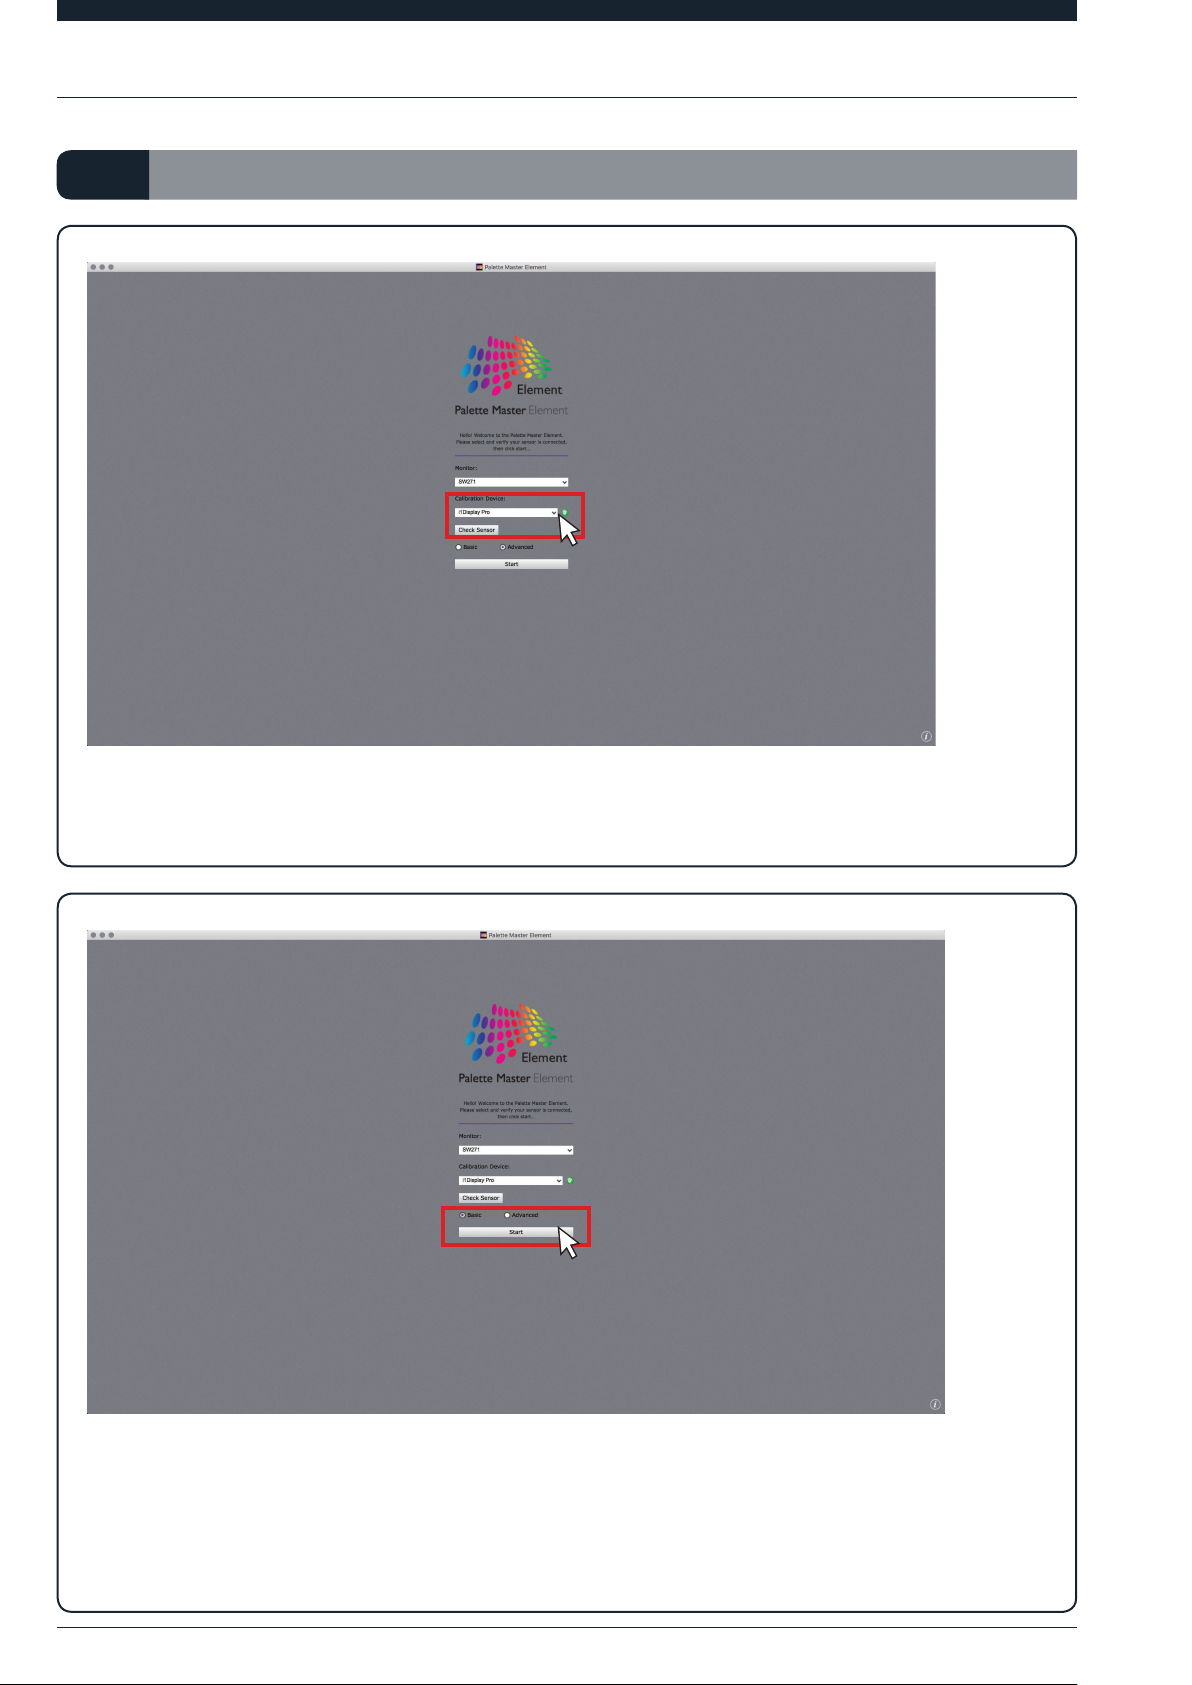
In Basic ModeII.
XPlug the colorimeter to a USB port and select the model name, then click Check Sensor to make connection.
XSelect Basic.
XClick Start to enter the Basic mode.
In Basic Mode

7
XSelect the desired Default profile, White Point and Luminance. You can choose the Photographer (Adobe
RGB), Web Design (sRGB), Graphics (Adobe RGB), Cinema (DCI-P3), Designer (Display P3),
or Video Editing (Rec.709) profile according to your demand (see Profiles and Scenarios on page 17 for
details). After setting, click Next.
XSelect Calibration 1, Calibration 2, or Calibration 3 to save the calibration result into the monitor, then
click Start Measurement to calibrate the monitor. This will take around 7 minutes.
In Basic Mode

8
Step 1 Step 2
XBefore calibrating, tilt the monitor up to ensure that the colorimeter snaps onto the monitor.
XFollow the instructions to open the sensor for calibration, then click Continue.
NOTE: The illustration is for i1 Display Pro. Instructions vary by device.
In Basic Mode

9
XPut the colorimeter on the screen and match the colorimeter image to get the best calibration result, then click
Continue to start calibration.
XOnce calibration finishes, you can see a brief calibration report of luminance, color temperature, and Delta E.
NOTE: The ICC profile after calibration can be accessed from the following:
Win: C:\Windows\System32\spool\drivers\colors
Mac: /Users/[User Name]/Library/ColorSync/Profiles
In Basic Mode

10
In Advanced ModeIII.
XSelect Advanced.
XClick Start to enter the Advanced mode.
XClick Profiling and Next.
In Basic Mode

11
XYou can choose the Photographer (Adobe RGB), Web Design (sRGB), Graphics (Adobe RGB),
Cinema (DCI-P3), Designer (Display P3), or Video Editing (Rec.709) profile according to your demand
(see Profiles and Scenarios on page 17 for details). After setting, click Next.
XYou can adjust White Point, RGB Primaries, Luminance, Gamma, and Blackpoint as desired.
In Advanced Mode

12
Note:
• Use RGB primaries to change the desired color gamut. Apart from the default standard gamut, you can
choose panel native to reach this panel’s maximum gamut, or select Custom to create a custom gamut.
• If the Photographer profile is selected, usually the maximum contrast ratio is required, set Blackpoint
to Absolute Zero. If you need smooth gray scale without extreme black, especially for printing, set
Blackpoint to Relative.
In Advanced Mode

13
XAfter customization, you can save the profile setting by customized naming. If you want to delete or change the
profile names, you can do so by finding the profile files on
Win: C:\ProgramData\rd\strings\benq_params
Mac: /Users/Shared/RD/strings/benq_params
In Advanced Mode

14
XSelect Calibration 1, Calibration 2, or Calibration 3 to save the calibration result into the monitor. If you
want to get more precise result, change the patch size to Medium or Large. Yet it will take more time to
calibrate. After all settings finish, click Start Measurement to calibrate the monitor. Before calibrating, tilt the
monitor up to ensure that the colorimeter snaps onto the monitor.
Note:
• Be sure you have the administrator privilege before selecting the system level. Otherwise, you may not be
able to build the ICC profile on the operating system.
• If you wish to maximize compatibility with other software (e.g., Photoshop), choose V2 in Profile Version,
and Matrix in Profile Type.
Step 1 Step 2
XBefore calibrating, tilt the monitor up to ensure that the colorimeter snaps onto the monitor.
In Advanced Mode

15
XFollow the instructions to open the sensor for calibration, then click Continue.
NOTE: The illustration is for i1 Display Pro. Instructions vary by device.
XPut the colorimeter on the screen and match the colorimeter image to get the best calibration result, then click
Continue to start calibration.
In Advanced Mode

16
XOnce calibration finishes, you can see the brief calibration report of luminance and color temperature.
XYou can setup the desired Delta E value range then click Validate Calibration for further validation.
In Advanced Mode

17
XAfter validation, you can know if the calibration result meets the desired Delta E range. If needed, you can export
the report into HTML format.
NOTE: The ICC profile after calibration can be accessed from the following:
Win: C:\Windows\System32\spool\drivers\colors
Mac: /Users/[User Name]/Library/ColorSync/Profiles
In Advanced Mode

18
Profiles and ScenariosIV.
Profile Default picture
Scenario
mode
Photographer Adobe RGB For professional photo editing.
Web Design sRGB For web designer.
Graphics Adobe RGB For soft proofing to match the colors on the screen and
on the prints.
Cinema DCI-P3 For video post production.
Designer Display P3 For Mac OS / iOS UI design.
Video Editing Rec. 709 For HDTV video editing.
NOTE: Available options vary by model.

19
System RequirementsV.
PC Mac
OS system
Windows® 7 (32-bit or 64-bit
OS X 10.6.8 or above
(*)
version) or above
Monitor
All SW series
• At least 2 USB ports
• Intel® Core 2 Duo or AMD Athlon™ 64 X2 or better CPU
Hardware
• 2GB of available disk space
• The graphic card must support at least 16.7 million display colors.
• Minimum resolution 1024 x 768
Supported ColorimetersVI.
Manufacturer Models
X-Rite i1 Pro, i1 Pro2, i1Pro 3 Plus, i1 Display Pro, i1Display Pro Plus,
i1 Display 2, i1 Studio, ColorMunki Photo
Datacolor Spyder 4, Spyder 5, Spyder X
NOTE:
• (*): When you color calibrate with Palette Master Element, HDR needs to remain off. In MacOS 10.15.4, HDR turns
on by default whenever an HDR-capable display is connected and detected. This results in a screen which cannot
display the dark areas as dark enough and the whole screen in low contrast. To turn off HDR on MacOS, choose
Apple menu > System Preference > Display, then uncheck High Dynamic Range.
• For more Q&A information, go to Support.BenQ.com > Palette Master Element > Q&A.
Specifications may vary by region, please visit your local stores for details. Actual product’s features and specifications are subject to change without prior notice. All logos,
products, or company names mentioned in this document may be the registered trademarks or copyrights of their respective companies, and are used for informational purposes
only.

BenQ.com
© 2020 BenQ Corporation.
All rights reserved. Rights of modification reserved.
V 3.3 08/06/2020
 Loading...