


Tuner-RC-TC.book Page 1 Friday, October 3, 2008 4:25 PM
繁體中文
彩色液晶顯示器專用電視盒與遙控器
安裝與使用指南
P/N: 4J.0M902.002
Tuner-RC-TC.book Page 2 Friday, October 3, 2008 4:25 PM
繁體中文
免責聲明
本公司不對於此使用手冊的相關內容、適銷性或適合於某特定目的保
證,作出任何明示或暗示的陳述或擔保。此外,本公司保留修訂本出版
品的權利,內容如有變更,恕不另行通知。
版權
本公司版權所有,並保留所有權利。未經本公司書面許可,不得以任何
形式或以電子、印刷、磁學、光學、化學、人工等其它方式複製、傳
播、轉錄本使用手冊的任何部分,也不得將任何部分儲存至檢索系統中
或翻譯成任何語言或電腦語言。
本指南適用於 SH、SD、VH、VB 與 VD 系列液晶顯示器。在本指南中,標註
有 (SH 系列 )、(SD 系列 )、(VH 系列 )、(VB 系列 ) 或 (VD 系列 ) 的部分,表
示該系列機種才有的功能。

Tuner-RC-TC.book Page i Friday, October 3, 2008 4:25 PM
目次
檢查包裝內容 ......................................................... 1
安裝電視盒 ............................................................. 1
準備使用遙控器 ..................................................... 4
RC-H081 遙控器按鍵功能說明 ........................... 5
RC-H072 遙控器按鍵功能說明 ........................... 8
使用遙控器 ............................................................. 11
繁體中文
安裝前的準備事項 .......................................................... 1
安裝電視盒 ...................................................................... 1
安裝電池 .......................................................................... 4
使用電池的注意事項 ...................................................... 4
開機、待機與關閉電源 ................................................. 11
打開顯示器的電源 ..............................................................11
讓顯示器進入待機狀態 .....................................................11
關閉顯示器的電源 (SH 系列 ) ..........................................11
選擇觀賞類比、數位電視或 MOD .............................. 11
切換輸入訊號 .................................................................. 12
調整聲音 .......................................................................... 12
調整音量 ..............................................................................12
靜音 .......................................................................................12
切換雙語聲音系統 ..............................................................12
切換環繞音效效果 ..............................................................13
切換音場效果 ......................................................................13
切換頻道 .......................................................................... 13
使用頻道輸入按鈕選擇頻道 .............................................13
使用頻道按鈕循序選擇頻道 .............................................13
使用頻道返回功能 ..............................................................13
選擇喜愛頻道 ......................................................................13
調整背光亮度 .................................................................. 13
顯示資訊 .......................................................................... 13
選擇影像模式 .................................................................. 14
使用定時關機功能 .......................................................... 14
使用畫面靜止功能 .......................................................... 14
目次 i

Tuner-RC-TC.book Page ii Friday, October 3, 2008 4:25 PM
繁體中文
使用子母畫面顯示功能 (SH/VH 系列 ) ....................... 15
調整畫面比例 ...................................................................16
螢幕顯示選單 ......................................................... 17
螢幕顯示選單架構 ..........................................................17
瀏覽螢幕顯示選單 ..........................................................19
螢幕顯示選單中的操作 ..................................................... 19
聲音選單 (SH/VH 系列 ) ................................................20
設定音場效果中的 「使用者模式」 ................................21
聲音選單 (VB/SD/VD 系列 ) ..........................................22
設定音場效果中的 「自訂」模式 ................................... 23
畫質選單 (SH/VH 系列 ) ................................................24
調整對比 ..............................................................................25
調整亮度 ..............................................................................26
設定影像模式中的 「使用者模式」 ................................26
畫質選單 (VB/SD/VD 系列 ) ..........................................26
調整對比度 ..........................................................................28
調整亮度 ..............................................................................28
設定畫質模式中的 「自訂」模式 ................................... 28
Senseye 選單 (SH 系列 ) .................................................. 29
Senseye 選單 (VB/SD/VD 系列 ) .................................... 30
功能選單 (VH 系列 ) .......................................................31
子母畫面選單 (SH/VH 系列 ) ........................................ 32
電視選單 (SH/VH 系列 ) ................................................33
掃瞄並記憶電視頻道 ......................................................... 33
設定喜愛頻道 ......................................................................33
TV 選單 (VB/SD/VD 系列 ) ............................................34
掃瞄並記憶電視頻道 ......................................................... 34
設定喜愛頻道 ......................................................................34
設定選單 (SH/VH 系列 ) ................................................35
設定選單 (VB/SD/VD 系列 ) ..........................................36
目次ii
Tuner-RC-TC.book Page 1 Friday, October 3, 2008 4:25 PM
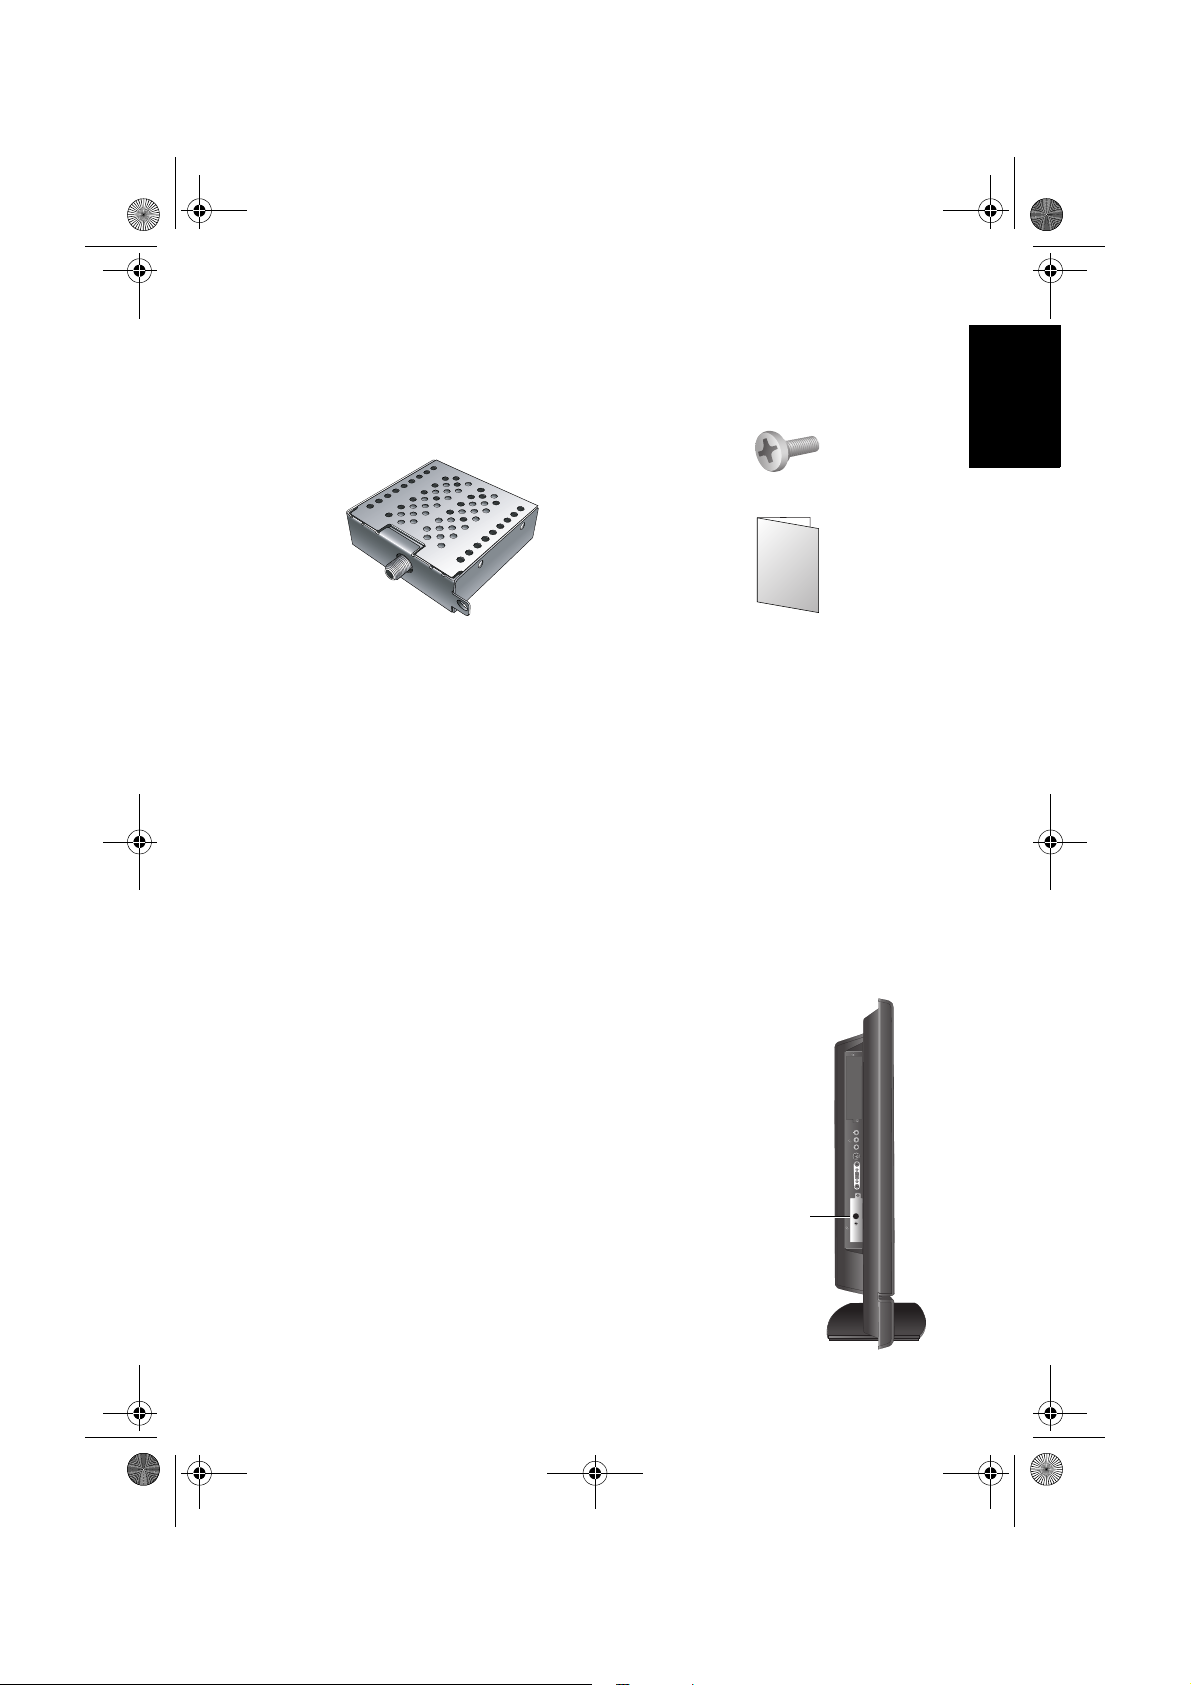
檢查包裝內容
請檢查包裝中的物品是否齊全。若有任何物品遺失或損壞,請速與您所
購買的經銷商聯絡。
電視盒 x 1 安裝與使用指南 x 1
安裝電視盒
安裝前的準備事項
在您開始安裝前,請先確認執行以下步驟,以確保您在安裝時的安全。
• 請先將顯示器的電源關閉,並將連接至顯示器上的電源線與所有已連
接的訊號線取下。
• 進行作業時,請戴上適合的絕緣手套,以確保安全。
• 確定您在顯示器左側有足夠的空間進行安裝作業。建議您將顯示器移
動到比較方便安裝的地點進行安裝。在安裝完成後,再將顯示器移動
回原處。由於顯示器的重量頗重,因此在移動顯示器時建議由兩名以
上之成人進行。
繁體中文
電視盒固定螺絲 x 1
安裝電視盒
1. 在顯示器的背面找出電視盒安裝槽的位
置 ( 如右圖所示 )。
電視盒安裝
槽的位置
檢查包裝內容 1

Tuner-RC-TC.book Page 2 Friday, October 3, 2008 4:25 PM
繁體中文
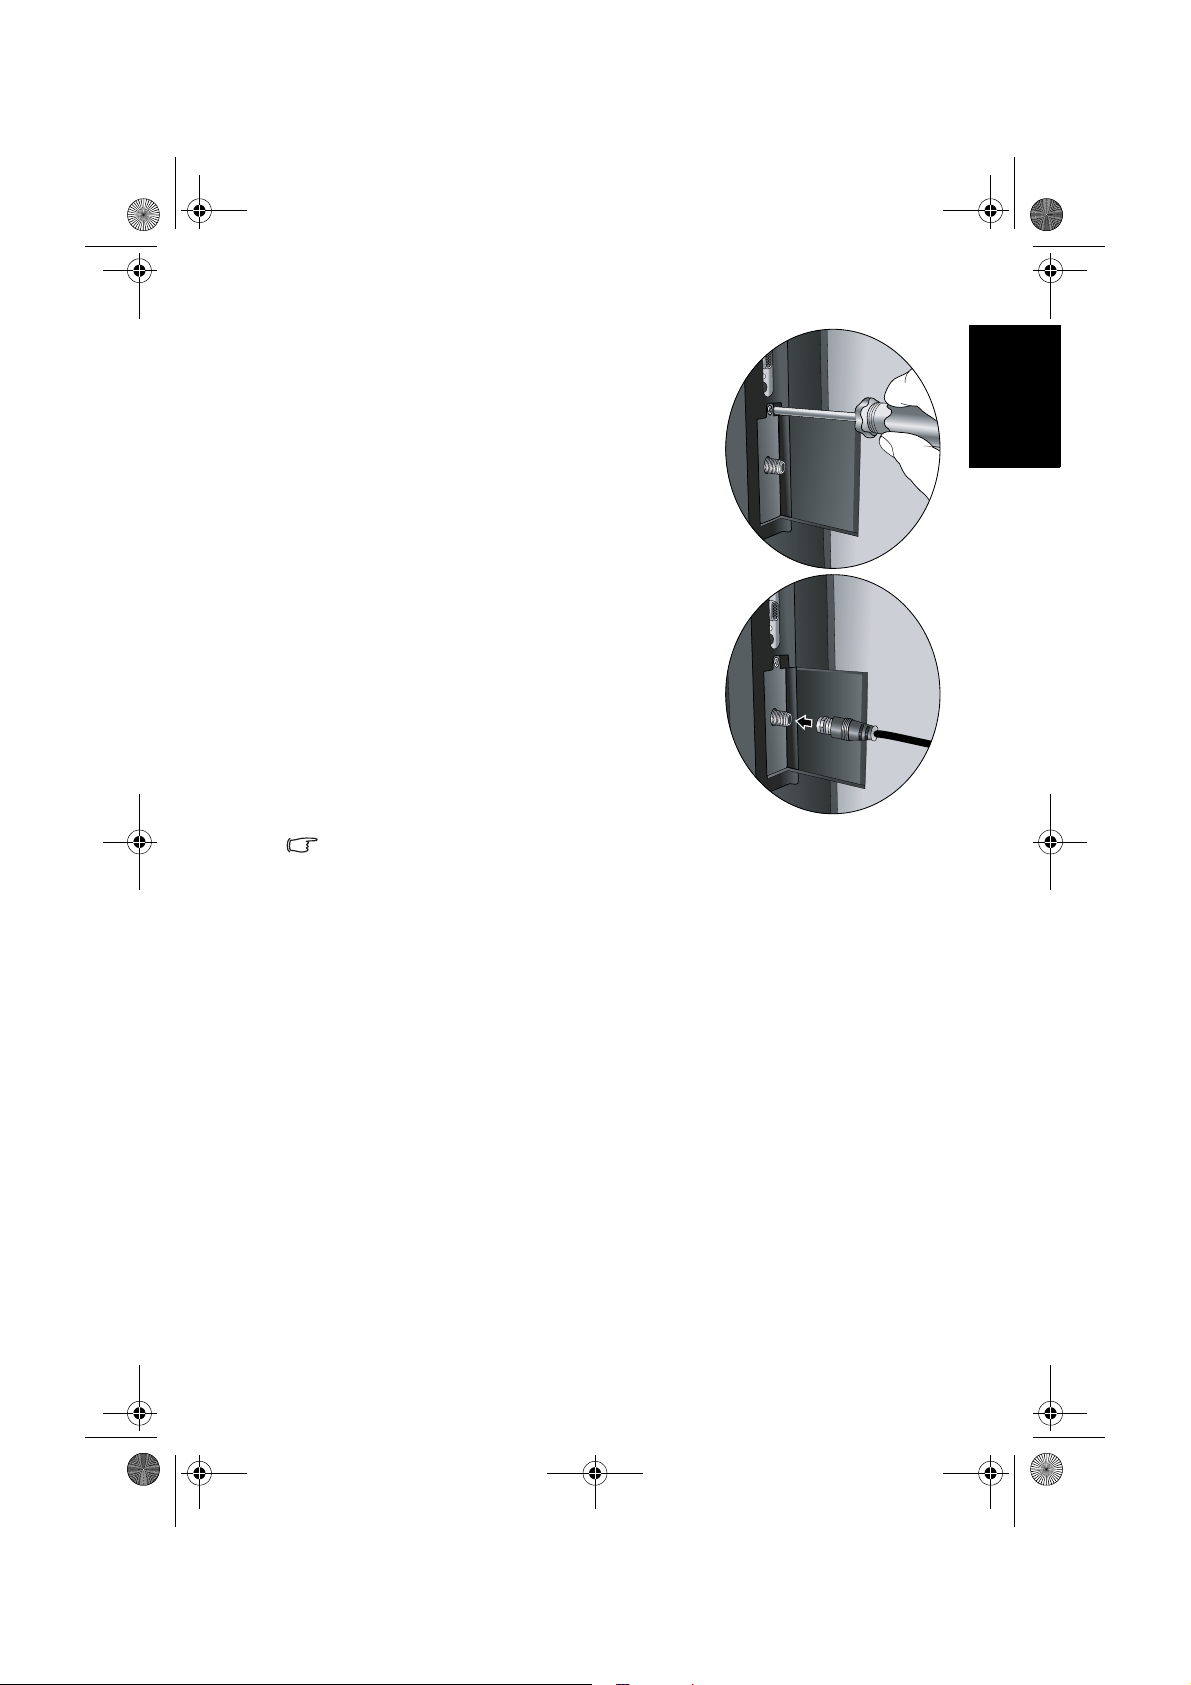
2. 顯示器出廠時,在電視盒安裝槽中裝有
一個金屬保護盒以保護安裝槽。使用適
當的十字螺絲起子,將固定金屬保護盒
的螺絲取下。
3. 使用螺絲起子將金屬保護盒從安裝槽中
取出,並妥善保管之 ( 例如存放在小孩
無法拿取的地方 )。
4. 先移除電視盒上之保護膜,然後如右圖
所示將電視盒插入安裝槽中。插入時,
請注意電視盒的方向。
5. 將電視盒推到底,直到與顯示器表面平
齊為止。
安裝電視盒2
Tuner-RC-TC.book Page 3 Friday, October 3, 2008 4:25 PM
6. 使用包裝中所附的螺絲與適當的十字起
子,將電視盒鎖緊固定在顯示器上。
7. 將您府上的電視天線電纜或有線電視電
纜連接到電視盒的天線電纜接頭上。請
確認連接是否牢固。接著請參閱第 33 頁
或第 34 頁的 「掃瞄並記憶電視頻道」的
說明讓顯示器掃描與記憶電視頻道。
繁體中文
在連接無線電視天線或有線電視纜線時,請注意以下事項:
• 在顯示器周圍如果有無線電主機或無線網路基地台等無線設備,其發射的電
波可能會造成顯示器畫面的干擾。故若可能的話,建議您將這些無線設備移
至離顯示器較遠的地方。
• 請檢查有線電視纜線是否有過長、破裂、老化的情形。若纜線有分接,請檢
查接頭是否有鬆脫的情況,若鬆脫請重新接妥。
安裝電視盒 3

Tuner-RC-TC.book Page 4 Friday, October 3, 2008 4:25 PM
繁體中文
準備使用遙控器
安裝電池
在使用遙控器前,您必須在遙控器內裝上適用的電池,請依照如下說明
進行。
1. 如圖所示,將遙控器上的電池蓋打開。
2. 在電池室中裝入兩顆 AAA ( 四號 ) 電池 。
裝入時,請注意電池的正負極性方向是否
與電池室中的標示相符。
若您使用隨機附贈的電池,請在確認遙控
器可以正常使用後儘早更換。
3. 如圖所示,將電池蓋裝回遙控器。
使用電池的注意事項
電池的使用方式如果錯誤,可能會導致化學物質的洩漏或爆炸。 請注意
下列事項:
• 安裝電池時,請確認電池的正負極已依照電池室中所標示的方向正確
安裝。
• 不同類型的電池具有不同的特性。 請勿混合使用不同類型的電池。
• 當電池電量用盡時,請儘速更換新電池。
• 長時間不使用遙控器時,請將電池從遙控器中取出。
• 請勿將新的和舊的電池混合使用。 將新電池與舊電池混合使用會減短
電池的使用壽命,或導致化學液從不良的電池中洩漏出來。
• 電池中洩漏出來的化學液可能會刺激皮膚並腐蝕金屬接點。 假使有任
何化學物質從電池中滲漏出來,請立即以乾布擦拭乾淨並更換電池。
準備使用遙控器4
Tuner-RC-TC.book Page 5 Friday, October 3, 2008 4:25 PM
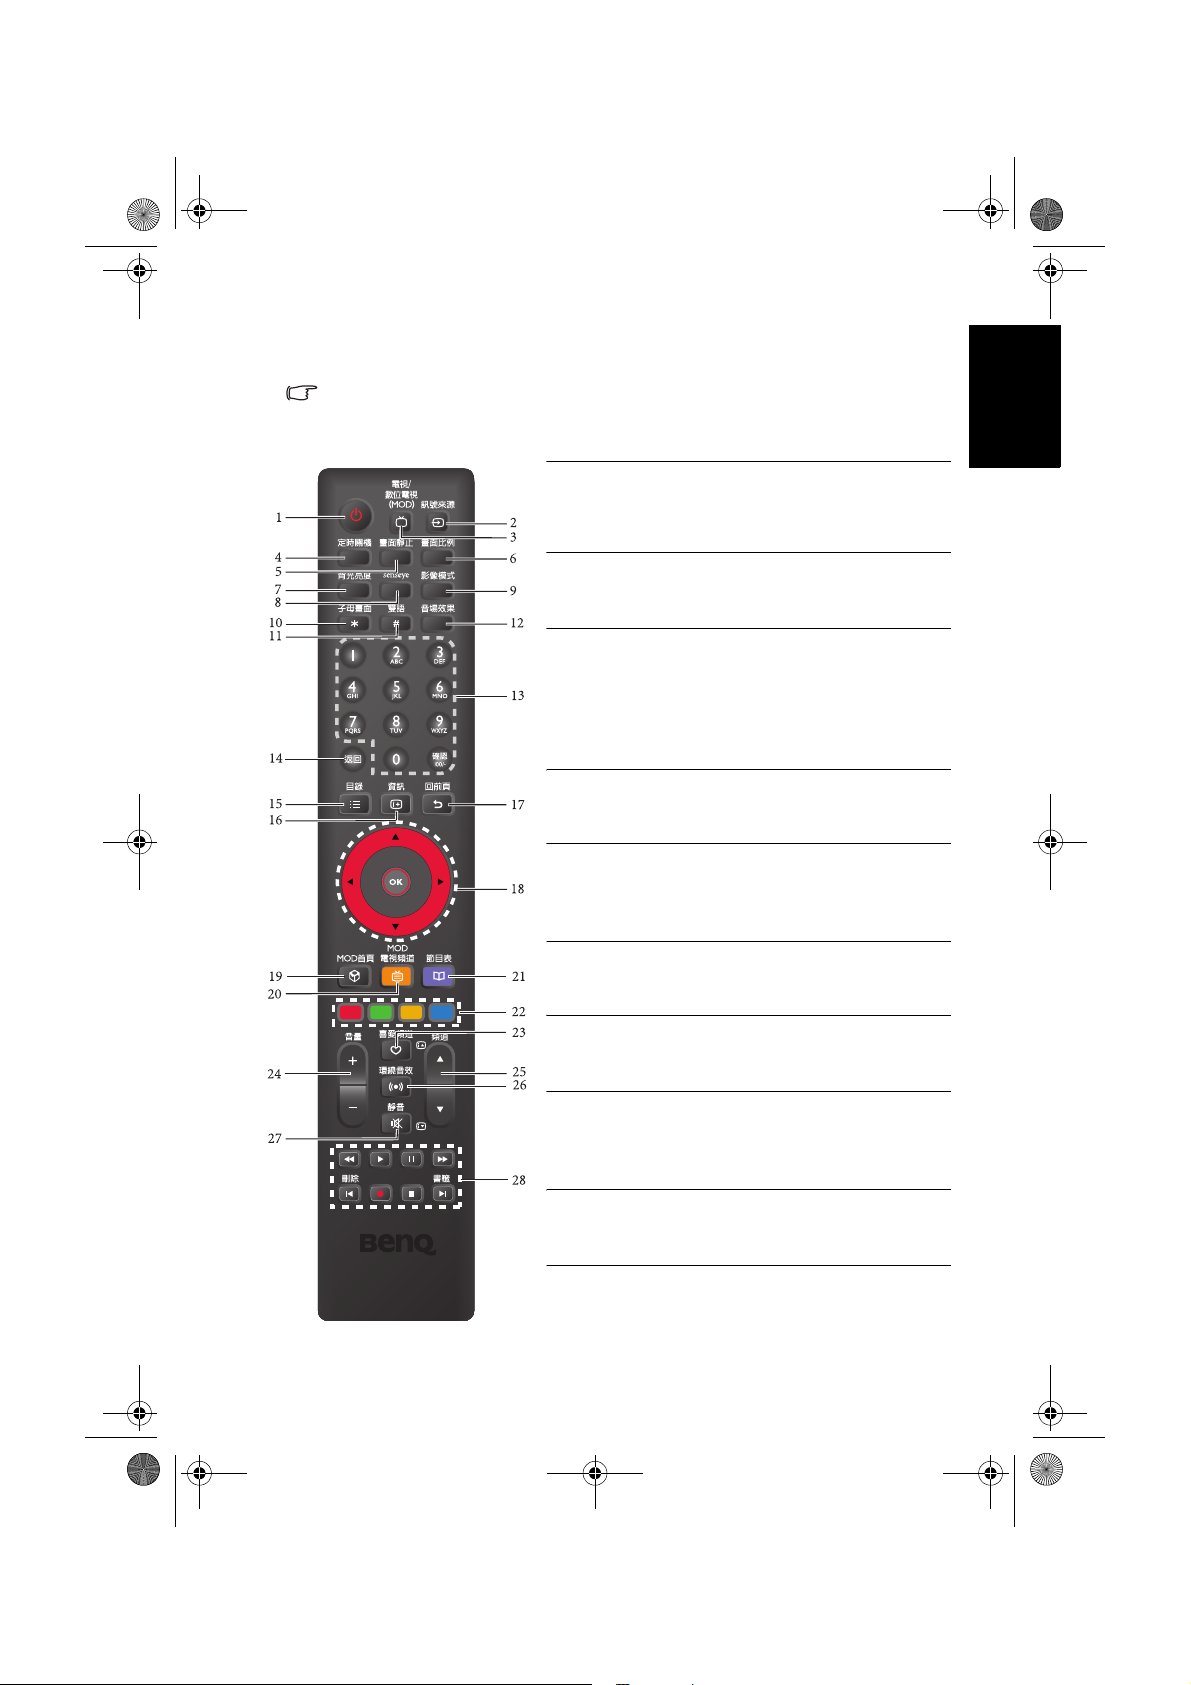
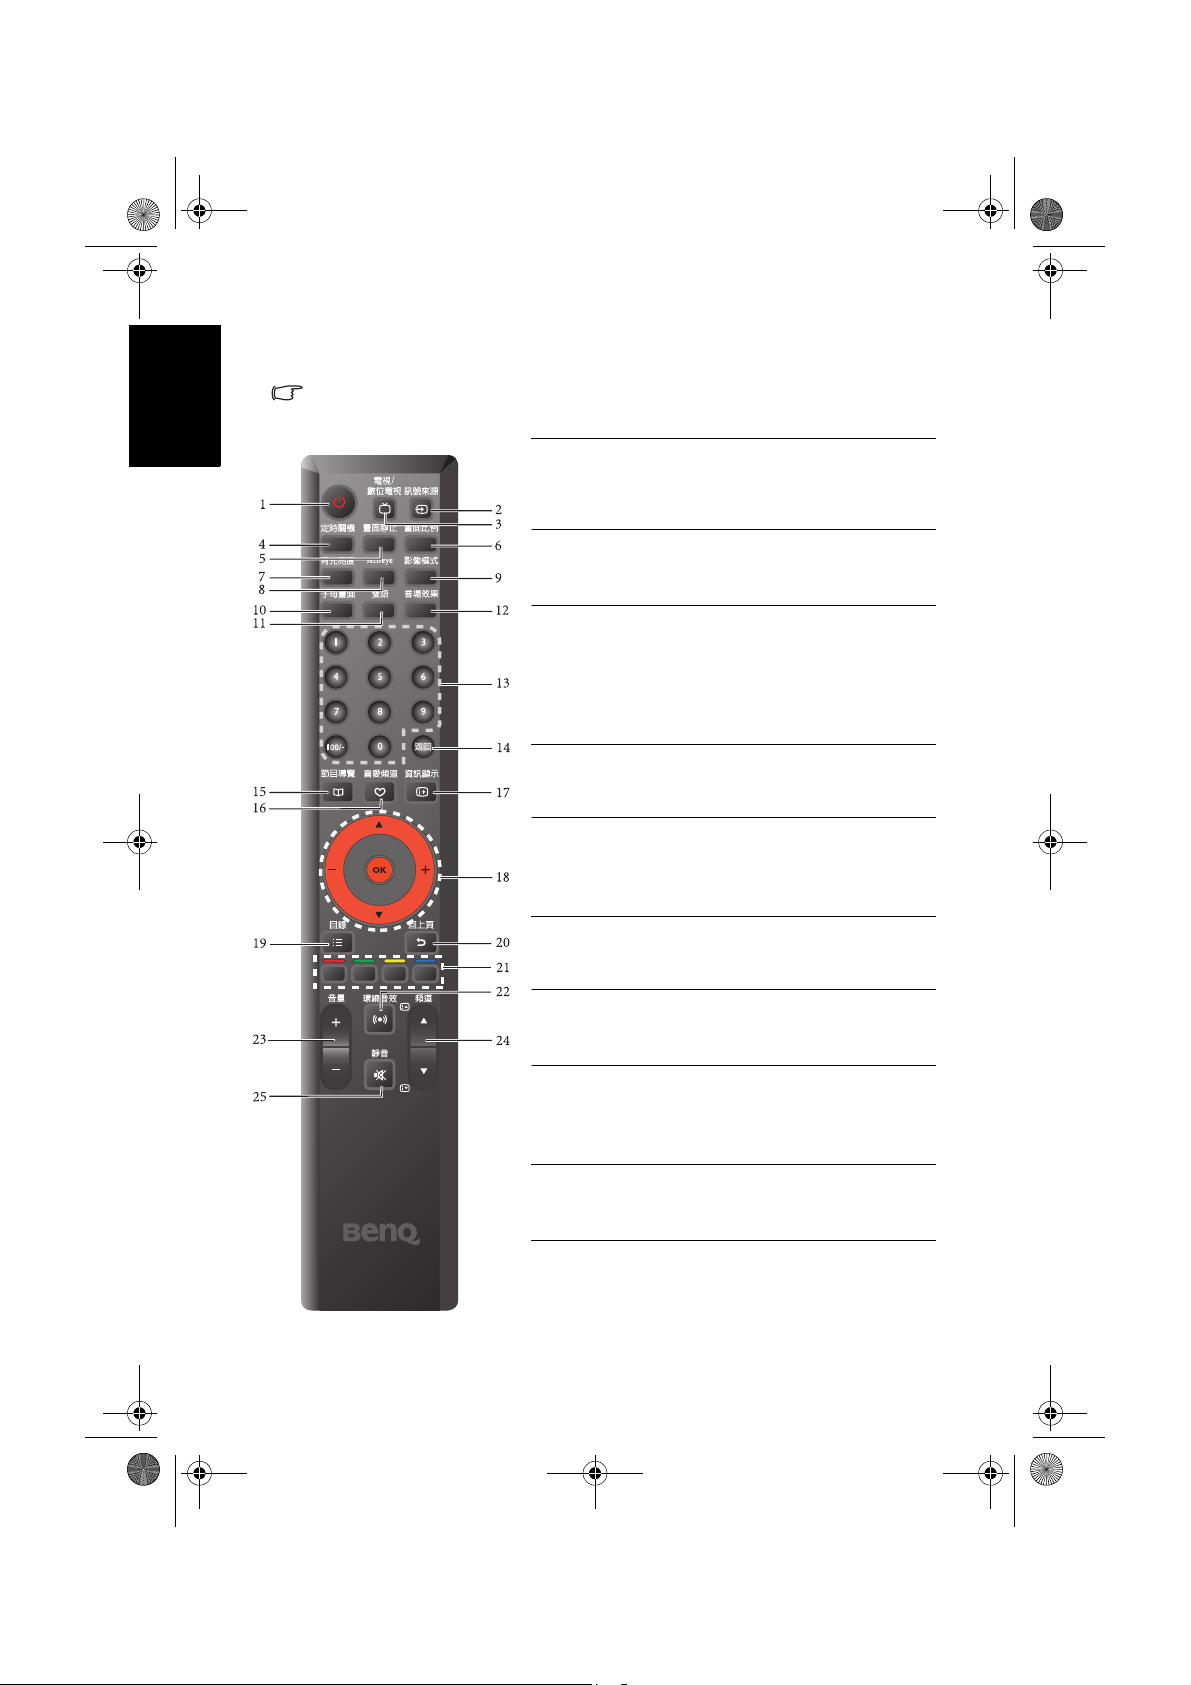
RC-H081 遙控器按鍵功能說明
數位電視與 MOD 功能必須安裝有選購的專用數位電視盒或 MOD 才能使用。
詳細的遙控器操作方式,請參閱隨數位電視盒或 MOD 所附的使用說明。
1. 電源 / 待機
按此按鈕可以開啟顯示器電源,再按一下此按
鈕則可以讓顯示器進入待機模式。請參閱第 11
頁的 「開機、待機與關閉電源」。
2. 訊號來源
按此按鈕可循環切換您所要觀賞的訊號輸入來
源。請參閱第 12 頁的 「切換輸入訊號」。
3. 電視 / 數位電視 (MOD)
按此按鈕可直接切換至類比電視模式,以觀看
傳統的類比 ( 非數位的 ) 有線或無線電視節
目,或切換至數位電視 /MOD 模式以觀看數位
電視或 MOD 節目。請參閱第 11 頁的 「選擇
觀賞類比、數位電視或 MOD」。
4. 定時關機
按此按鈕可以設定顯示器定時自動關機的時
間。請參閱第 14 頁的 「使用定時關機功能」。
5. 畫面靜止
按此按鈕可以凍結螢幕畫面 ( 但視訊源仍會繼
續播放 ),再按一下此按鈕可以關閉此功能。
請參閱第 14 頁的 「使用畫面靜止功能」。
6. 畫面比例
按此按鈕可在數種畫面比例間循環切換。請參
閱第 16 頁的 「調整畫面比例」。
7. 背光亮度
按此按鈕可以選擇顯示器的背光亮度。請參閱
第 13 頁的 「調整背光亮度」。
8. Senseye
按此按鈕可顯示用以調整畫質的
29
請參閱第
30
第
9. 影像模式
按此按鈕可以在數種預設的影像模式間循環切
換。請參閱第 14 頁的 「選擇影像模式」。
10. 子母畫面 (SH/VH 系列 )
若您的顯示器已同時連接視訊與電腦訊號來源,
按此按鈕可選擇讓顯示器以子母畫面或全畫面的
方式顯示這兩種輸入訊號的畫面。請參閱第
頁的 「使用子母畫面顯示功能
頁的 「
頁的 「
Senseye
Senseye
選單
Senseye
選單
(SH
(VB/SD/VD
(SH/VH
繁體中文
選單。
系列)」或
系列)」。
15
系列)」。
RC-H081 遙控器按鍵功能說明 5

Tuner-RC-TC.book Page 6 Friday, October 3, 2008 4:25 PM
繁體中文
11. 雙語
若接收的電視節目訊號或所您所連接的音源訊
號支援,按這個按鈕可以選擇不同的聲音系
統。 請參閱第 12 頁的 「切換雙語聲音系統」。
12. 音場效果
按此按鈕可在數種音場效果間循環切換。請參
閱第 13 頁的 「切換音場效果」。
13. 頻道輸入
• 在觀賞電視節目時,按這些按鈕可以直接選
擇您想觀賞的頻道。請參閱第 13 頁的 「使
用頻道輸入按鈕選擇頻道」。
• 在 MOD 模式下,按這些按鈕可輸入文字與
確認。
14. 返回
在觀賞電視節目時,按此按鈕可在目前觀賞的
電視頻道前一個觀賞的電視頻道間來回切換。
請參閱第 13 頁的 「使用頻道返回功能」。
15. 目錄
按此按鈕可以顯示螢幕顯示選單。再按一次此
按鈕可關閉螢幕顯示選單。請參閱第 19 頁的
「瀏覽螢幕顯示選單」。
16. 資訊
按這個按鈕可以讓顯示器顯示現在正在使用之
輸入訊號的相關資訊。請參閱第 13 頁的 「顯
示資訊」。
17. 回前頁
在螢幕顯示選單中,按此按鈕可退回上一層選
單。請參閱第 19 頁的 「瀏覽螢幕顯示選單」。
18. /// 與 OK 鈕
• 在數位電視模式下,按 OK 鈕可顯示或隱藏
頻道列表。
• 按 或 鈕可循序切換電視頻道。
• 按 或 鈕可調整音量。
在螢幕顯示選單顯示時:
• 按 或 鈕可進行上下選擇或改變設定。
• 按 或 鈕可進行左右選擇或改變設定。
• 按 OK 鈕可確認選項,或進入您所選取功能
的子選單。
請參閱第 19 頁的 「瀏覽螢幕顯示選單」。
19. MOD 首頁
按此按鈕可顯示 MOD 服務首頁選單。
RC-H081 遙控器按鍵功能說明6

Tuner-RC-TC.book Page 7 Friday, October 3, 2008 4:25 PM
20. MOD 電視頻道
按此按鈕可直接選擇 MOD 電視頻道服務。
21. 節目表
在數位電視模式下,您可以按此按鈕顯示或隱
藏節目表畫面。
22. 四色按鈕
在數位電視或 MOD 模式下,按這些按鈕可執
行在螢幕顯示選單中標有相同顏色的功能。
23. 喜愛頻道
按此按鈕可以直接切換至您所設定好的喜愛頻
道 1。再按此按鈕數次可切換至其它您所設定
的喜愛頻道。請參閱第 13 頁的 「選擇喜愛頻
道」。
24. 音量
按此按鈕可以提高或降低顯示器內建揚聲器的
音量。請參閱第 12 頁的 「調整音量」。
25. 頻道
• 按此按鈕可以依序向前或向後選擇電視頻
道。請參閱第 13 頁的 「使用頻道按鈕循序
選擇頻道」。
• 在數位電視節目表畫面中,按此按鈕可以切
換至上一頁或下一頁。
26. 環繞音效
按此按鈕可開啟或關閉環繞音效效果。請參閱
第 13 頁的 「切換環繞音效效果」。
27. 靜音
按此按鈕可以使顯示器進入靜音模式,再按一
下則可以恢復顯示器內建揚聲器的聲音播放。
請參閱第 12 頁的 「靜音」。
28. MOD 播放控制按鈕
在 MOD 模式下,按這些按鈕可控制倒轉、播
放、暫停、快轉等功能,或管理自建的書籤。
繁體中文
RC-H081 遙控器按鍵功能說明 7
Tuner-RC-TC.book Page 8 Friday, October 3, 2008 4:25 PM
繁體中文
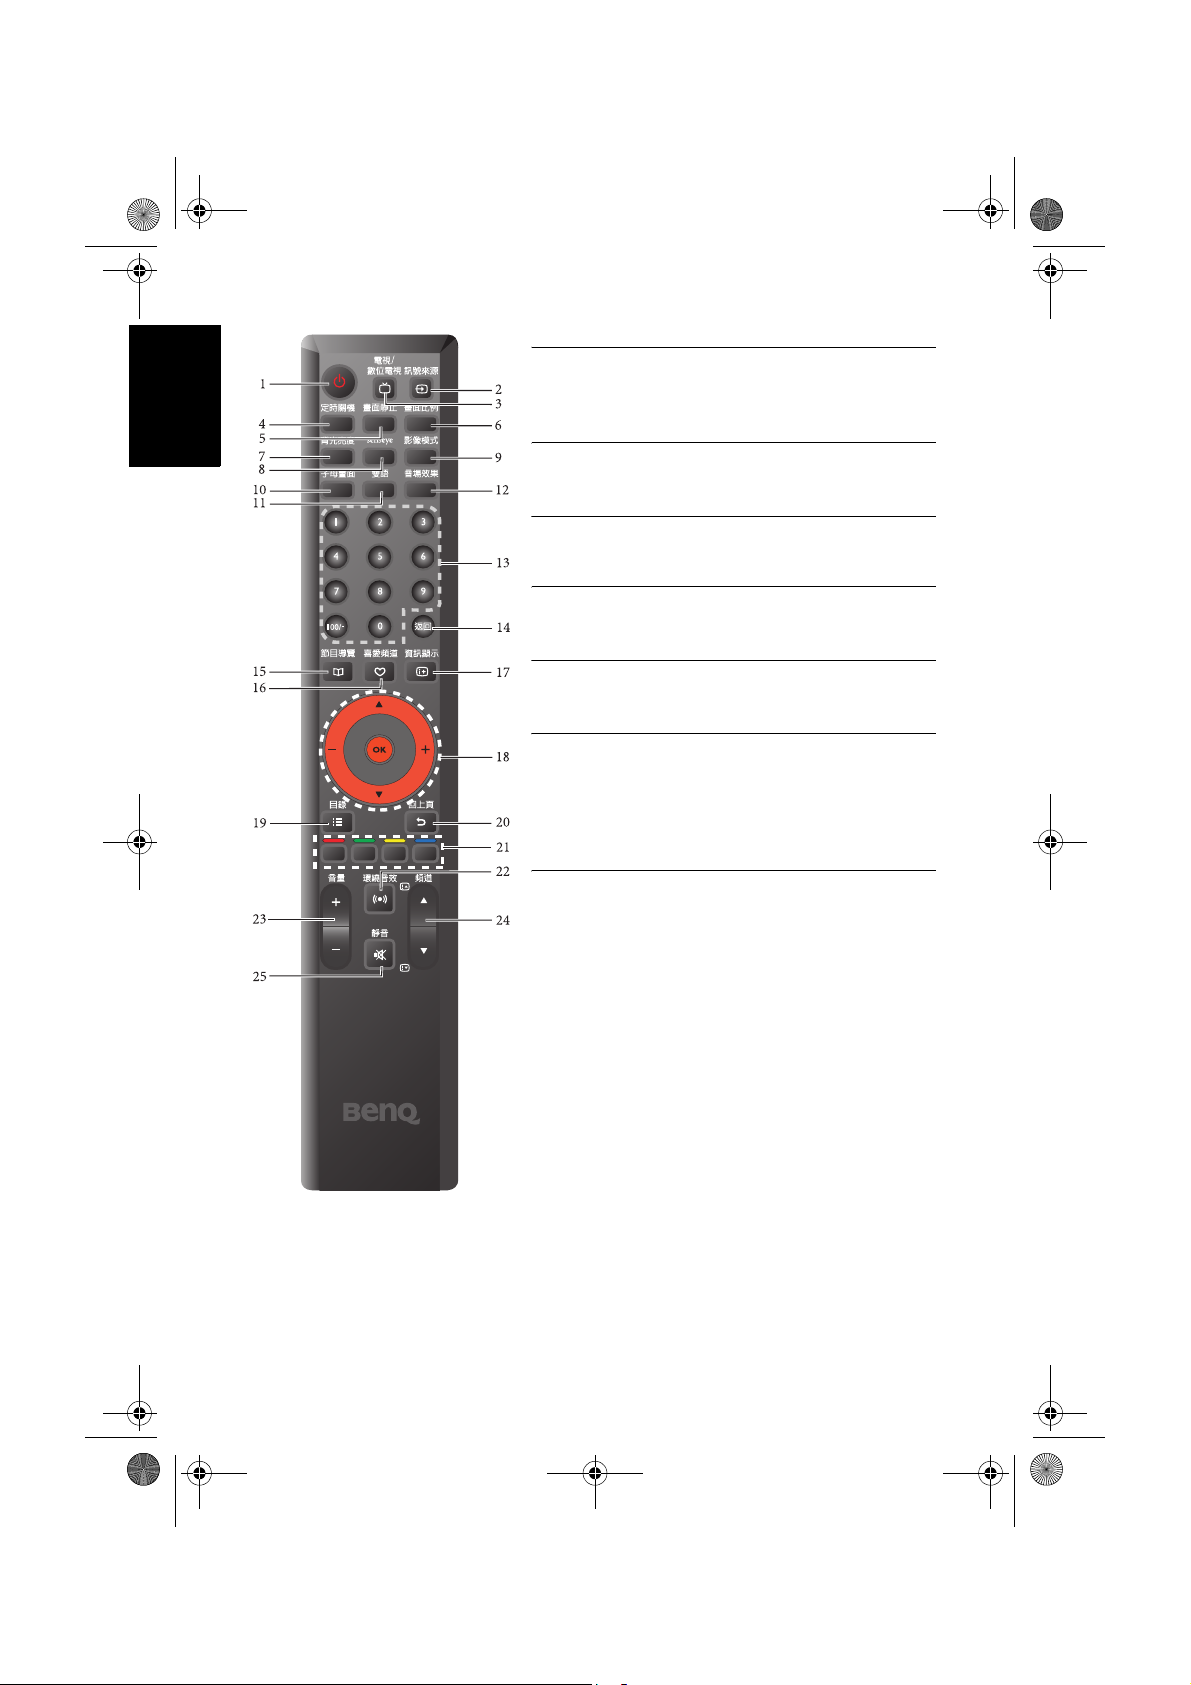
RC-H072 遙控器按鍵功能說明
數位電視功能必須安裝有選購的專用數位電視盒才能使用。
1. 電源 / 待機
按此按鈕可以開啟顯示器電源,再按一下此按
鈕則可以讓顯示器進入待機模式。請參閱第 11
頁的 「開機、待機與關閉電源」。
2. 訊號來源
按此按鈕可循環切換您所要觀賞的訊號輸入來
源。請參閱第 12 頁的 「切換輸入訊號」。
3. 電視 / 數位電視
按此按鈕可直接切換至類比電視模式,以觀看
傳統的類比 ( 非數位的 ) 有線或無線電視節
目,或切換至數位電視模式以觀看數位電視節
目。請參閱第 11 頁的 「選擇觀賞類比、數位
電視或 MOD」。
4. 定時關機
按此按鈕可以設定顯示器定時自動關機的時
間。請參閱第 14 頁的 「使用定時關機功能」。
5. 畫面靜止
按此按鈕可以凍結螢幕畫面 ( 但視訊源仍會繼
續播放 ),再按一下此按鈕可以關閉此功能。
請參閱第 14 頁的 「使用畫面靜止功能」。
6. 畫面比例
按此按鈕可在數種畫面比例間循環切換。請參
閱第 16 頁的 「調整畫面比例」。
7. 背光亮度
按此按鈕可以選擇顯示器的背光亮度。請參閱
第 13 頁的 「調整背光亮度」。
8. Senseye
按此按鈕可顯示用以調整畫質的
請參閱第
30
頁的 「
第
9. 影像模式
按此按鈕可以在數種預設的影像模式間循環切
換。請參閱第 14 頁的 「選擇影像模式」。
10. 子母畫面 (SH/VH 系列 )
若您的顯示器已同時連接視訊與電腦訊號來
源,按此按鈕可選擇讓顯示器以子母畫面或全
畫面的方式顯示這兩種輸入訊號的畫面。請參
閱第 15 頁的 「使用子母畫面顯示功能 (SH/
VH 系列 )」。
29
頁的 「
Senseye
Senseye
選單
Senseye
選單
(SH
(VB/SD/VD
選單。
系列)」或
系列)」。
RC-H072 遙控器按鍵功能說明8

Tuner-RC-TC.book Page 9 Friday, October 3, 2008 4:25 PM
11. 雙語
若接收的電視節目訊號或所您所連接的音源訊
號支援,按這個按鈕可以選擇不同的聲音系
統。 請參閱第 12 頁的 「切換雙語聲音系統」。
12. 音場效果
按此按鈕可在數種音場效果間循環切換。請參
閱第 13 頁的 「切換音場效果」。
13. 頻道輸入
按這些按鈕可以直接輸入並選取您想觀賞的頻
道。請參閱第 13 頁的 「使用頻道輸入按鈕選
擇頻道」。
14. 返回
在觀賞電視節目時,按此按鈕可在目前觀賞的
電視頻道前一個觀賞的電視頻道間來回切換。
請參閱第 13 頁的 「使用頻道返回功能」。
15. 節目導覽
在數位電視模式下,您可以按此按鈕顯示或隱
藏節目表畫面。
16. 喜愛頻道
按此按鈕可以直接切換至您所設定好的喜愛頻
道 1。再按此按鈕數次可切換至其它您所設定
的喜愛頻道。請參閱第 13 頁的 「選擇喜愛頻
道」。
17. 資訊顯示
按這個按鈕可以讓顯示器顯示現在正在使用之
輸入訊號的相關資訊。請參閱第 15 頁的 「使
用子母畫面顯示功能 (SH/VH 系列 )」。
18. //+/- 與 OK 鈕
• 在數位電視模式下,按 OK 鈕可顯示或隱藏
頻道列表。
• 按 或 鈕可循序切換電視頻道。
• 按 + 或 - 鈕可調整音量。
在螢幕顯示選單顯示時:
• 按 或 鈕可進行上下選擇或改變設定。
• 按 + 或 - 鈕可進行左右選擇或改變設定。
• 按 OK 鈕可確認選項,或進入您所選取功能
的子選單。
請參閱第 19 頁的 「瀏覽螢幕顯示選單」。
繁體中文
RC-H072 遙控器按鍵功能說明 9
Tuner-RC-TC.book Page 10 Friday, October 3, 2008 4:25 PM
繁體中文
19. 目錄
按此按鈕可以顯示螢幕顯示選單。再按一次此
按鈕可關閉螢幕顯示選單。請參閱第 19 頁的
「瀏覽螢幕顯示選單」。
20. 回上頁
在螢幕顯示選單中,按此按鈕可退回上一層選
單。請參閱第 19 頁的 「瀏覽螢幕顯示選單」。
21. 四色按鈕
在數位電視模式下,按這些按鈕可執行在螢幕
顯示選單中標有相同顏色的功能。
22. 環繞音效
按此按鈕可開啟或關閉環繞音效效果。請參閱
第 13 頁的 「切換環繞音效效果」。
23. 音量
按此按鈕可以提高或降低顯示器內建揚聲器的
音量。請參閱第 12 頁的 「調整音量」。
24. 頻道
• 按此按鈕可以依序向前或向後選擇電視頻
道。請參閱第 13 頁的 「使用頻道按鈕循序
選擇頻道」。
• 在數位電視節目表畫面中,按此按鈕可以切
換至上一頁或下一頁。
25. 靜音
按此按鈕可以使顯示器進入靜音模式,再按一
下則可以恢復顯示器內建揚聲器的聲音播放。
請參閱第 12 頁的 「靜音」。
RC-H072 遙控器按鍵功能說明10

Tuner-RC-TC.book Page 11 Friday, October 3, 2008 4:25 PM
使用遙控器
• 將遙控器的頂端直接對準顯示器的
遙控器感應窗,然後按下按鈕。
• 遙控器必須與顯示器的遙控器感應
窗保持 30 度以內的角度,且距離應
不超過 6 公尺,以便正常發揮功能。
• 勿覆蓋顯示器的遙控器感應窗,或
將物體置於其前面,這樣會阻斷遙
控器和感應窗之間的直接視線。
使用遙控器時請注意:
• 請勿讓遙控器受到撞擊或掉落,讓遙控器接觸到水或將它放置在潮濕的環境
中。勿將遙控器放置在日光直接照射的地方。 高熱可能會使遙控器損壞。
• 如果顯示器上的遙控器感應窗直接處於在陽光或強光照射之下,可能會失去
正常的作用。 在這種情況下,可以改變光源或調整顯示器的角度,或者在比
較靠近遙控器感應窗的位置使用遙控器。
開機、待機與關閉電源
打開顯示器的電源
在待機狀態下 ( 電源指示燈亮紅色 ),按遙控器上的 「電源/ 待機」
鈕。 顯示器將會開機,且電源指示燈會亮綠色。
讓顯示器進入待機狀態
在顯示器電源開啟的狀態下,按遙控器上的 「電源/ 待機」鈕,顯示
器將進入待機狀態,且電源指示燈將會亮紅色。
顯示器在待機狀態下仍會消耗約 1W (VH 系列 )/1.5W (SH/VB/SD/VD 系列 ) 的
電力。若要完全切斷 SH/VB/SD/VD 系列顯示器的電源,請將電源線從插座上
取下,或使用附有電源開關的插座。
繁體中文
6 公尺
30 度
關閉顯示器的電源 (SH 系列 )
關閉顯示器背面的電源開關以切斷顯示器的電源。電源指示燈會熄滅。
選擇觀賞類比、數位電視或 MOD
按遙控器上的 「電視 / 數位電視 (MOD)」或 「電視 / 數位電視」鈕,
可選擇切換至類比電視模式或數位電視 /MOD 模式。讓您可以觀賞傳
統的類比 ( 非數位的 ) 有線或無線電視,或數位電視 /MOD 節目。
• 您須安裝選購的專用數位電視盒,並連接數位電視訊號,才能使用數位電視
功能。
• 您須申請安裝 MOD 才能使用 MOD 相關功能。
使用遙控器 11
Tuner-RC-TC.book Page 12 Friday, October 3, 2008 4:25 PM
繁體中文
切換輸入訊號
1. 打開顯示器的電源,接著打開視訊來源設備的電源,並播放視訊。
2. 按遙控器上的 「訊號來源」鈕以選擇切換輸入訊號來源。您可按該
按鈕數次,直到您想使用的輸入源顯示在螢幕上為止, 順序為:
VB 系列
VH 系列
SD/VD
系列
SH 系列
• 這些選項僅有在輸入訊號已連接至電視上相應的輸入端子時才會出現。「數
位電視」僅有在您已安裝選購的專用數位電視盒才會顯示。
• 若在 AV 輸入端子上同時連接複合視訊與 S-Video 輸入,顯示器將僅顯示 SVideo 輸入。若您要觀賞複合視訊輸入,請暫時中斷 S-Video 輸入連接。
• 請注意,HDMII 輸入訊號必須與 HDCP( 一種數位視訊版權標準 ) 相容才能
正常顯示。在切換至 HDMI 輸入時,顯示器會停頓約三秒鐘偵測輸入訊號的
HDCP 資訊,而不會立即顯示畫面。這不是故障。
• 若您要顯示筆記型電腦的畫面,請參照您電腦的使用說明,將視訊從內建螢
幕切換至外接螢幕輸出,方能正常顯示畫面。
類比電視 AV 1 ( 色差視訊 ) AV2 ( 或 AV 2 - S ) H D M I
( 或 DVI) 數位電視 PC 類比電視 ...
AV 1 ( 色差視訊 1) AV2 ( 色差視訊 2) AV3 ( 或 AV 3 - S )
AV 4 ( 或 AV 4- S) H D MI ( 或 DVI) PC AV1 ( 色差
視訊 1)...
類比電視 AV 1 ( 色差視訊 ) AV2 ( 或 AV2-S) HDMI1
( 或 DVI 1) HDMI2 ( 或 DVI 2) 數位電視 PC 類比
電視 ...
AV 1 ( 色差視訊 1) AV2 ( 色差視訊 2) AV3 ( 或 AV 3 - S )
HDMI1( 或 DVI) HDMI2( 或 DVI) PC AV1 ( 色
差視訊 1)...
調整聲音
調整音量
• 按遙控器上的 「音量 +」或 「+」 / 「」鈕可增加音量。 螢幕上的音
量指示長度將會增加,代表音量正在增加。
• 按遙控器上的 「音量 -」或 「-」 / 「」鈕可降低音量。螢幕上的音
量指示長度將會減少,代表音量正在降低。
靜音
按遙控器上的 「靜音」鈕可以暫時關閉聲音。再按一次 「靜音」或
「音量 +」鈕,可以關閉靜音功能並恢復聲音播放。
切換雙語聲音系統
按遙控器上的 「雙語」鈕,可在目前觀賞的節目或視訊所提供的聲音
系統間循環切換 ( 可選的聲音系統視接收的電視或視訊所提供的聲音系
統而定 )。
使用遙控器12
Tuner-RC-TC.book Page 13 Friday, October 3, 2008 4:25 PM
切換環繞音效效果
您可以按遙控器上的 「環繞音效」鈕開啟或關閉顯示器內建的 SRS
TruSurround XT 環繞音效。SRS TruSurround XT 環繞音效技術不但可模
擬多聲道音訊輸出,也加強了低音效果與人物對話的清晰度。
切換音場效果
您可以按遙控器上的 「音場效果」鈕,依照您所收看的節目或影片音
訊循環選擇一種適合的音場效果。
切換頻道
使用頻道輸入按鈕選擇頻道
• 若要選取一或兩位數的頻道號碼 ( 例如第 8 台 ),請於三秒內先按
「0」鈕,然後按 「8」鈕。
• 若要選取三位數的頻道號碼 ( 例如第 120 台 ),請於三秒內先按
「100+」鈕,然後再按 「2」與 「0」鈕。
使用頻道按鈕循序選擇頻道
按遙控器上的 「頻道 」 / 「頻道 」或 「」 / 「」鈕,即可向
前或向後循序選擇頻道。
使用頻道返回功能
按遙控器上的 「返回」鈕,可以快速地回到前一個所觀賞的頻道。
選擇喜愛頻道
按遙控器上的 「喜愛頻道」鈕可直接觀賞至您已設定的喜愛頻道 1。再
按一次 「喜愛頻道」鈕可轉至您已設定的喜愛頻道 2, 以此類推。您可
在您已設定的喜愛頻道中進行選擇。關於如何設定喜愛頻道,請參閱第
33 頁或第 34 頁的 「設定喜愛頻道」的說明。
繁體中文
調整背光亮度
若要調整顯示器螢幕的背光亮度,請依照您所在環境的照明狀況,按遙
控器上的 「背光亮度」鈕切換適合的亮度 (SH/VH 系列 ),或按 「背光
亮度」鈕後,按 「」 / 「」或 「+」 / 「-」鈕調整適合的亮度 (VB/
SD/VD 系列 )。
若設定為 「自動」 (SH/VH 系列 ),則光線感應器將會啟動。顯示器會
依據周圍環境亮度自動調整背光的最佳亮度。
顯示資訊
按遙控器上的 「資訊」或 「資訊顯示」鈕,即可於螢幕上顯示目前訊
號源之相關資訊。顯示的資訊會因為訊號輸入來源的不同而異。
使用遙控器 13
Tuner-RC-TC.book Page 14 Friday, October 3, 2008 4:25 PM
繁體中文
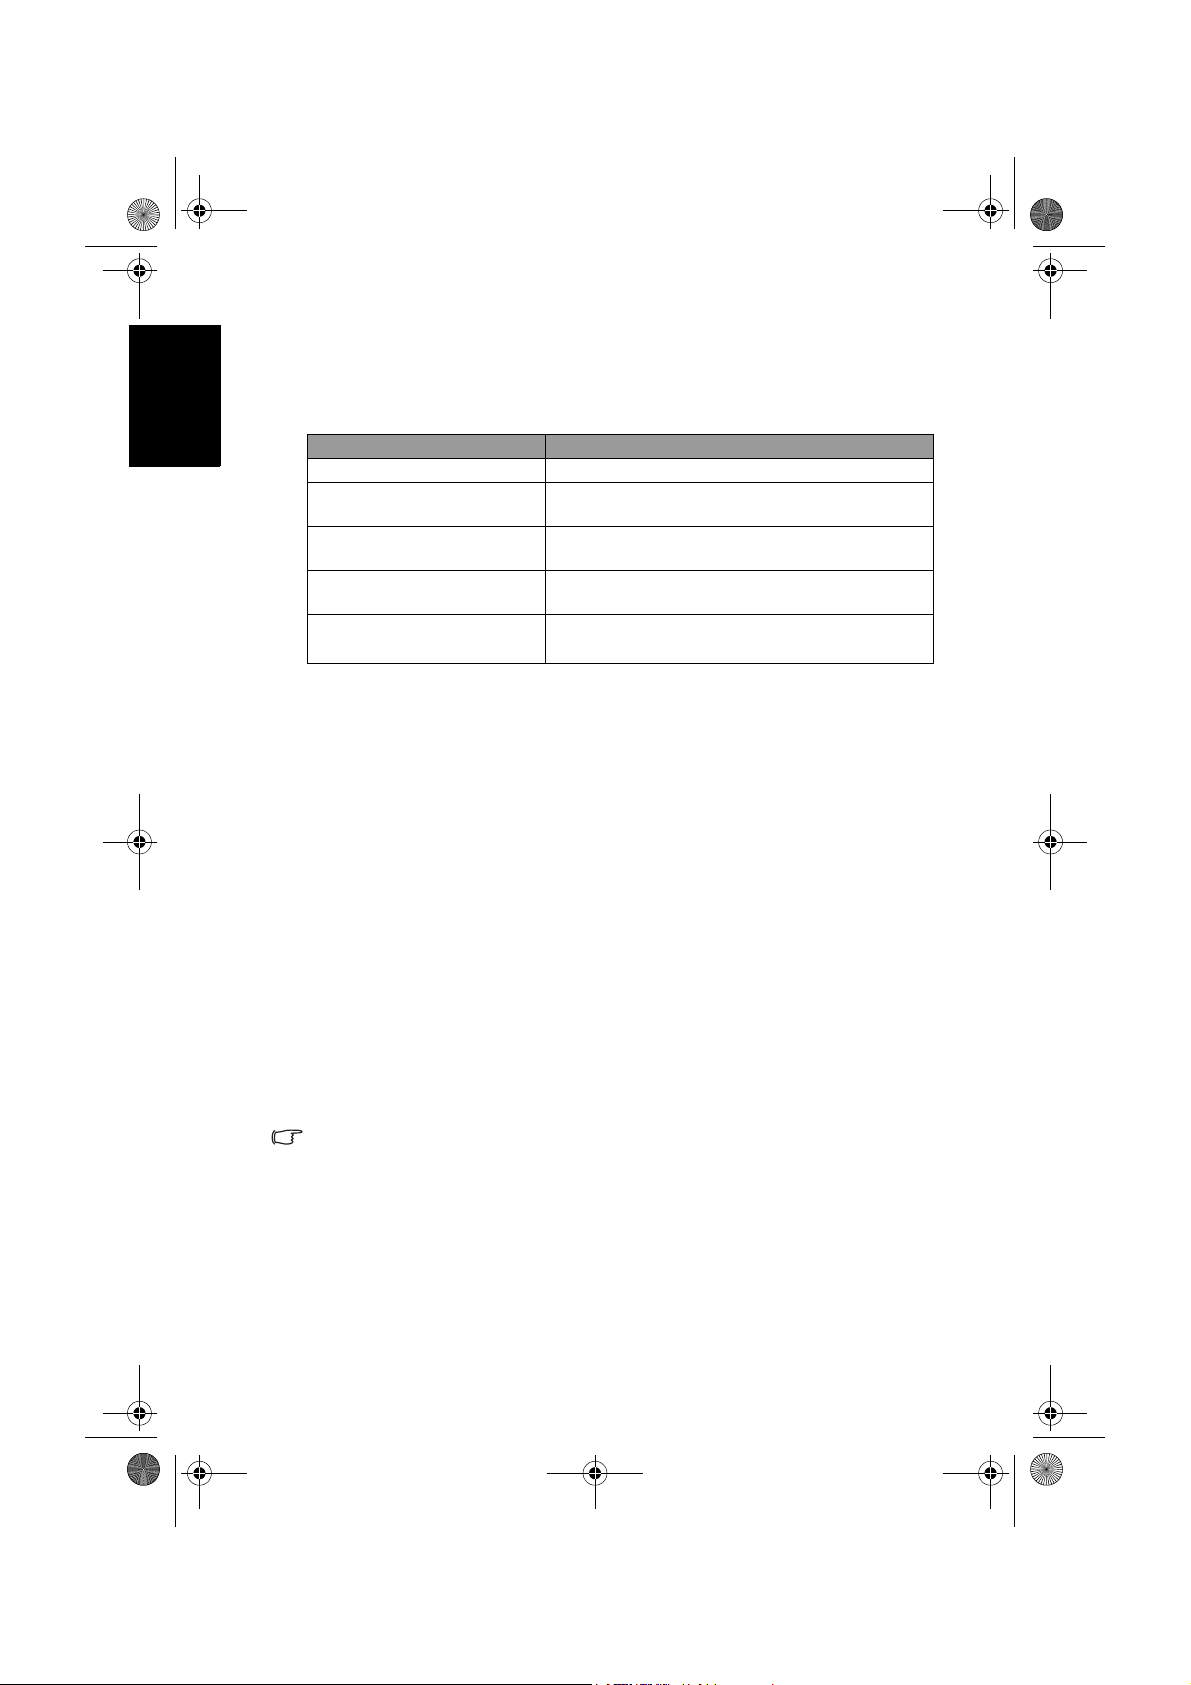
選擇影像模式
使用定時關機功能
您可以依照您所觀賞的視訊畫面以及周圍的環境,選擇一種適合的影像
模式,讓節目的畫面呈現更生動逼真。按遙控器上的 「影像模式」鈕,
即可在下列幾種畫質模式中直接選取切換。
畫質模式 說明
標準模式 適合在一般環境下觀賞視訊畫面時使用。
劇院模式
動態模式
遊戲模式 (SH/VB 系列 )
使用者模式
自訂模式
您也可以參閱第 26 頁的 「設定影像模式中的 「使用者模式」」或第 28
頁的 「設定畫質模式中的 「自訂」模式」設定您自訂的畫質模式。
您可以利用此功能設定液晶顯示器在自動關機前的時間。一旦到達設定
的時間,顯示器會自動進入待機模式。
1. 按遙控器上的 「定時關機」鈕開啟自動關機設定功能。
2. 再按遙控器上的 「定時關機」鈕可進行時間的調整。
例如,若您將定時關機時間設為 30 分鐘,則顯示器會在 30 分鐘後自動
進入待機狀態。您可以在 「設定」功能表的 「定時關機」 (SH/VH 系列
)/ 「睡眠計時器」 (VB/SD/VD 系列 ) 項目中查看到關機前的剩餘時間 (
請參閱第 35 頁的 「定時關機」或第 36 頁的 「睡眠計時器」 )。在到達
關機時間前一分鐘,螢幕上會出現提示。此時您可按遙控器上的任何鍵
取消定時關機功能。若要關閉定時關機功能,請將時間設定為 「0」
(SH/VH 系列 ) 或 「關」 (VB/SD/VD 系列 )。
(SH/VH
(VB/SD/VD
系列
畫面的對比度與層次感會被加強,以呈現出
更多亮部與暗部中的細節。
畫面的對比度、亮度、色飽和度會被提高,
適合在公眾場合顯示視訊畫面時使用。
畫面的亮度與對比度適中,適合長時間觀賞
電視畫面時使用。
) /
選擇使用您所設定的使用者模式。
系列
)
使用畫面靜止功能
在觀賞節目時,按遙控器上的 「畫面靜止」鈕,即可使畫面靜止 ( 但視
訊仍會繼續播放 )。再按一下 「畫面靜止」鈕,即可重新繼續播放。
• 在子母畫面模式下,此功能僅能靜止子畫面。
• 為避免在顯示器螢幕上留下難以回復的殘影 ( 烙痕 ),請勿讓顯示器螢幕顯示
固定不動的畫面超過兩小時,或長期使用固定的畫面比例顯示畫面。
使用遙控器14
Tuner-RC-TC.book Page 15 Friday, October 3, 2008 4:25 PM
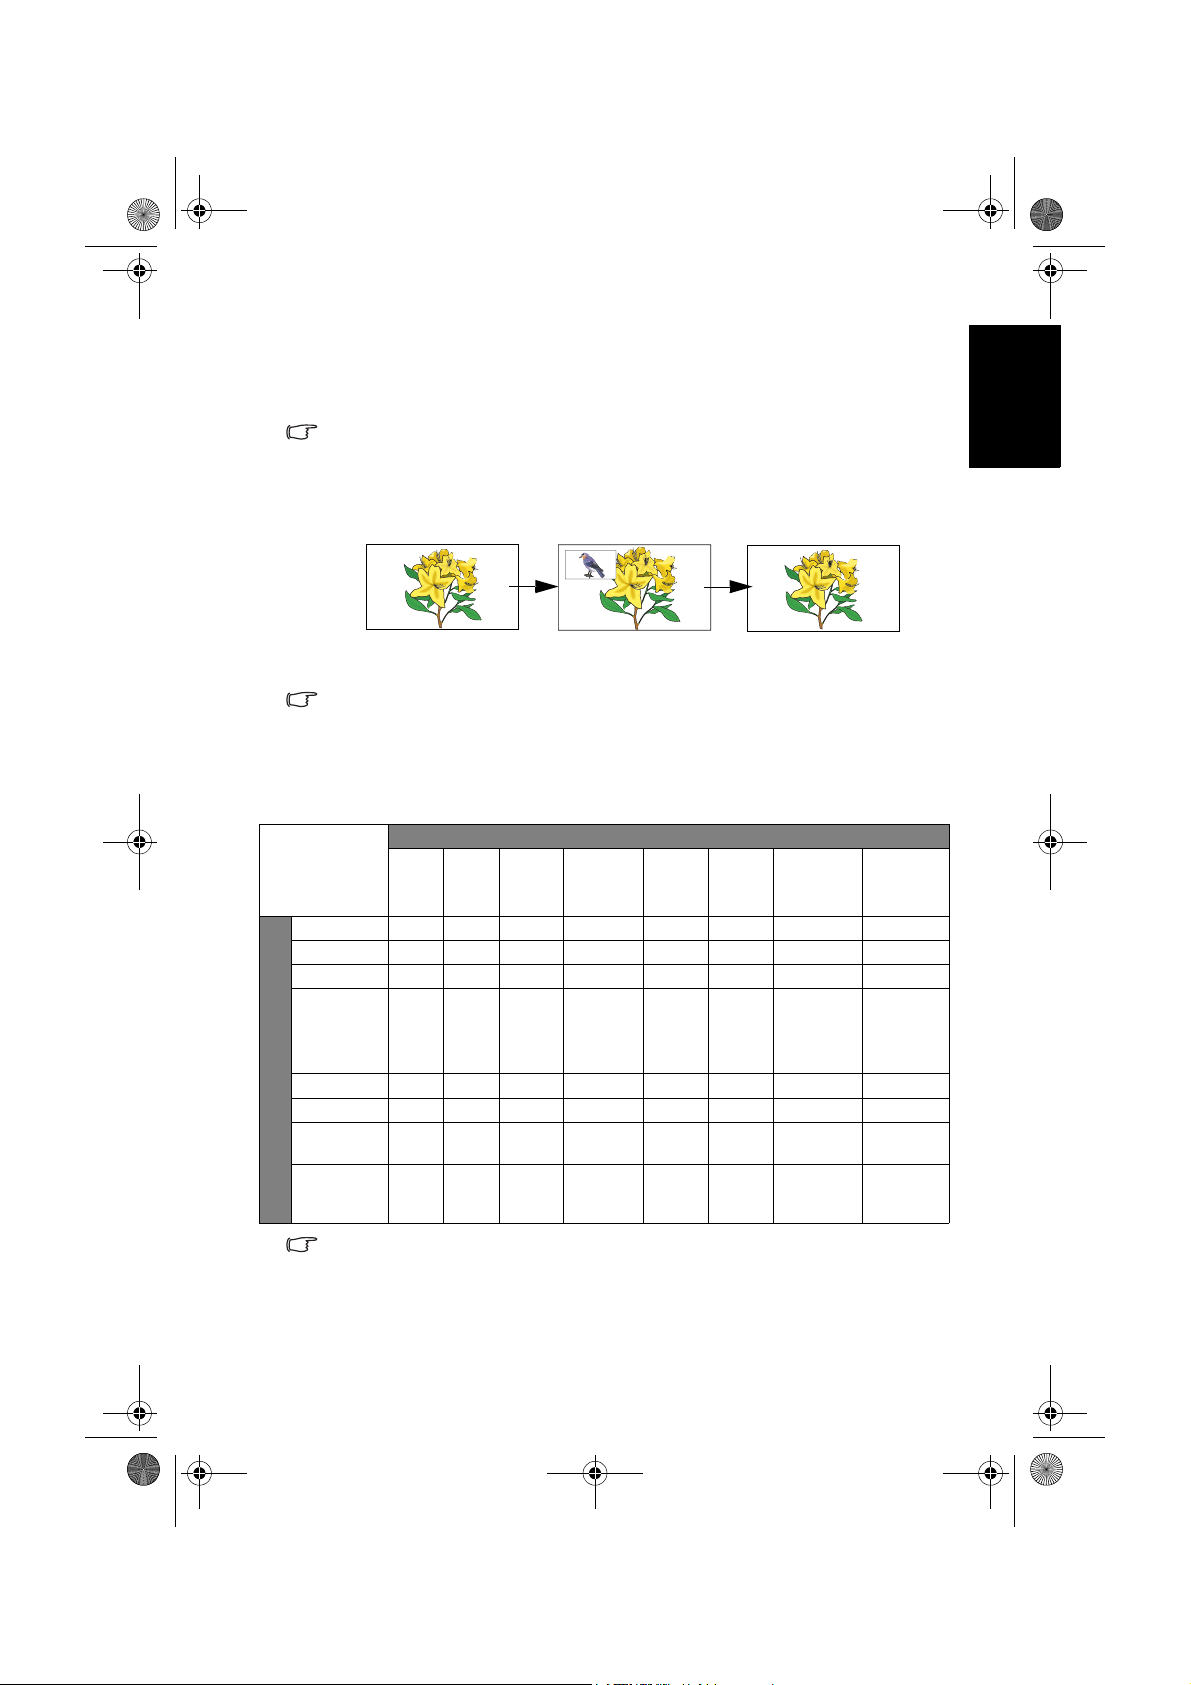
使用子母畫面顯示功能 (SH/VH 系列 )
若您的顯示器已同時連接了類比視訊與電腦 PC 或 DVI 視訊來源,使用
此功能即可讓顯示器以子母畫面的方式同時顯示這兩種訊號源的畫面。
• 若要使用子母畫面顯示功能,則 PC 或 DVI 必須為其中一種訊號源。
• 在子母畫面模式下,遙控器的功能僅有部份可以使用。
1. 先按遙控器上的 「訊號來源」鈕選擇並顯示 PC 或 DVI 視訊輸入。
2. 按 「子母畫面」鈕即可以子母畫面的方式顯示畫面。按數次 「子母
畫面」鈕可在子母畫面與全畫面這兩種顯示模式間切換:
全畫面顯示
3. 按遙控器上的 「訊號來源」鈕可選擇子畫面的輸入訊號來源。
子畫面無法顯示來自色差視訊 (AV1 或 AV 2) 輸入的畫面。
• 按遙控器上的 ///( 或 +/-) 鈕可改變子畫面的位置。
• 若要選擇播放來自子畫面或母畫面的聲音,請參照第 32 頁的 「PIP 音
頻」的說明。
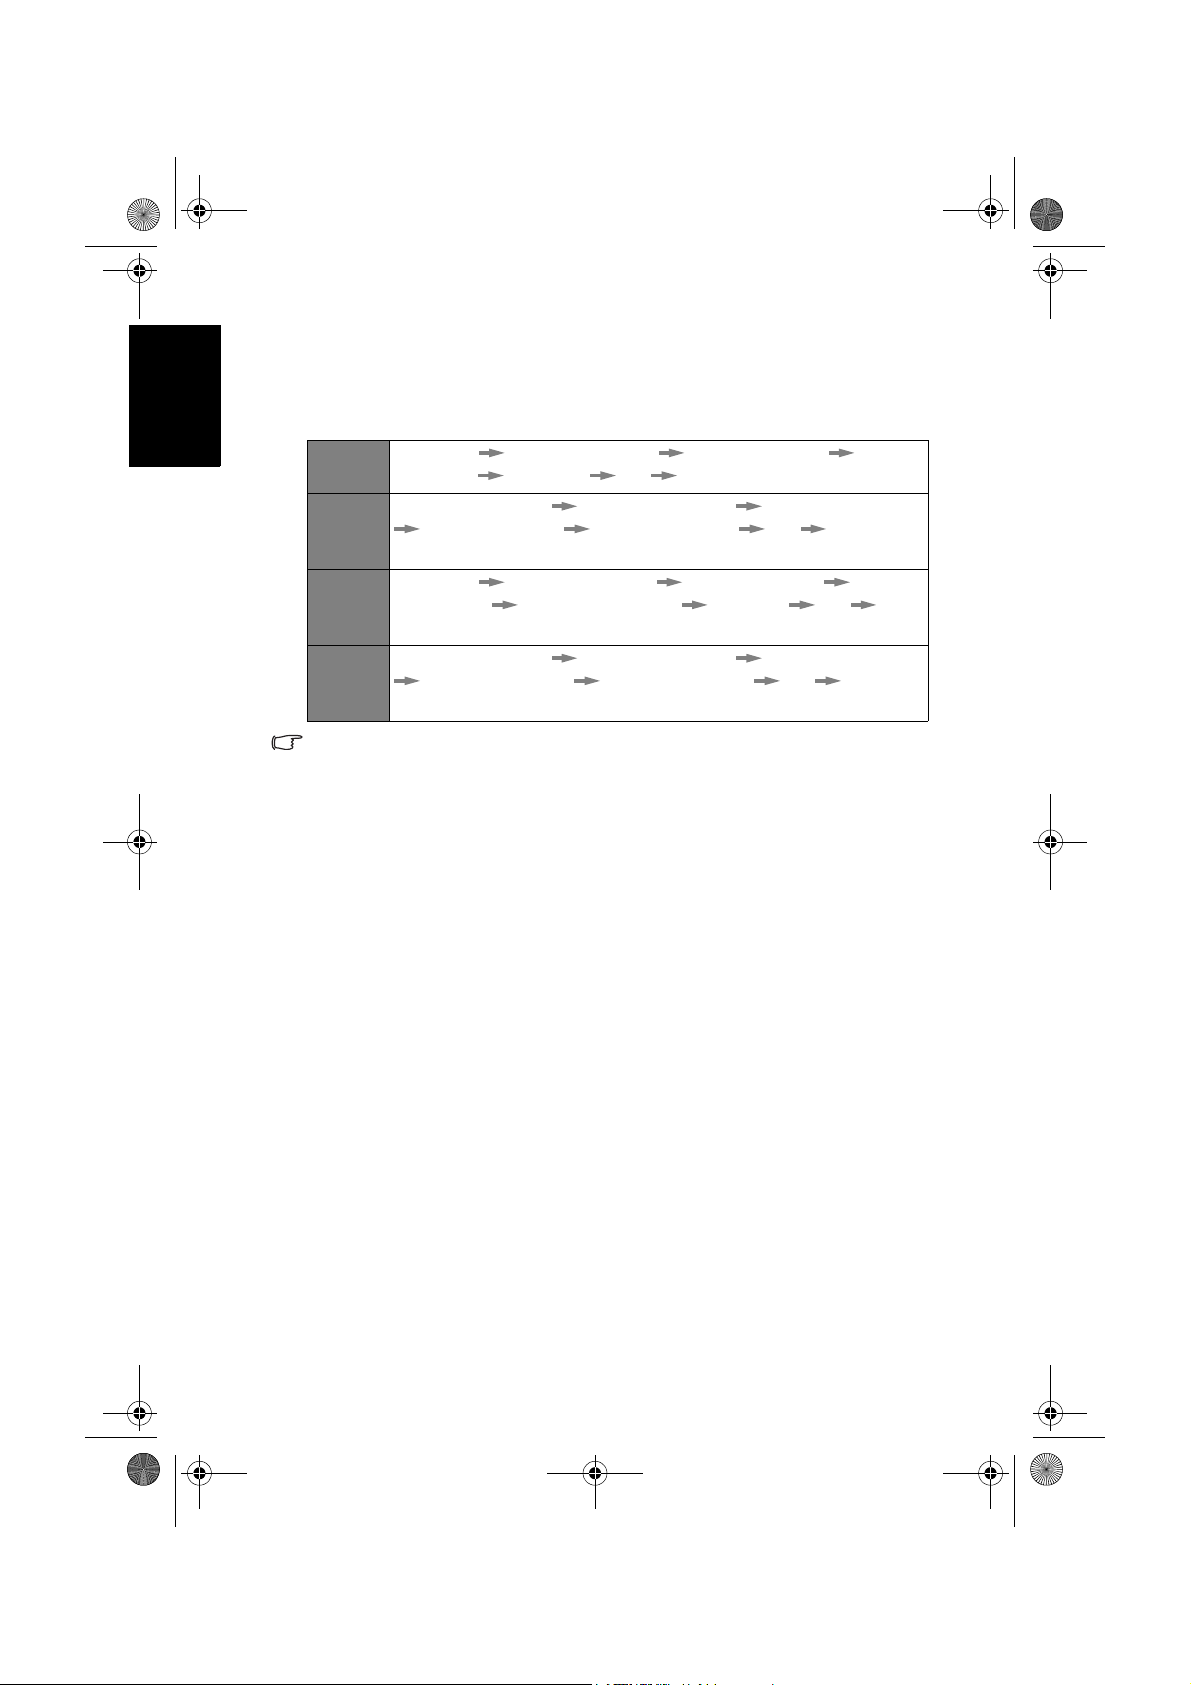
以下表格說明子母畫面功能所適用的訊號來源組合:
電視
AV 1 、
AV 2
子
畫
面
輸
入
訊
號
來
源
類比電視數位
類比電視
數位電視
AV 1 、AV2
AV 3
(
AV3-S)/
AV 4
(
AV4-S)
PC
DVI
HDMI
(VH 系列 )
HDMI1、
HDMI2 (SH
系列 )
在上表中:
• ○:表示此種子母畫面的訊號源組合可使用子母畫面顯示功能。
• -:表示此種子母畫面的訊號源組合無法使用子母畫面顯示功能。
-- - - ○ ○ - -
-- - - ○ ○ - -
-- - - - - - -
-- - - ○ ○ - -
-- - - - - - -
-- - - - - - -
-- - - - - - -
-- - - - - - -
子母畫面顯示
母畫面輸入訊號來源
AV 3
(AV3-S)/
AV 4
(AV4-S)
PC DVI
全畫面顯示
HDMI
(VH 系列 )
HDMI1、
HDMI2
(SH 系列 )
繁體中文
使用遙控器 15

Tuner-RC-TC.book Page 16 Friday, October 3, 2008 4:25 PM
繁體中文
調整畫面比例
畫面比例
選項
16:9
4:3
寬螢幕調
整
Letter
Box
按遙控器上的 「畫面比例」鈕,可依照輸入視訊畫面的畫面比例選擇
最適當的比例在螢幕上顯示。各種畫面比例的說明與使用時機如下表:
輸入視訊畫面的畫面比例
說明與使用時機
4:3
16:9
( 不建議選擇 )
( 不建議選擇 )
( 不建議選擇 )
將輸入視訊畫面以 16:9 的畫面比例
顯示。適合用於觀賞原本畫面比例
即為 16:9 的數位電視畫面,或大多
數寬螢幕 DVD 影片畫面。
將輸入視訊畫面以 4:3 的畫面比例
顯示。適合用於觀賞原本畫面比例
即為 4:3 的傳統類比電視畫面或 PC
視訊。
將輸入視訊畫面以 16:9 的畫面比例
顯示,並將畫面放大。 您可以使用
遙控器上的 或 鈕上下調整畫
面在螢幕上的位置。此選項適合用
於觀賞原本畫面比例即為 4:3 的傳
統類比電視畫面或 PC 視訊。
將輸入視訊畫面以 16:9 的畫面比例
顯示,並將畫面上半部與下半部超
出螢幕顯示範圍的部份去除。適合
用於顯示原本上下就有兩條黑邊的
Letter Box 格式畫面。
精緻縮放
使用遙控器16
將輸入視訊畫面填滿整個螢幕。適
( 不建議選擇 )
• 可選擇的畫面比例種類會因為訊號輸入來源的不同而異。
• 在使用 PC、DVI 與 HDMI 輸入時,僅支援 「4:3」與 「16:9」。
• 為避免在顯示器螢幕上留下難以回復的殘影 ( 烙痕 ),請勿讓顯示器螢幕顯示
固定不動的畫面超過兩小時,或長期使用固定的畫面比例顯示畫面。
合用於將 4:3 畫面比例的畫面以全
螢幕觀賞時。

Tuner-RC-TC.book Page 17 Friday, October 3, 2008 4:25 PM
螢幕顯示選單
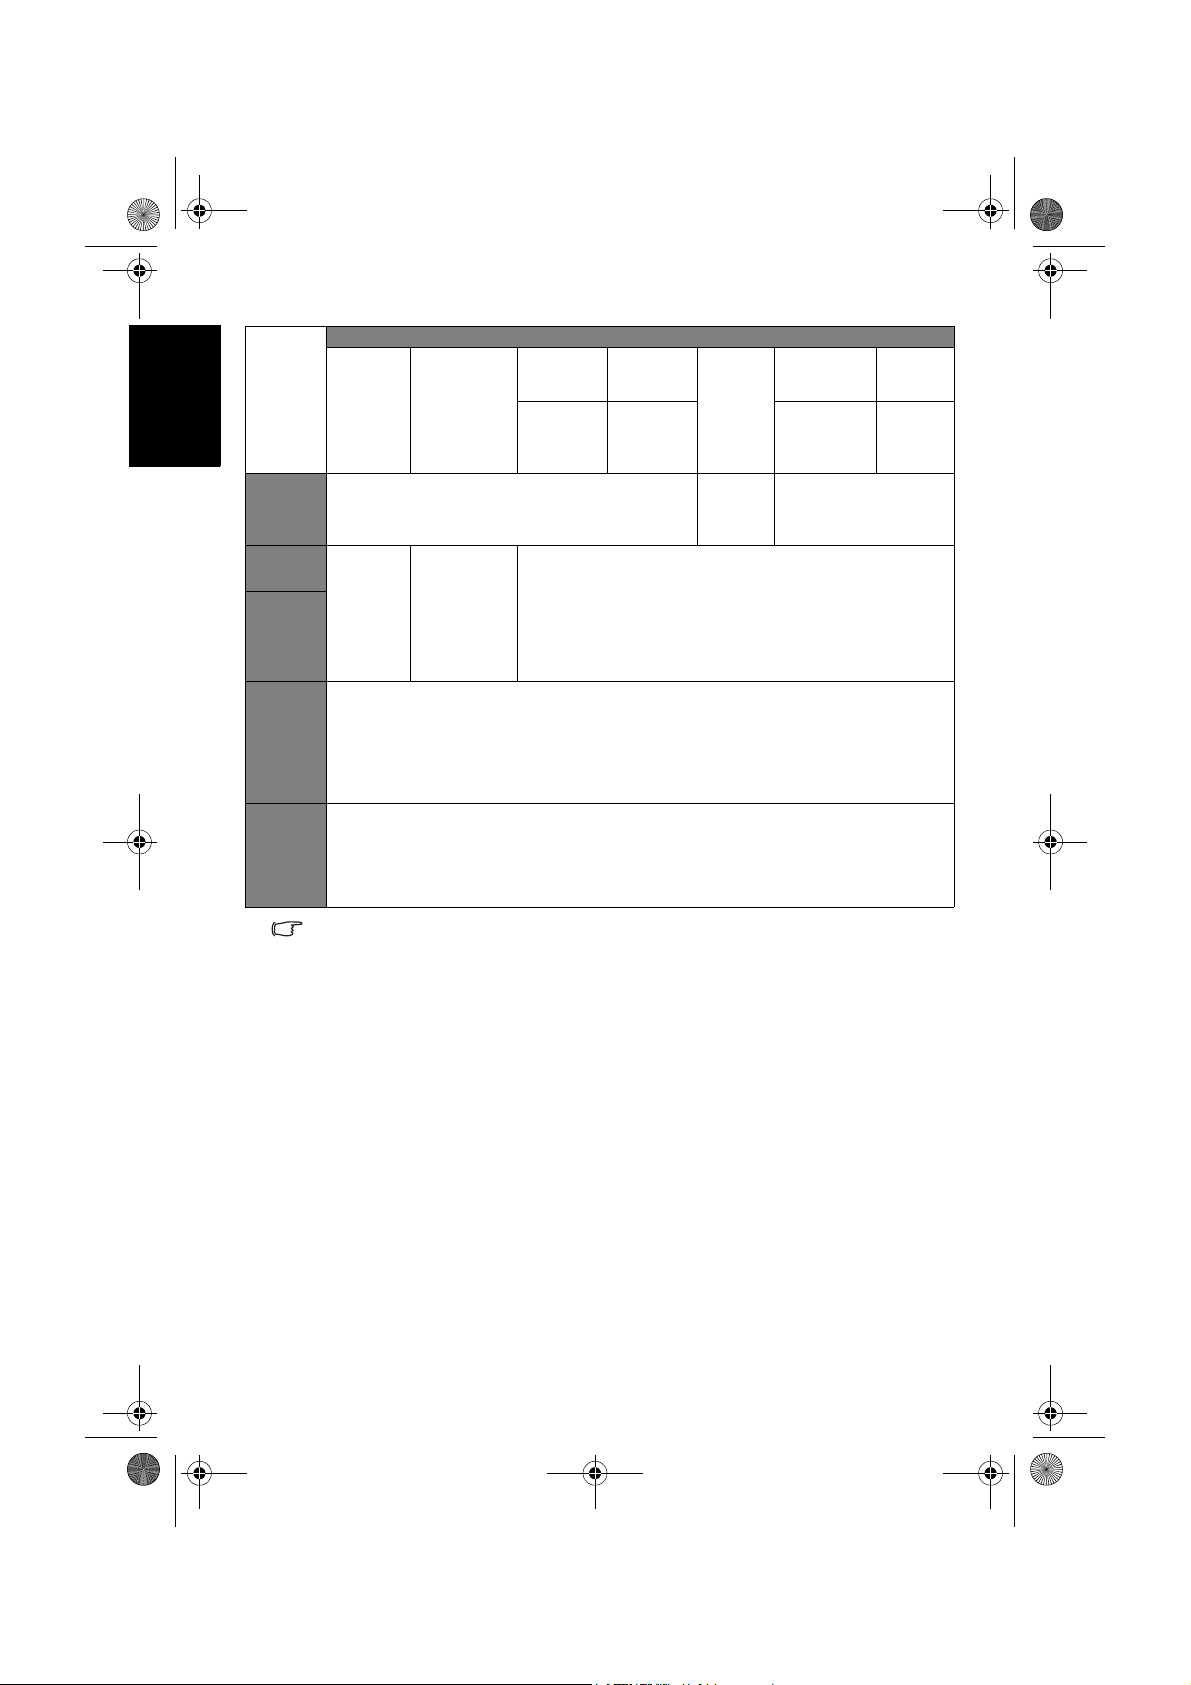
螢幕顯示選單架構
ATV
聲音 (SH/
VH 系列 )
聲音 (VB/
SD/VD 系
列 )
畫質 (SH/
VH 系列 )
畫質 (VB/
SD/VD 系
列 )
Senseye
(SH 系列 )
功能
(VH 系列 )
Senseye
(VB/SD/
VD 系列 )
類比電視
• 音量
• 均衡
• 聲音類型
• 頻道穩定音
• 環繞音效
• 內建揚聲器
• 音場效果設定
• 音量
• 平衡
• 聲音類型
• 穩定音
• 環繞音效
• 內建揚聲器
• 進階設定
• 影像模式
• 對比
• 亮度
• 色彩
• 銳利度
• 色溫
• NTSC 色調
• NTSC 設置
• 畫質模式
• 對比度
• 亮度
• 色彩
• 銳利度
• 色溫
• 背光
• NTSC 色彩
• NTSC 設定
• 色彩模式
• Gamma 模式
• 自動對比度增強
• 雜訊抑制
• 暗畫面對比度
• 自動對比度增強
• 雜訊抑制
• 畫面比例
• 黑階強化
• 自動對比度增強
• 雜訊抑制
數位電視
DTV
AV1
(VB/SD/VD
系列 )
AV1 、AV2
(SH/VH
系列 )
• 影像模式
• 對比
• 亮度
• 色彩
• 銳利度
• 色溫
• 畫質模式
• 對比度
• 亮度
• 色彩
• 銳利度
• 色溫
• 背光
輸入訊號來源
AV2 /AV2- S
(VB/SD/VD
系列 )
AV3 /AV3- S
AV4 /AV4- S
(SH/VH
系列 )
• 影像模式
• 對比
• 亮度
• 色彩
• 銳利度
• 色溫
• NTSC 色調
• NTSC 設置
• 畫質模式
• 對比度
• 亮度
• 色彩
• 銳利度
• 色溫
• 背光
• NTSC 色彩
• NTSC 設定
DVI (SH/VH/
VB 系列 )
PC
DVI 1/DVI 2
(SD/VD
• 對比
• 亮度
• 色溫
• 自動調整
• 頻率
• 相位
• 水平位置
• 垂直位置
• 對比度
• 亮度
• 色溫
• 背光
• 自動調整
• 頻率
• 相位
• 水平位置
• 垂直位置
• 色彩模式
• Gamma 模式
• 自動對比度增強
• 畫面比例
( 無法
使用 )
• 對比
• 亮度
• 色溫
• 畫質模式
• 對比度
• 亮度
• 色彩
• 銳利度
• 色溫
• 背光
• 黑階強化
• 自動對比度增強
• 雜訊抑制
系列
HDMI
(VB/VH
系列 )
HDMI1/
HDMI2
(SH/SD/
)
VD 系列 )
• 影像模式
• 對比
• 亮度
• 色彩
• 銳利度
• 色溫
繁體中文
螢幕顯示選單 17
Tuner-RC-TC.book Page 18 Friday, October 3, 2008 4:25 PM
繁體中文
子母畫面
(SH/VH
系列 )
電視 (SH/
VH 系列 )
TV (VB/
SD/VD 系
列 )
設定 (SH/
VH 系列 )
設定 (VB/
SD/VD 系
列 )
輸入訊號來源
AV1
(VB/SD/VD
ATV
類比電視
( 無法使用 )
• 電視 / 有
線電視
• 頻道增減
• 喜愛頻道
• 自動掃台
• 語言
• 背光亮度
• 定時關機
• 自動關機省電模式
• HDMI/DVI 訊源種類 (SH 系列 )/DVI 訊源種類 (VH 系列 )
• 藍屏模式 (SH 系列 )
• 重設為出廠預設值
• 語言
• 睡眠計時器
• 省電模式
• HDMI/DVI 輸入
• 藍屏模式
• 重回預設值
DTV
數位電視
• 電視 / 音樂
• 電子節目表
• 頻道列表
• 頻道編輯
• 取代現有數
位頻道
• 新增數位頻
道
系列 )
AV1 、AV2
(SH/VH
系列 )
( 無法使用 )
AV2 /AV2- S
(VB/SD/VD
系列 )
AV3 /AV3- S
AV4 /AV4- S
(SH/VH
系列 )
• 子母畫面
• 母畫面
• 子畫面
• PIP 音頻
PC
DVI (SH/VH/
VB 系列 )
DVI 1/DVI 2
(SD/VD 系列
)
( 無法使用 )
HDMI
(VB/VH
系列 )
HDMI1/
HDMI2
(SH/SD/
VD 系列 )
• 可使用的選單選項會根據您所選擇的輸入訊號來源而定。無法使用的選單選
項將會變成灰色或不顯示。請參閱:
第 20 頁的 「聲音選單 (SH/VH 系列 )」
第 22 頁的 「聲音選單 (VB/SD/VD 系列 )」
第 24 頁的 「畫質選單 (SH/VH 系列 )」
第 26 頁的 「畫質選單 (VB/SD/VD 系列 )」
第 29 頁的 「Senseye 選單 (SH 系列 )」
第 30 頁的 「Senseye 選單 (VB/SD/VD 系列 )」
第 31 頁的 「功能選單 (VH 系列 )」
第 32 頁的 「子母畫面選單 (SH/VH 系列 )」
第 33 頁的 「電視選單 (SH/VH 系列 )」
第 34 頁的 「TV 選單 (VB/SD/VD 系列 )」
第 35 頁的 「設定選單 (SH/VH 系列 )」
第 36 頁的 「設定選單 (VB/SD/VD 系列 )」
• 各訊號源下的選單設定是各自獨立的,並不會互相影響。例如在 AV1 訊號源
下的畫質設定並不會影響在 AV2 訊號源下的畫質設定。
螢幕顯示選單18

Tuner-RC-TC.book Page 19 Friday, October 3, 2008 4:25 PM
瀏覽螢幕顯示選單
您可以透過螢幕顯示選單調整各種不同的顯示器設定。 按遙控器上的
「目錄」鈕可顯示螢幕顯示選單 ( 下圖為 SH 系列顯示器之選單 ):
聲音
畫質
螢幕顯示選單中的操作
• 按遙控器上的 、、 或 (+ 或 -) 鈕可選取選項或變更設定值。
• 按遙控器上的 「OK 」鈕可進入子選單 ( 若有的話 )。
• 按遙控器上的 「回前頁」或 「回上頁」鈕可返回上一層選單。
• 按遙控器上的 「目錄」鈕可退出螢幕顯示選單。
以使用遙控器調整畫面銳利度為例:
1. 按遙控器上的 「目錄」鈕顯示螢幕顯示選單。
2. 按 或 (+ 或 -) 鈕選擇 「畫質」。
3. 按 「 OK 」鈕進入子選單。
Senseye
子母畫面 電視
設定
繁體中文
4. 按 或 鈕選擇 「銳利度」。
5. 按 或 (+ 或 -) 鈕調整畫面的銳利度至您滿意的程
度。
6. 按 「回前頁」或 「回上頁」鈕返回上一層選單,或
7. 按 「目錄」鈕退出螢幕顯示選單。
螢幕顯示選單 19
Tuner-RC-TC.book Page 20 Friday, October 3, 2008 4:25 PM
繁體中文
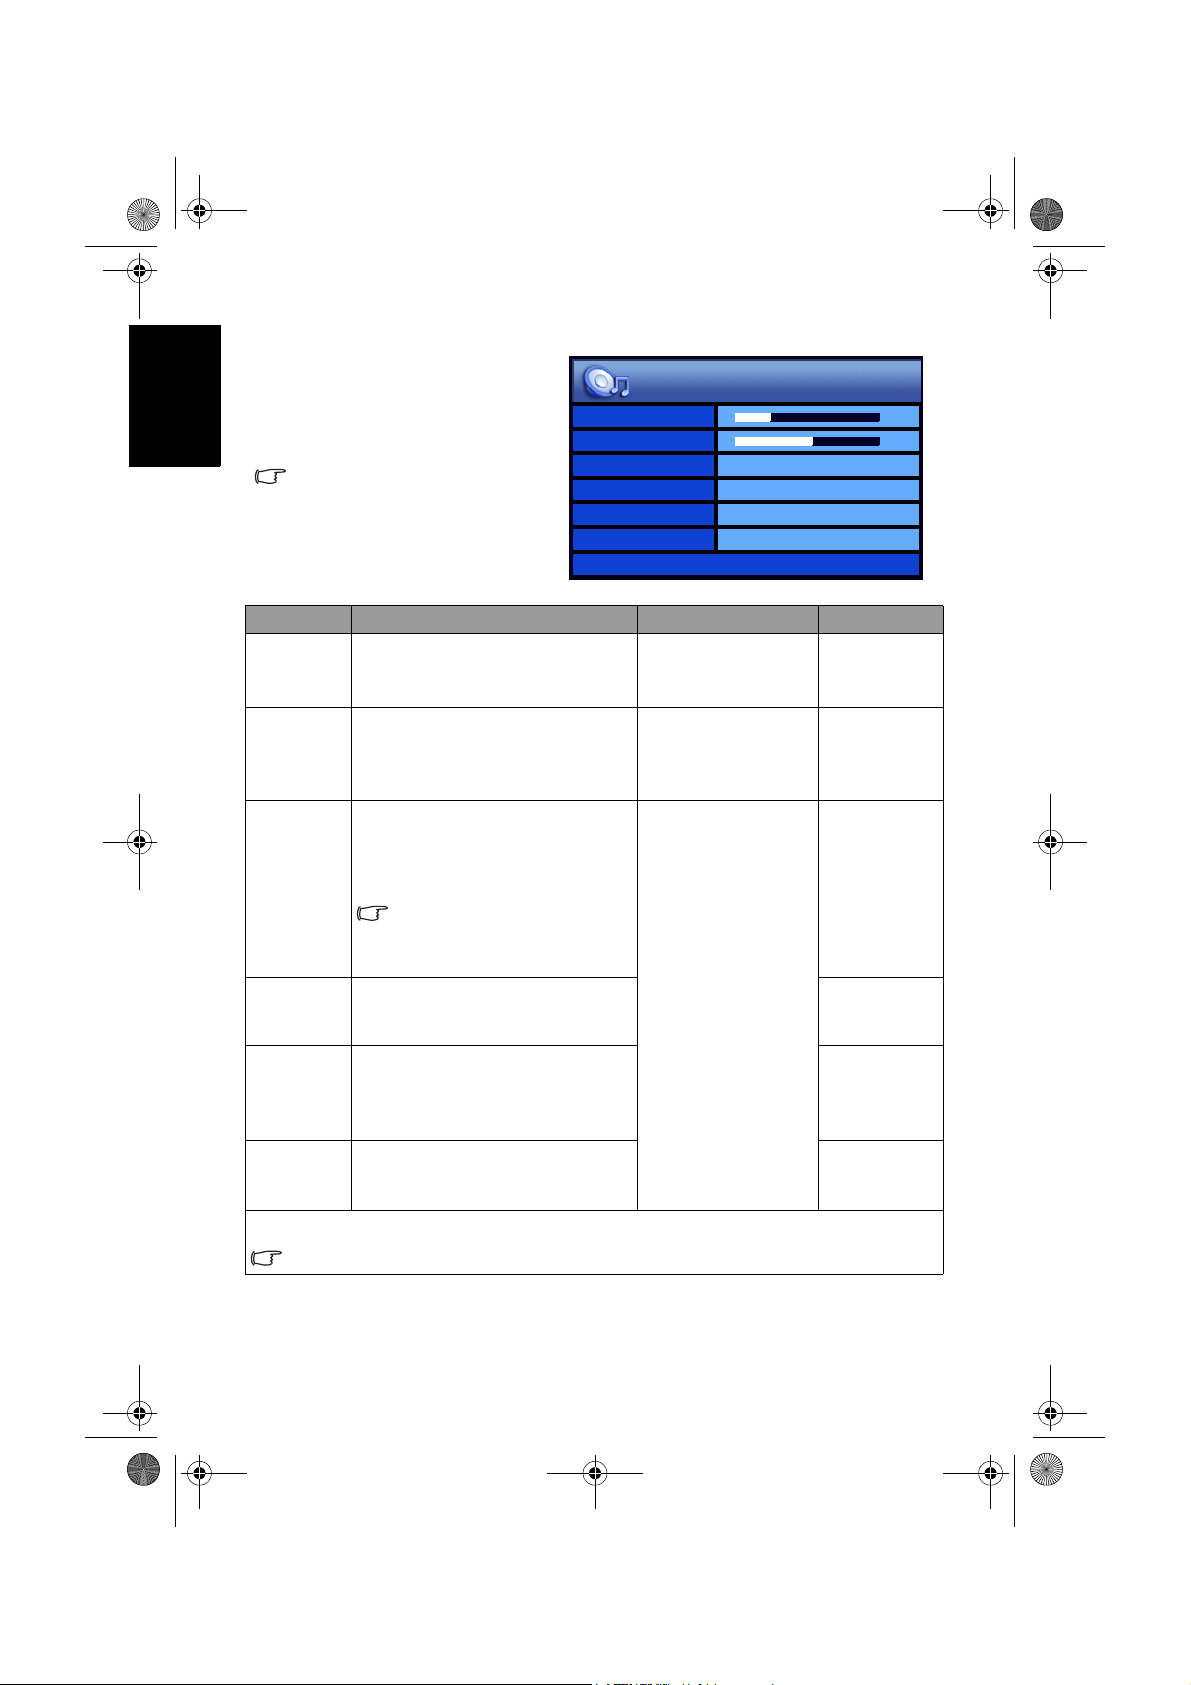
聲音
聲音選單 (SH/VH 系
列 )
選單中顯示的選項會因為輸入訊
號的種類不同而異。
右圖所示的選單選項與設定僅供
參考。
選項 功能 操作 範圍
音量
均衡
聲音類型
頻道穩定音
環繞音效
內建揚聲器
音場效果設定 - 按 OK 進入子選單。
若 「環繞音效」項目設為 「SRS TruSurround XT」,本項目無法使用。
調整顯示器之內建揚聲器的音量
大小。
調整顯示器之內建揚聲器的音量
平衡。
當您欣賞的電視節目或影片支援
多重聲道或多國語言播送時,您
可以使用本功能來選擇想要的聲
音類型。
可選擇的選項將依所接收的輸
入視訊或電視節目的音訊格式
是否支援而定。
若設為 「自動」,在觀賞節目
時,本功能可自動調整不同頻道
間的聲音大小,使其達到一致。
開啟或關閉顯示器的 SRS
TruSurround XT 環繞音效。
若設為 「開」,聲音將從顯示器
內建的揚聲器輸出。 若您有外接
音響系統時,可設為 「關閉」。
音量
均衡
聲音類型
頻道穩定音
環繞音效
內建揚聲器
音場效果設定>
按 (+) 增加音量,
或按 (-) 降低音
量。
按 (+) 增加右揚
聲器音量,或按
(-) 增加左揚聲器
音量。
按 或 (+ 或 -)
鈕選擇。
10
0
立體聲
關閉
關閉
開
0 到 47
-12 到 12
• 立體聲
• 單聲道
• 副語
• 左聲道
• 右聲道
• 語音 1
• 語音 2
• 自動
• 關閉
• SRS
TruSurround
XT
• 關閉
• 開
• 關閉
螢幕顯示選單20

Tuner-RC-TC.book Page 21 Friday, October 3, 2008 4:25 PM
音場效果
高音
中高音
中音
中低音
低音
選擇一種顯示器預設的音場效
果,或選擇使用者模式,讓您自
行調整喜好的音場效果。
當音場效果設定為 「使用者模
式」時,調整高音音調。
當音場效果設定為 「使用者模
式」時,調整中高音音調。
當音場效果設定為 「使用者模
式」時,調整中音音調。
當音場效果設定為 「使用者模
式」時,調整中低音音調。
當音場效果設定為 「使用者模
式」時,調整低音音調。
按 或 (+ 或 -)
鈕選擇。
按 或 (+ 或 -)
鈕進行調整。
設定音場效果中的 「使用者模式」
1. 按遙控器上的 「目錄」鈕顯示螢幕顯示選單。
2. 按 或 (+ 或 -) 鈕選擇 「聲音」,然後按 OK 鈕進入聲音選單。
3. 按 或 鈕選擇 「音場效果設定」,然後按 OK 鈕進入音場效果
設定選單。
4. 按 或 鈕選擇 「音場效果」,然後按 或 (+ 或 -) 鈕選擇
「使用者模式」。
5. 按 或 鈕選擇 「高音」、「中高音」、「中音」、「中低音」、
「低音」等設定,然後按 或 (+ 或 -) 鈕調整至您滿意的狀態。
6. 按 「目錄」鈕關閉螢幕顯示選單並儲存。
• 搖滾樂
• 爵士樂
•
古典樂
• 流行樂
• 使用者模式
-12 到 12
繁體中文
螢幕顯示選單 21

Tuner-RC-TC.book Page 22 Friday, October 3, 2008 4:25 PM
繁體中文
聲音
聲音選單 (VB/SD/VD
系列 )
選單中顯示的選項會因為輸入訊
號的種類不同而異。
右圖所示的選單選項與設定僅供
參考。
選項 功能 操作 範圍
音量
平衡
聲音類型
穩定音
環繞音效
內建揚聲器
進階設定 - 按 OK 進入子選單。
若 「環繞音效」項目設為 「SRS TruSurround XT」,本項目無法使用。
調整顯示器之內建揚聲器的音量
大小。
調整顯示器之內建揚聲器的音量
平衡。
當您欣賞的電視節目或影片支援
多重聲道或多國語言播送時,您
可以使用本功能來選擇想要的聲
音類型。
可選擇的選項將依所接收的輸
入視訊或電視節目的音訊格式
是否支援而定。
若設為 「自動」,在觀賞節目
時,本功能可自動調整不同頻道
間的聲音大小,使其達到一致。
開啟或關閉顯示器的 SRS
TruSurround XT 環繞音效。
若設為 「開」,聲音將從顯示器
內建的揚聲器輸出。 若您有外接
音響系統時,可設為 「關」。
音量
平衡
聲音類型
穩定音
環繞音效
內建揚聲器
進階設定>
按 (+) 增加音量,
或按 (-) 降低音
量。
按 (+) 增加右揚
聲器音量,或按
(-) 增加左揚聲器音
量。
按 或 (+ 或 -)
鈕選擇。
10
0
立體聲
關
關
開
0 到 47
-12 到 12
• 立體聲
• 單聲道
• 副語
• 聲音一
• 聲音二
• 自動
• 關
• SRS
TruSurround
XT
• 關
• 開
• 關
螢幕顯示選單22

Tuner-RC-TC.book Page 23 Friday, October 3, 2008 4:25 PM
音效模式
高音
中高音
中音
中低音
低音
選擇一種顯示器預設的音效模
式,或選擇 「自訂」,讓您自行
調整喜好的音場效果。
當音場效果設定為 「自訂」時,
調整高音音調。
當音場效果設定為 「自訂」時,
調整中高音音調。
當音場效果設定為 「自訂」時,
調整中音音調。
當音場效果設定為 「自訂」時,
調整中低音音調。
當音場效果設定為 「自訂」時,
調整低音音調。
按 或 (+ 或 -)
鈕選擇。
按 或 (+ 或 -)
鈕進行調整。
設定音場效果中的 「自訂」模式
1. 按遙控器上的 「目錄」鈕顯示螢幕顯示選單。
2. 按 或 (+ 或 -) 鈕選擇 「聲音」,然後按 OK 鈕進入聲音選單。
3. 按 或 鈕選擇 「進階設定」,然後按 OK 鈕進入進階設定選單。
4. 按 或 鈕選擇 「音效模式」,然後按 或 (+ 或 -) 鈕選擇
「自訂」。
5. 按 或 鈕選擇 「高音」、「中高音」、「中音」、「中低音」、
「低音」等設定,然後按 或 (+ 或 -) 鈕調整至您滿意的狀態。
6. 按 「目錄」鈕關閉螢幕顯示選單並儲存。
• 搖滾樂
• 爵士樂
• 古典
• 流行樂
• 自訂
-12 到 12
繁體中文
螢幕顯示選單 23

Tuner-RC-TC.book Page 24 Friday, October 3, 2008 4:25 PM
繁體中文
畫質
畫質選單 (SH/VH 系
列 )
選單中顯示的選項會因為輸入訊
號的種類不同而異。
右圖所示的選單選項與設定僅供
參考。
影像模式
對比
亮度
色彩
銳利度
色溫
NTSC 色調
NTSC 設置
使用者模式
7.5 IRE
選項 功能 操作 範圍
您可依照您的收視環境,使
用顯示器預設的影像模式,
使畫面的呈現最佳化,或自
影像模式
行設定您喜愛的影像模式。
若您選擇了 「使用者模
式」,您可針對您的喜好個
別調整對比、亮度、色彩和
銳利度等設定。
關於各種影像模式使用的時
機,以及如何設定 「使用者
模式」,請參閱第 14 頁的
按 或 (+ 或 -)
鈕選擇。
• 標準模式
• 劇院模式
• 動態模式
• 遊戲模式 (SH
系列 )
• 使用者模式
「選擇影像模式」與第 26 頁
的 「設定影像模式中的 「使
用者模式」」的說明。
按 (+) 鈕可將白
色調部分調亮
,
按
(-)鈕可將白色調
部分調暗。
按 (+) 鈕可將黑
,
色調部分調亮
按
(-)鈕可將黑色調
部分調暗。
0 到 64
對比
亮度
當影像模式設定為 「使用者
模式」時,用以調整影像的
對比度。請參閱第 25 頁的
「調整對比」。
當影像模式設定為 「使用者
模式」時,用以調整影像的
亮度。請參閱第 26 頁的
「調整亮度」。
當影像模式設定為 「使用者
按 (+) 鈕可調高
色彩的飽和度
,
按
(-) 鈕可調低色
彩的飽和度。
色彩
模式」時,用以調整影像的
色彩飽和度。飽和度亦即色
彩的純度,純度愈高,表現
愈鮮明,純度愈低,表現則
愈黯淡。
32
32
32
4
適中
32
螢幕顯示選單24

Tuner-RC-TC.book Page 25 Friday, October 3, 2008 4:25 PM
當影像模式設定為 「使用者
模式」時,用以調整影像的
銳利度。
調整銳利度的目的是為了補
償影像訊號轉換時損失的細
銳利度
節,而加入高頻訊號讓影像
更鮮明。
若銳利度太高,會使線條太
僵硬且產生高頻的雜訊。因
此調整時請注意不要讓雜訊
出現即可。
色溫 調整影像色溫。
調整 NTSC 格式視訊的色
NTSC 色調
調。
本選項僅適用於 NTSC 格
式的視訊。
設定顯示器所顯示的 NTSC
視訊類型,使其與視訊來源
設備 ( 例如 DVD 播放機 ) 所
NTSC 設置
輸出的 NTSC 視訊類型相
符。
本選項僅適用於 NTSC 格
式的視訊。
讓顯示器自動調整 PC 輸入
自動調整
畫面的頻率、相位、水平位
置與垂直位置。
頻率 手動調整 PC 輸入畫面的時
相位
脈頻率與相位,使畫面清晰
而沒有抖動的情形。
水平位置 手動調整 PC 輸入畫面的水
垂直位置
平與垂直位置,使畫面顯示
在螢幕的正中央。
按 (+) 鈕可使影
像看起來更銳利
按 (-) 鈕可使影
,
0 到 6
像看起來較模糊。
按 或 (+ 或 -)
鈕選擇。
• 暖色
• 適中
• 冷色
按 (+) 鈕可使色
調偏紅
,
按 (-)
0 到 64
鈕可使色調偏綠。
按 或 (+ 或 -)
鈕選擇。
• 0 IRE
• 7.5 IRE
按 「OK」 鈕開始自動調整功能。
按 或 (+ 或 -)
鈕調整。
( 依照輸入視訊
的解析度而異 )
繁體中文
調整對比
1. 先將對比度調到最高,再往下調整。
2. 在調整過程中,使亮部細節 ( 如大理石上的紋理 ) 由全白中慢慢浮
現,直到細節不再出現之對比最高值,即為最佳對比。如再降低,
亮部過暗,顏色飽和度及立體感則會消失。
螢幕顯示選單 25

5
Tuner-RC-TC.book Page 26 Friday, October 3, 2008 4:25 PM
繁體中文
調整亮度
設定影像模式中的 「使用者模式」
畫質選單 (VB/SD/VD
系列 )
1. 先將亮度調到最低,再往上調整。
2. 在調整過程中,使暗部細節 ( 如主播黑西裝上的紋理 ) 慢慢浮現,
直到細節不再出現之亮度最低值,即為最佳亮度。如再提高,黑色
會轉為偏灰白色,亮度即過亮。
1. 按遙控器上的 「目錄」鈕顯示螢幕顯示選單。
2. 按 或 (+ 或 -) 鈕選擇 「畫質」,然後按 OK 鈕進入畫質選單。
3. 按 或 鈕選擇 「影像模式」,然後按 或 (+ 或 -) 鈕選擇
「使用者模式」。
4. 按 或 鈕選擇 「對比」、「亮度」、「色彩」、「銳利度」等設
定,然後按 或 (+ 或 -) 鈕調整至您滿意的狀態。
5. 按 「目錄」鈕關閉螢幕顯示選單並儲存。
畫質
自訂
一般
7.5 IRE
選單中顯示的選項會因為輸入訊
號的種類不同而異。
右圖所示的選單選項與設定僅供
參考。
畫質模式
對比度
亮度
色彩
銳利度
色溫
背光
NTSC 色彩
NTSC 設定
32
32
32
4
5
32
選項 功能 操作 範圍
您可依照您的收視環境,使
用顯示器預設的畫質模式,
使畫面的呈現最佳化,或自
行設定您喜愛的自訂畫質模
畫質模式
式。若您選擇了 「自訂」,
您可針對您的喜好個別調整
對比度、亮度、色彩和銳利
度等設定。
關於各種影像模式使用的時
機,以及如何設定 「自訂」
按 或 (+ 或 -
) 鈕選擇。
• 標準
• 劇院
• 動態
• 遊戲 (VB 系列 )
• 自訂
模式,請參閱第 14 頁的
「選擇影像模式」與第 28 頁
的 「設定畫質模式中的 「自
訂」模式」的說明。
螢幕顯示選單26

Tuner-RC-TC.book Page 27 Friday, October 3, 2008 4:25 PM
當畫質模式設定為 「自訂」
對比度
時,用以調整影像的對比
度。請參閱第 28 頁的 「調
整對比度」。
當畫質模式設定為 「自訂」
亮度
時,用以調整影像的亮度。
請參閱第 28 頁的 「調整亮
度」。
當畫質模式設定為 「自訂」
時,用以調整影像的色彩飽
色彩
和度。飽和度亦即色彩的純
度,純度愈高,表現愈鮮
明,純度愈低,表現則愈黯
淡。
當畫質模式設定為 「自訂」
時,用以調整影像的銳利
度。
調整銳利度的目的是為了補
償影像訊號轉換時損失的細
銳利度
節,而加入高頻訊號讓影像
更鮮明。
若銳利度太高,會使線條太
僵硬且產生高頻的雜訊。因
此調整時請注意不要讓雜訊
出現即可。
色溫 調整影像色溫。
背光 調整液晶面板的背光亮度。
調整 NTSC 格式視訊的色
NTSC 色彩
調。
本選項僅適用於 NTSC 格
式的視訊。
設定顯示器所顯示的 NTSC
視訊類型,使其與視訊來源
設備 ( 例如 DVD 播放機 ) 所
NTSC 設定
輸出的 NTSC 視訊類型相
符。
本選項僅適用於 NTSC 格
式的視訊。
讓顯示器自動調整 PC 輸入
自動調整
畫面的頻率、相位、水平位
置與垂直位置。
按 (+) 鈕可將白
,
色調部分調亮
按
(-)鈕可將白色調
部分調暗。
按 (+) 鈕可將黑
,
色調部分調亮
(-)鈕可將黑色調
按
0 到 64
部分調暗。
按 (+) 鈕可調高
色彩的飽和度
,
按
(-)鈕可調低色彩
的飽和度。
按 (+) 鈕可使影
像看起來更銳利
按 (-) 鈕可使影
,
0 到 6
像看起來較模糊。
按 或 (+ 或 -)
鈕選擇。
按 或 (+ 或 -)
鈕調整。
• 暖
• 一般
• 冷
0 到 10
按 (+) 鈕可使色
調偏紅
,
按 (-)
0 到 64
鈕可使色調偏綠。
按 或 (+ 或 -)
鈕選擇。
• 0 IRE
• 7.5 IRE
按 「OK」 鈕開始自動調整功能。
繁體中文
螢幕顯示選單 27

Tuner-RC-TC.book Page 28 Friday, October 3, 2008 4:25 PM
繁體中文
頻率 手動調整 PC 輸入畫面的時
相位
水平位置 手動調整 PC 輸入畫面的水
垂直位置
脈頻率與相位,使畫面清晰
而沒有抖動的情形。
平與垂直位置,使畫面顯示
在螢幕的正中央。
調整對比度
1. 先將對比度調到最高,再往下調整。
2. 在調整過程中,使亮部細節 ( 如大理石上的紋理 ) 由全白中慢慢浮
現,直到細節不再出現之對比最高值,即為最佳對比。如再降低,
亮部過暗,顏色飽和度及立體感則會消失。
調整亮度
1. 先將亮度調到最低,再往上調整。
2. 在調整過程中,使暗部細節 ( 如主播黑西裝上的紋理 ) 慢慢浮現,
直到細節不再出現之亮度最低值,即為最佳亮度。如再提高,黑色
會轉為偏灰白色,亮度即過亮。
設定畫質模式中的 「自訂」模式
1. 按遙控器上的 「目錄」鈕顯示螢幕顯示選單。
2. 按 或 (+ 或 -) 鈕選擇 「畫質」,然後按 OK 鈕進入畫質選單。
3. 按 或 鈕選擇 「畫質模式」,然後按 或 (+ 或 -) 鈕選擇
「自訂」。
4. 按 或 鈕選擇 「對比度」、「亮度」、「色彩」、「銳利度」等
設定,然後按 或 (+ 或 -) 鈕調整至您滿意的狀態。
5. 按 「目錄」鈕關閉螢幕顯示選單並儲存。
-16 到 16
按 或 (+ 或 -)
鈕調整。
-50 到 50
螢幕顯示選單28

Tuner-RC-TC.book Page 29 Friday, October 3, 2008 4:25 PM
Senseye 選單 (SH 系列 )
選單中顯示的選項會因為輸入訊號的
種類不同而異。
右圖所示的選單選項與設定僅供參
考。
選項 功能 操作 範圍
色彩模式
您可以利用 BenQ 的新一代
Senseye 顯彩科技,透過選
擇不同的色彩模式,並與
Gamma 模式
不同的 Gamma 模式以及自
動對比度增強功能搭配,
以改變畫面的呈現方式,
使其符合您的觀賞喜好與
收視環境。
自動對比度增強
本功能可幫助去除影像的
雜訊。
本功能支援來自 ATV (
雜訊抑制
類比電視 )、DTV ( 數位
電視 )、AV1、AV 2 與
AV3 (AV3-S) 輸入的畫
面,並且僅支援最高到
576i 的解析度。
色彩模式
Gamma 模式
自動對比度增強
雜訊抑制
按 或 (+ 或 -)
鈕選擇。
繁體中文
色彩模式 1
Gamma 模式 1
低
低
• 色彩模式 1
• 色彩模式 2
• 色彩模式 3
• 色彩模式 4
• 關閉
• Gamma 模式 1
• Gamma 模式 2
• Gamma 模式 3
• Gamma 模式 4
• 關閉
• 低
• 中
• 高
• 最高
• 關閉
• 低
• 中
• 高
• 關閉
螢幕顯示選單 29

Tuner-RC-TC.book Page 30 Friday, October 3, 2008 4:25 PM
繁體中文
Senseye 選單 (VB/SD/
VD 系列 )
選單中顯示的選項會因為輸入訊號的
種類不同而異。
右圖所示的選單選項與設定僅供參
考。
選項 功能 操作 範圍
當觀看比較暗的影像時,可
加強影像細節的對比度。
黑階強化
自動對比度增
強
當「 自動對比度增強」功
能設定為 「低」、「中」或
「高」時,本選項將無法使
用。
本功能可自動依據影像輸入
的訊號增強影像對比度,使
影像對比度最佳化。
本功能可幫助去除影像的雜
訊。
雜訊抑制
本功能支援來自 ATV ( 類
比電視 )、DTV ( 數位電視
)、AV1 與 AV2
入的畫面,並且僅支援最
高到 576i 的解析度。
(AV2-S ) 輸
黑階強化
自動對比度增強
雜訊抑制
按 或 (+ 或 -)
選擇。
低
關
低
• 低
• 中
• 高
• 關
• 低
• 中
• 高
• 關
• 低
• 中
• 高
• 關
螢幕顯示選單30

Tuner-RC-TC.book Page 31 Friday, October 3, 2008 4:25 PM
繁體中文
功能選單 (VH 系列 )
選單中顯示的選項會因為輸入訊
號的種類不同而異。
右圖所示的選單選項與設定僅供
參考。
暗畫面對比度 低
自動對比度增強 關閉
雜訊抑制 低
畫面比例
功能
16:9
選項 功能 操作 範圍
當觀看比較暗的影像時,可
• 低
• 中
• 高
• 關閉
• 低
• 中
• 高
暗畫面對比度
自動對比度增
強
加強影像細節的對比度。
當「 自動對比度增強」功
能設定為 「低」、「中」或
「高」時,本選項將無法使
用。
本功能可自動依據影像輸入
的訊號增強影像對比度,使
影像對比度最佳化。
• 關閉
雜訊抑制
本功能可幫助去除影像的雜
訊。
本功能支援來自 ATV ( 類
比電視 )、DTV ( 數位電視
)、AV1、AV 2、AV3 (AV3 S) 與 AV 4
畫面,並且僅支援最高到
576i 的解析度。
(AV4 -S) 輸入的
按 或 (+ 或 -)
選擇。
• 低
• 中
• 高
• 關閉
• 16:9
• 4:3
• Letter Box
• 寬螢幕調整
畫面比例
調整影像顯示的畫面比例。
請參閱第 16 頁的 「調整畫
面比例」。
• 精緻縮放
螢幕顯示選單 31

Tuner-RC-TC.book Page 32 Friday, October 3, 2008 4:25 PM
繁體中文
子母畫面選單 (SH/
VH 系列 )
子母畫面
子母畫面
選單中顯示的選項會因為輸入訊
號的種類不同而異。
右圖所示的選單選項與設定僅供
參考。
母畫面
子畫面
PIP 音頻
選項 功能 操作 範圍
若您已經同時連接了類比視訊
與電腦訊號來源,您可以選擇
以全螢幕或子母畫面模式顯示
子母畫面
這兩種類型的視訊影像。
關於如何使用子母畫面功能,
請參閱第 15 頁的 「使用子母
畫面顯示功能 (SH/VH 系列
)」的說明。
選擇子母畫面功能的母畫面 (
圖形視訊 ) 訊號源。
DVI 輸入僅有在您已將 PC 模
式的 DVI 視訊連接到顯示器,
母畫面
且已將設定選單中的 DVI 訊
源種類選項 ( 請參閱第 35 頁
的「HDMI/DVI 訊源種類 (SH
系列 )」或 「DVI 訊源種類
(VH 系列 )」 ) 為「PC 訊號」
時才能顯示。
按 或 (+ 或
-) 鈕選擇。
選擇子母畫面功能的子畫面 (
類比視訊 ) 訊號源。
子畫面
本選項僅能使用於上述 「子
母畫面」選項設為 「子母畫
面」時。
子畫面無法顯示來自色差視訊
(AV1 或 AV 2) 輸入的畫面。
在子母畫面顯示模式下,選擇
您想聽見的畫面輸出聲音來源。
PIP 音頻
本選項僅能使用於上述 「子
母畫面」選項設為 「子母畫
面」時。
關閉
PC 訊號
AV3
母畫面音頻
• 關閉
• 子母畫面
類比視
訊畫面
圖形視訊畫面
• PC 訊號
• DVI 訊號
• 類比電視訊號
• 數位電視訊號
• AV 3 / AV3 -S
• AV 4/ AV4 -S ( VH
系列 )
• 母畫面音頻
• 子畫面音頻
全螢幕顯示
螢幕顯示選單32

Tuner-RC-TC.book Page 33 Friday, October 3, 2008 4:25 PM
繁體中文
電視選單 (SH/VH 系
列 )
選單中顯示的選項會因為輸入訊號
的種類不同而異。
右圖所示的選單選項與設定僅供參
考。
選項 功能 操作 範圍
依照您所連接的類比
電視 / 有線電視
頻道增減
喜愛頻道 設定或變更喜愛頻道。
自動掃台
電視收訊種類,選擇
電視或有線電視系統
模式。
增加微弱或額外的頻
道,或從頻道記憶體
中跳過不需要的頻道。
讓調諧器掃瞄並記憶
您當地所有可用的電
視頻道。
電視 / 有線電視
頻道增減
喜愛頻道 >
自動掃台
按 或 (+ 或 -) 鈕
選擇。
請參閱下面 「設定喜愛頻道」的說
明。
按遙控器上的 OK 鈕開始掃瞄頻道。
請參閱下面 「掃瞄並記憶電視頻道」
的說明。
掃瞄並記憶電視頻道
1. 請確定您已經將有線或無線電視天線纜線連接至電視盒上的天線輸
入端子。
2. 按遙控器上的 「目錄」鈕開啟螢幕顯示選單。
3. 按 或 (+ 或 -) 鈕選擇 「電視」,然後按 OK 鈕。
4. 按 或 鈕選擇 「自動掃台」,然後按 OK 鈕讓顯示器開始掃瞄
並記憶電視頻道。進行掃瞄時,顯示器會依序顯示掃瞄到的頻道。
依據您當地所提供電視頻道數量不同,此過程可能需要花上數分鐘
的時間。若您想要中斷掃描程序,請按 OK 鈕。
5. 在完成後,掃瞄會停止,且螢幕上會顯示電視頻道畫面。
電視
電視
新增頻道
• 電視
• 有線電視
• 跳過頻道
• 新增頻道
設定喜愛頻道
1. 按遙控器上的 「目錄」鈕開啟螢幕顯示選單。
2. 按 或 (+ 或 -) 鈕選擇 「電視」,然後按 OK 鈕。
3. 按 或 鈕選擇 「喜愛頻道」,然後按 OK 鈕進入子選單。
4. 按 或 鈕選擇一個您要設定的喜愛頻道 ( 頻道 1、頻道 2.... 頻道
5),然後按遙控器上的頻道輸入按鈕輸入您所希望設定的頻道號碼。
5. 按 「回前頁」或 「回上頁」鈕。
6. 按 「目錄」鈕關閉螢幕顯示選單。
螢幕顯示選單 33

Tuner-RC-TC.book Page 34 Friday, October 3, 2008 4:25 PM
繁體中文
TV 選單 (VB/SD/VD
系列 )
選單中顯示的選項會因為輸入訊號
的種類不同而異。
右圖所示的選單選項與設定僅供參
考。
選項 功能 操作 範圍
依照您所連接的類比
電視 / 有線電視
頻道增減
喜愛頻道 設定或變更喜愛頻道。
自動掃台
電視收訊種類,選擇
電視或有線電視系統
模式。
增加微弱或額外的頻
道,或從頻道記憶體
中跳過不需要的頻道。
讓調諧器掃瞄並記憶
您當地所有可用的電
視頻道。
電視 / 有線電視
頻道增減
喜愛頻道 >
自動掃台
按 或 (+ 或 -) 鈕
選擇。
請參閱下面 「設定喜愛頻道」的說
明。
按遙控器上的 OK 鈕開始掃瞄頻道。
請參閱下面 「掃瞄並記憶電視頻道」
的說明。
掃瞄並記憶電視頻道
1. 請確定您已經將有線或無線電視天線纜線連接至電視盒上的天線輸
入端子。
2. 按遙控器上的 「目錄」鈕開啟螢幕顯示選單。
3. 按 或 (+ 或 -) 鈕選擇 「TV」,然後按 OK 鈕。
4. 按 或 鈕選擇 「自動掃台」,然後按 OK 鈕讓顯示器開始掃瞄
並記憶電視頻道。進行掃瞄時,顯示器會依序顯示掃瞄到的頻道。
依據您當地所提供電視頻道數量不同,此過程可能需要花上數分鐘
的時間。若您想要中斷掃描程序,請按 OK 鈕。
5. 在完成後,掃瞄會停止,且螢幕上會顯示電視頻道畫面。
TV
電視
新增頻道
• 電視
• 有線電視
• 跳過頻道
• 新增頻道
設定喜愛頻道
1. 按遙控器上的 「目錄」鈕開啟螢幕顯示選單。
2. 按 或 (+ 或 -) 鈕選擇 「TV」,然後按 OK 鈕。
3. 按 或 鈕選擇 「喜愛頻道」,然後按 OK 鈕進入子選單。
4. 按 或 鈕選擇一個您要設定的喜愛頻道 ( 頻道 1、頻道 2.... 頻道
5),然後按遙控器上的頻道輸入按鈕輸入您所希望設定的頻道號碼。
5. 若要設定多個喜愛頻道,請重複步驟 4。
6. 按 「回前頁」或 「回上頁」鈕。
7. 按 「目錄」鈕關閉螢幕顯示選單。
螢幕顯示選單34

Tuner-RC-TC.book Page 35 Friday, October 3, 2008 4:25 PM
繁體中文
設定選單 (SH/VH 系
列 )
選單中顯示的選項會因為輸入訊
號的種類不同而異。
右圖所示的選單選項與設定僅供
參考。
語言
背光亮度
定時關機
自動關機省電模式
HDMI/DVI 訊源種類
藍屏模式
重設為出廠預設值
設定
繁體中文
適中
0
關閉
PC 訊號
關閉
選項 功能 操作 範圍
語言 選擇螢幕顯示選單的語言。
調整液晶面板的背光亮度。
背光亮度
若設定為 「自動」,則光線感應器將會
啟動。顯示器會依據周圍環境亮度自動
調整背光的最佳亮度。
• English
• 繁體中文
• 亮
• 適中
• 暗
• 自動
設定顯示器的預設自動關機時間。在設
定後,此處會顯示到關機前所剩餘的時
0, 30, 60, 90,
120, 150, 180
分鐘
• 關閉
• 開
定時關機
自動關機省電
模式
間。在到達關機時間前一分鐘,螢幕上
會出現提示。此時您可按遙控器上的任
何鍵取消定時關機功能。
一旦到達設定的時間,顯示器會自動進
入待機模式。
若設定為 「開」:
• 在顯示器偵測不到 PC 輸入訊號超過 5
秒鐘時,會自動進入省電模式。
• 在顯示器偵測不到其它視訊輸入訊號超
按 或
(+或-)
鈕選擇。
過 10 分鐘時,會自動進入待機模式。
HDMI/DVI 訊
源種類 (SH 系
列 )
DVI 訊源種類
(VH 系列 )
藍屏模式
(SH
系列 )
重設為出廠預
設值
選擇從 HDMI/DVI 輸入端子輸入的訊號
模式類型。例如,若您連接的是電腦,
請選擇 「PC 訊號」,若您連接的是視訊
設備 ( 如 DVD 播放機等 ),請選擇
「Video 訊號」。
若設定為 「開」,則顯示器會在未偵測
到輸入訊號或訊號微弱時顯示全藍畫面。
重設所有設定並還原回出廠的預設值。
• PC 訊號
• Video 訊號
• 關閉
• 開
按 OK 鈕以執行本功
能。
螢幕顯示選單 35

Tuner-RC-TC.book Page 36 Friday, October 3, 2008 4:25 PM
繁體中文
設定選單 (VB/SD/VD
系列 )
選單中顯示的選項會因為輸入訊
號的種類不同而異。
右圖所示的選單選項與設定僅供
參考。
語言
睡眠計時器
省電模式
HDMI/DVI 輸入
藍屏模式
重回預設值
設定
繁中
關
關
PC 訊號
關
選項 功能 操作 範圍
語言 選擇螢幕顯示選單的語言。
• English
• 繁中
設定顯示器的預設自動關機時間。在設
定後,此處會顯示到關機前所剩餘的時
關 , 15, 30,
45, 60, 90,
120 分鐘
睡眠計時器
間。在到達關機時間前一分鐘,螢幕上
會出現提示。此時您可按遙控器上的任
何鍵取消定時關機功能。
一旦到達設定的時間,顯示器會自動進
入待機模式。
省電模式
若設定為 「開」:
• 在顯示器偵測不到 PC 輸入訊號超過 5
秒鐘時,會自動進入省電模式。
• 在顯示器偵測不到其它視訊輸入訊號超
按 或
(+ 或-)
鈕選擇。
• 關
• 開
過 10 分鐘時,會自動進入待機模式。
選擇從 HDMI/DVI 輸入端子輸入的訊號
HDMI/DVI 輸
入
模式類型。例如,若您連接的是電腦,
請選擇 「PC 訊號」,若您連接的是視訊
設備 ( 如 DVD 播放機等 ),請選擇
• PC 訊號
• Video 訊號
「Video 訊號」。
藍屏模式
若設定為 「開」,則顯示器會在未偵測
到輸入訊號或訊號微弱時顯示全藍畫面。
重回預設值 重設所有設定並還原回出廠的預設值。
按 OK 鈕以執行本功
能。
• 關
• 開
螢幕顯示選單36

Tuner-RC-EN.book Page 1 Friday, October 3, 2008 4:07 PM
Analog TV Tuner Box and Remote Control for
English
Color LCD Display
Installation and Operation Guide

Tuner-RC-EN.book Page 2 Friday, October 3, 2008 4:07 PM
Disclaimer
This company makes no representations or warranties, either expressed or
implied, with respect to the contents of this document. This company reserves
the right to revise this publication and to make changes from time to time in
the contents thereof without obligation to notify any person of such revision
or changes.
English
Copyright
All rights reserved. No part of this publication may be reproduced,
transmitted, transcribed, stored in a retrieval system or translated into any
language or computer language, in any form or by any means, electronic,
mechanical, magnetic, optical, chemical, manual or otherwise, without the
prior written permission of this company.
This guide is written for the SH, SD, VH, VB and VD series color LCD
displays. The descriptions of functions are common to all these series
displays unless indicated by (SH series), (SD series), (VH series), (VB
series) or (VD series) in this guide, which means that the functions or
terms are only available on the specific series displays.

Tuner-RC-EN.book Page i Friday, October 3, 2008 4:07 PM
Table of Contents
Package contents ..................................................... 1
Installing the TV tuner box ..................................... 1
Important safety precautions ........................................... 1
Installing the TV tuner box .............................................. 1
Activate the remote control .................................... 4
Installing batteries ............................................................ 4
Battery safety notice .......................................................... 4
Remote control functions (RC-H081) ................... 5
Remote control functions (RC-H072) ................... 8
Using the remote control ........................................ 11
Power on, off and standby ............................................... 11
Turning the display on .........................................................11
Putting the display to standby .............................................11
Turning the display off (SH series) .....................................11
Viewing traditional (analog), digital TV or MOD programs 11
Switching inputs ............................................................... 12
Adjusting sound settings .................................................. 12
Adjusting the volume ...........................................................12
Mute setting ..........................................................................12
MTS (TV Sound selection) ..................................................12
Turning on/off the Surround sound effect .........................12
Selecting a preset EQ mode ..................................................13
Changing channels ........................................................... 13
Selecting a channel directly ..................................................13
Changing channels sequentially ..........................................13
Returning to the previous viewed channel ..........................13
Selecting favorite channels ...................................................13
Selecting a picture mode .................................................. 13
Using the PIP (Picture-In-Picture) function (SH/VH series) 14
Adjusting aspect ratio ....................................................... 15
Using the sleep timer ........................................................ 16
Adjusting backlight ........................................................... 16
Using the freeze function ................................................. 16
Displaying information .................................................... 16
English
Table of Contents i

Tuner-RC-EN.book Page ii Friday, October 3, 2008 4:07 PM
On-Screen Display (OSD) menu ............................ 17
OSD structure ....................................................................17
Navigating the OSD menu ................................................19
Operations in the OSD menu ..............................................19
Audio menu ....................................................................... 20
English
Setting up Personal EQ Mode .............................................21
Picture menu (SH/VH series) ..........................................22
Picture menu (VB/SD/VD series) ....................................23
Adjusting the contrast ..........................................................24
Adjusting the brightness ......................................................25
Setting up Personal Picture mode ....................................... 25
Senseye menu (SH series) ................................................. 26
Senseye menu (VB/SD/VD series) ...................................27
Feature menu (VH series) ................................................28
Window menu (SH/VH series) ........................................ 29
TV menu ............................................................................ 30
Searching and storing TV channels ..................................... 30
Setting up favorite channels ................................................ 30
Setup menu (SH/VH series) ............................................. 31
Setup menu (VB/SD/VD series) ....................................... 32
Table of Contentsii

Tuner-RC-EN.book Page 1 Friday, October 3, 2008 4:07 PM
Package contents
Check the package to see if all the following items are included. If any item is
missing or damaged, contact your place of purchase immediately and notify
them of the discrepancy.
TV tuner box × 1 Installation and operation guide × 1
Installing the TV tuner box
Important safety precautions
Before installing the TV tuner box, pay attention to the following to ensure
the safety of installation:
• Be sure to turn the display power off and disconnect the power cord from the
power outlet. Turn the power of the devices off and remove all connected
signal cables if the display is connected to other devices.
• Wear suitable insulation gloves to prevent any possibilities of injuries.
• Make sure that there is sufficient space around the display for performing the
installation. If not, it is recommended that you move the display to a suitable
place to perform installation, and then move it back to its original location
when installation is completed.
Installing the TV tuner box
Screw × 1
English
1. Locate the TV tuner box slot on the back of
the display (as shown in the illustration).
TV tuner box
slot
Package contents 1

Tuner-RC-EN.book Page 2 Friday, October 3, 2008 4:07 PM
2. Remove the screw that secures the metal box
in the TV tuner box slot using a suitable
screwdriver.
English
3. Use the screwdriver to remove the metal box
from the slot and keep it in a safe place (for
example, places inaccessible to small
children).
4. Remove the protective film on the TV tuner
box and then insert it into the slot. Pay
attention to the direction of the TV tuner
box when inserting.
5. Push the TV tuner box all the way into the
slot.
Installing the TV tuner box2

Tuner-RC-EN.book Page 3 Friday, October 3, 2008 4:07 PM
6. Use the supplied screw and a suitable
screwdriver to secure the TV tuner box on
the display.
7. Connect the cable TV or aerial antenna cable
to the TV cable connector on the TV tuner
box. Follow the instructions of "Searching
and storing TV channels" on page 30 to scan
and store the TV channels available in your
area.
English
For better TV signal reception, when connecting aerial or cable TV, please pay
attention to the following:
• Avoid placing devices that emit strong radio frequency near the display, such
as wireless access points or radio transmitters. The TV signal can easily be
interfered by the radio frequency energy from these devices.
• Check the cable for any damages or signs of aging, and repair or replace the
cable if necessary. Shorten the cable if it is longer than needed. If a signal
splitter is used, make sure that there are no loose connections.
Installing the TV tuner box 3

Tuner-RC-EN.book Page 4 Friday, October 3, 2008 4:07 PM
Activate the remote control
Installing batteries
English
1. Turn the remote control to reveal its back side,
and open the lid of the battery compartment.
2. Insert the supplied batteries ensuring that the
positive and negative marked battery
terminals match the (+) and (-) marks in the
battery compartment.
Note that these batteries are provided for your
convenience so that you can operate the
display straight away. You should replace them
as soon as possible.
3. Refit the lid of the battery compartment as
shown.
Battery safety notice
The use of the wrong type of batteries may cause chemical leaks and/or
explosion. Please note the following:
• Always ensure that the batteries are inserted with the positive and negative
terminals in the correct direction as shown in the battery compartment.
• Different types of batteries have different characteristics. Do not mix
different types.
• When batteries fail to function, replace them immediately.
• If the remote control will not be used for a prolonged period of time, remove
the batteries and store them in a safe place.
• Do not mix old and new batteries. Mixing old and new batteries will shorten
battery life and/or cause chemical leaks from the old batteries.
• Chemicals which leak from batteries may cause skin irritation. If any
chemical matter seeps out of the batteries, wipe it up immediately using a dry
cloth.
Activate the remote control4

Tuner-RC-EN.book Page 5 Friday, October 3, 2008 4:07 PM
Remote control functions (RC-H081)
The DTV and MOD functions are only available when the optional DTV tuner and MOD
set are installed. More information about the operations in the DTV and MOD modes
can be found in the installation and operation guides of the DTV tuner and MOD set.
1. Power/standby
Press this button to power the display on or put it
to standby mode. See "Power on, off and standby"
on page 11.
2. 訊號來源 (Input)
Press this button to select a different input source.
See "Switching inputs" on page 12.
3. 電視 / 數位電視 (MOD) (TV/DTV/MOD)
Press this button to switch directly to the analog
TV mode to view aerial or cable TV channels, or to
the digital TV (DTV) or the MOD mode and view
digital TV or MOD channels. See "Viewing
traditional (analog), digital TV or MOD programs"
on page 11.
4. 定時關機 (Sleep Timer)
Press this button to set the automatic shut-off
timer. See "Using the sleep timer" on page 16.
5. 畫面靜止 (Freeze)
Press this button to freeze the image on the screen.
Press the button again to resume viewing in real
time. See "Using the freeze function" on page 16.
6. 畫面比例 (Aspect)
Press this button to adjust the screen image aspect
ratio. See "Adjusting aspect ratio" on page 15.
7. 背光亮度 (Backlight)
Press this button to select your desired screen
backlight level. See "Adjusting backlight" on page 16.
8. Senseye
Press this button to display the Senseye menu. See
"Senseye menu (SH series)" on page 26 and
"Senseye menu (VB/SD/VD series)" on page 27.
9. 影像模式 (Picture Mode)
Press this button to select a desired preset picture
mode. See "Selecting a picture mode" on page 13.
10. 子母畫面 (Picture In Picture)(SH/VH series)
Press this button to simultaneously view signals
from two different sources on-screen. See "Using
the PIP (Picture-In-Picture) function (SH/VH
series)" on page 14.
English
Remote control functions (RC-H081) 5

Tuner-RC-EN.book Page 6 Friday, October 3, 2008 4:07 PM
11. 雙語 (MTS)
Press this button to toggle between available
sound reception modes. See "MTS (TV Sound
selection)" on page 12.
12. 音場效果 (EQ Mode)
Press this button to select a preset EQ mode. See
"Selecting a preset EQ mode" on page 13.
English
13. Channel selection
• Press these buttons to select the channel you wish to
view. See "Selecting a channel directly" on page 13.
• In the MOD mode, press these buttons to enter
text or confirm your entry.
14. 返回 (Recall)
Press this button to toggle between the current
and the previous channel you were viewing. See
"Returning to the previous viewed channel" on
page 13.
15. 目錄 (Menu)
Press this button to display the OSD menu for
commands and settings. Press it again to close. See
"Navigating the OSD menu" on page 19.
16. 資訊 (Information)
Press this button to display the input source
information. See "Displaying information" on
page 16.
17. 回前頁 (Back)
When operating in the OSD menu, press this
button to return to the previous menu level. See
"Navigating the OSD menu" on page 19.
18. /// and OK buttons
• In the digital TV mode, press the OK button to
display or hide the channel list.
• Press or to change channels sequentially.
• Pressorto adjust volume.
When the OSD menu displays on-screen:
• Press or to select settings.
• Pressorto adjust settings.
• Press the
enter a submenu you have selected.
See "Navigating the OSD menu" on page 19.
19. MOD 首頁 (MOD Homepage)
Press this button to go to the MOD Homepage
directly from normal viewing.
OK button to execute selections, or to
Remote control functions (RC-H081)6

Tuner-RC-EN.book Page 7 Friday, October 3, 2008 4:07 PM
20. MOD 電視頻道 (MOD TV Channel)
Press this button to display the MOD TV channel
service.
21. 節目表 (EPG)
In DTV mode, press this button to display the
Electronic Program Guide.
22. Color buttons
In DTV and MOD modes, press these buttons to
execute the functions as indicated by the same
color in the menu displayed.
23. 喜愛頻道 (Favorite channel)
Press this button to jump to one of the favorite
channels you have stored. See "Selecting favorite
channels" on page 13.
24. 音量 (Volume)
Press these buttons to raise or lower the volume
level of the display’s built-in speakers. See
"Adjusting the volume" on page 12.
25. 頻道 (Channel)
• Press these buttons to sequentially change
channels. See "Changing channels sequentially"
on page 13.
• In DTV EPG, press these buttons to go to the
previous or next page.
26. 環繞音效 (Surround)
Press this button to turn on or off the Surround
sound effect. See "Turning on/off the Surround
sound effect" on page 12.
27. 靜音 (Mute)
Press this button to mute the sound output. Press
it again to restore the sound output. See "Mute
setting" on page 12.
28. MOD playback control buttons
Press these buttons to manage the bookmarks or
control the playback functions in the MOD mode,
including play, reverse, pause and fast forward...,
etc.
English
Remote control functions (RC-H081) 7

Tuner-RC-EN.book Page 8 Friday, October 3, 2008 4:07 PM
Remote control functions (RC-H072)
The DTV function is only available when the optional DTV tuner is installed. More
information about the operations in the DTV mode can be found in the installation and
operation guide of the DTV tuner.
1. Power/standby
Press this button to power the display on or put it
English
to standby mode. See "Power on, off and standby"
on page 11.
2. 訊號來源 (Input)
Press this button to select a different input source.
See "Switching inputs" on page 12.
3. 電視 / 數位電視 (TV/DTV)
Press this button to switch directly to the analog
TV mode to view aerial or cable TV channels, or to
the digital TV (DTV) mode and view digital TV
channels. See "Viewing traditional (analog), digital
TV or MOD programs" on page 11.
4. 定時關機 (Sleep Timer)
Press this button to set the automatic shut-off
timer. See "Using the sleep timer" on page 16.
5. 畫面靜止 (Freeze)
Press this button to freeze the image on the screen.
Press the button again to resume viewing in real
time. See "Using the freeze function" on page 16.
6. 畫面比例 (Aspect)
Press this button to adjust the screen image aspect
ratio. See "Adjusting aspect ratio" on page 15.
7. 背光亮度 (Backlight)
Press this button to select your desired screen
backlight level. See "Adjusting backlight" on page 16.
8. Senseye
Press this button to display the Senseye menu. See
"Senseye menu (SH series)" on page 26 and
"Senseye menu (VB/SD/VD series)" on page 27.
9. 影像模式 (Picture Mode)
Press this button to select a desired preset picture
mode. See "Selecting a picture mode" on page 13.
10. 子母畫面 (Picture In Picture)(SH/VH series)
Press this button to simultaneously view signals
from two different sources on-screen. See "Using
the PIP (Picture-In-Picture) function (SH/VH
series)" on page 14.
Remote control functions (RC-H072)8

Tuner-RC-EN.book Page 9 Friday, October 3, 2008 4:07 PM
11. 雙語 (MTS)
Press this button to toggle between available
sound reception modes. See "MTS (TV Sound
selection)" on page 12.
12. 音場效果 (EQ Mode)
Press this button to select a preset EQ mode. See
"Selecting a preset EQ mode" on page 13.
13. Channel selection
Press these buttons to directly select the channel
you wish to view. See "Selecting a channel directly"
on page 13.
14. 返回 (Recall)
Press this button to toggle between the current
and the previous channel you were viewing. See
"Returning to the previous viewed channel" on
page 13.
15. 節目導覽 (EPG)
In DTV mode, press this button to display the
Electronic Program Guide.
16. 喜愛頻道 (Favorite channel)
Press this button to jump to one of the favorite
channels you have stored. See "Selecting favorite
channels" on page 13.
17. 資訊顯示 (Information)
Press this button to display the input source
information. See "Displaying information" on
page 16.
18. //+/- and OK buttons
• In the digital TV mode, press the OK button to
display or hide the channel list.
• Press or to change channels sequentially.
• Press + or - to adjust volume.
When the OSD menu displays on-screen:
• Press or to select settings.
• Press + or - to adjust settings.
• Press the
enter a submenu you have selected.
See "Navigating the OSD menu" on page 19.
19. 目錄 (Menu)
Press this button to display the OSD menu for
commands and settings. Press it again to close. See
"Navigating the OSD menu" on page 19.
English
OK button to execute selections, or to
Remote control functions (RC-H072) 9

Tuner-RC-EN.book Page 10 Friday, October 3, 2008 4:07 PM
20. 回上頁 (Back)
When operating in the OSD menu, press this
button to return to the previous menu level. See
"Navigating the OSD menu" on page 19.
21. Color buttons
In the DTV mode, press these buttons to execute
the functions as indicated by the same color in the
English
menu displayed.
22. 環繞音效 (Surround)
Press this button to turn on or off the Surround
sound effect. See "Turning on/off the Surround
sound effect" on page 12.
23. 音量 (Volume)
Press these buttons to raise or lower the volume
level of the display’s built-in speakers. See
"Adjusting the volume" on page 12.
24. 頻道 (Channel)
• Press these buttons to sequentially change
channels. See "Changing channels sequentially"
on page 13.
• In DTV EPG, press these buttons to go to the
previous or next page.
25. 靜音 (Mute)
Press this button to mute the sound output. Press
it again to restore the sound output. See "Mute
setting" on page 12.
Remote control functions (RC-H072)10

Tuner-RC-EN.book Page 11 Friday, October 3, 2008 4:07 PM
Using the remote control
• Point and aim the top front of the
remote control directly at the remote
control sensor window on the display
when pressing the buttons.
• The remote control must be held at an
angle within 30 degrees of the display's
remote control sensor window to
function correctly. The distance
between the remote control and the
sensors should not exceed 6 meters.
• Do not cover the remote control sensor window on the display, or place
objects in front of it which will block the direct line-of-sight between the
remote control and the sensor window.
• Do not let the remote control become wet, or place it in humid environments
(like bathrooms.)
• If the remote control sensor window on the display is in direct sunlight or
strong light, the remote control may not operate properly. In this situation,
change the light source or readjust the angle of your display, or operate the
remote control from a location closer to the remote control sensor window.
Power on, off and standby
Turning the display on
After plugging the display's power cable into a wall outlet and turning on the
main power switch, the display will enter standby mode automatically, and the
power indicator will light up red. Press
control. The display will turn on and the power indicator will change to green.
Putting the display to standby
When the display power is ON (the power indicator lights up green), press
Power/standby
mode. The power indicator will turn red.
The display still consumes about 1W (VH series)/1.5W (SH/VB/SD/VD series) of
power during standby. For the SH/VB/SD/VD series displays, to completely cut off
the power supply, disconnect the power cord from the power outlet, or use a
switched power board and switch it off.
Turning the display off (SH series)
You can turn the display power off by flipping the main power switch on the
display to the off (
on the remote control, and the display will return to standby
O) position. The power indicator will be off.
6 meters
30 degrees
Power/standby on the remote
English
Viewing traditional (analog), digital TV or MOD
programs
You can press 電視 / 數位電視 (MOD) (TV/DTV/MOD) or 電視 / 數位電視 (TV/
on the remote control to directly switch to the traditional (analog) TV
DTV)
mode, and view aerial or cable TV programs, or press it once more to switch
to the digital TV or MOD mode and view digital TV or MOD programs.
• The digital TV function requires a separate DTV tuner with available digital TV
signal connected.
• The MOD function requires an optional MOD set.
Using the remote control 11

Tuner-RC-EN.book Page 12 Friday, October 3, 2008 4:07 PM
Switching inputs
1. Turn on the display. Turn on the connected device and play the video.
2. Press
VB series
English
VH series
SD/VD
series
SH series
• These options will only appear when corresponding signals are connected to
• If both Composite Video (AV) and S-Video signals are connected to the AV input
• Be aware that the HDMI input signal must be HDCP-compliant to be displayed
• When displaying PC video, remember to switch the PC video output setting
訊號來源 (Input) on the remote control to display the current selected
input. Press the button repeatedly until your desired input is displayed.
The sequence is as follows:
ATV AV1 AV2 (or AV2-S) HDMI (or DVI) DTV
PC ATV...
AV2 AV3 (or AV3 - S) AV4 (or AV4- S) HDMI
AV1
(or
DVI) PC AV1...
ATV
AV1 AV2 (or AV2-S ) HDMI1 (or DVI 1)
HDMI2 (or DVI 2) DTV PC ATV...
AV2 AV3 (or AV3-S ) HDMI1(or DVI) HDMI2
AV1
(or
DVI) PC AV1...
the display. DTV will only appear when the optional DTV tuner is installed.
at the same time, only S-Video input will be displayed. If you wish to view the
Composite Video (AV) input in such case, remove the S-Video connection
temporarily.
properly. When switching to the HDMI inputs, the display needs approximately 3
seconds to detect the HDCP information from the signal source and no image
will be displayed during this period. This is not a malfunction.
from monitor display to external device. For more information, refer to the
documentations of your PC.
Adjusting sound settings
Adjusting the volume
• Press 音量 (Volume) + (or /+ )on the remote control to increase volume.
The volume indicator will increase in length as volume rises.
• Press
音量 (Volume) - (or /- )on the remote control to decrease volume.
The volume indicator will decrease in length as volume falls.
Mute setting
Press 靜音 (Mute) on the remote control to turn off the sound temporarily.
Press
靜音 (Mute) once more, or press 音量 (Volume) + to restore the sound
level.
MTS (TV Sound selection)
Press 雙語 (MTS) on the remote control to toggle TV sound among available
modes. (The modes available for selection will depend on the audio signal
being received).
Turning on/off the Surround sound effect
You can press 環繞音效 (Surround) on the remote control to turn on or off
the display’s SRS TruSurround XT sound effect. The SRS TruSurround XT
sound technology makes it possible for the display to deliver true-to-life
sounds by simulating multi-channel audio output. It also helps to enhance
the clarity of verbal conversations.
Using the remote control12

Tuner-RC-EN.book Page 13 Friday, October 3, 2008 4:07 PM
Selecting a preset EQ mode
Press 音場效果 (EQ Mode) on the remote control to select a suitable audio EQ
(Equalizer) mode according to your preference.
Changing channels
Selecting a channel directly
• To select a single- or double-digit channel, press the corresponding channel
selection buttons on the remote control. For example, to select channel 8,
press
0 and 8 on the remote control.
• To select a triple-digit channel, press 100+ on the remote control followed by
the rest of the digits. within 3 seconds For example, to select channel 120,
press
100+, and then press 2 and 0 on the remote control.
Changing channels sequentially
Press 頻道 (Channel) /頻道 (Channel) or / on the remote control to
sequentially cycle through your TV channels.
Returning to the previous viewed channel
You can press 返回 (Recall) on the remote control to quickly return to the
previous viewed channel.
Selecting favorite channels
Press 喜愛頻道 (Favorite channel) on the remote control to jump to your
preset favorite channel 1. Press the button again to jump to the next favorite
channel, and so on. You may select from up to 5 channels to set as your
favorites.
For more information about how to set up favorite channels, please refer to
"Setting up favorite channels" on page 30.
English
Selecting a picture mode
To select a picture mode, press 影像模式 (Picture Mode) on the remote
control. This enables you to select from the following settings:
Picture mode Description
Dynamic
Standard
Cinema
Game (SH/VB
series)
Personal
See "Setting up Personal Picture mode" on page 25 for how to setup the
Personal Picture Mode.
The contrast, brightness and color saturation are
enhanced for displaying vivid images in public areas.
Suitable for viewing in environments with normal
lighting condition.
In this mode, the contrast and levels of colors are
optimized in order to display more details in the bright
and dark areas of images.
Images are displayed with moderate brightness and
contrast, making it suitable for prolonged viewing.
Your own customized picture mode.
Using the remote control 13

Tuner-RC-EN.book Page 14 Friday, October 3, 2008 4:07 PM
Using the PIP (Picture-In-Picture) function (SH/VH
series)
If the display is connected to either a TV antenna or Video image source, and
also to an active PC or DVI image source at the same time, you can display
both images on the screen simultaneously by using PIP (Picture-In-Picture)
mode.
English
picture
input
• PC or DVI must be selected as one of the input sources in PIP mode.
• In PIP mode, some of the remote control functions will be unavailable.
1. Press 訊號來源 (Input) on the remote control to select PC or DVI as the
input source.
2. Press
子母畫面 (Picture In Picture) on the remote control to switch display
to PIP mode. Each press cycles the display through the following display
sequence:
Full screen PIP mode Full screen
• To change the input source for the sub picture, press
The sub picture cannot display Component Video (AV1 and AV2) input signals.
• To change the position of the sub picture on the screen, press , ,
or(+ or -) on the remote control.
• To select audio from the main or sub picture, see "PIP Audio" on page 29.
The table below shows the availability of the PIP function under different
Video and Graphic signal input combinations for the Main and Sub pictures.
ATV DT V
ATV
DTV
AV1 , AV2
AV3
(AV3-S)/
Sub
AV4
(AV4-S)
PC
DVI
HDMI
(VH series)
HDMI1,
HDMI2 (SH
series)
In the table above:
• ○ : The PIP function is available.
• – : The PIP function is unavailable and cannot be selected.
-- - - ○○ - -
-- - - ○○ - -
-- - - -- - -
-- - - ○○ - -
-- - - -- - -
-- - - -- - -
-- - - -- - -
-- - - -- - -
AV1 , AV2
Main picture input
AV3
(AV3-S)/AV4
(AV4-S)
PC DVI
訊號來源 (Input).
HDMI
(VH series)
HDMI1,
HDMI2 (SH
series)
Using the remote control14

Tuner-RC-EN.book Page 15 Friday, October 3, 2008 4:07 PM
Adjusting aspect ratio
The display can resize and reshape an image to suit your requirements. The
visual result will depend upon the setting your have chosen, and the original
aspect ratio of the input image. Press
control to cycle through the aspect ratios. The table below shows the resulting
images in relation to the input image when different aspects are selected:
Aspect ratio of input video
Aspect
ratio
畫面比例 (Aspect) on the remote
English
Description and usage
16:9
4:3
16:9 Adj.
(Adjust)
Letter
Box
Cinema
• Available aspect ratio options are dependent on the selected input signal type.
• When viewing PC, DVI and HDMI inputs, only “16:9“ and “4:3“ are available for
• To avoid possible "image retention“ or "screen burn-in“ on the LCD screen, it is
4:3
16:9
Stretches a 4:3 image to 16:9 aspect
proportions. Recommended for use
when viewing video sources which are
already in 16:9 aspect such as digital
TV and most widescreen DVDs.
Resizes the image to 4:3 aspect
(Not
recommended)
proportions. Recommended for use
when viewing video sources which are
already in 4:3 aspect such as analog TV
and PC video input.
Stretches a 4:3 image to 16:9 aspect
proportions and enlarges the resultant
(Not
recommended)
image on the screen. You can press
or on the remote control to pan the
enlarged image. Recommended for use
when viewing video sources which are
in 4:3 aspect such as analog TV input.
Resizes a 4:3 image to 16:9 aspect
proportions, and trims off the top and
bottom strips. Recommended for use
(Not
recommended)
when viewing 4:3 aspect video
presenting compressed 16:9 aspect
images in a 4:3 aspect frame in a so-
called letterbox format (black strips
along the top and bottom).
Stretches a 4:3 image to the width of a
(Not
recommended)
16:9 aspect image proportions.
recommended for use in filling the
screen with a 4:3 aspect image.
selection.
recommended that you change the aspect ratio from time to time, and prevent
the display from displaying a static image for a prolonged period of time.
Using the remote control 15

Tuner-RC-EN.book Page 16 Friday, October 3, 2008 4:07 PM
Using the sleep timer
The sleep timer is useful if you want the display to automatically go into
standby mode after a set period of time.
1. Press
定時關機 (Sleep Timer) on the remote control to activate the sleep
timer function.
2. Press the button again to set the time interval.
English
For example, if you set the sleep timer to 30 minutes, the display will enter
standby mode after 30 minutes of time. You can check the remaining time
before expiration in the
Sleep Timer item in the Setup menu (See "Sleep
Timer" on page 31). 1 minute before the expiration of the set time, a message
will display on-screen as a reminder. You can press any button on the remote
control to reset the sleep timer and the display will remain on. To turn off this
function, set the time to
0 minute (SH/VH series) or Off (VB/SD/VD series).
Adjusting backlight
To adjust the intensity of your display's backlight system, press 背光亮度
(Backlight)
VH series), or press
press or(
If
Auto (SH/VH series) is selected, the ambient light sensor on the display will
be activated and the display’s backlight will be changed automatically
according to the ambient lighting condition.
on the remote control several times to select a suitable level (SH/
背光亮度 (Backlight) on the remote control, and then
+ or -) to make adjustment (VB/SD/VD series).
Using the freeze function
Press 畫面靜止 (Freeze) on the remote control to freeze the image on the
screen. Press it again to restore normal viewing.
• This function does not control the input source which will continue normally,
but not be displayed whilst the image remains frozen. When the image freeze is
stopped, normal play will resume in real time. That is, the displayed image will
jump to the current time and any interim video is not displayed.
• In PIP mode, this function can only freeze the motion of the sub picture.
Do not leave the screen displaying a static image for an extended period of time
(days) as doing so may temporarily or permanently damage the screen resulting
in image traces which could remain visible long after the original image has been
removed.
Displaying information
Press 資訊 (Information) or 資訊顯示 (Information) on the remote control to
display the input signal information. The information displayed varies
according to the input source being selected.
Using the remote control16

Tuner-RC-EN.book Page 17 Friday, October 3, 2008 4:07 PM
On-Screen Display (OSD) menu
OSD structure
Input signal type
Audio
Picture
(SH/VH
series)
Picture
(VB/SD/
VD
series)
Senseye
(SH
series)
Feature
(VH
series)
Senseye
(VB/SD/
VD
series)
Window
(SH/VH
series)
ATV DT V
• Volume
• Balance
• Sound Type
• Steady Sound
• Surround
• Speaker Out
• Advanced Audio Settings
• Picture Mode
• Contrast
• Brightness
• Color
• Sharpness
• Color TEMP.
• NTSC Tint
• NTSC Setup
• Picture Mode
• Contrast
• Brightness
• Color
• Sharpness
• Color TEMP.
• Backlight
• NTSC Tint
• NTSC Setup
• Color Style
• Gamma Style
• ACE
• Noise Reduction
• Black Extension
• ACE
• Noise Reduction
• Aspect Ratio
• Black Extension
• ACE
• Noise Reduction
(Not available)
AV1 (VB/
SD/VD
series)
AV1 , AV2
(SH/VH
series)
• Picture
Mode
• Contrast
• Brightness
• Color
• Sharpness
• Color
TEMP.
• Picture
Mode
• Contrast
• Brightness
• Color
• Sharpness
• Color
TEMP.
• Backlight
AV2 /AV2- S
(VB/SD/VD
series)
AV3 /AV3- S
AV4 /AV4- S
(SH/VH
series)
• Picture
Mode
• Contrast
• Brightness
• Color
• Sharpness
• Color
TEMP.
• NTSC Tint
• NTSC Setup
• Picture
Mode
• Contrast
• Brightness
• Color
• Sharpness
• Color
TEMP.
• Backlight
• NTSC Tint
• NTSC Setup
PC
• Contrast
• Brightness
• Color
TEMP.
• Auto
• Frequency
• Phase
• H. Position
• V. Position
• Contrast
• Brightness
• Color
TEMP.
• Backlight
• Auto Adjust
• Frequency
• Phase
• H. Position
• V. Position
• Color Style
• Gamma Style
• ACE
• Aspect Ratio
(Not
available)
• PIP
• Main Input
• Sub Input
• PIP Audio
DVI (SH/VH/
VB series)
DVI 1/DVI 2
(SD/VD series)
• Contrast
• Brightness
• Color TEMP.
• Picture Mode
• Contrast
• Brightness
• Color
• Sharpness
• Color TEMP.
• Backlight
• Black Extension
• ACE
• Noise Reduction
(Not available)
HDMI (VB/
VH series)
HDMI1/
HDMI2 (SH/
SD/VD
series)
• Picture
Mode
• Contrast
• Brightness
• Color
• Sharpness
• Color
TEMP.
English
On-Screen Display (OSD) menu 17

Tuner-RC-EN.book Page 18 Friday, October 3, 2008 4:07 PM
English
TV
Setup
(SH/VH
series)
Setup
(VB/SD/
VD
series)
AV1 ( VB/
SD/VD
ATV DT V
• TV/Radio
• TV Guide
• TV/CATV
• Channel
+/-
• Favorite
Channels
• Auto
Program
• Language
• Backlight
• Sleep Timer
• ECO
• HDMI/DVI Input (SH series)/DVI Input (VH series)
• Blue Screen (SH series)
• Reset All Settings
• Language
• Sleep Timer
• ECO
• HDMI/DVI Input
• Blue Screen
• Reset All Settings
• Channel
List
• Channel
Editor
• Replace
Existing
Digital
Channels
• Add New
Digital
Channels
series)
AV1 , AV2
(SH/VH
series)
(Not available)
Input signal type
AV2/AV2-S
(VB/SD/VD
series)
AV3/AV3-S
AV4/AV4-S
(SH/VH
series)
PC
DVI (SH/VH/
VB series)
DVI 1/DVI 2
(SD/VD series)
HDMI (VB/
VH series)
HDMI1/
HDMI2 (SH/
SD/VD
series)
• The available menu items are dependent on the input source being selected.
Unavailable items will be greyed out or not displayed. For details see:
"Audio menu" on page 20
"Picture menu (SH/VH series)" on page 22
"Picture menu (VB/SD/VD series)" on page 23
"Senseye menu (SH series)" on page 26
"Senseye menu (VB/SD/VD series)" on page 27
"Feature menu (VH series)" on page 28
"Window menu (SH/VH series)" on page 29
"TV menu" on page 30
"Setup menu (SH/VH series)" on page 31
"Setup menu (VB/SD/VD series)" on page 32
• Settings under different input sources can be adjusted independently. For
example, the Picture settings for the AV1 input will not affect the Picture
settings for the AV2 input.
On-Screen Display (OSD) menu18

Tuner-RC-EN.book Page 19 Friday, October 3, 2008 4:07 PM
Navigating the OSD menu
You can use the On-Screen Display (OSD) menu to adjust the settings on
your display. To display the OSD menu, press
control (the main OSD menu of the SH series display is shown below):
目錄 (Menu) on the remote
Audio
Picture
Senseye
Window
TV Setup
Operations in the OSD menu
• Press , , or(+ or -) to make selections or change settings.
• Press
OK to confirm your selection or enter an submenu (if available).
• Press
回前頁 (Back) or 回上頁 (Back) to return to the previous menu level.
• Press
目錄 (Menu) to close the OSD menu.
For example, to adjust picture sharpness:
1. Press 目錄 (Menu) to display the OSD menu on-screen.
2. Press or(
3. Press
OK to enter the submenu.
4. Press or to select
5. Press or(
+ or -) to select Picture.
Sharpness.
+ or -) to make adjustment.
English
6. Press
回前頁 (Back) or 回上頁 (Back) to return to the
previous menu level, or
7. Press
目錄 (Menu) to close the OSD menu.
On-Screen Display (OSD) menu 19

10
0
Tuner-RC-EN.book Page 20 Friday, October 3, 2008 4:07 PM
Audio
Audio menu
The available menu items are
dependent on the input source
English
being selected. The illustration is
for reference only.
Item Function Operation Range
Adjusts the volume level of
Volume
the display’s built-in
speakers.
Balance
Adjusts left or right speaker
volume level.
Selects input audio type.
Sound Type
Available options are
dependent upon the
received signal.
If set to Auto, the display
Steady
Sound
automatically adjusts the
sound level to be constant
amongst different channels.
Activates or deactivates the
Surround
SRS TruSurround XT sound
effect.
Enables or disables sound
Speaker Out
output from the built-in
speakers of the display.
Advanced Audio Settings - Press OK to enter.
This menu item becomes unavailable if the Surround item is set to SRS TruSurround
XT.
Volume
Balance
Sound Type Stereo
Steady Sound Off
Surround Off
Speaker Out On
Advanced Audio Settings >
Press (+) to increase
or(-) to decrease
0 to 47
volume.
Press(
right speaker volume,
(
-) to increase left speaker
+) to increase
-12 to 12
volume level.
• Stereo
• Mono
• SAP
• L channel
• R channel
• Language 1
• Language 2
Pressor(+ or -) to
change selection.
• Auto
• Off
• SRS
TruSurround
XT
• Off
• On
• Off
On-Screen Display (OSD) menu20

Tuner-RC-EN.book Page 21 Friday, October 3, 2008 4:07 PM
EQ Mode
Treble
Mid Treble
Middle
Mid Bass
Bass
To restore a factory preset or
user customized EQ Mode.
Adjusts treble tones for the
Personal EQ Mode.
Adjusts mid-treble tones for
the
Personal EQ Mode.
Adjusts mid tones for the
Personal EQ Mode.
Adjusts mid-bass tones for
the
Personal EQ Mode.
Adjusts bass tones for the
Personal EQ Mode.
Pressor(
change selection.
Pressor(
make adjustment.
Setting up Personal EQ Mode
You can adjust the settings in the Advanced Audio Settings menu and save
them as your
1. Press
2. Pressor(
menu.
3. Press or to select
enter the Advanced Audio Settings menu.
4. Press or to select
Personal.
5. Press or to select
then pressor(
6. Press
Personal EQ Mode.
目錄 (Menu) to display the OSD menu on-screen.
+ or -) to select Audio, and then press OK to enter the Audio
Advanced Audio Settings, and then press OK to
EQ Mode, and then pressor(+ or -) to select
Treble , Mid Treble, Middle, Mid Bass, Bass and
+ or -) to adjust the settings to your satisfaction.
目錄 (Menu) to save the settings and close the OSD menu.
+ or -) to
+ or -) to
• Rock
• JAZZ
• Classic
• POP
• Personal
English
-12 to 12
On-Screen Display (OSD) menu 21

323232432
Tuner-RC-EN.book Page 22 Friday, October 3, 2008 4:07 PM
Picture
English
Picture menu (SH/VH
series)
The available menu items are
dependent on the input source
being selected. The illustration is
for reference only.
Item Function Operation Range
Picture Mode Personal
Contrast
Brightness
Color
Sharpness
Color TEMP. Normal
NTSC Tint
NTSC Setup 7.5 IRE
Provides complete preferred setups
adjusted for color, contrast,
brightness and sharpness to suit
Picture
Mode
various viewing situations. If
Personal is selected, you can
customize individual picture
setting to your satisfaction.
For more information about when
to use these modes and how to
setup the
Personal picture mode,
Pressor(
+ or -)
to change selection.
• Standard
• Cinema
• Dynamic
• Game (SH
• Personal
see "Selecting a picture mode" on
page 13 and "Setting up Personal
Picture mode" on page 25.
Contrast
Brightness
Color
Adjusts image white level so that
whites do not wash out
surrounding colors. See "Adjusting
the contrast" on page 24.
Adjusts image black level, so that
detail in the dark areas of an image
can be seen. See "Adjusting the
brightness" on page 25.
Adjusts image color intensity.
Press(+) for
brighter whites,
(
-) for darker
whites.
Press(+) for
brighter blacks,
(
-) for darker
blacks.
Press(
+) for
more intense
colors,(
-) for less
0 to 64
intense colors.
Sharpness
Color TEMP.
Adjusts image sharpness level.
Adjusts the color tint of the black
and white part of the image.
Press(
sharper image,
(
Pressor(+ or -)
to change selection.
+) for
0 to 6
-) for softer image.
• Warm
• Normal
• Cool
series)
On-Screen Display (OSD) menu22

32
32
3244
32
Tuner-RC-EN.book Page 23 Friday, October 3, 2008 4:07 PM
Adjusts color tint in NTSC video.
NTSC Tint
This option is only available for
NTSC video sources.
Sets up the NTSC video display
format to match that of the input
NTSC Setup
NTSC video input from other
devices (such as a DVD player).
This option is only available for
NTSC video sources.
Automatically adjusts Frequency,
Auto
Phase, H. Position and V. Position
to place the PC input image on the
screen.
Frequency
Adjusts the display clock frequency
and phase to correct shimmering
Phase
or distortion of the displayed
image.
H. Position
V. Position
Adjusts the horizontal and vertical
positions of the displayed image in
order to center it on the screen.
Picture menu (VB/SD/
VD series)
The available menu items are
dependent on the input source
being selected. The illustration is
for reference only.
Press(+) for
redder tones,(-)
0 to 64
for greener tones.
Pressor(+ or -)
to change selection.
Press
OK to begin the auto
• 0 IRE
• 7.5 IRE
adjustment function.
(Dependent
Pressor(
to make
adjustment.
+ or -)
upon the
resolution of
the input
signal)
Picture
Picture Mode Personal
Contrast
Brightness
Color
Sharpness
Color TEMP. Normal
Backlight
NTSC Tint
NTSC Setup 7.5 IRE
English
Item Function Operation Range
Provides complete preferred setups
adjusted for color, contrast,
Picture
Mode
brightness and sharpness to suit
various viewing situations. If
Personal is selected, you can
customize individual picture
setting to your satisfaction. For
more information, see "Selecting a
picture mode" on page 13 and
Pressor(
+ or -)
to change selection.
• Standard
• Cinema
• Dynamic
• Game (VB
• Personal
"Setting up Personal Picture mode"
on page 25.
On-Screen Display (OSD) menu 23
series)

Tuner-RC-EN.book Page 24 Friday, October 3, 2008 4:07 PM
English
Contrast
Brightness
Color
Sharpness
Color TEMP.
Backlight
NTSC Tint
NTSC Setup
Auto Adjust
Frequency
Phase
H. Position
V. Position
Adjusts image white level so that
whites do not wash out
surrounding colors. See "Adjusting
the contrast" on page 24.
Adjusts image black level, so that
detail in the dark areas of an image
can be seen. See "Adjusting the
brightness" on page 25.
Adjusts image color intensity.
Adjusts image sharpness level.
Adjusts the color tint of the black
and white part of the image.
Adjusts backlight intensity.
Adjusts color tint in NTSC video.
This option is only available for
NTSC video sources.
Sets up the NTSC video display
format to match that of the input
NTSC video input from other
devices (such as a DVD player).
This option is only available for
NTSC video sources.
Automatically adjusts Frequency,
Phase, H. Position and V. Position
to place the PC input image on the
screen.
Adjusts the display clock frequency
and phase to correct shimmering
or distortion of the displayed
image.
Adjusts the horizontal and vertical
positions of the displayed image in
order to center it on the screen.
Press(+) for
brighter whites,
(
-) for darker
whites.
Press (+) for
brighter blacks,
(
-) for darker
blacks.
Press(
+) for
more intense
colors,(
-) for less
intense colors.
Press(
sharper image,(
+) for
-)
for softer image.
Pressor(+ or -)
to change selection.
Press or(
+ or -
) to make
adjustment.
Press(+) for
redder tones,(
-)
for greener tones.
Pressor(+ or -)
to change selection.
Press
OK to begin the auto
adjustment function.
Pressor(
+ or -)
to make
adjustment.
0 to 64
0 to 6
• Warm
• Normal
• Cool
0 to 10
0 to 64
• 0 IRE
• 7.5 IRE
-16 to 16
-50 to 50
Adjusting the contrast
1. Set the contrast to the highest level.
2. Gradually decrease the contrast level until you reach the point where the
details in the bright areas of the image can be seen clearly. Do not further
decrease the contrast level to avoid losing the saturation of colors.
On-Screen Display (OSD) menu24

Tuner-RC-EN.book Page 25 Friday, October 3, 2008 4:07 PM
Adjusting the brightness
1. Set the brightness to the lowest level.
2. Gradually increase the brightness level until you reach the point where the
details in the dark areas of the image can be seen clearly. Do not further
increase the brightness level to avoid the black areas from looking grayish.
Setting up Personal Picture mode
You can adjust the settings in the Picture menu and save them as your
Personal Picture Mode. You can press 影像模式 (Picture Mode) on the
remote control to select these modes directly.
1. Press
2. Pressor(
3. Press or to select
4. Press or to select
5. Press
目錄 (Menu) to display the OSD menu on-screen.
+ or -) to select Picture, and then press OK to enter the
Picture menu.
Picture Mode, and then pressor(+ or -) to
select
Personal.
Contrast, Brightness, Color, Sharpness..., etc.,
and then pressor(
目錄 (Menu) to save the settings and close the OSD menu.
+ or -) to adjust the settings to your satisfaction.
English
On-Screen Display (OSD) menu 25

Tuner-RC-EN.book Page 26 Friday, October 3, 2008 4:07 PM
Senseye menu (SH
series)
The available menu items are
dependent on the input source
being selected. The illustration is
English
for reference only.
Item Function Operation Range
Color Style
The Senseye technology
allows you to change the
representation of images
freely using the Color Style,
Gamma Style
Gamma Style and ACE (Auto
Contrast Enhancement)
functions, making it possible
to find a best setting to
match your viewing
ACE (Auto
Contrast
Enhancement)
preferences.
Adjusts the image noise
reduction function that helps
Noise
Reduction
to remove noise in images.
This function is only
available when ATV, DTV,
AV1, AV2, or AV3 (AV3-S)
is the input source with
the resolution up to 576i.
Color Style Color 1
Gamma Style Gamma 1
ACE Low
Noise Reduction Low
Pressor(
-) to change
selection.
+ or
• Color 1
• Color 2
• Color 3
• Color 4
• Off
• Gamma 1
• Gamma 2
• Gamma 3
• Gamma 4
• Off
• Low
• Middle1
• Middle2
• High
• Off
• Low
• Middle
• High
• Off
On-Screen Display (OSD) menu26

Tuner-RC-EN.book Page 27 Friday, October 3, 2008 4:07 PM
Senseye menu (VB/
SD/VD series)
The available menu items are
dependent on the input source
being selected. The illustration is
for reference only.
Item Function Operation Range
Enhances the contrast among
details when viewing dark
Black Extension
ACE (Auto
Contrast
Enhancement)
Noise
Reduction
images.
This option will not be
available if the ACE
function is set to Low,
Medium or High.
Adjusts the auto contrast
enhancement function that
optimizes the image contrast
ratio for interlaced inputs.
Adjusts the image noise
reduction function that helps
to remove noise in images.
This function is only
available when ATV, DTV,
AV1 or AV2 (AV2-S) is the
input source with the
resolution up to 576i.
Black Extension Low
ACE Off
Noise Reduction Low
Press or(+ or
-) to change
selection.
English
• Low
• Middle
• High
• Off
• Low
• Middle
• High
• Off
• Low
• Middle
• High
• Off
On-Screen Display (OSD) menu 27

Tuner-RC-EN.book Page 28 Friday, October 3, 2008 4:07 PM
Feature menu (VH
series)
The available menu items are
dependent on the input source
being selected. The illustration is
English
for reference only.
Item Function Operation Range
Black Extension Low
ACE
Noise Reduction Low
Aspect Ratio 16:9
Feature
Enhances the contrast among
details when viewing dark
images.
Black Extension
ACE (Auto
Contrast
Enhancement)
Noise
Reduction
This option will not be
available if the ACE
function is set to Low,
Medium or High.
Adjusts the auto contrast
enhancement function that
optimizes the image contrast
ratio for interlaced inputs.
Adjusts the image noise
reduction function that helps
to remove noise in images.
This function is only
available when ATV, DTV,
AV1, AV2, AV3 (AV3-S) or
AV4 (AV4-S) is the input
source with the
resolution up to 576i.
Press or(+ or
-) to change
selection.
Adjusts screen image aspect
Aspect Ratio
ratio. See "Adjusting aspect
ratio" on page 15 for more
information.
Off
• Low
• Middle
• High
• Off
• Low
• Middle
• High
• Off
• Low
• Middle
• High
• Off
• 16:9
• 4:3
• Letter Box
• 16:9 Adj.
• Cinema
On-Screen Display (OSD) menu28

Tuner-RC-EN.book Page 29 Friday, October 3, 2008 4:07 PM
Window menu (SH/VH
series)
The available menu items are
dependent on the input source
being selected. The illustration is
for reference only.
Item Function Operation Range
PIP Off
Main Input PC
Sub Input AV3
PIP Audio Main
Window
Display TV/video and PC
images simultaneously in
Picture-In-Picture (PIP) mode.
PIP
For more information, see
"Using the PIP (Picture-InPicture) function (SH/VH
series)" on page 14.
Select the PC signal input
source for the PIP function.
The DVI input image will be
displayed only when a DVI
Main Input
input in PC mode is
connected to the display,
and the HDMI/DVI Input
option in the Setup menu
(see "HDMI/DVI Input (SH
series)" or "DVI Input (VH
series)" on page 31) is set
to PC.
Pressor(+ or
-) to change
selection.
Select the video signal input
source for the PIP function.
This option is available only
if the PIP item is set to
Sub Input
Picture in Picture.
The Component Video (AV1
and AV2) input image
cannot be displayed in the
Sub Window and cannot be
selected.
Select the audio source in PIP
mode.
PIP Audio
This option is available only
if the PIP item is set to
Picture in Picture.
• Off
Full screen
• Picture in
Picture
Video
image
PC image
• PC
• DVI
• ATV
• DTV
• AV 3 / AV3 -S
• AV4/AV4-S (VH
series)
• Main
• Sub
English
On-Screen Display (OSD) menu 29

Tuner-RC-EN.book Page 30 Friday, October 3, 2008 4:07 PM
TV menu
The available menu items are
dependent on the input source
being selected. The illustration is
for reference only.
English
Item Function Operation Range
TV/CATV
Channel +/-
Select TV or cable
system mode.
Add weak or additional
channels or delete
unwanted channels
TV/CATV TV
Channel +/- Added
Favorite Channels
Auto Program
Pressor(
change selection.
TV
+ or -) to
from display memory.
Favorite
Channels
Auto Program
Set and change Favorite
Channels
Tuner will search
through all available
channels and add them
to memory.
See "Setting up favorite channels" below.
Press
OK on the remote control to start
the tuning process. See "Searching and
storing TV channels" below.
Searching and storing TV channels
1. Press 目錄 (Menu) on the remote control to display the OSD menu on-
screen.
2. Press or(
3. Press or to select
start searching for available channels and store them in the memory. This
may take several minutes, depending on the available TV channels of your
local TV system. To stop the process, press
4. When the process is complete, press
+ or -) to select TV and then press OK.
Auto Program and then press OK. The display will
OK.
目錄 (Menu) to close the menu.
• TV
• CATV
• Skipped
• Added
Setting up favorite channels
1. Press 目錄 (Menu) on the remote control to display the OSD menu onscreen.
2. Pressor(
3. Press or to select
4. Press or to select an item (
press the
enter the channel number that you desire.
5. Repeat the steps above if you want to set up more favorite channels.
6. Press
7. Press
On-Screen Display (OSD) menu30
回前頁 (Back) or 回上頁 (Back).
目錄 (Menu) to close the menu.
+ or -) to select TV and then press OK.
Favorite Channels and then press OK.
Favorite 1, Favorite 2... Favorite 5), then
Channel selection numeric buttons on the remote control to

Tuner-RC-EN.book Page 31 Friday, October 3, 2008 4:07 PM
Setup
Setup menu (SH/VH
series)
The available menu items are
dependent on the input source
being selected. The illustration is
for reference only.
Item Function Operation Range
Language
Select your desired language for the OSD
menu.
Language English
Backlight Normal
Sleep Timer 0
ECO Off
HDMI/DVI Input PC
Blue Screen Off
Reset All Settings
Adjust backlight intensity.
If
Auto is selected, the ambient light
Backlight
sensor will be activated and the display's
backlight will be changed automatically
according to the ambient lighting
condition.
Sleep Timer
ECO
Set the Sleep Timer to automatically turn
off the display.
Once set to On, the display will activate
the Display Power Management System
(DPMS) and enter power saving mode
when no PC input signal is detected for 5
Pressor
(
+ or -) to
change
selection.
seconds, or enter standby mode
automatically if no Video signal is detected
for 10 minutes.
HDMI/DVI Input
(SH series)
DVI Input (VH
series)
Blue Screen
(SH series)
Reset All
Settings
Select an input mode according to the
device connected to the HDMI terminal.
Select
PC if a PC is connected. If a video
device (for example, a DVD player or TV
game console) is connected, select
Video.
Once set to On, a blue screen will be
displayed when no input signal is detected,
or when the signal is too weak.
Restore all settings to their default values.
The TV channel memory will not be
reset.
Press OK to activate the
reset.
English
• English
• 繁體中文
• Bright
• Normal
• Dark
• Auto
0, 30, 60, 90,
120, 150,
180 minutes
• Off
• On
• PC
• Video
• Off
• On
On-Screen Display (OSD) menu 31

Tuner-RC-EN.book Page 32 Friday, October 3, 2008 4:07 PM
Setup menu (VB/SD/
VD series)
The available menu items are
dependent on the input source
English
being selected. The illustration is
for reference only.
Item Function Operation Range
Language
Sleep Timer
Select your desired language for the OSD
menu.
Set the Sleep Timer to automatically turn
off the display.
Language English
Sleep Timer 0
ECO Off
HDMI/DVI Input PC
Blue Screen Off
Reset All Settings
Setup
Once set to On, the display will activate the
Display Power Management System
(DPMS) and enter power saving mode
ECO
when no PC input signal is detected for 5
seconds, or enter standby mode
automatically if no Video signal is detected
for 10 minutes.
Pressor
(
+ or -) to
change
selection.
Select an input mode according to the
device connected to the HDMI terminals.
HDMI/DVI Input
Select
PC if a PC is connected. If a video
device (for example, a DVD player or TV
game console) is connected, select
Video.
Once set to On, a blue screen will be
Blue Screen
displayed when no input signal is detected,
or when the signal is too weak.
Reset All
Settings
Restore all settings to their default values.
The TV channel memory will not be
reset.
Press OK to activate the
reset.
• English
• 繁中
Off, 15, 30,
45, 60, 90,
120 minutes
• Off
• On
• PC
• Video
• Off
• On
On-Screen Display (OSD) menu32

Tuner-RC-EN.book Page 33 Friday, October 3, 2008 4:07 PM
<Memo>
English
On-Screen Display (OSD) menu 33

Tuner-RC-EN.book Page 34 Friday, October 3, 2008 4:07 PM
<Memo>
English
On-Screen Display (OSD) menu34
 Loading...