

Page 1

Recycle Disassemble Instruction
(Dismantled Information)
Requirements according to ANNEX VII of DIRECTIVE 2012/19/EU
on waste electrical and electronic equipment (WEEE)
Materials and components with hazardous content
LCDs may contain hazardous substances like Pb and BFRs which are covered by
exemptions under the RoHS directive. However, the majority is present in the printed
circuit boards assembly. In order to reduce emissions as much as possible, a complete
disposal of the old appliance is required. This treatment may only be performed in
authorized handling plants.
Product Name: Interactive flat panel
Model No.: RP8602
Page 2
Disassembly Tools
Tool
picture
Philips Screwdriver for M3
screw
nosed pliers
Diagonal Cutting Pliers
Slotted screwdriver
Six Point Sockets
Philips Screwdriver for M2.5
screw
knife
Page 3

Disassembly process
Dismantle 4 pieces of
M8 x 20mm P head
flat tail ,elastic pad black
galvanized
machinery screws.
Dismantle 3 pieces of
M3 × 6mm meson head
nickel plating mechanical
screws.
Page 4
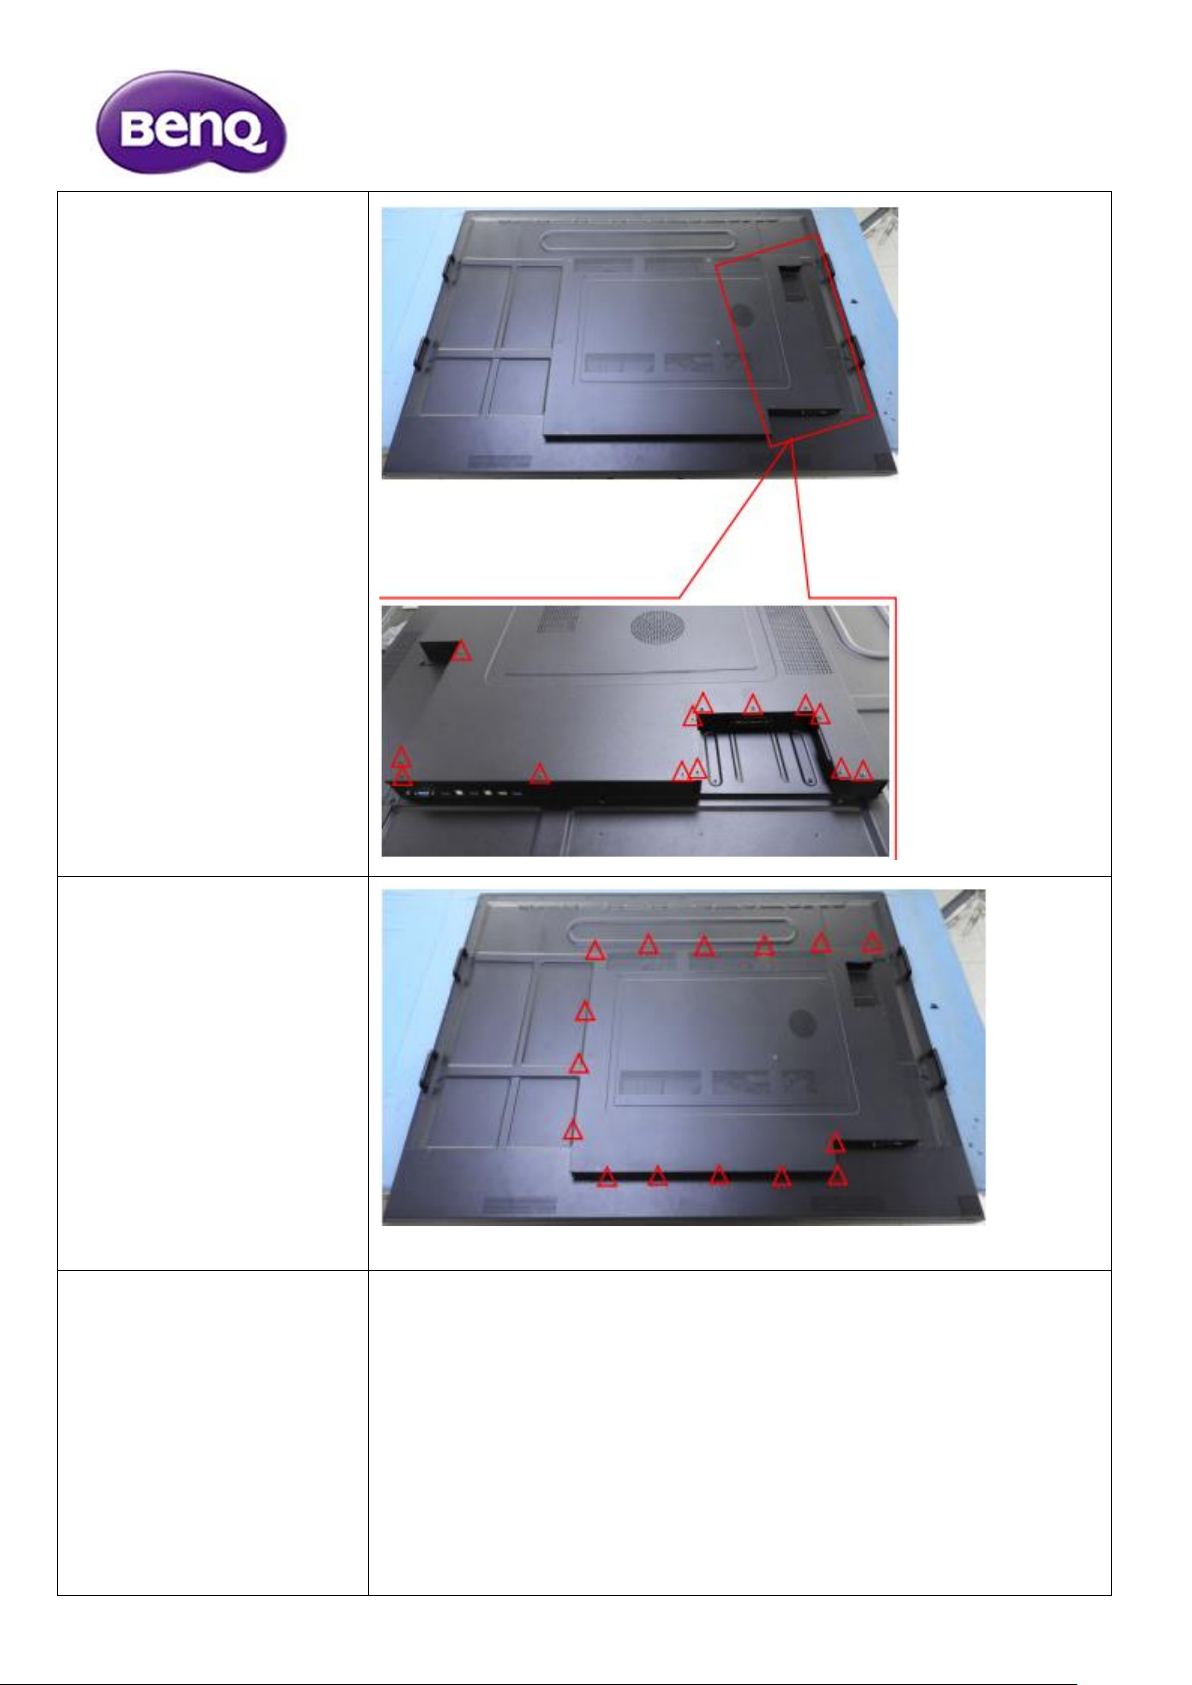
Dismantle 16 pieces of
M3 × 6mm meson
head nickel plating
mechanical screws.
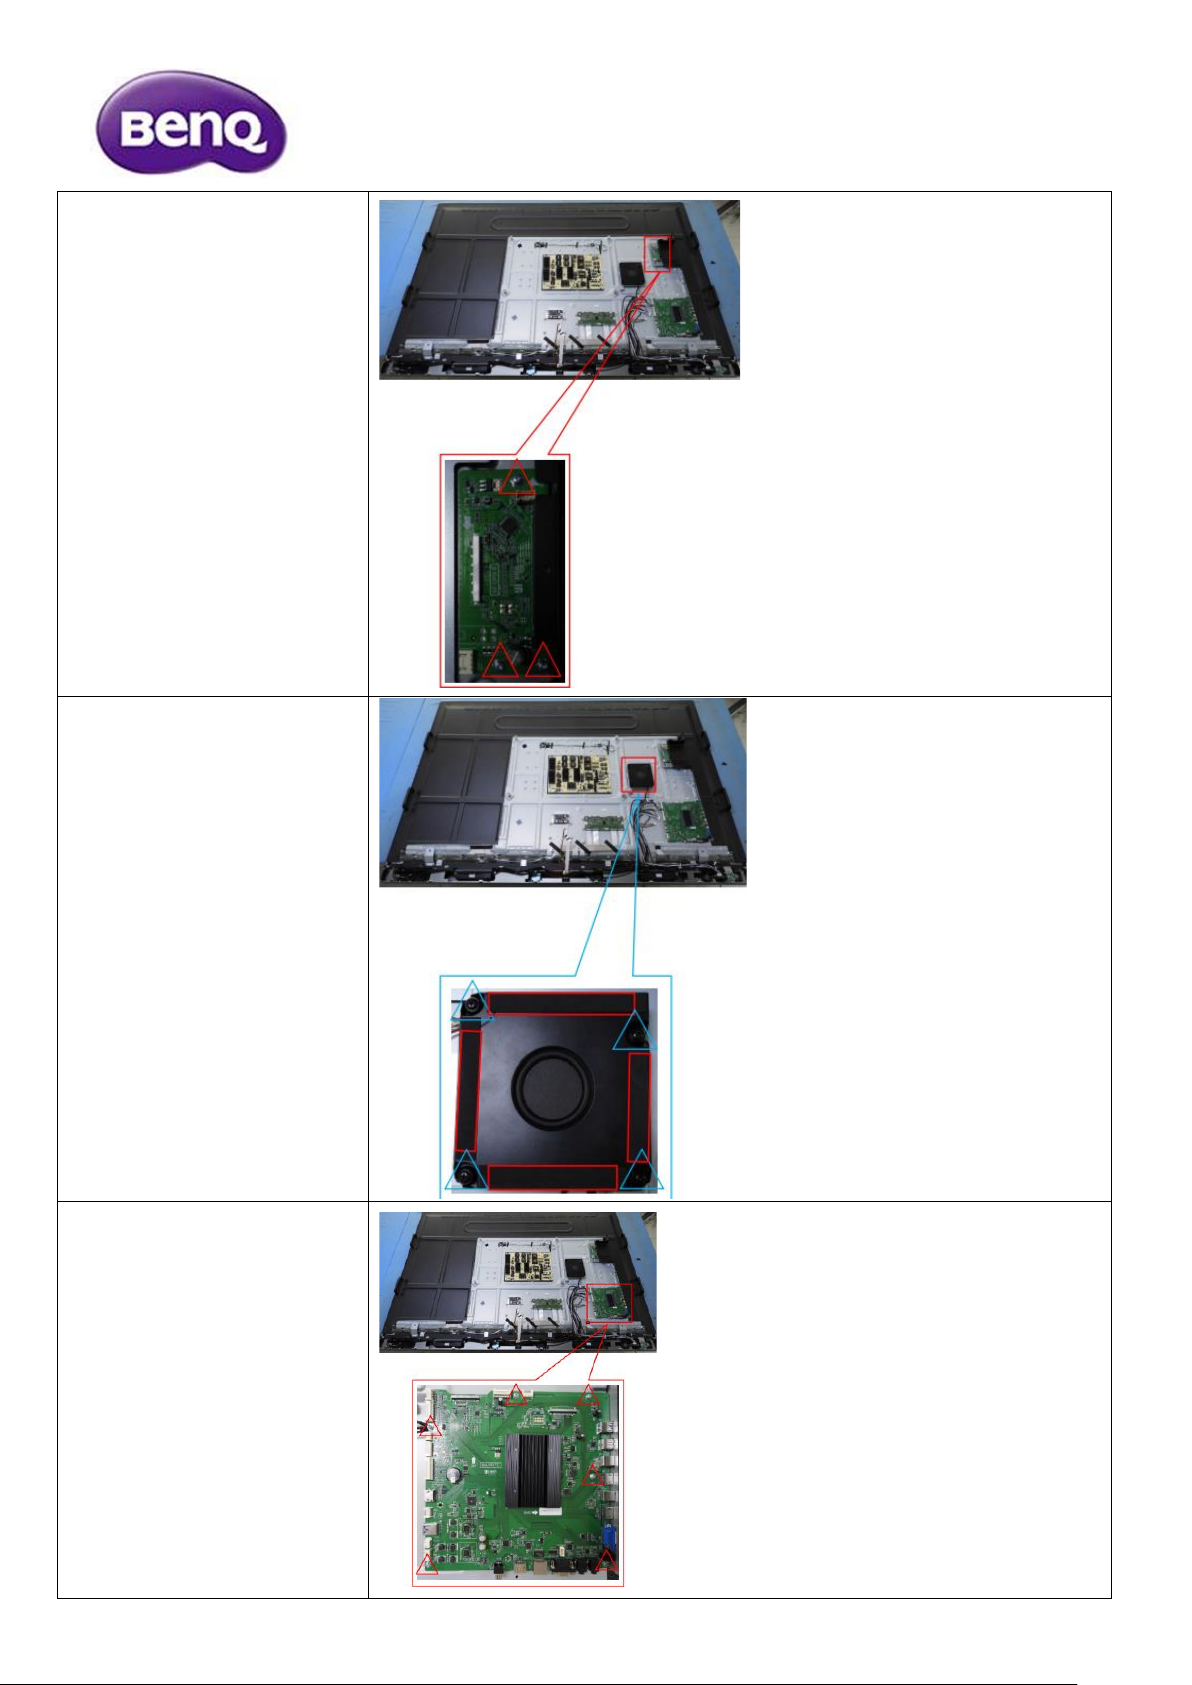
1、Dismantle 15 pieces
of M4 × 6mm flat
round head nickel plating
mechanical screws.
2、Open the back cover.
1、Dismantle 3 pieces of
M4 × 6mm flat round
head nickel plating
mechanical screws.
2、Dismantle 1 piece of
Ф4 x 5 mm round head
toothed pads blue zinc
plating machine screw.
Page 5

3、Remove the AC
bracket.
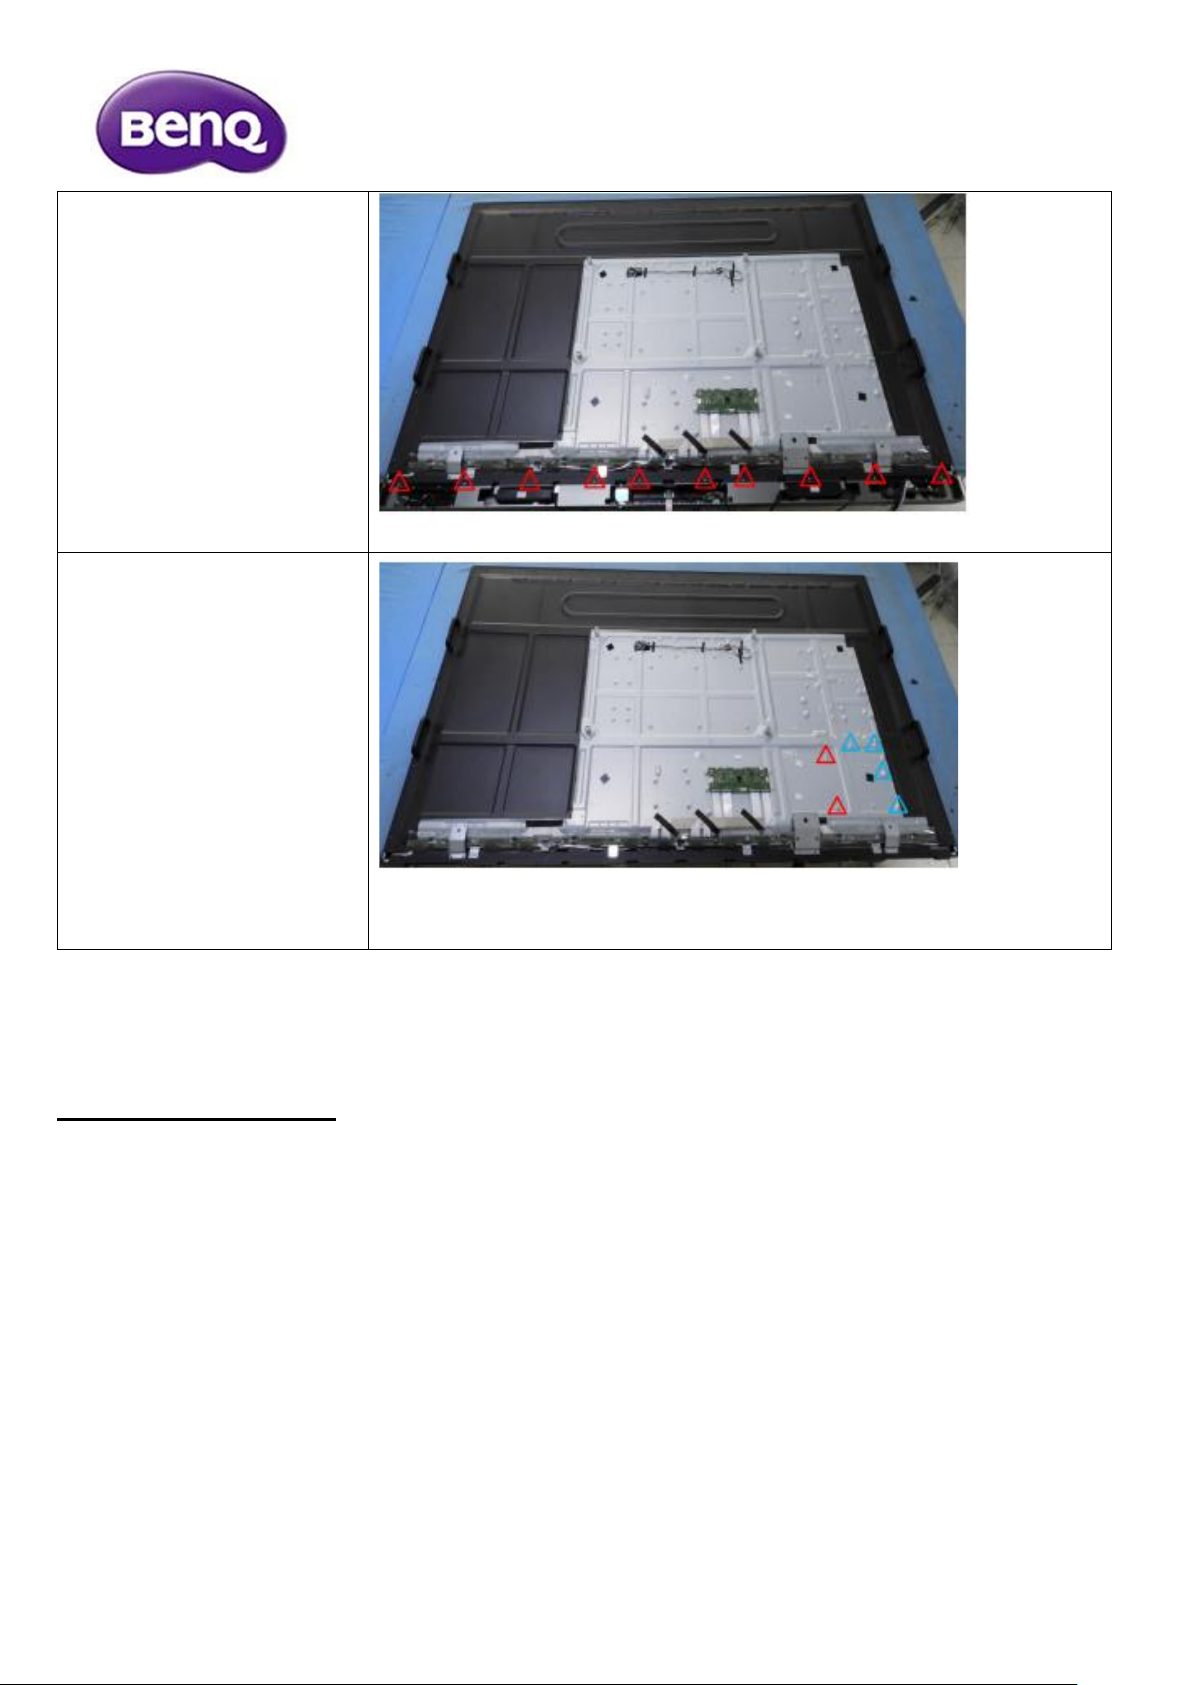
1、Dismantle 8 pieces of
M3 × 6mm meson
head nickel plating
mechanical screws.
2、Dismantle 7 pieces of
M4 × 6mm flat round
head nickel plating
mechanical screws.
3、Remove the back
shell at the bottom.
1、Dismantle 2 pieces of
M4 × 6mm flat round
head nickel plating
mechanical screws.
2、Remove the IO
baffle.
Page 6

1、Dismantle 3 pieces of
M3 × 6mm P head, flat
tail, elastic pad, flat pad,
blue galvanized
mechanical screws.
2、Remove the USB
board.
1、Dismantle 4 pieces of
M3 × 6mm P head, flat
tail, elastic pad, flat pad,
blue galvanized
mechanical screws.
2、Remove the MIC
board.
Page 7
1、Dismantle 3 pieces of
M3 × 6mm P head, flat
tail, elastic pad, flat pad,
blue galvanized
mechanical screws.
2、Remove the OPS
board.
1、Dismantle 4 pieces of
M5 × 8mm meson
head black galvanized
mechanical screws.
2、Separate the EVA
pad from the sound.
1、Dismantle 7 pieces of
M3 × 6mm P head, flat
tail, elastic pad, flat pad,
blue galvanized
mechanical screws.
2、Remove the
motherboard.
Page 8

1、Dismantle 6 pieces of
M3 × 6mm P head, flat
tail, elastic pad, flat pad,
blue galvanized
mechanical screws.
2、Remove the power
panel.
1、Dismantle 2 pieces of
M3 × 6mm P head, flat
tail, elastic pad, flat pad,
blue galvanized
mechanical screws.
2、Dismantle 2 pieces of
M3 × 4mm meson
head nickel plating
mechanical screws.
3、Remove the OPS
iron bracket.
1、Dismantle 3 pieces of
M3 × 6mm P head, flat
tail, elastic pad, flat pad,
blue galvanized
mechanical screws.
2、Remove the iron
support.
Page 9

1、Dismantle 3 pieces of
M3 x 5mm
flathead flat tail blue zinc
plating machinery
screws.
2、Remove the iron
support.
1、Dismantle 4 pieces of
M3 × 6mm P head, flat
tail, elastic pad, flat pad,
blue galvanized
mechanical screws.
2、Remove the horn
bracket.
1、Dismantle 3 pieces of
M4 × 6mm flat round
head nickel plating
mechanical screws.
2、Remove the IO
baffle.
Page 10

1、Dismantle 3 pieces of
M3 × 8mm P head, flat
tail, elastic pad, flat pad,
blue galvanized
mechanical screws.
2、Remove the
shielding can.
1、Dismantle 8 pieces of
M3 × 6mm P head, flat
tail, elastic pad, flat pad,
blue galvanized
mechanical screws.
2、Remove 8 plastic
buckles.
1、Dismantle 6 pieces of
M3 × 6mm P head, flat
tail, elastic pad, flat pad,
blue galvanized
mechanical screws.
2、Remove 6 rear shell
supports.
Page 11
1、Dismantle 10 pieces
of M3 × 8mm P head,
flat tail, elastic pad, flat
pad, blue galvanized
mechanical screws.
2、Remove aluminum
profile assembly.
1、Dismantle 2 pieces of
M3×3mm H =11mm flat
tail Blue zinc plating
machinery hexagon
studs.
2、Dismantle 4 pieces of
M3×2.5mm H =5mm flat
tail Blue zinc plating
machinery hexagon
studs.
Disassembly Time
Total time: about 35 minutes
 Loading...