

Parts of the display and their functions14
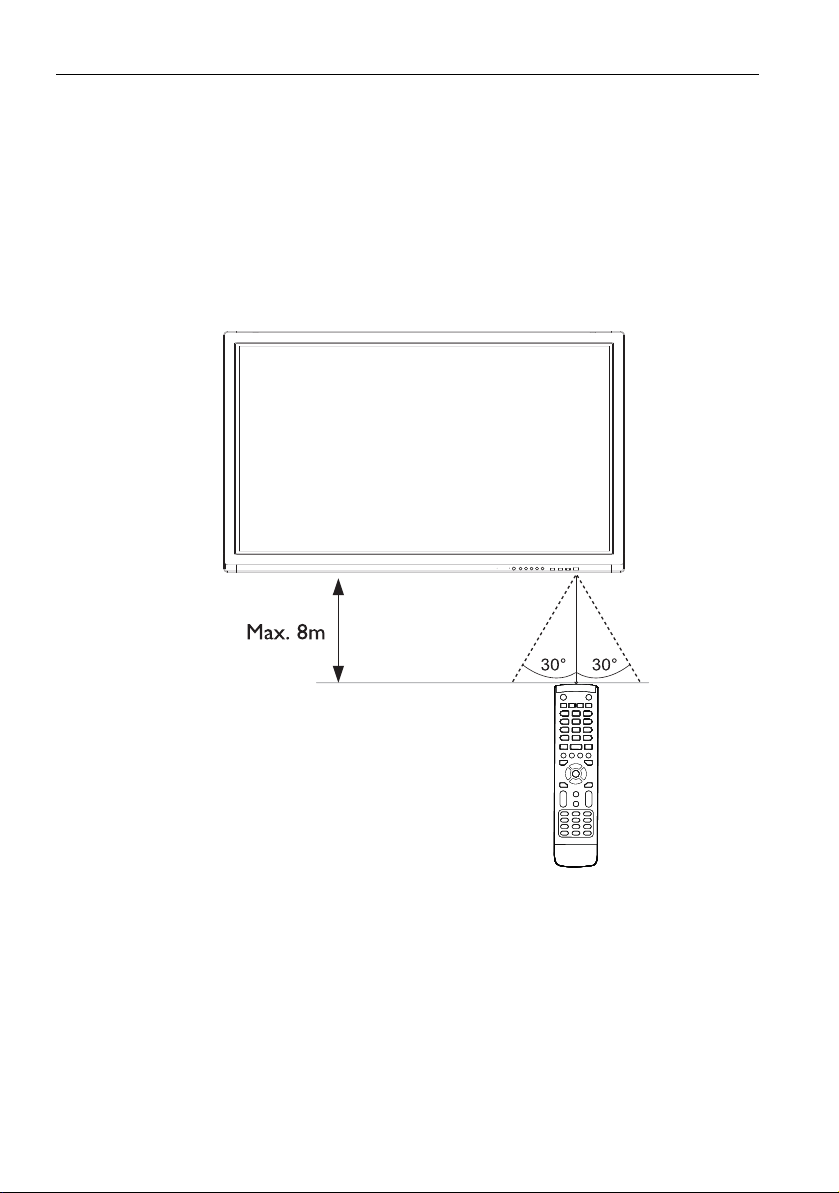
Remote control usage tips
• Point and aim the top front of the remote control directly at the display’s remote
control sensor window when you press the buttons.
• Do not let the remote control become wet or place it in humid environments (like
bathrooms).
• If the display’s remote control sensor window is exposed to direct sunlight or strong
light, the remote control may not operate properly. In this situation, change the light
source, readjust the angle of the display or operate the remote control from a location
closer to display’s remote control sensor window.
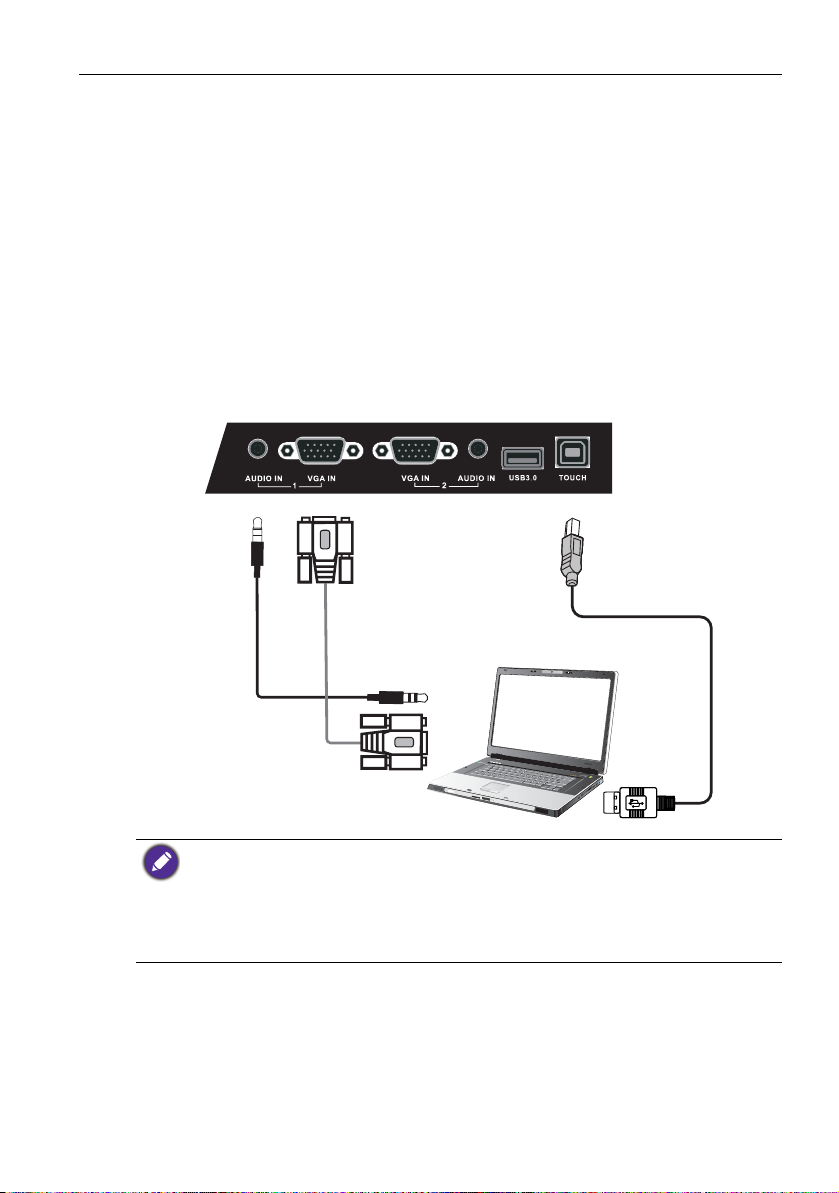
Connection
D-Sub (15-pin) cable
Audio cable
Computer
USB cable
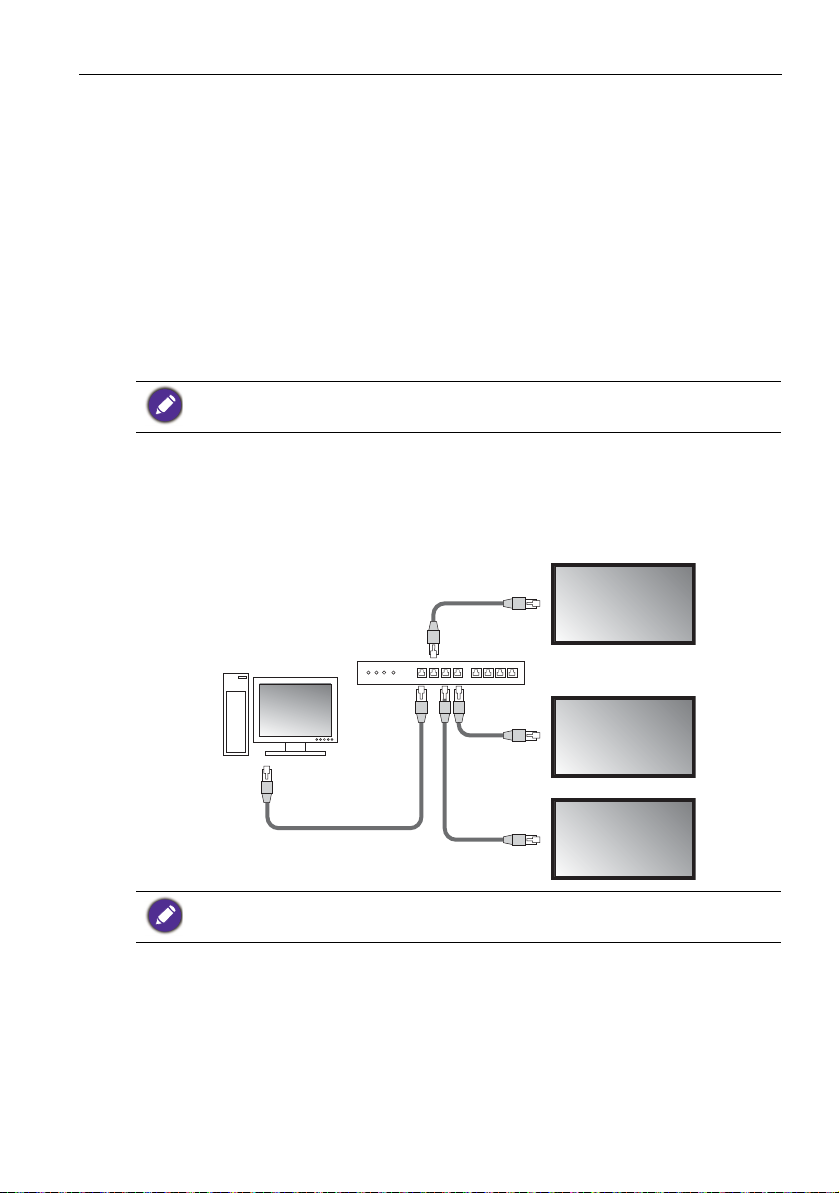
Connecting the VGA input
1. Connect the VGA IN jack on the display to the VGA output jack on a computer
using a D-Sub (15-pin) cable.
2. Connect the computer’s audio output jack to the AUDIO IN jack on the display
with a suitable audio cable.
3. To view images from this input, press the INPUT button on the remote control to
switch to respective input source.
Connecting the touch module
Connect the TOUCH (type B) jack on the display to the USB port of a computer using
the supplied USB cable. The touch module of the display supports easy Plug-and-Play
operation. There is no need to install additional drivers on the computer.
Connection 15
• Avoid blocking the touch screen frame (where sensors are located) when initiating the touch
module.
• It is highly recommended that you connect the display to the PC or laptop directly. Avoid
connecting the display to a face plate device which may cause failures in touch operations.
• If any ghost image occurs, please try to un-plug and then re-plug all USB cables. If the failure
image still exists, use another USB type B to A cable.
• TOUCH must be used with HDMI or VGA IN.
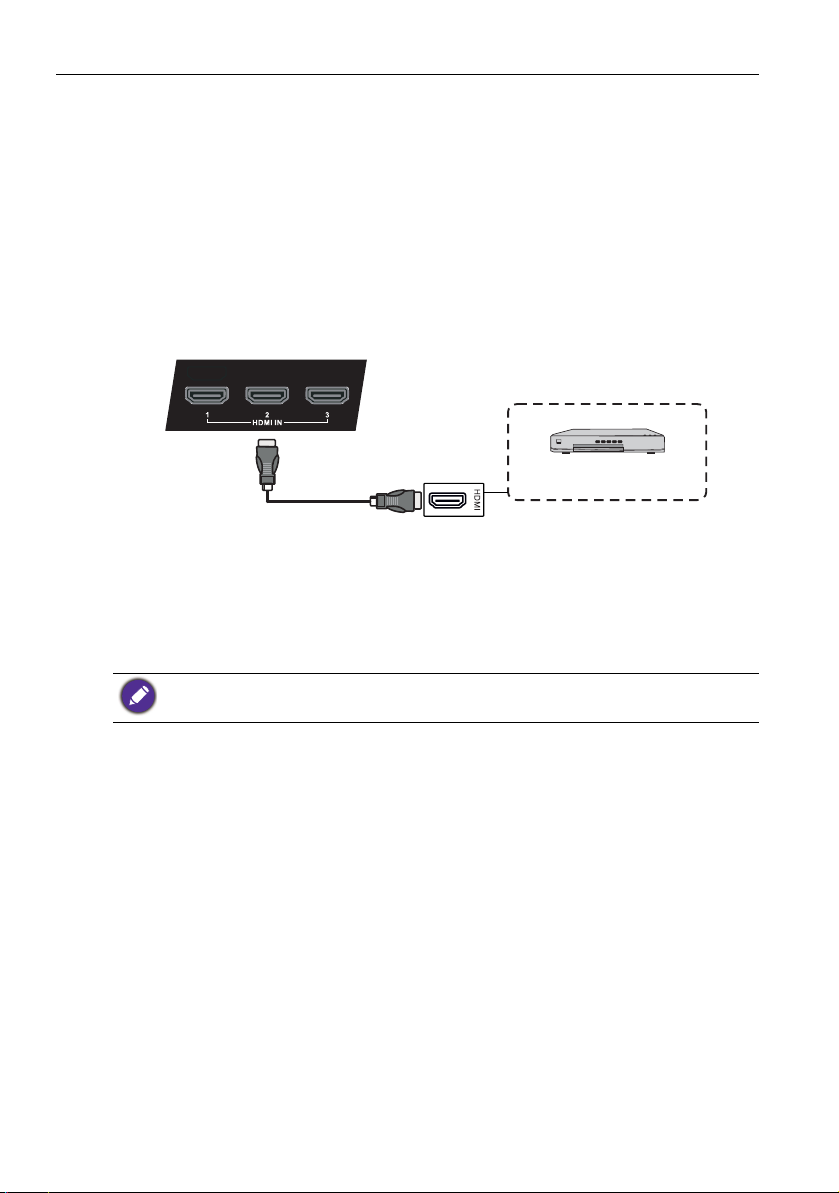
Connection16
DVD player
HDMI cable
Connecting the digital inputs
1. Connect the HDMI output jack of a computer or A/V device (such as a VCR or DVD
player) to the HDMI input jack on the display using an HDMI cable.
2. To view images from this input, press the INPUT button on the remote control to
switch to respective input source.
The applicable cable is not supplied and should be purchased separately.
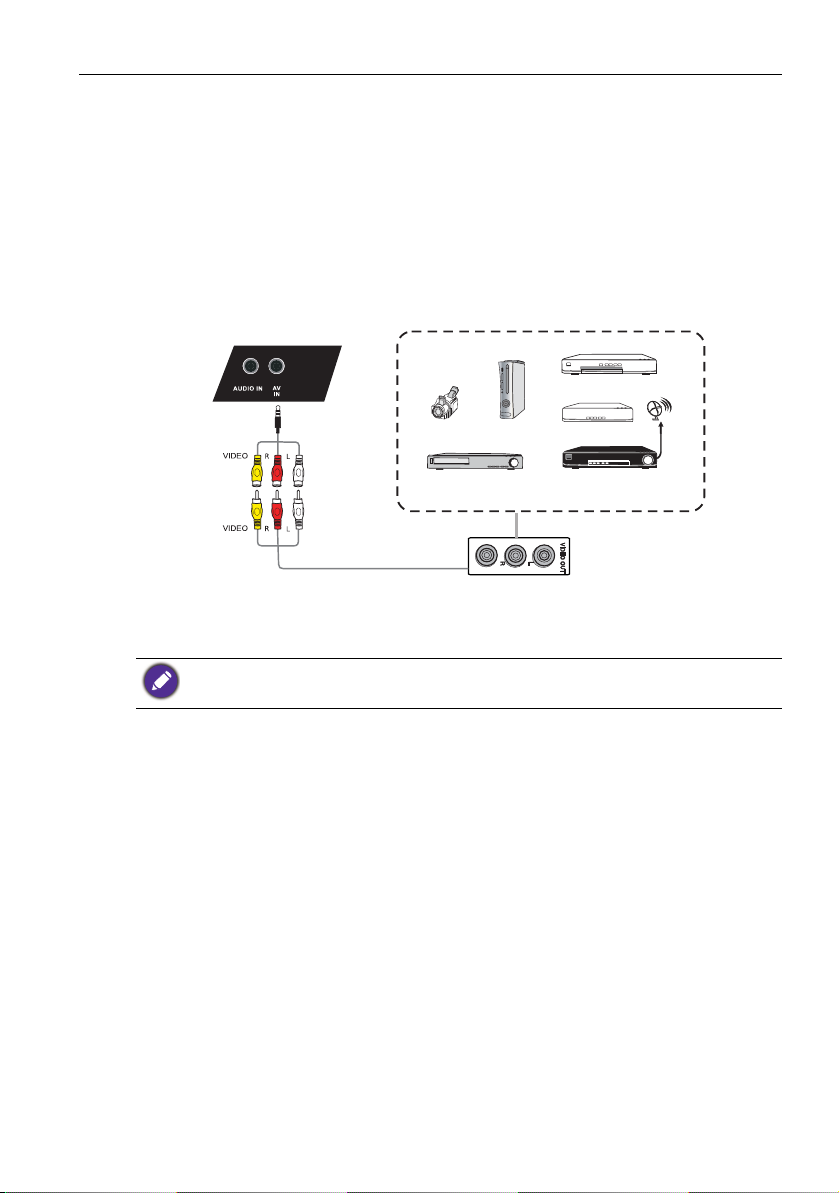
Connection 17
Set Top Box
AV
cable
VCR
DVD player
Satellite Receiver
Camcorder
Video Game Console
Connecting the AV inputs
1. Connect the AV I N jack on the display to the output jack on an A/V device (such as a
VCR) using an appropriate video cable.
2. Connect the VCR’s audio output jacks to the AV I N jacks on the display using a
suitable audio cable.
3. To view images from this input, press the INPUT button on the remote control to
switch to respective input source.
The applicable cable is not supplied and should be purchased separately.
Connection18
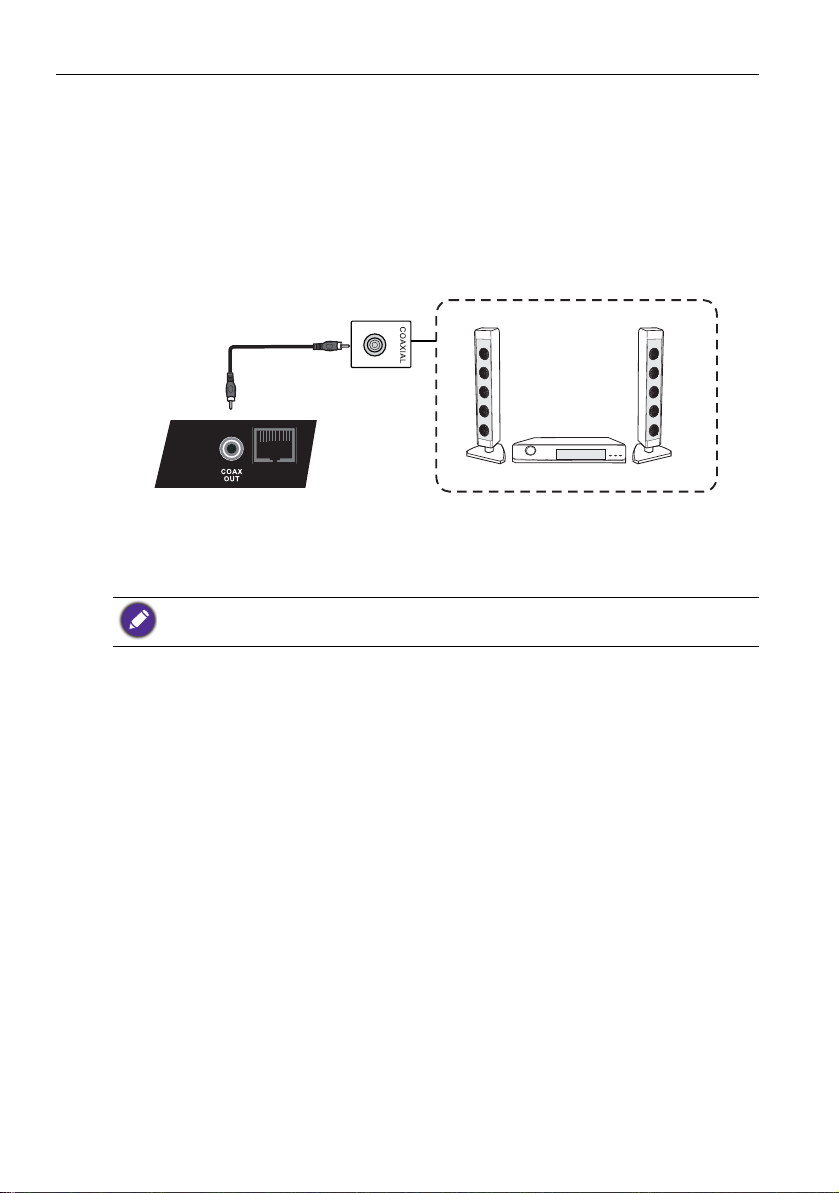
Coaxial cable drive
Audio equipment
Connecting the coaxial output
To use coaxial out for acoustic applications:
1. Use coaxial cable to connect via COAX OUT to your audio equipment.
2. Plug in power cord, and switch power on.
LAN
The applicable cable is not supplied and should be purchased separately.
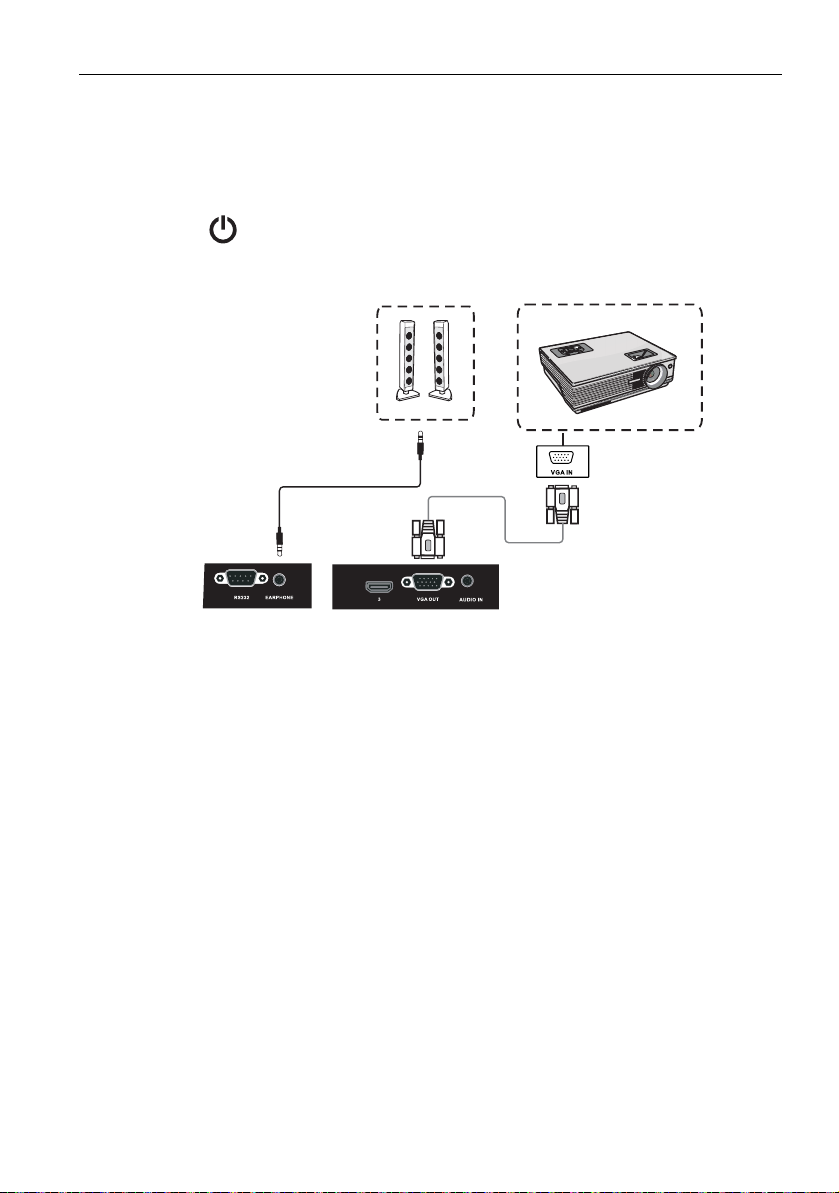
Connection 19
D-Sub (15-pin) cable
Audio cable
Connecting the video output
For computer:
1. Use D-Sub cable and audio cable to connect from VGA OUT and EARPHONE to
the respective jacks of the devices.
2. Plug in power cord, and switch power on.
3. Press on the remote control to turn on the display. Press INPUT to switch to
PC port. Set internal computer as VGA output or multi-screen display.
Connection20
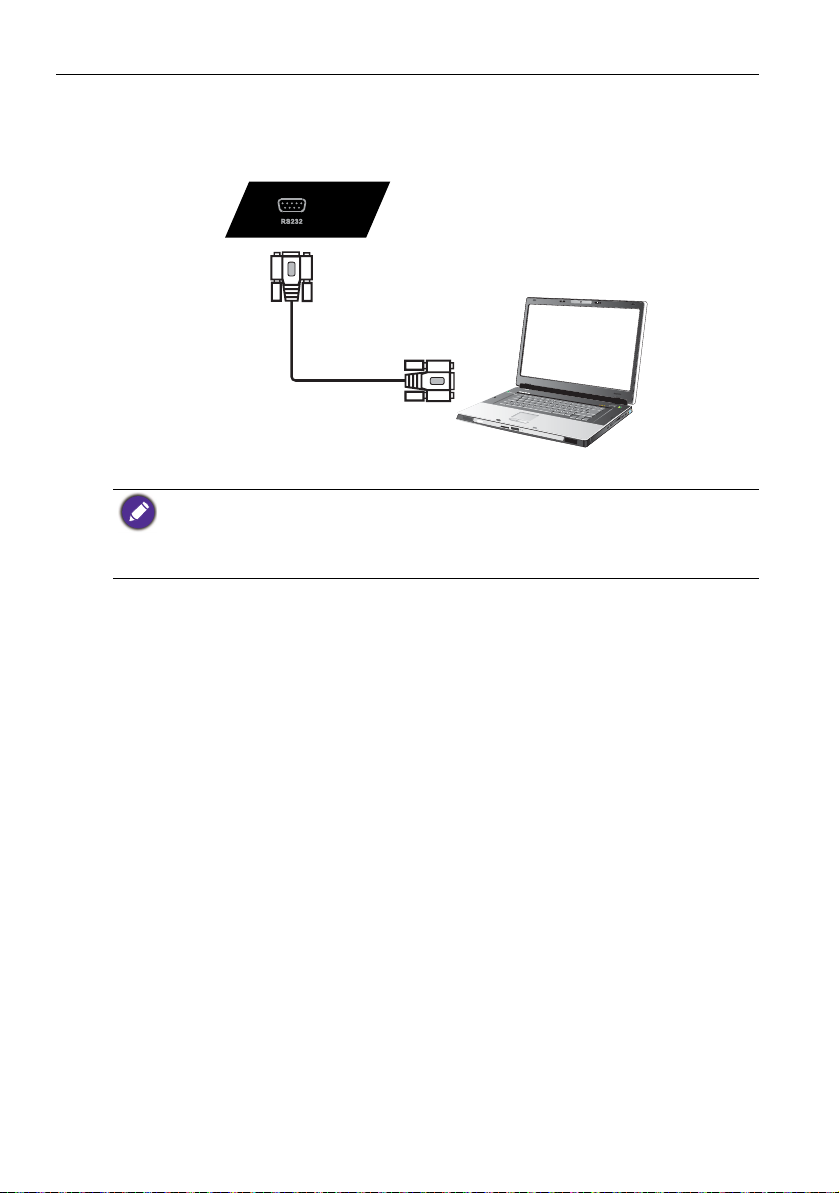
Computer
RS-232C
cable
Connecting to serial port
Directly connect the computer to RS232 ports on the input/output terminals.
• The applicable cable is not supplied and should be purchased separately.
• This connection is applicable to straight-through RS-232C cable only.
• After using serial port line to connect central control equipment and machine, certain function
of the machine can be controlled via central control equipment, such as: machine on/off, and
adjustment of sound volume, etc.

Connection 21
Connecting power
Plug one end of the power cord into the Power jack on the display and the other end
into an appropriate power outlet (if the outlet is switched, turn on the switch). .
• The supplied power cord is suitable for use with 100-240V AC power only.
• The power cord and outlet illustrated may differ from the ones used in your region.
• Only use an appropriate power cord for your region. Never use a power cord which appears
damaged or frayed, or change the plug type on the power cord.
• Be aware of the power loading when you use extension cords or multiple outlet power boards.
• There are no user serviceable parts in this display. Never unscrew or remove any covers.
There are dangerous voltages inside the display. Turn off the power and unplug the power cord
if you intend to move the display.
Product information22
Product information
Specifications
LCD panel
To uc h
Panel glass
Input
Output
Audio
Item
Backlight LED
Panel size 55"
Pixel pitch (mm) 0.630
Native resolution
(pixels)
Brightness (cd/m
(typical)
Contrast (typical) 1400:1
Response time (ms)
(typical)
Panel Bit 8-bit(16.7M)
Tec h no l og y IR To uc h
Resolution 32767 x 32767
Capacity
Accuracy +/- 2mm
Touch Output USB type B x 1
Operating System
Tempered glass AG coating, 80
Thickness 4mm
Computer VGA (D-Sub 15-pin) x 3
Video
Audio Line-in (3.5 mm jack) x 3, along with 3 VGA input
USB
Control RS-232C (D-Sub 9-pin)
TV Tuner NO
Computer VGA (D-Sub 15-pin) x 1
Video NO
Audio Earphone (3.5 mm jack), COAX x 1
External speaker out
(L/R)
Audio W (Amp) 10W x 2
Internal speaker YES
2
)
10 points touch (varies from operating systems and
Windows XP/Vista/7/8, Mac OS X 10.6~10.10, Linux,
Chrome OS 4.0.1847.134 (touch function varies
Composite Video (3-in-1 connector) x 1, HDMI x 3
Specifications
RP552
1920 x 1080
350 nits
8
applications)
from releases)
(1080P x 3)
Type A; Type B
(USB2.0 x3; USB3.0: x1)
NO
Power
Environment
Mechanical
Feature
Product information 23
Supply 100 - 240V AC, 50/60 Hz
Consumption Max. 190W
Consumption Standby ≤ 0.5W
Operating Temperature
0 - 40
o
C
Operating Humidity 10 - 90% (without condensation)
Storage Temperature
0 - 40
o
C
Storage Humidity 10 - 90% (without condensation)
Display Orientation Landscape
Weight (kg) 54/65 (without packing / with packing)
Dimensions (W x H x
D) (mm)
Bezel Dimension - T/B/
L/R (mm)
93*805*1315/270*950*1480
40 / 63 / 40 / 40
Image setting YES
Source/Volume Control YES
Sharpness
enhancement
Dimming control
(Adaptive Contrast)
YES
TBD/NO
10-bit color processing NO
De-Interlacing / comb
Filter
Customized Classroom
Mode
YES
YES
Blank screen YES
• Specifications and functions are subject to change without notice.
• To make sure that the touch function works properly on Mac OS X 10.10, you are
recommended to perform screen calibration first. Contact BenQ dealer for the required
calibration utility.

Product information24
Dimensions
Unit: mm
Supported input signal resolution
Product information 25
Resolution
640 x 480 @ 60Hz
640 x 480 @ 67Hz
640 x 480 @ 72Hz
640 x 480 @ 75Hz
720 x 400 @ 70Hz
800 x 600 @ 60Hz
800 x 600 @ 75Hz
832 x 624 @ 75Hz
1024 x 768 @ 60Hz
1024 x 768 @ 75Hz
1152 x 870 @ 75Hz
1280 x 720 @ 60Hz
1280 x 768 @ 60Hz
1280 x 800 @ 60Hz
RB
1280 x 800 @ 60Hz
1280 x 960 @ 60Hz
1280 x 1024 @ 60Hz
1360 x 768 @ 60Hz
1366 x 768 @ 60Hz
1400 x 1050 @ 60Hz
1600 x 1200 @ 60Hz
1680 x 1050 @ 60Hz
RB
1600 x 1050 @ 60Hz
1920 x 1080 @ 50Hz
1920 x 1080 @ 60Hz
NTSC-M
NTSC-J
PAL -BDGH I
576i (50Hz)
480i (60Hz)
480p (60Hz)
576p (50Hz)
Input source
AV S-Video YPbPr VGA HDMI
Product information26
720p (25Hz)
720p (30Hz)
720p (50Hz)
720p (60Hz)
1080i (50Hz)
1080i (60Hz)
1080p (24Hz)
1080p (25Hz)
1080p (30Hz)
1080p (24Psf)
1080p (25Psf)
1080p (50Hz)
1080p (60Hz)
• : supported
• Vacant: not supported

Troubleshooting
Problem Solution
No picture Check the following:
• Is the display turned on? Check the power indicator of the
display.
• Is the signal source device turned on? Turn on the device
and try again.
• Are there any loose cable connections? Make sure that all
cables are connected firmly.
• Have you chosen an unsupported output resolution on
the computer? Refer to Supported input signal resolution
on page 25 to select a supported resolution and try again.
• Have you chosen an unsupported output resolution on
the DVD or Blu-ray disc player? Refer to Supported input
signal resolution on page 25 to select a supported
resolution and try again.
No sound Check the following:
• Have you turned on the mute function on the display or
the input source device? Turn off the mute function or
increase the audio volume level and try again.
• Are there any loose cable connections? Make sure that all
cables are connected firmly.
The computer input
image looks strange
The control panel
buttons do not work
• Have you chosen an unsupported output resolution on
the computer? Refer to Supported input signal resolution
on page 25 to select a supported resolution and try again.
• Use the Auto Adjust function (See Advanced settings on
page 34) to let the display automatically optimize the
display of computer image.
• If the result of the Auto Adjust function is not
satisfactory, use the Phase, Horizontal Pos. and
Vertical Pos. functions to manually adjust the image.
Have you locked the control panel buttons? Unlock the
buttons and try again.
Troubleshooting 27

Troubleshooting28
The remote control does
not work
• Have you locked the remote control function? Unlock the
function and try again.
• Check for incorrect battery orientation.
• Check for dead batteries.
• Check your distance and angle from the display.
• Check whether remote control is properly being pointed
at the display’s remote control sensor window.
• Check for any obstacle between the remote control and
the remote control sensor window.
• Check that the remote control sensor window is not
under strong fluorescent lighting, or in direct sunlight.
• Check for any devices (computer or personal digital
assistant, PDA) nearby that transmit infrared signals which
may cause interference to signal transmission between the
remote control and the display. Turn off the infrared
function of these devices.
Remote control failure • Check whether there are other objects between remote
control and television remote control receiving window,
thus leading to failure of remote control.
• Check whether the battery electrode in the remote
control is correct.
• Check whether remote control needs to replace battery.
Machine automatically
shutdown
• Whether set sleep or not.
• Check whether there is sudden power outage.
• Check whether there is no signal automatic shutdown.
Signal out of range • Check whether display is set correctly.
• Check whether resolution is the best resolution.
• Adjust line and field synchronization in menu.
Background has vertical
lines or streaks
Image lack of color, color
is incorrect
• Select automatic correction in menu.
• Adjust clock and phase position in menu.
• Check whether VGA is not well connected or has quality
problem.
• Adjust chromaticity and brightness or contrast in menu.
Display format that is not
supported.
• Select automatic correction in menu.
• Adjust clock and phase position in menu.
Touch function invalid • Check whether touch driver is installed and started.
• Check whether the size of article touched is comparable
with finger.
Touch positioning not
correct
• Check whether driver is properly installed and make
correction.
• Check whether touch pen is facing the screen.
Troubleshooting 29
No picture and no sound • Check whether the machine is started state.
• Check whether signal wire is well plugged, whether
INPUT is corresponding to it.
• If in internal computer mode, check whether internal
computer is started.
With horizontal or
vertical stripes or image
dithering
No color, color is weak
or image is weak
With image but without
sound
• Check whether signal wire is well connected.
• Check whether other electronic equipment or power
tools are placed around the machine.
• Adjust chromaticity and brightness or contrast in menu.
• Check whether signal wire is well connected.
• Check whether mute button is pressed for mute.
• Press VOL. + / - to adjust volume.
• Check whether audio line is connected correctly.
Only one speaker has
sound
• Adjust sound balance in menu.
• Check whether computer sound control panel only sets
up one sound channel.
• Check whether audio line is connected correctly.
VGA output without
sound
Check whether connect external device with headphone
cable.
7/15/15

Appendix: Using Multi-Display Administrator30
Appendix: Using Multi-Display Administrator
The Multi-Display Administrator is a software program that enables remote and
centralized management of a single or multiple BenQ digital signage displays on a host
computer. You can create and edit display groups, view status of displays as well as change
display settings. You can also tile multiple displays and create a video wall easily through a
step-by-step guided wizard.
The key features of the Multi-Display Administrator include:
• Automatic search for displays on the same Ethernet network
• Easy and intuitive management of displays and display groups
• Remote access to display settings and operations including power on/off and input
source selection
• Real-time monitoring of display status
• Step-by-step guided video wall setup
System requirements
To install and run Multi-Display Administrator, the computer must meet the following
minimum hardware and software requirements.
CPU Pentium/Athlon 1.8GHz
Free memory 512 MB
Hard disk space 100 MB
Connectivity An available Ethernet RJ-45 port (for Ethernet connection)
Operating
system
• Windows XP (32-bit)
• Windows Vista (32/64-bit)
• Windows 7 (32/64-bit)
• Windows 8 (32/64 bit)
Appendix: Using Multi-Display Administrator 31
Computer
Hub, switch
or router
Display
RJ-45 cables
Initial Setup
The following operations must be performed before you can use the Multi-Display
Administrator to manage your display(s).
Installing Multi-Display Administrator
Ensure that the computer meets the minimum system requirements set forth on page 30.
1. Locate the setup.exe file and double-click it to begin installation.
2. Follow the on-screen instructions to complete the installation.
Connecting display(s) to the computer
The Multi-Display Administrator supports Ethernet LAN connections to your display(s).
You can choose one that best suits your display deployment and network environment.
For details on the location of ports and connectors, and instructions on the OSD settings,
please refer to the documentations of the computer and display.
RJ-45 Ethernet connection
As illustrated in the figure below, connect the computer and displays to the Ethernet
LAN or WAN network via a hub, switch or router using RJ-45 cables.
To check the network information, go to Settings > Ethernet checking on the Android
system.
 Loading...