

Page 1

L32-6000 / L42-6000 Series
LED Backlight TV
User Manual
Page 2
Copyright
Disclaimer
English
Copyright 2011 by BenQ Corporation. All rights reserved. No part of this
publication may be reproduced, transmitted, transcribed, stored in a retrieval system
or translated into any language or computer language, in any form or by any means,
electronic, mechanical, magnetic, optical, chemical, manual or otherwise, without the
prior written permission of BenQ Corporation.
All other logos, products, or company names mentioned in this manual may be the
registered trademarks or copyrights of their respective companies, and are used for
informational purposes only.
BenQ Corporation makes no representations or warranties, either expressed or
implied, with respect to the contents hereof and specifically disclaims any warranties,
merchantability or fitness for any particular purpose. Further, BenQ Corporation
reserves the right to revise this publication and to make changes from time to time in
the contents hereof without obligation of BenQ Corporation to notify any person of
such revision or changes.
This user manual aims to provide the most updated and accurate information to
customers, and thus all contents may be modified from time to time without prior
notice. Please visit http://www.benq.com for the latest version of this manual.
is a trademark of SRS Labs, Inc.
TruSurround HD technology is incorporated under license from
SRS Labs, Inc.
BenQ ecoFACTS
BenQ has been dedicated to the design and development of greener product as part
of its aspiration to realize the ideal of the "Bringing Enjoyment 'N Quality to Life"
corporate vision with the ultimate goal to achieve a low-carbon society. Besides
meeting international regulatory requirement and standards pertaining to
environmental management, BenQ has spared no efforts in pushing our initiatives
further to incorporate life cycle design in the aspects of material selection,
manufacturing, packaging, transportation, using and disposal of the products. BenQ
ecoFACTS label lists key eco-friendly design highlights of each product, hoping to
ensure that consumers make informed green choices at purchase. Check out BenQ’s
CSR Website at http://csr.BenQ.com/ for more details on BenQ’s environmental
commitments and achievements.
Page 3
Safety, Warning, and Notice
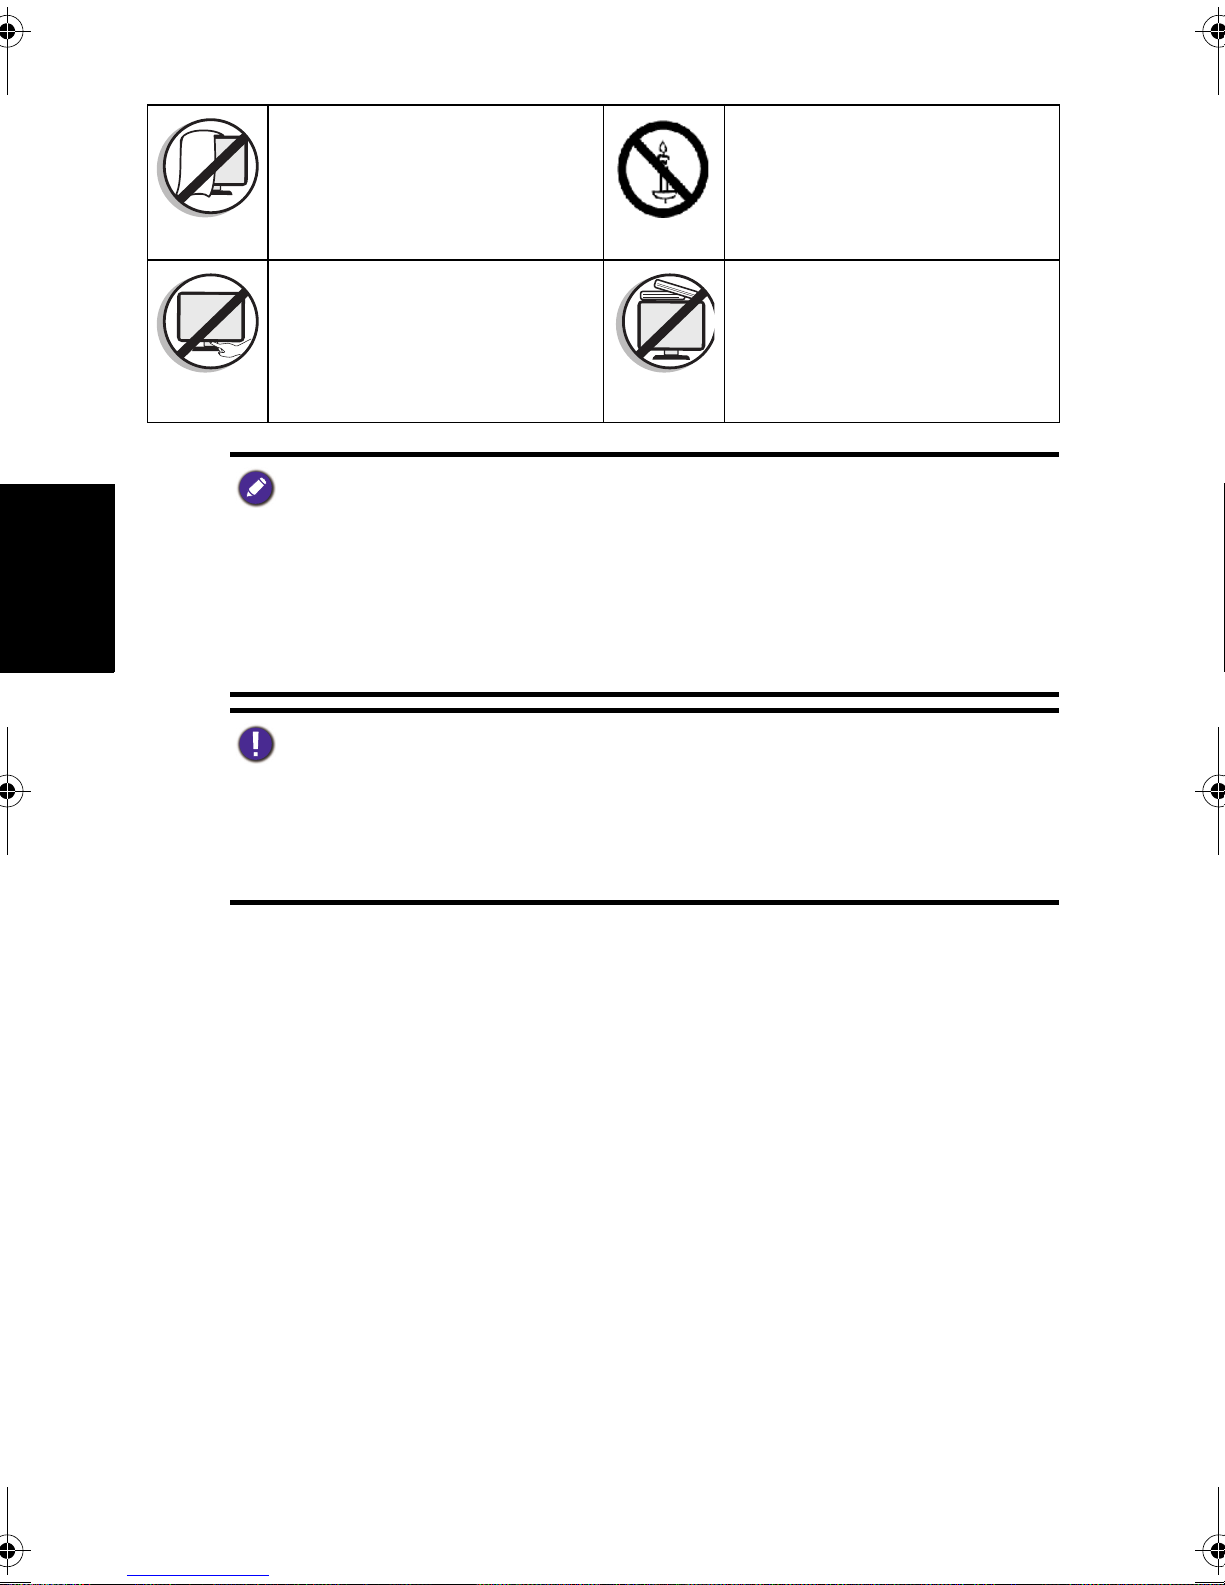
To prevent potential dangers and prolong the service life of the TV, please
observe the following points when installing, operating, and cleaning the TV.
For wall mounting, have a
qualified and experienced
technician mount it safely. Use
only a recommended wall
bracket (optional accessory) for
this TV and ensure that the
bracket is securely screw fixed to
the wall structure, and not just
the wall render, lining or
cladding.
Do not place the TV near water,
like a spa or pool, or in a
position which will allow the
splashing or spraying of water
onto the display.
Do not place the TV near or
above sources of heat, such as
radiators, heaters, fuel stoves
and other heat-generating items
(including audio amplifiers).
Observe all warnings and
cautions as labeled on the TV.
English
Do not place the TV in direct
sun or spot lighting will shine
onto the TV.
Do not place the TV on an
uneven, sloping or unstable
surface (such as a trolley) where
it may fall and cause damage to
itself or others.
For wall mounting, allow
appropriate space on top for
attaching the TV to the wall
bracket.
If recessed into a wall opening,
you must leave appropriate free
space both top and bottom for
mounting and removing the TV.
Do not place the TV in an
enclosed place without allowing
for ventilation.
All Liquid Crystal Display (LCD)
screens have a very thin
protective layer of glass which is
liable to marking or scratching,
and cracking if struck or
pressured. The liquid crystal
substrate is also liable to damage
under excessive force or
extreme temperatures. Please
handle with care.
Safety, Warning, and Notice 3
Page 4
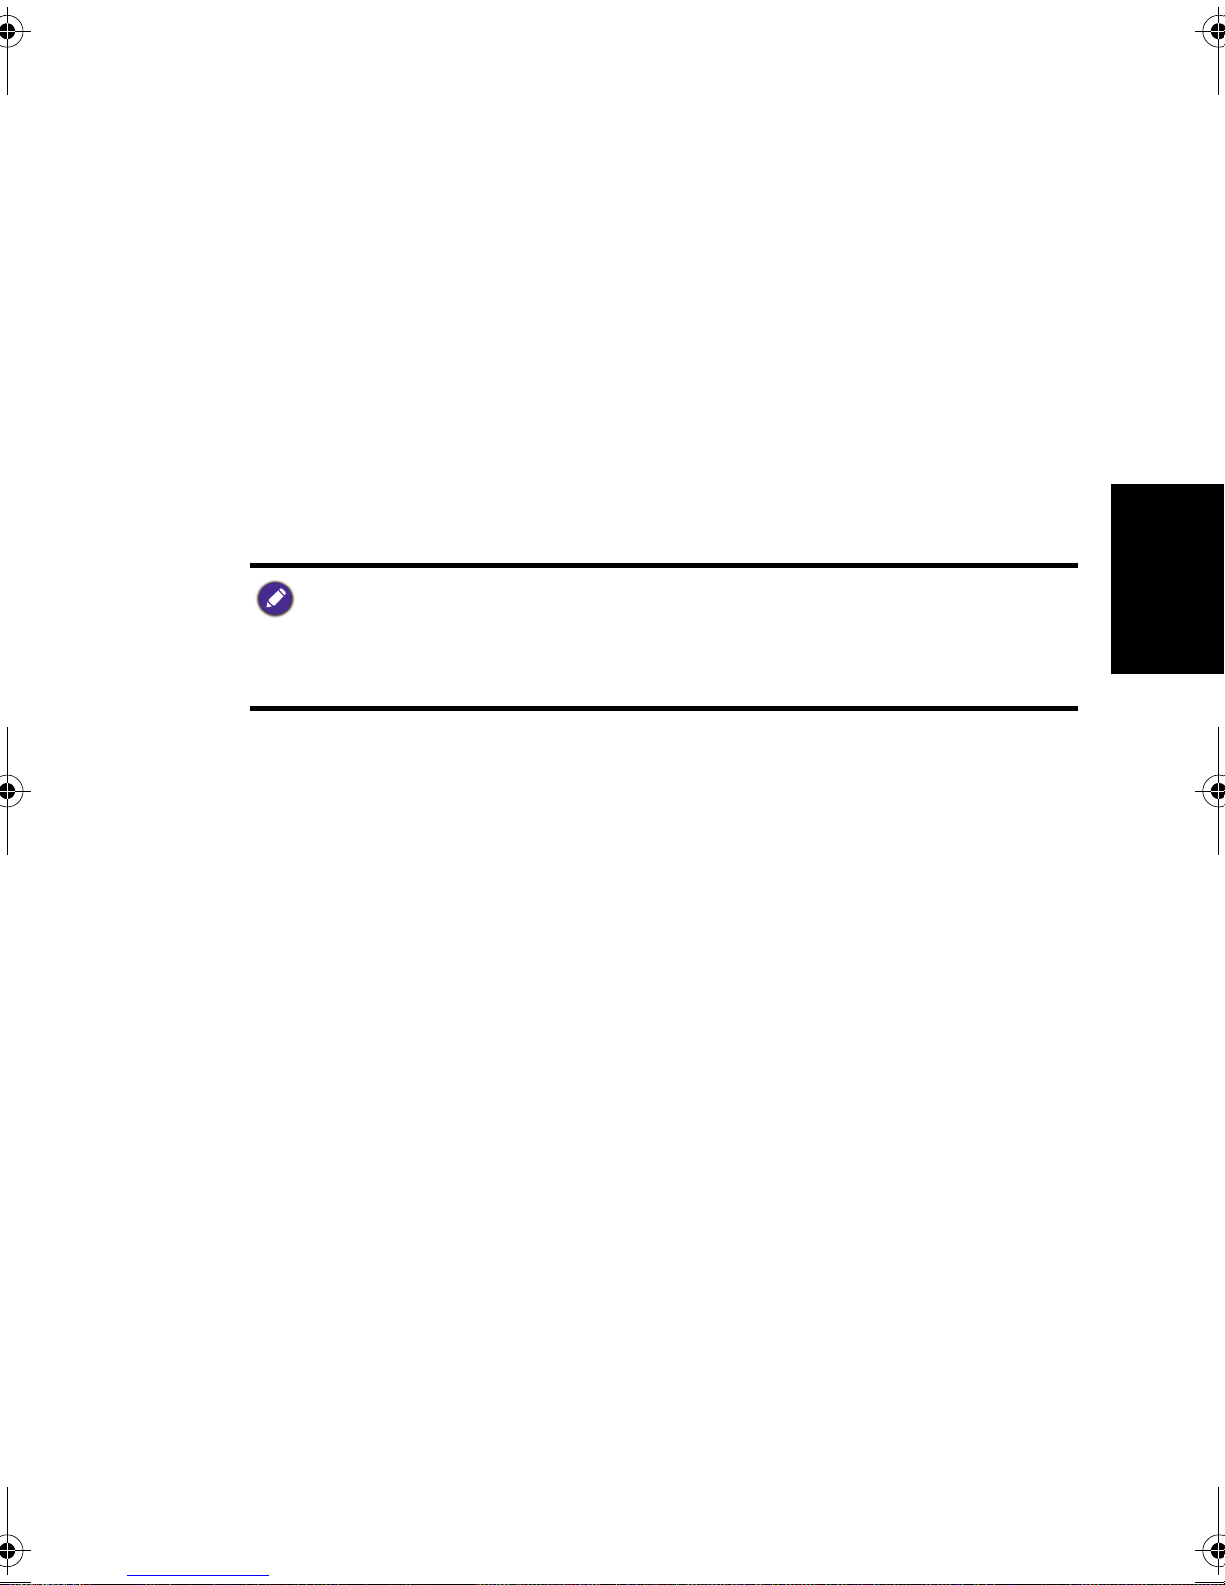
Do not cover or block the vents
and openings while the TV is
switched on.
To prevent the spread of fire,
keep candles or other open
flames away from the TV at all
times.
English
Do not insert your fingers or any
foreign objects into the hinge
and its surrounding area to avoid
Do not apply excessive force or
place heavy stuff on the TV to
avoid possible damage.
possible injury to you or damage
to the TV.
• Only use the power cord supplied with the TV. Never use a power cord which appears
damaged or frayed, or change the plug type on the power cord.
• Use only a properly grounded plug and receptacle. -- An improper ground may cause
electric shock or equipment damage (Class l Equipment only).
• Be aware of the total loading when using extension cords or multiple outlet power
boards.
• When installing the TV, incorporate a readily accessible disconnect device in the fixed
wiring, or connect the power cord to socket-outlet which must be provided near the
TV and easily accessible. If a fault should occur during operation of the unit, operate
the disconnect device to switch the power supply off, or disconnect the power cord.
• This TV has been engineered and manufactured with the highest priority on safety,
however, IMPROPER HANDLING OR USE CAN RESULT IN POTENTIAL
ELECTRICAL SHOCK OR FIRE HAZARD. Please handle this TV with care. If
damaged, turn off the power and unplug the power cord from the TV. Transport the
TV to your nearest BenQ authorized service center for repair.
• There are no user serviceable parts in this TV. Never unscrew or remove any covers.
There are dangerous voltages inside. Turn off the power and unplug the power cord
before moving the TV.
Care and cleaning information
• Always turn off and disconnect the TV from the mains power before cleaning.
• Do not use cream, liquid, aerosol or spray cleaners. Use only a slightly damp well
wrung-out (drip-free) and lint-free, clean soft cloth and lightly wipe the TV.
• If necessary, use a pH-neutral liquid dish-washing detergent diluted with water on a
separate clean lint-free cloth to remove oil or grease marks. Wipe over again with a
clean dry lint-free cloth to remove any smear marks.
• When cleaning the TV (including the frame around the screen), please use a proper
cleaning tool harmless to the materials used by the TV in order to avoid possible
scratches or damages.
• Under close examination and in certain circumstances, you may notice that a few
non-active pixels appear on the screen as a fixed point of color. Please note that this
does not affect the performance of your product as it is usually not visible at normal
viewing distances.
• If the TV is not going to be used for an extended period of time (like when you are
going away for holidays), it should be switched off and unplugged from the wall
outlet. You should also consider removing the batteries from the remote control (as
they may leak).
• The TV is not suitable for installation on certain transportation vehicles (such as
cars, yachts, and so on) to avoid possible damage to the TV because of vibration.
Care and cleaning information4
Page 5
• LCD (Liquid Crystal Display) screens, like plasma (PDP) and conventional CRT
(Cathode Ray Tube) screens, are also susceptible to “screen burn-in” or “image
retention” which can be found on the screen as visible fixed lines and shades and
cannot be removed. To avoid such permanent damage to the screen, please take the
following preventive measures when using your TV:
(1) Avoid displaying still images (like On-Screen Display menus, TV station logos,
fixed/inactive text or icons) for more than two hours.
(2) Change the aspect ratio from time to time. Fill the entire screen with the image
and eliminate the black bars whenever possible. Avoid displaying images in 4:3
aspect ratio over a long period of time, otherwise there may be visible burn
marks on the screen as two vertical lines.
(3) Turn on the ECO Mode function when displaying PC input image.
(4) This TV is designed for home use only. Do not use it as a commercial display in
public areas.Please note that the product warranty does not cover any screen
damages that result from the failure to take the measures above.
Please note that the product warranty does not cover any screen damages
that result from the failure to take the measures above.
Many of the electronic components used by the TV contain high tension coils, and thus
inductance occur when circuits pass through these components. This inductance is a
normal physical phenomenon, which can be found in many electronic devices in daily life
such as computers and fluorescent lights. Therefore, there is no concern or worry about
the use and safety of this TV.
English
Safety notice for batteries
The use of the wrong type of batteries may cause chemical leaks or
explosion. Please note the following:
• Always ensure that the batteries are inserted with the positive and negative
terminals in the correct direction as shown in the battery compartment.
• Different types of batteries have different characteristics. Do not mix different types.
• Do not mix old and new batteries. Mixing old and new batteries will shorten battery
life or cause chemical leaks from the old batteries.
• When batteries fail to function, replace them immediately.
• Chemicals which leak from batteries may cause skin irritation. If any chemical matter
seeps out of the batteries, wipe it up immediately using a dry cloth, and replace the
batteries as soon as possible.
• Due to varying storage conditions, the battery life for the batteries included with
your TV may be shortened. Replace them within 3 months or as soon as you can
after initial use.
Safety notice for remote control
If the TV comes with a remote control, please note the following:
• Do not put the remote control in the direct heat, humidity and avoid fire.
• Do not drop the remote control.
• Do not expose the remote control to water or moisture. Failure to do so could
result in malfunction.
• Confirm there is no object between the remote control and the remote control
sensor of the TV.
• If the remote control will not be used for an extended period, remove the batteries.
Safety notice for batteries 5
Page 6

English
<Note>
Safety notice for remote control6
Page 7
Table of Contents
Copyright ................................................................................................2
Disclaimer................................................................................................2
BenQ ecoFACTS....................................................................................2
Safety, Warning, and Notice ................................................................3
Care and cleaning information............................................................4
Safety notice for batteries....................................................................5
Safety notice for remote control........................................................5
Getting to know your TV ....................................................................9
English
Front view................................................................................................................. 9
Remote Control (Option 1)...............................................................................10
Remote Control (Option 2)...............................................................................13
Remote control usage tips ...........................................................................16
Control panel ...........................................................................................17
Rear view (L32-6000) ..........................................................................................18
Rear view (L42-6000) ..........................................................................................19
Connecting power ................................................................................................20
Initial setup ................................................................................................ 21
Adjusting aspect ratio ..........................................................................................21
Navigating the OSD menu ................................................................ 22
Picture menu .................................................................................... 23
Sound menu ..............................................................................................24
TV menu ....................................................................................................25
Table of Contents 7
Page 8
Time ...........................................................................................................26
Setup ...........................................................................................................27
Viewing images/videos or listening to the music .........................28
Supported devices and file formats:................................................................. 28
Photo playback ............................................................................................... 29
Music playback................................................................................................ 29
Video playback................................................................................................ 30
Text playback.................................................................................................. 30
Reference...............................................................................................31
English
Dimensions ............................................................................................................ 31
Specifications.........................................................................................33
Supported component (YPbPr) video timing ....................................34
Supported HDMI video timing .......................................................................... 34
Supported HDMI (for connecting with a computer) input signal
resolutions ................................................................................................35
Supported computer (D-sub/VGA) input signal resolutions...................... 35
Setting up appropriate output resolution on a computer.................... 36
Troubleshooting ...................................................................................37
Table of Contents8
Page 9
Getting to know your TV
1
23 4
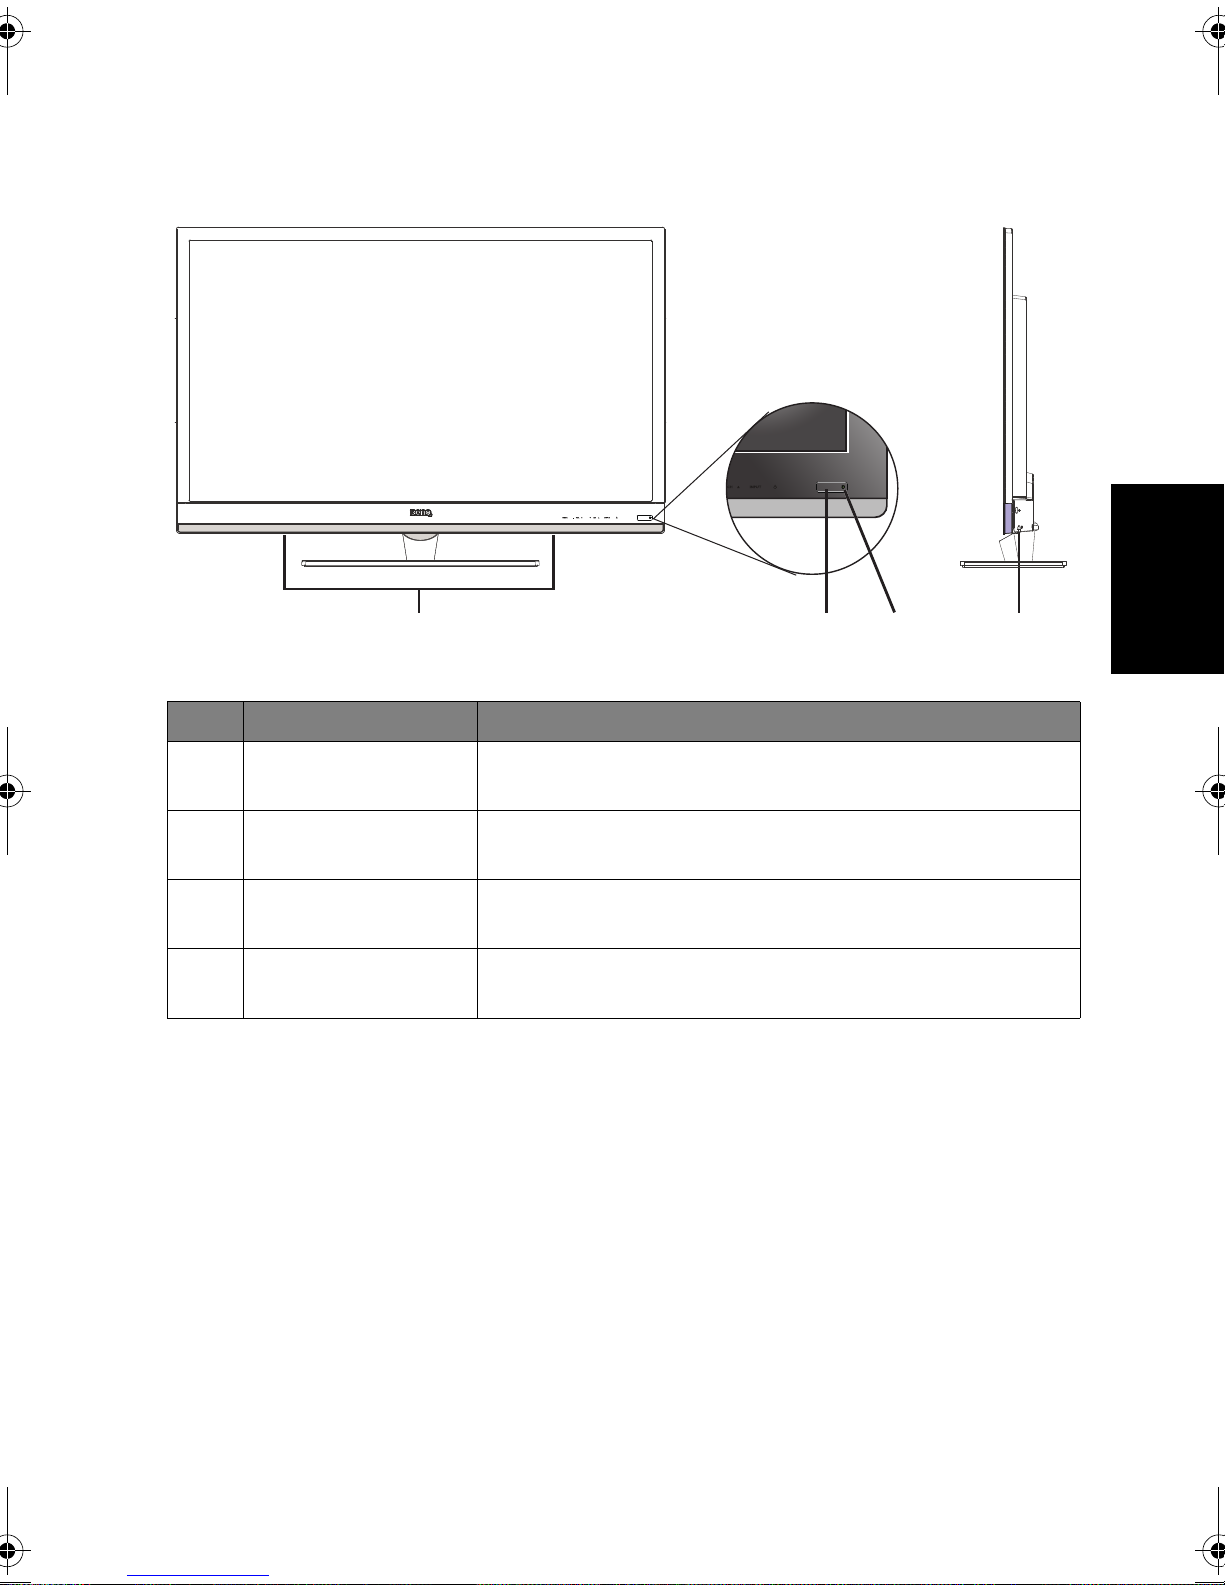
Front view
English
No. Name Description
1Speakers
2
3
4
Remote control
sensor window
Power/status
indicator
Hard off switch
(L42-6000 only)
Left and right speakers for reproducing high-quality
stereo audio.
Receives command signals from the remote control.
• Lights up blue when the TV is powered on.
• Lights up red when the TV is in standby mode.
Turns off the TV without any power consumption. Use
it when you want to shut down the TV for a long time.
Getting to know your TV 9
Page 10
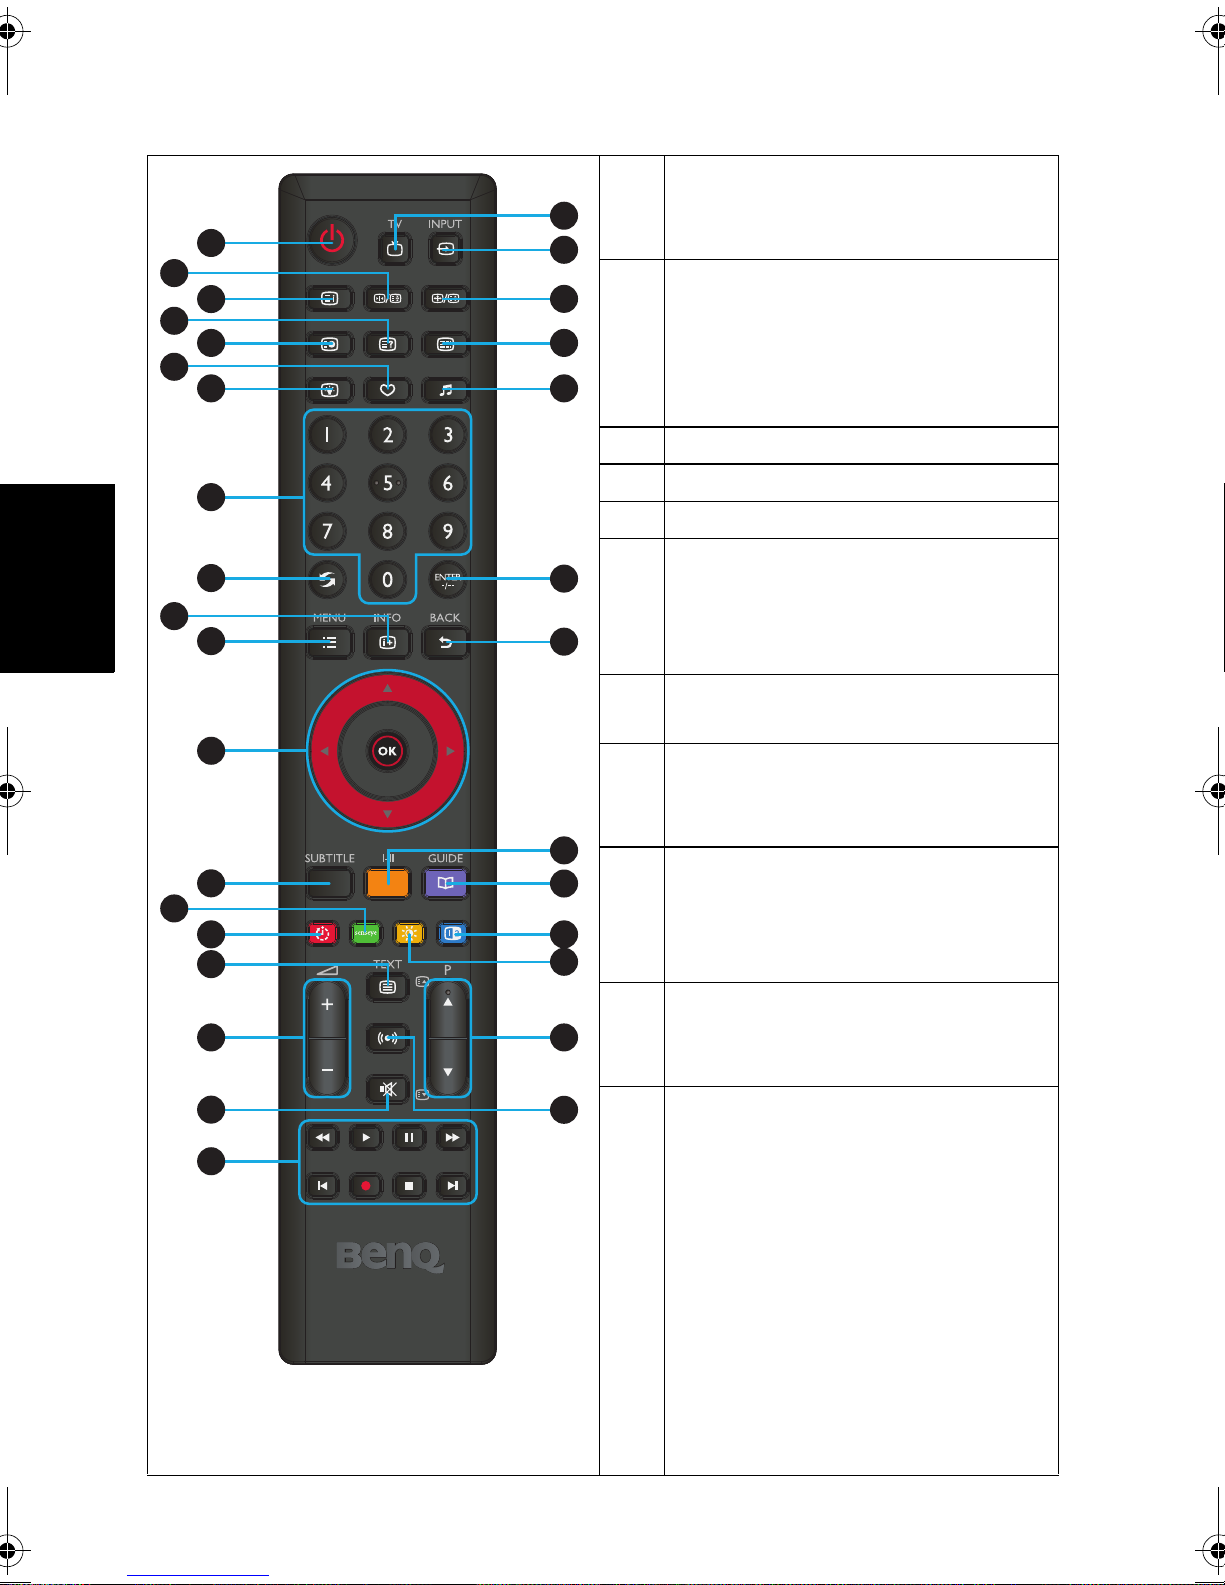
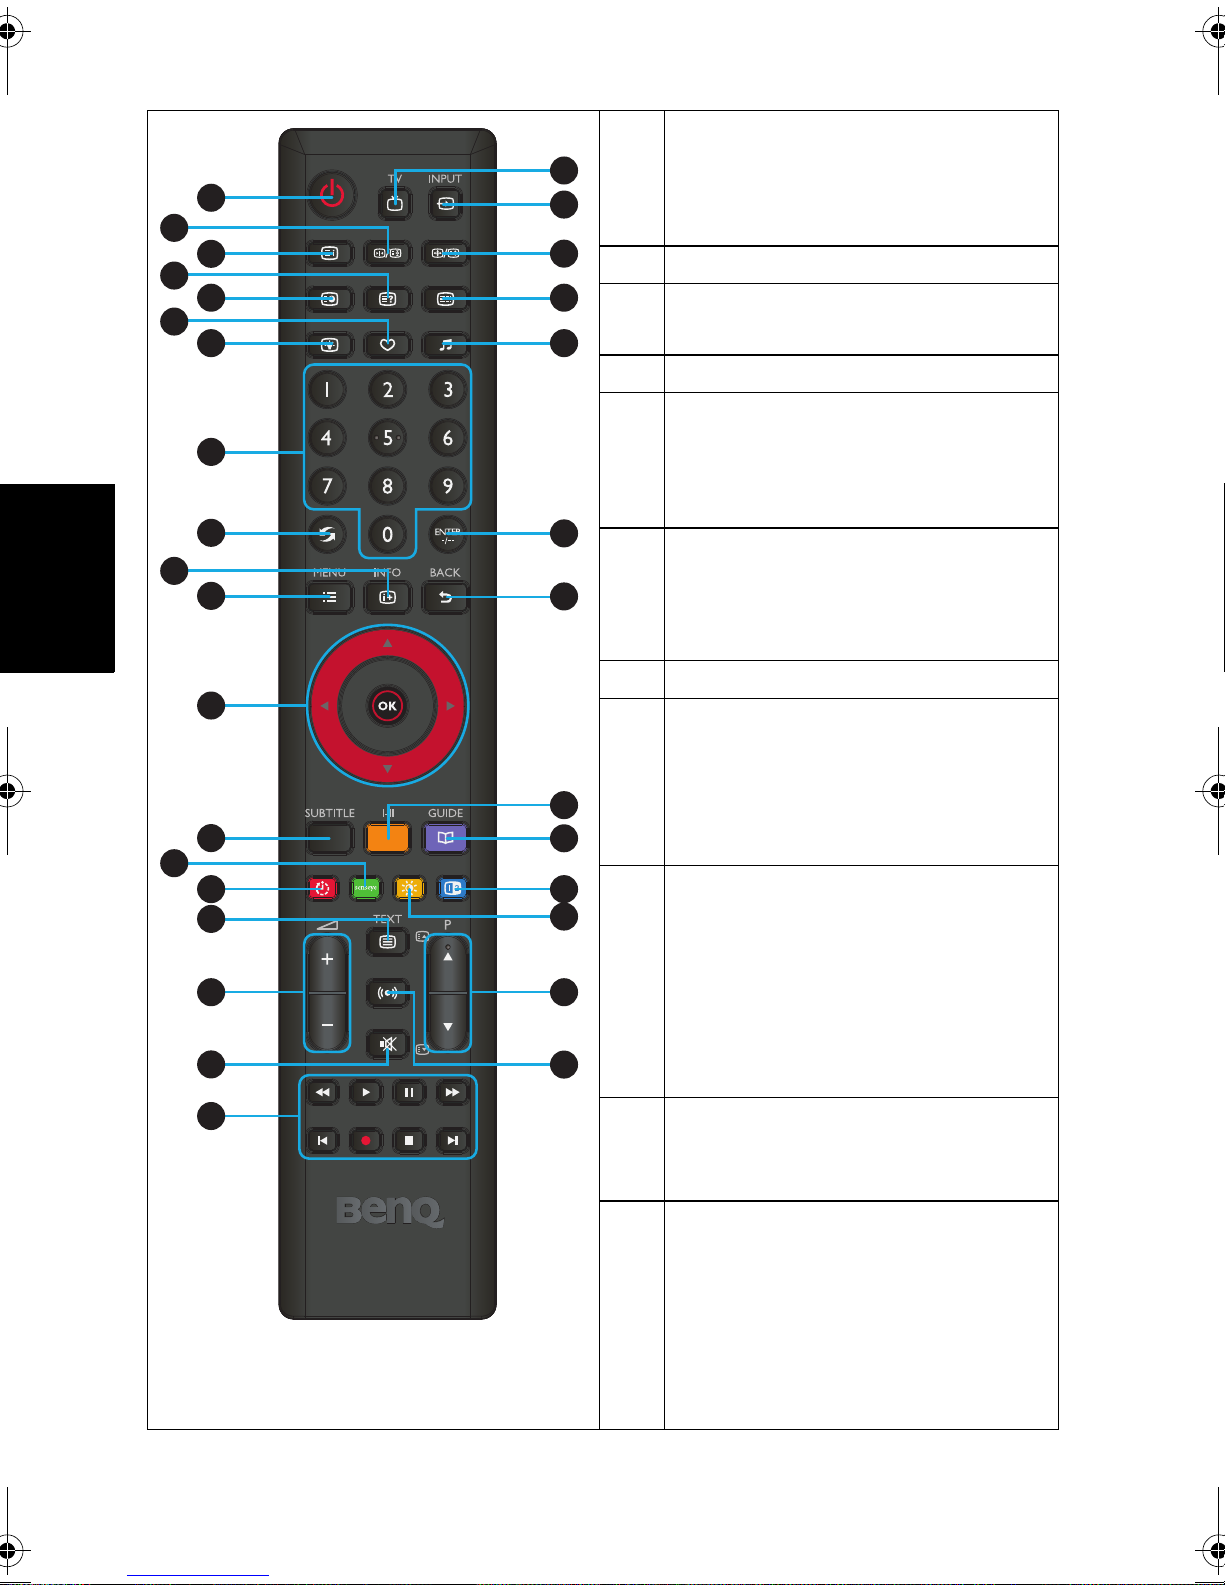
Remote Control (Option 1)
English
10
14
1
20
1
2
3
4
5
6
7
21
2
22
23
24
Power / Standby
Press this button to power the TV
on or put it to the standby mode.
Freeze
Press this button to freeze the
image on the screen. Press the
button again to resume viewing in
real time.
3
8
4
5
6
9
25
(No function)
(No function)
(No function)
Favorite List
Press this button to jump to one of
the favorite channels you have
11
26
7
stored.
When Dynamic Backlight is off, you
can set the backlight brightness.
12
8
0-9 Channel selection
Press these buttons to select the
program you wish to view.
13
15
16
27
28
29
30
9
Recall
Press to toggle between the
current channel and the previous
one.
17
9
18
19
Getting to know your TV10
31
32
10
11
INFO
Press this button to display the
input source information.
MENU
Press this button to display the
OSD menu for commands and
settings. Press it again to close.
Page 11

1
3
5
7
8
11
10
12
15
18
16
14
4
6
9
2
9
17
21
22
23
24
26
25
28
29
31
32
20
27
30
19
13
12
////OK
When the OSD (On-Screen
Display) menu displays on-screen:
• Press /or to select settings.
• Press /or to adjust settings.
• Press
BACK to execute
selections.
(No function)
13
Senseye menu / Green
14
Enters Senseye related menu.
Green: Runs the command labelled
green in the OSD menu when
showing files on a connected USB
device or editing channels.
Sleep Timer / Red
15
English
Sleep Timer: Press this button to
set the automatic shut-off timer.
Red: Runs the command labelled
red in the OSD menu when
showing files on a connected USB
device or editing channels.
(No function)
16
+/- Volume
17
Press these buttons to raise or
lower the volume level.
Mute
18
Press this button to mute the sound
output. Press it again to restore the
sound output.
Navigation Controls
19
Used when showing files on a
connected USB device.
TV
20
Press this button to switch directly
to the (traditional) analog TV mode
to view ATV channels.
21
INPUT
Press these buttons to sequentially
change channels.
Getting to know your TV 11
Page 12
22
20
1
2
3
4
5
6
7
21
22
23
24
23
24
25
Aspect Ratio
Aspect Ratio: Press this buttonto
adjust the screen image aspect
ratio.
(No function)
Audio
To select a sound mode.
Confirms channel.
English
10
14
11
12
13
15
16
17
18
26
8
BACK
In the OSD menu, press this button
to return to the previous menu
page.
9
25
27
Sound mode
Press to toggle among available TV
26
sound modes (may vary from your
TV sound system).
28
29
(No function)
Blue
Runs the command labelled blue in
the OSD menu when showing files
27
28
29
30
30
on a connected USB device or
editing channels.
Picture / Yellow
Picture: Press this button to select
a desired preset picture mode
9
31
Yellow: Runs the command labelled
yellow in the OSD menu when
showing files on a connected USB
32
device or editing channels.
19
Getting to know your TV12
31
32
Channel
Press these buttons to sequentially
change channels.
SRS TruSurround HD
Press these buttons to turn on/off
the SRS TruSurround HD sound
effect.
Page 13

Remote Control (Option 2)
1
19
1
2
3
4
5
6
7
8
9
20
21
22
23
24
25
2
Power/Standby
Press this button to power the TV
on or put it to the standby mode.
Senseye / Green
• When showing files on a
connected USB device or editing
channels, runs the command
labelled green in the OSD menu.
• To access the Senseye related
10
11
12
26
3
menu, press the
the remote control and select
Picture > Senseye Settings.
Sleep Timer / Red
• Sleep Timer: Press this button to
set the automatic shut-off timer.
MENU button on
English
• Red: Runs the command labelled
red in the OSD menu when
13
27
showing files on a connected USB
device or editing channels.
14
15
16
17
18
(No function)
(No function)
(No function)
(No function)
(No function)
(No function)
0-9 Channel selection
Press these buttons to select the
30
28
29
4
5
6
7
8
9
10
program you wish to view.
9
Getting to know your TV 13
Page 14

English
Recall
11
19
1
2
3
4
5
6
7
8
9
20
21
22
23
24
25
Press to toggle between the current
channel and the previous one.
Audio
12
To select a sound mode.
+/- Volume
13
Press these buttons to raise or
lower the volume level.
SRS TruSurround HD
14
10
Press this button to turn on/off the
SRS TruSurround HD sound effect.
////OK
When the OSD (On-Screen
Display) menu displays on-screen:
11
15
26
12
• Press /or to select settings.
13
27
• Press /or to adjust settings.
• Press
BACK to execute
selections.
14
28
16
MENU
Press this button to display the
OSD menu for commands and
15
settings. Press it again to close.
16
17
18
Navigation Controls
17
Used when showing files on a
29
30
9
connected USB device or editing
channels.
Favorite List
18
Press this button to jump to one of
the favorite channels you have
stored.
(No function)
19
INPUT
20
Press these buttons to sequentially
change channels.
Picture/ Yellow
21
Picture: Press this button to select a
desired preset picture mode
Yellow: Runs the command labelled
yellow in the OSD menu when
showing files on a connected USB
device or editing channels.
Getting to know your TV14
Page 15

22
1
3
5
7
8
11
10
12
15
20
16
14
4
6
9
2
21
13
23
24
25
26
28
27
22
9
17
19
29
30
18
Blue
Runs the command labelled blue in
the OSD menu when showing files
on a connected USB device or
editing channels.
23
24
(No function)
Freeze
Press this button to freeze the
image on the screen. Press the
button again to resume viewing in
real time.
25
26
27
Aspect Ratio
Aspect Ratio: Press this buttonto
adjust the screen image aspect
ratio.
Confirms channel.
Channel
English
Press these buttons to sequentially
change channels.
28
Mute
Press this button to mute the
sound output. Press it again to
restore the sound output.
29
INFO
Press this button to display the
input source information.
30
BACK
In the OSD menu, press this button
to return to the previous menu
page.
Functions on the remote control may vary depending on different sales regions.
Getting to know your TV 15
Page 16

• The remote control must be held at an
30 degrees
6 meters
• Do not cover the sensor window on
English
Remote control usage tips
angle within 30 degrees of the TV's
remote control sensor window to
function correctly. The distance
between the remote control and the
sensors should not exceed 6 meters.
the front of the TV, or place objects in
front of it which will block the direct
line-of-sight between the remote
control and the sensor window on TV.
• Do not let the remote control become wet, or place it in humid environments (like
bathrooms.)
• If the remote control sensor window on the TV is in direct sunlight or strong light, the
remote control may not operate properly. In this situation, change the light source or
readjust the angle of your TV, or operate the remote control from a location closer to
the remote control sensor window on the TV.
Getting to know your TV16
Page 17

Control panel
12 34
5
English
No. Name Description
1
MENU button
VOL (Volume)
2
-/+ button
Displays the On-Screen Display (OSD) menu if not visible,
or exits the current menu if displayed.
• Adjusts the volume level of the built-in speakers.
• In the OSD menu, moves the selection highlight left or
right or changes settings.
• Sequentially selects the previous or next tuned TV
3
CH (Channel)
/button
channel.
• In the OSD menu, moves the selection highlight up or
down or changes settings.
• Cycles through input signal sources.
4
INPUT button
• In the OSD menu, executes selections or to enter a
submenu you have selected.
5
(Power/
standby button)
Toggles the TV between standby mode and on.
Getting to know your TV 17
Page 18

Rear view (L32-6000)
1
7
3
4
2
5
6
8
English
No. Name Description
1 RF IN (Antenna/TV) Connects to an antenna TV/CATV cable system.
2AV1 IN
3 YPbPr IN
4 DC IN Connects to the power cable.
5 PC AUDIO IN (or DVI)
6 VGA Connects to the video (D-Sub) output of a PC.
7HDMI
8USB
Connects to the outputs (composite video and
audio) on a connected device.
YPbPr: Connects to the Component Video (Y Pb
Pr) output of an appropriate source device.
Audio (L: left; R: right): Connects to the audio
output of an appropriate source device to match
that of the Component Video output.
Connects to the audio output to match that of the
PC video (D-Sub) or DVI output.
Connects to the HDMI digital audio/video or DVI
digital video output of your digital source device.
Connects to USB external storage devices so that
you can use the TV to view digital photos.
Getting to know your TV18
Page 19

Rear view (L42-6000)
1
2
3
4
10
5
English
6
7
8
911
No. Name Description
1USB
2 RF IN (Antenna/TV) Connects to an antenna TV/CATV cable system.
3 SPDIF
4 Headphone output Connects to stereo headphones.
5AV OUT
6AV2 IN
Connects to USB external storage devices so that
you can use the TV to view digital photos.
Connects to the SPDIF digital audio input of a
connected device.
Connects to the inputs (composite video and audio)
on a connected device.
Connects to the outputs (composite video and
audio) on a connected device.
Getting to know your TV 19
Page 20

7 VGA Connects to the video (D-Sub) output of a PC.
AV
8 PC AUDIO IN
9AV1 IN
10 YPbPr IN
11 HDMI
English
Connecting power
Connects to the audio output to match that of the
PC video (D-Sub) output.
Connects to the outputs (composite video and
audio) on a connected device.
YPbPr: Connects to the Component Video (Y Pb
Pr) output of an appropriate source device.
Audio (L: left; R: right): Connects to the audio
output of an appropriate source device to match
that of the Component Video output.
Connects to the HDMI digital audio/video or DVI
digital video output of your digital source device.
Front views, rear views, available jacks, jack names, and their locations may be different
depending on the TV models available in your country or region.
L32-6000
L42-6000
Getting to know your TV20
USB1USB2
RF IN
SPDIF
AV OUT
AV2 IN
VGA
AUDIO IN
PC
AV1 IN
YPbPr IN
HDMI 2HDMI 3
HDMI 1
Pb
L
Pr
Y
R
Page 21

Initial setup
When first time turning on the TV, you will be asked to do the initial setup.
Please follow the on-screen instructions to specify the use of TV (family or
retail) and complete channel scanning.
Adjusting aspect ratio
The TV can resize and reshape an image to suit your requirements. The
visual result depends upon the setting your have chosen, and the original
aspect ratio of the input image. Press Aspect Ratio on the remote control to
cycle through different aspect ratios.
Aspect ratio of input video
Mode Description and usage
Display aspect ratio is 4:3.
Recommended for use when
4:3
Panorama
Zoom
viewing video sources already in
the 4:3 aspect ratio (such as
analog TV and PC video input).
Display aspect ratio is enlarged
non-proportionally from 4:3 to
16:9 while avoiding distortion on
the center of the image
(distortion on the edge is more
obvious though).
Recommended for use when
viewing a 4:3 video in full screen.
Display aspect ratio is enlarged
proportionally from 4:3 to 16:9.
Part of the top and bottom areas
(only those exceeding the
displayable area of the screen) of
the image is cut off.
Recommended for use when
viewing a letter box video already
having two black strips on top and
bottom of the screen.
4:3
English
16:9
Not
recommended
Not
recommended
Not
recommended
Getting to know your TV 21
Page 22

English
Navigating the OSD menu
Stretches a 4:3 image to 16:9
aspect proportions.
Recommended for use when
16:9
viewing video sources which are
already in 16:9 aspect such as
digital TV and most widescreen
DVDs.
• Available aspect ratio options are dependent on the type of input signal being selected.
When viewing PC input (via D-Sub or DVI), only full screen and wide screen are
available for selection.
• To avoid possible “image retention” or “screen burn-in” on the LCD screen of your
TV, it is recommended that you change the aspect ratio from time to time and prevent
the TV from displaying a static image for a prolonged period of time.
• The available menu items are dependent on the input source being selected.
Unavailable items will be greyed out or not displayed.
To enter the On-Screen Display (OSD) menu, press MENU on the remote
control or MENU on the TV. Next, follow the navigation guides shown on
the screen bottom.
For example, you can:
1. Press or on the remote control to move among 4 different main
menus:
2. Press
Picture, Sound, TV, Time, and Setup.
OK on the remote control to enter the submenu of a selected (as
highlighted on the screen) menu.
3. Press or on the remote control to select an item in the submenu.
4. Press / on the remote control to adjust settings.
5. Press
close the OSD menu. (Pressing
Back on the remote control to return to the previous menu or
MENU on the TV closes the OSD menu
directly.)
See the following section for more information on OSD.
Available menu items may vary depending on the selected input source.
Navigating the OSD menu22
Page 23

Picture menu
Item Function
English
Picture Mode
Back Light
Brightness
Contrast
Saturation
Hue
Sharpness
Color
Temperature
Selects a picture mode you want to use.
This option is not available when the computer D-Sub (VGA) input is in use.
Adjusts the screen brightness in a low-light environment.
This option is not available unless the Dynamic Backlight Control in Senseye
Setting is disabled.
Adjusts image black level, so that detail in the dark areas of an
image can be seen.
Adjusts image white level so that whites do not wash out
surrounding colors.
Adjusts the dark and light areas for colors. The darker the color,
the less saturation will be.
Adjusts colors shown in the color spectrum.
Adjusts image sharpness level.
When viewing text-rich contents from the VGA or DVI input, you may need
to set the sharpness level to 0 for a suitable display result.
Adjusts the color tint of the black and white part of the image.
You can choose from Normal, Warm, User or Cool.
Senseye
Setting
Adjusts settings in Gamma, Dynamic Backlight Control, ACE
(Automatic Contrast Enhancement), Black Extension, Dynamic
Noise Reduction, MPEG NR, Film Mode, Color Enhancement, and
HDMI RGB Level.
Navigating the OSD menu 23
Page 24

Sound menu
English
Item Function
Sound Mode
Bass
Tre bl e
Balance
Speaker Out
(L42-6000 only)
SPDIF Type
(L42-6000 only)
SPDIF Delay
(L42-6000 only)
Auto Volume
Control
SRS TruSurround
HD
Selects a sound effect: Standard, Music, Movie, Speech, and
User.
Adjusts the low tones of sound.
Adjusts the high tones of sound.
Adjusts the distribution of sounds between the left and the
right built-in speakers.
Turns on/off the TV speakers when SPDIF is in use.
Turns on SPDIF when a fiber audio cable is connected.
Synchronizes audio and video playback (also known as “lip-sync
correction”).
Turns on/off the automatic volume level control. When Auto
Volume Control is on, it provides a constant volume level.
Turns on/off the SRS TruSurround HD sound effect.
SRS TruSurround HD™ creates an immersive, feature-rich
surround sound experience from two speakers, complete with
rich bass, high frequency detail and clear dialog.
Navigating the OSD menu24
Page 25

TV menu
English
Item Function
Auto Scan
Manual Scan
Channel Edit
Favorite Channel
Show Signal Status
Channel Volume
Control
Press OK to start automatic channel scanning. All detected
channels will be automatically stored on the TV.
Scans TV channels manually.
Customizes the number and name of a channel.
Selects the channels you like and make a list, so you can find
these channels easier.
Displays the signal strength.
Adjusts the volume difference between different channels to
avoid unstable volume when changing channels.
Navigating the OSD menu 25
Page 26

Time
English
Item Function
Date
Time
Power On Timer
Timer
Power Off Timer
Timer
Autoplay Channel
Select Autoplay
Channel
Channel Autoplay
Timer
Sets up the date.
Sets up the time.
Turns on the Power On Timer.
Sets up the time of automatic power on.
Turns on the Power Off Timer.
Sets up the time of automatic power off.
When the TV is on, the TV will automatically switch to
this channel at the time you specify.
Selects the channel for the TV to automatically switch
to at the time you specify.
Sets up the time for the TV to switch to the preset
channel.
Navigating the OSD menu26
Page 27

Setup
English
Item Function
Language
ECO Mode
Display Area
Rest Remind
Power On Settings
Demo Mode
Reset Default
Selects the language for the OSD menu.
Turns off the TV if no signal is detected for 10 minutes (30
seconds for PC connection).
Adjusts the edges of the screen that may not be seen reliably.
Reminds you to stand up and take a break once you have
been watching TV for 2 hours.
Creates custom settings for turning on the TV.
Displays the difference between original video quality and
adjusted video quality (processed by the TV).
This mode is available only when the TV use is set to “Retail”
(store).
Restore all settings to their default values.
Once the TV is reset, it will return to the initial setup state.
Navigating the OSD menu 27
Page 28

Viewing images/videos or listening to the music
If you have images, videos, or music stored in a USB device, you can view/
listen to them on the TV:
1. Turn on the TV, and then plug a USB device into the USB port of the TV.
English
Supported devices and file formats:
2. Repeated press
selected.
3. Press orto select a media type (Photo, Music, Video, or Text), and
then press
4. Press , , or on the remote control to move to a file you wish
to start and press
be played backed in a sequence.
5. During playback, press the INFO button on the remote control to see
on-screen instructions.
Before file playback, you can press the MENU button on the remote control
for the following options:
a) Media Type: Chooses the file type for playback.
b) Thumbnail Size: Selects the dimensions of each file thumbnail.
c) Copy: Copies files. Press 0 for multiple selection.
d) Paste: Pastes files to be copied
e) Delete: Removes selected files
f) Photo Frame: Plays back the photos set inside the photo frame.
INPUT or / on the remote control until USB is
OK.
OK on the remote control. All files will automatically
USB 2.0
device
Photo file
format
Music file
format
Video file
format
File system
USB memory, USB card reader, HDD (mass storage class) 30Mbps
JPEG (maximum resolution 6666x5000)
BMP (L42-6000 only; maximum file size 5MB)
PNG (L42-6000 only; maximum file size 2.5MB)
GIF (L42-6000 only; maximum file size 2.5MB; still GIF only)
MP3 (sampling frequency 8~48KHz; bit-rate 8~320Kbps; mono/
stereo)
WMA (sampling frequency 8~48KHz; bit-rate 32~192Kbps; mono/
stereo)
MPEG-1/2 (*.DAT, *.MPG, *.VOB; maximum bit-rate 30Mbps)
MPEG-4 (L42-6000 only; *.AVI, *.VID, *.MP4; maximum bit-rate
30Mbps)
H.264/AVC (L42-6000 only; *.AVI, *.MP4; maximum bit-rate 30Mbps)
RealMedia (*.RM, *.RMVB; maximum bit-rate 30Mbps)
TS/MKV (L42-6000 only; *.TS, *.MKV; maximum bit-rate 30Mbps)
FLV (L42-6000 only; *.FLV; maximum bit-rate 30Mbps)
FAT / FAT32 / NTFS (supporting Primary Partition only)
Navigating the OSD menu28
Page 29

Photo playback
In the Photo menu, you have the following options:
1. Press /or / to select a photo, and then press
playback.
2. In the photo playback mode, press the green button on the remote
control to decide the playback duration of each photo; press the yellow
button for effects. In addition, press the MENU button for the options
below:
• Play/Pause
• Repeat (None / Repeat One / Repeat All)
• Shuffle (On / Off)
• Rotate: Changes the orientation of the photo displayed on the screen.
• Zoom: Enlarges the viewing size of the photo displayed on the screen.
• Show Info: Displays the information of the selected photo.
• Music: If the music is being played back, you can use the music as the
background music while viewing photos.
• Frame Image: Adds selected photos into the electronic photo frame.
3. To pause the photo playback, press or .To stop the photo
playback, press .
4. Press the BACK button to quit the photo playback mode.
OK to start
English
Music playback
In the Music menu, you have the following options:
1. Press /or / to select a music file, and then press
playback.
2. In the music playback mode, press the red button on the remote control
for repeat-related functions; press the yellow button for shuffle; press the
blue button for screen off. In addition, press the navigation control
buttons for the options below:
• Play/Pause
• Repeat (None / Repeat One / Repeat All)
• Sound Mode (Off / Rock / Pop / Live / Dance / Techno / Classic / Soft)
• Shuffle (On / Off)
• Show Info: Displays the information of the selected music file.
• Hide Spectrum: Shows or hides the audio spectrum.
• Lyrics Options: Shows lyrics embedded in the music file if available.
• Screen Off: Turns off the screen, so you can hear the music only.
3. To pause the music playback, press or .
4. During music playback, press the BACK button keep the music as
background music. At the same time, you can view photos or text.
Besides, press and hold the left or right button to fast rewind or fast
OK to start
forward the music playback at the interval of 3 seconds. If you press
Navigating the OSD menu 29
Page 30

or , you can fast rewind or fast forward the music playback at 2X
speed.
5. To stop the music playback, press . Press the BACK button to quit
the music playback mode.
Video playback
In the Video menu, you have the following options:
English
1. Press /or / to select a video file, and then press
playback.
2. In the video playback mode, press the red button for subtitles; press the
green button for audio languages; press the yellow button for zooming;
press the blue button for timer. In addition, press the MENU button for
the options below:
• Play/Pause
• Repeat (None / Repeat One / Repeat All)
• Picture Mode (Vivid / Standard / Cinema / Sport)
• Screen Mode (4:3 / 16:9 / Zoom)
• Show Info: Displays the information of the selected video file.
• Subtitle Info
• Audio Channel
3. To pause the video playback, press or .To stop the video
playback, press .
4. Press the BACK button to quit the video playback mode.
OK to start
Text playback
In the Text menu, you have the following options:
1. Press /or / to select a text file, and then press
playback.
2. In the text playback mode, press , , or to jump to another line
or page. In addition, press the MENU button for the options below:
• Play/Pause
• Repeat (None / Repeat One / Repeat All)
• Shuffle (On / Off)
• Font (Size / Style / Color)
• Show Info: Displays the information of the selected text file.
• Save Bookmarks: Chooses the page you want to add a bookmark.
• Extract Bookmarks: Jumps to the page where a bookmark exists.
• Scroll Time: sets the time of automatic page turning (15 / 30 / 45 / 60
seconds).
3. To pause the text playback, press or .To stop the text playback,
press .
4. Press the BACK button to quit the text playback mode.
Navigating the OSD menu30
OK to start
Page 31

Reference
Unit: mm
L32-6000
385.13
184.13
486.5
752.95
561.85
20.4
41.4
Dimensions
English
Reference 31
Page 32

Unit: mm
L42-6000
479.48
214.48
617.73
985.21
688.77
45.9
18.47
English
Reference32
Page 33

Specifications
L32-6000 L42-6000
Back light type LED LED
Size 32” 42”
Display
Input
terminals
Output
terminals
Audio output Speakers 5W x 2 10W x 2
Power
Dimensions
Operating temperature
Storage temperature
Resolution 1366 x 768 1920 x 1080
Native contrast ratio 3000:1 4000:1
Color depth 8 bits 8 bits
Viewing angle 178 degrees 178 degrees
RF tuner 1 1
HDMI 1 3
Composite (AV) 1 1
Component (YPbPr) 1 1
D-sub (VGA) 1 1
USB 1 2
PC Audio 1 1
AV out NA 1
SPDIF out NA 1
Headphone jack NA 1
TV (DC) input 19 V, 3A (DC) NA
TV (AC) input NA
Adapter
Power consumption 65W 120W
Standby mode < 0.5W < 0.5W
Dimensions with stand
(W x H x D mm)
Dimensions without stand
(W x H x D mm)
Weight with stand (Kg) 8.62 15.48
Weight without stand (Kg) 7.51 13.05
100-240 V~,
50/60 Hz (AC)
752.95 x561.85 x
181.43
752.95 x486.5 x
41.4
0°C~35°C (at sea
level)
-20°C~60°C (at
sea level)
100-240 V~,
50/60 Hz (AC)
NA
985.21 x 688.77 x
214.48
985.21 x 617.73 x
45.9
0°C~35°C (at sea
level)
-20°C~60°C (at
sea level)
English
Design and specifications are subject to change without notice.
Specifications 33
Page 34

Supported component (YPbPr) video timing
English
Supported HDMI video timing
Horizontal
Timing Resolution
480i 720 x 480 15.735 60i 13.5
480p 720 x 480 31.25 60p 27
720p 1280 x 720 45.00 60p 74.25
1080i 1920 x 1080 33.75 60i 74.25
1080p 1920 x 1080 67.5 60p 148.5
576i 720 x 576 15.625 50i 13.5
576p 720 x 576 31.25 50p 27
720p 1280 x 720 37.50 50p 74.25
1080i 1920 x 1080 28.13 50i 74.25
1080p 1920 x 1080 56.25 50p 148.5
Horizontal
Resolution
Frequency
(KHz)
Frequency
(KHz)
Ver ti cal
Frequency
(Hz)
Ver ti cal
Frequency
(Hz)
Dot Clock
Frequency
(MHz)
Dot Clock
Frequency
(MHz)
Note
720 x 480 15.735 60i 13.5 HDMI
720 x 480 31.25 60p 27 HDMI & DVI
1280 x 720 45.00 60p 74.25 HDMI & DVI
1920 x 1080 33.75 60i 74.25 HDMI & DVI
1920 x 1080 67.5 60p 148.5 HDMI & DVI
720 x 576 15.625 50i 13.5 HDMI
720 x 576 31.25 50p 27 HDMI & DVI
1280 x 720 37.50 50p 74.25 HDMI & DVI
1920 x 1080 28.13 50i 74.25 HDMI & DVI
1920 x 1080 56.25 50p 148.5 HDMI & DVI
1920 x 1080 27.000 24p 74.25 HDMI & DVI
1920 x 1080 28.125 25p 74.25 HDMI & DVI
1920 x 1080 33.75 30p 74.25 HDMI & DVI
Specifications34
Page 35

Supported HDMI (for connecting with a computer)
input signal resolutions
Horizontal
Resolution
640 x 480 31.5 59.94 25.175 HDMI & DVI
800 x 600 37.88 60.32 40.00 HDMI & DVI
1024 x 768 48.36 60 65.00 HDMI & DVI
1280 x 800 49.7 59.81 83.5 HDMI & DVI
1280 x 1024 63.98 60.02 108.00 HDMI & DVI
1360 x 768 47.71 60.01 85.5 HDMI & DVI
1440 x 900 55.94 59.89 106.5 HDMI & DVI
1680 x 1050 65.29 59.95 146.25 HDMI & DVI
Frequency
(kHz)
Verti ca l
Frequency
(Hz)
Pixel
Frequency
(MHz)
Mode
Supported computer (D-sub/VGA) input signal
resolutions
Resolution
640 x 480 31.5 59.94 25.175
Horizontal
Frequency (kHz)
Ver ti cal
Frequency (Hz)
Pixel Frequency
(MHz)
English
800 x 600 37.88 60.32 40.00
1024 x 768 48.36 60 65.00
1280 x 800 49.7 59.81 83.5
1280 x 1024 63.98 60.02 108.00
1360 x 768 47.71 60.01 85.5
1440 x 900 55.94 59.89 106.5
1680 x 1050 65.29 59.95 146.25
1920 x 1080 67.5 60 148.5
• Resolutions outside of these tables are not recognized and will not be displayed.
• When you connect the TV to a computer, you should adjust the resolution in the
display properties of the computer to closely match the native resolution of the TV.
For example, 1920×1080 @ 60Hz.
Specifications 35
Page 36

Setting up appropriate output resolution on a computer
Before connecting the TV to a computer to display computer video, please
follow the instructions below (in Windows XP for example) to setup
appropriate output resolution.
English
1. On Windows Desktop, right-click and select
Properties from the menu
that appears.
2. Click the
3. Drag the
Settings tab in the window that follows.
Resolution slider and select a compatible resolution. If your
computer supports it, select 1920 × 1080 @ 60Hz as the output
resolution for the best result.
4. Click
OK to save the setting and close the window.
5. Switch the computer video output from monitor to the TV.
6. Repeatedly press
Input on the remote control and select the VGA input.
Specifications36
Page 37

Troubleshooting
There are many external influences and circumstances beyond the control of
BenQ which may be causing problems with your TV. Some of the more
common and user fixable problems are listed below for your information.
Please check the following list before calling your nearest BenQ Customer
Service Center, and attempt the following steps to diagnose and fix the
problem yourself:
Symptoms Possible causes
Check that the power switch on the power outlet is turned
on.
Check that the power plug is securely inserted into both
The TV does not turn
ON.
There is no picture or
sound.
the
wall outlet is switched on (if switched).
Check that power is available from the power outlet by
trying another known working appliance (e.g. desk lamp)
from that same power outlet.
Check that the TV is turned on (The power indicator
should be blue).
Try a different input source to confirm if the symptom is
still present or whether the source is at fault.
Check for mis-connection of cables for that input.
Adjust the volume control to check that isn't turned down.
If the TV is connected to a computer, make sure that the
computer is not in standby or hibernation mode, and the
computer’s video display is switch to external output.
AC IN jack on the TV and the wall outlet, and that the
English
The picture is not
sharp or the picture
contains image
movement when using
the TV tuner input.
The picture is doubled
or tripled when using
the TV tuner input.
The reception may be weak. See next problem solution.
Change channels to confirm if the symptom is still present
or whether the channel station is at fault.
Make sure the antenna cable is properly connected.
Try redirecting or relocating your antenna to improve the
picture. If the antenna is exterior, have a suitable qualified
and experienced antenna specialist adjust the antenna.
Your TV antenna signal may be effected by interference. Try
redirecting or relocating your antenna to reduce the effects
of the interference. If the antenna is exterior, have a suitable
qualified and experienced antenna specialist adjust the
antenna. Picture ghosting is caused by reflections from
buildings, large metal structures and mountains.
Troubleshooting 37
Page 38

The cable connection is
correct, but there is
only sound and no
picture is displayed.
The image appears
English
distorted.
Check to make sure that the cables are firmly connected to
the terminals on the TV.
Ensure that the input signal resolution from the source
device (e.g., the computer or TV game console) is
supported by the TV (maximum 1080p for HDMI and
Component Video inputs, and 1920×1080 @ 60Hz for
computer and DVI inputs). If the input signal resolution is
too high or not supported, the picture will not be displayed.
Lower or select a compatible signal resolution on the signal
source device and try again.
Ensure the TV aspect ratio is correctly set to suit the image
source.
Try a different input source to confirm if the symptom is
still present or whether the source is at fault.
The image appears too
'washed out', or the
darkest areas of the
image appear too
bright.
Picture is not clear, or
there is no image
display when viewing
computer input.
Remote control does
not function properly.
Lower the
Contrast setting.
The input source device (e.g. DVD player) brightness level
may be set too high. Reduce its brightness level.
Reduce the brightness level until the black areas of the
picture appear as black.
Check the connection of cables.
The computer video output resolution is not supported by
the TV and cannot be displayed. Please select a compatible
output resolution on the computer and try again.
The computer output resolution is set too high. 1920×1080
@ 60Hz is the highest acceptable computer timing.
Check for incorrect battery orientation.
Check for dead batteries.
Check your distance and angle from the TV.
Check whether remote control is properly being pointed at
the TV's remote control sensor window.
Check for any obstacle between the remote control and
the remote control sensor window.
Check that the remote control sensor window is not under
strong fluorescent lighting. or in direct sunlight.
Check for any devices (computer or personal digital
assistant, PDA) nearby that transmit infrared signals which
may cause interference to signal transmission between the
remote control and the TV. Turn off the infrared function of
these devices.
Troubleshooting38
Page 39

<Memo>
English
Troubleshooting 39
Page 40

English
<Memo>
Troubleshooting40
 Loading...