

Page 1

InstaQPrint
User Manual
Page 2

Copyright
Copyright © 2017 by BenQ Corporation. All rights reserved. No part of this publication
may be reproduced, transmitted, transcribed, stored in a retrieval system or translated
into any language or computer language, in any form or by any means, electronic,
mechanical, magnetic, optical, chemical, manual or otherwise, without the prior written
permission of BenQ Corporation.
Disclaimer
BenQ Corporation makes no representations or warranties, either expressed or implied,
with respect to the contents hereof and specifically disclaims any warranties,
merchantability or fitness for any particular purpose. Further, BenQ Corporation reserves
the right to revise this publication and to make changes from time to time in the contents
hereof without obligation of BenQ Corporation to notify any person of such revision or
changes.
This user manual aims to provide the most updated and accurate information to customers,
and thus all contents may be modified from time to time without prior notice. Please visit
www.benq.com for the latest version of this manual.
The illustrations and the images in this guide are for your reference.
BenQ ecoFACTS
BenQ has been dedicated to the design and development of greener product as part of its
aspiration to realize the ideal of the “Bringing Enjoyment 'N Quality to Life” corporate
vision with the ultimate goal to achieve a low-carbon society. Besides meeting
international regulatory requirement and standards pertaining to environmental
management, BenQ has spared no efforts in pushing our initiatives further to incorporate
life cycle design in the aspects of material selection, manufacturing, packaging,
transportation, using and disposal of the products. BenQ ecoFACTS label lists key ecofriendly design highlights of each product, hoping to ensure that consumers make informed
green choices at purchase. Check out BenQ's CSR Website at http://csr.BenQ.com/ for
more details on BenQ's environmental commitments and achievements.
2
Page 3

Table of contents
Copyright 2
Disclaimer 2
BenQ ecoFACTS 2
Privacy policy 6
General information 6
Android OS System Permissions 6
Introduction 7
What is InstaQPrint? 7
What content can one print with InstaQPrint? 7
How it works? 7
Wireless printing: Wi-Fi 8
Shared local and remote printing 8
Windows, macOS and Linux native tools 8
InstaQPrint InstaQPrint Remote for Windows and macOS 9
Printing via USB 10
App overview 11
Controls 11
Manage Printers 11
Gear 11
Settings menu 11
Action overflow 14
Main menu 15
Files 16
Gallery 16
Web pages 16
Google Drive 17
Gmail 17
Email 17
Box 17
Dropbox 17
OneDrive 17
Evernote 17
Printing 18
Printer Setup Wizard 18
Network setting 20
Printing via Wi-Fi 21
Switching Wi-Fi On 21
Setting up the printer in the InstaQPrint app 22
Printing from the InstaQPrint app 24
Printing via USB 25
Connecting a printer to your IFP 26
Setting up the printer in the InstaQPrint app 27
Printing from the InstaQPrint app 29
Printing via InstaQPrint Remote 30
Setting up the printer in the InstaQPrint app 31
3
Page 4

Printing from the InstaQPrint app 32
Print options 34
Printer 35
Paper 36
Printout Mode 36
Duplex Mode 36
Picture Size 37
Page orientation 38
Page Margins 38
Scale 39
Align 39
Color 39
Printable area 40
Driver 40
Protocol 40
Copies 40
Print Range 40
Odd or Even Pages 41
Reverse order 41
Troubleshooting 42
Alert: Invalid credentials 42
Alert: Please log in via your web browser (Gmail) 42
Connection error: 0002, OK, Locked for printing 42
Connection error: Connection refused 43
Connection error: ECONNREFUSED (Connection refused) 44
Connection error: EHOSTUNREACH (No route to host) 45
Connection error: Host is unresolved 47
ERR Authentication failure: unknown user name or bad password 47
Error during discover: ERROR_BUSINESS_PRINTERS 50
Error during discover: Printer is off or network is unreachable 52
Error during discover: Windows shared printers error 52
Error during printing: Printer unsupported 53
Error during setup: Library pack installation error 53
Error: Authorization failed or network error has occurred 54
Error: File open error 54
Error: Invalid key hash 55
Error: Invalid transaction ID 55
Error: Library not found 55
Error: Restore failed 56
Error: USB device not found 56
HTTP error: 500 Internal Server Error 57
Internal error: Data transfer error 57
Internal error: EPIPE (Broken pipe) 57
Internal error: IJS Error 57
Rendering error 131072 58
Rendering error 16777216 58
Rendering error 2048 58
4
Page 5

Rendering error 256 59
Rendering error 32 59
Rendering error 4096 59
Rendering error 64 60
5
Page 6

Privacy policy
General information
At InstaQPrint we take user privacy very seriously. By the nature of the Android OS, InstaQPrint
needs to ask it for the System Permissions in order to print various data elements on the device
including images, web pages, emails, local files.
This information is not shared with anyone and we have no interest in it ourselves. It stays on the
device at all times (except printing via Google Cloud Print or InstaQPrint Remote) and then gets
sent directly to the printer (possibly via a computer when using InstaQPrint Remote locally) in a
special format ready for printout.
Simply put, the permissions are needed for printing purposes only. I.e. the app needs to have access
to your messages simply to be able to print them. You can find the latest version of our privacy
policy with explanation of permissions on our web site.
Note: when using Google Cloud Print, such information is sent via Google Cloud to the receiving end, leaving
InstaQPrint application (and our control) once transmitted.
Note: when printing via computer, the information is directly sent to the Mac or PC, and then to the printer.
It never leaves your local network.
Android OS System Permissions
As mentioned above, InstaQPrint requires a wide range of permissions on the device in order to
access the information to be printed. Below is the list of permissions with brief explanation why we
require them and what they are user for:
To be able to print emails, Google Docs, configure Google Cloud printers:
● YOUR ACCOUNTS
● GOOGLE SPREADSHEETS
● GOOGLE DOCS
To discover and manage connections to local printers:
● CHANGE WI-FI STATE
● ALLOW WI-FI MULTICAST RECEPTION
To print corresponding data elements and files from the device:
● STORAGE
● SYSTEM TOOLS
To improve quality of the application and report problems. It's also used for anonymous analytical
data collection via industry-standard Flurry.com service, which helps us improve the app.
● FULL INTERNET ACCESS
If you have any questions or concerns about InstaQPrint privacy, please feel free to contact us via
website.
6
Page 7
Introduction
What is InstaQPrint?
InstaQPrint is a one-stop solution for mobile printing letting one print from a mobile device (e.g.
smartphone or a tablet) on a printer locally (via Wi-Fi or USB) or via the Internet (via Google
Cloud Print).
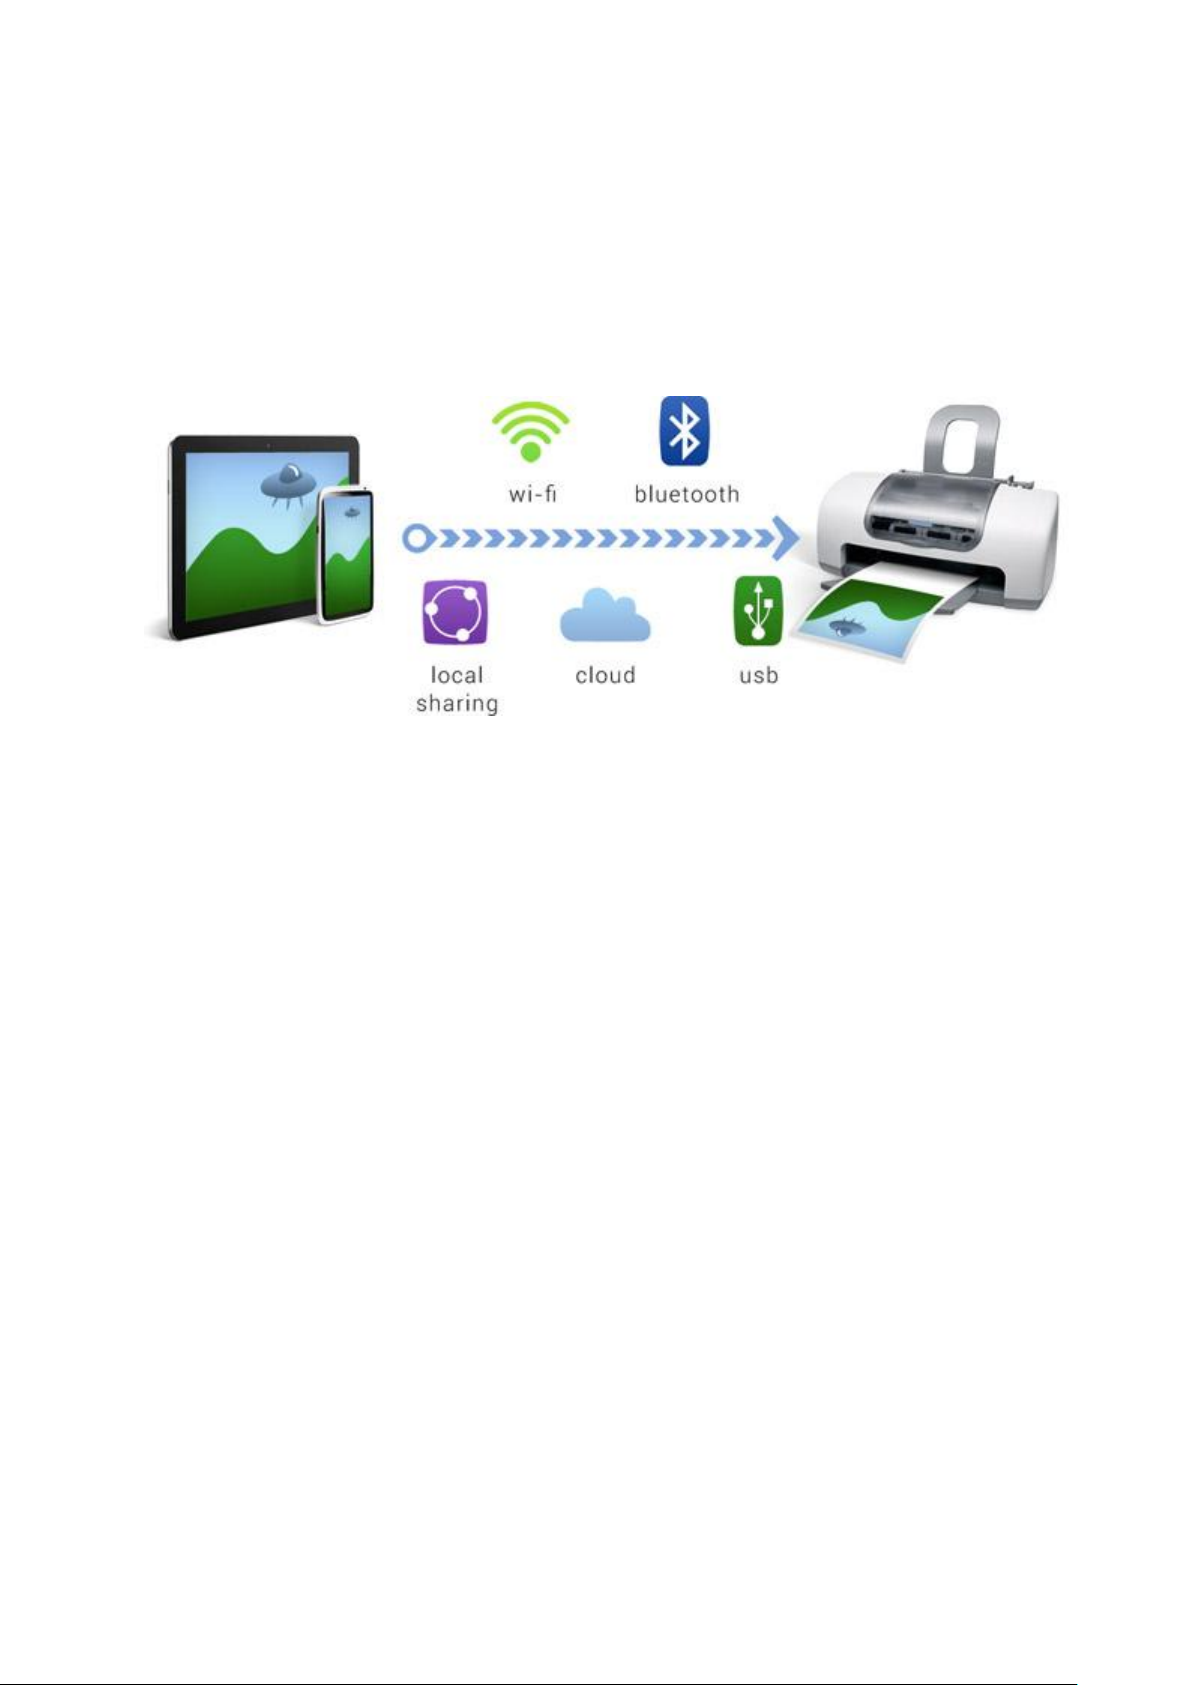
There are many ways to connect to printers. While some models have Wi-Fi and Bluetooth
capabilities and can work independently, others need to be connected to a computer. Typically the
printer is right next to you, but you can also print anywhere else in the world over the Internet. No
matter what printer you have, what connection it supports and where it is located, you'll be able to
print today.
What content can one print with InstaQPrint?
● Office documents, including MS Word, Excel, PowerPoint, PDF;
● Text files and other popular file types;
● Photos and images;
● Web pages, emails and attachments;
● Google Drive content;
● Files from Dropbox;
● Files from Box;
● Files from OneDrive;
● Notes from Evernote;
● Content shared from other apps.
How it works?
InstaQPrint application installed on a mobile device sends a print job to a printer via Wi-Fi, USB or
via the Internet connection depending on the capabilities of your printer and the way it is connected
to the network in order to print.
When you connect your device to the printer, printing is just a few clicks away. You can select what
you wish to print, preview pages, adjust printing options (margins, image quality, color, etc.
7
Page 8
depending on your printer capabilities). You may optionally select page range or individual pages to
be printed.
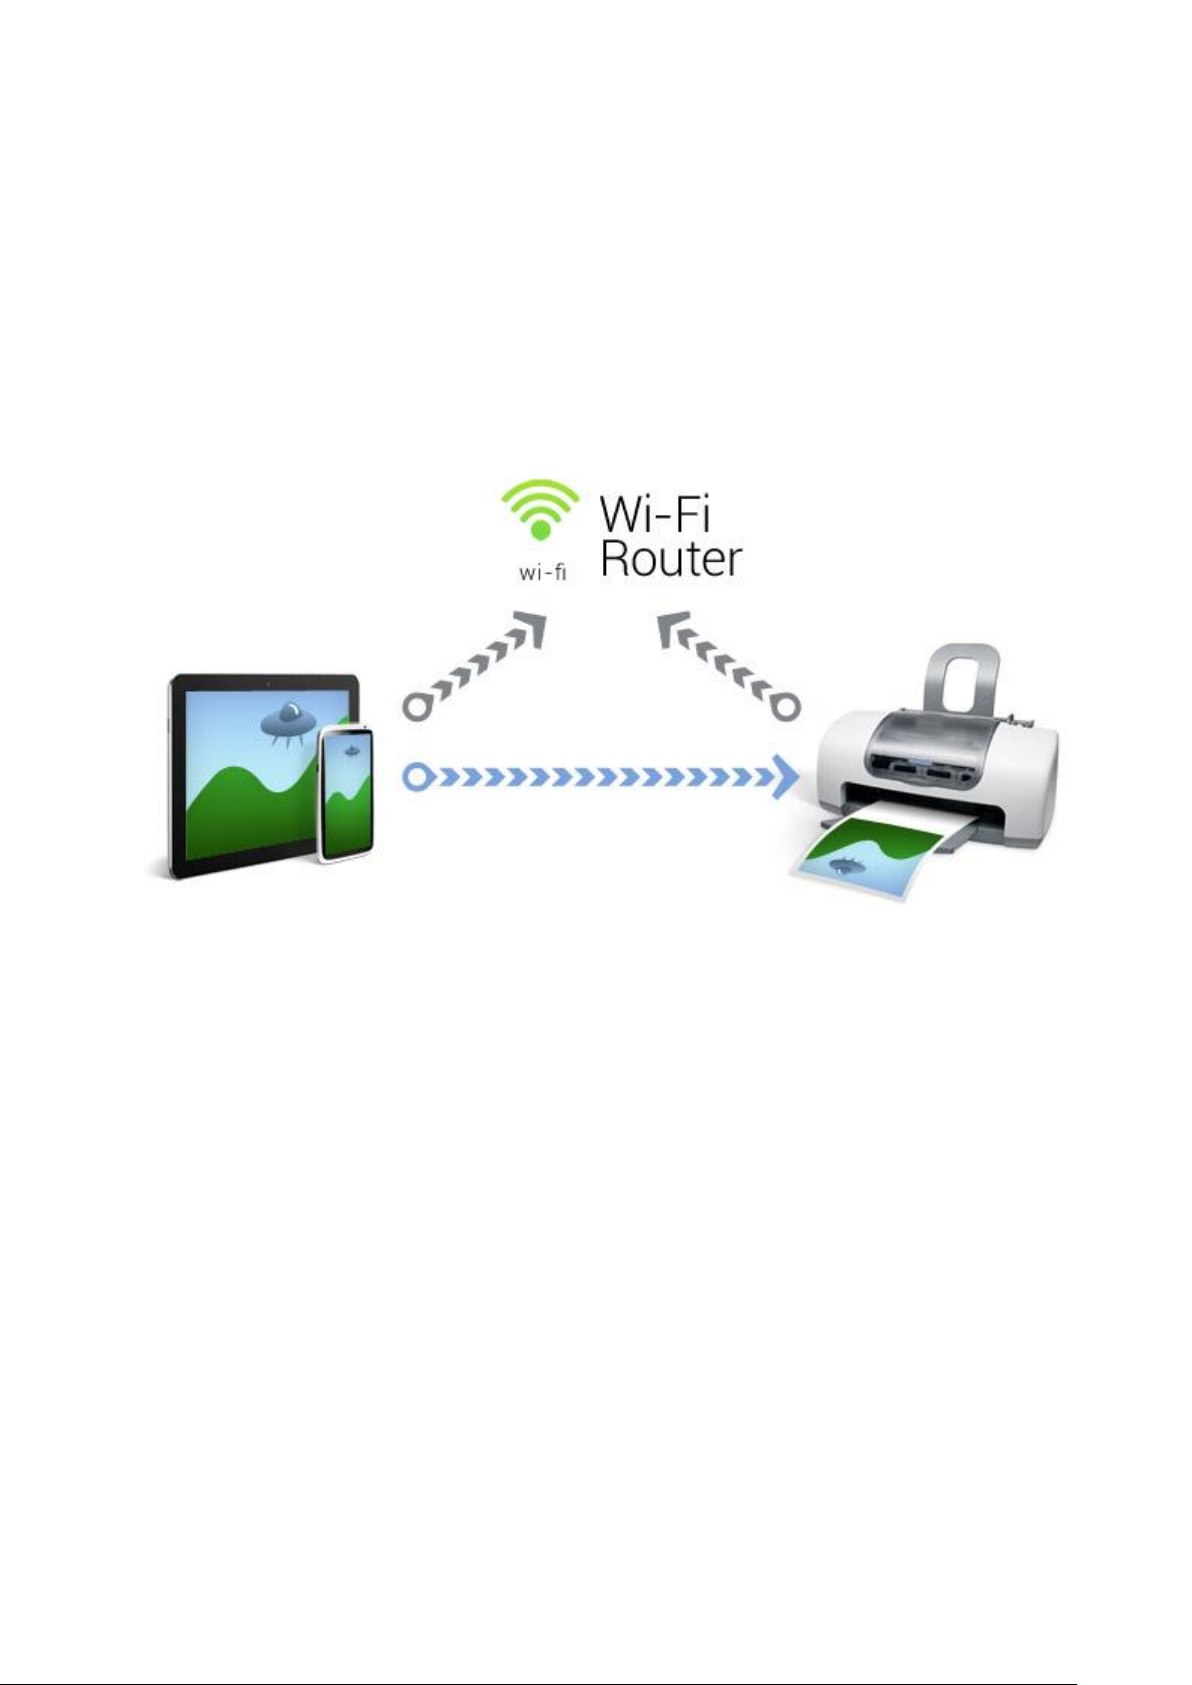
Wireless printing: Wi-Fi
Many printers support Wi-Fi Direct connectivity and don't require a computer as a middleman.
InstaQPrint can automatically detect your printer and connect to it directly making it the easiest and
fastest way to print.
Also your printer can be shared via a wireless Wi-Fi router or a print-server in a Wi-Fi network,
which will make it available for the InstaQPrint as well.
Note: To print via Wi-Fi your mobile device needs to be on the same Wi-Fi network as your printer.
Shared local and remote printing
Other printers, old and new, which do not support Wi-Fi or Bluetooth connectivity, have to be
connected to a computer (Mac, PC or Linux) with USB cable and shared.
Windows, macOS and Linux native tools
Normally, you can use native tools available in each operating system to share your printer with just
a few clicks and have it available to InstaQPrint application installed on your mobile device.
8
Page 9
Note: To print via Wi-Fi on a shared printer your mobile device needs to be on the same Wi-Fi network as
your printer.
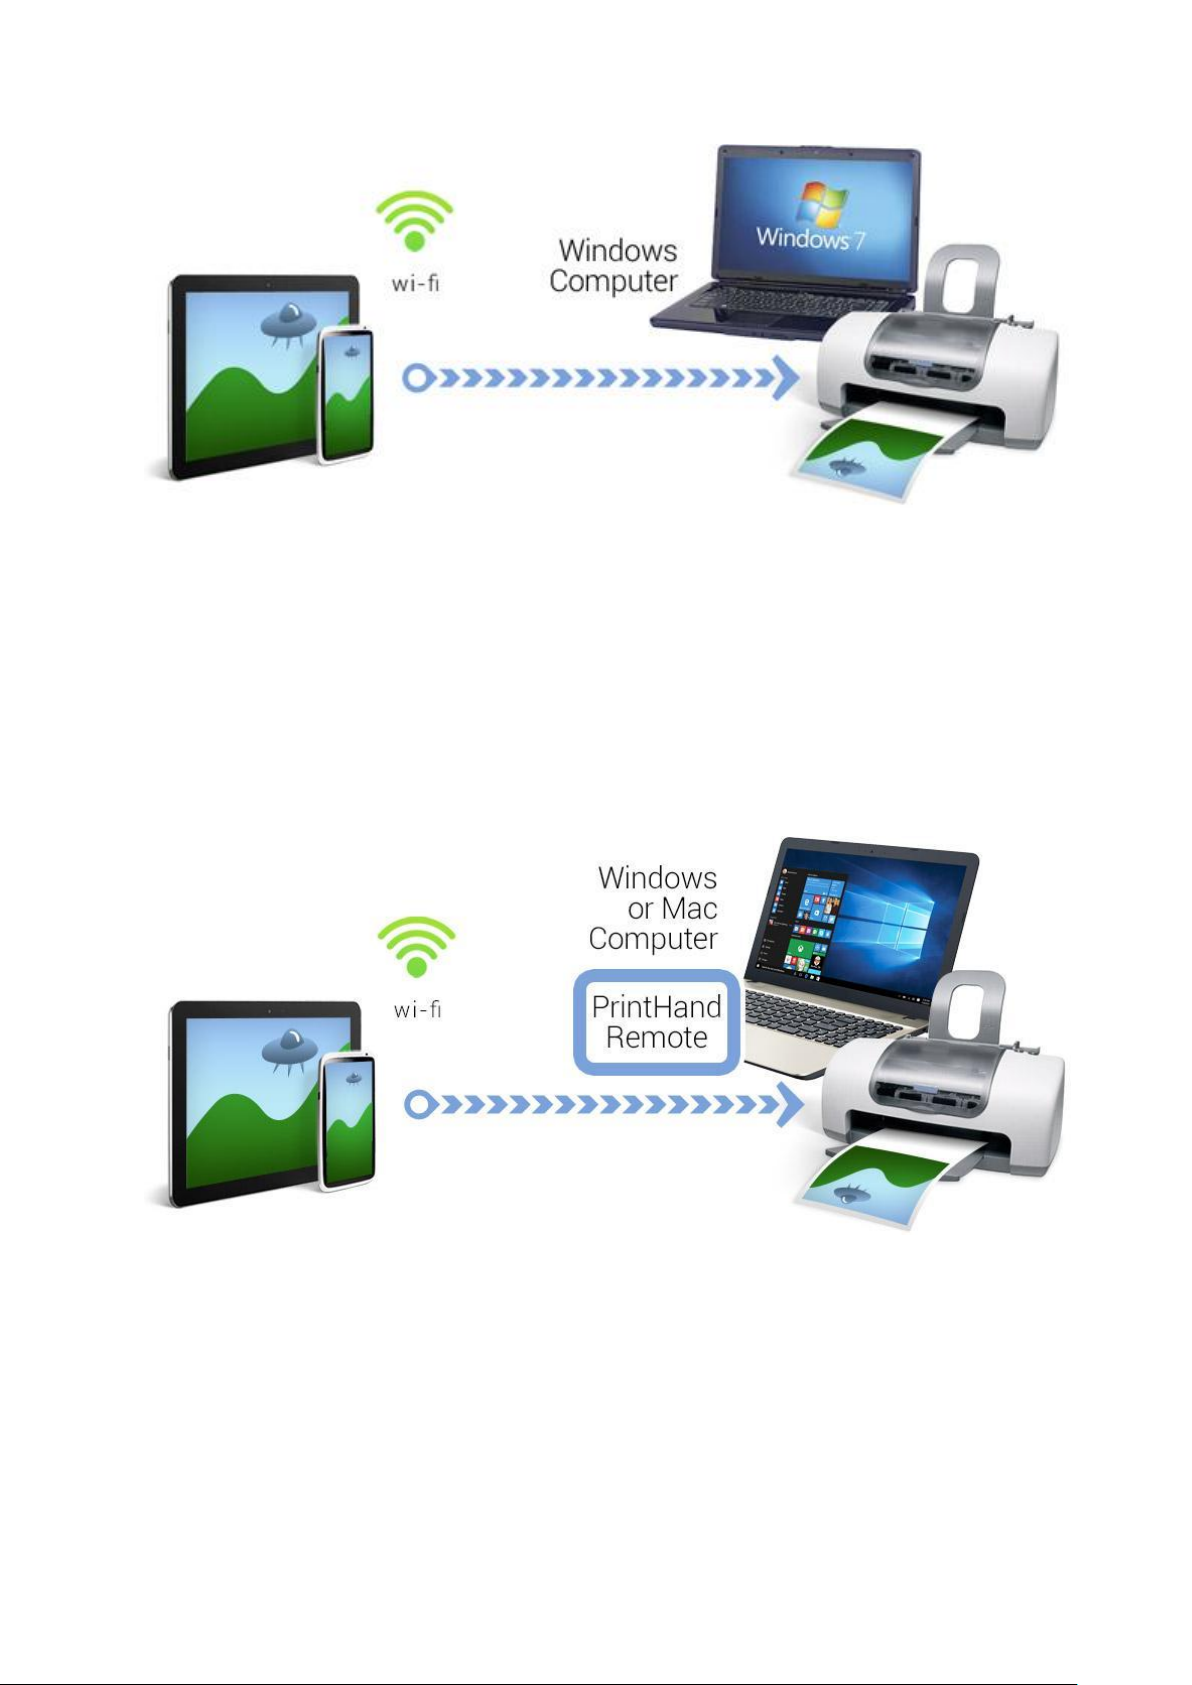
InstaQPrint InstaQPrint Remote for Windows and macOS
Printing via InstaQPrint Remote is useful when you cannot connect to the printer directly (over WiFi) or face compatibility (or printing quality) issues. It requires a macOS or Windows powered
computer to install the free software InstaQPrint Remote on it. The InstaQPrint Remote installation
is simple and requires no special knowledge. Once running on your computer, it automatically shares
all the printers connected to that computer on local wireless network.
You can always switch the sharing off and on for any printer through the InstaQPrint Remote's
settings. By default, the InstaQPrint Remote is running in background and starts with operating
system so you don't need to interact with it much.
There are 2 ways to share your printer using InstaQPrint Remote:
● Remotely (via Remote server) - InstaQPrint Remote account required
● Locally (via Nearby Service) - no InstaQPrint Remote account required
The main advantage of using InstaQPrint Remote to share your printers is the InstaQPrint for
Windows/macOS utilizes the desktop driver installed on your computer. All other printing modes
9
Page 10

use drivers available on mobile device. Because of that, there's no compatibility or quality problems
for any mobile device, content type or printer. Practically, it's guaranteed to work as long as you can
print from the computer itself.
We recommend using Shared Printing when nothing else works, but this may be a good option to
start with. It does require installing free InstaQPrint Remote and running a computer at the time of
printing. But if it's not a big inconvenience, you may find Shared Printing the best and the easiest
option.
Note: printers shared via InstaQPrint Remote are detected automatically by InstaQPrint application as Wi-Fi
printers.
Note: your computer needs to be on with the InstaQPrint Remote running at the time of printing.
Printing via USB
Some mobile devices can work in USB Host mode, which can be used to connect your mobile
device directly to the printer via USB. This is as fast and reliable as Wi-Fi printing.
If your device doesn't have computer-like USB connection, you can use USB OTG cable widely
available on the market to connect your printer to the micro USB port of your mobile device.
Note: This functionality is only available on Android 4.0 and above.
Note: some mobile devices are unable to communicate with a printer properly even if USB Host mode is
supported.
10
Page 11
App overview
Controls
Here is a short description of the app’s controls:
● Manage Printers — Select a printer to print on.
● Gear — Access Settings menu of the app.
● Action overflow — Access additional menu items.
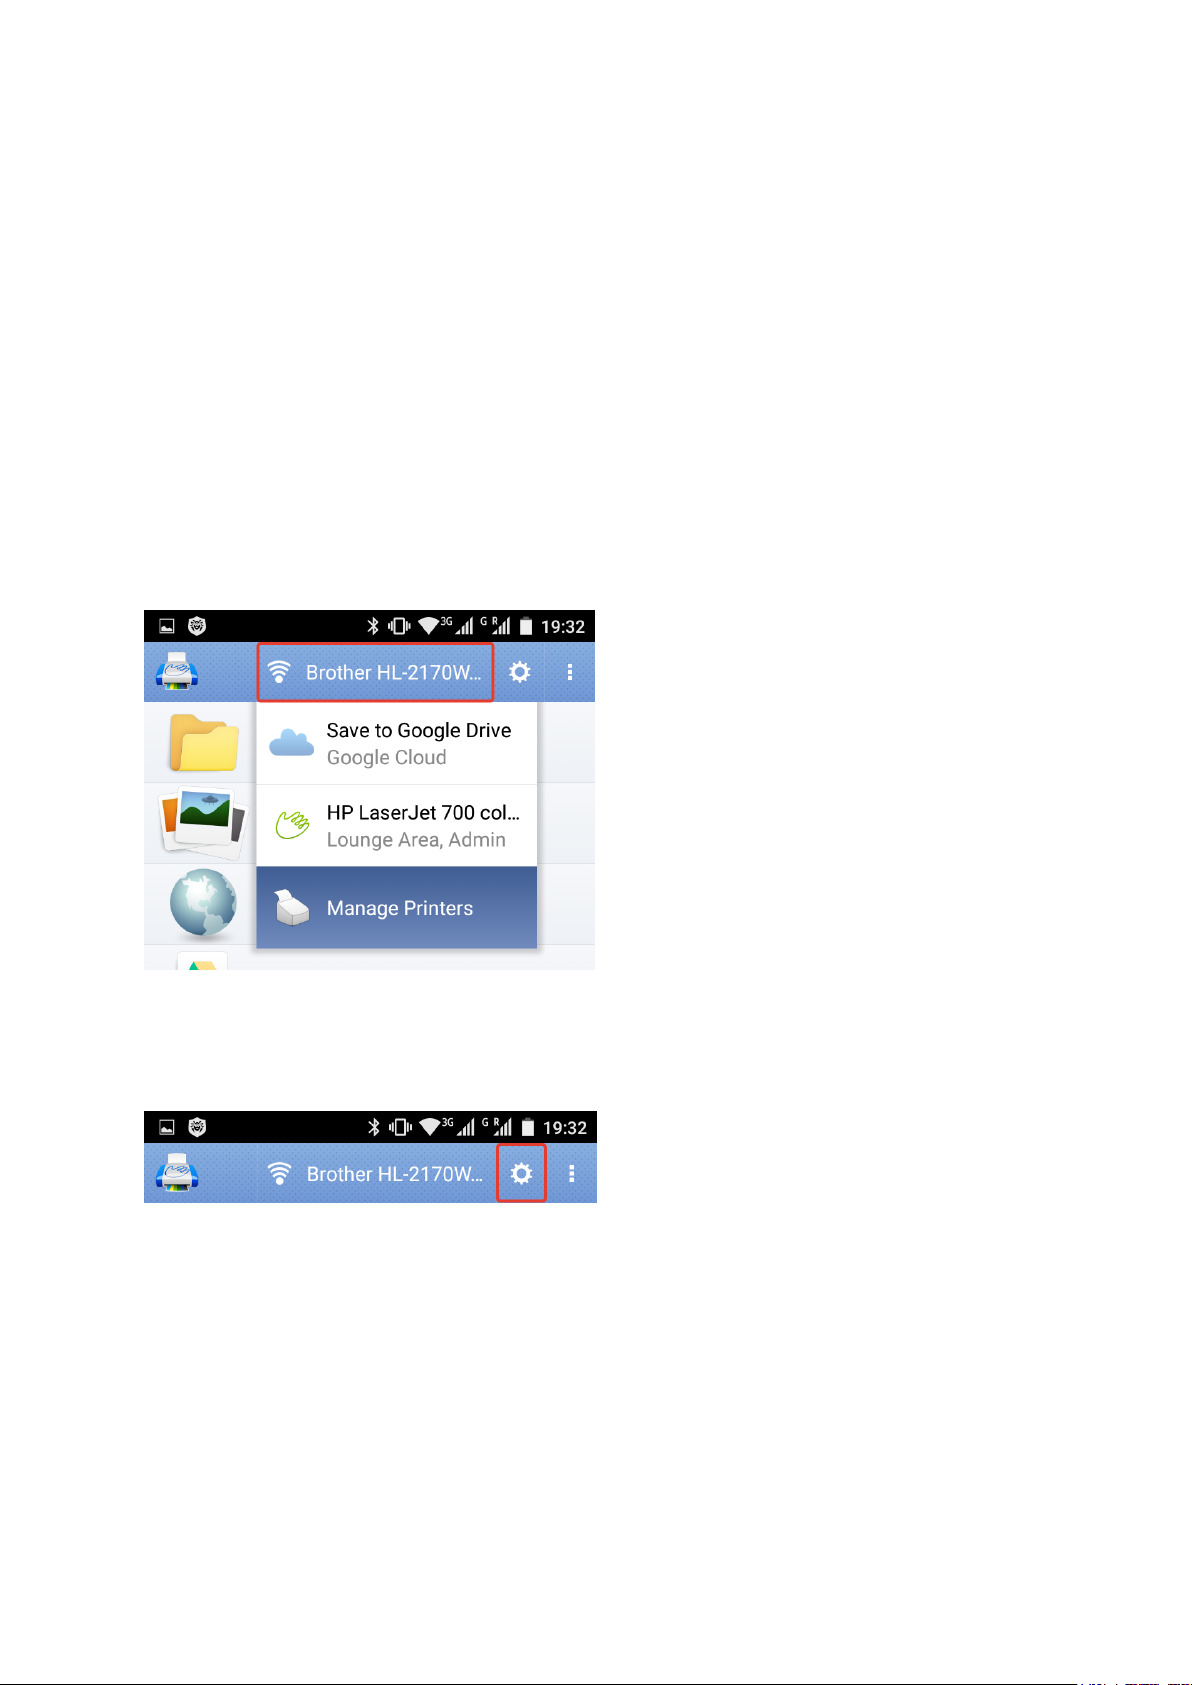
Manage Printers
Manage Printers menu lets one select a printer by tapping the following Manage Printers menu
entry or selecting one of the recent printers from the drop-down list.
Gear
Gear icon provides access to the Settings menu of the app.
Settings menu
In the Settings menu one can choose among following categories:
11
Page 12
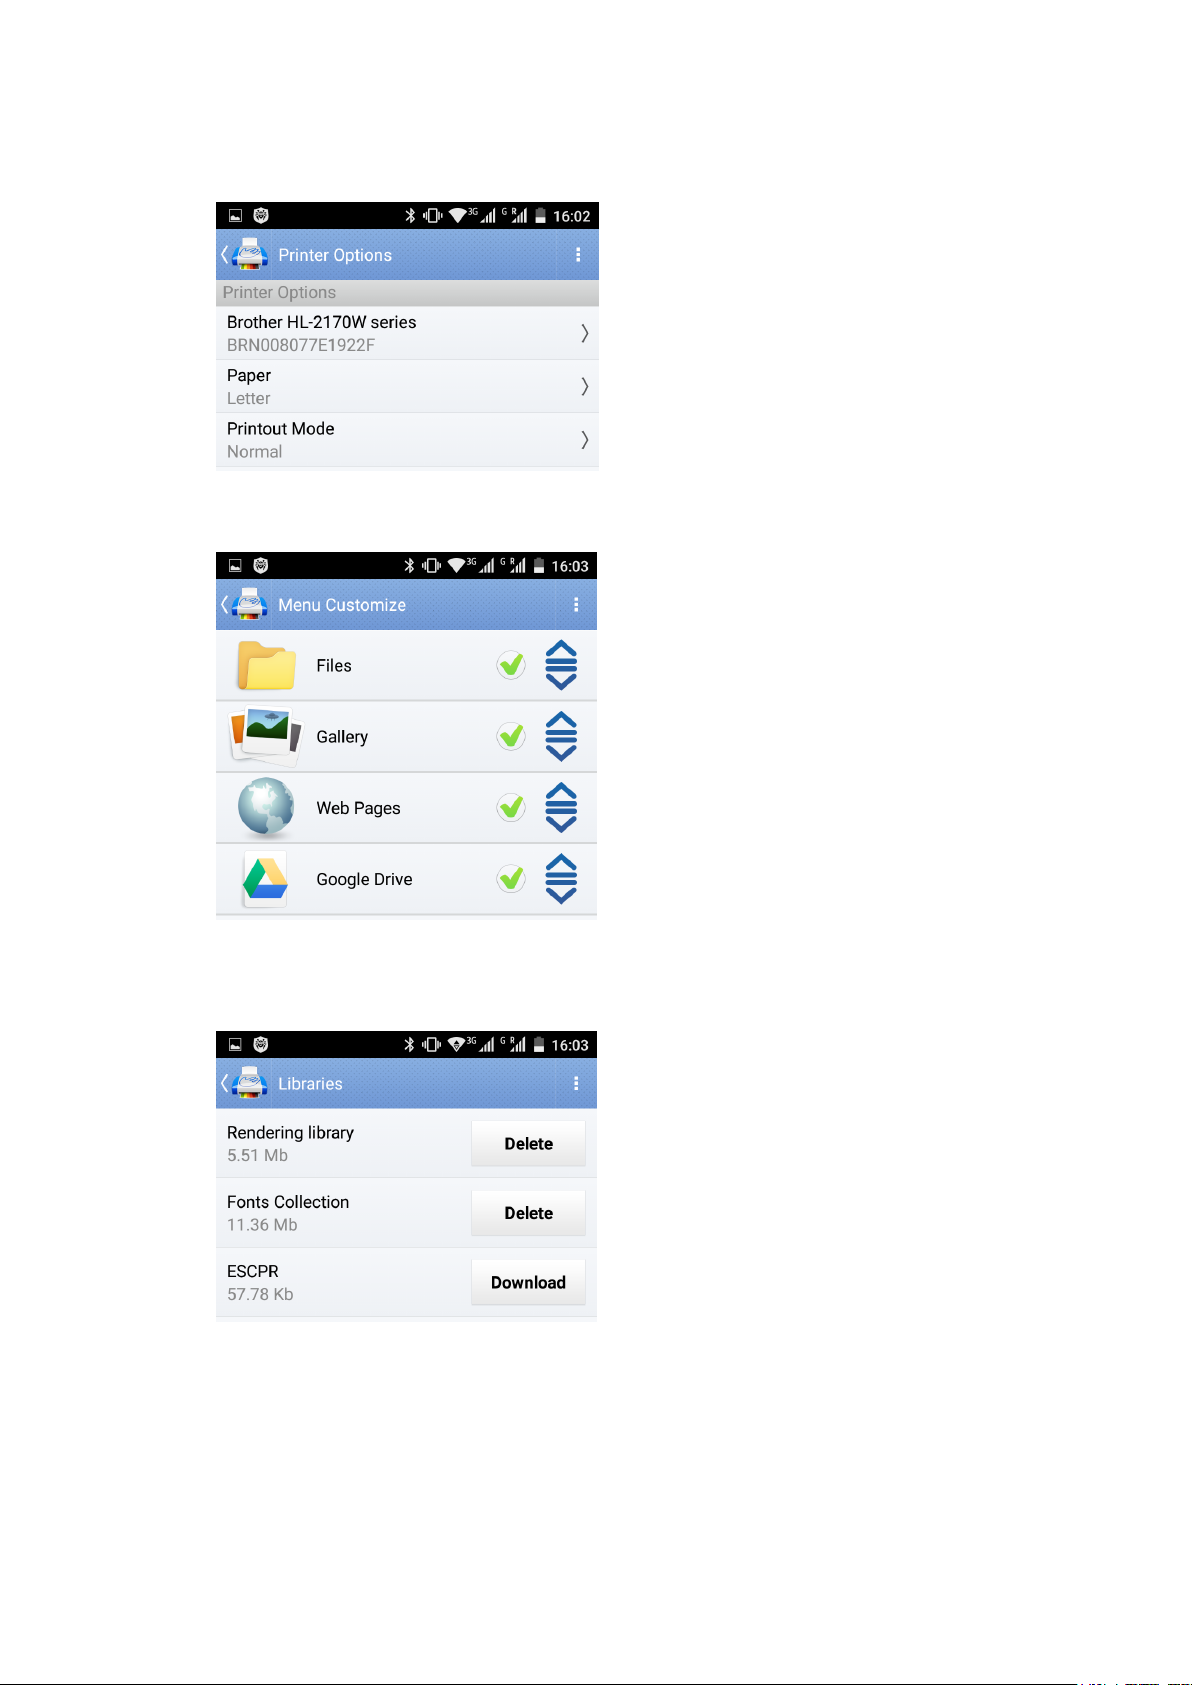
● Printer
Manage printing options (e.g. Printout Mode, Paper, etc.)
● Menu Customize
Manage the Main menu items (e.g. enable/disable the menu items and alter their order)
● Libraries
Manage the libraries (e.g. download/delete rendering or driver libraries needed for scanning
and printing)
12
Page 13
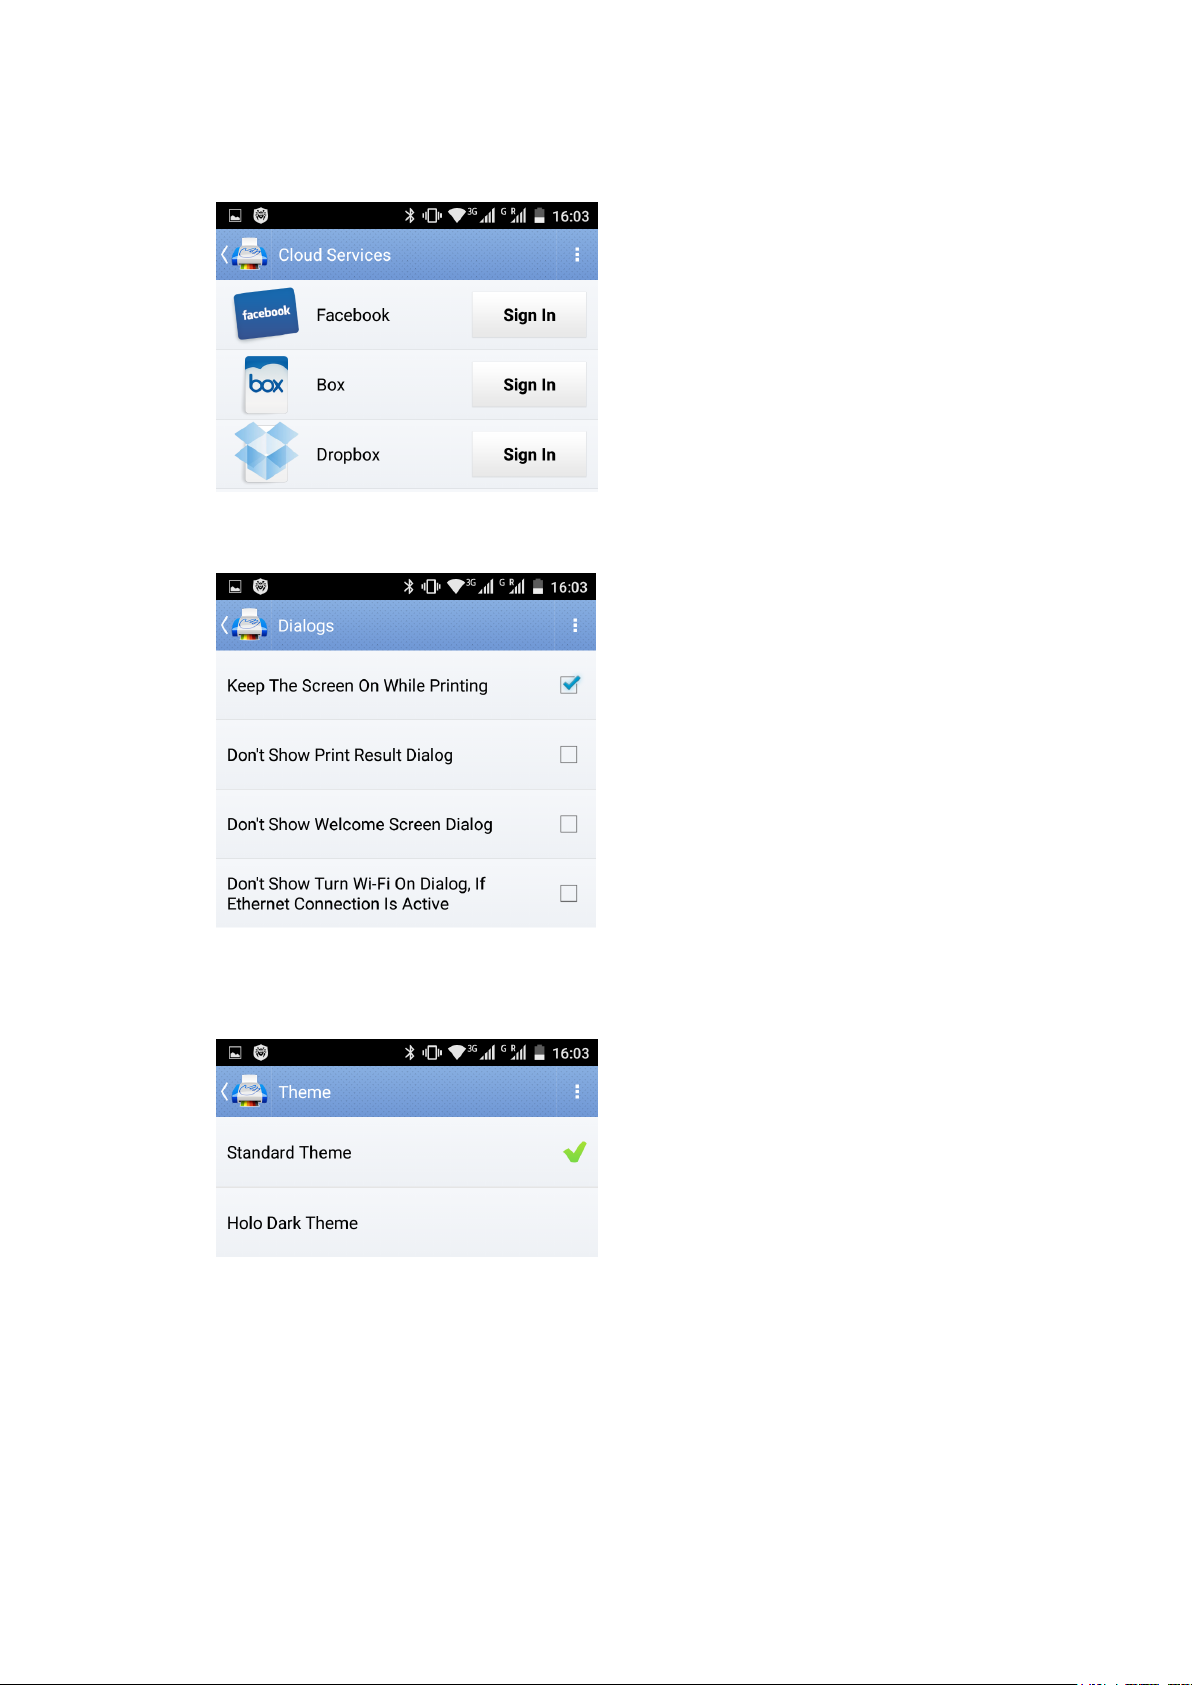
● Cloud Services
Sign in to the cloud service of your choice (e.g. Dropbox or OneDrive)
● Dialogs
Manage dialogs shown (e.g. disable/enable app’s dialogs to save time while printing)
● Theme
Switch between Standard Theme and Holo Dark Theme (the latter helps save energy
on AMOLED screens)
13
Page 14
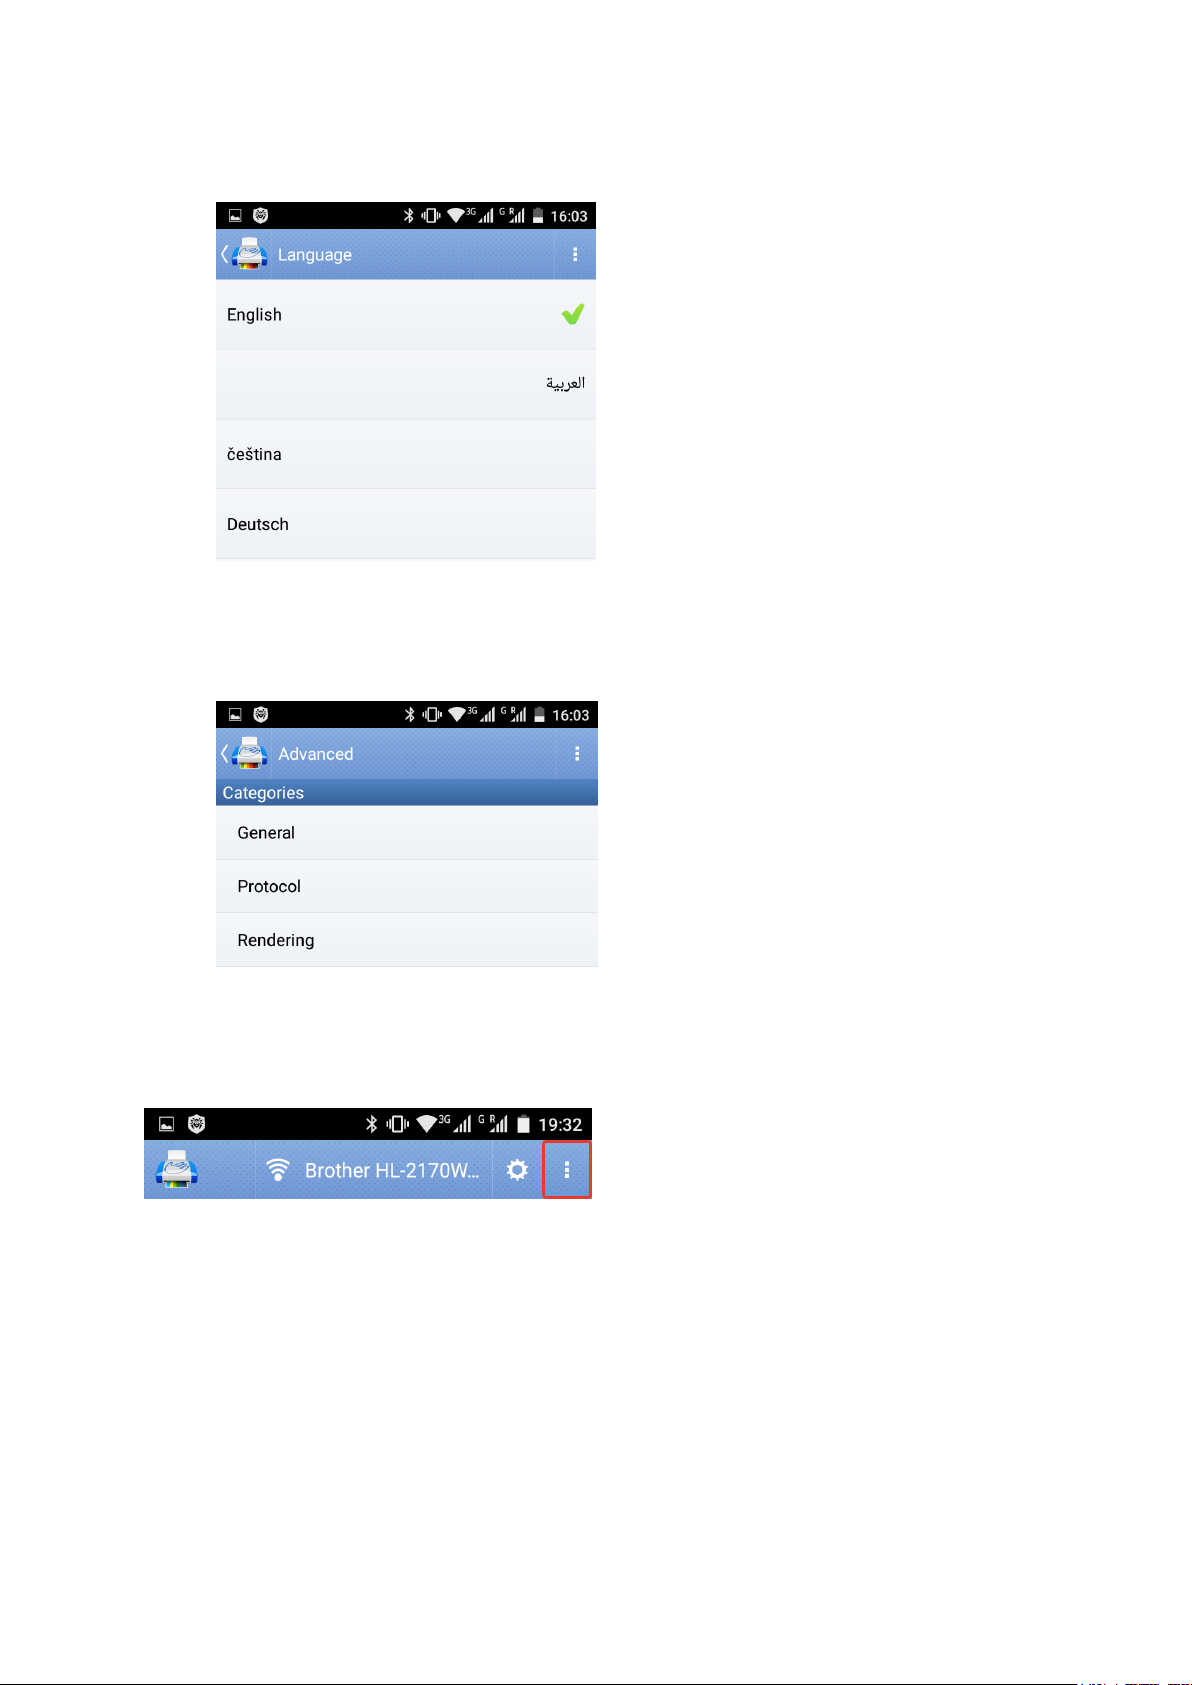
● Language
Alter the language of the app’s user interface (e.g. English, German, Chinese, etc.)
● Advanced
General: set printing timeouts and default paper size
Protocol: set USB delay
Rendering: choose default PDF rendering library
Action overflow
This button provides access to the additional menu items and is depicted by the 3 vertical dots.
Action overflow button triggers a drop-down menu with the following menu items available:
● About
Learn the app’s version, your Device ID or send feedback to the developers
● Help
Learn about the app’s features and screens
● Send Feedback
Share your thoughts about the app with the developers
14
Page 15
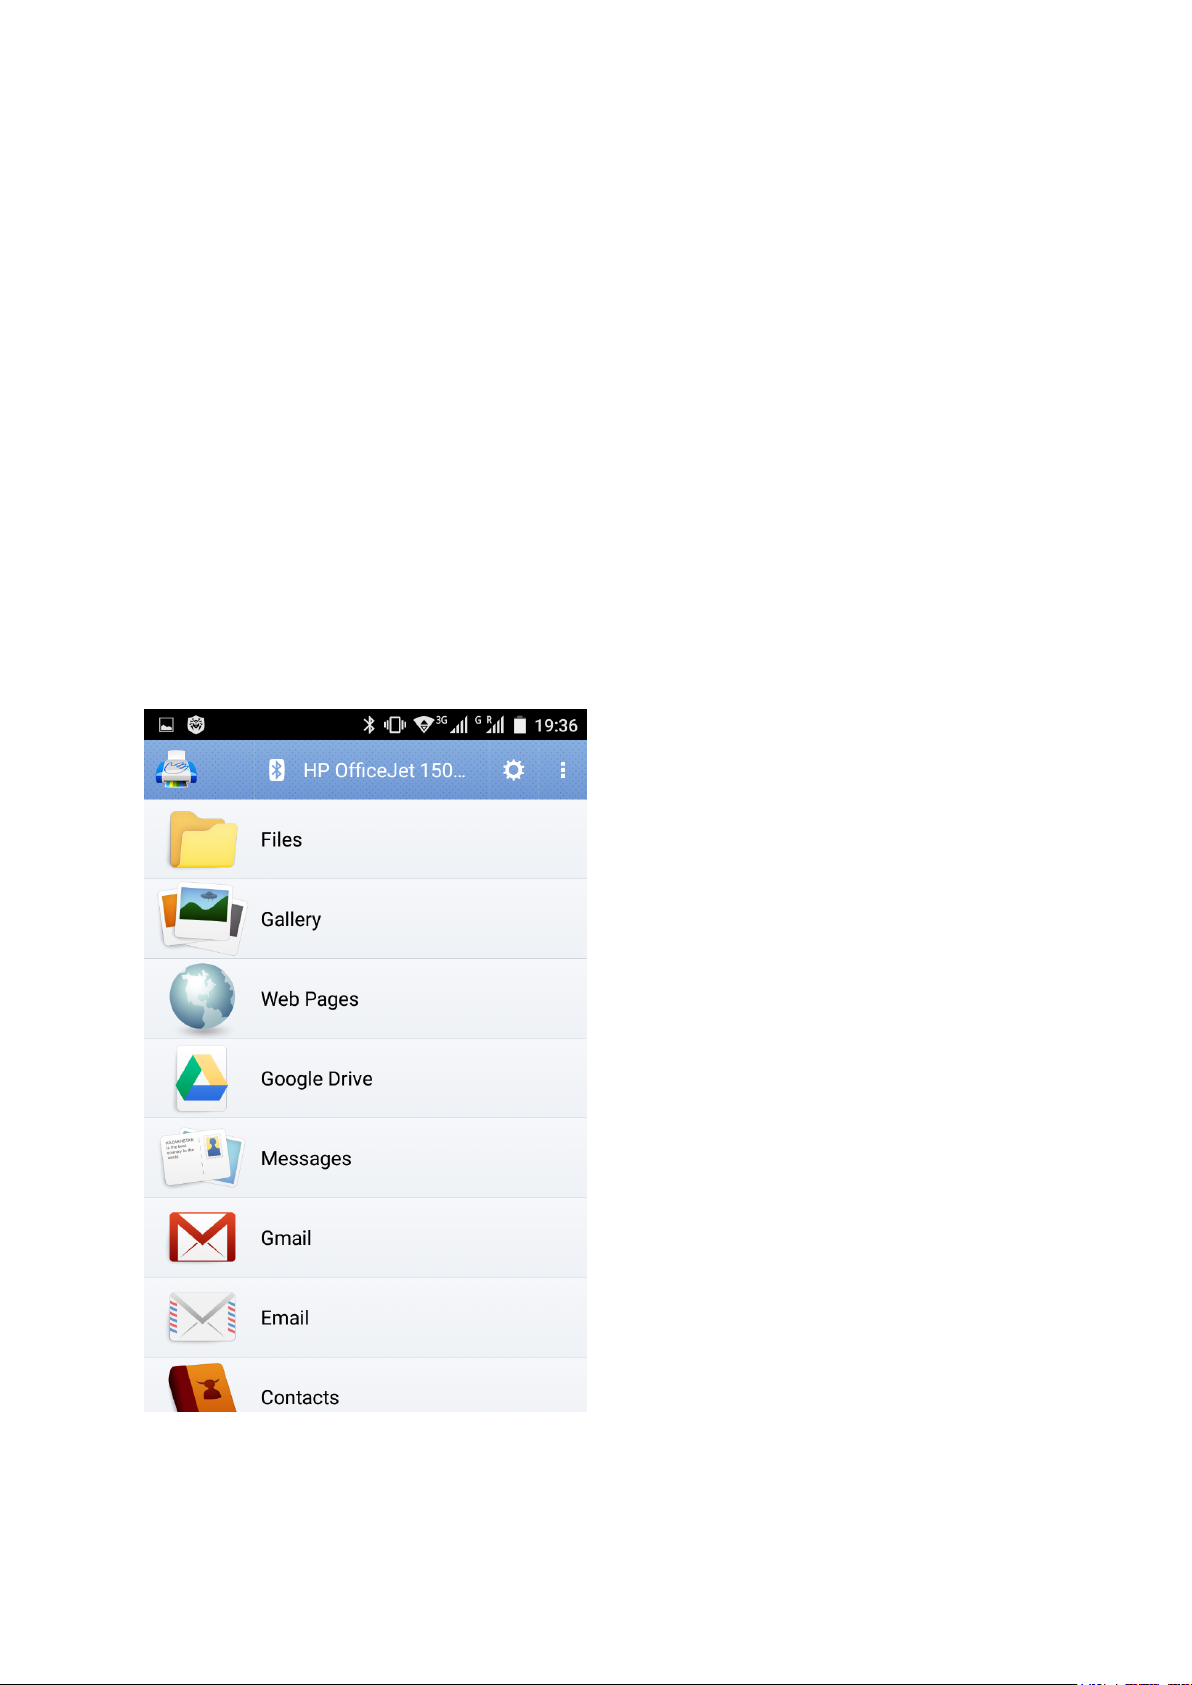
Main menu
Main menu of the app is used to access all the main features of the app being the main entry point of
the app.
Here is a short description of the main entries available in the Main menu:
● Files — Print documents (pdf, doc/docx, ppt/pptx, txt, hwp and more) and images (jpg, gif,
png, bmp) on your smartphone or tablet.
● Gallery — Print images from the Gallery.
● Web Pages — Browse the Web and choose web pages to print.
● Google Drive — Print documents and images stored in your Google Drive.
● Gmail — Print Gmail messages and attachments.
● Email — Print email messages and attachments stored in a non-Gmail account.
Note: Some options can be disabled if corresponding features are not available on your device.
15
Page 16

Files
You can print documents and files stored on your device. Please navigate through the folders to find
the file you would like to print. In addition to internal storage many devices have external SD card
with its own list of folders and files.
When navigating, don't be surprised to only see the files that we can print. The following are main
supported types:
● DOC/DOCX - Microsoft Word
● XLS/XLSX - Microsoft Excel
● PPT/PPTX - Microsoft PowerPoint
● PDF - Adobe PDF
● TXT - text files
● JPG/JPEG, BMP, PNG, GIF - images
● HWP - Hangul Word Processor
You can browse only through images by selecting the Gallery option on the left, or by navigating to
where the files are stored from here, typically in the DCIM folder in the internal memory or on the
microSD card.
In addition to navigating through folders, you can search for a file by typing in its name. The app will
try to find all the files beginning with the letters you typed in, regardless of file type (as long as it is
supported). You can limit the scope of search by selecting Images or Documents.
Note: to print documents you need to have several megabytes of free space on your microSD card to install
the Rendering library.
Gallery
In this section you can browse through the all the images and photos available on your device. Please
select the ones you like to print. Alternatively, you can find the same images as files in the Files
section. Typically images are located in the DCIM folder.
Another way to find image you need to print is to use our Files section.
Web pages
In this section you can type in a web address or navigate to the page you like to print. Access your
browser bookmarks by clicking the Star icon. InstaQPrint uses the same browse component as the
standard browser available on your device so the pages should look exactly the same as the appear
in the standard browser. However, keep in mind that many sites look different on desktops/laptops
and mobile devices.
Alternatively, you can open pages with standard Android browser and select Share from the menu
(click on 3-dot vertical bar on the right top). Choose InstaQPrint and you'll be able to print the
16
Page 17

page without having to start InstaQPrint application and manually navigating to the same page from
it.
Google Drive
You can print documents and images stored in your Google Drive tied to any Google account
configured on the device. Typically the account is setup and configured during device initialization.
Additional accounts can be added later on through Android’s Settings > Accounts & sync
section.
Navigate to and select a document or an image you wish to print.
Gmail
You can print email messages and attachments (documents or images) stored in your Gmail account
configured on your device. Typically the account is setup and configured during device initialization.
Additional accounts can be added later on through Android’s Settings > Accounts & sync
section.
Navigate the email folders and threads and select an email message or an attachment you wish to
print.
Email
You can print email messages and attachments (documents or images) stored in your email account.
Accounts can be added through Accounts menu of the Email section.
Navigate the email folders and threads and select an email message or an attachment you wish to
print.
Box
You can print documents and images stored in your Box account.
Dropbox
You can print documents and images stored in your Dropbox account.
OneDrive
You can print documents and images stored in your OneDrive account.
Evernote
You can print notes stored in your Evernote account.
17
Page 18
Printing
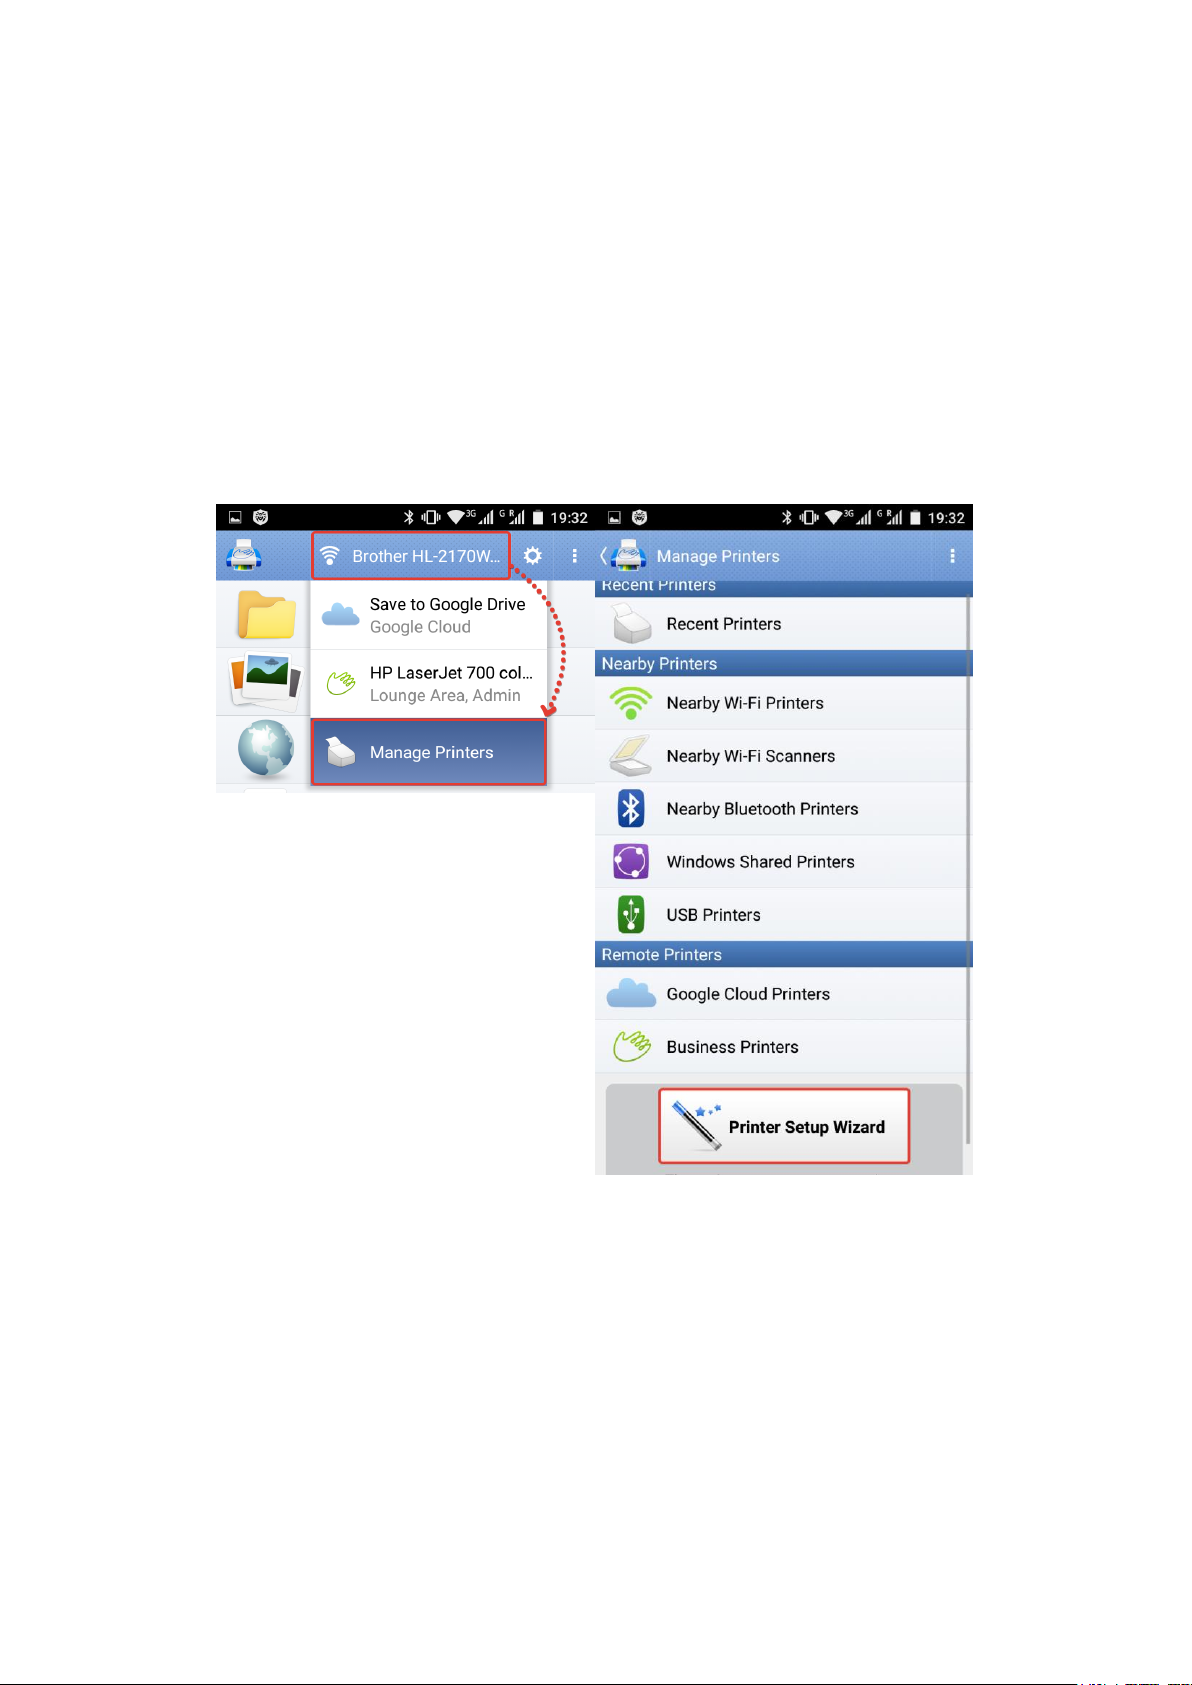
Printer Setup Wizard
It is a good place to start working with a new printer if you are not familiar with InstaQPrint
application yet. Just go through several easy steps to detect and setup your printer.
1. Launch the InstaQPrint app on your mobile device
2. Tap Manage Printers button (or the name of the printer currently selected), select
Manage Printers option in the drop-down menu and tap Printer Setup Wizard button
located in the bottom of the said menu
3. After that you will see the Choosing your printer dialog which will guide you through the
printer configuration process
18
Page 19

4. Finally you should be able to print on the printer by selecting content from the app’s main
menu or by sharing content to the InstaQPrint app from 3rd party apps
19
Page 20

Network setting
1. On the home screen, select Apps ( )>Settings ( ).
2. Make sure that both devices are connected to the same Wi-Fi network
3. Set up the printer in the InstaQPrint app
20
Page 21

Printing via Wi-Fi
To print via Wi-Fi one needs to do as follows:
4. Make sure that the Wi-Fi connection is ON on both mobile device and the printer
5. Make sure that both devices are connected to the same Wi-Fi network
(in case of printing on a local printer via the local Wi-Fi network)
6. Set up the printer in the InstaQPrint app
7. Select content in the InstaQPrint app in order to print it out
Switching Wi-Fi On
If you are printing via Wi-Fi, please go to Android Settings - Wi-Fi and make sure that Wi-Fi
connectivity is enabled.
Make sure that your printer is turned ON, connected to the Wi-Fi network (via a router, PC or
using Wi-Fi Direct or AirPrint features) and not in the sleep mode.
Turn the Wi-Fi connection On and connect to the desired Wi-Fi network
(if not connected automatically to one of the saved networks)
21
Page 22

Setting up the printer in the InstaQPrint app
1. Launch the InstaQPrint app on your mobile device
2. Tap Manage Printers button (or the name of the printer currently selected) and select
Manage Printers option in the drop-down menu
3. Select Nearby Wi-Fi Printers option and tap the Wi-Fi printer, which you would like to
set up or tap Scan for Wi-Fi Printers if there are no printers displayed
4. Also you can select a driver for your printer manually by long tapping the printer’s name and
then Select Manually (optional)
5. After selecting the printer you might see the pop-up asking you to install the drivers and
finally see the printer’s name in the header of the app’s main screen
22
Page 23

6. With this done, you should be ready to print
23
Page 24

Printing from the InstaQPrint app
1. If you would like to print an image, go to the app’s main menu and select Gallery entry to
select a bucket (folder)
2. Select a single image or a series of images by tapping on each of them and then tap Print to
see the print preview
3. In the print preview screen you can tap Options button to alter the printing options
24
Page 25

4. Finally tap Print to select the additional Print Options and finally print the image or a
series of images by tapping OK
Printing via USB
To print via Bluetooth one needs to do as follows:
25
Page 26

1. Connect the printer to the mobile device using USB cable
2. Set up the printer in the InstaQPrint app
3. Select content in the InstaQPrint app in order to print it out
Connecting a printer to your IFP
If you are printing via USB, please connect your IFP to the printer first.
● Make sure that your printer is turned ON and not in the sleep mode
● Connect your IFP to the printer using an USB cable
Your mobile device has to run at least Android 4.0 and have USB Host driver. If USB connection is
grayed-out in the software, the Android device you are using does not support USB Host mode.
Please note that some of the mobile devices are unable to communicate with a printer properly even
if USB Host mode is supported. This happens due to specific electrical design of the USB port or
limitations placed by the device manufacturer.
Note: The fact that your mobile device works properly with USB mice/keyboards or lets you browse files
stored on USB flash drives does not guarantee that it will be able to print via USB.
26
Page 27

Setting up the printer in the InstaQPrint app
1. Launch the InstaQPrint app on your mobile device and tap Manage Printers button (or
the name of the printer currently selected) and select Manage Printers option in the
drop-down menu
2. Select USB Printers option and tap the USB printer, which you would like to set up or tap
Scan for USB Printers if there are no printers displayed
3. Also you can select a driver for your printer manually by long tapping the printer’s name and
then Select Manually (optional)
27
Page 28

4. After selecting the printer you might see the pop-up asking you to install the drivers (which
need to be installed by tapping the Install button) and finally see the printer’s name in the
header of the app’s main screen
5. With this done, you should be ready to print
28
Page 29

Printing from the InstaQPrint app
1. If you would like to print an image, go to the app’s main menu and select Gallery entry to
select a bucket (folder)
2. Select a single image or a series of images by tapping on each of them and then tap Print to
see the print preview
3. In the print preview screen you can tap Options button to alter the printing options
29
Page 30

4. Finally tap Print to select the additional Print Options and finally print the image or a
series of images by tapping OK
Printing via InstaQPrint Remote
With InstaQPrint Remote you can share printers connected to your Windows or Mac computer
and then print to them both locally and remotely from any device. It’s fast, secure and easy to setup.
30
Page 31

You can also let other people - relatives, friends, colleagues - print on one of your printers in almost
no time.
To print via InstaQPrint Remote one needs to:
1. Install the InstaQPrint Remote desktop software and share printers using it
2. Select one of the shared printers in the InstaQPrint app and send content to it
Setting up the printer in the InstaQPrint app
1. Launch the InstaQPrint app on your mobile device
2. Tap Manage Printers button (or the name of the printer currently selected) and select
Manage Printers option in the drop-down menu
3. Select Nearby Wi-Fi Printers option and tap the instance of your printer shared via
InstaQPrint Remote (with a blue hand icon on it), on which you would like to print
4. After selecting the printer you should finally see the printer’s name in the header of the
app’s main screen
31
Page 32

5. With this done, you should be ready to print
Printing from the InstaQPrint app
1. If you would like to print an image, go to the app’s main menu and select Gallery entry to
select a bucket (folder)
2. Select a single image or a series of images by tapping on each of them and then tap Print to
see the print preview
3. In the print preview screen you can tap Options button to alter the printing options
32
Page 33

4. Finally tap Print to select the additional Print Options and finally print the image or a
series of images by tapping OK
33
Page 34

Print options
InstaQPrint app provides variety of printing options depending on the make and the model of your
printer and the driver selected.
Most options are available from the Print Options menu located in the print preview screen.
Other options are located in the additional Print Options menu available after tapping the Print
button in the print preview screen.
The key options are listed below.
34
Page 35

Printer
This option lets one to select a printer.
Also one can select a driver (mostly needed when printing on an unsupported printer or on a
printer supported by a driver designed for a similar printer model) using the Manage Printers
menu entry.
35
Page 36

Paper
This option lets one to select a proper paper size to fit the media used to print. Say, if you are using
A4 paper size, selecting A4 paper size in the app should be the right decision.
Printout Mode
Use this option one can switch between printing in color and grayscale (shades of gray or b/w, if you
will) or select a better printing quality.
Duplex Mode
With this option one can print on both sides of a sheet of paper. Say, if you would like to save some
paper (and trees), you can switch this mode on to print on both sides.
36
Page 37

Actually, there are 2 options available:
● Long Edge (Standard)
The app will print the pages so that you flip them like you would a book.
Picture Size
This option lets one to select the desired actual size of the printout. You might not want all the
pictures to fit the sheet of paper. Instead you might want to print them in their original size
(depends on the image size in pixels).
37
Page 38

Page orientation
Using this setting you can select whether to print your image in album or portrait orientation.
By default it is set to Auto to let your printer’s driver decide on the better option.
Note: this option is available for images only.
Page Margins
If you need to leave some free space between the content and the page border, select one of the
values provided. If you would like to fill the page with content, stick to the No Margins option.
38
Page 39

Scale
With this option you can tell the printer how to deal with content which does not have the same
aspect ratio as your media.
Say, if you are printing a photo on A4 paper, there is a chance that your photo has aspect ratio
different from your media. For instance, you might have some photos with aspect ratio of 4:3 or
16:9. However, the A4 sheet has aspect ratio of 3:2.
This means that you need to crop the photo so that it fits the sheet of paper if you would like to fill
the whole sheet of paper with it. In this case use the Crop option.
However, if you need to print the photo without cropping it, you will have to leave some margins on
the printout. In this case use the Inside option.
Align
You can align an image to the top left corner or to the center of the page.
Color
One can select Grayscale option to print in shades of gray or to save color ink.
39
Page 40

Printable area
Printer’s printable area might be smaller than the paper size. When printing with the Fit to paper
size option selected, some of the content might be cropped. One can use the Fit to printer’s
printable area to print content without cropping it.
Driver
Using this option one can select a printer driver. It might come in useful in case one is trying to
configure an unsupported printer by selecting a Generic driver from our collection.
Protocol
Availability of the printing protocols depends on the driver (corresponding to the printer model).
We recommend altering this option in case of printing issues only as InstaQPrint selects the
protocol automatically according to the driver selected.
Copies
In the additional Print Options menu you can set the number of copies you would like to print out
instead of sending the same documents to print multiple times.
Print Range
With this option one can set the range of pages to be printed out. There are 3 options:
● All - prints all pages in the document
● Selected - prints pages selected with a tick in the print preview screen
● Pages - prints the pages listed manually using the page numbers
40
Page 41

Odd or Even Pages
Using this option one can select only odd or even pages to be printed. Say, if you just need to print
pages 1, 3, 5 and 7 - you can simply select odd pages to be printed instead of inputting all the
numbers manually.
Select All pages in range if you need to print the whole document.
Hint: you can use the option to print on both sides of paper in case the Duplex option is not
available for your printer.
Reverse order
In case your printer deposits printed pages in such a manner that the last page appears to be the first
one you see when you take the document out from the printer, this option might be extremely
helpful. It can simply help you collate a large multi-page document properly automatically.
41
Page 42

Troubleshooting
Here we have gathered solutions for the issues one might face while using our mobile app.
If you've been unable to find a solution suitable for you, please send a message to our Customer
support.
Please describe your problem thoroughly and provide complete information about your setup. This
will help us to find a solution for the issue in a timely manner.
Alert: Invalid credentials
This error might occur when inputting incorrect login information.
Please make sure that you are entering correct login information. You can copy and then paste login
and password from a txt file or email message to be sure that you are entering correct information.
If you are sure that you've entered correct login information, please follow the suggestions below.
● Please make sure that your Internet connection is stable
● Please restart your mobile device, your printer and the router
● Re-install the app if the problem persists
Alert: Please log in via your web browser (Gmail)
This error might appear upon entering password incorrectly.
If you're using the wrong Gmail password, you might experience these problems:
● The app keeps asking for your username and password
● You see the "Invalid credentials" error message
● You see the "Web login required" error message
If you have these problems or can't sign in, first of all make sure you're using the right password.
Tip: Keep in mind that passwords are case-sensitive.
For more suggestions please refer to the Google's help section.
Connection error: 0002, OK, Locked for printing
This error message is known to be displayed due to the lack of ink or paper. It might be displayed
even upon finishing a print job successfully.
Please make sure that your printer is not running out of paper or ink. See if it helps.
42
Page 43

If content could not be printed and the error message was displayed, please tell us more about the
problem: we will need to know what content you printed and if your printer did not respond to
printing command.
Connection error: Connection refused
This is a connectivity issue. Possible causes of the connection error message are listed below
alongside with the solutions.
1. Your firewall may be blocking the incoming connection.
2. Check your firewall settings.
3. If you are sure that the firewall does not block it, restart the PC and the router.
4. Unknown Network error
5. If you are printing directly to a printer and not through an intermediate PC, restart your
mobile device, your printer and the router.
6. You input an incorrect value in IP address field in manual setup screen or left the field empty
7. If you would like to connect to a network printer by specifying its IP address, you will first
need to learn its IP address. You may need to input its IP address if the printer is located on
a subnet different from the one on which your mobile device is located.
8. Some printers with network capabilities can display their IP address on a built-in screen.
9. If your network printer does not have a screen, you can find its address from any networked
computer configured to use the printer.
10. To find the printer IP address from a Windows machine, do this:
1. Click 'Start' button> Devices and Printers
2. Right-click the name of your printer>Properties
3. Click 'Web Services' tab or 'Ports' (will depend on your Windows version).
11. To find the printer IP address from a Mac, do this:
1. Go to the 'Apple' menu and select the 'System Preferences' option. Click 'Print &
Fax' from the menu
2. Select the printer from the menu on the left and press the 'Open Print Queue'
button
3. Open the 'Printer' menu at the top of the screen and select 'Print Test Page'
4. Go to the 'Device URI' on the CUPS text page and look towards the end of the
string. The IP address appears after 'ip='
12. The app is using an improper printing protocol.
43
Page 44

13. Please try altering Protocol in Options.
14. The printer is not properly connected.
15. If your printer is connected to a PC, print-server or to a router using a cable, please unplug
the cable from both devices and then plug it in again. Also please try using another data
cable.
16. Inappropriate driver selected
17. Make sure that your printer is supported. If it is supported, please try selecting an
appropriate driver manually.
18. To select a driver for your printer you need to do as follows:
1. Launch the app
2. Go to the list of detected printers by tapping 'Manage printers' (if you've already
selected a printer, it can display the printer's make and model) button in the top of
the screen -> 'Nearby Wi-Fi printers'
3. Tap and hold your printer (you will see a new pop-up menu)
4. Tap 'Select manually'
5. Select the driver
Connection error: ECONNREFUSED (Connection refused)
This is a connectivity issue. Possible causes of the connection error message are listed below
alongside with the solutions.
1. Your firewall may be blocking the incoming connection.
2. Check your firewall settings.
3. If you are sure that the firewall does not block it, restart the PC and the router.
4. Unknown Network error
5. If you are printing directly to a printer and not through an intermediate PC, restart your
mobile device, your printer and the router.
6. You input an incorrect value in IP address field in manual setup screen or left the field empty
7. If you would like to connect to a network printer by specifying its IP address, you will first
need to learn its IP address. You may need to input its IP address if the printer is located on
a subnet different from the one on which your mobile device is located.
8. Some printers with network capabilities can display their IP address on a built-in screen.
9. If your network printer does not have a screen, you can find its address from any networked
computer configured to use the printer.
44
Page 45

10. To find the printer IP address from a Windows machine, do this:
1. Click 'Start' button> Devices and Printers
2. Right-click the name of your printer>Properties
3. Click 'Web Services' tab or 'Ports' (will depend on your Windows version).
11. To find the printer IP address from a Mac, do this:
1. Go to the 'Apple' menu and select the 'System Preferences' option. Click 'Print &
Fax' from the menu
2. Select the printer from the menu on the left and press the 'Open Print Queue'
button
3. Open the 'Printer' menu at the top of the screen and select 'Print Test Page'
4. Go to the 'Device URI' on the CUPS text page and look towards the end of the
string. The IP address appears after 'ip='
12. The app is using an improper printing protocol.
13. Please try altering Protocol in Options.
14. The printer is not properly connected.
15. If your printer is connected to a PC, print-server or to a router using a cable, please unplug
the cable from both devices and then plug it in again. Also please try using another data
cable.
16. Inappropriate driver selected
17. Make sure that your printer is supported. If it is supported, please try selecting an
appropriate driver manually.
18. To select a driver for your printer you need to do as follows:
1. Launch the app
2. Go to the list of detected printers by tapping 'Manage printers' (if you've already
selected a printer, it can display the printer's make and model) button in the top of
the screen -> 'Nearby Wi-Fi printers'
3. Tap and hold your printer (you will see a new pop-up menu)
4. Tap 'Select manually'
5. Select the driver
Connection error: EHOSTUNREACH (No route to host)
This is a connectivity issue. Possible causes of the connection error message are listed below
alongside with the solutions.
45
Page 46

1. Your firewall may be blocking the incoming connection.
2. Check your firewall settings.
3. If you are sure that the firewall does not block it, restart the PC and the router.
4. Unknown Network error
5. If you are printing directly to a printer and not through an intermediate PC, restart your
mobile device, your printer and the router.
6. You input an incorrect value in IP address field in manual setup screen or left the field empty
7. If you would like to connect to a network printer by specifying its IP address, you will first
need to learn its IP address. You may need to input its IP address if the printer is located on
a subnet different from the one on which your mobile device is located.
8. Some printers with network capabilities can display their IP address on a built-in screen.
9. If your network printer does not have a screen, you can find its address from any networked
computer configured to use the printer.
10. To find the printer IP address from a Windows machine, do this:
1. Click 'Start' button> Devices and Printers
2. Right-click the name of your printer>Properties
3. Click 'Web Services' tab or 'Ports' (will depend on your Windows version).
11. To find the printer IP address from a Mac, do this:
1. Go to the 'Apple' menu and select the 'System Preferences' option. Click 'Print &
Fax' from the menu
2. Select the printer from the menu on the left and press the 'Open Print Queue'
button
3. Open the 'Printer' menu at the top of the screen and select 'Print Test Page'
4. Go to the 'Device URI' on the CUPS text page and look towards the end of the
string. The IP address appears after 'ip='
12. The app is using an improper printing protocol.
13. Please try altering Protocol in Options.
14. The printer is not properly connected.
15. If your printer is connected to a PC, print-server or to a router using a cable, please unplug
the cable from both devices and then plug it in again. Also please try using another data
cable.
16. Inappropriate driver selected
46
Page 47

17. Make sure that your printer is supported. If it is supported, please try selecting an
appropriate driver manually.
18. To select a driver for your printer you need to do as follows:
1. Launch the app
2. Go to the list of detected printers by tapping 'Manage printers' (if you've already
selected a printer, it can display the printer's make and model) button in the top of
the screen -> 'Nearby Wi-Fi printers'
3. Tap and hold your printer (you will see a new pop-up menu)
4. Tap 'Select manually'
5. Select the driver
Connection error: Host is unresolved
This error comes up if you are not connected to any network and are trying to specify an IP address
of your printer or if the IP address you specified is incorrect.
It may also come up if you typed in an incorrect IP address of your network printer.
Please enter correct host name or IP address. You can refer to any network-connected device in
either of two ways:
1. by its IP address (a four-part number string such as "18.72.0.3"), in which the first part(s)
identify the specific network to which the machine is connected;
2. by its host name (a text string such as "bitsy.mit.edu") which consists of the machine name
(e.g., "bitsy") and the domain name.
ERR Authentication failure: unknown user name or bad password
This message is displayed if incorrect email account settings were rejected by the email service
provider.
1. After inputting your email address and your password, tap 'Manual setup' button in the same
dialogue window
2. Select Account type depending on the server you are connecting to: IMAP or POP3
3. Input server name, port number and security type
Also please do as follows if the suggestions above were not helpful.
● Restart your mobile device and your router
● Re-install the app if the problem persists
Settings for some email services can be found below.
47
Page 48

Hotmail, Outlook, Live (all share the same settings):
Account type: IMAP
IMAP server: imap-mail.outlook.com
Port: 993
Security type: SSL
Gmail:
Account type: IMAP
IMAP server: imap.gmail.com
Port: 993
Security type: SSL
Orange:
Account type: IMAP
IMAP server: imap.orange.fr
Port: 993
Security type: SSL
Web.de:
Account type: POP3
POP3 server: pop3.web.de
Port: 995
Security type: SSL
Optonline:
Account type: POP3
POP3 server: mail.optonline.net
Port: 110
Security: None
Verizon:
Account type: POP3
pop.verizon.net
48
Page 49

Port: 995
Security type: SSL
Yahoo:
Account type: IMAP
IMAP server: imap.mail.yahoo.com
Port: 993
Security type: SSL
Sbcglobal:
Account type: POP3
POP3 server: inbound.att.net
Port: 995
Security type: SSL
AOL:
Account type: IMAP
IMAP server: imap.aol.com
Port: 993
Security type: SSL
Charter:
Account type: IMAP
IMAP server: mobile.charter.net
Port: 993
Security type: SSL
GMX:
Account type: IMAP
Server: imap.gmx.com
Port: 993
Security type: SSL
(If "SSL" is not available, you simply have to enable the "Encryption" function.)
49
Page 50

Seznam:
Account type: IMAP
IMAP server: imap.seznam.cz
Port: 993 (143 if not using SSL)
Security type: SSL
1und1:
Account type: IMAP
IMAP server: imap.1und1.de
Port: 993 or 995
Security type: SSL
Comcast:
Account type: IMAP
IMAP server: imap.comcast.net
Port: 993
Security type: SSL
Yandex:
Incoming mail
IMAP server: imap.yandex.com (imap.yandex.ru for russian email accounts)
Port: 993
Security type: SSL
Outgoing mail
SMTP server: smtp.yandex.com (smtp.yandex.ru for russian email accounts)
Port: 465
Security type: SSL
Error during discover: ERROR_BUSINESS_PRINTERS
This error occurs when inputting incorrect credentials while signing into Business printers
environment.
Typically one does not need to select 'Business printers' entry in order to print via Wi-Fi or USB.
50
Page 51

If you are printing on a local Wi-Fi printer, please select 'Nearby Wi-Fi printers' in 'Manage printers'
menu.
Note that your Wi-Fi printer and your mobile device have to be connected to the same wireless
network.
Please refer to our Wi-Fi Printing help page for more information.
51
Page 52

Error during discover: Printer is off or network is unreachable
This error comes up if the printer cannot be detected by the app.
Please try to:
● power-cycle the printer (we would advise switching it off and then waiting for about a
minute before turning it back on);
● reboot a router or a printer server if the printer is connected to them;
● reboot your mobile device.
If that does not help, you can try to:
● reinstalling the app;
● un-share the printer from your network and then share it again.
Please note that you have to configure your wireless printer using the network utility tool that came
with it if you have not done so already (probably on an installation disk). If the printer is not shared
through the router using this piece of proprietary software provided by printer manufacturer, no
devices (including your mobile device) are going to detect your printer. Both your mobile device and
your printer should be connected to the same wireless network.
Error during discover: Windows shared printers error
This error might appear when printing on a Windows shared printer.
When the app asks for authorization, please enter your login and password of the PC to which your
printer is connected. If your PC is not protected by a password, please leave the fields blank and tap
OK.
If the printer cannot be detected by the app, please try to:
● power-cycle the printer (we would advise switching it off and then waiting for about a
minute before turning it back on);
● reboot the computer (if the printer is connected to it);
● reboot your mobile device.
If that does not help, you can try to:
● reinstall the app;
● un-share the printer from your network and then share it again using standard tools of the
OS.
Please note that you have to configure your printer if it supports wireless connectivity using the
network utility tool that came with it (probably on an installation disk). If a wireless printer is not
shared through the router using this piece of proprietary software provided by printer
52
Page 53

manufacturer, no devices (including your mobile device) are going to detect your printer. Both you
mobile device and your printer should be connected to the same wireless network.
Error during printing: Printer unsupported
This error message appears if a printer is not supported by the app.
Unfortunately we are not sure when or if we are going to be able to create a specific driver for the
printer if it is not supported at the moment.
This means that there are no known compatible drivers for this printer, sorry.
But you can try using one of the Generic drivers by selecting it manually. Also you can try using a
driver designed for a similar printer model.
To select a driver for your printer you need to do as follows:
● Launch the app
● Go to the list of detected printers by tapping 'Manage printers' button (if you've already
selected a printer, it might display the printer's model) in the top of the screen
● Select Nearby Wi-Fi printers (in case you are printing via Wi-Fi)
● Tap and hold your printer (you will see a new menu)
● Tap Select manually and select a driver
If nothing helps or if you've found a driver compatible with your unsupported printer, please let our
support know.
NOTE: The list of printers supported by InstaQPrint app is available on our web site.
Error during setup: Library pack installation error
This error might occur if one of the libraries has not been installed properly.
Please make sure that you have a stable Internet connection at the time you are installing library
pack.
Re-install the app if the problem persists.
Alternatively you can try downloading the libraries manually.
● Make sure that your Internet connection is ON
● Launch the app
● Tap the Gear icon in the top right portion of the screen
● Tap 'Libraries' and download all the libraries needed
53
Page 54

Libraries needed for printing:
● ESCPR
● Gutenprint
● HPLIP
● Rendering library
● Fonts collection (optional)
Error: Authorization failed or network error has occurred
This error might occur when experiencing connectivity issues or inputting incorrect login
information.
Please make sure that you are entering correct login information. You can copy and then paste login
and password from a txt file or email message to be sure that you are entering correct information.
If you are sure that you've entered correct login information, please follow the suggestions below.
● Please make sure that your Internet connection is stable
● Please restart your mobile device, your printer and the router
● Re-install the app if the problem persists
Error: File open error
This error might appear when opening a file which has an unsupported file format.
Please make sure that the file format is supported by the app. Supported file formats are listed
below.
Images:
● JPEG
● PNG (not to be confused with Animated PNG)
● GIF (not to be confused with Animated GIF)
Documents:
● DOC/DOCX
● XLS/XLSX
● PPT/PPTX
● PDF
● TXT
54
Page 55

● HWP
If it is listed as supported and you are still having issues, please send us a copy of the file for testing.
Error: Invalid key hash
This error might appear when using an app installed from an unauthorized web site.
Please install the app from Google Play, Amazon or from any other authorized marketplace
corresponding to your device.
Installing the app provided by unauthorized web-sites might be dangerous and insecure due to the
wide range of permissions used by the app. The app might be reassembled and modified with
malicious code. This means that your private information may fall into the wrong hands.
If you are using the app provided by unauthorized web-sites, you are doing so at your own risk.
Error: Invalid transaction ID
This error is displayed when the app fails to be restored using a PayPal Transaction ID.
Please make sure that the ID you are entering is valid and input correctly.
You can copy and then paste the ID and password from a txt file or from an email to be sure that it
is correct.
If the app fails to be restored using a valid ID, please contact support. Do not forget to specify the
Transaction ID and details of your transaction.
Please specify:
● The app store on which you bought the app
● The email account which you were using to purchase the app
Error: Library not found
This error might occur if one of the libraries has not been installed properly.
Please make sure that you have a stable Internet connection at the time you are installing library
pack.
Re-install the app if the problem persists.
Alternatively you can try downloading the libraries manually.
● Make sure that your Internet connection is ON
● Launch the app
● Tap the Gear icon in the top right portion of the screen
● Tap 'Libraries' and download all the libraries needed
55
Page 56

Libraries needed for printing:
● ESCPR
● Gutenprint
● HPLIP
● Rendering library
● Fonts collection (optional)
Error: Restore failed
This error is displayed when the app fails to be restored using a promo code.
Please make sure that the code you are entering is valid and input correctly.
You can copy and then paste login and password from a txt file or from an email to be sure that the
code you are entering is correct.
If the app fails to be restored using a valid code, please contact support. Do not forget to specify the
promo code and the ID of your device.
Error: USB device not found
This error might appear when trying to print on a USB printer.
Your mobile device has to run at least Android 4.0 and have USB Host driver included into the
firmware of the device.
If USB connection is grayed-out in the software, the Android device you are using does not support
USB Host mode.
If the app is unable to identify the printer over USB, restart the printer along with the mobile device.
Please follow the steps below to troubleshoot the issue
● Please try using the USB Host Diagnostics app. With the help of the said app you can check
if the functionality of the USB port of your mobile device is limited for the 3rd party apps by
the device manufacturer.
● One can get rid of such limitation using the said app on a rooted device only. We do not
recommend rooting a device if you are not authorised to do so as this might lead to the
violation of the warranty.
● Moreover, please try using another USB OTG cable
● If above listed steps are not helpful, please try using a driver for a similar printer model (this
might be helpful if a specific driver used by the app for your printer is not fully functional)
Note: the fact that your mobile device works properly with USB mice/keyboards or lets you browse files
stored on USB flash drives does not guarantee that it will be able to print via USB.
56
Page 57

Some of the mobile devices are unable to communicate with a printer properly even if USB Host
mode is supported. This happens due to specific electrical design of the USB port.
Sadly in such case the app is not likely to work properly.
HTTP error: 500 Internal Server Error
This is a connectivity issue.
● Please make sure that your Internet connection is stable
● Try accessing the resource later (this might be a temporary problem on the server side)
Also please do as follows if the suggestions above were not helpful.
● Restart your mobile device and your router
● Re-install the app if the problem persists
Internal error: Data transfer error
This error might occur while transferring data to printer.
● Please make sure that your Internet connection is stable
● Please restart your mobile device, your printer and the router
● Re-install the app if the problem persists
Internal error: EPIPE (Broken pipe)
This error appears when the app fails to send a print job to a printer correctly.
This issue can be fixed by selecting BJNP as the printer's protocol if you are using a Canon printer.
Please note that your printer should be detected by the app prior to selecting the protocol.
● Launch the main screen of the app
● Tap 'Gear' icon in the top portion of the screen
● Select 'Printer' menu
● Tap 'Protocol' entry in the 'Advanced Options' section of the menu
● Select 'BJNP' protocol
If you are using a printer manufactured by any other company, please try reinstalling the app and
rebooting your mobile device as well.
Internal error: IJS Error
This error might occur while transferring data to printer.
57
Page 58

Sadly there is no 100% working fix for this error at the moment. However, you can try doing as
follows.
● Please restart your mobile device, your printer and the router
● Re-install the app if the problem persists
Rendering error 131072
This error appears when opening an empty or corrupted file.
Please follow the suggestions below to troubleshoot the issue.
● Make sure that the document you are trying to print is not empty
● Make sure that the document is not corrupted
● Try reinstalling the app and rebooting your mobile device as well
Rendering error 16777216
This error might appear when using an app installed from an unauthorized web site.
Please install the app from Google Play, Amazon or from any other authorized marketplace
corresponding to your device.
Installing the app provided by unauthorized web-sites might be dangerous and insecure due to the
wide range of permissions used by the app. The app might be reassembled and modified with
malicious code. This means that your private information may fall into the wrong hands.
If you are using the app provided by unauthorized web-sites, you are doing so at your own risk.
Rendering error 2048
This error message appears if Fonts collection has not been installed properly.
Try reinstalling the app or clearing its data in Settings/Apps/InstaQPrint as follows.
● Go to the 'Settings' menu. This can be done by tapping the Gear icon in the notification
shade or in the app drawer where all apps are located
● Locate 'Apps' (or 'Applications', depending on your device) in the menu, then locate the
InstaQPrint app
● Tap 'Clear data' button (if you are using Andropid 6.0+, prior to doing so tap on 'Storage'
entry so that the buttons for clearing the cache and app data will become available)
If nothing helps, please contact support and specify the account (email address) which you were
using to buy the app.
58
Page 59

Rendering error 256
This happens with documents generated by some mobile Office apps.
Our app works properly with documents created with MS Office suite and other word processors.
As for documents generated by mobile Office apps, we have tested those that are generated with
Olive office, WPS Office (former Kingsoft Office) - both are free. We have also tested Documents
created with Google Docs, Office Suite Pro and Docs2Go with satisfactory results. QuickOffice
word documents are not supported yet.
You can also try converting the document from DOCX or XLSX to DOC or XLS file format
respectively.
Rendering error 32
This usually happens to TXT documents with a type of encoding that is not supported by our app.
Please try changing the encoding of a document to UTF8 or a different type of encoding and see if
this helps.
Usually one can alter encoding of a text file in a text editor. This can be done in a free Sublime Text
editor available for Windows, Linux and macOS.
In the menu of the editor you can select 'File' - 'Save' with 'Encoding' and switch it to 'UTF-8'.
Alternatively you can try using Microsoft Word to do so. Please see Microsoft's help page on
choosing encoding when saving files.
Please don't forget to save file after altering the encoding.
Moreover, there are some mobile apps capable of doing so. For instance, you can try using a 3rd
party app called Change Encoding.
Rendering error 4096
This error is related to fonts. It is likely that the Fonts collection has not been downloaded or
installed properly.
You can try installing or reinstalling the libraries manually.
● Make sure that your Internet connection is ON
● Launch the app
● Tap the Gear icon in the top right portion of the screen
● Tap 'Libraries'
● Delete the Fonts collection and download it again
If nothing helps, please go to Settings/Apps/InstaQPrint and tap on 'Clear data' button.
59
Page 60

Also please try reinstalling the app and rebooting your mobile device as well.
Rendering error 64
This happens with documents generated by some mobile Office apps.
Our app works properly with documents created with MS Office suite and other word processors.
As for documents generated by mobile Office apps, we have tested those that are generated with
Olive office, WPS Office (former Kingsoft Office) - both are free. We have also tested Documents
created with Google Docs, Office Suite Pro and Docs2Go with satisfactory results. QuickOffice
word documents are not supported yet.
You can also try converting the document from DOCX or XLSX to DOC or XLS file format
respectively.
60
 Loading...