

Page 1

DC E800
Digital Camera
User Manual
Welcome
Page 2

i Preface
English
Preface
About this Manual
This manual is designed to assist you in using your new digital camera. All information
presented is as accurate as possible but is subject to change without notice.
Copyright
Copyright 2008 by BenQ Corporation. All rights reserved. No part of this publication may
be reproduced, transmitted, transcribed, stored in a retrieval system or translated into any
language or computer language, in any form or by any means, electronic, mechanical,
magnetic, optical, chemical, manual or otherwise, without the prior written permission of
this company.
Disclaimer
BenQ Corporation makes no representations or warranties, either expressed or implied,
with respect to the contents hereof and specifically disclaims any warranties,
merchantability or fitness for any particular purpose. Further, BenQ Corporation reserves
the right to revise this publication and to make changes from time to time in the contents
hereof without obligation of this company to notify any person of such revision or changes.
Taking care of your camera
• Do not use your camera in the following environmental range: temperature below 0°C
or above 40°C.
• Do not use or store your camera in the environments listed below:
- Direct sunlight
- High and dusty places
- Next to an air conditioner, electric heater or other heat sources
- In a closed car that is in direct sunlight
- Unstable locations
• If your camera becomes wet, wipe it with a dry cloth as soon as possible.
• Salt or seawater may cause severe camera damage.
• Do not use solvents, such as alcohol, to clean your camera.
• If the lens is dirty, use a lens brush or soft cloth to clean the lens. Do not touch the lens
with your fingers.
• To prevent electric shock, do not attempt to disassemble or repair your camera by
yourself.
• Water may cause a fire or electric shock. Therefore, store your camera in a dry place.
• Do not use your camera outdoors when it is raining or snowing.
• Do not use your camera in or near water.
About this Manual
Page 3

Preface ii
• If a foreign substance or water gets in your camera, please turn the power off
immediately and remove the batteries. Remove the foreign substance or water, and send
it to the maintenance center.
• Transfer the data to the computer as soon as possible to avoid losing your images and /
or video clips.
• Disposal of Waste Electrical and Electronic Equipment by users in private households in
the European Union.
This symbol on the product or on the packaging indicates that this can not be
disposed of as household waste. You must dispose of your waste equipment by
handing it over to the applicable take-back scheme for the recycling of electrical
and electronic equipment. For more information about recycling of this
equipment, please contact your city office, the shop where you purchased the
equipment or your household waste disposal service. The recycling of materials will help to
conserve natural resources and ensure that it is recycled in a manner that protects human
health and environment.
CE Regulatory Notice
English
Hereby, BenQ Corp. declares under our responsibility that the product is in conformity with
the requirements set out in the Council Directive on the Approximation of the Laws of the
Member States relating, Electromagnetic Compatibility Directives (89/336/EEC, 92/31/
EEC) and Low Voltage Directive (73/23/EEC).
A "Declaration of Conformity" in accordance with the above Directives has been made and
is available from BenQ Corp. upon request.
FCC Statement
This equipment has been tested and found to comply with the limits for a Class B digital
device, pursuant to Part 15 of the FCC Rules. These limits are designed to provide
reasonable protection against harmful interference in a residential installation. This
equipment generates, uses and can radiate radio frequency energy and, if not installed and
used in accordance with the instructions, may cause harmful interference to radio
communications. However, there is no guarantee that interference will not occur in a
particular installation. If this equipment does cause harmful interference to radio or
television reception, which can be determined by turning the equipment off and on, the user
is encouraged to try to correct the interference by one or more of the following measures:
• Reorient or relocate the receiving antenna.
• Increase the separation between the equipment and receiver.
• Connect the equipment into an outlet on a circuit different from that to which the
receiver is connected.
• Consult the dealer or an experienced radio/TV technician for help.
Trademark Recognition
Windows 2000/XP/Vista are registered trademarks of Microsoft Corporation in the United
States and/or other countries. Windows is an abbreviated term referring to the Microsoft
Windows Operation System. Adobe is a trademark of Adobe Corporation. ArcSoft is the
trademark of ArcSoft System, Inc. All other companies or product names are trademarks or
registered trademarks of their respective companies.
About this Manual
Page 4

iii Preface
English
Safety and Handling Precautions
Camera Information
• Do not take apart or attempt to service the camera yourself.
• Do not expose the camera to moisture, or extreme temperatures.
• Allow the camera to warm up when moving from cold to warm temperatures.
• Do not touch the camera lens.
• Do not expose the lens to direct sunlight for extended periods.
• Do not use abrasive chemicals, cleaning solvents or strong detergents to clean the
product. Wipe the product with a slightly damp soft cloth.
Battery Information
• Turn off the camera before installing or removing the battery.
• Use only the type of battery. Using other types of battery may damage the equipment
and invalidate the warranty.
• Ensure that the Li-ion battery is inserted into the product with correct polarity.
Incorrect polarity may damage the product or cause fire.
• Download all pictures and remove the battery from the camera if you are going to store
the camera for long periods.
Safety and Handling Precautions
Page 5

Table of Contents
Preface ..................................................................................................................... i
About this Manual ..............................................................................................................i
Copyright .................................................................................................................................................i
Disclaimer ................................................................................................................................................i
Taking care of your camera ..................................................................................................................... i
CE Regulatory Notice .............................................................................................................................ii
FCC Statement ........................................................................................................................................ii
Trademark Recognition .........................................................................................................................ii
Safety and Handling Precautions ................................................................................... iii
Camera Information ..............................................................................................................................iii
Battery Information ............................................................................................................................... iii
Introduction .......................................................................................................... 1
System Requirements ........................................................................................................1
Package Contents ...............................................................................................................1
Main Features ..................................................................................................................... 1
Camera Views ..................................................................................................................... 2
Front View ............................................................................................................................................... 2
Back View ................................................................................................................................................ 2
Top View ................................................................................................................................................. 2
Bottom View ........................................................................................................................................... 3
Left / Right View ..................................................................................................................................... 3
LED Indicators ................................................................................................................... 3
English
Camera Buttons .................................................................................................................4
Navigation Buttons ................................................................................................................................. 4
The Scene Button .................................................................................................................................... 6
Function Buttons .................................................................................................................................... 7
LCD screen .........................................................................................................................8
Capture/Video Mode Display ................................................................................................................ 8
Camera Setup ...................................................................................................... 12
Attaching the Wrist Strap ................................................................................................ 12
Inserting the Battery ........................................................................................................ 12
Inserting an SD/SDHC Memory Card ............................................................................13
Turning On ....................................................................................................................... 13
First Time Use ..................................................................................................................13
Getting Started .................................................................................................... 14
Taking your First Photo .................................................................................................. 14
Shake Free Function ............................................................................................................................. 14
Using Macro Mode ............................................................................................................................... 14
Setting the Flash Mode .........................................................................................................................14
Using the Zoom in/out Function ......................................................................................................... 15
Using the Self-timer and Multi-Burst Photography ........................................................................... 15
Page 6

English
Setting the Scene Mode ........................................................................................................................15
Using Smile Catch ................................................................................................................................. 16
Recording your First Video ............................................................................................. 16
Recording Voice Memos .................................................................................................. 17
Capture Settings .................................................................................................. 18
The Capture Menu ...........................................................................................................18
Image Resolution .................................................................................................................................. 18
Image Quality ........................................................................................................................................ 18
Focus Zone ............................................................................................................................................ 19
Face Tracking ........................................................................................................................................ 19
EV Compensation ................................................................................................................................. 19
M-Burst Interval ................................................................................................................................... 19
White Balance ....................................................................................................................................... 20
ISO Speed .............................................................................................................................................. 20
AE Metering .......................................................................................................................................... 20
Color ......................................................................................................................................................20
Sharpness ............................................................................................................................................... 21
Saturation .............................................................................................................................................. 21
Contrast ................................................................................................................................................. 21
Setup ......................................................................................................................................................21
Video Capture Menu ....................................................................................................... 21
Video Resolution ..................................................................................................................................21
White Balance ....................................................................................................................................... 22
Color ...................................................................................................................................................... 22
Saturation .............................................................................................................................................. 22
Contrast ................................................................................................................................................. 22
Setup ...................................................................................................................................................... 22
Photo & Video Playback ..................................................................................... 23
Playback Mode Display ...................................................................................................23
Viewing Photos/Videos on the LCD Screen ................................................................... 25
Viewing M-Burst Photos ...................................................................................................................... 25
Listening to Voice Memo ..................................................................................................................... 25
Viewing Photos/Videos on your TV ...............................................................................26
Zooming In During Playback .........................................................................................26
Deleting Photos/Videos ...................................................................................................27
Using the Playback Menu ................................................................................................ 27
DPOF ..................................................................................................................................................... 27
Slideshow ............................................................................................................................................... 28
Resize ..................................................................................................................................................... 28
Rotate .................................................................................................................................................... 28
Protect ...................................................................................................................................................29
Red-Eye Compensation ........................................................................................................................ 29
Move ......................................................................................................................................................29
Transferring Photos/Videos to your PC ......................................................................... 30
Page 7

Camera Settings .................................................................................................. 31
The Setup Menu ...............................................................................................................31
File Number .......................................................................................................................................... 31
Digital Zoom ......................................................................................................................................... 31
Quick View ............................................................................................................................................ 31
Camera Sound ......................................................................................................................................31
Auto LCD Off ........................................................................................................................................ 32
Auto Power Off ..................................................................................................................................... 32
Video Out .............................................................................................................................................. 32
USB Mode ............................................................................................................................................. 32
Date Stamp ............................................................................................................................................32
Date and Time ......................................................................................................................................33
Language ...............................................................................................................................................33
Image Storage ........................................................................................................................................ 33
Format ...................................................................................................................................................33
Reset .......................................................................................................................................................33
Voice Memo .......................................................................................................................................... 33
PictBridge Print (PTP) .................................................................................................... 34
Image Storage ........................................................................................................................................ 34
This Image ............................................................................................................................................. 34
Index Print ............................................................................................................................................34
DPOF Image ......................................................................................................................................... 34
All Images .............................................................................................................................................. 35
English
Specifications ...................................................................................................... 36
Troubleshooting ................................................................................................. 39
Page 8

1 Introduction
English
Introduction
Congratulations on the purchase of your new digital camera. This manual provides step-bystep instructions on how to use your camera, and is intended for your reference only.
System Requirements
In order to get the most out of your camera, your computer must meet the following system
requirements:
• OS: Windows 2000/XP/Vista
• Memory: 64MB or above
• HDD space: 128 MB or above
• USB port
Package Contents
Check the contents of your camera package. It should contain:
• Digital camera
• USB/AV 3-in-1 cable
• Wrist strap
• One Li-ion battery
• Camera pouch
• Quick start guide
• Bundled AP-CD (Application Software, User’s Manual)
Main Features
• 8.1 mega pixels resolution
• 15x zoom (Up to 3x optical zoom and 5x digital zoom)
• 1/2.5 inch CCD image sensor
• 2.7 inch TFT LCD monitor
• 10 MB internal flash memory with optional external SD/SDHC card (supported up to
8G)
• Sleek and slim design
• Easy-to-use button interface
• PictBridge compatibility
• Slideshow feature to review your pictures and movies
• A/V output to view your pictures and movies on your TV
• USB port to transfer photos and movies to your PC
System Requirements
Page 9
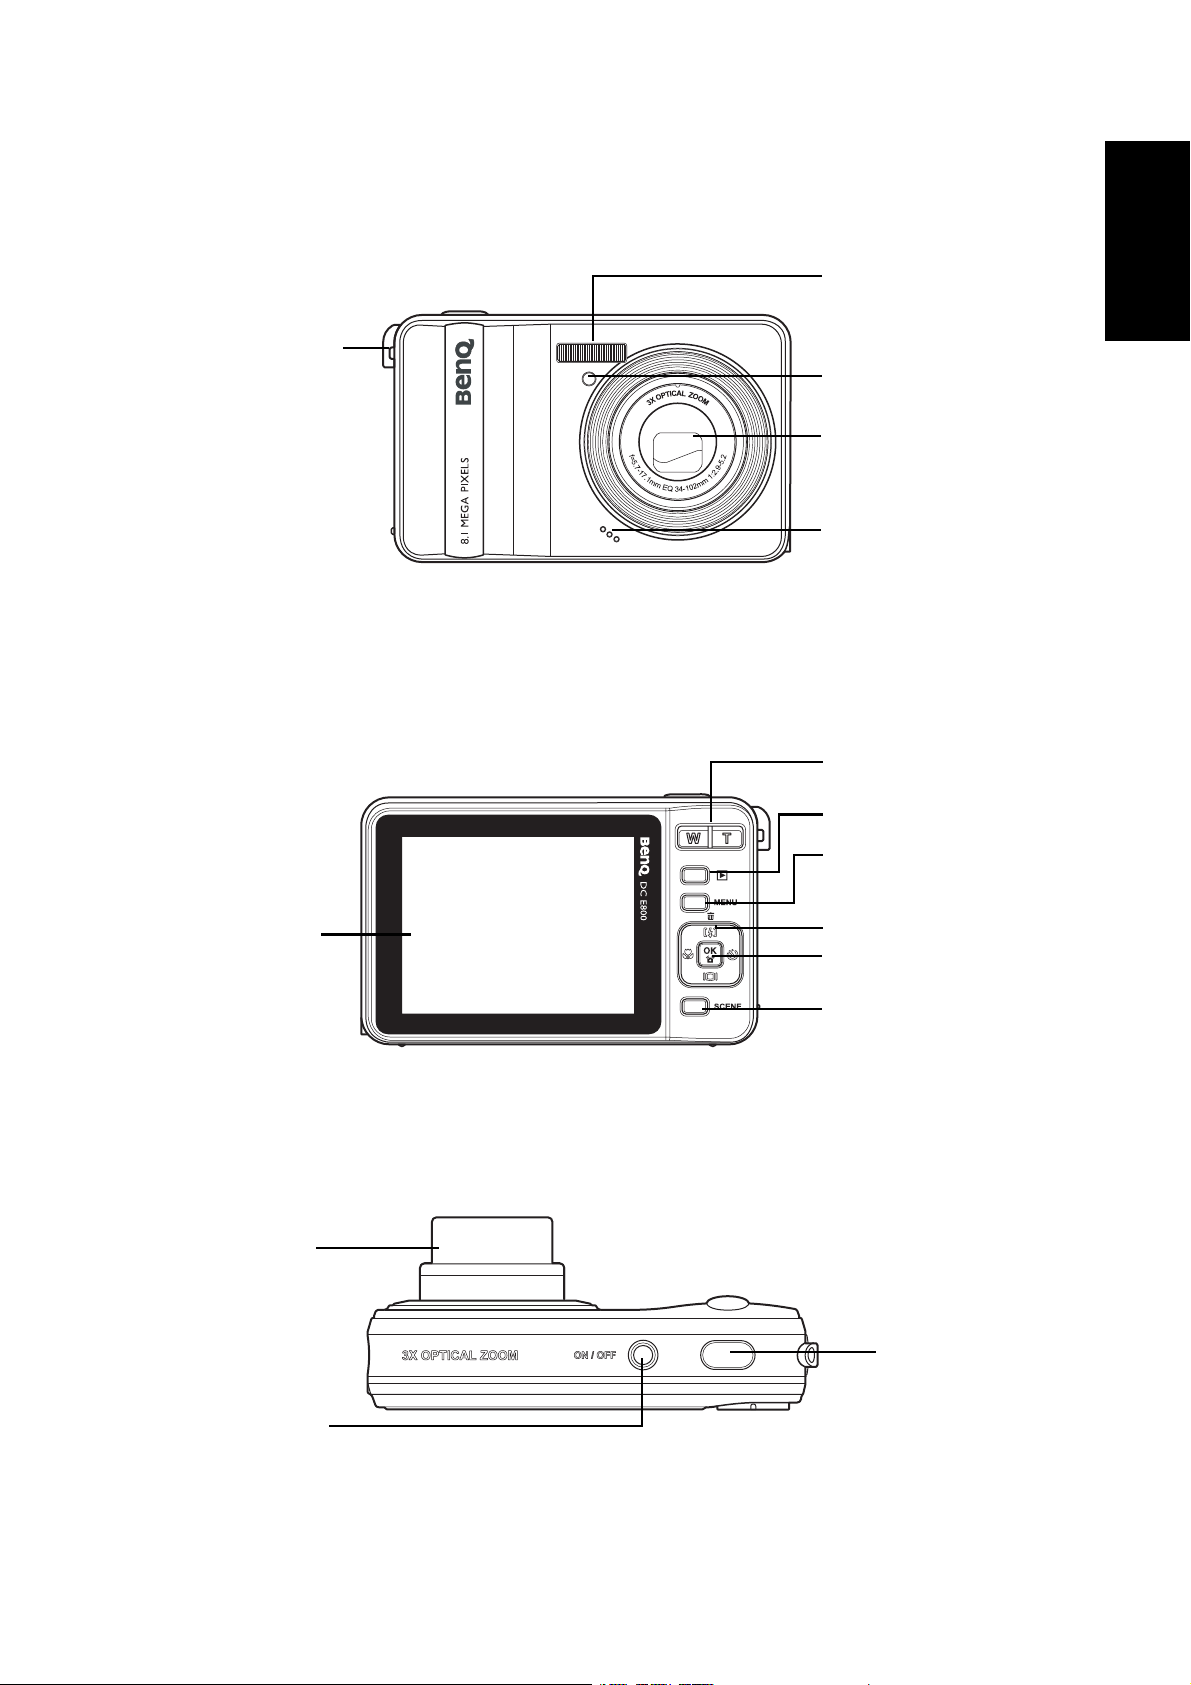
Camera Views
Front View
Introduction 2
Wrist strap loop
Back View
Flash
English
Self-timer LED
Zoom Lens
Microphone
Zoom button
Playback button
Menu button
LCD screen
Top Vi e w
Zoom Lens
Power button
Four-way navigation
buttons
OK button
Scene button
Shutter
button
Camera Views
Page 10

3 Introduction
English
Bottom View
Battery/SD card
compartment
Left / Right View
Tripod mount
Wris t st ra p
loop
Speaker
USB/AV port
DC Jack
LED Indicators
LED LED Status Camera Status
Power/Flash LED Off Power Off.
Blue (steady) Ready to take pictures.
Blue (blinking) Camera busy.
Self-timer LED/
Assist Lamp
Off Self-timer off.
Red (blinking) (1Hz) Self-timer count down, flashes lasting
for 8 seconds.
Red (blinking) (4Hz) Self-timer count down, flashes lasting
for 2 seconds.
LED Indicators
Page 11

Introduction 4
Camera Buttons
Navigation Buttons
The four-way navigation buttons and the OK button allow you to access the various options
available from the On Screen Display (OSD) menu. You can configure a wide range of settings
to ensure maximum results from your photos and videos.
Icon Button Function
1. Confirms a selection when using the OSD menus.
2. In Capture mode:
• Press to enable AF area selection when Selected
Area is selected in Focus Zone submenu
3. In Playback mode:
OK OK
• Press to start and pause the video playback
• Press to stop the voice memo playback
4. In USB mode:
English
Up/Flash/Delete
• MSDC: N/A
• PTP: Press to confirm the selection
1. Moves up in the OSD menus.
2. In Capture mode:
• Scroll through the flash mode options (Auto, Off,
Fill, and Anti Red-eye.)
• Press to pan up in AF area selection
3. In Playback mode:
• Press to pan up in magnify/crop mode
• Press to move up in the thumbnail display
• Press to delete images.
4. In USB mode:
• MSDC: N/A
• PTP: Press to scroll up through a menu
Camera Buttons
Page 12

5 Introduction
English
Icon Button Function
1. Moves right in the OSD menus.
2. In Capture mode:
• Press to scroll through the Self-timer/Multi-Burst
mode
• Press to pan right in AF area selection
3. In Video mode:
• Press to scroll through the Self-timer options
Right/Self-timer/
Burst mode
4. In Playback mode:
• Press to pan right in magnify/crop mode
• Press to move right in the thumbnail display
• Press to navigate to next image in single up
• Press to fast forward video playback
5. In USB mode:
• MSDC: N/A
• PTP: Press to select the next image in This Image
submenu
Down/Screen
1. Moves down in the OSD menus.
2. In Capture mode:
• Press to turn off extra icons on the LCD screen,
press again to turn all icons back on the LCD
screen
• Press to pan down in AF area selection
3. In Video mode:
• Press to turn off extra icons on the LCD screen,
press again to turn all icons back on the LCD
screen
4. In Playback mode:
• Press to pan down in magnify/crop mode
• Press to move down in the thumbnail display
• Press to show the file information
5. In USB mode:
• MSDC: N/A
• PTP: Press to scroll down through a menu
Camera Buttons
Page 13
Icon Button Function
1. Moves left in the OSD menus.
2. Goes up to the previous level in the OSD menus.
3. In Capture mode:
• Press to enable Macro mode. Macro icon displays
on the LCD screen
• Press to pan left in AF area selection
4. In Playback mode:
Introduction 6
English
Left/Macro
• Press to pan left in magnify/crop mode
• Press to move left in the thumbnail display
• Press to navigate to previous image in single up
• Press to fast rewind video playback
5. In USB mode:
• MSDC: N/A
• PTP: Press to select the previous image in This
Image submenu
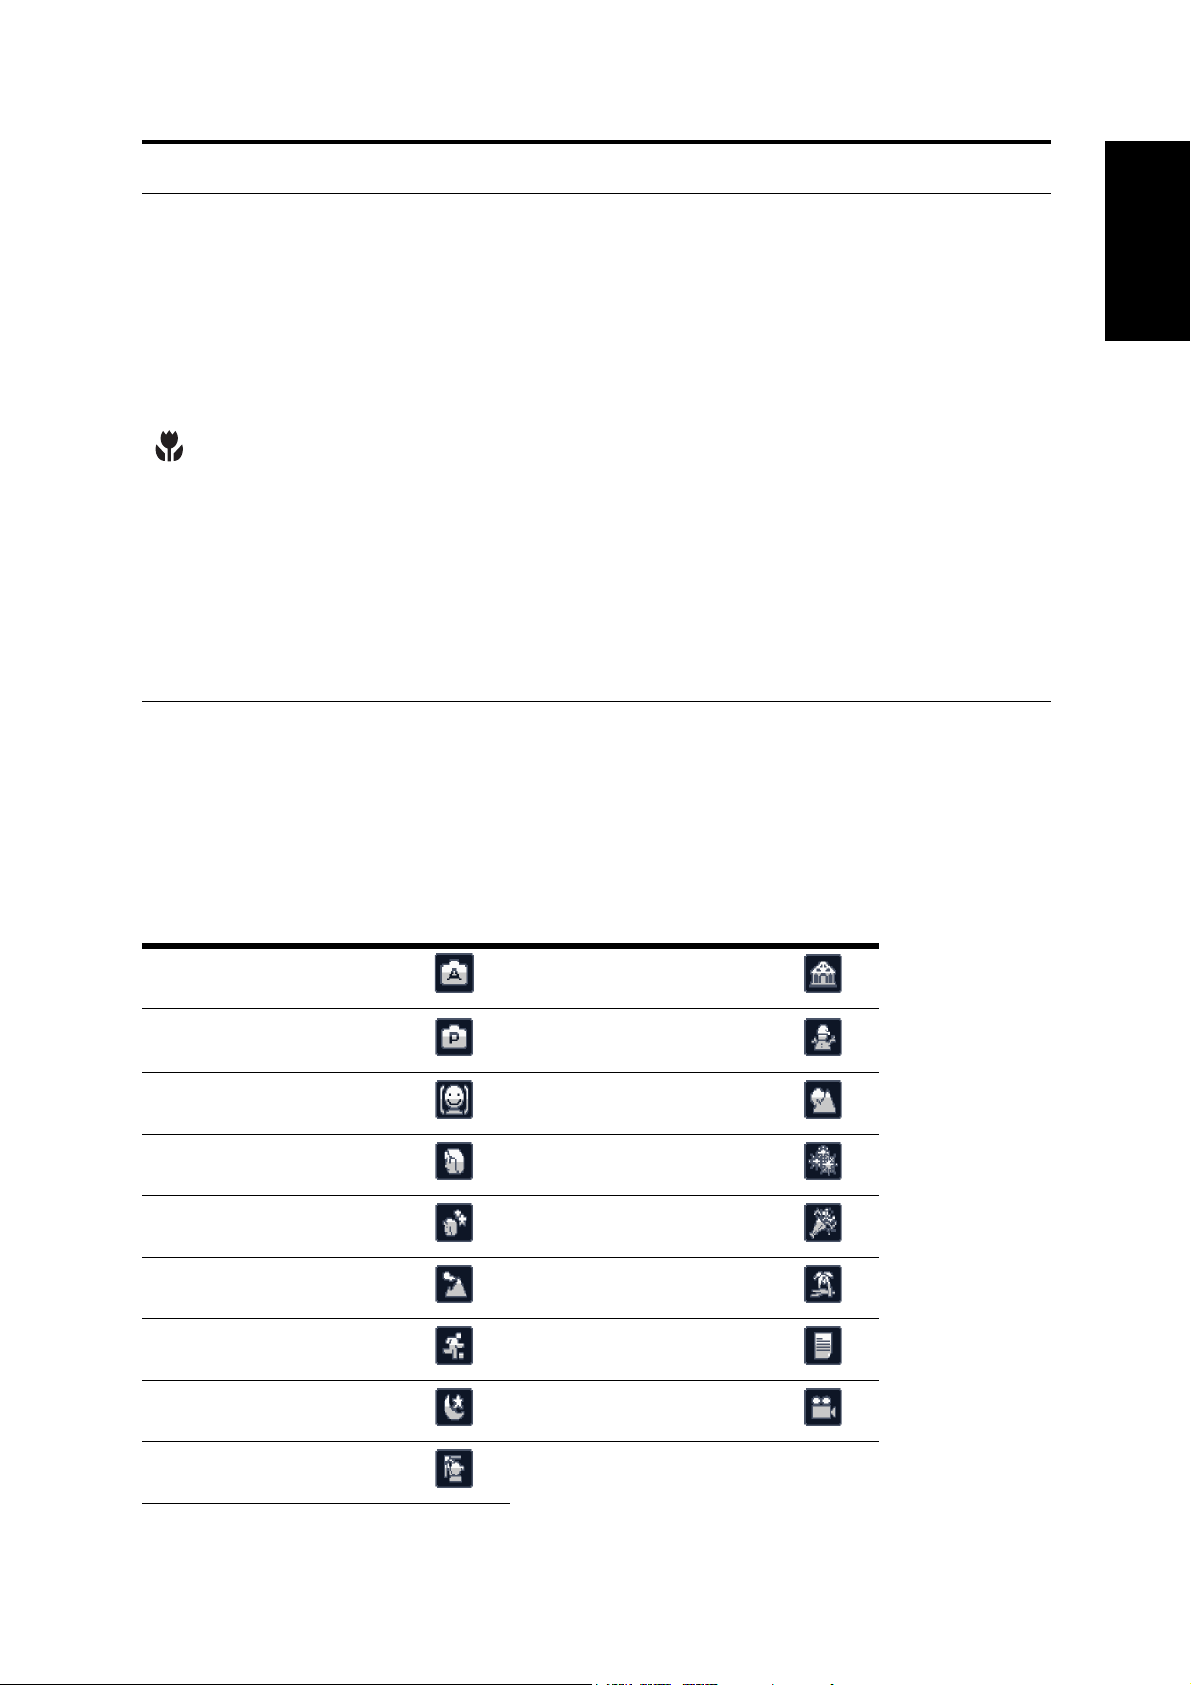
The Scene Button
The camera is equipped with a convenient SCENE button that takes you to the Scene Menu
where you can scroll between different modes and choose different scene options. Use the
Up/Down navigation buttons to scroll and use the OK button to select. Use the SCENE
button to:
Mode Type Icon Mode Type Icon
Auto Museum
P-Mode
(Program Mode)
Snow
Smile Catch Sunset
Portrait Fireworks
Night Portrait Party
Landscape Beach
Sport Text
Night Landscape Video
Backlight
Camera Buttons
Page 14

7 Introduction
English
Function Buttons
Icon Button Function
MENU Menu Press to display the Menu options.
Playback
T Zoom in
W Zoom out
Press to review photos/videos clips saved in the internal
memory or on the memory card.
In Capture mode:
• Press to zoom in on subject to be taken
In Playback mode:
• Press to zoom in on saved photos
In Capture mode:
• Press to zoom out from the subject to be taken
In Playback mode:
• Press to zoom out of saved photos
• Press to view thumbnails of all current saved
media
Camera Buttons
Page 15
Introduction 8
LCD screen
The high resolution 2.7” TFT LCD screen shows all important information regarding
camera settings as well as the visual image for your photo or video.
Use the SCENE button to switch between screen modes. Press the Down/Screen button
to switch between a Full display (all icons are displayed), or a Simple display (only mode
icon and focus area are shown while other icons are hidden).
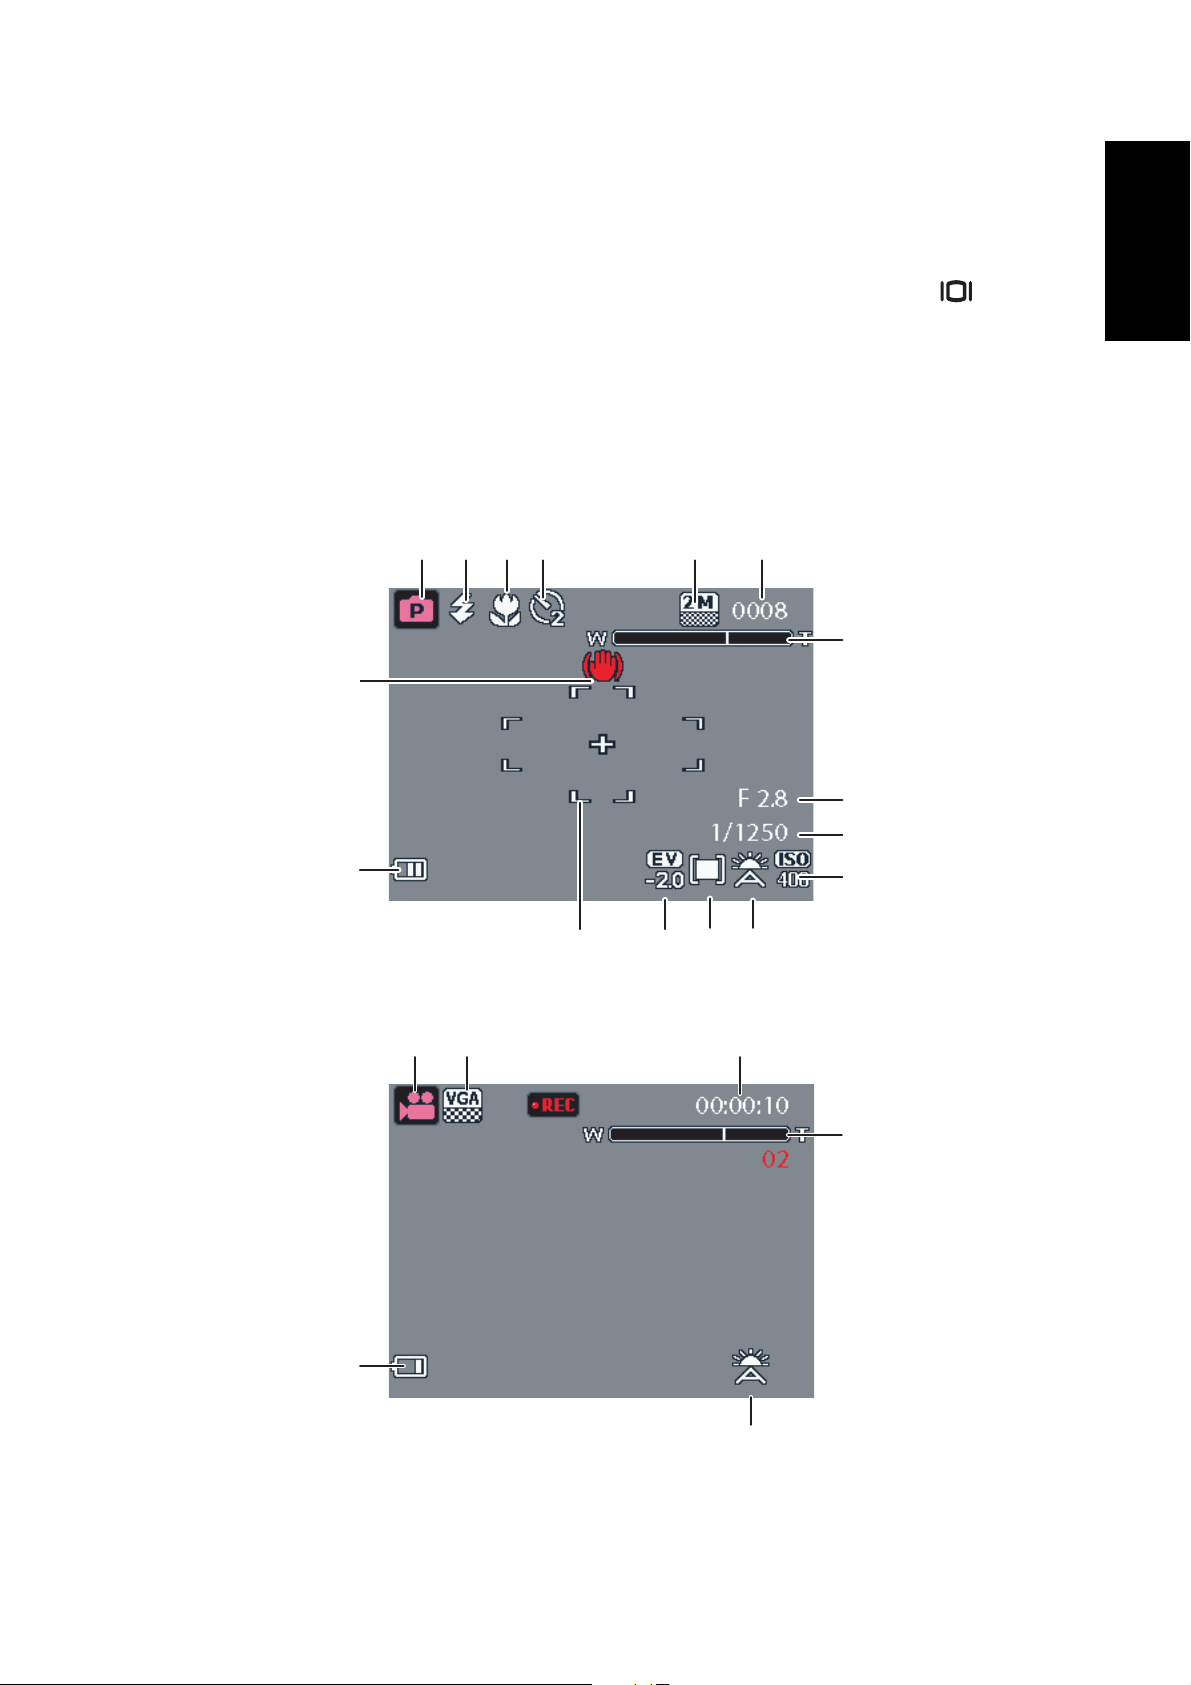
Capture/Video Mode Display
Capture Mode
1234 5 6
7
16
8
9
15
10
English
Video Mode
15 6
15
11121314
7
11
LCD screen
Page 16

9 Introduction
English
No. Name Scene Icon
1 Scene indicator Auto
P-Mode
Smile Catch
Portrait
Night Portrait
Landscape
Sport
Night Landscape
Backlight
Museum
Snow
Sunset
Fireworks
Party
Beach
Te x t
Video
LCD screen
Page 17

2 Flash Auto Flash
Flash Off
Introduction 10
Flash On
Anti Red-eye
3 Macro indicator Macro Mode
4 Self-timer/
Burst mode
5 Image Resolution/
Image Quality
M-Burst
Self Timer
8M
3:2
16:9
English
2 Seconds
10 Seconds
5M
3M
2M
VGA
6 Image Counter Capture Mode Quantity 0008
Video Mode Timer 00:00:00
7Zoom Bar -
8 Aperture Value - F2.8
9 Shutter Speed - 1/1600
LCD screen
Page 18

11 Introduction
English
10 ISO Speed Auto
ISO 100
ISO 200
ISO 400
ISO 800
ISO 1600
11 White Balance Auto
Sunny
Tungsten
Fluorescent
Cloudy
12 AE Metering Matrix
Spot
Average
13 EV Compensation - -2.0EV
14 AF Frame - -
15 Battery Indicator Battery level: full
Battery level: 2/3 left
Battery level: 1/3 left
Battery level: low
16 Camera Steady
Warning
-
LCD screen
Page 19

Camera Setup
Camera Setup 12
Attaching the Wrist Strap
Follow these instructions to attach the wrist strap to your camera to
facilitate easy carrying:
1. Insert the short loop of the strap in the strap eyelet.
2. String the larger loop of the strap though the short loop and pull tight
to attach the strap to the camera.
Inserting the Battery
Follow these instructions to insert the Li-ion battery into the battery compartment.
1. Open the battery compart-
ment on the right side of the
camera.
2. Insert the battery into the
battery compartment
observing the correct
polarity.
English
3. Close the battery
compartment.
Note:
The Li-ion battery should be fully charged before using for the first time.
Attaching the Wrist Strap
Page 20

13 Camera Setup
English
Inserting an SD/SDHC Memory Card
The camera features 10 MB internal flash memory but you may also use an optional SD/
SDHC memory card for additional storage.
Follow these instructions to insert the SD/SDHC card.
1. Open the battery compart-
ment on the right side of the
camera.
2. Insert the SD/SDHC card
into the memory card slot as
shown.
3. Close the battery compartment.
To remove the SD/SDHC card, gently push the card until it pops out. Pull out the card
carefully.
Turning On
Press and hold the Power button to turn on the camera. To turn off the camera, press the
Power button again.
First Time Use
Press the Power button as described in “Turning On”, a BenQ Logo displays on the LCD
screen.
If the camera is turned on for the first time, the Language menu pops up automatically after
powering on the camera.
After the desired language is selected, the Date and Time menu pops up. Use the navigation
buttons to toggle each field and adjust the value. Press the OK button to confirm.
Note:
If the Date and Time is reset (when running out the battery and not in use for a long period),
the Date and Time setup screen displays automatically.
Inserting an SD/SDHC Memory Card
Page 21

Getting Started 14
Getting Started
Now that you are familiar with the layout of your camera, you are ready to start taking
photos and movies.
Taking your First Photo
Taking a photo with the camera is very simple.
Turn the camera on and press the SCENE button to access the Auto mode.
1. Frame the shot on the LCD screen and press the Shutter button halfway. The camera
automatically adjusts the focus and exposure. The focus bracket turns green when ready.
2. Press fully and hold the Shutter button to capture the image.
When a camera steady warning icon appears, hold the camera as still as possible, as a
longer exposure time (more than 1/30 second) is required.
English
Shake Free Function
This function is only available in Auto capture mode. Press the OK/ button to enable
the Shake Free function, and press again to disable it. An Shake Free icon displays on the
LCD screen when the function is activated.
Using Macro Mode
Macro mode is designed for close-up photography and can capture all detail even when your
subject is very close to the camera. Press the Left/Macro navigation button. The Macro
icon displays on the LCD screen.
Setting the Flash Mode
You can choose from four flash modes to suit various lighting conditions.
Press the Up/Flash/Delete navigation button to scroll through the four modes on
the LCD screen. The flash setting remains the same for subsequent photos until you change
it as described above.
Auto flash: The flash fires automatically when needed.
Flash off: The flash is turned off.
Flash on: The flash always fires.
Anti Red-eye: The flash fires 3 times so as to reduce the red-eye effect.
Taking your First Photo
Page 22

15 Getting Started
English
Using the Zoom in/out Function
The camera comes equipped with 3x optical zoom and 5x digital zoom that allows you to
zoom in on your subject.
To use the zoom:
1. Press the right side of the Zoom switch T to zoom in on your subject.
2. Press the lefts side of the Zoom switch W to zoom out from your subject.
Using the Self-timer and Multi-Burst Photography
The camera comes equipped with a self-timer which allows you to take photos after a predefined delay. The Multi-Burst photography feature allows you to take multiple consecutive
photos by pressing and holding the Shutter button. The multi-burst photography feature
allows you to take multiple (16) consecutive VGA photos by pressing the Shutter button
once.
To set the self-timer/Multi-Burst mode:
1. Press the Right/Self-timer/Multi-Burst mode navigation button to cycle through
the self-timer( or ) and Multi-Burst photography options ( ) on the LCD
screen.
2. Once you have selected an option, frame and take your shot. In self-timer mode, the
icon will flash until the time expires and the photo is taken.
3. After taking a photo, the Self-timer automatically exit. If you want to use these functions
for the next photo, press the Right/Self-timer/Multi-Burst mode navigation button
again to activate the function.
Setting the Scene Mode
The camera supports various preset modes for shooting in different environments and
conditions. Each setting is configured automatically by the camera.
To select scene modes:
Press the SCENE button to access Scene menu which displays the Scene menu options.
Use the Up/Down navigation buttons to scroll through the modes.
•Auto
• P-Mode
•Smile Catch
• Portrait
• Night Portrait
• Landscape
•Sport
• Night Landscape
Taking your First Photo
Page 23

• Backlight
• Museum
Getting Started 16
•Snow
• Sunset
• Fireworks
•Party
• Beach
•Text
• Video
Press OK to confirm your selection.
Using Smile Catch
Smile Catch automatically captures the moment of a smile of your subject.
1. In the REC mode, press the SCENE button and select .
2. The camera is tracking the face of your subject (a white frame shows).
English
3. Press the shutter to activate smile tracking, and then release the shutter immediately.
The camera now is tracking the smile of your subject (a green frame shows).
4. Once a smile is detected, the camera instantly takes a picture.
5. The camera continues to detect smiles and takes more pictures (Step 4 is repeated). To
stop the smile tracking at anytime, press the shutter.
• The camera will also automatically stop smile tracking if your subject leaves your
composition area.
• Face tracking (one face only) is always on in the Smile Catch mode.
Recording your First Video
You can also record video clips with the camera.
To record a video clip:
1. Turn the camera on and press the SCENE button. Use the Up/Down navigation but-
tons to locate Video mode. Press the OK button to select.
2. Frame your subject using the LCD screen and press the Shutter button to start recording. The self-timer LED is steady on to indicate recording is in progress.
3. Press the Shutter button again to stop recording. If not, recording will continue until all
free memory space is used.
Recording your First Video
Page 24

English
17 Getting Started
4. In playback mode, press the OK button to playback the recording. Press the Up/Flash/
Delete navigation button to delete the recording if needed.
Recording Voice Memos
You can add a 1-minute voice memo to an image right after it’s taken.
To record a voice memo:
1. Hold the Shutter button to start recording and release the Shutter button to stop
recording.
2. While recording, the selected image is shown on the LCD screen.
3. The elapsed time screen shows the length of a voice memo.
Note:
A Voice Memo can also be added in Playback mode.
Recording Voice Memos
Page 25

Capture Settings 18
Capture Settings
This section describes the various settings you can modify to get better results when taking
photos and video clips.
The Capture Menu
To access the Capture menu:
1. Press the SCENE button. Use the Up/Down navigation buttons to select Scene Mode,
except Video.
2. Press the MENU button to display menu options.
3. Press the Up/Down navigation buttons to highlight an option and press the OK button
to confirm.
Refer to the following sections for more detailed information about each setting.
Note:
All the options in this section may vary accoring to the different modes.
English
Image Resolution
The Image Resolution setting refers to the size of the image in pixels. Use the Up/Down
navigation buttons to select from the options. Seven settings for image resolution are
available:
• 8M (3280 x 2460)
• 3:2 (3280 x 2186)
• 16:9 (3280 x 1846)
• 5M (2592 x 1944)
• 3M (2048 x 1536)
• 2M (1600 x 1200)
• VGA (640 x 480)
Image Quality
The Image Quality setting refers to the compression ratio of the JPG. The higher the image
quality, the less the image compression ratio but more memory space is required. Use the
Up/Down navigation buttons to select from the options. Three settings for image quality are
available:
• Best (default)
• Better
• Good
The Capture Menu
Page 26

19 Capture Settings
English
Focus Zone
The Focus Zone setting allows you to select the number of zones the camera will focus on
when taking a photo. Use the Up/Down navigation buttons to select from the options. Three
settings for focus zone are available:
• Multi-Zone (default)
•Center
• Selected Area: The new setting is applied to the Live View image each time the Up/Down
navigation buttons are pressed. Press the OK button to return to the Capture menu and
save the current setting, which will take effect until it is changed again.
Face Tracking
The Face Tracking enables you to focus on on subject’s face automatically. When the
subject’s face is detected, the green focus frames appear on the LCD screen. Then the camera
automatically adjusts the focus point and exposure to the optimized value.
However, when the camera fails to detect your subject’s face, the camera will set the focus to
Multi-Zone with a green or red focus frame.
EV Compensation
The EV Compensation menu allows you to adjust the exposure while capturing photos or
videos. Use this feature to lighten or darken the image when the brightness between the
subject and background is not balanced or when the subject occupies only a small part of the
photograph. Use a positive (+) EV compensation for spotlit subjects, especially against dark
backgrounds or scenes with low reflectivity, such as green or dark foliage.
Use the Up/Down navigation buttons to modify the value. This setting can be modified
from -2.0 to +2.0 in a 0.3 increment/decrement.
M-Burst Interval
The M-Burst Interval setting allows you to adjust the burst interval when the multi-burst
function is enabled. Use the Up/Down navigation buttons to select from the options.
• 1/30 Sec (default)
• 1/15 Sec
• 1/7.5 Sec
The Capture Menu
Page 27

Capture Settings 20
White Balance
The White Balance setting allows you to adjust the camera setting according to the ambient
white light when shooting. White balance represents the degree of coolness of the light. If
the light has a yellowish or reddish tinge, it is said to be warm; if it has a bluish tinge, it is
said to be cool. You can select the setting and preview it on screen before confirming your
choice. Use the Up/Down navigation buttons to select from the options. Five white balance
settings are available:
• Auto (default)
• Sunny
• Tungsten
• Fluorescent
• Cloudy
ISO Speed
The ISO Speed setting allows you to adjust the CCD light-sensitivity. Use the Up/Down
navigation buttons to select from the options. Six ISO settings are available:
English
• Auto (default)
• ISO 100: For outdoor photography in bright sunlight.
• ISO 200: For outdoor or indoor photography in bright light.
• ISO 400: For indoor photography or low light environments.
• ISO 800: For moving object photography or low light environments without using flash.
• ISO 1600: For moving object photography or low light environments without using
flash.
AE Metering
AE Metering allows you to select the area of the subject or frame by which the camera
measures light. Use the Up/Down navigation buttons to select from the options. Three AE
metering settings are available:
• Matrix (default): Camera metering is set for evaluating 16 zones of objects with
intelligent weighting in the frame.
• Spot: Camera metering is set for the brightness of a single object in the center of the
frame.
• Average: Camera metering is set for the average brightness of objects in the frame.
Color
The Color setting allows you to take photos and apply different colors or color tones for an
artistic effect. Use the Up/Down navigation buttons to select from the options. Four color
settings are available:
•Vivid
• Color (default)
• Black & White
• Sepia
The Capture Menu
Page 28

21 Capture Settings
English
Sharpness
The Sharpness setting allows you to enhance the finer details of your photos. Use a higher
setting for very sharp photos and a lower setting for a
soft-toned photo. Use the Up/Down navigation buttons to select from the options. Three
sharpness settings are available:
•High
• Normal (default)
•Low
Saturation
The Saturation setting allows you to adjust the saturation of the colors in your photos. Use a
high saturation setting for rich colors and a lower saturation setting for more natural tones.
Use the Up/Down navigation buttons to select from the options. Three saturation settings
are available:
•High
• Normal (default)
•Low
Contrast
The Contrast setting allows you to adjust the contrast of your photos. Use the Up/Down
navigation buttons to select from the options. Three contrast settings are available:
•High
• Normal (default)
•Low
Setup
See “The Setup Menu” on page 31 for more details on the setup menu options.
Video Capture Menu
To access the video menu:
1. Press the SCENE button and scroll to Video mode.
2. Press the MENU button to display the menu options.
3. Use the Up/Down navigation buttons to highlight an option and press the OK button to
confirm. Refer to the following sections for more detailed information about each setting.
Video Resolution
The Video Resolution setting allows you to adjust the resolution at which your videos are
recorded. Two video size settings are available:
• 640X480
• 320X240
Video Capture Menu
Page 29

White Balance
See “White Balance” on page 20 for more details on the setup menu options.
Color
Capture Settings 22
See “Color” on page 20 for more details on the setup menu options.
Saturation
See “Saturation” on page 21 for more details on the setup menu options.
Contrast
See “Contrast” on page 21 for more details on the setup menu options.
Setup
See “The Setup Menu” on page 31 for more details on the setup menu options.
English
Video Capture Menu
Page 30

23 Photo & Video Playback
English
Photo & Video Playback
Playback Mode Display
Photo Playback
1 2 3
19
18
17
4
5
6
7,8
Video Playback
18
16
1 2 3
16
131415
1012131415
9
5
6
11
Playback Mode Display
Page 31

Photo & Video Playback 24
No. Name Icon
1Playback mode
2 Date and Time 2005/12/12 00:00:00
3 Quantity 0001/1250
4 Histogram
5 File Name Photo mode: IMG_XXXX.JPG
Video mode: IMG_XXXX.AVI
6 File Size 1.25MB
7 Shutter speed 1/60
8 Aper tu re va lue F 2.8
9AE Metering
10 Flash mode
11 Recording Time 00:00:00
12 ISO Speed
English
13 EV Compensation -0.7EV
14 White Balance
15 Image resolution
16 Mode icons Please see “Capture/Video Mode Display”
17 DPOF
18 Protect
19 Voice memo
Photo mode:
Video mode:
640 (640x480), 320 (320x240)
on page 8 for detailed information.
Playback Mode Display
Page 32

25 Photo & Video Playback
English
Viewing Photos/Videos on the LCD Screen
To view your photos and video files on the LCD screen:
1. Press the Playback button . The most recent photo or video clip is displayed.
2. Use the Right/Left navigation buttons to scroll through photos and video clips.
3. Press the OK button to begin playback of a video clip.
4. Press the Left/Right navigation buttons at any time during playback to skip to the previous/next photo or video.
5. Press the OK button and press the Left/Right navigation buttons to fast-rewind/fast-forward during video playback.
6. Press the OK button at any time during playback to pause the video.
7. After the video clip finishes playing, the LCD screen displays the first frame of the clip.
Viewing M-Burst Photos
To view your multi-burst photos on the LCD screen:
1. Press the Playback button . The most recent photo or video clip is displayed.
2. Press the OK button first, then use the Right/Left navigation buttons to scroll through
photos.
3. When reviewing a multi-burst image, it will be displayed from the 1st frame to the 16th
frame at 2 frames/per second like a slideshow.
4. To stop the M-Burst slideshow, press the Left/Right navigation buttons and skip to the
previous/next image.
Listening to Voice Memo
A voice memo plays simultaneously when playing a saved image with voice memo.
To stop a voice memo while reviewing an image, press the OK button.
To skip to previous/next image, press the Left/Right navigation buttons.
Viewing Photos/Videos on the LCD Screen
Page 33

Photo & Video Playback 26
O
N
/
O
F
F
3X O
PTIC
A
L
ZO
O
M
Audio
Video
Viewing Photos/Videos on your TV
To view images stored on the camera on your TV, you must connect via the A/V port on the
side of the camera. To connect your camera to a TV:
1. Turn on the camera and make sure that the camera’s video out format is set to the same
as that of the TV. See “Video Out” on page 32 for more information.
2. Connect the USB/AV 3-in-1 cable to the USB port on the camera.
3. Connect the other end of the cable to the TV’s AV input port.
English
4. The LCD screen turns blank and all images and video clips are displayed on the TV
screen. Follow the same steps described in “Viewing Photos/Videos on the LCD Screen”
on page 25.
Zooming In During Playback
The camera’s zoom feature can also be used during Playback. This allows you to view photos
in greater detail.
To zoom in on saved photos:
1. Press on the right side of the Zoom button T to zoom in and on the left side of the Zoom
button W to zoom out of the photo/video.
2. Use the navigation buttons to pan across the image.
3. When zoomed in on a photo, press the OK button to crop the image. When zoomed out
to the maximum, the LCD screen will display all photos and videos as a series of thumbnails.
Viewing Photos/Videos on your TV
Page 34

27 Photo & Video Playback
English
Deleting Photos/Videos
The Delete function allows you to remove unwanted files stored on internal memory or a
memory card.
To delete a photo/video:
1. In Playback mode, press the Up/Flash/Delete navigation button to display the Delete
menu.
2. Press the Up/Down navigation buttons and the OK button to select from the three
available options:
• Cancel: Select to cancel the action and exit to the main menu.
• This Image: Select to delete the current image.
• All Images: Select to delete all images.
Using the Playback Menu
Access the Playback menu to view further information, configure printing settings, view a
slideshow, or delete photos or movies.
To access the Playback menu:
1. Press the Playback button .
2. Press the MENU button to display the menu options.
3. Use the Up/Down navigation buttons to highlight an option and press the OK button to
confirm.
DPOF
DPOF (Digital Print Order Format) allows you to specify the number of copies of a certain
image that you want to print at a later date.
Use this function to tag pictures stored in your memory card with print information. You
can tag all pictures to be printed or just the current picture. You can also select how many
copies print and whether to include the date and time.
When all images to be printed are tagged, remove the memory card and take it to a
photographic shop for printing, or use it with a DPOF compatible printer.
To set DPOF:
1. Press the MENU button to select DPOF from the menu.
2. Press the Up/Down navigation buttons and the OK button to select from the available
options:
• This Image: Select to print the current image.
• All Images: Select to print all images.
• Exit: Select to exit to the main menu.
3. Use the Up/Down navigation buttons to set the number of copies you wish to print.
Deleting Photos/Videos
Page 35

Photo & Video Playback 28
Slideshow
The Slideshow function allows you to view all stored photos in a continuous sequence.
To view a slideshow:
1. Press the MENU button to select Slideshow from the menu.
2. Press the Up/Down navigation buttons and the OK button to select from the available
options:
• Start: Select to start the slideshow.
• Interval: Select to set the interval time between each photo during the slideshow. Use the
Up/Down navigation buttons to set a value in seconds. The default setting is 5 seconds.
• Loop: Select to enable/disable a continuous loop of the slideshow. Select On or Off
(default) from the submenu.
• Exit: Select to exit to the main menu.
Resize
The Resize function allows you to change the image resolution.
English
To resize a photo:
1. Press the MENU button to select Resize from the menu.
2. Press the Up/Down navigation buttons and the OK button to select the resize ratio you
require: 6M, 4M, 2M, 1M and VGA.
3. Select Exit to return to the main menu.
Note:
It is only possible to scale-down image resolutions. If the current image resolution is VGA,
this menu item is disabled in the Resize submenu. The ratio of the image (4:3, 16:9 or 3:2)
remains unchanged after resizing.
• This function only supports native pictures
• Cropped images cannot be resized
• If there is not sufficient storage space, images cannot be resized
• If the SD/SDHC card is locked, images cannot be resized
• VGA images cannot be resized
Rotate
The Rotate function allows you to change the orientation of a saved photo.
To rotate an image:
1. Press the MENU button to select Rotate from the menu.
2. Press the Left/Right navigation buttons and the OK button to rotate the select image.
• OK: Select to rotate the image.
• Exit: Select to exit to the main menu.
Using the Playback Menu
Page 36

29 Photo & Video Playback
English
Protect
You can lock a photo or video to protect it from being accidentally erased.
To lock a photo or video:
1. Press the MENU button to select Protect from the menu.
2. Press the OK button to confirm.
3. A key icon displays at the top of the screen to indicate the photo/video is now
locked.
Red-Eye Compensation
The Red-Eye Compensation function allows you to perform red-eye reduction on a saved
photo.
To remove red-eye from a photo:
1. Press the MENU button to select Red-Eye Compensation from the menu.
2. The camera starts processing. Press the Up/Down navigation buttons and the OK button to select from the three available options:
• New file: Select to save the fixed image to a new file.
• Overwrite: Select to overwrite the original image.
• Cancel: Select to discard the changes to the image and return to the main menu.
Note:
1. If the image is protected, the fixed image will be saved as a new file directly without asking.
2. If a failure occurs, the message “Cannot Processing Correctly” appears on the screen.
Move
The Move function allows you to move images stored in internal memory to a memory card.
To move an image:
1. Press the MENU button to select Move from the menu.
2. Press the Up/Down navigation buttons and the OK button to select from the three
available options:
• This Image: Select to move the current image to a memory card.
• All Images: Select to move all images to a memory card.
• Exit: Select to exit to the main menu.
Note:
The Move function is only available when you choose internal memory as the storage media
and an SD card has been inserted into the camera.
Using the Playback Menu
Page 37

Photo & Video Playback 30
O
N
/ O
FF
3
X
O
P
T
I
C
A
L
Z
O
O
M
Transferring Photos/Videos to your PC
To transfer photos and videos to your PC:
Use the software CD to install the camera driver. Follow the on-screen instructions to
complete the installation.
Connect the camera’s USB port to a free USB port on your PC using the USB cable.
English
The camera’s internal memory and/or SD/SDHC card appear as removable drives in the file
manager. Copy the files from the drives to the directory on your PC.
Use ArcSoft PhotoImpression and ArcSoft VideoImpression (provided on the software CD)
to view or edit the photos and videos respectively.
Transferring Photos/Videos to your PC
Page 38

31 Camera Settings
English
Camera Settings
The Setup Menu
The setup menu, available in capture and playback modes, allows you to configure the
camera’s general settings according to your preferences.
To access the setup menu:
1. Press the MENU button when in Playback or any of the capture modes.
2. Select Setup from the menu. The submenu appears.
3. Use the Up/Down navigation buttons to scroll through the options and press the OK
button to enter further submenus and to confirm your selection. Refer to the following
sections for more detailed information about each setting.
File Number
The File No. setting allows you to reset all file numbers assigned to each of the files on your
camera. Select Reset to reset or Continue to set the file numbers in continuous order.
Digital Zoom
The Digital Zoom setting allows you to turn the digital zoom function on or off. Select On
to enable the function or Off (default) to disable it.
Quick View
The Quick View setting allows you to view the photo that you have just taken. Once you
have taken your photo, it displays on the LCD screen. If you are not satisfied with the result,
you can press the button to delete the photo immediately. Select On (default) to enable
the function or Off to disable it.
Note:
The Quick View function is not available in M-Burst modes.
Camera Sound
The Camera Sound setting allows you to adjust the camera sound level. Three options are
available:
• Off
• Low (default)
•High
The Setup Menu
Page 39

Camera Settings 32
Auto LCD Off
The Auto LCD Off setting allows you to adjust the length of time that the LCD screen will
remain lit before turning off to save battery power. Three options are available:
• Off (default)
• 30 sec
•1 min
Auto Power Off
The Auto Power Off setting allows you to adjust the length of time after which the camera
will power down when inactive. Use the Up/Down navigation buttons to select from the
menu options. Two options are available:
• 5 min (default)
•2 min
Video Out
The Video Out setting allows you to adjust the video output, depending on the type of your
TV. Use the Up/Down navigation buttons to select from the menu options. Two options are
available:
English
• NTSC (default)
•PAL
USB Mode
The USB Mode setting allows you to select the transfer method between your camera and
your PC. Two options are available:
• PTP (PictBridge Print): When the camera is connected to a printer by a USB cable
which supports Pictbridge, it can directly print images stored on the media. For
details on PTP function, please See “PictBridge Print (PTP)” on page 34.
• MSDC (default): The camera is set up to act as a mass storage device, allowing only
for transfer of files between your camera and PC.
Date Stamp
The Date Stamp setting allows you to adjust the format in which the date will appear on
each photo or video. You can also deactivate this function if you wish. Setting a date stamp
allows for easy sorting and the date will appear on the photo when printed. Use the Up/
Down navigation buttons to select from the menu options. Four options are available:
• Off (default)
• YYYY MM DD: year-month-date format
• MM DD YYYY: month-date-year format
• DD MM YYYY: date-month-year format
The Setup Menu
Page 40

33 Camera Settings
English
Date and Time
The Date and Time setting allows you to set or adjust the date and time on your camera. To
set or adjust the date and time:
• Press the Left/Right navigation buttons to select the Ye a r field.
• Press the Up/Down navigation buttons to adjust the Ye a r value.
• In the same way, select the Month, Date, Hour and Minute fields and adjust them
accordingly.
Language
The Language setting allows you to choose which language the OSD menu uses. Scroll down
the list and select your language. Use the Up/Down navigation buttons to select from the
menu options.
Image Storage
The Image Storage setting allows you to specify where photos and video clips will be stored.
The camera features 10 MB internal memory but you can also insert an SD/SDHC card (See
“Inserting an SD/SDHC Memory Card” on page 13 for more details). Two options are
available:
• Auto (default): When selected, the camera chooses the storage medium automatically.
If an SD/SDHC card is inserted in the camera, all photos and videos are stored on the
card. If an external card is not detected, all photos and videos are stored in the
internal memory.
• Internal Memory: All photos and videos are stored in the internal memory.
Format
The Format setting allows you to erase all data in the internal memory or on the SD/SDHC
card. Use the Up/Down navigation buttons to select from the menu options. Three options
are available:
• Memory Card (default): All data on the SD/SDHC will be formatted.
• Internal Memory: All data in the internal memory will be formatted.
• Exit: Cancel format action.
Reset
The Reset setting allows you to reset the camera to the original factory default settings. This
means all modifications you have made to the camera settings will be cleared.
Once selected, the Reset screen displays a confirmation message. Select Ye s to proceed with
the reset or Exit (default) to cancel.
Voi ce Me m o
The Voic e Me mo setting allows you to record a voice memo when a photo is taken. Select On
to enable the Voice Memo function or Off (default) to disable it.
The Setup Menu
Page 41

Camera Settings 34
PictBridge Print (PTP)
The PTP function allows you to print images captured by the camera directly without
connecting the camera to a PC.
If the camera is not connected to a PTP compliant printer, an error message displays on the
LCD screen.To enable PTP function, see “USB Mode” on page 32 for detailed information.
If the USB mode is not set at PTP, an error message displays on the LCD screen.
When a PTP compliant printer is connected to the camera, the Printer Connecting screen
displays on the LCD screen.The Print menu pops up automatically.
Use the Up/Down navigation buttons to select an option and press the OK button to
confirm.
Image Storage
See “Image Storage” on page 33 for detailed information.
This Image
Print the selected image with the current setting.
English
1. Use the Up/Down navigation buttons to select This Image from the options and press
the OK button to confirm. Use the Left/Right navigation buttons to select previous/next
file.
2. Press the Up/Down navigation buttons to set the number of copies.
3. Press the Up/Down navigation buttons again to select the paper size.
• Default Size
•4” x 6”
•A4
4. Press the Up/Down navigation buttons to Continue or Cancel the action.
Index Print
Use this function to print all images in index format.
1. Press the Up/Down navigation buttons to select the Paper size.
• Default Size
•A4
2. Press the Up/Down navigation buttons to set the number of copies. After the number of
copies is set, press the Up/Down navigation buttons again to continue or cancel the
action.
PictBridge Print (PTP)
Page 42

35 Camera Settings
English
All Images
Print all images saved in memory.
1. Use the Up/Down navigation buttons to select All Images from the options and press
the OK button to confirm.
2. Press the Up/Down navigation buttons to set the number of copies.
3. Press the Up/Down navigation buttons to select the Paper size.
• Default Size
•4” x 6”
•A4
4. Press the Up/Down navigation buttons to select Continue or Cancel this action.
PictBridge Print (PTP)
Page 43

Specifications 36
Specifications
General Resolution / Image Type 8.1 M Pixels / 1/2.5” CCD
LCD 2.7” TFT, 230,000 Pixels
Dimensions 93(W)x58(H)x21.5(D)mm
Exterior Casing Plastic Housing
Optics Aperture Wide: F2.9
Tele: F5.2
Optical Zoom Up to 3x
Digital Zoom Up to 5x
Focal Length Wide(W): 34mm,
Tele(T): 102mm
Focus Mode Normal: 60cm to infinity
Macro: 10cm ~ 70cm
Shutter Speed 2 ~ 1/2000 Sec.
Viewfinder None
Field of View 99% by LCD
Camera Features Auto Power Off / Time Out Yes
English
ISO Equivalent Auto,ISO100/200/400/800/1600
Internal Memory 10 MB internal, SD/SDHC
removable card slot (supported up
to 8G)
Flash Modes Auto, Off, On, Anti Red-eye
Preset Scene Auto, P-Mode, Smile Catch,
Portrait, Night Portrait, Landscape,
Sport, Night Landscape, Backlight,
Museum,Snow, Sunset, Fireworks,
Party,Beach, Text, and Video
Page 44

37 Specifications
English
Resolution Image Image File Formats Still Image: JPEG (Exif2.2)
Image Quality Mode Still Image:
8M(3280*2460), 3:2(3280*2186),
16:9(3280*1846), 5M(2592*1944),
3M(2048*1536), 2M(1600*1200),
VGA(640*480)
Movie Mode:
640x480@15fps,
320x240@30fps
Quality Levels Best, Better, Good
Capture Features DPOF Version 1.1
Erase Protection Yes
Exposure Compensation Selectable +/-2.0EV with
0.3 EV steps
Sharpness High, Normal, Low
Color Vivid, Color, B&W, Sepia
Metering Matrix, Spot, Average
Focus Multi-Zone
Single-Zone: Center, Selected area
Flash Range 2.5m@wide
Shake Free Yes
Drive Mode Single Mode, Multi-Burst
(VGA@16 shots)
Quick Delete Yes
Quick View Yes
Self Timer 2 or 10 seconds
Playback Magnify Up to 8X (11 steps)
White Balance Auto, Sunny, Tungsten, Fluorescent,
Cloudy
Video Video Out PAL, NTSC
Stream to SD/SDHC Yes
Speaker Yes, Mono
Movie File Format AVI
Movie Length Unlimited as long as space is
available on the SD/SDHC card
Microphone Yes, Mono
Page 45

Power Battery NP40
Capability Camera Interface USB 2.0 full speed
Host Platform Windows 2000/XP/Vista
Specifications 38
Standards Operating Temperature
0°C ~ 40°C
English
Page 46

39 Troubleshooting
English
Troubleshooting
Problem Action
Camera does not turn on • The batteries may be exhausted. Charge or replace
the batteries.
• The batteries are installed incorrectly. Re-insert the
batteries observing the correct polarity.
Camera turns off automatically Press any button to turn on the camera.
LCD turns off automatically Press any button to turn on the LCD.
Empty battery icon is displayed
on the LCD after which camera
turns off
LCD screen displays ‘Card
Requires Formatting’
LCD screen displays ‘Card is
Full’
Batteries are exhausted. Replace the batteries.
Memory card format not recognized. Re-format the
memory card.
Memory card is full. Replace the memory card with a new
one or delete unnecessary images from the existing card.
LCD screen displays ‘Card is
locked’
Insufficient memory space to
complete request
No image displays on the TV
screen
Insufficient space on the card Delete unnecessary images.
The card is protected by a protect switch mechanism.
Move the switch to the unlock position.
Insufficient space in memory to rotate an image. Delete
unnecessary images.
Incorrect TV-out type was selected. Set correct
TV-out type to match your TV system.
 Loading...