

Page 1

Digital Camera1500
User’s Manual
Page 2

Copyright
Copyright (c) 2002 by BenQ Corporation. All rights reserved. No part of this publication may be
reproduced, transmitted, transcribed, stored in a retrieval system or translated into any language
or computer language, in any form or by any means, electronic, mechanical, magnetic, optical,
chemical, manual or otherwise, without prior written permission from BenQ Corporation.
Brands and product names are trademarks or registered trademarks of their respective companies.
This product supports PRINT Image Matching. Combination of using PRINT Image
Matching and PRINT Image Matching II enabled digital still cameras, printers and
software help photographers to produce images which are more faithful to their
intentions.
Disclaimer
BenQ makes no warranty of any kind with regard to this material, including, but not limited to,
the implied warranties of merchantability and fitness for a particular purpose. BenQ assumes no
responsibility for any error that may appear in this document. BenQ makes no commitment to
update nor to keep current the information contained in this document.
Taking care of your camera
• Do not use your camera over the following environmental range: temperature: OºC to 40ºC,
relative humidity: 45% ~ 85%.
• Do not use or store your camera in environments listed below:
Direct sunlight.
High humidity and dusty places.
Next to the air conditioner, electric heater or the other heat sources.
In a closed car that is directly under the sun.
Avoid shaky places.
• If your camera becomes wet, wipe it with dry cloth as soon as possible.
• Salt of seawater may cause severe camera damage.
• Do not use organic solvents, such as alcohol, etc., to clean your camera.
• If the lens or viewfinder is dirty, please use the lens brush or soft cloth to clean the lens. Do not
touch the lens with your fingers.
• To prevent electrical shock, do not attempt to disassemble or repair your camera by yourself.
• Water may cause a fire or electric shock. Therefore, please store your camera in a dry place.
• Do not use your camera outdoors when it is raining or snowing.
• Do not use your camera in the water.
• If the foreign substance or water gets in your camera, please tum the power off immediately and
disconnect the batteries and the transformer. Remove the foreign substance or water, and send
it to the maintenance center.
• Transfer the data to the computer as soon as possible to avoid losing your image data.
Page 3

BenQ DC 1500 User’s Manual
1. Touring your DC 1500 ................................. 1
1.1. Checking package contents ................................ 1
1.2. Parts of the DC 1500 and their names ............ 1
1.2.1. Front View ......................................................................... 1
1.2.2. Rear View .......................................................................... 2
1.2.3. Bottom View ..................................................................... 2
2. Preparing your DC 1500 for using ............. 3
2.1. Charging built-in lithium batteries .................. 3
2.2. Installing batteries ................................................ 3
2.3. Installing memory card ........................................ 4
2.4. Turning on the power ......................................... 5
2.5. Turning off the power ......................................... 5
2.5.1. Turning off the power ..................................................... 5
2.5.2. Power Save Mode ............................................................ 5
2.5.3. Auto Shut Down Mode .................................................. 5
2.5.4. Forced Shut Down Mode ............................................... 6
2.6. Taking Photos ........................................................ 6
2.6.1. To take photos using the viewfinder ........................... 6
2.6.2. To take photos using the LCD monitor ..................... 6
2.7. Function Keys for taking photos ....................... 8
2.7.1. Setting LCD monitor icon display mode .................... 8
2.7.1.1. To set the LCD monitor icon display mode off: ...................... 8
2.7.1.2. To set the LCD monitor icon display mode on: ...................... 8
2.7.1.3. To set the LCD monitor display mode off: ............................... 9
2.7.1.4. To set the LCD monitor display mode on: ............................... 9
2.7.2. Selecting flash mode ........................................................ 10
2.7.3. Setting the macro mode ................................................. 10
I
Page 4

BenQ DC 1500 User’s Manual
3. Using the DC 1500 ....................................... 12
3.1. Camera Mode .......................................................12
3.1.1. Use Camera Mode to take photos ...............................12
3.1.2. The Camera Mode Setting Menu on LCD screen ....12
3.1.2.2. Adjusting image compression ........................................................14
3.1.2.4. Setting exposure compensation value .........................................15
3.2. Play Mode ...............................................................17
3.2.1. Use Play Mode on the LCD screen ..............................17
3.2.2. The Play Mode Setting Menu on LCD screen ............18
3.2.2.1. Erasing images ...................................................................................19
3.2.2.2. Locking and unlocking images ........................................................19
3.2.2.3. Slide show mode ...............................................................................20
3.3. Burst Mode ............................................................21
3.3.1. Use Burst Mode to take photos ....................................21
3.3.2. The Burst Mode Setting Menu on LCD screen .........21
3.3.2.1. Adjusting image resolution .............................................................22
3.3.2.2. Adjusting image compression ........................................................23
3.3.2.3. Setting white balance .......................................................................23
3.3.2.4. Setting exposure compensation value .........................................23
3.4. Self-timer Mode ....................................................24
3.4.1. Use Self-timer Mode to take photos ............................24
3.4.2. The Self-timer Mode Setting Menu on LCD screen .24
3.5. Video Mode ...........................................................25
3.5.1. Shooting videos .................................................................25
3.5.2. Viewing videos ...................................................................26
3.6. Setup Mode ............................................................27
3.6.1. Use Setup Mode (Tool Box) ..........................................27
3.6.2. The Setup Mode Setting Menu on LCD screen ........27
3.6.2.1. Setting date ........................................................................................28
3.6.2.2. Setting time ........................................................................................29
II
Page 5

BenQ DC 1500 User’s Manual
3.6.2.3. Copy from Flash memory to SD card .........................................29
3.6.2.4. Video out type ..................................................................................29
3.6.2.5. Format SD card and the flash memory of DC 1500 ................30
3.6.2.6. Firmware version ..............................................................................30
4. PC dependent features ............................... 31
4.1. Preparations ............................................................31
4.1.1. Installing digital camera software ..................................31
4.1.2. The Software of this Installation CD ...........................32
4.1.3. DC 1500 Driver installation instruction .....................32
4.2. Connecting the DC 1500 to your PC ..............33
5. TV dependent features ............................... 35
6. Built-in Lithium battery usage ................... 37
6.1. Connecting to PC for power supply .................37
6.2. Use Your PC To Charge Lithium Battery .......38
7. Troubleshooting .......................................... 39
8. Service information ..................................... 40
III
Page 6

BenQ DC 1500 User’s Manual
<Memo>
IV
Page 7
BenQ DC 1500 User’s Manual
]1. T
OURING YOUR
DC 1500
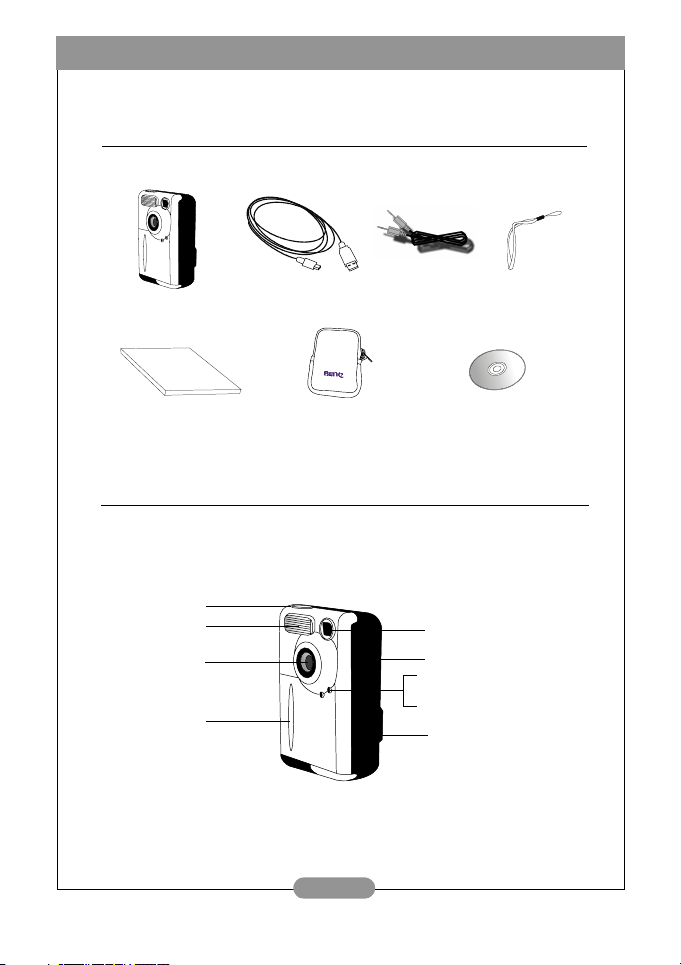
1.1. Checking package contents
The package should include the following items:
DC 1500 digital camera
User’s Manual Pouch
USB cable
Video cable
1.2. Parts of the DC 1500 and their names
1.2.1. Front View
Capture button
Flash light
Lens
Hand stop
Neck Strap
DC 1500 software CD-ROM
Viewfinder
Macro switch
Self-timer activation indicator
Power Indicator (Green)
Charge indicator (Red)
USB/Video cable
connection port
(SD/MMC slot)
1
Page 8
BenQ DC 1500 User’s Manual
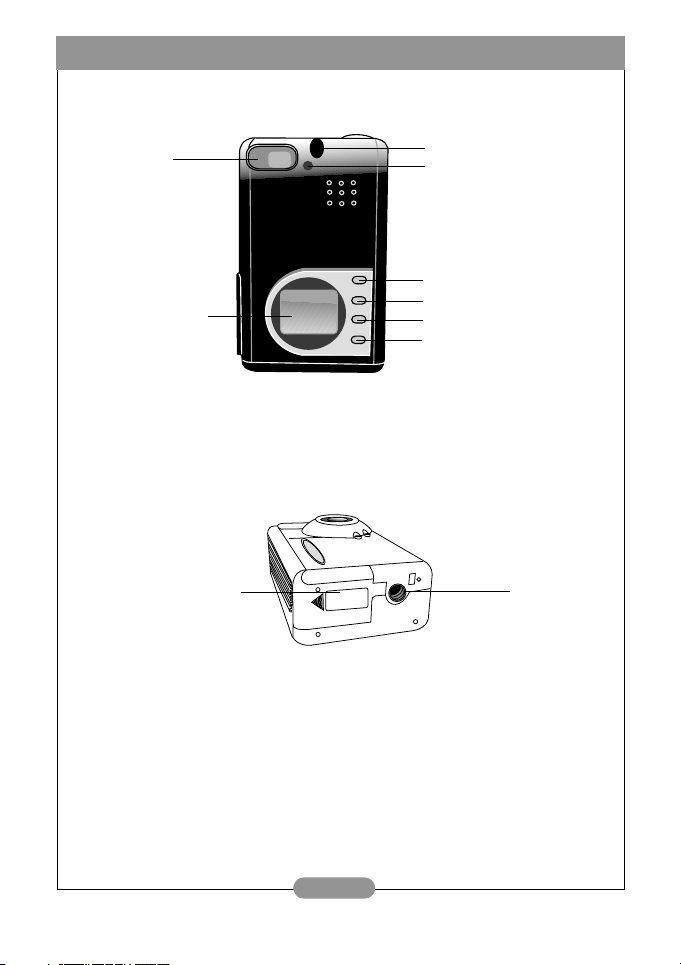
1.2.2. Rear View
Viewfinder
LCD monitor
1.2.3. Bottom View
Battery compartment
cover
Strap Eyelet
Busy indicator
Power/ Mode/ OK button
Menu button
LCD/ Up button
Flash/ Down button
Tripod set
2
Page 9

BenQ DC 1500 User’s Manual
2. P
REPARING YOUR
DC 1500
FOR USING
2.1. Charging built-in lithium batteries
The DC 1500 has a lithium battery built in it. Before you start to use DC 1500 for the
very first time, please use the bundled USB cable to fully charge the built-in lithium
battery. It takes 2 hours to fully charge the lithium battery.
2.2. Installing batteries
Because the DC 1500 package doesn’t provide any AAA alkaline battery, you have to
buy two additional AAA alkaline batteries for using DC 1500 if you don’t want to use
the built-in lithium battery or when the built-in lithium battery runs out of electricity.
Please also note that DC 1500 are designed with a Protection Circuit, which makes
DC 1500 unable to power up if you insert the AAA alkaline batteries when the builtin lithium battery are totally out of electricity. This protection circuit will cause DC
1500 unable to power up for a short period (5~10 minutes). During this period, the
DC 1500 use the AAA alkaline batteries as a sort of power supply to recharge the
built-in lithium battery in order to promote the operating efficiency of DC 1500.
Please don’t be anxious about this temporary condition.
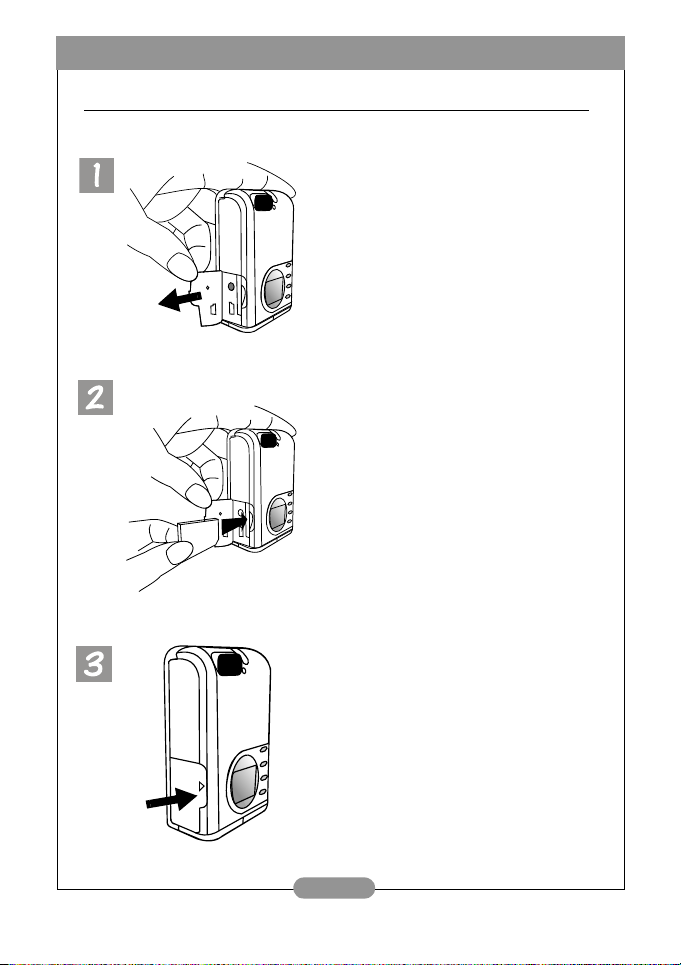
Follow the steps below to install battery.
Press the battery cover and then slide the
cover in the direction shown.
Open the cover and insert two AAA
alkaline batteries into the compartment.
Note the polarity of the batteries when
you install.
Close battery compartment cover and
slide the cover in the direction shown.
You will hear a click sound when the
cover is firmly closed.
3
Page 10
BenQ DC 1500 User’s Manual
2.3. Installing memory card
Follow the steps below to install memory card.
Open the cover in the direction shown.
Insert the SD card into the memory card
slot in the direction shown and make sure
that it’s firmly fixed.
SD
After the SD card is firmly fixed in the
memory card slot, close the cover in the
direction shown.
4
Page 11

BenQ DC 1500 User’s Manual
2.4. Turning on the power
Press the “Power” button for 2 seconds to turn on
the power of the camera. The camera beeps once and
enters camera mode. The status of camera will appear
on the status display.
The Power indicator on the rear panel will also light
up for a few seconds at the same time.
2.5. Turning off the power
2.5.1. Turning off the power
To turn off the power, press the “Power/Mode” button for 2 seconds to turn off the power of the camera. You will see the LCD screen turn blank. Then
the power is turned off.
2.5.2. Power Save Mode
The DC 1500 supports power save function. If the DC 1500 doesn’t receive any
operation from the user for 1 minute, it will enter power save mode automatically.
However, you can press any key to wake up the DC1500 from power save mode.
2.5.3. Auto Shut Down Mode
The DC 1500 supports auto shut down function. If the DC 1500 doesn’t receive
any operation from the user for 2.5 minutes, it will enter auto shut down mode
and automatically shut down instantly. To wake up the DC1500 from auto shut
down mode, you have to press the “Power” button for 2 seconds to turn on the
power again.
5
Page 12

BenQ DC 1500 User’s Manual
2.5.4. Forced Shut Down Mode
The DC 1500 supports forced shut down function. If the DC 1500 fails to operate
normally, you can press the “Down” button and the capture button at the same time to
forced the DC 1500 to be shut down. To turn on the power, press the “Power” button for 2 seconds again.
2.6. Taking Photos
Make sure the camera enters camera mode , burst mode or self-timer
mode .
2.6.1. To take photos using the viewfinder
Point the camera to the object and make the object appear on the
center of the viewfinder.
2.6.2. To take photos using the LCD monitor
When the camera power is turned on, the LCD monitor will be turned on at the
same time. The camera beeps once and enters camera mode, the icon and
other relative icons will also appear on the LCD screen.
focus
The images will app ear
on the LCD monitor.
The image will appear on the LCD monitor, move the camera until the image on the
LCD monitor is on the desired position.
6
Page 13
BenQ DC 1500 User’s Manual
Press the capture button. The camera beeps and the image will be captured and
saved to the flash memory of the camera or the SD memory card. If you take
photos with the LCD monitor, the result will be shown simultaneously.
If you did not get a satisfactory result, move the position of camera and
press the capture button again until desired result is displayed.
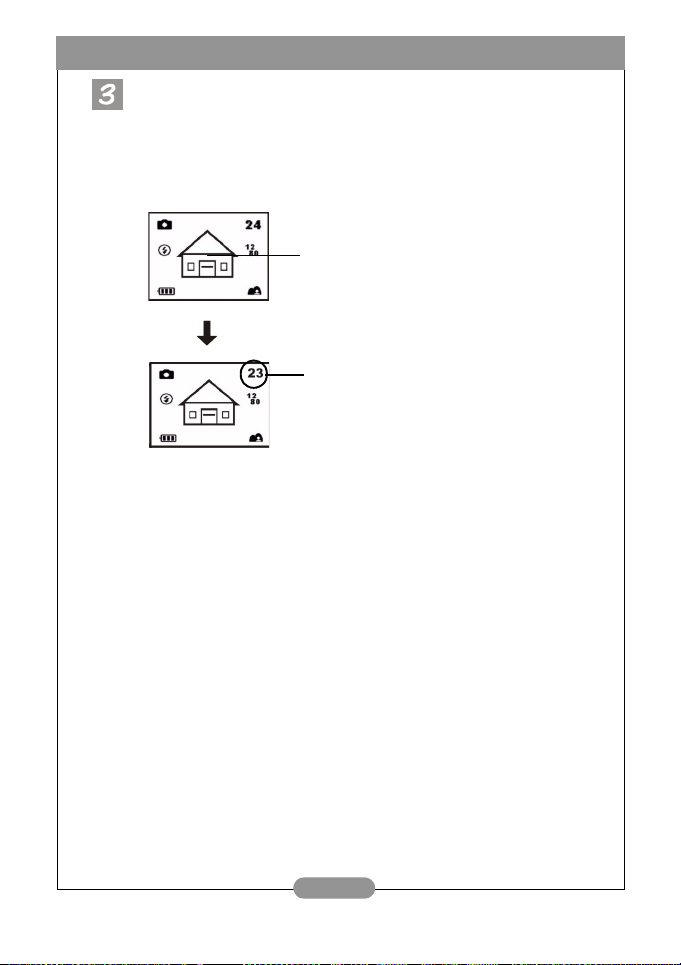
The remaining number of images you can take will appear on the LCD
screen.
Choose a subject and press the capture button
to capture the image. The captured image will
be saved to the flash memory or the memory
card.
The remaining number of images you
can take will appear on the LCD
screen.
Note 1: When you press the capture button, the camera beeps once and
*
*
the image will be captured and saved to the flash memory of the
camera. After the image was saved to the flash memory, the
camera beeps twice and then you may start to move your DC
1500.
Note 2: If you insert a SD/MMC card in your DC1500, the captured
images will be automatically saved to the SD/MMC card. On the
contrary, if you remove the SD/MMC card from your DC 1500,
then the captured images will be automatically saved to the
camera flash memory instead.
7
Page 14
BenQ DC 1500 User’s Manual
2.7. Function Keys for taking photos
This section introduces 2 main function keys for you to use when taking photos.
You can change these 2 settings by simply pressing these function keys without
entering the sub menu.
2.7.1. Setting LCD monitor icon display mode
The DC 1500 provides LCD monitor icon display function that allows you to set
the LCD monitor icon display function on or off. This function is only available
when you take photos with the LCD monitor and you can set the LCD monitor
icon display mode on or off by simply pressing the “LCD/ Up” button.
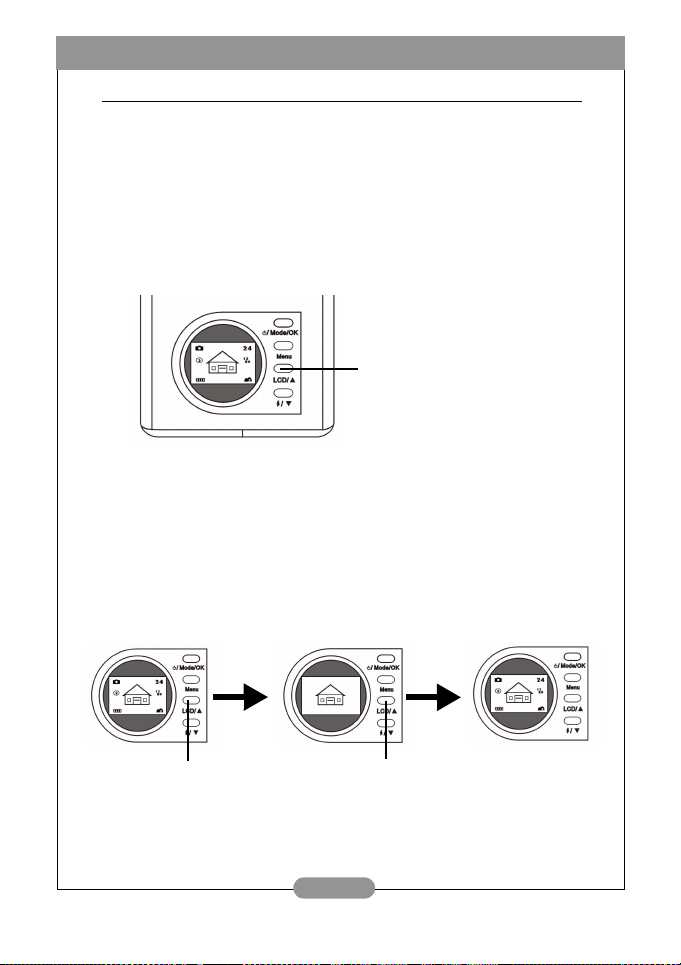
Press the “LCD” button to set the
LCD monitor icon display mode (or
the LCD monitor display mode) on
or off.
Press the “LCD” button and the LCD icon display mode will operate in sequence as
the following graphs illustrate.
2.7.1.1. To set the LCD monitor icon display mode off:
Turn on the power of your DC 1500 and you will see all the icons on the
LCD monitor appear. To turn the LCD monitor icon display off, press the
“LCD/Up” button and all the icons on the LCD monitor will disappear.
2.7.1.2. To set the LCD monitor icon display mode on:
After setting the LCD monitor icon display mode off, press the “LCD”
button again and all the icons will appear again on the LCD monitor.
Press the “LCD” button
to set the LCD monitor icon
display mode off.
Press the “LCD” button
again to set the LCD monitor
icon display mode on.
8
Page 15

BenQ DC 1500 User’s Manual
2.7.1.3. To set the LCD monitor display mode off:
Turn on the power of your DC 1500 and you will see all the icons on the
LCD monitor appear. To turn the LCD monitor display off, long press the
“LCD” button for 2 seconds and the LCD monitor display mode will be
set to off. The LCD monitor will become blank and enter suspend mode.
2.7.1.4. To set the LCD monitor display mode on:
When the LCD monitor display mode is set to off, you can long press the
“LCD” button for 2 seconds again and you can wake up the LCD monitor
from suspend mode. You will see all the icons on the LCD monitor appear
again.
Long press the “LCD”
button for 2 seconds to set
the LCD monitor display
mode off.
The LCD monitor becomes blank.
Long press the “LCD” button
for 2 seconds again to set the
LCD monitor display mode on.
9
Page 16

BenQ DC 1500 User’s Manual
2.7.2. Selecting flash mode
You can turn on or off the flash light according to the environment where you take
photos. This is done by pressing the “Flash/ Down” button to select the flash mode.
To select a flash mode:
Press the “Flash/ Down” button on the
rear panel of the camera.
Press it several times and different flash
modes will scroll continuously on the LCD
screen.
Flash off mode
When this mode is selected, the camera will not use the flash even the
environment and the object is dark.
Forced flash on mode
When this icon appears, the camera will use the flash whenever you
take photos, regardless of the environment and condition of the
object.
Automatic flash mode
The camera will detect the brightness of the environment and the
object, then use flash if necessary.
2.7.3. Setting the macro mode
The DC 1500 provides macro function that allows you to capture images at a close
range (15~50 cm). You can select the macro mode by simply sliding the macro switch.
1
2
10
Slide the switch to the position
marked or to
activate the macro function.
Page 17

BenQ DC 1500 User’s Manual
Use the macro function when you need to shoot images at a very close range (15~50
cm).
To turn on/off the macro function:
Slide the macro switch on the camera.
1
2
Select from the following items:
Normal Mode:
set the macro function off (1.5 m ~ ).
Macro Mode 1:
Macro Mode 2:
When the macro mode is set, the relative icon will appear on the LCD
screen.
Note: The distance range of DC 1500 macro mode is shown as follows:
Infinity
set the macro function on (30 ~ 50 cm).
set the macro function on (14.5 ~ 16.5 cm).
1
40 cm2.5 m
2
15.5 cm
14.5 cm16.5 cm30 cm50 cm1.5 m
F
: 2.5 m
1
:40 cm
2
: 15.5 cm
11
Page 18

BenQ DC 1500 User’s Manual
3. U
SING THE
BenQ Digital Camera 1500 provides 6 different operation modes: Digital camera mode,
Play mode, Continuous shooting mode (Burst mode), Self-timer mode, video recording
mode, Setting mode. With these modes, BenQ Digital Camera 1500 not only performs as a
camera for taking photos, but also capturing and showing images in various ways when
connecting to your PC.
DC 1500
3.1. Camera Mode
3.1.1. Use Camera Mode to take photos
In camera mode, you can take photos and save them as files.
To activate the digital camera mode:
Press the “Power” button for 2 seconds to turn on
the power of the camera. The camera beeps once and
enters camera mode, the icon will appear on the
LCD screen.
When the camera Mode is activated, the LCD screen will show icons as
follows:
Remaining number of photos
you can take (It depends on the
Camera mode
Flash status
Battery capacity
3.1.2. The Camera Mode Setting Menu on LCD screen
When in camera mode, the DC 1500 provides a setting menu that allows you to
make adjustments on various photo taking and image saving settings.
To enter the setting menu, press the “Menu” button and you can switch the LCD
screen frame from shutter menu to the main setting menu of the camera mode.
image resolution, compression
and image background.)
Image resolution
Macro/normal
Press this button to enter the setting
menu.
12
Page 19

BenQ DC 1500 User’s Manual
The menu bar appears on the bottom part of the LCD screen.
Image resolution
Image compresstion
White balance
Exposure value
Menu operations
• Press the “Menu” button to move among main items or highlight a main item on the menu
bar.
• To go to the sub-menu of a main item, press the up arrow button or the down
arrow button to highlight the item.
• To select an item, highlight the item you want to select and then press the “OK” button.
• To exit a submenu, press the “Menu” button. After your settings finished, press this
button to return to the normal LCD preview screen.
Camera mode setting functions
There are 4 different setting functions of the camera mode: 1. Adjusting image
resolution; 2. Adjusting image compression; 3. Setting white balance; 4. Setting
exposure compensation value. Press “Menu” button to change different setting
functions in turns. The menu bar appears on the bottom part of the LCD screen and
the menu is shown as follows:
3.1.2.1. Adjusting image resolution
You can take photos at different resolutions. Higher resolution delivers more image
details, but results in larger file size. This will also affect the remaining images that can
be taken in the memory card.
To select image resolution:
13
Page 20

BenQ DC 1500 User’s Manual
Enter the image resolutioun sub-menu.
Select a image resolution mode:
1600 x 1200 resolution:
Image with 1600 x 1200 resolution.
1280 x 1024 resolution:
1024 x 768 resolution:
640 x 480 resolution:
Press the “OK” button. The image resolution mode is set. The corresponding
icons will be displayed on the LCD screen.
3.1.2.2. Adjusting image compression
You can take photos at different compression. Lower compression delivers more
image details, but results in larger file size. This will also affect the remaining images
that can be taken in the memory card
.To select image compression:
Enter the image compression sub-menu.
Select a image compression mode:
Fine:
Image with low compression.
Normal:
Press the “OK” button. The image compression mode is set. The corresponding
icons will be displayed on the LCD screen.
Image with high compression.
Image with 1280 x 1024 resolution.
Image with 1024 x 768 resolution.
Image with 640 x 480 resolution.
14
Page 21

BenQ DC 1500 User’s Manual
3.1.2.3. Setting white balance
Under different environments, you can adjust white balance mode to get the best
color registration image effect. The DC 1500 provides 5 white balance modes to
modify white balance under different situations.
To select a white balance mode to use:
Enter the white balance sub-menu.
Select a white balance mode:
Automatic:
The DC 1500 selects a white balance mode automatically.
Daylight:
Select this mode if you are taking pictures under direct daylight.
Overcast:
Select this mode if you are taking pictures under cloudy sky.
Tungsten light:
Select this mode if you are taking pictures under tungsten bulb light.
Fluorescent light:
Select this mode if you are taking pictures under fluorescent light.
Press the “OK” button. The white balance mode is set.
3.1.2.4. Setting exposure compensation value
This main item allows you to adjust exposure value and it also supports promp
effect function. You can use the up and down arrow button on the rear panel to
set exposure value when the LCD screen is turned on.
To set exposure value:
15
Page 22

BenQ DC 1500 User’s Manual
Select item and the exposure value adjustment screen will appear.
Press the up arrow button and the down arrow button to decrease
exposure value or increase exposure value. The result will appear on the LCD
screen instantly.
Press the “OK” button. The exposure value is set.
16
Page 23

BenQ DC 1500 User’s Manual
3.2. Play Mode
3.2.1. Use Play Mode to view photos and images on the LCD screen
The pictures you took are saved in the flash memory of DC 1500 or the memory
card. You can view these pictures on the LCD screen and delete, protect one or
all of them if necessary.
To view pictures in the flash memory or memory card, press the "Mode" button to
switch the LCD screen frame from camera mode to play mode. The camera beeps
once and enters play mode, the icon will appear on the LCD screen.
When the play mode is activated, you can view captured photos by pressing the up
and down button on the rear panel, the last picture taken in the flash memory or
memory card will first appear on the LCD screen. The camera will show one
photo a time automatically.
To activate the play mode:
Press the “Power” button again to switch the LCD
screen frame from camera mode to play mode. The
camera beeps once and enters play mode, the icon
will appear on the LCD screen.
When the play mode is activated, the LCD screen will show icons as
follows:
Play mode
Total image number
Present image number
Battery capacity
Basic Operation:
You can press the up arrows on the rear panel to go to the previous image, or
the down arrow on the rear panel to go to the next image.
Go to the previous image.
Go to the next image.
17
Page 24

BenQ DC 1500 User’s Manual
3.2.2. The Play Mode Setting Menu on LCD screen
When in play mode, the DC 1500 provides a setting menu that allows you to
make adjustments on various photo viewing and image saving settings.
To enter the setting menu, press the “Menu” button and you can switch the
LCD screen frame from viewer menu to the main setting menu of the play
mode.
Press this button to enter the setting
menu.
The menu bar appears on the bottom part of the LCD screen.
Erase image
Lock image
Slide show
Menu operations
• Press the “Menu” button to move among main items or highlight a main item on the
menu bar.
• To go to the sub-menu of a main item, press the up arrow button or the down
arrow button to highlight the item.
• To select an item, highlight the item you want to select and then press the “OK”
button.
• To exit a submenu, press the “Menu” button. After your settings finished, press this
button to return to the normal LCD preview screen.
18
Page 25

BenQ DC 1500 User’s Manual
Play mode setting functions
There are 3 different setting functions of the camera mode: 1. Erase image; 2. Lock
image; 3. Slide show. Press “Menu” button to change different setting functions in
turns. The menu bar appears on the bottom part of the LCD screen and the menu
is shown as follows:
3.2.2.1. Erasing images
To erase image(s) in the memory card:
Select item and the image erase modes will appear.
Then press the “OK” button to set the image erase mode. The erase mode are as
below:
: erase current image.
:erase all images in the memory card.
3.2.2.2. Locking and unlocking images
You can lock images to prevent being erased accidentally.
I. To lock images:
Select item and the image lock modes will appear.
After entering the image lock submenu, highlight the icon in the submenu and
press “OK” button. The current image is locked.
19
Page 26

BenQ DC 1500 User’s Manual
Repeat step 1 and 2 if you want to lock multiple images.
Note: If you erase the locked image, the lock icon will appear on the LCD
screen and the image can not be erased unless you unlock the
image.
The locked image will not be erased when you erase all images in
the flash memory of DC 1500 or the memory card.
II. To unlock images
In the image lock submenu, highlight the icon and press “Mode/OK” button.
The current image will be unlocked.
Repeat step 1 if you want to unlock multiple images.
3.2.2.3. Slide show mode
If the slide show mode is activated in play mode, the camera will playback a slide
show of the photos you captured. In this mode, you can also review the photos you
captured; the slide showing speed depends on the file size of each photo.
To activate the slide show mode:
Select item and the slide show mode will appear.
After entering the slide show submenu, highlight the icon in the submenu
and press “OK” button to activate the slide show function.
When the slide show mode is activated, the icon flashes 2 times and then
the LCD screen starts to show images in sequence. To stop the slide show, you can
press any button on the rear panel of the camera.
20
Page 27

BenQ DC 1500 User’s Manual
3.3. Burst Mode
3.3.1. Use Burst Mode to take photos
If the burst mode is activated in camera mode, you can take more than one photo a
time by pressing the capture button. The number of photos taken is decided by the
resolution you set. It is shown as follows:
1280 x 1024:
1024 x 768:
640 x 480:
To activate the burst mode:
Burst mode
the camera will take 3 photos a time automatically.
the camera will take 3 photos a time automatically.
the camera will take 3 photos a time automatically.
Press the “Mode” button again to switch the LCD
screen frame from play mode to burst mode. The
camera beeps once and enters burst mode, the icon
will appear on the LCD screen.
When the burst mode is activated, the LCD screen will show icons as
follows:
Remaining number of photos
you can take (It depends on the
image resolution, compression
and image background.)
Image resolution
Battery capacity
Macro/normal
3.3.2. The Burst Mode Setting Menu on LCD screen
When in burst mode, the DC 1500 also provides a setting menu that allows you to
make adjustments on various photo taking and image saving settings.
To enter the setting menu, press the “Menu” button and you can switch the LCD
screen frame from shutter menu to the main setting menu of the burst mode.
Press this button to enter the setting
menu.
21
Page 28

BenQ DC 1500 User’s Manual
The menu bar appears on the bottom part of the LCD screen.
Image resolution
Image compresstion
White balance
Exposure value
Menu operations
• Press the “Menu” button to move among main items or highlight a main item on the
menu bar.
• To go to the sub-menu of a main item, press the up arrow button or the down
arrow button to highlight the item.
• To select an item, highlight the item you want to select and then press the “Mode/OK”
button.
• To exit a submenu, press the “Menu” button. After your settings finished, press this button to return to the normal LCD preview screen.
Burst mode setting functions
There are 4 different setting functions of the burst mode: 1. Adjusting image
resolution; 2. Adjusting image compression; 3. Setting white balance; 4. Setting
exposure compensation value. Press “Menu” button to change different setting
functions in turns. The menu bar appears on the bottom part of the LCD screen and
the menu is shown as follows:
3.3.2.1. Adjusting image resolution
You can take photos at different resolutions. Higher resolution delivers more image
details, but results in larger file size. This will also affect the remaining images that can
be taken in the memory card.
To select image resolution:
22
Page 29

BenQ DC 1500 User’s Manual
Enter the image resolutioun sub-menu.
Select a image resolution mode:
1280 x 1024 resolution:
1024 x 768 resolution:
640 x 480 resolution:
Press the “OK” button. The image resolution mode is set. The corresponding icons
will be displayed on the LCD screen.
3.3.2.2. Adjusting image compression
(Please refer to “3.1.2.2. Adjusting image compression” on page 14 for
relative information of this fucntion.)
3.3.2.3. Setting white balance
(Please refer to “3.1.2.3. Setting white balance” on page 15 for relative
information of this fucntion.)
3.3.2.4. Setting exposure compensation value
(Please refer to “3.1.2.4. Setting exposure compensation value” on
page 15 for relative information of this fucntion.)
Image with 1280 x 1024 resolution.
Image with 1024 x 768 resolution.
Image with 640 x 480 resolution.
23
Page 30

BenQ DC 1500 User’s Manual
3.4. Self-timer Mode
3.4.1. Use Self-timer Mode to take photos
If the self-timer mode is activated in camera mode, 10 seconds after you press the
capture button, the camera will take photo automatically.
To activate the self-timer mode:
Press the “Mode” button again to switch the LCD
screen frame from burst mode to self-timer mode.
The camera beeps once and enters self-timer mode,
the icon will appear on the LCD screen.
When the self-timer mode is activated, the LCD screen will show icons as
follows:
Self-timer mode
Flash status
Remaining number of photos
you can take (It depends on the
image resolution, compression
and image background.)
Image resolution
Battery capacity
Press the capture button and the camera will start generating beep sound.
The self-timer activation indicator on the front panel will blinks
simultaneously.
After10 seconds, the camera will take photos automatically.
Macro/normal
The camera will start
generating beep sound and
the self-timer activation
indicator on the front panel
will blinks simultaneously.
3.4.2. The Self-timer Mode Setting Menu on LCD screen
The content of the self-timer mode setting menu on LCD screen is the same as the
camera mode setting menu on LCD screen. Please refer to “3.1.2. The Camera
Mode Setting Menu on LCD screen” on page 12 for relative information of this
menu.
24
Page 31

BenQ DC 1500 User’s Manual
3.5. Video Mode
Use Video Mode to shoot videos
If the video mode is activated, you can shoot video by pressing the capture button.
The image resolution of Video mode is 320 x 240 and the video length will be limited
by the remaining memory capacity in the flash memory of DC 1500 or your memory
card. It is shown as follows:
To activate the video mode:
Press the “Mode” button again to switch the LCD
screen frame from self-timer mode to video mode.
The camera beeps once and enters video mode, the
icon will appear on the LCD screen.
When the video mode is activated, the LCD screen will show icons as follows:
Video mode
Battery capacity
Estimted remaining time
you can shoot
Macro/normal
3.5.1. Shooting videos
Point the camera to the object you want to shoot and make the object appear on the
center of the viewfinder or the LCD screen. Then press the capture button and the
camera will beep once and start to shoot videos. The icon on the LCD screen
will keep on flashing while the video is being shot and the recording time will also be
displayed on the LCD screen. The icon and the recording time will stop flashing when
you stop shooting videos. To stop your video shooting, press the capture button
again.
The icon flashes while
shooting videos.
00:06
Recording time
25
Page 32

BenQ DC 1500 User’s Manual
3.5.2. Viewing videos
The videos you shot will be saved in the flash memory of DC 1500 or your SD
memory card. To view these videos, press the "Mode" button to switch the LCD
screen frame from the video mode to play mode.
To activate the play mode:
Press the “Mode” button to switch the LCD screen
frame from video mode to play mode. The camera
beeps and enters play mode, the icon and the
icon will both appear on the LCD screen.
When the play mode is activated, the LCD screen will show icons as
follows:
Play mode
Video icon
Battery capacity
You can press the up arrows on the rear panel to go to the previous image
(video), or the down arrow on the rear panel to go to the next image (video).
Go to the previous image (video).
Go to the next image (video).
When the play mode is activated, you can select the videos by pressing the up and
down button on the rear panel, the last video taken in the camera flash memory or
the SD memory card will first appear on the LCD screen. Select the video which
you want to see, then press capture button to play it. While playing the video, the
icon on the LCD screen will keep on flashing and the recording time will
also be displayed on the LCD screen; it will stop flashing when you stop playing
videos. To stop playing your videos, press the capture button again.
Total image (video)
Present image (video) number
The icon flashes while
playing videos.
26
00:06
Recording time
Page 33

BenQ DC 1500 User’s Manual
3.6. Setup Mode
3.6.1. Use Setup Mode (Tool Box)
You can change the DC 1500 inner settings by entering the setup menu.
To activate the setup mode:
Press the “Mode” button again to switch the LCD
screen frame from video mode to setup mode. The
camera beeps once and enters setup mode, the icon
will appear on the LCD screen.
When the setup mode is activated, the LCD screen will show icons as
follows:
Setup mode
Battery capacity
3.6.2. The Setup Mode Setting Menu on LCD screen
When in setup mode, the DC 1500 provides a setting menu that allows you to
change the DC 1500 inner settings.
To enter the setting menu, press the “Menu” button and you can switch the
LCD screen frame from viewer menu to the main setting menu of the setup
mode.
Press this button to enter the setting
menu.
27
Page 34

BenQ DC 1500 User’s Manual
The menu bar appears on the bottom part of the LCD screen.
2002/08/22
Date setting
Time setting
Save from Flash memory to SD card
Video out type
Firmware version
Format SD card or
camera flash memory
Menu operations
• Press the “Menu” button to move among main items or highlight a main item on the
menu bar.
• To go to the sub-menu of a main item, press the up arrow button or the down
arrow button to highlight the item.
• To select an item, highlight the item you want to select and then press the “OK”
button.
• To exit a submenu, press the “Menu” button. After your settings finished, press this
button to return to the normal LCD preview screen.
Setup mode setting functions
There are 6 different setting functions of the setup mode: 1. Date setting; 2.
Time setting; 3. Copy from Flash memory to SD card; 4. Video out type; 5.
Format SD card; 6. Firmware version. Press “Menu” button to change different
setting functions in turns. The menu bar appears on the bottom part of the LCD
screen and the menu is shown as follows:
3.6.2.1. Setting date
This main item allows you to set correct date. Press the up and down arrow
button on the rear panel to select the right number and press the “OK” button
to change items among year, month and day.
2002/08/22
28
Page 35

BenQ DC 1500 User’s Manual
3.6.2.2. Setting time
This main item allows you to set correct time. Press the up and down arrow button
on the rear panel to select the right number and press the “OK” button to change
items among AM, PM, hour and minute.
AM 12:00
3.6.2.3. Copy from Flash memory to SD card
This main item allows you to copy data which stored in the flash memory of DC 1500
to an exterior SD card. Please note that this function is only available when the SD
card is plugged in. Highlight the icon and then press the “OK” button on the
rear panel to copy data from DC 1500 flash memory to a SD card.
3.6.2.4. Video out type
This main item allows you to set video out type to NTSC or PAL. Highlight the icon
and then press the “OK” button on the rear panel to set video out type to
NTSC or highlight the icon and then press the “OK” button to set video out
type to PAL.
29
Page 36

BenQ DC 1500 User’s Manual
3.6.2.5. Format SD card and the flash memory of DC 1500
This main item allows you to format SD card and the flash memory of DC 1500.
When the SD card is plugged in your DC1500, it allows you to format SD card. On
the other hand, when the SD card is not plugged in your DC1500, it allows you to
format the flash memory of the camera. Highlight the icon and then press
“OK” button and the LCD screen will prompt a message to ask if you are sure to
format it. Choose “Yes” and the card or the flash memory will be formatted. If you
don’t want to format the SD card or the flash memory, choose “No” and the card
or the flash memory will not be formatted.
3.6.2.6. Firmware version
This main item shows the version of the camera firmware.
V1.0.0.1
30
Page 37

BenQ DC 1500 User’s Manual
4. PC
DEPENDENT FEATURES
4.1. Preparations
To use the PC dependent functions, you need to install your digital camera software
and connect the camera to your PC.
4.1.1. Installing digital camera software
• If your operation system is Windows 98/ME, please setup the DC1500 driver first,
if the operation system is Windows 2000/XP, then it's not necessary for you to
setup driver in advanced, please refer to the descriptions of Universal Plug and Play
installation instruction below.
• It's recommended that you setup driver and software before connecting digital still
camera to your PC for smooth installation. Normally, a software installation menu
appears automatically after this installation CD is inserted into your CD-ROM
drive.
• Click on each item to start installing the software program of your choice. You can
choose “Typical Installation” for installing all the bundled software programs, or you
can also choose “Custom Installation” for installing the software programs from the
list as you like. If the menu did not appear, please browse the CD and find a
program file named "autorun.exe" in the root directory and double-click on it. The
menu will appear. If you want to know the content of this CD and install software
manually, please refer to the descriptions of the CD content below.
31
Page 38

BenQ DC 1500 User’s Manual
4.1.2. The Software of this Installation CD
Software Description
1. DC 1500 Driver DC 1500 digital camera software driver.
2. PhotoBase Arcsoft PhotoBase 3.0, for you to find and
organize your media-files efficiently. You can use
it to creat a slide show, a web album, or a video
postcard, then sharing these media-files with
your friends through internet.
3. VideoImpression Arcsoft Video Impression 1.6, for you to edit
4. Acrobat reader Adobe Acrobat Reader 5.0 (Chinese Version
5. NetMeeting You can use your camera with NetMeeting for
6. Microsoft DirectX 8.1 Microsoft DirectX 8.1, an all-in-one and closs-
and combine the video files. New videos can be
created by existing video, animation, and image
files,quickly and easily create desktop video
presentations for use at home, business or on
the internet.
5.05), it's a "must have" utility to read files in the
popular cross-platform file format "PDF".
remote video conferencing.
platform media tool.
4.1.3. DC 1500 Driver installation instruction
We suggest users sincerely that setup DC1500 driver first under Windows 98SE/
ME operation system, then connect your digital still camara to PC. If your
operation system is Windows 2000/XP, just connect your DC 1500 to PC directly,
then DC 1500 will perform as a USB mass-storage device under your operating
system which means that your operating sysytem will come out a new removable
drive.
32
Page 39

BenQ DC 1500 User’s Manual
4.2. Connecting the DC 1500 to your PC
• Use the USB cable included in the package to connect the DC 1500 to the USB
port of your PC.
• A new USB mass-storage device found and then DC 1500 will be used as a new
removable drive under operating system.
Press the “Power” button for 2 seconds
to turn on the power of the camera.
Open the cover in the
direction shown.
After opening the cover,
you will see the USB port as
the arrow shows.
Then connect one end of the
USB cable to the USB port
on your DC 1500.
33
Page 40

BenQ DC 1500 User’s Manual
Connect the other end of the USB
cable to the USB port on the back
panel of your computer and your
computer will install DC 1500 to
your system as a new drive
automatically.
.
Double click the newly installed DC1500 drive and you will see all the
photos you captured which are stored in the flash memory of
DC1500 or the memory card. Then you can use the software
programs which installed by the installation CD to edit or modify
your photos.
Please note that there are 2 different modes of DC1500 when
connecting to the PC.
These modes are : 1. Mass Storage Mode.
2. PC Camera Mode.
If you connect the DC 1500 to your PC when the camera power is
off, you can choose modes between mass storage mode and PC
camera mode by pressing the “Up”, “Down” and “OK” buttons. If you
don’t press any button, the camera will enter mass storage mode.
On the other hand, if you connect the DC 1500 to your PC when the
camera power is on, the camera will automatically enter mass storage
mode and you can press the “Menu” button to switch modes between
mass storage mode and PC camera mode.
Note: In PC camera mode, you can use Digital Camera 1500 as a motion
image capturing device for your PC. You can use it for video
conferencing, capturing snapshots and so on. After connecting the
DC 1500 to your PC, you can activate the bundled software
“NetMeeting” and wait for the NetMeeting monitor frame appearing.
After the monitor frame appears, you’ll see the motion images
captured by DC 1500 shown on the motion image display of the
NetMeeting monitor frame. This means you are using your DC 1500
as a PC camera.
34
Page 41

BenQ DC 1500 User’s Manual
5. TV
DEPENDENT FEATURES
Preparations
To use the TV dependent functions, you need to connect the camera DC 1500 to
your TV.
Connecting the DC 1500 to TV
• Use the Video cable included in the DC 1500 package to connect the DC 1500
to the Video port of your TV.
• After connecting to TV, all the frames and message appear on LCD screen will
be displayed on your TV screen.
Press the “Power” button for 2
seconds to turn on the power of the
camera.
Open the cover in the
direction shown.
After opening the cover, you
will see the Video output
port as the ar row shows.
35
Page 42

BenQ DC 1500 User’s Manual
Video
(Yellow)
Then connect the other end of the Video cable to the Video input
port of your TV. Please note that the yellow header is for Video
port. After the connection to your TV, you will see the LCD
monitor function on your TV screen.
Connect one end of the
Video cable to your DC
1500 as illustrated.
TV
36
Page 43

BenQ DC 1500 User’s Manual
6. B
UILT-IN LITHIUM BATTERY USAGE
Preparations
The DC 1500 has a lithium battery built in it. Before you start to use DC 1500 for the
very first time, please use the bundled USB cable to fully charge the built-in lithium
battery. It takes 2 hours to fully charge the lithium battery.
In addition, when the built-in lithium battery runs out of electricity, the camera can also
get power from the USB cable if it is connected to your PC.
6.1. Connecting the DC 1500 to PC for power supply
• If your DC 1500 runs out of electricity, use the USB cable included in the package
to connect the DC 1500 to the USB port of your PC.
Open the cover in the
direction shown.
After opening the cover,
you will see the USB port as
the arrow shows.
37
Page 44

BenQ DC 1500 User’s Manual
Then connect one end of the
USB cable to the USB port on
your DC 1500.
Connect the other end of the USB
cable to the USB port on the back
panel of your computer and the DC
1500 will get power from your PC.
6.2. Use Your PC To Charge Lithium Battery
The DC 1500 has a lithium battery built in it. Before you start to use DC 1500 for the
very first time, please use the bundled USB cable to fully charge the built-in lithium
battery. It takes 2 hours to fully charge the lithium battery. Please note that when you
charge the lithium battery with camera power off, the charge indicator will light in red.
However, if you charge the lithium battery with camera power on, the charge
indicator will light in green because the indicator also performs as power indicator
(Green). Therefore, please feel comfortable if you see the charge indicator light in
green when charging the lithium battery with the camera power on.
Note:
• If the built-in lithium battery totally runs out of electricity, please use the bundled
USB cable to fully charge it. It takes no more than 2 hours to fully charge the lithium
battery with the camera power off. In addition, it takes no more than 5 hours to fully
charge the lithium battery with the camera power on.
• When the camera power is on, the charge indicator will not extinguish even if the
built-in lithium battery is fully charged. But if the charge indicator extinguishes right
after you turn off the camera power, it represents that the lithium battery is fully
charged.
• If the AAA alkaline batteries are put in the DC 1500, the AAA alkaline batteries will
be the first priority to supply the camera power.
• To prevent the AAA alkaline battery liquid from leaking, please take the AAA
alkaline batteries out of your DC 1500 if you will not use it for a very long time.
38
Page 45

BenQ DC 1500 User’s Manual
7. T
ROUBLESHOOTING
1. The camera can not take a picture after the capture button is pressed.
Please check whether the busy indicator is blinking. If it’s blinking, it means that the
flash is still under charging. During this time the camera is busy and cannot take
pictures. Wait until the indicator becomes OFF.
2. I have connected the camera to the computer, but the
DC 1500 does not appear as a new drive under my
operating system.
Make sure that there is enough power in DC 1500. Check if the camera power is
turned on. If not, turn it on and then connect the camera to the computer again.
Please make sure that the driver has been installed if your operating system is Win
98.
3. In Windows 2000, when I unplug the DC 1500 from my
computer while the USB mass-storage is active, the
computer freezes.
You should double click the USB mass storage icon on Windows 2000 system tray
to move DC 1500 from the computer OS first, then unplug the DC 1500.
4. The photos I captured have strange flare on them.
Usually this is caused by the dirty of the lens or maybe there are finger prints on the
lens glass of the Digital Camera 1500. Check the lens glass or the lens of the Digital
Camera 1500. If it is not clean or there are some finger prints on it, please clean the
lens cover glass and try not to leave finger prints on it. Leaving finger prints on the
lens cover glass may cause the abnormality of your photos.
39
Page 46

BenQ DC 1500 User’s Manual
8. S
ERVICE INFORMATION
Technical support
If you encountered problems using Digital Camera 1500 and the camera driver program,
please send an E-mail (containing detailed descriptions of the problem you came upon, the
hardware and software environment of your system) to the following addresses:
USA: support-sc@BenQ.com
Europe: service@BenQ-eu.com
Taiwan: service-tw@BenQ.com
China: service_china@BenQ.com
Asia and other countries: support@BenQ.com
For free driver program updates, product information and news release, please visit the following web address:
http://www.BenQ.com.tw/global/
For questions about the bundled application, please consult the following web addresses:
http://www.adobe.com (Adobe Active Share)
http://www.arcsoft.com (Arcsoft)
http://www.microsoft.com (Microsoft)
40
 Loading...