

Page 1

Joybee 110 (DA-110)
Digital Audio Player
User Manual
Welcome
Page 2

Copyright
Copyright 2003 by BENQ Corporation. All rights reserved. No part of this publication may be reproduced, transmitted, transcribed, stored in a retrieval system or translated into any language or computer language, in any form or by any means, electronic, mechanical, magnetic, optical, chemical,
manual or otherwise, without the prior written permission of this company.
Disclaimer
BENQ Corporation makes no representations or warranties, either expressed or implied, with respect
to the contents hereof and specifically disclaims any warranties, merchantability or fitness for any
particular purpose. Further, BENQ Corporation reserves the right to revise this publication and to
make changes from time to time in the contents hereof without obligation of this company to notify
any person of such revision or changes.
*Windows, Internet Explorer and Outlook Express are trademarks of Microsoft Corporation. Others
are copyrights of their respective companies or organizations.
Handling Instructions
1. This player is a highly precise electronic product. Please do not disassemble it.
2. Do not format the memory of the player in FAT32/NTFS file format.
3. Do not attempt to alter any part of the player.
4. Do not subject the player to severe impact.
5. Keep the player away from water or direct sunlight.
6. Use damp cloth to clean the player. Do not use any chemical solution.
7. Use only chargers and accessories for use with this particular player model. The use of any other
types will invalidate any approval or warranty applying to the player, and may be dangerous.
8. Keep proper volume while listening or it may cause eternal harm to listening capacity.
9. Dispose of unused player and its accessories according to local environmental regulations.
Page 3

Table of Contents
1
Copyright 2
Disclaimer 2
Table of Contents i
Your Joybee 110 Digital Audio Player 1
Introduction 1
Package Contents 1
System Requirements 1
Touring the Joybee 110 Digital Audio Player 2
Buttons/Ports/Parts 2
The LCD Display 4
Getting the Joybee 110 Digital Audio Player Ready 5
Connecting Earphone 5
Charging the Battery 5
Installing Joybee 110 Digital Audio Player Software 6
Installing the USB Driver 7
Installing in Windows ME/Windows 2000/Windows XP 7
Installing in Windows 98 7
Using the Joybee 110 Digital Audio Player 8
Turning the Player On and Off 8
Playing Music 8
Section Repeat 8
Play Repeat, EQ (Equalizer), Play Speed 8
Repeat 8
Equalizer 9
Speed 9
Recording 9
Using the Record Function 9
System Setups 9
Recording setups 10
Setting date and time 10
Table of Contents i
Page 4

Format flash memory 10
Setting Joybee 110 Auto-Off time 10
Setting display backlight duration 10
Setting display contrast 10
Setting language 10
SW Upgrade 10
Buttons Lock 10
Using the Joybee 110 Digital Audio Player as a USB Flash Drive 11
Using QMusic 12
The Main Screen 12
Adding songs to the Joybee 110 Digital Audio Player using QMusic 14
Notes, FAQ and Troubleshooting Tips 21
Notes 21
FAQ and Troubleshooting Tips 22
Table of Contentsii
Page 5

Your Joybee 110 Digital Audio Player
Introduction
Congratulations on your purchase of the Joybee 110 Digital Audio Player!
The Joybee 110 Digital Audio Player not only provides multiple functions for high quality
music playback and voice recording but consumes lower power to extend your good time. It
supports MP3 and WMA music formats, multi-language display and 7 pre-set EQ modes.
Joybee 110 also features audio files segment repeating and options for play speed, making it
an ideal tool for language learning. Besides, you can use the Joybee 110 Digital Audio Player
as a flash drive, so you can not only make your music mobile, but also move your important
data with you.
In addition to the Joybee 110 Digital Audio Player itself, its bundle software tools also
provide you with added convenience for converting and transferring music data, making it
the easiest to use and highly personalized digital audio player ever available.
Package Contents
The Joybee 110 Digital Audio Player sales package should include the following items. Please
contact your dealer if any of them is missing or damaged.
Joybee 110 Digital Audio Player
Earphone
USB cable
CD-ROM (eManual / QMusic / Driver..., etc.)
Quick start guide
Warranty card
Necklet
System Requirements
Microsoft Windows 98SE/ME/2000/XP
Pentium 200MHz or higher
USB port
CD-ROM drive
60MB hard disk space
32MB system memory
Your Joybee 110 Digital Audio Player 1
Page 6
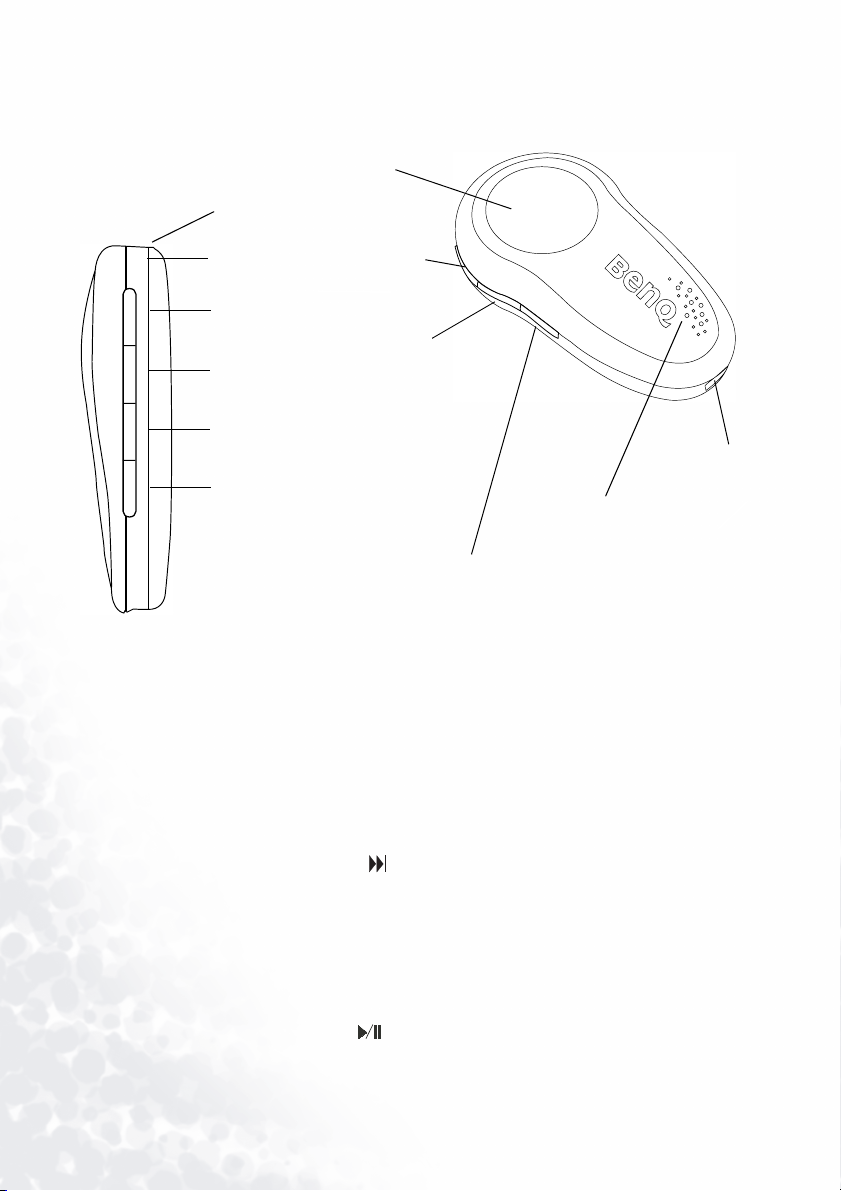
Touring the Joybee 110 Digital Audio Player
Buttons/Ports/Parts
(1) LCD Dipslay
(2) Earphone Jack
(3) Necklet Hole
(4) Scroll Up/ Next/ Fast
Forward
(5) Play/ Pa use/ S top/ Power
(6) Scroll Down/ Previous/
Fasr Rewind
(7) Menu/ Function
(8) Volume Up
(9) Volume Down
(10) A-B/ Hold
(1) LCD display
Displays the status of the player. (e.g. song title, play time..., etc.)
(2) Earphone jack
For connecting your earphone to Joybee 110.
(3) Necklet hole
For strapping the necklet.
(12)USB port
(11) In-Built Microphone
(3) Scroll up/Next track/Fast forward ( ) Button
Skip to the next track while playing music, or to the next file while playing recorded files.
If current song or file is already the last one, pressing this button brings you to the first
song or file.
Hold down the button while playing to fast forward through tracks.
Scroll up in menus.
(4) On/Off/Play/Pause/Stop Button ( )
When player power is off, long press this button to turn on the player and the startup
screen will appear.
Your Joybee 110 Digital Audio Player2
Page 7
When the player is in standby mode, press this button to start playing.
In a menu, press this button to enter or confirm your selection.
When player power is on or in standby mode, hold down this button for 2 seconds to turn
it off.
When playing or recording, press this button to pause. The icon will appear on the dis-
play. When paused, press this button to resume playing or recording. The icon will
disappear.
While playing or recording, long press this button to stop and put the player into standby
mode.
(5) Scroll down/Previous track/Fast rewind ( ) Button
Skip to the previous track while playing music, or to the previous file while playing
recorded files. If current song or file is already the first one, pressing this button brings
you to the last song or file.
Hold down the button while playing to fast rewind through tracks.
Scroll up in menus.
(6) Menu/Function (MENU) Button
Press to select among main menu in idle mode.
Long press to have pop-up options while playing audio files.
(7)/(8) Volume up (+VOL)/Volume down (-VOL) Button
Use the 2 volume control buttons to adjust playback volume: "+" to increase (up to level
17) it and "-" to decrease (down to level 0) it. The volume status is displayed on the display.
(9) Functions button lock/Audio files segment repeat ( /A-B) Button
While playing, press this button to set the starting point for section repeat. The icon
"A " will appear on the display. Press this button again to set the ending point. The
icon " AB" will appear on the display and meanwhile the player will start playing the
section repeatedly. Press this button to cancel section repeat. The icon " AB" disappears
and resumes to normal playback mode.
Long press /A-B button to disable all button functions. Long press again to cancel lock
mode.
(10)In-built microphone
For voice recording.
(15) USB port
As a USB port, you can connect the USB cable to this port and the USB port on your
computer to establish connection between both.
For connecting Joybee 110 to computer when charging.
Your Joybee 110 Digital Audio Player 3
Page 8
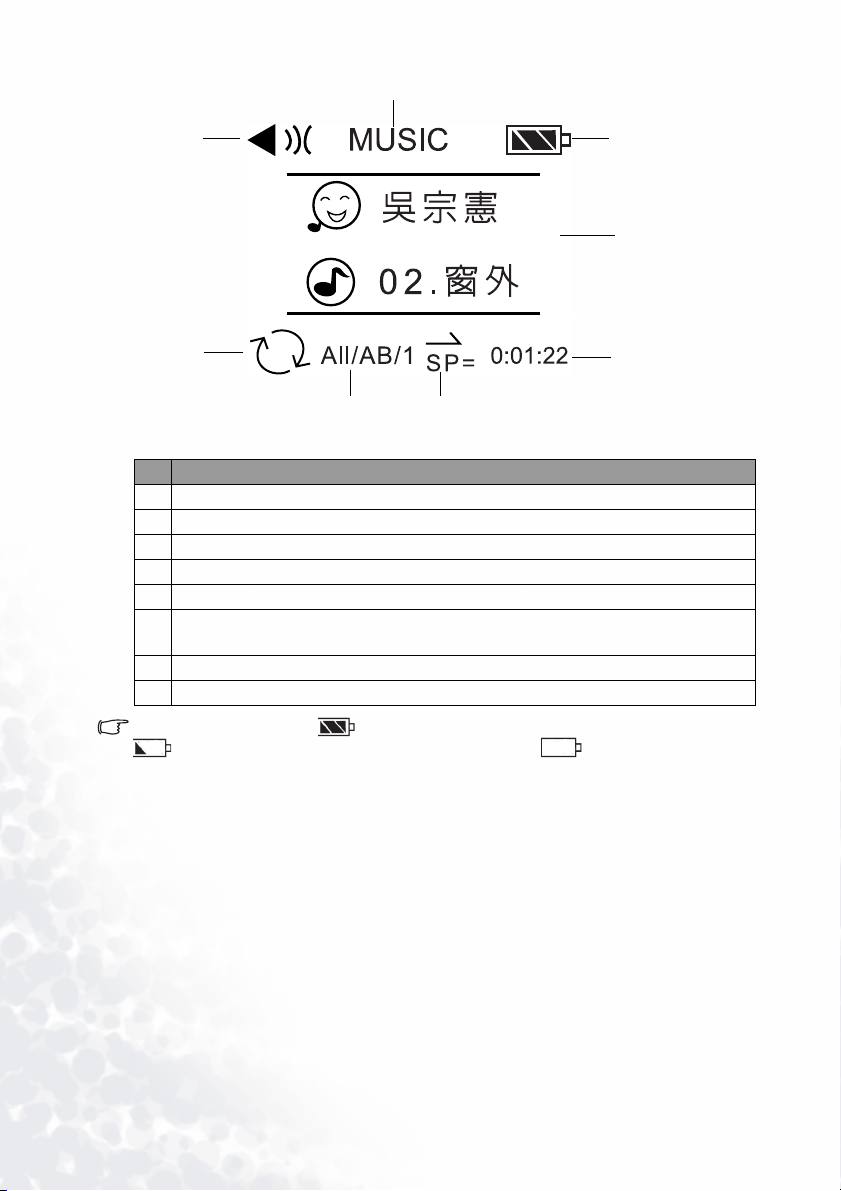
The LCD Display
(2)
(1)
(5)
(6)
(7)
(3)
(4)
(8)
No. Description
(1) Indicates that the player is in playback mode.
(2) Indicates that the player is in MUSIC/VOICE/RECORD/ SETTING mode.
(3) Shows the status of battery power.
(4) Shows the artist and the audio file being played.
(5) Appearance of this icon indicates that the player is in repeat mode.
Appearance of this icon indicates type of repeat mode. (ALL repeat/ AB section
(6)
repeat/single audio tract repeat)
(7) Shows current playspeed.
(8) Shows current track elapsed time when playing or recording time when recording.
3 bars in the battery status icon indicate that the battery power is sufficient. Only one bar in the icon
indicates that the power is weak. If there are no bars in the icon , the battery is near empty and
you need to charge it immediately. The player will turn off automatically, and any recording in progress will be
saved.
Your Joybee 110 Digital Audio Player4
Page 9
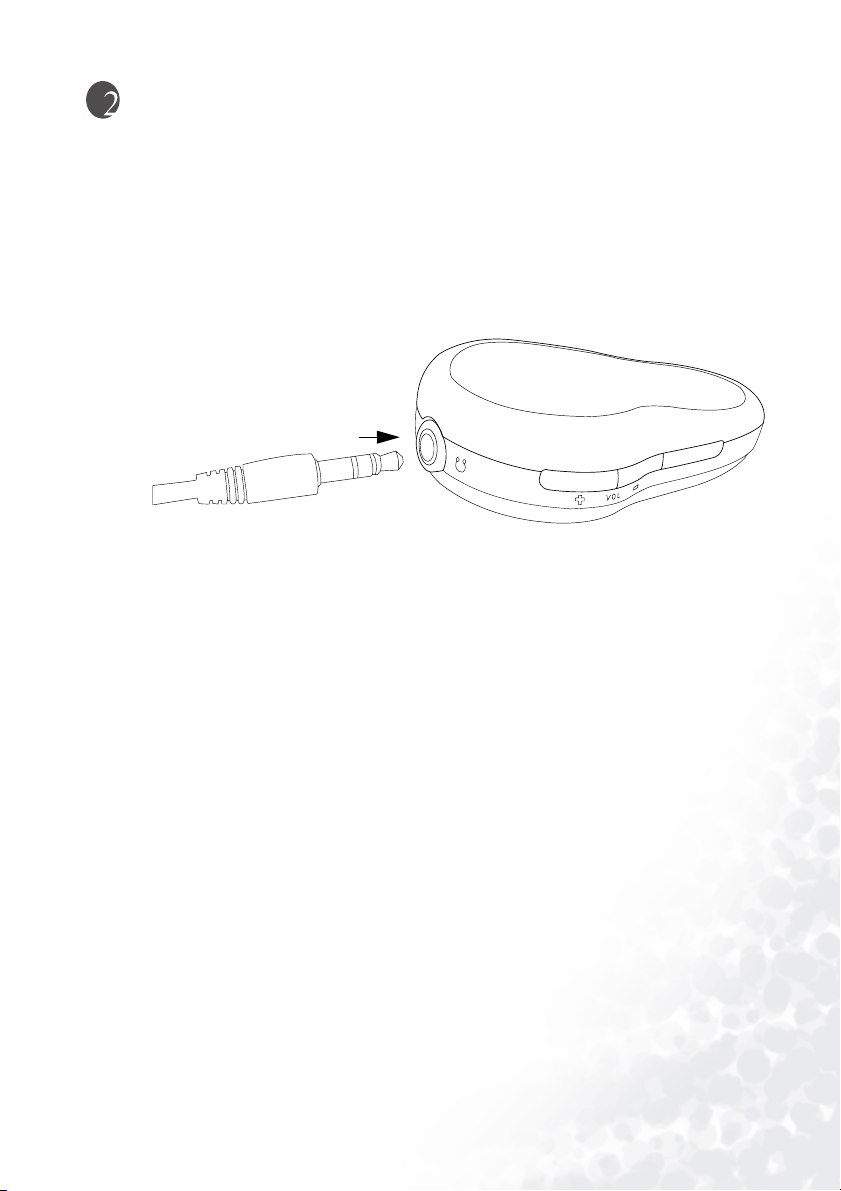
Getting the Joybee 110 Digital Audio Player Ready
Connecting Earphone
As illustrated, plug the earphone into the earphone jack on the Joybee 110 Digital Audio
Player.
Charging the Battery
Connect Joybee 110 Digital Audio Player to PC USB port with the USB cable. When
charging completes, “Charging Completes” will show on display. It’ll take about three hours
the first time you charge your Joybee 110.
A fully charged battery is capable of providing up to 10 hours of playback time. The
maximum playback time will vary depending on the playback volume and file format.
Getting the Joybee 110 Digital Audio Player Ready 5
Page 10

When the battery is completely drained after your first time use, extend the charging time for 2 more hours than
usual.
Installing Joybee 110 Digital Audio Player Software
Insert the Joybee 110 Digital Audio Player CD-ROM into your CD-ROM drive. A few
seconds later, a software installation menu will appear on your computer screen. Click on an
item to select it and start installing the selected software.
If the autorun function of your CD-ROM drive is disabled, look for the file "Setup.exe" in the CD-ROM
directory using Windows Explorer and double-click on it. The software installation menu will then appear.
Follow the on-screen instructions to install. Please refer to the table below for a brief
description of the contents on the CD-ROM and what you can do with these bundle
material.
Items on the
installation screen
Install QMusic
Install Joybee 110 Driver
for Windows 98SE
Introduction
Click this item to install QMusic. QMusic is a powerful music
management software program that allows you to easily
convert CD music into .mp3 format, save the converted files or
update music in the Joybee Digital Audio Player through just a
few clicks, or let it perform update automatically. Besides, you
can also use it as a standalone music player to play music and
create multiple playlists. For how to use QMusic in
combination with the Joybee 110 Digital Audio Player, please
see "Using QMusic" on page 12
Click this item to install Joybee 110 Driver for Windows 98SE.
The software provides the driver for Windows 98SE to validate
QMusic.
Getting the Joybee 110 Digital Audio Player Ready6
Page 11

Install Windows Media
Player 9
TVF plug-in for Microsoft
Media Player
Install Acrobat Reader
Read User Manual Click this item to access the electronic user manual files.
Click this item to install Windows Media Player 9. Click this
item if you do not have such program in your computer, or
what you have is an older version.
QMusic does not support TVF format at this version. Please
install this TVF plug-in program, then play your TVF file with
Microsoft Media Player 9.
Click this item to install the Acrobat Reader software for
viewing the on-line manual files.
Installing the USB Driver
Installing in Windows ME/Windows 2000/Windows XP
Turn on the power of the Joybee 110 Digital Audio Player by pressing the button, and
then connect it to the USB port of your computer using the USB cable. A New Hardware
Found message will appear and installation will be completed automatically.
Installing in Windows 98
In addition to clicking Install Joybee 110 Driver on the software installation screen, you can
also install the USB driver following the steps below:
1. Turn on the power of the Joybee 110 Digital Audio Player by pressing the button, and
then connect it to the USB port of your computer using the USB cable.
2. If the Adding New Hardware Wizard appears, browse to select the files required for
installation under the Joybee 110 directory in the BENQ folder on the disk drive where
you installed the Joybee 110 Digital Audio Player software.
3. Follow the instructions of the wizard to complete the installation process.
A Removable Disk icon will appear in My Computer window if installation is successfully
completed.
Getting the Joybee 110 Digital Audio Player Ready 7
Page 12

Using the Joybee 110 Digital Audio Player
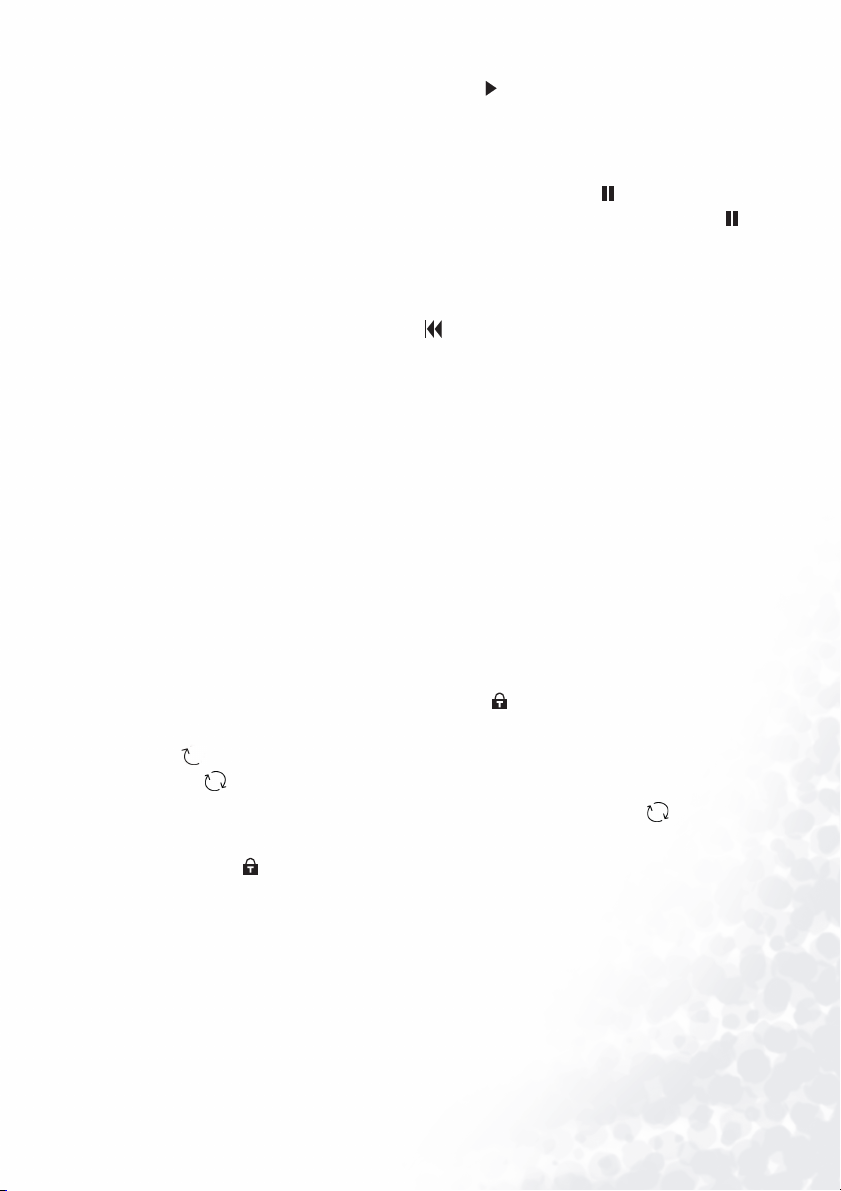
Tur n ing the Player On an d Off
In power off status, long press the button to turn on the player.
In playback and recording modes, long press the button to stop playing or recording and
enter standby mode.
In standby status, press and hold the button for about 2 seconds to turn off the player.
Playing Music
1. Press the button to turn on the player and the main menu will appear on the display
automatically.
2. In the main menu, press MENU button to search for Music Mode. Scroll or button
to choose the music file you want to play.
3. Press the button to start playing.
4. Long press the MENU button to have pop-up options. Scroll or button to choose
and then long press to confirm and screen will go back to display.
While playing music, you can press the button to pause. The icon will appear on the
display. Press the button again to continue playing.
Section Repeat
While playing, press the / A-B button to set the starting point for section repeat. The icon
"A " will appear on the display. Press the / A-B button again to set the ending point.
The icon " AB" will appear on the display and meanwhile the player will start playing the
section repeatedly. Press the / A-B button to cancel section repeat. The icon " AB"
disappears and resumes to normal playback mode.
Play Repeat, EQ (Equalizer), Play Speed
When playing music, press and hold the MENU button for about 2 seconds. The pop-up
option box will appear on the display. Press or button to scroll to an item, and then
press button to confirm and select it. The pop-up option box consists of 3 setup items:
Play Repeat, EQ (Equalizer), Play Speed.
Repeat
Here you can setup the play repeat mode. Scroll or button to Repeat and press to
enter the sub-options. : Ran. Rep, Random, All, One, and Normal. Scroll or button to
choose and then press to confirm.
Using the Joybee 110 Digital Audio Player8
Page 13

Ran. Rep: Random repeat. Joybee 110 will repeatedly play random audio files.
Random: Random play. Joybee 110 will play audio files randomly.
All: Repeat all. Joybee 110 Digital Audio Player plays all audio files repeatedly. The
icon will appear on the display in this mode.
One: Repeat current one. Joybee 110 will play current audio repeatedly. The icon will
appear on the display in this mode.
Normal: No repeat. The Joybee 110 Digital Audio Player will just play all audio files once in
this mode.
Equalizer
You can select from the following equalizer modes: Speech, Bass, Rock, Pop, Jazz, Classic,
and Normal.
Press first to enter sub-options and then or button to scroll to an equalizer mode,
and then press button to select it.
Speed
You can select from the following play speeds: Ve r y s l o w, Slow, Normal, and Speedy.
Press or button to scroll to a play speed, and then press the button to select it.
Recording
The Joybee 110 Digital Audio Player supports built-in microphone recording. The
recordable time depends on the bitrate selected and remaining space in the memory.
The maximum number for recorded files is 256.
Using the Record Function
Recording using the built-in microphone
1. Press button to turn on the player.
2. Press the MENU button to Record mode and press button to start recording.
3. Press again to pause or long press to stop recording. The recorded file would be saved in
the default folder named MICIN and you can find it in Voice mode.
4. Press the MENU button to find Voice mode. You can press the or button to scroll to
select the file you just recorded and press to play.
When you record using the built-in microphone, this file will be automatically saved in the default folder
named MicIn.
System Setups
Press MENU button to Setting Menu. Scroll or button to choose setting item and
press to enter.
Using the Joybee 110 Digital Audio Player 9
Page 14

Recording setups
Quality: Here you have four choices to decide the recording quality : High, Mid, Low, and
VOR : If you set VOR on, Joybee 110 Digital Audio Player only starts recording when there’s
Exit: Scroll here and press to go back to Setting menu.
TVF (TVF, mono audio format. Taking up less memory space to extend recording
time.).
sound signal detected by in-built microphone. Or Joybee 110 Digital Audio
Player will start recording whenever you start recording.
Setting date and time
Press or button to increase or decrease the highlighted digits and press button to
next digits until finish. the display will go back to Setting menu.
Format flash memory
Quick: Executes quick format.
Complete: Executes complete format.
Exit: Scroll here and press to go back to Setting menu.
Setting Joybee 110 Auto-Off time
You can set your Joybee 110 to turn off automatically when in idle mode for different peri-
ods of time: Never, 1Min, 3Min, 5Min, 10Min. Scroll or button to select and press
to confirm.
Setting display backlight duration
You can scroll to choose a auto-off backlight duration here: Always Off, 5Sec, 10Sec, 15Sec,
30Sec. Scroll or button to select and press to confirm.
Setting display contrast
Scroll or button to slide the contrast bar and press to confirm.
Setting language
There are three languages options to choose: Tr ad - Ch i n es e (traditional Chinese), Simp-Chi-
nese (Simplified Chinese), English. Press or button to select and press to confirm.
SW Upgrade
Please connect to http://BenQ.com to know more about it.
Buttons Lock
Using the Joybee 110 Digital Audio Player10
Page 15

Long press /A-B to disable the button functions, and long press again to release button
functions.
Using the Joybee 110 Digital Audio Player as a USB Flash Drive
In combination with the USB cable, you can use the Joybee 110 Digital Audio Player as a
handy USB flash drive.
1. Connect the Joybee 110 Digital Audio Player using the USB cable. The player will be recognized automatically and there will be a new removable disk icon in the My Computer
window.
2. Now you can manage files by using the cut/copy/paste commands between your PC and
the player.
If the files are not in .mp3, .wma or .tvf formats, they will not be recognized by the Joybee 110 Digital Audio
Player as music files, and will not effect normal functions.
Using the Joybee 110 Digital Audio Player 11
Page 16

Using QMusic
QMusic is a software program that helps you to easily organize your music collection. You
can use it to play music CDs and MP3 files, convert CD music into .mp3 format, create
playlists for playing music, burn music CDs and compile your own music album.
When used with the Joybee 110 Digital Audio Player, you can easily convert CD music into
.mp3 format and transfer it to the player. You can also let QMusic update the music files in
the player automatically.
The following section will focus on the QMusic functions that are used with the Joybee 110
Digital Audio Player. For instructions on how to use other features, please refer to its online
help.
After QMusic is successfully installed, an icon will be created on your computer desktop.
Double-click the icon to open QMusic.
Or, you can also click the Start button on Windows Taskbar and select Programs, QMusic2,
QMusic2.
The Main Screen
Action Buttons
Left
panel
Playing Buttons
Parts Description
Action Buttons Execute certain actions in QMusic.
Left Panel Displays all available media for QMusic.
Display
Status
Bar
System
Buttons
Search
Window
Feature
Buttons
Using QMusic12
Page 17

Music Playing Buttons You can use these buttons to play music.
Status Bar
The detailed information of playlist will appear here, including total
number of songs and total playback time.
Feature Buttons When playing music, you can use these buttons to change play mode.
Right Panel
Search Window
Shows songs in the selected playlist/media on the left panel.
You search for a song by entering its name and pressing the magnifier
icon.
System Buttons Used to control the QMusic window.
Shows the process currently being carried out by QMusic. For example,
Display
when playing music, the title of the song, elapsed time and other
information will appear here.
Using QMusic 13
Page 18

Adding songs to the Joybee 110 Digital Audio Player using QMusic
After QMusic is opened, connect the Joybee 110 Digital Audio Player to your computer using the USB cable. The
icon will appear on the left panel of QMusic and default folders MP3 and MicIn will appear below
it.
Adding CD music to the Joybee 110 Digital Audio Player
1. Insert a music CD into the CD-ROM drive of your computer. A few seconds later, the
icon will appear on QMusic left panel, and a list of songs on the CD will appear
on the right panel.
Using QMusic14
Page 19

2. Check the checkboxes next to the songs you want to transfer to the player. When finished,
click the button. QMusic will convert selected songs into MP3 format.
3. When QMusic has done with the conversion process, it will place all converted files in a
New Album playlist on the left panel. Click on it and you will see a list of converted files
on the right panel.
Using QMusic 15
Page 20

4. Click and drag the selected songs on the right panel to the MP3 directory under the
icon.
Before dragging the selected songs to the Joybee 110 Digital Audio Player, make sure that there is enough memory space.
Adding new songs to the Joybee 110 Digital Audio Player from your computer
1. Click the My Joybee playlist on the left panel.
Using QMusic16
Page 21

2. Click the button and then browse for and select the .mp3, .wav or .wma song files
you want to transfer to the Joybee 110 Digital Audio Player. Click Open and the selected
song files will be added to the My Joybee playlist.
3. Click the icon on the left panel.
4. Click the button. The songs you just added will be transferred by QMusic to the
player. QMusic will ask you whether you want to delete the songs that are already in the
Using QMusic 17
Page 22

player. If you want to keep these songs, please back them up in your computer before
continuing.
Before dragging the selected songs to the Joybee 110 Digital Audio Player, make sure that there is enough memory space.
Let QMusic automatically update the songs upon getting connected to the Joybee 110 Digital
Audio Player
1. Click on My Joybee under Music Library on the left panel.
Using QMusic18
Page 23

2. Click the button and then browse for and select the .mp3, .wav or .wma song files
you want to transfer to the Joybee 110 Digital Audio Player. Click Open and the selected
song files will be added to the My Joybee playlist.
3. Click the button.
Using QMusic 19
Right
Panel
Page 24

4. Click the Joybee tab on the dialogue box that appears.
5. On the Joybee tab, click to select Automatically launch QMusic when Joybee inserted and
Automatically transfer MP3 files to Joybee when inserted, then click
the button.
6. Disconnect the Joybee 110 Digital Audio Player and then reconnect it to the computer.
QMusic will automatically update the songs in the player with the songs in the My Joybee
playlist.
From now on, you only have to place the new songs under the My Joybee playlist on the left
panel. Every time you connect the Joybee 110 Digital Audio Player to your computer, the
update action will be carried out automatically.
Before dragging the selected songs to the Joybee 110 Digital Audio Player, make sure that there is enough
memory space.
Using QMusic20
Page 25

Notes, FAQ and Troubleshooting Tips
Notes
Do not put too many files under each directory or in the root directory to prevent the
system from slowing down. If a large number of files must be put in the player, organize
the files into different directories.
Do not store data in the player to its full memory capacity. Allow at least 0.5 MB for the
system to manage memory to prevent the system from slowing down or improper data
storage status.
When transferring files to the Joybee 110 Digital Audio Player, do not remove the USB
cable when the transfer is in progress.
The Joybee 110 Digital Audio Player only plays the files in default folder MP3 and MicIn
in the memory.
Do not remove the USB cable when updating the firmware of the player. Otherwise, the
player may not be able to startup. Remove the USB cable only when you are informed by
the message on the display.
This player can play wma files with a bitrate higher than 32kbps.
Avoid storing over 256 song files in the root directory.
When formatting the player using the Windows Format command, do not format it using
the FAT32/ NTFS file system.
Notes, FAQ and Troubleshooting Tips 21
Page 26

FAQ and Troubleshooting Tips
Why can’t I play certain songs in WMA format using my Joybee 110 Digital Audio Player?
Some WMA songs currently available from the Internet are copyright protected. This kind
of protection method prevents unauthorized person from playing protected song files.
These songs can only be played using a Window Media Player program that has been authorized. If you are already authorized to play these protected songs and want to make them
playable on your Joybee 110 Digital Audio Player, follow the steps below:
1. Open Windows Media Player and select Open in the File menu.
2. Select the songs you want to transfer to the Joybee 110 Digital Audio Player and click
Open.
3. Connect the Joybee 110 Digital Audio Player to your computer. A new Removable Disk
should appear in the My Computer window.
4. Select Copy in the Windows Media Player File menu, and then select Copy to portable
devices.
5. A file list will appear. Check to select the songs you want to copy to the Joybee 110 Digital
Audio Player and then click the Copy button located at the upper right corner of the
screen.
The music files will be copied and become playable using the Joybee 110 Digital Audio
Player.
How many minutes of MP3 music can be stored in the Joybee 110 Digital Audio Player?
It depends on the memory capacity of the player and the compression ratio used in
encoding the MP3 files. For MP3 files encoded by MPEG1 Layer3 with a bitrate of 128kbps
and sampling frequency of 44kHz (most commonly used), 1MB of memory can store about
1 minute of music. i.e. 128MB/256MB of memory stores about 128/256 minutes of music.
How long is the maximum recording time?
Recording time depends on the encoding method, bitrate, sampling frequency and memory
capacity of the player. If high sound quality is not needed for recording of meeting or
lecture, lower bitrate and sampling frequency such as MPEG1 Layer3, bitrate: 16kbps,
sampling frequency: 16kHz are recommended. To record with high sound quality, use
higher bitrate and sampling frequency such as MPEG1 Layer3, bitrate: 224kbps, sampling
frequency: 48kHz. The following table shows the recording time for different settings of
recording.
Encoding
method
MPEG2 Layer3 16kbps 16kHz 120kByte 9 minutes
MPEG2 Layer3 128kbps 44.1kHz 960kByte 1 minute
MPEG2 Layer3 224kbps 48kHz 1640kByte 40 seconds
MPEG2 Layer3 32kbps 32kHz 500kByte 2 minutes
MPEG2 Layer3 96kbps 22.05kHz 720kByte 1.4 minutes
Bitrate
Sampling
Frequency
Occupied
memory space
Recording time
per MB
When should I recharge the battery?
When the battery indicator on the display shows that the battery is empty, or battery appears
to be weak (there is only one bar in the battery icon) or when the sound quality deteriorates,
recharge the battery as soon as possible.
Notes, FAQ and Troubleshooting Tips22
Page 27

Why do different songs have different sound volumes?
Because the parameter of the volume level when recording each song may not be the same,
the volume level of different songs are different.
The file size is smaller than the free memory available in my player, but I still cannot transfer it to
my player
The Joybee 110 Digital Audio Player allocates memory in cluster of 16KB or 32KB. A file of 1
Byte also occupies one cluster, so a file of a size smaller than the free memory available might
not be transferred to the player.
Why is the memory capacity shown in the player smaller than that in the specifications chart?
The player needs some memory space to store other system data, therefore the usable
memory is smaller than its full capacity.
How can I get the updated firmware and fonts data?
You can go to BenQ website at http://www.BenQ.com to download these data when they are
available.
The Joybee 110 Digital Audio Player does not start up!
Check the following:
Make sure if you have accidentally disconnected the player from the computer when
updating firmware.
Physical damages in the flash memory may result in this problem.
The battery power is too low.
Solutions:
Recharge the battery.
Perform the firmware upgrade procedure again.
Please try to format the flash memory completely. If the problem still exists, please contact
your local service providers.
Notes, FAQ and Troubleshooting Tips 23
 Loading...