

Page 1

Contents
Introduction...............................................................................2
Installation ................................................................................4
Hardware Installation................................................................4
CD-RW Burning Software Installation ......................................5
Operation..................................................................................6
Disc Loading/ Replacement......................................................6
Emergency Disc Unloading ......................................................6
MS-DOS, Windows 95, Windows 98, and Windows NT are registered trademarks of
Microsoft Corporation. Pentium is a registered trademark of Intel Corporation. Names
of products mentioned herein are used for identification purposes only and may be
trademarks and/or registered trademarks of their respective company.
E-1 USER MANUAL
Page 2
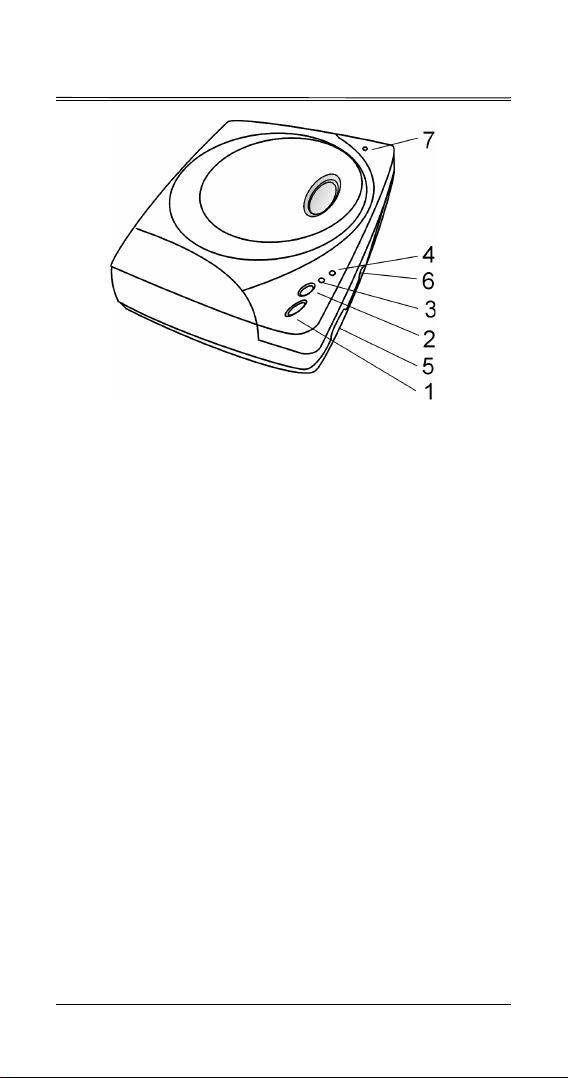
Introduction
OPEN/STOP:
1.
playback
PLAY/SKIP:
2.
next program.
DISC IN Indicator:
3.
when searching data. See ‘Indicator Status Table’ for
details.
WRITING Indicator:
4.
tor Status Table' for details.
VOLUME CONTROL:
5.
HEADPHONE JACK:
6.
powered speakers.
EMERGENCY EJECT HOLE:
7.
a paper clip to open cover.
Push to open CD-RW cover or to stop music
Push once to play an audio CD; push again to
Lights when reading data and blinks
Blinks when writing data. See 'Indica-
Controls volume at headphone jack.
Stereo mini-jack for headphones and
In case of emergency, insert
USER MANUAL E-2
Page 3
Indicator Status Table
Indication
WRITING DISC IN Status
OFF OFF CD-RW is ready, no disc
inside.
OFF Blinks green Power is ON and CD-RW in
standby mode. Music is on.
OFF Lights green. Disc inside and ready for
operation.
Blinks red Blinks green Test before writing data.
Lights red Blinks green Writing data.
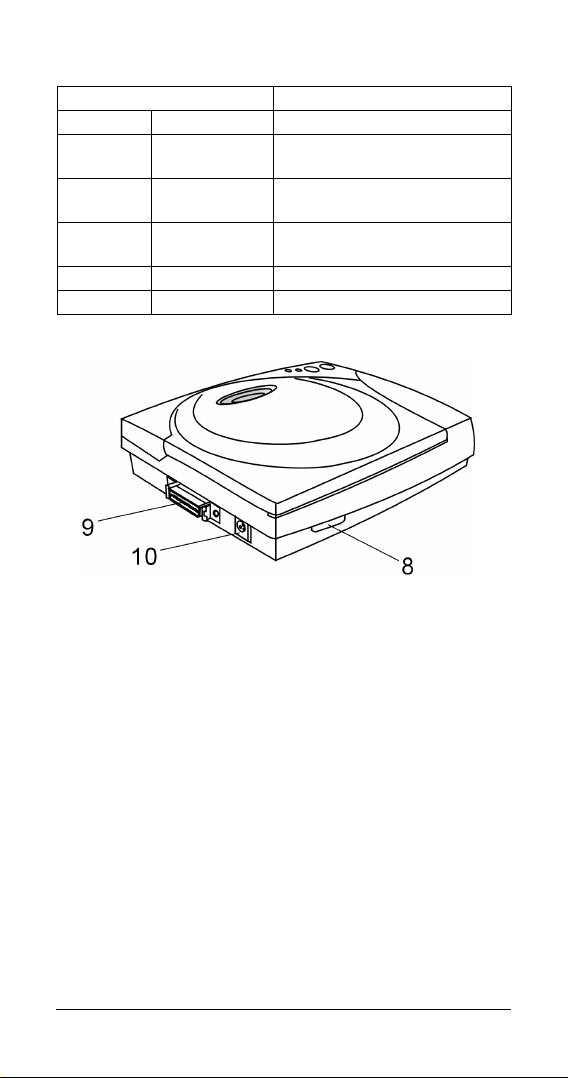
POWER BUTTON:
8.
INTERFACE CONNECTOR:
9.
POWER CONNECTOR
10.
Switches CD-RW ON or OFF.
Connects CD-RW to PC.
E-3 USER MANUAL
Page 4

Installation
Hardware Installation
Procedures
) Attention! Installation and operation of CD-RW
must be performed at a horizontal level.
1. Turn on your PC with Windows 98 or Windows 2000 ME.
2. Connect one end of the AC adaptor to the CD-RW and
another end to a power outlet.
3. Turn CD-RW ON.
USER MANUAL E-4
Page 5

4. Connect CD-RW to a USB port on the PC with the cord provided by the manufacturer.
5. After you have completed the above procedures, the system
will automatically detect the CD-RW. Follow the instructions
on the screen to install the driver (in the 1.44" diskette provided by the manufacturer). The system will identify the CDRW after system reboot.
6. After the installation, please de-install the product in the
reverse order of step 3 to 1.
E-5 USER MANUAL
Page 6

Indicator Status Table CD-RW Burning
Software Installation
Before the installation...
A burning process must not be interrupted; hence, a stable burning environment is necessary. The best way is to prepare a special hard drive for burning operation. Of course, a complete
operating system such as Windows 98 or Windows 2000,
Windows ME must be installed on this hard drive. If it is unable to
prepare a special hard drive for burning operation, tune your system to the best condition according to the following steps.
1. Turn off all TSR programs, including antivirus, screensaver,
file manager, power management. Additionally, we do not
recommend maximization or minimization of windows in a
burning operation. Any program operation may cause a disc
burning failure.
2. We recommend you not to connect too many devices on
your system. An overloaded power supply may cause power
instability and thus system instability.
CD-RW Burning Software Installation
1. Install software from CD-ROM or the CD-RW.
Indicator Status Table
2.
to complete software installation.
3. Some programs may request a system reboot after installation completes. Reboot system when requested.
Follow the instructions on the screen
USER MANUAL E-6
Page 7

Operation
Disc Loading/ Replacement
1. Push 'Open/Stop' button to open CD-RW cover.
2. Open cover to its highest position.
3. Load or replace a disc.
4. Gently push cover edge to close cover.
Emergency Disc Unloading
If you are unable to open the cover, follow the emergency disc
unloading instructions below to open cover.
1. Turn OFF power.
2. Insert a paper clip to the
Emergency Eject Hole
to open cover.
3. Remove disc.
E-7 USER MANUAL
 Loading...