

Page 1
Product Description
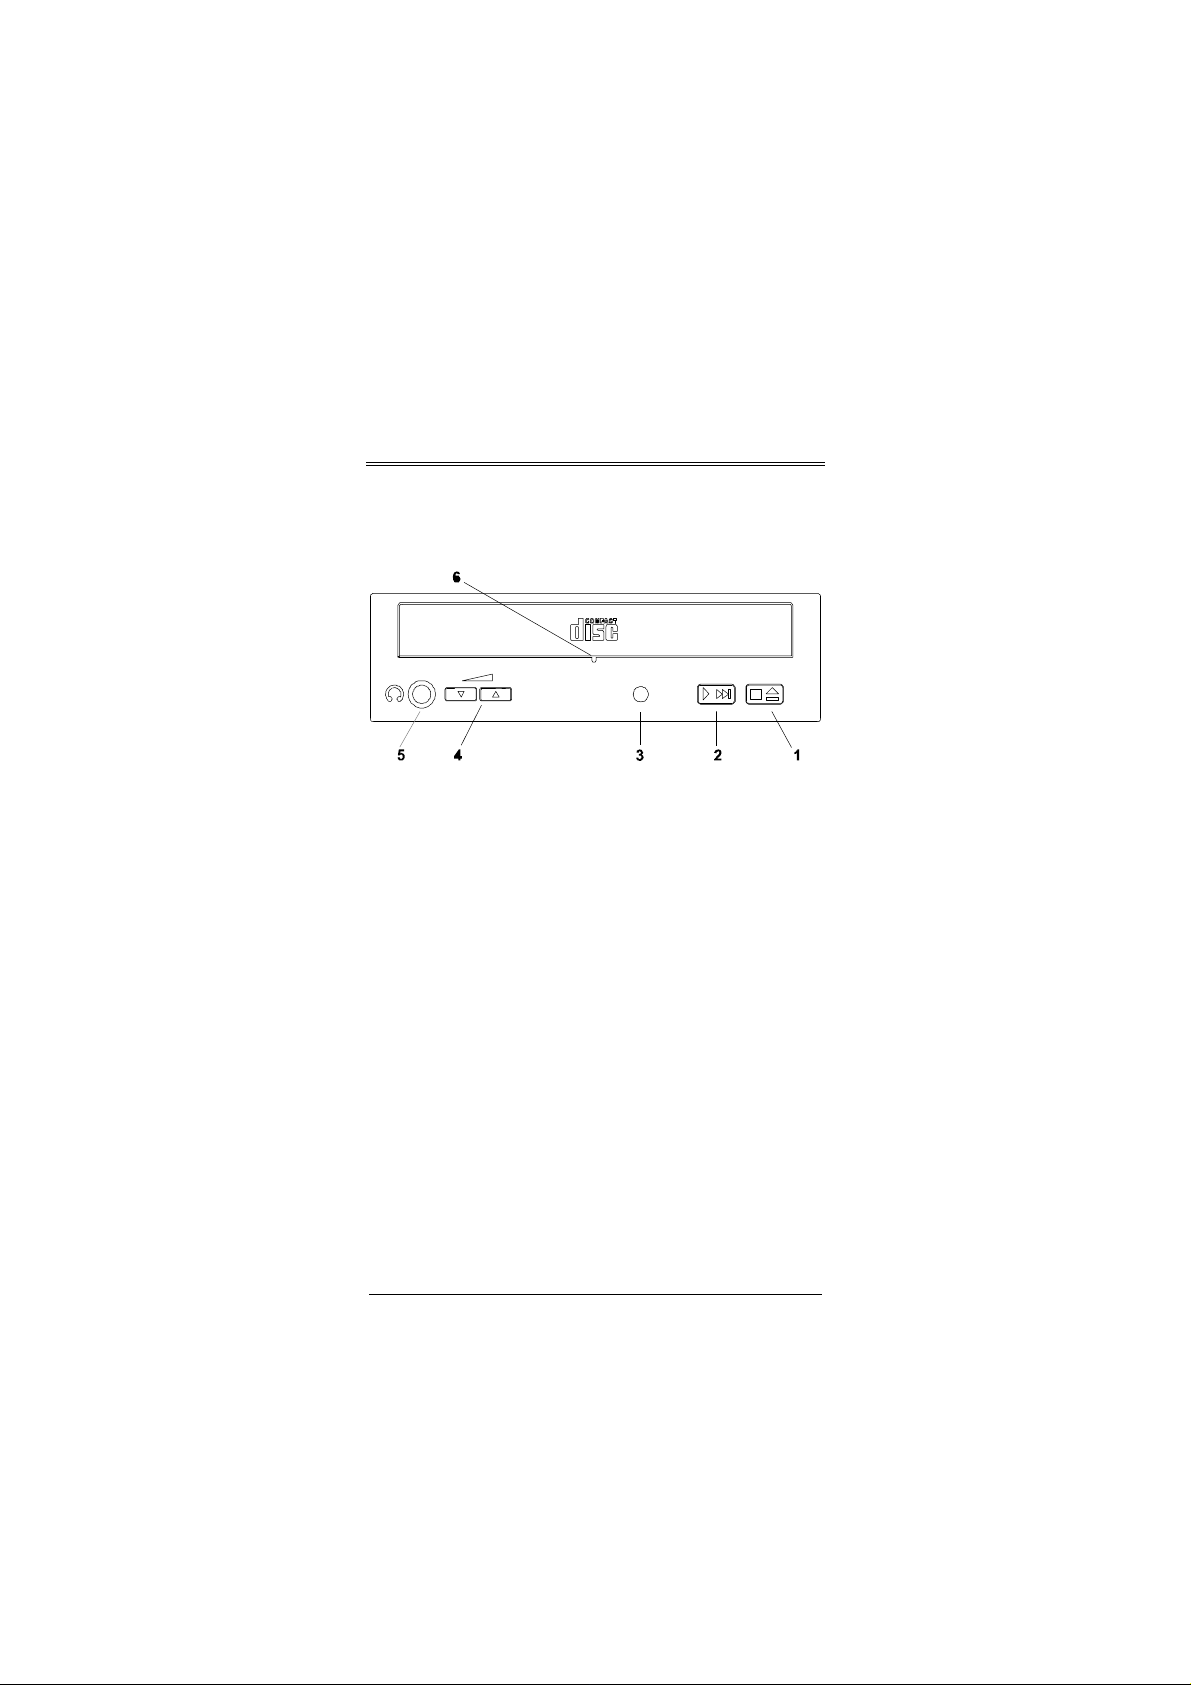
Front View
1. Disc tray button opens and closes for disc
loading and removal.
2. Audio Play/Skip track control button plays and
skips one information track of an audio CD.
3. Busy indicator lights up while data is being
read from the disc; flashes during seek
operation.
4. Headphone volume control adjusts
headphone sound level.
5. Headphone jack is used for attaching
headphones or self-amplified speakers.
6. Emergency eject hole. Insert a
straightened paper clip to eject the tray
manually.
User’ s Guide 1
Page 2

Rear View
AUDIO
R G G L
4
CABLE SELECT
SLAVE
C S M
S L A
3
MASTER
39
40
IDE INTERFACE
2
1
2
DC INPUT
5V 12VG G
16
DIGITAL
AUDIO
D G
5
1. Power supply connector connects the CDROM drive to the computer’ s power supply.
2. Interface connector connects the CD-ROM
drive to the 40-pin IDE interface cable.
3. Device configuration jumper is installed on
"SL" for slave mode by default. The CD-ROM
drive can be configured as a master drive if
the jumper is installed on "MA".
4. Audio line out connector has two channels,
left and right audio outputs.
5. Digital Audio Output offers high quality audio
effect by outputting digital signal to D/A
converter.
6. Testing jumper is reserved for manufacturer
internal testing purposes.
2 User’ s Guide
Page 3

Installation
Hardware Installation
Please follow these steps to install this CD-ROM
drive:
1. Turn off the computer and all peripheral
devices, and disconnect the computer’ s
power cord.
2. Remove the computer housing or casing.
3. Place the CD-ROM drive in a 5.25-inch bay.
4. Secure the drive into the half-height drive bay
using four screws.
NOTE: This CD-ROM drive must be operated
horizontally.
5. Connect the 4-pin drive power cable and 40pin IDE interface cable. The colored edge
of the IDE cable must be aligned with the Pin
1 position.
6. Re-install the computer housing or casing.
7. Reconnect the computer power cord, and turn
on the computer.
Software Installation
For Windows 95 or OS/2 Warp, no external device
driver is needed. For DOS and Windows 3.1, the
procedure for installation is as follows:
User’ s Guide 3
Page 4

1. Turn on your computer with DOS booting.
2. Insert the CD-ROM Device Driver disk into a
3.5” floppy disk drive.
3. At the command prompt, type the drive letter
of the drive you’ re using, followed by a colon
(:), and then press Enter.
4. Type setup, and then press Enter.
5. Follow the instructions on the screen.
6. You can choose Express Setup or Custom
Setup. It is recommended that you use
Express Setup; however, you can use
Custom Setup if you are an experienced user.
7. Reboot your system.
NOTE: Please read the README file in the device
driver disk to learn more about using this
drive.
Emergency Eject
If for any reason the tray does not eject
automatically, insert and press an eject-bar inside
the emergency eject hole
to manually eject the tray.
A straightened paper clip
with a diameter of 1.2
mm (typical) can be used
as an eject-bar.
Make sure to turn off the power before manual
disc eject operation.
4 User’ s Guide
 Loading...