

Page 1

Digital Projector
User Manual
Portable Entertainment Series | GV1
V 1.00
Page 2

Copyright and disclaimer
Copyright
Copyright © 2018 by BenQ Corporation. All rights reserved. No part of this publication may be reproduced, transmitted, transcribed, stored in a
retrieval system or translated into any language or computer language, in any form or by any means, electronic, mechanical, magnetic, optical, chemical,
manual or otherwise, without the prior written permission of BenQ Corporation.
All other logos, products, or company names mentioned in this manual may be the registered trademarks or copyrights of their respective companies,
and are used for informational purposes only.
Android™ is a trademark of Google LLC.
The Bluetooth® word mark and logos are registered trademarks owned by Bluetooth SIG, Inc. and any use of such marks by BenQ Corporation is
under license.
iOS is a trademark or registered trademark of Cisco in the U.S. and other countries and is used under license.
macOS® is a trademark of Apple Inc., registered in the U.S. and other countries.
USB-C™ is a trademark of the USB Implementers Forum.
Disclaimer
BenQ Corporation makes no representations or warranties, either expressed or implied, with respect to the contents hereof and specifically disclaims
any warranties, merchantability or fitness for any particular purpose. Further, BenQ Corporation reserves the right to revise this publication and to
make changes from time to time in the contents hereof without obligation of BenQ Corporation to notify any person of such revision or changes. This
user manual aims to provide the most updated and accurate information to customers, and thus all contents may be modified from time to time
without prior notice. Please visit http://www.benq.com for the latest version of this manual.
Warranty
BenQ warrants this product against any defects in material and workmanship, under normal usage and storage.
2
Page 3

Proof of purchase date will be required with any warranty claim. In the event this product is found to be defective within the warranty period, BenQ’s
only obligation and your exclusive remedy shall be replacement of any defective parts (labor included). To obtain warranty service, immediately notify
the dealer from which you purchased the product of any defects.
Important: The above warranty shall be void if the customer fails to operate the product in accordance with BenQ’s written instructions, especially the
ambient humidity must be in-between 10% and 90%, temperature in-between 0°C and 40°C, altitude lower than 2000 meters, and avoiding to operate
the projector in a dusty environment. This warranty gives you specific legal rights, and you may have other rights which vary from country to country.
For other information, please visit www.BenQ.com.
Statement regarding hyperlinks and third-party websites
BenQ is not responsible for the content of the websites or of similar resources, which are maintained and controlled by third parties, that may be
linked from this product. Providing links to those websites or to similar resources does not mean that BenQ makes any warranty or representation to
their content by expression or by implication.
Any third party content or service preinstalled in this product is provided "as is". BenQ does not, by expression or by implication, make any warrant to
the content or to the services provided by third parties. BenQ does not warrant or guarantee that the content or services provided by third parties
are accurate, effective, most up-to-date, legal, or complete. Under no circumstances shall BenQ be liable for the content or services provided by third
parties including their negligence.
Services provided by third parties may be terminated temporarily or permanently. BenQ does not warrant or guarantee that any content or services
provided by third parties are in good condition at any time, and is not liable for the termination of the said content and services.
In addition, BenQ is not involved in any transactions you conduct in the websites or similar resources maintained by third parties.
You should contact the content or service providers for any questions, concerns, or disputes.
3
Page 4

Table of contents
Copyright and disclaimer ...........................................................................................................................................................................2
Copyright................................................................................................................................................................................................................... 2
Disclaimer.................................................................................................................................................................................................................. 2
Warranty.................................................................................................................................................................................................................... 2
Statement regarding hyperlinks and third-party websites .............................................................................................................................. 3
Package contents .......................................................................................................................................................................................11
Standard accessories ............................................................................................................................................................................................. 11
Introduction ................................................................................................................................................................................................13
Projector features.................................................................................................................................................................................................. 13
Projector exterior view ...................................................................................................................................................................................... 15
Front and left side view ......................................................................................................................................................................................................................... 15
Rear and right side view ....................................................................................................................................................................................................................... 16
Bottom view............................................................................................................................................................................................................................................ 17
Controls and functions ......................................................................................................................................................................................... 18
Control panel...........................................................................................................................................................................................................................................18
LED Indicators ....................................................................................................................................................................................................... 19
Remote control...................................................................................................................................................................................................... 21
Activating the remote control battery.............................................................................................................................................................................................. 22
Replacing the remote control battery............................................................................................................................................................................................... 23
Remote control effective range .......................................................................................................................................................................................................... 24
Installation ...................................................................................................................................................................................................25
4
Page 5

Choosing a location .............................................................................................................................................................................................. 25
Obtaining a preferred projected image size ................................................................................................................................................... 27
Projection dimensions ............................................................................................................................................................................................................................27
Operations ................................................................................................................................................................................................. 29
Attaching the plug head........................................................................................................................................................................................ 29
Removing the plug head....................................................................................................................................................................................... 29
Charging the battery............................................................................................................................................................................................. 30
Starting up the projector .................................................................................................................................................................................... 31
Shutting down the projector ............................................................................................................................................................................. 35
Adjusting the projected image .......................................................................................................................................................................... 36
Adjusting the projection angle..............................................................................................................................................................................................................36
Fine-tuning the image clarity ............................................................................................................................................................................................................... 37
Correcting keystone ...............................................................................................................................................................................................................................38
BenQ Launcher ..................................................................................................................................................................................... 39
The BenQ Launcher home page......................................................................................................................................................................................................39
Navigating the BenQ Launcher home page...................................................................................................................................................................................40
Using the BenQ Launcher Settings menus............................................................................................................................................................................... 41
Inputting text ............................................................................................................................................................................................................................................41
Connections ............................................................................................................................................................................................... 43
Wireless Connections ......................................................................................................................................................................................... 45
Connecting the projector to a Wi-Fi network.................................................................................................................................................................................45
Wireless Projection for iOS & macOS®............................................................................................................................................................................................47
Wireless Projection for Android™................................................................................................................................................................................................... 50
Wireless Projection for PC................................................................................................................................................................................................................. 52
Wi-Fi Hotspot ....................................................................................................................................................................................................... 54
5
Page 6

Wired Connections............................................................................................................................................................................................... 58
Connecting a USB-C™ device with DisplayPort............................................................................................................................................................................. 58
Connecting a USB-C™ device without DisplayPort ..................................................................................................................................................................... 61
Connecting a USB-C™ flash drive..................................................................................................................................................................................................... 62
Media Player ............................................................................................................................................................................................................................................ 63
Bluetooth Connections ....................................................................................................................................................................................... 71
Pairing/Connecting to a Bluetooth speaker or headphones ......................................................................................................................................................... 71
Using the Projector as a Bluetooth speaker..................................................................................................................................................................................... 73
Navigating the Settings menu ...............................................................................................................................................................75
About the Settings menu...................................................................................................................................................................................75
Using the Settings menu.................................................................................................................................................................................... 76
Picture ..................................................................................................................................................................................................................................................... 77
Sounds .................................................................................................................................................................................................................................................... 79
Wi-Fi......................................................................................................................................................................................................................................................... 80
Bluetooth ...............................................................................................................................................................................................................................................81
Hotspot ................................................................................................................................................................................................................................................... 82
Installation ............................................................................................................................................................................................................................................. 83
Preference............................................................................................................................................................................................................................................. 84
About .......................................................................................................................................................................................................................................................85
Maintenance ................................................................................................................................................................................................86
Care of the projector............................................................................................................................................................................................86
Cleaning the lens ..................................................................................................................................................................................................................................... 86
Storing the projector.............................................................................................................................................................................................................................. 86
Transporting the projector................................................................................................................................................................................................................... 87
Extending LED life................................................................................................................................................................................................................................... 87
Troubleshooting .........................................................................................................................................................................................89
Specifications ...............................................................................................................................................................................................91
Projector specifications ........................................................................................................................................................................................................................ 91
6
Page 7

Dimensions.............................................................................................................................................................................................................................................. 93
Timing chart............................................................................................................................................................................................................................................ 94
Supported file formats.......................................................................................................................................................................................................................... 96
7
12/19/2018
Page 8
Important safety instructions
Your projector is designed and tested to meet the latest standards for safety of information technology equipment. However, to ensure safe use of this
product, it is important that you follow the instructions mentioned in this manual and marked on the product.
1. Please read this user manual before you operate your projector.
Keep this manual in a safe place for future reference.
2. Always place the projector on a level, horizontal surface during
operation.
- Do not place the projector on an unstable cart, stand, or table as
it may fall and be damaged.
- Do not place inflammables near the projector.
- Do not use if tilted at an angle of more than 10 degrees left to
right, nor at angle of more than 15 degrees front to back.
3. Do not store the projector on end vertically. Doing so may cause
the projector to fall over, causing injury or resulting in damage.
4. Do not place the projector in any of the following environments:
- Space that is poorly ventilated or confined. Allow at least 50 cm
clearance from walls and free flow of air around the projector.
- Locations where temperatures may become excessively high, such
as the inside of a car with all windows closed.
- Locations where excessive humidity, dust, or cigarette smoke may
contaminate optical components, shorten the projector’s lifespan
and darken the screen.
- Locations near fire alarms.
- Locations with an ambient temperature above 40°C/104°F.
8
Page 9

- Locations where the altitudes are higher than 2000 m (6562 feet).
5. Do not block the vents holes while the projector is on (even in
standby mode).
8. Do not place liquids near or on the projector. Liquids spilled into
the projector will void your warranty. If the projector does
become wet, disconnect it from the power point and call BenQ to
have the projector repaired.
- Do not cover the projector with any item.
- Do not place the projector on a blanket, bedding or any other soft
surface.
6. In areas where the mains power supply voltage may fluctuate by
±10 volts, it is recommended that you connect the projector
through a power stabilizer, surge protector or uninterruptible
power supply (UPS) as appropriate to your situation.
7. Do not step on the projector or place any objects upon it.
9. Do not look straight into the projector lens during operation. It
may harm your sight.
10. Do not operate the projector lamp beyond the rated lamp life.
Excessive operation of lamps beyond the rated life could cause a
lamp to break on rare occasions.
11. The lamp becomes extremely hot during operation. Allow the
projector to cool for approximately 45 minutes prior to removing
the lamp assembly for replacement.
9
Page 10

12. This projector is capable of displaying inverted images for ceiling
installation.
13. Do not attempt to disassemble this projector. There are dangerous
high voltages inside which may cause death if you should come into
contact with live parts.
Under no circumstances should you ever undo or remove any
other covers. Refer servicing only to suitably qualified professional
service personnel.
Moisture condensation
Never operate the projector immediately after moving it from a cold
location to a hot location. When the projector is exposed to such a
change in temperature, moisture may condense on the crucial internal
parts. To prevent the projector from possible damage, do not use the
projector for at least 2 hours when there is a sudden change in
temperature.
Avoid volatile liquids
Do not use volatile liquids, such as insecticide or certain types of
cleaner, near the projector. Do not have rubber or plastic products
touching the projector for a long time. They will leave marks on the
finish. If cleaning with a chemically treated cloth, be sure to follow the
cleaning product’s safety instructions.
Disposal
This product contains the following materials which are harmful to
human bodies and environment.
Please keep the original packing for possible future shipment. If you need to pack
your projector after use, adjust the projection lens to an appropriate position,
put the lens cushion around the lens, and fit the lens cushion and projector
cushion together to prevent damage during transportation.
14. When you think service or repair is required, take the projector
only to a suitably qualified technician.
• Lead, which is contained in solder.
• Mercury, which is used in the lamp.
To dispose of the product or used lamps, consult your local
environment authorities for regulations.
The illustrations and the images shown in this document are for your reference.
The actual content may vary by the product supplied for your region.
10
Page 11

Package contents
GV1 Projector
USB-C™ Cable
Remote Control
Adapter (ICP30-120-2000)
Adapter Plug Head (US)
Adapter Plug Head (EU)
Carefully unpack and verify that you have the items below. Some of the items may not be available depending on your region of purchase. Please check
with your place of purchase.
Standard accessories
11
Page 12

Adapter Plug Head (UK)
Adapter Plug Head (CHINA)
Adapter Plug Head (AUS)
Carry Bag
Digital Projector
Quick Start Guide
Portable Entertainment Series | GV1
Projecteur numérique
Guide de démarrage rapide
Gamme de divertissement portable | GV1
Quick Start Guide
Regulatory Statement
Warranty Ca rd
• Lamp life results will vary depending on environmental conditions and usage. Actual product’s features and specifications are subject to change without notice.
• Some of the accessories may vary from region to region.
• The warranty card is only supplied in some specific regions. Please consult your dealer for detailed information.
• For AC/DC adapter, the socket-outlet shall be installed near the equipment and shall be easily accessible.
• Use original accessories to ensure compatibility.
12
Page 13

Introduction
Projector features
• Instant Wireless Projection
Release your hands and eyes to enjoy binge-watching on a big screen. If you have access to internet connection, you can cast the screen from a
mobile device through GV1 instantly. With GV1, you can just sit back, relax and enjoy some well-earned downtime.
• Bluetooth® Speaker Mode
Entertaining friends and family in style is easy with the GV1. With Bluetooth 4.0 intelligent connection, you can set GV1 as a speaker, and play
music from mobile device through it. Bluetooth 4.0 lets you waste less battery power because, unless critical data is being shared, the connection
is solid and secure. You can connect to your devices without draining the battery.
• Media playback from USB-C™ DisplayPort
GV1 supports laptop or mobile phone projection by USB-C™ DisplayPort interface. Once GV1 is plugged into the USB-C™ DisplayPort via the
USB-C™ Gen 3.1 cable, you can extend the screen for business meetings or entertainment projection.
• Multimedia entertainment at your finger tips
With a built-in USB reader, streaming content like movies, music and videos in a few seconds has never been simpler. You can share memorable
photos or videos and everyone can enjoy them without huddling around a small screen.
• Convenient Android-based BenQ Launcher
The projector operates through the Android-based BenQ Launcher which is complemented by a WLAN connection that allows you to
project/broadcast media via embedded or downloaded streaming apps. (The app market will be introduced by OTA update in late 2018)
• 15-Degree Adjustable Tilt for Flexible Installation
To satisfy diverse projection scenarios, GV1 introduces a considerate15-degree adjustable tilt to avoid troublesome obstacles and ensure a
perfect big screen projection.
•Auto Keystone
GV1 offers an automatic vertical keystone adjustment function which adjusts the projected image accordingly. With 15-Degree Adjustable Tilt,
you can stream content without installation hassles.
• High Portability
The GV1 is handy and portable, making it useful for business trips and leisure activities.
• Advanced LED light source
13
Page 14

The projector features a long lasting LED lightbulb that provides a longer lifespan than traditional bulbs.
•Low Heat
Unlike other projectors, GV1 emits lower temperature, making it safe enough for inquisitive children to touch without hurting their hands.
14
Page 15

Projector exterior view
1
2
3
4
Front and left side view
1. Control panel (See Control panel on page 18 for details.)
2. Projection lens
3. Front IR sensor
4. Focus ring
15
Page 16
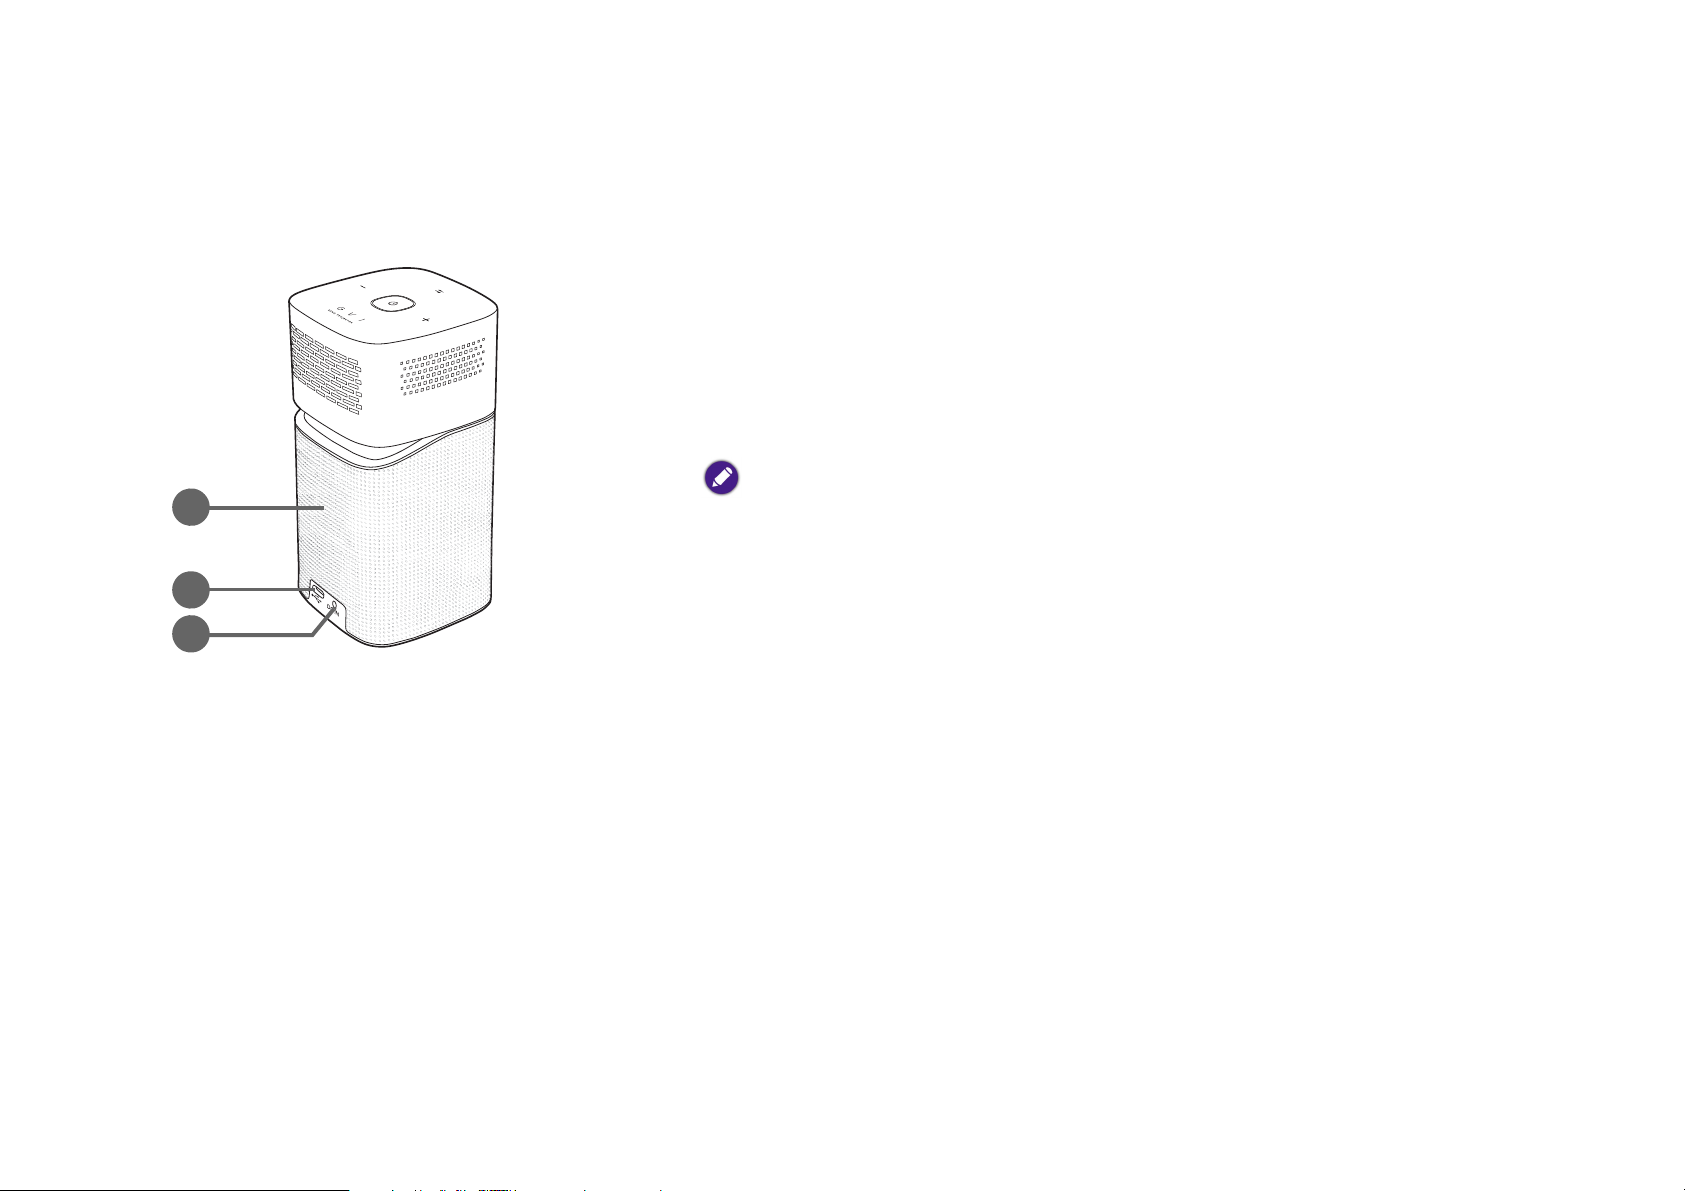
Rear and right side view
5
6
7
See Connections on page 43 for connection details.
5. Speaker grill
Inside the speaker grill is the rear speaker.
6. USB-C™ port
Used to connect devices with DisplayPort functionality to project video from the
device or flash drives to project/broadcast media stored on the card.
7. DC-IN power jack
Please only use the supplied power adapter to avoid possible dangers such as electric shock and
fire.
16
Page 17

Bottom view
8
8. Tripod screwhole
Used to attach a tripod plate to mount the projector onto a tripod.
17
Page 18

Controls and functions
4
1
2
3
I
I
Control panel
1. Switch mode key/LED indicator
• Toggles the Bluetooth speaker on and off.
• Acts as an LED indicator for Bluetooth and errors. See LED Indicators on page
19 for more details.
2. Vol um e d own key
Decreases the projector volumes.
3. Power key/LED indicator
• Turns the projector on and off. See Starting up the projector on page 31 for
more details.
• Acts as an LED indicator for the battery. See LED Indicators on page 19 for
more details.
4. Vol um e u p key
Increases the projector volume.
18
Page 19

LED Indicators
The power and switch mode keys feature LEDs that help indicate the status and possible operating errors for the projector, refer to the table below
for definitions of various LED behaviors.
Power Key Switch Mode Key
Scenario Status
LED Behavior Schema LED Behavior Schema
Battery capacity < 20% Red - breathing N/A
Battery capacity = 20 - 60% Yellow - breathing N/A
Charging with Adapter
Battery capacity > 60% Green - breathing N/A
Battery capacity = 100% Green - solid N/A
Battery capacity < 20% Red - flashing N/A
Battery Mode
Bluetooth Speaker Mode
System Update
Battery capacity = 20 - 60% Yellow - solid N/A
Battery capacity > 60% Green - solid N/A
Ready to pair / Pairing
Depends on power status
Pairing successful Blue - solid
System update in progress Green - flashing Blue - flashing
System update has failed Red - solid Red - solid
System update is successful;
system is restarting
Green - solid Blue - solid
19
Blue - flashing
Page 20

Scenario Status
LED error Yellow - solid Red - flashing
Fan error Red - solid Red - flashing
Power Key Switch Mode Key
LED Behavior Schema LED Behavior Schema
Error*
Optical engine temperature
error
Battery temperature error N/A Red - flashing
Driver board error Red - flashing Red - flashing
*If there are any errors, turn the projector off.
N/A Red - solid
20
Page 21
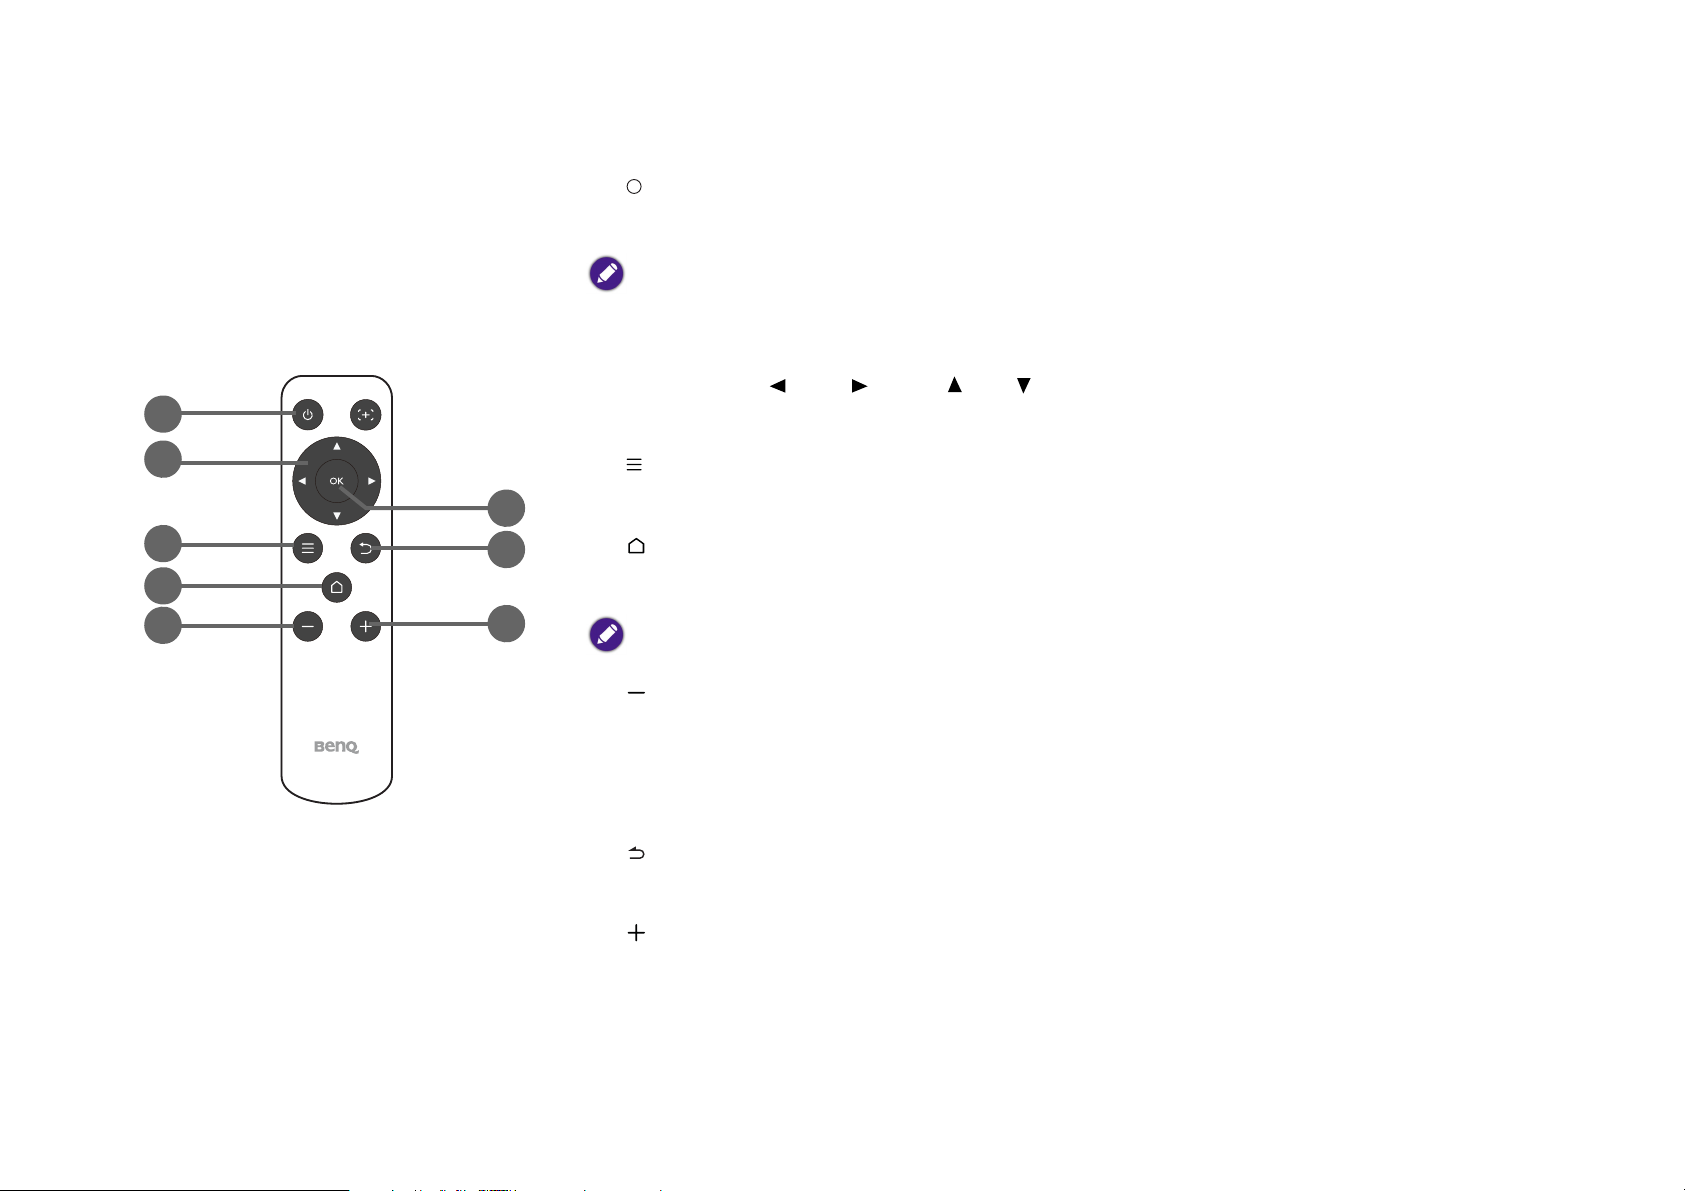
Remote control
6
7
8
1
2
3
4
5
I
I
1. Power
Turns the projector off and on after initial startup.
After initially starting up the projector using the keypad button, the remote control power button can be used to
turn the projector off or on for subsequent power ups.
See Starting up the projector on page 31 for more details.
2. Arrow keys ( Left, Right, Up, Down)
Used as directional arrows to select the desired menu items and to make adjustments.
3. Settings
Launches the BenQ Launcher settings menu.
4. HOME
Press this key to enter the BenQ Launcher home menu
This key is only active when the projector is under BenQ Launcher mode.
5. Volume Down
Decreases the projector volume.
6. OK
Used to confirm the selection on the BenQ Launcher menu.
7. BACK
Used to return to the previous layer.
8. Volume Up
Increases the projector volume.
21
Page 22
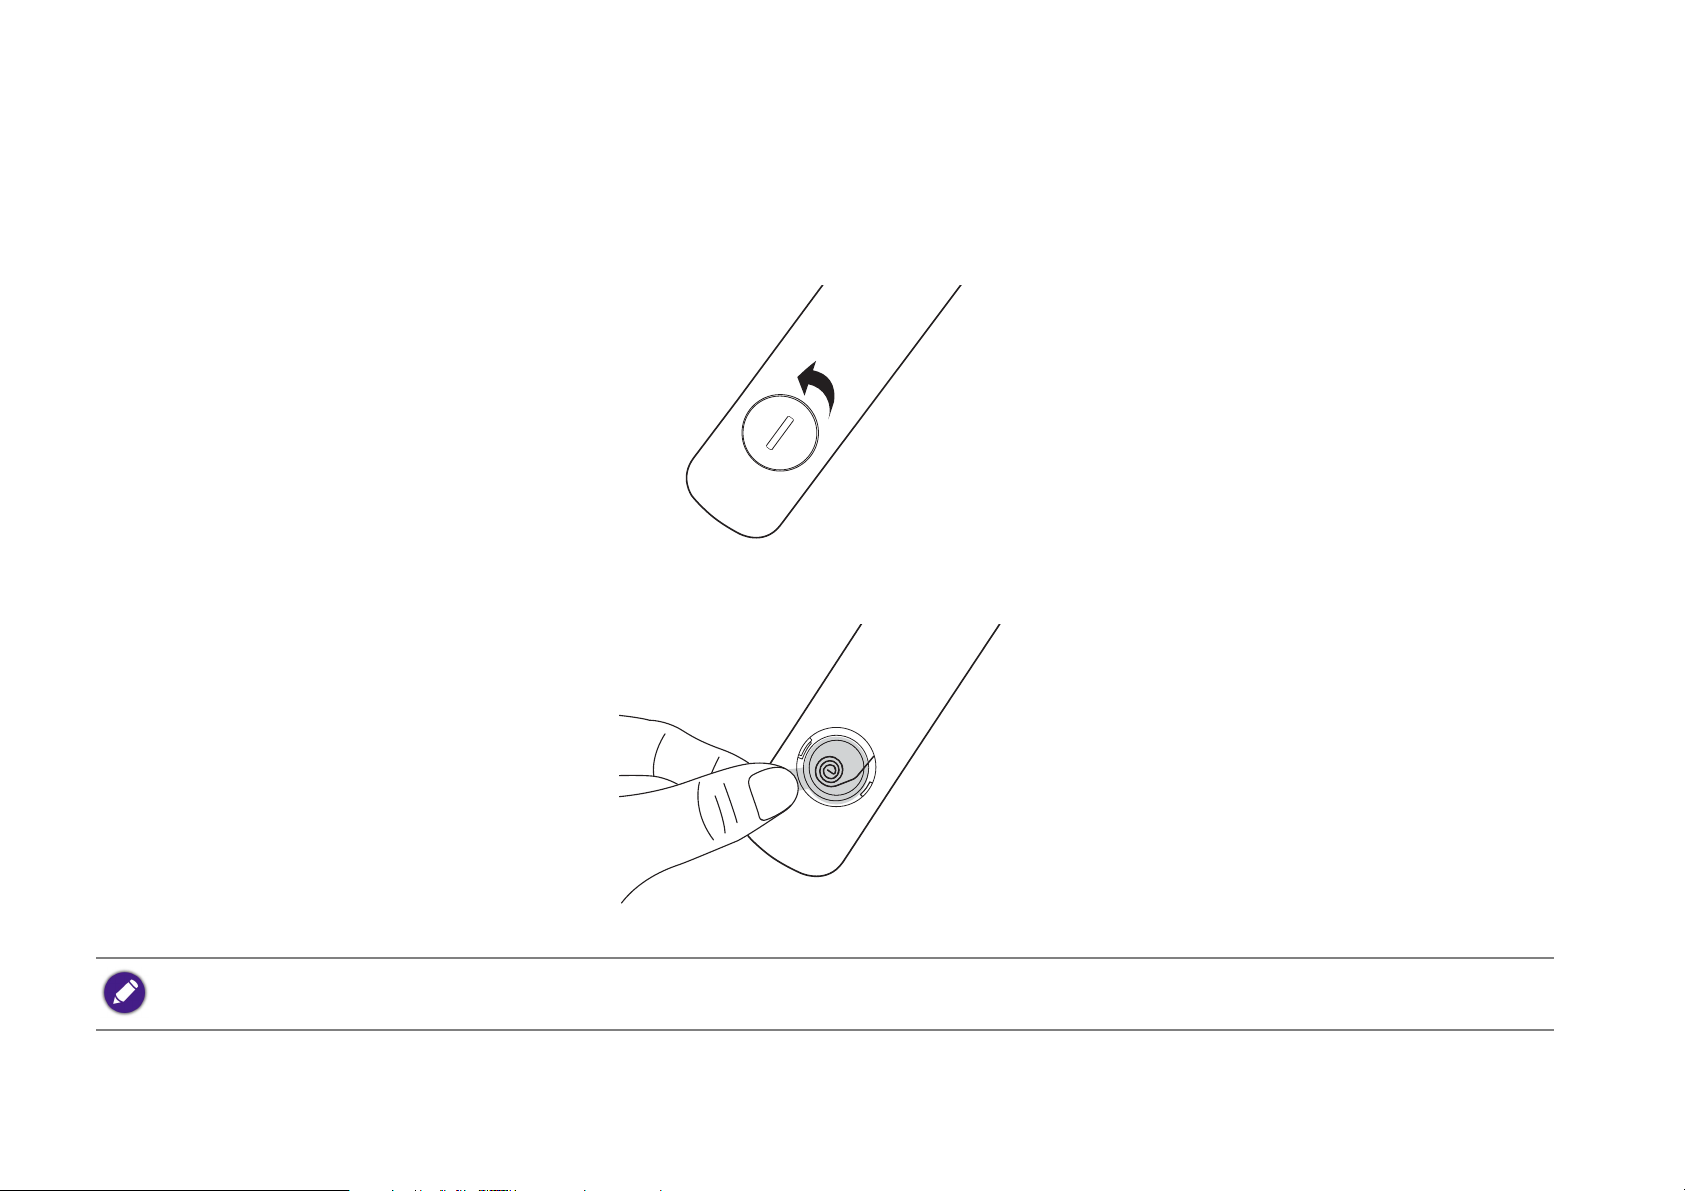
Activating the remote control battery
Before you can begin to use the remote control, you must first remove the clear plastic battery sticker between the battery and the contact on the
remote control.
1. Use a flat-tipped instrument to rotate the battery cover counter-clockwise to the unlocked position.
2. Remove the battery cover from the remote control.
3. Pull and remove the plastic battery sticker.
4. Place the battery cover back onto the remote control and rotate it clockwise to the locked position.
Avoid leaving the remote control and battery in an excessive heat or humid environment like the kitchen, bathroom, sauna, sunroom or in a closed car.
22
Page 23

Replacing the remote control battery
1. Use a flat-tipped instrument to rotate the battery cover counter-clockwise to the unlocked position.
2. Remove the battery cover from the remote control.
3. Carefully dislodge the used battery from underneath the retention coil and slide it out from the remote control.
4. Slide the new battery into its position underneath the retention coil.
5. Place the battery cover back onto the remote control and rotate it clockwise to the locked position.
• Avoid leaving the remote control and battery in an excessive heat or humid environment like the kitchen, bathroom, sauna, sunroom or in a closed car.
• Replace only with the same or equivalent type recommended by the battery manufacturer.
• Dispose of the used batteries according to the manufacturer's instructions and local environment regulations for your region.
• Never throw the battery into a fire. There may be danger of an explosion.
23
Page 24

Remote control effective range
The projector’s IR remote control sensor is located at the front of the projector with a range of 8 metres (~26 feet) at an angle of 30-degrees (left and
right) and 20-degrees (up and down). The remote control can be used either by pointing it at the front of the projector or by reflecting the IR signal off
of a wall.
Make sure that there are no obstacles between the remote control and the IR sensor on the projector.
24
Page 25

Installation
Choosing a location
Before choosing an installation location for your projector, take the following factors into consideration:
• Size and position of your screen
• Electrical outlet location
• Location and distance between the projector and the rest of your equipment
• Location and distance between the projector and the wireless access point, or if using a LAN cable, the internet hub
You can install your projector in the following ways.
1. Front Table:
Select this location with the projector placed near the floor in front of the screen.
This is the most common way to position the projector for quick setup and portability.
Turn on the projector and select the following settings:
Settings > Installation > Projector Installation > Front Table
2. Front Ceiling:
Select this location with the projector elevated near the ceiling in front of the screen.
Turn on the projector and select the following settings:
Settings > Installation > Projector Installation > Front Ceiling
The projector does not feature ceiling mount components/equipment so when choosing to use a front ceiling location you must place
it on an elevated location of your choice.
25
Page 26

3. Rear Table:
Select this location with the projector placed near the floor behind the screen.
Turn on the projector and select the following settings:
Settings > Installation > Projector Installation > Rear Table
A special rear projection screen is required.
4. Rear Ceiling:
Select this location with the projector elevated from the ceiling behind the screen.
Turn on the projector and select the following settings:
Settings > Installation > Projector Installation > Rear Ceiling
A special rear projection screen is required.
The projector does not feature ceiling mount components/equipment so when choosing to use a rear ceiling location you must place
it on an elevated location of your choice.
26
Page 27

Obtaining a preferred projected image size
Screen Size Screen
Center of lens
Projection Distance
Vertical Offset
The projected image size is determined by the distance from the projector lens to the screen, and the video format. The data in the table below is
based on a normal projection method and not the result of adjusting the projection angle (1-15 degrees).
Projection dimensions
Use the illustration and tables below to help you determine the projection distance.
Screen size Projector distance (mm)
Diagonal
H (mm) W (mm) Average
Inch mm
30 762 664 373 864
35 889 775 436 1007
40 1016 886 498 1151
45 1143 996 560 1295
50 1270 1107 622 1439
55 1397 1218 684 1583
27
Page 28
Screen size Projector distance (mm)
Diagonal
H (mm) W (mm) Average
Inch mm
60 1524 1329 747 1727
65 1651 1439 809 1871
70 1778 1550 871 2015
75 1905 1661 933 2159
80 2032 1771 996 2303
85 2159 1882 1058 2447
90 2286 1993 1120 2591
95 2413 2104 1182 2735
100 2540 2214 1245 2879
All measurements are approximate and may vary from the actual sizes. If you want a permanent installation of the projector, we recommend that you use the actual
projector to physically test the projection size, distance, and the projector's optical characteristics prior to the installation. This helps you determine the exact mounting
position which best suits your installation.
28
Page 29

Operations
Attaching the plug head
1. Place the plug head onto the adapter.
2. Rotate the plug head clockwise until it clicks into place.
Removing the plug head
1. Press the button next to the plug head on the adapter.
2. Rotate the plug head counter-clockwise and remove the plug head from the adapter.
Images above may differ depending on the region of the plug head.
29
Page 30

Charging the battery
1. Charge the projector’s battery by leaving the supplied power adapter connected to the projector and a power outlet.
• The power LED indicator will illuminate according to its charge status, for a full charge wait until the indicator lights up solid green (see LED
Indicators on page 19 for more information on LED behavior).
Charge the battery fully to ensure successful OTA update.
30
Page 31

Starting up the projector
I
I
1. Charge the battery or supply power to the projector by plugging the supplied power adapter into the projector and a power outlet.
2. Press and hold the power key for 3 seconds. The power LED indicator on the projector lights up and “breathes” blue after power has been
applied. It will then illuminate according to its charge setting (see LED Indicators on page 19).
3”
• The power button on the remote control is not able to power on the projector, powering on the projector can only be done using the power key on the top side of the
projector.
• When supplying power directly to the projector please use the supplied power cable to avoid possible dangers such as electric shock and fire.
3. Connect any video equipment supporting DisplayPort (version 1.1 or above) or a USB-C™ storage device to the USB-C™ port on the rear of
the projector. If you want to project video via a wireless connection or if you want to access the BenQ Launcher, you do not need to connect
any video equipment.
For more details on connection options, see Connections on page 43.
4. The fans starts operating, and a start-up image will be shown while the projector warms up, this process may take a few minutes. The projector
does not respond to further commands while it is warming up.
5. If this is the first time you turn on the projector, the setup wizard appears to guide you through setting up the projector. If you have already done
this, skip this step.
• Use the arrow keys (///) on your remote control to move through the menu items.
31
Page 32

• Use OK to confirm the selected menu item.
• Use Back to return to the previous menu.
• Use MENU to skip a menu.
The Setup Wizard screenshots below are for reference only and may differ from the actual design.
Step 1:
Specify Language.
Available languages may vary by the product supplied for your region and may be updated without prior notice.
32
Page 33

Step 2:
Configure the Wi-Fi settings by selecting the Wi-Fi network and entering the password.
To connect to a hidden Wi-Fi network select Add a New Network and enter the SSID, security setting, and password for the network.
33
Page 34

Step 3:
Specify Time Zone.
Step 4:
Read the Privacy Announcement and press OK.
You’ve completed the setup wizard, you may now connect a device to the projector to project video, see Connections on page 43 for more
information.
34
Page 35

Shutting down the projector
I
I
1. Press on the projector or your remote control. The projector displays a shutdown confirmation message.
2. The power LED indicator turns off and will illuminate again according to its charge status if the adapter is connected to the projector (see LED
Indicators on page 19). The fans may continue to run in order to cool the lamp.
If the projector will not be used for an extended period, unplug the power cable from the power outlet.
• Avoid turning on the projector immediately after turning it off as excessive heat may shorten lamp life.
• The actual lamp life may vary due to different environmental conditions and usage.
35
Page 36

Adjusting the projected image
15°
max
Adjusting the projection angle
The projector is equipped with a pivoting head which changes the image height and projection angle.
To adjust the projection angle:
• Pivot the head upwards or downwards until the image is positioned as desired.
• The maximum angle of adjustment is 15 degrees.
• If the screen and the projector are not perpendicular to each other, the projected image becomes vertical trapezoidal. To correct this, see Correcting keystone on page
38 for details.
36
Page 37

Fine-tuning the image clarity
To sharpen the picture, rotate the focus ring on the side of the projector.
Do not look into the lens while the lamp is on. The strong light from the lamp may cause damage to your eyes.
37
Page 38

Correcting keystone
Keystoning refers to the situation where the projected image is noticeably wider at either the top or bottom. It occurs when the projector is not
perpendicular to the screen.
To a d j u s t t h e Keystone:
1. Press the down arrow key on the remote control to navigate to the settings menus.
2. Select Settings and press OK.
3. Select Installation and press OK.
4. Disable the Auto Keystone setting.
5. Select Keystone and press OK.
• To correct keystoning at the top of the image, use on your remote control.
• To correct keystoning at the bottom of the image, use on your remote control.
• To return to default keystone settings press the menu button on your remote control
You may only make these adjustments if Auto Keystone is disabled in the Installation menu, see Installation on page 83 for details.
6. When you are done adjusting the keystone, press to save your changes and return to the previous menu, or press to save your changes and
go back to the home screen directly.
38
Page 39

BenQ Launcher
BenQ Launcher is the projector’s operating system that allows you to project videos wirelessly or play media files, as well as adjust projector
settings.
Use your remote control to operate BenQ Launcher functions. The projector’s control panel keys are limited to control projector functions.
The BenQ Launcher home page
When the projector is not projecting an image from a connected source it will display BenQ Launcher by default. If the projector is projecting from
a source, you can return to BenQ Launcher mode by pressing on your remote control.
• Actual screen may vary based on your BenQ Launcher firmware version.
• Keep at least 60% of battery (3 bars on the battery status icon) to ensure successful OTA update.
39
Page 40

The BenQ Launcher home page features five main sections:
• Wireless Projection buttons - Provides instructions on how to project wirelessly via iOS/Android devices or a laptop/PC.
• Input Source buttons - Projects the current device connected via USB-C™.
Only devices with DisplayPort (version 1.1 or above) functionality can project via the USB-C™ connection.
• Media Player buttons - Plays the media files from a device connected via USB-C™.
• Status Bar icons - Icons that display the date, time, wireless and battery status.
• Settings menus - Shortcuts to the settings menus to adjust Wi-Fi, Bluetooth and other settings.
Press the down button on the remote control to access the Settings menus.
Navigating the BenQ Launcher home page
1. From the BenQ Launcher home page, press /// on your remote control to select the desired function and press OK.
2. Follow on-screen instructions for further operations.
40
Page 41

Using the BenQ Launcher Settings menus
Full Settings Menu
Sub-Menu Shortcuts
Press the down button on the remote control from the BenQ Launcher home page to access the settings menus section, which features a button
for the projector’s full settings menu as well as shortcut buttons for various sub-menus within the settings menus.
Actual screen may vary based on your BenQ Launcher firmware version.
For more information on the settings menus see About the Settings menu on page 75.
Inputting text
Various menus within the BenQ Launcher may require that you input text. To input text in a text field:
1. Select the text field where you want to input text.
2. Press OK on your remote control, a full alphanumeric keyboard will appear on screen.
41
Page 42

3. Press /// on your remote control to navigate the keyboard, and press OK to select the letter/key/symbol you want to enter into the
text field.
4. Press at anytime to exit out of the keyboard.
42
Page 43

Connections
You can connect your device to the projector in various ways to project video content.
Wireless Connection (Wi-Fi)
• Smartphone, Tablet, Laptop/PC.
Wired Connection (USB-C™ port)
• Smartphone, Tablet, Laptop/PC
• Devices connected via the USB-C™ port require a USB-C™ cable and must support DisplayPort (version 1.1 or above) functionality in order to project video.
• When the projector is running on battery power (not connected to a power source), it will not charge or provide power to any devices connected to the USB-C™
port. Only when the projector is connected to a power source will it be able to charge or provide power to devices connected to the USB-C™ port.
• USB-C™ flash drive
Furthermore, you can also connect the projector to Bluetooth speakers/headphones to broadcast audio through the speakers/headphones or connect
a mobile device to the projector via Bluetooth to broadcast audio through the projector’s speakers.
Before connecting a signal source to the projector, be sure to:
• Place the projector within range of the wireless AP you plan to connect it to.
• Use the correct signal cables for each source.
• Make sure the cables are firmly inserted.
43
Page 44

Wireless Connections:
Smartphone, Tablet,
Laptop/PC
USB-C™
Flash Drive
Wireless AP
Devices with USB-C™
DisplayPort
For Android™ devices
with USB-C™ DisplayPort
Bluetooth Speakers
(On Projector Mode)
The illustration above is for reference only.
44
Page 45

Wireless Connections
Connecting the projector to a Wi-Fi network
Before you can project wirelessly via the projector you must first connect the projector to a Wi-Fi network. To connect your projector to a Wi-Fi
network, or to switch Wi-Fi networks:
If you have already connected the projector to a Wi-Fi network during the setup wizard you may skip the steps in this section.
1. Power on the projector (see Starting up the projector on page 31).
2. On the home page of the BenQ Launcher interface, press the down arrow key on the remote control to navigate to the settings menus.
3. Select Wi-Fi in the settings menus and press OK.
45
Page 46

4. Select Wi-Fi and press OK to enable Wi-Fi.
5. Select the SSID for the wireless AP you want to connect to.
• To connect to a hidden Wi-Fi network select Add a New Network and enter the SSID, security setting, and password for the network.
• The list of available Wi-Fi networks will be refreshed every 10 seconds. If the desired SSID is not listed please wait for refreshing to complete.
6. If you chose a secured SSID for the first time, a window appears prompting you to enter the appropriate password. Use the virtual keypad to
enter the password. After you have entered the password, select Next and the projector will automatically connect.
• The password will be stored in the projector’s memory. In the future, if you select the same SSID again, you will not be prompted to enter a password unless you delete
the SSID from the projector’s memory.
• If the password is typed incorrectly, you can select either Tr y A g a i n to return to the virtual keypad or View Available Networks to return to the list of SSIDs.
46
Page 47

7. Once you have successfully connected to the wireless AP a wireless connection icon will appear at the top right corner of the BenQ Launcher
interface. You can now connect your devices wirelessly to the projector to project videos.
Wireless Projection for iOS & macOS®
To connect an iOS device to the projector and project video via AirPlay:
1. On the home page of the BenQ Launcher interface, select Wireless Projection for iOS & macOS and press OK.
47
Page 48

2. On your iOS mobile device’s Wi-Fi menu connect to the Wi-Fi network shown on the Wireless Projection for iOS & macOS screen and
then select Next.
3. Follow the instructions shown on the Wireless Projection for iOS & macOS screen to project your iOS device’s screen via AirPlay.
48
Page 49

4. Select Finished on the Wireless Projection for iOS & macOS menu to finish the tutorial and return to the home screen.
Once you have finished projecting, disable AirPlay on your iOS device to end the connection.
49
Page 50

Wireless Projection for Android™
To connect an Android™ device to the projector and project video:
1. On the home page of the BenQ Launcher interface, select Wireless Projection for Android™ and press OK.
2. On your Android mobile device’s Wi-Fi menu connect to the Wi-Fi network shown on the Wireless Projection for Android™ screen and
then select Next.
50
Page 51

3. Follow the instructions shown on the Wireless Projection for Android™ screen to project your Android device’s screen.
4. Select Finished on the Wireless Projection for Android™ screen to finish the tutorial and return to the home screen.
Once you have finished projecting, disable screencasting on your Android device to end the connection.
51
Page 52

Wireless Projection for PC
To connect a PC to the projector and project video:
1. On the home page of the BenQ Launcher interface, select Wireless Projection for PC and press OK.
2. On your PC’s Wi-Fi menu connect to the Wi-Fi network shown on the Wireless Projection for PC screen and then select Next.
52
Page 53

3. Follow the instructions shown on the Wireless Projection for PC screen to project your PC’s screen.
4. Select Finished on the Wireless Projection for PC screen to finish the tutorial and return to the home screen.
Once you have finished projecting, disable screencasting on your PC to end the connection.
53
Page 54

Wi-Fi Hotspot
In situations where the projector is out-of-range of a Wi-Fi network (for example while on a camping trip), you can configure the projector to act as a
Wi-Fi hotspot to create a closed network for devices to connect directly to the projector via a wireless connection and to project files from their local
storage.
The projector will have no access to the Internet while in Wi-Fi hotspot mode.
To create a Wi-Fi hotspot:
1. On the home page of the BenQ Launcher interface, press the down arrow key on the remote control to navigate to the settings menus.
2. Select Settings and press OK.
54
Page 55

3. Select Hotspot and press OK.
4. (Optional) Select Hotspot Password and press OK to change the password of the Wi-Fi hotspot.
The Hotspot Name and the Hotspot Password can only be changed when Hotspot is disabled.
55
Page 56

5. Select Hotspot and press OK to enable Wi-Fi hotspot.
6. Once Wi-Fi hotspot is enabled, use the name shown in the Hotspot Name field as the SSID to connect to from your mobile device’s Wi-Fi
menu and use the password shown in the Hotspot Password field as the connection password.
56
Page 57

7. If the Wi-Fi hotspot can not be found by your device, select Normal(2.4G) under the Internet Quality heading.
After the Wi-Fi hotspot is setup, follow the corresponding connection instructions described in the previous section(s) to connect to the projector
directly and project video.
57
Page 58

Wired Connections
Connecting a USB-C™ device with DisplayPort
Using the USB-C™ cable provided (or another USB-C™ Gen3.1 cable), you can connect a device that is equipped with DisplayPort capabilities to the
projector in order to broadcast videos and images
• Not all devices with a USB-C™ cable have DisplayPort functionality. Check your device’s documentation for clarification.
• If your device has a USB-C™ cable but not DisplayPort functionality, you can connect to the projector as a storage device. See Connecting a USB-C™ device without
DisplayPort on page 61
To connect a USB-C™ device with DisplayPort:
1. Connect the device to the USB-C™ port on the rear of the projector.
2. A pop-up notification will appear indicating that a device is connected to the projector. Select OK to connect to the device.
58
Page 59

3. The projector will attempt to connect to the device’s signal.
4. The video from the device will automatically be displayed full screen once the signal from the device is detected.
59
Page 60

5. If no signal is detected or the signal is interrupted a message will appear.
6. Press to stop the broadcast and return to the previously displayed menu, or press to exit and go back to the BenQ Launcher home
screen directly.
7. If the device remains connected and you wish to display its signal again, navigate to the Input Source button on the BenQ Launcher home
screen and press OK. Select the device and press OK.
• If you want to use your USB-C™ device as a storage device to view videos, images and audio, then see Media Player on page 63.
• Many laptops do not turn on their external video ports when connected to a projector. Usually a key combination like Fn + F3 or CRT/LCD key turns the external
display on/off. Locate a function key labeled CRT/LCD or a function key with a monitor symbol on the laptop. Press Fn and the labeled function key simultaneously.
Refer to your laptop’s documentation to discover your laptop’s key combination.
60
Page 61

Connecting a USB-C™ device without DisplayPort
If you connect a device with a USB-C™ port that does not support DisplayPort, the projector will recognize it as a storage device and its media files
can be accessed accordingly.
Not all devices with a USB-C™ port have DisplayPort functionality. Check your device’s documentation for clarification.
To connect a USB-C™ device without DisplayPort:
1. Connect the device to the USB-C™ port on the rear of the projector.
2. A pop-up notification will appear indicating that a device is connected to the projector. Select OK to search for signal.
3. The Media Player will launch automatically. For more information on viewing files on Media Player see Media Player on page 63.
61
Page 62

Connecting a USB-C™ flash drive
Connect a USB-C™ flash drive to the USB port on the rear of the projector to view media files stored on the flash drive.
You can also use devices with a USB-C™ port as a storage device. See Connecting a USB-C™ device without DisplayPort on page 61
To connect a USB-C™ flash drive
1. Connect the flash drive to the USB-C™ port on the rear of the projector.
2. A pop-up notification will appear indicating that a storage device is connected to the projector. Select OPEN to open the device.
3. The Media Player will launch automatically. For more information on viewing files on Media Player see Media Player on page 63.
62
Page 63

Media Player
The Media Player on the BenQ Launcher interface allows you to access images, videos, and audio files for projection once a USB-C™ flash drive
or mobile device without DisplayPort capabilities is connected. See Connecting a USB-C™ device without DisplayPort on page 61 and Connecting a
USB-C™ flash drive on page 62 for more information on connecting such devices to the projector.
• Once a storage device is connected to the projector, a notification will be displayed asking if you want to open the device. Select OPEN to be automatically directed to
Media Player or select CANCEL to remain on the current screen.
• See Supported file formats on page 96 for a list of what file formats can be played on the projector.
Navigation
• Use the arrow keys ( / / / ) on your remote control to navigate to the file or icon you wish to select.
•Press OK to select a menu or file.
• Press to return to the previously displayed menu or to exit out of playing a media file.
63
Page 64

The Media Player will show selections for your connected devices.
Each selection has a sub-directory that lists files for each of the following categories: All, Video, Picture and Audio.
If no supported media files are on the connected device then a message “Not Available” will appear.
64
Page 65

Using the Media Player to play video files:
1. Select Video in the sub-directory list for the connected device and press OK.
2. Use the up and down arrow keys ( / ) to choose the video file to be displayed and press OK.
3. The video file will begin playing.
65
Page 66

4. In the viewing window you can choose one of the following options:
• Press the OK key on the button to pause the video. Press it again to resume playing.
• Press the OK key on the button to rewind the video.
• Press the OK key on the button to fast forward the video.
5. If the video file was played previously, a pop-up notification will appear asking to resume play or start over.
66
Page 67

Using the Media Player to play image files:
1. Select Picture in the sub-directory list for the connected device and press OK.
2. Use the up and down arrow keys ( / ) to choose the image file to be displayed and press OK.
3. The image file will be displayed.
67
Page 68

4. In the viewing window you can choose one of the following options:
• Press the OK key on the button to stop playing the playlist.
• Press the OK key on the button to play the previous image in the playlist.
• Press the OK key on the button to play the next image on the playlist.
68
Page 69

Using the Media Player to play audio files:
1. Select Audio in the sub-directory list for the connected device and press OK.
2. Use the up and down arrow keys ( / ) to choose the audio file to be played and press OK.
3. The audio file will begin playing.
69
Page 70

4. In the viewing window you can choose one of the following options:
• Press the OK key on the button to start or stop playing the audio file.
• Press the OK key on the button to play the previous audio file in the playlist.
• Press the OK key on the button to play the next audio file on the playlist.
• Press and hold the left arrow key ( ) on the button to rewind through an audio track.
• Press and hold the right arrow key ( ) on the button to fast forward through an audio track.
• Press the OK key on the button to randomly play all audio files on the playlist. Press OK again to turn shuffle mode off.
• Press the OK key on the button to repeat the playlist on a loop. Press the OK key again to repeat playing the current audio file . Press
OK again to turn repeat mode off.
• Press the OK key on the button to return to the album where the song is listed.
• You can play audio files in the background while playing an image slideshow. Select while an audio file is playing in the audio player in order to return to the Media
Player main menu to select an image file to play.
• The button will only work if songs are organized in albums. If all songs are in one directory then it will have no function.
70
Page 71

Bluetooth Connections
The projector allows the following types of Bluetooth connections:
• Connect to a Bluetooth-enabled speaker or headphones to output audio directly for greater sound particularly in outdoor settings.
• Connect a mobile device to the projector to broadcast audio through the projector’s speakers
Pairing/Connecting to a Bluetooth speaker or headphones
Pairing is the process by which your projector creates a connection to a Bluetooth speaker or headphones for the first time. Once both devices have
been successfully paired each device will have the corresponding device’s pairing information stored internally and both will be able to connect
automatically when they are within a ~8 meter range of each other and Bluetooth is enabled on the projector.
To pair your projector to a Bluetooth speaker or headphones:
1. Power on the projector.
2. Press the down arrow key on the remote control to navigate to the settings menus.
3. Select Bluetooth and press OK.
4. Select Bluetooth and press OK to enable Bluetooth.
5. Activate Bluetooth-pairing mode on the speaker or headphones.
71
Page 72

6. Select the speaker or headphones from the Available Device list and in the Bluetooth setting menu press OK.
7. When the projector and speaker or headphones have successfully connected the device listing in the Bluetooth setting menu will be labeled
Connected, you can now output the audio from the projector to the speaker or headphone.
Once you have successfully paired your projector with the Bluetooth speaker, pairing information will be stored on both devices and a connection will
automatically be made when Bluetooth is enabled on both devices and both devices are within range of each other.
Ending the Bluetooth connection
In cases where you want to disconnect a speaker or headphones from the projector and connect to another speaker or headphones follow the steps
below:
1. Press the down arrow key on the remote control to navigate to the settings menus.
2. Select Bluetooth and press OK.
3. Select the already connected speaker or headphones from the Available Device list in the Bluetooth setting menu and press OK.
4. Confirm that you want to disconnect the speaker or headphones from the projector.
5. Activate Bluetooth-pairing mode on the new speaker or headphones.
6. Select the new speaker or headphones from the Available Device list in the Bluetooth setting menu and press OK.
If you are unable to find the speaker or headphones from the list of Bluetooth devices on the first try, ensure that pairing mode is activated on the device, then select Scan
for devices in the Bluetooth setting menu to restart the scanning process.
72
Page 73

Deactivating the Bluetooth speaker or headphones
To deactivate Bluetooth on the projector so that it no longer outputs its audio to a separate speaker or headphones:
1. Press the down arrow key on the remote control to navigate to the settings menus.
2. Select Bluetooth and press OK.
3. Select Bluetooth and press OK disable Bluetooth.
Using the Projector as a Bluetooth speaker
To connect a mobile device to the projector and use the projector as a Bluetooth speaker:
1. Press the switch mode key on the projector, a screen will be shown by the projector indicating that it is switching to Bluetooth mode.
2. The projector lamp on the projector will shut off and the switch mode LED indicator will begin flashing blue.
3. Enable Bluetooth on your mobile device.
4. Select the BenQ GV1 device name from the list of available devices on your mobile device.
5. Once your mobile device has successfully paired and connected to the projector the projector will play a connection sound and the switch mode
LED indicator will light up solid blue.
Once you have successfully paired your mobile device with the projector, pairing information will be stored on both devices and a connection will
automatically be made when Bluetooth is enabled on both devices and both devices are within range of each other.
73
Page 74

Ending the Bluetooth connection
In cases where you want to disconnect the mobile device from the projector either:
• Disconnect from the projector in the Bluetooth menu of your mobile device.
• Press the switch mode key on the projector to return the projector to projector mode.
74
Page 75

Navigating the Settings menu
About the Settings menu
To let you make various adjustments or settings on the projector, its wireless connections, and the projected image, BenQ Launcher provides a
Settings menu. Under the Settings menu are menus for various settings.
To access the Settings menu, in the BenQ Launcher home page press the down button on your remote control, and then select Settings.
75
Page 76

The following is the Settings menu:
Using the Settings menu
To access the various settings menus:
• Use the left and right arrow keys (/) to move through the main settings menus.
•Use OK to select the desired menu.
When configuring items within a menu:
• Use the up and down arrow keys ( / ) to move to the item you want to configure.
• Use left and right arrow keys (/) to toggle through the available options.
•Use OK to enable/disable options or select sub-menu options.
• Use the back button to return to the main settings menu.
• Use the home button to return to the BenQ Launcher home page.
76
Page 77

Picture
The following table describes the items available in the Picture menu:
Item Options and descriptions
Selects a preset picture mode to suit your operating environment and input signal picture type. The preset picture modes are
described as below:
Picture Mode
Bright
Presentation
Vivid TV
Cinema
Sport
Maximizes the brightness of the projected image. This mode is suitable for environments where extra-high
brightness is required, such as using the projector in well lit rooms.
Designed for presentations. The brightness is emphasized in this mode to match PC and notebook
coloring.
Being slightly brighter than Cinema mode, it is suitable for playing movies in rooms where there is a small
amount of ambient light, e.g. your living room.
Well-balanced color saturation and contrast with a low brightness level, this mode is most suitable for
enjoying movies in a totally dark environment (as you would find in a commercial cinema).
This mode is best for watching sporting events in rooms where is a small amount of ambient light, eg. your
living room.
77
Page 78

Item Options and descriptions
Selects the projector lamp power from the following modes.
Normal Provides full lamp brightness.
Light Mode
Eco Mode
Battery Mode
Reduces system noise and power consumption by 30%. If Eco Mode mode is selected, the light output will
be reduced and result in darker projected pictures.
Reduces system noise and power consumption to fulfill 3 hours projection*. If Battery Mode is selected,
the light output will be reduced and result in darker projected pictures. And the picture mode will lock at
Cinema mode.
*The 3 hours of projection is under the following settings:
• Light Mode: Battery Mode
• Picture Mode: Vivid TV mode
• Audio volume: 50% and playing from GV1
• Bluetooth: On, but not connected to other device
• Wi-Fi: On and connected.
78
Page 79

Sounds
The following table describes the items available in the Sounds menu
Item Options and descriptions
Feedback Enables/Disables feedback on the audio provided by the projector.
Vol um e Adjusts the sound level for the projector.
Utilizes sound enhancement technology, which incorporates Waves’ algorithms to deliver great effects of the bass and treble and
Sound Mode
provide you with immersive cinematic audio experience. The following preset sound modes are provided: Standard, Cinema,
Music, Game, and Sport.
79
Page 80

Wi-Fi
The following table describes the items available in the Wi-Fi menu
Item Options and descriptions
Wi-Fi Enables Wi-Fi for the projector. See Connecting the projector to a Wi-Fi network on page 45 for details.
Speed Test Tests the speed of the projector’s Internet connection.
Diagnosing Diagnoses the status of the projector’s Internet connection.
Add a New
Network
SSID List
Allows you to add a specific network that may be hidden or undetected in the SSID List. Once selected you will be prompted
to enter the SSID and security settings for the network.
Lists the available Wi-Fi access points which the projector can connect to. See Connecting the projector to a Wi-Fi network on
page 45 for details.
The SSID List is only available when Wi-Fi is enabled.
80
Page 81

Bluetooth
The following table describes the items available in the Bluetooth menu
Item Options and descriptions
Bluetooth Enables Bluetooth for the projector, allowing the projector to output its audio to a Bluetooth speaker or headphones.
Lists the available Bluetooth devices which the projector can pair and connect to. Select Scan for devices if you want to refresh
Available
Device
the list of devices.
The Available Device is only available when Bluetooth is enabled.
81
Page 82

Hotspot
The following table describes the items available in the Hotspot menu
Item Options and descriptions
Hotspot
Hotspot Name
Hotspot
Password
Internet Quality
Enables Wi-Fi hotspot for the projector, allowing other devices to connect to the projector directly. See Wi-Fi Hotspot on page
54 for details.
Sets the name for the projector’s Wi-Fi hotspot, which appears in the Wi-Fi list for devices looking to connect directly to the
projector.
The default name for the projector’s Wi-Fi hotspot is “BenQ PRJ GV1”.
Sets the password for the projector’s Wi-Fi hotspot.
The password needs to be 8 characters.
Sets the frequency for the projector’s Wi-Fi hotspot signal. Available options include 2.4G and 5G.
The default frequency is set to 5G, certain mobile devices may not be able to connect via a 5G. In such instances set the Internet Quality to 2.4G.
82
Page 83

Installation
The following table describes the items available in the Installation menu
Item Options and descriptions
The projector can be installed in a high location or behind a screen. See Choosing a location on page 25 for details.
Front Table Select this location with the projector placed near the floor in front of the screen.
Projector
Installation
Front Ceiling Select this location with the projector elevated near the ceiling in front of the screen.
Rear Table Select this location with the projector placed near the floor behind the screen.
Auto Keystone
Keystone
Rear Ceiling Select this location with the projector elevated from the ceiling behind the screen.
Enable this function to allow the projector to automatically adjust the keystone settings when powered on. See Correcting
keystone on page 38 for more details.
Adjusts the keystone settings for the projected image. See Correcting keystone on page 38 for more details.
This function is only available when Auto Keystone is disabled.
83
Page 84

Preference
The following table describes the items available in the Preference menu
Item Options and descriptions
Language Sets the language for BenQ Launcher.
Time Zone Sets the time zone for the projector.
Auto Power Off
Timer
LED Indicators You can turn off the LED warning lights. This is to avoid any light disturbance when viewing images in a dark room.
Sets the time interval in which the projector will automatically power off when inactive.
The following Auto Power Off Timer options are provided: Disable, 5 mins, 10 mins, 15 mins, 20 mins, 25 mins, and 30
mins.
84
Page 85

About
The following table describes the items available in the About menu
Item Options and descriptions
System Update Displays the software version and allows you to update the software over Wi-Fi or directly via a USB flash drive.
Factory Reset Returns all settings to the factory preset values.
System
Information
Projector
Information
About Privacy Displays the BenQ privacy announcement.
Displays hardware/firmware information for the projector including its model name, operating system version, memory, storage
capacity, serial number, and MAC address.
Displays information on the current status of the projector including the current Picture Mode, Light Mode, Detected
Resolution, Native Resolution, and Firmware Version.
85
Page 86

Maintenance
Care of the projector
Your projector needs little maintenance. The only thing you have to do on a regular basis is keep the lens clean.
Never remove any parts of the projector. Contact your dealer or local customer service center if the projector fails to operate as expected.
Cleaning the lens
Clean the lens whenever you notice dirt or dust on the surface.
Before cleaning any part of the projector, turn it off using the proper shutdown procedure (see Shutting down the projector on page 35), unplug the
power cable, and let it cool down completely.
• Use a canister of compressed air to remove dust.
• If there is dirt or smears, use lens-cleaning paper or moisten a soft cloth with lens cleaner and gently wipe the lens surface.
• Never use any type of abrasive pad, alkaline/acid cleaner, scouring powder, or volatile solvent, such as alcohol, benzene, thinner or insecticide.
Using such materials or maintaining prolonged contact with rubber or vinyl materials may result in damage to the projector surface and cabinet
material.
Never touch the lens with your finger or rub the lens with abrasive materials. Even paper towels can damage the lens coating. Only ever use a proper photographic lens
brush, cloth, and cleaning solution. Do not attempt to clean the lens while the projector is switched on or is still hot from previous use.
Storing the projector
To store the projector for an extended time:
• Make sure the temperature and humidity of the storage area are within the recommended range for the projector. Refer to Specifications or
consult your dealer about the range.
• Retract the adjuster feet.
• Remove the batteries from the remote control.
• Pack the projector in its original packing or equivalent.
86
Page 87

Transporting the projector
It is recommended that you ship the projector with its original packing or equivalent.
Extending LED life
The projection LED is an 200AL LED bulb which features a light-source life far beyond traditional bulbs, yet it is still a consumable item. To keep the
lamp life as long as possible, you can change the following settings via the settings menu.
To access the settings menu, see Using the Settings menu on page 76 for details.
87
Page 88

Setting LED Mode
Setting the projector in Eco Mode extends the lamp life.
LED mode Description
Normal 100% lamp brightness
Eco Mode
Battery Mode
1. Select Settings > Picture > Light Mode.
2. Press ( / ) to move to your desired mode.
3. When done, press to your changes and exit.
Eco Mode reduces system noise and power consumption by 30%. If Eco Mode is selected, the light output
will be reduced and result in darker projected pictures.
Battery Mode reduces system noise and power consumption to fulfill 3 hours projection*. If Battery mode is
selected, the light output will be reduced and result in darker projected pictures. And the picture mode will
lock at Cinema Mode.
*The 3 hours of projection is under the following settings:
• Light Mode: Battery Mode
• Picture Mode: Vivid TV mode
• Audio volume: 50% and playing from GV1
• Bluetooth: On, but not connected to other device
• Wi-Fi: On and connected.
Setting Auto Power Off
This function allows the projector to turn off automatically if no action is detected after a set period of time.
1. Select Settings > Preference > Auto Power Off Timer and press OK.
2. Press ( / ) to select a time period. If the preset time lengths are not suitable for your presentation, select Disable, and the projector will not
automatically shut down.
3. When done, press to save your changes and exit.
88
Page 89

Troubleshooting
Problem Cause Remedy
There is no power from the power cable.
Plug the power cable into the AC inlet on the rear of
the projector, and plug the power cable into to the
power outlet. If the power outlet has a switch, make
sure that it is switched on.
The projector does not turn on.
No input source.
Attempting to turn the projector on again
during the cooling process.
The battery is running out and in low
voltage.
The video source is not turned on or
connected correctly.
The projector is not correctly connected to
the input source device.
The video or audio file format is not
supported by the projector.
Wait until the cooling down process has completed.
Plug in power adapter to charge it for a while, then
press and hold the power key on the projector for 3
seconds to turn it on.
Turn the video source on and check that the signal
cable is connected correctly.
Check the connection.
Please also make sure your device supports
DisplayPort and is connected by USB-C™ Gen 3.1
cable.
Make sure the supported file format as described in
Supported file formats on page 96 is being played, or
contact the customer service for assistance.
89
Page 90

Problem Cause Remedy
Image or audio is unstable.
Picture is blurred.
Remote control does not work correctly.
The connection cables are not securely
connected to the projector or the signal
source.
The Internet bandwidth is limited or
over-occupied.
Correctly connect the cables to the appropriate
terminals.
Connect to another Wi-Fi AP or to an Internet
channel of better speed.
Make sure the projector is within the effective range of
The projector is out of effective range of
Bluetooth connection.
Bluetooth connection.
Make sure there is as less radio frequency interference
as possible when using a 2.4G network.
The projection lens is not correctly focused. Adjust the focus of the lens using the focus ring.
The projector and the screen are not
aligned properly.
Adjust the projection angle and direction as well as the
height of this projector if necessary.
The batteries are out of power. Replace both of the batteries with new ones.
There is an obstacle between the remote
control and the projector.
Remove the obstacle.
You are too far away from the projector. Stand within 8 meters (26.2 feet) of the projector.
90
Page 91

Specifications
Projector specifications
All specifications are subject to change without notice.
GV1 Projector Specifications
Projection System DLP
Native Resolution WVGA (854 x 480)
Brightness 200AL
Contrast Ratio (FOFO) 100,000:1
Lens F=1.5, f=5.53mm
Throw Ratio 1.3 (35"@1M)
SoC Qualcomm Snapdragon 210 MSM8909
OS Android 7.1.2
RAM 1G LPDDR3
Flash 8G EMMC
91
Page 92

GV1 Projector Specifications
WLAN IEEE 802.11 a/b/g/n, 2.4G/5G
A SKU
2.4G
E SKU
A SKU
5G
E SKU Band1: Ch36, Ch40, Ch44, Ch48
Ch1-Ch11
Band1: Ch36, Ch40, Ch44, Ch48
Band4: Ch149, Ch153, Ch157, Ch161, Ch165
Interface
•DC in x1
• USB-C™ (DP Alt mode, Data) x1
Dimensions 80 x 155 x 80 mm
Wei ght 708g
Working Temperature 0˚C-40˚C
Working Altitude 0 m - 2000 m
Frequency AC 100 to 240 V, 50/60 Hz
Power Rating 12V 2000mAh 24W
Power
Type Lithium-ion Polymer
Electrical Rating 7.4V 3000mAh 22.2W
Battery Cycle Life 300 cycles
Charging Time 3 hours from 0% to 100%
DC Supply
Battery Life
Battery Life 3 hours in battery mode
92
Page 93

Dimensions
80 mm x 80 mm x 155 mm (W x D x H)
93
Page 94

Timing chart
Supported timing for video input
Timing Resolution H. Frequency (KHz) V. Frequency (KHz) Dot Clock Frequency (MHz)
480p 720 x 480 31.47 59.94 27
576p 720 x 576 31.25 50 27
720/50p 1280 x 720 37.5 50 74.25
720/60p 1280 x 720 45.00 60 74.25
1080/24P 1920 x 1080 27 24 74.25
1080/25P 1920 x 1080 28.13 25 74.25
1080/30P 1920 x 1080 33.75 30 74.25
1080/50P 1920 x 1080 56.25 50 148.5
1080/60P 1920 x 1080 67.5 60 148.5
Supported timing for PC input
Resolution Mode Refresh Rate (Hz) H. Frequency (KHz) Dot Clock Frequency (MHz)
640 x 480 VGA_60 59.940 31.469 25.175
800 x 600 SVGA_60 60.317 37.879 40.000
1024 x 768 XGA_60 60.004 48.363 65.000
1280 x 720 1280 x 720_60 60 45.000 74.250
1280 x 800 WXGA_60 59.810 49.702 83.500
94
Page 95

Resolution Mode Refresh Rate (Hz) H. Frequency (KHz) Dot Clock Frequency (MHz)
1280 x 960 1280 x 960_60 60.000 60.000 108
1920 x 1080 @ 60Hz 1920 x 1080_60 60 67.5 148.5
The timings showing above may not be supported for due to EDID file and VGA graphic card limitations. It is possible that some timings cannot be chosen.
95
Page 96

Supported file formats
File type File extension
Documents .txt
Photos JPG(.jpg, .jpeg), PNG(.png), BMP(.bmp)
Music MP3(.mp3), AAC(.aac)
Video
Subtitles N/A
Bit rate range: If the peak bit rate of a video file is larger than 10MB, it might cause video playback lag.
XVID(.avi)
MPEG-4(3gp, mp4)
H.263(3g2, .avi, .mkv, .webm, 3gp, mp4)
96
 Loading...