

Page 1
Owner's manual
Page 2

1 General information ............................. 1
1.1 Symbols ................................................. 2
1.2 Identification data ................................... 3
2 Safety information ............................... 5
2.1 Safety ..................................................... 5
2.1.1 Motorcycle modification and trim
personalization ....................................... 5
2.1.2 General safety regulations...................... 6
2.1.3 Vehicle load ............................................ 8
2.1.4 Use of the vehicle in competitions .......... 9
2.1.5 Advices for safe riding ............................ 9
2.1.6 Protective clothing ..................................12
2.1.7 Suggestions against theft .......................13
2.2 Safety -
Visual and acoustic signals ....................14
3 Controls and instruments ...................15
3.1 Location of controls and instruments ......15
3.2 Sidestand ...............................................16
3.3 Handlebar controls, left side ...................17
3.4 Handlebar controls, right side .................19
3.5 Ignition switch and steering lock.............21
3.6 Gear lever ...............................................23
3.7 Instruments and warning lights ...............24
3.7.1 Multifunction display ...............................25
4 Operation ..............................................26
4.1 Using the motorcycle ..............................26
4.2 Preriding checks .....................................27
4.3 Running-in .............................................29
4.4 Selecting the display functions ...............30
4.5 Adjusting the clock .................................31
4.6 Parking the motorcycle ...........................32
4.7 Saddle disassembly driver......................33
4.8 Saddle disassembly passenger..............33
4.9 Removing the passenger saddle tail ......34
4.10 Refuelling ...............................................35
4.11 Starting the engine .................................37
4.12 Improve our riding skills..........................38
5 Adjustments .........................................39
5.1 List of adjustments .................................39
5.2 Recapitulatory table of adjustments .......41
5.3 Adjustments that can be done by user ...42
5.3.1 Front brake lever adjustment ..................42
5.3.2 Adjusting the rearview mirrors ................42
5.4 Adjustments that has to be done by a
Benelli Authorized Workshop..................43
5.4.1 Clutch lever play .....................................43
5.5 Adjusting the front suspension................44
5.5.1 Adjusting front suspension spring
preload ...................................................45
5.5.2 Adjusting front suspension rebound
damper hydraulic device.........................45
5.5.3 Adjusting front suspension compression
damper hydraulic device.........................46
5.6 Adjusting the rear suspension ................47
5.6.1 Adjusting rear suspension spring
preload....................................................49
5.6.2 Adjusting rear suspension rebound
damper hydraulic device ........................49
5.6.3 Adjusting rear suspension compression
damper hydraulic device ........................50
5.6.4 Hydraulic compression braking
system at high-speed back -
wheel suspension ...................................50
6 Maintenance ..........................................52
6.1 Tables of scheduled maintenance
and checks .............................................52
6.2 Tools and accessories supplied..............62
6.3 Table of lubricants and fluids ..................63
6.4 Checking the engine oil level .................64
6.4.1 Topping up the engine oil level ..............65
6.5 Checking the coolant level .....................67
6.5.1 Topping up the coolant level ...................68
6.6 Checking the wear of the brake pads .....70
6.7 Checking the brake fluid level.................71
6.8 Checking the tires and rims.....................73
6.8.1 Checking of the rims and the
wheel rims .............................................75
6.9 Cleaning checking and lubricating
the drive chain ........................................76
6.9.1 Cleaning .................................................77
6.9.2 Lubrification ............................................77
6.10 Checking the idle speed .........................78
6.11 Replacing the fuses ................................79
6.12 Battery ....................................................81
6.13 Cleaning the motorcycle .........................82
6.14 Prolonged inactivity ................................84
7 Technical information ..........................85
7.1 Specifications ........................................85
Page 3

1 General information
Dear Customer,
We invite you to read this Owner’s Manual before using your new Tornado RS.
It contains important information for a sefe use of the vehicle and to keep it in perfect working order.
Keep it by putting it in the special papers-case compartment.
We remain you, however, that Tornado RS is a higt performance vehicle thet needs to be ride with attention
and skill.
You better refrain from driving the vehicle out of bounds, if you are not sure of tour ability in managing it;
however, when you ride on public street or open to the public, you have to scrupulously observe the
Highway Code.
Always remember to use a homologated helmet, of your size, and always correctly laced up. We recommend
you, besides, always to wear an appropriate protective wear.
1.1 Symbols
In order to make more simple and readibly the most important information, we have used the following
symbols:
Danger – Warns you that there is a serious instrinsic danger that could cause personal
injuries and deadly accidents in case you don’t follow the supplied directions.
Warning – Warns you that there is a danger that could cause personal injuries and deadly
accidents in case you don’t follow the supplied directions.
1
Caution – Reminds you a safety practice you better follow or an unsafety activity you
better avoid if you don’t want to risk undergo personal injuries or to damage your vehicle.
Benelli SpA reserves the right to make any changes, whenever deemed, to its products and to this manual. Wherever
you will find any dissimilarity between what is written on tihs Owner’s Manual and the specific fitting-out of your
vehicle, don’t hesitate to download from the web site
Manual, or contact the Customer Service Benelli calling 800342300, which will arrange to send to you the
new update version.
www.benelli.com
the update version of the Owner’s
2
Page 4
2) engine serial number
1.2 Identification data
1. vehicle identification number
2. engine serial number
3. homologation data
We recommend writing down the main numbers in the spaces provided below.
FRAME No. ZBN ____________________
ENGINE No. ________________________
COLOR CODE ________________________
KEY No. ________________________
1) vehicle identification number
3) homologation data
Identification motorcycle
The motorcycle is identified by the matriculation frame
number.
Motorcycle key identification
The key, supplied in four copies, can be used both for
starting the motorcycle and for operating all the locks.
Keep the key copies in a safe place.
Knowing the key identification number is essential in case
you need to ask for a duplicate of the key.
Identification of motorcycle colour combination
The colour code must be mentioned when ordering body
spares. This code can be read on the labels placed under
the saddle.
3
key identification number
labels
colour code
Spare parts order
If you need to order spare parts, beside the matriculation
frame number, it can be necessary to mention the engine
number, the colour code and the key identification
number.
4
Page 5

2 Safety information
2.1 Safety
2.1.1 Motorcycle modification and trim personalization
WARNING It is strictly frobidden to intervene on the vehicle by modifying the mechanical
components or by replacing them with non genuine spare parts. All this activities make the
vehicle homologation forfait rendering it unusable for public street use, and can also cause
serious damages for the user and for the vehicle itself. Benelli is not responsablefor any damage
to persons or things caused by any modifications of the motorcycle original conditions.
It is possible to personalize the suspension trim by working on the special adjustments this
activity is absolutely unwary unless the user is absolutely confident in his technical ability. The
trim adjustment can compromise the motorcycle safe use and, therefore, it has to be done only
by expert persons. Wherever you want to personalize the motorcycle trim in relation to your
personal requirements, we suggest you to apply to a BenelliAuthorized Workshop. You can find
the Benelli Authorized Workshop list on Benelli web site www.benelli.com or calling the Benelli
Customer Service dialling 800342300.
2.1.2
Before you start riding make sure you keep in mind the controls, characteristics, working and limits of the motorcycle.
In order to guarantee the vehicul maximum efficiency and reliability it is essential that your Benelli Authorized
workshop does all the maintenance operations written on the “Maintenaqnce” section of this Owner’s Manual,
following carefully all the directions and suggestions.
We advise you against having the maintenance operations and the repairs done by persons or workshop that don’t
belong to the Benelli Authorized Workshop net. Especially we advise you against doing on your own the maintenance
operations and the repairs on your
For any necessity or further information don’t hesitate to apply to your Benelli Distributor or to the nearest Benelli
Authorized Workshop. You can find the Benelli Distributor and the Benelli Authorized Workshop list on the web site
www.benelli.com
The full control of this motorcycle is basic for a safe riding. Therefore it is necessary to start riding with a good
concentration and in perfect physical conditions, apare from always assessing the street and atmospheric conditions.
General safety regulations
Tornado RS!
or calling the Benelli Customer Service dialling 800342300.
5
In order to avoid compromising handling and stability of your motorcycle, you should obey the following warnings:
• do not attach any object to the vehicle;
• do not hook a sidecar, a tow or any other accessory to the motorcycle;
• do not remove any part and/or component;
• do not modify the vehicle in any way;
• do not wear garments that could adversely affect control and handling of the motorcycle.
6
Page 6

Do not ride this motorcycle if you do not possess a regular driving licence. Failure to heed this warning constitutes
a breach of the Highway Code, besides posing a serious hazard to the driver’s and other people’s safety.
Always wear a helmet, even on short rides.
Always wear suitable clothes, especially when travelling by night (e.g. garments with fluorescent bands).
When refuelling, switch off the engine and refrain from smoking.
Do not start the engine in closed places. Exhaust gases are toxic and can quickly saturate the air and cause fainting
or even death.
While riding, always keep both hands on the handlebars.
Park the vehicle where it is unlikely to be bumped into or damaged. Even slight or involuntary bumps can cause the
vehicle to topple over, with subsequent risk of serious harm to people or children.
To prevent the vehicle from tipping over, never park it on soft or uneven ground, nor on asphalt strongly heated by
the sun.
Do not cover your motorcycle with a canvas soon afterwards riding. Before covering your motorcycle, wait until the
engine and the exhaust pipes have thoroughly cooled.
If your motorcycle has been involved in an accident, check all levers, wires, hoses, brake calipers and other main
parts for damage. Do not use the vehicle if you detect a damage that could adversely affect safety.
As soon as possible and, kowever, before using your motorcycle after an accident, even if there are not any visible
damages, it is necessary to have it inspected by a Benelli Authorized Workshop, in order to erify the absence of
defects and/or damages that the owner could not be able to detect.
2.1.3
The vehicle is designed for use by the rider with a passenger. To drive safely and under the highway code, never
exceed the maximum allowed total gross weight of 400 kg (881.84 Lbs).
That is the sum of the motorcycle, driver, passenger and load weight, according to the EEC 92/61 directive.
Vehicle load
WARNING
Since the load can strongly affect handling, braking, performance and safety characteristics of
your motorcycle, you should always keep in mind the following warnings.
NEVER OVERLOAD YOUR MOTORCYCLE! Driving an overloaded motorcycle can cause damage
to the tyres, loss of control of the vehicle and serious injury. Check that the total of driver and
passenger weight, the burden weight and the vehicle gross weight never exceed the granted
values.
Never carry any incorrectly fastened object on your motorcycle, because it could move from its
position during riding.
Steadily fasten the heaviest objects near the center of the motorcycle, and equally divide the
load on both sides of the vehicle.
Do not insert any object in the spaces on the frame trellis, in order to avoid interferring with the
movable parts of the motorcycle.
Before riding, always check the wear and the pressure of the tyres.
Adjust the suspensions according to the load.
Even if the motorcycle is correctly loaded, drive with caution and never exceed 130 km/h (80.6
mph) when you carry a load.
7
8
Page 7

2.1.4 Use of the vehicle in competitions
Your
Tornado RS
However, making some modifications, considering the high performances that the motorcycle can reach, it is possible
to use it also in competitions.
However, you need to remember that once you transform the motorcycle for competitions use, it is nomore suitable
for street traffic unless it is brought to its original conditions.
To meet the passionate drivers numerous requests, Benelli has designed a number of special components for use
in competitions and/or sporting events. The use of such components is strictly limited to areas closed to traffic.
Failure to observe this restriction constitutes a breach of the Highway Code for which Benelli cannot be held
responsible.
For more information about Benelli special components visit the web site
Customer Service dialling 800342300.
WARNING
Riding the vehicle in competitions requires considerable skill and experience as well as an accurate setup of the motorcycle which was to be made only by perticularly prepared persons.
2.1.5 Advices for safe riding
Besides being a means of transport, your motorcycle is a source of recreation and excitement. (and this is true,
especially, when we talk about a
was projected for road use.
Tornado RS!
www.benelli.com
).
or call tghe Benelli
However the nature itself of the vehicle involves, a certain amount of risk. To ensure maximum safety, in addition to
scrupulously observing the warnings and instructions provided in the previous paragraphs, it is essential to take a
few additional precautions.
In particular:
Before starting off
Follow all the directions given in the section “PRE-RIDING CHECKS”. Conduct an overall check of all safety-related
aspects of the motorcycle.
Familiarizing with the vehicle
The rider’s ability and his mechanical skills form the basis of riding safety. It is advisable to practise riding in areas
without traffic until you have become familiar with the vehicle and its controls.
Being aware of one’s limits
When riding, never exceed your limits nor those imposed by law. Being aware of your limits and acting accordingly
will help you avoid accidents.
9
Adverse weather conditions
Be very careful when riding in adverse weather conditions. On wet roads, for example, the braking distance increases
as a result of reduced tyre traction. It is therefore necessary to travel at moderate speed and avoid abrupt braking
and acceleration. Pay particular attention when riding on slippery surfaces such as road markings, manholes, level
crossings, bridges, gratings, etc. Considering that a motorcycle cannot provide the same degree of shock protection
as a motor vehicle, it is essential to adopt a “defensive” riding attitude, particularly in the adverse weather conditions
described above.
10
Page 8

When riding down long hills, reduce the speed of your motorcycle by closing the throttle and using a low gear ratio
to take advantage of engine braking. Use the front and rear brakes as little as possible to maintain your speed, in
order to prevent brake overheating and fade.
Special attention should be given to the braking system, which plays a key role in ensuring safety. When braking,
always take account of the speed of the vehicle and the condition of the road surface.
The braking action should always be applied gently and gradually to both wheels.
Performing this operation and, more in general, riding the vehicle always requires the utmost care. Therefore,
caution should be exercised by all users, and in particular by inexperienced riders.
When you make a turn, avoid sudden braking. Failure to observe this warning could lead to the sliding of the wheels
and the loss of control of the vehicle. Always operate the brakes before starting a turn.
When you are laterally blown by a sudden gust of wind (as it may happen when you’re overtaken by a vehicle of
great dimensions, when you come out of a tunnel or when you’re driving in a hilly zone), you could lose control of the
vehicle. While driving under the above mentioned conditions, reduce your speed and be careful to avoid sideways
gusts of wind.
Maintain a safe distance behind vehicles in front of you and adjust your speed to the weather and traffic conditions.
Remember that, as your bike picks up speed, stopping distances increase and the motorcycle becomes more
difficult to control. In any case, never exceed the speed limits imposed by the Highway Code.
It is strictly forbidden to drink alcoholic beverages or take drugs before riding. Even very small amounts of these
substances adversely affect the rider’s ability to control the vehicle.
11
HELMET
Wearing the helmet when you ride a motorcycle in many countries, including Italy, is compulsory. However, wherever
this obligation doesn’t exist, it is absolutely advisable to wear a helmet, taking care of choosing a homologated and
of the right size one. If the helmet has no visor take care of wearing appropriate protective glasses during your
riding.
The helmet has to be always laced up. If you carry a passenger you better make sure that he wears correctly a
homologated helmet. Never wear light helmet DGM (they can be used in Italy only for riding mopeds).
2.1.6 Protective clothing
Always wear suitable protective clothing.
In particular, the following items should be worn:
• A close fitting jacket, made of tough material and easy to fasten.
• Supple, reinforced gloves providing both sensitivity and protection.
• Strong, close-fitting trousers covering the legs completely.
• Soft, reinforced boots providing both sensitivity and protection.
In any case, the clothes must allow complete freedom of movement and not hamper the rider in any way.
In addition, they must have no loose parts capable of catching in the control levers, the footrests, the wheels, the
drive chain, etc., in order to avoid dangerous situations.
12
Page 9

WARNING
Protective clothes do not afford complete protection against the risk of personal injury in the
event of an accident. It is therefore essential not be deceived by the false sense of security that
you might perceive by wearing protective clothing. When riding, always adopt a cautious attitude
and follow the recommendations given in the previous paragraphs.
2.1.7 Suggestions against theft
Your
Tornado RS
is a precious property and, like that, it has to be protected.
• Every time you park your motorcycle, operate the steering lock and remove the ignition key.
• Park your motorcycle in a closed garage every time it is possible.
• Install a good quality anti-theft device on your vehicle.
2.2 Safety - Visual and acoustic signals
Before each ride, it is essential to verify the operation of the visual and acoustic signals.
High beam, low beam and parking light Tail lamp and stoplight
Number plate lamp
Front
turn
indicators
131415
Rear turn
indicators
Horn
Page 10
3 Controls and instruments
3.1 Location of controls and instruments
Instruments and warning lights
Clutch lever
Left handlebar electrical controls
Ignition switch and steering lock
Fuel tank cap
Left sideLeft side
Left side
Left sideLeft side
SidestandSidestand
Sidestand
SidestandSidestand
Front brake lever
Throttle twist grip
Right handlebar electrical controls
Right sideRight side
Right side
Right sideRight side
3.2 Sidestand
The sidestand is equipped with a safety switch that
prevents the motorcycle from moving off while the stand
is down.
In case of working engine, with gear engaged and clutch
lever pulled, the switch automatically turns off the engine
by cutting the current supply.
If the motorcycle is parked (sidestand down) and the
gears are engaged, the switch prevents the engine from
being started, thereby avoiding the risk of accidentally
toppling the vehicle.
Check in any way the sidestand position
before riding.
Sidestand
Safety switch
Dual return spring
16
Page 11
3.3 Handlebar controls, left side
Clutch lever
Move towards/away from the handgrip to release/engage
the clutch.
Control Lights
Lights on
Low or high beam on
Low/high beam button
Shift the light switch to the position
Button not pressed in : low beam
Button pressed in : high beam
Control Turn indicator
Shifting the lever to the left or right switches on the left or right turn
indicators. The switch then returns to the central position.
Press to turn off the indicators.
Horn button
Press to operate the warning horn.
High beam flasher button
Press the button repeatedly.
Mode button
Repeatedly press to enter the various functions of the
LCD display.
17
Clutch lever
It is used to engage/disengage the clutch.
Control Lights
Pushing the switch you can turn the sidelights into the headlights or dipped headlights.
Low/high beam button
When the light switch is in the position, the low beam is on. The high beam can be switched on by pressing the
button when allowed by the traffic and road conditions.
Control Turn indicator
It is used to show the rider’s intention to change direction or lane.
WARNING: Failure to switch the turn indicators on or off at the right time may cause an accident.
Always switch on the indicators before turning or changing lanes.
Then be sure to switch off the indicators after completing the operation.
Horn button
It is used to attract the attention of other road users in case of danger.
High beam flasher button
It is used to attract the attention of other road users in case of danger. When the high beam is on, the function is
inactive.
Mode button
It is used to visualize all the functions of the LCD display.
18
Page 12
3.4 Handlebar controls, right side
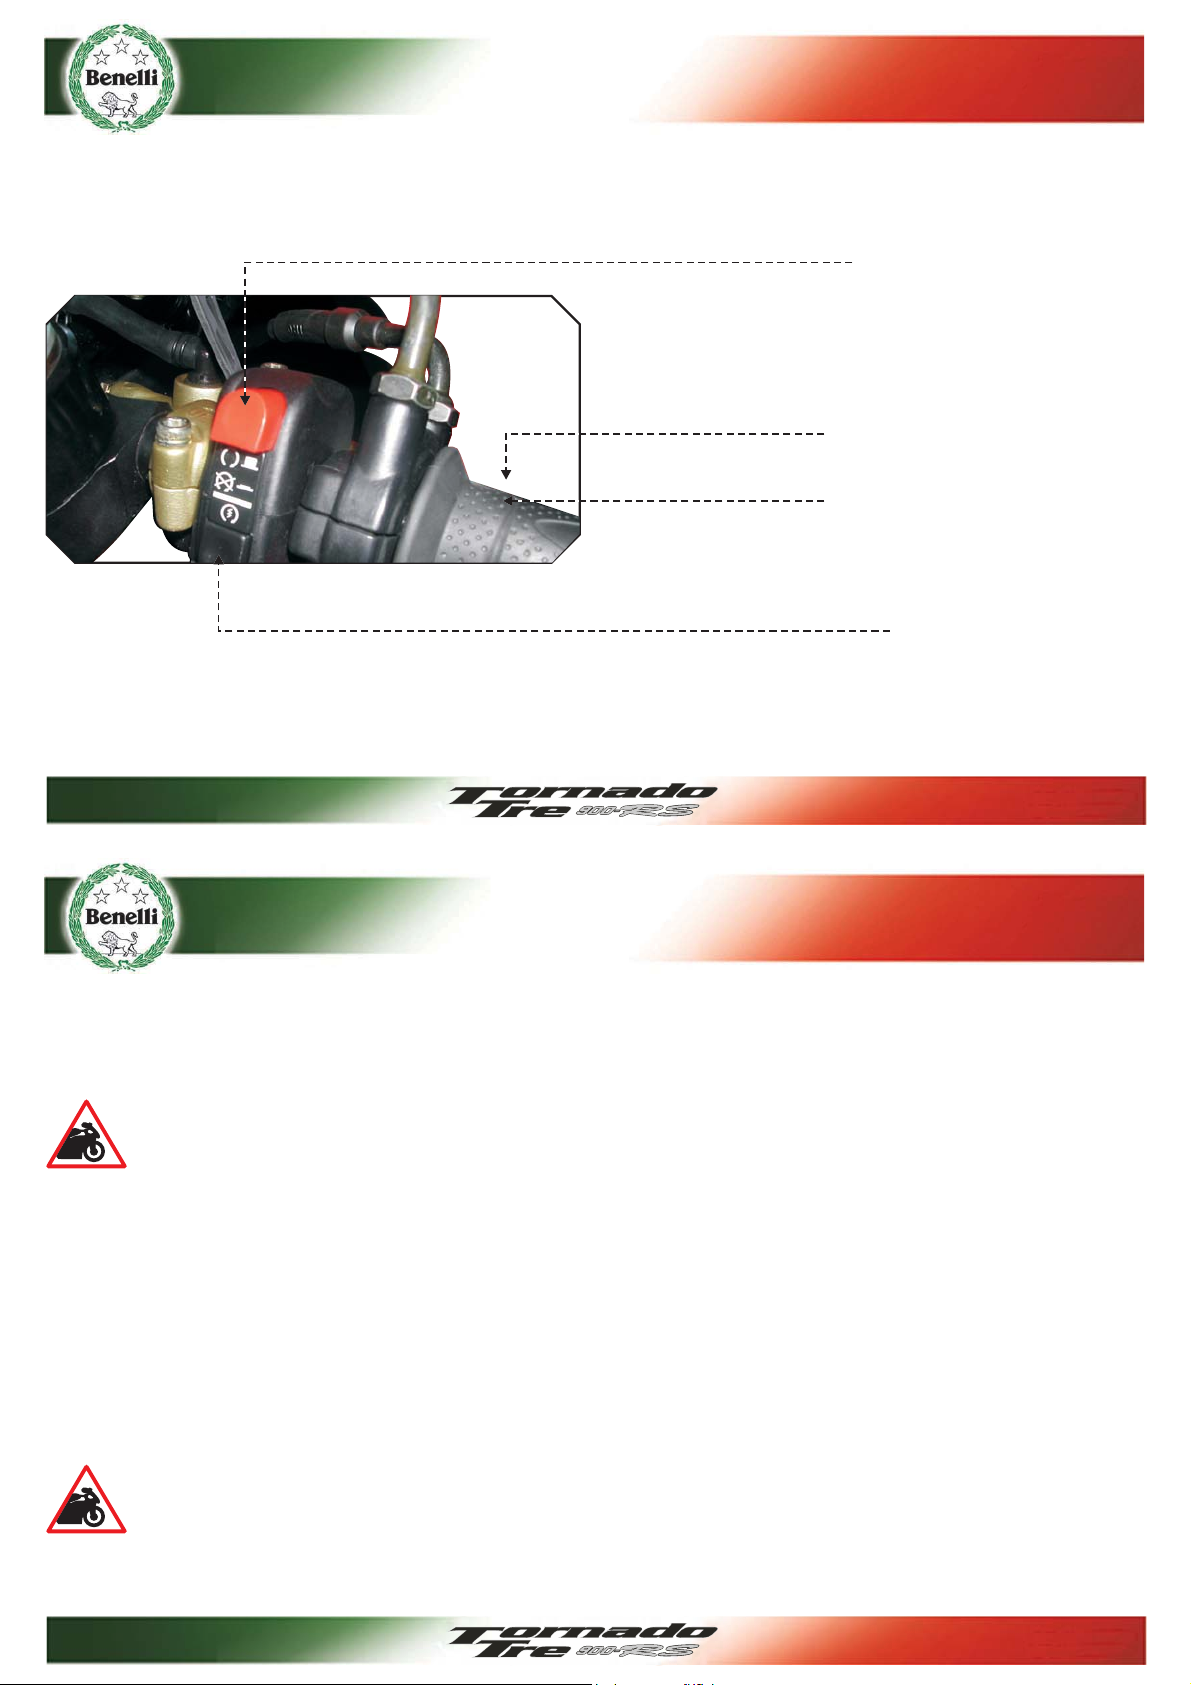
Engine stop switch
Stops the engine and prevents it from being restarted.
Front brake lever
Pull to the lever to apply the front brake.
Throttle twist grip
Rotate counterclockwise to increase engine speed.
Engine start button
To be released as soon as the engine starts.
Starts the engine when pressed contemporaneously with the clutch
lever.
19
Engine stop switch
It is used to switch off the engine in an emergency. The ignition circuit is disabled, preventing the engine from being
restarted. To be able to restart the engine, return the switch to the “ON” position.
Under normal conditions, do not use this switch to shut off the engine.
Front brake lever
It controls a hydraulic circuit that operates the front wheel braking system.
Throttle twist grip
It controls the fuel-air mixture supplied to the engine, which regulates engine speed. To increase engine speed,
rotate the hand grip from its idle position counterclockwise.
Engine start button
This system allows the engine starting when the clutch is pushed.
To avoid damaging the electrical equipment, be sure not to hold down the button for longer than
5 consecutive seconds.
If, after some attempts, the engine does not start, contact your authorized Benelli service center.
20
Page 13
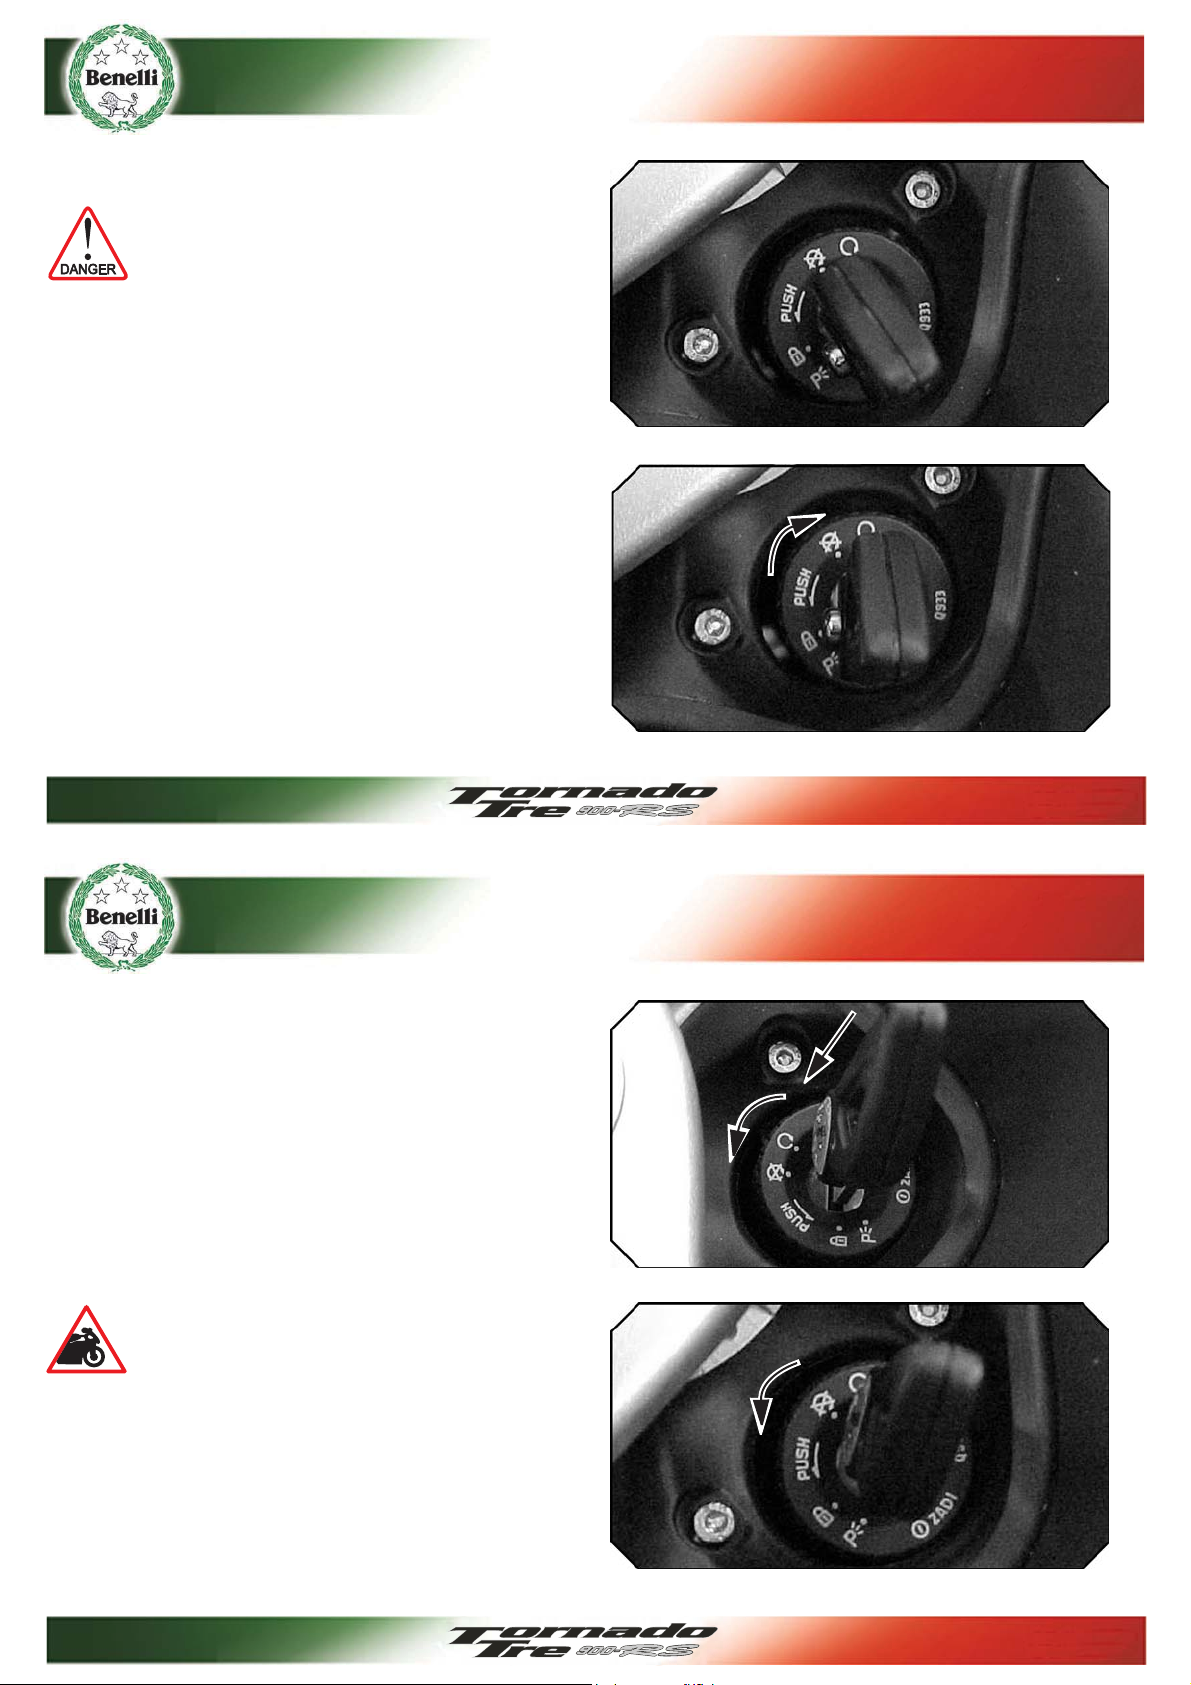
3.5 Ignition switch and steering lock
WARNING
Do not attach a ring or any other object
to the ignition key as they may hinder the
steering action. Never attempt to change
the switch functions while riding,as you
may lose control of the vehicle.
Always check the absence of any
restriction in the steering action befero
you ride.
The ignition switch enables and disables the electrical
circuit and the steering lock. The four positions of the
switch are described below.
OFF position
All electrical circuits are deactivated. The key can be
removed.
ON position
All electrical circuits are activated. The instruments and
warning lights perform the self-diagnostic cycle. The
engine can be started. The key cannot be removed.
LOCK position
Turn the handlebar to the left. Press the key in gently
while rotating it to the LOCK position.
All electrical circuits are deactivated and the steering is
locked. The key can be removed.
Posizione “P”
CAUTION
Do not leave the key on the P position for
a long time, in order to avoid discharging
the battery of your motorcycle.
21
Turn the key from the LOCK position to the P position
(parking).
All electrical circuits are deactivated except the parking
lights (position lights). The steering is locked.
The key can be removed.
22
Page 14

3.6 Gear lever
6°
5°
4°
3°
2°
1°
WARNING
Only operate the change gear with the
clutch lever fully pulled.
5
6
The N (neutral) position is indicated by the warning
light on the instrument panel.
To change into first gear, push the lever down.
To change into second gear, lift the lever up. Lifting
the lever up repeatedly engages all the other gears
in succession up to the sixth speed.
6°
5°
4°
3°
2°
1°
23
3.7 Instruments and warning lights
The instruments and warning lights are activated by turning the ignition switch to the ON position. After a preliminary
check the displayed information reflects the current general condition of the motorcycle.
High beam warning light (blue)
Lights up when the high beam
is activated.
Warning lights
Turn indicator light
(green)
Lights up when the turn
indicators are activated.
Reserve fuel indicator
(amber)
Comes on when approximately 5
litres of fuel are left; in this case, fill
up the tank as soon as possible.
Multifunction display
Water temperature indicator
Indicates the cooling water
temperature expressed in Celsius degrees (°C).
Tachometer
Indicates the engine rpm expressed in thousands.
Neutral indicator (green)
Lights up when the gears are
in neutral.
Injection warning
light (orange)
Lights up in case of the injectors
failure; in this case, contact an
authorized service center as soon as
possible.
Alarm led
Lights up when the oil pressure or
the cooling water tempeare not
correct (more than one anomalies
may occur simultaneously);
at the same time, the writings
“OIL”,“H2O” ,“BAT” start flashing on
the tachometer in place of the speed
indication.
If the alarm led lights up, immediately stop the vehicle, allows it
cool down for a few minutes, check
the oil level rature or the battery
voltage and top up if necessary. If
the problem persists, contact an
authorized service center as soon as
possible.
24
Page 15

3.7.1 Multifunction display
Speedometer
Measures the speed of the vehicle. The
speed can be displayed in kilometres per
hour (km/h) temperatuor miles per hour
(mph). The full-scale value is 320 km/h
(199 mph).
Fuel level
Displays the amount of fuel in the tank
using an 8-bar chart.
“Total” mileage counter
Displays the total distance covered
from 0 to 999999 (km or mi).
“Chrono” chronometer
Displays the distance covered time
expressed in minutes, seconds and
hundredths.
“Clock”Displays the time (0÷12)
and the minutes.
“Trip” mileage counter
Displays the partial distance covered, from 0 to
99999.9 (km or mi).
“Lap” trip
With the chrono mode it displays the
intermediate time; once the chronometer is stopped,
it displays the total time.
Thermometer
Displays the ambient temperature in centigrade
degrees (°C) or Farenheit (°F).
The range is between
-30 and +50 (°C) or -22 and +122 (°F).
NOTE: when a °F value greater than 99°F is
displayed, the hundreds are not indicated
although they are understood.
Service Warning Light
It comes on the first time after 1000 km (600 mi), and then every 5000 km (3100
mi). Whenever it lights up, contact an authorized service center as soon as possible
and carefully follow the indications provided in the maintenance and control tables
in this manual. When the warning light goes on, also the writing “Service” starts
flashing for 10 seconds every time the vehicle is started, in place of the trip odometer
“Trip” writing.
25
4
OperOper
Oper
OperOper
aa
tiontion
a
tion
aa
tiontion
4.1 Using the motorcycle
This section provides the basic information needed to correctly operate the motorcycle:
• Preriding checks
• Running-in
• Selecting the display functions
• Adjusting the clock
• Parking the motorcycle
• Saddle disassembly
• Refuelling
• Starting the engine
• Improve our riding skills
PROTECT THE ENVIRONMENT
Benelli, in order to protect the interests of the community, awakens the Customers and the
Technical Assistance operators to use the vehicle and dispose of its replaced parts respecting
the laws in force concerning environmental pollution and waste disposal and recycling.
26
Page 16

4.2 Preriding checks
A motorcycle can be in good running order and then become unexpectedly unreliable even if
unused (e.g. deflation of the tyres, battery discarge, and so on…). It is therefore important to
carry out the checks described in the table below before each ride. A few moments taken to
carry out these checks will help you maintain your motorcycle safe and in perfect working order.
If any of the above-mentioned parts shows a failure during its operation, have it controlled and
repaired by a Benelli Authorized workshop before using the motorcycle.
Check fluid level.
Brakes
Check for fluid leakage.
Pull lever and press pedal to check brake operation.
Gear lever
Clutch
lever
Engine start
button/ stop
switch
Throttle twist
grip
Steering system
Press pedal to check gear operation.
Pull lever and check that it moves smoothly and gradually.
Check operation.
Check that grip rotates smoothly and returns to closed position when released.
27
Verify that the operation is smooth and uniform.
Check for play and loosening.
Steering
damper
Lights, visual and
acoustic signals
Tyres
Suspensions
Frame
fasteners
Drive chain
Fuel
Coolant
Engine oil
Check clearance or slackening.
Check operation.
Check inflating pressure and wear.
Verify that the operation is smooth and uniform.
Check clearance or slackening.
Check clearance absence and lubrification presence.
Check level.
Refuel, if necessary.
Check for fuel leakage.
Check level.
Check for leakage.
Check level.
Check for leakage.
28
Page 17

4.3 Running-in
Failure to observe the indications provided below can reduce performance and shorten the life
of the motorcycle.
Running-in is generally considered to apply only to the engine. In fact, it should be regarded as an essential phase
for other important parts such as the tyres, the brakes and the drive chain. During the very first miles, adopt a
relaxed riding style.
km
0 to 500 Km
(0 to 312.5 mi)
500 to 1000 Km
(312.5 to 625 mi)
1000 to 2500 Km
rpm max.
5000 rpm
7500 rpm
9000 rpm
NOTE
New tyres must undergo a proper running-in period to reach their
complete efficiency. Avoid abrupt acceleration, turning and braking
during the first 100 km (62,5 mi). Failure to observe these
prescriptions can lead to the sliding of the wheels and the loss of
control of the vehicle with subsequent risk of accidents
(625 to 1562.5 mi)
IIn particular, observe for the first 2500 km (1600 mi) the max revolutions number indicated in the table.
After the running-in period, above 2500 km (1600 mi), the engine is “hot” and can be run to its maximum speed.
29
4.4 Selecting the display functions
WARNING
Any modification or adjustment of the
display functions must be performed with
the key turned to “ON”.
The display is provided with 3 main functions:
1) “Total”/“Trip”
2) “Chrono“/”Lap”
3) “Clock“/”Trip”
To switch from function 1 to function 2, keep pressed the
“Mode” button for more than two seconds.
To switch from function 2 to function 3, keep pressed the
“Mode” button for more than two seconds (with
chronometer off).
To switch from function 3 to function 1, keep pressed the
“Mode” button for less than two seconds.
(Mode>2sec)
(Mode>2sec con cronometro fermo)
with chronometer off)
(Mode<2sec)
30
Page 18

Resetting the trip mileage counters
Press twice the “Mode” button to reset the “Trip” function value.
NOTE:
The instrument panel has an integrated memory which retains all the parameters even when the engine is
not running. Except for the clock, which is reset, all the parameters are retained even when the battery is
disconnected.
Chronometer stop and Starter
Switch to function 2.
To start the chronometer (“Chrono”), press the “Mode” button for less than 2 seconds (<2 sec.). Afterwards, whenever
the “Mode” button is pressed (<2 sec.), the “Lap” function will display the time indicated by the “Chrono” at that given
moment (lap time).
To reset the chronometer press the “Mode” button for more than 2 seconds (> 2 sec.).
At this point the “Lap” function will display the last time indicated by the chronometer (trip time).
4.5 Adjusting the clock
Switch to function 3
Press the “Mode” button (> 2 sec.); the first figure will start flashing.
Repeatedly press the “Mode” button until the desired figure has been entered.
Press the “Mode” button (> 2 sec.) to enter the following figure.
Repeat the above procedure to enter the second figure of the “hours”, the first and second figure of the “minutes”.
Press the “Mode” button (> 2 sec.) to confirm the time adjustment and to stop the selection (the flashing).
4.6 Parking the motorcycle
Tornado RS is equipped with the sidestand. It is possible
to separately buy the central back stand.
Using the sidestand
Park the motorcycle safely on solid
ground.
On slopes, engage the first gear and park
the vehicle so that the front wheel faces
uphill. Remember to put the gear lever in
the neutral position before restarting the
engine.
Using your foot, lower the sidestand as far as it will go,
and then slowly tip the motorcycle toward you to bring
the stand supporting foot into contact with the ground’s
surface.
31
WARNING
Do not sit on the vehicle when it is parked
on the sidestand, as your full weight
would rest on the vehicle’s only support.
32
Page 19

4.7 Saddle disassembly driver
Insert the key.
Press the end part of the saddle and, at the same time,
turn the key clockwise.
Slightly lift the saddle from the rear, slide it backwards
and remove it.
2
1
Keys
supplied
4.8 Saddle disassembly passenger
Insert the key.
Press the end part of the passenger saddle and, at the
same time, turn the key counterclockwise.
Slightly lift the saddle from the rear, slide it backwards
and remove it.
4.9 Removing the passenger saddle tail
1
2
Keys
supplied
33
Remove the complete saddle tail by following the
“Disassembly saddle passenger” instructions.
Then separate the tail from the saddle by pressing
outwards against the tabs, releasing the rear section of
the saddle first followed by the front section.
Use the reverse procedure to reassemble.
34
Page 20

4.10 Refuelling
Lift the dust cover.
Insert the key into the lock, rotate it clockwise and lift the
tank cap.
After refuelling, press down the tank cap while rotating
the key clockwise to facilitate the locking. Then release
the key and remove it.
35
WARNING
Petrol and its fumes are highly toxic and flammable. Avoid contact and inhalation. When refuelling,
switch off the engine, avoid smoking, and keep away from flames, sparks and heat sources.
Perform refuelling in the open air or in a well ventilated area.
Overfilling the tank may cause the fuel to overflow as a result of the expansion due to the heat
from the engine or to exposure to sunlight. Fuel spills can catch fire. The level of the fuel in the
tank must never be higher than the base of the filler.
Verify that the tank filler cap is correctly closed before using the motorcycle.
Only use unleaded fuel with a R.O.N. octane rating of 95 or higher. Immediately wipe the overflown
fuel with a clean cloth, to avoid damage to the painted or plastic surfaces.
36
Page 21

4.11 Starting the engine
As you turn the ignition switch to the ON position, the
instruments and the warning lights will go through the
self-diagnostic cycle; during this phase, make sure that
all the warning lights on the dashboard come on. One of
the following conditions must be verified, in order that
the ignition switch system allows engine starting:
The gears are in neutral.
The gears are engaged, the clutch lever is pulled and
the side stand is up.
Press the start button without turning the throttle twist
grip.
As soon as the engine starts, release the button.
• Do not press the start button for longer
than 5 consecutive seconds.
• Avoid warming up the engine while the
vehicle is stationary. It is advisable to
bring the engine to the working temperature by riding at reduced speed.
• To ensure the maximum life of the
engine, never speed up at full throttle
when the engine is cold.
37
4.12 Improve our riding skills
Riding a motorcycle requires experience and concentration.
Inexperienced riders should undergo a period of training and attend an introductory course consisting of theoretical
lessons as well as practical riding sessions in areas closed to traffic.
The instructor’s advice will help the novice rider become familiar with the basics of riding safety.
Relying on the advice of persons other than a qualified riding instructor, even if possessing specific knowledge, may
prove to be useless or even dangerous, especially if the practical training takes place in an area open to traffic.
38
Page 22

5 Adjustments
5.1 List of adjustments
There are many adjustments that can significantly improve the ergonomics, geometry and safety of the motorcycle.
WARNING
To avoid losing control of the vehicle while riding, be sure to always keep both hands on the
handlebars. All adjustments must be performed when the vehicle is stationary and, where not
otherwise provided in this manual, they have to be done only by Benelli Authorized Workshop;
in fact, some of these operations can cause a danger for the user’s safety if they are not properly
done or if they are unappropriate.
39
Steering gear damper regulation
Rearview mirrors adjustment Front brake lever
adjustment
Gear lever adjustment
Headlight adjustment
Front suspension
adjustment
Clutch lever adjustment
Rear brake lever adjustment
Drive chain
adjustment
Rear suspension adjustment
40
Page 23

5.2 Recapitulatory table of adjustments
TYPE OF ADJUSTMENT
Front brake lever
adjustment
COMPETENCE
User
Adjusting rear
suspension spring preload
Adjusting rear
suspension compression
damper hydraulic device
Authorized Dealer
Authorized Dealer
Clutch lever adjustment
Rearview mirrors
adjustment
Rear brake lever
adjustment
Adjusting front
suspension spring preload
Hydraulic system braking
regulation front - wheel extension and suspension.
Adjusting front
suspension compression
damper hydraulic device
User
User
Authorized Dealer
Authorized Dealer
Authorized Dealer
Authorized Dealer
Hydraulic system braking
regulation in back - wheel
suspension compression
Hydraulic system braking
regulation at high speed
back - wheel suspension
compression
Drive chain adjustment
Gear lever adjustment
Headlight adjustment
Authorized Dealer
Authorized Dealer
Authorized Dealer
Authorized Dealer
Authorized Dealer
41
5.3 Adjustments that can be done by user
WARNING
Never perform the adjustment while
riding.
5.3.1 Front brake lever adjustment
Push the lever forward to neutralize the spring thrust and,
at the same time, adjust its position in one of the four
possible directions by turning the ring nut clockwise or
anticlockwise.
5.3.2 Adjusting the rearview mirrors
Press the mirror at the points shown in the figure to adjust
its position in the four directions.
42
Page 24

5.4 Adjustments that has to be done by a
Benelli Authorized Workshop
WARNING – The following adjustments
are reserved to the Benelli Authorized
Workshops. Never perform the
adjustment while riding. B
5.4.1 Clutch lever play
Remove the adjustment cover cap.
Unloose the ring nut (A) and reset the clutch lever play
by turning the adjustment (B) clockwise or anticlockwise.
Turn clockwise to decrease the play.
Turn anticlockwise to increase the play.
B
A
43
5.5 Adjusting the front suspension
Rebound damper hydraulic device
Compression damper hydraulic device
+
-
Spring preload
+
-
44
Page 25

5.5.1 Adjusting front suspension spring
preload
Adjusting of the spring preload is performed by counting
the rule turns (A), either clockwise and anticlockwise.
Turn clockwise for stiffer preload adjustment.
Turn anticlockwise for softer preload adjustment.
WARNING
It is essential that the adjusters of both
fork rods are adjusted to the same
position.
5.5.2 Adjusting front suspension rebound
damper hydraulic device
Adjusting of the rebound damper hydraulic device is
made in jerks. Turn the rule (B) clockwise to increase
the braking action, or turn anticlockwise to decrease it.
A
+
B
+
Turns
-
Clicks
-
45
5.5.3 Adjusting front suspension compression
damper hydraulic device
Adjusting of the compression damper hydraulic device
is made in jerks. Turn the rule (C) clockwise to increase
the braking action, or turn anticlockwise to decrease it.
FRONT SUSPENSION
Standard configuration
Spring preload
Rebound damper
Compression damper
NOTE:
Start adjusting the preload from the “all open”
position (direction - ).
The compression and rebound adjusting starts rom
the “all close” position (direction +).
7,0 turns
(range max.15 turns)
1,5 turns
1,5 turns
C
+
Clicks
-
46
Page 26

5.6 Adjusting the rear suspension
Compression damper hydraulic device
Hydraulic system braking at high speed compression
Spring preload
Rebound damper hydraulic device
WARNING
The high temperature of the exhaust
pipes can cause burns. Before adjusting
the rear suspension, shut off the engine
and wait until the exhaust pipes have
thoroughly cooled.
The rear shock absorber contains highly
compressed gas. Do not try to open or
disassemble it in any way
When you estimate the rear suspension
settings, never push or pull in any way
on the exhaust muffler and on the tail.
They would be certainly damaged.
Check the rear suspension settings in the position
indicated by the arrow.
47
OK
NO
NOTE: At the moment of delivery of the motorcycle,
the rear suspension is adjusted in the standard
configuration, with damper spring length of 141 mm
(5.55 in) [11 mm (0.43 in) of preload].
48
Page 27

5.6.1 Adjusting rear suspension spring
preload
Adjust the spring preload by means of the two ring nuts
(A and B) shown in the figure. Unloose the ring nut (A)
and adjust the preload using the ring nut (B).
Turn clockwise for a stiffer preload.
Turn anticlockwise for a softer preload.
Once the adjustment is over, tighten the ring nut (A).
5.6.2 Adjusting rear suspension rebound
damper hydraulic device
Adjusting of the rebound damper hydraulic device is made
in jerks. Turn the rule (C) clockwise to increase the
braking action, or turn anticlockwise to decrease it.
5.6.3 Adjusting rear suspension compression
damper hydraulic device
Adjusting of the compression damper is made in jerks.
Turn the rule (D) clockwise to increase the braking action,
or turn anticlockwise to decrease it.
5.6.4 Hydraulic compression braking system at
high-speed back - wheel suspension
Adjusting of the compression damper is made in jerks.
Turn the rule (E) clockwise to increase the braking action,
or turn anticlockwise to decrease it.
49
E
50
Page 28

REAR SUSPENSION
Standard configuration
Spring length
Rebound damper
Compression damper
High speed
compression braking
141 mm (5.55 in)
7 clicks
6 clicks
6 clicks
NOTE:
Adjusting of the preload starts from the damper
spring length of 141mm (5.55 in).
The compression and rebound adjustment starts
from the “all close” position (direction +).
6 Maintenance
6.1 Tables of scheduled maintenance and checks
WARNING
• Impropriety or lack of recommended maintenance operations can lead to an increase of the
risk of accidents and damage to the motorcycle.
• Always use genuine Benelli spare parts. Using non-genuine spare parts can accelerate the
wear of your motorcycle and shorten its life.
• Failure to perform the recommended operations, as well as using non-genuine spare parts,
can cause the unoperativeness of the legal guaranty.
To replace or top up the lubricants and fluids of your motorcycle, use only the suitable products.
51
PROTECT THE ENVIRONMENT
Benelli, in order to protect the interests of the community, awakens the Customers and the
Technical Assistance operators to use the vehicle and dispose of its replaced parts respecting
the laws in force concerning environmental pollution and waste disposal and recycling.
The main periodic checks and maintenance operations are shown in the following tables. These operations are
necessary to keep the motorcycle safe and in perfect running order.
52
Page 29

The intervals indicated in the periodic maintenance and lubrication tables must be intended as a general guide
under normal riding conditions. It could be necessary to reduce these intervals according to the climate, the ground
conditions, the geographic position and the conditions of use.
Some of the operations can be carried out by the user, providing he or she possesses the requisite skills and,
however, only when explicitly scheduled in this Owner’s Manual. In any other case have the operations performed
by a Benelli Authorized Workshop, whose list is available on the web site
Coustomer Service dialling 800342300.
As a rule maintenance operations must be performed while the motorcycle is on the rear stand
after switching off the engine and setting the start switch to OFF. On the contrary, while checking
the fluid levels it is advisable to keep the motorcycle in an upright position without using the
rear stand.
Tables of scheduled maintenance
NOTE: the table below describes all the scheduled maintenance operations. The column “COMPETENCE”
indicates (C) who must carry out the operations described:
Legend:
“i” = inspection and adjustment, cleaning, lubrication or replacement according to requirements
“R” = replacement
“T” = tighten
“O“ = authorized dealer or personnel
“U“ = user
www.benelli.com
or calling the Benelli
535455
Page 30

56
Page 31

57
58
Page 32

596061
Page 33

6.2 Tools and accessories supplied
The motorcycle comes supplied with a kit containing the following tools:
• Spark plug wrench;
• Allen wrench size 3;
• Allen wrench size 4;
• Allen wrench size 5;
• Allen wrench size 8;
• Open wrench size 10/13;
• Cross screwdriver Philips 2 with handgrip;
• Handle for screwdriver;
• Case.
It is recommended to use the supplied tools only if you are able to properly handle them and,
however, only if you are sure about the action you have to perform.
62
Page 34

6.3 Table of lubricants and fluids
Description
Engine lubrication oil *
Coolant
Brake and clutch fluid
Drive chain lubrication oil
* : For the availability of the suggested product, Benelli suggests to directly apply to the Authorized Dealers
or Workshops. If the above described lubricant is not available, Benelli suggests to use a fully synthetic
engine oil having characteristics equal or better than the ones prescribed in the following standards:
15W/50 (Synthetic) JASO - MA CC MC G4
READY FOR USE RADIATORS FLUID
SPRAY GREASE SPECIFIC FOR CHAINS WITH
Recommended product
SPECIAL BRAKE FLUID DOT4
O-RING
• API SJ
• ACEA A3
• JASO - MA CC MC G4
6.4 Checking the engine oil level
Check the oil level while the engine is not running, and
has been allowed to cool down for at least ten minutes
after a ride.
The check must be performed after placing the
motorcycle in an upright position on a horizontal surface.
The level must be between the MAX and MIN marks on
the crankcase.
If the oil level is below the MIN mark, top up.
Do not start the engine if the oil level is
below the MIN mark.
63
MAX
MIN
Oil sight glass
64
Page 35

6.4.1 Topping up the engine oil level
To top up the engine oil level, remove the oil filler plug
and pour an appropriate amount of engine oil of the
recommended type. Never exceed the MAX level mark.
At the end of the operation, place back the oil filler plug.
To avoid clutch sliding and damage to the
engine, never add chemical additives to
the engine oil, nor use an engine oil
different from the one specified in the
table lubricants and fluids.
Make sure that no foreign body gets in
the crankcase while topping up the
engine oil.
Oil filler plug
65
WARNING
New or exhaust engine oil can be dangerous. Engine oil is highly toxic for people and domestic
animals. In the event of an engine oil ingestion, immediately call a doctor and do not cause
vomiting, in order to avoid inhalation of engine oil in lungs. It has been proved that prolonged
contact with engine oil can cause skin cancer on guinea pigs.
Even a brief contact with engine oil can cause skin irritation.
• Keep new or exhaust engine oil out of reach of children and domestic animals.
• While topping up the engine oil, wear a long-sleeved shirt and a pair of water-proof gloves to
protect your skin.
• If the engine oil comes in touch with your skin, wash it away with soap and water.
• Correctly recycle or dispose of the exhaust engine oil, in order to avoid environmental pollution.
66
Page 36

6.5 Checking the coolant level
Check the coolant level while the engine is off and cold.
The check must be performed after placing the
motorcycle in an upright position on a horizontal surface.
Ensure that the coolant level is between the MAX and
the MIN marks.
If the coolant level is below the MIN mark, top up the
coolant at the nearest Benelli Authorized Workshop.
Do not start the engine if the coolant level
is below the MIN mark.
Coolant sight glass
6.5.1 Topping up the coolant level
WARNING
This operation has to be performed only by a Benelli Authorized Workshop. Perform the topping
up of the coolant when the engine is off and cold. Never attempt to remove the coolant filler cap
when the engine is hot, in order to avoid the risk of burns. The cooling system is under pressure!
Under certain conditions, ethylene glycol contained in the coolant can become flammable.
When it is lighted, it produces an invisible flame.
Avoid spilling coolant on hot parts of the motorcycle, because the subsequent combustion of
ethylene glycol could cause serious burns.
Coolant is a highly toxic fluid. Avoid contact and ingestion. Keep coolant out of reach of children
and domestic animals. In the event of a coolant ingestion, immediately call a doctor and do not
cause vomiting, in order to avoid inhalation of coolant in lungs. If the coolant comes in touch
with your skin or eyes, immediately wash it away with water.
67
68
Page 37

To gain access to the coolant filler cap, remove the
passenger saddle.
Remove the filler cap and top up using the coolant
recommended in the lubricants and liquids table.
After topping up, carefully refit the cap and the passenger
saddle.
Coolant can damage painted and plastic
parts.
When you top up the coolant level, be
careful not to spill coolant on any part of
the motorcycle. If you do spill coolant on
your motorcycle, immediately wipe it
away using a clean cloth.
Coolant filler cap
6.6 Checking the wear of the brake pads
WARNING
If the brake pads are excessively worn out, the effectiveness of the braking system decreases,
increasing the risk of accidents. Check frequently, from a Benelli Authorized Workshop, the
wear and tear of the linings and, wherever need, make them replaced.
Ensure that the new pads are suitably broken in.
Limit of the wear and tear of the linings A: 3,5 mm (0.14 in).
69
70
Page 38

6.7 Checking the brake fluid level
WARNING
Lack of maintenance of the braking system can increase the risk of accidents. If you notice any
anomaly in the working of the braking system, go immediately to a Benelli Authorized Workshop.
Wherever you suspect that can exsist a serious failure of the braking system, stop immediately
the motorcycle and call the nearest Benelli Authorized Workshop.
Never use your motorcycle if the fluid level is below the MIN mark. The brakes may fail to properly
operate, which could lead to an accident. If the brake fluid level is below the MIN mark, you must
have it topped up by an authorized Benelli dealer.
Rear brake fluid reservoir
Front brake fluid reservoir
71
The level of the brake fluid decreases as the brake pads wear down. Ensure that the fluid level is always between
the MAX and MIN marks. If the level falls below the MIN mark, contact a Benelli authorized service center and have
the brake system overhauled.
Have the topping up of the brake fluid performed only by Benelli authorized service center.
Brake fluid is highly toxic. Avoid contact and ingestion. Keep brake fluid out of reach of children and domestic
animals. In the event of a brake fluid ingestion, immediately call a doctor and do not cause vomiting, in order to
avoid inhalation of brake fluid in lungs. If the brake fluid comes in touch with your skin or eyes, immediately wash
with water.
Use only the brake fluid specified in the table lubricants and fluids of this manual.
Mixing different brake fluids can cause a dangerous chemical reaction, as well as the decrease of the braking
efficiency, with subsequent increase of the risk of accidents.
An insufficient amount of brake fluid may allow the introduction of air in the braking system. This could compromise
the effectiveness of the braking system, with subsequent increase of the risk of accidents.
Presence of air in the braking system can be identified in the moment you feel a characteristic “spongy effect” while
pushing the brake pedal. In this case, have a braking system bleeding performed by an authorized Benelli dealer
before riding your motorcycle again.
72
Page 39

6.8 Checking the tires and rims
WARNING
Before using the motorcycle, always
check the pressure and wear of the tyres.
An incorrect inflating pressure can lead
to dangerous situations during riding.
An insufficiently inflated tyre can cause
the sliding of the tyre on the wheel rim or
its detachment; this may lead to the
deflation of the tyre with subsequent loss
of control of the vehicle.
Checking the inflating pressure of the tyres is an essential
requirement to ensure driving safety. Insufficiently inflated
tyres can reduce the handling of the motorcycle and wear
themselves out very quickly.
On the other hand, an excessively high inflating pressure
reduces the wideness of the surface in contact with the
ground, and it can compromise the grip of the vehicle.
Before riding your motorcycle, it is therefore necessary
to measure the tyre pressure at room temperature.
The vehicle must be parked since three hours at least.
73
Check the pressure according to the values indicated in the table below:
Pressure
Front cool tyre
Back cool tyre
In the event of long travels, you can increase the face value of the tyre pressure of 0.2 bar.
It is extremely important to check the wear of the tyres before riding. In fact, a worn out tyre can be punctured more
easily than a new one, and it can adversely affect handling and stability of the motorcycle.
Check that the depth of the tyre tread is not below the values prescribed by the Highway Code.
Verify the absence of crevices at the bottom of the tread design and fissures on the tyre sidewall. Moreover, verify
the absence of nails and glass splinters in the tyre. If these conditions are not verified, have the tyre replaced by an
authorized Benelli dealer.
If a tyre is punctured it must be replaced, not repaired. A repaired tyre provides a restricted
performance and lower safety levels than a new one. If you make a provisional or emergency
repair to a tyre, you must ride at very low speed until you reach the nearest Benelli authorized
service center and have the tyre replaced. With a provisionally repaired tyre, never exceed 60
km/h (37.2 Mph). Tyre repairing must never be performed if the tyre is punctured on its sidewall,
or if the diameter of the puncture on the tread is greater than 6 mm (0.23 in).
250 kPa [2,5 bar (36.25 psi)]
250 kPa [2,2 bar (31.9 psi)]
74
Page 40

When it is necessary to replace the tyres, use only the type specified in the technical data table.
Moreover, avoid using tyres of a different brand or type on the front and on the rear wheel at the
same time. Using tyres different from those specified can adversely affect the handling and
stability of the motorcycle, increasing the risk of accidents.
• The wheel rims of your motorcycle have been designed for use with tubeless tyres only. Do not
assemble an air tube tyre on rims designed for tubeless tyres. Otherwise, the tyre bead could
not properly settle down on the wheel rim, leading to the deflation of the tyre and the loss of
control of the vehicle.
• Have the tyres replaced according to their direction of spin, which is highlighted by a small
arrow on the tyre sidewall.
• New tyres should be run in for a short period before demanding their full performance.
In fact, during this period the tyres could have a reduced grip on some kind of roads. We suggest
to ride at reduced speed and exercise extreme caution during the first 100 km (62.5 mi) after the
replacement of a tyre.
6.8.1 Checking of the rims and the wheel rims
Before riding, always verify the absence of cracks, bending or buckling on the wheel rims.
WARNING
If you find that the wheel rim is damaged, have it replaced by a Benelli authorized service center.
Never attempt to repair the wheel rim, even in case of slight damage.
Every time you replace a tyre or a rim, you must have a wheel balancing performed.
Wheel unbalance can adversely affect performance and handling of the motorcycle, as well as
shorten the life of the tyres.
75
6.9 Cleaning checking and lubricating the drive chain
To perform this operation, you must put the motorcycle on the rear stand, upright on a horizontal surface and with
the gear in neutral.
WARNING
Riding your motorcycle when the drive chain is in poor condition or improperly adjusted can
lead to accidents. If you notice any anomaly in the working of the drive chain, like suspected
noises or excessive loose of the chain, go immediately a Benelli authorized service center.
Wherever you suspect that can exist a serious failure of the drive chai, stop immediately the
motorcycle and call the nearest Benelli authorized service center.
Every time the chain is replaced, you must always replace the front and rear sprockets too.
Never try to repair or replace a drive chain. It is a complex and particularly dangerous operation and, therefore, it
has to be performed by the Benelli authorized service centers.
76
Page 41

6.9.1 Cleaning
The chain of
high pressure water jet, nor using gasoline or other solvents.
The chain must be cleaned using kerosene only.
Kerosene is highly toxic and flammable.
Avoid contact and inhalation.
Keep kerosene away from sparks and flames.
Keep kerosene out of reach of children and domestic animals.
Correctly dispose of exhaust kerosene, in order to avoid environmental pollution.
If you are not sure that you can use kerosene in complete safety, don’t use it and, when you can go to a Benelli
authorized service center ask for the drive chain cleaning.
6.9.2 Lubrification
Chain lubrication has to be performed only by a Benelli authorized service center according to the intervals specified
in the tables of scheduled maintenance.
It is also necessary to perform this operation after riding under the rain and after cleaning the motorcycle.
Riding your motorcycle when the drive chain is in poor condition or improperly adjusted can lead to accidents.
To ensure proper operation, the drive chain needs to be properly lubricated.
Tornado RS
is of the O-ring type. To prevent it from damaging, never clean the chain with a steam or
6.10 Checking the idle speed
The idle speed should range from 1200 to 1300 rpm.
If a tune-up is necessary, contact an authorized service
centre.
77
78
Page 42

6.11 Replacing the fuses
The replacement of the fuses has to be performed only
by a Benelli authorized service center. Only in case of
extreme urgency and if it is not possible to have a
specialized technical assistance, the operation can be
carried out by the owner according to the indications
provided below..
Turn the ignition key on the “OFF”
position before checking or replacing the
fuses, in order to avoid a short circuit with
subsequent damage to other electric
parts of the motorcycle.
The recharge fuse is located on the left side of the
motorcycle, in the position shown in the figure.
The service fuses are found under the passenger saddle;
remove the saddle to gain access to the fuses.
Remove the fuse box cover.
Replace the blown fuse and refit the cover. To identify
the function of the fuses, refer to the information
shown on the adhesive label.
Spare fuses 10A
Reserve fuel
Spare fuses 15A
Cooling fans
Spare fuse
Recharge fuse
79
General
Injectors
Lights
Spare fuses 15A
WARNING
Never replace a fuse with a rating other
than that precribed, in order to avoid
damage to the electrical equipment of the
motorcycle which could lead to a fire.
80
Page 43

6.12 Battery
The battery is of the maintenance-free type and is installed under the saddles, between the driver saddle and the
passenger saddle.
This battery does not require checking of the fluid level or adding of distilled water.
If the battery seems to be run-down (causing electrical problems or a difficult starting), have it recharged by an
authorized Benelli dealer as soon as possible. Remember that the battery runs down more quickly if your motorcycle
is equipped with additive electrical accessories.
Always have the battery replaced by a Benelli authorized service center.
WARNING
If the battery casing is damaged, there may be a leakage of sulphuric acid, a highly toxic and
corrosive substance. Avoid any contact with your eyes, skin and clothes.
Always wear protective glasses when you have to work near the battery.
In the event of a contact with sulphuric acid, give the FIRST AID as described below:
• CONTACT WITH SKIN: Wash away with a great amount of water.
• INGESTION: Drink great amounts of water or milk, and immediately call a doctor.
• CONTACT WITH EYES: Wash away with water for about 15 minutes, and immediately call a
doctor.
Furthermore, leakage of sulphuric acid can result in the formation of hydrogen gas which, if
ignited by a spark or a flame, would cause an explosion.
81
The inversion of the battery wires can damage the battery and the recharging system.
The red wires must be connected to the positive terminal (+), while the black wires must be
connected to the negative terminal (-).
If the motorcycle is to remain unused for a long time (a month or longer), it is advisable to disconnect the battery
cables or have the battery removed by skilled personnel. In case of prolonged inactivity, to avoid shortening the life
of the battery, it is essential to have it recharged by a Benelli authorized service center every 4-5 months, in order to
guarantee its life in time.
6.13 Cleaning the motorcycle
Periodic careful cleaning is a key factor in preserving the value of the motorcycle, protecting its surface finish and
checking for damages, wear and leakage of corrosive fluids.
Wash the motorcycle with water, a mild detergent and a sponge. Wipe the vehicle with a soft cloth. Use an air jet to
dry difficult-to-reach areas.
Periodically treat the paintwork with high quality wax. After riding on roads treated with corrosive substances (salt),
wash the vehicle as soon as possible with cold water. Do not use hot water as it enhances the corrosive action.
82
Page 44

Do not wash your motorcycle soon afterwards riding. Attend a few minutes to allow the engine
and the exhaust pipes to thoroughly cool.
Before washing the vehicle, stop up the exhaust pipes and protect the electrical parts.
Never use washing systems involving steam or high pressure water jets. These systems could
cause water infiltration and damage the internal parts of your motorcycle.
Avoid cleaning the rims with fuel or solvents.
Avoid using clothes or sponges that have been in contact with strong or abrasive detergents,
solvents or gasoline.
To avoid irreparable damage to the front fairing, never use alkaline or strongly acid detergents,
petrol, brake fluid or other solvents. Clean the front fairing only with a soft cloth, warm water and
a neutral detergent.
WARNING
Avoid smearing brakes or tyres with oil or wax.
The presence of water on the brakes can lead to a decrease of the braking effectiveness with
subsequent risk of accidents. After completing the washing, run the engine for a few minutes
and start off at reduced speed. Carefully apply the brakes a few times so as to dry the brake pads
and discs.
83
6.14 Prolonged inactivity
If the motorcycle is not to be used for a long period, contact a Benelli authorized service center to have the following
operations carried out:
- Empty the fuel tank.
- Remove the battery and store it in a suitable place.
- Remove the spark plug caps and the spark plugs. Pour a teaspoonful of engine oil in every spark plug hole, then
place back the spark plugs and the corresponding caps. Make the engine run idle for a few times.
- Lubricate all control cables and the joints of all pedals and levers.
- Clean the motorcycle and treat the paintwork with high quality wax.
- Park your motorcycle in a fresh, dry and dark place, with a temperature relatively constant and lower than 25° C
(77°F). Avoid direct contact of the tyres with heating pipes or radiators, and prolonged contact with oil or gasoline.
Avoid parking with the tyres near to electrical motors or devices capable to produce sparks or electric discharge.
During the period of inactivity, place your motorcycle on the rear stand.
- Cover the vehicle with an adequate canvas cover Benelli that can be bought as optional.
When the motorcycle is used the first time, carry out a general check and have it serviced at an
authorized service center.
84
Page 45

7 Technical information
Benelli Spa reserves the right to make any changes to its models on the purpose of constantly conform them to the
technological advance.
Therefore the technical data that are shown below, can be different from those that can be checked on the vehicle.
Moreover some data, like the performance, are susceptible of alteration in function of the specific recording conditions
besides, of course, in function of the typical performance of every vehicle.
7.1 Specifications
DIMENSIONS
Overall length
Max. width
Max. height
Seat height
Min. ground clearance
Wheelbase
Trail
WEIGHT
Empty weight (without
oil and fuel)
Net weight (with oil and
full fuel tank)
Maximum mass
technically allowed (with
driver and load)
2040 mm (80.3 in)
780 mm (30.7 in)
1160 mm (45.7 in)
840 mm (33.1 in)
100 mm (3.9 in)
1419 mm (55.9 in)
94,5 mm (3.7 in)
198 kg (436.5 Lbs)
220 kg (485 Lbs)
400 kg (882 Lbs)
Type
Displacement
Number of cylinders
Cylinders position
Bore stroke
Compression ratio
Idle speed
Distribution
Starting
Clutch
Lubrication
Cooling
Filter oil
85
ENGINE
four-stroke 12 valves
DOHC
898 cc
3
aligned inclined by 15°
forward
88 x 49.2 mm
(3.5 X 1.94 in)
11.8:1±0.5
1350 rpm
Double-overhead
camshaft
Electric starter
Oil bath
Wet sump
With water radiator
to air-cool oil
Polyurethan dry sponge
86
Page 46

Maximum net power
Maximum net torque
FUEL
Recommended fuel
Fuel tank capacity
Reserve fuel
ENGINE OIL
Recommended oil
Total
Quantity without oil filter
cartridge replacement
106 KW (144CV)
to 10500 rpm
96 Nm to
9750 rpm
Lead-free premium
petrol
18 lt (4.8 Gal)
5 lt (1.3 Gal)
API SJ 15W/50
(Synthetic)
JASO - MA CC MC G4
4 lt (1 Gal)
3.8 lt (0.8 Gal)
IGNITION - POWER SUPPLY
Type
Spark plug
Spark gap
Primary
Number of teeth on
crankshaft gear
Number of teeth on
clutch gear
Transmission ratio
“SAGEM“ integrated
ignition-injection
system.
Inductive discharge
electronic ignition,
“Multipoint” electronic
injection.
CHAMPION G59C \
NGK CR9E
0,7 ÷ 0,8 mm
(0.028 ÷ 0.032 in)
TRASMISSIN
Z = 44
Z = 79
1.795
Secondary
Number of teeth on front
sprocket
Number of teeth on rear
sprocket
Transmission ratio
GEAR SPEED
Type
Gear ratio in first
(overall ratio)
Gear ratio in second
(overall ratio)
Gear ratio in third
(overall ratio)
Z = 16
Z = 41
2.563
Removable, six-speed
gearbox with
constantmesh gears
2.786 (12.816)
1.994 (8.946)
1.524 (7.010)
Gear ratio in fourth
(overall ratio)
Gear ratio in fifth
(overall ratio)
Gear ratio in sixth
(overall ratio)
Type
SUSPENSIONS
Type
Rod diameter
Travel range
87
1.304 (6.000)
1.167 (5.367)
0.926 (4.260)
FRAME
Steel-aluminium mixed
solution
Front
“Upside down”
telescopic hydraulic fork
with external adjustment
of rebound and
compression damping
and of spring preload
50 mm
120 mm (4.7 in)
88
Page 47

Type
Swingarm
Wheel travel range
Type
Disc diameter
Disc flange
Radiator pincers
Calipers, piston
diameters
Rear
damper wheelbase
regulation, extension
braking, compression
braking, high-speed
compression braking,
BRAKES
Front
Double steel floating
Progressive mono
spring-loaded.
Aluminium alloy
115 mm (4.5 in)
disc
320 mm (12.6 in)
Aluminium alloy
4-piston
34 mm (1.4 in)
Type
Disc diameter
Caliper
Calipers, piston
diameters
Type
Material
Dimensions
Type
Material
Dimensions
Rear
Single steel disc
240 mm (9.5 in)
2-piston
32 mm (1.3 in)
RIMS
Front
Five spokes
Radiator pincers
3,50” x 17”
Rear
Five spokes
Radiator pincers
6,00” x 17”
Type
Dimensions
Maximum inflating
pressure
Type
Dimensions
Maximum inflating
pressure
TYRES
Front
Tubeless
120/70 - ZR 17 (58 W)
250 kPa
2,8 bar
Rear
Tubeless
190/55 - ZR 17 (73 W)
2,8 bar
ELECTRICAL EQUIPMENT
Equipment voltage
Low beam
High beam
Front light
Rear light - Brake light
Front turn indicators
Battery
Alternator
89
12V
12V - 55W
12V - 55W
12V - 5W
12V - 21W
12V - 3 x 5W
12V - 10 Ah
480W to 5000 rpm
90
Page 48

This Manual is property of Benelli Spa.
Any total or partial reproduction is forbidden.
91
Versione 2003 / 12
Strada della Fornace Vecchia
Benelli Spa
61100 - Pesaro - ITALY
www.benelli.com
 Loading...