

Beltronics Sti r Plus User Manual

S T E A L T H I N S T A L L E D
BELTRONICS
5442 West Chester Road
West Chester OH
45069 USA
N O R T H
A M E R I C A
USA 00.1.800-3
www.beltronics.com
©2
011 BELTRONICS
Made in Canada
Features, specifications and prices subject to change without notice.
Model: STi-R Plus
41-2288
D I G I T A L R A D A R•L A S E R•S A F E T Y D E T E C T O R
Owner’s Manual

Congratulations
Quick Reference
Your new STiR Plus is the most advanced
custom installed camera location system
ever. In addition, your StiR Plus can be
upgraded to a full radar and laser detector
with a simple software update from our
website.
The STiR Plus features:
• State of the art onboard Defender
database for locating red light and
speed cameras
• Ability to download database
updates using your PC and the
Beltronics website
• Exclusive detector capability
(optional) including X, K,
SuperWide Ka, and Safety Warning
System messages
If the detector feature is activated, you’ll
enjoy these exclusive features:
• TotalShield™ Technology makes the
STiR Plus totally undetectable by any
radar detector detector (RDD)
• Twin-antenna design with dual LNA
(low noise amplifier) receivers
provide the best long-range
performance against all radar bands
• Exclusive AutoLock feature
identifies each signal and
automatically eliminates false
alarms
• Easy-to-use Settings lets you
customize up to 10 features
• All the performance you’d expect
from Beltronics
The radar feature can also be deactivated
at any time by simply pressing the VOL
and SENS buttons for (5) five seconds. To
re-activate, simply use the detector tools
again.
If you’ve used a detector before, a review
of the Quick Reference Guide on pages 4
and 5, and the Settings on pages 12 and 13
will briefly explain the new features.
If this is your first detector, please
read the manual in detail to get the most
out of your STiR Plus’s outstanding
performance and innovative features.
Please drive safely.
FCC Note: Modifications not expressly
approved by the manufacturer could
void the user’s FCC granted authority
to operate the equipment.
There are 10 user-selectable options so
you can customize your STiR Plus for your
own Settings.
The buttons labeled VOL and BRT are
also used to enter Settings, REVIEW your
current settings, and to CHANGE any
settings. The abbrevi ations PGM, RVW, and
CHG are located on the lower part of the
controller.
How to use EZ-Settings
1 To enter Sett ings, press and hold
both VOL and BRT button s d own for 2
A voice announces “Settings,”
seconds .
and will display the word
2 Then press the VOL button to
review the curre nt settings. You can
either tap the button to change from
setting to setting, or hold the button to
scroll through all the options.
3 Press the BRT button to chang e a ny
settin g. You can either tap the button to
change from setting to setting, or hold the
button down to scroll through all the
options.
4 To leave Settings, simpl y wait 8
seconds wit hout pressing any button ,
or momentar ily press the PWR button.
The unit will display
accompanied by a voice announcement.
Factory De fault Setting s
To reset the STiR Plus to its original
factory set tings, press and hold the VOL
and SENS buttons while turning the
power on. The STiR Plus’s display will
provide a
audible alert, ackn owledging the reset.
STiR Plus Quick Reference
Settings.
Complete,
Reset accompanied by an
An example :
Here is how you would turn STiR Plus’s
AutoMute feature off:
1 Enter Settings by holding both the VOL
and BRT buttons down for 2 seconds. The
STiR Plus will display
accompanied by a voice announcement.
2 Then hold the VOL button down. The
STiR Plus will scroll through the categories,
starting with Pilot (
AutoLock (
Meter (
Meter), then AutoMute (aMute).
3 Release the VOL button when the STiR
Plus shows the AutoMute item.
Since the factory setting is for AutoMute to
be on, STiR Plus will display
accompanied by a voice announcement.
If you accidentally don’t release the
button in time, and the STiR Plus goes to the
next category, hold the VOL button down
again, and scroll through the categories
again until aMute is displayed.
4 Press the BRT button to change from
aMute ON to aMute OFF.
5 To comple te this change, simply wait 8
seconds without pressing any button, or
press the PWR button. The STiR Plus will
display Complete, accompanied by a
voice announcement and return to its
normal operation.
Settings,
Pilot), GPS (GPS),
aLock), SpeedCheck (sChk),
aMute ON,
Settings Details
1

Quick Reference
Table of Contents
STiR Plus Quick Reference
Press the VOL button
to go from one category
When KaSW is off,
each Ka segment can be turned on or off
Ka1 (33.392 - 33.704) ON or OFF (default is off)
Ka2 (33.704 - 33.896) ON or OFF (default is off)
Ka3 (33.886 - 34.198) ON or OFF (default is off)
Ka4 (34.184 - 34.592) ON or OFF (default is off)
Ka5 (34.592 - 34.808) ON or OFF (default is off)
Ka6 (34.806 - 35.166) ON or OFF (default is off)
Ka7 (34.143 - 35.383) ON or OFF (default is off)
Ka8 (35.378 - 35.618) ON or OFF (default is off)
Ka9 (35.595 - 35.835) ON or OFF (default is off)
Ka10 (35.830 - 35.998) ON or OFF (default is off)
* Factory Default Settings
to the next
(Power-on indication)
AUTOLOCK
SPEED CHECK
AUTOMUTE
MARKERS
Press the BRT/CHG butt on
to change your setting
within a category
PILOT
Pilot HWY
Pilot H
Pilot V
Pilot SPD
GPS
GPS ON
GPS OFF
aLock ON
aLock OFF
sChk ON
sChk OFF
METER
Meter STD
Meter THT
Meter TEC
aMute ON
aMute OFF
UNITS
Units ENG
Units MET
VOICE
Voice ON
Voice OFF
BANDS
Bands DFT
Bands MOD
X ON
K ON or OFF (default is ON)
KaSW ON or OFF (default is ON)
POP ON or OFF (default is OFF)
SWS ON or OFF (default is OFF)
LSR RECV or BLCK or OFF (default is RECV)
RDR ON or OFF (default is ON)
TSR ON or OFF (default is OFF)
Mark DFT
Mark MOD
rCam ON
sCam ON or OFF (default is ON)
aCam ON or OFF (default is ON)
Trap ON or OFF (default is ON)
Othr ON or OFF (default is ON)
* Full word: Highway, AutoScn, etc.
Let ter: H, A , C , Cnx
Vehicle voltage
Vehicle spee d
* GPS On
GPS Off
* AutoLock On
AutoLock Off
* Speed Check On
Speed Check Off
* Bar-graph Meter
Threat Display
Tech Display
* AutoMute On
AutoMute Off
* Units English
Units Metric
* Voice Alerts On
Voice Alert s Off
* Factory Default Settings
Factory Default Settings Modified
Turn bands ON or OFF by
pressing the MUTE button
or OFF (default is ON)
* Factory Default Settings
One or more bands have b een changed
or OFF (default is ON)
2
Quick Reference Guide 4-5
Controls and Features 6-1
• Power 6
• Power-On Indication
• Volume Control 6
• Mute/AutoMute 6-7
• Sensitivity 7
• Marking Locations 8
• Safety Camera Data 9
• AutoLock / AutoUnLock 9
• Locking Out False Alarms 9
• Audible Alerts 9
• Voice Announcements 10
• Display Brightness 10
• Signal Strength Meter 10
• ThreatDisplay 11
Settings 12-16
• How to use Settings 12
1
• Example of Settings 12
• Overview of Settings 13
6
• Details of Settings 14-16
Technical Details 1
• Specifications 17
• Interpreting Alerts 18-19
• How Radar Works 20
• How TSR Works 20
• How “POP” Works 21
• How Laser Works 21
• How TotalShield™ Works 22
• How GPS Works 22
• How TrueLock Works 23
• How AutoLock Works 23
• How Safety Radar Works 24-25
Service 26-33
• Troubleshooting 26-2
• Service 28
• Warranty 29
• Registration 31-32
3
7-25
7
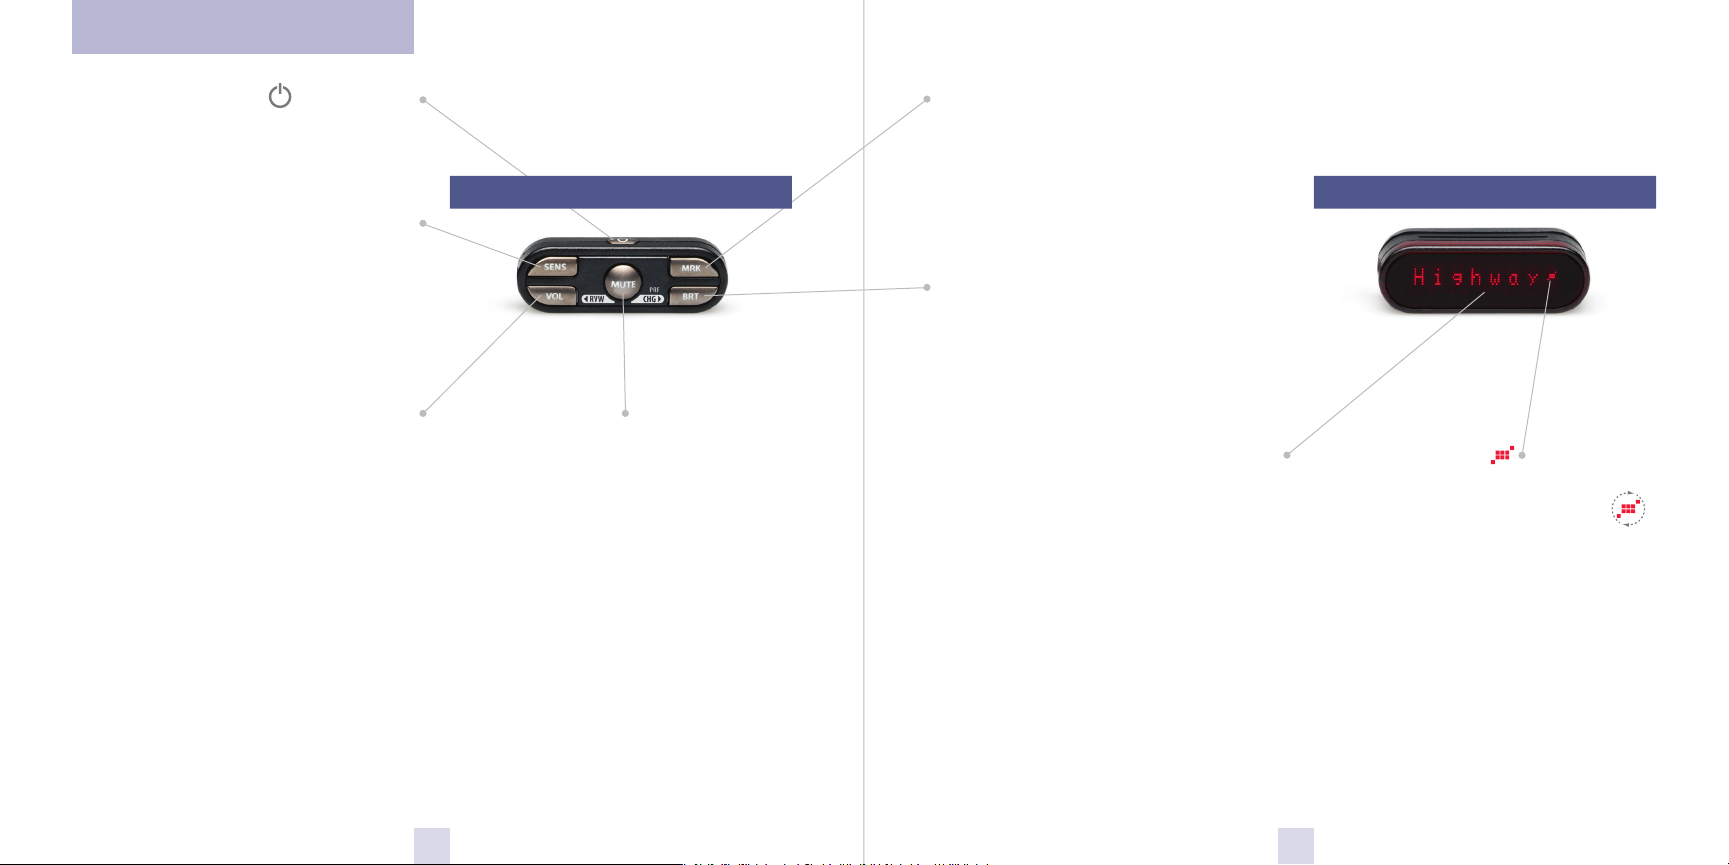
Quick Reference Guide
Power Button
Press and hold to manually turn the STiR
Plus on or off. If installed properly, the
system will turn on or off automatically
with the ignition.
Sensitivity Button (SENS)
The “SENS” button selects the STiR Plus’s
sensitivity. The choices are Highway (full
sensitivity), AutoScan (based on the speed
of the vehicle), City (reduced X and K-
band sensitivity) and City No X, (same as
City but without X-band). In general, we
recommend AutoScan.
Volume Button (VOL)
Press and hold the VOL button on the
controller to adjust the alert volume level.
The audio will ramp up to increase, down
to decrease, accompanied by a bar-graph
To change the direction of the audio
ramping (down instead of up or vice
versa) simply release the VOL button
quickly press and hold it again to change
NOTE: Your preferred audio level
will be stored in memory, even after
the detector is turned off.
Page 7
on the display.
its direction.
Mute Button (Mute)
Briefly press this button to silence the
audio for a specific alert. (The audio will
alert you to the next encounter.)
Pages 6-7
Mark Location Button (MRK)
The “MRK” button allows you to mark a
specific location and label it for future
reference. Once marked, the STiR Plus will
provide an alert before you reach this area
again. This can be extremely useful when
there are known speed traps or safety
cameras in a particular location.
Display Brightness (BRT)
The “BRT” button selects your preferred
brightness level. The factory default
setting is Auto (automatic), which will
adjust the display brightness based on the
ambient light in the vehicle. See the
Settings section for details.
The STiR Plus’s alphanumeric display
consists of 280 individual LEDs, to provide
an intuitive ultra-bright display of
signal strength and text messages. The
STiR Plus’s display will show Highway,
Autoscan, City or CityNoX as its power-on
indication. If you prefer, you can choose
other power-on indications. Pages 12-15
During an alert, the display will
indicate the radar or laser band, and a
precise bar-graph of signal strength.
Note: In the Dark Mode the
display will not light during an alert.
Page 8
MatrixDisplay
Page 14
Display ModuleControl Module
GPS Signal Indicator
The GPS icon indicates reception of GPS
satellite signals and will rotate when
a false alert is being rejected.
4 5

Controls and Features
Power
The STiR Plus is typically wired to a
switched supply at the vehicle’s fuse box.
This allows the detector to turn on/off
with the ignition. If you prefer, the power
button can be used to manually turn the
STiR Plus on or off.
Power-On Indication
Once your STiR Plus’s is installed, the
system will turn on with the ignition.
Once the start-up sequence is complete,
the display will show “Highway”,
“AutoScn”, “City” or “City NoX” to indicate
which sensitivity mode it is in.
If you prefer, you can select alternate
power-on displays. See the Settings
section for details.
Volume Control
Press and hold the VOL button on the
controller to adjust the alert volume level.
The audio will ramp up and down,
accompanied by a bar-graph on the display.
Once your desired level is reached, simply
release the button. This audio level will be
stored in memory, even after the detector
is turned off.
NOTE: To change the direction of
the audio ramping (e.g. down instead
of up) simply release the VOL button
quickly and press and hold again.
Mute
The MUTE button, located in the center of
the STiR Plus’s controller, has several
functions:
1. Mute the audio during a single alert.
To do this, briefly press the MUTE button
during the alert. After that radar
encounter has passed, the Mute will
disengage, and the audio will return to
your preset level.
2. Lockout false alarms using TrueLock.
To do this, simply press the Mute button
(3) three consecutive times during the
false alert. The first time the audio will
mute as stated above. The second time the
mute button is pressed; the display will
read “Lockout?” To confirm and lockout
that signal, press the mute button a third
time.
NOTE: Visually scan the area to
ensure no real threat exists before
locking out any signals.
Once a signal has been locked out, the
satellite icon on the display will rotate,
giving you a visual indication that it is
detecting that signal, but no alert will be
given.
3. Unlock a signal. To do this, simply
press (do not hold) the Mute button while
the icon is rotating. An “Unlock” message
will be displayed. Press the mute button
again to confirm and unlock that signal.
When optional Laser Blockers are
connected
4. Disengage “Laser Blockers”. To do this,
simply double-tap the mute button during
a laser alert once you’ve adjusted your
speed. This will put the Laser Shifters into
a “receive only” mode for approximately
(1) one minute. Once this time has passed,
the Shifters will automatically return to
the “shifting” mode.
NOTE: Blockers must be turned on
in Settings. See Settings section for
details.
5. Once the vehicle is under 25 mph,
press and hold to disable the Shifters for
an extended period of time. Once the
vehicle reaches 25 mph, the Shifters will
reset and return to Shift mode.
AutoMute
Your STiR Plus has our patented AutoMute
feature. After the STiR Plus alerts you to a
radar encounter at the volume you have
selected, the AutoMute feature will
automatically reduce the volume to a
lower level. This keeps you informed
without the annoyance of a continuous
full-volume alert.
If you prefer, you can turn AutoMute
off. See the Settings section for details.
:
Sensitivity Button (SENS)
The “SENS” button selects the STi-R’s
sensitivity mode. We recommend
AutoScan mode for most driving.
Highway (Highway Mode)
In this setting, the STi-R will detect all
signals at maximum range.
AutoScn (AutoScan Mode)
In this setting the STi-R’s internal
computer continuously analyzes all
incoming signals and intelligently filters
out unwanted X and K-band false alarms
from automatic door openers and motion
sensors. Full sensitivity is maintained on
all other bands.
City STD (City Mode)
In this setting, X and K-band sensitivity is
further reduced to eliminate unwanted
false alarms in congested urban areas.
City NoX (City Mode with NoX)
In this setting, K-band sensitivity is the
same as City STD, however, X-band is
completely turned off.
WARNING: Do not use the STi-R City
NoX mode unless you are
absolutely certain that there are no
traffic radar guns using X-band in
your area.
6 7
 Loading...