

Belling COUNTRY CLASSIC 100 E Users Manual & Installation Handbook
Users Guide & Installation
Handbook
Belling
Country Classic 100 E

Our Warranty
Should you need it . . . .
Inside the paperwork which has come with this appliance,
there is a leaflet and card explaining the terms of our
extended warranty and guarantee.
In order to apply for a one year guarantee, simply fill in the
details on the card and post it off, this will register your
appliance.
Should you wish to take out extended warranty, please fill
in the details on the leaflet and post this off.
Alternatively, you can register, and apply for extended warranty on line at:
www.belling.co.uk/contact/warranty.
If your appliance is covered by the warranty and guarantee, you will not be billed for work undertaken should your
appliance be faulty, terms and conditions do apply, so
please read through the literature carefully.
Our Customer Care Centre can be called on:
0844 815 3746
We aim to answer calls as quickly as possible, and in strict
rotation as soon as one of our Customer Care team
becomes free.
Please ensure that you have available your appliances
model number and serial number, there is a space at the
back of this book for recording that information.
Alternatively visit the web site.
Outside the UK and Northern Ireland, please contact your
local supplier.

User’s Section . . . . . . . . . . . . . . . . . . . . . . . . . . . . . . . . . . . . . . . . . . . . . . . . . . . . . .
Before Using Your Cooker. . . . . . . . . . . . . . . . . . . . . . . . . . . . . . . . . . . . . . . . . . . . . . 4
Hob & Cooker Safety . . . . . . . . . . . . . . . . . . . . . . . . . . . . . . . . . . . . . . . . . . . . . . . . . 5
Chip Pan Fires . . . . . . . . . . . . . . . . . . . . . . . . . . . . . . . . . . . . . . . . . . . . . . . . . . . . . . 6
Using The Clock / Programmer . . . . . . . . . . . . . . . . . . . . . . . . . . . . . . . . . . . . . . . . . . 7
Using Your Ceramic Hob. . . . . . . . . . . . . . . . . . . . . . . . . . . . . . . . . . . . . . . . . . . . . .
. 9
Using Your Grill . . . . . . . . . . . . . . . . . . . . . . . . . . . . . . . . . . . . . . . . . . . . . . . . . . . .
1 1
Using Your Main Oven(s) . . . . . . . . . . . . . . . . . . . . . . . . . . . . . . . . . . . . . . . . . . . . .
1 2
Oven & Grill Functions . . . . . . . . . . . . . . . . . . . . . . . . . . . . . . . . . . . . . . . . . . . . . . .
1 3
Fanned Oven Guide . . . . . . . . . . . . . . . . . . . . . . . . . . . . . . . . . . . . . . . . . . . . . . . . .
1 4
Cooking Guide . . . . . . . . . . . . . . . . . . . . . . . . . . . . . . . . . . . . . . . . . . . . . . . . . . . . .
1 5
Cleaning Your Electric Hob . . . . . . . . . . . . . . . . . . . . . . . . . . . . . . . . . . . . . . . . . . . .
1 9
Cleaning Your Cavities . . . . . . . . . . . . . . . . . . . . . . . . . . . . . . . . . . . . . . . . . . . . . . .
2 0
Cleaning Your Appliance . . . . . . . . . . . . . . . . . . . . . . . . . . . . . . . . . . . . . . . . . . . . . .
2 1
Cook Shop. . . . . . . . . . . . . . . . . . . . . . . . . . . . . . . . . . . . . . . . . . . . . . . . . . . . . . . .
2 2
Trouble Shooting . . . . . . . . . . . . . . . . . . . . . . . . . . . . . . . . . . . . . . . . . . . . . . . . . . . .
Before You Call . . . . . . . . . . . . . . . . . . . . . . . . . . . . . . . . . . . . . . . . . . . . . . . . . . . .
2 3
Changing Light Bulbs . . . . . . . . . . . . . . . . . . . . . . . . . . . . . . . . . . . . . . . . . . . . . . . .
2 4
Installation Instructions . . . . . . . . . . . . . . . . . . . . . . . . . . . . . . . . . . . . . . . . . . . .
2 5
Technical Data . . . . . . . . . . . . . . . . . . . . . . . . . . . . . . . . . . . . . . . . . . . . . . . . . . . .
2 8
Customer Care . . . . . . . . . . . . . . . . . . . . . . . . . . . . . . . . . . . . . . . . . . . . Back Cover
Contents
IMPORTANT NOTICE
Please note the cooling fan fitted to this appliance is an integral part of its safety and functionality.
When the appliance is installed care must be taken that the cooling fans performance is not
impeded by any objects coming into contact with it. (Installation pipes, leads etc)
Care must also be taken that there is sufficient air flow at the rear of the appliance for the
cooling fan to run at its optimum efficiency. (Particularly Built In appliances) See clearance
dimensions in the installation section of the booklet.
During use the Appliance must never be disconnected from the Mains supply as this will
seriously affect the safety and performance of the appliance, particularly in relation to surface temperatures becoming hot and gas operated parts not working efficiently.
The cooling fan is designed to run on after the control knob has been switched off to keep
the front of the appliance and the controls cool until the appliance has naturally cooled
itself.
Before Using Your Cooker
Before using this appliance please make sure that
you have removed all packaging and wrapping.
Some of the furniture inside this
appliance may have additional wrapping.
It is also advised that you turn the ovens and/or
grill on for a short while, this will burn off any
residues left from manufacturing. There may be a
smell which accompanies this process - but this is
nothing to worry about and is harmless.
We also recommend that you wash the oven
shelves, the baking tray, the grill pan, and the grill
pan trivet before their first use in hot soapy water,
this will remove the protective oil coating.
Although every care has been taken to ensure this
appliance has no burrs, or sharp edges, we
recommend that you wear protective gloves when
installing and moving this appliance.
This will prevent any injury.
Our policy is one of constant development and
improvement. Strict accuracy of illustrations and
specifications cannot be guaranteed. Modification
to design and material may be necessary
subsequent to publication.
Please bear in mind that not all the sections inside
this handbook are relevant to your appliance, but
you should read carefully the sections which are
relevant before installation and use. This will save
you time.
Always use a registered installer for this appliance.
Environmental protection:
Glen Dimplex Home Appliance brands are
committed to protecting the environment and
operates and Environmental Management System
which complies with BS EN ISO 14001.
All packaging with this appliance is recyclable.
Please recycle whenever possible - contact your
local authority for your nearest recycling centre.
!!!
i
i
!!!
i
i
!!!
4
Hob & Cooker Safety
Always ensure that pan bases are dry, and flat before
using them on the hob.
Always position pans over the centre of the element,
and turn the handles to a safe position so they cannot
be knocked or grabbed.
Always use pans which are no smaller than 100mm
(4”), or larger than 250mm (10”).
Always take care when removing food from the oven
as the area around the cavity may be hot.
Always use oven gloves when handling any utensils
which have been in the oven as they will be hot.
Always make sure that the oven shelves are resting in
the correct position in between two runners. Do not
place the oven shelves on top of the highest runner,
this will lead to spillage and injury if the baking tray, or
dish falls.
Never use double pans, rimbased pans, old or
misshapen pans, or any pan which is not stable on a
flat surface.
Never leave cooking fat, or oil, unattended.
Never use commercial simmering aids, or heat
diffusers, as they create excessive heat and can
damage the surface of the hob.
Never use the hob for any other purpose than cooking
food.
Plastic cooking utensils can melt if they come into
contact with a warm hob. Never leave them close to,
or on top of the hob.
Never leave the element alight without a pan covering
it. This causes a fire hazard.
Do not place items on the door while it is open.
Do not wrap foil around the oven shelves, or allow it to
block the flue.
Do not drape tea towels near the oven while it is on,
this will cause a fire hazard.
Do not pull heavy items, such as turkeys, or large
joints of meat, out from the oven on the shelf, as they
may overbalance and fall.
Do not use this appliance to heat anything other than
food items, and do not use it for heating the room.
Call Customer Care for
a service engineers visit
if:
You find over a period of
time that the gas oven
becomes hotter at a
particular temperature - the
thermostat may need
replacing.
The cooling fan fails to
work.
i
Always use the Minute Minder
(if fitted) if you are leaving the
oven unattended, this reduces
the risk of food burning.
Warning (ceramic
glass): Never use the
hob if the ceramic
surface is cracked,
broken or shattered.
This creates a high risk
of injury. Switch off
the electric supply and
call for a service
engineer to come out.
Warning (ceramic
glass): Do not stare at
the halogen elements
(if fitted). This may
impair your vision!
Aluminium foil:
Do not leave foil on the hob
top, it reflects heat back into
the element which leads to
damage.
Slow cooking time?
Check the base of your pan.
Shiny pans can often reflect
heat back into the element
causing it to cycle on and off
more.
!!!
!!!
WARNING: Parts of
the appliance may
become hot while in
use, always make
sure that children
are supervised when
they are near to the
appliance.
!!!
5

Chip Pan Fires
What causes a chip pan fire?
Chip pan fires start when oil of fat overheats and catches fire,
or when oil or fat spills on to the cooker because the pan has
been filled too high.
They can also start when wet chips are put into hot oil,
making it bubble up and overflow.
Preventing a chip pan fire
Never fill the pan more than a third full with oil or fat.
Never leave the pan alone with the heat on - even for a few
seconds.
Dry chips before putting them in the pan.
Never put chips in the pan if the oil has started smoking.
Turn off the heat and leave the oil to cool down, or else it
could catch fire.
In the event of a chip pan fire
If your chip pan does catch fire - don’t panic, and don’t move
the pan. Serious burns are often caused by picking up the
pan and running outside with it.
If it is safe to do so, and you don’t have to reach across the
pan, turn off the heat.
Never throw water, or use a fire extinguisher.
If you can, drape a damp cloth or towel over the pan to
smother the flames.
Leave the pan to cool down for at least half an hour.
If you can’t control the fire yourself, close the door, get out
and tell everybody else to get out.
Call the fire brigade. Don’t go back inside whatever the
reason.
6
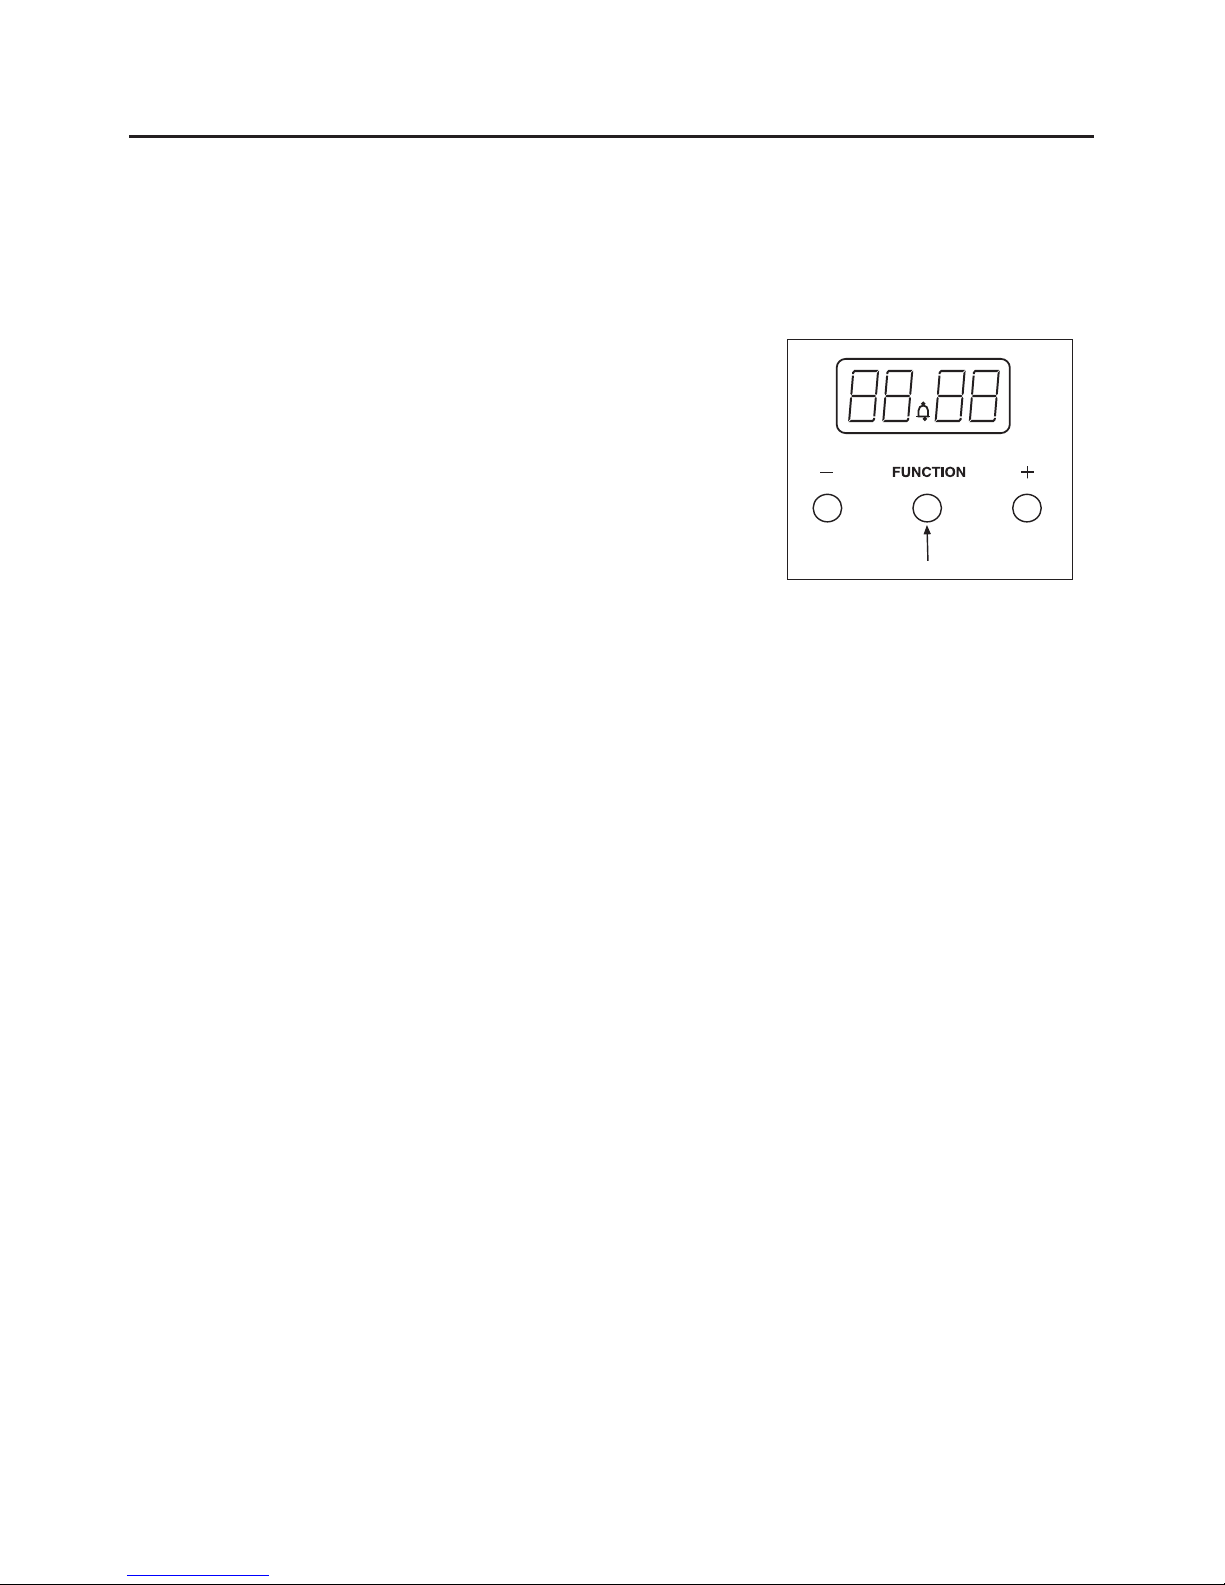
Through your clock you will be able to set the time
of day
and
set the minute minder.
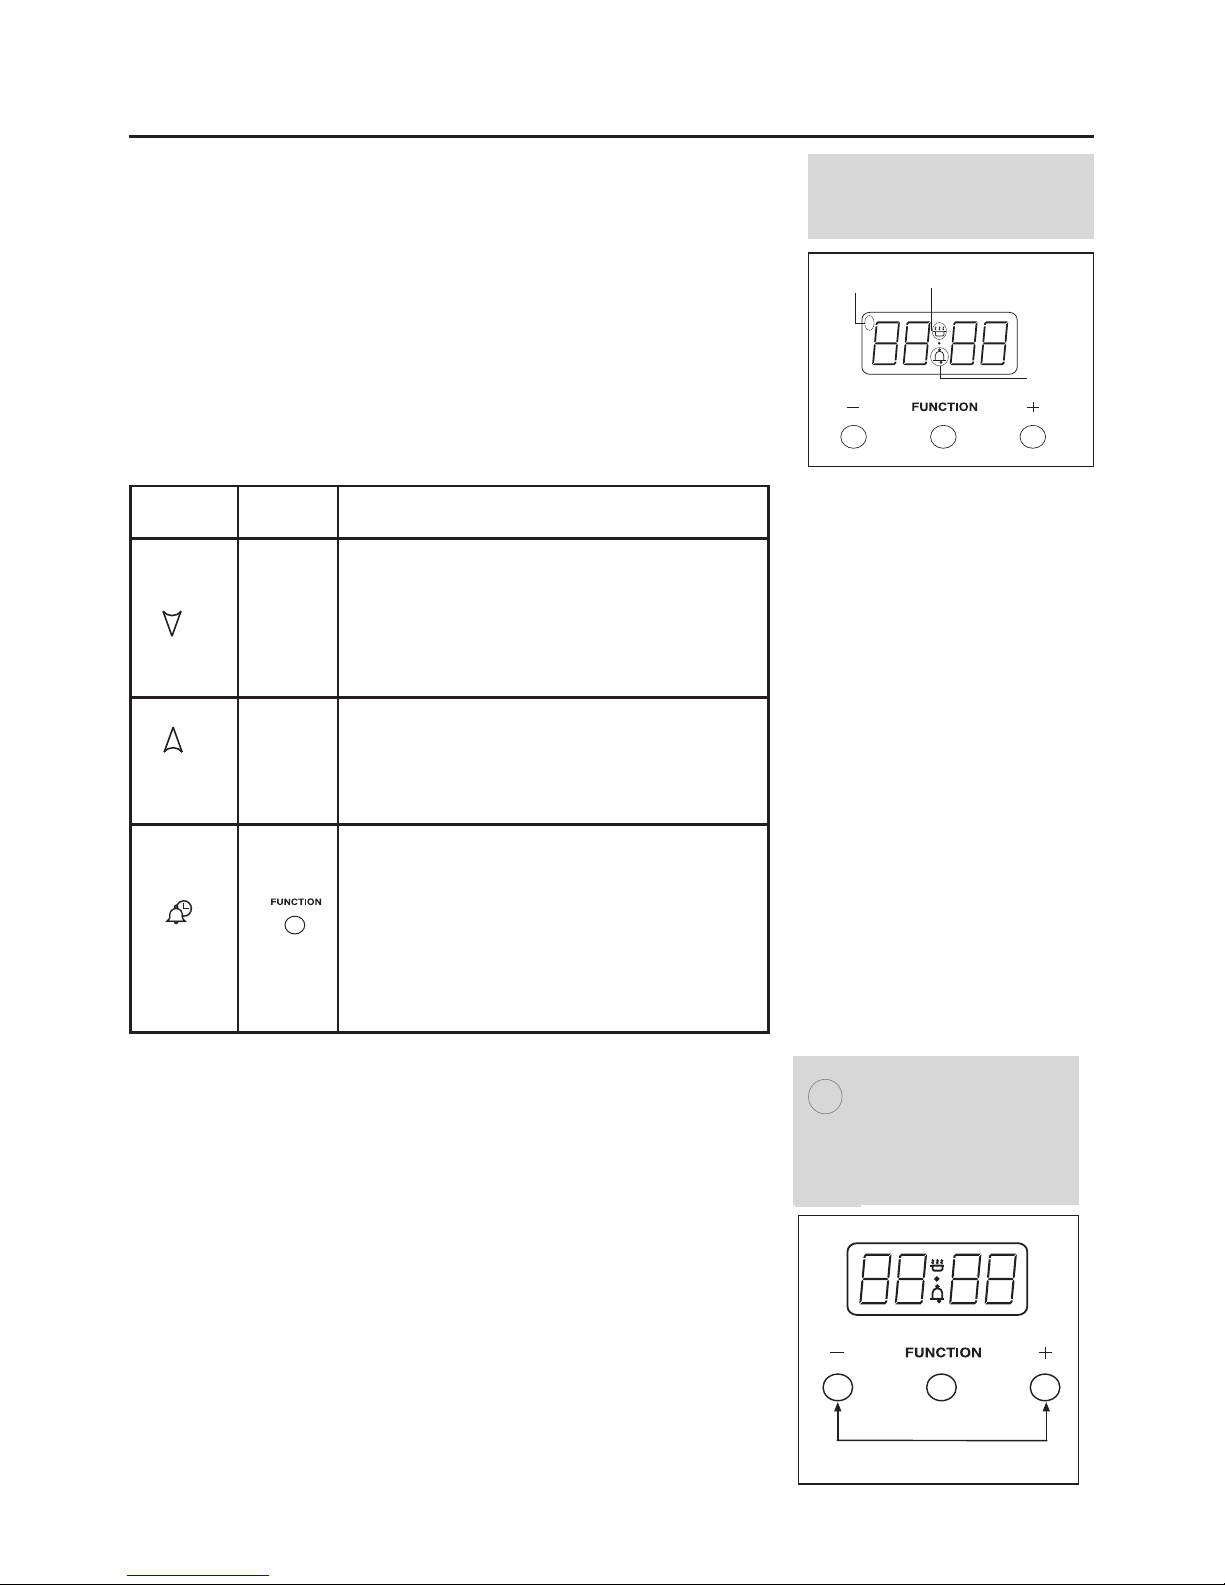
The programmer buttons (push button timer)
There are three buttons on this type of timer. The table
below shows you what their symbols look like, depending on
the model type, and what they do.
Setting the time of day (push button timer)
Press the Plus and Minus buttons together for a few
seconds, and release.
The ‘’ in between the numbers on the LED Display will
begin to flash.
While the ‘’ is flashing it is possible to adjust the time
using the Plus and Minus buttons.
Important - Once the time has been set, allow
approximately 30 seconds before using any of
the other timer functions. This ensures that the time
will remain correct.
Wait until the clock has finished flashing before attempting to use other functions of the clock
Symbol Symbol What is it?
-
Down / Minus
Used to decrease cook / end time, remove
minutes from the minute minder and adjust
the time of day.
Also for listening to and setting the alarm
tone. There are 3 tones to choose from.
+
Up / Plus
Used to increase cook / end time, add minutes
to the minute minder and adjust the time of
day.
Function button
Used to select the functions available on this
timer.
Press once for: Minute Minder.
Using The Programmer/Clock
A
Automatic
symbol
Cook Pot
Minute Minder
symbol
A
This is a 24 hour clock.
Before you do anything
with your appliance you must set the correct time of day.
i
What your timer symbols
mean.
7
Using The Programmer/Clock
8
Setting an alarm tone (Push button timer)
Press and hold the minus button.
Once the minus button is released, the tone is selected.
You can change tone by repeatedly pressing the minus
button (3 tones)
Setting the minute minder (push button timer)
To set the Minute Minder, press the centre button once.
The bell symbol will appear and start flashing.
The flashing will last for approx. 5 seconds so the
time must be set within this time frame.
Use the Plus and Minus button to set the length of time
required. Once this has been done, the Minute Minder
is set.
When the desired length of time has counted down the
alarm will sound. To cancel the tone, press any of the
buttons.
To cancel the Minute Minder at any time, press the Plus
and Minus buttons together.
Using Your Ceramic Hob
About your hob
Your hob may have halogen element (s) as well as the
standard ceramic elements. In terms of care and use the
procedure remains the same as with the other elements.
The hot hob light
The hot hob light will come on when one of the hotplates
is switched on, or when it has begun to warm up. It will
remain on for a short time after the last element has been
switched off to serve as a reminder that the hob top may
still be warm to the touch.
Switching on - rotary control
Select the element you wish to use, place the pan on
and turn the control knob clockwise to the heat you
wish to use.
The temperature settings on the hob do not indicate
any set temperature and cannot be used to judge one
element against another.
During cooking, the elements will cycle on and off, this
is to prevent the hob for overheating.
In addition for your safety, there may be a ‘hot hob’
light, this will indicate that the hob has been recently
used and may still be hot to touch.
To switch off, turn the selected control knob
anti-clockwise to the ‘
OFF’ position.
Energy Saving
Position pans centrally over the elements.
Only heat the amount of liquid you need.
Once liquids have been brought to the boil, reduce the
heat setting to a simmer.
Consider using a pressure cooker if possible.
Vegetables in small pieces will cook quicker.
Use a pan which is a close match to your element size.
Smaller elements are ideal for simmering and stewing
in smaller pans, while the larger elements are ideal for
frying and boiling.
Always make sure that
children are supervised when they are
near to the appliance
when it is in use.
!!!
Before use:
Apply a thin coat of
ceramic hob cleaner
to the hob to help
maintain and protect it.
Supplies can be
purchased from our
Customer Parts Centre.
The part number and
contact number are
towards the back of this
guide.
i
Try to avoid spillages of
salty substances or
sugary substances onto
your hotplate spillage
well, as this may cause
staining and damage your
hob.
Clean the hob top as
regularly as possible, this
will prevent any build up
of grease which may be a
fire hazard.
!!!
Use flat based pans
which are the correct
size for your burners
and suitable for your
hob type.
We recommend the
following sizes:
100mm or 4” min.
250mm or 10” max.
Smaller or larger pan
sizes may lead to slower
cooking times.
i
9
 Loading...