

Page 1
PRESSURE COOKER
8 QT. MULTI-FUNCTION
OLLA A PRESIÓN
8 QT. MULTIFUNCIÓN
Instruction Manual
Manual de instrucciones
Register your product and get support at:
Para registrar y obtener asistencia de su producto ir:
www.bellahousewares.com/welcome
For recipes, how-to videos, tips, visit our pressure cooker website:
Para ver recetas, videos de preparaciones, consejos y otra información
interesante, visite nuestro sitio web de ollas a presión:
www.bellahousewares.com/bella-pressure-cookers/
SO-313533_14595_BELLA_8qt Pressure cooker_BJ's_IM_R5.indd 1 2016-07-29 11:13 AM
Page 2

Table of Contents
Important Safeguards .................................................................................................................................. 2
Additional Important Safeguards ...............................................................................................................3
Notes on the Cord.........................................................................................................................................4
Grounded 3-Conductor Plug .......................................................................................................................4
Plasticizer Warning ....................................................................................................................................... 4
Electric Power................................................................................................................................................4
Notes on Pressure Release Valve ............................................................................................................... 4
Notes on Safety Locking Lid .......................................................................................................................4
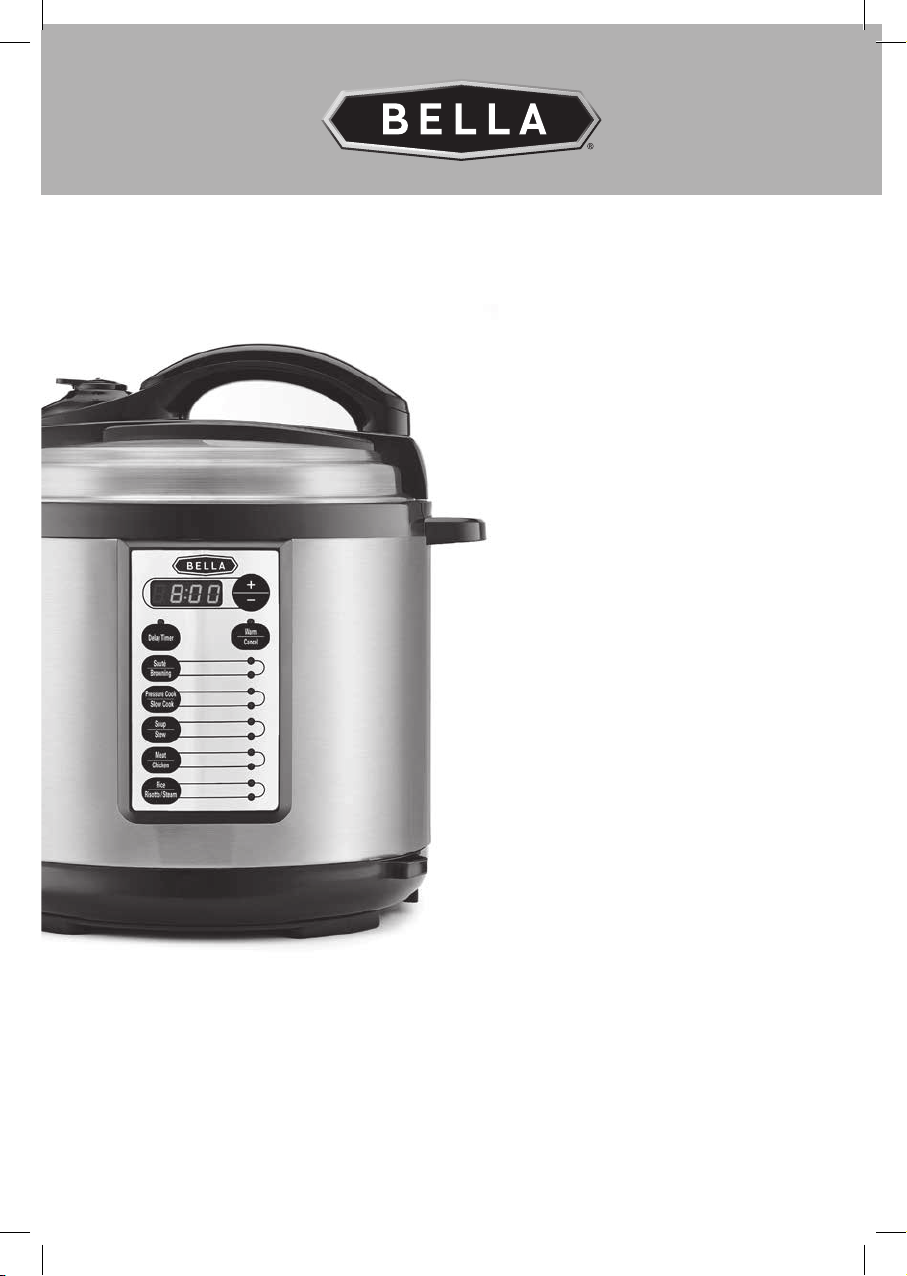
Introducing the BELLA 8 Qt. Pressure Cooker with 10 Digital One-Touch Functions ........................ 4
Getting to Know Your Pressure Cooker ................................................................................................. 5-6
Control Panel ................................................................................................................................................. 6
Before Using for the First Time .................................................................................................................. 7
Operating Instructions
Sauté/Browning .....................................................................................................................................8
Pressure Cook ........................................................................................................................................9
Slow Cook .............................................................................................................................................10
Rice Function...................................................................................................................................10 -11
Steam Function ............................................................................................................................... 11-12
Quick Steam Release .......................................................................................................................... 12
Delay Time ................................................................................................................................................... 12
User Maintenance Instructions .................................................................................................................13
Care & Cleaning Instructions .................................................................................................................... 13
Storing Instructions ....................................................................................................................................13
Trouble Shooting ........................................................................................................................................ 14
USDA Cooking Guidelines ......................................................................................................................... 14
Warranty ......................................................................................................................................................15
Índice
Medidas de seguridad importantes ......................................................................................................... 16
Otras medidas de seguridad importantes ......................................................................................... 17-18
Notas sobre el cable ...................................................................................................................................18
Enchufe conductor de 3 patas con conexión a tierra ............................................................................ 18
Advertencia sobre los plasticantes ........................................................................................................ 18
Corriente eléctrica ......................................................................................................................................18
Notas sobre la válvula de liberación de presión .................................................................................... 19
Notas sobre la tapa de cierre de seguridad ............................................................................................ 19
Presentación de la olla a presión BELLA de 8 cuartos de galón (5,7 L)
con 10 funciones digitales instantáneas ................................................................................................. 19
Conozca su olla a presión .................................................................................................................... 20 -21
Panel de control .......................................................................................................................................... 21
Antes de utilizar por primera vez .............................................................................................................22
Instrucciones de funcionamiento
Saltear/Dorar .................................................................................................................................. 23-24
Cocción a presión .......................................................................................................................... 24-25
Cocción lenta .......................................................................................................................................26
Función Rice (Arroz) ...................................................................................................................... 26-27
Función Steam (Vapor) ....................................................................................................................... 28
Liberación rápida de vapor ................................................................................................................29
Retraso .........................................................................................................................................................29
Instrucciones de mantenimiento para el usuario ..................................................................................30
Instrucciones de limpieza ..........................................................................................................................30
Instrucciones de almacenamiento ...........................................................................................................30
Solución de problemas .............................................................................................................................. 31
Pautas de cocción del USDA .....................................................................................................................31
Garantía........................................................................................................................................................32
SO-313533_14595_BELLA_8qt Pressure cooker_BJ's_IM_R5.indd 2-1 2016-07-29 11:13 AM
Page 3

IMPORTANT SAFEGUARDS
When using electrical appliances, basic safety precautions should always be
followed, including the following:
1. READ ALL INSTRUCTIONS.
2. Do not touch hot surfaces. Use handles or knobs.
3. To protect against electrical shock, do not immerse cord, plugs or appliance in
water or other liquid.
4. This appliance is not intended for use by persons (including children) with
reduced physical, sensory or mental capabilities, or lack of experience
and knowledge, unless they have been given supervision or instruction
concerning use of the appliance by a person responsible for their safety.
5. Close supervision is necessary when any appliance is used by or near
children.
6. Unplug from outlet when not in use and before cleaning. Allow to cool before
putting on or taking off parts.
7. Do not operate any appliance with a damaged cord or plug or after the
appliance malfunctions or has been damaged in any manner. Bring it to
a qualied technician for examination, repair or electrical or mechanical
adjustment.
8. The use of accessory attachments not recommended by the appliance
manufacturer may cause injuries.
9. Do not use outdoors.
10. Do not let cord hang over edge of table or counter, or touch hot surfaces.
11. Do not place on or near a hot gas or electric burner, or in a heated oven.
12. Extreme caution must be used when moving an appliance containing hot oil
or other hot liquids.
CAUTION: To protect against damage or electric shock, do not cook in the
base unit. Cook only in the cooking pot provided.
13. To disconnect, remove plug from wall outlet with dry hands.
14. Do not use appliance for other than intended use.
SAVE THESE INSTRUCTIONS
FOR HOUSEHOLD USE ONLY
ADDITIONAL IMPORTANT
SAFEGUARDS
CAUTION, HOT SURFACES: This appliance generates heat and escaping steam
during use. Proper precautions must be taken to prevent the risk of burns, res
orother injury to persons or damage to property.
1. A person who has not read and understood all operating and safety
instructions is not qualied to operate this appliance. All users of this appliance
must read andunderstand this instruction manual before operating or cleaning
this appliance.
2. If this appliance falls or accidentally becomes immersed in water,
unplugitfrom the wall outlet immediately. Do not reach into the water!
3. When using this appliance, provide adequate air space above and on all sides
for air circulation. Do not operate this appliance while it is touching or near
curtains, wall coverings, clothing, dish towels or other ammable materials.
4. Do not leave this appliance unattended during use.
5. If this appliance begins to malfunction during use, immediately unplug the
cord. Do not use or attempt to repair a malfunctioning appliance!
6. The cord to this appliance should be plugged into a 120V AC electrical wall outlet.
7. Do not use this appliance in an unstable position.
8. Never use the cooking pot on a gas or electric cook top or on an open ame.
9. Always keep your hands and face away from the pressure release valve,
when releasing the pressure.
10. Use extreme caution when removing the lid after cooking. Always tilt the lid
away from you, so that any remaining steam is blocked from your face.
11. Never attempt to open the lid while cooking, or before the pressure has
dropped. Do not attempt to bypass this safety feature by forcing the lid to open.
12. Do not cover or block the valves.
13. Do not touch the pot or lid except for the handle immediately after use.
Whilsttheproduct is in use only touch the handle, do not touch the pot or lid.
14. To avoid burns, allow the food to cool before tasting. The temperature of
the food gets considerably hotter than with conventional cooking.
15. Do not touch hot surfaces. Use oven gloves or a cloth when opening
the lid or handling hot containers as hot steam will escape.
16. Do not move the appliance while in use.
17. Remove the plug from the wall socket when the appliance is not in use
orbeforecleaning.
18. Allow the appliance to cool down completely before undertaking any cleaning task.
19. Do not touch the power cord, plug or any part of the appliance with wet hands.
20. Do not place this appliance directly under kitchen wall cupboards when in
use, as it produces steam. Avoid reaching over the appliance when it is in use.
21. Do not use the appliance near or below combustible materials,e.g: curtains.
22. To open, hold and rotate the lid clockwise to the “unlock” position but do not
leanover the appliance.
23. Never use sharp objects inside the cooking pot as this will damage the
non-stickcoating.
24. Do not use the pressure cooker for deep frying
3 2
SO-313533_14595_BELLA_8qt Pressure cooker_BJ's_IM_R5.indd 2-3 2016-07-29 11:13 AM
Page 4

callouts aligned
GROUNDED 3-CONDUCTOR PLUG
This appliance is equipped with a grounded-type 3-wire cord (3-prong plug). This
plug will only t into an electrical outlet made for a 3-prong plug. This is a safety
feature. If the plug should fail to t the outlet, contact an electrician to replace the
obsolete outlet. Do not attempt to defeat this safety feature.
NOTES ON THE CORD
The provided short power-supply cord (or detachable power-supply cord) should
be used to reduce the risk resulting from becoming entangled in or tripping over
alongercord. Do not use an extension cord with this product.
PLASTICIZER WARNING
CAUTION: To prevent Plasticizers from migrating from the nish of the counter top
or table top or other furniture, place NON-PLASTIC coasters or place mats between
the appliance and the nish of the counter top or table top. Failure to do so may
cause thenish to darken; permanent blemishes may occur or stains can appear.
ELECTRIC POWER
If the electrical circuit is overloaded with other appliances, your appliance may not operate
properly. It should be operated on a separate electrical circuit from other appliances.
NOTES ON PRESSURE RELEASE VALVE
The pressure release valve is used to regulate pressure inside the Pressure Cooker.
Small amounts of steam may escape during cooking, this is normal. Ensure that
the pressure cooker is not placed under overhanging cabinets during cooking.
Avoid reaching over the pressure release valve when in use. The pressure release
valve should always be on the ‘PRESSURE’ setting during cooking. After cooking
is complete change the setting to RELEASE before attempting to open the lid.
Ensure that your face and hands are away from the opening of the pressure
release valve to ensure that you do not get burnt or injured, the steam isveryhot
and extreme caution must be exercised when steam is being released.
NOTES ON SAFETY LOCKING LID
For your safety the lid will not come off when it is in the LOCK position. To open
the lid use the handle to turn the lid clock-wise to the UNLOCK position and lift-off
the lid. Always keep the lid in the locked position during cooking. When cooking is
complete rst turn the pressure release valve to RELEASE position, wait for steam
to escape and then turn the handle clockwise to the UNLOCK position and lift the
lid off the unit. When removing the lid, remove it in such a manner that the steam
is directed away from you. Do this by allowing the top ofthe lid to face your
direction, so steam escape away from the user.
NOTE: Do not attempt to open the Pressure Cooker when the lid is locked.
INTRODUCING THE BELLA 8 QT. PRESSURE COOKER WITH 10 DIGITAL
ONE-TOUCH FUNCTIONS
Multifunctional One Pot Cooking! With the ability to both pressure cook and slow
cook, your Digital Pressure Cooker is an absolutely indispensable kitchen appliance.
10 preset functions are automatically timed and temped to ensure perfectly cooked
soups, stews, meats, chicken. Sauté and brown foods in the non-stick cooking pot to
reduce the amount of fat, add color and rich avors before slow or pressure cooking!
With its powerful 1100 watts, this 8 Qt. Pressure Cooker can cook meals up to 70% faster
than conventional cooking methods; heat to temperature quickly; provide even cooking
temperature and pressure to ensure foods are super juicy and avorful. Prepare light
and uffy rice, perfect risotto effortlessly. At the end of each pre-programmed cook time,
the unit advances to a 4 hour WARM cycle, then turns itself OFF! How simple is that?
Getting To Know Your Pressure Cooker
Product may vary slightly from illustration
Figure 1
Lid Handle
Housing Lid
Aluminum Cover
Gasket
Removable
Cooking Pot
Base Handles
Condensation Tray
+/– TIME Buttons
Time Display
Control Panel
Base Unit
Heating Plate
(not shown)
Measuring Cup
Detachable Power
Supply Cord
Pressure Release Valve
Safety Valve
(rises when
under pressure)
Rice Paddle
Holder
Rice Paddle
5 4
SO-313533_14595_BELLA_8qt Pressure cooker_BJ's_IM_R5.indd 4-5 2016-07-29 11:13 AM
Page 5
Figure 1a
Underside of Lid
Figure 2
Control Panel
Center hole
Gasket
Aluminum
Cover
Center Pin
Cover Grip
Vent Strainer
Cap
Lid Lock
Lid Safety Valve
(as viewed from
the bottom)
Control Panel Function Time Chart
The operating pressures mentioned below will be reached after the pressure build up cycle is complete.
Make sure to securely lock the lid and set the pressure release valve to PRESSURE position.
Default Time Maximum Time Operating Presure Temperature
1. Sau té 00:30 (30 min.) 01:39 (99 min.) — * — * 170°C (338°F)
2. Browning 00:30 (30 min.) 01:39 (99 min.) — * — * 148°C (298°F)
3. Pressure Cook 00:30 (30 min.) 01:39 (99 min.) 55- 65 kPa 7.97 - 9.42 psi 110°C – 115°C (230° F – 239 °F)
4. Slow C ook 04:00 (4 hrs.) 12:0 0 (12 hrs .) — ** — ** 4 hours: 82°C - 95°C (179°F
5. Soup 00:20 (20 min.) 01:39 (99 min.) 55- 65 kPa 7.97 - 9.42 psi 110°C – 115°C (230°F – 239°F)
6. Stew 00:30 (30 min.) 01:39 (99 min.) 55- 65 kPa 7.97 - 9.42 psi 110°C – 115°C (230°F – 239 °F)
7. Mea t 00:60 (6 0 min.) 01:39 (99 min.) 55-65 kPa 7.97 - 9.42 psi 110°C – 115°C (230 °F – 23 9°F)
8. Chicken 00:45 (45 min.) 01:39 (99 min.) 55- 65 kPa 7.97 - 9.42 psi 110°C – 115°C (230°F – 239 °F)
9. Rice 00:20 (20 min.) 01:39 (99 min.) 55-65 kPa 7.97 - 9.42 psi 110°C – 115°C (230°F – 239°F)
10. Risotto/
Steam
00:25 (25 min.) 01:39 (99 min.) 55- 65 kPa 7.97 - 9.42 psi 110°C – 115°C (230°F – 239°F)
* There is no pressure for the SAUTÉ and BROWNING function as these functions are used without the lid.
** The pressure for SLOW COOK function is negligible as the temperature is lower compared to otherfunctions.
– 203°F)
6 hours: 90°C - 99°C (194°F
– 210°F)
Before Using for the First Time
1. Carefully unpack your Pressure Cooker. Remove all packaging materials from parts and accessories.
2. Unlock the Lid:
Firmly grasp the lid handle (Figure 3) and turn the lid clockwise (follow the arrow) to the UNLOCK
position to open. (See Figure 4.)
Figure 3
Figure 4
Lid
Handle
Base
Lock to
Handle
Unlock
3. Lid Disassembly:
Remove lid and rest on countertop, handle side down. Grasp the cover grip and pull to remove
aluminum cover from the underside of the lid. (See Figure 5.) Remove gasket. (See Figure 6.)
4. Remove and wash the non-stick cooking pot, aluminum cover, gasket, rice measuring cup and
paddle in warm soapy water. Rinse with clean water and dry thoroughly.
Figure 5
Cover Grip
Figure 6
Center Hole
Aluminum
Cover
Center Pin
Lid
5. Lid Assembly:
Replace clean gasket. Make sure the gasket is attached properly around the aluminum cover.
(See Figure 7.) With the cover grip facing outwards, place the cover’s center hole over the pin in the
center of the lid’s underside. (See Figure 8.) Firmly press the aluminum cover into the inside of the lid.
IMPORTANT: Check to make sure the aluminum cover is securely in place inside the lid.
Figure 7
Gasket
Figure 8
Center Hole
Aluminum
Cover
6. Slide the condensation tray into place on the side of the base unit. (See Figure 9.)
7. Clean and dry the bottom of the removable cooking pot as well as the heating plate, making sure
there are no unwanted materials on the surface. The removable cooking pot must sit at on the
heating plate to ensure proper contact.
8. Place the Digital Pressure Cooker on a at, level surface, approximately 2 feet from a standard 120V
AC electrical outlet. DO NOT let cord hang over the edge of a table or countertop.
WARNING: When slow cooking or cooking
under pressure, never place the Digital Pressure
Figure 9
Cooker under cabinets. When releasing steam,
make sure the area several feet above the
pressure release valve is clear from all lighting
xtures, furniture or cabinetr y.
9. Connect the detachable power cord to the
Slide in
Condensation
Tray
receptacle at the back of the Digital Pressure Cooker.
Gasket
Cover
Grip
Center
Hole
Aluminum
Cover
Cover Grip
Center Hole
Aluminum
cover
Center Pin
Lid
7 6
SO-313533_14595_BELLA_8qt Pressure cooker_BJ's_IM_R5.indd 6-7 2016-07-29 11:13 AM
Page 6
Before Each Use
1. Always check the lid to ensure the pressure release valve is in good working order and there are
noforeign particles blocking the valve openings on the underside of the lid.
2. Make sure gasket is attached correctly to the aluminum cover and is in proper position on the
underside of the lid. Pressure cooker set tings.
Operating Instructions
• SAUTÉ/BROWNING
WARNING: Never deep-fry or pressure-fry in the Digital Pressure Cooker, regardless of whether the lid is
on or off. THIS IS DANGEROUS AND CAN CAUSE A FIRE AND SERIOUS DAMAGE.
1. Browning adds richness and avor to pressure cooked or slow cooked foods. The SAUTÉ
orBROWNING function allows you to sauté or sear food in the removable cooking pot (in the
samebase unit) before cooking.
WARNING: Make sure the lid is removed when using SAUTÉ or BROWNING function.
2. Place the removable cooking pot into the base unit.
3. Plug the cord into a 120V AC electrical wall outlet. A series of 4 dashes (- - - - ) will be displayed.
For best results:
• Always pat food dry with paper towels.
• Cut food into small, uniform pieces.
• SAUTÉ or BROWN food in small batches. Do not crowd the cooking pot.
4. Add oil, as called for in the recipe.
IMPORTANT: To avoid scratching the non-stick surface of the cooking pot, use non-metal,
plasticorwooden utensils to turn food when sautéing or browning.
5. With the lid off, press the SAUTÉ/BROWNING button. The SAUTÉ indicator light will illuminate.
(See Figure 10.)
6. Press the SAUTÉ/BROWNING button again, the BROWNING indicator light will illuminate.
(SeeFigure 11.)
7. The default time “00:30” (30 minutes) will ash on the display. While ashing, the default time can
be changed by pressing the “+” and “-“ buttons to manually change the time from 5 minutes (00:05)
to 99 minutes (01:39).
8. When temperature is reached, time will count down to 00:00.
WARNING: Extreme caution should be used when sautéing or browning foods in hot oil.
Keephands and face away from the cooking pot especially when adding new ingredients, as
hotoilmayspatter.
9. When food is satisfactorily seared or browned, press the WARM/CANCEL button.
A series of 4 dashes (- - - - ) will be displayed to indicate the Digital Pressure Cooker is OFF.
10. When cook time reaches “00:00” 5 audible beeps can be heard and the unit will auto shift to WARM mode.
11. Continue cooking with the Digital Pressure Cooker according to recipe directions.
12. IMPORTANT: After browning or sautéing, if you want to select a different cooking function, you
have to rst press WARM/CANCEL. Then follow the instructions for the cooking function.
Figure 10
1x
Figure 11
2x
• PRESSURE COOK
Introduction
1. Your Digital Pressure Cooker cooks like a traditional pressure cooker by combining steam heat and
pressure for faster cooking times. Since an air tight seal is formed when the lid is closed and locked,
the heat and steam stay trapped inside the removable cooking pot. The combination of high heat
and pressure cooks the food faster while retaining water soluble nutrients and avor.
2. Your Digital Pressure Cooker takes the guesswork out of cooking under pressure.
A built-in thermostat knows exactly when pressure is reached inside the removable cooking pot
andautomatically adjusts the heat and triggers the timer when cooking begins.
3. The powerful 1100 watt heating element allows for quick heating and maintains even cooking
temperatures and pressures.
4. The large, 8-quart capacity, heavy-duty, non-stick, aluminum removable cooking pot heats
quicklyand evenly.
IMPORTANT: Since overcooked food cannot be corrected, it is advisable to err on the
undercookedside by cooking an unfamiliar food for a shorter period of time than you may think
necessary. Youcan always go back and continue cooking a minute or two longer if need be.
Cooking Under Pressure
1. Place food to be pressure cooked into the removable cooking pot.
WARNING: Do not ll the removable cooking pot higher than the MAX 2/3 line inside the cooking
pot when cooking vegetables or whole pieces of meat.
WARNING: Do not exceed the 1/2 line when pressure cooking foods that expand: rice, dried beans,
grains, and legumes.
WARNING: Add at least 1 cup (8 oz.) liquid to the removable cooking pot when cooking under pressure.
CAUTION: Never operate the Digital Pressure Cooker when the cooking pot is empty.
WARNING: Do not cook with food content below the minimum marking on the cooking pot.
2. Lid Assembly
Please follow the detailed instructions described in the BEFORE USING FOR THE FIRST TIME
section of this instruction manual. Make sure the gasket is attached properly around the cover
andthe aluminum cover is securely in place on the lid.
3. Lock the Lid
Place the lid onto the Digital Pressure Cooker. (See Figure 12.) Holding the base handle in one hand,
rmly grasp the lid handle with the other hand and turn the lid counter-clockwise (follow the arrow).
The lid will click as it locks into place. When locked, the lid handle and the base handle will be in
perfect alignment. (See Figure 13.)
Figure 12
Unlock
Position
Lid
Handle
Base
Handle
4. Turn the pressure release valve to the PRESSURE
position. (See Figure 14.)
IMPORTANT: If the pressure release valve is
not closed or is not in the PRESSURE position,
theDigital Pressure Cooker will not build pressure.
5. Plug the cord into a 120V AC electrical wall outlet.
A series of 4 dashes (- - - - ) will be displayed.
6. Press the desired FUNCTION button (PRESSURE
COOK, SOUP, STEW, MEAT, CHICKEN) once or twice until the corresponding light indicates the
desired setting. The FUNCTION default time will ash on the display.
NOTE: If a recipe calls for a time that is not the default cook time, cooking times may be easily modied.
7. While ashing, the default time can be changed by pressing the “+” and “-“ buttons to manually
change the time from 5 minutes (00:05) to 99 minutes (01:39).
8. As the unit begins to heat and cooking pot pressure builds, the “0” graphic on the display
will begin to spin.
NOTE: Preheat / pressure build-up times vary depending on the FUNCTION selected.
Figure 13
Lock
Position
Lid
Handle
Base
Handle
Figure 14
Pressure
9 8
SO-313533_14595_BELLA_8qt Pressure cooker_BJ's_IM_R5.indd 9 2016-07-29 11:13 AM
Page 7

9. When temperature and pressure have been achieved, the “0” graphic will stop spinning and the
time will begin to count down until “00:00” (00 minutes) is shown.
10. When cook time reaches “00:00” 5 audible beeps can be heard; “bb” will be displayed to indicate
the unit has advanced to a 4 hour WARM cycle, during which the steam will be released naturally
and then the Digital Pressure Cooker will turn itself OFF.
CAUTION: WHEN COOKING UNDER PRESSURE, THE LID CANNOT BE OPENED ONCE PRESSURE
IS REACHED. DO NOT TRY TO FORCE THE LID OPEN.
CAUTION: Keep hands and face clear of the pressure release valve when the appliance is in
operation. Hot steam and water may be emitted during use.
NOTE: Press the WARM/CANCEL button to turn the Digital Pressure Cooker OFF at any time.
Aseries of 4 dashes (- - - - ) will be displayed.
• SLOW COOK
Slow cooking occurs at temperatures just around boiling. The Slow Cooker can cook for up to 12 hours,
much like a covered pot on the stove top.
1. Place food to be cooked into the removable cooking pot.
IMPORTANT: Do not ll the removable cooking pot higher than the MA X 2/3 line inside the cooking
pot when cooking vegetables or whole pieces of meat.
CAUTION: Never operate the Digital Pressure Cooker when the cooking pot is empty.
IMPORTANT: Do not cook with food content below the minimum marking on the cooking pot.
2. Following detailed instructions previously described for PRESSURE COOK, assemble lid, close and
lock lid.
3. Turn the pressure release valve to the RELEASE position.
4. Plug the cord into a 120V AC electrical wall outlet. A series of 4 dashes (- - - - ) will be displayed.
5. Press the PRESSURE COOK/SLOW button twice until the corresponding light indicates
SLOWCOOK.
The default time of 04:00 (4 hours) will ash.
6. While ashing, the default time can be changed by pressing the “+” and “-“ buttons.
MaximumSLOW COOK time is 12:00 (12 hours).
7. When temperature is reached, the time will begin to count down until “00:00” (00 minutes) is shown.
8. When cook time reaches “00:00” 5 audible beeps can be heard; “bb” will be displayed to indicate
the unit has advanced to a 4 hour WARM cycle after which the unit will then turn itself OFF.
IMPORTANT: When using SLOW COOK function, you may remove the lid to check on food,
stir contents, add food or liquids during cooking. The unit will begin to beep, and “E0” will be
displayeduntil the lid is replaced and locked.
• RICE FUNCTION
WARNING: Do not use your Digital Pressure Cooker to cook instant rice.
A 180 ml. (3/4 cup) rice measuring cup is included with your Digital Pressure Cooker. Up to 7 rice
measuring cups (6-3/4 cups) of uncooked white rice may be pressure cooked in the 8 Qt. Digital Pressure
Cooker. Many varieties of rice can be used including: basmati, wild rice, black rice, Arborio, risotto, brown,
long and short grains. For estimated times and rice to water/cooking liquid quantities, please refer to the
RICE COOKING CHART that follows.
1. Using the rice measuring cup, add leveled cups of raw rice to the cooking pot. Rice may be rinsed or
not, depending on your preference.
2. When pressure cooking white, long grain rice, use the ratio: 2 cups raw rice to 3 cups water, or use
1-1/2 times more water than raw rice. For example, for 9 rice measuring cups of raw rice, add 13-1/2
rice measuring cups of water. Water volume may be adjusted to taste on subsequent rice cooking.
IMPORTANT: Add one tablespoon of oil (vegetable, olive, sesame) to reduce excess foaming.
IMPORTANT: When pressure cooking wild rice, add 25% to 50% more water to cook thoroughly.
Follow package instructions.
3. Following detailed instructions previously described for PRESSURE COOK, assemble lid,
close and lock lid.
4. Plug the cord into a 120V AC electrical wall outlet. A series of 4 dashes (- - - - ) will be displayed.
5. Press the RICE button once; RICE light will illuminate. The default time of 00:20 (20 minutes)
will be displayed.
NOTE: If a recipe calls for a time that is not the default cook time, cooking times may be easily modied.
6. While ashing, the default time can be changed by pressing the “+” and “-“ buttons to manually
change the time from 5 minutes (00:05) to 99 minutes (01:39).
7. As the unit begins to heat and cooking pot pressure builds, the “0” graphic on the display
will begin to spin.
8. When temperature and pressure have been achieved, the “0” graphic will stop spinning and
thetime will begin to count down until “00:00” (00 minutes) is shown.
9. When cook time reaches “00:00” 5 audible beeps can be heard; “bb” will be displayed to indicate
the unit has advanced to a 4 hour WARM cycle.
10. To avoid over-cooking rice, immediately press the WARM/CANCEL but ton. A series of 4 dashes
(- - - - ) will be displayed to indicate the Digital Pressure Cooker is OFF.
11. IMPORTANT: Use the Quick Steam Release following the detailed instructions described in
thePRESSURE COOK section of this instruction manual.
WARNING: Use caution when opening lid. Steam escapes as soon as the lid is opened.
Never place your face or hands over the Digital Pressure Cooker when removing the lid.
Always use oven mitts when handling the hot cooking pot.
12. Unplug the cord from the outlet.
NOTE: After cooking rice, some rice cooking liquid may pool under the lid at the top of the unit
around the cooking pot. This is normal. Use a paper towel or kitchen cloth to clean after every use.
Use a small brush or cotton swab if necessary.
Rice Cooking Chart
IMPORTANT: Add one tablespoon of oil (vegetable, olive, sesame) to reduce excess foaming.
NOTE: Use Rice Measuring Cup (provided) to measure both rice and water.
RAW WHITE RICE
(cups)
2 3 2 3-1/4
3 4-1/2 3 4-3/4
4 6 4 6-1/4
5 7-1/2 5 7-3/4
6 9 6 9-1/4
7 10-1/2 7 10-3/4
*Actual cooking times may vary depending on the age of the grain and personal preference.
WATER
(cups)
RAW BROWN RICE
(cups)
WATER
(cups)
• STEAM FUNCTION
Preparing Vegetables for Steam
• Peel vegetables when appropriate, or scrub them well. Keep in mind that hard vegetables such as
potatoes and beets hold their shape better when the peel is left intact.
• Vegetables may be cooked whole or chopped into pieces. The larger the piece, the longer it will take
to cook.
• Vegetables with the same cooking time may be cooked together.
• Since quick-cooking vegetables like zucchini, asparagus and broccoli may easily be overcooked, it is
best to steam rather than pressure-cook.
Basic Vegetable Steaming
1. Place the removable cooking pot into the base. Arrange food in a non-metal, heat-resistant plastic
or bamboo steaming rack or basket (NOT INCLUDED) and use basket handles to lower food into
the removable cooking pot.
NOTE: You may add more food on top of and around basket, but do not exceed the 2/3 MAX line on
the cooking pot.
2. Pour 1-1/2 cups water or steaming liquid into the removable cooking pot.
3. Following detailed instructions previously described for PRESSURE COOK, assemble lid, close and
lock lid.
4. Turn the pressure release valve to the PRESSURE position. (See Figure 13.)
IMPORTANT: If the pressure release valve is not closed (in the PRESSURE position), the Digital
Pressure Cooker will not build pressure.
5. Plug the cord into a 120V AC electrical wall outlet. A series of 4 dashes (- - - - ) will be displayed.
6. Press the desired RICE/RISOT TO/STEAM button twice until the corresponding light indicates the
STEAM setting. The default time of 00:25 (25 minutes) will be displayed.
NOTE: If a recipe calls for a time that is not the default cook time, cooking times may be easily modied.
7. While ashing, the default time can be changed by pressing the “+” and “-“ buttons to manually
change the time from 5 minutes (00:05) to 99 minutes (01:39).
11 10
SO-313533_14595_BELLA_8qt Pressure cooker_BJ's_IM_R5.indd 10-11 2016-07-29 11:13 AM
Page 8

8. As the unit begins to heat and cooking pot pressure builds, the “0” graphic on the display
will begin to spin.
9. When temperature and pressure have been achieved, the “0” graphic will stop spinning and the
time will begin to count down until “00:00” (00 minutes) is shown.
10. When cook time reaches “00:00” 5 audible beeps can be heard; “bb” will be displayed to indicate
the unit has advanced to a 4 hour WARM cycle.
11. To avoid over-steaming, immediately press the WARM/CANCEL button. A series of 4 dashes (- - - - )
will be displayed to indicate the Digital Pressure Cooker is OFF.
12. IMPORTANT: Use the Quick Steam Release following the detailed instructions described in the
PRESSURE COOK section of this instruction manual.
WARNING: Use caution when opening lid. Steam escapes as soon as the lid is opened. Never place
your face or hands over the Digital Pressure Cooker when removing the lid. Always use oven mitts
when handling the hot cooking pot.
• QUICK STEAM RELEASE
1. Using an oven mitt or kitchen towel, turn the pressure release valve to RELEASE
and allow the steam to escape. (See Figure 15.) When the pressure is fully released, the safetyvalve
will drop down completely.
2. Holding the base handles rmly in one hand,
rmly grasp the lid handle with the other hand
and rotate clock wise (follow the arrow on the
lid handle) to unlock. (See Figure 3.)
WARNING: Use caution when opening lid.
Steam escapes as soon as the lid is opened.
3. Remove the lid, tilting it away from you to
avoid steam.
CAUTION: Never place your face or hands
overthe Digital Pressure Cooker when
removing the lid.
CAUTION: Always use oven mitts when handling the hot cooking pot.
CAUTION: After making soups and stock, allow several minutes before releasing the pressure
and removing the lid to avoid hot liquids from boiling over.
4. Check the food to see if it has been cooked sufciently. If not, replace the lid and lock into position
following the previous instructions. Set time to 5 minutes (minimum). Cook under pressure an
additional 2 to 3 minutes if necessary.
5. Press the WARM/CANCEL button af ter 2 minutes. A series of 4 dashes (- - - - ) will be displayed to
indicate the Digital Pressure Cooker is OFF. Turn the pressure release valve to RELEASE to quick
release steam. Unplug the cord from the outlet.
6. Allow the appliance to cool before cleaning. Follow the Care & Cleaning Instructions outlined in this
instruction manual.
Figure 15
Pressure
Release
Delay Time
The unit offers a delay timer if you choose to delay your cooking time by up to 2 hours.
1. Place food to be cooked into the removable cooking pot.
IMPORTANT: Do not ll the removable cooking pot higher than the MA X 2/3 line inside the cooking
pot when cooking vegetables or whole pieces of meat.
CAUTION: Never operate the Digital Pressure Cooker when the cooking pot is empty.
IMPORTANT: Do not cook with food content below the minimum marking on the cooking pot.
2. Following detailed instructions previously described for PRESSURE COOK, assemble lid,
close and lock lid.
3. Before selecting the cooking function press the DELAY TIMER key to add a cooking time delay.
Continue to press the but ton until the desired time delay is reached. The delay timer can be
adjusted up to a maximum delay time of 2 hours.
4. Once the delay has been selected use the CONTROL PANEL to choose the desired cooking setting
(i.e. rice, soup, chicken, etc.). The cooking will begin once the time delay has elapsed.
User Maintenance Instructions
This appliance requires little maintenance. It contains no user-serviceable parts. Any servicing requiring
disassembly other than cleaning must be performed by a qualied appliance repair technician.
Care & Cleaning Instructions
1. Unplug and allow the Digital Pressure Cooker cool to room temperature before cleaning.
2. Wash the removable cooking pot with warm soapy water and a clean, soft cloth or sponge. Rinse
with clean water and dry thoroughly.
NOTE: After cooking rice or larger pot meals, some cooking liquid may pool under the lid at the top
of the unit around the cooking pot. This is normal.
3. Use a paper towel or kitchen cloth to clean after every use. Use small brush or cotton swab if necessary.
4. Please follow the detailed Lid Disassembly instructions described in the BEFORE USING FOR THE
FIRST TIME section of this instruction manual. (See Figures 3 and 4.) Use the cover grip on the
underside of the lid to lift the removable aluminum cover up and off. Remove the gasket.
5. Wash gasket and aluminum cover in warm, soapy water. Rinse with clean water and dry thoroughly.
The cooking pot can be cleaned in a dishwasher.
6. Remove the pressure indicator valve from the lid by lifting it up and off the Digital Pressure Cooker
lid. Rinse well and replace.
7. After cleaning, reassemble the Digital Pressure Cooker lid following the detailed Lid Assembly
instructions described in the BEFORE USING FOR THE FIRST TIME section of this instruction
manual. (See Figures 7 and 8.) Firmly press the aluminum cover into the inside of the lid. Check to
make sure that it is securely
in place.
IMPORTANT: The gasket must always be properly positioned on the underside of the lid. Check
periodically to make sure that it is clean, exible and not cracked or torn. If damaged, do not use
this appliance.
8. Gently pull the condensation tray downwards to remove from the back of the unit. Discard water
after each use. Rinse and replace the condensation tray before the next use.
9. Wipe the base clean with a damp soft cloth or sponge. Do not pour any liquid into the Digital
Pressure Cooker’s base.
10. Never use harsh chemical detergents, scouring pads or powders on any of the parts or components.
11. In order to maintain optimal performance of your Digital Pressure Cooker, the heating plate must be
free of dirt, food, or residue. If necessary, wipe with a soft, damp cloth and be sure to dry thoroughly.
Storing Instructions
1. Unplug and allow unit to cool completely. Be sure all parts are clean and dry before storing.
Assemble lid (see Figures 7 and 8) before storing.
2. Store the detachable power cord, rice measuring cup, and paddle in the cooking pot.
3. To prevent aromas, molds and of f avors, never store your Digital Pressure Cooker closed with
the lid locked in place. Pack and store the Digital Pressure Cooker with the lid resting upside-down
on the removable cooking pot.
4. Store the Digital Pressure Cooker in its original box or covered in a cool, dry place.
13 12
SO-313533_14595_BELLA_8qt Pressure cooker_BJ's_IM_R5.indd 12-13 2016-07-29 11:13 AM
Page 9

Limited TWO-YEAR Warranty
SENSIO Inc. hereby warrants that for a period of TWO YEARS from the date
of purchase, this product will be free from mechanical defects in material and
workmanship, and for 90 days in respect to non-mechanical parts. At its sole
discretion, SENSIO Inc. will either repair or replace the product found to be
defective, or issue a refund on the product during the warranty period.
The warranty is only valid for the original retail purchaser from the date of initial
retail purchase and is not transferable. Keep the original sales receipt, as proof
of purchase is required to obtain warranty validation. Retail stores selling this
product do not have the right to alter, modify, or in any way revise the terms and
conditions of the warranty.
EXCLUSIONS:
The warranty does not cover normal wear of parts or damage resulting from
any of the following: negligent use of the product, use of improper voltage or
current, improper routine maintenance, use contrary to the operating instructions,
disassembly, repair, or alteration by anyone other than qualied SENSIO Inc.
personnel. Also, the warranty does not cover Acts of God such as re, oods,
hurricanes, or tornadoes.
SENSIO Inc. shall not be liable for any incidental or consequential damages
caused by the breach of any express or implied warranty. Apart from the extent
prohibited by applicable law, any implied warranty of merchantability or tness
for a particular purpose is limited in time to the duration of the warranty. Some
states, provinces or jurisdictions do not allow the exclusion or limitation of
incidental or consequential damages, or limitations on how long an implied
warranty lasts, and therefore, the above exclusions or limitations may not apply to
you. The warranty covers specic legal rights which may vary by state, province
and/or jurisdiction.
HOW TO OBTAIN WARRANTY SERVICE:
You must contact Customer Service at our toll-free number: 1-866-832-4843.
A Customer Service Representative will attempt to resolve warranty issues
over the phone. If the Customer Service Representative is unable to resolve the
problem, you will be provided with a case number and asked to return the product
to SENSIO Inc. Attach a tag to the product that includes: your name, address,
daytime contact telephone number, case number, and description of the problem.
Also, include a copy of the original sales receipt. Carefully package the tagged
product with the sales receipt, and send it (with shipping and insurance prepaid)
to SENSIO Inc.’s address. SENSIO Inc. shall bear no responsibility or liability for
the returned product while in transit to SENSIO Inc.’s Customer Service Center.
Trouble Shooting
The Digital Pressure Cooker is equipped with safety features that will shut the unit down if an abnormal
condition is encountered during pressure or slow cooking. An error signal will be displayed on the control
panel. Depending on the error, audible beeping may be heard. Once the problem has been identied and
corrected, plug in the unit and resume pressure cooking.
ERROR DISPLAY : E0
Description Solution
The lid is incorrectly used. If the lid is not locked
correctly and a function is selected, an audible beep
can be heard the error message “E0” will be displayed.
Searing/Browning with lid attached, an audible beep
can be heard the error message “E0” will be displayed.
Lid is opened during SLOW COOK. Constant beeping
can be heard and the error message “E0” will be
displayed.
Make sure lid is correctly locked in position.
Remove lid. Always cook with lid removed
when SEARING or BROWNING foods.
When using SLOW COOK function, you may
remove the lid to check on food, stir contents,
add food or liquids during cooking. Replace
lid and lock properly. SLOW COOK will
resume.
USDA Cooking Guidelines
PLEASE NOTE: Cook all food to these minimum internal temperatures as measured with a food
thermometer before removing food from the heat source. For reasons of personal preference,
consumersmay choose tocook food to higher temperatures. This char t is intended as a general guide
by the USDA.
Product Minimum Internal Temperature & Rest Time
Beef, Pork, Veal & Lamb
Steaks, chops, roasts
Pork 160 °F (71.1 °C)
Ground meats 160 °F (71.1 °C)
Ham, fresh or smoked (uncooked) 145 °F (62.8 °C) and allow to rest for at least 3minutes
Fully Cooked Ham (to reheat) Reheat cooked hams packaged in USDA-inspected plants
145 °F (62.8 °C) and allow to rest for at least 3minutes
to140°F (60 °C) and all others to 165 °F (73.9°C).
Product Minimum Internal Temperature
All Poultry (breasts, whole bird, legs,
thighs, andwings, ground poultry,
andstufng)
Eggs 160 °F (71.1 °C)
Fish & Shellsh 145 °F (62.8 °C)
Leftovers 165 °F (73.9 °C)
Casseroles 165 °F (73.9 °C)
170 °F (77 °C)
15 14
SO-313533_14595_BELLA_8qt Pressure cooker_BJ's_IM_R5.indd 14-15 2016-07-29 11:13 AM
Page 10

MEDIDAS DE SEGURIDAD
OTRAS MEDIDAS DE
IMPORTANTES
Al utilizar electrodomésticos, siempre deben cumplirse las precauciones de
seguridad básicas, incluidas las siguientes:
1. LEA TODAS LAS INSTRUCCIONES.
2 No toque las supercies calientes. Utilice las asas o perillas.
3 Para protegerse del riesgo de descarga eléctrica, no sumerja el cable,
losenchufes ni el electrodoméstico en agua ni en ningún otro líquido.
4 Este electrodoméstico no debe ser utilizado por personas (incluidos niños)
con capacidades físicas, sensoriales o mentales reducidas, o con falta de
experiencia y conocimientos, a menos que una persona responsable por
suseguridad los supervise o los instruya sobre el uso del electrodoméstico.
5 Es necesario que haya una supervisión estricta cuando el electrodoméstico
sea utilizado por niños o cerca de ellos.
6 Desenchufe el electrodoméstico del tomacorriente cuando no lo utilice
y antes de limpiarlo. Deje que se enfríe antes de colocarle o retirarle piezas.
7 No utilice ningún electrodoméstico que tenga un cable o enchufe dañado,
quemuestre un funcionamiento defectuoso o que se haya dañado de
cualquier manera. Lleve el electrodoméstico a un técnico calicado para
quelo examine, lo repare o le haga ajustes eléctricos o mecánicos.
8 El uso de accesorios no recomendados por el fabricante del electrodoméstico
puede provocar lesiones.
9 No utilice este aparato en exteriores.
10 No permita que el cable cuelgue del borde de una mesa o de una
encimeranique entre en contacto con supercies calientes.
11 No lo coloque sobre un quemador a gas o eléctrico, o cerca de este,
nidentrode un horno caliente.
12 Se debe ser sumamente cuidadoso al mover un electrodoméstico que
contiene aceite caliente u otros líquidos calientes.
PRECAUCIÓN: Para protegerse de los daños o del riesgo de descarga
eléctrica, no cocine en la unidad base. Cocine solo en la cacerola de
cocciónprovista.
13 Para desconectar, retire el enchufe del tomacorriente de pared con
lasmanossecas.
14 No utilice el electrodoméstico con nes que no sean para los que
fuediseñado.
GUARDE ESTAS INSTRUCCIONES
ESTE PRODUCTO ES PARA USO
DOMÉSTICO ÚNICAMENTE.
SEGURIDAD IMPORTANTES
PRECAUCIÓN, SUPERFICIES CALIENTES: Este electrodoméstico genera calor y
libera vapor mientras está en funcionamiento. Se deben tomar las medidas de
precaución adecuadas para evitar el riesgo de quemaduras, incendios u otros
tipos de lesiones a personas o daños materiales.
1 Las personas que no hayan leído y comprendido todas las instrucciones de
funcionamiento y seguridad no deben utilizar este electrodoméstico. Todos los
usuarios de este electrodoméstico deben leer y comprender este manual de
instrucciones antes de poner en funcionamiento o limpiar la unidad.
2 Si el electrodoméstico se cae o accidentalmente se sumerge en agua, desenchúfelo
del tomacorriente de pared de inmediato. ¡No introduzca la mano en el agua!
3 Cuando utilice este electrodoméstico, proporcione una buena ventilación
por encima y a los lados de la unidad para que circule el aire. No utilice este
electrodoméstico mientras esté en contacto con cortinas o se encuentre
cerca de cortinas, recubrimientos de pared, ropa, paños de cocina u otros
materiales inamables.
4 No descuide el electrodoméstico mientras está en funcionamiento.
5 Si el electrodoméstico comienza a funcionar mal mientras está en uso, desenchufe
el cable de inmediato. ¡No utilice ni intente reparar un electrodoméstico que
funcione mal!
6 El cable de este electrodoméstico debe enchufarse en un tomacorriente de pared
de 120 V CA.
7 No utilice este electrodoméstico en una posición inestable.
8 Nunca use la cacerola de cocción sobre una supercie de cocción eléctrica o a
gas ni sobre llama abierta.
9 Cuando libera la presión, mantenga siempre sus manos y rostro alejados de la
válvula de liberación de presión.
10 Tenga mucho cuidado cuando quita la tapa después de cocinar. Siempre incline
la tapa lejos de usted para evitar que el vapor restante entre en contacto con su
rostro.
11 Nunca intente abrir la tapa durante la cocción o antes de que la presión haya
disminuido. No intente evadir esta función de seguridad, haciendo fuerza para
abrir la tapa.
12 No cubra ni bloquee las válvulas.
13 No toque la cacerola ni la tapa, excepto el asa, inmediatamente después de
usar. Mientras el producto está en uso, solo toque el asa; no toque la cacerola
ni la tapa.
14 Para evitar quemaduras, deje que los alimentos se enfríen antes de probarlos.
Latemperatura de los alimentos aumenta de forma considerable en comparación
con la cocción convencional.
15 No toque las supercies calientes. Utilice guantes de horno o un paño al abrir
latapa o manipular recipientes calientes, ya que el vapor caliente se escapará.
16 No mueva el electrodoméstico mientras está en uso.
17 Retire el enchufe del tomacorriente de pared cuando el electrodoméstico no está
en uso o antes de limpiar.
18 Deje enfriar el electrodoméstico por completo antes de realizar cualquier tarea
de limpieza.
17 16
SO-313533_14595_BELLA_8qt Pressure cooker_BJ's_IM_R5.indd 16-17 2016-07-29 11:13 AM
Page 11

callouts aligned
19 No toque el cable de alimentación, el enchufe ni ninguna otra parte del
electrodoméstico con las manos mojadas.
20 No coloque el electrodoméstico directamente debajo de las alacenas
de lacocina mientras lo utiliza, ya que despide vapor. Evite tocar el
electrodoméstico mientras está en uso.
21 No utilice el electrodoméstico cerca o debajo de materiales combustibles,
porejemplo, cortinas.
22 Para abrirlo, sostenga y gire la tapa en sentido horario hasta la posición
“unlock” (Desbloquear), pero no se incline sobre el electrodoméstico.
23 No utilice nunca objetos puntiagudos dentro de la cacerola de cocción,
yaquedañará el revestimiento antiadherente.
24 No utilice la olla a presión para preparar frituras.
ENCHUFE CONDUCTOR DE 3 PATAS CON CONEXIÓN A TIERRA
Este electrodoméstico está equipado con un cable de conexión a tierra de tres
hilos (enchufe de 3 patas). El enchufe solo encajará en un tomacorriente eléctrico
apto para un enchufe de 3 patas. Debe conectarlo únicamente a un tomacorriente
con conexión a tierra. Si el enchufe no encaja en el tomacorriente, comuníquese
con un electricista para que reemplace el tomacorriente defectuoso. No intente
anular esta característica de seguridad.
NOTAS SOBRE EL CABLE
Se debe usar el cable de alimentación corto provisto (o un cable de alimentación
desmontable) para reducir el riesgo de enredarse o tropezarse con un cable más
largo. No utilice un prolongador con este producto.
ADVERTENCIA SOBRE LOS PLASTIFICANTES
PRECAUCIÓN: A n de evitar que los plasticantes se adhieran al acabado de
laencimera, la mesa u otro mueble, coloque un posafuentes o salvamanteles
queNOSEA DE PLÁSTICO entre el electrodoméstico y la supercie de la encimera
o mesa. Si no se hace esto, es posible que el acabado se oscurezca, se formen
marcas permanentes o aparezcan manchas.
CORRIENTE ELÉCTRICA
Si el circuito eléctrico está sobrecargado con otros artefactos, es posible que el
electrodoméstico no funcione correctamente. El electrodoméstico debe funcionar
en un circuito eléctrico separado de otros aparatos.
NOTAS SOBRE LA VÁLVULA DE LIBERACIÓN DE PRESIÓN
La válvula de liberación de presión se utiliza para regular la presión dentro de la
olla a presión. Es normal que se escapen pequeñas cantidades de vapor durante la
cocción. Asegúrese de no colocar la olla a presión debajo de armarios suspendidos
durante la cocción.
Evite tocar la válvula de liberación de presión mientras está en uso. La válvula de
liberación de presión siempre debe estar en el ajuste ‘PRESSURE’ (Presión) durante
la cocción. Después de nalizar la cocción, cambie el ajuste a RELEASE (Liberación)
antes de intentar abrir la tapa.
Asegúrese de que sus manos y su rostro estén alejados de la abertura de la válvula
de liberación de presión a n de no sufrir quemaduras o lesiones; el vapor es muy
caliente y debe tener extrema precaución cuando se libera el vapor.
NOTAS SOBRE LA TAPA DE CIERRE DE SEGURIDAD
Para su seguridad, la tapa no se abre cuando se encuentra en posición LOCK
(Bloquear). Para abrir la tapa, utilice el asa para girar la tapa en sentido horario hasta
la posición UNLOCK (Desbloquear) y levante la tapa. Mantenga siempre la tapa
en posición bloqueada durante la cocción. Al nalizar la cocción, gire la válvula de
liberación de presión a la posición PRELEASE (Liberación de presión), espere que
escape el vapor y luego gire el asa en sentido horario hasta la posición UNLOCK
(Desbloquear) y levante la tapa para quitarla de la unidad. Cuando quite la tapa,
hágalo de manera tal que el vapor salga lejos de usted. Para ello, coloque la parte
superior de la tapa en dirección hacia usted, para que el vapor escape lejos deusted.
NOTA: No intente abrir la olla a presión cuando la tapa está bloqueada.
PRESENTACIÓN DE LA OLLA A PRESIÓN BELLA DE 8 CUARTOS DE GALÓN (5,7 L)
CON 10 FUNCIONES DIGITALES INSTANTÁNEAS
¡Cocción multifuncional en una sola cacerola! Gracias a su capacidad
dellevar a cabo cocción a presión y cocción lenta, su olla a presión digital
esunelectrodoméstico de cocina absolutamente indispensable.
Las 10 funciones preestablecidas se sincronizan automáticamente y garantizan
laperfecta cocción de sopas, guisos, carnes y pollo. ¡Saltee y dore los alimentos
en la cacerola de cocción antiadherente para reducir la cantidad de grasa, aportar
color y sabores ricos antes de llevar a cabo cocción a presión y cocción lenta!
Gracias a sus potentes 1100 watts, esta olla a presión de 8 cuartos de galón (5,7L)
puede cocinar comidas hasta un 70 % más rápido que los métodos de cocción
convencionales; calienta para alcanzar la temperatura rápidamente; proporciona
temperatura de cocción y presión uniformes para hacer que los alimentos queden
muy jugosos y deliciosos. Prepare arroz ligero y esponjoso y un risotto perfecto
sin esfuerzo. ¡Al nal de cada tiempo de cocción programado previamente, la
unidad ingresa en un ciclo WARM (Calentar) de 4 horas y, luego, se apaga sola!
Asídesimple.
19 18
SO-313533_14595_BELLA_8qt Pressure cooker_BJ's_IM_R5.indd 18-19 2016-07-29 11:13 AM
Page 12

Conozca su olla a presión
El producto puede variar ligeramente con respecto a la ilustración.
Figura 1
Asa de la tapa
Tapa de la carcasa
Válvula de liberación de presión
Válvula de seguridad
(se eleva cuando
se encuentra bajo
presión)
Figura 1b
Lado interno de la tapa
Oricio central
Junta
Figura 2
Panel de Control
Agarre de
la cubierta
Cubierta de aluminio
Junta
Cacerola de cocción
desmontable
Asas de la base
Bandeja de
condensación
Botones de TIEMPO +/-
Pantalla del tiempo
Panel de control
Unidad base
Placa de calentamiento
(no se muestra)
Taza medidora
Cable de
alimentación
desmontable
Soporte de
lacuchara
para arroz
Cuchara
paraarroz
Tapa de
aluminio
Clavija
Cubierta
con ltro de
ventilación
Seguro
de la tapa
Tapa
Válvula de seguridad
(vista desde abajo)
Tabla de tiempo de funciones del panel de control
Las presiones de funcionamiento que se mencionan a continuación se alcanzan después de que nalice el
ciclo de acumulación de presión. Asegúrese de bloquear la tapa de manera rme y colocar la válvula de
liberación de presión en la posición PRESSURE (Presión).
Tiempo
predeterminado
1. Sauté (Saltear) 00:30 (30 min) 01:39 (99 min) — * — *
2. Browning (Dorar)
3. Pressure Cook
(Cocción a presión)
4. Slow C ook
(Cocción lenta)
5. Soup (Sopa) 00:20 (20 min) 01:39 (99 min) 55 a 65 kPa 7,97 a 9,42 lb/in2110 °C a 115 °C (230 °F a 239 °F)
6. Stew (Guiso) 00:30 (30 min) 01:39 (99 min) 55 a 65 kPa 7,97 a 9,42 lb/in2110 °C a 115 °C (230 °F a 239 °F)
7. Meat (Carne) 0 0:60 (60 min) 01:39 (99 min) 55 a 65 kPa 7,97 a 9,42 lb/in2110 °C a 115 °C (230 °F a 239 °F)
8. Chic ken (Pollo) 00:45 (45 min) 01:39 (99 min) 55 a 65 kPa 7,97 a 9,42 lb/in2110 °C a 115 °C (230 °F a 239 °F)
9. Rice (Arroz) 00:20 (20 min) 01:39 (99 min) 55 a 65 k Pa 7,97 a 9,42 lb/in2110 °C a 115 °C (230 °F a 239 °F)
10. Risotto/Steam
(Risotto/ Vapor)
00:30 (30 min) 01:39 (99 min) — * — *
00:30 (30 min) 01:39 (99 min) 55 a
04:00 (4 h) 12:0 0 (12 h) — ** — **
00:25 (25 min) 01:39 (99 min) 55 a 65 kPa 7,97 a 9,42 lb/in2110 °C a 115 °C (230 °F a 239 °F)
* No se utiliza presión en la función SAUTÉ (Saltear) y BROWNING (Dorar), ya que estas funciones se utilizan
sin la tapa.
** La presión de la función SLOW COOK (Cocción lenta) es insignicante, ya que la temperatura es más baja
en comparación con otras funciones.
Tiempo
máximo
Presión de funcionamiento Temperatura
170 °C (338 °F)
148°C (298°F)
65 kPa
7,97 a
9,42 lb/in
21 20
110 °C a 115 °C (230 °F a 239 °F)
2
4 horas: 82 °C a 95 °C (179 °F a 203 °F)
6 horas: 90 °C a 99 °C (194 °F a 210 °F)
SO-313533_14595_BELLA_8qt Pressure cooker_BJ's_IM_R5.indd 20-21 2016-07-29 11:13 AM
Page 13

Antes de utilizar por primera vez
1. Desempaque con cuidado la olla a presión. Separe todos los materiales de empaque de las piezas
ylos accesorios.
2. Desbloquee la tapa:
Sujete con rmeza el asa de la tapa (Figura 3) y gire la tapa en sentido horario (siga la echa) hasta
la posición UNLOCK (Desbloquear) para abrir. (Vea la Figura 4).
Figura 3
De
bloqueo a
desbloqueo
Asa de
latapa
Asa de
labase
Figura 4
8. Coloque la olla a presión digital sobre una supercie plana y nivelada, aproximadamente a 2 pies
(61 cm) de un tomacorriente de pared de 120 V CA estándar. NO permita que el cable cuelgue del
borde de la mesa o encimera.
ADVERTENCIA: Cuando cocine a presión o mediante cocción lenta, nunca coloque la olla a presión
digital debajo de un gabinete. Al liberar el vapor, asegúrese de que haya un espacio de varios
pies o metros por encima de la válvula de liberación de presión y que esté libre de ar tefactos de
iluminación, muebles o armarios.
9. Conecte el cable de alimentación desmontable al receptáculo en la parte trasera de la olla a presión digital.
Antes de cada uso
1. Siempre verique la tapa para asegurarse de que la válvula de liberación de presión funcione
correctamente y no haya partículas extrañas que bloqueen la apertura de la válvula en el lado
interno de la tapa.
2. Asegúrese de que la junta esté sujeta correctamente a la cubierta de aluminio y se encuentre en
posición adecuada en el lado interno de la tapa. Ajustes de la olla a presión.
3. Desarmado de la tapa:
Quite la tapa y apóyela sobre la encimera, con el asa hacia abajo. Tome el agarre de la cubierta y jale para
quitar la cubierta de aluminio del lado interno de la tapa. (Vea la Figura 5). Quite la junta. (Vea la Figura 6).
4. Quite y lave la cacerola de cocción antiadherente, la cubierta de aluminio, la junta, la taza medidora
de arroz y la cuchara con agua tibia y jabón. Enjuague con agua limpia y seque completamente.
Figura 5
5. Armado de la tapa:
Vuelva a colocar la junta limpia. Asegúrese de que la junta esté colocada correctamente alrededor
de la cubierta de aluminio.
(Vea la Figura 7). Con el agarre de la cubierta puesto hacia afuera, coloque el oricio central de
la cubierta sobre la clavija en el centro del lado interno de la tapa. (Vea la Figura 8). Presione con
rmeza la cubierta de aluminio dentro de la parte inferior de la tapa.
IMPORTANTE: Verique que la cubier ta de aluminio esté colocada de manera rme dentro de la tapa.
Figura 7
6. Deslice la bandeja de condensación en su lugar
al costado de la unidad base. (Vea la Figura 9).
7. Limpie y seque la parte inferior de la cacerola
de cocción desmontable y la placa de
calentamiento y asegúrese de que no haya
materiales no deseados sobre la supercie. La
cacerola de cocción desmontable debe quedar
plana sobre la placa de calentamiento para
garantizar un contacto adecuado.
Agarre de
la cubierta
Oricio
central
Cubierta de
aluminio
Clavija
central
Tapa
Junta
Oricio
central
Tapa de
aluminio
Figura 6
Figura 8
Figura 9
Deslice
Bandeja de
condensación
Junta
Agarre
de la
cubierta
Oricio
central
Tapa de
aluminio
Agarre de
la cubierta
Oricio
central
Cubierta de
aluminio
Clavija
central
Tapa
Instrucción de funcionamiento
SAUTÉ/BROWNING (Saltear/Dorar)
ADVERTENCIA: No fría en abundante aceite ni a presión en la olla a presión digital, independientemente
desi la tapa está o no colocada. ESTO ES PELIGROSO Y PUEDE OCASIONAR INCENDIO Y DAÑOS GRAVES.
1. El dorado realza la textura y el sabor a los alimentos cocidos a presión o mediante cocción lenta.
Lafunción SAUTÉ (Saltear) o BROWNING (Dorar) le permite saltear o sellar alimentos en la cacerola
de cocción desmontable (en la misma unidad base) antes de cocinar.
ADVERTENCIA: Asegúrese de haber quitado la tapa cuando utilice la función SAUTÉ (Saltear)
oBROWNING (Dorar).
2. Coloque la cacerola de cocción desmontable en la unidad base.
3. Enchufe el cable en un tomacorriente de pared de 120V CA. Aparecerá en pantalla una serie de
4guiones (- - - - ). Para obtener mejores resultados:
• Seque siempre los alimentos con toallas de papel.
• Corte los alimentos en trozos pequeños y uniformes.
• Saltee o dore los alimentos en tandas pequeñas. No sobrecargue la cacerola de cocción.
4. Agregue aceite, tal como indica la receta.
IMPORTANTE: Para evitar rayar la supercie antiadherente de la cacerola de cocción, utilice
utensilios no metálicos, de plástico o madera para dar vuelta los alimentos cuando saltea o dora.
5. Con la cacerola sin tapa, presione el botón SAUTÉ/BROWNING (Saltear/Dorar). Se encenderá la luz
indicadora de SAUTÉ (Saltear). (Vea la Figura 10).
6. Presione el botón SAUTÉ/BROWNING (Saltear/Dorar) nuevamente, se iluminará la luz indicadora de
BROWNING (Dorar). (Vea la Figura 11).
7. Destellará el tiempo predeterminado de “00:30” (30 minutos) en la pantalla. Mientras destella,
se puede cambiar el tiempo predeterminado presionando los botones “+” y “-” para cambiar
manualmente el tiempo de 5 minutos (00:05) a 99 minutos (01:39).
8. Cuando se alcanza la temperatura, comenzará la cuenta regresiva hasta 00:00.
ADVERTENCIA: Debe tener mucho cuidado al saltear o dorar los alimentos en aceite caliente.
Mantenga las manos y el rostro alejados de la cacerola de cocción, en especial al agregar nuevos
ingredientes, ya que el aceite podría salpicar.
9. Cuando los alimentos estén sellados o dorados como usted desee, presione el botón WARM/
CANCEL (Calentar/Cancelar).
Aparecerá en pantalla una serie de 4 guiones (- - - - ) para indicar que la olla a presión digital está apagada.
10. Cuando el tiempo de cocción llega a “00:00”, se escucharán 5 señales sonoras y la unidad pasará
automáticamente al modo WARM (Calentar).
11. Continúe cocinando con la olla a presión digital según las indicaciones de la receta.
23 22
SO-313533_14595_BELLA_8qt Pressure cooker_BJ's_IM_R5.indd 23 2016-07-29 11:13 AM
Page 14

12. IMPORTANTE: Después de dorar o salear, si desea seleccionar una función de cocción diferente, primero
deberá presionar WARM/CANCEL (Calentar/Cancelar). Luego siga las instrucciones correspondientes a la
función de cocción.
Figure 10
1x
Figure 11
2x
• COCCIÓN A PRESIÓN
Introducción
1. Su olla a presión digital cocina como una olla a presión tradicional al combinar la presión y el calor
del vapor para acelerar los tiempos de cocción. Debido a la formación de un sello hermético de
aire al cerrar y bloquear la tapa, el calor y el vapor se mantienen atrapados dentro de la cacerola
de cocción desmontable. La combinación del calor y la presión elevados cocina los alimentos más
rápido y, a la vez, retiene los nutrientes solubles en agua y el sabor.
2. Su olla a presión digital elimina la incertidumbre de la cocción a presión. El termostato incorporado
sabe exactamente cuándo alcanza la presión necesaria dentro de la cacerola de cocción
desmontable y regula automáticamente el calor y activa el temporizador al comenzar a cocinar.
3. El poderoso elemento de calentamiento de 1100 watts permite un calentamiento rápido y mantiene
temperaturas y presiones de cocción uniformes.
4. La cacerola de cocción grande, desmontable, de 8 cuartos de galón (5,7 litros) de capacidad, de gran
resistencia y aluminio se calienta rápidamente y de manera uniforme.
IMPORTANTE: Debido a que la cocción en exceso de los alimentos es irreversible, es preferible cocinar
demenos cuando cocina un alimento que no conoce durante un período de tiempo menor que el que cree
necesario. Siempre puede regresar y continuar cocinando uno o dos minutos más si fuera necesario.
Cocinar a presión
1. Coloque el alimento que cocinará a presión en la cacerola de cocción desmontable.
ADVERTENCIA: No llene la cacerola de cocción desmontable por encima de la línea máxima
de2/3de capacidad cuando cocina verduras o trozos enteros de carne.
ADVERTENCIA: No supere la mitad de la capacidad de la cacerola cuando cocina a presión
alimentos que aumentan de volumen: arroz, frijoles secos, granos y legumbres.
ADVERTENCIA: Agregue al menos 1 taza (8 oz [237 ml]) de líquido a la cacerola de cocción
desmontable cuando cocina a presión.
PRECAUCIÓN: Nunca utilice la olla a presión digital si la cacerola de cocción está vacía.
ADVERTENCIA: No cocine cuando el contenido de los alimentos es inferior a la marca mínima de
lacapacidad de la cacerola de cocción.
2. Armado de la tapa
Siga las instrucciones detalladas que se describen en la sección ANTES DE UTILIZAR POR PRIMERA
VEZ de este manual de instrucciones. Asegúrese de que la junta esté colocada correctamente
alrededor de la tapa y que la cubierta de aluminio esté colocada de manera rme en la tapa.
3. Bloquee la tapa
Coloque la tapa sobre la olla a presión digital. (Vea la Figura 12). Con el asa de la base en una mano,
tome rmemente el asa de la tapa con la otra mano y gire la tapa en sentido antihorario (siga la
echa). La tapa hará un chasquido al bloquearse en su lugar. Cuando esté bloqueada, el asa de la
tapa y el asa de la base estarán perfectamente alineadas. (Vea la Figura 13).
Figura 12
Posición
Desbloquear
Asa
de la tapa
Asa
de la base
4. Gire la válvula de liberación de presión a la
posición PRESSURE (Presión). (Vea la Figura 14).
IMPORTANTE: Si la válvula de liberación de
presión no está cerrada o no se encuentra en
la posición PRESSURE (Presión), la olla a
presión digital no acumulará presión.
5. Enchufe el cable en un tomacorriente de pared de 120V CA. Aparecerá en pantalla una serie de
4guiones (- - - - ).
6. Presione el botón de la FUNCIÓN que desee (PRESSURE COOK [Cocción a presión], SOUP [Sopa],
STEW [Guiso], MEAT [Carne], CHICKEN [Pollo]) una o dos veces hasta que la luz correspondiente
indique el ajuste deseado. El tiempo predeterminado de la FUNCIÓN destellará en la pantalla.
NOTA: Si la receta indica un tiempo diferente al tiempo de cocción predeterminado, es posible
modicar el tiempo de cocción con facilidad.
7. Mientras destella, se puede cambiar el tiempo predeterminado presionando los botones “+” y “-”
paracambiar manualmente el tiempo de 5 minutos (00:05) a 99 minutos (01:39).
8. A medida que la unidad comienza a calentar y se acumula presión en la cacerola de cocción,
comenzará a
NOTA: Los tiempos de precalentamiento/acumulación de presión varían según la FUNCIÓNseleccionada.
9. Después de llegar a la temperatura y presión deseadas, el gráco “0” dejará de girar y el tiempo comenzará
a disminuir en minutos haciendo una cuenta regresiva hasta que aparezca “00:00” (00minutos).
10. Cuando el tiempo de cocción llegue a “00:00” se podrán escuchar 5 señales sonoras; se mostrará en
pantalla “bb” para indicar que la unidad ha ingresado al ciclo WARM (Calentar) de 4 horas, durante el
cual el vapor se liberará naturalmente y luego la olla a presión digital se apagará automáticamente.
PRECAUCIÓN: CUANDO COCINE A PRESIÓN, NO DEBE ABRIR LA TAPA CUANDO SE ALCANCE
LAPRESIÓN. NO INTENTE HACER FUERZA PARA ABRIR LA TAPA.
PRECAUCIÓN: Mantenga las manos y el rostro alejados de la válvula de liberación de presión cuando
el electrodoméstico esté en funcionamiento. Durante el uso, es posible que la olla despida agua y
vapor calientes.
NOTA: Presione el botón WARM/CANCEL (Calentar/Cancelar) para apagar la olla a presión digital en
cualquier momento. Aparecerá en pantalla una serie de 4 guiones (- - - - ).
girar el gráco “0” en la pantalla.
Figura 13
Posición
Bloquear
Asa de
la tapa
Asa de
la base
Figura 14
Presión
25 24
SO-313533_14595_BELLA_8qt Pressure cooker_BJ's_IM_R5.indd 24-25 2016-07-29 11:13 AM
Page 15

• COCCIÓN LENTA
La cocción lenta se produce a temperaturas apenas cercanas al punto de hervor. La olla de cocción lenta
puede cocinar por hasta 12 horas como máximo, similar a una olla cubierta sobre la cocina.
1. Coloque el alimento que cocinará en la cacerola de cocción desmontable.
IMPORTANTE: No llene la cacerola de cocción desmontable por encima de la línea máxima de
2/3de capacidad cuando cocina verduras o trozos enteros de carne.
PRECAUCIÓN: Nunca utilice la olla a presión digital si la cacerola de cocción está vacía.
IMPORTANTE: No cocine cuando el contenido de los alimentos es inferior a la marca mínima de
lacapacidad de la cacerola de cocción.
2. Conforme a las instrucciones descritas anteriormente para la COCCIÓN A PRESIÓN, arme la tapa,
cierre y bloquee la tapa.
3. Gire la válvula de liberación de presión a la posición RELEASE (Liberación de presión).
4. Enchufe el cable en un tomacorriente de pared de 120V CA. Aparecerá en pantalla una serie de
4guiones (- - - - ).
5. Presione el botón PRESSURE COOK/ SLOW (Cocción a presión/lenta) dos veces hasta que la luz
correspondiente indique SLOW COOK (Cocción lenta). Destellará el tiempo predeterminado de
04:00 (4 horas).
6. Mientras destella, se puede cambiar el tiempo predeterminado al presionar los botones “+” y “-”.
ELtiempo máximo de la función SLOW COOK (Cocción lenta) es de 12:00 (12 horas).
7. Cuando se alcanza la temperatura, el tiempo comenzará a disminuir en minutos haciendo una
cuenta regresiva hasta que aparezca “0:00” (00 minutos).
8. Cuando el tiempo de cocción llegue a “00:00”, se podrán escuchar 5 señales sonoras; se mostrará
en pantalla “bb” para indicar que la unidad ha ingresado al ciclo WARM (Calentar) de 4 horas,
después del cual la unidad se apagará automáticamente.
IMPORTANTE: Cuando utiliza la función SLOW COOK (Cocción lenta), podrá quitar la tapa para
vericar la comida, revolver el contenido, agregar alimentos o líquidos durante la cocción.
Launidad comenzará a emitir señales sonoras y se mostrará en pantalla “E0” hasta volver a
colocary bloquear la tapa.
•
FUNCIÓN RICE (Arroz)
ADVERTENCIA: No utilice la olla a presión para cocinar arroz instantáneo.
La olla a presión digital incluye una taza medidora de arroz de 180 ml (3/4 de taza). Se podrá cocinar a
presión hasta 7 tazas medidoras de arroz (6 tazas y 3/4) de arroz blanco crudo en la olla a presión digital
de 8 cuartos (7,6 L). Puede utilizar diversas variedades de arroz, por ejemplo, basmati, arroz salvaje, arroz
negro, arborio, risotto, arroz integral, granos largos y cortos.
Para conocer los tiempos estimados y las cantidades de arroz y agua/líquido de cocción, consulte la
TABLADE COCCIÓN DE ARROZ a continuación.
1. Con la taza medidora de arroz, agregue las tazas al ras de arroz crudo a la cacerola de cocción.
Elarroz se puede enjuagar o no, según su preferencia.
2. Cuando cocine a presión arroz blanco de grano largo, utilice la siguiente proporción: 2 tazas de arroz
crudo por cada 3 tazas de agua, o utilice una cantidad y media más de agua que arroz crudo. Por
ejemplo, para 9 tazas medidoras de arroz crudo, agregue, usando la misma taza medidora, 13 tazas y
media de agua. El volumen de agua se podrá regular a gusto en posteriores cocciones de arroz.
IMPORTANTE: Agregue una cucharada de aceite (vegetal, de oliva, de sésamo) para reducir el
exceso de espuma.
IMPORTANTE: Cuando cocine arroz salvaje a presión, agregue de un 25 % a un 50 % más de agua
para cocinar por completo. Siga las instrucciones del paquete.
3. Conforme a las instrucciones descritas anteriormente para la COCCIÓN A PRESIÓN, arme la tapa,
cierre y bloquee la tapa.
4. Enchufe el cable en un tomacorriente de pared de 120V CA. Aparecerá en pantalla una serie de
4guiones (- - - - ).
5. Presione el botón RICE (Arroz) una vez; se iluminará la luz RICE (Arroz).
Se mostrará en pantalla el tiempo predeterminado de 00:20 (20 minutos).
NOTA : Si la receta indica un tiempo diferente al tiempo de cocción predeterminado,
es posible modicar el tiempo de cocción con facilidad.
6. Mientras destella, se puede cambiar el tiempo predeterminado presionando los botones “+” y “-”
para cambiar manualmente el tiempo de 5 minutos (00:05) a 99 minutos (01:39).A medida que la
unidad comienza a calentar y se acumula presión en la cacerola de cocción, comenzará a girar el
gráco “0” en la pantalla.
7. Después de llegar a la temperatura y presión deseadas, el gráco “0” dejará de girar y el tiempo
comenzará a disminuir en minutos haciendo una cuenta regresiva hasta que aparezca “00:00”
(00minutos).
8. Cuando el tiempo de cocción llegue a “00:00” se podrán escuchar 5 señales sonoras; se mostrará
en pantalla “bb” para indicar que la unidad ha ingresado al ciclo WARM (Calentar) de 4 horas.
9. Para evitar cocinar el arroz en exceso, presione de inmediato el botón WARM/CANCEL
(Calentar/Cancelar). Aparecerá en pantalla una serie de 4 guiones (- - - - ) para indicar que la olla
apresión digital está apagada.
10. IMPORTANTE: Utilice la liberación rápida de vapor conforme a las instrucciones detalladas que
sedescriben en la sección PRESSURE COOK (Cocción a presión) de este manual de instrucciones.
ADVERTENCIA: Tenga cuidado al abrir la tapa. El vapor se escapa apenas abre la tapa. No coloque
nunca su rostro o sus manos encima de la olla a presión digital cuando quita la tapa. Use siempre
manoplas cuando manipula la cacerola de cocción caliente.
11. Desenchufe el cable del tomacorriente.
NOTA: Después de cocinar el arroz, se podría acumular líquido de cocción del arroz debajo de
latapa en la parte superior de la unidad alrededor de la cacerola de cocción. Esto es normal.
Utiliceuna toalla de papel o paño de cocina para limpiar después de cada uso. Si fuera necesario,
utilice un cepillo pequeño o cotonete de algodón.
Tabla de Cocción de Arroz
IMPORTANTE: Agregue una cucharada de aceite (vegetal, de oliva, de sésamo) para reducir el exceso de espuma.
NOTA: Utilice una taza medidora de arroz (provista) para medir el arroz y el agua.
ARROZ BLANCO CRUDO
tazas (g)
2 3 2 3 y 1/4
3 4 y media 3 4 y 3/4
4 6 4 6 y 1/4
5 7 y media 5 7 y 3/4
6 9 6 9 y 1/4
7 10 y media 7 10 y 3/4
*Los tiempos de cocción reales pueden variar según la edad del grano y las preferencias personales.
AGUA tazas
(ml)
ARROZ INTEGRAL CRUDO
tazas (g)
AGUA
tazas (ml)
27 26
SO-313533_14595_BELLA_8qt Pressure cooker_BJ's_IM_R5.indd 26-27 2016-07-29 11:13 AM
Page 16

• FUNCIÓN STEAM (VAPOR)
Preparación de Verduras Al Vapor
• Pele las verduras cuando fuera necesario o lávelas bien. Recuerde que las verduras duras como
laspapas y la remolacha mantienen mejor su forma cuando se les deja la piel intacta.
• Podrá cocinar verduras enteras o cortadas en trozos. Cuanto más grandes sean los trozos,
mástiempo tomará la cocción.
• Las verduras con el mismo tiempo de cocción se pueden cocinar juntas.
• Debido a que las verduras de cocción rápida como zapallitos, espárragos y brócoli se cocinan
enexceso con facilidad, es conveniente cocinarlos al vapor en lugar de cocinarlos a presión.
Cocción Al Vapor Básica Para Verduras
1. Coloque la cacerola de cocción desmontable en la base. Acomode los alimentos en una canasta
orejilla de bambú o plástico, resistente al calor, sin metal para cocción al vapor (NO SE INCLUYE)
yutilice las asas de la canasta para bajar los alimentos a la cacerola de cocción desmontable.
NOTA: Podrá agregar más alimentos sobre la canasta y alrededor de esta, pero no supere la línea
de llenado máximo de 2/3 de la cacerola de cocción.
2. Vier ta 1 taza y media de agua o líquido de vapor en la cacerola de cocción desmontable.
3. Conforme a las instrucciones descritas anteriormente para la COCCIÓN A PRESIÓN,
arme la tapa, cierre y bloquee la tapa.
4. Gire la válvula de liberación de presión a la posición PRESSURE (Presión). (Vea la Figura 13).
IMPORTANTE: Si la válvula de liberación de presión no está cerrada (en la posición PRESSURE
[Presión]), la olla a presión digital no acumulará presión.
5. Enchufe el cable en un tomacorriente de pared de 120V CA. Aparecerá en pantalla una serie de
4guiones (- - - - ).
6. Presione el botón RISE/RISOTTO/STEAM (Arroz/Risotto/Vapor) dos veces hasta que la luz
correspondiente indique STEAM (Vapor). Se mostrará en pantalla el tiempo predeterminado de
00:25 (25 minutos).
NOTA: Si la receta indica un tiempo diferente al tiempo de cocción predeterminado, es posible
modicar el tiempo de cocción con facilidad.
7. Mientras destella, se puede cambiar el tiempo predeterminado presionando los botones “+” y “-”
para cambiar manualmente el tiempo de 5 minutos (00:05) a 99 minutos (01:39).
8. A medida que la unidad comienza a calentar y se acumula presión en la cacerola de cocción,
comenzará a
9. Después de llegar a la temperatura y presión deseadas, el gráco “0” dejará de girar y el tiempo comenzará
a disminuir en minutos haciendo una cuenta regresiva hasta que aparezca “00:00” (00 minutos).
10. Cuando el tiempo de cocción llegue a “00:00” se podrán escuchar 5 señales sonoras; se mostrará
en pantalla “bb” para indicar que la unidad ha ingresado al ciclo WARM (Calentar) de 4 horas.
11. Para evitar el vapor en exceso, presione de inmediato el botón WARM/CANCEL (Calentar/Cancelar).
Aparecerá en pantalla una serie de 4 guiones (- - - - ) para indicar que la olla a presión digital está apagada.
12. IMPORTANTE: Utilice la liberación rápida de vapor conforme a las instrucciones detalladas que se
describen en la sección PRESSURE COOK (Cocción a presión) de este manual de instrucciones.
ADVERTENCIA: Tenga cuidado al abrir la tapa. El vapor se escapa apenas abre la tapa. No coloque
nunca su rostro o sus manos encima de la olla a presión digital cuando quita la tapa. Use siempre
manoplas cuando manipula la cacerola de cocción caliente.
girar el gráco “0” en la pantalla.
• LIBERACIÓN RÁPIDA DE VAPOR
1. Con una manopla o paño de cocina, gire la
válvula de liberación de presión hasta la
posición RELEASE (Liberación de presión)
y deje que salga el vapor. (Vea la Figura 15).
Después de liberar la presión por completo,
laválvula de seguridad caerá completamente.
2. Sostenga las asas de la base de manera rme
con una mano y tome el asa de la tapa con la otra mano y gire en sentido horario (siga la echa del
asa de la tapa) para desbloquear. (Vea la Figura 3).
ADVERTENCIA: Tenga cuidado al abrir la tapa. El vapor se escapa apenas abre la tapa.
3. Quite la tapa y aléjela de usted en posición inclinada para evitar el vapor.
PRECAUCIÓN: No coloque nunca su rostro o sus manos encima de la olla a presión digital cuando
quita la tapa.
PRECAUCIÓN: Use siempre manoplas cuando manipula la cacerola de cocción caliente.
PRECAUCIÓN: Después de preparar sopa y caldo, espere varios minutos antes de liberar la presión
y quitar la tapa para asegurarse de que el líquido caliente se derrame al hervir.
4. Verique los alimentos para ver si se cocinaron lo suciente. De lo contrario, vuelva a colocar la
tapa y haga que se bloquee en su lugar siguiendo las instrucciones anteriores. Fije el tiempo en
5minutos (como mínimo). Cocine a presión durante 2 a 3 minutos más, de ser necesario.
5. Presione el botón WARM/CANCEL (Calentar/Cancelar) después de 2 minutos. Aparecerá en pantalla
una serie de 4 guiones (- - - - ) para indicar que la olla a presión digital está apagada. Gire la válvula
de liberación de presión a la posición RELEASE (Liberación de presión) para liberar rápidamente el
vapor. Desenchufe el cable del tomacorriente.
6. Deje enfriar el electrodoméstico antes de limpiar. Siga las Instrucciones de cuidado y limpieza que
se describen en este Manual de instrucciones.
Figura 15
Liberación
de presión
Retraso
La unidad ofrece un temporizador de retraso si desea retrasar el tiempo de cocción hasta 2 horas.
1. Coloque el alimento que cocinará en la cacerola de cocción desmontable.
IMPORTANTE: No llene la cacerola de cocción desmontable por encima de la línea máxima de
2/3de capacidad cuando cocina verduras o trozos enteros de carne.
PRECAUCIÓN: Nunca utilice la olla a presión digital si la cacerola de cocción está vacía.
IMPORTANTE: No cocine cuando el contenido de los alimentos es inferior a la marca mínima de
lacapacidad de la cacerola de cocción.
2. Conforme a las instrucciones descritas anteriormente para la COCCIÓN A PRESIÓN, arme la tapa,
cierre y bloquee la tapa.
3. Antes de seleccionar la función de cocción, presione DELAY TIMER (Temporizador de retraso) para
agregar el retraso del tiempo de cocción. Continúe presionando el botón hasta llegar al retraso
deseado. El temporizador de retraso se puede ajustar hasta un tiempo de retraso máximo de 2 horas.
4. Después de seleccionar el retraso, utilice el PANEL DE CONTROL para seleccionar el ajuste de
cocción que desee (por ejemplo, arroz, sopa, pollo, etc.). La cocción comenzará cuando nalice
eltiempo de retraso.
29 28
SO-313533_14595_BELLA_8qt Pressure cooker_BJ's_IM_R5.indd 28-29 2016-07-29 11:13 AM
Page 17

Instrucciones de mantenimiento para el usuario
Este electrodoméstico requiere poco mantenimiento. No contiene piezas que puedan ser reparadas por
el usuario. Cualquier tipo de mantenimiento, aparte de la limpieza, para el que sea necesario desarmar
elaparato, debe ser realizado por un técnico autorizado para reparar electrodomésticos.
Instrucciones de cuidado y limpieza
1. Desenchufe y deje enfriar la olla a presión digital hasta que alcance la temperatura ambiente antes
delimpiar.
2. Lave la cacerola de cocción desmontable con agua tibia y jabón y una esponja o paño limpio y suave.
Enjuague con agua limpia y seque completamente.
NOTA: Después de cocinar el arroz o alimentos más grandes en la cacerola, se puede acumular líquido
de cocción del arroz debajo de la tapa en la parte superior de la unidad alrededor de la cacerola de
cocción. Esto es normal.
3. Utilice una toalla de papel o paño de cocina para limpiar después de cada uso. Si fuera necesario,
utilice un cepillo pequeño o cotonete de algodón.
4. Siga las instrucciones detalladas de Desarmado de la tapa que se señalan en la sección ANTES DE
UTILIZAR POR PRIMERA VEZ de este manual de instrucciones. (Vea las Figuras 3 y 4). Utilice el agarre
de la cubierta en el lado interno de la tapa para levantar y quitar la cubierta de aluminio desmontable.
Quite la junta.
5. Lave la junta y la cubierta de aluminio en agua tibia y jabón. Enjuague con agua limpia y seque
completamente. La cacerola de cocción se puede lavar en un lavaplatos.
6. Quite la válvula indicadora de presión que se encuentra en la tapa; para ello, levántela y quítela de
latapa de la olla a presión digital. Enjuague bien y vuelva a colocar.
7. Después de limpiar, vuelva a armar la tapa de la olla a presión digital; para ello, siga las instrucciones
detalladas de desarmado de la tapa que se describen en la sección ANTES DE UTILIZAR POR PRIMERA
VEZ de este manual de instrucciones. (Vea las Figuras 7 y 8). Presione con rmeza la cubierta de
aluminio dentro de la parte inferior de la tapa. Verique que esté colocada de manera rme en su lugar.
IMPORTANTE: Siempre debe posicionar correctamente la junta en el lado interno de la tapa.
Contrólela de forma periódica para asegurarse de que esté limpia, exible y no esté quebrada o rota.
Si está dañada, no utilice este electrodoméstico.
8. Jale con cuidado hacia abajo la bandeja de condensación para quitarla desde la parte trasera
de la unidad. Deseche el agua después de cada uso. Enjuague y vuelva a colocar la bandeja de
condensación antes del siguiente uso.
9. Limpie la base con una esponja o un paño suave húmedo. No vierta ningún líquido dentro de la base
de la olla a presión digital.
10. Nunca utilice detergentes químicos, esponjas metálicas o polvos abrasivos sobre ninguna de las partes
o los componentes.
10. Para mantener el rendimiento óptimo de su olla a presión digital, la placa de calentamiento no deberá
tener suciedad, alimentos ni residuos. Si fuera necesario, limpie con un paño suave y húmedo y
asegúrese de secar bien.
Instrucciones de almacenamiento
1. Desenchufe y deje enfriar la unidad por completo. Asegúrese de que todas las piezas estén limpias
y secas antes de guardarlas. Arme la tapa (vea las Figuras 7 y 8) antes de guardar.
2. Guarde el cable de alimentación desmontable, la taza medidora de arroz y la cuchara en la cacerola
de cocción.
3. Para evitar aromas, moho y olores desagradables, nunca guarde la olla a presión digital cerrada con
la tapa bloqueada en su lugar. Empaque y guarde la olla a presión digital con la tapa boca arriba
sobre la cacerola de cocción desmontable.
4. Guarde la olla a presión digital en su caja original o cubierta en un lugar limpio y seco.
Solución de problemas
La olla a presión digital está equipada con funciones de seguridad que apagan la unidad si encuentra una
condición anormal durante la cocción lenta o a presión. Se mostrará una señal de error en el panel de
control. Según el error, se podría escuchar una señal sonora. Después de identicar y corregir el problema,
enchufe la unidad y reanude la cocción a presión.
MENSAJE DE ERROR: E0
Descripción Solución
La tapa se utiliza de forma incorrecta. Si la tapa
no está bloqueada correctamente y selecciona una
función, se podrá escuchar una señal sonora y se
mostrará en pantalla el mensaje de error “E0”.
Si está sellando/dorando con la tapa colocada,
podrá escuchar una señal sonora y se mostrará en
pantalla el mensaje de error “E0”.
La tapa está abierta durante la función SLOW COOK
(Cocción lenta). Se podrá escuchar la señal sonora y
se mostrará en pantalla el mensaje de error “E0”.
Asegúrese de que la tapa esté bloqueada
correctamente en su posición.
Quite la tapa. Cocine siempre sin la tapa cuando
SELLE o DORE alimentos.
Cuando utiliza la función SLOW COOK
(Cocciónlenta), podrá quitar la tapa para
vericar la comida, revolver el contenido,
agregar alimentos o líquidos durante la cocción.
Vuelva a colocar la tapa y bloquee de manera
adecuada. Se reanudará la función SLOW COOK
(Cocciónlenta).
Pautas de cocción del USDA
TENGA EN CUENTA LO SIGUIENTE: Cocine todos los alimentos con estas temperaturas internas
mínimas medidas con un termómetro para alimentos antes de quitar los alimentos de la fuente de
calor. Por razones de preferencia personal, los consumidores podrán elegir cocinar los alimentos a
temperaturas más altas. Este cuadro es solo una guía básica del USDA.
Producto Temperatura interna mínima y tiempo de reposo
Carne de res, cerdo, ternera y
cordero
Bifes, chuletas, carnes asadas
Cerdo 160 °F (71,1 °C)
Carne picada 160 °F (71,1 °C)
Jamón, fresco o ahumado (no
cocido)
Jamón totalmente cocido (para
recalentar)
145 °F (62,8 °C) y deje reposar durante al menos 3 minutos
145 °F (62,8 °C) y deje reposar durante al menos 3 minutos
Recaliente el jamón totalmente cocido empacado en plantas
inspeccionadas por el USDA a 140 °F (60 °C) y los demás a
165 °F (73,9 °C).
Producto Temperatura interna mínima
Todas las aves (pechugas, ave entera,
patas, muslos y alas, ave picada y
rellenos)
Huevos 160 °F (71,1 °C)
Pescado y mariscos 145 °F (62,8 °C)
Sobras de comida 165 °F (73,9 °C)
Guisados 165 °F (73,9 °C)
170 °F (77 °C)
31 30
SO-313533_14595_BELLA_8qt Pressure cooker_BJ's_IM_R5.indd 30-31 2016-07-29 11:13 AM
Page 18

Garantía limitada de DOS AÑOS
Mediante la presente, SENSIO Inc. garantiza que, durante el plazo de DOS AÑOS
a partir de la fecha de compra, este producto no presentará defectos mecánicos
en el material ni en la mano de obra, y durante 90 días, no los presentará en las
piezas no mecánicas. A su entera discreción, SENSIO Inc. reparará o reemplazará
el producto que resulte defectuoso, o emitirá un reembolso por el producto
durante el plazo de garantía.
Esta garantía es válida únicamente para el comprador minorista original a partir
de la fecha de compra minorista inicial y no es transferible. Conserve el recibo de
compra original, ya que se exige una prueba de compra para obtener la validación
de la garantía. Las tiendas minoristas no tienen derecho a alterar, modicar ni
corregir de ninguna manera los términos y condiciones de la garantía.
EXCLUSIONES:
La garantía no cubre el desgaste normal de las piezas ni el daño ocasionado
por cualquiera de las siguientes causas: uso negligente del producto, uso de
un voltaje o corriente incorrectos, mantenimiento de rutina inadecuado, uso
contrario al de las instrucciones de funcionamiento, desarmado, reparación o
alteración a cargo de personas que no sean miembros del personal calicado
de SENSIO Inc. Asimismo, la garantía no cubre actos de la naturaleza, como
incendios, inundaciones, huracanes o tornados.
SENSIO Inc. no asumirá responsabilidad por daños incidentales o resultantes
ocasionados por la violación de cualquier garantía expresa o implícita. Salvo en
la medida en que lo prohíban las leyes aplicables, cualquier garantía implícita de
comerciabilidad o aptitud para un propósito particular se limita temporalmente
a la duración de la garantía. Algunos estados, provincias o jurisdicciones no
permiten la exclusión ni la limitación de daños incidentales o resultantes, o
limitaciones sobre la duración de una garantía implícita y, por lo tanto, es posible
que las exclusiones o limitaciones mencionadas no le correspondan. La garantía
cubre derechos legales especícos que pueden variar de un estado, una provincia
o una jurisdicción a otros.
CÓMO OBTENER EL SERVICIO DE GARANTÍA:
Debe comunicarse con el Servicio de atención al cliente a nuestro número
telefónico gratuito: 1-866-832-4843. Un representante del Servicio de atención
al cliente intentará resolver los problemas referidos a la garantía por teléfono.
Si este no puede resolver el problema, le proporcionarán un número de caso
y le solicitarán que devuelva el producto a SENSIO Inc. Adhiera una etiqueta
al producto que incluya: su nombre, dirección, número telefónico de contacto
durante el día, número de caso y descripción del problema. Además, incluya
una copia del recibo de compra original. Envuelva cuidadosamente el producto
etiquetado con el recibo de compra, y envíelo (con el envío y el seguro
prepagados) a la dirección de SENSIO Inc. SENSIO Inc. no asumirá obligación ni
responsabilidad alguna por el producto devuelto que esté en el trayecto hacia el
Centro de servicio al cliente de SENSIO Inc.
SO-313533_14595_BELLA_8qt Pressure cooker_BJ's_IM_R5.indd 32-33 2016-07-29 11:13 AM
32
Page 19

For customer service questions or comments
Dudas o comentarios contactar el departamento de servicio al cliente
1-866-832-4843
www.sensioinc.com
BELLA is a registered trademark of Sensio Inc., Montréal, Canada H3B 3X9.
All rights reserved.
BELLA es una marca registrada de Sensio Inc., Montréal, Canada H3B 3X9.
Todos los derechos reservados.
SO-313533
BellaLife
bellahousewares.com
BellaLifestyle
BellaLifestyle
BellaLife
SO-313533_14595_BELLA_8qt Pressure cooker_BJ's_IM_R5.indd 34 2016-07-29 11:13 AM
 Loading...